
Любой системный администратор Windows должен уметь пользоваться не только графическими оснастками AD (чаще всего это ADUC – Active Directory Users and Computer), но и командлетами PowerShell для выполнения повседневных задач администрирования Active Directory. Чаще всего для администрирования домена, управления объектами (пользователями, компьютерами, группами) используется модуль Active Directory для Windows PowerShell. В этой статье мы рассмотрим, как установить модуль RSAT-AD-PowerShell, его базовый функционал и популярные командлеты, которые должны быть полезными при управлении и работе с AD.
Содержание:
- Как установить модуль Active Directory для PowerShell в Windows 10 и 11?
- Установка модуля RSAT-AD-PowerShell в Windows Server
- Основные командлеты модуля Active Directory для PowerShell
- Импорт модуля Active Directory PowerShell с удаленного компьютера
- Администрирование AD с помощью модуля Active Directory для PowerShell
Как установить модуль Active Directory для PowerShell в Windows 10 и 11?
Вы можете установить модуль RSAT-AD-PowerShell не только на серверах, но и на рабочих станциях. Этот модуль входит в состав пакета RSAT (Remote Server Administration Tools) для Windows.
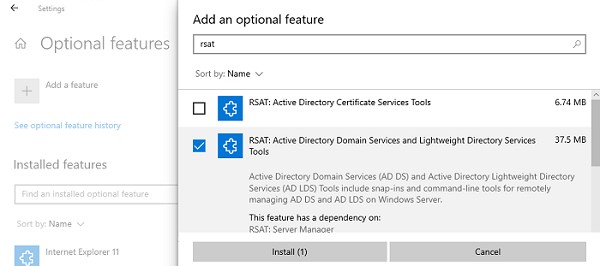
В современных билдах Windows 11 и Windows 10 компоненты RSAT устанавливаются онлайн в виде Features on Demand. Вы можете установить модуль с помощью команды:
Add-WindowsCapability -online -Name Rsat.ActiveDirectory.DS-LDS.Tools~~~~0.0.1.0

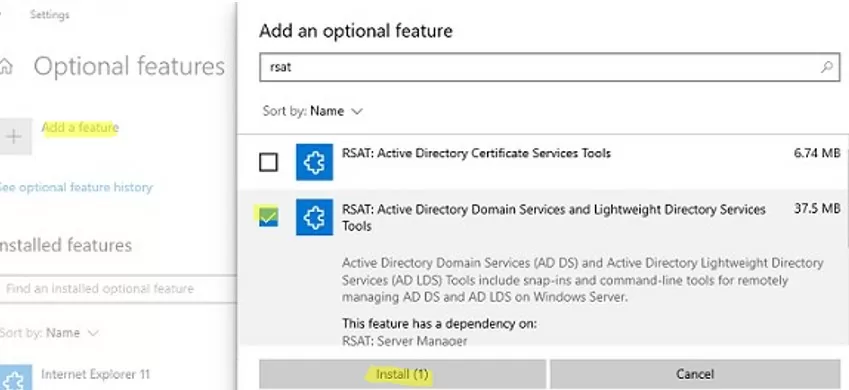
Или через панель Settings -> Apps -> Optional features -> Add a feature -> RSAT: Active Directory Domain Services and Lightweight Directory Services Tools.
Для предыдущих версий Windows пакет RSAT нужно было качать и устанавливать вручную. После этого нужно активировать модуль AD для PowerShell из панели управления (Control Panel -> Programs and Features -> Turn Windows features on or off -> Remote Server Administration Tools-> Role Administration Tools -> AD DS and AD LDS Tools).
Для использования командлетов AD в PowerShell Core 6.x, 7.x сначала нужно установить модуль WindowsCompatibility:
Install-Module -Name WindowsCompatibility
Затем загрузите модуль в сессию с помощью команд:
Import-Module -Name WindowsCompatibility
Import-WinModule -Name ActiveDirectory

Теперь вы можете использовать командлеты AD в ваших скриптах на PowerShell Core 7.
Установка модуля RSAT-AD-PowerShell в Windows Server
В Windows Server вы можете установить модуль Active Directory для Windows PowerShell из графической консоли Server Manager или с помощью PowerShell.
Вы можете проверить, что модуль Active Directory установлен с помощью команды:
Get-WindowsFeature -Name «RSAT-AD-PowerShell»
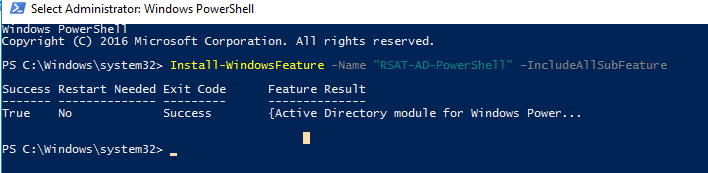
Если модуль отсутствует, установите его:
Install-WindowsFeature -Name "RSAT-AD-PowerShell" –IncludeAllSubFeature
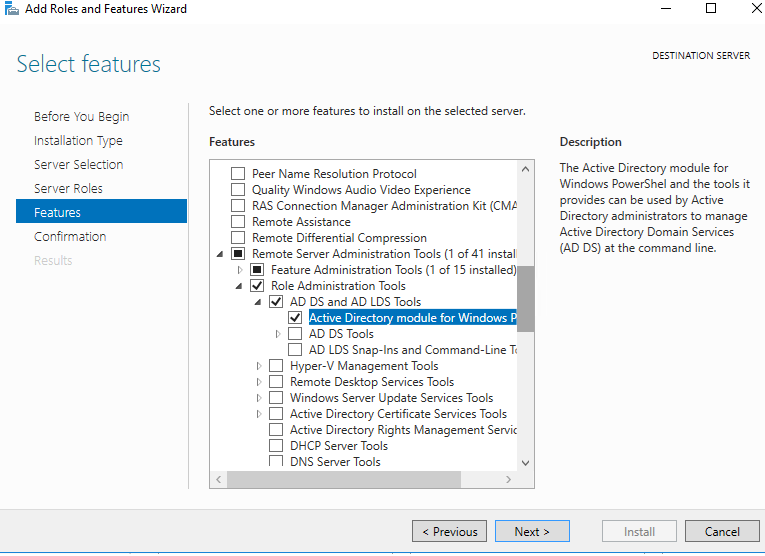
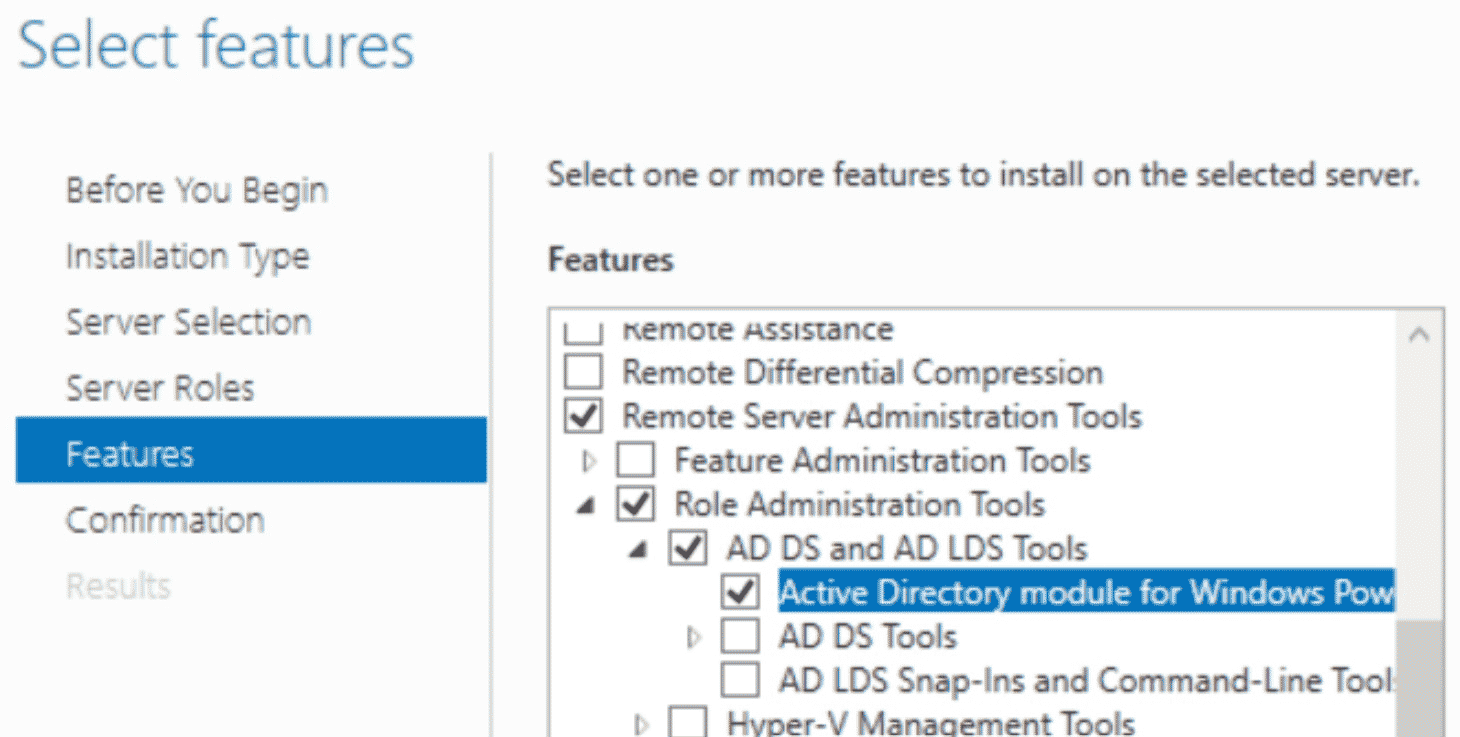
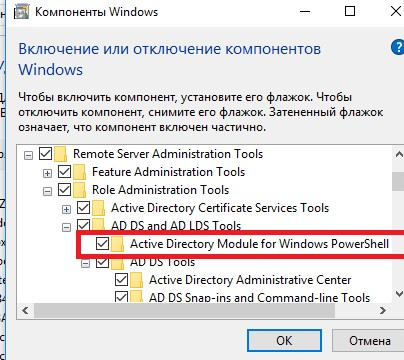
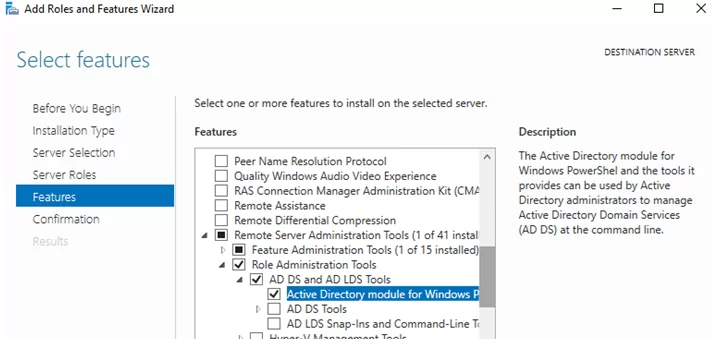
Для установки модуля через панель управления Server Manager, перейдите в Add Roles and Features -> Features -> Remote Server Administration tools -> Role Administration Tools -> AD DS and AD LDS Tools -> выберите Active Directory module for Windows PowerShell.
Не обязательно использовать контроллер домена для администрирования Active Directory с помощью модуля RSAT-AD-PowerShell. Этот модуль можно установить на любом сервере или рабочей станции. На контроллерах домена AD модуль устанавливается автоматически при развертывании роли ADDS (при повышении сервера до DC).
Модуль взаимодействует с AD через службу Active Directory Web Services, которая должна быть запущена на контроллере домена и доступна клиентам по порту TCP 9389. Проверьте, что порт доступен на DC с помощью командлета Test-NetConnection:
tnc MSK-DC01 -port 9389
Основные командлеты модуля Active Directory для PowerShell
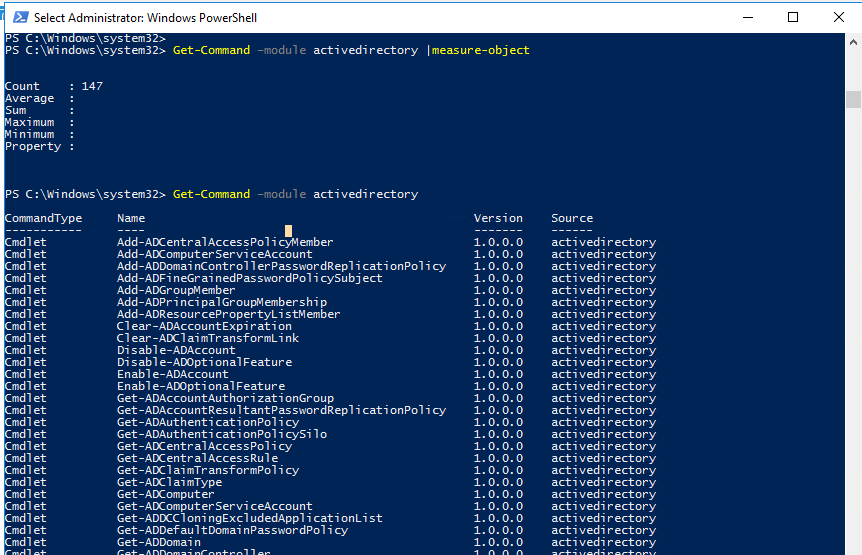
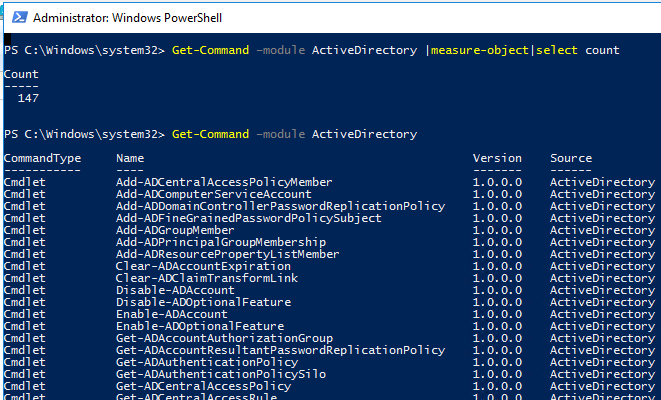
В модуле Active Directory для Windows PowerShell имеется большое командлетов для взаимодействия с AD. В текущей версии модуля для Windows Server 2022/Windows 11 доступно 147 PowerShell командлетов для AD.
Проверьте, что модуль установлен на компьютере:
Get-Module -Name ActiveDirectory –ListAvailable
Перед использованием командлетов модуля, его нужно импортировать в сессию PowerShell (начиная с Windows Server 2012 R2/ Windows 8.1 и выше модуль импортируется автоматически):
Import-Module ActiveDirectory
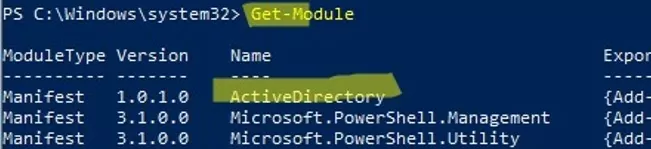
Проверьте, что модуль AD загружен в вашу сессию PowerShell:
Get-Module

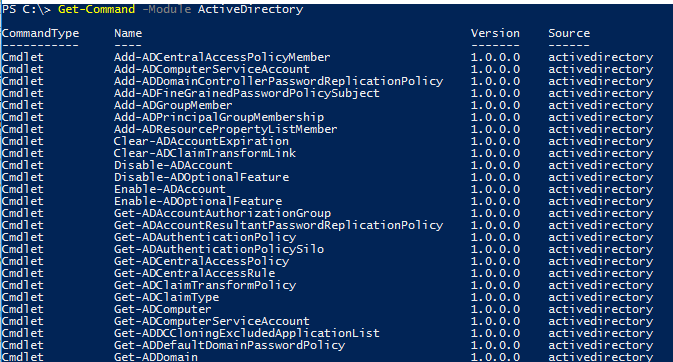
Вы можете вывести полный список доступных командлетов с помощью команды:
Get-Command –module activedirectory
Общее количество команд в модуле:
Get-Command –module activedirectory |measure-object
Большинство командлетов модуля RSAT-AD-PowerShell начинаются с префикса Get-, Set-или New-.
- Командлеты класса Get— используются для получения различной информации из AD (Get-ADUser — свойства пользователей, Get-ADComputer – параметры компьютеров, Get-ADGroupMember — состав групп и т.д.). Для их выполнения не нужно быть администратором домена, любой пользователь домена может выполнять скрипты PowerShell для получения значений большинства атрибутов объектов AD (кроме защищенных, как в примере с LAPS).
- Командлеты класса Set— служат для изменения параметров объектов в AD, например, вы можете изменить свойства пользователя (Set-ADUser), компьютера (Set-ADComputer), добавить пользователя в группу и т.д. Для выполнения этих операций у вашей учетной записи должны быть права на объекты, которые вы хотите изменить (см. статью Делегирование прав администратора в AD).
- Команды, начинающиеся с New- позволяют создать объекты AD: создать пользователя — New-ADUser, группу — New-ADGroup, создать Organizational Unit — New-ADOrganizationalUnit.
- Командлеты, начинающиеся с Add—: добавить пользователю в группу (Add-ADGroupMember), создать гранулированные политики паролей (Add-ADFineGrainedPasswordPolicySubject);
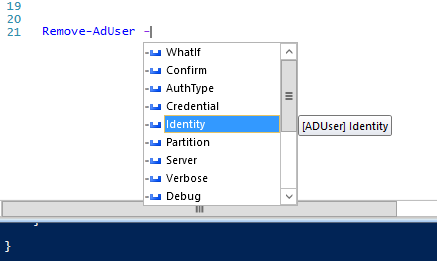
- Командлеты Remove— служат для удаления объектов AD (Remove-ADGroup, Remove-ADComputer, Remove-ADUser).
Есть специфические командлеты PowerShell для управления только определенными компонентами AD:
-
Enable-ADOptionalFeature
– включить компоненты AD (например, корзину AD для восстановления удаленных объектов) -
Install-ADServiceAccount
– настроить учетную запись для службы (MSA, gMSA) -
Search-ADAccount
– позволяет найти в AD отключенные, неактивные, заблокированные учетные записи пользователей и компьютеров -
Enable-ADAccount
/
Disable-ADAccount
/
Unlock-ADAccount
– включить/отключить/ разблокировать учетную запись
По умолчанию командлеты PowerShell подключаются к вашему ближайшему контроллеру в вашем домене (LOGONSERVER). С помощью параметра -Server вы можете подключиться к ADDS на другом контроллере домена или в другом домене (список DC в другом домене можно вывести с помощью команды
nltest /dclist:newdomain.com
). Параметр -Server доступен почти для всех командлетов модуля. Например:
Get-ADuser aaivanov -Server msk-dc01.winitpro.ru
Также вы можете указать учетную запись для подключения к AD с помощью параметра -Credential.
$
creds = Get-Credential
Get-ADUser -Filter * -Credential $creds
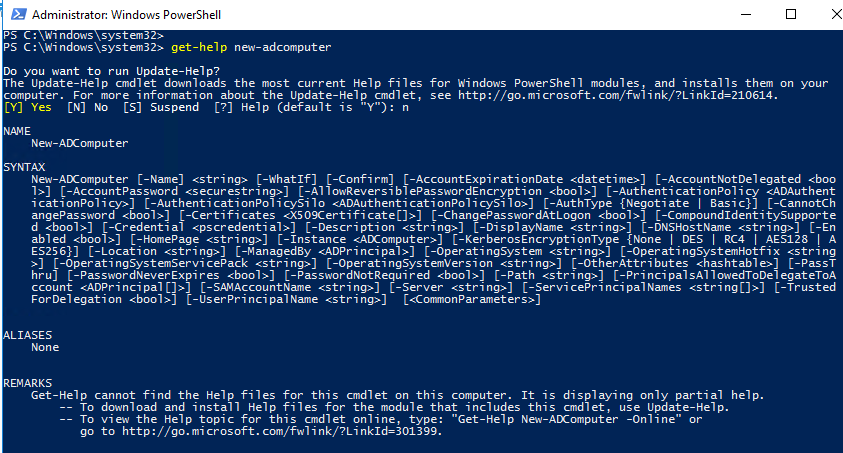
Получить справку о любом командлете можно так:
get-help New-ADComputer
Примеры использования командлетов Active Directory можно вывести так:
(get-help Set-ADUser).examples
В PowerShell ISE при наборе параметров командлетов модуля удобно использовать всплывающие подсказки.
Импорт модуля Active Directory PowerShell с удаленного компьютера
Не обязательно устанавливать модуль AD PowerShell на все компьютеры. Администраора может удаленно импортировать это модуль с контроллера домена (нужны права администратора домена) или с любого другого компьютера.
Для подключения к удаленном компьютеру исопьзуется PowerShell Remoting. Это требует, чтобы на удаленном компьютере был включен и настроен Windows Remote Management (WinRM).
Создайте новую сесиию с удаленнм компьютером, на котором установлен модуль AD PowerShell:
$rs = New-PSSession -ComputerName DC_or_Comp_with_ADPosh
Импортируйте модуль ActiveDirectory с удаленного компьютера в вашу локальную сессию:
Import-Module -PSsession $rs -Name ActiveDirectory
Теперь вы можете выполнять любые команды из модуля Active Directory на своем компьютере, как будто это модуль установлен локально. При этом они выполняются на удаленном хосте.
Вы можете добавить эти команды в ваш файл профиля PowerShell (например,
notepad $profile.CurrentUserAllHosts
), чтобы автоматически импортировать модуль из удаленной сессии при запуске консоли powershell.exe.
Завершить удалённую сессию можно командой:
Remove-PSSession -Session $rs
Этот же способ с импортом модуля AD через PoweShell implicit remoting позволит вам использовать командлеты PowerShell с хостов Linux and macOS, на которые нельзя установить локальную копию модуля.
Также вы можете использовать модуль Active Directory для PowerShell без установки RSAT. Для этого достаточно скопировать с компьютера с установленным модулем RSAT-AD-PowerShell:
- Каталог C:\Windows\System32\WindowsPowerShell\v1.0\Modules
- Файл ActiveDirectory.Management.dll
- Файл ActiveDirectory.Management.resources.dll
Затем нужно импортировать модуль в сессию:
Import-Module C:\path\Microsoft.ActiveDirectory.Management.dll
Import-Module C:\path\Microsoft.ActiveDirectory.Management.resources.dll
После этого вы можете использовать все командлеты из модуля AD без установки RSAT.
Администрирование AD с помощью модуля Active Directory для PowerShell
Рассмотрим несколько типовых задач администратора, которые можно выполнить с помощью команд модуля AD для PowerShell.
Полезные примеры использования различных командлетов модуля AD для PowerShell уже описаны на сайте. Следуйте ссылкам по тексту за подробными инструкциями.
New-ADUser: Создать пользователя в AD
Для создания нового пользователя в AD используется использовать командлет New-ADUser. Создать пользователя можно командой:
New-ADUser -Name "Andrey Petrov" -GivenName "Andrey" -Surname "Petrov" -SamAccountName "apetrov" -UserPrincipalName "[email protected] " -Path "OU=Users,OU=Ufa,DC=winitpro,DC=loc" -AccountPassword(Read-Host -AsSecureString "Input Password") -Enabled $true
Более подробно о команде New-ADUser (в том числе пример массового создания учетных записей в домене) читайте в статье .
Get-ADComputer: Получить информацию о компьютерах домена
Чтобы вывести информацию о компьютерах в определённом OU (имя компьютера и дата последней регистрации в сети) используйте командлет Get-ADComputer:
Get-ADComputer -SearchBase ‘OU=Russia,DC=winitpro,DC=ru’ -Filter * -Properties * | FT Name, LastLogonDate -Autosize
Add-AdGroupMember: Добавить пользователя в группу AD
Чтобы добавить пользователей в существующую группу безопасности в домене AD, выполните команду:
Add-AdGroupMember -Identity MskSales -Members apterov, divanov
Вывести список пользователей в группе AD и выгрузить его в файл:
Get-ADGroupMember MskSales -recursive| ft samaccountname| Out-File c:\script\export_users.csv
Более подробно об управлении группами AD из PowerShell.
Set-ADAccountPassword: Сброс пароля пользователя в AD
Чтобы сбросить пароль пользователя в AD из PowerShell, выполните:
Set-ADAccountPassword apterov -Reset -NewPassword (ConvertTo-SecureString -AsPlainText “P@ssw0rd1” -Force -Verbose) –PassThru
Блокировка/разблокировка пользователя
Отключить учетную запись:
Disable-ADAccount apterov
Включить учетную запись:
Enable-ADAccount apterov
Разблокировать аккаунт после блокировки парольной политикой:
Unlock-ADAccount apterov
Search-ADAccount: Поиск неактивных компьютеров в домене
Чтобы найти и заблокировать в домене все компьютеры, которые не регистрировались в сети более 100 дней, воспользуйтесь командлетом Search-ADAccount:
$timespan = New-Timespan –Days 100
Search-ADAccount -AccountInactive -ComputersOnly –TimeSpan $timespan | Disable-ADAccount
New-ADOrganizationalUnit: Создать структуру OU в AD
Чтобы быстро создать типовую структуры Organizational Unit в AD, можно воспользоваться скриптом PowerShell. Допустим, нам нужно создать несколько OU с городами, в которых создать типовые контейнеры. Вручную через графическую консоль ADUC такую структуру создавать довольно долго, а модуль AD для PowerShell позволяет решить такую задачу за несколько секунд (не считая время на написание скрипта):
$fqdn = Get-ADDomain
$fulldomain = $fqdn.DNSRoot
$domain = $fulldomain.split(".")
$Dom = $domain[0]
$Ext = $domain[1]
$Sites = ("SPB","MSK","Sochi")
$Services = ("Users","Admins","Computers","Servers","Contacts")
$FirstOU ="Russia"
New-ADOrganizationalUnit -Name $FirstOU -Description $FirstOU -Path "DC=$Dom,DC=$EXT" -ProtectedFromAccidentalDeletion $false
foreach ($S in $Sites)
{
New-ADOrganizationalUnit -Name $S -Description "$S" -Path "OU=$FirstOU,DC=$Dom,DC=$EXT" -ProtectedFromAccidentalDeletion $false
foreach ($Serv in $Services)
{
New-ADOrganizationalUnit -Name $Serv -Description "$S $Serv" -Path "OU=$S,OU=$FirstOU,DC=$Dom,DC=$EXT" -ProtectedFromAccidentalDeletion $false
}
}
После выполнения скрипта у нас в AD появилась такая структура OU.
Для переноса объектов между контейнерами AD можно использовать командлет Move-ADObject:
$TargetOU = "OU=Buhgalteriya,OU=Computers,DC=corp,DC=winitpro,DC=ru"
Get-ADComputer -Filter 'Name -like "BuhPC*"' | Move-ADObject -TargetPath $TargetOU
Get-ADReplicationFailure: Проверка репликации в AD
С помощью командлета Get-ADReplicationFailure можно проверить состояние репликации между контроллерами домена AD:
Get-ADReplicationFailure -Target DC01,DC02
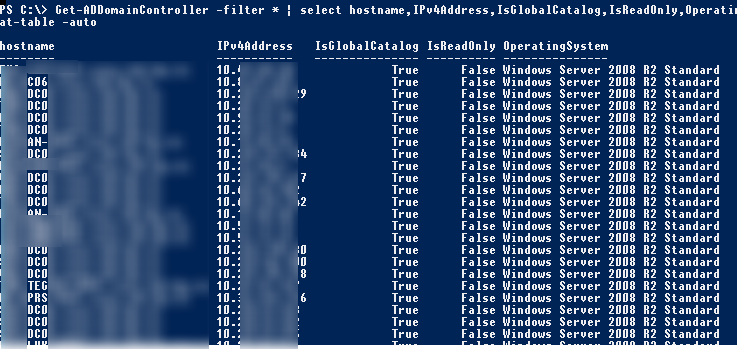
Получить информацию обо всех DC в домене с помощью командлета Get-AdDomainController:
Get-ADDomainController –filter * | select hostname,IPv4Address,IsGlobalCatalog,IsReadOnly,OperatingSystem | format-table –auto
В этой статье мы рассмотрели, как установить и использовать модулья AD PowerShell для администрирования домена. Надеюсь, эта статья подтолкнет вас к дальнейшему исследованию возможностей этого модуля и автоматизации большинства задач управления AD.
The Active Directory PowerShell module is part of the Remote Server Administration Tools (RSAT) in all Windows Operating Systems. It is a set of PowerShell cmdlets that imparts flexibility in managing Active Directory.
While AD management is possible using the native GUI-based tools like Active Directory Users and Computers console, installing the Windows Active Directory PowerShell Module gives you the ability to make changes in bulk. This is because PowerShell commands can iterate changes through object lists at a far greater rate than through the graphical interface.
A full list of Active Directory PowerShell cmdlets is available on the Microsoft site.
In this tutorial, we will see how to install and import the AD PowerShell module. Installing it makes the tool available on your workstation or server, while importing the PowerShell module for AD loads it to the instance of PowerShell that is running.
Installing the Active Directory PowerShell module on member servers
The Active Directory PowerShell module is available by default on all domain controllers. It is also available for installation on member servers running Windows Server 2008 and higher.
Method 1: Installation via Add Roles and Features
1. Open Server Manager.
2. Click on Manage -> Add Roles and Features.
3. Select Role Based Installation and click Next.
4. Select the server you want the Active Directory PowerShell module on. Click Next.
5. On the Features Page, expand Remote Server Administration Tools -> Role Administration Tools -> AD DS and AD LDS Tools, then select Active Directory module for Windows PowerShell. Once selected, click Next.
6. On the confirmation page, click Install.
Method 2: Installation via PowerShell
1. Open Windows PowerShell from the Start menu.
2. In the PowerShell console, use the Install-WindowsFeature cmdlet to install the Active Directory PowerShell module. Specify the feature -Name (RSAT-AD-PowerShell) and add the -IncludeAllSubFeature parameter to add any child features.
Install-WindowsFeature -Name “RSAT-AD-PowerShell” -IncludeAllSubFeature
Installing the Active Directory PowerShell module on workstations
1. Windows 10 (version 1809 and higher)
To install the Active Directory PowerShell module on Windows 10 (versions 1809 and higher) workstations, you need to enable the RSAT tools feature using the Apps & Features setting in Windows.
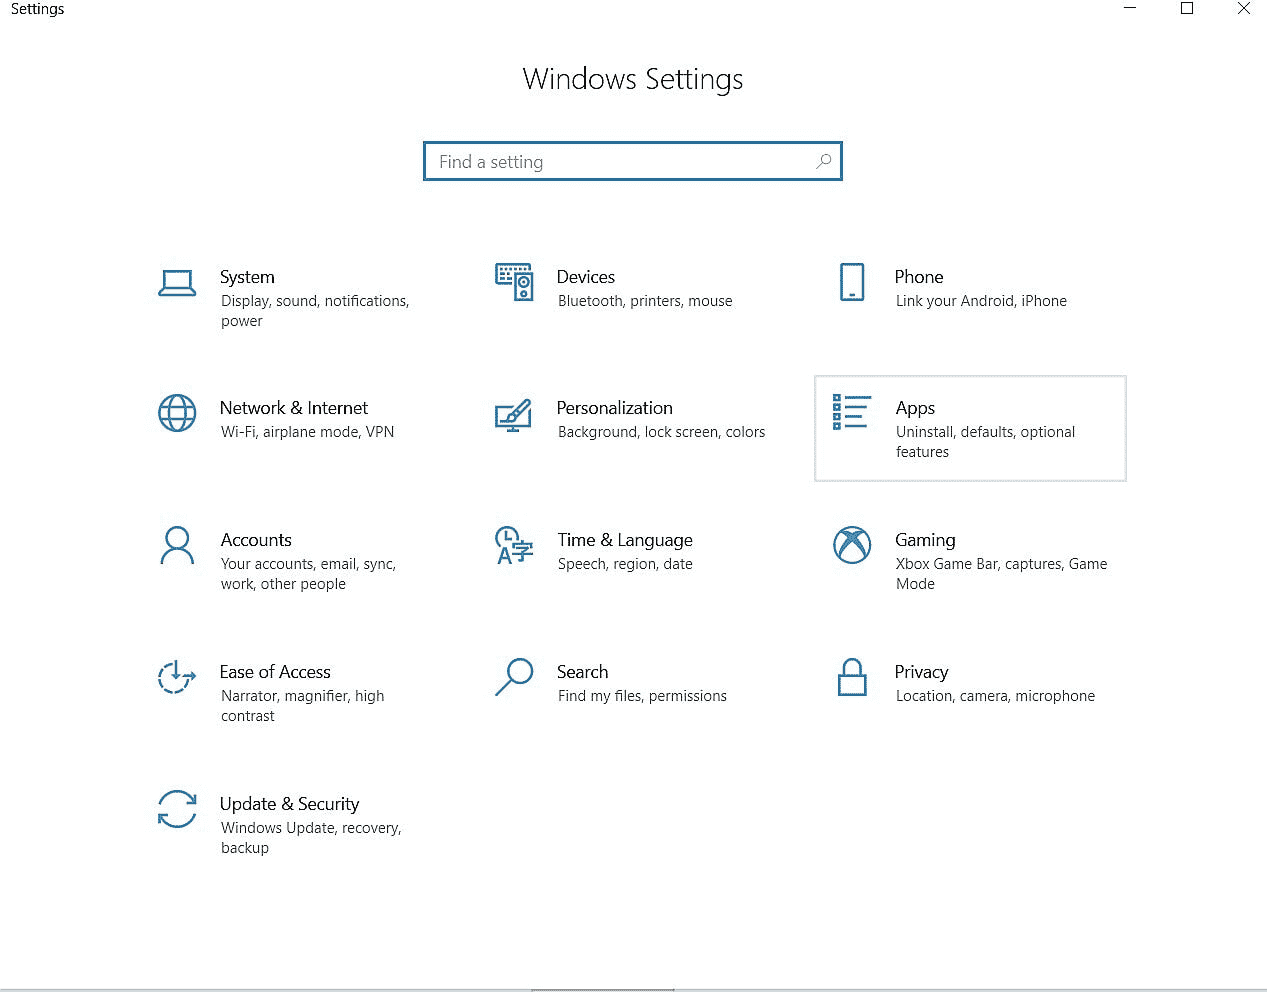
1. Click Start -> Settings -> Apps.
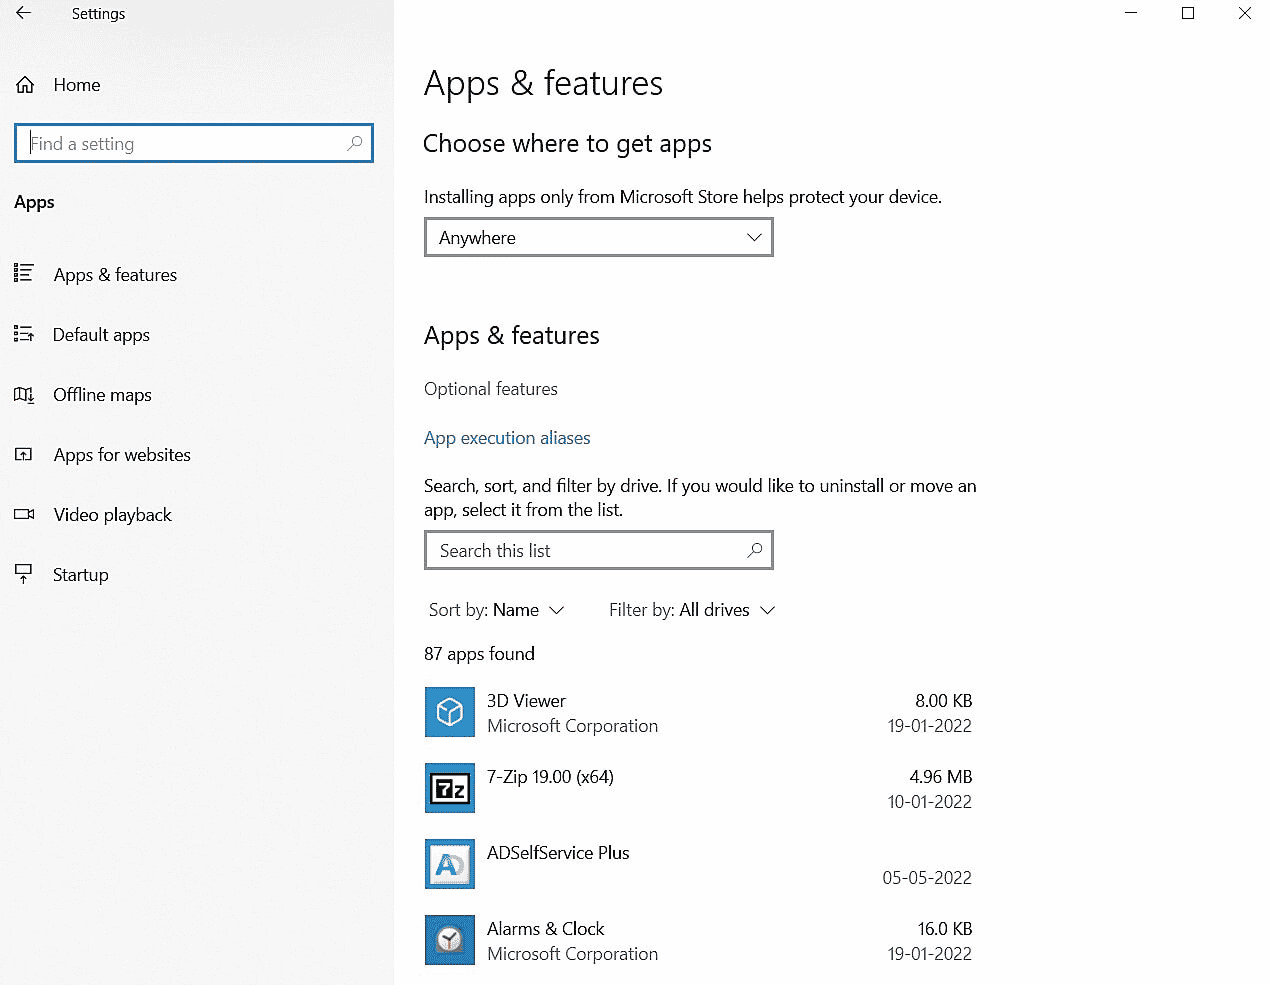
2. In the Apps & Features window, click Optional Features.
3. Click on Add a Feature and select RSAT: Active Directory Domain Services and Lightweight Directory Services Tools from the options.
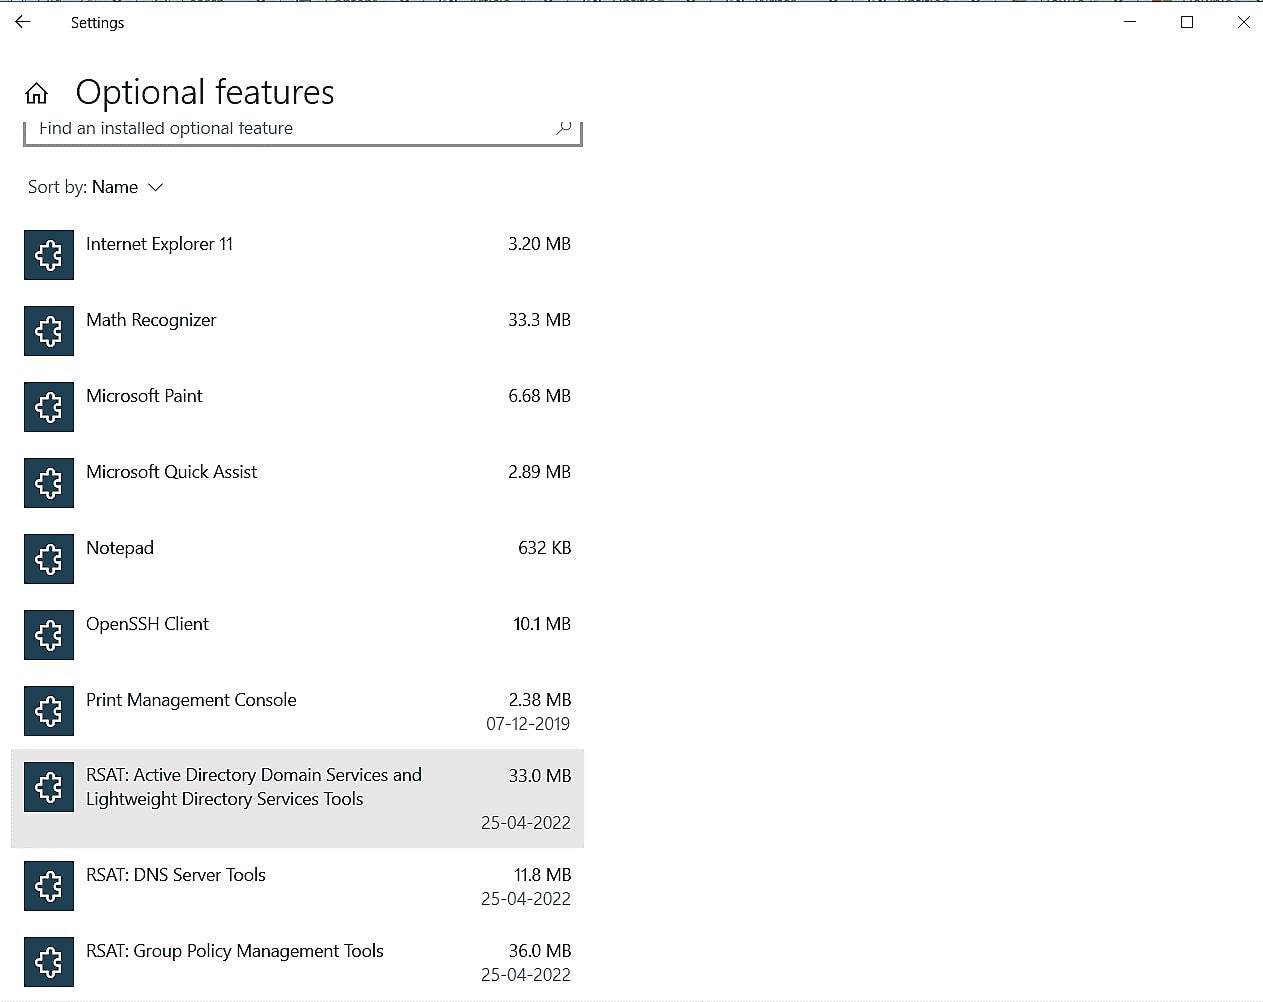
4. Select Install.
2. Windows 10 (before version 1809), Windows 8.1 and Windows 8
RSAT tools need to be downloaded from the Microsoft site (links below) and installed on domain workstations running Windows operating systems 10, 8.1 or 8.
The download and install process is straightforward. RSAT tools including the PowerShell Active Directory module will be available once the installation is done and the system is restarted.
Windows PowerShell Module for Windows 10
Windows PowerShell Module for Windows 8.1
Windows PowerShell Module for Windows 8
3. Windows 7
Windows 7 has been deprecated by Microsoft since January 2020. RSAT tools are hence unavailable for workstations running Windows 7.
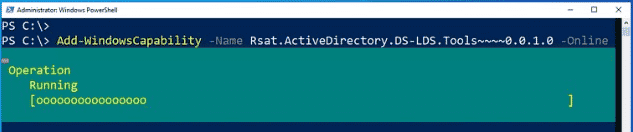
Installation using PowerShell
In the Windows PowerShell console, use the Add-WindowsCapability cmdlet to install the Active Directory RSAT tools. Specify the -Name (Rsat.ActiveDirectory.DS-LDS.Tools~~~~0.0.1.0) and the -Online parameter to use Windows Update to install the feature.
Add-WindowsCapability -Name Rsat.ActiveDirectory.DS-LDS.Tools~~~~0.0.1.0 -Online
Importing the PowerShell Active Directory module
There are multiple ways to install RSAT and AD PowerShell, but only one way to import it.
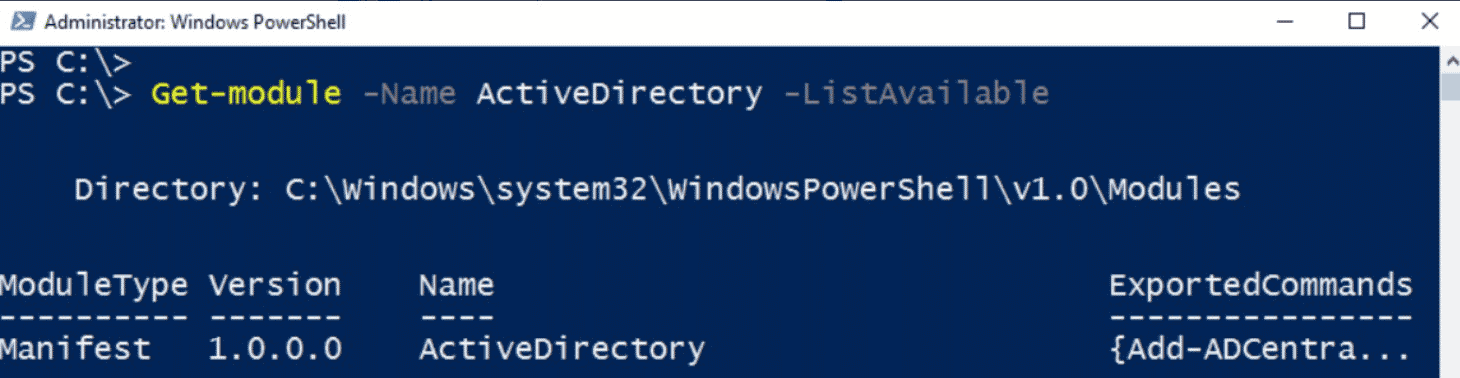
1. Open Windows PowerShell from the Start menu.
2. Verify that the AD PowerShell module has been installed by using the Get-Module command specifying the -Name (ActiveDirectory) and the -ListAvailable parameter to search all modules installed on the system.
Get-Module -Name ActiveDirectory -ListAvailable
3. Import the module using the Import-Module cmdlet, specifying the module’s name (ActiveDirectory) using the -Name parameter.
Import-Module -Name ActiveDirectory
That’s it! You have now installed and imported the Windows Active Directory PowerShell module.
A common misconception, especially with new Windows system administrators, is they should log in to the domain controller server to manage the Active Directory. I’ve seen organizations where even the frontline service desk is allowed to log in to the domain controller servers just to provision new user accounts or create groups.
Microsoft has introduced the Remote Server Administration Tools (RSAT), allowing other computers (server or workstation) to remotely manage the Active Directory and other services running on Windows Server 2008 R2 and above. Part of the RSAT is the Active Directory PowerShell module, which administrators can use to manage the Active Directory using PowerShell cmdlets.
Stick around, and we’ll show different ways to have the Active Directory module on Windows Server and client computers.
Note. Any installation method involving the DISM module or DISM.exe installs all RSAT tools, not just the ActiveDirectory PowerShell module.
Install PowerShell Active Directory Module on Windows Server
While the Active Directory Module is automatically installed on servers with the Active Directory Domain Services (AD DS) role, it has to be installed on other servers that don’t hold the same role.
There are a few ways to install the Active Directory Module on Windows Servers, and we’ll tackle them next.
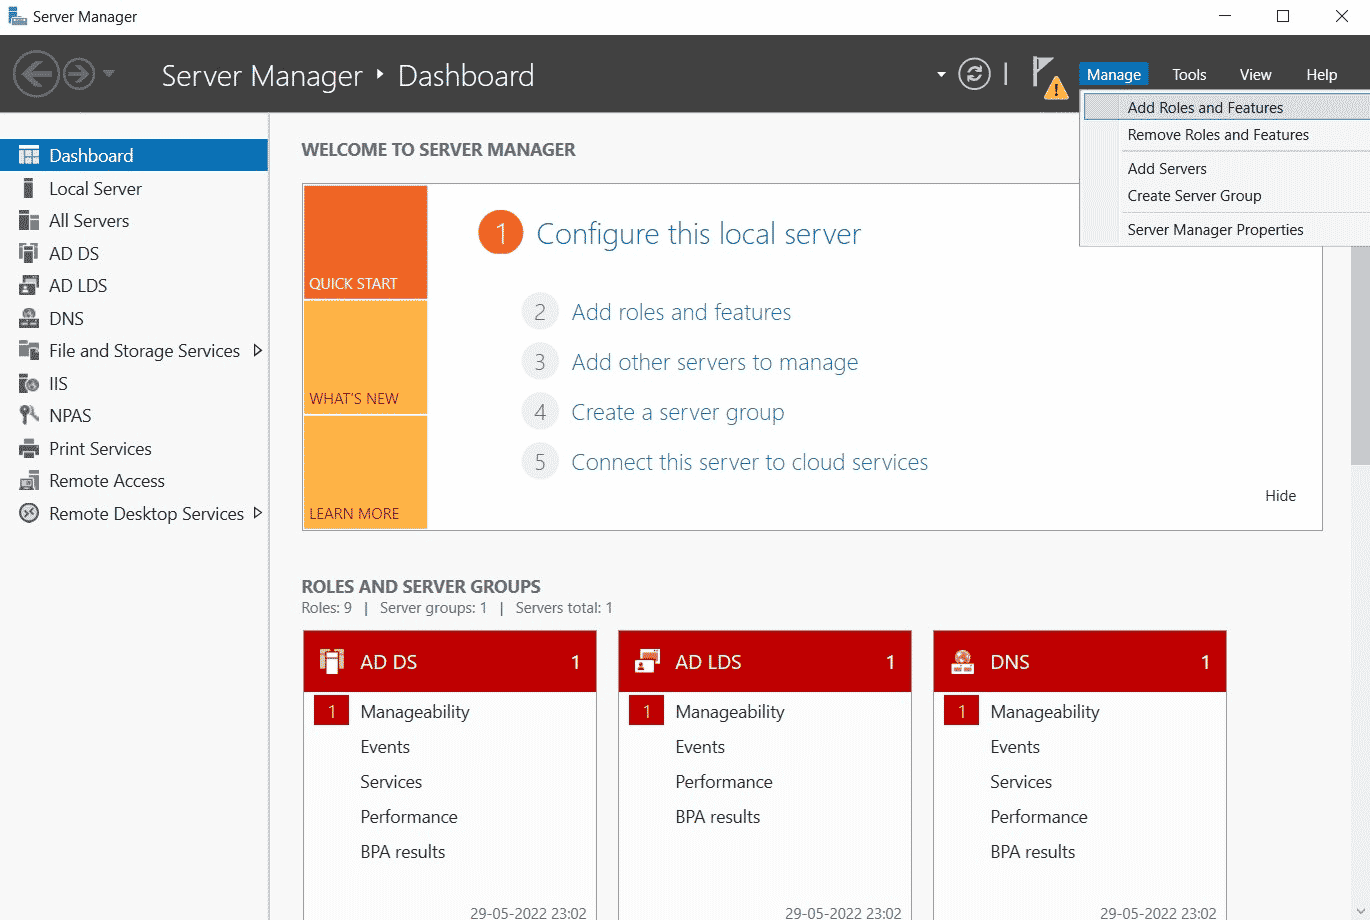
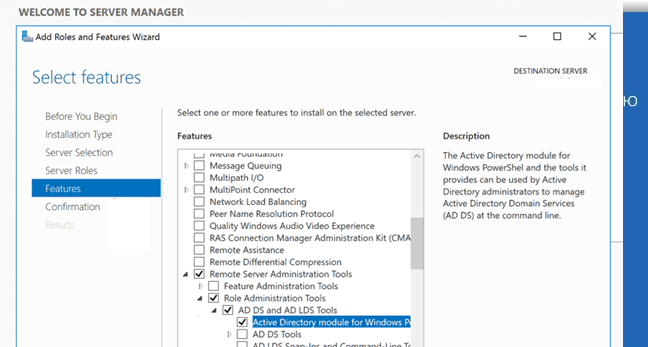
Using the Add Roles and Features Wizard (Server Manager Console)
The Server Manager console is a graphical user interface to manage the local and remote servers. It also allows administrators to install roles and features, including the Active Directory Module.
On your server, open the Server Manager.

On the Dashboard, click “Add roles and features.”

When the “Add Roles and Features Wizard” window shows up, click Next until you reach the “Features” page.
Expand “Remote Server Administration Tools” → “AD DS and AD LDS Tools” and check the “Active Directory module for Windows PowerShell” box, then click Next.

On the Confirmation page, review the selection and click Install.

Wait for the installation to finish and click Close.

Using Install-WindowsFeature Cmdlet (ServerManager Module)
Installing features in the Server Manager console has a cmdlet counterpart in PowerShell called Install-WindowsFeature. This cmdlet also has an alias called Add-WindowsFeature. These cmdlets are part of the ServerManager module that’s built-in to Windows servers.

But first, let’s find out the Active Directory Module for Windows PowerShell feature status. Open Windows PowerShell as admin and run this command.
Get-WindowsFeature -Name RSAT*
As you can see below, the RSAT-AD-PowerShell feature install state is available. This status means we can install it.

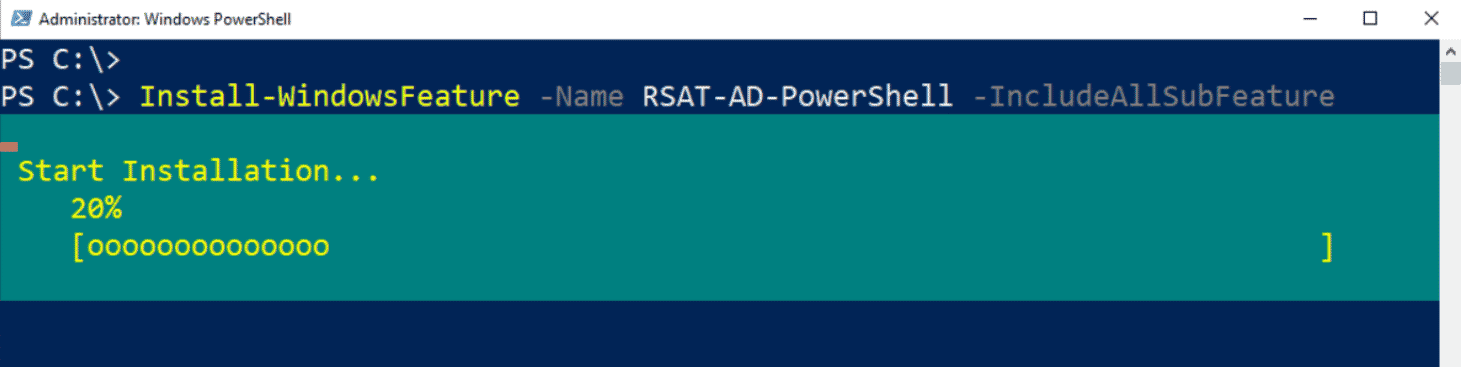
Run this command to install the RSAT-AD-PowerShell feature.
Install-WindowsFeature -Name RSAT-AD-PowerShell
The screenshot below shows the result of a successful installation.

Install PowerShell Active Directory Module on Windows 10 or 11
On modern Windows 10 builds (1809 and newer), the RSAT became a part of Features on Demand (FoD). You can install RSAT directly via the Optional Features in Windows Settings, DISM.exe, and Add-WindowsCapability.
Using the Optional Features in Windows Settings
On your Windows computer, press WIN+R and run this command to open the Optional Features settings.
ms-settings:optionalfeatures

Click the “View features” button.

In the “Add an optional feature” window, search RSAT, check the “RSAT: Active Directory Domain Services Tools” box, and click Next.

Click Install on the next page.

Wait for the feature to finish installing.

Using the Add-WindowsCapability Cmdlet (DISM Module)
Another method to install RSAT via Feature on Demand is the Add-WindowsCapability cmdlet. This cmdlet is part of the DISM module in Windows PowerShell.
Open Windows PowerShell as admin and run this command to find the RSAT feature to install.
Get-WindowsCapability -Online -Name RSAT* | Format-Table
As you can see, multiple features match. But in this instance, what we want is the Rsat.ActiveDirectory.DS-LDS.Tools~~~~0.0.1.0. Notice that the State is NotPresent, which means it is not yet installed.

To install, run this command:
Add-WindowsCapability -Online -Name Rsat.ActiveDirectory.DS-LDS.Tools~~~~0.0.1.0

Wait for the installation to finish.

Using DISM.exe
You can also install RSAT using the DISM.exe tool. To do so, open an elevated CMD or PowerShell and run this command.
DISM.exe /Online /Add-Capability /CapabilityName:Rsat.ActiveDirectory.DS-LDS.Tools~~~~0.0.1.0

Import PowerShell Active Directory Module after Installing
Now that you’ve installed the PowerShell Active Directory Module, you can import it into Windows PowerShell using this command.
Import-Module ActiveDirectory

If you’re using PowerShell 7+, use the Windows PowerShell compatibility switch (-UseWindowsPowerShell).

Import PowerShell Active Directory Module without Installing
You can also import the PowerShell Active Directory Module from a remote computer that has it. This way, you do not have to install it first.
First, create a session object to the remote command by running this command on your local PowerShell window. This method uses PowerShell remoting via WinRM.
$session = New-PSSession -ComputerName DC1
Next, export the ActiveDirectory module from the remote computer to the local computer. The module is saved to $env:HOMEPATH\Documents\WindowsPowerShell\Modules\<MODULE NAME> folder.
Export-PSsession -Session $session -Module ActiveDirectory -OutputModule RemoteADModule
Now that the ActiveDirectory module is exported as RemoteADModule to your local machine, you can import it like so:
Import-Module RemoteADModule

Using the Active Directory PowerShell Module
So you’ve installed the Active Directory PowerShell Module. What’s next? Well, it’s up to you. You can now manage the Active Directory using the various cmdlets at your disposal.
Cyril Kardashevsky
I enjoy technology and developing websites. Since 2012 I’m running a few of my own websites, and share useful content on gadgets, PC administration and website promotion.
Сегодня я покажу, как установить и использовать модуль администрирования Active Directory для Windows PowerShell. Командлеты этого модуля можно использовать для получения информации и управлением различными объектами и параметрами AD. Данный модуль в серверных ОС устанавливается в виде отдельного компонента. На десктопные ОС (Windows 10, 8.1, 7) придется установить пакет Remote Server Administration Tools (RSAT) в состав которого входит модуль для взаимодействия с AD из PowerShell. Кроме этого модуля в состав RSAT входят все необходимые графические оснастки управления, утилиты командной строки и модули Windows PowerShell для администрирования Windows и AD. Данный пакет для вашей версии ОС нужно самостоятельно скачать с сайта Microsoft.
- Установка модуля Active Directory для Windows PowerShell
- Импорт и использование модуля PowerShell для Active Directory
Содержание:
Установка модуля Active Directory для Windows PowerShell
Модуль Active Directory для Windows PowerShell впервые появился в Windows Server 2008 R2. Он автоматически устанавливается на контроллерах домена при их установке на них роли ADDS. Для использования комадлетов PowerShell из модуля AD в домене должен быть хотя бы один контроллер с Windows Server 2008 R2 или выше. Если в вашей сети имеются DC только с Windows Server 2003 и 2008, необходимо скачать и установить Active Directory Management Gateway Service. Командлеты PowerShell из модуля Active Directory взаимодействуют с веб-сервисом, который является частью контролера домена с ролью ADDS.
Вы можете установить модуль Active Directory для Windows PowerShell не только на контроллер домена, но и на любой рядовой сервер домена или рабочую станцию. В Windows Server 2016 установить модуль Active Directory для Windows PowerShell можно из графической консоли Server Manager с помощью мастера добавления ролей и компонентов. Достаточно запустить мастер и на этапе выбора компонентов нужно выбрать пункт Средства удаленного администрирования сервера -> Средства администрирования ролей -> Средства AD DS и AD LDS -> Модуль Active Directory для Windows PowerShell (Remote Server Administration Tools > Role Administration Tools > AD DS and AD LDS Tools ->Active Directory module for Windows PowerShell).
Данный модуль можно установит и с помощью PowerShell. Откройте консоль PowerShell с правами администратора и выполните команды:
Import-Module ServerManager
Add-WindowsFeature -Name "RSAT-AD-PowerShell" –IncludeAllSubFeature

В Windows 10, Windows 8.1 и Windows 10 для установки модуля RSAT-AD-PowerShell нужно сначала установить соответствующую версию RSAT, после этого модуль нужно включить в Панели управления (Панель управления -> Программы ->Программы и компоненты и нажмите «Включить компоненты Windows» -> Remote Server Administration Tools -> Role Administration Tools -> AD DS and AD LDS Tools -> включите компонент Active Directory Module for Windows POwerShell.
Либо можно установить модуль с помощью PowerShell:
Enable-WindowsOptionalFeature -Online -FeatureName RSATClient-Roles-AD-Powershell
Импорт и использование модуля PowerShell для Active Directory
В Windows 7 и Windows Server 2008 R2, на которых установлен PowerShell 2.0, чтобы начать пользоваться модулем AD необходимо импортировать его в сессию PowerShell командой:
Import-Module activedirectory

Кроме того, вы можете экспортировать модуль с удаленной машины, где он уже установлен и импортировать его в свою сессию PowerShell:
$MySession = New-PSSession -ComputerName MyDomainController
Export-PSsession -Session $MySession -Module ActiveDirectory -OutputModule RemoteADPosh
Remove-PSSession -Session $MySession
Import-Module RemoteADPosh
В Windows Server 2012 R2/ 2016 и Windows 8.1 / Windows 10 модуль (если он установлен) импортируется в сессию автоматически.
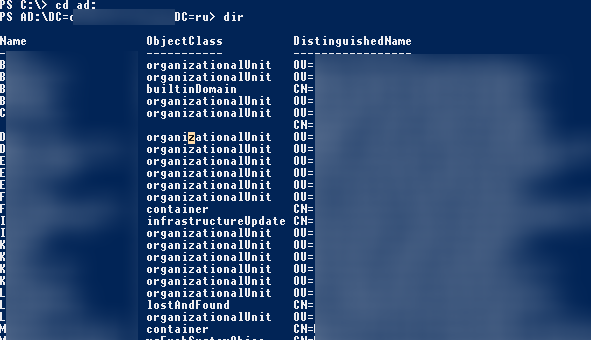
Если компьютер включен в домен, по умолчанию создается диск по имени AD:..Вы можете перейти на этот диск командой CD и использовать привычные команды работы с файловой системой для навигации по этому диску. Пути представлены в формате X500.
PS C:\> cd AD:PS AD:\> dir
…
PS AD:\> cd "DC=vmblog,DC=ru"
Вывести список доступных командлетов модуля для работы с Active Directory можно так:
Get-Command -Module ActiveDirectory
В различных версия Windows доступно разное количество командлетов:
- Windows Server 2008 R2 — 76 командлетов.
- Windows Server 2012 — 135 командлетов
- Windows Server 2012 R2 / 2016 — 147 командлетов.
Итак, теперь вы можете использовать командлеты PowerShell для администрирования AD. На нашем сайты вы можете познакомиться с использованием следующих командлетов из модуля AD для PowerShell: Get-ADGroupMember , Add-ADGroupMember , Move-ADDirectoryServerOperationMasterRole, New-ADGroup.
Windows OS Hub / PowerShell / How to Install the PowerShell Active Directory Module and Manage AD
Every Windows system administrator should be able to use not only graphical AD snap-ins (usually it is ADUC, Active Directory Users and Computers), but also PowerShell cmdlets to perform everyday Active Directory administration tasks. Most commonly, the Active Directory module for Windows PowerShell is used for domain and object management tasks (users, computers, groups). In this article, we will look at how to install theRSAT-AD-PowerShell module on Windows, discover its basic features, and popular cmdlets that are useful to manage and interact with AD.
Contents:
- How to Install the Active Directory PowerShell Module on Windows 10 and 11
- Installing the RSAT-AD-PowerShell Module on Windows Server
- Active Directory Administration with PowerShell
- Importing Active Directory PowerShell Module from a Remote Computer
- Common PowerShell Commands for Active Directory
How to Install the Active Directory PowerShell Module on Windows 10 and 11
You can install the RSAT-AD PowerShell module not only on servers but also on workstations. This module is included in the RSAT (Remote Server Administration Tools) package for Windows.
In current builds of Windows 11 and Windows 10, the RSAT components are installed online as Features on Demand. You can install the module by using the command:
Add-WindowsCapability -online -Name Rsat.ActiveDirectory.DS-LDS.Tools~~~~0.0.1.0

Or through via the Settings -> Apps -> Optional features -> Add a feature -> RSAT: Active Directory Domain Services and Lightweight Directory Services Tools.
The RSAT package had to be manually downloaded and installed on previous versions of Windows. After that, you need to enable the AD module for PowerShell from the Control Panel: Programs and Features -> Turn Windows features on or off -> Remote Server Administration Tools-> Role Administration Tools -> AD DS and AD LDS Tools.
You must first install the WindowsCompatibility module to use AD cmdlets in PowerShell Core 6.x, 7.x:
Install-Module -Name WindowsCompatibility
Then load the module into your session:
Import-Module -Name WindowsCompatibility
 Import-WinModule -Name ActiveDirectory

Now you can use AD cmdlets in your PowerShell Core 7.x scripts.
Installing the RSAT-AD-PowerShell Module on Windows Server
On Windows Server, you can install the Active Directory Module for Windows PowerShell from the Server Manager graphical console or by using PowerShell.
You can check that the Active Directory module is installed with the command:
Get-WindowsFeature -Name "RSAT-AD-PowerShell"
If the module is missing, install it:
Install-WindowsFeature -Name "RSAT-AD-PowerShell" –IncludeAllSubFeature

To install the module through the Server Manager, go to Add Roles and Features -> Features -> Remote Server Administration Tools -> Role Administration Tools -> AD DS and AD LDS Tools -> enable the Active Directory module for Windows PowerShell.
You do not need to use a local domain controller session to manage Active Directory by using the RSAT-AD PowerShell module. This module can be installed on any member server or workstation. On AD domain controllers, the module is automatically installed when the Active Directory Domain Services (AD DS) role is deployed (when the server is promoted to a DC).
The module interacts with AD through the Active Directory Web Service that must be running on your domain controller and available to clients on a TCP port 9389. Use the Test-NetConnection cmdlet to verify that this port is not blocked by a firewall on the DC:
Test-NetConnection MUN-DC1 -port 9389
Active Directory Administration with PowerShell
The Active Directory module for Windows PowerShell has a large number of cmdlets for interacting with AD. There are 147 AD PowerShell cmdlets available in the current version of the module for Windows Server 2022/Windows 11.
Check that the module is installed on the computer:
Get-Module -Name ActiveDirectory –ListAvailable
Before you can use the Active Directory module cmdlets, you must import it into your PowerShell session (starting from Windows Server 2012 R2/ Windows 8.1 the module is imported automatically).
Import-Module ActiveDirectory
Make sure that the AD module is loaded in your PowerShell session:
Get-Module
You can display a complete list of available Active Directory cmdlets:
Get-Command –module ActiveDirectory
The total number of cmdlets in the AD module:
Get-Command –module ActiveDirectory |measure-object|select count
Most of the RSAT-AD PowerShell module cmdlets begin with the Get-, Set- or New- prefixes.
- Get– class cmdlets are used to get different information from Active Directory (
Get-ADUser— user properties,Get-ADComputer– computer settings,Get-ADGroupMember— group membership, etc.). You do not need to be a domain administrator to use these cmdlets. Any domain user can run PowerShell commands to get the values of the AD object attributes (except confidential ones, like in the example with LAPS); - Set- class cmdlets are used to set (change) object properties in Active Directory. For example, you can change user properties (Set-ADUser), computer settings (Set-ADComputer), etc. To perform these actions, your account must have write permissions on the objects you want to modify (see the article How to Delegate Administrator Privileges in Active Directory);
- Commands that start with New- allow you to create AD objects (create a user —
New-ADUser, create a group —New-ADGroup, create an Organizational Unit —New-ADOrganizationalUnit); - Cmdlets starting with Add-: add a user to a group (
Add-ADGroupMember), add a Fine-Grained Password Policy (Add-ADFineGrainedPasswordPolicySubject); - Remove- cmdlets are used to delete AD objects
Remove-ADGroup,Remove-ADComputer,Remove-ADUser).
There are specific PowerShell cmdlets that you can use to manage only certain AD components:
Enable-ADOptionalFeature– enable optional AD features (for example, AD Recycle Bin to restore deleted objects);Install-ADServiceAccount– configure managed service account (MSA, gMSA);Search-ADAccount– allows you to find disabled, inactive, locked user and computer accounts in Active Directory;Enable-ADAccount/Disable-ADAccount/Unlock-ADAccount– enable/disable/unlock an account.
By default, the PowerShell cmdlets connect to the nearest domain controller in your environment (LOGONSERVER). With the -Server parameter, you can connect to ADDS on a different domain controller or in a different domain (you can display a list of DCs in another domain using the nltest /dclist:newad.com command).
The -Server parameter is available for nearly all of the module cmdlets. For example
Get-ADuser j.smith -Server mun-dc1.woshub.com
You can also use the -Credential parameter to specify alternative Active Directory user credentials.
$creds = Get-Credential
 Get-ADUser -Filter * -Credential $creds
Here is how you can get help on any cmdlet
get-help Set-ADUser
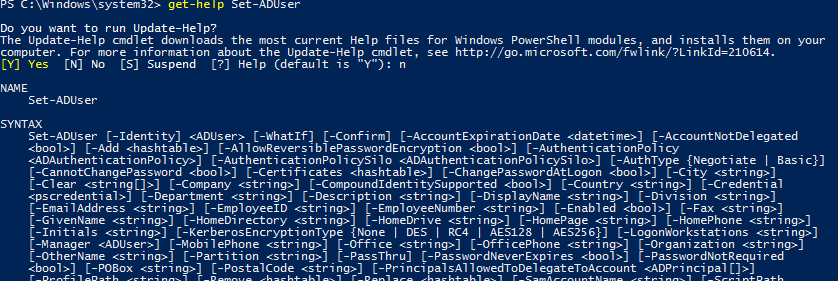
You can display the examples of using Active Directory cmdlets as follows:
(get-help New-ADComputer).examples
Importing Active Directory PowerShell Module from a Remote Computer
It is not necessary to install the AD PowerShell module on all computers. An administrator can remotely import this module from a domain controller (domain administrator privileges are required) or from any other computer.
PowerShell Remoting is used to connect to a remote computer. This requires that Windows Remote Management (WinRM) is enabled and configured on the remote host.
Create a new session with the remote computer that has the AD PowerShell module installed:
$psSess = New-PSSession -ComputerName DC_or_Comp_with_ADPosh
Import the ActiveDirectory module from the remote computer into your local PS session:
Import-Module -PSsession $psSess -Name ActiveDirectory
Now you can run any commands from the Active Directory module on your computer as if the module was installed locally. However, they will be executed on a remote host.
You can add these commands to your PowerShell profile file to automatically import the module from the remote session when you start the powershell.exe console. Run the notepad $profile.CurrentUserAllHosts to open your PS profile file.
You can end a remote session with the command :
Remove-PSSession -Session $psSess
This method of importing the AD module through PowerShell implicit remoting allows you to use PowerShell cmdlets from Linux and MacOS hosts that cannot install a local copy of the module.
You can also >use the Active Directory Module for PowerShell without installing RSAT. To do this, simply copy some files from a computer where the RSAT-AD PowerShell module is installed:
- Directory
C:\Windows\System32\WindowsPowerShell\v1.0\Modules - File
ActiveDirectory.Management.dll - File
ActiveDirectory.Management.resources.dll
Then you need to import the module into your current session:
Import-Module C:\PS\ADmodule\Microsoft.ActiveDirectory.Management.dll
 Import-Module C:\PS\ADmodule\Microsoft.ActiveDirectory.Management.resources.dll
After that, you can use all of the AD module cmdlets without installing RSAT.
Common PowerShell Commands for Active Directory
Let’s take a look at some typical administrative tasks that can be performed using the Active Directory for PowerShell cmdlets.
You can find some useful examples of how to use Active Directory for PowerShell module cmdlets on the WOSHub website. Follow the links to get detailed instructions.
New-ADUser: Creating AD Users
To create a new AD user, you can use the New-ADUser cmdlet. You can create a user with the following command:
New-ADUser -Name "Mila Beck" -GivenName "Mila" -Surname "Beck" -SamAccountName "mbeck" -UserPrincipalName "[email protected]" -Path "OU=Users,OU=Berlin,OU=DE,DC=woshub,DC=com" -AccountPassword(Read-Host -AsSecureString "Input User Password") -Enabled $true
For detailed info about the New-ADUser cmdlet (including an example on how to create user domain accounts in bulk), see this article.
Get-ADComputer: Getting Computer Object Properties
To get the properties of computer objects in a particular OU (the computer name and the last logon date), use the Get-ADComputer cmdlet:
Get-ADComputer -SearchBase ‘OU=CA,OU=USA,DC=woshub,DC=com’ -Filter * -Properties * | FT Name, LastLogonDate -Autosize
Add-ADGroupMember: Add Active Directory Users to Group
To add users to an existing security group in an AD domain, run this command:
Add-AdGroupMember -Identity LondonSales -Members e.braun, l.wolf
Display the list of users in the AD group and export it to a CSV file:
Get-ADGroupMember LondonSales -recursive| ft samaccountname| Out-File c:\ps\export_ad_users.csv
Set-ADAccountPassword: Reset a User Password in AD
In order to reset a user’s password in AD with PowerShell:
Set-ADAccountPassword m.lorenz -Reset -NewPassword (ConvertTo-SecureString -AsPlainText “Ne8Pa$$0rd1” -Force -Verbose) –PassThru
How to Unlock, Enable, and Disable Active Directory Accounts?
To disable the AD user account:
Disable-ADAccount m.lorenz
To enable an account:
Enable-ADAccount m.lorenz
Unlock an account after it has been locked by a domain password policy:
Unlock-ADAccount m.lorenz
Search-ADAccount: How to Find Inactive and Disabled AD Objects?
To find and disable all computers in the AD domain that have not logged on for more than 90 days, use the Search-ADAccount cmdlet:
$timespan = New-Timespan –Days 90
 Search-ADAccount -AccountInactive -ComputersOnly –TimeSpan $timespan | Disable-ADAccount
New-ADOrganizationalUnit: Create an Organizational Unit in AD
To quickly create a typical Organizational Unit structure in AD, you can use a PowerShell script. Suppose you want to create multiple OUs with states as their names and create typical object containers. It is quite time-consuming to create this AD structure manually through the graphical ADUC snap-in. AD module for PowerShell allows solving this task in seconds (except the time to write the script):
$fqdn = Get-ADDomain
$fulldomain = $fqdn.DNSRoot
$domain = $fulldomain.split(".")
$Dom = $domain[0]
$Ext = $domain[1]
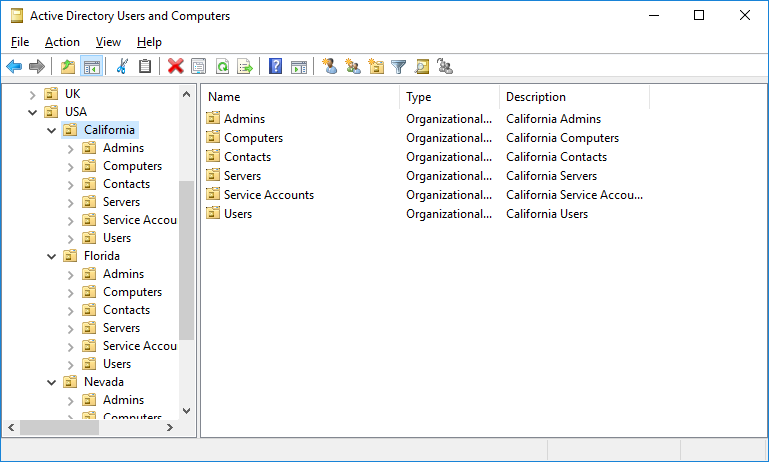
$Sites = ("Nevada","Texas","California","Florida")
$Services = ("Users","Admins","Computers","Servers","Contacts","Service Accounts")
$FirstOU ="USA"
New-ADOrganizationalUnit -Name $FirstOU -Description $FirstOU -Path "DC=$Dom,DC=$EXT" -ProtectedFromAccidentalDeletion $false
foreach ($S in $Sites)
{
New-ADOrganizationalUnit -Name $S -Description "$S" -Path "OU=$FirstOU,DC=$Dom,DC=$EXT" -ProtectedFromAccidentalDeletion $false
foreach ($Serv in $Services)
{
New-ADOrganizationalUnit -Name $Serv -Description "$S $Serv" -Path "OU=$S,OU=$FirstOU,DC=$Dom,DC=$EXT" -ProtectedFromAccidentalDeletion $false
}
}
After you run the script, you will see the following OU structure in the Active Directory.
To move objects between AD containers, you can use the Move-ADObject cmdlet:
$TargetOU = "OU=Sales,OU=Computers,DC=woshub,DC=com"
 Get-ADComputer -Filter 'Name -like "SalesPC*"' | Move-ADObject -TargetPath $TargetOU
Get-ADReplicationFailure: Check Active Directory Replication
You can use the Get-ADReplicationFailure cmdlet to check the status of replication between AD domain controllers:
Get-ADReplicationFailure -Target NY-DC01,NY-DC02
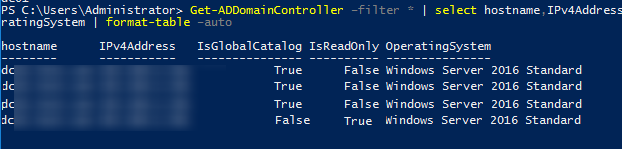
To get information about all DCs in the domain, use the Get-AdDomainController cmdlet:
Get-ADDomainController –filter * | select hostname,IPv4Address,IsGlobalCatalog,IsReadOnly,OperatingSystem | format-table –auto
In this article, we looked at how to install and use the Active Directory PowerShell module for AD domain administration. I hope this article will encourage you to further explore this module and start automating most of your AD management tasks.