
Здравствуйте.
Есть стационарный ПК, windows 10 — подключен к роутеру по lan кабелю.
Есть телевизор со smart tv — подключен к роутеру по wifi.
Как передавать изображение с ПКна телевизор?
Подключать hdmi кабель то к монитору, то к телевизору уже надоело.
-
Вопрос задан
-
6358 просмотров
Пригласить эксперта
В Windows 10 нажмите сочетание клавиш Win + P. В открывшемся справ окне с вариантами проецирования изображения нажмите на пункт «Подключение к беспроводному дисплею» (если его нет, значит ваш компьютер не поддерживает Miracast). В списке беспроводных устройств должен появится ваш телевизор. Выберите его
У меня тоже телевизор на OS VIDAA, подключен по wi-fi, а стационар по кабелю, работает отлично.
так же как и обычно
они же в 1 роутер воткнуты….
Если у вас Win10, то обеспечить вайфайное подключение ТВ не составит труда. Правда, для этого придётся снабдить комп любым вайфайным адаптером.
Открываете «Параметры», в них — «Сеть и интернет», а там — «Мобильный хот-спот». Придумываете имя новой WiFi-сети и её ключ, вводите их в соответствующие строчки, включаете созданный хот-спот — и вот у вас в комнате появляется новая беспроводная сеть, совершенно отдельная от той, которую создаёт роутер. Далее можете раздавать с её помощью интернет мобильным устройствам, или подключаете к ней ТВ.
Установите на тв VLC (например), он умеет смотреть видео по сети. Расшарьте на пк папку с фильмами и смотрите наздоровье
Как передавать изображение с ПКна телевизор?
Если речь идет про видео — правой клавишей мыши на видео, и выбираем — отправить на устройство.
Если dlna, то home media server
Войдите, чтобы написать ответ
-
Показать ещё
Загружается…
Минуточку внимания
Miracast has enabled us to share digital content from one screen to another. This wireless technology helps us to display presentations, images, and videos on other screens and projectors.
Wi-Fi Alliance approved this shared screen, or the screen mirroring technology, and made Miracast a standard in this domain. So you only have Miracast-compatible devices to enjoy the screen mirroring technology.
But can you use Miracast without WiFi? Thousands of users have asked this question. So, read this post until the end if you are also curious about using Miracast without a WiFi connection.
Table of Contents
Miracast Wireless Display Without Wi-Fi
Imagine that your whole family and friends are gathered in your house. They urge you to show your wedding photographs. Unfortunately, as you try to connect your smartphone to your Smart TV, your router or the internet device shows a connection error.
You look for a solution but discover that the router is not giving any Wi-Fi signals. What will you do now?
Turn on Miracast screen mirroring on your mobile device because it works without Wi-Fi. That’s right.
By using Miracast, you can easily share your screen with your Smart TV. There’s no need for an additional WiFi connection or a wireless display adapter.
The TV screen will notify you when you enable Miracast on your smartphone. So allow that pop-up and enjoy a seamless screen mirroring experience with your beloved ones.
Let’s see how Miracast works without Wi-Fi when sharing your phone screen with the TV screen.
How Do I Use Mirascreen Without Wi-Fi?
Miracast, or Wireless Display, can share screens on devices without Wi-Fi. That’s the first advantage of Miracast over a Chromecast device because the latter needs a stable WiFi connection to send data for screen sharing.
Miracast is also faster than Bluetooth, as it can share data 10 times more quickly. That means you can enjoy an almost real-time experience while sharing your screen from one device to another.
However, you can only use Miracast on Android devices because of compatibility. But still, it’s a valuable feature because you can mirror the phone screen of your Android device on the big screen without an internet connection.
Follow these steps to stream your Android devices on other screens using Miracast wireless display.
Miracast Android Mobile Device
First, ensure your smartphone has Android 5.0 or later and your Smart TV has Miracast.
- Open the Apps Menu on your TV.
- Find screen-sharing features like Miracast, Screen Mirror, and Screen Sharing. That way, you will know whether your TV supports Miracast.
- Another way of checking your TV’s compatibility with Miracast is to Google your TV’s brand name and model number and search whether it supports Miracast.
- Now, check your phone’s Android version. Since screen mirroring technology requires a specific type of hardware, checking whether it’s Miracast-enabled before updating the software is recommended.
- You can upgrade to the Android version if you find out that the later OS has Miracast.
Now you know both your devices are Miracast-enabled and ready for screen mirroring.
Wi-Fi Direct on Smart TV
- Go to the Miracast option on your Smart TV.
- Go to options and find Wi-Fi Direct.
- Enable Wi-Fi Direct.
The Wi-Fi Direct feature creates a direct wireless connection without external Wi-Fi. Instead, it’s a built-in feature through which you can share data with another Wi-Fi Direct device.
Wireless Display on Your Android Phone
- Open the Settings app on your phone.
- Go to Display.
- Select Wireless Display and toggle it on.
- If you can’t find “Enable Wireless Display” in the above settings, follow the next step.
- Go to Settings.
- Tap Bluetooth & Device Connection.
- Tap Cast.
Once you do that, your phone will scan for nearby devices to share the screen. A list will appear with your TV’s name.
Mirror Screen
- Select your TV from the list. Your TV might show a permission prompt.
- Tap Allow. Your TV will instantly display your phone screen.
That’s how you can share the screen of your mobile devices that are Miracast-compatible. In addition, you don’t need wireless connections because of the Wi-Fi Direct feature. Instead, the sending and receiving devices create an independent wireless connection.
Now let’s see how to use this feature on Windows 10 computer screens.
Miracast Windows 10 Computer/Laptop Without WiFi Network
Apart from an Android phone, you can mirror Windows 10 computer screens and audio using Miracast without WiFi. Here’s how.
Enable Miracast
- All Windows 10 computers and laptops have screen mirroring technology enabled. To activate the screen mirroring option, click the notification bubble on the far right side of the taskbar. A list of notifications will appear with more features at the bottom.
- Click Expand if you can’t find the Connect button.
- Click the Connect button. A list will appear having a Miracast-active device.
Connect to Miracast Devices
- Select your desired Miracast device from the list to mirror your computer’s or laptop’s screen. Once you select a device, a security prompt will appear, asking you to enter a PIN.
- The receiving devices also get the PIN prompt. It’s a safety feature that validates mirroring your screen to the right device.
Adjust the Computer’s Display
The computer’s display might flick and change once the screen mirroring begins. However, it’s a normal response, and there’s no need to worry.
Follow these steps to adjust the monitor’s display if you want:
- But first, go to the Notification bubble.
- Click on the Project button. This feature allows you to select how you want the screen mirroring should work. For example, using the Project button, you can decide whether to make your monitor’s primary display, extend it, or disable it.
- Remember that duplicating your monitor’s display will make it appear as a mirrored screen on all other screens if you have connected with more than one device.
Microsoft Wireless Display Adapter
You might wonder how to mirror screen without a Miracast-enabled Android phone, TV, or Windows computer. Microsoft screen sharing enables multiple devices and operating devices to Miracast without WiFi.
You can connect the Microsoft screen mirroring adapter to your TV and Miracast your phone screen.
Another option is using a wireless HDMI cable. This device allows you to share a screen from a source to your TV without WiFi or HDMI cables. Therefore, plug in the wireless HDMI display dongle to your TV and connect it to the source.
FAQs
Can I Mirror iPhone Screen Using Miracast?
Unfortunately, you can’t Miracast iPhone because it follows the AirPlay protocol by Apple. However, other apps can share the iPhone screen, like ApowerMirror.
Can Miracast Work Without Wi-Fi?
Yes. Miracast works without WiFi. You only need a Miracast-enabled mobile phone and TV for wireless screen mirroring.
How Can I Mirror My TV Without Wi-Fi?
Enable Wi-Fi Direct on your TV and connect with nearby Miracast devices to mirror the display.
Can You Mirror a Device Without Wi-Fi?
Yes. Miracast allows you to mirror a device without WiFi. It’s the most successful screen mirroring technology for wireless presentation systems and other entertainment purposes.
Conclusion
Miracast without WiFi has eased the screen mirroring feature to work. You don’t need any external Wi-Fi connection to share your device’s screen. Enable Miracast on your smartphone and enjoy mirroring your phone’s screen on the TV.

Using Miracast over Ethernet is the latest development from Microsoft. Sadly, many people do not know how it works.
This article will explain how to send a Miracast stream over Ethernet. So read on for more details.
Contents
- Can Miracast Work Over Ethernet?
- – Facts You Need to Know
- How Does Miracast Work With Ethernet?
- Miracast and Ethernet Connection Without WIFI
- – Device or Surface Hub
- – Enterprise Network/Internet Connectivity
- How to Send Miracast Streams Over Ethernet
- Benefits of Projecting Over Infrastructure
- Conclusion
Miracast over Ethernet connection has been possible since the unveiling of Windows 10 version 1703. Microsoft allowed sending Miracast streams over a local network instead of over a direct wireless link. The feature is based on the Miracast over Infrastructure Connection Establishment Protocol (MS-MICE).
– Facts You Need to Know
In the recent development, you can project over Ethernet, in what Microsoft calls “Miracast over Infrastructure.” You must define a source and a receiver and then create a connection.
A quick check on Miracast over Ethernet Reddit reveals a lot of attempts by users trying to use Miracast over a local area network. Miracast works flawlessly over Wi-Fi direct, which is what most people are used to.
Remember, Miracast is a wireless display standard for sharing a tablet, smartphone, or computer’s screen to television without cables. Simply put, it is a wireless equivalent to the HDMI lines; thus, the Miracast technology eliminates the hassles and limitations of the cables. This makes it a great tool for home use or office presentations.
Typically, Miracast will create a wireless connection between your device and the display. For instance, you can send content from your Windows phone to a receiver or smart TV using Miracast.
How Does Miracast Work With Ethernet?
To make Miracast work with Ethernet, you will need a Wi-Fi adapter to connect to your Miracast receiver. Power on all the necessary devices and let the Miracast receiver be populated. After the list of Miracast receivers is populated, Windows 10 determines whether the receiver can support a connection over the Infrastructure.
Miracast and Ethernet Connection Without WIFI
When you select a Miracast receiver, Windows 10 will try to resolve the hostname of that device through standard DNS and through multicast DNS (mDNS). If it cannot resolve the name through either method, Windows 10 falls back on establishing the Miracast session using the standard Wi-Fi direct connection.
For you to have successful casting, certain conditions must be met. Here is the list of conditions:
– Device or Surface Hub
Either of the equipment must be running Windows 10, version 1703. Your device can be a Windows computer or phone. Note that Windows PC or the Surface hub can act as a receiver. Similarly, a Windows computer or phone can act as a source.
– Enterprise Network/Internet Connectivity
Both the Miracast receiver and source must be connected to the internet. While in the past, the connection was via Wi-Fi, this time, you will need to connect your device via an Ethernet cable or a secure Wi-Fi connection.
So as a receiver, connect the Surface Hub or device to the enterprise network via the Ethernet. If you connect the device or Surface Hub to open Wi-Fi, it will be disabled. Similarly, connect a Miracast source (Windows PC or phone) to an enterprise network via Ethernet or a secure Wi-Fi connection.
Other conditions you need to meet are:
- Resolving the DNS Hostname (device name) of the Surface Hub or device via your DNS servers. To do so, you can manually allow the Surface Hub to automatically register via Dynamic DNS or create an A or AAAA record for the Surface Hub’s hostname.
- The Windows 10 PCs must be connected to the same network via Ethernet.
How to Send Miracast Streams Over Ethernet
Sending a Miracast stream over Ethernet is a bit complex. Typically, Windows 10 screen mirroring over Ethernet can sometimes prove challenging to establish. However, here is a straightforward way of achieving it:
- Determine the source and the receiver. For instance, a Windows PC can be a Miracast source while a laptop is a receiver. Both devices must be Miracast ready. If not, you’ll need an adapter.
- Both devices must run over Ethernet on the same network, and the Wi-Fi interface must be enabled to respond to discovery requests.
- Turn on your devices and plug in the Miracast adapter. Toggle into the display; in this case, the laptop.
- Let the discovery begin, and once it is over, the actual session will take place over Infrastructure, provided the right conditions are met.
- Confirm whether the projection is on through the Task Manager. Specifically, check under the performance tab if you have wireless connections. If there is no wireless connection with an SSID beginning with “DIRECT-” but you are still projecting, then it’s over Infrastructure.
Before a Miracast Windows 10 set, you must determine whether your device is Miracast ready. Here is how:
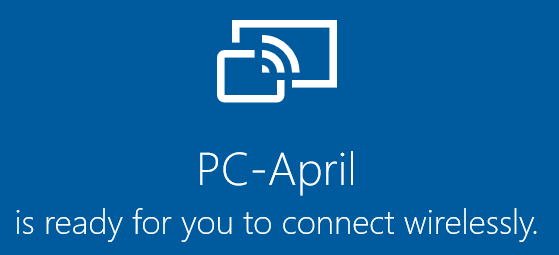
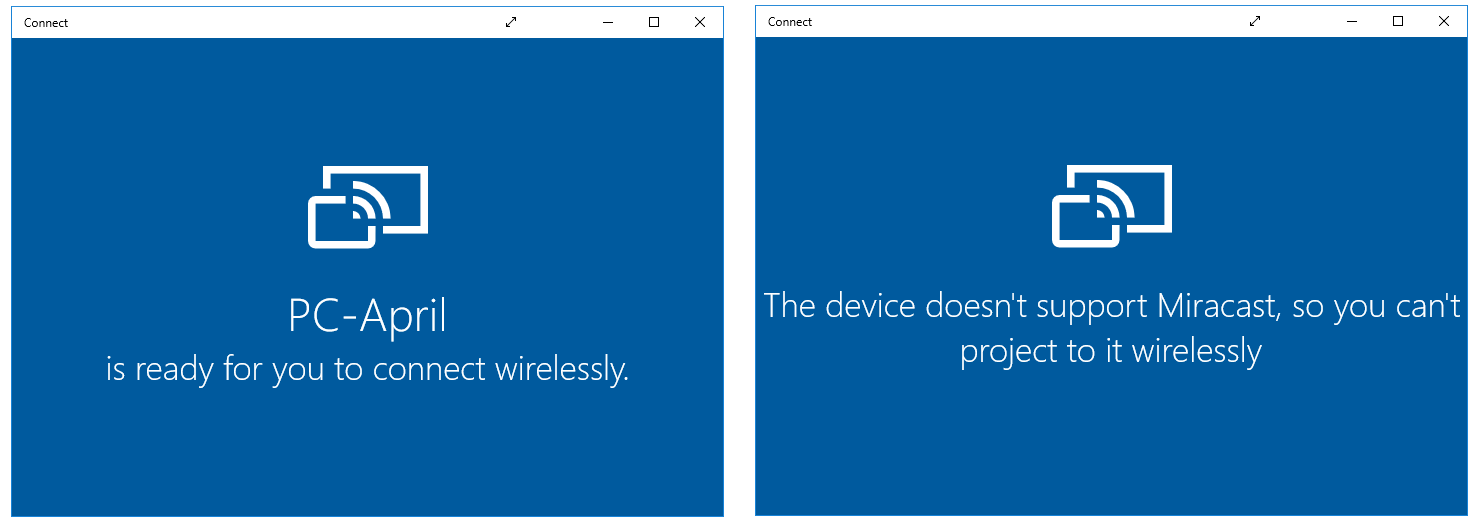
- Press the Win button and type Connect, and click on it.
- If your PC is Miracast ready, the system will tell you it is ready to pair wirelessly. If not, it will display a message saying that the PC cannot connect wirelessly.
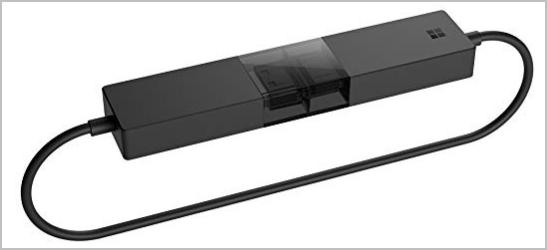
In case your device is not Miracast-ready, you’ll have to use Miracast over USB. That means you’ll need to buy a Microsoft Wireless Display adapter.
Benefits of Projecting Over Infrastructure
When you Miracast over Ethernet, you get the benefits below:
- It works perfectly with old wireless hardware that is not optimized for Miracast over Wi-Fi Direct.
- It takes advantage of the existing connection, thus, reducing the time to connect while providing a very stable stream.
- You will not need to change how you connect to a Miracast receiver. You’ll still use the same user interface for the standard Miracast connections.
- No changes to the existing PC hardware or wireless drivers are needed.
- Windows 10 detects when sending the video stream over this path automatically is applicable.
- Windows will only choose the route if the connection is over Ethernet or a secure Wi-Fi network.
Remember, Miracast is a wireless connection technology that allows you to mirror a device screen to a monitor. Although it is wireless like Bluetooth, you cannot Miracast over Bluetooth.
Conclusion
Miracast over Ethernet is possible to achieve. For instance, Wi-Fi laptops connect to a wired PC on the same network. The PC should have a Wi-Fi card but not be associated with other networks. Here are highlights of this powerful write-up:
- Miracast over Ethernet requires Windows 10 version 1703.
- You will need a Microsoft Wireless Display adapter if your device is not Miracast ready.
- For a successful video stream, you will need a secure Wi-Fi connection to establish and maintain the connection between the two devices.
- Miracast over the Ethernet lines uses the existing connection, resulting in stable streams and reducing the time it takes to connect.
Hopefully, you’ve learned something about how Miracast works. So, when you encounter it, you should be able to handle it effectively.
Технология Miracast используется для беспроводной трансляции изображения экрана и звука с компьютера, ноутбука или смартфона на телевизор, проектор или даже отдельно стоящий монитор. Например, вы можете транслировать дублированную картинку со своего телефона или планшета на свой ЖК-телевизор или проектор (удобно при проведении демонстрации). Технология Miracast основана на стандарте Wi-Fi Direct, использующем peer-to-peer архитектуру передачи данных (устройства подключаются напрямую, а не через Wi-Fi роутер или программную точку доступа). Источник и приемник в технологии Miracast должны быть сертифицированными устройствами. С помощью специальных адаптеров (Miracast-приемник, Mirascreen), подключаемых в USB или HDMI порт можно использовать Miracast с любыми устройствами, которые изначально не поддерживают эту технологию.
В Windows 10 и Windows 8.1 поддержка Miracast (как технологии проецирования на беспроводной дисплей) имеется по умолчанию. В Windows 7 необходимо ставить дополнительное ПО.
Содержание:
- Преимущества и недостатки технологии Miracast
- Как проверить поддерживает ли ваш компьютер Miracast?
- Настройка Miracast в Windows 10
- Не работает Miracast, отсутствует пункт «Подключение к беспроводному дисплею»
- Не удалось подключиться к беспроводному дисплею
- Как настроить Miracast подключение к дисплею вашего компьютера
Преимущества и недостатки технологии Miracast
Стандарт Miracast позволяет передавать изображение экрана одного устройства на другое напрямую через беспроводную Wi-Fi сеть (поддерживается стандарт IEEE 802.11n), без использования HDMI-кабеля. Передача данных выполняется напрямую, для подключения не нужен даже Wi-Fi роутер. Это значит, что роутер не вносит дополнительных задержек в передачу видео между двумя устройствами, и через трафик не создает дополнительную нагрузку на роутер, и не пересекается с данными, передаваемыми другими пользователями по Wi-Fi сети.
Технологий Miracast является кроссплатформенной и поддерживается в разных ОС (Windows, Android, iOS). При передаче видео сигнала по Miracast не происходит потеря качества (максимальное качество передачи — 1920×1200, т.е. UltraHD передать не получится).
Нужно отличать, что на самом деле есть две схожих технологии для трансляции видеоконтента между устройствами — Miracast и Intel WiDi. Технологии практически идентичные, но Intel WiDi обладает более высокой стабильностью работы, но требует установки на компьютер приложения Intel Wireless Display.
Как проверить поддерживает ли ваш компьютер Miracast?
Большинство современных компьютеров и ноутбуков с Windows 10 уже поддерживают Miracast. Кроме того, устройства с Windows 10 могут выступать в качестве получателя изображения в соединении Miracast.
Чтобы проверить, что ваше устройство поддерживает Miracast:
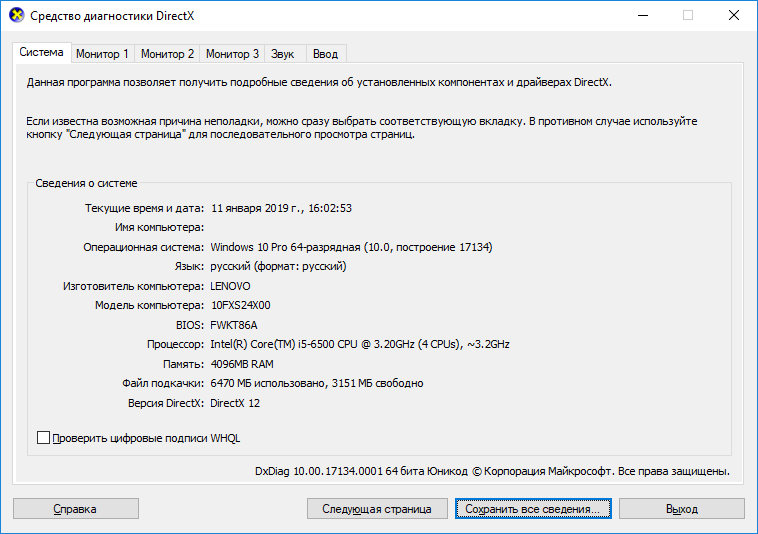
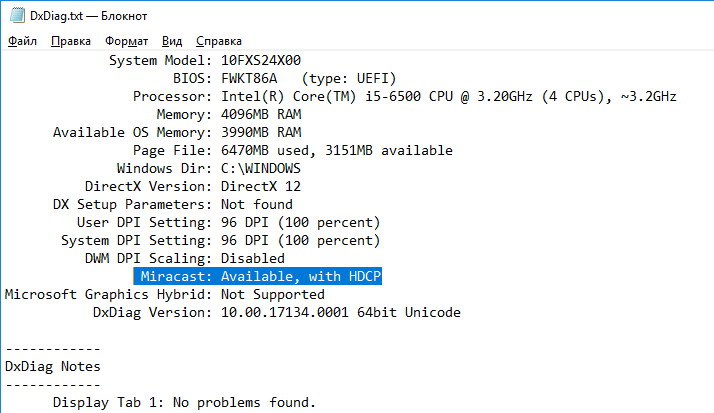
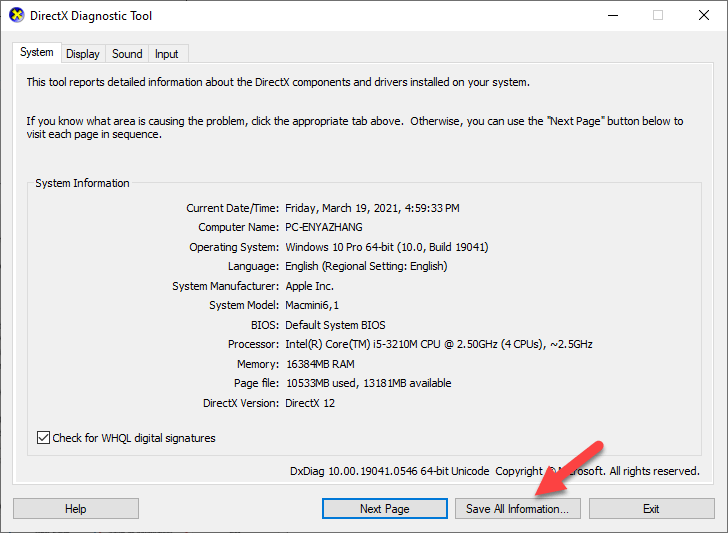
- Запустите утилиту DirectX Diag (dxdiag.exe);
- Дождитесь окончания сканирования;
- Нажмите кнопку «Сохранить все сведения» и сохраните файл dxdiag.txt;

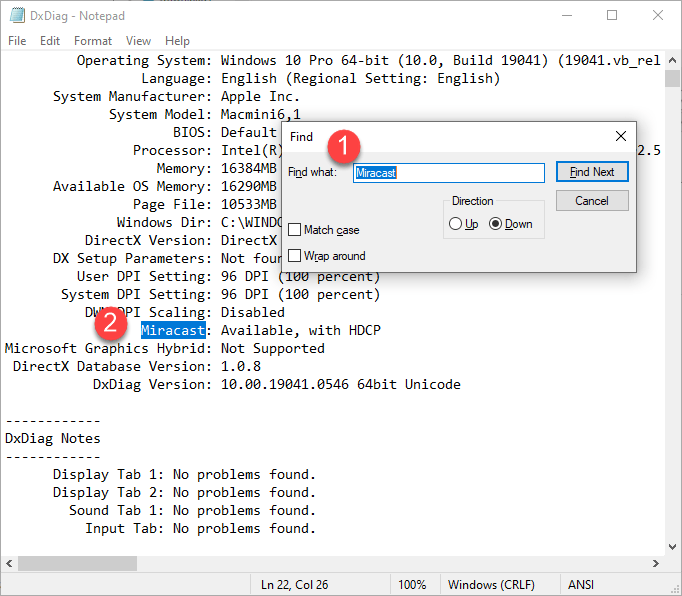
- Откройте файл dxdiag.txt и найдите строку Miracast;
- Строка «Miracast: Available, with HDCP» означает, что ваше устройство поддерживает Miracast.
Естественно, ваш компьютер / ноутбук должен быть оборудован Wi-Fi модулем с поддержкой Virtual Wi-Fi и Wi-Fi Direct. Т.к. протокол Wi-Fi Direct был представлен в NDIS 6.3, то ваш адаптер должен поддерживать как минимум эту версию NDIS. Проверить поддерживаемые версии NDIS у ваших Wi-Fi адаптеров можно с помощью PowerShell:
NetAdapter | Select Name, NdisVersion
Здесь должно быть как минимум NDIS 6.3.

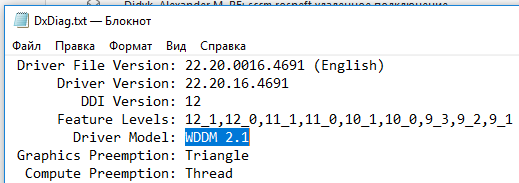
Также драйвер дисплея должен поддерживать как минимум стандарт WDDM 1.3. Проверить версию WDDM поддерживаемую драйвером дисплея можно в том же файле dxdiag.txt. Ищите строку Driver Model. В моем примере это WDDM 2.1.
WiFi адаптер должен поддерживать стандарт 802.11n. Cписок Wi-Fi стандартов, поддерживаемых драйвером можно вывести с помощью команды:
netsh wlan show drivers
(см. статью).
Настройка Miracast в Windows 10
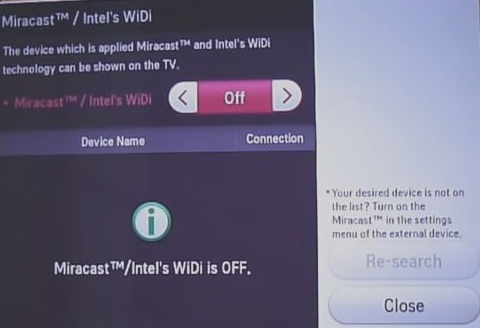
Допустим, вы хотите транслировать изображение с ноутбука с Windows 10 на свой ЖК-телевизор. В первую очередь необходимо включить Miracast в настройках ТВ. Конкретное местоположение этой настройки зависит от модели телевизора. Обычно он находится в разделе с настройками сети или Wi-Fi. Он может называть Miracast WiFi / Intel WiDi (на некоторых моделях ТВ эта настройка отсутствует, но, если устройство поддерживает Miracast, достаточно просто включить Wi-Fi модуль).
В Windows 10 нажмите сочетание клавиш Win + P. В открывшемся справ окне с вариантами проецирования изображения нажмите на пункт «Подключение к беспроводному дисплею» (если его нет, значит ваш компьютер не поддерживает Miracast).
В списке беспроводных устройств должен появится ваш телевизор. Выберите его.
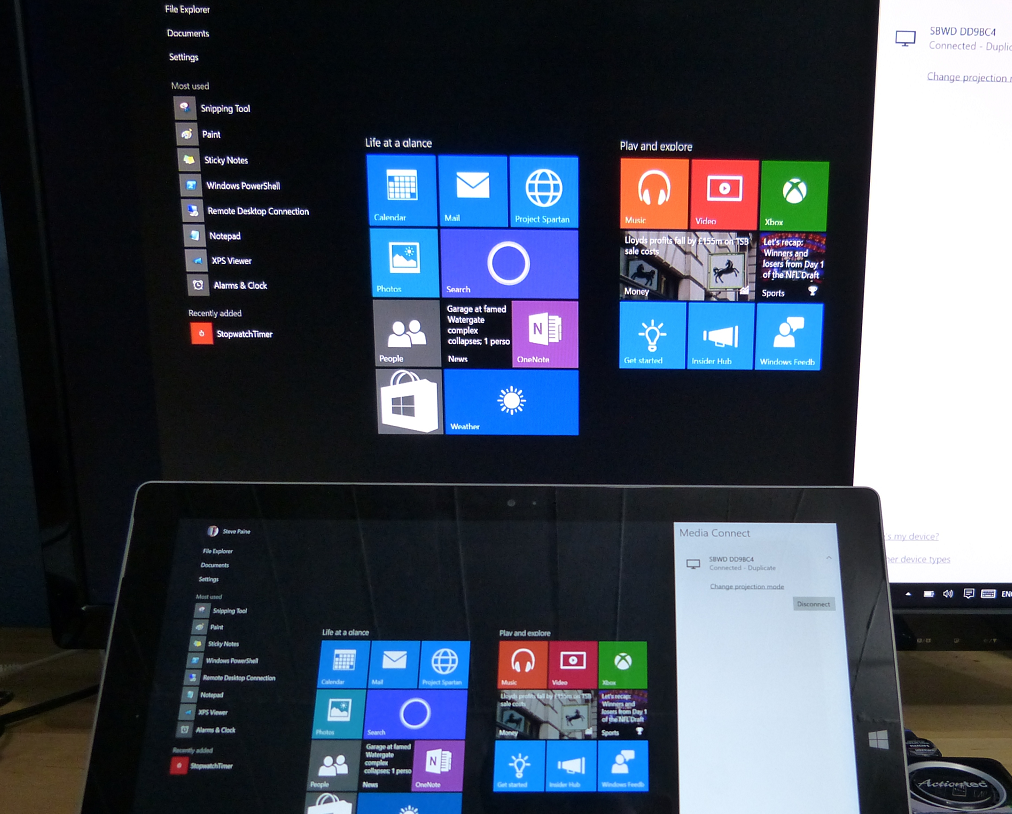
После этого между ваши устройством и ТВ инициализируется Miracast подключение и через 10-15 секунд на экране ТВ появится изображение с рабочего стола вашего компьютера.
Если на экране появилась надпись «Выполните инструкции на экране устройства», значит нужно вручную подтвердить подключение компьютера через меню телевизора.
Если с первого раза не удалось установить подключение к монитору через Miracast, перезагрузите оба устройства и попробуйте подключится еще раз.
Вы можете изменить режим проекции на ТВ, например, расширить / дублировать или выводить изображение только на 1 экран, нажав на кнопку «Изменение режима проекции» и выбрав нужный режим. Здесь же можно отключиться от беспроводного дисплея.
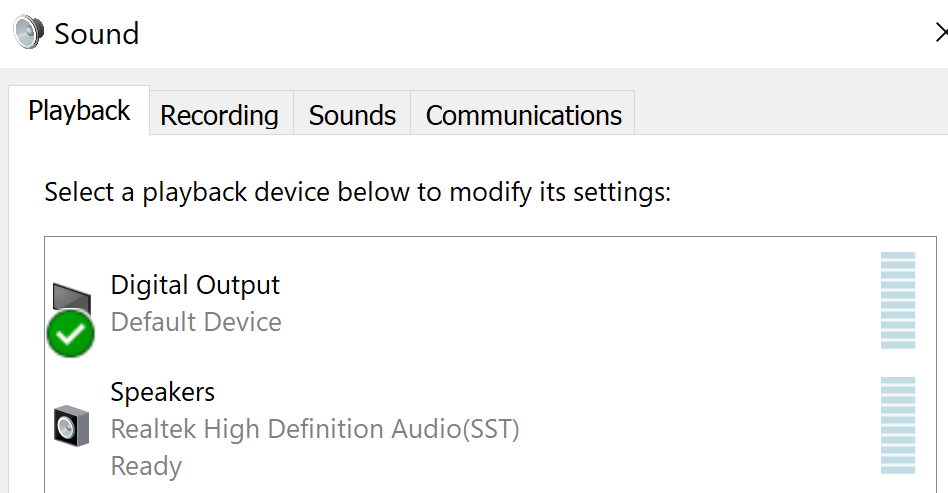
Т.к. по Miracast кроме изображения передается еще и звук, то по умолчанию, звук с вашего компьютера / ноутбука выводится через динамики ТВ. Если открыть список устройств воспроизведения, вы увидите что в качестве устройства по-умолчанию используется «Digital Output» – это означает что звук выводится через Miracast приёмник. Чтобы выводить звук через компьютер, выберите динамики устройства в качестве устрой устройства воспроизведения по умолчанию.
Не работает Miracast, отсутствует пункт «Подключение к беспроводному дисплею»
Если при нажатии сочетания клавиш Win+P в Windows 10 выводится сообщение «ПК или мобильное устройство не поддерживает Miracast, поэтому беспроводное проецирование с него невозможно» или же пункт «Подключение к беспроводному дисплею» отсутствует, возможно ваше оборудование или драйвер не поддерживает Mitracast.
Чтобы проверить наличие поддержки Miracast на уровне беспроводного Wi-Fi адаптера, откройте командную строку и выполните команду:
netsh wlan show driver

Если в результатах команды будет присутствовать строка:
Wireless Display Supported (Поддерживается беспроводной дисплей): No (Graphics Driver: Yes, Wi-Fi Driver:No)
Это значит, что графический драйвер поддерживает Miracast, а Wi-Fi драйвер – нет.
В мое случае помогло обновление версии драйвера Wi-Fi адаптера на последнюю. В результате строка поменялась на:

Если используется актуальная версия драйвера, но поддержки Miracast нет, придется заменить Wi-Fi адаптер на другую более свежую модель.
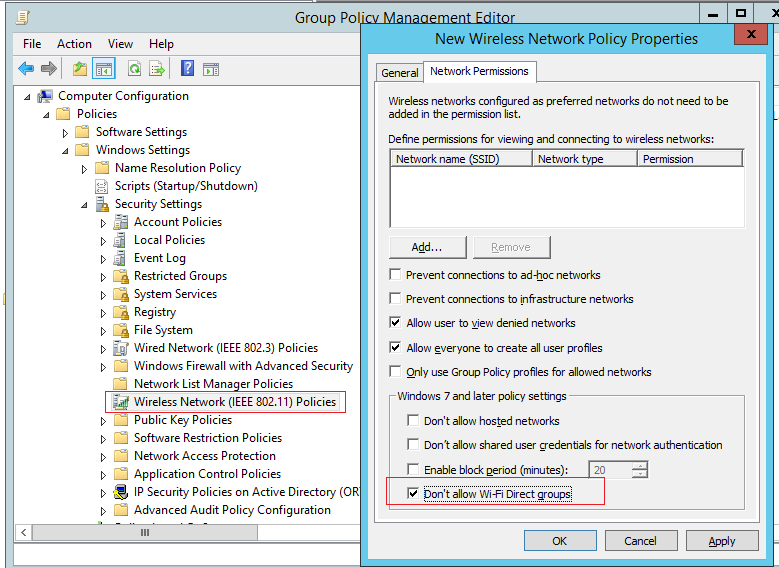
Также проверьте, не включена ли локальная или доменная политика (если компьютер в домене) в разделе Computer Configuration -> Windows Settings -> Security Settings -> Wireless Network (802.11) Policies -> Network Filters. Политика должна быть не настроена, либо включена, но параметр Prevent connection to adhoc networks и Don’t allow WI-FI Direct groups отключены. Иначе подключение Miracast может не работать.
Не удалось подключиться к беспроводному дисплею
Если компьютер обнаруживает внешний дисплей через Miracast, но при попытке подключения появляется ошибка «Не удалось подключиться», попробуйте выполнить следующие шаги:
- Перезагрузите оба устройства (и компьютер и ТВ/проектор);
- Проверьте включена ли функция Miracast в настройка телевизора/ проектора, попробуйте поднести ноутбук ближе к беспроводному дисплею (исключить влияние помех Wi-Fi сигнала);
- Попробуйте на компьютере обновить драйвер Wi-Fi.
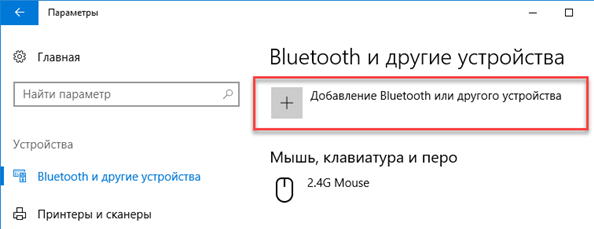
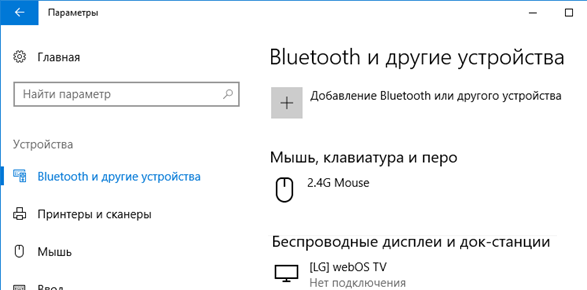
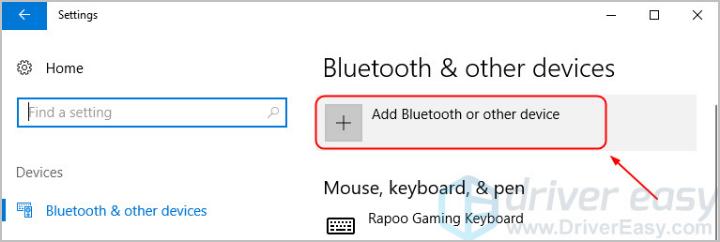
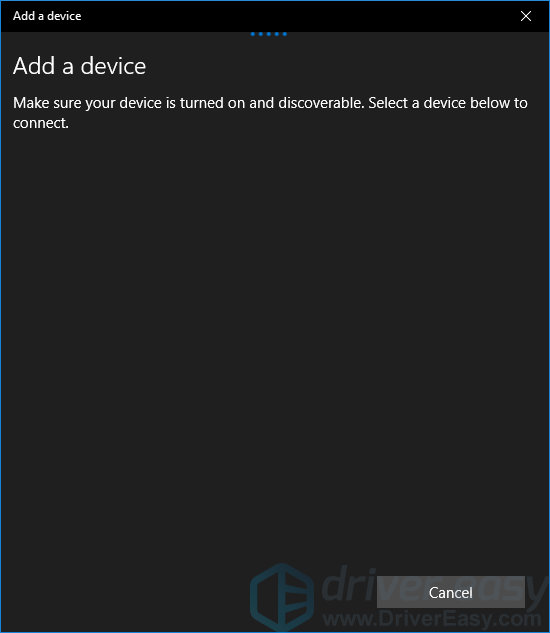
В моем случае помогло подключение беспроводного дисплея как нового устройства вручную. Для этого в Windows 10 перейдите в раздел Параметры -> Устройства -> Добавление Bluetooth или другого устройства.
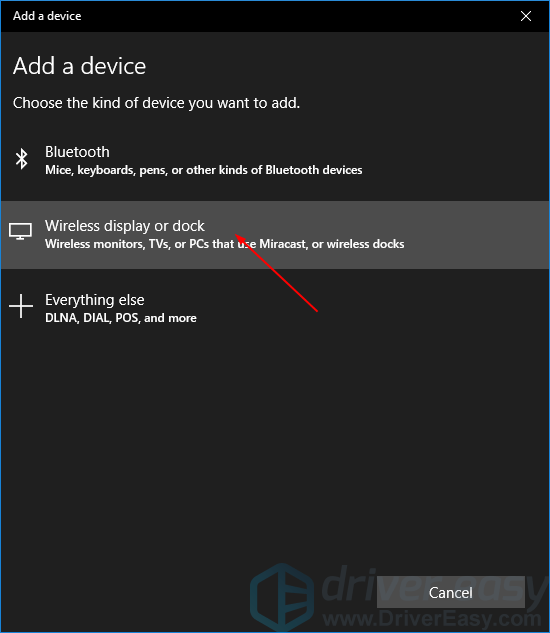
Выберите пункт «Беспроводной дисплей или док-станция».
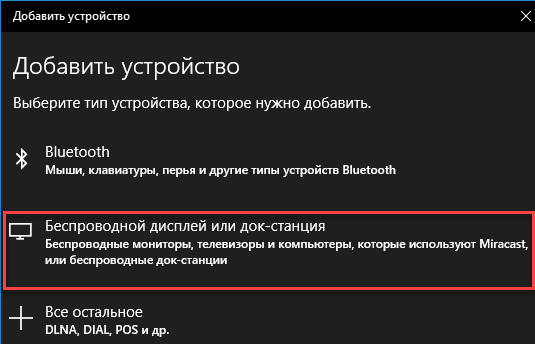
Дождитесь окончания сканирования. Ваш телевизор с беспроводным адаптером должен появится в списке. Выберите его. Через какое-то время ваш беспроводной дисплей появится в списке устройств.
Нажмите сочетание клавиш Win+P и попробуйте еще раз подключиться к вашему беспроводному дисплею. Подключение должно успешно установиться.
Как настроить Miracast подключение к дисплею вашего компьютера
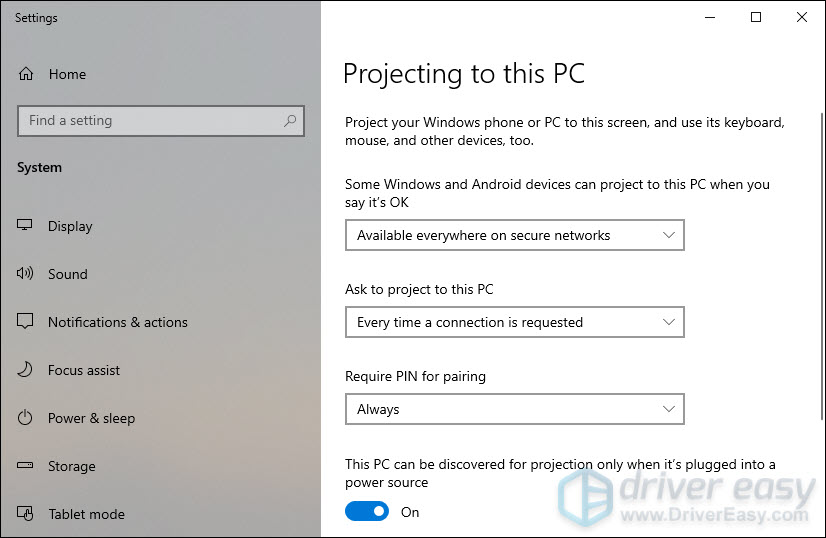
Вы можете передавать картинку не только с вашего устройства на другие, но и самому получать изображения с других устройств. Чтобы проверить поддержку трансляции Miracast на ваше устройство с Windows 10:
- Нажмите на кнопку поиск и наберите Miracast;
- Выберите опцию Проецирование на этот компьютер (Параметры –> Система –> Проецирование на этот компьютер);
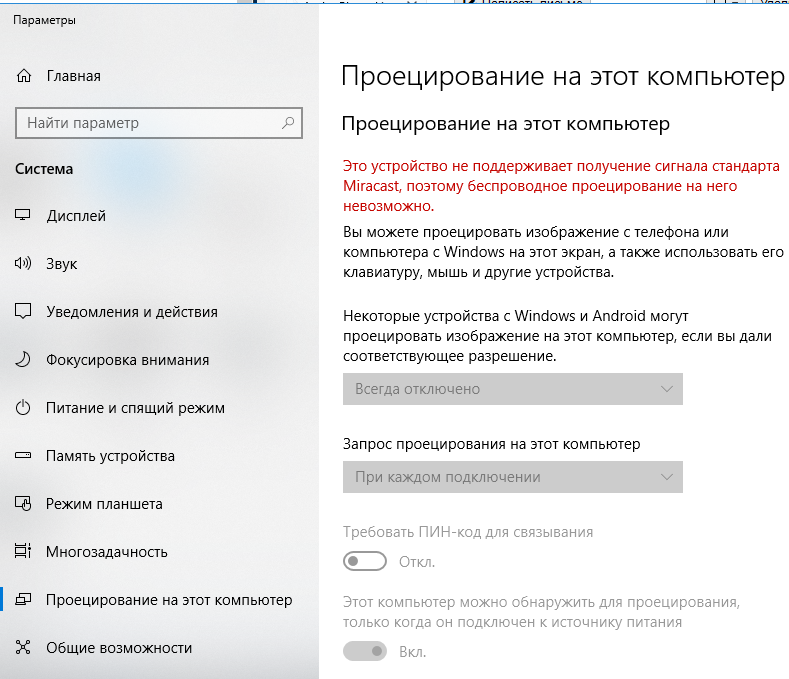
- Если в вашем компьютере нет устройства Miracast-приемника, вы увидите сообщение:
Это устройство не поддерживает получение сигнала стандарта Miracast, поэтому беспроводное проецирование на него невозможно.
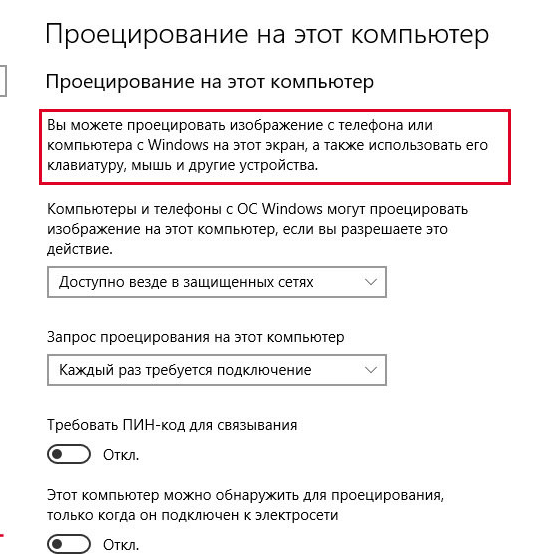
Если компьютер поддерживает проецирование на него здесь будет надпись: «Вы можете проецировать изображение с телефона или компьютер с Windows 10 на этот экран, а также использовать его клавиатуру, мышь и другие устройства»
- Здесь же можно настроить параметры видимости дисплея, задать ПИН-код подключения;
- После этого на Miracast источнике запустите подключение к беспроводному дисплею и выберите дисплей вашего компьютера;
- Если все верно настроено, появится надпись «Скоро начнется проецирование» и на дисплее своего компьютера вы увидите изображение с удаленного устройства.

Want to add a wireless display to your Windows 10 PC? It’s easy. Just use the popular, built-in feature, Miracast. Read on to find out how.
What you’ll learn in this article:
- What is Miracast?
- How do I set up and use Miracast on Windows 10?
- How do I solve Miracast not working on Windows 10?
What is Miracast?
Miracast is a standard wireless connection technology. It enables you to mirror the device screen like laptops, tablets, and smartphones to the displays like monitors, TVs and projectors without a USB cable. So you can simply regard Miracast as “HDMI over Wi-Fi“.
Miracast now comes built into Windows 8 and Windows 10 systems. If your display device doesn’t have Miracast support, a Miracast adapter such as a Microsoft Wireless Display adapter can help you solve this problem.
Read on to see how to use Miracast…
How do I set up and use Miracast on Windows 10?
- Check to see if the Windows 10 system on your PC is ready to go:
- Type connect in the search box from your Start menu.
- You’ll then see if the Windows 10 on your computer supports Miracast.
a) If you see the left below window, then you can set up Miracast on your Windows 10 computer.

b) If unfortunately, you see the right below window, don’t panic, follow How to solve Miracast not working on my Windows 10 computer to troubleshoot the problem first.
- Set up the Miracast on your Windows 10 computer and your display device:
- Turn on the display device you want to project to, like a TV or a projector. If your display device doesn’t have built-in Miracast support, plug a Miracast adapter such as a Microsoft Wireless Display adapter into your display device.

- On your Windows 10 PC keyboard, press the Windows logo key and I (at the same time) to invoke the Settings window.
- Click Devices.

- It will be shown in the Bluetooth & other devices section by default. Click Add Bluetooth or other device.

- Click Wireless display or dock.
- Turn on the display device you want to project to, like a TV or a projector. If your display device doesn’t have built-in Miracast support, plug a Miracast adapter such as a Microsoft Wireless Display adapter into your display device.

6) Windows 10 should detect your display device which you turned on before. Click your display device to project your Windows 10 computer to it.
How do I solve Miracast not working on Windows 10?
Fix 1: Check if your PC is Miracast compatible
If your Windows 10 PC fails to miracast, the first thing you should look into is whether your PC supports the feature.
Here are the steps:
1) On your keyboard, press the Windows logo key and R at the same time to bring up the Run box.
2) Type dxdiag, then press Enter on your keyboard.
3) In the DirectX Diagnostic Tool window, click Save All Information….
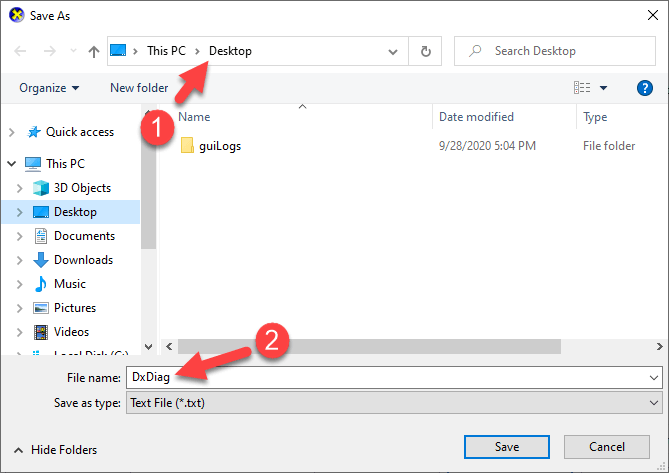
4) In the Save As window, choose a location to save the information. You might want to save it to Desktop since it’s easy to find.
5) From your desktop, double-click on the DxDiag text file to open it.
6) On your keyboard, press the CTRL key and F key at the same time, then type Miracast and press Enter to locate Miracast. From there, you’ll see whether the function is available or not. If it’s available, then great – you can now move on to Fix 2 to further troubleshoot the issue. If it’s unavailable, unfortunately, you might have to upgrade your hardware if you’re set on using Miracast.
Fix 2: Check if WiFi is enabled on both devices
Miracast is a standard for wireless connections from the sending device to the display device. So in order to miracast, you should make sure that both your devices are connected to the same WiFi network (i.e. An Ethernet connection wouldn’t cut it in this case).
Here’s how to check if WiFi is enabled on your computer:
1) On your keyboard, press the Windows logo key and R at the same time to invoke the Run box.
2) Type ms-settings:network-wifi, then press Enter on your keyboard.
3) Click on the toggle to activate WiFi if it’s deactivated.
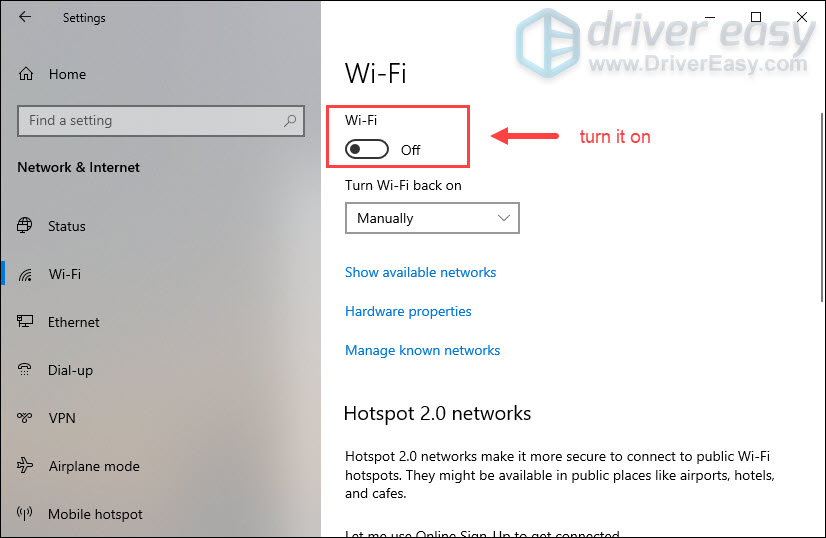
At the same time, you should check the receiving device to make sure it’s connected to the same wireless connection.
Once done, you can try Miracast to see if it works:
1) In the Search box, type projection. Select Projection settings from the result.
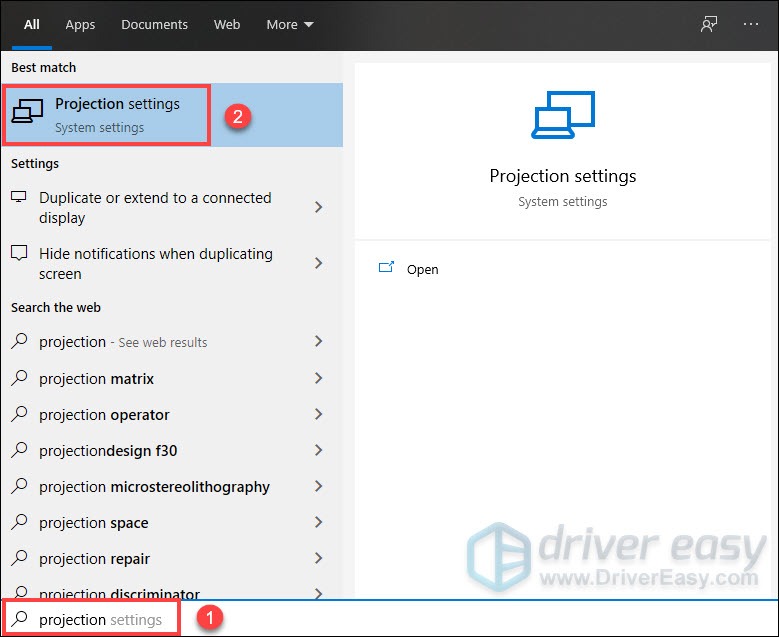
2) The error message should be gone.
Is Miracast still not working? Don’t worry – here’s one more fix for you to try.
Fix 3: Update your device drivers
Your Miracast not working problem is probably being caused by driver issues – you may have the wrong, outdated or corrupt device drivers on your computer. So you should update your device drivers to see if it fixes your problem. If you don’t have the time, patience or skills to update the driver manually, you can do it automatically with Driver Easy.
Driver Easy will automatically recognize your system and find the correct drivers for it. You don’t need to know exactly what system your computer is running, you don’t need to be troubled by the wrong driver you would be downloading, and you don’t need to worry about making a mistake when installing. Driver Easy takes care of it all.
You can update your drivers automatically with either the FREE or the Pro version of Driver Easy. But with the Pro version it takes just 2 steps (and you get full support and a 30-day money back guarantee):
1) Download and install Driver Easy.
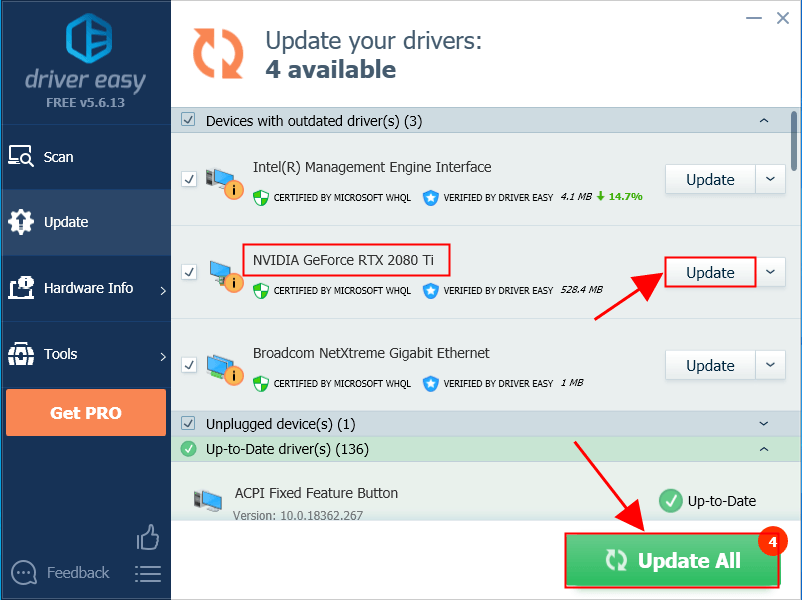
2) Run Driver Easy and click the Scan Now button. Driver Easy will then scan your computer and detect any problem drivers.
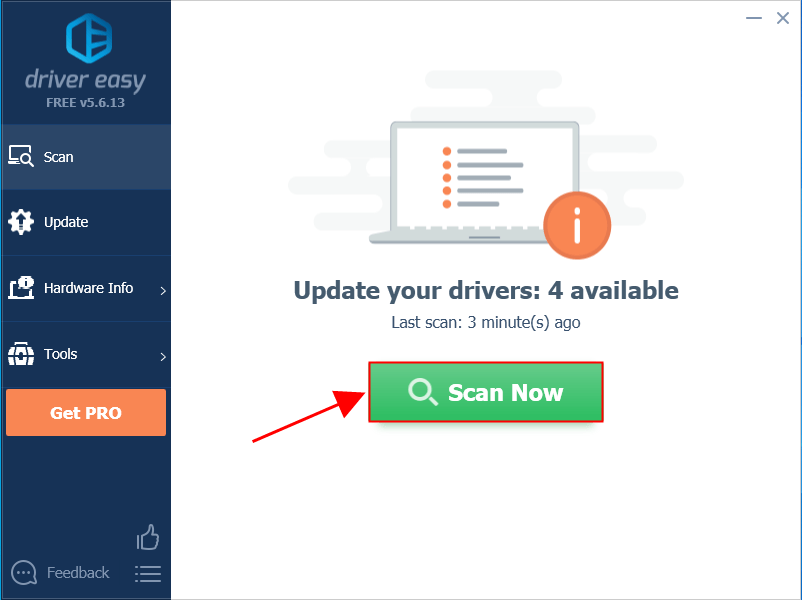
3) Click Update All to automatically download and install the correct version of all the drivers that are missing or out of date on your system (this requires the Pro version – you’ll be prompted to upgrade when you click Update All).
Note: You can do it for free if you like, but it’s partly manual.
4) Restart your PC for the changes to take effect.
5) Try setting up Miracast to see if it works.
Are you able to enjoy using Miracast on Windows 10? Feel free to comment below with your own experience or for any questions.
150
150 people found this helpful
Available in other languages
Möchten Sie unter Windows 10 Miracast nutzen? Dieser Artikel kann Ihnen bei der Einrichtung und Problembehebung von Miracast helfen.