
1 – Review system requirements
The following are estimated system requirements Windows Server 2019. If your computer has less than the “minimum” requirements, you will not be able to install this product correctly. Actual requirements will vary based on your system configuration and the applications and features you install.
Unless otherwise specified, these minimum system requirements apply to all installation options (Server Core, Server with Desktop Experience, and Nano Server) and both Standard and Datacenter editions.
Processor
Processor performance depends not only on the clock frequency of the processor, but also on the number of processor cores and the size of the processor cache. The following are the processor minimum requirements for this product:
- 1.4 GHz 64-bit processor
- Compatible with x64 instruction set
- Supports NX and DEP
- CMPXCHG16b, LAHF/SAHF, and PrefetchW Supports
- Supports Second Level Address Translation (EPT or NPT)
Coreinfo is a tool you can use to confirm which of these capabilities your CPU has.
RAM
The following are the estimated RAM minimum requirements for this product:
- 512 MB (2 GB for Server with Desktop Experience installation option)
- ECC (Error Correcting Code) type or similar technology, for physical host deployments
Storage controller and disk space requirements
Computers that run Windows Server 2019 must include a storage adapter that is compliant with the PCI Express architecture specification. Persistent storage devices on servers classified as hard disk drives must not be PATA. Windows Server 2019 does not allow ATA/PATA/IDE/EIDE for boot, page, or data drives.
The estimated minimum disk space requirements for the system partition: 32 GB
Network adapter requirements
Network adapters used with this release should include these features:
- An Ethernet adapter capable of at least gigabit throughput
- Compliant with the PCI Express architecture specification.
A network adapter that supports network debugging (KDNet) is useful, but not a minimum requirement.
A network adapter that supports the Pre-boot Execution Environment (PXE) is useful, but not a minimum requirement.
Other requirements
Computers running this release also must have the following:
- DVD drive (if you intend to install the operating system from DVD media)
The following items are not strictly required, but are necessary for certain features:
- UEFI 2.3.1c-based system and firmware that supports secure boot
- Trusted Platform Module
- Graphics device and monitor capable of Super VGA (1024 x 768) or higher-resolution
- Keyboard and Microsoft® mouse (or other compatible pointing device)
- Internet access (fees may apply)
2 – The Installation steps
Now we will walk through the steps of installing Windows Server 2019 on a physical server, Virtual Environment or in the Cloud. For a physical server installation, you’ll need to pull the Windows Server ISO image and burn to a USB device.
After creating a bootable USB or DVD medium, insert it and start your Computer. VirtualBox, KVM and VMware users only need to attach the ISO file during VM creation and follow the installation steps shown.
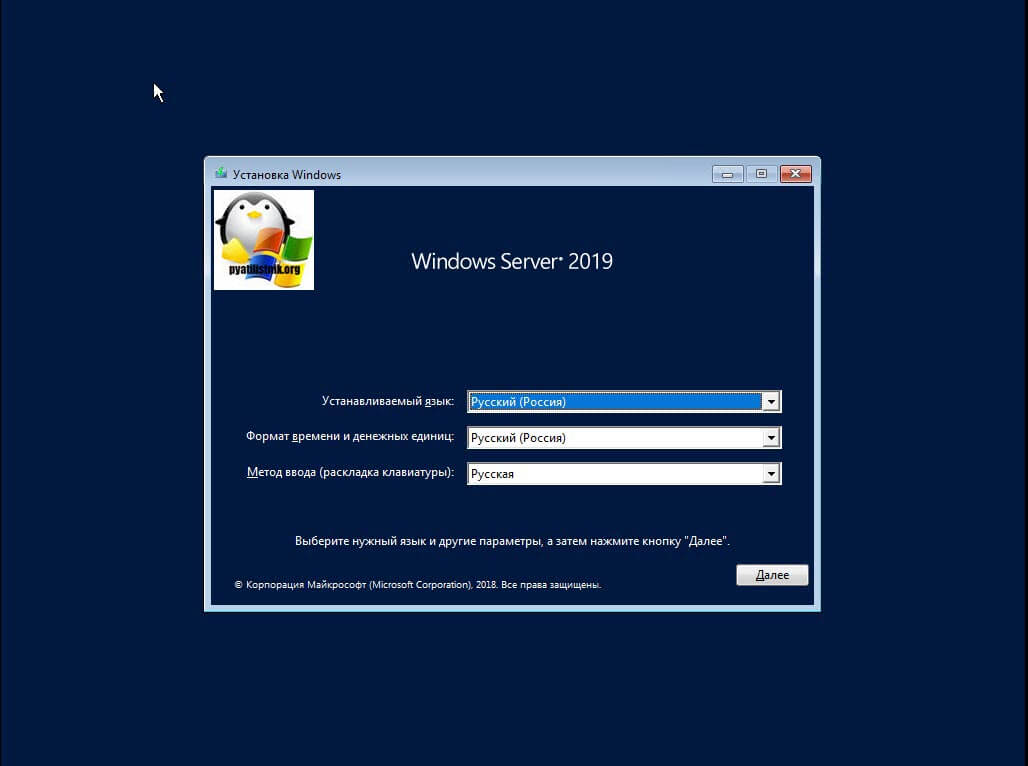
1.On the first screen, select installation language, Time and keyboard layout the click “Next“.
2.Start the installation by clicking on “Install Now“.
The setup should start in a short while.
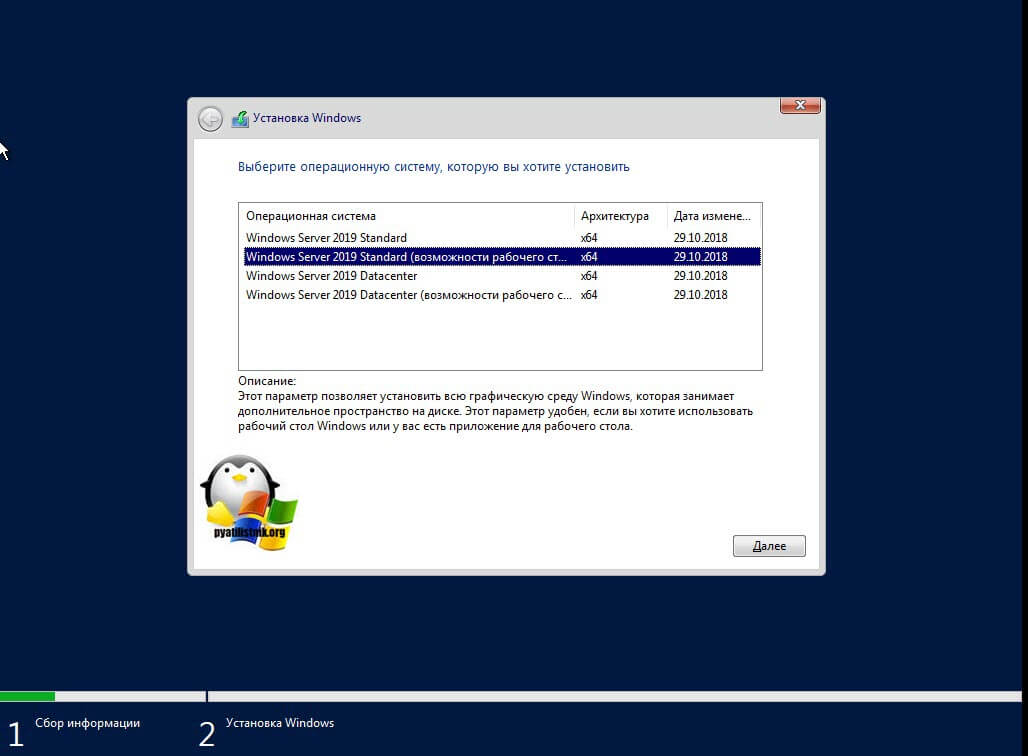
3.Select the Windows Server 2019 edition to install and click Next.
4. Read the License terms and agree to them to start the installation by checking the box “I accept the license terms“.
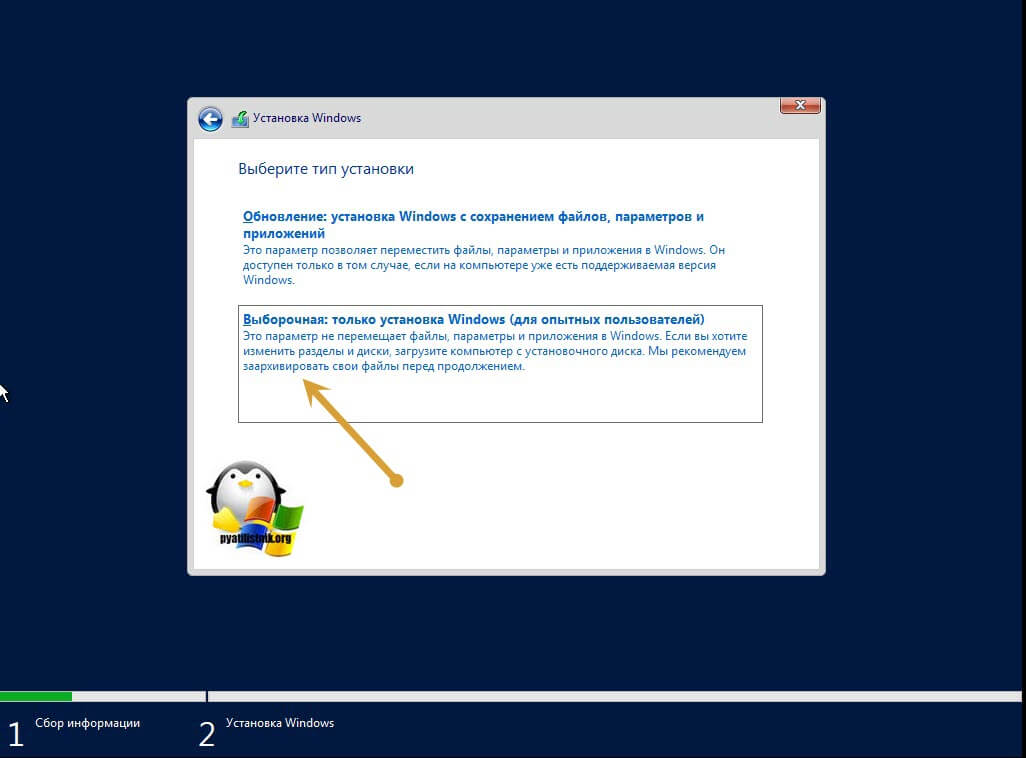
5. if this is the first installation of Windows Server 2019 on the server, select (Custom: Install Windows only).
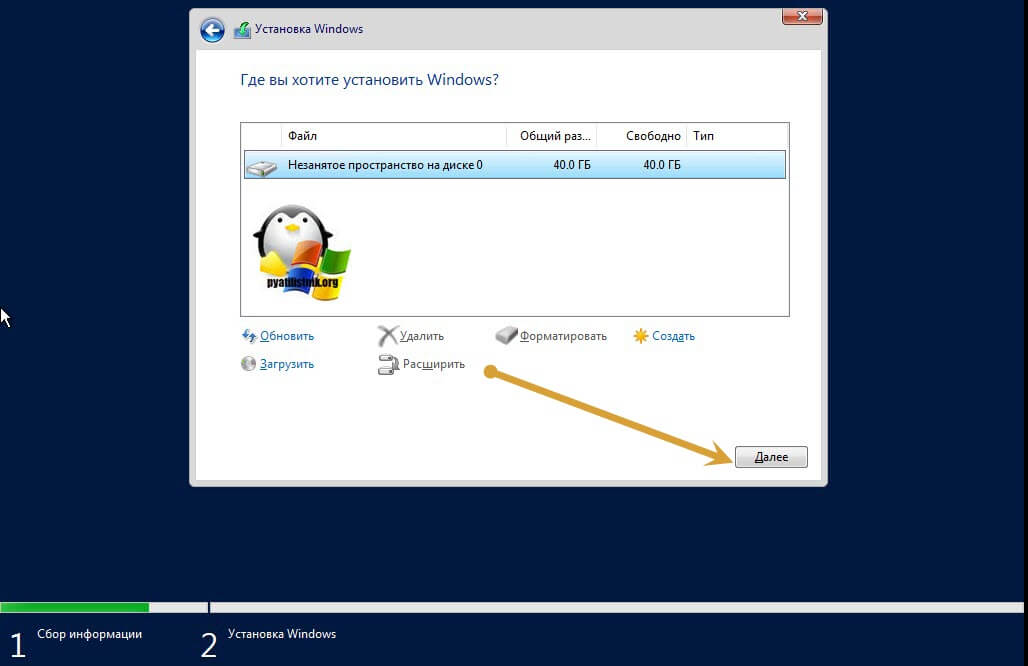
6. Select a partition to install Windows Server, you can optionally create new one from available or use total available size by clicking “Next“.
7. The installation should start, wait for it to finish.
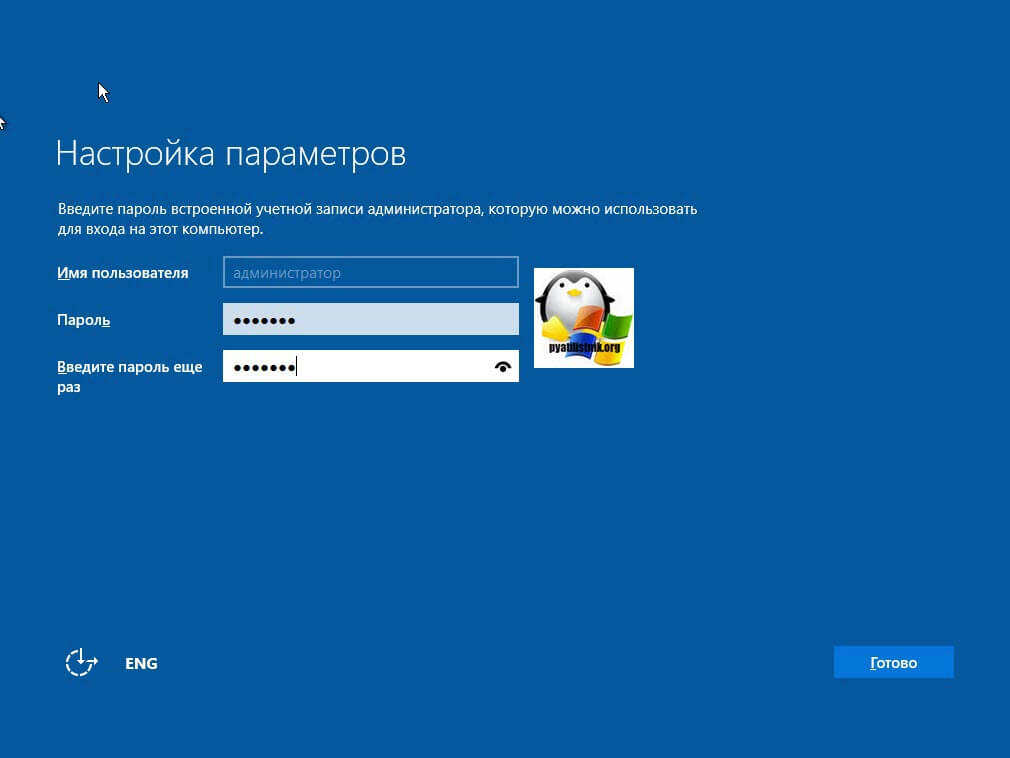
8. The system should automatically reboot after the installation. Set Administrator password when prompted on the next screen.
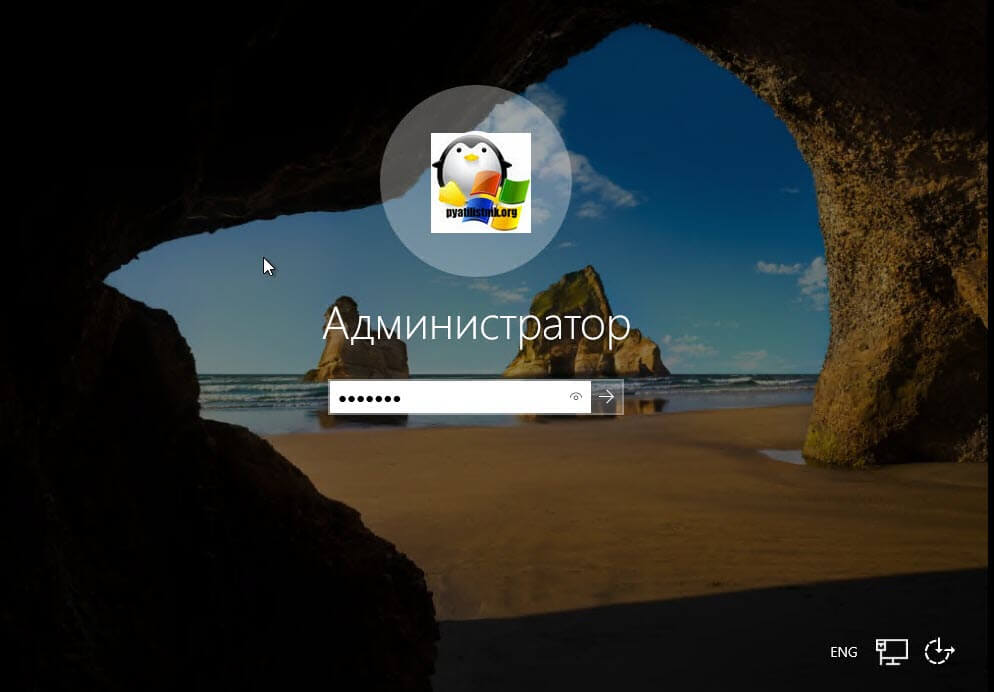
9. Click Finish to complete the installation. To login with the Administrator user, use Ctrl + Alt + Del key combination.
10. Provide your Administrator Password and hit Enter.
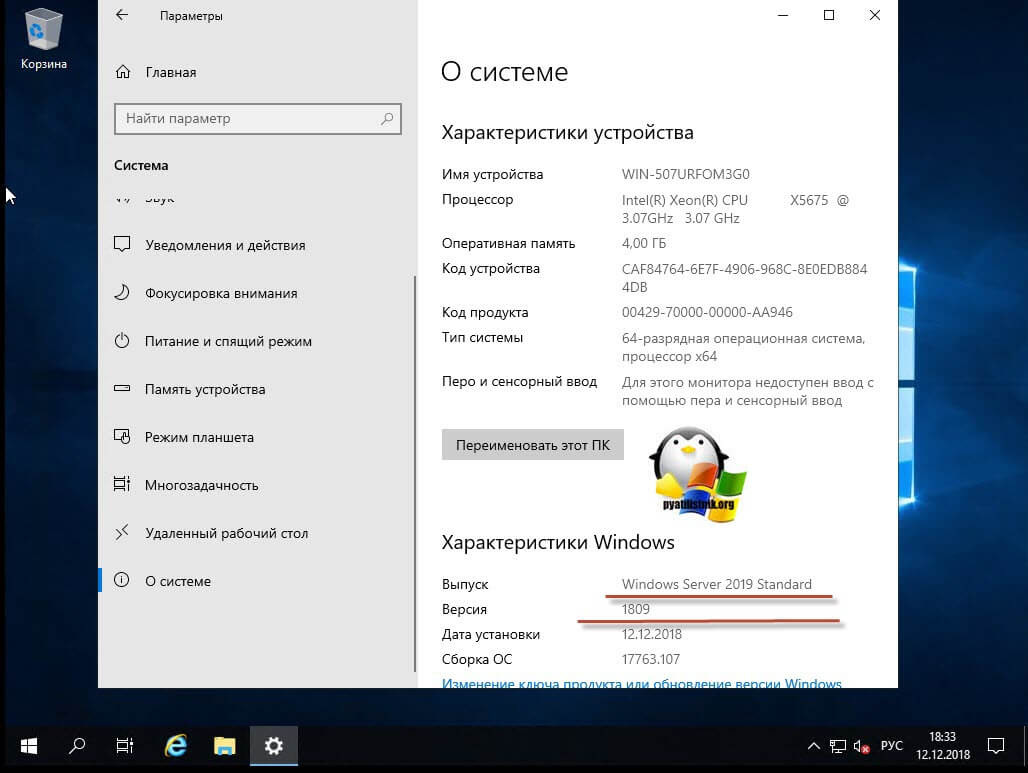
You can get Windows Server details on the settings section.
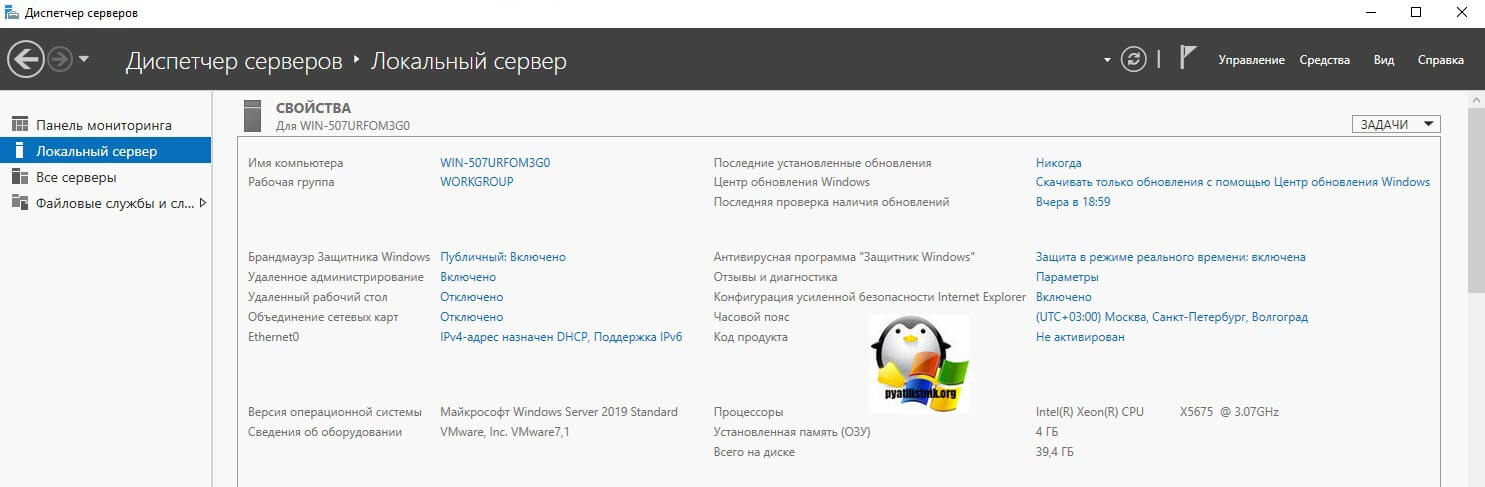
Access to Server Manager Local Server section should also give you some details about Windows Server 2019 installation.
That’s all. You have successfully installed Windows Server 2019 on your Physical server or Virtual Environment.
— Advertisement —
Everything Linux, A.I, IT News, DataOps, Open Source and more delivered right to you.
Subscribe
«The best Linux newsletter on the web»
Ниже указаны примерные системные требования Windows Server 2019. Если компьютер не удовлетворяет минимальным требованиям, то правильно установить продукт будет невозможно. Фактические требования зависят от конфигурации системы и устанавливаемых приложений и компонентов.
Процессор
Минимальные требования
- 64-разрядный процессор с тактовой частотой 1,4 ГГц
- Совместимый с набором инструкций для архитектуры х64
- Поддержка технологий NX и DEP
- Поддержка CMPXCHG16b, LAHF/SAHF и PrefetchW
- Поддержка преобразования адресов второго уровня (EPT или NPT)
ОЗУ
Минимальные требования
- 512МБ (2ГБ для варианта установки «Сервер с рабочим столом»)
- Тип ECC (код исправления ошибок) или аналогичная технология, для развертываний физического узла
Требования к контроллеру запоминающего устройства и пространству на диске
Компьютеры под управлением Windows Server 2019 необходимо включить адаптер хранения, соответствующий спецификации архитектуры PCI Express. Устройства постоянного хранения на серверах, классифицируемые как жесткие диски, не должны быть устройствами PATA. Windows Server 2019 не позволяет ATA/PATA/IDE и EIDE для загрузки, страницы или дисков с данными.
Ниже указаны примерные минимальные требования к свободному месту на диске для системного раздела.
- Минимальные требования: 32 ГБ
Требования к сетевому адаптеру
Минимальные требования
- Адаптер Ethernet с пропускной способностью не менее 1ГБ.
- Совместимость со спецификацией архитектуры PCI Express.
Другие требования
- Компьютеры под управлением этого выпуска также должны содержать следующие компоненты.
- Дисковод DVD-дисков (если операционная система будет устанавливаться с DVD-диска)
Следующие элементы не являются безусловно обязательными, но необходимы для некоторых компонентов.
- Система UEFI на основании версии 2.3.1c и встроенное ПО с поддержкой безопасной загрузки. Доверенный платформенный модуль
- Графическое устройство и монитор Super VGA (1024 x 768) или с более высоким разрешением.
- Клавиатура и мышь Microsoft® (или другое совместимое указывающее устройство).
- Доступ к Интернету (может потребоваться дополнительная оплата)
Содержание
- Требования к системе System Requirements
- Обзор требований к системе Review system requirements
- Процессор Processor
- ОЗУ RAM
- Требования к контроллеру запоминающего устройства и пространству на диске Storage controller and disk space requirements
- Требования к сетевому адаптеру Network adapter requirements
- Другие требования Other requirements
- Сервер под windows server 2019
- Чистая установка windows server 2019
- Сервер под windows server 2019
- Установка и настройка Active Directory, DNS, DHCP
- Переименование сервера
- Настройка сетевого интерфейса
- Установка на сервера ролей: DNS-сервер, Доменные службы Active Directory, DHCP-сервер
- Повышение роли сервера до уровня контроллера домена
- Настройка обратной зоны DNS
- Настройка DHCP-сервера
Требования к системе System Requirements
Относится к: Windows Server 2019 Applies to: Windows Server 2019
В этом разделе описаны минимальные системные требования для запуска Windows Server® 2019. This topic outlines the minimum system requirements to run Windows Server® 2019.
Обзор требований к системе Review system requirements
Далее приводятся примерные требования к системе для Windows Server 2019. The following are estimated system requirements Windows Server 2019. Если компьютер не удовлетворяет минимальным требованиям, то правильно установить продукт будет невозможно. If your computer has less than the «minimum» requirements, you will not be able to install this product correctly. Фактические требования зависят от конфигурации системы и устанавливаемых приложений и компонентов. Actual requirements will vary based on your system configuration and the applications and features you install.
Если не указано иное, эти минимальные системные требования применяются ко всем вариантам установки (основные серверные компоненты, сервер с рабочим столом и сервер Nano Server), а также к выпускам Standard и Datacenter. Unless otherwise specified, these minimum system requirements apply to all installation options (Server Core, Server with Desktop Experience, and Nano Server) and both Standard and Datacenter editions.
Возможные варианты развертывания столь разнообразны, что невозможно дать универсальные рекомендации по требованиям к системе. The highly diverse scope of potential deployments makes it unrealistic to state «recommended» system requirements that would be generally applicable. Чтобы подробнее узнать о ресурсах, необходимых для каждой развертываемой роли сервера, обратитесь к документации по этой роли. Consult documentation for each of the server roles you intend to deploy for more details about the resource needs of particular server roles. Выполните тестовое развертывание, чтобы определить подходящие требования к системе в конкретном сценарии. Это позволит добиться оптимального результата. For the best results, conduct test deployments to determine appropriate system requirements for your particular deployment scenarios.
Процессор Processor
Производительность процессора зависит не только от тактовой частоты, но также от количества его ядер и размера кэша. Processor performance depends not only on the clock frequency of the processor, but also on the number of processor cores and the size of the processor cache. Ниже указаны требования к процессору для данного продукта. The following are the processor requirements for this product:
Минимальные требования Minimum:
Coreinfo — инструменты, который можно использовать, чтобы проверить, которой из этих возможностей обладает ваш ЦП. Coreinfo is a tool you can use to confirm which of these capabilities your CPU has.
ОЗУ RAM
Ниже указаны примерные требования к ОЗУ для данного продукта. The following are the estimated RAM requirements for this product:
Минимальные требования Minimum:
Если вы создадите виртуальную машину с минимальными поддерживаемыми параметрами оборудования (1 ядро процессора и ОЗУ объемом 512 МБ) и затем попытаетесь установить этот выпуск на виртуальной машине, установка завершится ошибкой. If you create a virtual machine with the minimum supported hardware parameters (1 processor core and 512 MB RAM) and then attempt to install this release on the virtual machine, Setup will fail.
Чтобы этого не случилось, выполните одно из указанных ниже действий. To avoid this, do one of the following:
Требования к контроллеру запоминающего устройства и пространству на диске Storage controller and disk space requirements
Компьютеры под управлением Windows Server 2019 должны иметь адаптер хранения, соответствующий спецификации архитектуры PCI Express. Computers that run Windows Server 2019 must include a storage adapter that is compliant with the PCI Express architecture specification. Устройства постоянного хранения на серверах, классифицируемые как жесткие диски, не должны быть устройствами PATA. Persistent storage devices on servers classified as hard disk drives must not be PATA. В Windows Server 2019 устройства ATA, PATA, IDE и EIDE не следует использовать в качестве загрузочных дисков, дисков с файлом подкачки или дисков с данными. Windows Server 2019 does not allow ATA/PATA/IDE/EIDE for boot, page, or data drives.
Ниже указаны примерные минимальные требования к свободному месту на диске для системного раздела. The following are the estimated minimum disk space requirements for the system partition.
Минимальные требования 32 ГБ Minimum: 32 GB
Обратите ванимание, что 32 ГБ — это абсолютный минимум для успешной установки. Be aware that 32 GB should be considered an absolute minimum value for successful installation. Этот минимум должен позволять установить Windows Server 2019 в режиме установки основных серверных компонентов с ролью сервера веб-служб (IIS). This minimum should allow you to install Windows Server 2019 in Server Core mode, with the Web Services (IIS) server role. Сервер в режиме установки основных серверных компонентов примерно на 4 ГБ меньше, чем тот же сервер с графическим пользовательским интерфейсом. A server in Server Core mode is about 4 GB smaller than the same server in Server with a GUI mode.
В любом из следующих случаев потребуется дополнительное место для системного раздела. The system partition will need extra space for any of the following circumstances:
Требования к сетевому адаптеру Network adapter requirements
Сетевые адаптеры, используемые в этом выпуске, должны включать следующие компоненты. Network adapters used with this release should include these features:
Минимальные требования Minimum:
Сетевой адаптер с поддержкой сетевой отладки (KDNet) может пригодиться, но не входит в минимальные требования. A network adapter that supports network debugging (KDNet) is useful, but not a minimum requirement.
Сетевой адаптер с поддержкой среды предзагрузочного выполнения (PXE) может пригодиться, но не входит в минимальные требования. A network adapter that supports the Pre-boot Execution Environment (PXE) is useful, but not a minimum requirement.
Другие требования Other requirements
Компьютеры под управлением этого выпуска также должны содержать следующие компоненты. Computers running this release also must have the following:
Следующие элементы не являются безусловно обязательными, но необходимы для некоторых компонентов. The following items are not strictly required, but are necessary for certain features:
Система UEFI на основании версии 2.3.1c и встроенное ПО с поддержкой безопасной загрузки. UEFI 2.3.1c-based system and firmware that supports secure boot
Доверенный платформенный модуль Trusted Platform Module
Графическое устройство и монитор Super VGA (1024 x 768) или с более высоким разрешением. Graphics device and monitor capable of Super VGA (1024 x 768) or higher-resolution
Клавиатура и мышь Microsoft® (или другое совместимое указывающее устройство). Keyboard and Microsoft® mouse (or other compatible pointing device)
Доступ к Интернету (может потребоваться дополнительная оплата) Internet access (fees may apply)
Микросхема доверенного платформенного модуля (TPM) не является обязательным требованием для установки данного выпуска, однако она необходима для использования определенных функций, таких как шифрование диска BitLocker. A Trusted Platform Module (TPM) chip is not strictly required to install this release, though it is necessary in order to use certain features such as BitLocker Drive Encryption. Если компьютер использует доверенный платформенный модуль, он должен соответствовать следующим требованиям. If your computer uses TPM, it must meet these requirements:
Источник
Сервер под windows server 2019
И добрый день! Очень рад вас вновь видеть, уважаемые читатели и гости IT блога Pyatilistnik.org. На дворе уже 2019 год, а это значит, что Microsoft готова нас с вами перевести на новый продукт в серверном сегменте. В прошлый раз я вам рассказывал, как производится установка Windows Server 2016. Данная операционная система заимела очень хорошую оценку, это вам не десятка и Microsoft тут особо не экспериментирует, это же корпоративный сегмент, приносящий основные дивиденды. Сегодня я вам покажу, процесс установки Windows Server 2019 Standard, и мы разберем что нового в данной ОС. Уверен, что вам будет интересно.
Чистая установка windows server 2019
Когда речь идет, о сервере, то ни один уважающий себя администратор, не будет производить обновление одной версии на другую, это вам не клиентские операционные системы, где например, Windows 7 обновляли до Windows 10. Так как это сервер, то и у него ответственность иная, он предоставляет пользователям и клиентам сервисы компании, нужные для бизнес процесса или получения прибыли, поэтому тут все серьезнее.
Правильнее производить чистую установку на виртуальную машину или физический сервер, и уже потом на него переводить (мигрировать) нужные вам сервисы со старого сервера, причем за счет нововведений Windows Server 2019.
Из подготовительных действий вам нужно выполнить три действия :
Я буду производить инсталляцию на тестовом стенде, поэтому у меня это будет простое монтирование ISO в виртуальную машину, вы же должны выбрать удобный для себя метод. Первым делом, когда вы вставили загрузочное устройство, вам в BIOS нужно выставить загрузку с него, так называемый приоритет загрузки.
Когда все сделано как нужно, то после перезагрузки сервера у вас появится сообщение, о выборе загрузки с диска с дистрибутивом, в виде сообщение «Press any key to boot from CD or DVD» вам нужно успеть нажать «Enter», для того чтобы попасть в мастер установки.

После того, как у вас пробежит белый ползунок загрузки мастера установки, у вас появится приветственное окно «Установка Windows», где вам покажут, что это Windows Server 2019 и предложат выбрать три пункта, которые напоминаю, будут распространятся только на интерфейс мастера инсталляции:
После чего можете смело нажимать «Далее». На следующем окне мастера установки Windows Server 2019 Standard у вас будет две кнопки. Собственно кнопка «Установка» и ссылка на инструменты восстановления системы. Начнется подготовка «Начало установки».

Далее от вас потребуют указать, какую операционную систему систему вы выбираете, на выбор будет четыре варианта, два с графическим интерфейсом, а два в режиме ядра (Core), но разница только в редакции Standard или Datacenter. Выбираем нужную и нажимаем «Далее».
Теперь если вы совсем упоротый, то полностью изучаем и читаем условия лицензии, после чего их принимаем, ставя соответствующую галку «Я принимаю условия лицензии».

Теперь у вас будет самый важный шаг, вы по сути на развилке:
Теперь остался последний подготовительный этап, и заключается он в том, что вам необходимо разметить диск для установки системы. В момем примере, это SSD диск, размеров в 40 гб, в виде незанятого пространства и я просто нажимаю далее. Если у вас уже имеются разделы, то нужно выбрать куда вы будите ставить, обчно делают резервную копию данных, после чего удаляют не нужные разделы.
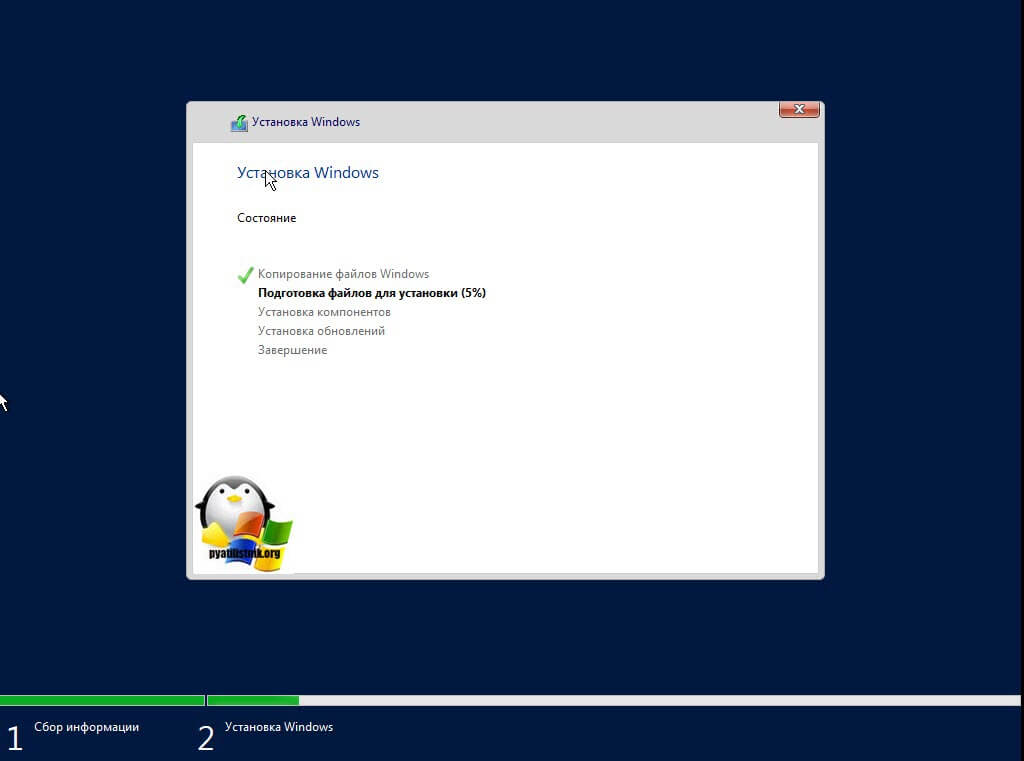
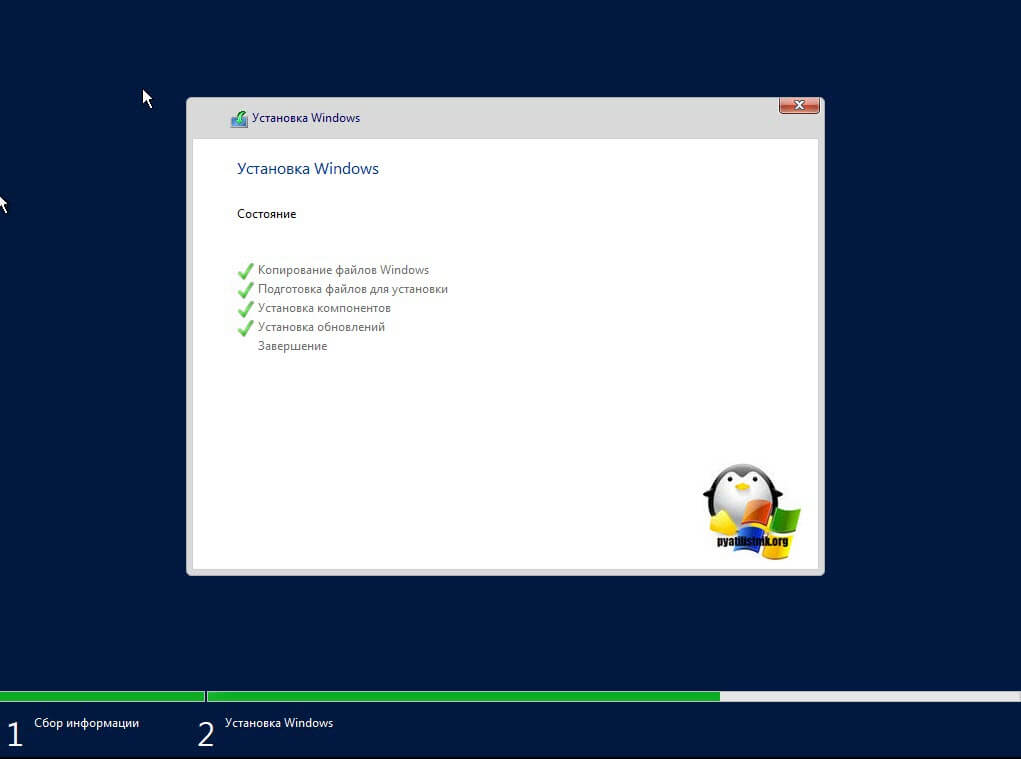
Ну и собственно начинается сам процесс установки виндоус. У вас на первом этапе, мастер инсталляции Windows Server 2019 скопирует с дистрибутива необходимые файлы на локальный диск, после чего начнет их извлечение, а уже потом начнет установку компонентов и обновлений. Как только он это сделает сервер первый раз перезагрузиться, по сути ему больше не нужно будет иметь подключенного загрузочного устройства с дистрибутивом системы.
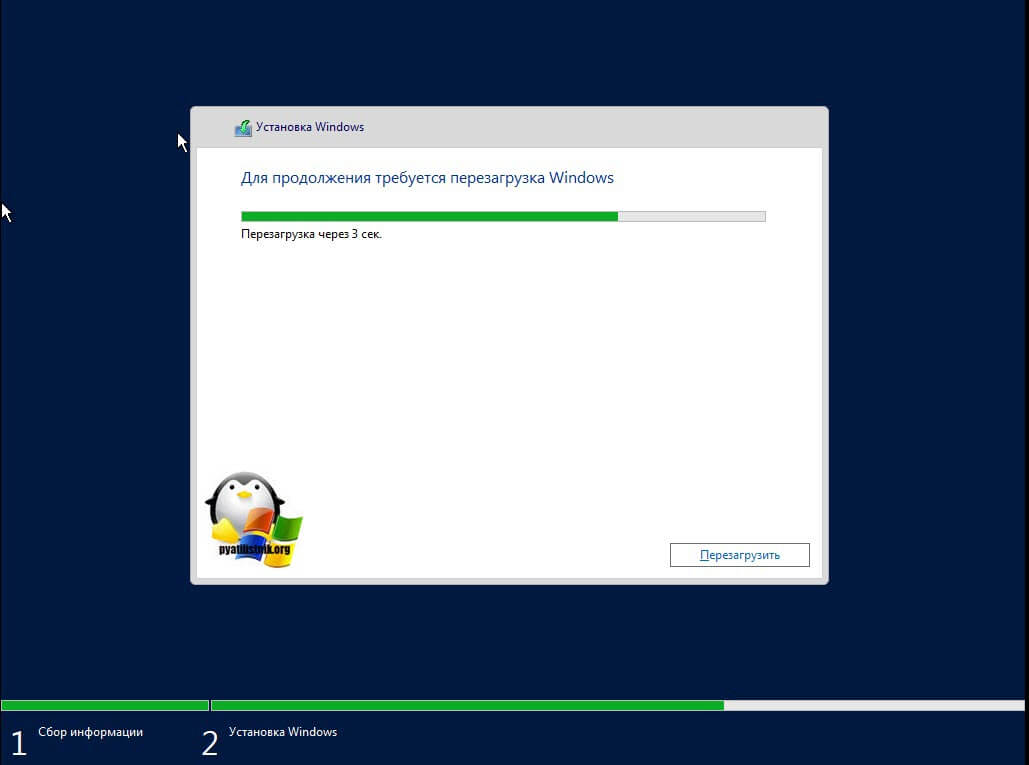
Вот так вот будет выглядеть завершающий этап
Потребуется еще одна перезагрузка.
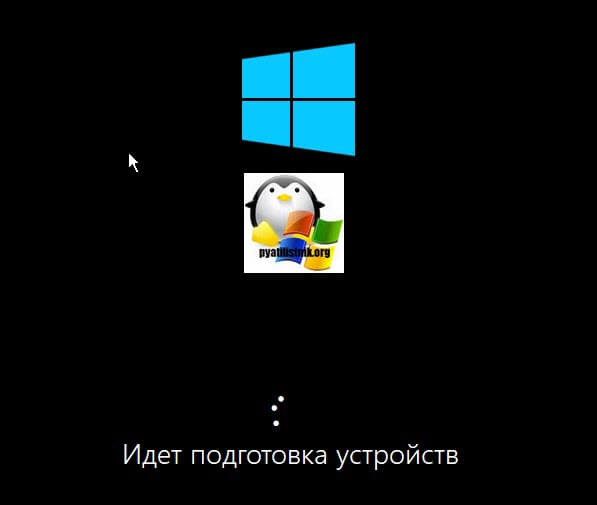
Теперь начинается подготовительный этап, где будет определено ваше оборудование и произведены для него настройки
Когда все будет закончено, у вас появится окно «Настройка параметром», где вас попросят указать два раза пароль для учетной записи Администратор, напоминаю, что тут действует правило стойкости пароля.
Через мгновение перед вами будет экран аутентификации, нажимаем волшебное сочетание клавиш CTRL+ALT+DELETE

Вводим пароль администратора и логинимся в систему.
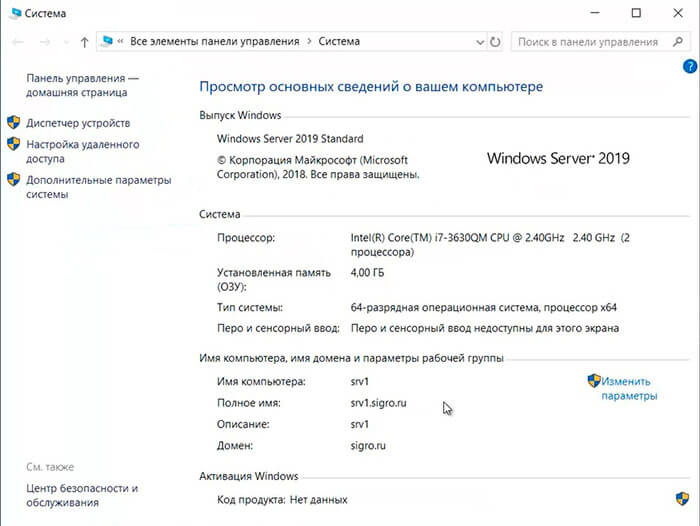
Перед вами будет рабочий стол, для примера я зайду в окно «о системе», где мы видим, что установлена Windows Server 2019 Standard 1809 Сборка 17763.107
Когда вы попадете на рабочий стол 2019 сервера, то у вас автоматически будет запущено окно диспетчера серверов, как это было и ранее, но тут появился новый нюанс, в виде окна с подсказкой, где компания Microsoft вас уведомит, что появился новый инструмент управления серверами, под названием Windows Admin Center, это кросплатформенный комбайн управления серверами из браузера, думаю он станет через лет пять, основным инструментом для системного администратора, о нем я напишу отдельную статью (Настройка Windows Admin Center)

В диспетчере серверов, у вас все так же будут три вкладки:
Вот так вот выглядит окно управления локальным сервером, тут все по старому, здесь вы можете выполнить действия:
Перед вами список ролей Windows Server 2019, в данной версии операционной системы их 20.
Вот подробный список компонентов в Windows Server 2019
Источник
Сервер под windows server 2019
Установка и настройка Active Directory, DNS, DHCP
Переименование сервера
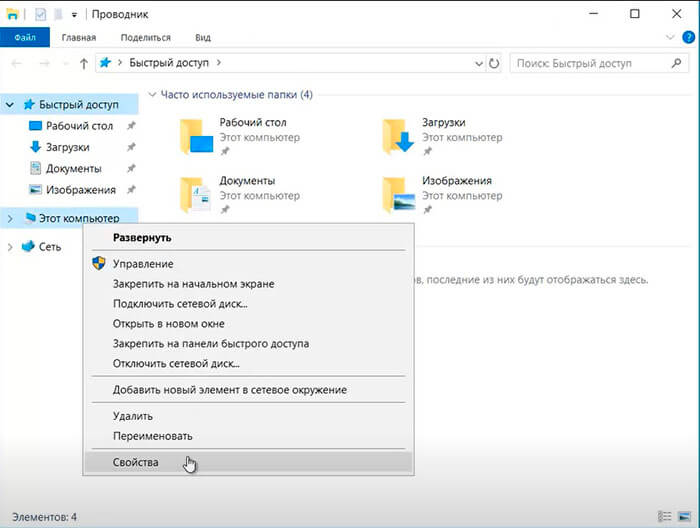
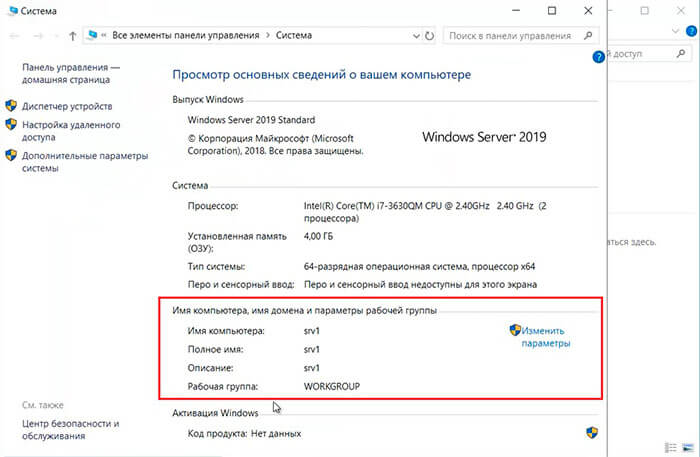
1. Для изменения имени сервера нажимаем правой клавишей мыши на «Этот компьютер«, в появившемся меню выбираем «Свойства«.
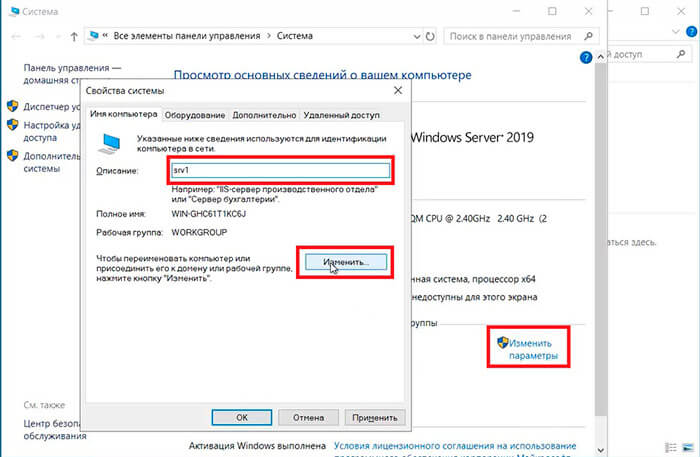
2. Далее нажимаем «Изменить параметры«. В открывшемся окне добавляем описание сервера, далее выбираем «Изменить«.
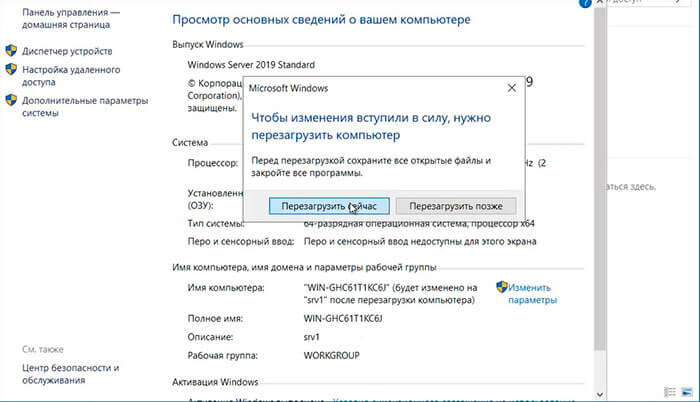
4. Нажимаем «Перезагрузить сейчас» и ожидаем перезагрузки сервера.
Настройка сетевого интерфейса
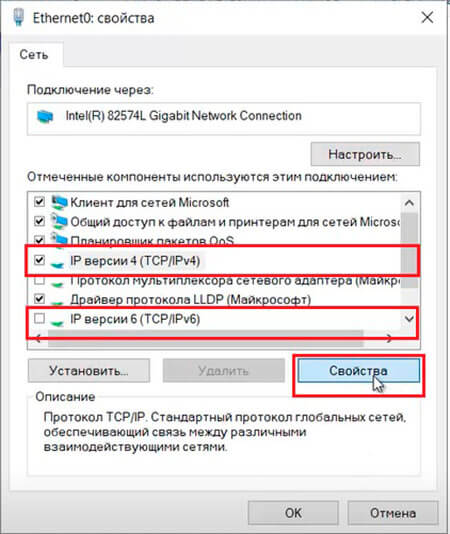
6. Для настройки сетевого интерфейса в поиске набираем ncpa.cpl, далее «Enter«. Снимаем чекбокс «IP версии 6«, далее выбираем «IP версии 4«, далее «Свойства«.
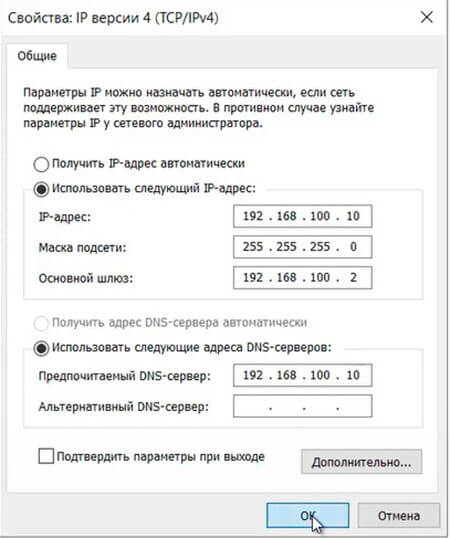
7. Выбираем «Использовать следующий IP-адрес» и задаём статический IP-адрес сервера, маску подсети, основной шлюз (если есть), и предпочитаемый DNS-сервер. Нажимаем «ОК«. На этом настройка сетевого интерфейса закончена.
Установка на сервера ролей: DNS-сервер, Доменные службы Active Directory, DHCP-сервер
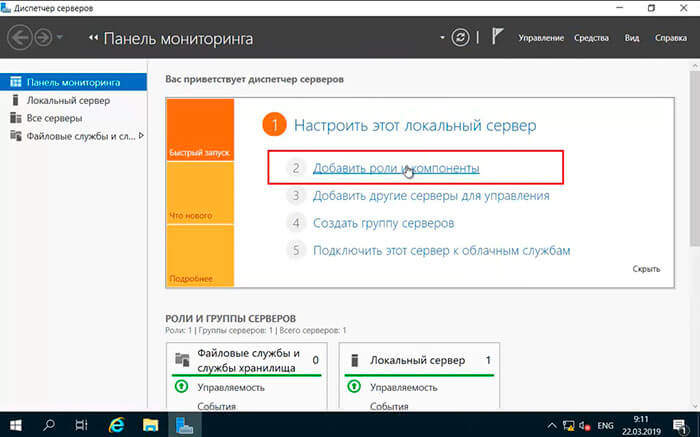
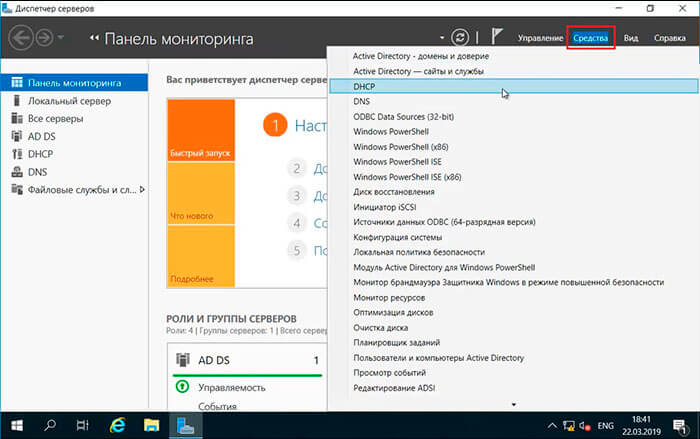
8. Нажимаем «Пуск«, далее «Диспетчер серверов«.

9. В новом окне выбираем «Добавить роли и компоненты«.
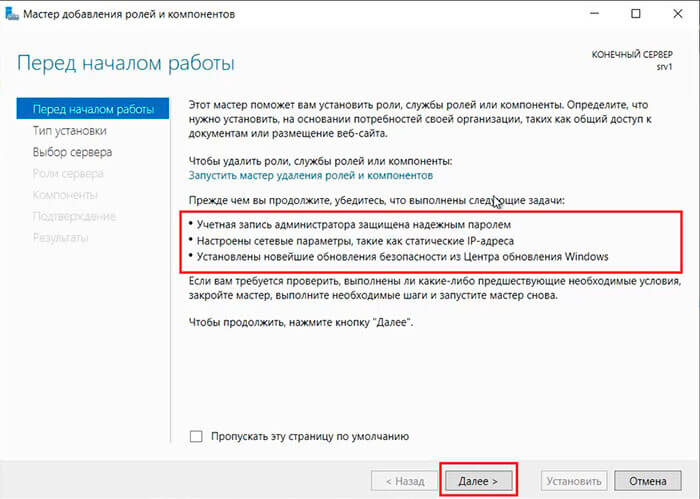
10. Читаем предупреждение сервера «Перед началом работы«, не забываем защитить учетную запись администратора надежным паролем, затем «Далее«.
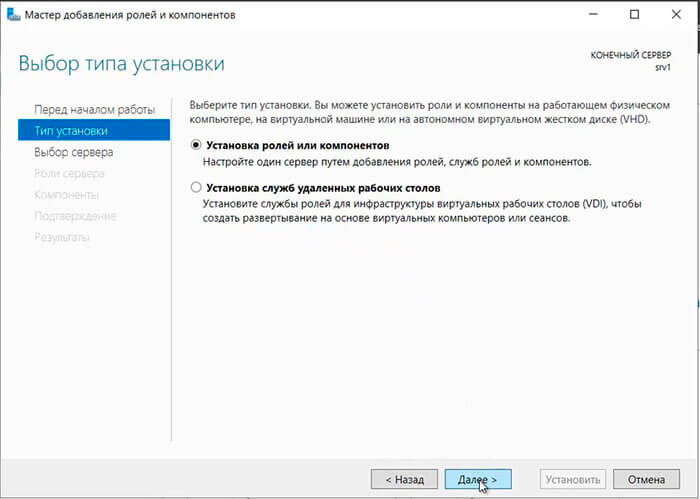
11. Проверяем, что чекбокс стоит на «Установка ролей или компонентов«, затем «Далее«.
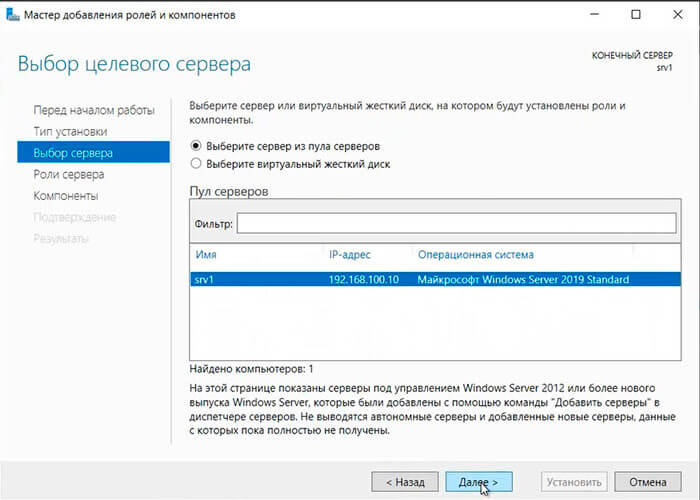
12. Выбираем сервер, на который будут установлены роли и компоненты. Снова «Далее«.
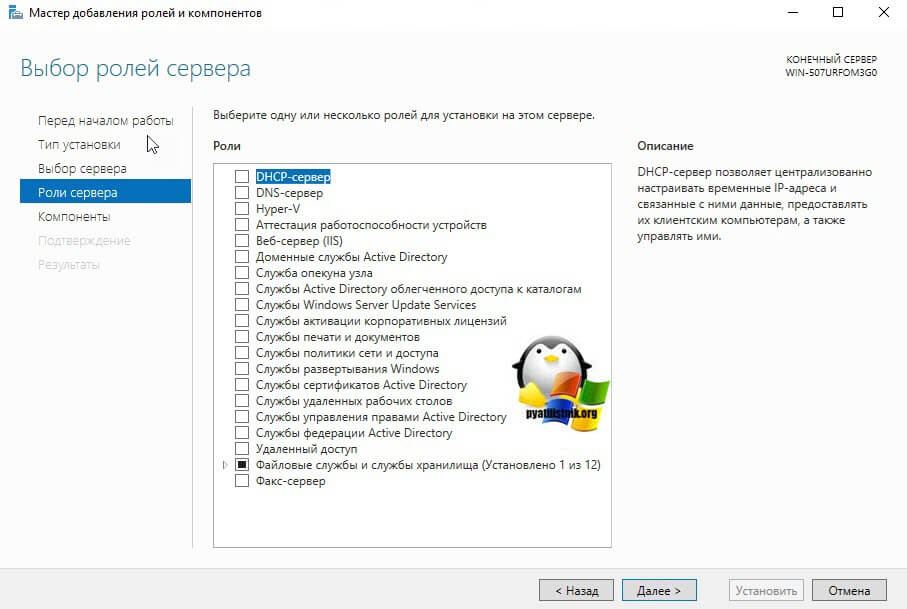
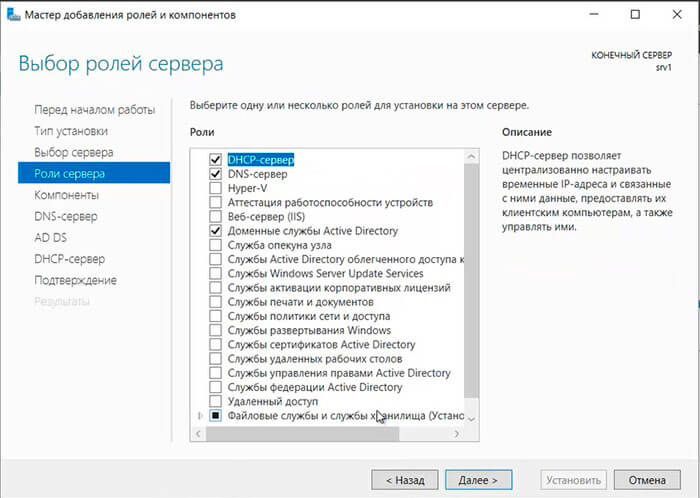
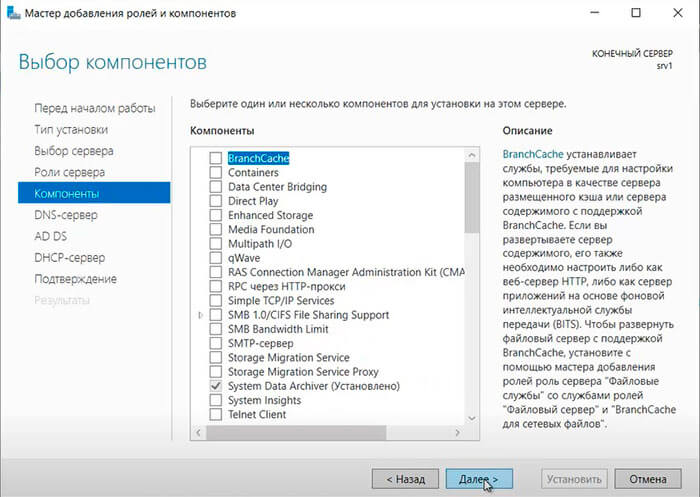
13. Устанавливаем чекбоксы напротив выбранных ролей сервера, в данном случае это DNS-сервер, Доменные службы Active Directory, DHCP-сервер. Нажимаем «Далее«.
14. При каждом выборе роли будет появляться «Мастер добавление ролей и компонентов«, который будет спрашивать о добавлении компонентов для выбранных ролей сервера. Нажимаем «Добавить компоненты«.

15. Нажимаем «Далее«, необходимые компоненты были выбраны в предыдущем шаге.
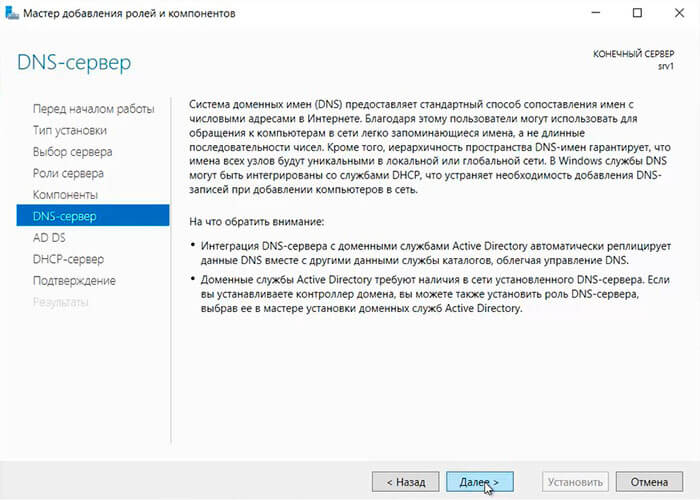
16. Читаем предупреждение DNS-сервера на что обратить внимание, затем «Далее«.
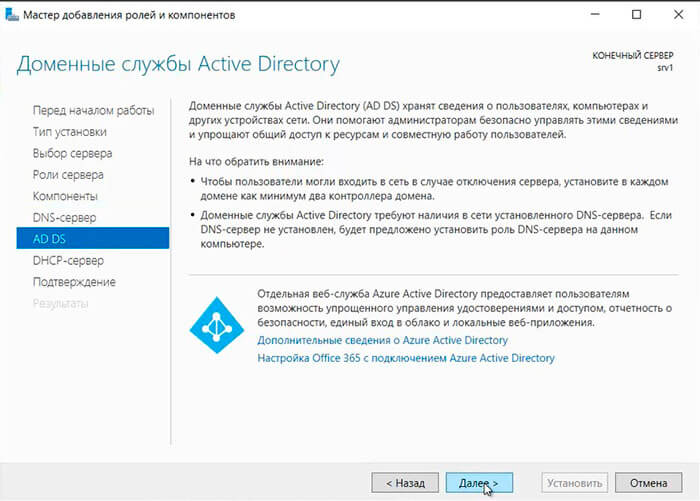
17. Читаем предупреждение AD DS, нажимаем «Далее«.
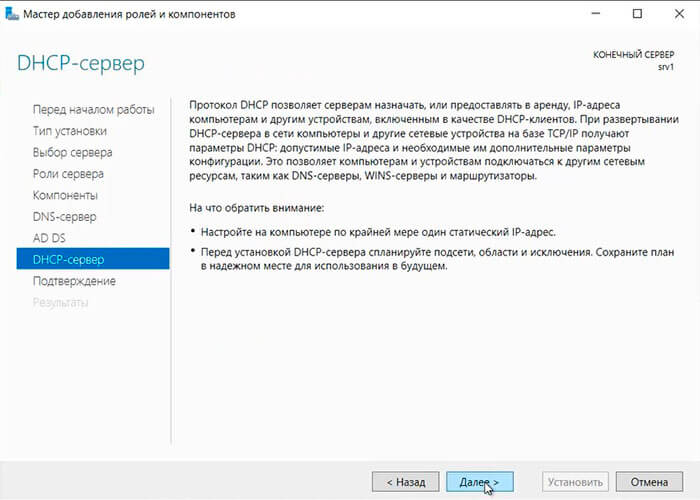
18. Читаем предупреждение DHCP-сервера, снова «Далее«.
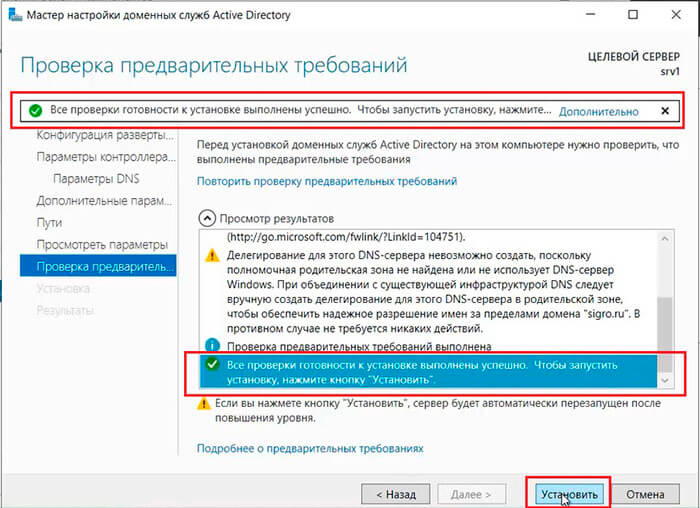
19. Ставим «чекбокс» напротив «Автоматический перезапуск конечного сервера, если требуется«, нажимаем «Установить«.
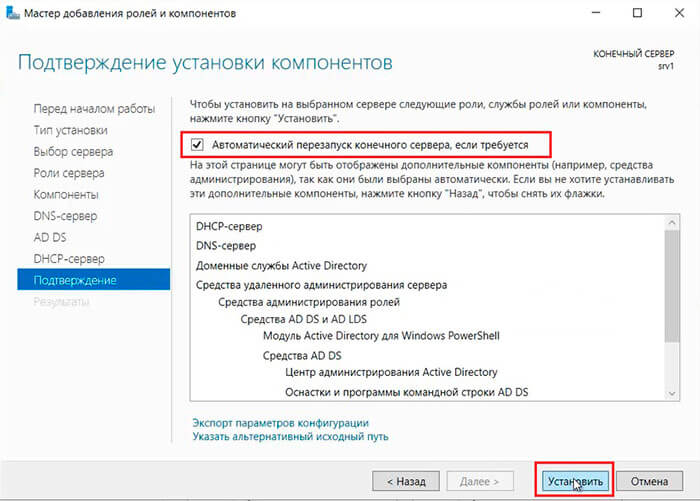
В результате произойдет установка выбранных ролей сервера.
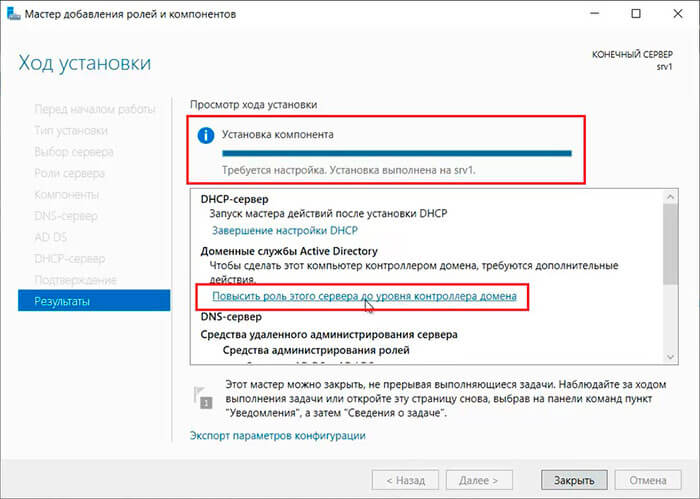
Повышение роли сервера до уровня контроллера домена
20. Нажимаем «Повысить роль этого сервера до уровня контроллера домена«.
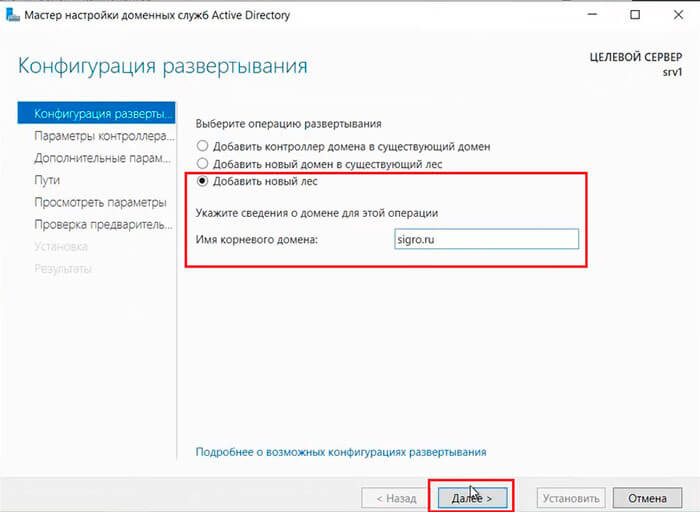
21. Далее выбираем «Добавить новый лес» и задаем «Имя корневого домена«.
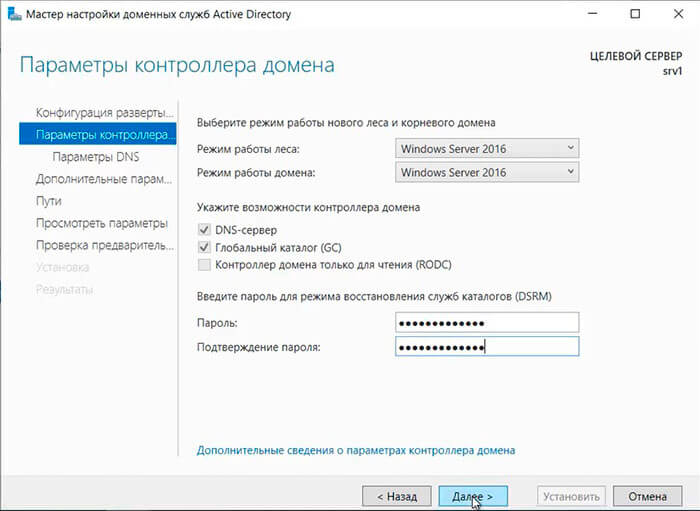
22. В следующем окне дважды вводим пароль для режима восстановления служб каталогов (DSRM), затем «Далее«.
23. В следующем окне снова «Далее«.
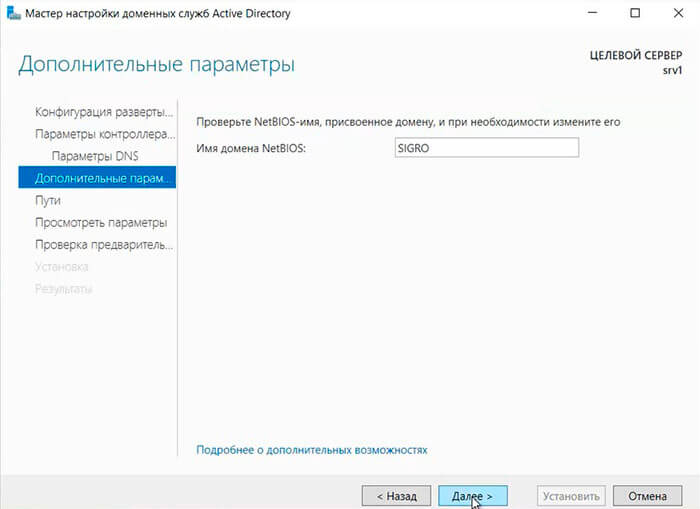
24. Проверяем NetBIOS-имя, присвоенное домену, и при необходимости меняем его. Затем «Далее«.
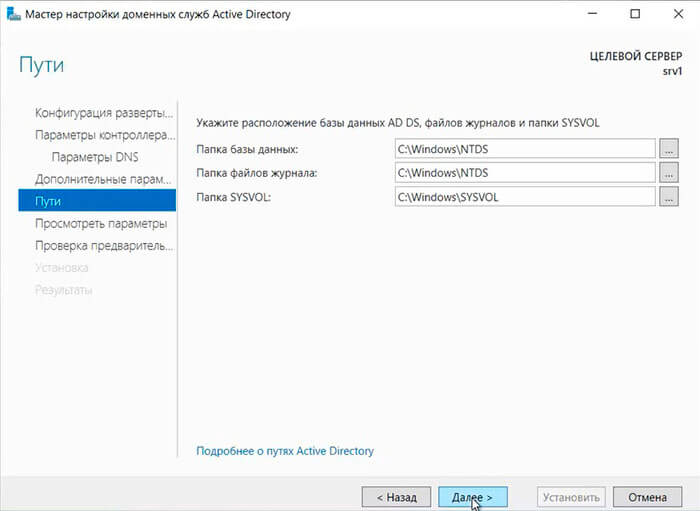
25. Оставляем по умолчанию расположение базы данных AD DS, файлов журналов и папки SYSVOL, снова «Далее«.
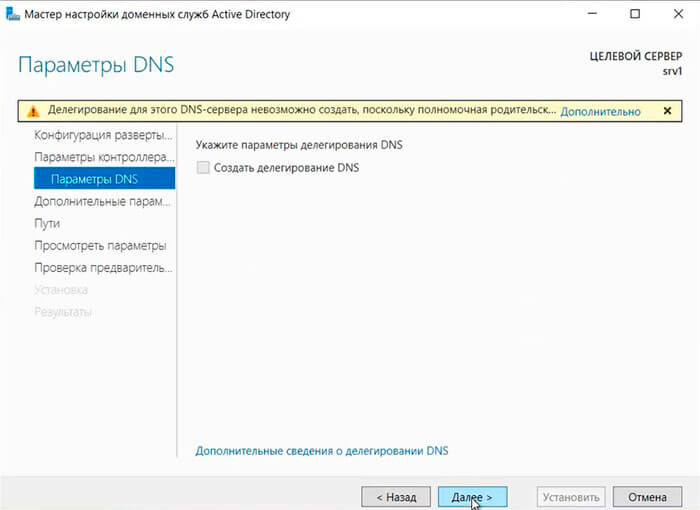
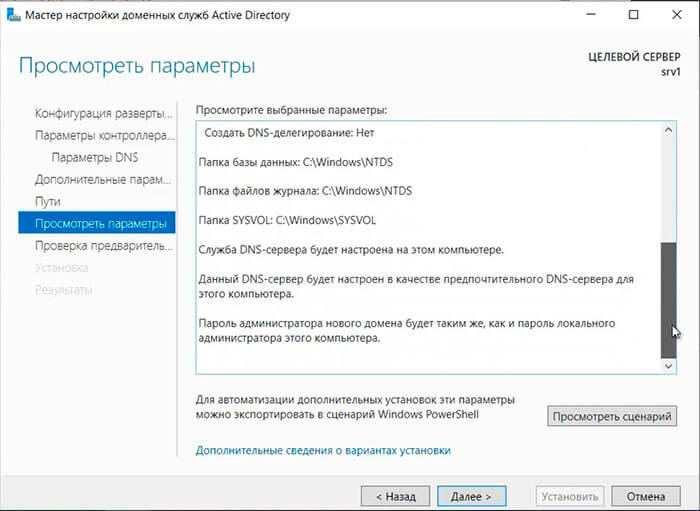
26. После просмотра выбранных параметров и их одобрения нажимаем «Далее«.
28. По завершению установки произойдет перезагрузка сервера.
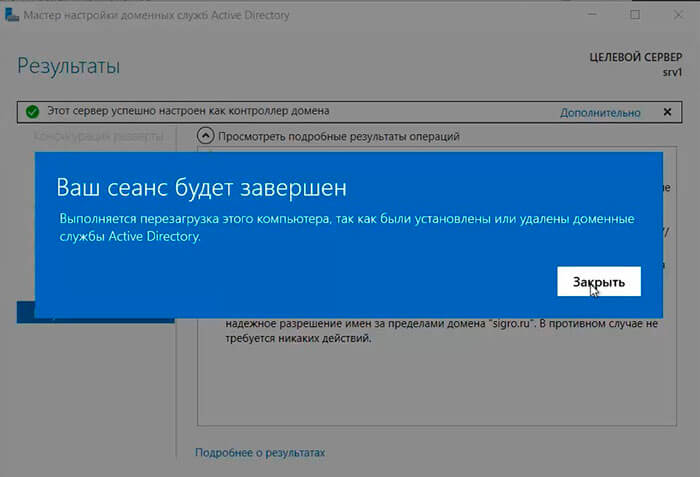
29. После перезагрузки полное имя компьютера изменится, к имени сервера добавиться доменное имя. Active Directory можно использовать.
Настройка обратной зоны DNS
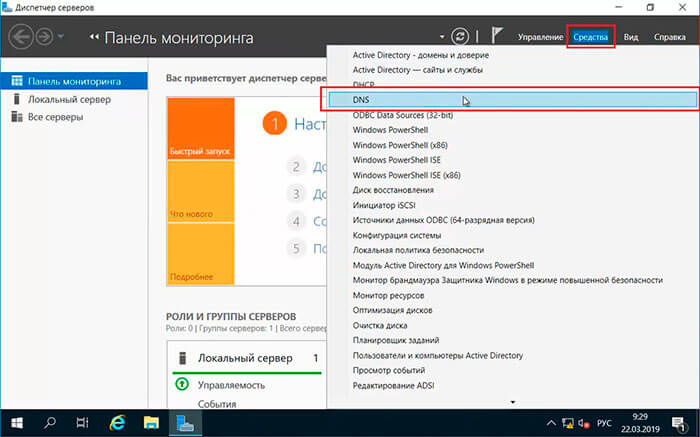
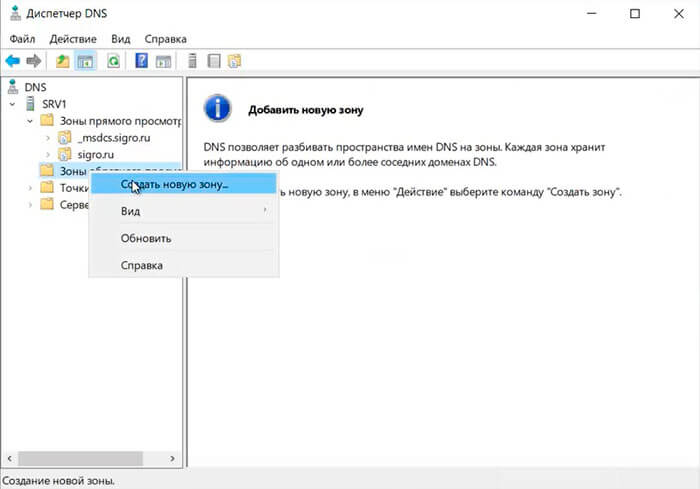
31. Раскрываем дерево DNS, нажимаем правой клавишей мыши на «Зоны обратного просмотра«, в появившемся меню «Создать новую зону. «.
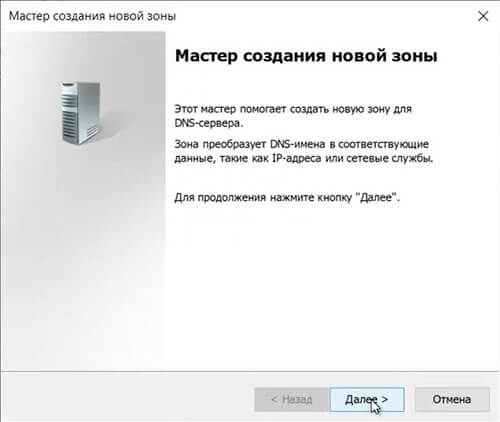
32. В появившемся мастере создания новой зоны нажимаем «Далее«.
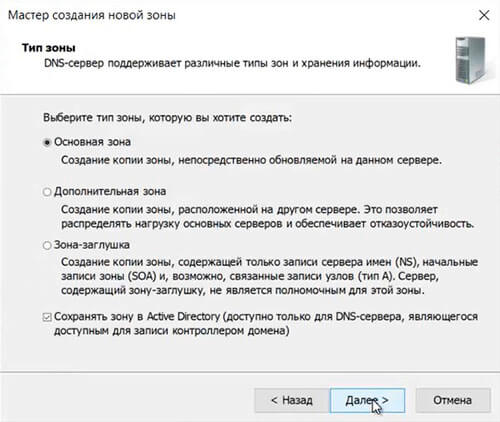
33. Выбираем «Основная зона«, затем «Далее«.
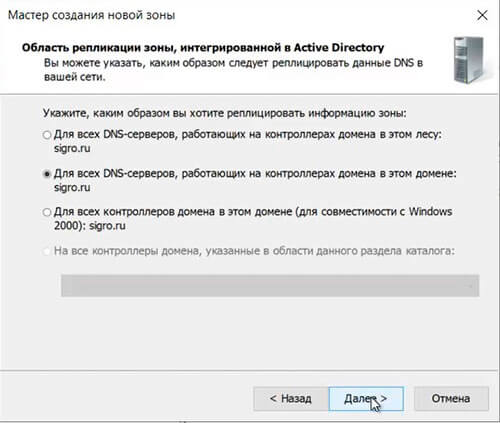
34. Оставляем по умолчанию область репликации зоны, интегрированной в Active Directory, нажимаем «Далее«.
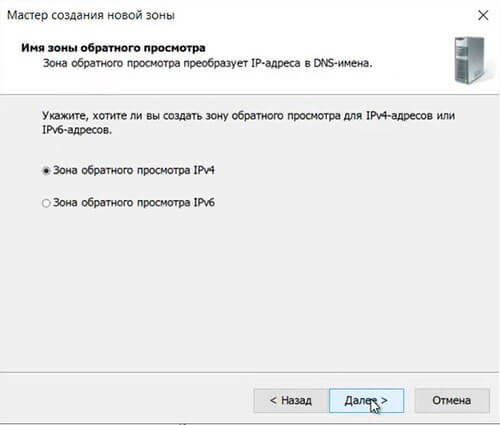
35. Оставляем «Зона обратного просмотра IPv4», просто «Далее«.
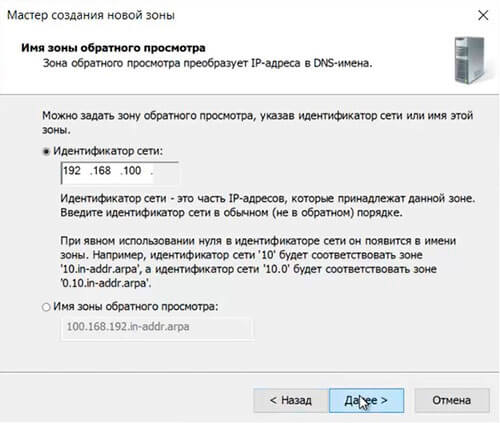
36. В следующем окне задаем Зону обратного просмотра, которая преобразует IP-адреса в DNS-имена. В идентификатор сети забиваем три актета своей сети, затем «Далее«.
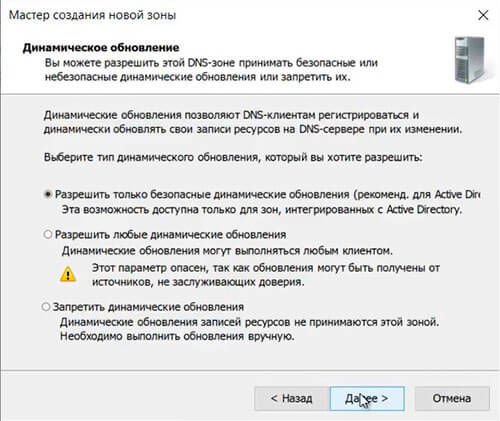
37. Разрешаем только безопасные динамические обновления, снова «Далее«.
38. Зона обратного просмотра создана.

Настройка DHCP-сервера
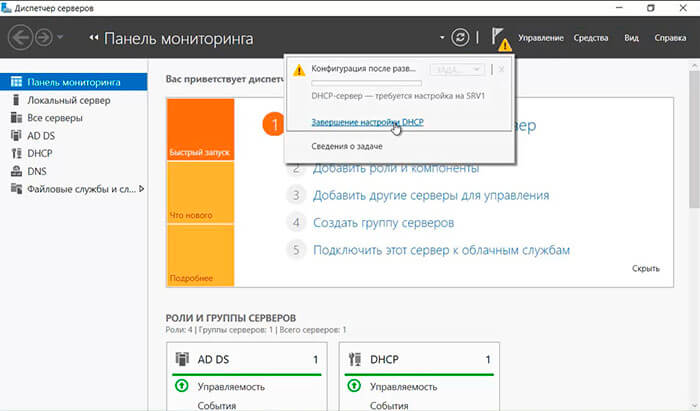
39. После установки роли DHCP-сервера в Диспетчере серверов нажимаем на желтый треугольник, в появившемся окне выбираем «Завершение настройки DHCP«.
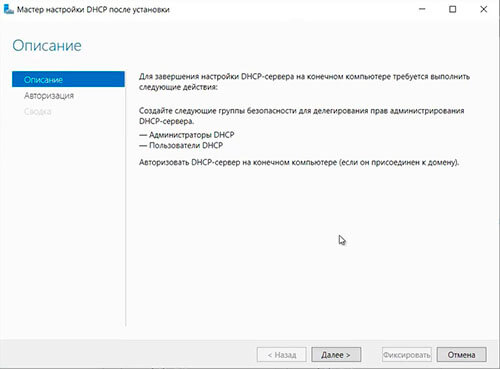
40. В следующем окне читаем описание завершения настройки DHCP-сервера на конечном компьютере, затем «Далее«.
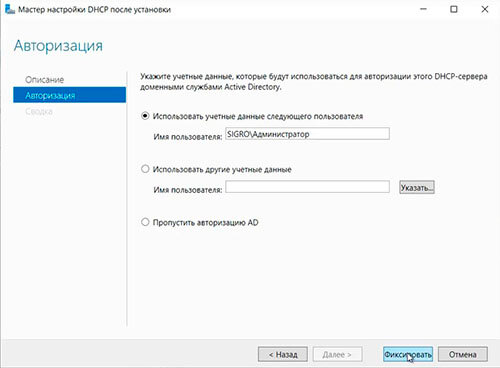
41. Оставляем по умолчанию учетные данные, которые будут использоваться для авторизации DHCP-сервера доменными службами Active Directory. Нажимаем «Фиксировать«.
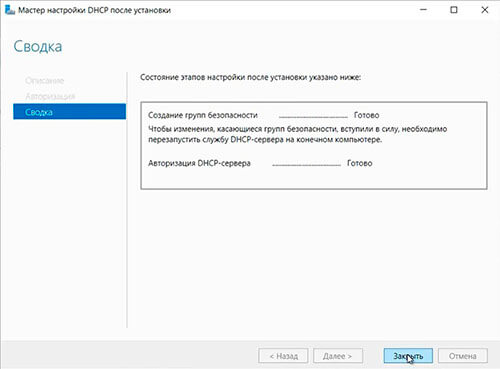
42. В следующем окне нажимаем «Закрыть«.
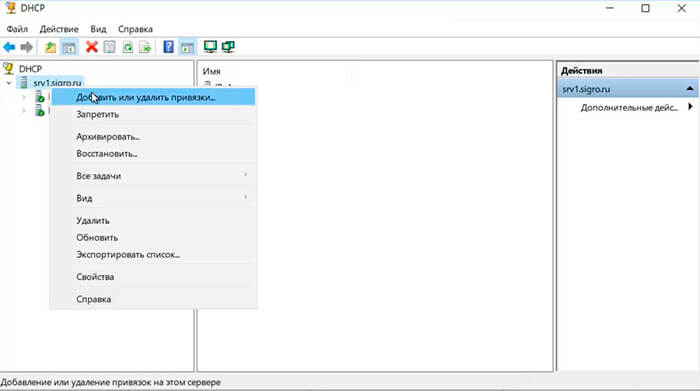
44. В открывшемся окне открываем дерево DHCP. Правой клавишей мыши нажимаем на домен, в появившемся окне выбираем «Добавить или удалить привязки. «.
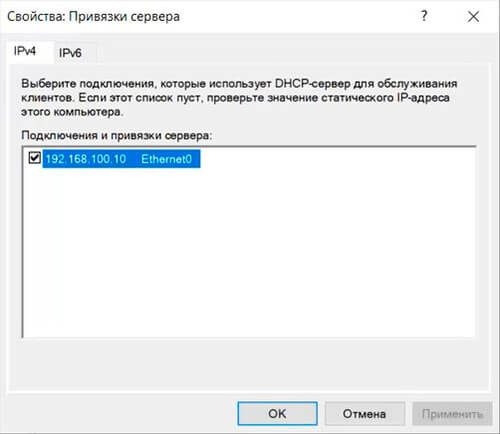
45. Проверяем сетевой интерфейс, который будет использовать DHCP-сервер для обслуживания клиентов. Далее «ОК«.
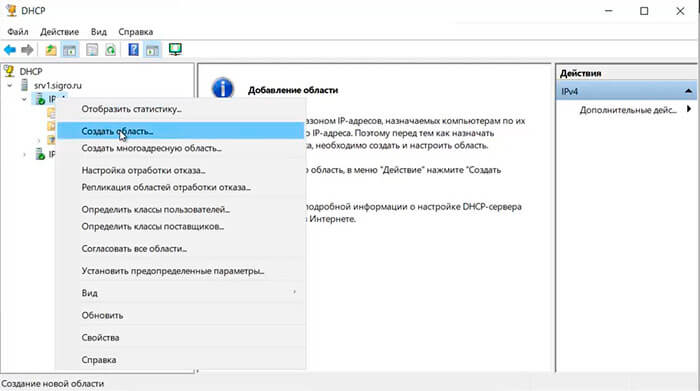
46. Затем правой клавишей нажимаем на IPv4, в появившемся меню выбираем «Создать область. «.
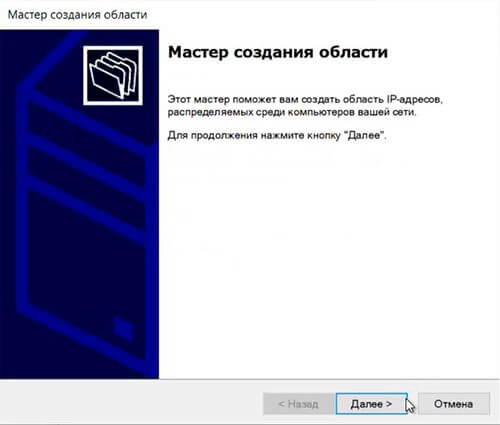
47. Откроется мастер создания область, который помогает создать область IP-адресов, распределяемых среди компьютеров вашей сети. Нажимаем «Далее«.
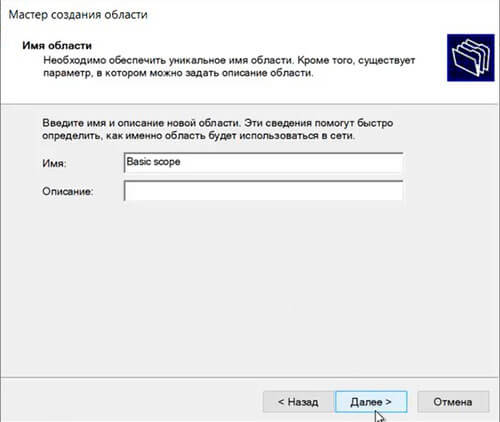
48. Задаем имя новой области, если необходимо, задаем также описание новой области. Снова «Далее«.
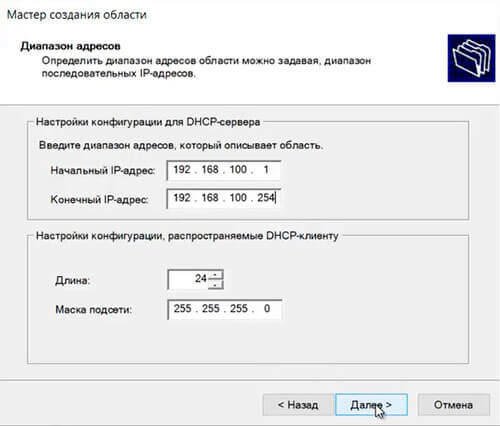
49. Вводим диапазон адресов, который описывает создаваемую область, маску подсети. Нажимаем «Далее«.
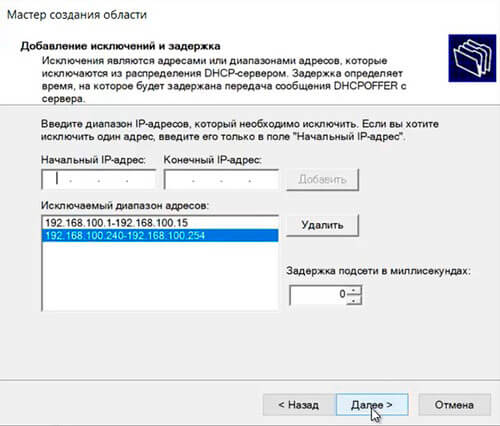
50. В следующем окне вводим с помощью кнопки «Добавить» один адрес или диапазон IP-адресов, который необходимо исключить. После ввода всех адресов или диапазонов нажимаем «Далее«.
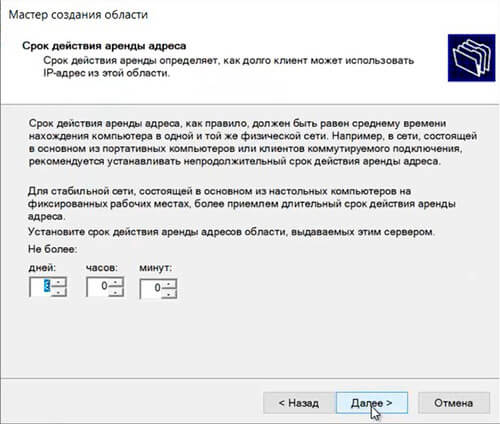
51. Оставляем по умолчанию срок действия аренды адресов области, выдаваемых сервером. Снова «Далее«.
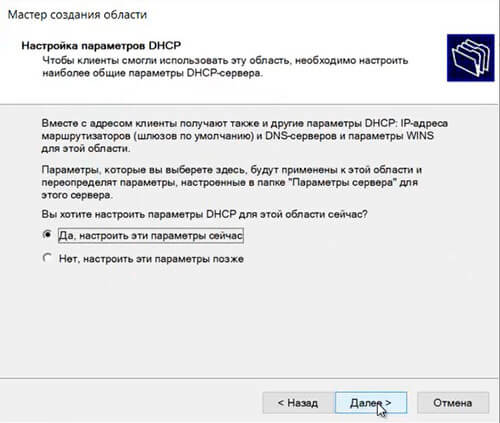
52. Для настройки других параметров DHCP выбираем «Да, настроить эти параметры сейчас«, затем «Далее«.
53. Добавляем с помощью кнопки «Добавить» IP-адрес маршрутизатора, снова «Далее«.

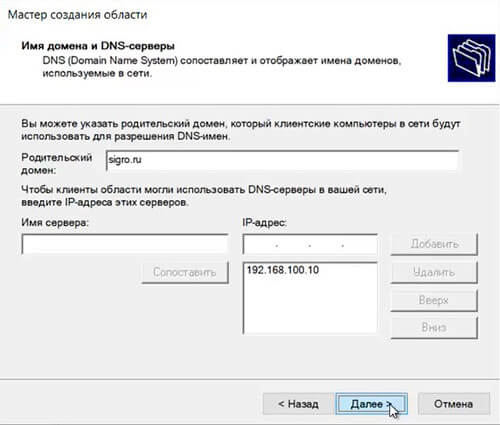
54. Оставляем по умолчанию родительский домен, который клиентские компьютеры в сести будут использовать для разрешения DNS-имен. Затем «Далее«.
55. Вводим IP-адреса WINS-сервера, или нажимаем просто «Далее«.

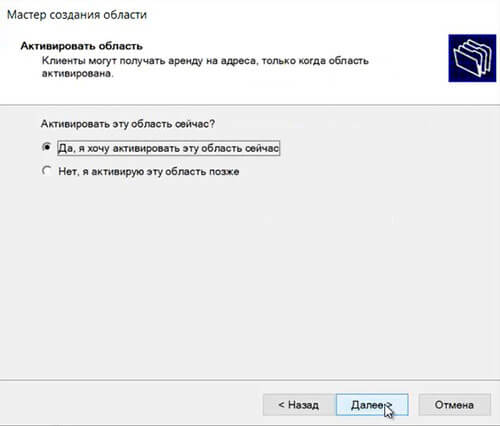
56. Выбираем «Да, я хочу активировать эту область сейчас«, затем «Далее«.
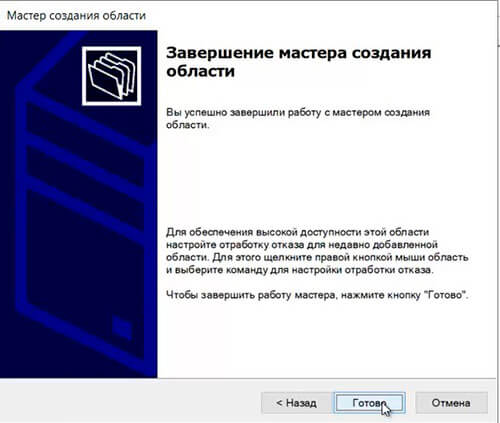
57. В следующем окне появится «Вы успешно завершили работу с мастером создания области», нажимаем «Готово».
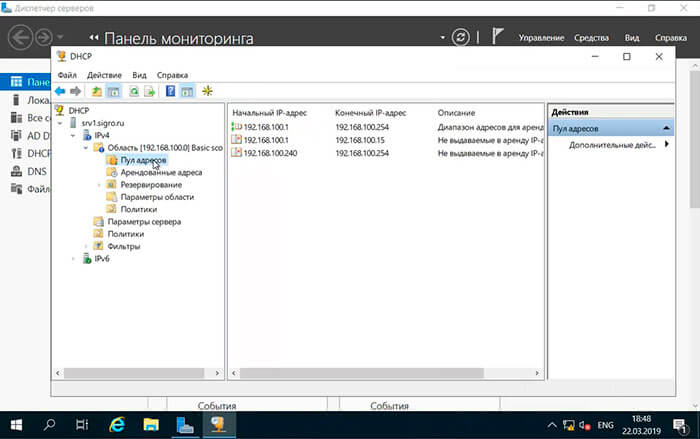
58. Вновь созданный диапазон появится в «Пул адресов«.
Посмотреть видео можно здесь:
Источник
Are you ready to install Windows Server 2019 and take advantage of its powerful features? This comprehensive guide will walk you through the entire installation process, from obtaining the Windows Server 2019 ISO to configuring your system. Whether you’re setting up a standalone system or integrating it into a larger network, we’ll cover the essentials to ensure a smooth installation.
Don’t miss important details like the Windows Server 2019 end of life considerations and the different editions available, including Windows Server 2019 Standard. Let’s get started and make your Windows Server setup a success!
A Quick Guide:
The article provides a step-by-step guide for installing Windows Server 2019, starting with ensuring your system meets the minimum hardware requirements, including a 64-bit processor, 2 GB RAM, and 32 GB storage. It then instructs you to access the Voxfor website, select a subscription plan, and complete the signup process. Once subscribed, you prepare for installation by accessing the Voxfor management interface, locating, and loading the Windows Server 2019 ISO image, and rebooting the virtual machine.
The installation involves selecting the preferred Windows Server 2019 edition, accepting the license terms, choosing the custom installation type, and loading necessary drivers from the “virtio-win” ISO image. You also need to partition the disk by deleting existing partitions and creating new ones for the installation. Post-installation steps include setting up the initial user account and password, accessing the server via Remote Desktop Connection, and performing system updates and configurations, such as enabling Ethernet drivers and remote desktop access. This comprehensive guide ensures a smooth and complete installation of Windows Server 2019 on your system.
Windows Server 2019 Requirements
Minimum Requirements
- Processor: 1.4 GHz 64-bit, supports NX, DEP, CMPXCHG16b, LAHF/SAHF, PrefetchW, SLAT
- Memory: 512 MB (2 GB for Desktop Experience)
- Storage: 32 GB
- Network: Gigabit Ethernet adapter, PCI Express, PXE boot support
- Other: UEFI 2.3.1c, TPM 2.0, Super VGA (1024 x 768), DVD drive, Internet access
Recommended Requirements
- Processor: 3.1 GHz or faster multi-core
- Memory: 16 GB or more
- Storage: 64 GB or more
These requirements ensure that Windows Server 2019 runs effectively and efficiently.
Voxfor Lifetime Server Offer
First you need to navigate to voxfor website and then move to the windows vps price.
To subscribe to a plan, follow these steps:
- First Scroll down and select Windows Server 2019.
- You can select the 7 days trial only for $1 or just choose the plan you need.
- Choose the “Purchase Plan” option.
On the new page, sign up by entering your details.
Complete all steps and you’ll receive an email from Voxfor confirming your subscription.
Your Server is ready
After following all the above steps you’ll receive a confirmation email from voxfor confirming your subscription and the server information.

After getting the confirmation email from voxfor, you just need to click on the services as shown in the below image:

Windows 2019 Server Installation Steps
Follow these simple steps to install Windows 2019 Server iso:
1. Prepare Your Server:
Access the Voxfor management interface and select and click on your server from the list Under Services.

2. Service Management
Locate the “Service Management” section on your dashboard.
Click on the “ISO Images” option, which is represented by an icon with a disc and the text “ISO Images”.

3. ISO images:
Windows Server 2019 download or ISO for installation: In the search box, type the “Windows” and press Enter.
From the list of available ISO images, locate “Windows Server 2019 English.”
To load the ISO image, click on the refresh icon button next to “Windows Server 2019 iso English”.

After this you will get a confirmation dialogue box and you just need to click on the confirm button as you can see in the below image.

4. Reboot To Load ISO Image:
Return to the main service management page.
In the “Service Actions” section, click on the “Reboot” option to load the ISO image.

5. Reboot This Virtual Machine:
A confirmation box will appear asking, “Are you sure that you want to reboot this virtual machine?” Click “Yes” to proceed.

6. Navigate To Console:
In the “Service Management” section, click on the “Console” option to navigate to the console.

7. Windows Server 2019 Boot Menu:
On the console screen, you will see the Windows Server 2019 boot menu. Select the Language to install, set time and currency format and keyboard and input method and then press Next.

To proceed with configuring the Server Core installation, click Install Now

8. Windows Server 2019 Standard:
The setup wizard lists the install options below. In this list, editions without Desktop Experience are the Server Core install options:
- Windows Server Standard
- Windows Server Standard with Desktop Experience
- Windows Server Datacenter
- Windows Server Datacenter with Desktop Experience
Choose the operating system you would like to install, which in this case is Windows Server 2019 Standard (Desktop Experience). Depending on the license that you have, you may select Windows Server 2019 Datacenter as well. The options with the suffix Desktop Experience should not be selected because they will not install the Server Core edition.

Accept the License Terms for Windows Server Core 2019. Click Next.

Select the Server Core Installation Type: Upgrade or Custom. Selecting Upgrade will upgrade the existing server to the core edition. Since we are installing Windows Server 2019 Core on a VM, select Custom.

9. Virtio ISO Images:
Go to the services again and in the search box, type “virtio” and press Enter. From the list of available ISO images, locate “virtio-win-0.1.248.iso”. To load the ISO image, click on the refresh icon button next to “virtio-win-0.1.248.iso.” We are doing this because we need to install the driver during the installation.

After this you will get a confirmation dialogue box and you just need to click on the confirm button as you can see in the below image.

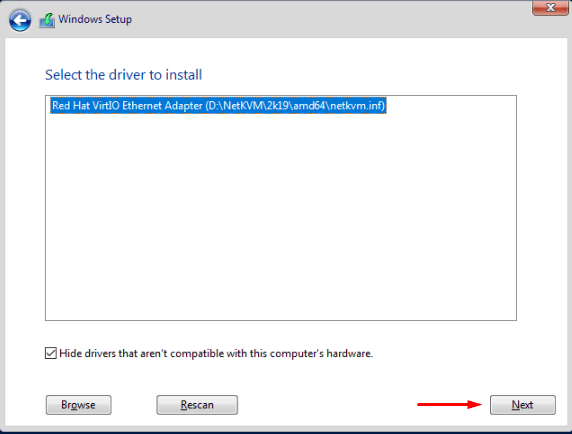
10. Load Driver:
Click on the load drive as you can see in the below image.

You have to select Browse from the options as you can see the image below:

You can select the CD Drive option under This PC as you can also see in the image.

Search NetKVM in CD drive.

In the dropdown menu of NetKVM you have to find 2k19 and click on that.

Select amd64 and click on Next as shown in the below image.

After this you will get the below image and you have to click on next.
11. Available ISO Images:
After this you need to go once again in Services and in the search box, type the “Windows” and press Enter.
From the list of available ISO images, locate “Windows Server 2019 English”
To load the ISO image, click on the refresh icon button next to “Windows Server 2019 English.”
After this you will get a confirmation dialogue box and you just need to click on the confirm button as you can see in the below image.

12. Release Storage:
Select the Disk for installing Windows Server 2019 Core. First you have to release some space by selecting and clicking on Delete as shown in the image. Click Next.

After this you can get a confirmation box and you have to click OK.

Select Drive 0 Partition 1, click on delete and press Next.

It will show you a warning message and hit OK on it.

Same step you will do for this option also.

After this you can get a confirmation box and you have to click OK.

Next, click on “New” to create a new partition for the installation of Windows Server 2019. Select the desired size, click on “Apply,” and then press “Next.”

After this, a confirmation box will appear. You will need to click “OK.”

Now, select the partition you created for the installation of the operating system and click “Next.”

13. Windows Server 2019 Core Installation:
Windows Server 2019 Core Installation begins now. All you need to do is wait a few minutes to complete the installation. While the installation is in progress, if you’re feeling too sleepy, why not grab a cup of coffee?
The Server 2019 installation should be quick, with the entire process taking no more than 5-10 minutes. This completes the steps to install Windows Server 2019 Core.

You may click “Restart Now,” but if you do not, the system will automatically reboot after 10 seconds.

After reboot you will see this window.
14. Administrator Creation:
Next, you will need to enter your login password and retype it for confirmation. After this, click on “Finish.”

Press “Alt+Ctrl+Del” to log in to your operating system.

Enter the password you set during the installation.

15. Windows Server 2019 Interface:
After a successful login, you will access the Windows Server 2019.

As you can see that your Ethernet drivers have been installed automatically. Click on “No,” and proceed on.

Windows has successfully updated your drivers. Simply click on “Close”.

16. Local Storage:
The Control Panel is available in the same way as it is on conventional Windows operating systems, so you can start customizing your server from here or explore more possibilities there. After this you have to select a local server.

17. Enhanced Security Manager:
In the server manager find If Enhanced Security Manager and click at ON as you can see in the below image.

After selecting on you have a new menu and click on OFF at Admin

18. Enable Remote Desktop:
In the server manager screen you need to find the remote desktop and click on disabled written in front of Remote desktop as you can see in the below image.

After this you will see the system properties menu in which you have to select Allow remote connections to the computer, then you will see the new window click OK as shown in image.

First click ok and then hit apply as you can see in the image.

19. Command Prompt:
Left-click on the Command Prompt and select “Run as administrator”.

20. Ethernet Drivers Ping Test:
To verify your Ethernet drivers, you can perform a ping test from the Command Prompt. Type ping 8.8.8.8. If your drivers are working correctly, you will see successful ping responses.

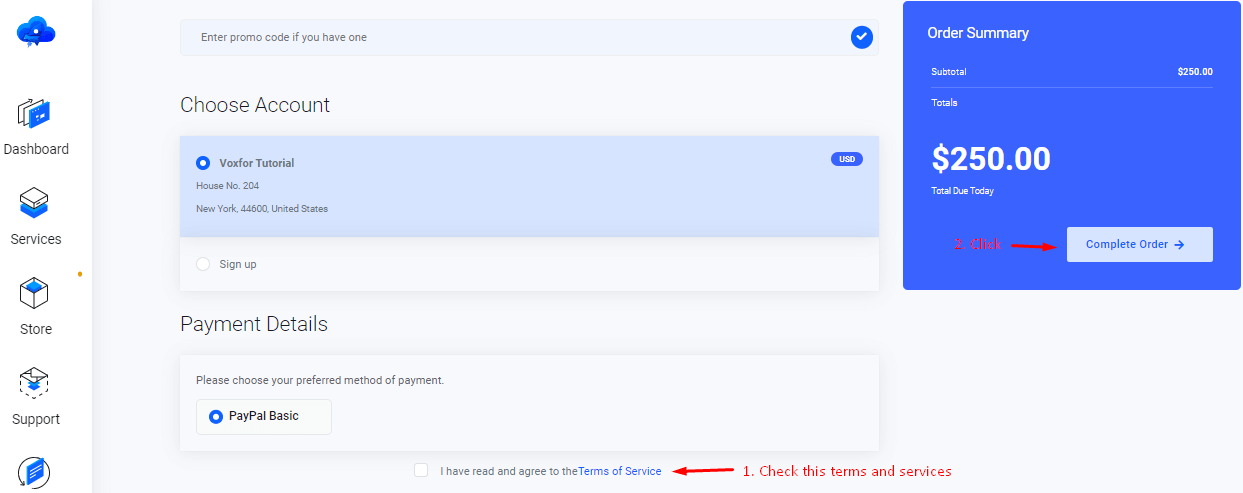
21. Voxfor Control Panel
Once again, navigate to the services section of Voxfor.

Copy the IP Address. In this case, the IP Address is 5.161.235.159, as shown in the image below.

22. Remote Desktop Connection:
Now, go to the search box and type “remote.” Click on “Remote Desktop Connection,” as shown in the image.
Paste the IP Address that you copied from the Voxfor dashboard into the provided field, and then click on “Connect,” as shown in the image.

You will now see a pop-up where you need to enter your credentials. In the username field, type “Administrator.” Then, enter the password you set during the installation.
After this, you will receive a pop-up message from Remote Desktop Connection. Check the box that says “Don’t ask me again for connections to this computer,” and then click on “Yes.”
Now, you will see that your Remote Desktop Connection is connecting to the server.

After the connection is established, you will have successfully entered your operating system.

23. Check For updates:
Now, search for “updates” in the search box and click on “Check for updates.”

If you find any updates, click on “Install now,” as shown in this case.

Conclusion
Congratulations! You now have an installation of Windows 2019 Server up and running. Windows Server 2019 is a powerful and stable distribution, perfect for servers and workstations alike. Ready for more? Choose Voxfor for your server needs and enjoy the simplicity of a ready-to-use server with Windows Server 2019 installed, available in just two minutes. Visit Voxfor to get started today! Thank you for following this guide. For more tips and tutorials, stay tuned to our website. If you have any questions or need further assistance, feel free to reach out to our support team.For further installation guides, visit the Voxfor website where you can find information on Almalinux, CentOS 7.9, and windows 2022 server.
Introduction
Are you interested in learning how to install Windows Server 2019? Installing Windows Server 2019 is easy and straightforward, and can be done in just a few steps. In this blog post, we’ll cover the basics of installing Windows Server 2019, including the prerequisites, step-by-step process, and the benefits of using the latest version of Windows Server.
Overview of Windows Server 2019
Windows Server 2019 is the latest version of Microsoft’s server operating system. It offers a range of features and tools to help businesses manage their IT infrastructure, including virtualization, storage, networking, and security.
Benefits of Installing Windows Server 201
There are many benefits to installing Windows Server 2019, including improved performance, enhanced security, and better scalability. Additionally, Windows Server 2019 offers a range of new features, such as Windows Admin Center, which provides an intuitive dashboard for managing and monitoring your server environment.
Prerequisites for Installing Windows Server 2019
Before you can install Windows Server 2019, there are a few prerequisites that must be met.
Hardware Requirements
The hardware requirements for installing Windows Server 2019 depend on the number of users and the type of workloads that will be running on the server. Generally, you’ll need a server with at least 8GB of RAM and a 64-bit processor.
Software Requirements
You’ll need to have the latest version of Windows Server 2019 installed on the server before you can begin the installation process. Additionally, you’ll need to have a DVD drive or USB port available for the installation media.
Network Requirements
You’ll need to have a network connection available to install Windows Server 2019. This can be either a wired or wireless connection. Additionally, you’ll need to have a DNS server available to configure the network settings.
Step-by-Step Process for Installing Windows Server 2019
Now that you’ve met the prerequisites, you’re ready to begin the installation process.
Download and Install the Windows Server 2019 ISO
The first step is to download the Windows Server 2019 ISO from the Microsoft website. Once you’ve downloaded the ISO, you’ll need to burn it to a DVD or USB drive.
Install the Windows Server 2019 Operating System
Once you’ve burned the ISO to a DVD or USB drive, you can begin the installation process. You’ll need to boot from the installation media and follow the on-screen instructions to install the operating system.
Configure the Windows Server 2019 Installation
Once the operating system is installed, you’ll need to configure the settings. This includes setting up the network settings, adding users, and configuring the services and applications that will be running on the server.
Activate the Windows Server 2019 Installation
Once you’ve configured the server, you’ll need to activate the installation. This can be done by entering your product key or using the automated activation process.
Conclusion
Installing Windows Server 2019 is easy and straightforward. By following the steps outlined in this blog post, you can quickly and easily install the latest version of Windows Server.
Installing Windows Server 2019 can seem intimidating, but it doesn’t have to be. With a few simple steps, anyone can have Windows Server 2019 up and running in no time. First, you’ll need to purchase the necessary software and hardware. Once that’s done, you’ll need to download and install the software. After that, you’ll need to configure the server to meet your needs. Finally, you’ll need to test the server to make sure everything is working properly. With these easy steps, you can have Windows Server 2019 up and running quickly and easily. So what are you waiting for? Discover the amazingly simple steps to installing Windows Server 2019 today!
Frequently Asked Questions (FAQ) :
Q1: What is the minimum hardware requirement to install Windows Server 2019?
A1: The minimum hardware requirements for Windows Server 2019 are a 1.4 GHz 64-bit processor, 512 MB of RAM, 32 GB of disk space, and a Super VGA (800 x 600) or higher-resolution monitor.
Q2: What type of installation is recommended for Windows Server 2019?
A2: The recommended installation type for Windows Server 2019 is the Server Core installation, which is a minimal installation that does not include a graphical user interface (GUI).
Q3: How do I install Windows Server 2019?
A3: To install Windows Server 2019, you must first download the ISO file from the Microsoft website. Once the file is downloaded, you can use a program such as Rufus to create a bootable USB drive. After the USB drive is created, you can boot the computer from the USB drive and follow the on-screen instructions to complete the installation.
Q4: Does Windows Server 2019 come with any pre-installed applications?
A4: Yes, Windows Server 2019 comes with several pre-installed applications, including Active Directory, DNS, DHCP, and IIS.
Q5: Is it possible to upgrade from an earlier version of Windows Server to Windows Server 2019?
A5: Yes, it is possible to upgrade from an earlier version of Windows Server to Windows Server 2019. However, it is recommended that you perform a clean installation of Windows Server 2019 instead of upgrading.