
Если у тебя ноутбук с UEFI, то для того, что бы поставить Windows, тебе нужно либо создать установочную флешку с Windows, которая может грузиться в UEFI режиме. И далее подключить её к компьютеру, вызвать загрузочное меню и выбрать пункт загрузки с флешки в UEFI режиме.
Либо создать установочную флешку с Windows, которая умеет грузиться не в UEFI, а в BIOS режиме, опять же подключить её к компьютеру, включить его, вызвать загрузочное меню, в нём выбрать вариант загрузки с флешки не в UEFI, а в bios режиме.
Как вызвать загрузочное меню смотри либо в документации к материнской плате, если это стационарный компьютер, либо в документации к ноутбуку, но обычно это клавиши F8, F12, ещё может быть F6, но ты смотри в документации, у тебя может быть по другому.
Как создать загрузочную флешку с Windows тебе лучше узнать на форумах по поддержке этой операционной системы.
Но скажу лишь, то проще всего создать флешку с Windows 10 для UEFI загрузки, там просто форматируешь её в FAT32 и копируешь на неё все файлы из ISO образа.
Для Windows 7 тоже можно создать флешку с поддержкой UEFI, но там нужно найти UEFI загрузчик.
Про создание флешки с установкой Windows не в UEFI режиме — ищи сам.
anonymous
()
- Ссылка
You probably have encountered, Minimal BASH like line editing is supported. For the first word, TAB lists possible command completions. Anywhere else, TAB lists possible device or file completions error in Grub if you dual boot Windows and Linux and have recently updated Windows.
Windows updates have a history of corrupting the boot files or partition of the Linux installations. You can encounter this error in any Linux based OS. But don’t worry, there’s an easy fix for this error.
Prerequisites to Fix This Error
You will need the following things to get started :
- Live USB stick of the same Linux Distribution
- An Internet connection (Ethernet or Wi-Fi)
If you do not have a Live USB stick, you can create one by following the steps mentioned here.
Boot into the live USB stick of your distribution, now follow these steps carefully:
1. Check if your system uses EFI or BIOS
From the command line interface, type the following command to list your partitions and to check the type of your filesystem:
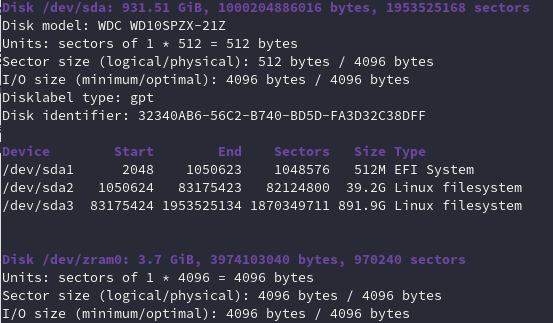
If anywhere, you spot something like ‘EFI’ then that means your system is of EFI type. Most of you probably have this type of installation.
2. For UEFI based systems
We are now going to mount our root (/) partition, in my case, it is /dev/sda2, but yours can be different. Look closely at your fdisk command output to know your root partition, and then mount it using this command :
sudo mount /dev/sdaX /mnt
Now, we will mount our EFI partition as well. To do that, type :
sudo mount /dev/sdaY /mnt/boot/efi
Again, don’t forget to change X and Y with the correct partition numbers on your disk. Finally, reinstall grub using the following commands :
sudo grub-install --boot-directory=/mnt/boot --bootloader-id=ubuntu --target=x86_64-efi --efi-directory=/mnt/boot/efi
And now finally, restart your system by typing the following commands in the terminal and remove your Live USB stick when prompted.
3. For BIOS systems
We will again mount our root partition using the following commands :
sudo mount /dev/sdaX /mnt
And then we will easily re-install GRUB using the following commands :
sudo grub-install /dev/sdX
Reboot your system now and remove the installation media when prompted. Your system should work fine now.
Solution #2 – Minimal BASH-like line editing is supported error in Ubuntu Linux
If the above method didn’t work for you to fix the Grub error in Ubuntu based Linux systems, then you can try installing a tool called ‘Boot Repair’. This tool is capable of detecting and fixing all the GRUB-related problems for you. You will also need a live USB stick of the distribution for this method.
1. Install Boot Repair tool
Boot into your live USB stick, open a terminal, and add this repository :
sudo add-apt-repository ppa:yannubuntu/boot-repair
Run an update first and then install the boot-repair tool as follows :
sudo apt-get update
sudo apt-get install boot-repair
2. Repair your installation
Launch the boot repair tool by typing the following commands in your Terminal :
A window will appear before you, click on the ‘Recommended Repair’ option.
It will take some time, but after that, it will present you with some commands to fix the issue. Copy (or type) the commands one by one in the Terminal.
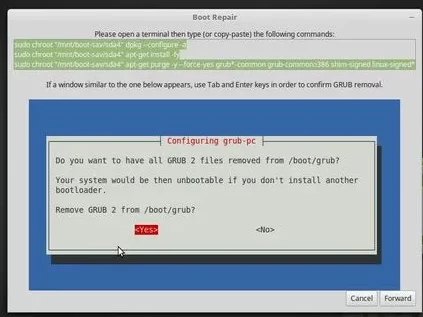
If while typing the commands a window appears, select yes and remove the old GRUB files. Once the process is finished, You will be greeted with a menu which will tell you to restart your system. You can also check the log files mentioned in the URL. Don’t forget to remove your installation media when prompted.
Summary
If while typing the commands a window appears, select yes and remove the old GRUB files. Once the process is finished, You will be greeted with a menu which will tell you to restart your system. You can also check the log files mentioned in the URL. Don’t forget to remove your installation media when prompted.
What is the Fixed Minimal Bash-Like Line Editing Is Supported Grub Error in Ubuntu Linux?
The Fixed Minimal Bash-Like Line Editing Is Supported Grub Error in Ubuntu Linux is a common error that could occur during the boot process, usually displayed as a “minimal bash-like line editing is supported” error message in the Grub rescue prompt.
How can I fix the Fixed Minimal Bash-Like Line Editing Is Supported Grub Error in Ubuntu Linux?
To fix the Fixed Minimal Bash-Like Line Editing Is Supported Grub Error in Ubuntu Linux, you can boot into a live environment using a bootable USB, open the terminal, and follow specific commands to resolve the issue. This error could occur with any Linux OS, not just Ubuntu.
Is the Fixed Minimal Bash-Like Line Editing Is Supported Grub Error specific to Ubuntu Linux only?
No, the Fixed Minimal Bash-Like Line Editing Is Supported Grub Error is not specific to Ubuntu Linux only. It could occur with any Linux distribution such as Linux Mint, elementary OS, and others.
Can this error occur in a dual-boot setup with Windows?
Yes, the Fixed Minimal Bash-Like Line Editing Is Supported Grub Error can occur in a dual-boot setup with Windows when the Grub bootloader encounters issues during the boot process.
How do I fix the black screen of death for Linux related to this error?
To fix the black screen of death issue related to the Fixed Minimal Bash-Like Line Editing Is Supported Grub Error, you can follow specific troubleshooting steps outlined in tutorials or guides available online
Also Read
Arch Wiki – Grub Troubleshooting
I tried the installation process again, unsuccessfully.
I did also run
the out of which contains this line:
==> Creating gzip-compressed initcpio image: /boot/initramfs-linux.imgwhich seems to suggest that in the «Minimal bash-like line editing is supported»-GRUB I should have uset that, is it right? (*)
The output of the command ends with this last line:
Image generation successfulwhich seemed good.
At the Boot loader section, which is the only step left before rebooting, I don’t know very well what to do, as the section just says Choose and install a Linux-capable boot loader. If you have an Intel or AMD CPU, enable microcode updates in addition (where the latter part does not apply to me, as my system has an i7).
Therefore, I tried to follow these installation steps, so I simply run this:
# mount /dev/nvme0n1p1 /home            # is it ok to mount it in home???
# grub-install --target=x86_64-efi --efi-directory=/home --bootloader-id=GRUB
But again I end up with the Minimal bash-like line editing is supported…
In the grub installation after the second command I copied above, I read Remember to #Generate the main configuration file after finalizing the configuration, but I did not do it, as it refers to a subsection in Configuration, which starts with On an installed system, so I understand it’s after the reboot.
(*) I did run indeed these commands
grub> set root=(hd0,gpt4)
grub> linux /boot/vmlinuz-linux root=/dev/nvme0n1p4
grub> initrd  /boot/initramfs-linux.img
grub> boot
but the boot does not succeed, and all I read on screen is:
Arch Linux 5.7.8-arch1-1 (tty1)

redviper login: [    2.860377] sof-audio-pci 0000:00:1f.3: error: request firmware intel/sof/sof-cml.ri failed err: -2
[    2.860426] sof-audio-pci 0000:00:1f.3: error: failed to load DSP firmware -2
[    2.860854] sof-audio-pci 0000:00:1f.3: error: sof_probe_work failed err: -2
EDIT
The boot actually does succeed, I just had to hit Return to get the login prompt. But I cannot really use the system this way, having to manually run those 4 lines in GRUB, expecially considering that I don’t know the US keyboard layout and I have to look it up on a photo.
Last edited by Enrico1989 (2020-07-14 18:00:04)
Главное не напартачить)
1) Загрузка в сеансе
Подключите live USB и загрузитесь в прямую сессию.
2) Установите Boot Repair
После того, как вы вошли в сеанс жизни, откройте терминал и используйте следующие команды для установки Boot Repair:
sudo add-apt-repository ppa: yannubuntu / boot-repair
sudo apt-get update
sudo apt-get установить boot-repair
Примечание. Следуйте этому руководству, чтобы исправить ошибку, из-за которой не удалось получить cdrom. Apt-get update не может быть использован для добавления новой ошибки CD-ROM, если вы столкнулись с ней во время выполнения вышеуказанной команды.
3) Восстановите загрузку с помощью Boot Repair
Установив Boot Repair, запустите его из командной строки, используя следующую команду:
ремонт «обуви»
На самом деле все довольно просто отсюда. Вам просто нужно следовать инструкциям, предоставленным Boot Repair tool. Во-первых, нажмите «Рекомендованный вариант ремонта» в «Boot Repair».
восстановление загрузчика в Ubuntu Linux
Boot Repair займет пару минут, чтобы проанализировать проблему с загрузкой и Grub. После этого он предоставит вам некоторые команды для использования в командной строке. Скопируйте команды одну за другой в терминал. Для меня это показало мне такой экран:
Исправление проблемы с Grub в Ubuntu Linux будет отличатся!!!
Он будет выполнять некоторые процессы после ввода этих команд:
«minimal bash like editing»
Как только процесс завершится, он предоставит вам URL, который состоит из журналов восстановления загрузки. Если проблема с загрузкой не устранена даже сейчас, вы можете зайти на их форум или написать письмо команде разработчиков и предоставить им URL в качестве ссылки. Круто, не правда ли?
Ремонт «багажника» успешно завершен!!!
После успешного завершения восстановления загрузите компьютер, отключите USB и снова загрузитесь.