
minidump что это за папка?
minidump (малый дамп памяти) -это файл в который записывает минимальный набор данных для определения причины неожиданного сбоя компьютера. Такие как: Список загруженных драйверов, сообщение о неустранимой ошибке, ее параметры и т.д. Данный дамп памяти может помочь разобраться в причинах возникновения синих окон смерти Windows (BSoD).
Малый дамп можно найти в %systemroot%\minidump (он же C:\Windows\minidump), где имя файла обычно имеет вид: число когда возникла ошибка — xxxx-xx.dmp. Например: 020816-6031-01.dmp. В более старых версиях операционных систем названия файлов имеет формат Mini+месяц+день+год когда произошел сбор — порядковый номер файла. Например Mini121615-01.dmp. Этот файл был создан 16 декабря 2015 года и он первый файл дампа.
Minidump — это папка в которой содержаться все малые дампы памяти. Мы настоятельно не рекомендуем удалять эту папку.
Для анализа этих существует множество утилит. Например: Microsoft Kernel Debugger (Ее можно скачать с официального сайта компании Microsoft), BlueScreenView (Ее официальный сайт http://nirsoft.net).
Внимание! Файлы minidump не смогут создаваться если файл подкачки меньше 2 мб или операционная система работает без файла подкачки.

- 0
- 1
- 2
- 3
- 4
- 5
-
Home
-
Knowledge Base
- What Is Minidump File on Windows? How to Use It to Fix BSOD?
By Daisy | Follow |
Last Updated
What is the minidump file? How to enable minidump files on Windows? How to use it to fix the BSOD issue? If you are looking for the answers to the above questions, you can refer to this post. Here are the answers.
What Is the Minidump File?
Windows minidumps are small files that are generated every time the Windows operating system unexpectedly encounters an error, such as during a Blue Screen of Death (BSOD) crash. This file is stored in the C:\Windows\minidump or C:\Winnt\minidump directory depending on your version of Windows.
This file contains information about the nature of the error, such as the state of the system before and possibly during the crash. This contains information such as the services and processes that are running and the resources each is using.
Tips:
Tip: To learn more information about Windows system issues, you can go to the MiniTool official website.
Why You Need a Minidump File to Diagnose Your BSOD
In earlier versions of Windows, BSODs showed you some error codes that were at least a little helpful. However, in Windows 10, the screen will give you a stop code that you can write down and study, and a QR code that you can use on your phone. However, this just takes you to the Microsoft website and describes some of the error codes.
Tips:
Tip: If you encounter the blue screen of death issue on Windows 11/10, your PC may not boot normally. Thus, you can back up your system in advance. Once your PC is not booting normally, you can restore it with the backup image. To do that, you can try the professional backup tool – MiniTool ShadowMaker. It allows you to try the all features for free for 30 days. Now, you can download it.
MiniTool ShadowMaker TrialClick to Download100%Clean & Safe
How to Enable the Minidump File?
The memory dump or minidump file feature is not enabled in Windows by default. To use it, you need to enable it.
Step 1: Type System Properties in the Search box. Click the Advanced system settings link under the Related settings part.
Step 2: Go to the Advanced tab. Under Startup and Recovery, click Settings….
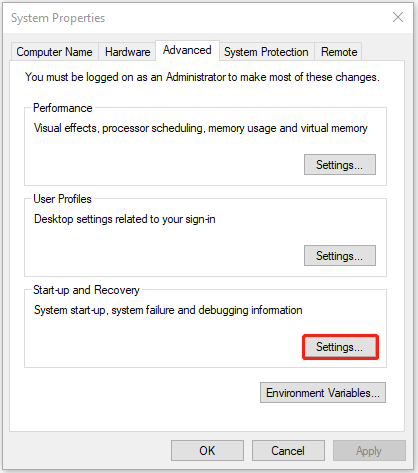
Step 3: Check the following options under the System failure part.
- Write an event to the system log
- Automatically restart
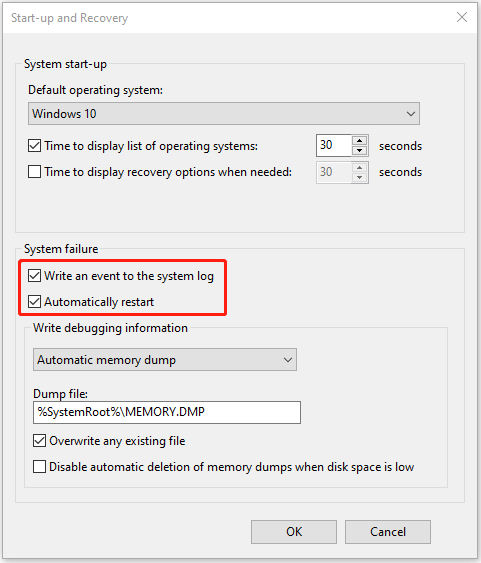
Step 4: Expand the Write debugging information drop-down menu, select Small Memory Dump (256KB) and click OK.
How to Use the Minidump File to Fix BSOD
Now you can use the minidump file to fix the BSOD issue. To do that, you will need to use a tool called BlueScreenView to open and view the contents of a minidump file.
- Download and install BlueScreenView from its official website. Then, choose the compatible version for your computer (32-bit or 64-bit).
- Then, install and launch BlueScreenView.
- Now, you can view the contents of the minidump file and see what might have caused the blue screen of death error. You can see the error caused by the last column of each line.
- Right-click on any line and select Google Search – Bug Check + Driveror Google Search – Bug Check or Google Search – Bug Check + Parameter 1 to search for more solutions for the BSOD problem.
Find BSOD Stop Code Using a Minidump File
You can also use BlueScreenView to see the exact blue screen that Windows displayed when the BSOD occurred.
- To do so, select Options> Lower Pane Mode > Blue Screen in XP Style.
- Double-click anywhere on the line to see more information about the BSOD issue.
What If a Crashed PC Cannot Load Windows?
When a BSOD error occurs, your PC may stop loading Windows. In that situation, the minidump file also comes up very handy. You can move the Minidump (C:\Windows\Minidump\) folder to another functional computer and analyze the Minidump files from there. For that:
- On the BlueScreenViewapp, go to Options > Advanced options (Ctrl + O) or select the Advanced Options icon from the File menu.
- Once you click Browse, BlueScreenView will look in the transferred Minidump folder for the minidump files.
Final Words
Now, you have known what the minidump file is. Besides, you can know how to enable it on Windows and how to use it to fix the BSOD issues.
About The Author
Position: Columnist
Having been an editor at MiniTool since graduating college as an English major, Daisy specializes in writing about data backups, disk cloning, and file syncing as well as general computer knowledge and issues. In her free time, Daisy enjoys running and going with friends to the amusement park.
Каждый раз, когда Windows случается завершить свою работу сбоем с экраном BSOD, в системной папке %SystemRoot% создаётся отчёт — бинарный файл дампа памяти в формате DMP. Также файлы дампов могут создаваться сторонним программным обеспечением, например, популярным браузером Chrome. Дампы бывают весьма полезны в деле диагностики возникающих в работе системы и программ проблем, с другой стороны, они могут занимать на диске немало места, что не есть хорошо для небольших SSD-дисков.
{banner_google1}
Поэтому поставленный вопрос вполне закономерен и естественен — можно ли удалять файлы дампов и если можно, то как это правильно делать? Ответ на этот вопрос — да, файлы дампов можно удалять, это никак не повредит системе и установленным на компьютере программам. Более того, вы вообще можете отключить создание дампов, по крайней мере тех, которые создаются операционной системой при критических сбоях.
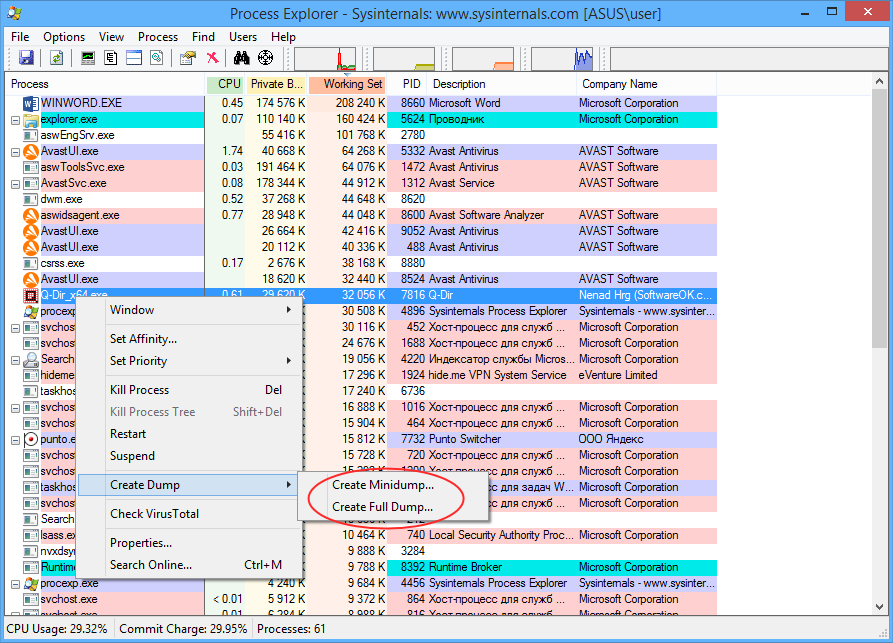
Windows поддерживается несколько типов системных дампов: полный, памяти ядра и малый дамп памяти. Полный дамп содержит всю физическую память системы, дамп памяти ядра — только ту часть ОЗУ, которая используется ядром, малый дамп содержит сведения об ошибках, загруженных драйверах и прочую служебную информацию. «Большие» дампы сохраняются в каталоге %SystemRoot% (Windows), под хранение минидампов в системе отведена папка %SystemRoot%\Minidump. Дампы сторонних программ обычно хранятся в папках профиля пользователя. Существуют также дампы отдельных процессов, создать такой дамп можно из Диспетчера задач или с помощью небезызвестной утилиты Process Explorer.
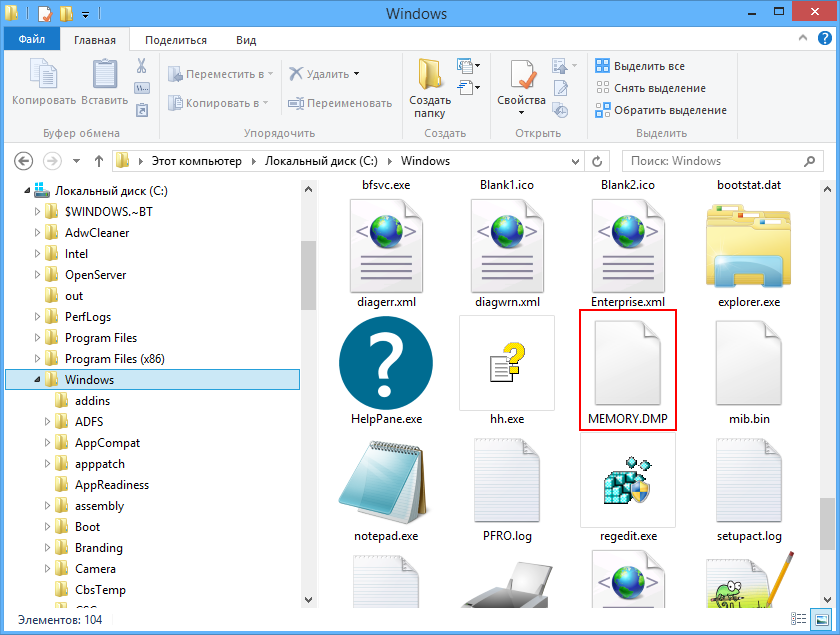
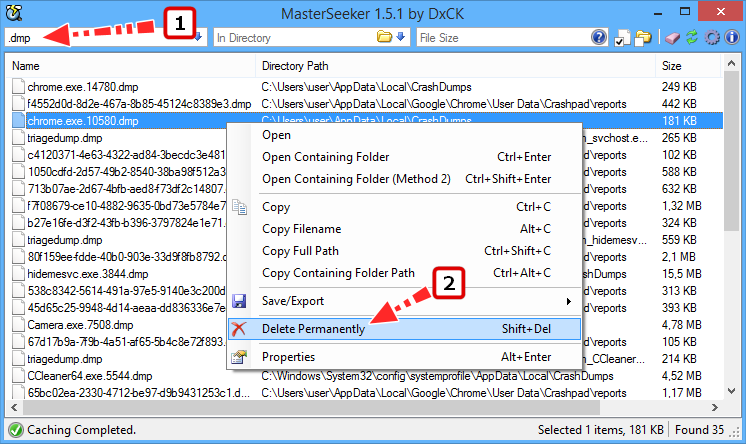
Этот способ сводится к поиску всех файлов в формате DMP и их удалению. Как уже было сказано, системные файлы дампов располагаются в папках C:\Windows и C:\Windows\Minidump, для обнаружения дампов, созданных другими программами можно задействовать встроенный поиск Windows или сторонние утилиты, например, MasterSeeker. Запустите утилиту и вставьте в поле поиска запрос «.dmp» без кавычек, и утилита тут же выведет список всех имеющихся на жёстком диске файлов дампов. Чтобы удалить дампы, выделите их кликом левой кнопкой мыши с зажатой Shift и нажмите Shift + Del или выберите опцию «Delete Permanently» в контекстном меню.
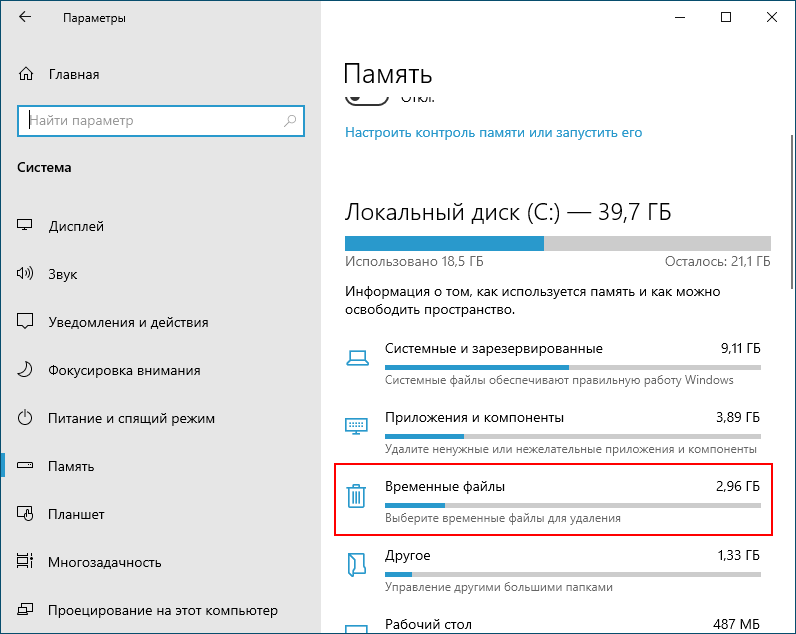
В Windows 10 удалить файлы дампов можно через приложение Параметры. Открыв последнее, перейдите в раздел Система → Память → Временные файлы, отметьте флажком пункт «Файлы дампа памяти и системных ошибок» и нажмите кнопку «Удалить файлы».
{banner_google1}

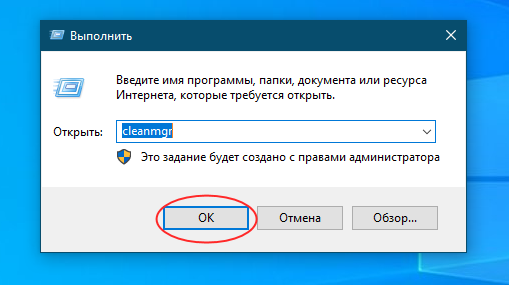
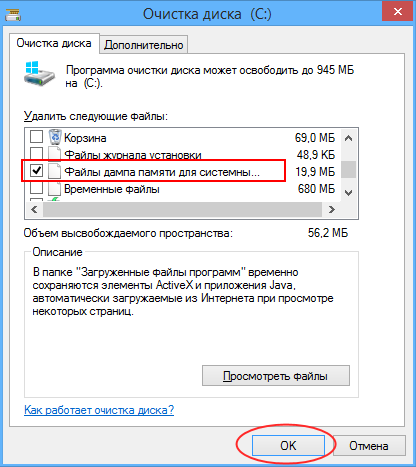
Более универсальным способом очистки (работает в Windows 10, 8.1 и 7) является использование классической утилиты cleanmgr. Запустите ее одноименной командой через диалоговое окошко «Выполнить», выберите очищаемый диск C и нажмите в открывшемся окне очистки диска кнопку «Очистить системные файлы».
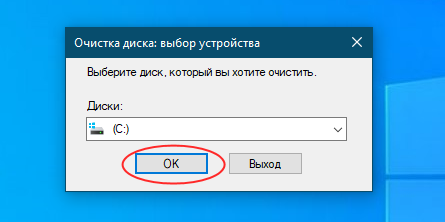
Опять выберите системный раздел, нажмите «OK» и дождитесь завершения сканирования. Отметьте в открывшемся окошке флажками пункты файлов дампов, нажмите «OK» и подтвердите действие.
Наконец, для удаления временных файлов дампов можно использовать сторонние программы-чистильщики, ту же CCleaner. Кстати, по умолчанию этот чистильщик уже настроен на удаление дампов памяти, в чём вы сами можете убедиться, внимательно изучив список удаляемых данных в категории «Система» на вкладке «Система». Примечательно, что CCleaner обнаруживает дампы, созданные не только Windows, но и другими программами, в частности, браузером Google Chrome.
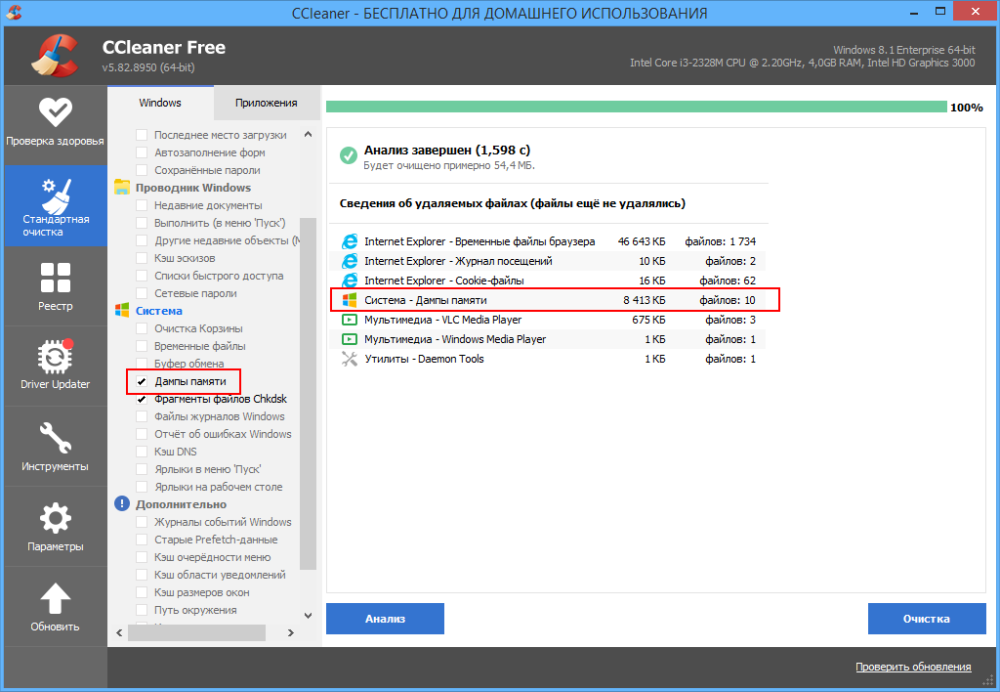
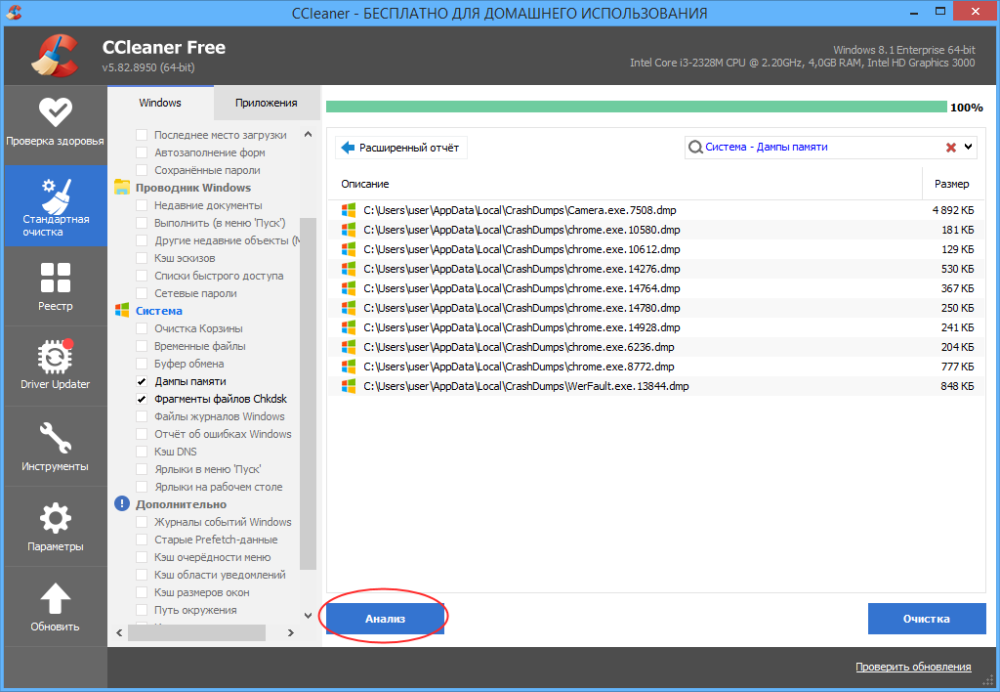
Приводить инструкцию по использованию чистильщика здесь не будем, программа достаточно известная, отметим лишь, что по сравнению с ручным поиском она выводит меньше результатов, но она же предлагает и более безопасное решение проблемы.
Дамп памяти (снимок состояния оперативной, содержащий отладочную информацию) — то, что часто оказывается наиболее полезными при возникновении синего экрана смерти (BSoD) для диагностики причин возникновения ошибок и их исправления. Дамп памяти сохраняется в файл C:\Windows\MEMORY.DMP, а мини дампы (малый дамп памяти) — в папку C:\Windows\Minidump (подробнее об этом далее в статье).
Автоматическое создание и сохранение дампов памяти не всегда включено в Windows 10, и в инструкциях на тему исправления тех или иных ошибок BSoD мне время от времени приходится описывать и путь включения автоматического сохранения дампов памяти в системе для последующего просмотра в BlueScreenView и аналогах — потому и было решено написать отдельное руководство именно о том, как включить автоматическое создание дампа памяти при ошибках системы, чтобы в дальнейшем ссылаться на него.
Настройка создания дампов памяти при ошибках Windows 10
Для того, чтобы включить автоматическое сохранение файла дампа памяти системных ошибок достаточно выполнить следующие простые шаги.
- Зайдите в панель управления (для этого в Windows 10 вы можете начать набирать «Панель управления» в поиске на панели задач), если в панели управления в поле «Просмотр» включено «Категории», установите «Значки» и откройте пункт «Система».

- В меню слева выберите пункт «Дополнительные параметры системы».

- На вкладке «Дополнительно» в разделе «Загрузка и восстановление» нажмите кнопку «Параметры».

- Параметры создания и сохранения дампов памяти находятся в разделе «Отказ системы». По умолчанию включены опции записи в системный журнал, автоматической перезагрузки и замены существующего дампа памяти, создается «Автоматический дамп памяти», хранящийся в %SystemRoot%\MEMORY.DMP (т.е. файл MEMORY.DMP внутри системной папки Windows). Параметры для включения автоматического создания дампов памяти, используемые по умолчанию вы также можете увидеть на скриншоте ниже.


Опция «Автоматический дамп памяти» сохраняет снимок памяти ядра Windows 10 с необходимой отладочной информацией, а также память, выделенную для устройств, драйверов и ПО, работающего на уровне ядра. Также, при выборе автоматического дампа памяти, в папке C:\Windows\Minidump сохраняются малые дампы памяти. В большинстве случаев этот параметр оптимален.
Помимо «Автоматический дамп памяти» в параметрах сохранения отладочной информации есть и другие варианты:
- Полный дамп памяти — содержит полный снимок оперативной памяти Windows. Т.е. размер файла дампа памяти MEMORY.DMP будет равен объему используемой (занятой) оперативной памяти на момент появления ошибки. Обычному пользователю обычно не требуется.
- Дамп памяти ядра — содержит те же данные что и «Автоматический дамп памяти», по сути это одна и та же опция, за исключением того, как Windows устанавливает размер файла подкачки в случае выбора одной из них. В общем случае вариант «Автоматический» подходит лучше (подробнее для интересующихся, на английском — здесь.)
- Малый дамп памяти — создание только мини дампов в C:\Windows\Minidump. При выборе данной опции сохраняются файлы по 256 Кб, содержащие базовую информацию о синем экране смерти, списке загруженных драйверов, процессах. В большинстве случаев при непрофессиональном использовании (например, как в инструкциях на этом сайте по исправлению ошибок BSoD в Windows 10), используется именно малый дамп памяти. Например, при диагностике причины синего экрана смерти в BlueScreenView используются файлы мини дампов. Однако в некоторых случаях может потребоваться и полный (автоматический) дамп памяти — часто службы поддержки ПО при возникновении неполадок (предположительно вызванных этим ПО) могут просить предоставить именно его.
Дополнительная информация
В случае, если вам нужно удалить дамп памяти, вы можете сделать это вручную, удалив файл MEMORY.DMP в системной папке Windows и файлы, содержащиеся в папке Minidump. Также можно использовать утилиту «Очистка диска» Windows (нажать клавиши Win+R, ввести cleanmgr и нажать Enter). В «Очистке диска» нажмите кнопку «Очистить системные файлы», а затем в списке отметьте файла дампа памяти для системных ошибок, чтобы удалить их (при отсутствии таких пунктов можно предположить, что дампы памяти пока не создавались).
Ну и в завершение о том, почему может быть отключено создание дампов памяти (или отключаться само после включения): чаще всего причиной являются программы для очистки компьютера и оптимизации работы системы, а также софт для оптимизации работы SSD, который также может отключать их создание.
What is Windows minidump?
A Windows minidump is a small file that contains information about a system crash or error. It provides valuable insights to software developers and technicians for diagnosing and troubleshooting issues. Minidumps are created automatically when a crash occurs and can be analyzed to identify the cause of the problem.
Why are minidumps important?
Minidumps are crucial in the diagnostic process as they provide a snapshot of the system state at the time of the crash. By analyzing these files, you can gain insights into the root cause of the crash, such as faulty drivers, hardware failures, or software conflicts. This information is essential for resolving the issue and preventing future crashes.
Where can I find Windows minidump files?
Windows minidump files are typically located in the «C:\Windows\Minidump» folder. However, this location can be customized, so it’s important to check the system settings or consult the documentation for your specific Windows version.
How can I analyze a Windows minidump file?
To analyze a Windows minidump file, you can use tools such as WinDbg or Visual Studio Debugger. These tools allow you to load the minidump file and examine the stack trace, register values, and other relevant information to diagnose the cause of the crash.
Are minidump files useful for analyzing all types of crashes?
Minidump files are particularly useful for analyzing crashes that occur due to software errors, such as application crashes or driver failures. However, for certain types of hardware-related crashes or low-level system errors, additional diagnostic techniques may be required.
Can a minidump file be analyzed on a different computer?
Yes, a minidump file can be analyzed on a different computer if the necessary debugging tools are available. However, it’s important to ensure that the debugging symbols for the operating system and any relevant modules are accessible on the analyzing computer for accurate analysis.
Can I configure Windows to generate minidump files?
Yes, you can configure Windows to generate minidump files when a system crash occurs. This can be done by accessing the system properties dialog, navigating to the «advanced» tab, and clicking on the «settings» button under the «startup and recovery» section. From there, you can customize the settings for minidump generation.
Can I configure Windows to automatically analyze minidump files?
Yes, you can configure Windows to automatically analyze minidump files by enabling the «Automatic Memory Dump» option in the System Properties dialog. This allows Windows to generate and analyze minidump files when a crash occurs, providing you with potential solutions or recommendations.
Are minidump files encrypted or compressed?
No, minidump files are not encrypted or compressed by default. They are stored in a binary format that can be directly loaded and analyzed using debugging tools. However, you can compress or archive minidump files manually if desired to save disk space.
Can minidump files help diagnose intermittent system crashes?
Yes, minidump files can be valuable in diagnosing intermittent system crashes. Even if a crash doesn’t occur consistently, analyzing the minidump files from the occurrences can provide insights into common factors, such as specific drivers, software conflicts, or underlying hardware issues.
Can I generate a minidump manually?
Yes, you can manually generate a minidump file using tools like ProcDump or Windows error reporting (WER). These tools allow you to capture a minidump of a specific process or application when certain conditions are met, such as high control processing unit (CPU) usage or unhandled exceptions.
Are there different types of minidump files?
Yes, there are different types of minidump files in Windows. The most common types include MiniDumpNormal, MiniDumpWithFullMemory, MiniDumpWithHandleData, and MiniDumpWithUnloadedModules. Each type provides varying levels of information about the crash, allowing for different levels of analysis.
Can I share minidump files with Microsoft for analysis?
Yes, you can share minidump files with Microsoft for analysis through the Windows error reporting (WER) feature. WER allows you to send crash reports, including minidump files, to Microsoft for diagnostic purposes. This helps Microsoft identify and fix common software issues.
Can a minidump file be converted to a different format?
Yes, minidump files can be converted to other formats for analysis or compatibility purposes. Tools like DumpChk and WinDbg allow you to convert minidump files to text-based formats, such as comma separated value (CSV) or text file document (TXT), which can be easier to parse or integrate into other tools.
Can I extract specific data from a minidump file programmatically?
Yes, you can extract specific data from a minidump file programmatically using application programming interfaces (APIs) provided by debugging libraries, such as DbgHelp library in Windows. These APIs allow you to access various aspects of the minidump, such as thread information, module details, exception records, and more, enabling custom analysis or automation of crash diagnostics.
Can I generate a minidump file for a specific user session in a multi-user environment?
Yes, you can generate a minidump file for a specific user session in a multi-user environment using tools like procdump or Task Manager. These tools allow you to target a specific process running in a particular user session and capture a minidump of that process, facilitating troubleshooting and analysis for individual sessions.
Can minidump files be used for proactive system monitoring?
Yes, minidump files can be utilized for proactive system monitoring and diagnostics. By configuring Windows to generate minidump files in specific scenarios, such as high control processing unit (CPU) usage or application crashes, you can gather valuable data for analysis and identify potential issues before they cause major disruptions.
Can I configure Windows to generate a full memory dump instead of a minidump?
Yes, you can configure Windows to generate a full memory dump instead of a minidump. A full memory dump captures the entire contents of the system’s physical memory at the time of the crash, providing more extensive information for analysis. You can adjust this setting in the System Properties dialog or through the registry.
Can I extract stack traces from a minidump file?
Yes, you can extract stack traces from a minidump file using debugging tools like WinDbg or Visual Studio Debugger. Stack traces show the sequence of function calls leading up to the crash, which can be helpful in pinpointing the cause of the issue. Debugging tools allow you to view and analyze the stack frames within the minidump file.