
Для работы над заданиями курса в Windows 10 рекомендуется использовать следующее программное окружение:
- Редактор Visual Studio Code
- Инструменты командной строки Git for Windows
- Среда разработки MinGW-w64 (Minimalist GNU for Windows), содержащая компилятор GCC (GNU Compiler Collection)
- Инструменты для сборки проектов CMake
- Система управления пакетами python Miniconda3
Рассмотрим процесс установки и настройки этих инструментов.
Установка VS Code
Установка VS Code не представляет сложностей. Достаточно скачать установочный файл со страницы загрузок и запустить его. Пока это все, что необходимо сделать. После установки остальных программ мы вернемся к настройке VS Code.
Установка и настройка Git for Windows
Скачайте установочный файл Git for Windows со страницы загрузок и запустите его. На момент написания этого текста актуальной версией является 2.28.0. В процессе установки Вам будут заданы вопросы по конфигурации. В большинстве случаев подойдут рекомендуемые варианты.
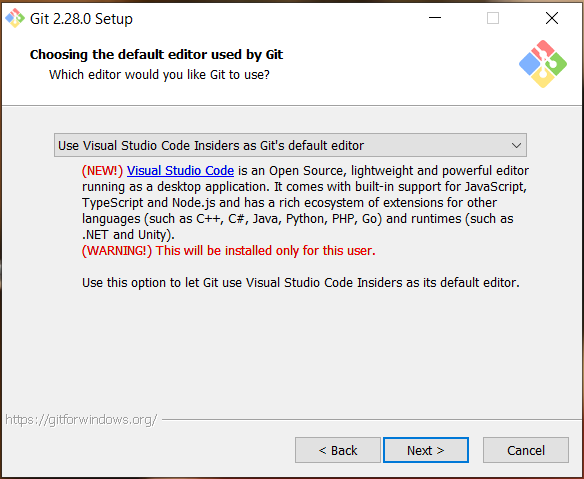
Если в системе уже установлен редактор VS Code, то его можно выбрать в качестве редактора по умолчанию для Git:
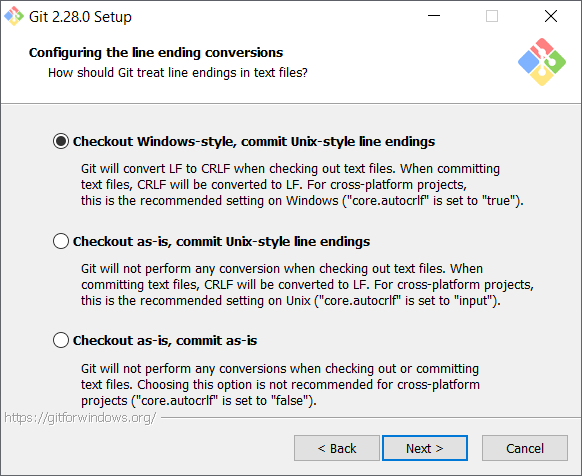
Важным моментом является настройка обработки конца строки в файлах. Чтобы с этим не возникало проблем, необходимо выбрать вариант, который уже отмечен по умолчанию:
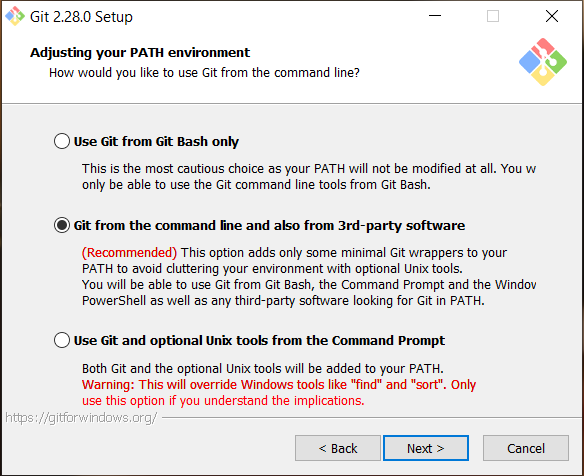
Чтобы команды git были доступны во всех терминалах, следует выбрать рекомендуемый вариант для изменения переменной окружения PATH:
Проверьте, что установка завершилась успешно, открыв терминал и исполнив команду git. Результат должен выглядеть так:
> git
usage: git [--version] [--help] [-C <path>] [-c <name>=<value>]
           [--exec-path[=<path>]] [--html-path] [--man-path]
           [--info-path] [-p | --paginate | -P | --no-pager]
           [--no-replace-objects] [--bare] [--git-dir=<path>]
           [--work-tree=<path>] [--namespace=<name>]
           <command> [<args>]
В качестве терминала в Windows 10 мы рекомендуем использовать PowerShell.
Теперь необходимо задать имя пользователя и адрес электронной почты:
> git config --global user.name "Ivan Petrov"
> git config --global user.email i.petrov@nsu.ru
Git хранит настройки в файле ~\.gitconfig. У автора этот файл выглядит следующим образом:
[user]
    email = vit.vorobiev@gmail.com
    name = Vitaly Vorobyev
[core]
    editor = \"[path-to-vscode]" --wait
На этом первоначальная конфигурация инструментов git завершена. Навык работы с git приходит с практикой. Действия с git, необходимые для выполнения заданий курса, всегда будут подробно описаны. Тем не менее, мы рекомендуем обращаться к документации, чтобы прояснять непонятные моменты.
Установка MinGW-w64
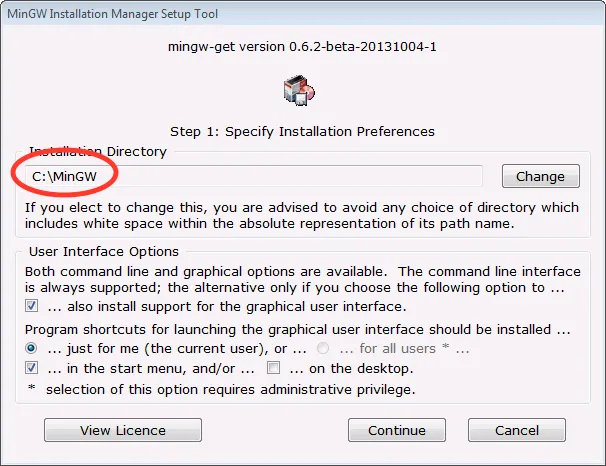
Установочный файл MinGW-w64 mingw-w64-install.exe можно найти на этой странице. При установке не нужно менять настройки по умолчанию, кроме пути установки. Путь установки не должен содержать пробелов, поэтому путь по умолчанию в директории Program Files не подходит.
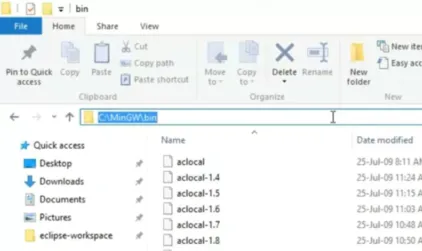
После завершения установки, в директории mingw32\bin будут расположены различные исполняемые файлы. Среди них нас интересует файл g++.exe, который запускает сборку программ C++. Сделаем так, чтобы этот файл был доступен в любой директории из командной строки. Если этого не сделать, то для использования команды g++ надо будет прописывать полный путь до файла g++.exe.
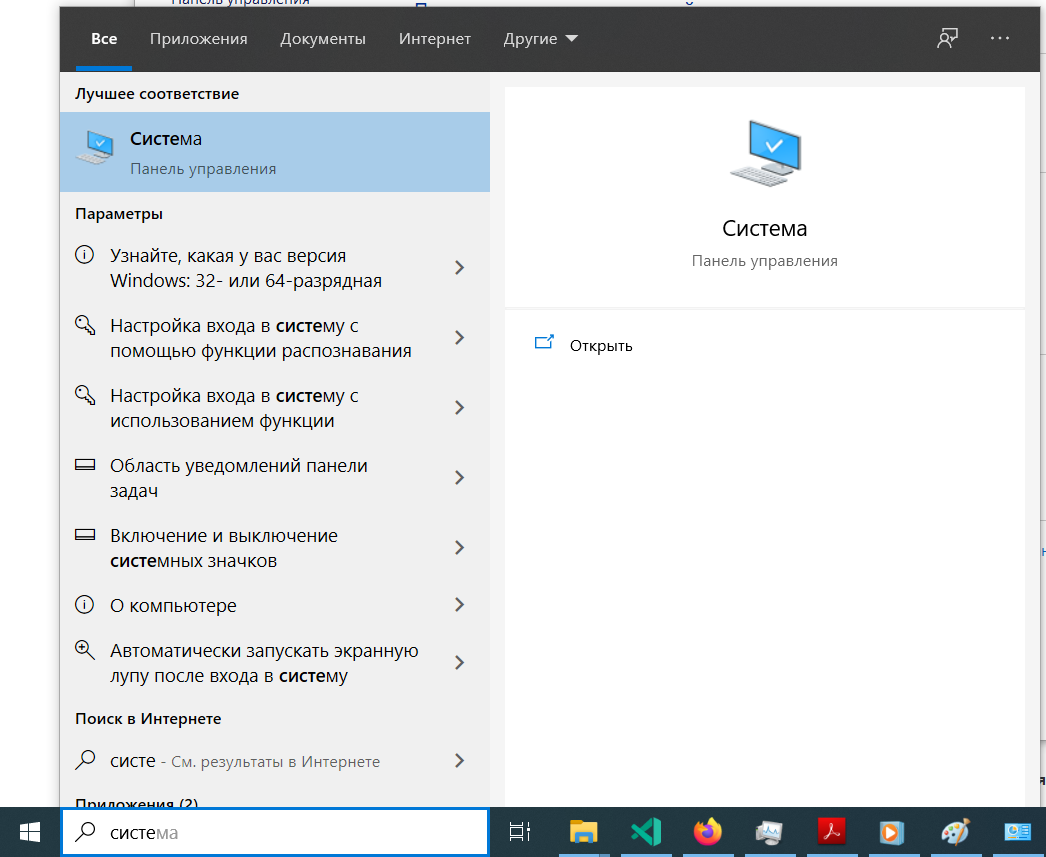
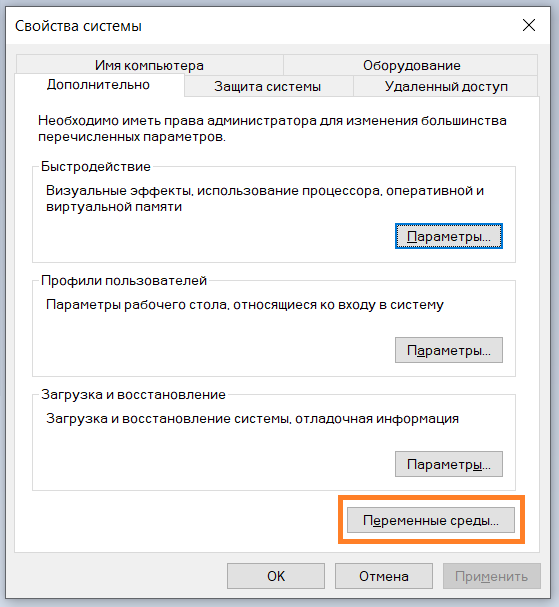
Откройте меню “Система” в “Панели управления”:
Из меню “Система” перейдите в “Дополнительные параметры системы”:

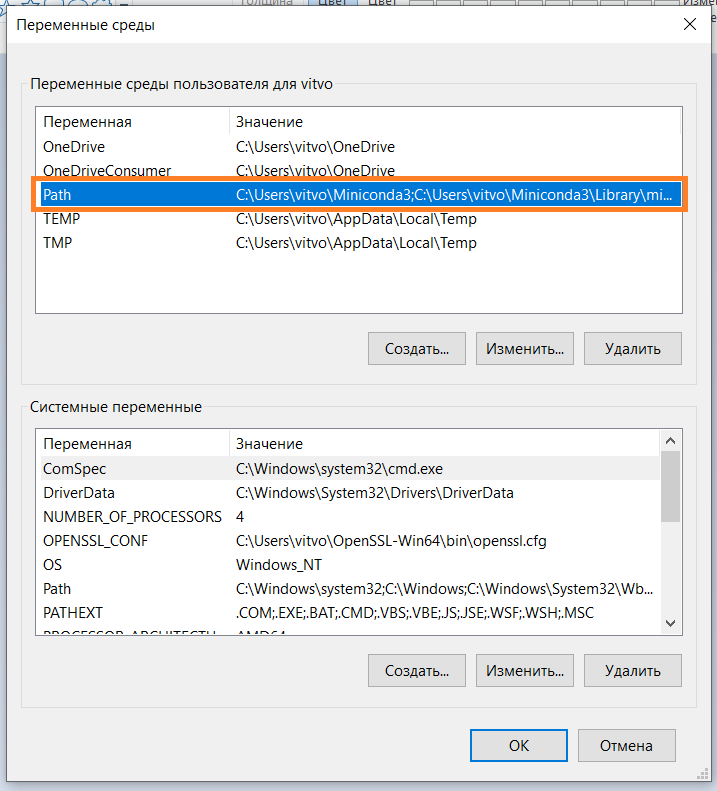
Выберите “Переменные среды”:
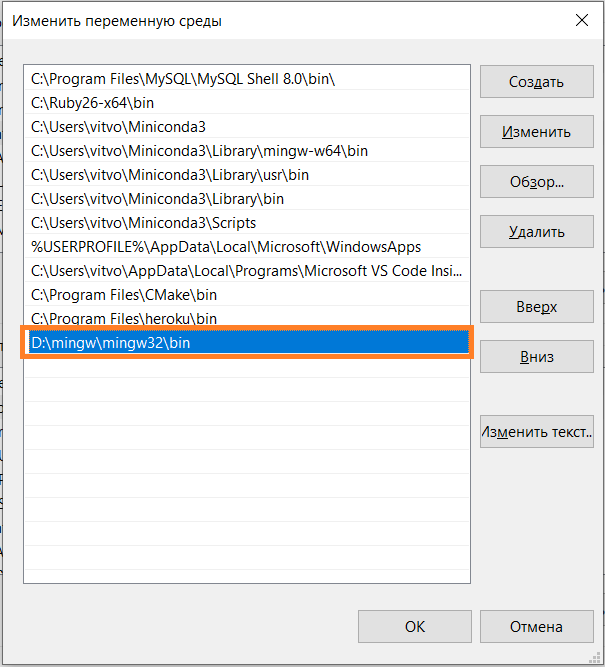
Выберите переменную Path и нажмите кнопку “Изменить…”:
Добавьте в новую строку полный путь до директории mingw32\bin и нажмите кнопку OK.
Чтобы проверить, что настройка выполнена успешно, откройте консоль (не в директории mingw32\bin) и выполните команду g++ --help:
> g++ --help
Usage: g++.exe [options] file...
Ваша система теперь готова к сборке программ на языке C++.
Установка CMake
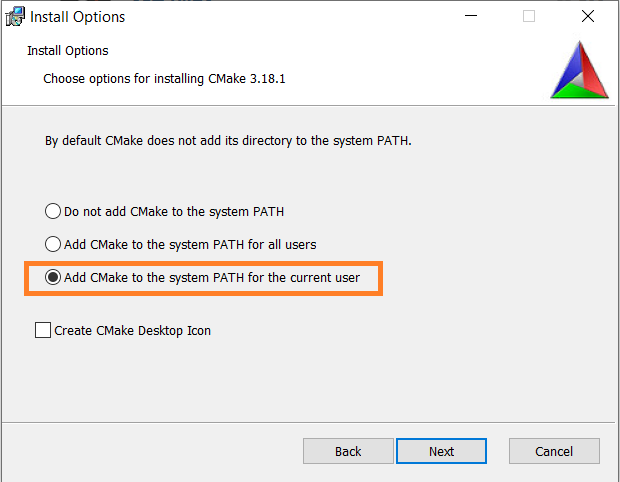
Скачайте со станицы загрузок установочный файл cmake-3.18.1-win64-x64.msi (на момент написания текста актуальная версия — 3.18.1). Для 32-разрядной системы вместо этого нужно скачать файл cmake-3.18.1-win32-x86.msi. Запустите файл и выполните установку. В ходе установки выберите изменение переменной окружения PATH:
Выполните в консоли команду cmake --help для проверки корректности установки CMake:
> cmake --help
Usage

  cmake [options] <path-to-source>
  cmake [options] <path-to-existing-build>
  cmake [options] -S <path-to-source> -B <path-to-build>

Specify a source directory to (re-)generate a build system for it in
the current working directory.  Specify an existing build directory to
re-generate its build system.
Код большинства заданий по C++ этого курса будет компилироваться с помощью CMake. Эта система значительно упрощает процесс сборки C++ проектов, особенно если они состоят из многих файлов.
Установка Miniconda3
Система Windows (в отличие от Linux) не имеет установленного по умолчанию интерпретатора python. Менеджер пакетов python Anaconda и его минимальная сборка Miniconda позволят нам установить в системы все необходимые инструменты для работы с python. Загрузите со страницы загрузки установочный файл Miniconda3 Windows 64-bit или Miniconda3 Windows 32-bit, в зависимости от разрядности системы. При установке отметьте галочку для добавления необходимых записей в переменную окружения PATH, несмотря на то что это действие не рекомендуется установщиком:

Убедитесь в том, что установка выполнена успешно, выполнив в консоли следующую команду:
>conda --help
usage: conda-script.py [-h] [-V] command ...

conda is a tool for managing and deploying applications, environments and packages.
Выполните инициализацию (необходимо выполнить один раз):
Создайте окружение для работы с заданиями этого курса:
>conda create -n nsu python=3
Conda вычислит набор пакетов, которые необходимо установить в новом окружении, и попросит подтвердить создание окружения:
После установки активируйте новое окружение и запустите консоль python:
>conda activate nsu
(nsu) >python
Python 3.8.5 (default, Aug  5 2020, 09:44:06) [MSC v.1916 64 bit (AMD64)] :: Anaconda, Inc. on win32
Type "help", "copyright", "credits" or "license" for more information.
>>>
Ваша система теперь готова для работы с заданиями курса “Программирование на C++ и python”. Нам осталось настроить редактор VS Code для максимально удобной работы.
Настройка VS Code
Установите следующие расширения VS Code:
- C/C++ for Visual Studio Code
- CMake Tools
- Python
Выбор интерпретатора python
При начале работы с кодом python (при открытии файла с расширением .py) VS Code предложит выбрать интерпретатор python, который будет использоваться для подсветки кода, проверки синтаксиса и вывода подсказок:
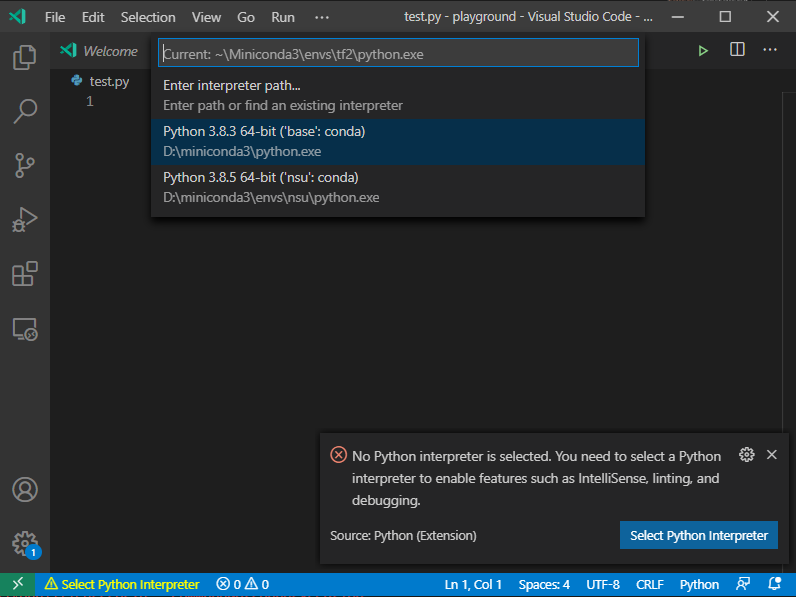
Можете, например, выбрать интерпретатор из недавно созданного окружения nsu.
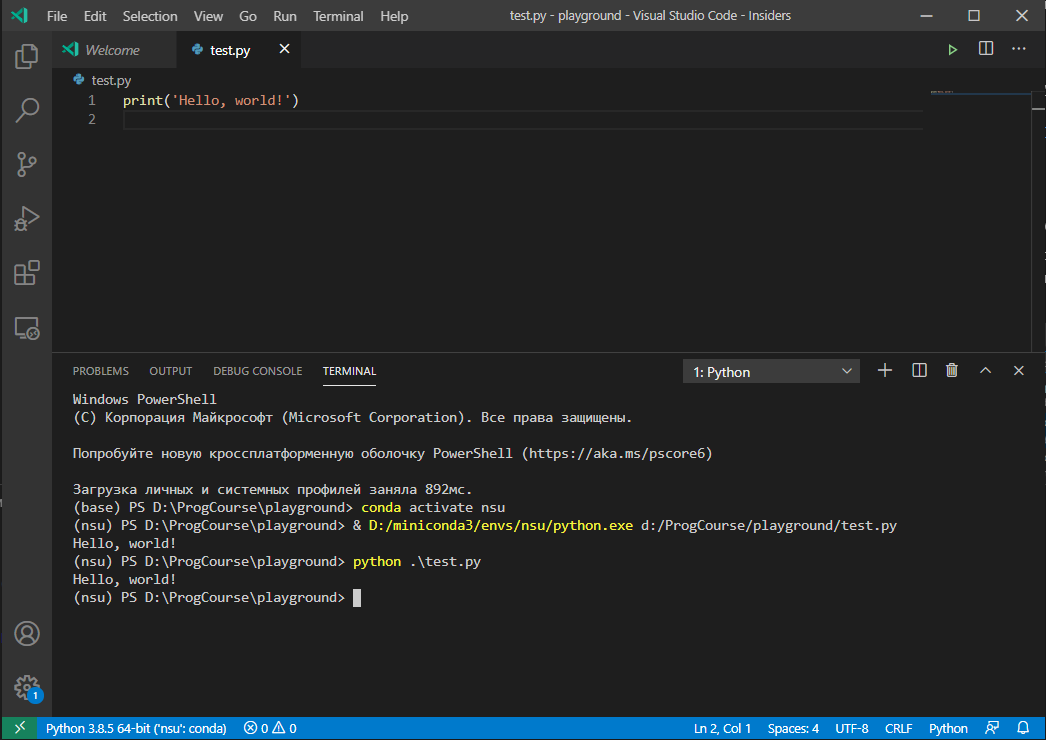
Создадим файл test.py, содержащий одну строку:
Исполнить этот скрипт можно, открыв консоль в VS Code с помощью сочетания клавиш Ctrl+J и набрав в ней
В правом верхнем углу окна находится кнопка с зеленым треугольником ▷, нажатие на которую приводит к тому же результату:
Настройка работы с GCC
Создайте файл test.cpp, содержащий следующий код:
#include <iostream>

int main() {
    std::cout << "Hello, world!" << std::endl;
    return 0;
}
Скомпилируем его с помощью компилятора GCC и командной строки. Откройте консоль в VS Code (Ctrl+J) и исполните команду
Компилятор создал исполняемый файл a.exe. Запустите его:
Работает. Настроим теперь VS Code для автоматизации этого действия. Выберите в меню пункт Terminal -> Configure Default Build Task...:
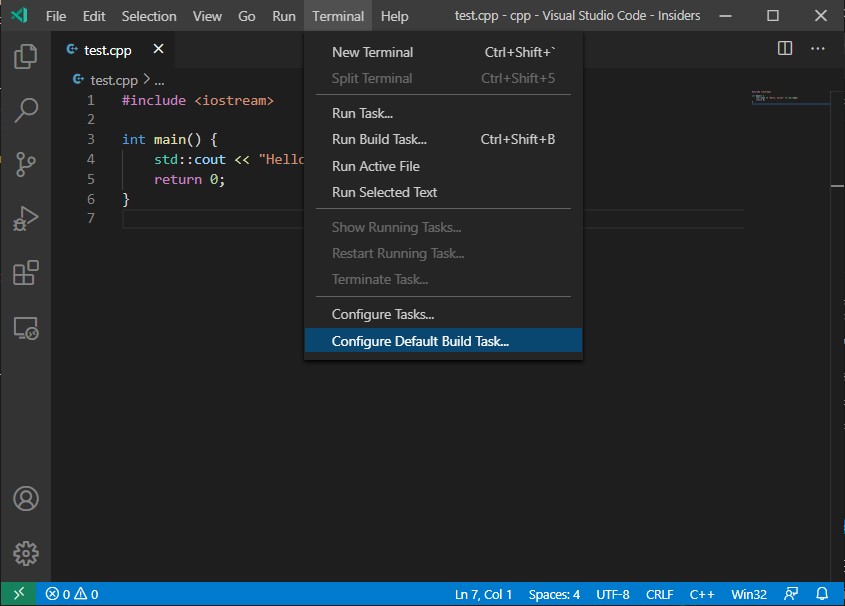
Выберите из выпавшего списка пункт g++.exe. В результате будет сгенерирован файл .vscode/tasks.json подобный такому:
{
    "version": "2.0.0",
    "tasks": [
        {
            "type": "shell",
            "label": "C/C++: cpp.exe build active file",
            "command": "D:\\mingw\\mingw32\\bin\\g++.exe",
            "args": [
                "-g",
                "${file}",
                "-o",
                "${fileDirname}\\${fileBasenameNoExtension}.exe"
            ],
            "options": {
                "cwd": "${workspaceFolder}"
            },
            "problemMatcher": [
                "$gcc"
            ],
            "group": {
                "kind": "build",
                "isDefault": true
            }
        }
    ]
}
Теперь при нажатии клавиш Ctrl+Shift+B или выборе пункта меню Terminal -> Run Build Task будет выполняться компиляция открытого файла. Для файла test.cpp будет создан исполняемый файл test.exe.
Работа с CMake
Откройте новую рабочую директорию VS Code, создайте в ней файл main.cpp, содержащий следующий код:
#include <iostream>

int main() {
    std::cout << "Hello, world!" << std::endl;
    return 0;
}
и файл CMakeLists.txt со следующим содержанием:
cmake_minimum_required(VERSION 3.0.0)
add_executable(test main.cpp)
Эти два файла составляют минимальный CMake-проект. Выполним сначала сборку CMake-проекта через консоль: создайте в рабочей директории поддиректорию build, в которой будет осуществляться сборка, и перейдите в неё:
Выполните настройку проекта и запустите сборку:
> cmake -G "MinGW Makefiles" ..
> cmake --build .
В первой команде мы указали, что сборка будет осуществляться с помощью MinGW и что файлы проекта расположены в родительской директории (путь ..). Вторая команда осуществляет сборку в текущей директории (путь .). В директории build должен появиться исполняемый файл test.exe.
Расширение VS Code для работы с CMake позволяет автоматизировать сборку проекта. Выберите рабочую директорию VS Code (комбинация клавиш Ctrl+K+O), содержащую файлы main.cpp и CMakeLists.txt. Наберите комбинацию клавиш Ctrl+Shift+P и в строке сверху наберите команду >CMake: Configure. Это запустит настройку инструментов CMake. После завершения настройки в нижней части окна появятся инструменты управления сборкой:
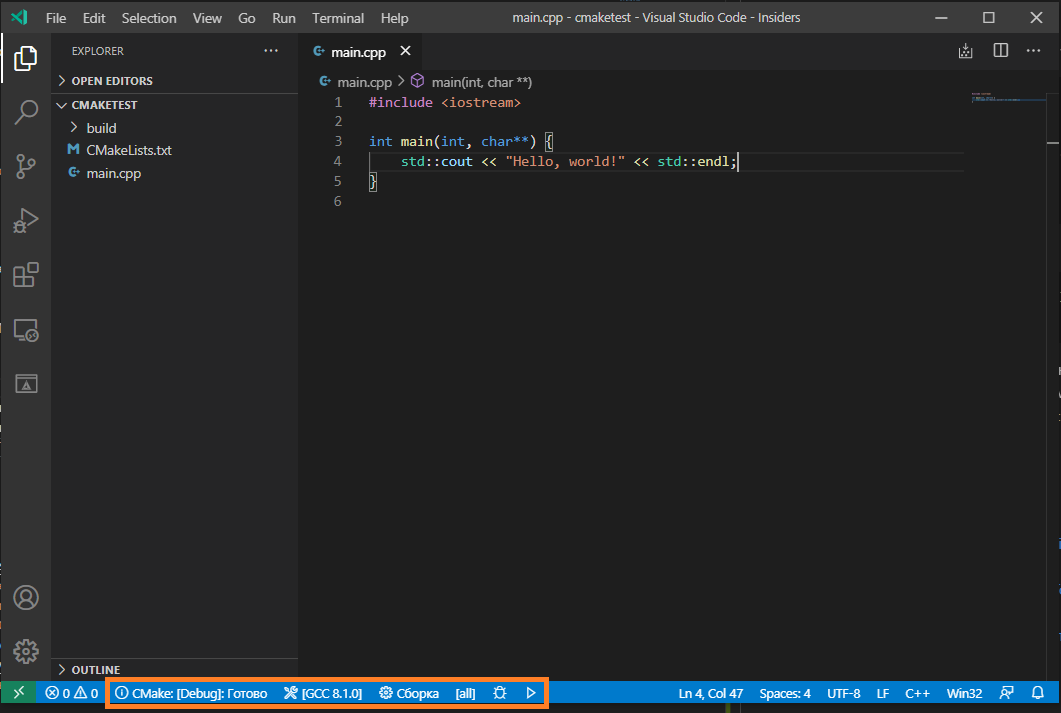
Кнопку “Сборка” запускает сборку, а кнопка ▷ — исполняемый файл.
Если автоматическая настройка CMake привела к ошибке, то, вероятно, инициализация CMake выполнилась без параметра -G "MinGW Makefiles". В этом случае выполните эту команду в консоли, как показано выше. Достаточно выполнить это действие один раз, после чего конфигурация этого и других проектов будет выполняться верно.
Работа с git
Покажем как можно работать с git-репозиторием через VS Code. Выполните fork репозитория задания Hello, Classroom на GitHub:
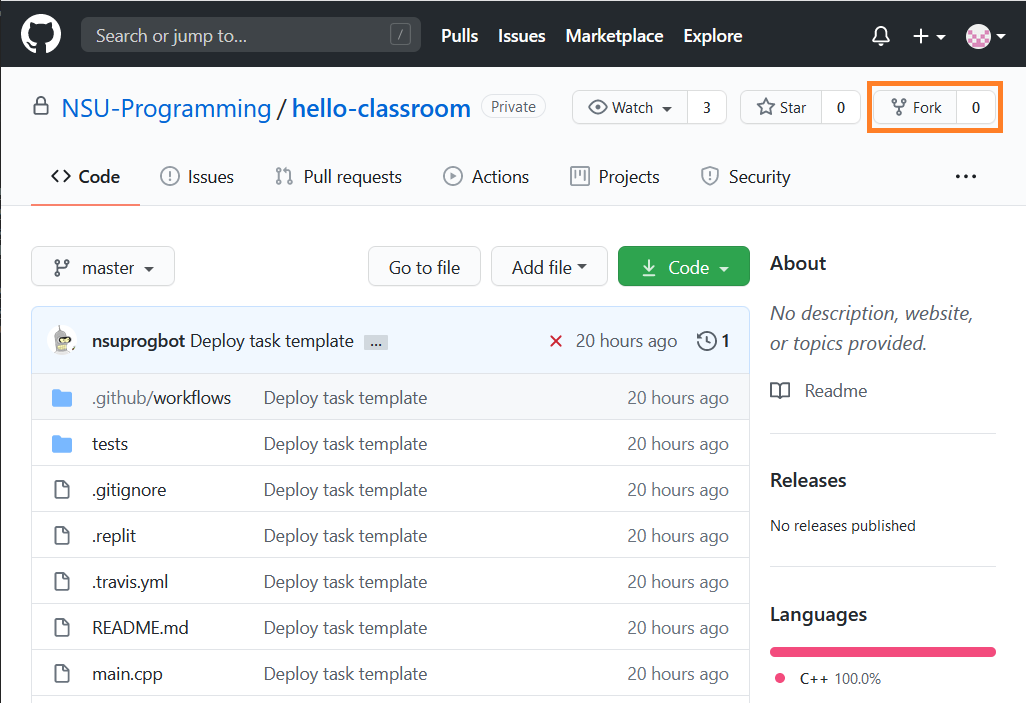
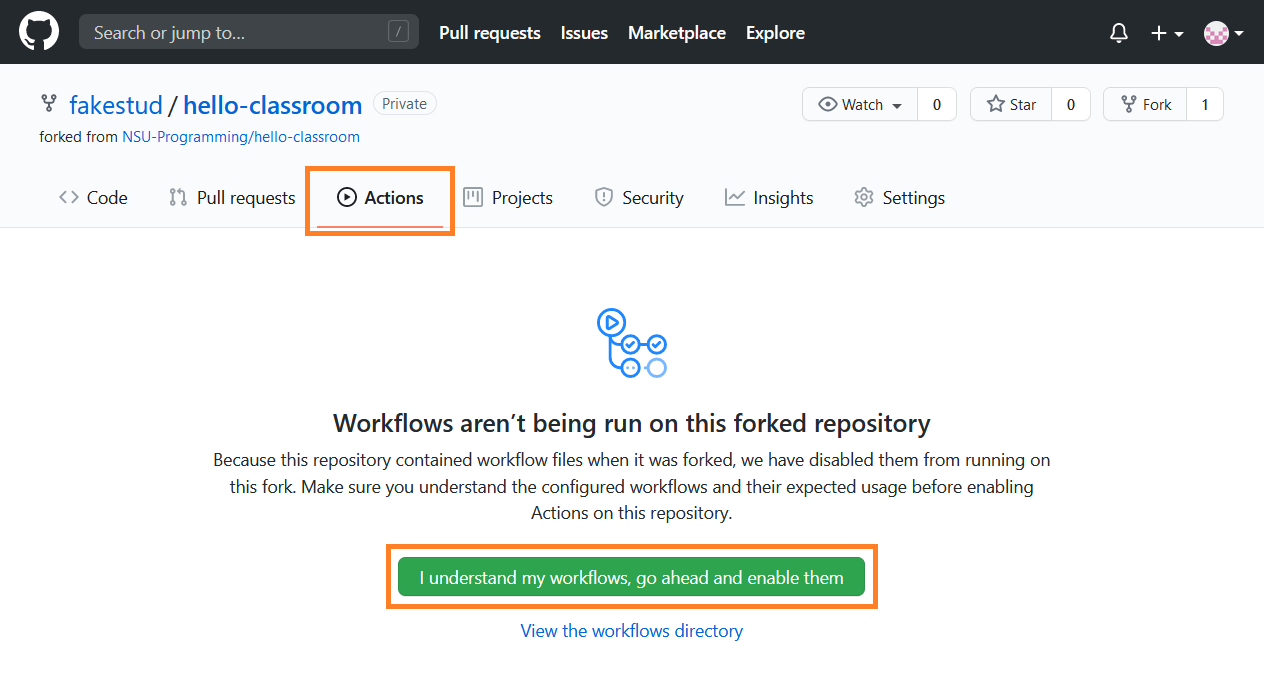
Это действие создает новый репозиторий в Вашем аккаунте. Разрешите автоматическое тестирование решения, нажав на большую зеленую кнопку во вкладке Actions:
Новый репозиторий необходимо клонировать на Вашу локальную систему. Удобнее всего это делать с помощью протокола ssh. Для этого сначала необходимо включить OpenSSH Client, который по умолчанию выключен.
Взаимодействие с GitHub репозиторием будет происходить по протоколу ssh с помощью техники шифрования с открытым ключом. Создать пару из приватного и публичного ключа можно в консоли:
>ssh-keygen
Generating public/private rsa key pair.
По умолчанию сгенерированные ключи будут расположены в директории ~\.ssh. Файл с публичным ключом называется id-rsa.pub. Публичный ключ нужно добавить на GitHub. Для этого откройте раздел SSH and GPG keys в меню Settings и нажмите на кнопку New SSH key:

Заполните открывшуюся форму. В поле Key нужно скопировать содержимое файла id-rsa.pub. Проследите, чтобы при копировании не появились лишние переносы строк. Весь ключ должен быть расположен в одной строке.
Теперь мы готовы к клонированию репозитория. Выберите на компьютере директорию, в которой Вы будете работать с заданиями курса и перейдите в неё. Откройте страницу репозитория hello-classroom в Вашем аккаунте GitHub и скопируйте строку для клонирования через ssh:
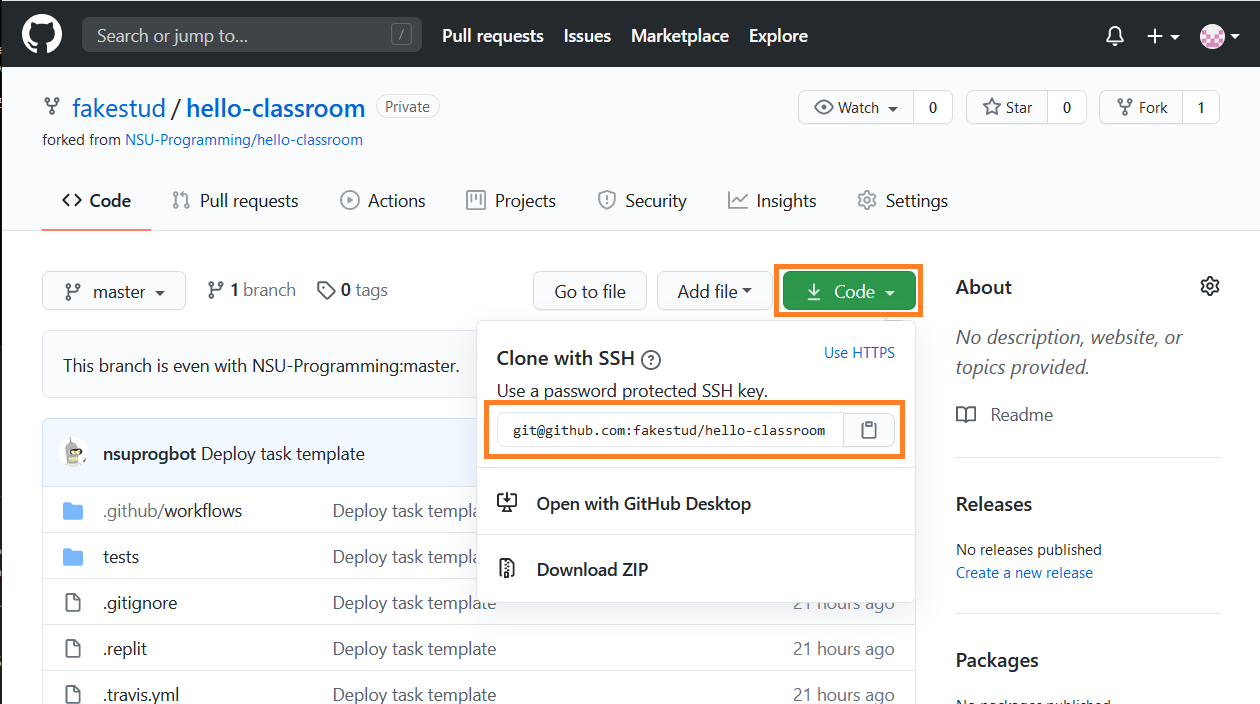
Выполните в консоли команду git clone:
> git clone git@github.com:fakestud/hello-classroom.git
Cloning into 'hello-classroom'...
remote: Enumerating objects: 15, done.
remote: Counting objects: 100% (15/15), done.
remote: Compressing objects: 100% (8/8), done.
remote: Total 15 (delta 0), reused 15 (delta 0), pack-reused 0
Receiving objects: 100% (15/15), done
Строка git@github.com:fakestud/hello-classroom.git есть скопированная выше строка. Репозиторий был клонирован в директорию hello-classroom. Выберите её в качестве рабочей директории VS Code. Прочитайте файл README.md, содержащий инструкции по решению задания. После решения задания выполните локальную проверку:
> conda activate nsu
> pip install -r .\requirements.txt
> g++ -std=c++17 main.cpp -o a.out
> test_cmd tests/ .\a.out
Running 1 tests on 4 CPUs...

test1
Command: .\a.out
Success

All 1 tests passed.
Тесты пройдены успешны. Значит, мы готовы к синхронизации репозитория GitHub с нашей локальной версией. В командной строке для этого достаточно выполнить следующие команды:
git add main.cpp
git commit -m "Task solved"
git push -u origin master
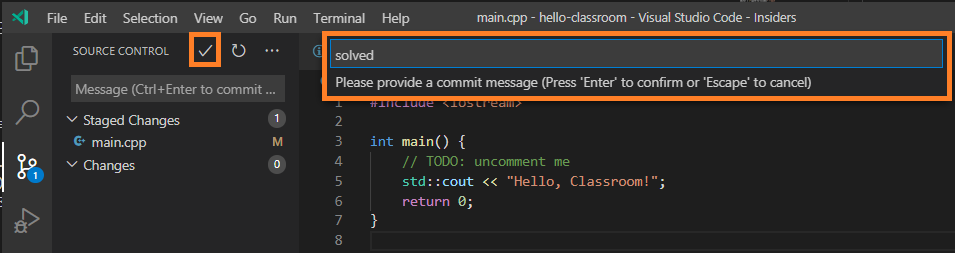
Редактор VS Code позволяет выполнить эти действия через графический интерфейс. VS Code отслеживает изменения локальной версии репозитория. Откройте вкладку контроля версий слева и посмотрите на список изменившихся файлов. В нашем случае это должен быть только файл main.cpp. Выполните команду git add, нажав на кнопку +:
Затем команду git commit, нажав на кнопку ✓ и введя комментарий в текстовом поле:
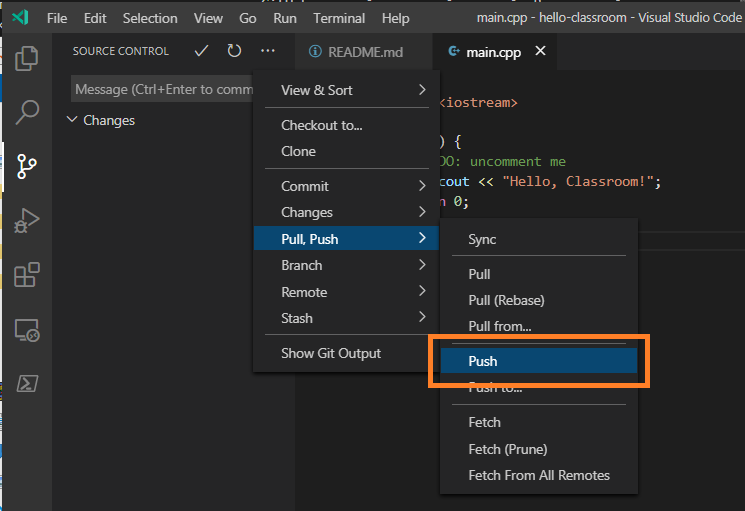
Наконец, выполните команду git push:
Источники
- First-Time Git Setup
- VS Code: User and Workspace Settings
- VS Code: Using GCC with MinGW
- VS Code: Get started with CMake Tools on Linux
- Git in Visual Studio Code
- Must-have плагины и несколько полезностей для С\С++ разработки в VS Code
- Памятка пользователям ssh
In this tutorial ,We will learn How to install 64 bit (GCC) GNU Compiler Collection (Mingw-w64 port) on a Windows 10 system using MSYS2 installer for C/C++ software development.
Contents
- GCC on Windows Platform
- What is Mingw-w64
- What is MSYS2
- Installing MSYS2 on Windows
- Install GCC on Windows using Pacman on Windows 10
- Compiling C/C++ file on Windows-10 using GCC (MingW-w64/MSYS2)
- Compiling a C file using GCC (MingW-w64/MSYS2)
- Compiling a C++ code using GCC (MingW-w64/MSYS2)
- Compiling a Win32/64 API GUI C code using GCC
- IDE’s for C/C++ development on Windows
GCC on Windows Platform
GNU Compiler Collection (GCC) is an compiler produced by the GNU Project supporting various programming languages like for Objective-C, Objective-C++, Fortran, Ada, D and Go. Here we will be concentrating only C/C++ development on Windows 10.
GCC along with other utilities like GNU Binutils for Windows (assembler, linker, archive manager), set of freely distributable Windows specific header files and static import libraries have been ported to Windows platform and is available in the following flavors.
- MinGW — («Minimalist GNU for Windows») which can be used for creating 32 bit native executable on Windows platform
- Mingw-w64 — 64bit version
Please note that we will not be covering WSL or Windows Subsystem for Linux.

What is Mingw-w64
Mingw-w64 is a fork off MinGW which provides a more complete Win32 API implementation including Win64 support,C99 support, DDK, DirectX.Mingw-w64 can generate 32 bit and 64-bit executables for x86 under the target names i686-w64-mingw32 and x86_64-w64-mingw32.
Here we will be using Mingw-w64 for C/C++ native application development using Windows API as most modern PC are now 64 bit.
Mingw-w64 Project does not provide any binaries for download from its website instead it maintains a list of Pre-built toolchains and packages provided by other vendors.
These prebuilt toolchains contains GCC, Debugger ,Package Manager ,Terminals and a set of other Unix tools like curl, openssl, sed, awk etc which can be used for development on Windows Platform.
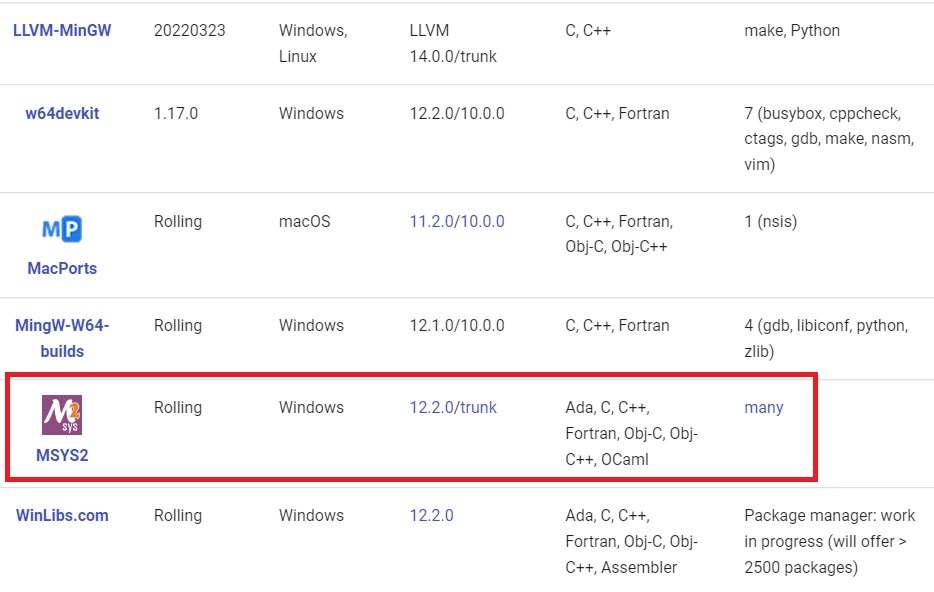
Here we will be using a Mingw-w64 package called MSYS2 Software Distribution
What is MSYS2
MSYS2 is a collection of tools and libraries providing the developer with an easy-to-use environment for building, installing and running native Windows software.
MSYS2 Software Distribution consists of
- command line terminal called mintty,
- Bash,
- tools like tar and awk
- build systems like autotools,
all based on a modified version of Cygwin. Despite some of these central parts being based on Cygwin, the main focus of MSYS2 is to provide a build environment for native Windows software and the Cygwin-using parts are kept at a minimum.
To install and remove various software packages internally MSYS2 uses Pacman as their package manager.
MSYS2 is sponsored by Microsoft Open Source Programs Office through their FOSS Fund.
-
Download MSYS2 Software Distribution (Mingw-w64) for Windows
-
Download extra MSYS2 Packages from Repo here
Installing MSYS2 on Windows
Installing MSYS2 on Windows 10 is quite easy. Download the executable using the above link and run it.
After the binary is installed on your system ,
MSYS2 comes with different environments/subsystems and the first thing you have to decide is which one to use.
The differences among the environments are mainly environment variables, default compilers/linkers, architecture, system libraries used etc.
If you are unsure, go with UCRT64.
UCRT (Universal C Runtime) is a newer version which is also used by Microsoft Visual Studio by default.
It should work and behave as if the code was compiled with MSVC.
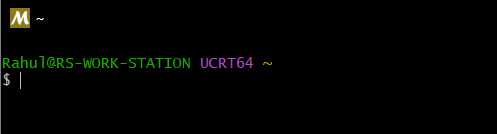
You can start a terminal .The default terminal is Mintty (above)
Install GCC on Windows using Pacman on Windows 10
MSYS2 on Windows 10 uses pacman as its package manager.After installing MSYS2 ,you can check the installed packages by typing
$pacman -Q on the Mintty terminal. This will list all the available packages on your system as shown below.
GCC will not be installed by default, So you can go to the package repo and search for gcc.
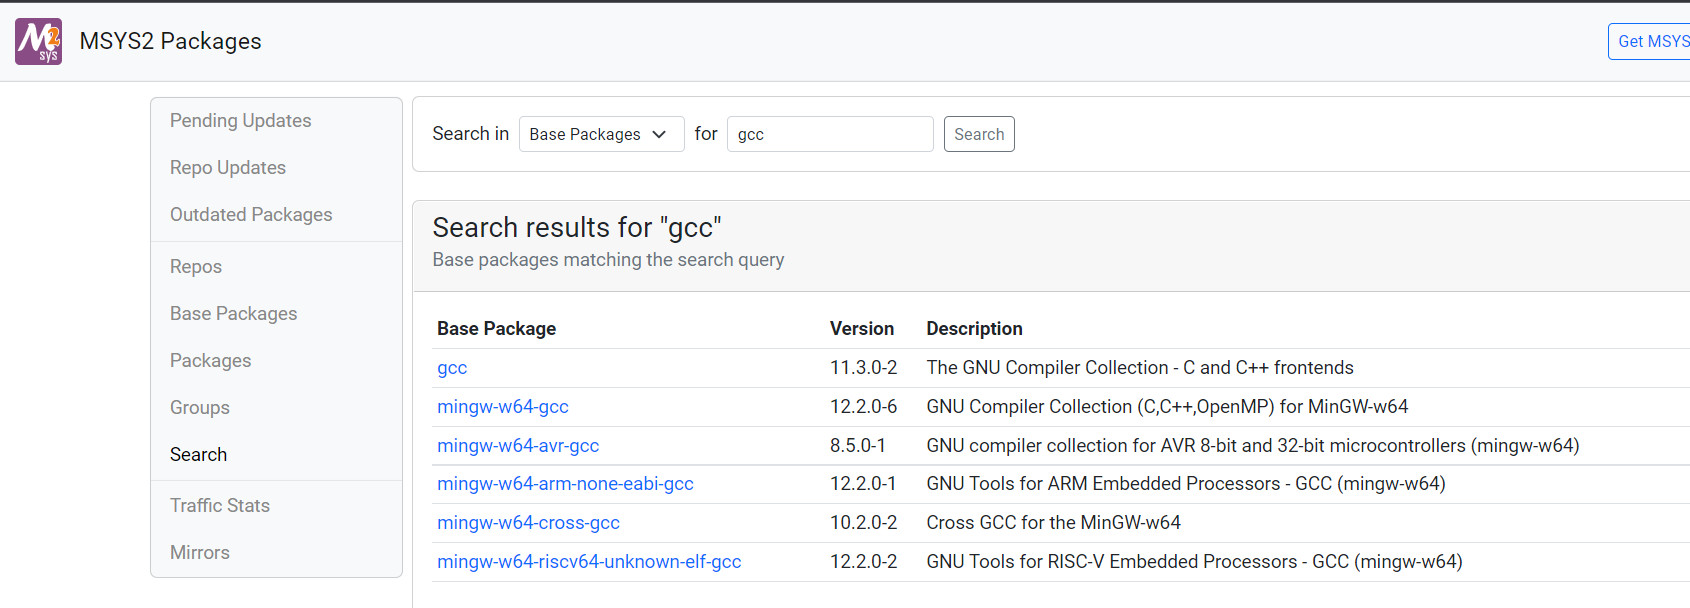
You can now use pacman to install gcc on Windows.
$pacman -S gccInstallation process of GCC using pacman on Windows 10 (below)
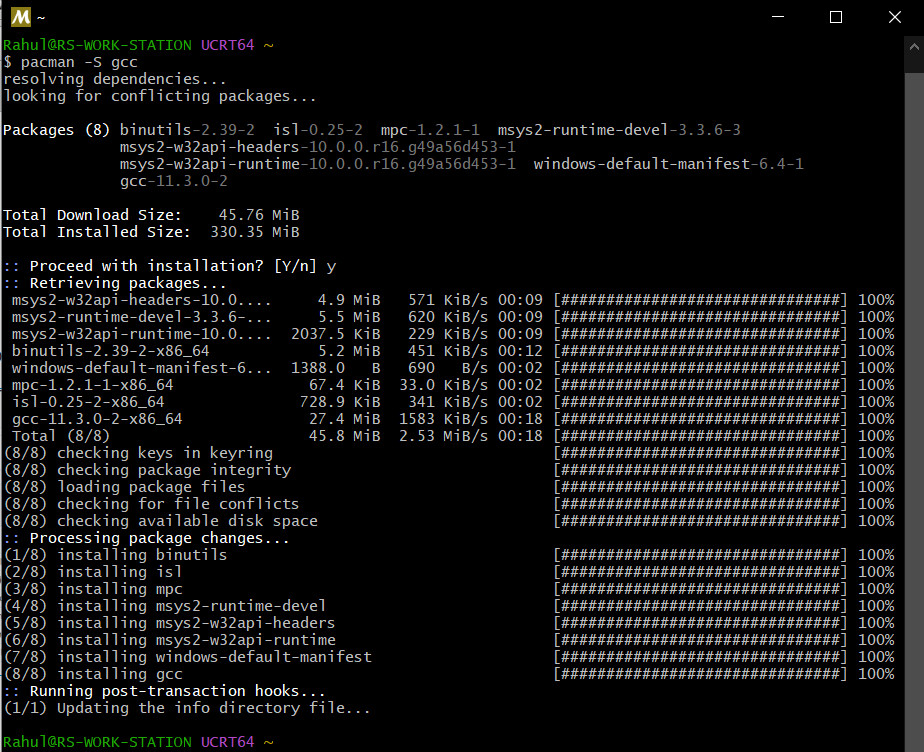
After which you can check GCC by issuing the whereis command.
$whereis gcc
Compiling C/C++ file on Windows-10 using GCC (MingW-w64/MSYS2)
Once we have installed the Compiler, we will compile a hello world C and C++ code using the installed GCC on Windows 10.
Compiling a C file using GCC (MingW-w64/MSYS2)
Type the below simple code on a text editor like notepad.exe or other text editors like Sublime Text,Notepad++
Save the below C Code as main_c.c
#include<stdio.h>
int main()
{
 printf("Hello World");
 return 0;
}
Compile and run the code using the below commands
$ gcc -o main_c main_c.c
$ ./main_c
Compiling a C++ code using GCC (MingW-w64/MSYS2) using g++
Here we will be compiling a simple C++ file using the g++ compiler in the MSYS2 (MingW-w64) tool chain.
Save the C++ Code as main_cpp.cpp
#include <iostream>
using namespace std;
int main()
{
   cout << "Hello from MSYS2\n!";
   cout << "Compiled C++ File\n!";
}
Compile and run the C++ code using g++ compiler as shown below.
$ g++ -o main_cpp main_cpp.cpp
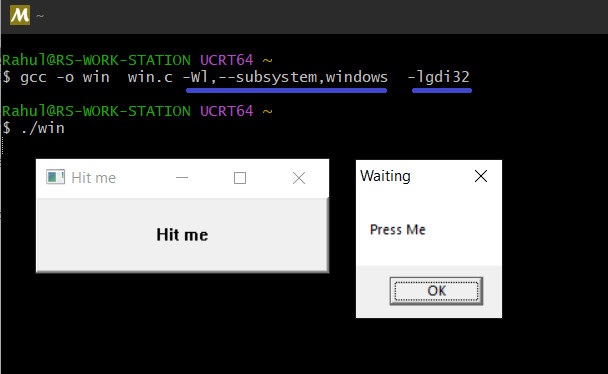
$ ./main_cppCompiling a Win32/64 API GUI C code using GCC (MingW-w64/MSYS2)
Now we will compile a Win32/64 GUI application using GCC (MingW-w64/MSYS2) on Windows 10 .
We will create a Window and a Message Box using Win32 native api and configure the gcc to compile and link to the native system API.
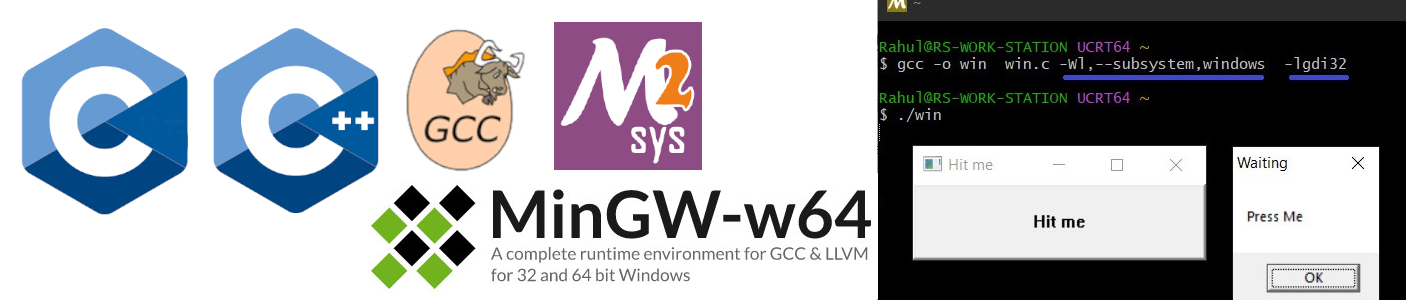
Copy the below code and save it as win.c
#include<Windows.h>
int WINAPI WinMain(  HINSTANCE hInstance,     //the instance of the program
                     HINSTANCE hPrevInstance, //the previous instance
                     LPSTR lpCmdLine,         //ptr to command line args
                     int nCmdShow)            //display properties
{
   HWND h;
   h = CreateWindow("BUTTON",
                     "Hit me",
                      WS_OVERLAPPEDWINDOW,
                      350,300,250,100,0,0,
                       hInstance,0); //Create a window with BUTTON class

    ShowWindow(h,nCmdShow);   //show the window
    MessageBox(0,"Press Me","Waiting",MB_OK); //used to display window
}
You can compile the Win32 API code on GCC using the following command
$ gcc -o win  win.c -Wl,--subsystem,windows  -lgdi32
$ ./win
Here
-
The -Wl,—subsystem,windows linker switch ensures that the application is built as a Windows GUI application, and not a console application. Failing to do so would result in a console window being displayed whilst your application runs
-
You should link with the gdi32 library using «-lgdi32 » otherwise the code will complain about «undefined reference to GetStockObject«.
Light weight IDE’s for C/C++ development on Windows.
The above examples were all done on command line, Now if you want a full featured opensource C/C++ IDE for development on Windows ,you can check the below list.
-
Code::Blocks IDE
-
Code::Blocks is a free C/C++ and Fortran IDE that is designed to be very extensible and fully configurable. Built around a plugin framework, Code::Blocks can be extended with plugins.
-
Code blocks IDE works straight out of box and has a version that comes with GCC compiler bundled with it.
-
Documentation of the IDE is also quite Good.
-
It is a light weight IDE that taxes your system very little.
-
-
Code Lite IDE
-
CodeLite is an open source, free, cross platform IDE, specialized in C, C++, Rust, Python, PHP and JavaScript (mainly for backend developers using Node.js) programming languages which runs best on all major Platforms ( OSX, Windows and Linux ).
-
Documentation not that good.
-
Setting it up was not that easy
-
Looking for the best way to install the MinGW w64 compiler and configure the mingw-w64 installer with Visual Studio Code on a Windows 7, 8, 10, or 11 operating system?
Then you’ve come to the right place; we’ll walk you through the best way to install MinGW w64 exe on your Windows device. Stay tuned for this article.
MinGW is a GCC compiler variant that can build both 32-bit and 64-bit applications (hence the w64 in the name). MinGW can create programs in C, C++, and Fortran 90/95 that are publicly accessible on all systems.
MinGW supports open-source projects such as the Open Watcom compiler, the GNU toolchain, and numerous prominent commercial compilers.
Also, many people don’t know how to set up GCC for Visual Studio code.
So in this post, I’ll teach you a new approach to downloading and installing the MinGW w64 compiler on your Windows 10 operating system. And you may also like How to Contact Snapchat Support.
Table of Contents
- How do I download and install MinGWw64?
- Setting GCC compiler path in Windows 10
- Related Video: How to Install MinGW (GCC/G++) Compiler
- Conclusion
- Related FAQs
How do I download and install MinGWw64?
I hope this Installation Tutorial helps you understand how to install MinGW w64 on Windows 10, 9, 8, and other operating systems.
You can download either the 32-bit or 64-bit versions of Mingw.
Simply type MinGW w64 or 32-bit MinGW compiler into Google and press Enter; sourceforce.net will appear as the first result. Simply click the first result that appears.
MinGW: Minimalist GNU for Windows download (SourceForge)
- Just click on that, and we will download this Mingw-w64 Installer from this Sourceforge website. Or simply Click Here to download.
- So, in this section, click download to install MinGW w64.
- Wait four to five seconds for the download to complete, then double-click the exe file to install.
- Simply click Install and navigate to the directory where this software will be installed. However, I recommend maintaining the default installation folder and clicking on Proceed.
- And now, as you can see below, it’s connecting to downloads.sourceforge.net, implying that you must have an active internet connection during the installation; as you can see, the downloading is presently in progress.
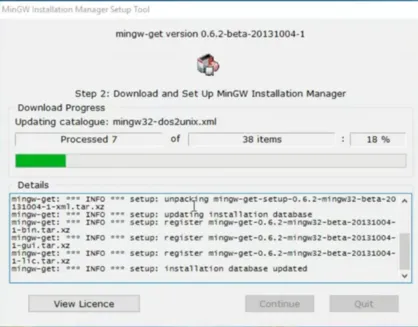
- And after it’s finished, simply click on Continue. The installation manager with this MinGW merely provided you with various alternatives to install.
- Click on them all and mark them for installation in the MinGW Installations wizard. You may do this by right-clicking on it and selecting “Mark for Installation.”
- Now, click on Installation and then on this application’s modifications.
- After clicking on Apply Changes, it will show you that downloading is in progress.
After downloading, the files will be extracted and installed. Once it’s done, you can see that all changes have been applied successfully, so now you can close this wizard.
Now simply click on this command prompt by searching for it.
and in the command window,
- First type g++ –version
Click on the Enter Button (note it (G plus plus space minus minus version)).
Now it will be showing that
g++ is not recognized as an internal or external command
Now, this is because this environmental path has not been taken.
I hope the above procedure will answer your question about how to install Mingw-w64 on your PC.
Now I will show you how to set the GCC compiler path if you want to run C or C++ programs on your PC.
Setting GCC compiler path in Windows 10
So for that, simply close the command prompt
Now we will show you the steps to setting up a GCC path using GCC with Mingw-w64.
Then just go to your C directory
- And you can see that MinGW has been installed here, so click on that folder.
- Then navigate to this bin directory and now Just navigate to this address bar, right-click on it, and copy this path by pressing Ctrl+V.
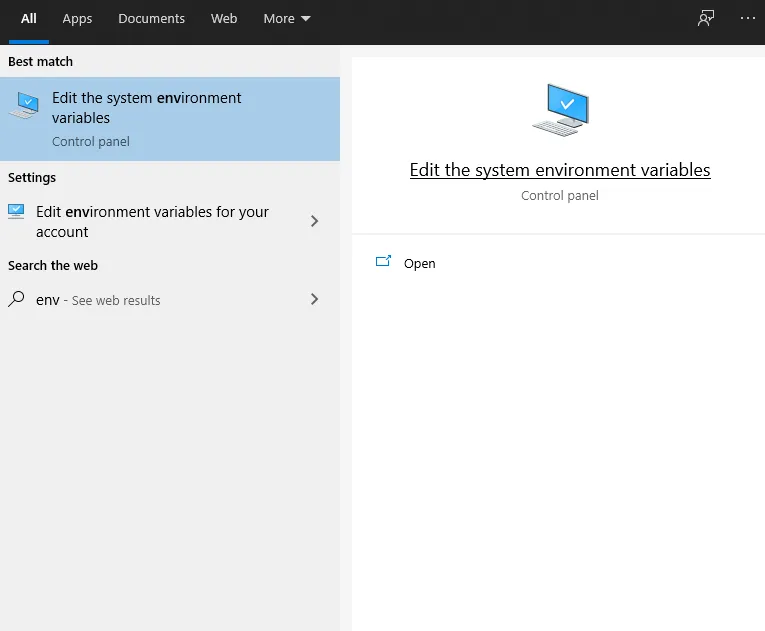
- Then click the search icon, type environment, and click the Edit System Environment Variables button.
- Now that you’ve seen this pop-up from the system properties, click on these environment variables again.
- Click on the path under this system variable and then modify the edit.
- And now you will see this edit environment variable pop up, so click on new.
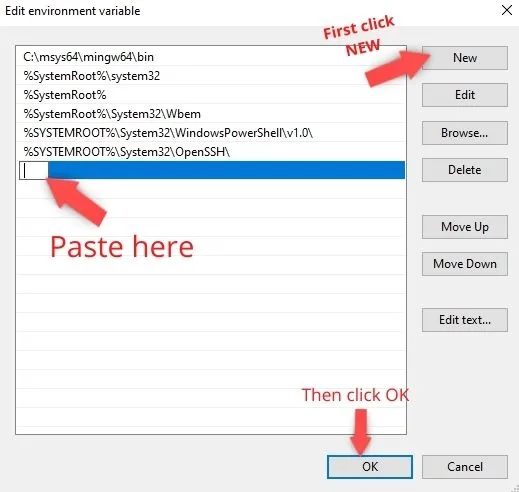
- And in here, paste the previous path by simply pressing Ctrl V.
And now, as you can see, this means the MinGW slash bin folder has been correctly printed
- Now just click OK three times.
Now After closing this again, open your command prompt and simply type (G plus plus minus minus version) as
G++ –version
And now just enter, and you will see something like this:
mingw.org 6.3.0 has also been correctly shown in our home directory, so we know this environment path has been correctly established.
After installation has finished, click on Finish.
Conclusion
We hope you found our guide on installing MinGW on Windows useful. With this information, we can install MinGW on your Windows PC and develop apps in C and C++.
It includes a GCC compiler and additional tools for creating C and C++ applications for Windows. As a result, it is critical for coders and students who wish to learn to code.
If you have any other questions or want to learn more about the MinGW compiler, please leave a comment, and we will respond or publish a new article on that issue.
How to install the MinGW w64 C, C++ compiler?
MinGW, a modified GCC compiler version, can compile applications on 32-bit and 64-bit architectures. MinGW may be downloaded via the SourceForge website.
How do I download the C++ compiler for Visual Studio code?
The Mingw compiler is often used in Visual Studio programs to build C++ code. Go to www.mingw.org and click the “Download/Installer” link to get the MinGW setup file.
How do I install the CPP compiler on Windows?
GCC requires MinGW to be installed on Windows. Visit www.mingw.org and get the latest MinGW installation software.
To download and install Mingw on Windows 10, you can follow these steps:
1. Visit the official Mingw website (https://mingw-w64.org/doku.php) and navigate to the «Downloads» section.
2. Scroll down and find the «MinGW-W64-builds» section. There, you will see different options for downloading Mingw.
3. Depending on your system architecture (32-bit or 64-bit), click on the appropriate version link to start the download.
4. Once the download is complete, locate the downloaded file and run the installer.
5. The installer will prompt you to choose the installation options. Select the desired packages you want to install, such as the compiler, libraries, and tools. You can customize the installation based on your needs.
6. Choose the installation folder where you want Mingw to be installed. By default, it is recommended to use the default location.
7. After selecting the installation options and folder, click on the «Install» button to start the installation process.
8. The installer will now download and install the selected packages. This might take some time depending on your internet speed and chosen components.
9. Once the installation is complete, you will see a «Installation Complete» message. You can now close the installer.
10. To use Mingw, you need to add its bin directory to the system’s PATH environment variable. This allows you to run Mingw commands from any location in the command prompt. To do this, follow these steps:
– Right-click on the «Start» button and select «System«.
– In the System window, click on the «Advanced system settings» option on the left.
– In the System Properties window, click on the «Environment Variables» button.
– In the Environment Variables window, locate the «Path» variable under the «System variables» section and click on the «Edit» button.
– In the Edit Environment Variable window, click on the «New» button and add the path to the Mingw bin directory (e.g., C:\Mingw\bin).
– Click «OK» to save the changes.
11. Now, you should be able to use Mingw on your Windows 10 system. To verify the installation, open the command prompt and type «gcc -v» (without quotes). If Mingw is installed correctly, you will see the details of the installed version.
By following these steps, you can successfully download and install Mingw on Windows 10 for your programming needs.
Video Tutorial:Do I need MinGW for C++?
How do I open MinGW in Windows 10?
To open MinGW in Windows 10, you need to follow these steps:
1. First, ensure that you have MinGW installed on your computer. If you haven’t installed it yet, you can download it from the MinGW website and follow the installation instructions.
2. Once MinGW is installed, open the Start menu and search for «Environment Variables.» Click on «Edit the system environment variables» to open the System Properties window.
3. In the System Properties window, click on the «Environment Variables» button at the bottom right.
4. In the Environment Variables window, under the «System variables» section, scroll down and find the «Path» variable. Select it and click on the «Edit» button.
5. In the Edit Environment Variable window, click on the «New» button and add the path to your MinGW installation. The default installation directory is usually «C:\MinGW\bin«. Once you have added the path, click on the «OK» button to save your changes.
6. Close all the windows by clicking «OK» to apply the changes and exit.
7. Now you can open MinGW by opening the command prompt. Press the Windows key + R to open the Run dialog box, type «cmd,» and press Enter.
8. In the command prompt, type «mingw32-make» or any other MinGW command you wish to use. If you see the command executing without any errors, it means MinGW is successfully installed and working.
That’s it! You can now use MinGW on your Windows 10 system for compiling and running programs.
Why is MinGW 64 not installing?
There could be several reasons why MinGW 64 may not be installing properly on your system. Here are a few possible explanations:
1. Compatibility Issues: Ensure that you are downloading the correct version of MinGW 64 that is compatible with your operating system. Double-check if you have chosen the appropriate version for your system architecture (32-bit or 64-bit) and operating system type (Windows, Linux, macOS).
2. Installation Path: Make sure you are installing MinGW 64 in a folder or directory that does not contain any spaces or special characters. It is recommended to install it in a location with a simple path, such as «C:\MinGW» or «C:\Program Files\MinGW«.
3. Antivirus or Firewall Interference: Your antivirus software or firewall might be blocking the installation process. Temporarily disable these security measures and try installing MinGW 64 again. Remember to re-enable them once the installation is complete.
4. Administrative Privileges: Ensure that you have administrative rights on your computer. Some installation processes require elevated privileges to modify system settings, and without such rights, the installation might fail.
5. Corrupted Download: If the installation package for MinGW 64 was not downloaded properly, it may be corrupted, resulting in installation issues. Try downloading it again from a reliable source and verify the integrity of the downloaded file using a hashing tool.
6. Conflicting Software: Check if you have any other software installed on your system that could conflict with MinGW 64’s installation process. Temporarily disable or uninstall any similar software and attempt to install MinGW 64 again.
7. Insufficient System Resources: Ensure that your system meets the minimum requirements for installing MinGW 64. Check if you have enough free disk space, memory, and processing power available to complete the installation.
If you have tried these troubleshooting steps and are still experiencing installation issues, you may want to seek further assistance from the MinGW community forums or consult with an IT professional who can provide specialized support.
How do I add MinGW to my path in Windows 10?
To add MinGW (Minimalist GNU for Windows) to your path in Windows 10, follow these steps:
1. Download MinGW from the official website (https://mingw-w64.org/doku.php).
2. Choose the appropriate version based on your system architecture (32-bit or 64-bit) and the latest available release.
3. Run the installer and select the desired components to install. Generally, you should include the C and C++ compilers.
4. During the installation process, you will be prompted to choose the installation directory. Make a note of this directory, as you will need it later.
5. Once the installation is complete, open the Start menu and search for «Environment Variables» to access the system’s Environment Variables settings.
6. In the Environment Variables window, click on «Path» under System Variables and then click on «Edit«.
7. Click on «New» and add the path to the MinGW installation directory (the one you noted earlier) to the list. Make sure to include the bin folder within the MinGW directory.
8. Click «OK» to save the changes.
9. Open a new Command Prompt or PowerShell window to test if MinGW is successfully added to the path by running the `g++` command. If it executes without errors, then MinGW is correctly configured.
By adding MinGW to the system’s path, you can conveniently access its compilers and related tools from any Command Prompt or PowerShell window without having to specify the full path each time.
Should I use GCC or G ++ for C++?
When it comes to choosing between GCC and G++ for C++, it’s important to understand their use cases and features. Both are compilers provided by the GNU Compiler Collection (GCC), designed to compile C and C++ programs. Here’s a professional perspective on this matter without using summary phrases:
GCC, or the GNU Compiler Collection, is a widely-used compiler suite known for its versatility and support for multiple programming languages. It includes the G++ compiler, which specifically focuses on compiling C++ programs. G++ provides language-specific features and optimizations that are tailored for C++ development.
If your primary goal is to compile C++ code, G++ is generally recommended due to its language-specific optimizations and support for the latest features of the C++ language. G++ handles C++ syntax, language extensions, and linking libraries for C++ programs.
However, there may be scenarios where using GCC instead of G++ can be beneficial. For instance, if you have a mixed codebase with both C and C++ files, or if you need to compile C programs along with your C++ code, using GCC might be a more suitable choice. GCC supports both C and C++ languages, allowing you to seamlessly compile and link both types of files within a single build process.
Ultimately, the decision between GCC and G++ depends on the specific requirements of your project. If you are solely working with C++ code, it’s generally recommended to utilize G++ for its language-specific features and optimizations. However, if you have a mixed codebase or other unique needs, using GCC may be more appropriate. Consider the context of your project and the specific features offered by each compiler when making your decision.
What is the difference between MinGW and GCC compiler?
MinGW (Minimalist GNU for Windows) and GCC (GNU Compiler Collection) are both popular software development tools used to compile and build applications. While they are related, there are some important distinctions between the two.
GCC is a collection of compilers supporting multiple programming languages, including C, C++, Objective-C, and Fortran. It is widely recognized as a powerful and robust compiler suite, providing optimizations, debugging features, and support for various platforms. GCC is highly portable and supports a vast range of operating systems, processors, and architectures.
On the other hand, MinGW is a specific port of GCC designed for Windows systems. It provides a development toolchain, including GCC, along with other necessary utilities, libraries, and headers. MinGW allows developers to compile and build native Windows applications using the GNU toolset, bringing the power and flexibility of GCC to the Windows environment.
One key difference between MinGW and GCC is their target platforms. GCC, being a comprehensive compiler collection, can target a wide range of platforms and operating systems beyond Windows, such as Linux, macOS, BSD, and various embedded systems. MinGW, however, specifically focuses on Windows and provides a solution customized for Windows development.
Another distinction lies in the underlying runtime libraries. MinGW uses the Microsoft runtime libraries (msvcrt.dll) by default, while GCC typically relies on the GNU C Library (glibc) on Linux and macOS. This difference may impact interactions with the operating system and other libraries when developing and deploying applications.
In summary, while GCC is a powerful compiler collection supporting multiple languages and platforms, MinGW is a Windows-specific port of GCC, tailored for developing native Windows applications. MinGW provides a convenient toolchain for Windows developers to harness the benefits of the GNU toolset.
How do I install MinGW on Windows 10 64 bit?
To install MinGW on a Windows 10 64-bit system, follow these steps:
1. Visit the official MinGW website (https://mingw.org/) and navigate to the «Downloads» section.
2. Look for the latest version of MinGW and click on the corresponding download link. Ensure that you select the 64-bit version suitable for Windows 10.
3. Once the download is complete, run the installer executable file.
4. In the installer window, you’ll be presented with various components to install. Make sure to select at least the «Base» package, which includes the essential tools and libraries for compiling and building applications.
5. Optionally, you can choose additional components like development headers or libraries depending on your requirements.
6. Specify the installation directory, or you can stick with the default location suggested by the installer.
7. Proceed with the installation and wait for the process to complete. This may take a few minutes, depending on your system and the selected components.
8. Once the installation finishes, dismiss the installer window and close any other related windows.
9. To use MinGW in your command prompt or PowerShell, you’ll need to add its bin directory to the system’s PATH environment variable.
– Open the Start Menu and search for «Environment Variables» to open the «Edit the system environment variables» control panel.
– Click on the «Environment Variables» button at the bottom of the window.
– In the «System variables» section, locate the variable named «Path» and double-click on it.
– In the Path variable’s «Edit environment variable» window, click on the «New» button.
– Enter the path to your MinGW installation’s bin directory (e.g., C:\MinGW\bin) and click «OK» to save changes.
– Close all the environment variable windows by clicking «OK.«
10. To verify that MinGW is correctly installed, open a new command prompt or PowerShell window and type «gcc -v» without quotes. If the installation is successful, it should display the version information of the GCC compiler.
Now you have MinGW installed on your Windows 10 64-bit system, and you can start using it to compile and build applications from the command line.
Introduction: Learn to Install GCC (Mingw-w64) Compiler Tools on Windows 10 Using MSYS2
We will learn
How to install 64 bit (GCC) GNU Compiler Collection on a Windows 10 system using MSYS2 installer for C/C++ software development.
After installing GCC, we will compile a Win32/64 GUI application using GCC (MingW-w64/MSYS2) on Windows 10 .
Step 1: Contents
Step 2: What Is GCC
GNU Compiler Collection (GCC) is an compiler produced by the GNU Project supporting various programming languages like for Objective-C, Objective-C++, Fortran, Ada, D and Go.
Here we will be concentrating only C/C++ development on Windows 10.
GCC along with other utilities like a set of freely distributable Windows specific header files and static import libraries have been ported to Windows platform in the following flavors.
- MinGW — («Minimalist GNU for Windows») which can be used for creating 32 bit native executable on Windows platform
- Mingw-w64 — 64bit version of GCC
Step 3: What Is Mingw-w64
Mingw-w64 is a fork off MinGW which provides a more complete Win32 API implementation including Win64 support,C99 support, DDK, DirectX.
Mingw-w64 can generate 32 bit and 64-bit executables for x86 under the target names i686-w64-mingw32 and x86_64-w64-mingw32.
Here we will be using Mingw-w64 for C/C++ native application development using Windows API as most modern PC are now 64 bit.
Mingw-w64 Project does not provide any binaries for download from its website instead it maintains a list of Pre-built toolchains and packages provided by other vendors.
Here we will be using a Mingw-w64 package called MSYS2 Software Distribution
Step 4: MSYS2 Software Distribution
MSYS2
MSYS2 is a collection of tools and libraries providing the developer with an easy-to-use environment for building, installing and running native Windows software.
MSYS2 Software Distribution consists of
- command line terminal called mintty,
- Bash,
- tools like tar and awk
- build systems like autotools,
all based on a modified version of Cygwin.
o install and remove various software packages internally MSYS2 uses Pacman as their package manager.
MSYS2 is sponsored by Microsoft Open Source Programs Office through their FOSS Fund.
- Download MSYS2 Software Distribution (Mingw-w64) for Windows
- Download extra MSYS2 Packages from Repo here
Step 5: Installing MSYS2 on Windows
Installing MSYS2 on Windows 10 is quite easy. Download the executable using the above link and run it
After the binary is installed on your system ,
MSYS2 comes with different environments/subsystems and the first thing you have to decide is which one to use.
The differences among the environments are mainly environment variables, default compilers/linkers, architecture, system libraries used etc.
If you are unsure, go with UCRT64.
Step 6: Install GCC on Windows Using Pacman on Windows 10
MSYS2 on Windows 10 uses pacman as its package manager.
After installing MSYS2 ,you can check the installed packages by typing
$pacman -Q
on the Mintty terminal.
This will list all the available packages on your system.
GCC will not be installed by default, So you can go to the package repo and search for gcc.
You can now use pacman to install gcc
$pacman -S gcc
After which you can check GCC by issuing the whereis command.
$whereis gcc
Step 7: Compiling C/C++ File on Windows10 Using GCC (MingW-w64/MSYS2)
First we will compile a simple c file using gcc.
Code below ,Save as main_c.c
#include<stdio.h>
int main()
{
  printf("Hello World");
  return 0;
}
Compile and run the code using the below commands
$ gcc -o main_c main_c.c
$ ./main_c
Step 8: Compiling a C++ Code Using GCC (MingW-w64/MSYS2)
Code below, Save as main_cpp.cpp
#include <iostream>
using namespace std;
int main()
{
    cout << "Hello from MSYS2\n!";
    cout << "Compiled C++ File\n!";
}
Compile and run the code using the below commands
$ g++ -o main_cpp main_cpp.cpp
$ ./main_cpp
Step 9: Compiling a Win32/64 API GUI C Code Using GCC (MingW-w64/MSYS2)
Now we will compile a Win32/64 GUI application using GCC (MingW-w64/MSYS2) on Windows 10 .
We will create a Window and a Message Box using Win32 native api and configure the gcc to compile and link to the native system API.
Copy the below code and save it as win.c
#include<Windows.h>int WINAPI WinMain(HINSTANCE hInstance, //the instance of the program
HINSTANCE hPrevInstance, //the previous instance
LPSTR lpCmdLine, //ptr to command line args
int nCmdShow) //display properties
{
HWND h;
h = CreateWindow("BUTTON",
"Hit me",
WS_OVERLAPPEDWINDOW,
350,300,250,100,0,0,
hInstance,0); //Create a window with BUTTON classShowWindow(h,nCmdShow); //show the window
MessageBox(0,"Press Me","Waiting",MB_OK); //used to display window
}
You can compile the Win32 API code on GCC using the following command
$ gcc -o win win.c -Wl,--subsystem,windows -lgdi32$ ./win
More details about compiling Win32 API can be found here