
Цель статьи
Быстро, кратко, понятно описать свой личный опыт, что к чему (не супер программист, так что ввязывать в споры по типу, что один компилятор собирает программу на целых 20 килобайт меньше, итоговая программа быстрее на 200 миллисекунд или алгоритмы оптимизации лучше в Clang нежели в gcc, я не буду).
Просто кратко как, что сделать с чего начать и чем закончить.
Начало
Для начала стоит понимать, что gcc компилятор по сути сборник компиляторов для C/C++/D/Ada и др. (весь список или для любителей прямых источников) и в будущем, возможно других языков программирования. Хотя изначально разрабатывался только для C (первоначально аббревиатура расшифровывалась как GCC — GNU C Compiler (GNU компилятор для языки Си), а ныне GCC — GNU Compilers Collection (коллекция компиляторов) ).
Сама же приставка GNU отсылает нас к лицензии, используемой в данном проекте и к операционной системе GNU. Хотя скорее в целом к проекту GNU. Т.к. GNU является организацией по распространению и развитию open source решений.
Версии GCC
Так получилось, что изначально gcc идет исключительно под Linux/Unix подобные операционные системы, со всеми вытекающими несовместимостями с Windows окружением. Поэтому энтузиастами были собраны 2 различные версии GCC — Cygwin и MinGW.
Разница в том, что Cygwin эмулирует окружение Unix — подобных операционных систем прямо внутри Windows.
MinGW — по сути прямой (насколько возможно) порт GCC на Windows.
Я лично буду использовать MinGW т.к. привык к Windows, а на мой взгляд он чуть проще да и размеры бинарных файлов (исполняемых файлов) у него куда меньше т.к. отпадает нужна в эмуляции Unix-окружения.
Так что по сути и Cygwin и MinGW являются GCC компиляторами, но только это разные сборки сделанные по разным идеологиям и причинам.
Установка MinGW
Есть много вариантов (как и всегда для открытого ПО), но главных по сути 2:
-
Использовать MSYS пакетный менеджер (доступен для Windows)
-
Напрямую загрузить только MinGW.
Я буду действовать по наиболее простому и прямому пути без лишних «зависимостей» потому напрямую скачаю MinGW.
Страница для MinGW и репозиторий с готовыми билдами MinGW (ссылка взята со страницы для MinGW). Перейдя по ним, сразу видим много билдов, и с ходу не понятно какой выбрать. Но все просто. То что начинается с i686 (сильно упрощая — есть 32 bit версия компилятора), а то что начинается с x86_64 64 bit версия компилятора, действительная разница в том, что сборке в 32 bit версии не сможет генерировать 64 bit программы т.е. для ваших программ будет доступно максимум 4 Гб оперативной памяти (что для абсолютного большинства программ более чем достаточно).
Далее mcf/posix/win32. MCF — модель потоков GCC, Posix — порт предназначенный для опять же эмуляции Unix/Linux путей (но тут могу ошибаться т.к. сам не тестировал и не пробовал, что к чему). Win32 — название от winapi32, родной порт для Windows.
SEH/Dwarf — модель обработки исключений, но этот пункт имеет значение для более продвинутых останавливать не вижу смысла, проще — можно выбрать любой, когда поймете зачем он вам и в чем разница сами выберите нужный.
UCRT/MSVCRT — стандартная библиотека для языков и ее реализация. Для более менее правильно работы рекомендую MSVCRT т.к. используется стандартная библиотека времени выполнения от Windows. UCRT стандартная библиотека больше ориентированная для Linux/Unix систем т.к. для них изначально и разрабатывалась, хотя вполне работает и на Windows. Но со сборкой некоторых библиотек на C/C++ могут возникнуть проблемы.
Промежуточный итог
Это был крайне короткий и простой для понимания новичков, обзор, что к чему. Много мест где мог допустить неточность или ошибиться, но опять же вся информация из моего опыта работы с GCC.
Установка
Как такового процесса установки нет, т.к. это не в полном смысле программа или приложения, а просто собранные в архив бинарные файлы.
Но «установка» не сложна. Требуется лишь выбрать нужный каталог на вашем ПК, туда распаковать ранее скаченный архив и ВАЖНО! прописать к нему путь в системной переменной Path. Для чего это нужно, чтобы при вызове из командой строки фразы «gcc» операционная система понимала к какому именно файлу из тысяч других нужно обратиться.
Проще всего будет сделать через графический интерфейс самой Windows хотя можно и через командную строку.
-
Открыть мой компьютер (проводник) — корневой каталог где находятся диски или диск (Локальный диск (C:), Локальный диск (D:) — (если имеется) и др.).
-
Кликнуть ПКМ на любое свободное место и в выпадающем меню перейти в свойства.
-
Далее в перейти в дополнительные параметры.
-
Далее в переменные среды.
-
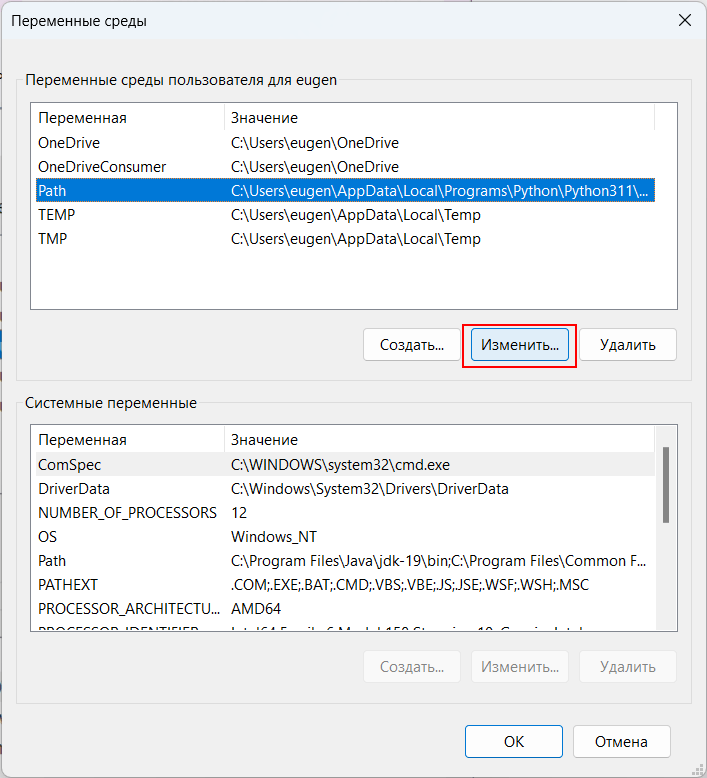
В разделе системные переменные найти в колонке «переменная» название Path, нажать на нее и далее нажать изменить.
-
И можете в начало а можете и в конец вставить полный путь к тому месту где у вас находится компилятор MinGW, например у меня это D:\mingw64. Главное вы НЕ ДОЛЖНЫ удалять или изменять содержимое данной переменной, а просто дополнить ее новым путем отделенным от других точкой с запятой (;), например D:\mingw64;C:\Program Files\Python312\Scripts. Но и в интернете есть куча более подробных статей на эту тему том числе со скриншотами и посвященными именно MinGW.
Итог
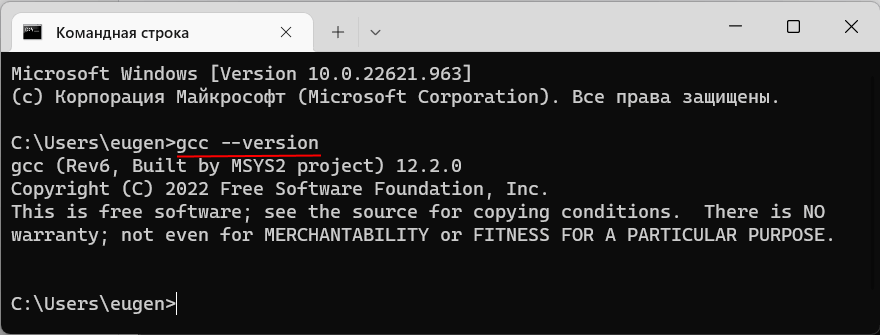
Установленный и настроенный MinGW. Чтобы убедиться, что вы все сделали правильно откройте командную строку и введите gcc —version если windows пишет что такой команды не существует значит, вы что-то сделали неправильно пересмотрите шаги. Если выведет информацию о текущей версии gcc компилятора и некоторые другие данные, значит gcc в вашей системе успешно установлен и готов к работе.
While mingw-w64 provides the core Windows headers and libraries needed for
Windows development, it’s not very useful on its own. Most users should install
a pre-built toolchain that combines mingw-w64 with a compiler (like GCC with
binutils, or LLVM/Clang) and other essential build components. These
distributions package everything needed to compile programs for Windows and are
much easier to set up than building from source.
| Version | Host | GCC / mingw-w64 Version | Languages | Additional Software in Package Manager | |
|---|---|---|---|---|---|
|
Arch Linux |
Rolling | Linux | 14.2.0/12.0.0 | Ada, C, C++, Fortran, Obj-C, Obj-C++ | many |
|
Cygwin |
Rolling | Windows | 12.4.0/12.0.0 | C, C++, Fortran, Obj-C | many |
|
Debian |
Debian 10 (Buster) | 8.3.0/6.0.0 | Ada, C, C++, Fortran, Obj-C, Obj-C++ | 9 (gdb, libassuan, libgcrypt, libgpg-error, libksba, libnpth, nsis, win-iconv, zlib) | |
| Debian 11 (Bullseye) | 10.2.1/8.0.0 | ||||
| Debian 12 (Bookworm) | 12.0.0/10.0.0 | ||||
|
Fedora |
Fedora 40 | 14.1.1/11.0.1 | Ada, C, C++, Fortran, Obj-C, Obj-C++ | many | |
| Fedora 41 | 14.2.1/12.0.0 | ||||
| LLVM-MinGW | 20240518 | Windows, Linux, macOS | LLVM 18.1.6/trunk | C, C++ | make, Python |
|
MacPorts |
Rolling | macOS | 14.2.0/12.0.0 | C, C++, Fortran, Obj-C, Obj-C++ | 1 (nsis) |
| MinGW-W64-builds | Rolling | Windows | 13.1.0/11.0.0 | C, C++, Fortran | 4 (gdb, libiconf, python, zlib) |
|
MSYS2 |
Rolling | Windows | 14.2.0/trunk | Ada, C, C++, Fortran, Obj-C, Obj-C++, OCaml | many |
|
Ubuntu |
20.04 Focal Fossa | 9.3.0/7.0.0 | Ada, C, C++, Fortran, Obj-C, Obj-C++ | 9 (gdb, libassuan, libgcrypt, libgpg-error, libksba, libnpth, nsis, win-iconv, zlib) | |
| 22.04 Jammy Jellyfish | 10.3.0/8.0.0 | ||||
| 24.04 Noble Numbat | 13.2.0/11.0.1 | ||||
| 24.10 Oracular Oriole | 14.1.0/12.0.0 | ||||
| w64devkit | 2.0.0 | Windows | 14.2.0/12.0.0 | C, C++, Fortran |
8 (busybox, cppcheck, ctags, gdb, make, nasm, pkg-config, vim) |
| WinLibs.com | Rolling | Windows | 13.2.0 | Ada, C, C++, Fortran, Obj-C, Obj-C++, Assembler | Package manager: work in progress (will offer > 2500 packages) |
Arch Linux
Installation:
- Extra repository (toolchain)
- AUR repository (additional packages)
Cygwin
Cygwin is a Unix-like environment and command-line
interface for Microsoft Windows. Its core is the cygwin1.dll library which
provides POSIX functionality on top of the Win32 API. It can be used as a build
environment which targets Windows directly and for which output doesn’t depend
on cygwin1.dll.
Installation is done through cygwin’s package manager:
setup.exe.
As part of the numerous packages in cygwin, there are cross-compilation
toolchains which target both 32 bits and 64 bits; their names start with
“mingw64-”.
Once they are installed, they should be used according to the general
cross-compilation approach.
Debian
Installation: through integrated package manager.
mingw-w64 packages on Debian
Fedora
Installation: through integrated package manager.
LLVM-MinGW
LLVM-MinGW is a toolchain built with Clang, LLD, libc++, targeting
i686, x86_64, arm and aarch64 (ARM64), with releases both for running
as a cross compiler from Linux and for running on Windows. It supports
Address Sanitizer, Undefined Behaviour Sanitizer, and generating debug
info in PDB format.
Installation: GitHub
MacPorts
To install just the 32-bit or just 64-bit compiler with dependencies, use:
sudo port install i686-w64-mingw32-gcc
sudo port install x86_64-w64-mingw32-gcc
A shortcut to install both:
sudo port install mingw-w64
Here is the list of mingw-w64 packages on MacPorts.
MinGW-W64-builds
Installation: GitHub
MSYS2
Installation: GitHub
Ubuntu
Installation: through integrated package manager.
mingw-w64 packages on Ubuntu
w64devkit
w64devkit is a portable C and C++ development kit for x64 (and x86) Windows.
Included tools:
- mingw-w64 GCC : compilers, linker, assembler
- GDB : debugger
- GNU Make : standard build tool
- busybox-w32 : standard unix utilities, including sh
- Vim : powerful text editor
- Universal Ctags : source navigation
- NASM : x86 assembler
- Cppcheck : static code analysis
The toolchain includes pthreads, C++11 threads, and OpenMP. All included
runtime components are static.
Installation: GitHub
WinLibs.com
Standalone mingw-w64+GCC builds for Windows, built from scratch (including all dependencies) natively on Windows for Windows.
Downloads are archive files (.zip or .7z). No installation is required,
just extract the archive and start using the programs in mingw32\bin or mingw64\bin.
This allows for a relocatable compiler suite and allows having multiple versions on the same system.
Also contains other tools including:
- GDB — the GNU Project debugger
- GNU Binutils — a collection of binary tools
- GNU Make — a tool which controls the generation of executables and other non-source files
- Yasm — The Yasm Modular Assembler Project
- NASM — The Netwide Assembler
- JWasm — A free MASM-compatible assembler
Flavors:
- separate packages for 32-bit (i686) and 64-bit (x86_64) Windows
- separate packages for MSVCRT and UCRT builds
- only POSIX threads builds (which also include Win32 API thread functions)
- exception model: Dwarf for 32-bit (i686) and SEH for 64-bit (x86_64)
Installation: Download from winlibs.com and extract archive (no installation needed).
Unsorted complementary list
GCC with the MCF thread model
GCC with the MCF thread model is a series of
x86 and x64 native toolchains built by LH_Mouse. The MCF thread model has been
merged into GCC 13, and can be enabled by passing --enable-threads=mcf to
GCC’s configure script. C++11 threading facilities, such as std::thread,
std::mutex, std::condition_variable, std::call_once, thread_local etc.
invoke the mcfgthread library, which
implements them on Windows syscalls in a more standard-compliant and more
efficient way, outperforming even native slim reader/write locks (SRW) since
Windows Vista.
OpenSUSE
The OpenSUSE Linux distribution also has a large and
well-maintained set of packages for cross-compilation.
Последнее обновление: 01.01.2023
Установка компилятора
Рассмотрим создание первой простейшей программы на языке Си с помощью компилятора GCC, который на сегодняшний день является одим из
наиболее популярных компиляторов для Cи и который доступен для разных платформ. Более подобному информацию о GCC можно получить на официальном сайте проекта https://gcc.gnu.org/.
Набор компиляторов GCC распространяется в различных версиях. Для Windows одной из наиболее популярных версий является пакет средств для разработки от
некоммерческого проекта MSYS2. Следует отметить, что для MSYS2 требуется 64-битная версия Windows 7 и выше (то есть Vista, XP и более ранние версии не подходят)
Итак, загрузим программу установки MSYS2 с официального сайта MSYS2:
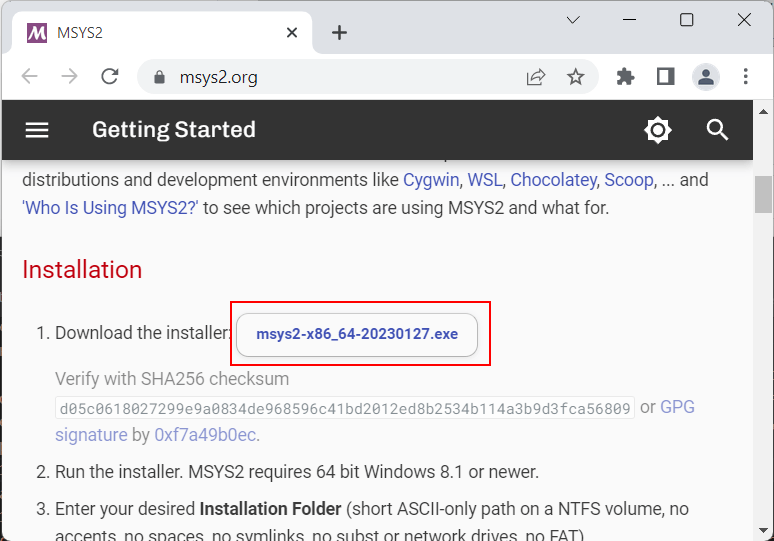
После загрузки запустим программу установки:
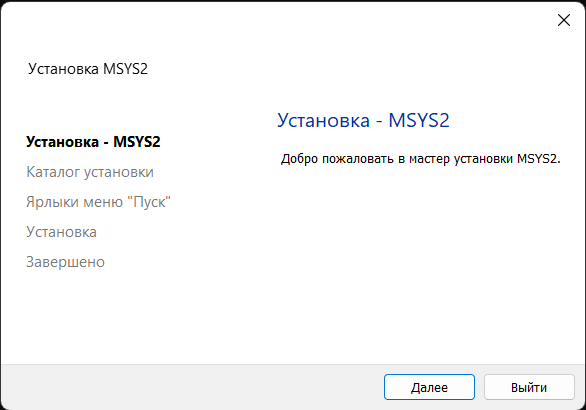
На первом шаге установки будет предложено установить каталог для установки. По умолчанию это каталог C:\msys64:
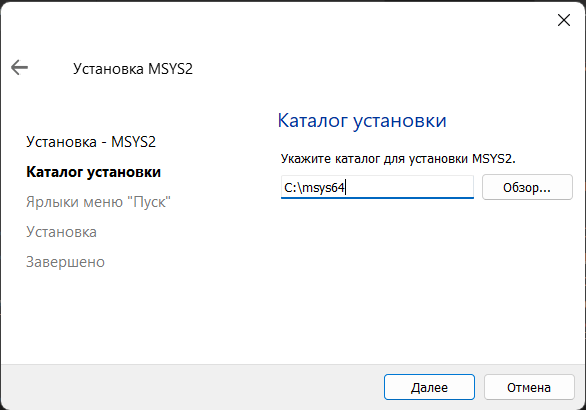
Оставим каталог установки по умолчанию (при желании можно изменить). На следующем шаге устанавливаются настройки для ярлыка для меню Пуск, и затем собственно будет произведена установка.
После завершения установки нам отобразить финальное окно, в котором нажмем на кнопку Завершить
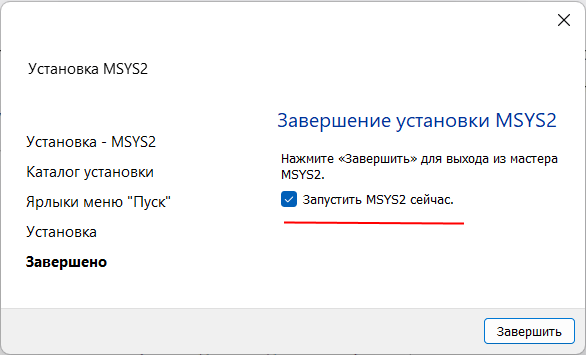
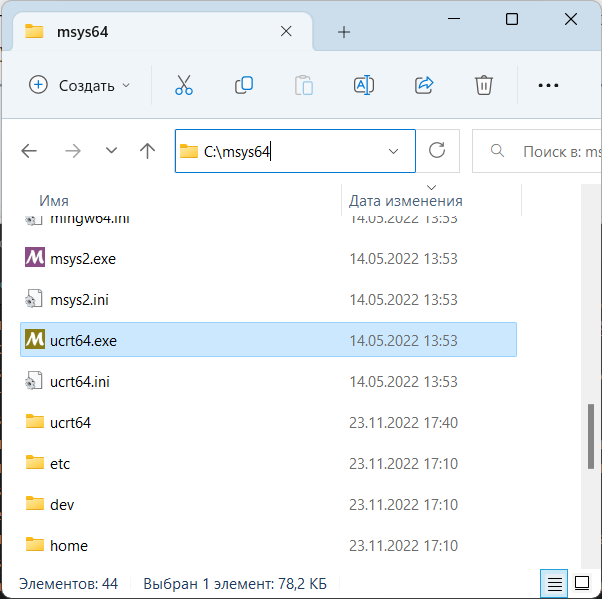
После завершения установки запустится консольное приложение MSYS2.exe. Если по каким-то причинам оно не запустилось,
то в папке установки C:/msys64 надо найти файл usrt_64.exe:
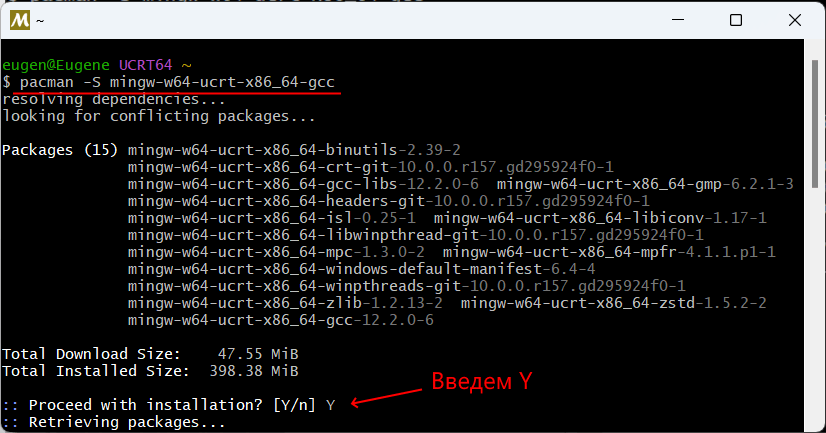
Теперь нам надо установить собственно набор компиляторов GCC. Для этого введем в этом приложении следующую команду:
pacman -S mingw-w64-ucrt-x86_64-gcc
Для управления пакетами MSYS2 использует пакетный менеджер Packman. И данная команда говорит пакетному менелжеру packman установить пакет mingw-w64-ucrt-x86_64-gcc,
который представляет набор компиляторов GCC (название устанавливаемого пакета указывается после параметра -S).
и после завершения установки мы можем приступать к программированию на языке Си. Если мы откроем каталог установки и зайдем в нем в папку C:\msys64\ucrt64\bin,
то найдем там все необходимые файлы компиляторов:
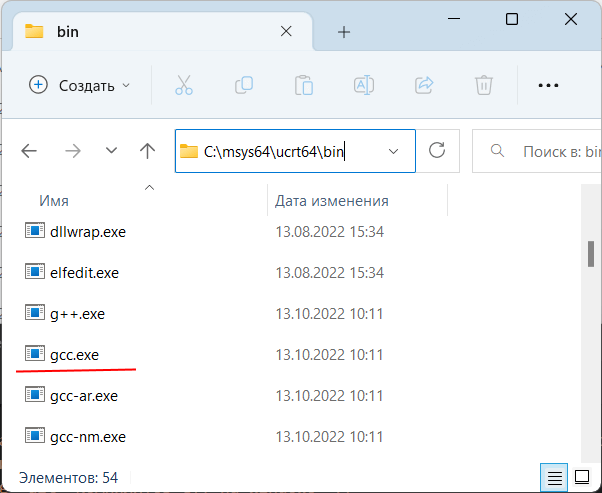
В частности, файл gcc.exe как раз и будет представлять компилятор для языка Си.
Далее для упрощения запуска компилятора мы можем добавить путь к нему в Переменные среды. Для этого можно в окне поиска в Windows ввести «изменение переменных среды текущего пользователя»:
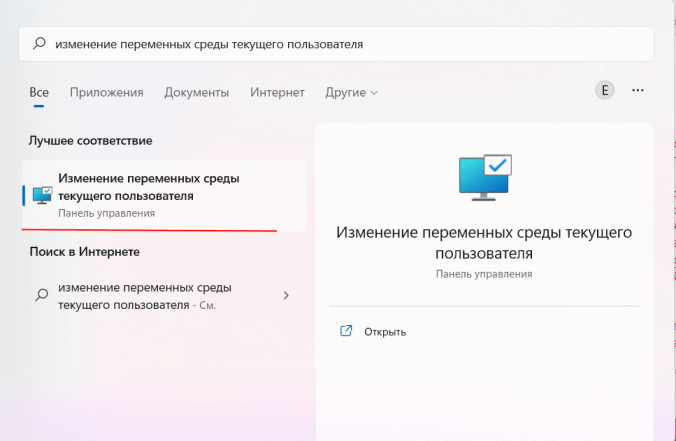
Нам откроется окно Переменныех среды:
И добавим путь к компилятору C:\msys64\ucrt64\bin:

Чтобы убедиться, что набор компиляторов GCC успешно установлен, введем следующую команду:
В этом случае нам должна отобразиться версия компиляторов
Создание первой программы
Итак, компилятор установлен, и теперь мы можем написать первую программу. Для этого потребуется любой текстовый редактор для набора исходного кода.
Можно взять распространенный редактор Visual Studio Code или даже обычный встроенный Блокнот.
Итак, создадим на жестком диске папку для исходных файлов. А в этой папке создадим новый файл, который назовем hello.c.
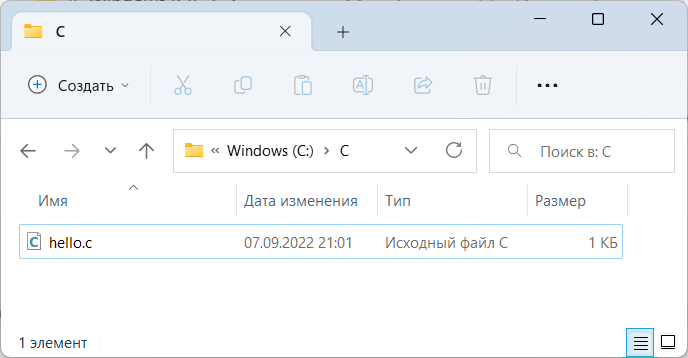
В моем случае файл hello.c находится в папке C:\c.
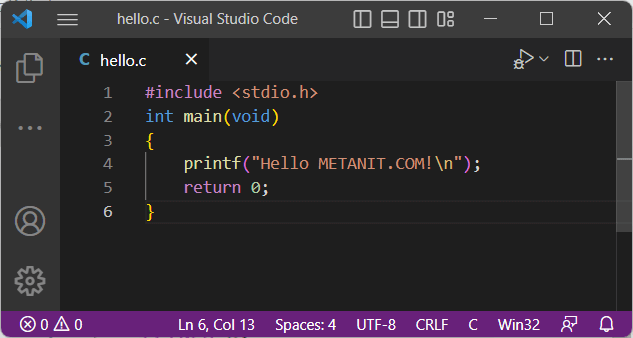
Теперь определим в файле hello.c простейший код, который будет выводить строку на консоль:
#include <stdio.h>			// подключаем заголовочный файл stdio.h
int main(void)						// определяем функцию main
{									// начало функции
	printf("Hello METANIT.COM!\n");	// выводим строку на консоль
	return 0;						// выходим из функции
}									// конец функции
Для вывода строки на консоль необходимо подключить нужный функционал. Для этого в начале файла идет строка
#include <stdio.h>
Директива include подключает заголовочный файл stdio.h, который содержит определение функции printf, которая нужна для вывода строки на консоль.
Далее идет определение функции int main(void). Функция main должна присутствовать в любой программе на Си, с нее собственно и начинается
выполнение приложения.
Ключевое слово int в определении функции int main(void) говорит о том, что функция возвращает целое число.
А слово void в скобках указывает, что функция не принимает параметров.
Тело функции main заключено в фигурные скобки {}. В теле функции происходит вывод строки на консоль с помощью функции printf, в которую передается выводимая строка «Hello METANIT.COM!».
В конце осуществляем выход из функции с помощью оператора return. Так как функция должна возвращать целое число, то после return указывается число 0.
Ноль используется в качестве индикатора успешного завершения программы.
После каждого действия в функции ставятся точка с запятой.
Теперь скомпилируем этот файл. Для этого откроем командную строку Windows и вначале с помощью команды cd перейдем к папке с исходным файлом:
Чтобы скомпилировать исходный код, необходимо компилятору gcc передать в качестве параметра файл hello.c:
После этого будет скомпилирован исполняемый файл, который в Windows по умолчанию называется a.exe. И мы можем обратиться к этому файлу
и в этом случае консоль выведет строку «Hello METANIT.COM!», собственно как и прописано в коде.
Стоит отметить, что мы можем переопределить имя компилируемого файла с помощью флага -o и передав ему имя файла, в который будет компилироваться программа.
Например:
В этом случае программа будет компилироваться в файл hello.exe, который мы также запустить.
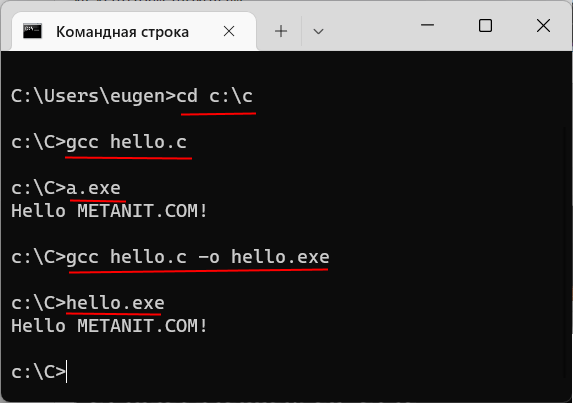
Чтобы не приходилось вводить две команды: одну для компиляции программы и другую для ее запуска, мы можем объединить команды:
gcc hello.c -o hello.exe & hello
Эта команда сначала компилирует код в файл hello.exe, а потом сразу запускает его.

The default compiler for Microsoft Windows is MSVC and it is installed when we install Visual Studio. Despite being a very powerful IDE, I recommend it for almost all situations, some libraries are more practical to work with in a more minimalist environment and this can be achieved using GCC/G++ on Windows.
The package developed by GNU to get you to use gcc/g++ on Windows is MinGW .
In this article we will see how to install on Windows 10 in the most basic and minimalist way possible!
Let’s go step by step!
1. Downloading MinGW
Access the address: https://sourceforge.net/projects/mingw-w64/ in the tab: Files and in MinGW-W64 GCC-8.1.0 (if you have a later version, choose her) and download the file:
x86_64-posix-seh and after downloaded: unzip the file:

2. Installation
Move the unzipped folder to the C:\ drive and copy the address of the bin subfolder the full path is: C:\mingw64\bin
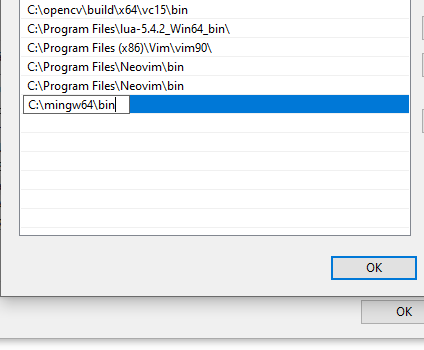
3. Create Environment Variables
Search the Startbar for the word Environment Variables , click on the first option and then on the button: Environment Variables, a new window will open:
In the bottom box (System Variables), select Path and click on the Edit button, in the window that opened click on the New button and paste the path address: C:\mingw64\bin:
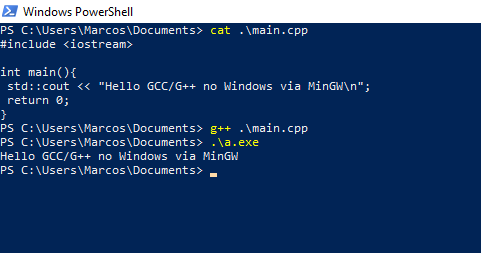
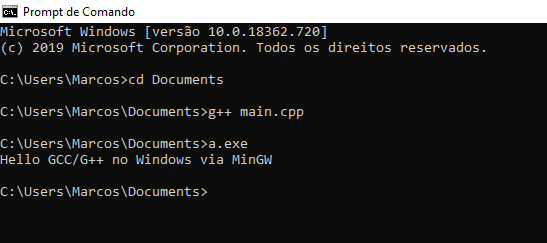
4. Testing in PowerShell and cmd
Open PowerShell or CMD, enter the folder where there is a C/C++ file, compile and run:
In VS Code it is easier to use:
To facilitate the opening of PowerShell in VS Code you can install this extension.
If you wish, you can choose to follow this tutorial to install with MSYS2, however I find it messier, MSYS2 creates a bunch of shortcuts.
See too:
Create Games for Windows, Linux and Web with Raylib C/C++
windows
gcc
cpp
clanguage
Related articles
The GNU Compiler Collection (GCC) is a versatile set of compilers developed by the GNU Project. It supports a wide range of programming languages like C, C++, Fortran, and Go. Originally built for the GNU operating system, GCC has become an essential tool across multiple platforms, including Windows.
While GCC typically comes preinstalled on many Linux distributions, this is not the case with Windows. Additionally, due to differences in system architecture, installing GCC on Windows can be a bit more involved.
In this tutorial, you will learn to install GCC on Windows.
Prerequisites
- A machine running Windows.
- A user account with admin privileges.
- Access to the command line.
Install GCC on Windows via MinGW-w64
The minGW-w64 tool collection provides a straightforward way to install the GCC compiler and related Windows tools, supporting 32-bit and 64-bit architectures. This section outlines the steps for installing GCC using minGW-w64.
Step 1: Download MinGW-w64
Navigate to the GitHub minGW-w64 page and scroll down to the Assets section. From the list of files, select the one you want to use on your system:
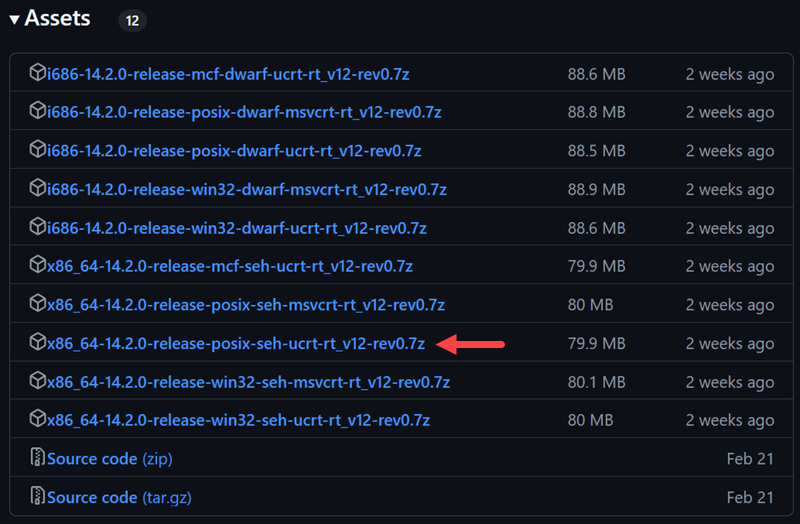
We use Windows 11 64-bit and will download the x86_64-14.2.0-release-posix-seh-ucrt-rt_v12-rev0.7z release. This version uses modern Windows runtime (ucrt), POSIX threading for cross-platform compatibility, and SEH for 64-bit Windows exception handling.
Step 2: Unpack Archive
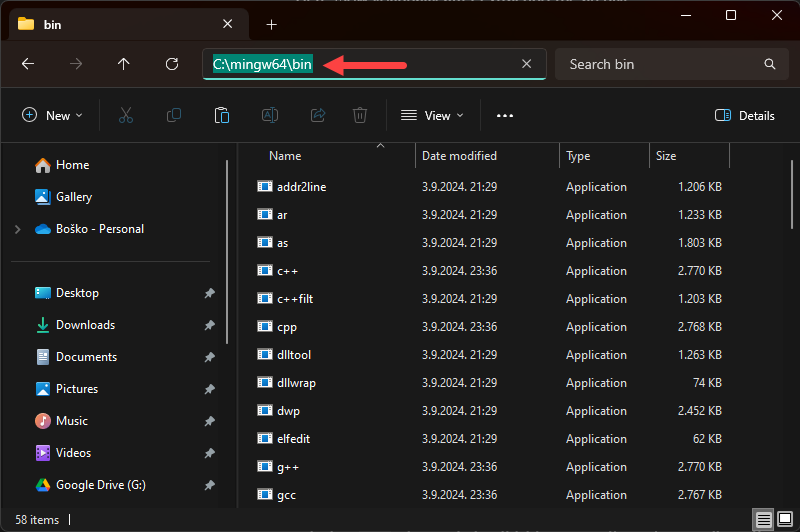
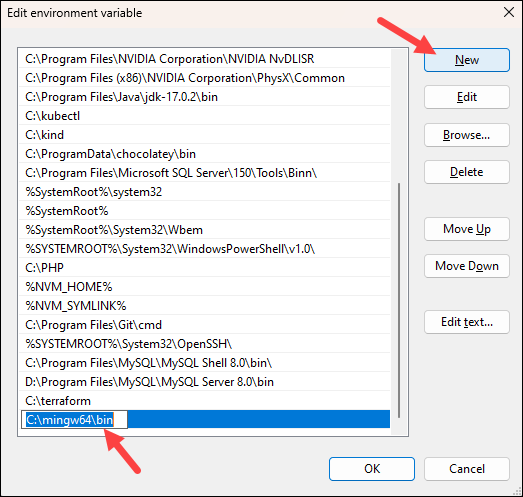
Extract the downloaded archive to a folder that is easy to access. For example, we will place it at the root of the C drive:
C:\mingw64After extracting the archive, navigate to the bin folder and copy the folder path. Add the path to the system’s PATH environment variable for it to function.
Step 3: Set Path Environment Variable
This section shows how to set the PATH environment variable on Windows to instruct the system where the executable files are.
1. Press the Windows key and search for Environment variables. Press Enter to open the System Properties window and click the Environment Variables button.
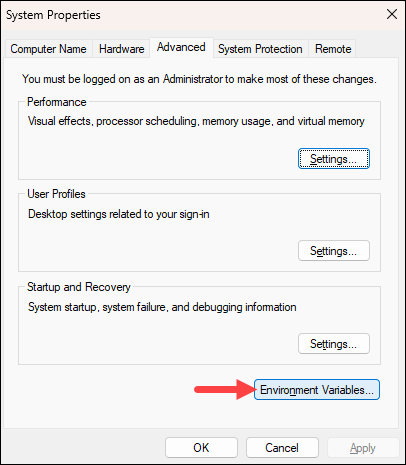
2. Under the System variables section, find Path, select it, and click Edit…
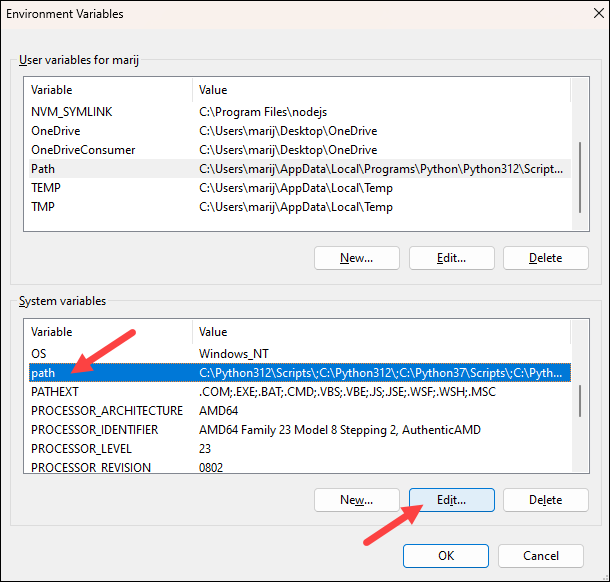
3. Click New and paste the path to the bin folder from the previous step.
4. Click OK in each window to apply the changes.
5. Check if GCC was properly installed by opening the Command Prompt and running the following command:
gcc --version
The system should output the program version, which means that it has been properly installed.
Install GCC on Windows via Chocolatey
Another way to install GCC on Windows is to use Chocolatey, a package manager designed for the Windows OS. It simplifies the process of installing, updating, and managing software through the command line. It is especially useful for developers and system administrators because it reduces the time and effort required to download and configure tools like GCC manually.
The upside is that Chocolatey completely automates the installation, while the downside is that you will probably not get the bleeding edge version you would get from installing manually.
Follow the steps below to install GCC via Chocolatey:
Note: If you don’t have Chocolatey installed, check out our guide on how to install Chocolatey on Windows. The guide explains the process step-by-step and offers tips on getting started with the package manager.
Step 1: Install mingw
Open the Command Prompt as an administrator and run the following command to install the mingw installer:
choco install mingw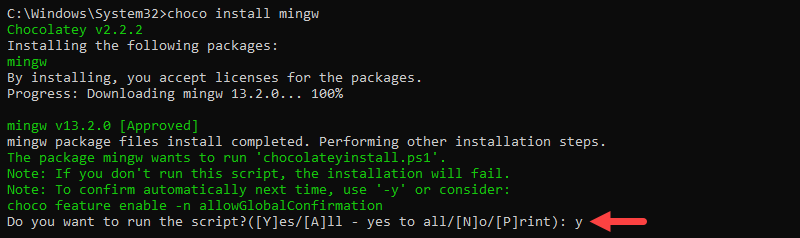
When prompted, type y and press Enter to confirm the installation.
Step 2: Confirm Installation
After the installation process completes, close and reopen the Command Prompt or run the following command to load the changes made to the PATH environment variable:
refreshenvConfirm the installation by checking the GCC program version:
gcc --version
Install GCC on Windows via Subsystem for Linux (WSL)
Windows Subsystem for Linux (WSL) allows you to run a Linux environment directly on Windows. Doing so enables you to install and use GCC as you would on a native Linux system.
Follow the steps listed in the sections below.
Step 1: Enable Windows Subsystem for Linux
WSL is a preinstalled feature on new Windows versions. However, you still need to enable it and install a Linux distribution to use it:
1. Press the Windows key and type powershell. Select the Run as administrator option from the right panel to open PowerShell as Administrator.
2. Run the following command to enable WSL and install Ubuntu:
wsl --install
Note: Ubuntu is installed by default when enabling WSL. Run wsl --list --online to see a list of other available distros, and install one using the syntax below:
wsl --install -d [distro_name]3. Restart the system when prompted and the installation continues automatically. Type in the username and password you want to use for your Linux distro:
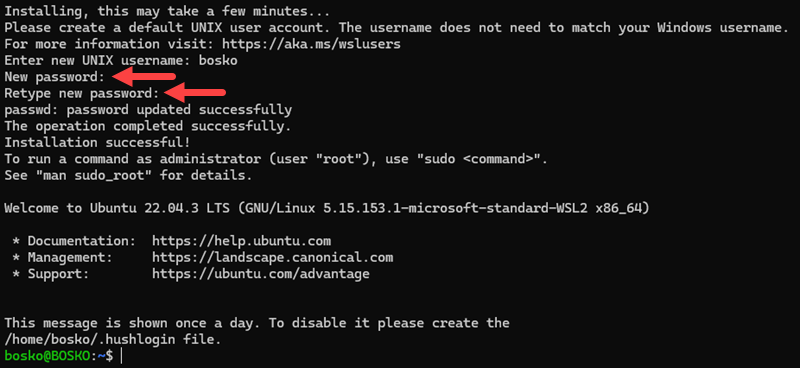
Step 2: Install GCC on WSL
After the installation process completes, you can install GCC:
1. Refresh the package list:
sudo apt update2. Install GCC with:
sudo apt install build-essential -yStep 3: Verify GCC Installation
In the Linux terminal, run the following command to confirm the installation:
gcc --version
Conclusion
This tutorial showed how to install GCC on a Windows system using three different methods. GCC supports a wide range of programming languages and provides a robust, open-source platform for compiling code, making it essential for software development.
Next, learn how to install the GCC compiler on Ubuntu, or check out our list of 15 best DevOps tools on the market.
Was this article helpful?
YesNo