Все способы:
- Способ 1: Проверка аудиоустройства
- Способ 2: Настройки микрофона
- Способ 3: Настройки сторонних программ
- Способ 4: Средство устранения неполадок
- Способ 5: Переустановка микрофона
- Способ 6: Обновлении или откат драйвера
- Вопросы и ответы: 0
Способ 1: Проверка аудиоустройства
Первым делом при таком поведении микрофона необходимо убедиться в исправности устройства и проверить качество его подключения. Если микрофон внешний, подключите его к другому компьютеру, планшету или телефону и протестируйте. Самопроизвольное изменение громкости и чувствительности, скорее всего, укажут на аппаратную неисправность записывающего устройства или его кабеля. Проверьте также качество подключения, если микрофон использует порт USB, подключите его к другому порту – USB 2.0 или USB 3.0.
Способ 2: Настройки микрофона
Наладьте системные настройки микрофона, в частности настройки автоматического усиления и регулирования уровня громкости.
- Нажатием клавиш Win + R вызовите диалоговое окошко «Выполнить», введите в него команду
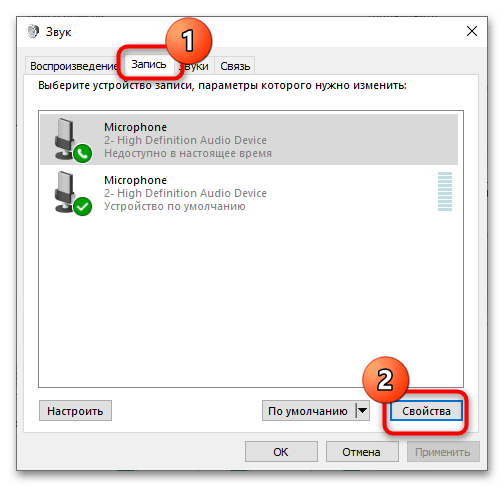
mmsys.cplи нажмите клавишу ввода, чтобы открыть апплет «Звук». - Переключитесь на вкладку «Запись», выберите записывающее устройство и нажмите кнопку «Свойства».
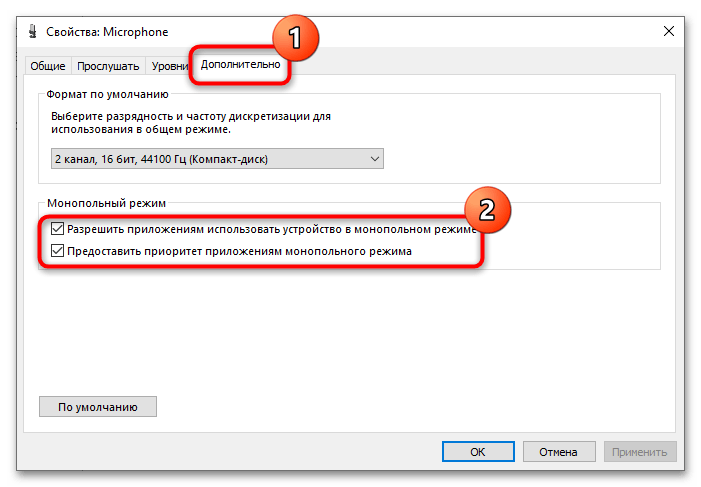
- Переключитесь на вкладку «Дополнительно» и отключите или, напротив, включите опции монопольного доступа, сохраните настройки и проверьте работу микрофона.
- Также посмотрите, имеется ли на вкладке «Уровни» опция «Усиление микрофона». Если да, установите ползунок в среднее положение или вовсе сдвиньте его влево (отключите усиление).


Способ 3: Настройки сторонних программ
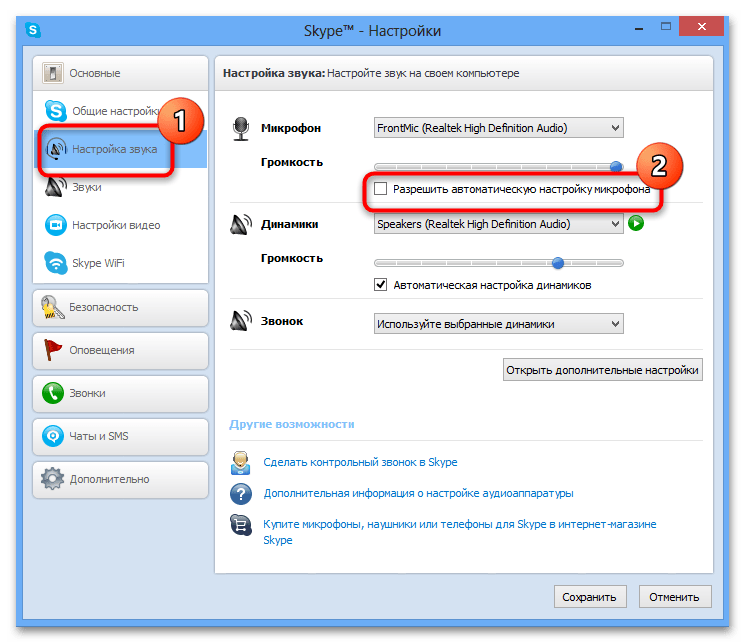
Если микрофон самопроизвольно меняет звук в интернет-мессенджерах, возможно, есть надобность отредактировать их звуковые настройки. Например, в Skype необходимо зайти в раздел «Настройки звука» и снять флажок с чекбокса «Разрешить автоматическую настройку микрофона».
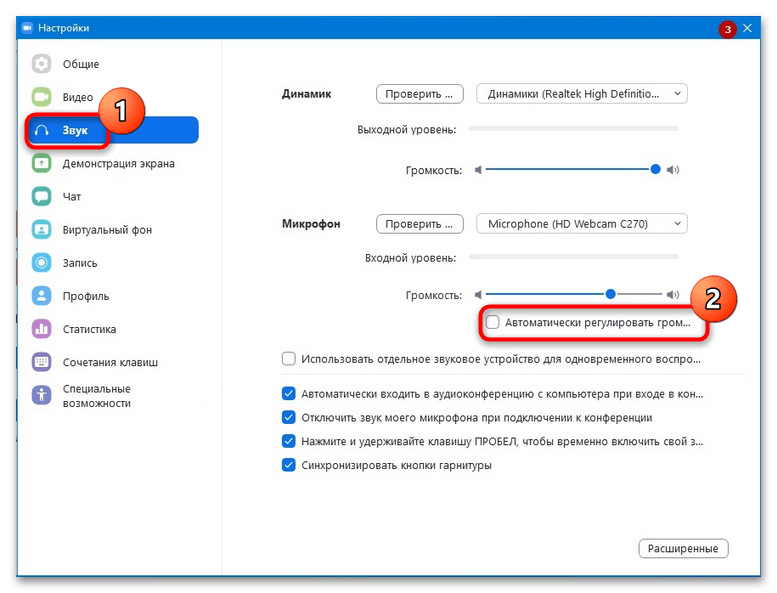
Аналогичная настройка имеется и в других программах для голосового общения. Так, в настройках приложения Zoom надо вызвать раздел «Звук» и снять флажок с пункта «Автоматически регулировать громкость микрофона».
Способ 4: Средство устранения неполадок
Запустите встроенное в Windows 10 «Средство устранения неполадок» со звуком — возможно, ему удастся обнаружить и устранить неисправность.
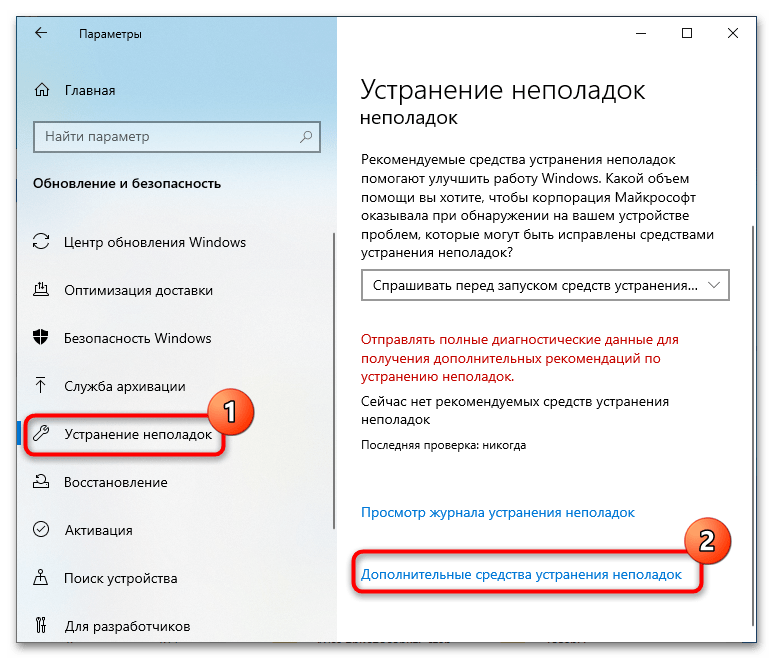
- Откройте приложение «Параметры», перейдите в раздел «Обновления и безопасность» → «Устранение неполадок» и нажмите ссылку «Дополнительные средства устранения неполадок».
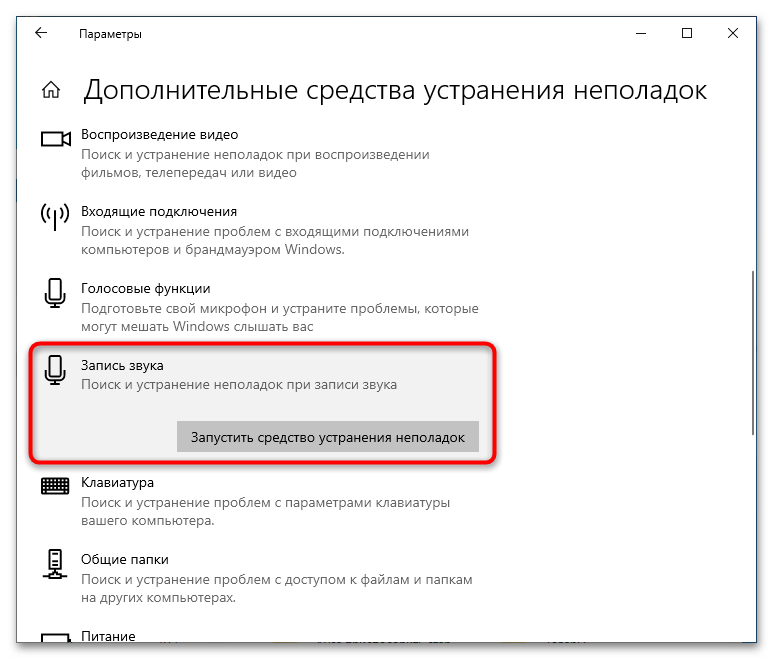
- Найдите в списке пункт «Запись звука», нажмите по нему, а затем — по появившейся кнопке «Запустить средство устранения неполадок».
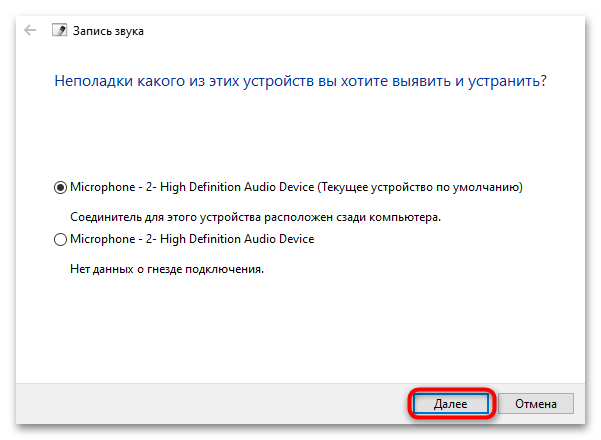
- Дождитесь завершения результата проверки, выберите из списка проблемное устройство, нажмите «Далее» и проследуйте предложенным рекомендациям мастера.
Способ 5: Переустановка микрофона
В некоторых случаях устранить неполадку в работе микрофона успешно удается путем его переустановки из «Диспетчера устройств».
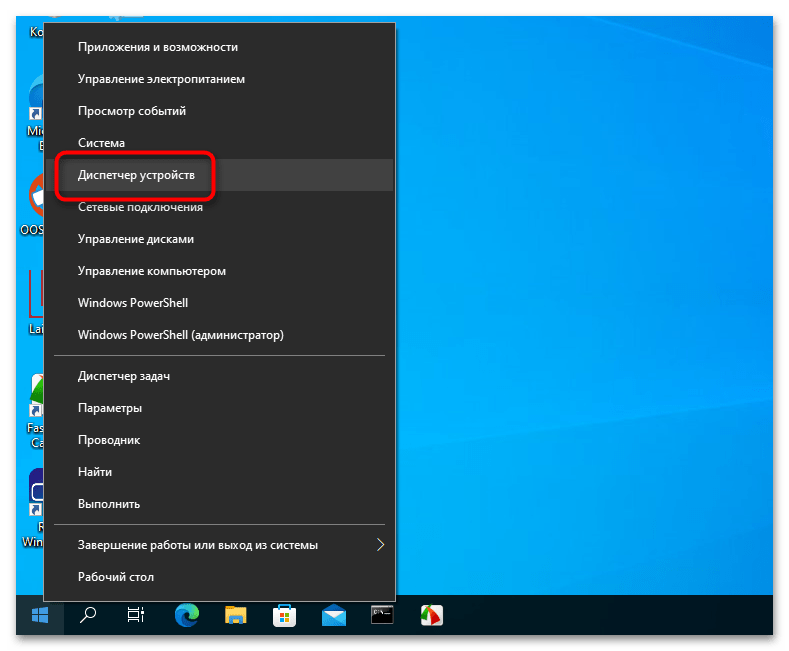
- Запустите «Диспетчер устройств» из контекстного меню кнопки «Пуск».
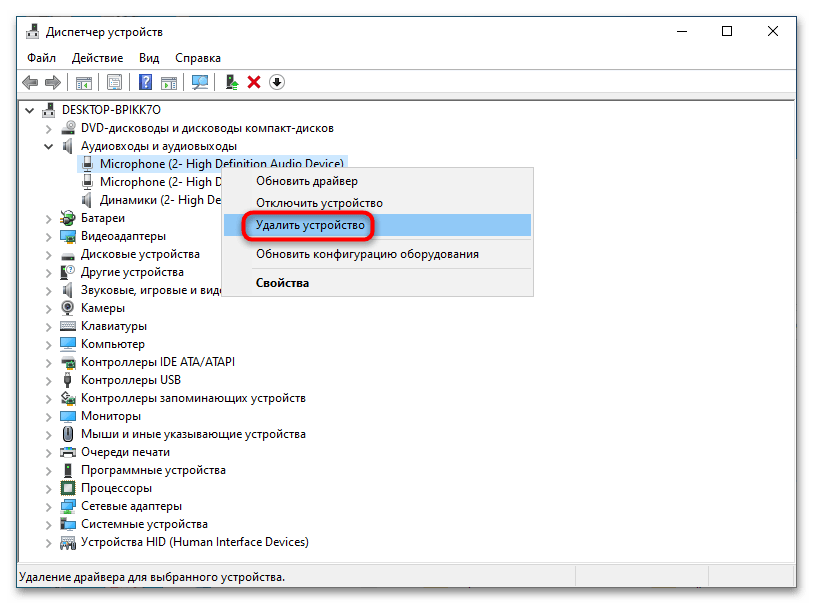
- Раскройте раздел «Аудиовходы и аудиовыходы», кликните правой кнопкой мыши по микрофону и выберите из контекстного меню «Удалить устройство».
- Подтвердите удаление в диалоговом окошке.
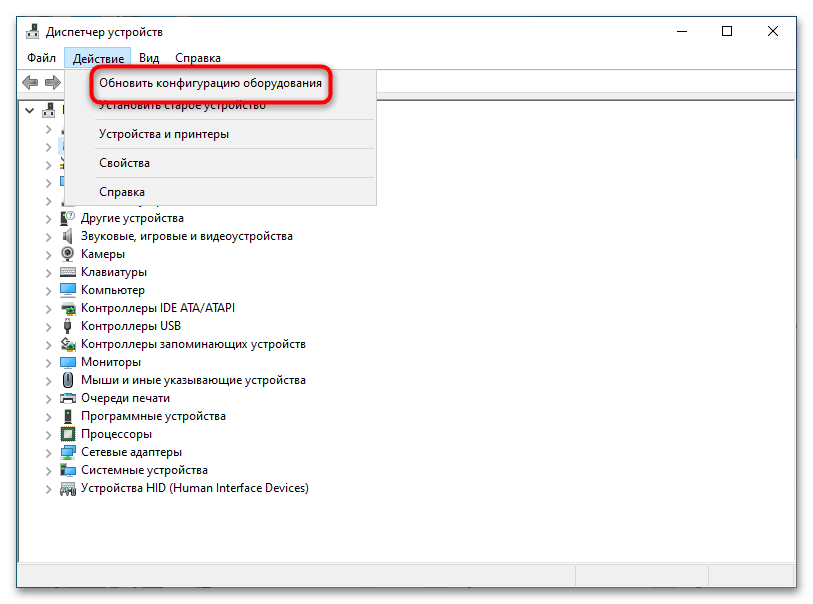
- Разверните меню «Действие» и выберите там «Обновить конфигурацию оборудования» либо перезагрузите компьютер.
Способ 6: Обновлении или откат драйвера
Помочь устранить проблемы с произвольно изменяющейся громкостью микрофона может обновление драйверов устройства, хоть и не всегда.
- Откройте «Диспетчер устройств» как было показано выше, перейдите в раздел «Аудиовходы и аудиовыходы» и кликните по микрофону дважды, чтобы открыть его «Свойства». Обратите внимание, что подключаемые по USB микрофоны могут находиться в других разделах «Диспетчера устройств», например в разделе «Звуковые, игровые и видеоустройства», а также в «Устройства HID».
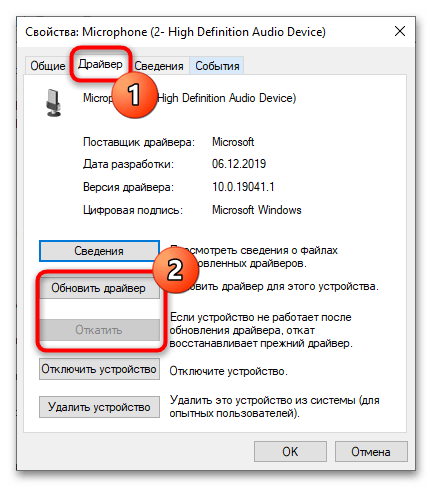
- Переключитесь на вкладку «Драйвер», нажмите кнопку «Обновить драйвер», а затем проследуйте указаниям мастера. Если же проблемы начались после обновления драйверов, нажмите кнопку «Откатить» и точно так же выполните предложенные шаги.
После того как драйвер будет установлен или переустановлен, перезагрузите компьютер.
И еще один момент: в случае с профессиональными микрофонами драйвер необходимо брать с официального сайта производителя. Также обратите внимание, что конфигурация таких микрофонов выполняется не через системные настройки, а через собственную фирменную панель управления (при наличии на ПК соответствующих драйверов).
Наша группа в TelegramПолезные советы и помощь
Table of contents
- What If a Microphone Keeps Muting Itself in Windows 10?
- 1. The system sound settings are incorrect
- 2. The sound drivers are outdated
- 3. Malware infection has corrupted the sound files
- How to Fix an Auto-Muting Microphone on Windows 10
- Solution 1: Temporarily disable your antivirus
- Solution 2: Change your microphone settings
- How to Fix an Auto-Muting Microphone on Windows 11
- Fix 1: Reinstall or update the sound drivers
- Fix 2: Use another format for the microphone
- Wrapping Up
- FAQ
The microphone is an essential part of the computer for those who spend a lot of time recording media files or using communication apps or unified communications systems. Imagine, therefore, the annoyance caused by an auto-muting microphone without user input. Some Windows 10 users report experiencing the issue with their microphone. Moreover, this issue affects internal and external mics equally.
Some issues are specific to a certain version of Windows, but the auto-muting mic issue isn’t one of them. The microphone can randomly start muting itself.
Suppose your PC’s mic suddenly starts muting itself – what do you do? This guide was created to answer this question for you.
If you’re looking for a way to resolve this malfunction on your PC, the tips we provided here will help you.
What If a Microphone Keeps Muting Itself in Windows 10?
If a microphone keeps going to zero volume levels in Windows 10, it can be incredibly frustrating. Imagine having to stop enjoying that fantastic and immersive conversation because you suddenly went silent.
Naturally, when something like this happens, knowledge of the immediate cause would help. If the microphone keeps resetting itself to zero volume despite your best efforts to fix it at a certain sound level, these are the likely reasons:
1. The system sound settings are incorrect
Most of us don’t need to configure any special settings for sound on Windows 10. We simply use the volume controls to increase or decrease audio per our requirements at any point during the viewing, gaming, streaming, chatting, or recording experience.
If sound keeps being muted, perhaps your system volume has been set to Mute unknowingly.
More likely, either the internal microphone or the external one has been disabled — which would prevent sound from coming through that device.
Other improper sound settings can have a similar effect.
2. The sound drivers are outdated
If you’re getting this sound malfunction on a PC that has seen better days, perhaps the sound drivers haven’t been updated for a long time.
If you have recently upgraded or updated the OS, the current sound drivers might have become incompatible with the firmware. Only compatible device drivers can be used by PC hardware, such as your video, sound and network cards.
Incompatible PC drivers may not work at all. When they do, they usually work incorrectly, leading to all manner of bugs, such as the auto-muting mic issue.
3. Malware infection has corrupted the sound files
There are many system files that play a role in delivering audio input. If these files get targeted by malware, the result will be myriad sound issues, including the mic randomly muting itself.
Now that we’ve explained the potential causes of the random microphone muting issue on Windows 10, let’s go ahead and check out the possible solutions.
PRO TIP
Don’t let malware compromise your audio experience or any other crucial system functions. Auslogics Anti-Malware is designed to detect and remove even the most elusive threats, providing you with peace of mind and reliable system performance. Keep your PC safe and enjoy uninterrupted audio and overall system functionality.
How to Fix an Auto-Muting Microphone on Windows 10
If your mic starts behaving erratically and mutes itself at random intervals, you won’t have a pleasant experience on Skype until the behavior returns to normal.
The following fixes have worked for a majority of Windows 10 users with the same issue, and there’s no reason yours won’t be resolved after applying them.
Solution 1: Temporarily disable your antivirus
Some antivirus tools, such as Norton, have been known to cause unintended side effects. They are very aggressive with their anti-malware measures and sometimes end up affecting system functioning.
If your mic keeps going to zero volume at inopportune times and without your manual input, try turning off your antivirus for a time and see what happens.
Whether you’re using Norton, Windows Defender or another popular security software tool, turning off real-time protection is pretty easy.
Once you’ve done that, use your mic for up to an hour and see if the problem happens again.
If it does, consider updating the antivirus software for better performance and fewer bugs.
Use Auslogics Anti-Malware
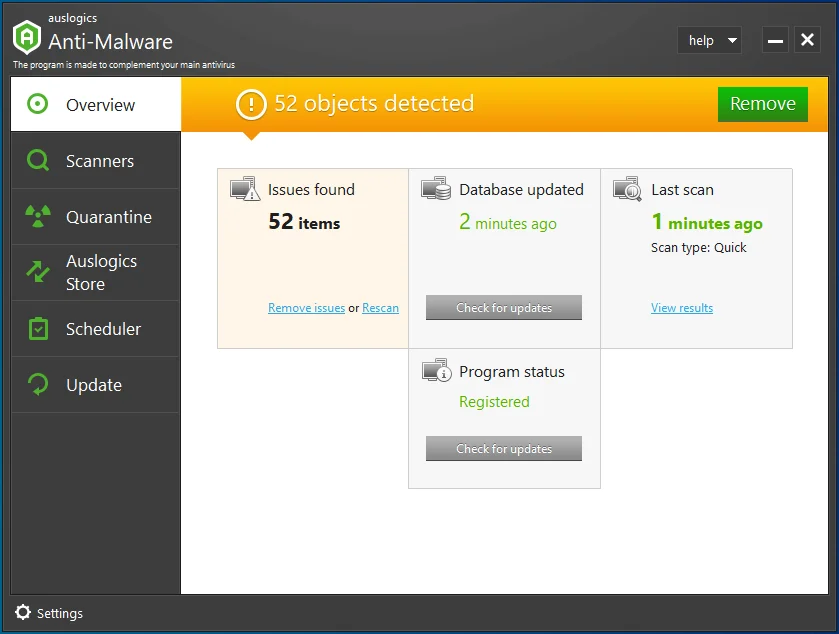
If no update is available, your best bet might be switching to a highly recommended security tool like Auslogics Anti-Malware.
This tool has been approved by Microsoft for use as a primary or secondary antivirus on Windows 10 systems.
It scrutinizes all parts of your system for potential threats that might be lurking in obscure locations and quarantines or removes them.
Related
: Auslogics Anti-Malware: Features and Reviews
Solution 2: Change your microphone settings
From the evidence of the users who have reported this issue in public Windows forums, incorrect sound settings are the prime culprit that causes device mics to self-mute at random intervals.
In that case, you might reasonably expect that introducing the correct sound settings will restore normal audio functioning. This is indeed the case.
Here’s what you need to do:
- There is a speaker icon in the right corner of your taskbar. Right-click it and select Recording Devices.
Note
On the latest version of Windows 10, the Recording Devices option no longer exists. You must select Sounds instead when you right-click the speaker icon.
- The Sound Control window will open.
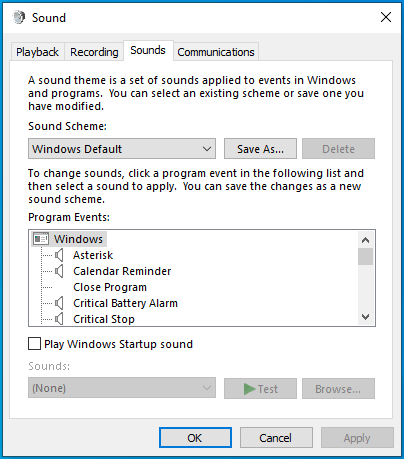
- Select the Communications tab.
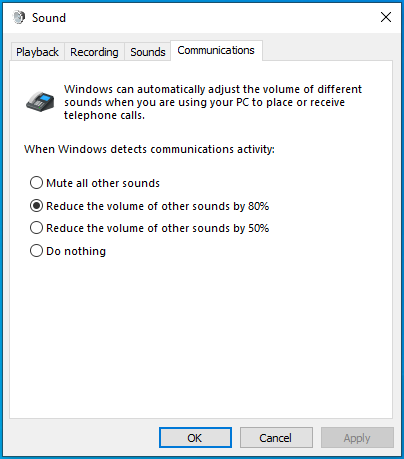
- Under When Windows detects communications activity, select Do nothing.
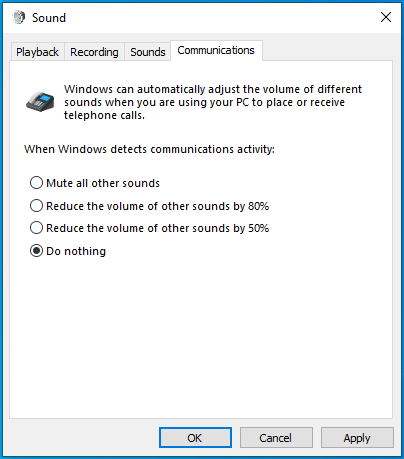
- Click Apply and then OK.
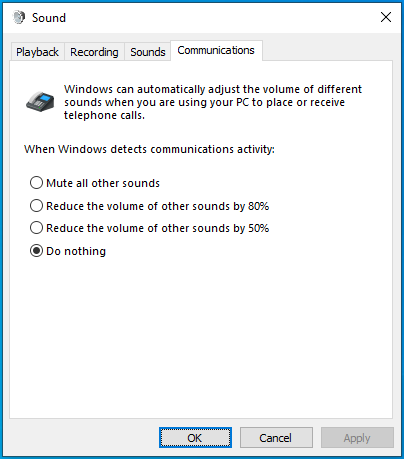
- Test your microphone for a few minutes. Has the random muting stopped? If the bug still occurs, repeat Step 1.
- Switch to the Recording tab.
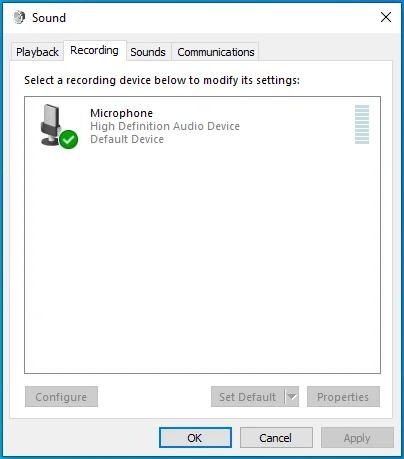
- Right-click your sound device and select Properties.
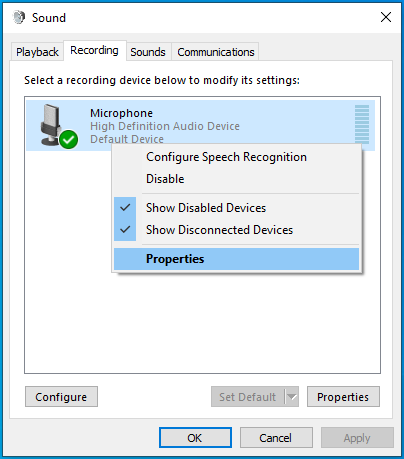
- The Microphone Properties window will open.
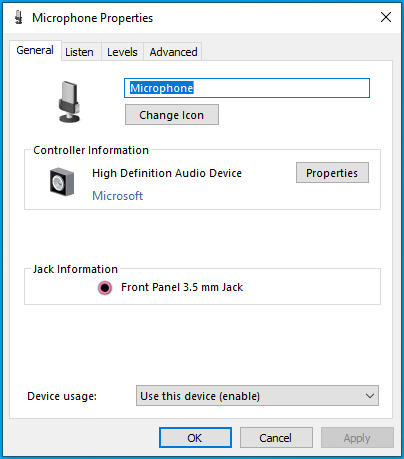
- Switch to the Advanced tab.
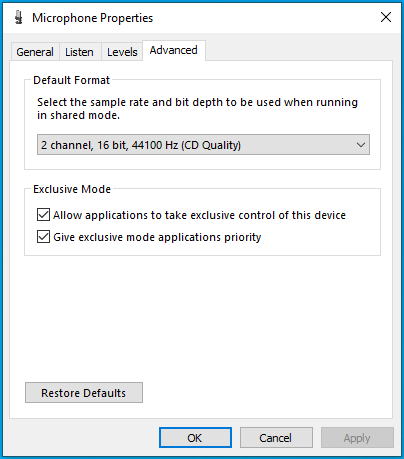
- In the Exclusive Mode group, deselect the Allow applications to take exclusive control of this device option.
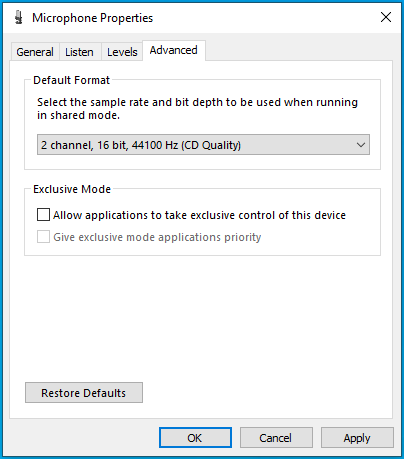
- Click Apply to save your changes and then click OK to return to the Sound dialog.
Also Read:How to Fix Blue Yeti Microphone Not Detected or Recognized in Windows 10 and 11?
How to Fix an Auto-Muting Microphone on Windows 11
Note
You can implement the solutions discussed above to see if it works. if it doesn’t follow the solutions below.
Fix 1: Reinstall or update the sound drivers
The correct sound drivers are required for the best audio experience on a Windows 10 PC.
If the sound driver is corrupted by malware, damaged by manual modification, or has been rendered obsolete after an upgrade, you should update it to restore stable sound functionality.
Otherwise, be prepared to deal with annoying sound bugs, such as the microphone muting itself at random.
If the sound driver is old, an update is required. If the driver is already up to date but is buggy, reinstalling it can fix the issue. You can update your sound card driver or reinstall it using Device Manager.
Let’s show you how:
To reinstall the sound card driver, do the following:
- Press the
Windows key + Xcombination to bring up the Quick Access menu on Windows 10 or Windows 11.
- Select Device Manager.
- In Device Manager, locate “Sound, video and game controllers” and click it to expand its contents.
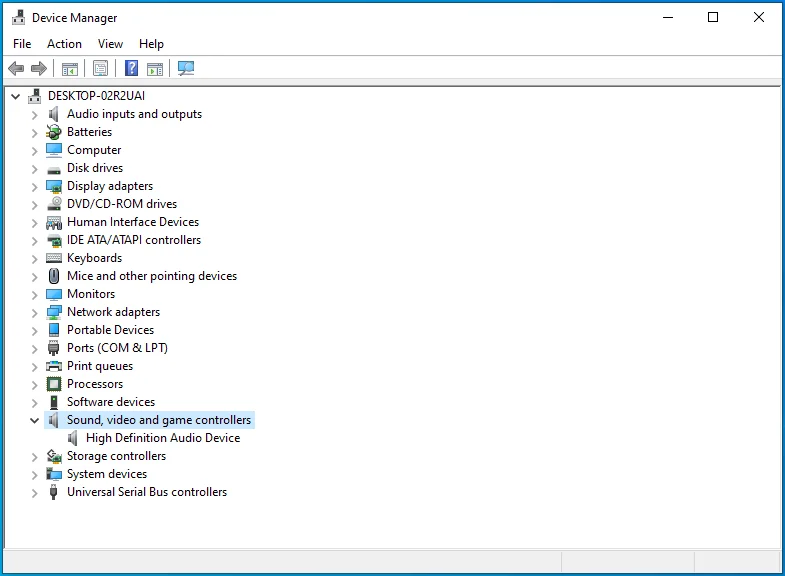
- Double-click your sound device to open its Properties dialog.
- Switch to the Driver tab.
- Click the Uninstall Device button.
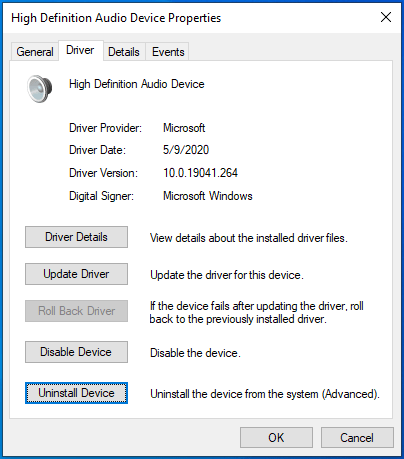
- When you get the warning prompt that you’re about to uninstall your sound device driver from your system, click Uninstall to confirm your action.
- Reboot your computer, and the sound driver will be automatically reinstalled.
Update your sound card driver if it’s old
If the sound card driver is old and requires an update, follow these steps:
- Right-click the Windows icon on the taskbar and select Device Manager.
- The Device Manager app will open.
- Locate the Sound, video and game controllers option and expand it.
- Right-click your sound device and select Update driver.
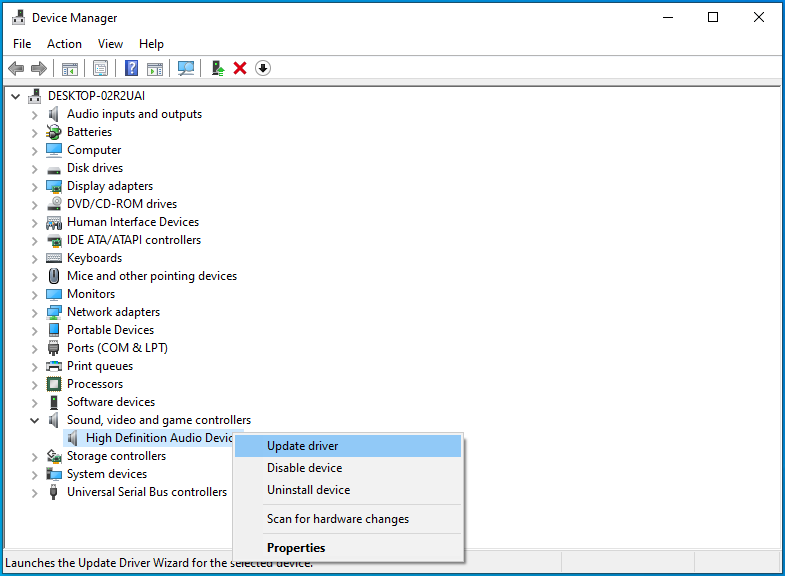
- Choose the Search automatically for updated driver software option.
Note
On the latest Windows 10 and Windows 11 versions, this option is named Search automatically for drivers.
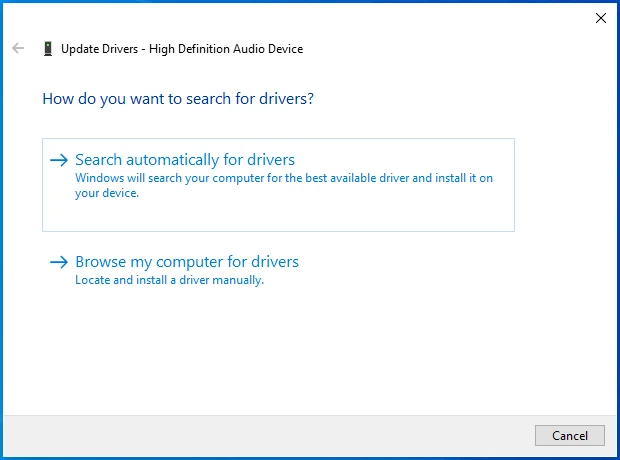
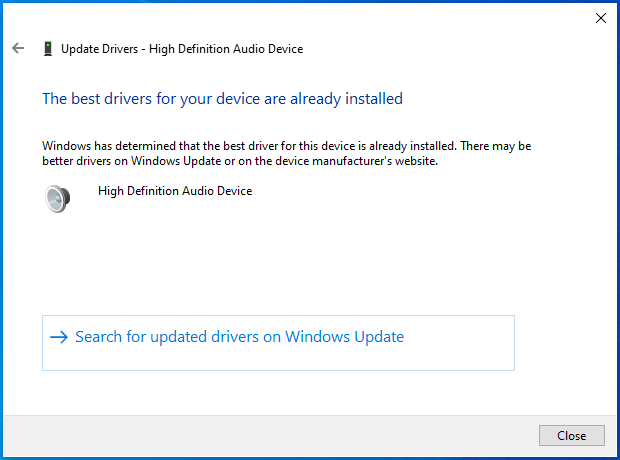
- Windows will attempt to locate and download the latest driver for the device. If it can’t find any, it will inform you that the best drivers for your device are already installed.
Use Auslogics Driver Updater to automatically update drivers
You can simplify the process of updating your sound drivers by using a reputable driver updater like Auslogics Driver Updater.
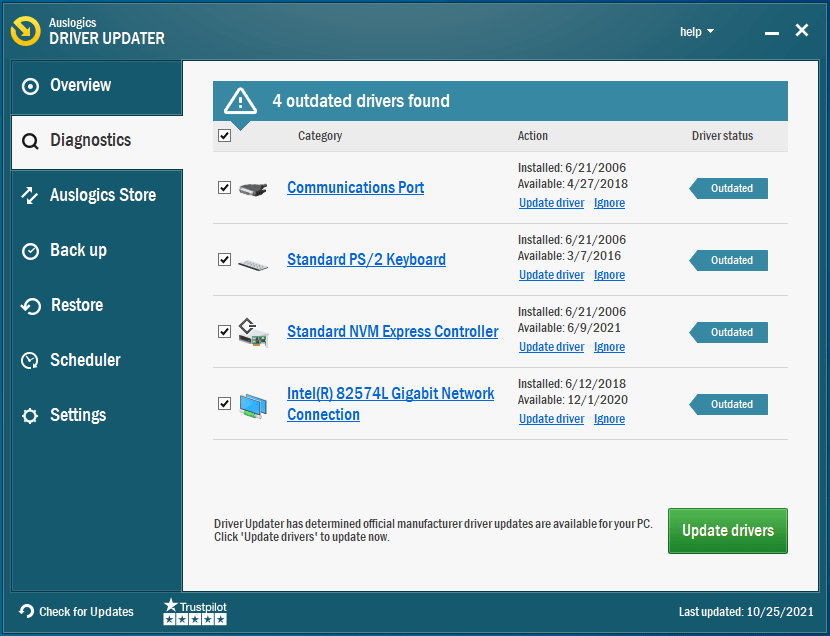
This tool will scan your PC and present a comprehensive list of devices with obsolete drivers.
You can update an individual driver by clicking the Update button or, if you have a premium license, bring all your device drivers up to date with a single click.
Download Auslogics Driver Updater
Prevent hardware errors and ensure problem-free device operation with this advanced tool that detects outdated drivers and safely gets them updated.
Related
: Auslogics Driver Updater: Update Your Drivers in One Click!
Fix 2: Use another format for the microphone
It is possible that the microphone malfunctions because the wrong audio format is in use. You can try other sound formats and stick with the one that stops further self-muting.
If you don’t know how to change the sound format, follow these steps:
- Right-click the icon and select Sound settings then scroll down the Sound window and click the More sound settings link.
- The Sound dialog will open.
- Make sure you’re on the Recording tab.
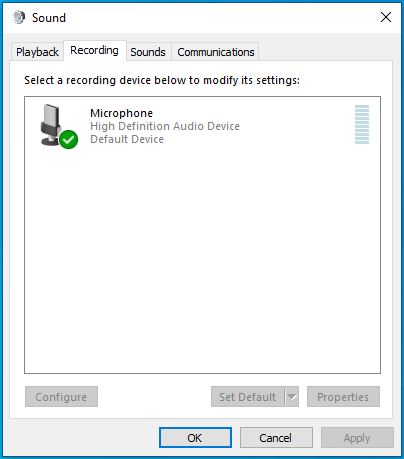
- Double-click your current sound device to open its Properties dialog.
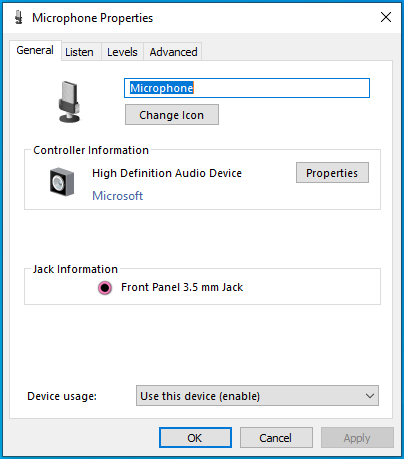
- Switch to the Advanced tab.
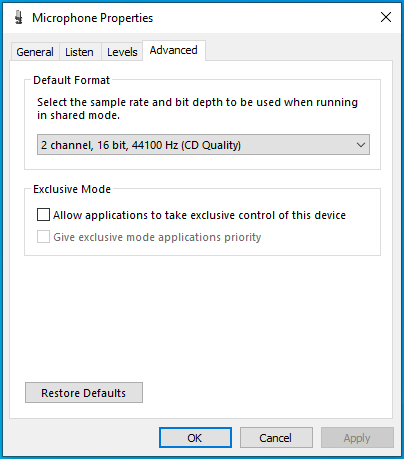
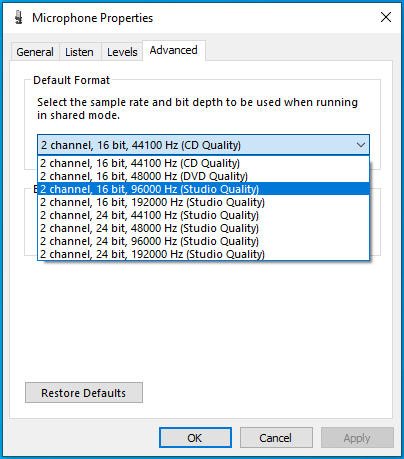
- Click the drop-down arrow under Default format and choose an option different from the one currently in use. The option you choose should be a 16-bit option.
- Click Apply to save your changes and then OK to close the dialog.
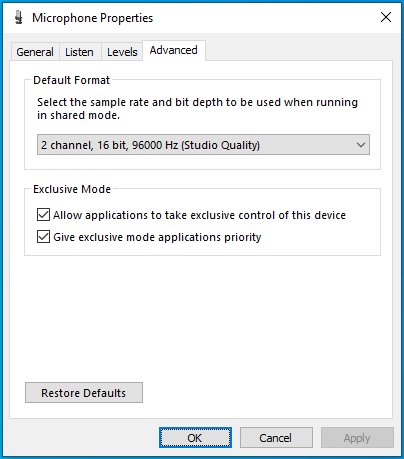
Your PC’s mic should be working fine now.
Wrapping Up
When a PC microphone keeps muting itself, it isn’t funny to the affected user. This type of bug interrupts conversations over VoIP software, like Skype, and should be nipped in the bud.
This article presents a few methods to stop the self-muting issue from happening again. It explains how to fix a microphone that keeps turning itself down using the correct steps.
Hopefully, this article has helped you to regain full control of your internal or connected microphone. We’d like to hear about your experience. Hit us up in the comments.
FAQ
How do I fix my microphone muted on my desktop?
If your desktop microphone is muted, you can unmute it by looking for the physical mute button or, if it doesn’t apply, turning on the microphone itself. Make sure the microphone is at the right volume and that the mute feature is turned off. If the microphone lacks physical mute controls, make sure it’s not muted or turned down by checking the sound settings in your operating system. Mice mute problems on your desktop can also be fixed by updating the audio drivers, looking for software conflicts, and adjusting the system-wide mute settings.
How do I fix mic muted by system settings in Windows 11?
You can resolve the issue of your microphone being muted in Windows 11 by modifying the operating system’s sound settings. To access the Sound settings, simply perform a right-click on the taskbar’s volume icon and choose “Open Sound settings.” Make sure the right microphone device is set as the default recording device by selecting it under the Input tab. Look for any volume or mute settings that might be interfering with the microphone and make the necessary adjustments. To ensure that the microphone works properly, make sure that any system-wide mute settings, such as those found in communication or conference applications, are disabled.
Why does my mic keep muting itself Windows 10?
There are several reasons why your microphone can keep muting itself, including wrong settings, program incompatibilities, or hardware problems. Check and make any necessary adjustments to any third-party programs or applications that might be in charge of the microphone settings. If the microphone is muting itself unintentionally, you can try to fix any compatibility issues by updating the audio drivers using Device Manager or the manufacturer’s website.
A lot of users complain that their microphone level is automatically adjusting without any user intervention. How to stop microphone auto adjusting Windows 10? If you are trying to fix the issue, this post of MiniTool is what you need.
Why Microphone Level Keep Changing on Windows 10
A lot of users reported that the microphone levels keep changing on Windows 10. This issue often occurs when using much multiple applications or third-party programs. According to investigating many user reports, there are several situations that can cause Windows 10 microphone level keeps changing.
- It is commonly reported that Skype can cause microphone levels keep changing if it is configured to launch every system startup.
- Steam is also responsible for the automatic microphone adjustments issue. You can change its settings to fix the issue.
- If an application is allowed to take exclusive control of the microphone, it may automatically adjust the microphone levels.
- Outdated or corrupt microphone driver can cause the microphone issue as well.
Now, let’s see how to stop microphone auto adjusting Windows 10.
How to Stop Microphone Auto Adjusting Windows 10
Method 1. Prevent Skype from Auto Adjusting the Microphone
If Skype is configured by default to adjust the microphone levels, you may encounter the problem. So, it is necessary to prevent Skype from auto adjusting the microphone. Here’s how to do that:
Step 1. Open the Skype UWP client, and then click the Action button (three-dot icon) at the upper left corner and select Settings from the context menu.
Tip: If you are using the desktop version, you can navigate to Tools > Options from the ribbon bar.
Step 2. Select the Audio &Video tab from the pane, and then scroll down to the Microphone section and untick the checkbox for Automatically adjust microphone settings.
If you are using the Desktop version, you can go to the Audio Settings and uncheck the box of Automatically adjust microphone settings.
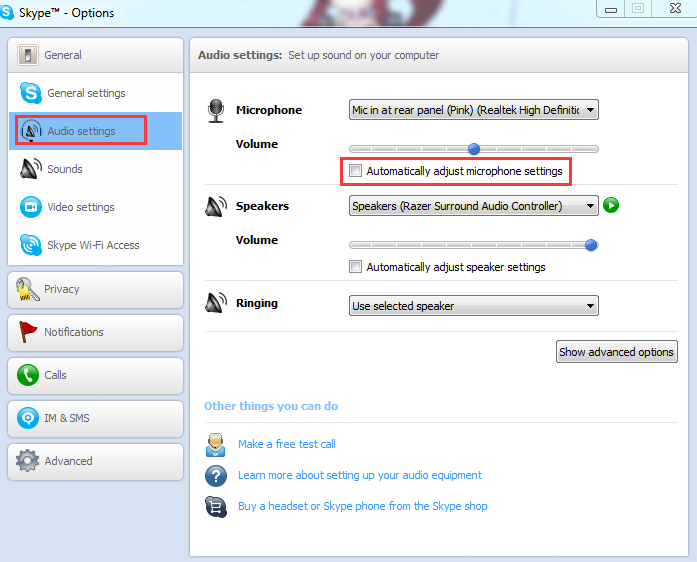
Now, you can start your computer and see if the issue “mic volume keeps changing” still persists.
Method 2. Prevent Steam from Auto Adjusting the Microphone
As mentioned above, Steam is another application that may cause microphone levels keep changing. If you are using the Steam client and configure it to launch automatically at startup, you need to disable the Automatic volume settings. For that:
Step 1. Log in to your Steam client and click on the Friends & Chat icon at the bottom right corner of the window.
Step 2. Click on the Gear icon at the upper right corner and select the Settings menu.
Step 3. In the Friends List settings, click on the Voice tab and scroll down to the bottom of the screen and click on Show Advanced Settings.
Step 4. Toggle off the switch of Automatic volume/gain control.
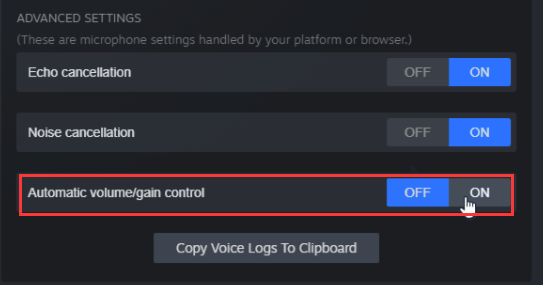
Restart Steam and see if Windows 10 microphone level keeps changing.
Method 3. Reconfigure the Microphone Settings
How to stop microphone auto adjusting Windows 10? Another effective method is to reconfigure the microphone settings. By doing so, no apps are allowed to take exclusive control of the microphone. Here’s how:
Note: This operation might cause some other voice features to function improperly. If this method fails to work, you’d better reverse its settings.
Step 1. Press Win + R keys to open the Run box, and then type mmsys.cpl in it and hit Enter.
Step 2. Go to the Recording tab, and then select the affected microphone and click on Properties.
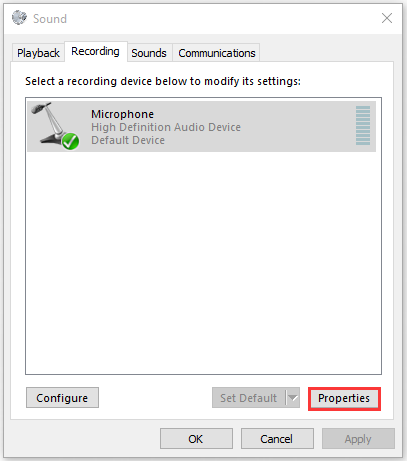
Step 3. Go to the Advanced tab inside the Properties window and then untick the checkbox next to Allow applications to take exclusive control of this device.
Step 4. Click on the Apply button to execute the changes.
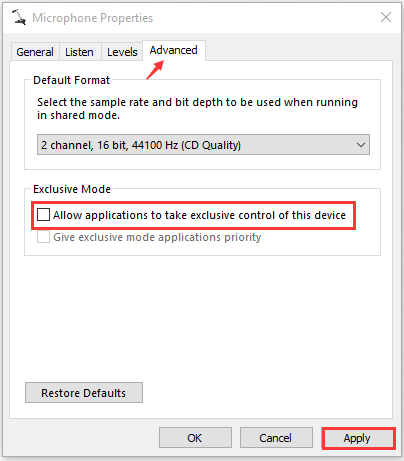
After that, restart your computer and see if it stops microphone auto adjusting Windows 10
Method 4. Change the Microphone Levels Manually
Another quick fix is to set a default value for your microphone manually. This method has been proven to be useful. Try it now.
Step 1. Open the Sound window through the above method and go to the Recording tab. Alternatively, you can right-click the Speaker icon at the bottom of the notification screen and select Sound from the elevated menu.
Step 2. Select the affected microphone/headset and click on Properties.
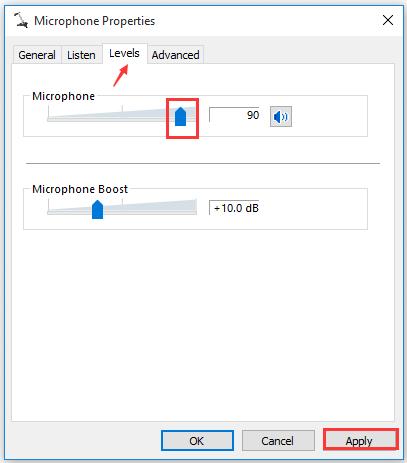
Step 3. Navigate to the Levels tab inside the Microphone Properties window, and then adjust the value of the microphone via the slider and click on Apply to save the changes.
Method 5. Update the Microphone Driver
An outdated or corrupted audio driver is also responsible for the issue. To fix the problem, you can try updating the audio driver to the latest build. Here’s a quick guide:
Step 1. Right-click the Start button and select Device Manager from the context menu.
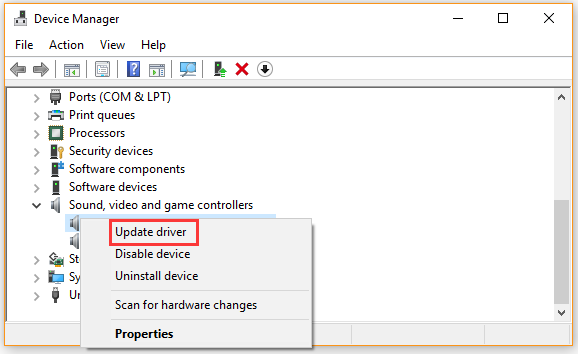
Step 2. Expand the Sound, video and game controllers category, and then right-click the audio device that needs to update and select Update Driver.
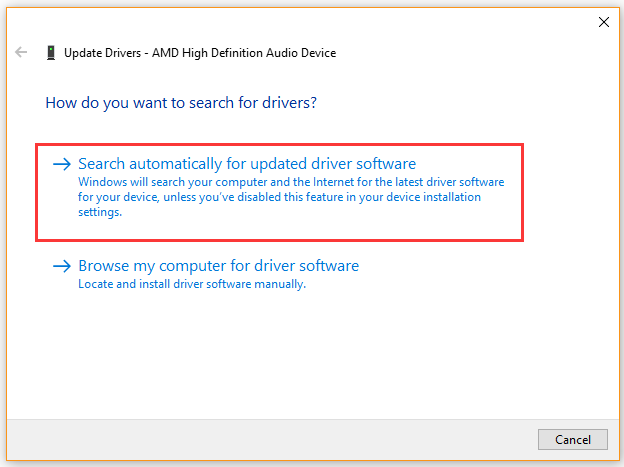
Step 3. Select the Search automatically for updated driver software option. Then follow the on-screen prompts to complete this update. Now, Windows will automatically any available updated driver and install it for you.
Once the update finishes, reboot your computer and see if the auto adjustment issue still persists.
How to stop microphone auto adjusting Windows 10? The top 5 methods have been introduced to you. Now, it’s your turn to have a try.
While working from home, the microphone & webcam have become the most significant components of every computer system. As a result, keeping its features in top shape should be your top priority. For an online meeting, you will need a working microphone so that others can hear you speak. However, you may have noted that the microphone level in Windows 10 is sometimes excessively low, requiring you to shout into the device to see any movement on the indicator. Most of the time, this problem of the microphone being too quiet Windows 10 appears out of nowhere and persists even after reinstalling USB device drivers. We bring to you a perfect guide that will teach you how to fix microphone too quiet Windows 10 issue by learning to increase microphone boost.

Table of Contents
Laptops have built-in microphones, while on Desktops, you can buy an inexpensive mic to plug into the audio socket.
- A pricey microphone or a sound-proof recording studio setup is not necessary for regular usage. It will suffice if you limit the quantity of noise around you. Earbuds can also be used as an alternative.
- Though you can usually get away with a quiet environment, chatting to someone on Discord, Microsoft Teams, Zoom, or other calling applications in a noisy area might cause problems. Although many of these apps can modify audio settings, it is significantly easier to adjust or boost the microphone volume in Windows 10.
Why Your Microphone is Too Quiet?
When you try to utilize your mic on your PC, you will discover that it is not loud enough for a variety of reasons, such as:
- Your hardware and software are incompatible with the microphone.
- The microphone was not made to be any louder.
- The mic quality is not very good.
- The microphone is made to work with sound amplifiers.
Regardless of whether the issue is hardware or software, there is a technique to raise the volume of your microphone. Adjusting the mic parameters to your specific needs is a simple method to solve your microphone too quiet Windows 10 problem. You may also use the communication sound as an advanced option. Remember that you may fix Realtek microphone too quiet Windows 10 problem by downloading drivers from the manufacturer website, which also provides long-term support. Keep in mind that changing your system sound settings will not cure all of your problems. It is conceivable that your microphone is not up to the task and has to be replaced.
Many customers complained that the volume on their microphone is too low, and as a result, too quiet during calls. Here are a few options for resolving this issue of Realtek microphone being too quiet in Windows 10.
Method 1: Remove Virtual Audio Devices
It is possible that your PC mic is too quiet because the operating system settings need to be adjusted and you may need to boost the master sound level in the app. It is possible that the mic is too quiet because you have a virtual audio device installed, such as an app that lets you reroute audio between applications.
1. If you need the virtual device, go at its options to see if you can amplify or raise the mic volume.
2. If the issue persists, then uninstall the virtual device if it is not required, and restart your PC afterward.
Method 2: Connect External Microphone Properly
Other possibilities for this issue include broken hardware being used to record. Microphone volumes in Windows 10 typically start below full capacity to spare other people discomfort while retaining quality. If you have low-powered audio input devices, then you may discover that your Windows 10 microphone is overly quiet resultantly. This is especially true with USB microphones and Realtek microphone drivers.
- If you are using an external microphone instead of a built-in one, check if your microphone is properly connected to your PC.
- This issue might also raise if your cable is loosely connected.

Also Read: Fix Windows 10 No Audio Devices are Installed
Method 3: Use Volume Hotkeys
This problem might be related to your volume controls, making it perceivable as a microphone-related issue. On your keyboard check your volume manually.
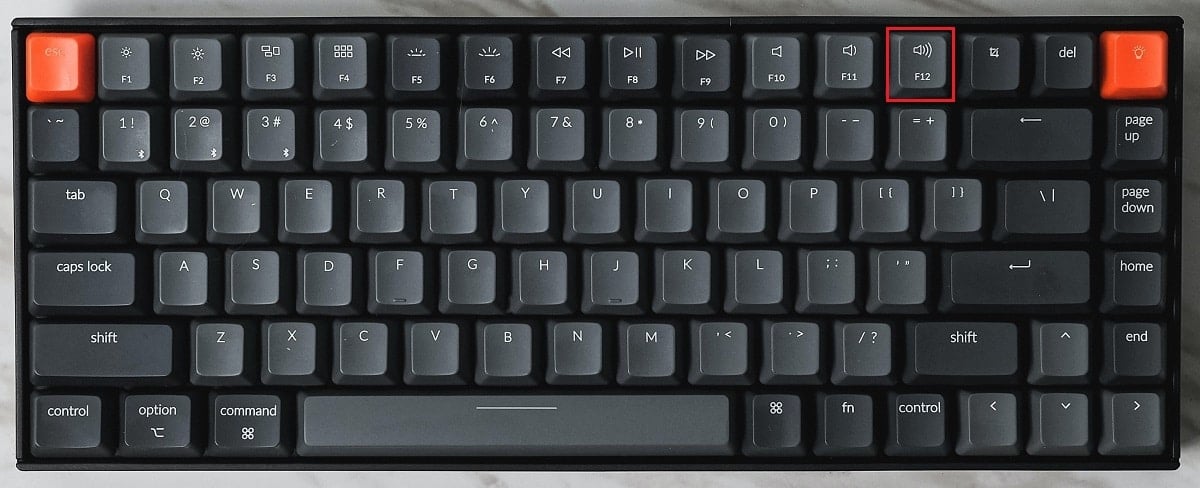
1A. You can press the Fn with arrow keys or press the increase or decrease volume button if it is given on your laptop accordingly.
1B. Alternately, press the Volume Up key on your keyboard according to the inbuilt volume hotkeys provided by the manufacturer.
Method 4: Increase Input Device Volume
When the intensity is not adjusted appropriately in the Sound settings, the volume on Windows 10 is too low. Thus, it must be synchronized at an appropriate level, as follows:
1. Press Windows key + I keys simultaneously to open Windows Settings.
2. Click on System Settings, as shown.

3. Go to the Sound tab from the left pane.

4. Click on the Device properties under the Input section.

5. As needed, adjust the Microphone Volume slider shown highlighted.

Also Read: How to Increase Volume on Windows 10
Method 5: Increase App Volume
You would not need any microphone boost software to increase your microphone volume, your system default drivers and Windows settings should suffice. Adjusting these will boost mic volume on Discord and other apps, but it may also increase noise. This is usually better than someone being unable to hear you.
The microphone volume may be controlled in several programs, as well as in Windows 10. Check to verify whether the app that is utilizing your microphone has an audio option for the microphone. If it does, then try to increase it from the Windows Settings, as follows:
1. Navigate to Windows Settings > System > Sound as shown in Method 4.

2. Under Advanced sound options, click on App volume and device preferences, as shown.

3. Now in the App Volume section, check if your app has required volume controls.
4. Slide the app volume (e.g. Mozilla Firefox) to the right to increase the volume, as depicted below.

Now check if you have enabled microphone boost in Windows 10 PC.
Method 6: Increase Microphone Volume
The microphone in Windows 10 may have been set too low. Here’s how to modify it:
1. Press the Windows key, type Control Panel and click on Open.

2. Set View by: > Large icons and click on Sound option.
3. Switch to the Recording tab.

4. Double-click on the microphone device (e.g. Microphone Array) to open the Properties window.

5. Switch to the Levels tab and use the Microphone slider to increase the volume.

6. Click on Apply > OK to save the changes.
Also Read: Fix Device Not Migrated Error on Windows 10
Method 7: Increase Microphone Boost
Mic boost is a type of audio enhancement that is applied to the microphone in addition to the present level of volume. If your mic is still quiet after altering the level, you can microphone boost Windows 10 by implementing the following steps:
1. Repeat Steps 1-4 of Method 6 to navigate to the Levels tab of Microphone Array Properties window.

2. Slide Microphone Boost to the right till the volume of your mic is loud enough.

3. Click on Apply > OK to save the changes.
Method 8: Run Recording Audio Troubleshooter
You can use the Recording Audio Troubleshooter if you have previously verified the volume of your mic under the Sound settings. This can help you discover any microphone troubleshooting in a well-organized list and provide suggestions to resolve the problem.
1. Launch Windows Settings by pressing Windows + I keys together.
2. Select the Updates & Security Settings.

3. Click on Troubleshoot tab in the left pane and scroll down to the Find and fix other problems section
4. Here, choose Recording Audio from the list and click on the Run the troubleshooter button as illustrated below.

5. Wait for the troubleshooter to detect and fix audio-related issues.

6. Once the process is completed, choose to Apply the recommended fix and restart your PC.
Also Read: How to Mute Microphone in Windows 10
Method 9: Disallow Exclusive Control of Microphone
1. Navigate to Control Panel > Sound as shown.
2. Go to the Recording tab

3. Double-click your microphone device (e.g. Microphone Array) to open Properties.

4. Here, switch to the Advanced tab and uncheck the box marked Allow applications to take exclusive control of this device, as depicted below.

5. Click on Apply > OK to save the changes.
Method 10: Disallow Automatic Adjustment of Sound
Here are the steps to disallow automatic adjustment of sound to fix microphone too quiet Windows 10 issue:
1. Open Control Panel and select the Sound option as earlier.
2. Switch to the Communications tab.

3. Select the Do nothing option to disable the automatic adjustment of sound volume.

4. Click on Apply to save changes followed by OK and Exit.

5. To apply the modifications, restart your PC.
Also Read: Fix I/O Device Error in Windows 10
Frequently Asked Questions (FAQs)
Q1. How can I increase the volume of my microphone in Windows 10?
Ans. When people are having trouble hearing you via your PC, you may turn up the mic volume on Windows 10. To boost the level of your microphone, click the Sounds icon in the bottom bar of your screen and adjust different microphone and volume parameters.
Q2. What’s up with my microphone suddenly being so quiet?
Ans. If nothing else works, go to Settings > Update & Security > Windows Update. Look for Updates that were recently installed, and delete them.
Q3. How can I stop Windows from altering the volume of my microphone?
Ans. If you are using the Desktop version, go to Audio Settings and uncheck the option titled Automatically update microphone settings.
Recommended:
- How to Check if Modern Standby is Supported in Windows 11
- Fix Xbox One Headset Not Working
- Fix Low Microphone Volume in Windows 11
- Fix Sound Keeps Cutting Out in Windows 10
We hope this information helped you to resolve your microphone too quiet Windows 10 issue by using Microphone boost feature. Let us know which method you found to be the most successful in resolving this problem. Drop queries/suggestions in the comments section below.
