
For years, hard disk drives have been the standard storage type in computers, but solid-state drives (SSD) are taking over. The main reason for this change is that SSDs offer much more speed than HDDs.
Other factors such as durability, size, and noise have also influenced users to jump to the SSD ship. If you’re considering making the shift, I can assure you that you’re doing the right thing.
If you already have a functioning hard drive with your operating system and files on, you have to clone this drive onto the SSD you wish to use. Don’t worry; this process isn’t as tough as it sounds, especially if you follow this guide.
How to Migrate Windows 11/10 from HDD to SSD free
I’ll begin this guide by showing you the prerequisites for cloning your hard drive into an SSD, and then we’ll dive right into the steps.
- Prerequisites.
- Back up and defragment your hard drive.
- Free up space on the hard drive data.
- Migrate your data to the SSD.
- Clean the original system drive.
- Restore your files and folders.
Continue reading this post for the full guide.
1] Prerequisites
Before you begin cloning your system drive into a new SSD, you have to ensure that you have all you need. Go through the checklist below before proceeding with the steps:
- Update your computer’s and SSD’s firmware
- The system drive you currently use should be healthy to prevent errors.
- Insert the SSD into your computer or connect it using a USB cable.
- Ensure that the new SSD has sufficient space to hold the data from the old volume.
- You need a Windows system repair disc.
- Back up the data in your hard drive.
- Get a reliable USB cable to connect the drive you’ll back up your files and folders.
- A capable backup and recovery software. I’ll recommend a free tool that does the job excellently.
2] Back up and defragment your hard drive
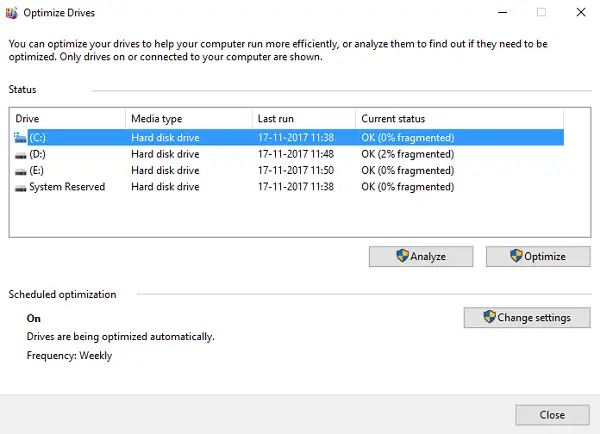
Press the Windows button and search for defrag. Select Defragment and optimize drives. Optimize your hard disk using this tool. Also, cloning your drive is a delicate procedure, and to avoid losing your data, I recommend that you make a backup of your hard drive before proceeding with the operation.
3] Free up space on the hard drive data
You are cloning your hard drive into an SSD, and the less data that gets transferred, the better and faster the operation. Hence, I advise that you delete less important files from the old volume. While at that, confirm that the SSD is large enough to store your files and folders.
Alternatively, you can install a fresh Windows operating system on your SSD and make it your primary boot drive. With this, you can now set the old hard drive to hold other files.
4] Migrate your data to the SSD
System drive migration would’ve been a complicated operation, but thanks to backup and recovery utilities, it can be a breeze. For this guide, I recommend EaseUS Todo Backup because it’s free and it works perfectly.
Launch the application and select the Clone option from the left panel. Click on the Disk Clone option next. After that, select the source and target volumes.
Mark the Optimize for SSD checkbox and hit the Next button to continue. At this point, EaseUS will start copying the disk. You might also want to mark the checkbox next to Shut down the computer when the operation.
5] Clean the original system drive
After successfully cloning the hard drive into your SSD, your data will remain in the hard drive. If you plan to let go of the hard drive, you need to remove your files from this volume to prevent them from falling into the wrong hands.
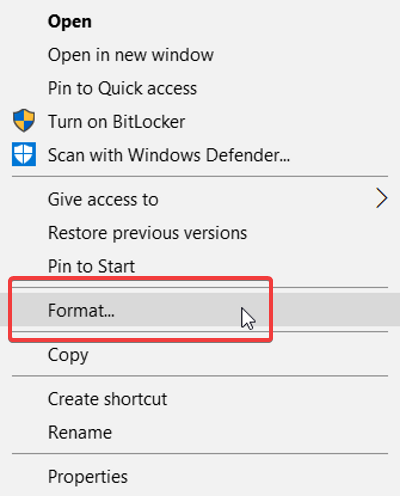
To do this, boot your computer from the SSD. Launch Windows Explorer and go to This PC. Here, right-click on the drive and select Format. You can go with the Quick Format option to get rid of your data from the hard drive.
5] If you use both drives…
If you plan to use both drives, you’d probably want to save large files like setups, videos, music, and pictures in the hard drive. This volume should be empty now if you formatted it. So, head in there and create a new folder.
Return to the SSD and navigate to C:\Users\<your username>.
Right-click on each user account in this folder and move them to the new folder on your hard drive.
6] Restore your files and folders
If you made the backup as I recommended, you’d have all your old files and folders intact. After cloning the hard drive, you want to restore these files to your system. Simply connect the volume you backed up on and open it up in File Explorer.
Select the files and folders you wish to restore and copy/paste them to the relevant directories on your system drive.
That’s all.
Position:
How Tos
—
Backup & Restore
— How to Migrate Windows 11/10 to SSD with Freeware DiskGenius Free Edition?
Table of Contents
Nowadays, in the eyes of many computer users, the experience of using SSDs is completely different from that of mechanical hard drives. Given the highest storage capacity, price, and reliability of mechanical hard drives, smaller and faster SSD drives have become the ultimate goal of data storage technology. If you are thinking about how to transfer Windows 11/10 system hard drives to SSD hard drives for faster speeds, this article will introduce you to a simple method of using free software.
Can I migrate Windows 11/10 from HDD to SSD
«Hi, Recently I have been looking for solutions to clone Windows 11 to SSD from a large HDD. Currently, Windows 11 is installed on a 1TB internal hard drive. I purchased a 256GB SSD and want to add it to the desktop, for I was told computer will be faster if Windows is installed on SSD. What I really want is moving Windows to the SSD and keep other files intact on the HDD. I’m not skilled in computer staff and do not know how to make a clean install of OS. I tried two software claiming that moving OS to SSD free of charge, and yet I need to purchase it first. Do you have any free tool to transfer Windows OS to a smaller disk?»
Compared to its predecessors, Windows 11 boasts superior efficiency with faster booting times, improved performance and an enhanced user experience. For optimal speed, users can install the operating system on an SSD rather than a traditional hard drive. While many prefer to make an SSD their system drive, the process of reinstalling Windows, configuring settings, and installing applications can be time-consuming and complicated. Fortunately, migrating Windows to a new SSD is a simpler solution. With free migration software, all you need to do is connect the SSD and let the software take care of the rest.
If you are looking for freeware to trsanfer Windows 11/10 from hard drive to SSD/HDD, you may as well have a try of DiskGenius Free Edition. DiskGenius Free is efficient Windows system migration freeware and it is able to transfer Windows operating system to a new and smaller SSD or HDD without interrupting any running software. This freeware makes it easy for those who want to upgrade computer by adding new SSD and do not want to reinstall everything. Apart from moving Windows OS, DiskGenius Free also provides many other useful functions such as resize partition, clone HDD to SSD, clone partition, backup & restore partition, check and repair bad sectors, wipe hard disk, unlock BitLocker drive, batch format USB drive, etc.
- Allows you to transfer Windows to smaller SSD or HDD as long as the target disk has large capacity to hold original system.
- Allows you to set whether to change boot sequence before migrating UEFI-based system.
- Windows migration feature is available for both MBR and GPT disk and it also supports to migrate UEFI-based system.
- Supports to create WinPE bootable USB disk which supports both UEFI and MBR boot method.
- Supports to manage UEFI boot entries in Windows such as add, delete, backup, restore, edit UEFI boot options, set one-time boot option, modify boot order in Windows, etc.
ô Free Download
How do I migrate Windows 11/10 to SSD using free system migration software?
Preparations before moving Windows 11/10 to an SSD
- Install the SSD to your desktop or laptop properly. Your computer will be able to boot from system on this new SSD after migrating Windows completes, thus, you should make sure it is correctly connected.
- Backup files. If the SSD chosen as the destination disk contains files, you need to backup files beforehand, for the Windows migration process will remove and overwrite files on target disk.
- Clean up useless files and uninstall unwanted application for original disk. For example, you can use Windows cleanup tool: right-click on system partition in File Explorer > Properties > Disk Cleanup. You can choose files you want to delete and click OK button; if you want to free up more disk space and delete system files, then click Clean up system files.
Here goes the step-by-step guide of moving Windows 11/10 from HDD to SSD with DiskGenius Free edition
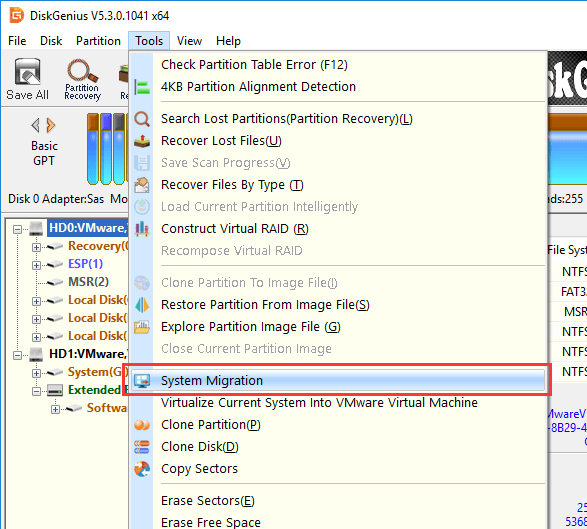
Step 1. Free download, install and run DiskGenius Free from your computer, and click Tools
>
System Migration
, as follows:
Step 2. Select destination disk.
The pop-up window lists all disks except system disk, and you need to find out and choose the SSD as the target disk and click OK button.
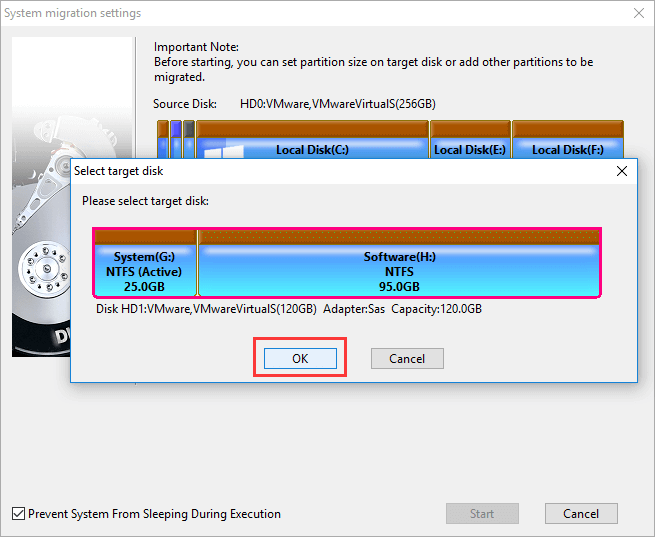
If the target disk contains too much free space, you can resize partitions on the disk by dragging mouse.
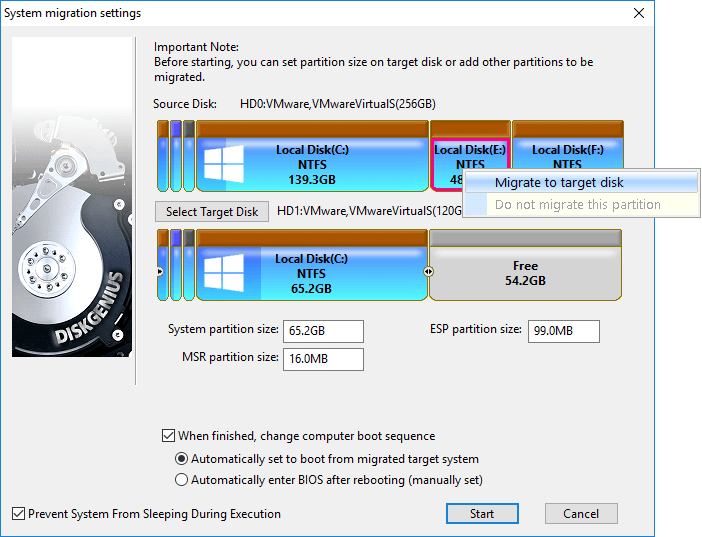
Moreover, DiskGenius supports to move all partitions from system disk to target disk if target disk is large enough, for example, if source disk contains other partitions apart from those related Windows such as drive (E:), you can right-click on partition and choose to migrate it as well.
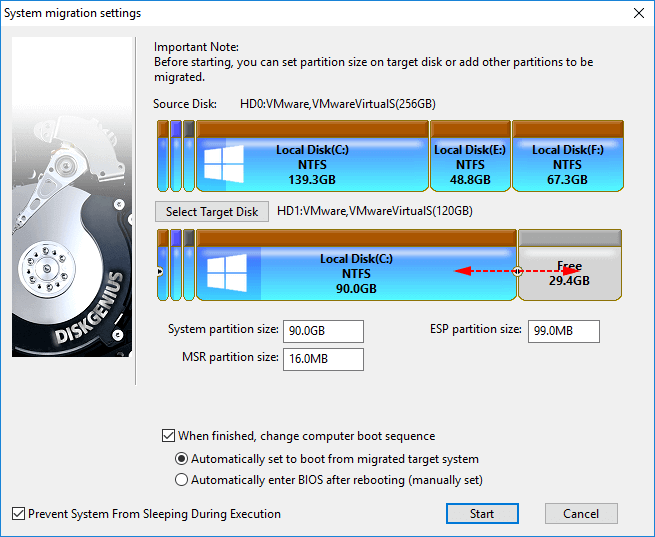
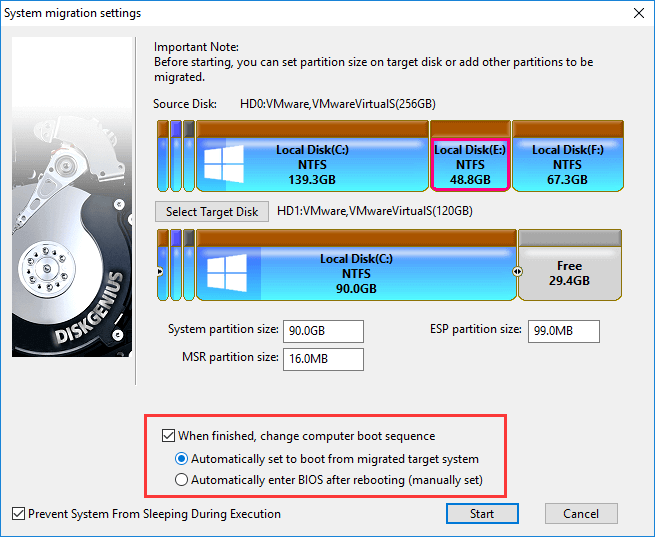
Step 3. Change boot sequence for UEFI-based computer in advance.
For UEFI-based system, you can set whether to change boot sequence after Windows OS is migrated to new SSD: check the option «When finished, change computer boot sequence«, and you can choose either «Automatically set to boot from migrated target system» or «Automatically enter BIOS after rebooting (manually set)«. What do they mean? If you choose «Automatically set to boot from migrated target system», after system migration, computer will automatically boot from the system on the SSD which is set as the destination disk; if you choose the other option, when DiskGenius finishes migrating OS, your computer will enter BIOS firmware interface where you can manually change boot sequence. If you leave the option «When finished, change computer boot sequence» unselected, your computer will continue booting from the original disk. These options are only available for UEFI-based computers.
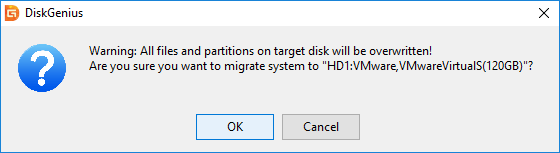
Step 4. Click Start button, and you will receive following message.
All files and partitions on target disk will be removed and overwritten, please backup files for target disk in advance. Then click OK button to continue.
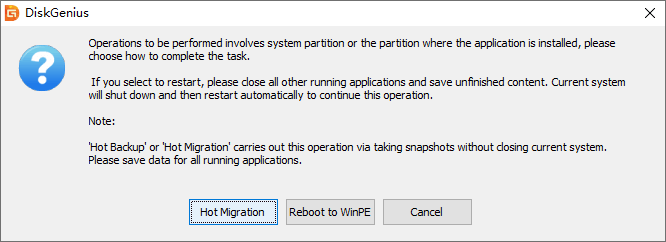
Step 5. Choose the way to migrate Windows.
DiskGenius provides two system migration ways: Hot Migration and Reboot to WinPE, and you can choose either one based on your own requirements. Hot migration moves Windows 11/10 to SSD without closing current system, and you won’t be disturbed by the entire process. Such system migration method is powered by Windows VSS technology, which is stable and effective. If you choose «Reboot to WinPE», DiskGenius will create the WinPE environment and then reboot to DiskGenius WinPE edition to complete rest operations. Thus, hot migration is recommended considering convenience and simple in operation.
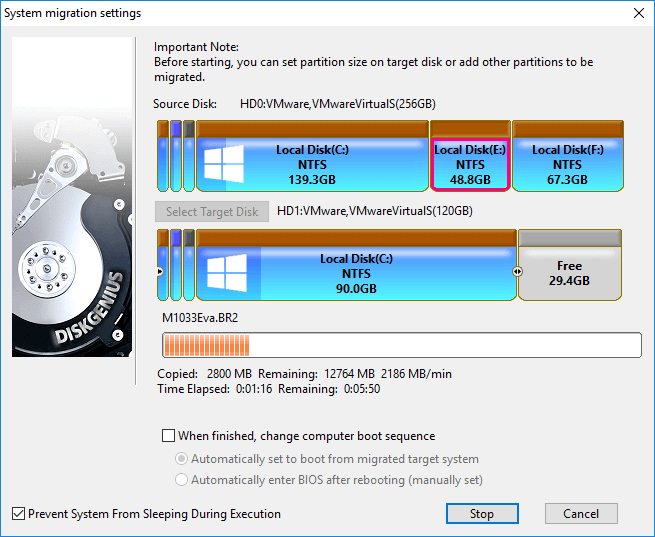
Step 6. Wait for the process to complete.
Frequently asked questions on Windows 11/10 migration
1. Can I move Windows 11/10 to a smaller SSD?
Yes. DiskGenius supports to transfer Windows 11/10 to smaller disk, but you should make sure the SSD is large enough to hold data of all system boot related partition(s).
2. How do I move Windows 11/10 to a new SSD or hard drive?
Follow steps listed below and you will be able to clone existing Windows 11/10 OS to a new SSD or hard drive easily.
Step 1: Connect the new SSD or hard drive to the computer you want to migrate.
Step 2: Launch DiskGenius Free Edition and click System Migration button.
Step 3: Select target disk and click Start button.
3. How do I transfer my OS from HDD to SSD?
DiskGenius Free Edition is the tool that can help you transfer operating system as well installed applications to hard drive, SSD or USB external disks. You need to make sure you’ve backed up all data for the destination disk. Then follow the step-by-step guide above to complete the OS migration.
4. How do I clone my hard drive to SSD without reinstalling Windows?
System migration is the recommended solution if you want to clone everything including Windows 11/10 from a hard drive to SSD. The process will clone OS, customized settings, personal data and installed programs to the target SSD. Free download DiskGenius Free Edition and you can start the disk cloning.
5. Do I have to purchase DiskGenius so as to transfer Windows OS to SSD/HDD?
NO. System migration is available for DiskGenius Free Edition. With this freeware, you can migrate Windows 11/10/8/7/Vista and Windows Server 2022/2019/2016/2012/2008 operating system with ease
6. Why choose DiskGenius?
DiskGenius Free edition covers a wide range of features on data backup, partition management and disk utilities. With this freeware, you can easily migrate Windows OS to SSD/HDD, clone disk, backup partition, copy partition, resize partition, convert disk between MBR/GPT, wipe hard disk, etc. Moreover, this freeware allows users to try the data recovery functions.
7. I bought DiskGenius Standard Edition. Can I upgrade it to the Pro edition?
Yes. You can upgrade to the Pro edition by paying the price difference. Please contact our support team via email to know how to upgrade software.
Conclusion
Here is the end of the guide for Windows OS migration. By using the free software DiskGenius, we can easily transfer Windows 11/10 systems to faster SSDs free of charge. This can significantly improve startup and running speed, extend the lifespan of the hard drive, and is also one of the most effective ways to protect the computer. If you are looking for advanced options such as how to transfer more data or partition management, DiskGenius also provides more features for you to use. Whether you are a beginner user or experienced user, this classic software can help you easily clone hard drive to SSD, migrate Windows, or backup system with ease.
You may also like
- How to migrate Windows operating system to SSD / HDD?
- How to clone HDD to smaller SSD in Windows 11/10/8/7?
- How to clone laptop hard drive to smaller SSD in Windows 11/10/8/7?
- How to clone Windows 11/10 to smaller SSD free of charge?
The speed and efficiency of computer systems are paramount. One of the most valuable methods to increase the computer
system performance is upgrading its storage drive to a solid-state drive (SSD). Indeed, SSDs offer significant
performance improvements over traditional hard disk drives (HDDs), delivering fast boot times and quicker
application launches.
However, migrating OS to SSD Windows 10 can be challenging and have potential complications.
Fortunately, multiple
modern tools and techniques can help migrate OS to SSD Windows 11 in straightforward and simple steps. This article
will explain how to migrate OS to SSD in just three easy-to-follow steps, helping you improve your system
performance without any hassle or headache.
Part 1: What is OS Migration?
Operating system (OS) migration is the process of transferring an existing operating system installation from one
storage device to another. This is commonly done when upgrading from a traditional hard disk drive (HDD) to a
solid-state drive (SSD), as SSDs offer faster performance and better reliability.
OS migration involves moving the OS files and all associated system files, user data, and configurations
necessary for the operating system to function correctly. This process ensures that your computer remains fully
operational after the migration, with all programs, settings, and data intact.
There are several reasons why you should migrate OS to SSD. Firstly, SSDs provide the best performance and
multiple benefits, including faster boot times, quicker application launches, and improved system
responsiveness. You can enjoy these performance benefits by migrating your OS to an SSD without reinstalling
Windows.
Moreover, OS migration allows you to take advantage of the larger storage capacities offered by modern SSDs,
providing ample space for your operating system, applications, and files. This can be useful if you’re running
low on storage space on your current HDD and need to upgrade
to a larger drive.
Part 2: How to Migrate OS to SSD? [Windows 10/11]
If you’re searching for a solution to migrate OS from HDD to SSD in Windows 10 or 11, you have come to the right
place. We recommend utilizing the most efficient and user-friendly tool: 4DDiG Partition
Manager. It is designed with simplicity and effectiveness and streamlines the OS migration process,
making it accessible to users of all skill levels.
Follow the below key features of 4DDiG Partition Manager:
- Easy-to-Use Interface: 4DDiG Partition Manager offers a clean and intuitive user interface that lets
you go through the migration process quickly. If you’re not an IT expert or a beginner computer user, you’ll
find the interface of 4DDiG Partition Manager easy to understand and navigate. - One-Click OS Migration: The most efficient feature of 4DDiG Partition Manager is its ability to
migrate OS to SSD with just one click. This process can remove the need for complex manual configurations,
which saves you time and effort. - Partition Management: Whether you need to resize partitions, create new ones, or merge existing ones,
4DDiG Partition Manager provides all the tools to optimize your disk space efficiently. - Data Protection: Data integrity is paramount when you need to migrate OS to SSD Windows 11. 4DDiG
Partition Manager offers data protection and utilizes modern algorithms to ensure your files and settings
are transferred securely and accurately.
Follow the below steps that can help how to use 4DDiG Partition Manager to migrate OS:
-
Connect your new SSD once 4DDiG Partition Manager has been downloaded and installed on your computer.
Then, open the application, choose the SSD as the target disk, and press «Start» to proceed. -
You will receive a pop-up window warning that files and partitions on the target disk will be
overwritten during system migration. Click «Sure» and «Start» to initiate the system migration and move
on to the next step. -
Depending on the size of the drives, system migration will now start under 4DDiG Partition Manager and
take some time to finish. You can see data about migration, including elapsed time, speed, and other
metrics.

Note
Get 1 Month License Instantly!
In short, 4DDiG Partition Manager is a powerful and user-friendly tool for migrating OS to SSD Windows 10 or 11.
With its intuitive interface, one-click migration feature, and comprehensive partition management tools, 4DDiG
Partition Manager simplifies the migration process, which enables you to enjoy the performance benefits of an
SSD with less effort.
Part 3: How to Boot Windows from the New SSD After OS Migration?
Once you migrate OS to SSD successfully, it’s crucial to configure your computer to boot from the SSD. This
ensures that you can fully utilize the enhanced speed and performance offered by the SSD. Follow the below steps
to boot Windows from the new SSD after OS migration:
- Restart the computer and press the F2/F8/F11 or Del key to access the BIOS.
-
Navigate to the boot section of the BIOS and select the cloned SSD as the boot drive.
- Restart the computer after saving the changes.
FAQs about Migrate OS to SSD
1. Can I migrate just my OS to an SSD?
You can migrate OS to SSD without transferring all the data from your current storage device. This process, known
as OS migration or cloning, allows you to copy only the OS files and system partitions to the SSD, leaving your
data and other files safe on the original drive. For this purpose, 4DDiG Partition Manager makes this process
easy and allows you to enjoy the speed and performance benefits of an SSD while keeping your existing files
intact.
2. How do I move my OS to SSD without reinstalling Windows?
You can use specialized software tools designed for OS migration to move your operating system (OS) to a
solid-state drive (SSD) without reinstalling Windows. These tools move all the contents of your existing OS
drive to the new SSD, including the OS files, system configurations, and personal data. One popular software for
this purpose is 4DDiG Partition Manager.
To migrate OS to SSD, you must install the software, connect your SSD, and follow the steps mentioned above.
After migration, you can set the SSD as the primary boot device in your computer’s BIOS or UEFI settings to boot
into Windows from the SSD. This method allows you to seamlessly transfer your OS to the SSD without needing a
new Windows installation.
Conclusion
In short, we have discussed how to migrate OS to SSD with just three easy and simple steps. By following the
steps outlined in this guide, you can seamlessly transfer your OS and all associated files to the SSD, enjoying
faster boot times, quicker application launches, and improved overall system responsiveness.
OS migration has become easier than ever before, thanks to user-friendly tools and techniques such as the 4DDiG Partition
Manager. This software can migrate OS to SSD easily and allow you to transfer your OS with just a few
clicks, saving you time and effort.
Furthermore, configuring your computer to boot from the new SSD ensures you can fully leverage its performance
benefits. By adjusting the boot order in the BIOS or UEFI settings, you can prioritize the SSD as the primary
boot device, ensuring that your system boots quickly and efficiently every time.
William Bollson (senior editor)
William Bollson, the editor-in-chief of 4DDiG, devotes to providing the best solutions for Windows and Mac related issues, including data recovery, repair, error fixes.
Если вы купили новый жесткий диск или твердотельный SSD накопитель для своего компьютера, очень вероятно, что большого желания заниматься переустановкой Windows, драйверов и всех программ у вас нет. В этом случае вы можете клонировать или, иначе, перенести Windows на другой диск, причем не только саму операционную систему, но и все установленные компоненты, программы и прочее. Отдельная инструкция для 10-ки, установленной на GPT диск в UEFI системе: Как перенести Windows 10 на SSD.
Существует несколько платных и бесплатных программ для клонирования жестких дисков и SSD, некоторые из которых работают с дисками только определенных марок (Samsung, Seagate, Western Digital), некоторые другие — с почти любыми дисками и файловыми системами. В этом коротком обзоре я опишу несколько бесплатных программ, перенос Windows с помощью которых будет наиболее простым и подойдет почти для любого пользователя. См. также: Настройка SSD для Windows 10.
Acronis True Image
Acronis True Image является официальной утилитой для SSD и жестких дисков следующих производителей: WD, Kingston, SanDisk, Crucial, A-Data. Это означает, что приобретя диск этой марки вы имеете право использовать специальную бесплатную версию Acronis True Image для переноса Windows 10, 8.1 или Windows 7 на SSD. После несложной установки и запуска программы, в главном окне выберите пункт «Клонирование диска. Копирование разделов одного диска на другой.» Действие доступно как для жестких дисков, так и в том случае, если вам требуется перенести ОС на SSD.
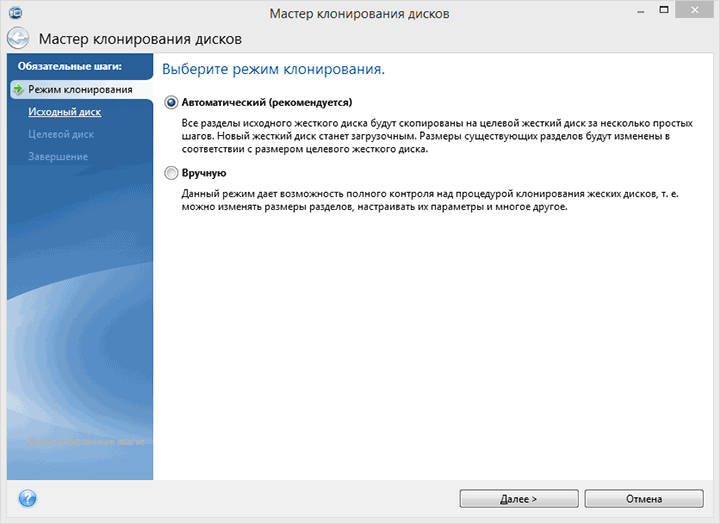
В следующем окне вам потребуется выбрать режим клонирования — автоматический или ручной, для большинства задач подходит автоматический. При его выборе, все разделы и данные с исходного диска копируются на целевой (если на целевом диске что-то было, то оно будет удалено), после чего целевой диск делается загрузочным, то есть с него будет запускаться Windows или другие ОС, как и раньше. После выбора исходного и целевого диска начнется перенос данных с одного диска на другой, который может занять достаточно продолжительное время (все зависит от скорости диска и объема данных).
Пошаговая подробная инструкция по использованию программы и где скачать фирменные бесплатные версии для разных производителей SSD — Как перенести Windows 10, 8.1 или Windows 7 на SSD в Acronis Ture Image.
Seagate DiscWizard
По факту, Seagate DiscWizard — это полная копия предыдущей программы, только для работы ей требуется наличие хотя бы одного жесткого диска Seagate на компьютере.
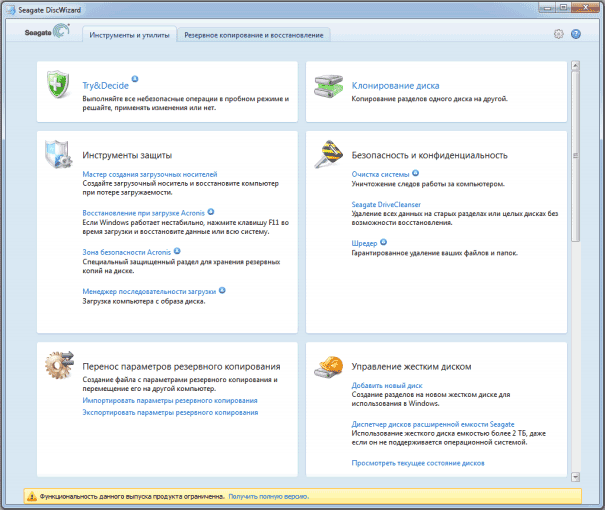
Все действия, позволяющие перенести Windows на другой диск и полностью клонировать его аналогичны Acronis True Image WD Edition (по сути, это та же программа), интерфейс тот же самый.
Скачать программу Seagate DiscWizard вы можете с официального сайта (в настоящее время, похоже, заблокирован в РФ) https://www.seagate.com/support/downloads/discwizard/
Samsung Data Migration
Программа Samsung Data Migration предназначена специально для переноса Windows и данных на SSD марки Samsung с любого другого диска. Так что, если вы обладатель такого твердотельного накопителя — это то, что вам нужно.
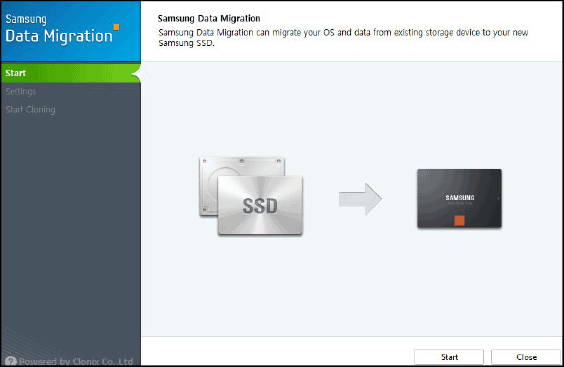
Процесс переноса выполнен в виде мастера из нескольких шагов. При этом, в последних версиях программы возможно не только полное клонирование диска с операционными системами и файлами, но и выборочных перенос данных, что может быть актуально, учитывая, что размеры SSD все-таки меньше, чем современных жестких дисков.
Программа Samsung Data Migration на русском языке доступна на официальном сайте https://www.samsung.com/semiconductor/minisite/ssd/download/tools/
Важно: такие же утилиты переноса Windows на другой диск есть и у других производителей SSD и HDD. Обычно, из можно найти, задав запрос, состоящий из марки и фразы «Data Migration», так вы найдете, например, Intel Data Migration Tool и аналогичные программы для других марок дисков.
Как перенести Windows с HDD на SSD (или другой HDD) в Aomei Partition Assistant Standard Edition
Еще одна бесплатная программа, к тому же на русском языке, позволяющая удобно выполнить перенос операционной системы с жесткого диска на твердотельный накопитель или на новый HDD — Aomei Partition Assistant Standard Edition.
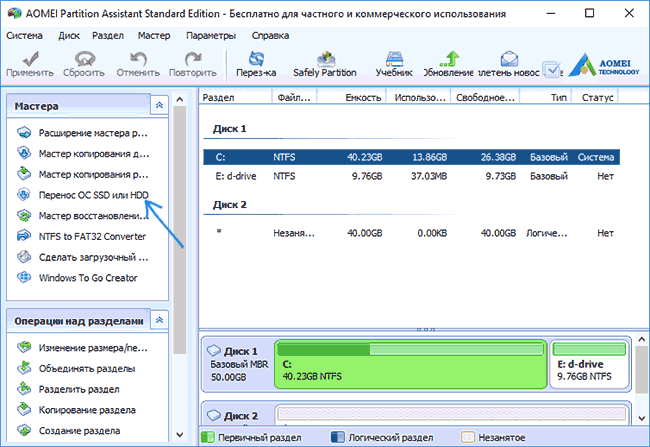
Примечание: данный способ работает только для Windows 10, 8 и 7, установленных на MBR диск на компьютерах с БИОС (или UEFI и Legacy загрузкой), при попытке переноса ОС с GPT диска, программа сообщает о том, что сделать этого не может (возможно, тут сработает простое копирование дисков в Aomei, но поэкспериментировать не удалось — сбои при перезагрузке для выполнения операции, несмотря на отключенный Secure Boot и проверку цифровой подписи драйверов).
Шаги для копирования системы на другой диск просты и, думаю, будут понятны даже начинающему пользователю:
- В меню Partition Assistant, слева, выберите «Перенос ОС SSD или HDD». В следующем окне нажмите «Далее».

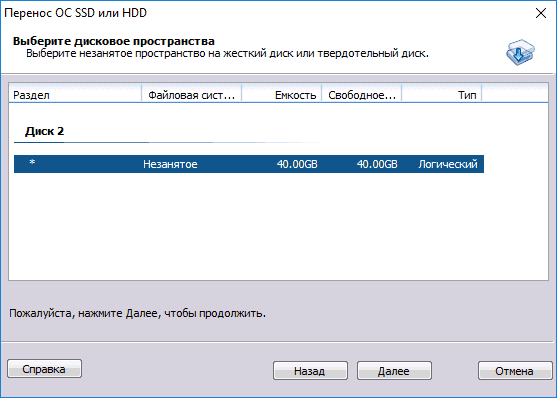
- Выберите тот диск, на который будет осуществляться перенос системы.

- Вам будет предложено изменить размер раздела, на который будет перенесена Windows или другая ОС. Тут можно не выполнять изменений, а настроить (при желании) структуру разделов уже после завершения переноса.
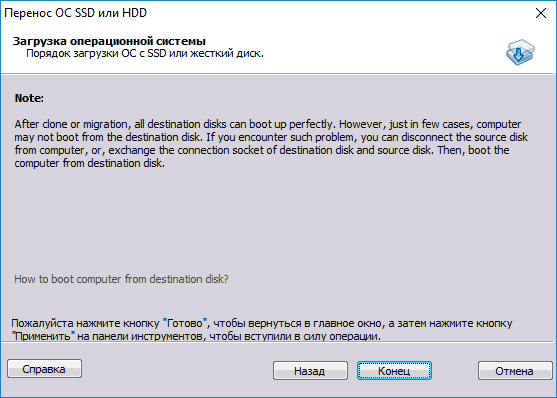
- Вы увидите предупреждение (почему-то на английском) о том, что после клонирования системы, можно будет загрузиться с нового жесткого диска. Однако, в некоторых случаях, компьютер может загружаться не с того диска с которого нужно. В этом случае, вы можете отключить исходный диск от компьютера или поменять шлейфы исходного и целевого диска. От себя добавлю — можно поменять порядок следования дисков в БИОС компьютера.
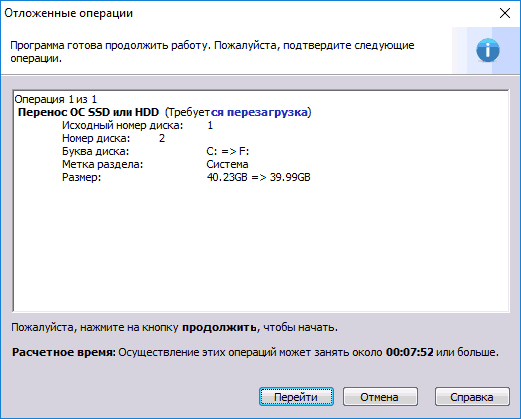
- Нажмите «Конец», а затем, кнопку «Применить» слева вверху главного окна программы. Последнее действие — нажать «Перейти» и дождаться завершения процесса переноса системы, которое начнется автоматически после перезагрузки компьютера.

Если всё пройдет успешно, то по завершении вы получите копию системы, которую можно загрузить с вашего нового SSD или жесткого диска. Скачать Aomei Partition Assistant Standard Edition вы можете бесплатно с официального сайта https://www.disk-partition.com/free-partition-manager.html
Перенос Windows 10, 8 и Windows 7 на другой диск в Minitool Partition Wizard Bootable
Обновление: для переноса с помощью MiniTool Partition Wizard рекомендую использовать новую инструкцию: Как перенести Windows на SSD или другой диск в MiniTool Partition Wizard Free.
Minitool Partition Wizard Free, наравне с Aomei Partition Assistant Standard, я бы отнес к одним из лучших бесплатных программ для работы с дисками и разделами. Одно из преимуществ продукта от Minitool — доступность полностью работоспособного загрузочного ISO образа Partition Wizard на официальном сайте (бесплатный Aomei дает возможность создать демо-образ с отключенными важными функциями).
Записав данный образ на диск или флешку (для этого разработчики рекомендуют использовать Rufus) и загрузив ваш компьютер с него, вы можете перенести систему Windows или другую на другой жесткий диск или SSD, причем в данном случае нам не будут мешать возможные ограничения ОС, так как она не запущена.
Примечание: мною клонирование системы на другой диск в Minitool Partition Wizard Free было проверено только без EFI загрузки и только на MBR дисках (переносилась Windows 10), за работоспособность в системах EFI/GPT не ручаюсь (мне не удалось заставить работать программу в данном режиме, несмотря на отключенный Secure Boot, но похоже это баг конкретно моего оборудования).
Процесс переноса системы на другой диск состоит из следующих шагов:
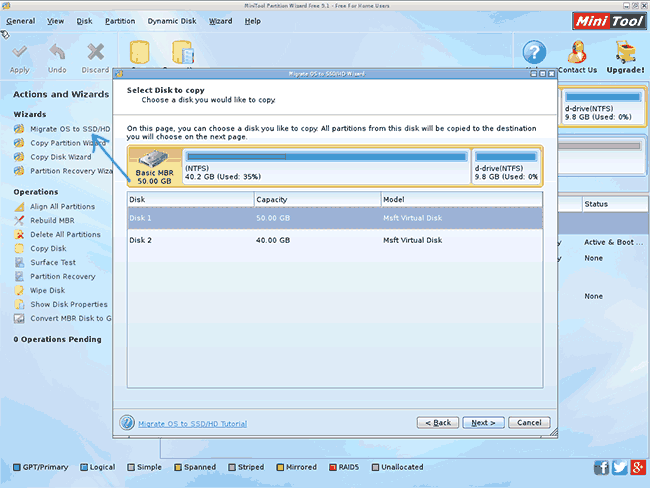
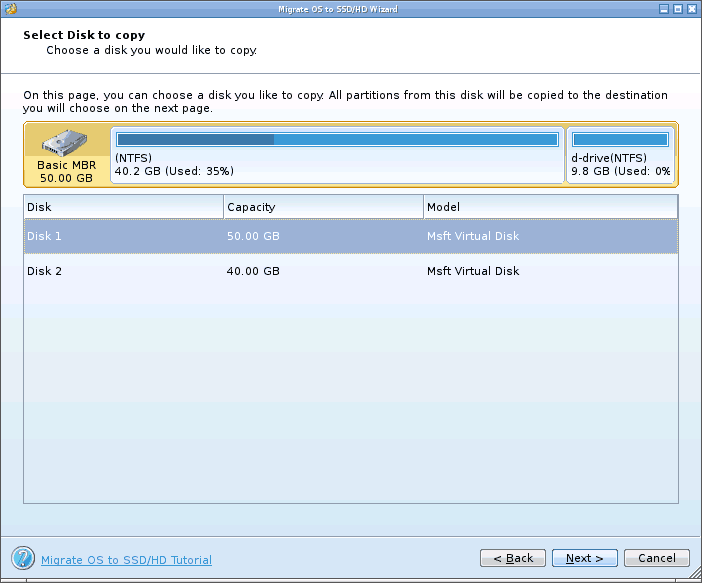
- Загрузившись с флешки и войдя в Minitool Partition Wizard Free, слева выберите пункт «Migrate OS to SSD/HDD» (Перенести ОС на SSD/HDD).

- В открывшемся окне нажмите «Next» (Далее), а на следующем экране выберите тот диск, с которого будет выполняться перенос Windows. Нажмите «Next».
- Укажите диск, на который будет выполняться клонирование (если их всего два, то он будет выбран автоматически). По умолчанию включены параметры, изменяющие размеры разделов при переносе в случае если второй диск или SSD меньше или больше исходного. Обычно достаточно оставить эти параметры (второй пункт копирует все разделы без изменения их разделов, подойдет, когда целевой диск более объемен чем исходный и после переноса вы сами планируете настроить незанятое пространство на диске).

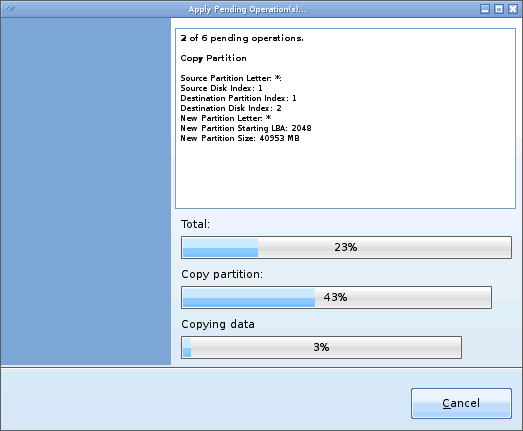
- Нажмите Next, действие по переносу системы на другой жесткий диск или твердотельный накопитель будет добавлено в очередь заданий программы. Чтобы начать перенос, нажмите кнопку «Apply» вверху слева главного окна программы.
- Дождитесь завершения переноса системы, продолжительность которого зависит от скорости обмена данными с дисками и объема данных на них.

По завершении вы можете закрыть Minitool Partition Wizard, перезагрузить компьютер и установить загрузку с нового диска, на который была перенесена система: в моем тесте (как я уже упоминал, BIOS+MBR, Windows 10) все прошло успешно, и система загрузилась как ни в чем не бывало с отключенным исходным диском.
Скачать бесплатно загрузочный образ Minitool Partition Wizard Free можно с официального сайта https://www.partitionwizard.com/partition-wizard-bootable-cd.html
Macrium Reflect
Бесплатная программа Macrium Reflect позволяет клонировать целые диски (как жесткие, так и SSD) или отдельные их разделы, причем независимо от того, какой марки ваш диск. Кроме этого, вы можете создать образ отдельного раздела диска (в том числе с Windows) и позже использовать его для восстановления системы. Также поддерживается создание загрузочных дисков восстановления на базе Windows PE.
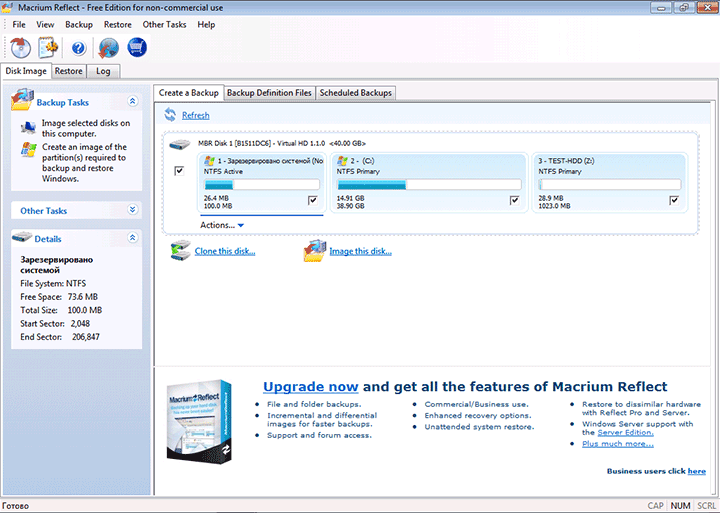
После запуска программы в главном окне вы увидите список подключенных жестких дисков и SSD. Отметьте диск, на котором находится операционная система и нажмите «Clone this disk» (Клонировать этот диск).
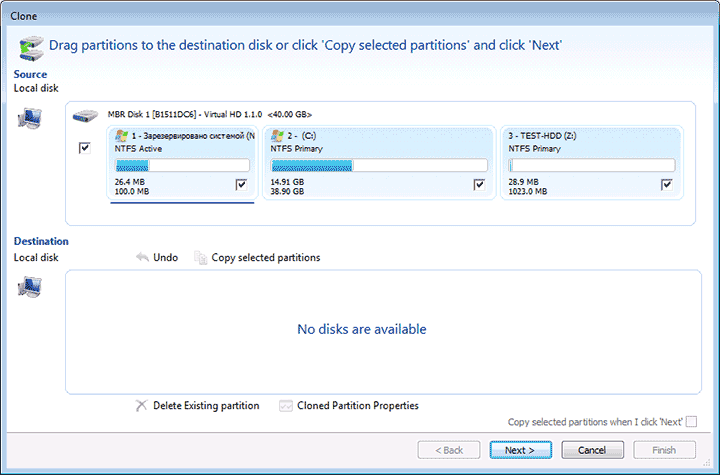
На следующем этапе в пункте «Source» уже будет выбран исходный жесткий диск, а в пункте «Destination» потребуется указать тот, на который нужно перенести данные. Также вы можете выбрать только отдельные разделы на диске для копирования. Все остальное происходит автоматически и не сложно даже для начинающего пользователя. Подробная инструкция доступна здесь: Перенос Windows на SSD или другой диск в Macrium Reflect.
Дополнительная информация
После того, как вы перенесли Windows и файлы, не забудьте либо поставить загрузку с нового диска в BIOS или отключить старый диск от компьютера.