
Вы хотите перейти на более новую версию Windows Server? Пришло время обновить Windows Server 2012 до Windows Server 2016. В Windows Server 2016 появилось множество полезных функций и улучшений.
Отметим основные особенности Windows Server 2016 – данная платформа поддерживает только 64-битную архитектуру, версия Itanium не поддерживается. Кроме того, имеется всего четыре редакции Windows Server 2012 и 2016.
Обновление Windows Server – это сложный процесс. Поэтому Microsoft рекомендует администраторам переносить роли и настройки на новый сервер с Windows Server 2016 не используя обновление (в режиме новой установки и миграции ролей), из-за возможности появления ошибок.
В нашей статье мы расскажем, как проапгрейдить Windows Server 2012 до Server 2016 без переустаноки (хотя это и не рекомендуется).
- Особенности обновления и конвертации Windows Server
- Запуск апгрейда Windows Server 2012 до Windows Server 2016
- Установка Windows Server 2016
Содержание:
Особенности обновления и конвертации Windows Server
Чтобы обновить Windows Server 2012 до Server 2016, вам необходимо учесть следующие требования:
Все редакции Windows Serer 2016 бывают только 64 битные (обновление с 32-разрядной Windows Server 2008 до 64-разрядной версии невозможно).
Windows Server 2012 можно обновить до Server 2016, более ранние версии Windows Server такой сценарий не поддерживают.
Не поддерживается обновление с одной редакции на другую ( т.е. нельзя обновить Windows Server 2012 Standart до версии Windows Server 2016 Datacenter).
- Обновление с одного языка на другой не поддерживается.
- Обновление, с переключением из режима Server Core в режим полноценного GUI (и наоборот) также не поддерживается.
- Обновление ранее установленной Windows Server на пробную версию Windows Server не поддерживается. Ознакомительные версии должны быть установлены в режиме чистой установки.
- При апгерейде отключите антивирусную защиту, поскольку она замедляет процесс, так как антивирус сканирует каждый файл, копируемый на диск.
- Если сервер использует NIC Teaming, отключите его. Вы можете включить NIC Teaming после завершения обновления ОС сервера.
- Прежде чем обновлять сервер создайте его резервную копию. При возникновении ошибок или проблем у вас будет возможность откатить систему к исходному состоянию.
- Проверьте, нет ли у в журналах сервера проблем и ошибок, если они есть – их необходимо устранить. В противном случае это может привести к ошибкам, которые способны спровоцировать сбой процесса обновления.
Запуск апгрейда Windows Server 2012 до Windows Server 2016
Теперь, когда вам известны и понятны правила апгрейда версий, давайте начнем.
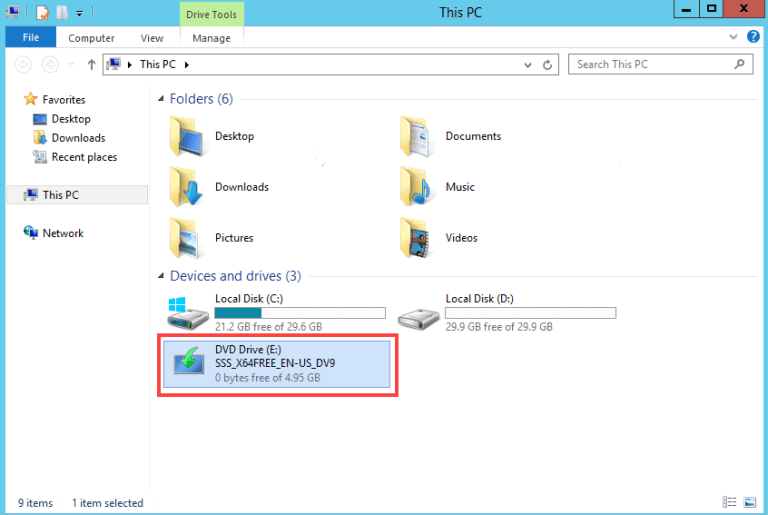
Авторизуйтесь на Windows Server 2012 и подключите к серверу установочный диск с Windows Server 2016 (в виде iso образа, или установочном DVD диске или USB флешке). Смонтируйте диск, откройте проводник и дважды щелкните по диску в устройстве DVD, чтобы запустить установку Windows Server 2016.
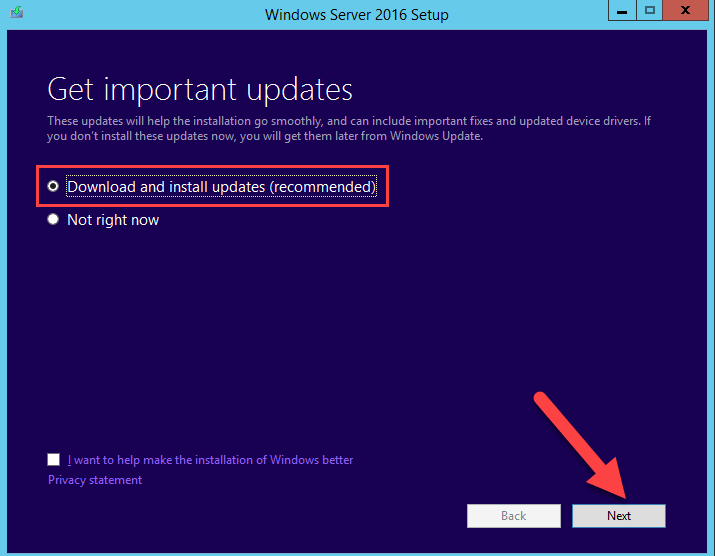
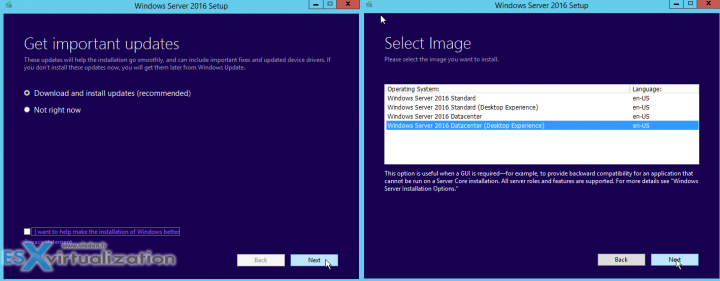
Выберите «Download & install updates», поставьте галочку напротив «I want to help make installation of Windows better». Нажмите кнопку «Next».
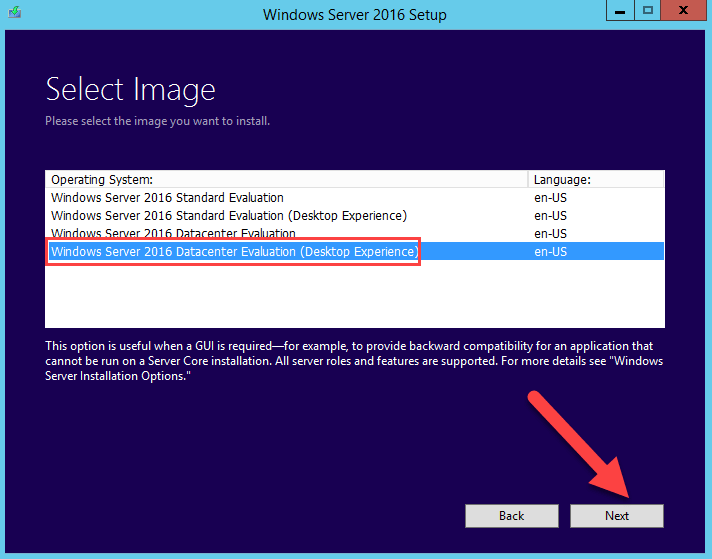
Выберите необходимую редакцию Windows Server 2016, которая соответствует ранее установленной редакции ОС. Нажмите кнопку «Next».
Прочитайте условия лицензионного соглашения. Если вы не согласны нажмите на кнопку «Decline», после чего вы вернетесь назад. Если вы согласны, нажмите кнопку «Accept».
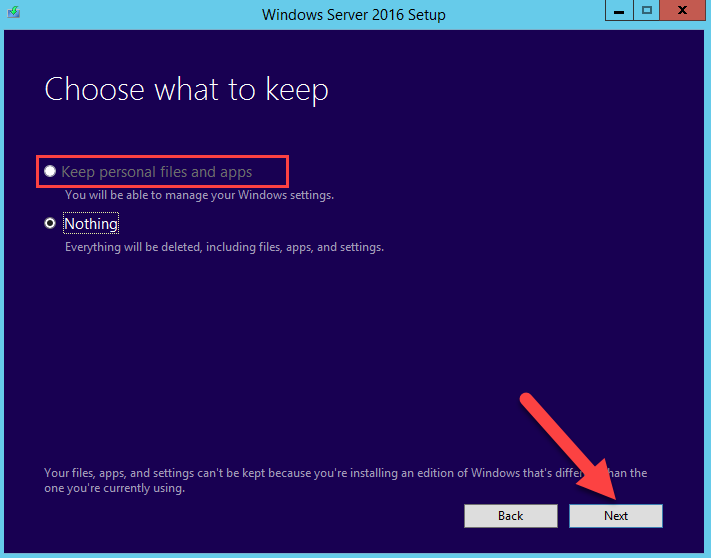
Если вы выбрали туже самую редакцию, которую используете в данный момент, вы можете сохранить свои приложения и файлы. Как уже упоминалось ранее, если вы выбрали неправильную редакцию, вы не сможете сохранить свои приложения и файлы. Выберите «Keep personal files and apps», если вы используете ту же редакцию или выберите «Nothing», чтобы затереть все. Затем нажмите кнопку «Next».
Установка Windows Server 2016
Windows Server автоматически проверит вашу систему на совместимость, поэтому просто нажмите кнопку «Install», чтобы начать установку.
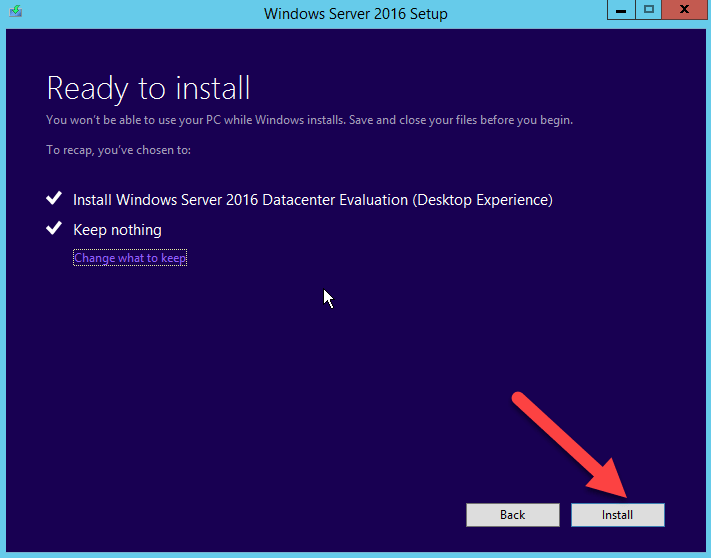
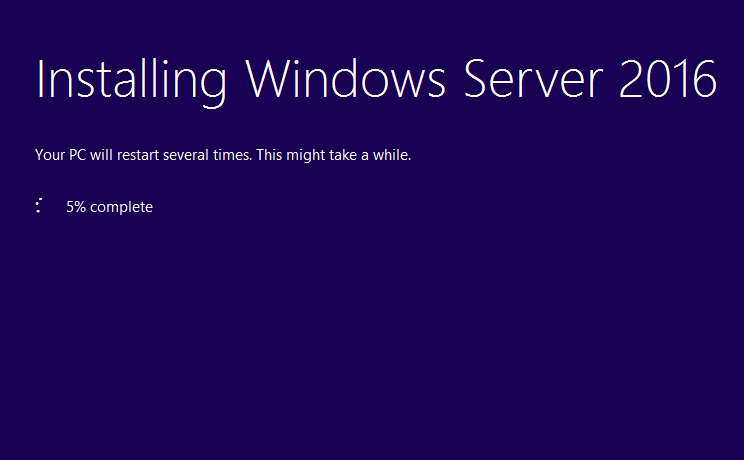
Будьте терпеливы, потому что процесс установки Windows Server занимает достаточно много времени. В процессе установки ваша система может перезагрузится несколько раз.
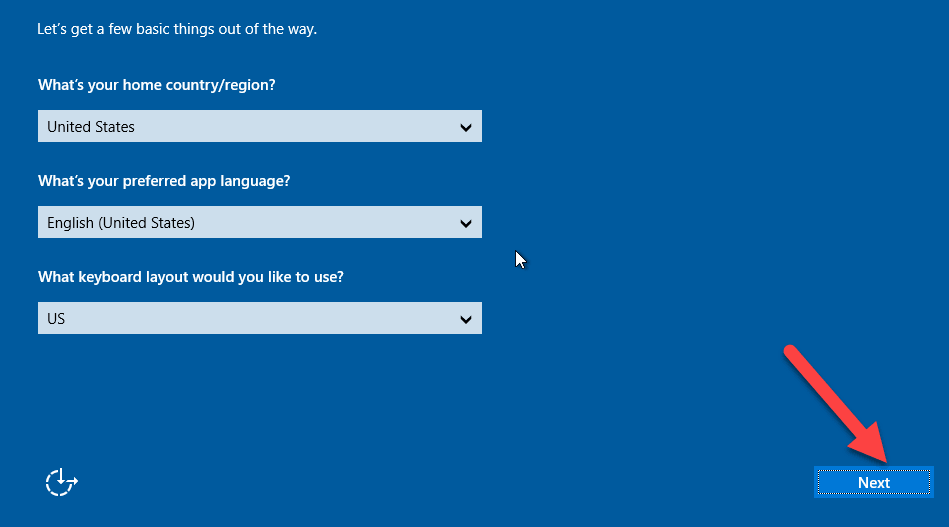
Выберите страну и предпочитаемую раскладку клавиатуры сервера.. Нажмите кнопку «Next», чтобы перейти к следующей странице.
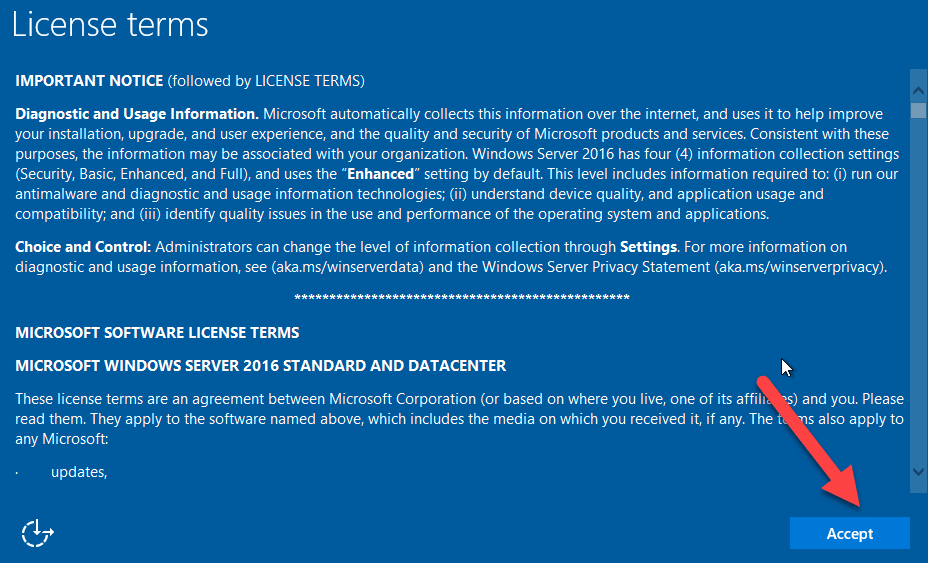
Внимательно прочитайте условия лицензии и нажмите кнопку «Accept».
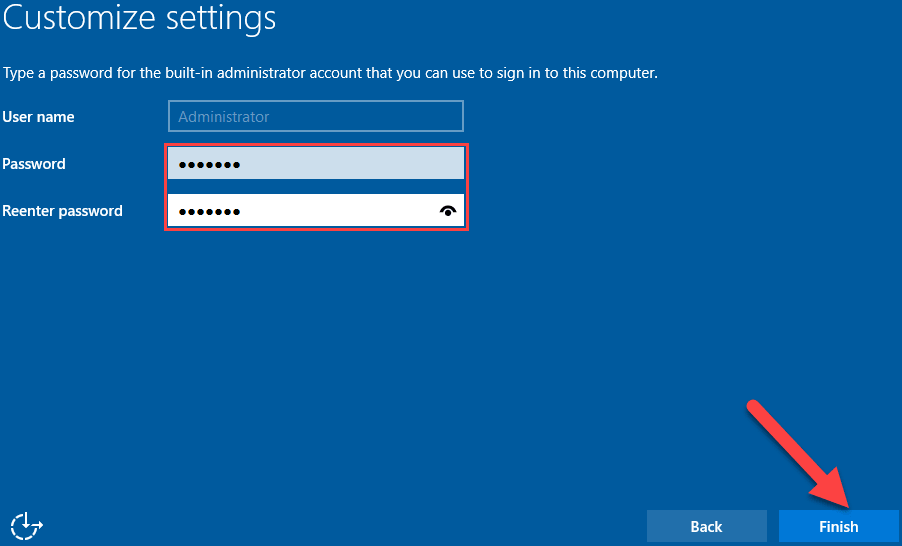
По умолчанию имя пользователя — «Administrator», придумайте ему сложный пароль (пароль, состоящий из строчных букв, прописных букв, цифр и символов). Повторно введите пароль. Затем нажмите кнопку «Finish». Используя эти имя пользователя и пароль, вы можете авторизоваться на сервере.
На экране входа нажмите нажатием клавиш Ctrl + Alt + Del, затем авторизуйтесь в системе, используя ранее созданную учетную запись.

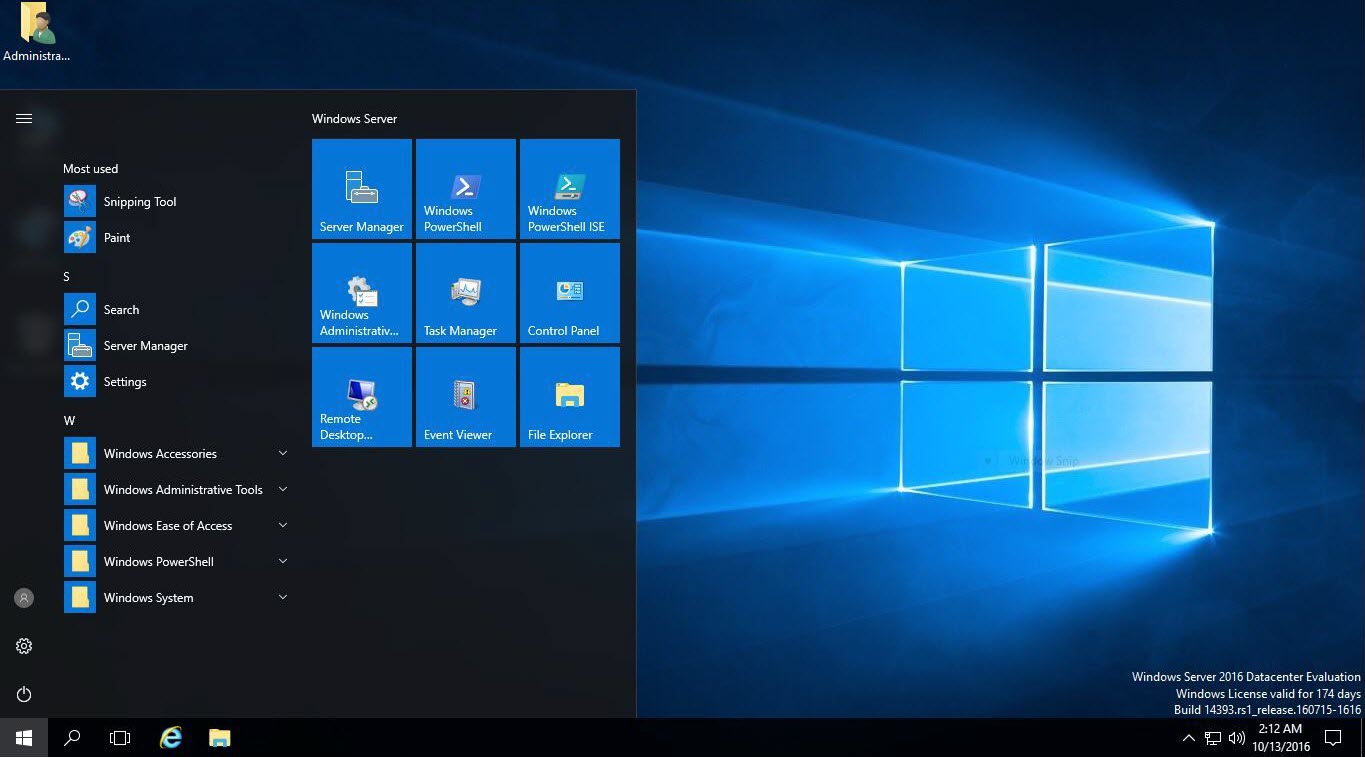
Добро пожаловать в Server Windows 2016. На этом процесс обновления Server Windows 2012 до Server Windows 2016 завершен. Теперь вы можете увидеть домашнюю страницу сервера Windows Server 2016 и оценить все нововведения.
Можете глубоко вдохнуть, процесс обновления прошел без ошибок. Не стесняйтесь, задавайте ваши вопросы и оставляйте комментарии ниже.
| Workable Solutions | Step-by-step Troubleshooting |
|---|---|
| Windows Server Migration Checklist | #1. Download essential Windows server migration tool; #2. Find out your goals in Windows server migration…Full steps |
| Solution 1. Migration (Data, Apps, Account) | Step 1. Launch EaseUS Todo PCTrans on your source and target computers, connect both PCs via the internet…Full steps |
| Solution 2. In-place Upgrade (Everything) | Step 1. Create an image of all important data, apps, and even accounts on Windows Server 2012…Full steps |
Methods on this page are also applicable to Windows Server 2008/2008 R2/2012/2012 R2/2016/2019. It also works to upgrade and migrate Windows Server essentials to standards.
According to Microsoft, the new end-of-extended support date for Windows Server 2012 is October 10, 2023. The original date had been January 10, 2023.
How to Successfully Migrate Windows Server 2012 to 2016?
It’s confirmed that Windows Server 2012 and Windows Server 2012 R2 supports will end by Oct.10th, 2023. And Microsoft has released two new Windows Servers — 2016 and 2019 for personal and enterprise users to explore their businesses on the new Windows Server systems. And it’s a smart choice to get things ready in advance. Therefore, it’s time to make a full plan of upgrading or migrating Windows Server 2012/2012 R2 to new Windows Server 2016/2019.
So how to successfully migrate your Windows Server 2012 to 2016 with all applications, data, and even accounts? If you are having the same doubts as listed here, stay calm and follow the provided tips in the following to get problems resolved:
- 1. Will I lose data while migrating Windows Server 2012 to 2016?
- 2. How do I upgrade Windows Server 2012 to 2019?
- 3. How to keep applications, data, accounts while migrating Windows Server 2012 to 2016/2019?
Windows Server Migration Checklist (2 Steps)
Here is a checklist that can be applied to upgrade and migrate Windows Servers applications, data, and accounts, etc., for all Windows Server users. Take the following two steps to get the right tool and resolution for Windows Server Migration:
- #1. Download Essential Windows Server Migration Tool
For most Windows Server users, the biggest challenge of migrating Windows Server is about how to fully transfer data, installed applications, and even Windows Server accounts to the new Windows Server machine. Advanced Windows Server PC transfer software — EaseUS Todo PCTrans Technician specializes in Windows Server data, app, account and settings migration between Windows Servers.
EaseUS Todo PCTrans Technician supports to transfer data, application, accounts via network or image on all Windows Servers, including Windows Server 2019/2016/2012/2012 R2/2008/2008 R2, etc.
- #2. Find Out Your Goals in Windows Server Migration
To find out the right way to migrate Windows Server, you should first find out your goals.
- If you want to transfer Windows Server OS to a new computer, try EaseUS Windows Server Migration Tool. You will successfully migrate Windows Server OS to a new computer without reinstalling the Server OS.
- If you only want to transfer Windows Server 2012 data, installed applications, account and settings to Windows Server 2016/2019 computer, follow Solution 1 listed below for help.
- If you want to perform an in-place upgrade from Windows Server 2012 to 2016/2019 or fresh install Windows Server 2016/2019 on old Windows Server 2012 but keep all data, installation apps, and account, follow Solution 2 on this page for help.
Applies to: Transfer data, installed applications, account and settings from Windows Server 2012 to new Windows Server 2016/2019 computers. No reinstallation is required.
To transfer Windows Server 2012 data, applications, and account, etc., to a new Windows server computer like 2016 or 2019, all you need is a reliable Windows Server PC Transfer software. EaseUS Todo PCTrans Technician is capable to help. It enables all levels of users to efficiently transfer everything from an old Windows Server computer to a new Server machine via the network connection.
See how to migrate Windows Server 2012 data, application, and even account to new Server step by step:
Step 1. Set Up the Old PC
- First, install and launch EaseUS Todo PCTrans and select Data Transfer on the left panel of the main interface.
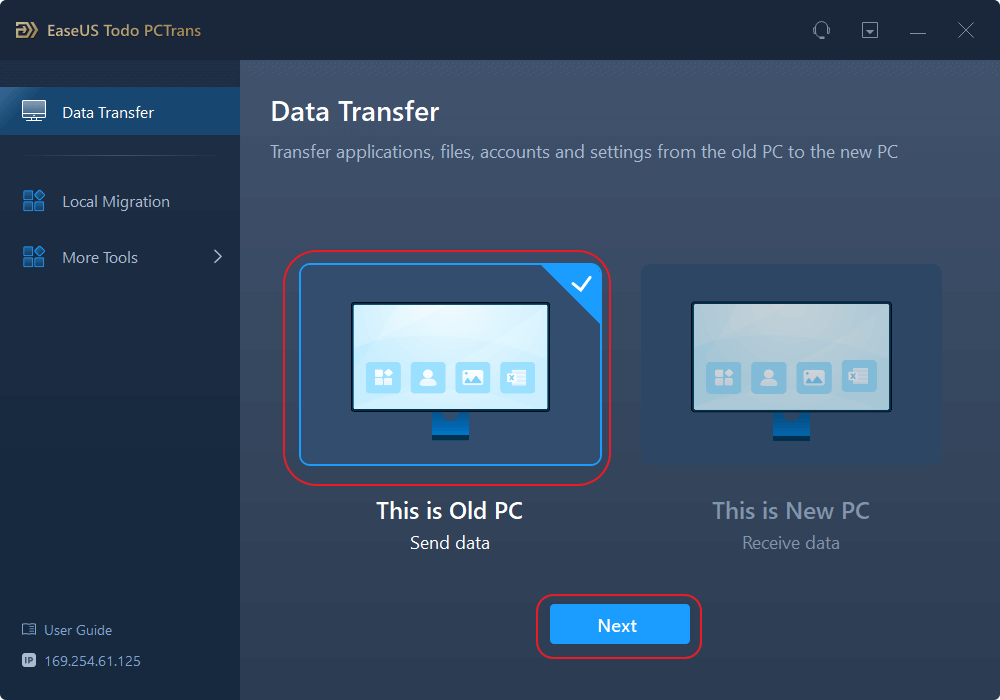
- Select «Transfer Directly» and click «Next» to continue.
Step 2. Set Up the New PC
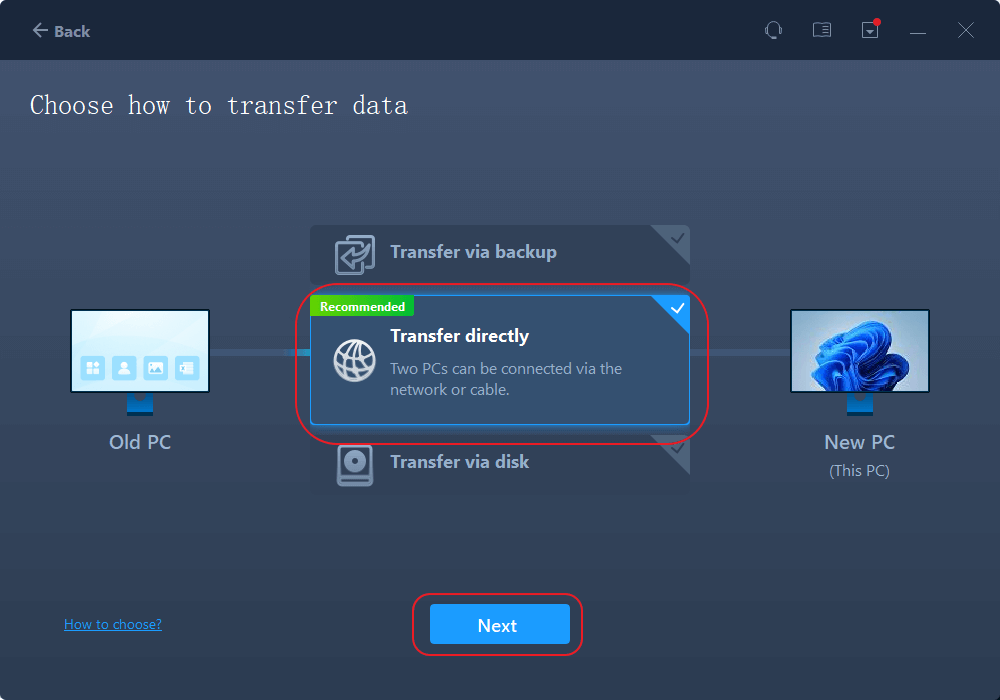
- Download and launch EaseUS Todo PCTrans on the new computer; select «This is New PC» and click «Next».
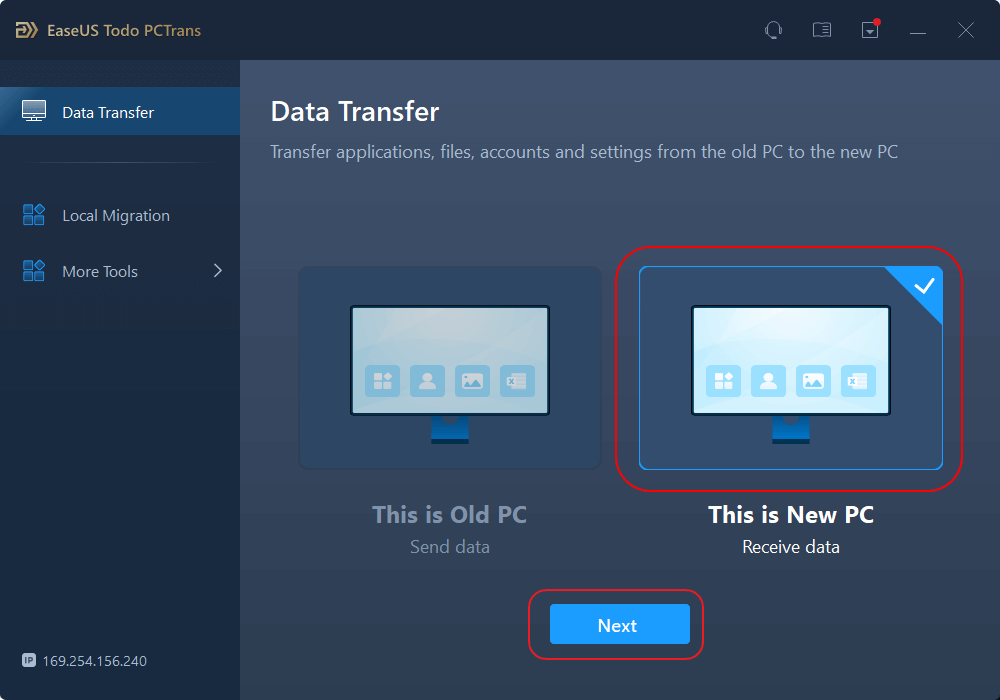
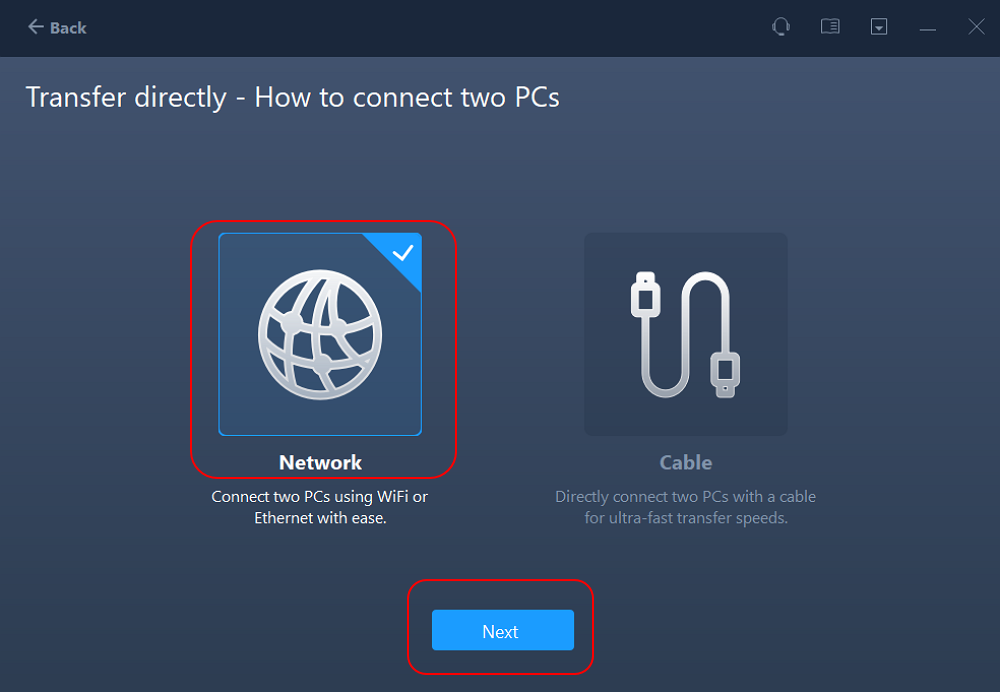
- Select «Transfer directly» and click «Next» to continue.
- Select «Network» and click Next to continue. This will automatically scan the old PC. (Make sure the two PCs are connected to the same LAN.)
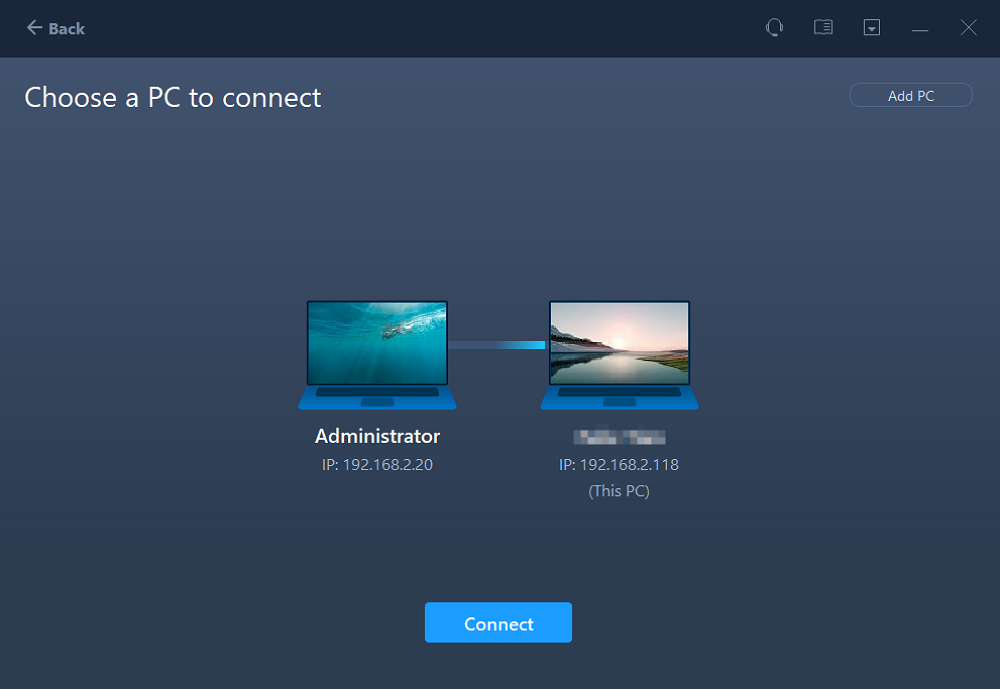
- Select the target PC and click Connect. Then, it will take some time to scan and analyze the data in old PC.
Step 3. Select the Data to Transfer
- On the new PC, select the applications, files, and accounts that you want to transfer. Then, click «Transfer» to start.

After the migration, you can restart the new Windows Server 2016 or 2019 computer and then continue using the software again. If some applications require reactivation, use your old key to activate the programs again. If you want to know more information about using EaseUS Todo PCTrans, click the buttons below.
EaseUS Todo PCTrans Enterprise
Batch computer program transfer, Windows account transfer, domain account transfer, virtual-physical machine transfer, local to cloud desktop transfer.
Technical Chat 24/7
Solution 2. In-place Upgrade Windows Server 2012 to 2016/2019, Keep Everything on Server
Applies to: In-place upgrade Windows Server 2012 to 2016 or 2019 and keep everything on the Server, including data, applications, and account, etc.
If you need to in-place upgrade Windows Server 2012 to newer Windows Server, keeping everything on the machine, follow the tutorial steps below carefully.
Step 1. Create an image of all important data, apps, and even accounts on Windows Server 2012
EaseUS Todo PCTrans with its Backup and Restore feature supports you to create an image backup of all important data, applications, accounts, etc., from Windows Server 2012 to an external hard drive.
Video Tutorial of Image Transfer using EaseUS Todo PCTrans:
Step 2. Perform in-place upgrade from Windows Server 2012 to 2016/2019, or fresh install Windows server 2016 on old Server PC.
If you don’t know how to perform Windows Server in-place upgrade, follow to the Microsoft tutorial: Upgrade Windows Server 2012 to Windows Server 2016 for help.
If you need to fresh install Windows Server 2016 or 2019 on the old Server machine, you need first download a Windows Server ISO and then follow the video below to clean install the Windows Server:
Video Tutorial to Install Windows Server 2016 produced by Server Academy on YouTube:
Step 3. Restore data, applications, accounts to new Windows Server via EaseUS Todo PCTrans using its Image Transfer feature.
If you lost some apps or data, you can use EaseUS Todo PCTrans Technician to selectively restore applications, data, and accounts to your new Windows Server 2016/2019.
Conclusion
On this page, we collected two solutions to help Windows Server users migrating Windows Server 2012 with data, applications, and accounts, etc., to Windows Server 2016/2019 using reliable PC transfer — EaseUS Todo PCTrans.
We also provide extra tips to help users to perform in-place upgrade or fresh install Windows Server 2016/2019 on old Windows Server machine. By following the provided tips, you can effortlessly move everything to the new Windows Server computer.
Windows Server 2012 Migration FAQs
If you have more questions about Windows Server migration, check the following questions and find answers here immediately.
1. Can Windows Server 2012 be upgraded to 2016?
Yes. Windows Server 2012 can be upgraded to 2016 in many ways. Here, we have collected all the possible ways that you can try to upgrade to Windows Server 2016 from 2012:
- Method 1. Use Windows Server migration tool: back up Windows Server 2016 OS and restore to the Windows Server 2012.
- Method 2. Perform in-place Windows Server upgrade from 2012 to 2016.
- Method 3. Clean install Windows Server 2016 on the old Windows Server 2012 computer.
2. Can Windows Server 2008 r2 be upgraded to 2016?
Sure. You can upgrade Windows Server 2008 r2 to 2016 by performing an in-place upgrade or fresh installing Windows Server 2016 on the computer. If you need to move data, applications, and account from the old Windows Server 2008 to new Windows server 2016, refer to Migrate Windows Server 20018 (R2) to 2016 step by step guide for help.
3. How do I migrate Windows Server 2012 R2 to 2019?
The ways to migrate Windows Server 2012 R2 to 2019 is similar to the ways as recommended on this page — migrating Windows Server 2012 to 216.
First, you need a reliable Windows PC transfer software that supports you to migrate old Windows Server data, apps, accounts to the new server computer.
Next, confirm your goals — to transfer data, apps, accounts between server machines, or to upgrade Windows server to 2019 but keep everything on the computer.
Last, take the right solution to migrate Windows Server 2012 R2 to 2019:
- If you need to migrate everything to a new Server computer, use the PC to PC feature in EaseUS Todo PCTrans Technician and migrate data, apps, accounts to Windows Server 2019 without losing anything.
- If you need to perform in-place upgrade or clean install Windows Sever 2019 on the old Server 2012 R2 computer, use Image Transfer feature in EaseUS Todo PCTrans to create an image of all important things, in-place upgrade or fresh install new Server, and then recover the image back to the computer.
OK, I know that this is not really a good idea, but I had questions on this and wanted to test. I wanted to test an upgrade Windows Server 2012R2 AD to Server 2016. In place migration. Yes, I know, it’s not really worth it as often when migrating, the system isn’t really “clean” with all those Microsoft patches accumulated over the years. And also, you usually deploy a new hardware as old hardware might not have the drivers compatible with Windows Server 2016.
Yes, we’re talking about physical domain controller (DC) as in real life it’s really not worth it to upgrade a virtual machine running 2012R2 into 2016. Usually, I’d chose the second option, which is just to install Windows Server 2016 as a member server and then add a DC role to it and do the migration of the AD like this, then “downgrading” the 2012R2 DC back to server member, before completely decommission the system from the domain.
The AD Services in Windows Server 2016 brought quite a few new things that I have already detailed. Let’s remind just a few:
Privileged Access Management – This PAM feature allows mitigating security concerns in AD environment which cause by techniques such as pass-the-hash, spear fishing … this is very interesting how it works.
Azure AD Join – This enhances identity experience for businesses. Including benefits such as SSO, access organizational resources, MDM integration etc.
Microsoft Passport – Microsoft Passport is a new key-based authentication approach organizations and consumers that go beyond passwords. This form of authentication relies on a breach, theft, and phish-resistant credentials.
Group Membership Expiration – Windows Server 2016 adds support for group membership expirations, allowing you to add a user to a group for a certain period of time. Very interesting indeed for folks you want to give them access for a limited time period only.
TIP: Windows Server 2016 Active Directory Installation Guide
But as I said I was curious as I haven’t tried this just yet. So one of my lab DCs which runs as VMs (not physical), will be migrated this way. Currently the VM has the Active Directory Domain Services role installed. I think it has also all 5 FSMO roles as well as I did not bother to separate the roles, to spread them out, to my other DC, which is also running 2012R2. OK, let’s kick in the lab and do an Upgrade Windows Server 2012 R2 Domain Controller to Windows Server 2016 with the AD services.
How to Upgrade Windows Server 2012R2 AD to Server 2016 – The steps
The process starts with mounting the ISO and executing the setup.exe > The installer proposes to download the latest updates > Select the image you want to install
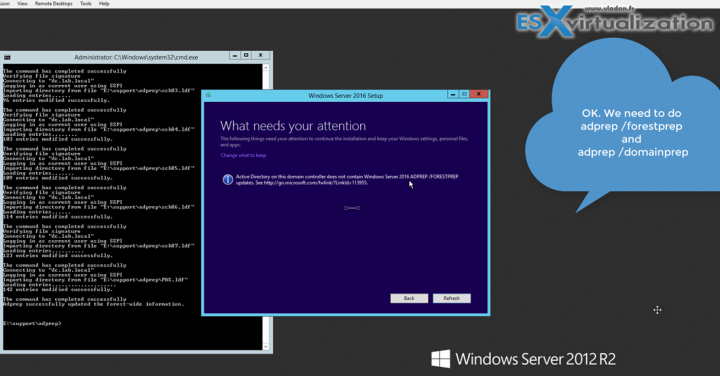
Then we’ll have a message saying that “Active Directory on this domain controller does not contain Windows Server ADPREP /FORESTPREP updates. Our Windows 2016 ISO image is still attached, so we’ll need to change drive letter and do:
E: (our CD-ROM drive letter)
then do a:
cd /support/adprep
and then
adprep.exe /forestprep
You’ll need to press letter “c” on your keyboard to validate the command.
Once finished, rinse and repeat. Execute the:
adprep.exe /domainprep
and again validate by pressing the “c” letter on your keyboard. Once done you can click the finish button to start the upgrade process.
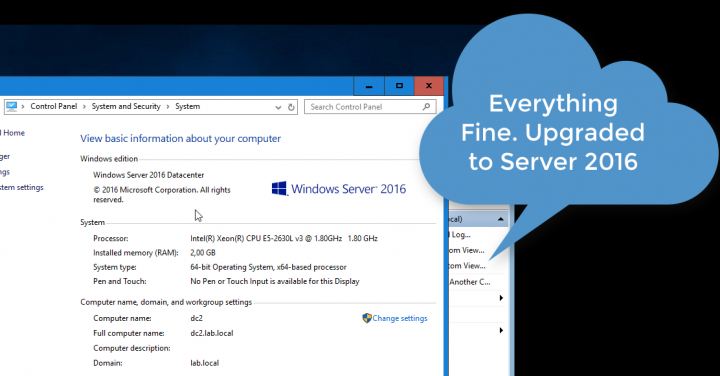
Then the process will start the process of upgrading Windows Server 2012r2 to Windows Server 2016 by preserving our Active Directory (AD) services. During the process the system will reboot once (in my case).
Then we simply check that we can successfully login and that our AD is still there.
I have also recorded a quick video detailing the steps. Note that the video is accelerated on some parts. This is to make it faster on the parts of the upgrade which are boring and slow.
Here is the video. Best to watch in Full Screen and HD (1080p).
More from ESX Virtualization:
- How to Deploy VMware LogInsight 4 and What’s new?
- DISM ++ is Free Utility better than the command line version
- Free Tools
Stay tuned through RSS, and social media channels (Twitter, FB, YouTube)
This website is maintained by Vladan SEGET. Vladan is as an Independent consultant, professional blogger, vExpert x16, Veeam Vanguard x9, VCAP-DCA/DCD, ESX Virtualization site has started as a simple bookmarking site, but quickly found a large following of readers and subscribers.
Connect on: Facebook. Feel free to network via Twitter @vladan.
Need to migrate Windows Server 2012 to Server 2019 / 2022? This tutorial will show you how.
Server 2012 R2 End Of Support is October 23, 2023 – so, naturally, you are not alone: 2012’s should be migrated ASAP. Of course, you want to minimize the time and effort spent on that, and to automate as much of that migration as possible.
In this guide, we’ll cover how to natively migrate server applications, databases, user profiles, shares, data from Server 2012 / 2012 R2, to a new Server 2022 / 2019. We will also cover role migration best practices and tutorials. (Note: this works for non-2012 servers as well, we are just focusing on 2012 due to its 2023 EOL)
Migration covered here is native migration – not app virtualization. You can use these methods to migrate from physical to physical, physical to virtual / Cloud, Cloud to Cloud etc. For example, you can migrate from an on-prem physical 2012 to an on-prem 2022 VM, from an on-premise Server 2012 to an Azure Server 2022, or from a Private Cloud 2012 R2 server to an EC2 Server 2019. You can even use this to implement an in-place upgrade of a Server 2012 running on Azure / AWS.
The goal of this how to is to allow to complete a server migration in less than 4 hours for application and file servers, and less than 24 hours for role-focused servers (although complicated cases may require more time).
Just want to find out how to automate the migration, and don’t need a general tutorial?
Click here to skip to the part with the actual migration process.
Or, if you need to migrate workstations, click here for migration to Windows 11.
Evaluation licenses and pricing are available here
Video demo – automatic Server 2012 Migration tool
Before you begin: Audit your 2012 servers and plan your migration.
Audit your servers: In a typical environment, you’ll have quite a few different server types. There will be role-oriented servers, which focus on Windows Server roles such as Domain Controller, Active Directory, IIS, Exchange, DNS, DHCP. The more common group, however, are application and file servers, which run the actual Line of Business applications (LOB) and store the company data. They typically outnumber the role-based group.
Migration is done differently for these two. Roles are migrated manually, or with utility tools that are typically focused on one specific role (see below).
Application and file servers, however, can be migrated automatically and on massive scale, using server migration software such as Zinstall WinServ.
In the planning stage, you need to prepare a list of servers in the environment, and figure out what each of them is responsible for.
Even just knowing how many role servers and how many application servers is already a big step. Since application server migration can be automated, you will be able to develop a fairly accurate estimate of time and effort that will be required for the migration.
Schedule your migration time slot: Migrations take time, and during that time, your users may be affected to some extent. If possible, try and schedule the actual migration to be performed after hours or during a weekend. Note that you don’t actually have to stay there yourself at that time: application migration can be performed remotely or launched in advance in unattended mode.
Verify your backups are up to date, and are actually restorable: Any major upgrade may go wrong, and without a valid up-to-date backup, you risk losing everything you’ve had on the server. Make sure to verify that the backup you have is not damaged and ready to be restored if needed!
Decide on replacement type: Once you have decided to replace a server, you have several options regarding what the replacement will be. It may be an on-premise physical Windows 2022 / 2016 server, a on-prem VM server (ESX / Hyper-V, for example), or a Cloud-based server running off premise (such as migration to Azure or migration to Amazon AWS). If you are using WinServ, it supports any of those transfers, so migration difficulty does not vary significantly with your choice.
How to migrate Server 2012 to Windows Server 2022 / 2019
The process below outlines the migration steps for moving from Server 2012 / 2012 R2, to a new Windows Server 2016 / 2019 / 2022.
Option 1: Direct migration from 2012 to 2022 / 2019 over network
- Before you begin, consider disabling the firewall on the old 2012 server, or at least adding Zinstall to its whitelist, so that the firewall does not interfere with the migration.
- Run Zinstall WinServ on both servers.
Note: You can get Zinstall WinServ here, and its user guide here. - Select the first option, “Moving between two machines”, on both servers.
- If you do NOT want to transfer server applications, and are only interested in a profile, data and shares transfer, switch the radio button on the main screen to “profile and settings only” mode.
- On the source server, choose the “Source system” option, and leave it running. It will be waiting for connection from the new one.
- On the new Server 2022 / 2019, choose the “Target system” option.
- WinServ will automatically detect the source server. Alternatively, if the servers are on different networks, you can manually specify the source server’s IP address.
- If you’d like to select exactly what you want to transfer, press the Advanced menu. If you just want to transfer everything, you don’t need to go to the Advanced menu.
- Click Next and then Go to start the migration.
- The transfer will take a while (depending on how much data you have to transfer), and report to you when done.
- That’s it!
Option 2: Indirect migration, via intermediate storage
- Run Zinstall WinServ on both servers.
Note: You can get Zinstall WinServ here, and its user guide here. - On the source server, select the 3rd option, “Moving from Machine to Container”
- Choose the container location (such as a network share, a NAS, a USB hard drive – any type of storage), and press Go to perform a full capture of the source server to that location.
- On the new 2022 / 2019 server, select the 4th option, “Moving from Container to Machine”
- If you do NOT want to transfer programs, and are only interested in a profile, data and shares transfer, switch the radio button on the main screen to “profile and settings only” mode.
- Specify the location of the container created in step 3.
- If you’d like to select exactly what you want to transfer, press the Advanced menu. If you just want to transfer everything, you don’t need to go to the Advanced menu.
- Click Next and then Go to start the migration.
- The transfer will take a while (depending on how much data you have to transfer), and report to you when done.
- That’s it!
Server Roles migration
This part of the migration is done manually, and multiple tutorials exist that may help. We recommend John Savill’s excellent guide: Winding Down Windows Server 2003 in Your Organization. Information below is based on the article above.
- IIS migration: If all you have running on IIS 8 are basic HTML pages or Active Server Pages (ASP), you can copy the content to the IIS version running on your new server, then update the DNS records to point to the new IIS server. Of course, usually if you have IIS, you use it for more than static sites (such as Sharepoint), so simple copy won’t cut it. The good news is that you can use a migration toolkit named Web Deploy 3.6. If you need to migrate websites to Microsoft Azure Web Apps, there’s a separate tool available named Azure Web App Migration Assistant.
- DC and AD migration: Providing you have followed best practices, your domain controllers (DCs) don’t run any other software, which means the existing domain and forest will be prepared for Server 2022 / 2019. In this case, you need to create new DCs running the new OS, migrate the Flexible Single-Master Operation (FSMO) roles, migrate any certificates or other items, then decommission the Server 2012 DCs. For detailed guidance on migrating DCs, see Upgrade Domain Controllers to a newer version of Windows Server .
- DHCP migration: DHCP scopes provide the IP addresses given to clients, along with their IP configuration (e.g., gateway, DNS server). To migrate DHCP scopes, the best option is to export the scopes from the Server 2012 instance, then import them to the Server 2022 / 2019 instance.
- DNS migration: If you’re hosting DNS on Windows, you’re likely integrating it with AD and your DNS servers are DCs. Therefore, when you migrate AD, the DNS configuration will move as well. It’s important to remember to migrate any DNS server configurations, such as forwarding. If the DNS servers will be hosted on new IP addresses, you need to make sure that you update any static IP configurations and all DHCP configurations. To avoid this time-consuming task, most organizations will change the IP addresses of the new servers to that of the old servers once the old servers are retired.
- Print services: Like file services, printer configurations and shares must be migrated from the source server to the target server. In addition, you’ll need new printer drivers that are 64-bit and compatible with Server 2022 or 2019 as well as with modern clients.
Dealing with incompatible applications:
Some legacy 3rd party applications running on Windows Server 2012 may be incompatible with Windows Server 2022 / 2019. This is not as common as it once was with Server 2003 / 2008, but it may still happen – usually for legacy software, which has not been updated for newer OS versions.
Note that “old” does not necessarily mean “won’t work”. Quite a few applications ah
If these applications cannot be eliminated immediately, and are mission-critical for continued operation of the organization, the recommended option to preserve them operation is to perform a virtualized migration of those applications, into a virtual Server 2003 instance running on newer replacement server. Then, continue to take the steps required to phase those applications out and stop running the virtualized 2003 instances.
WinServ is application-generic, and can migrate even custom and in-house applications that have not been seen by the outside world – as long as they are capable of running on the new server. Here is a partial list of common applications that our customers have migrated in the past:
- SQL Server
- MS SQL
- MySQL
- SAP (including SAP Business One)
- Oracle
- Sybase
- DB2
- Java Application Server
- Crystal Reports
- Avaya
- PeopleSoft
- JD Edwards Enterprise One (JDE E1)
- Citrix
- Apache (Windows only)
- WebSphere
- Microsoft Dynamics
After the migration:
Once the migration process is complete, it is time to verify the results.
- You may need to adjust your domain’s DNS to point to the new server where needed. For example, changing your old CRM Server DNS entry to the new server’s address.
- Same goes for login scripts and GPO policy.
- Launch every application and console you use, and verify they load correctly.
- Using a client workstation, verify that clients can access the migrated server correctly and their applications run without issues.
Congratulations! Your server migration is now complete.
Ready to migrate to Windows Server 2022 / 2019 / 2016?
Get Zinstall WinServ here
You can also contact us for assistance, volume licensing, and help in setting up a POC.
Do you know how to upgrade Windows Server 2012/2012 R2 to 2016 without losing data? During the upgrade, it is easy to run into some accidents and lose your data, so, here on MiniTool, we would like to give you some advice for the upgrade.
Upgraded Features of Windows Server 2016
Windows Server 2016 was initially released on September 26, 2016, and broadly released for retail sale on October 12, 2016. It has many excellent and advanced features attracting Windows Server 2012/2012 R2 users to change their system.
Some users may still be reluctant to part with the old Server system. If you are one of them, let’s see some upgraded features of Windows Server 2016 that may change your mind.
Developed security features include:
- Shielded Virtual Machines
- Host Guardian Service
- Credential Guard
- Remote Credential Guard
- Device Guard
- Control Flow Guard
- Etc.
Better datacenter operations develop here, including:
- Cluster OS Rolling Upgrade
- Storage Spaces Direct
- Storage Replica
- Site-Aware Failover Clusters
- Virtual Machine Storage Resiliency
- Storage Health Monitoring
- Network Controller
- Etc.
Now, it’s time to make the decision for the Windows server 2012 R2 to 2016 upgrade. This upgrade is available for both Windows Server 2012 and 2012 R2 users. More Windows Server comparisons, you can see Windows Server 2022 vs 2019 vs 2016 – Which One to Choose.
Preparations Before Upgrading Windows Server 2012/2012 R2 to 2016
First of all, don’t hurry to migrate Windows Server 2012/2012 R2 to 2016 directly. You need to make some preparations to make sure the upgrade process will go smoothly and for that, the basic requirements should be met.
This is the minimal system requirements for Windows Server 2016:
- Processor: A minimum of AMD64 or 1.4GHz EMT64 Processor
- RAM: 512 MB and 2 GB for Window Servers that have the Desktop Experience feature
- Disk Space: A minimum disk space of 32 GB, PCI Express-compliant
- Network: A Gigabit adapter with 1 Gbps throughput; PXE-supported
- Optical Storage: DVD drive (if installing the OS from DVD media)
This is the recommended requirements for Windows Server 2016:
- Processor: 3.0GHz 64 Bit Processor
- RAM: 8GB RAM
- Disk Space: 32 GB
- Network: Gigabit (10/100/1000baseT) Ethernet adapter, 1Gbps connection is ideal.
- Optical Storage: DVD drive (if installing the OS from DVD media)
Apart from that, there are other notifications to upgrade Windows Server 2012 (R2) to 2016 without losing data.
1. Notice that Windows Server 2016 only supports the x64-bit operating system and upgrading from 32-bit to 64-bit is not possible, so you need to check if the installed programs are x64-bit, or they may fail to work after the upgrade.
2. The version upgrade among Servers will erase all your data. For example, you can’t keep your data when upgrading Windows Server 2012 Standard Edition to Windows Server 2016 Datacenter Edition.
3. Make sure the system and applications installed have been up to date.
4. Clean up unnecessary data as much as possible and verify if your disk has enough space.
5. Deactivate your virus protection because it may stop or lag the upgrade procedures, and make sure no virtual machines running.
6. If the server uses NIC Teaming, disable it and after the server is upgraded, enable the NIC Teaming again.
7. Prepare a full backup for your system because once the upgrade goes wrong, you can resort to the backup to get everything restored.
8. Prepare a Windows Server 2016 Setup media.
Tips:
Have you ever failed to back up Windows Server? We have professional guides for this issue: Windows Server System State Backup Fails? Fix It Now.
How to Upgrade Windows Server 2012/2012 R2 to 2016 Without Losing Data?
Part 1: Collect Diagnostic Information
According to what Microsoft suggests, you had better collect some information from the Server for diagnostic and troubleshooting purposes. You need to store it somewhere so that you can get it when you can’t access your device once the upgrade failure happens.
To collect the diagnostic information, you can do as follows.
Step 1: Run an elevated PowerShell prompt as administrator and write down the current directory.
Step 2: Run the following commands.
- Get-ComputerInfo
- systeminfo.exe
- ipconfig /all
Step 3: Go to File Explorer and navigate to the noted directory. Then copy the files to your external hard drive or network location from your computer.
Part 2: Protect Your Data
You need to start a backup for your important data, at best the whole system, to prevent any failure happens. It is an important step and if you want to find a reliable backup software, we would like to recommend MiniTool ShadowMaker.
MiniTool ShadowMaker, as free backup software, has many wonderful features available to improve the user experience. It provides multiple backup sources, including files, folders, partitions, disks, and your system. You are allowed to apply a Server backup for data backup and recovery.
Furthermore, to save time and make your system resources highly utilized, MiniTool offers backup schedules and schemes for automatic backups. You just need to configure the time point and choose schemes among full, incremental, and differential backups.
Download and install MiniTool ShadowMaker and you will get a 30-day free trial version. We advise you to prepare an external hard drive to store the backup and you need to connect the drive before launching the program so the drive can be recognized.
MiniTool ShadowMaker TrialClick to Download100%Clean & Safe
To do the backup, you can start with these steps.
Step 1: Launch the program and click Keep Trial to enter the interface.
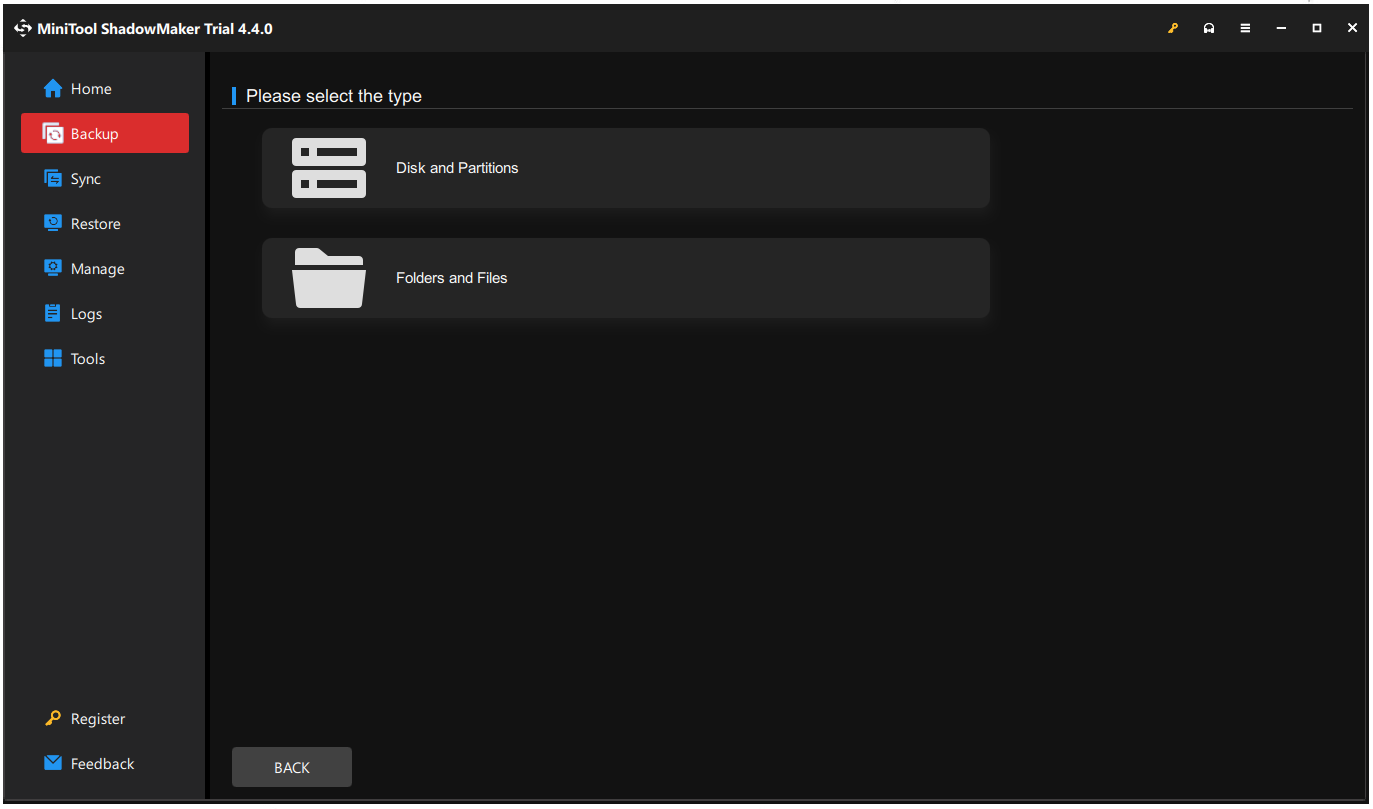
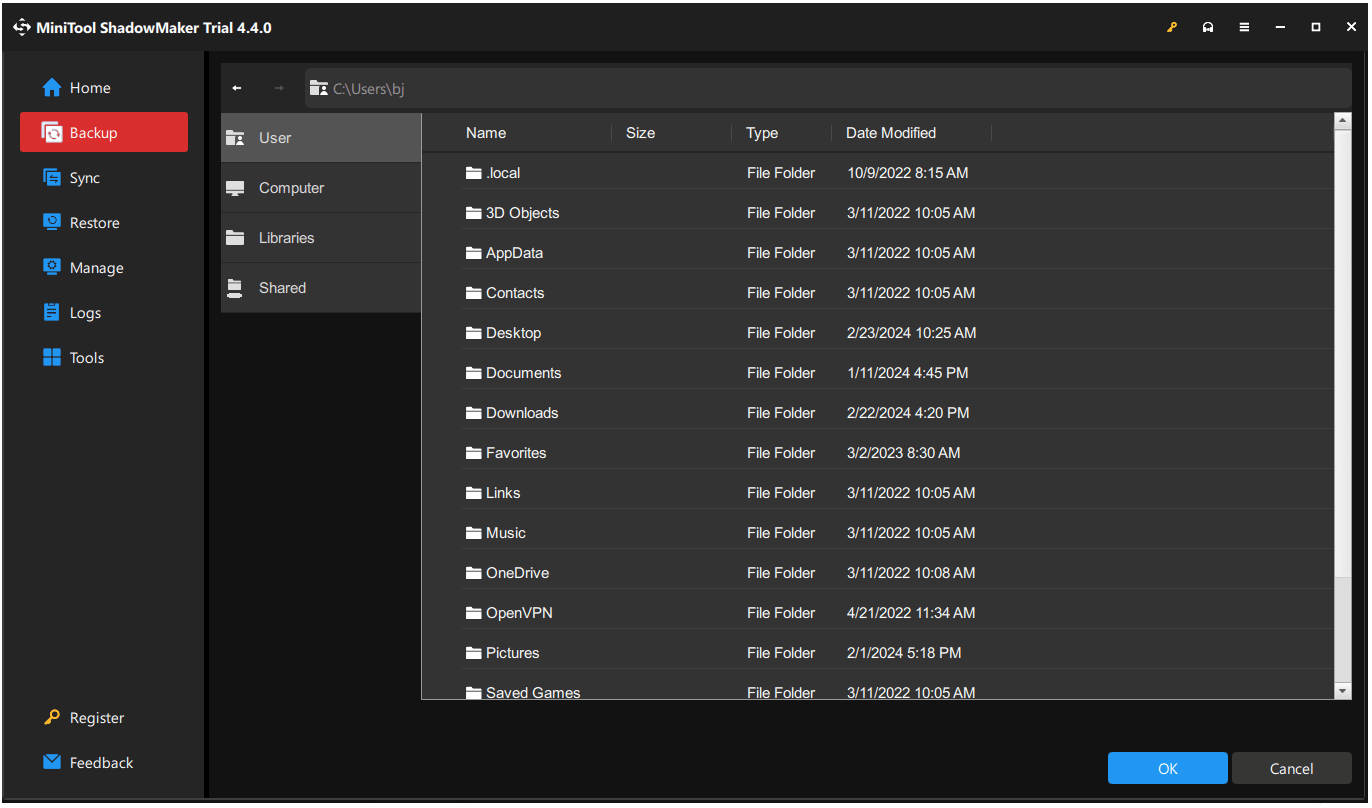
Step 2: In the Backup tab, choose the SOURCE section where the system-included partitions have been set by default. If you want to back up others, you can choose Disk and Partitions and Folders and Files.
Step 3: Go to the DESTINATION section where four options are available – User, Computer, Libraries, and Shared and choose where to store the backup.
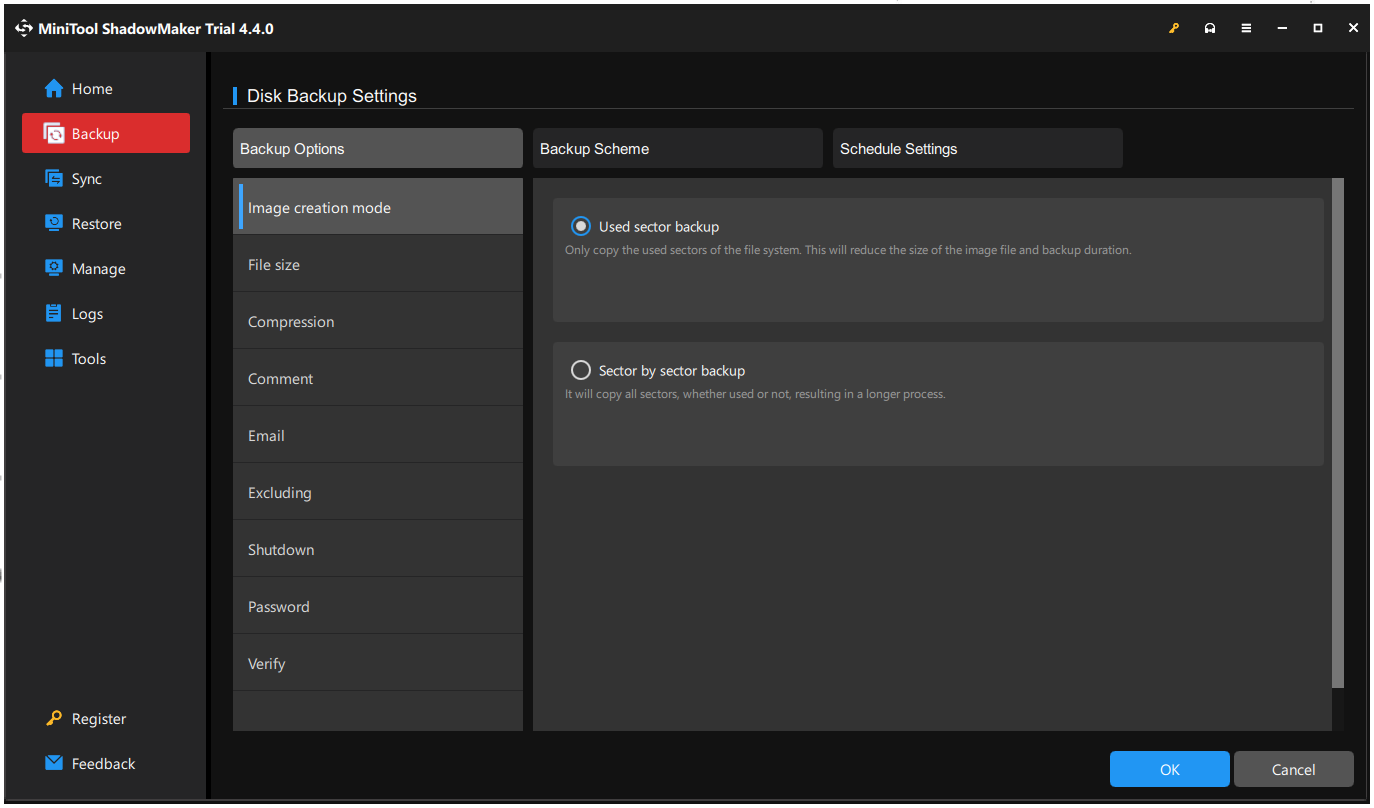
Step 4: Choose the Options feature if you want to configure the backup settings. You can choose your image creation mode, file size, and compression level, and enable password protection.
Step 5: When you finish that, now, you can click Back Up Now to start the task immediately. Alternatively, choose Back Up Later and start it in the Manage tab when needed.
Related post: How to Clone Windows Server to HDD/SSD? Here Is a Guide!
Part 3: Upgrade Windows Server 2012/2012 R2 to 2016
Now that you have prepared all of the above, you can upgrade Windows Server 2012 (R2) to 2016 without losing data. Here is the detailed guide and please follow that one by one.
Step 1: Make sure you have inserted or installed the Windows Server 2016 installation media and login to the server as an administrator.
Step 2: Locate and browse the root of the installation media and double-click setup.exe.
Step 3: When the Windows Server 2016 Setup window appears, choose language, time and currency, and keyboard or input method, and click Next to go on with the steps.

Step 4: Then you may click Install now to start the setup.
Step 5: When you are asked to input the product key, do that and click Next for the next steps.
Step 6: When you are prompted to the Select Image window, you can see multiple system editions are allowed to choose. Choose the one that meets your organization’s requirements and click Next.
Step 7: After that, Microsoft will show you a series of applicable notices and license terms. You can click Accept to continue the procedures.
Step 8: Now, you can choose which type of installation you want – Upgrade or Custom. each one has a detailed explanation and you can choose them based on your demands. Here, you can choose the second one for Windows only.

Step 9: Choose the right drive to start the installation. If the chosen drive has files related to the old system, they will be moved to a folder named Windows.old.
Then Windows will automatically check your system for compatibility and start the upgrade process.
Please be patient and the installation may take some time to finish. You can follow the on-screen prompts to customize the settings.
Further Reading: Migrate Windows Server 2012/2012 R2 to 2016 via Backup and Restore
Backup and restore can help you migrate Windows Server 2012/2012 R2 to 2016 if you can find a running Windows Server 2016. It will be easier to perform only if you choose a reliable utility – MiniTool ShadowMaker.
You can use this tool to back up Windows Server 2016 and restore this system backup to a Windows Server 2012 computer. If you are worried about hardware compatibility issues, MiniTool can resolve that easily via Universal Restore.
MiniTool ShadowMaker TrialClick to Download100%Clean & Safe
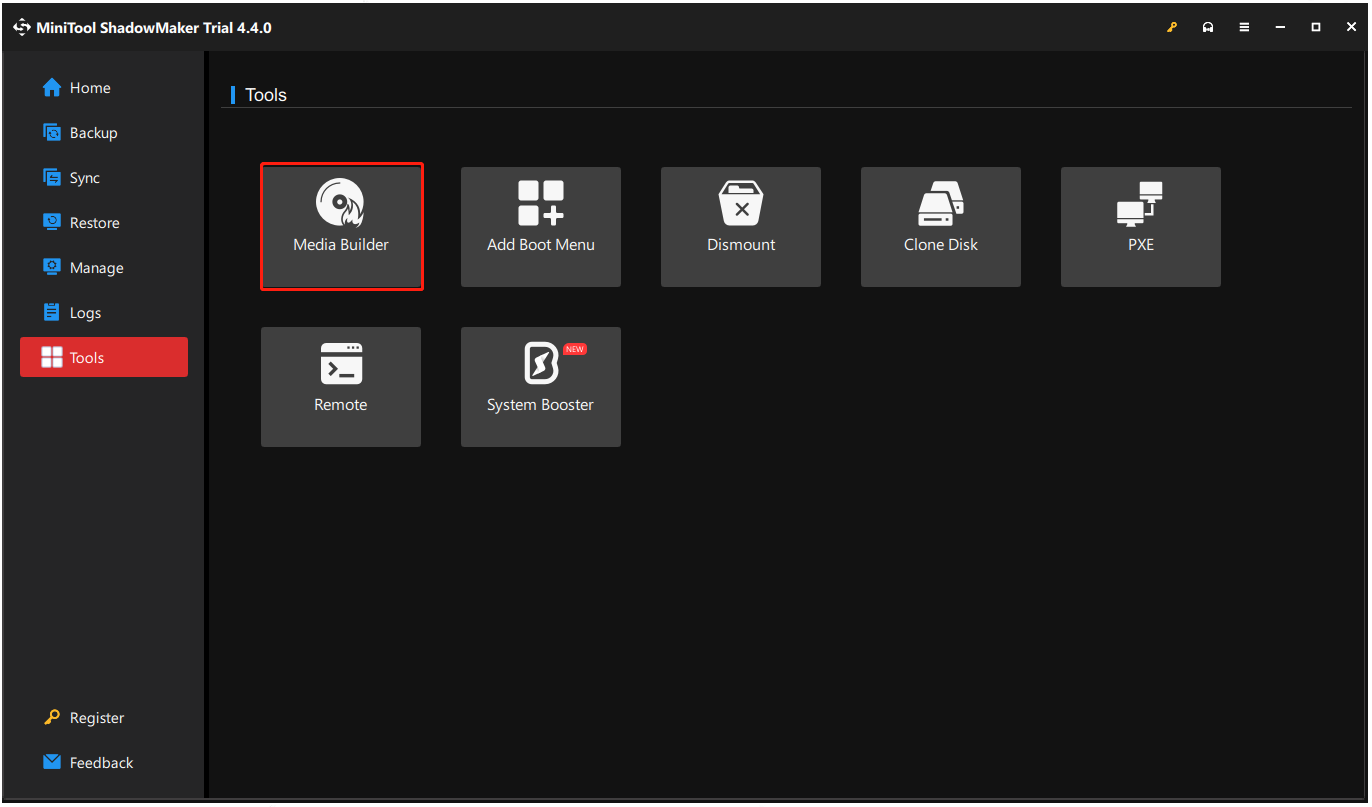
First of all, you need to use MiniTool to back up Windows Server 2016 on an external hard drive and then prepare another drive to store the bootable edition of MiniTool ShadowMaker created by MiniTool Media Builder.
You can find this feature in the Tools tab and for detailed steps to create a bootable drive, this post can be helpful: Create Bootable CD/DVD/USB Drive with Bootable Media Builder.
Connect the two drives to the target computer, enter the MiniTool recovery environment. In the Restore page, find the system image you have created, and click the Restore button to follow the next on-screen instructions.
After that, open MiniTool ShadowMaker in WinPE and choose Universal Restore in Tools. This feature will automatically detect and list all the operating systems that are installed on the hard disk. Just choose the one you need and click the RESTORE button to continue.
You need to wait for a while until the restoration operation and then exit WinPE to boot Windows from the computer with dissimilar hardware without any issues.
If you still have issues with the universal Restore feature, the previous article on MiniTool has more explanations and a detailed guide to it: A Guide on How to Restore Windows Backup to a Different Computer.
Bottom Line:
Before upgrading Windows Server 2012/2012 R2 to 2016, you need to do some preparations to prevent data loss. Some people will ignore this step but that is necessary. The whole detailed steps are listed and you can choose the suitable method to finish the Windows server 2012 r2 to 2016 upgrade.
Besides, MiniTool SadowMaker, which we recommended, boasts many wonderful features and if you run into any issues when using this software, you can contact us via [email protected] and we have a professional support team to resolve your concerns.
Upgrade Windows Server 2012/2012 R2 to 2016 FAQ
Can I upgrade directly from Windows Server 2012 R2 to 2019?
Yes, you can directly upgrade Windows Server 2012 R2 to 2019, and on the MiniTool Website, we have issued an article for a detailed guide about the upgrade. You can refer to this one: How to Upgrade Windows Server 2012 R2 to 2019? [Step by Step]. Notice that the direct upgrade from Windows Server 2012 R2 to 2022 is not allowed.
Is Windows Server 2016 end of life?
The mainstream support for Windows Server 2016 has been ended on Jan. 11, 2022. Microsoft stopped the free updates, bug fixes, and technical support to the system, but it will still provide security updates at no additional cost within the extended support period until 2027.
How long does a Windows Server in Place upgrade take?
The upgrade time depends on the configuration, software installed, the speed of your server hardware, etc. Usually, it may take a couple of minutes, sometimes an hour, or even longer. During the upgrade, you had better wait patiently. Casual interruption may cause some severe problems.
Was Windows Server 2012 R2 succeeded by Windows Server 2016?
Yes, Windows Server 2016 is the immediate successor to Windows Server 2012 R2. Windows Server 2016 was developed alongside Windows 10 and is the successor to the Windows 8.1-based Windows Server 2012 R2.