
Все способы:
- Варианты и ограничения переноса
- Вариант 1: Перенос конкретного профиля
- Вариант 2: Перенос всех профилей
- Вопросы и ответы: 4
Варианты и ограничения переноса
Способ переноса папок профиля пользователя будет отличаться в зависимости от того, переносится на другой раздел/диск папка с именем пользователя или папка «Users» («Пользователи»), в которой находится конкретный профиль. Также следует учитывать, что перенос профильных каталогов пользователей имеет определенные ограничения. Так, профиль может быть перенесен на раздел или диск, на котором нет другой установленной Windows и который имеет файловую систему NTFS.
Если в папке профиля имеются символические ссылки, после переноса они по-прежнему будут перенаправлять обращения в старое расположение, что, впрочем, не критично для Windows 10 и новых приложений. Кроме того, после переноса каталогов профиля в работающей Windows могут возникнуть проблемы с обновлением операционной системы до новых версий, что в свою очередь приведет к необходимости применения дополнительных решений.
Вариант 1: Перенос конкретного профиля
Этот вариант переноса является наименее затратным и более безопасным, чем вариант с переносом папки «Users» с одним, двумя или более профилями.
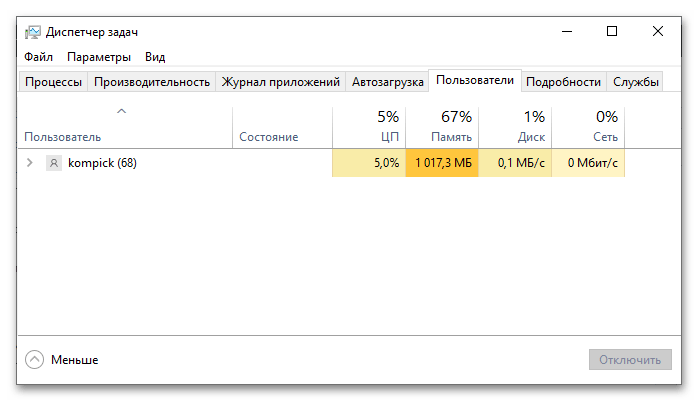
- Первым делом откройте «Диспетчер задач», переключитесь на вкладку «Пользователя» и убедитесь, что переносимый профиль данный момент не используется.

Если в системе имеется только один профиль, рекомендуется создать дополнительную учетную запись администратора и работать из-под нее.
Подробнее: Создание учетной записи администратора в Windows 10
- Создайте в нужном расположении каталог, в который хотите перенести профиль пользователя.
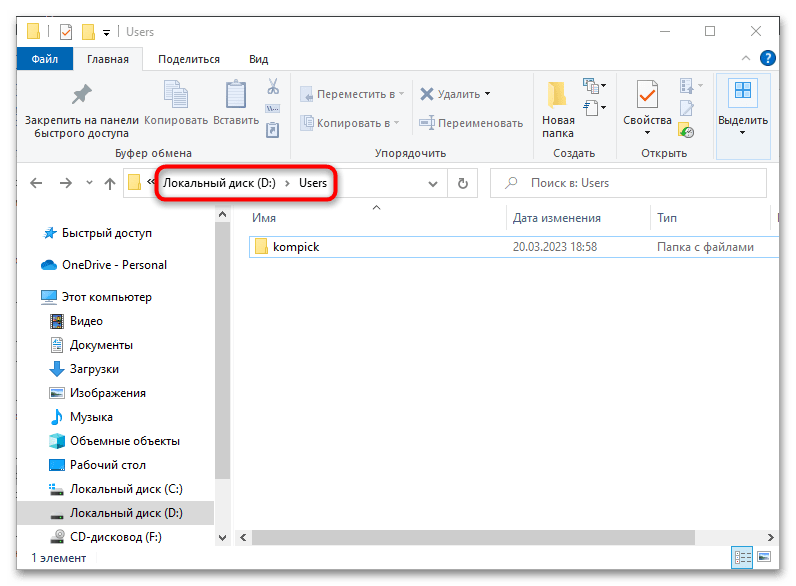
- Перейдите в расположение
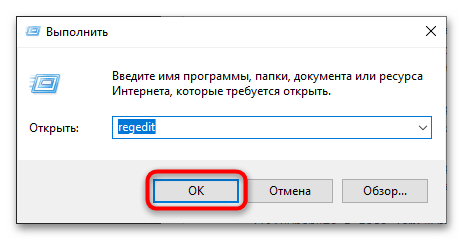
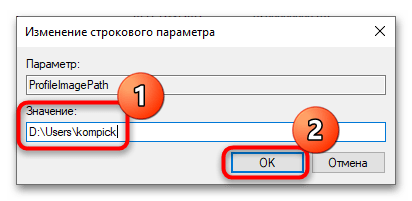
C:\Usersи скопируйте каталог профиль пользователя в созданную папку. - Откройте «Редактор реестра», для чего вызовите нажатием Win + R диалоговое окошко быстрого запуска, введите в него команду
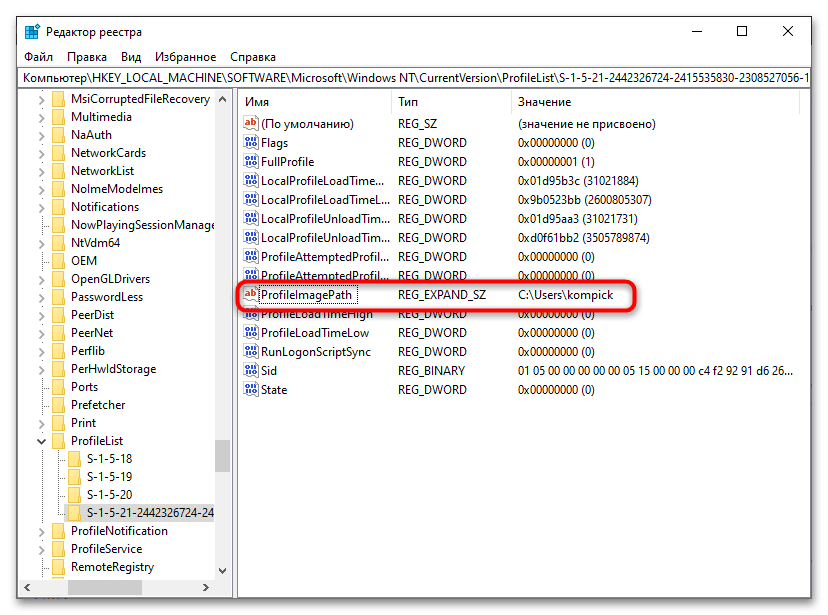
regeditи нажмите кнопку «OK». - Разверните в редакторе ветку
HKEY_LOCAL_MACHINE\SOFTWARE\Microsoft\Windows NT\CurrentVersion\ProfileListи отыщите подраздел с GUID переносимого профиля. Определить его нетрудно: в нем имеется параметр «ProfileImagePath», в качестве значения которого указан текущий путь к папке профиля. - Откройте окошко редактирования параметра двойным кликом и замените старый путь новым, ведущим к скопированной ранее папке профиля пользователя.
- Закройте «Редактор реестра», откройте свойства папки профиля пользователя в новом расположении, переключитесь на вкладку «Безопасность» и нажмите кнопку «Изменить».
- Выберите в поле «Группы или пользователи» владельца профиля и предоставьте ему полные права на каталог.
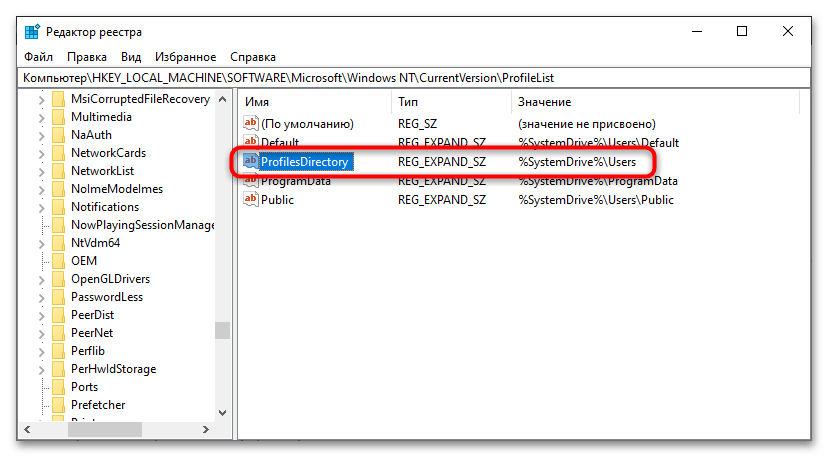
Также можно сделать, чтобы все новые профили создавались в новом расположении. Для этого в «Редакторе реестра» необходимо развернуть ветку HKEY_LOCAL_MACHINE\SOFTWARE\Microsoft\Windows NT\CurrentVersion\ProfileList и изменить значение параметра «ProfilesDirectory», указав в качестве его значения путь к новой папке хранения профилей.
Вариант 2: Перенос всех профилей
Если необходимо перенести сразу несколько профилей разных учетных записей, используйте этот способ. В целом он безопасен, тем не менее перед выполнением операции рекомендуется создать резервную копию системы.
Читайте также: Создание резервной копии Windows 10
К сожалению, после переноса описанным ниже методом система не сможет больше обновляться до новых версий. Учитывайте это обстоятельство.
- Первым делом необходимо создать файл ответов, который будет использоваться встроенной утилитой «Sysprep». Создайте «Блокнотом» текстовый файл и вставьте в него следующий код:
<?xml version="1.0" encoding="utf-8"?>

<unattend xmlns="urn:schemas-microsoft-com:unattend">

<settings pass="oobeSystem">

<component name="Microsoft-Windows-Shell-Setup" processorArchitecture="amd64" publicKeyToken="31bf3856ad364e35" language="neutral" versionScope="nonSxS" xmlns:wcm="http://schemas.microsoft.com/WMIConfig/2002/State" xmlns:xsi="http://www.w3.org/2001/XMLSchema-instance">

<FolderLocations>

<ProfilesDirectory>D:\Users</ProfilesDirectory>

</FolderLocations>

</component>

</settings>

</unattend>
Если Windows 10 – 32-битная, в качестве значения «processorArchitecture» следует указать x86 вместо amd64. Между тегами «ProfilesDirectory» указывается путь к новой папке, в которой будут храниться каталоги профилей.
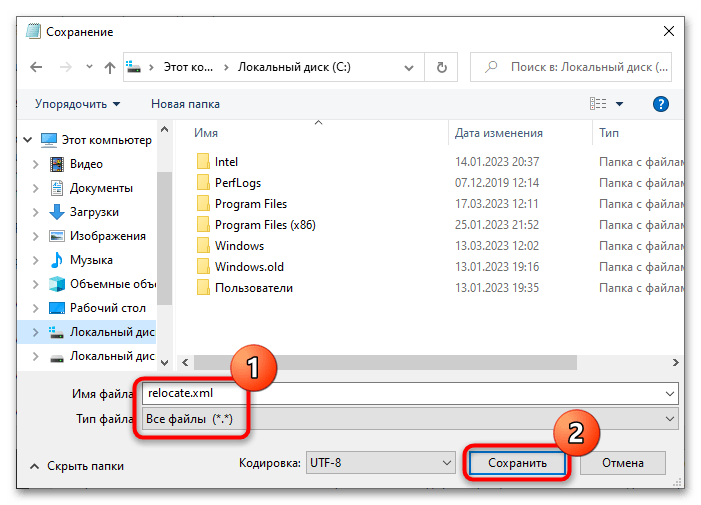
- Сохраните файл с именем «relocate.xml» (не забудьте выставить «Тип файла» как «Все файлы») в корень системного либо пользовательского раздела.
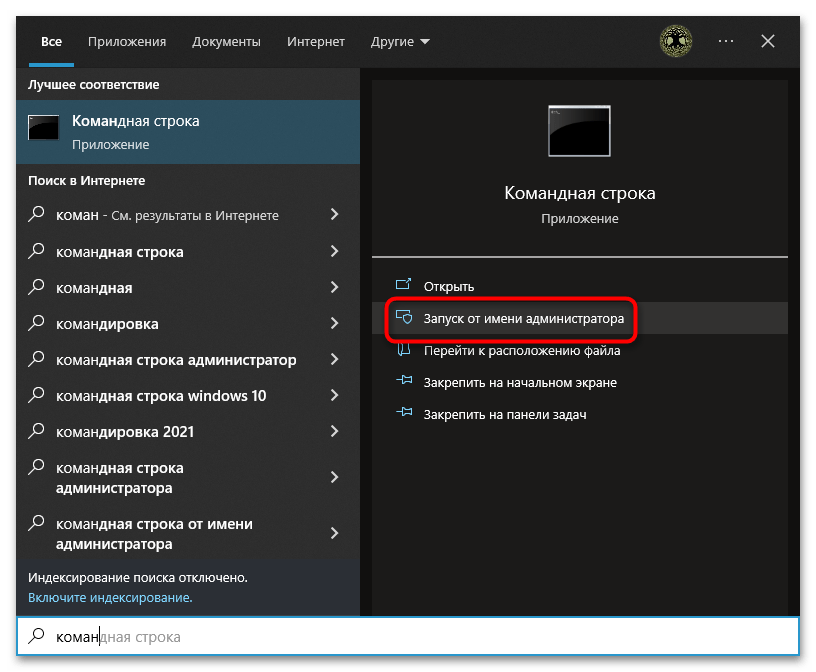
- Запустите из поиска Windows классическую «Командную строку» от имени администратора.
- Выполните одну за другой следующие команды:
net stop wmpnetworksvc%windir%\system32\sysprep\sysprep.exe /oobe /reboot /unattend:C:\relocate.xml

Если файл ответов «relocate.xml» был размещен в корне диска D, соответственно, букву C в команде необходимо заменить на D.


В результате Windows 10 будет загружена в режиме аудита на этапе первичной настройки. Далее необходимо будет проделать шаги, которые традиционно выполняются при установке системы: выбрать параметры сети и создать учетную запись.

Последняя необходима, чтобы завершить настройку системы, затем эту временную учетную запись можно будет удалить. По завершении настройки перезагрузите компьютер и войдите в перенесенную учетную запись.
Наша группа в TelegramПолезные советы и помощь
Иногда может возникнуть задача переноса данных профиля пользователя Windows в другую учётную запись, на другой компьютер или в новую систему после переустановки. Файлы пользователя можно перенести вручную из папки C:\Пользователи\Имя_пользователя, но иногда может потребоваться также и перенос других параметров учетной записи.
Transwiz — бесплатная для личного использования программа, позволяющая легко перенести профиль пользователя со всеми данными в пользовательских папках на новый компьютер, восстановить параметры и данные профиля после переустановки системы, либо выполнить перенос данных в другую учётную запись на том же компьютере. В этом материале — о том, как использовать программу.
Сохранение данных профиля в файл
Скачать полнофункциональную бесплатную версию Transwiz с поддержкой Windows 11, 10 и предыдущих версий ОС можно с официального сайта.
Запустите скачанный файл .MSI, файлы программы будут распакованы в папку C:\ProgramData\ForensiT\Deployment Files, из которой достаточно запустить исполняемый файл Transwiz.exe (по факту, это Portable программа, и вы можете перенести исполняемый файл в удобное расположение).
Дальнейшие шаги по сохранению данных профиля пользователя:
- Выберите опцию «I want to transfer data to another computer» (Я хочу перенести данные на другой компьютер).

- Выберите пользователя, данные которого следует перенести. Учитывайте, что данные по умолчанию включают в себя всё содержимое папок пользователя: Рабочий стол, Документы и Изображения, Загрузки. Если что-то переносить не нужно, либо очистите соответствующие папки, либо отредактируйте файл конфигурации (о чём в последней части инструкции).
- Укажите место сохранения данных профиля пользователя программой.
- При желании установите пароль на архив с данными профиля пользователя, если он не требуется — просто нажмите «Ок».
- Дождитесь завершения создания файла для переноса данных профиля.


На этом первый этап завершён. Теперь созданный файл с данными можно использовать для импорта на другом компьютере или в другой системе.
Перенос данных профиля на другой компьютер или в другую систему
Импорт данных профиля пользователя Windows из созданного файла осуществляется схожим образом:
- Запустите Transwiz в систему, в которую осуществляется перенос и выберите пункт «I have data I want to transfer to this computer» (у меня есть данные, которые я хочу перенести на этот компьютер).

- Укажите путь к файлу с данными.

- Укажите имя пользователя (по умолчанию то же, которое было на компьютере, где создавался файл).
- Если имя пользователя отсутствует в текущей системе, вам будет предложено создать новый аккаунт с этим именем (на скриншоте). Если такой пользователь уже есть — то объединить данные с имеющейся учетной записью (Merge).
- Укажите группу пользователя, если создается новый пользователь: стандартный пользователь (группа «Пользователи»), администратор или другая.
- Укажите (можно оставить пустыми) полное имя пользователя, описание, пароль, установите другие параметры при необходимости.
- Дождитесь завершения переноса данных и конфигурации пользователя: переносятся не только файлы, но и записи в реестре, ACL, параметры приложений UWP.


Готово. Теперь, можно попробовать зайти в новую учётную записи (если создавался именно новый профиль) и убедиться, что всё было перенесено именно так, как ожидалось.
Дополнительная информация
Некоторые дополнительные нюансы, касающиеся использования Transwiz:
- Если перенос данных осуществляется в новую учётную запись, следует учитывать, что Transwiz создаёт только локальные учётные записи.
- На официальном сайте присутствует инструкция по использованию программы, в которой описаны дополнительные возможности, в частности редактирование файла конфигурации для включения или исключения папок при переносе данных, что также может оказаться полезным, например, для исключения папки «Загрузки» при переносе.
Due to varied needs and diverse reasons, many Windows users are now having problems with how to transfer and move a user account with a password, personalization, and even the power settings to a new PC or laptop. If you are one of these people who are urgent about transferring user account profiles between PCs, relax and find the best solution here now.
View Necessary Information on How to Transfer User Account to New PC in Windows:
How Do You Transfer A User Account to Another Computer?
Transferring user accounts from one computer to another is of great concern to users. We have found a lot of questions from the forum about transferring user accounts. Here are two common cases:
Case 1. Can I transfer my user account from my desktop to a new laptop?
«Does anyone know how to transfer the Windows user account and its password, personal settings, etc., to a new laptop in the same network?
I bought a new laptop home yesterday, and I want to use my old user account with settings on the new laptop instead of creating a new account.
So is there a way that can help me do this?«
Case 2. How do you transfer a user account to a new PC under a different network?
«Here is my case I forgot to bring my laptop, and I’m on a trip to a new city with a borrowed laptop. I created a new user account on it and created some useful documents on the laptop.
There will be two days left before I go home. I want to carry the user account with all the new files that I created on the borrowed computer. So I want to know, is it possible to transfer a user account with all settings and files from the current computer to my laptop at home? I mean that these two computers are under different networks, so do I still have the chance? How?«
If you have similar confusion, keep reading. We will provide detailed information to solve this problem.
One-Click Transfer User Account with Settings to New PC
Some of you may think that the Windows built-in transfer tool — Windows Easy Transfer, might help to transfer a user account between two computers. Indeed, Windows Easy Transfer does work to transfer files in Windows 7 and Windows 8.
But the problem is that Windows Easy Transfer doesn’t support Windows 10. It means that if you are a Windows 10 user, you can’t transfer files to a new PC. The User Account is unsupported, of course.
So what is the best way to do the job? There are many Windows transfer tools on the market now. However, for the consideration of protecting your privacy and network security, we would recommend you to be very careful than to download a ‘just-ok’ tool for help.
EaseUS Todo PCTrans Free is a safe Windows transfer software that has three advantages listed below that you can fully trust and apply to transfer and move a user account with all settings to a new PC on your own now:
1. All Windows OS supported: EaseUS Todo PCTrans supports all Windows Operating Systems, including Windows 11/10/8.1/8/7/XP and even Vista.
2. «PC to PC» and «Backup & Restore» modes satisfy different needs: EaseUS Todo PCTrans supports you to transfer files to another PC via network or backup. If your PCs are using the same network, you can transfer files via the network. «Backup & Restore» mode is free and allows you to back up files to restore them on another PC or not in the same network with some simple clicks.
3. Safe for transferring files, no privacy leaking: EaseUS Todo PCTrans is 100% secure for you to apply for file transferring and even user account transferring without leaking or losing your private information.
How do I get this tool? It’s available for you to download and install on your PC for Free here now:
Tutorial: Steps to Transfer User Account to New PC for Free
- Notice:
- There are two ways to transfer user accounts between PCS by using EaseUS Todo PCTrans.
- If you want to transfer many files between PCs, activate this tool to its pro version before you follow the guidelines below.
You can follow either way to transfer the user account with all settings to a new PC now:
Transfer User Account to a new PC via the network
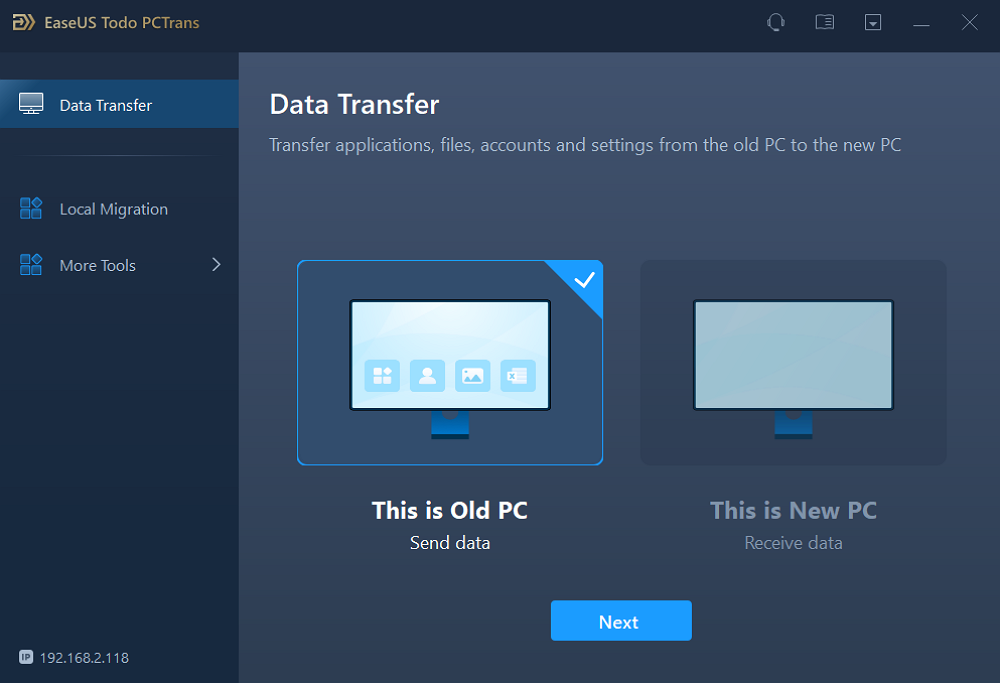
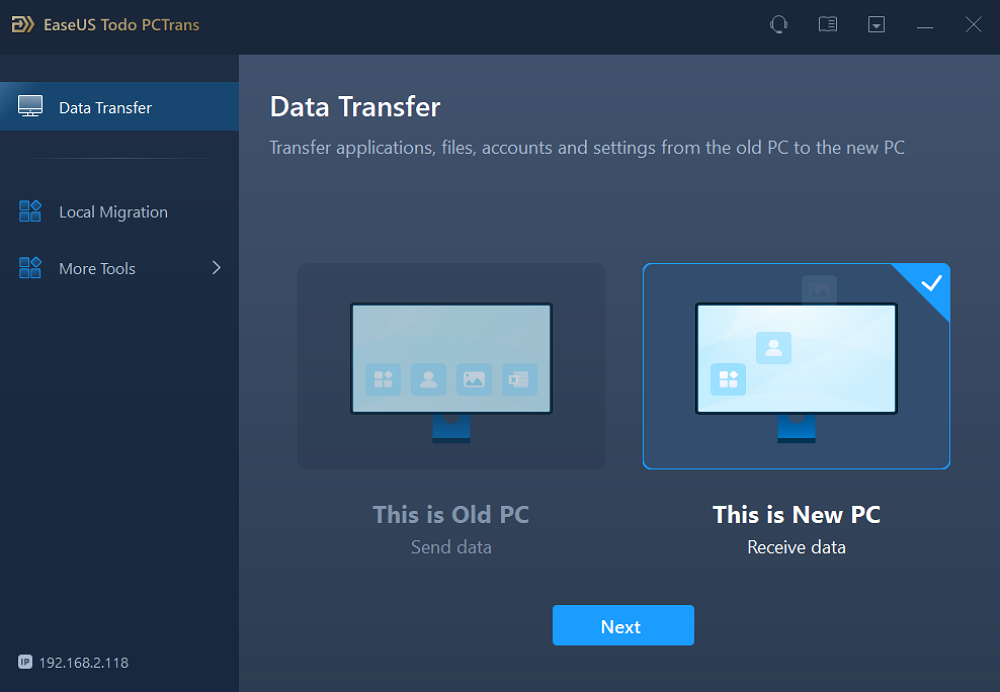
Step 1. Install and launch EaseUS Todo PCTrans on both two devices. On the source PC, select «PC to PC» to continue.
Step 2. Select the transfer direction — as an Old PC or a New PC.
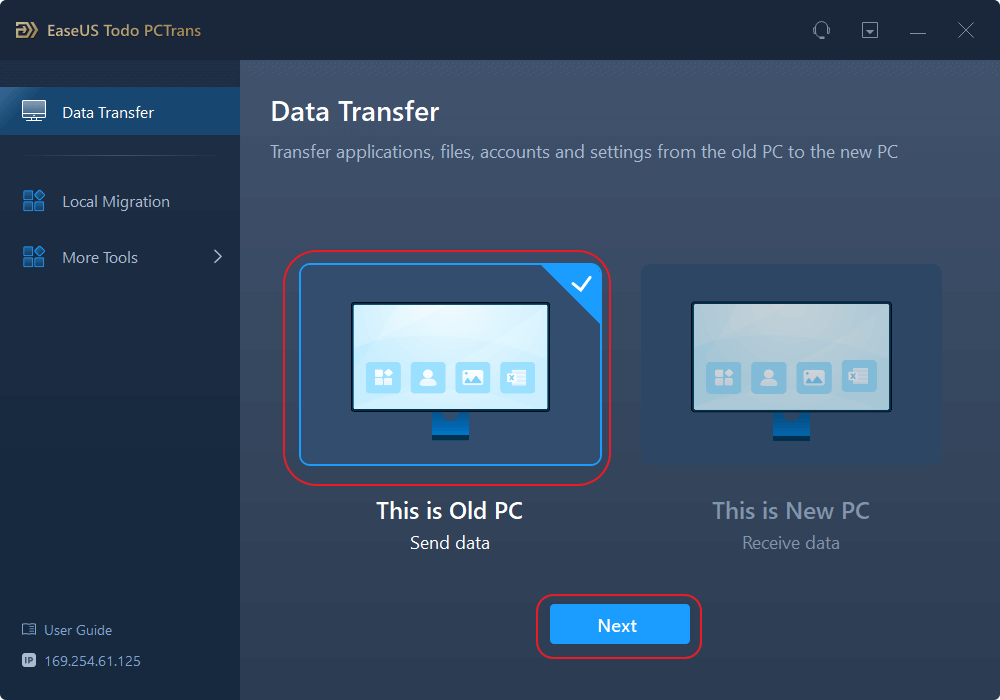
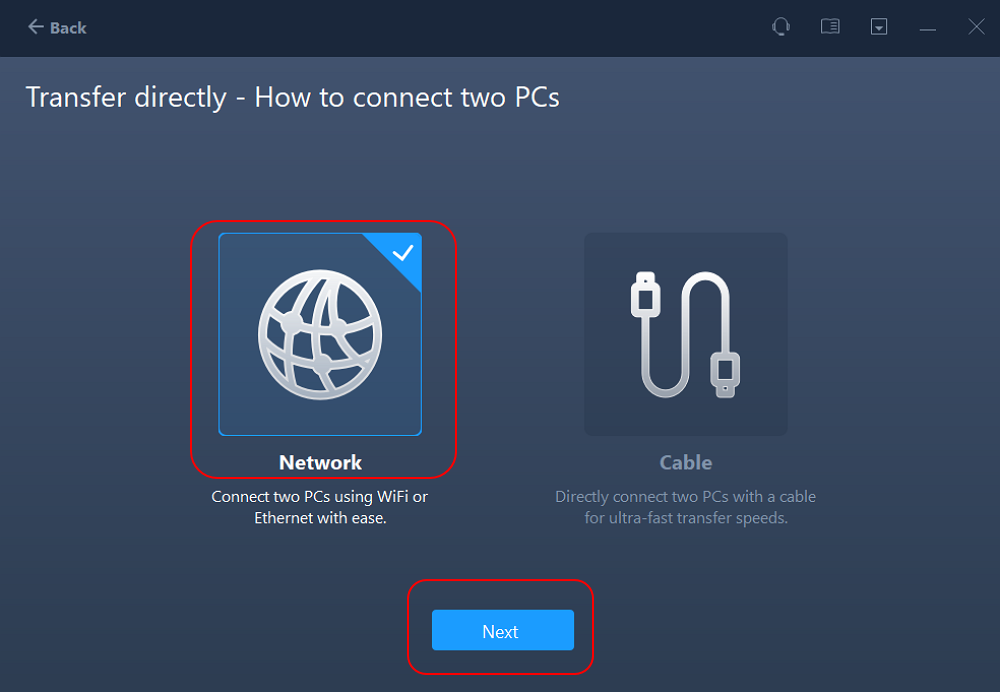
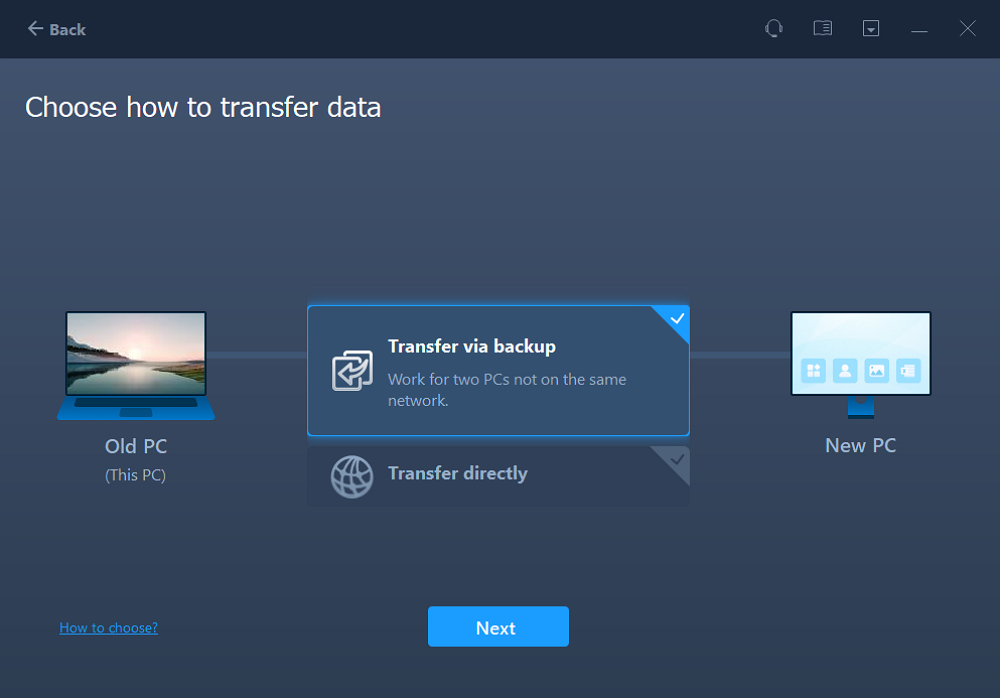
Then, on the new PC, select «Transfer directly» and click «Next» to continue.
Select «Network» and click Next to continue. This will automatically scan the old PC. (Make sure the two PCs are connected to the same LAN.)
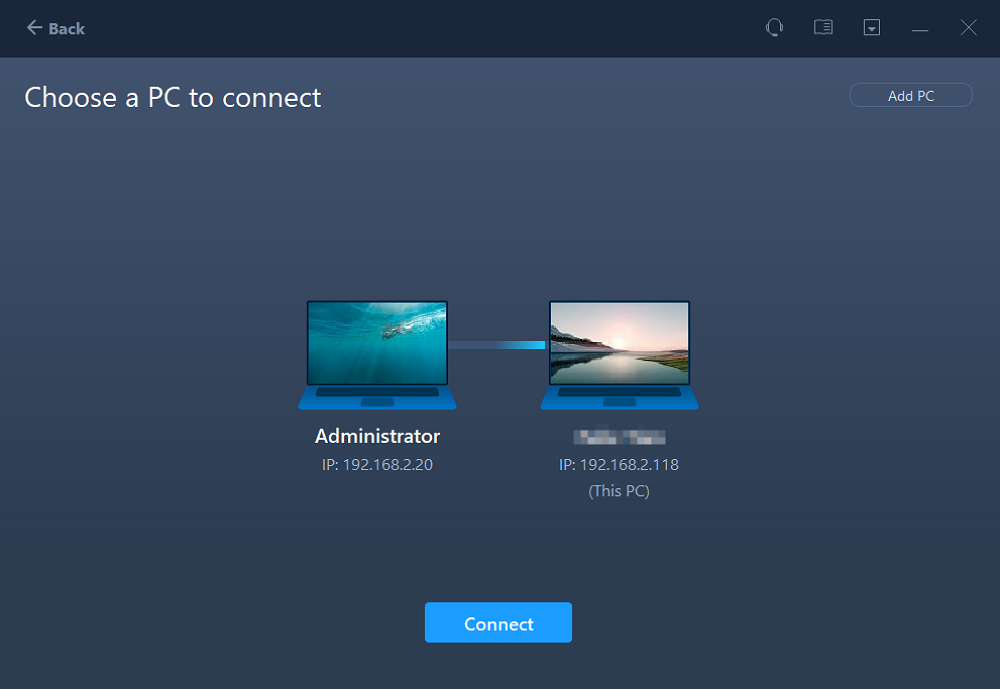
Select the target PC and click Connect. Then, it will take some time to scan and analyze the data in old PC.
Step 3. Click at the «Accounts» section to specify User Accounts and Settings for transferring.

Step 4. Enter the user account and password of the source computer, select the User Account Settings, User Data and other settings that you want to transfer.
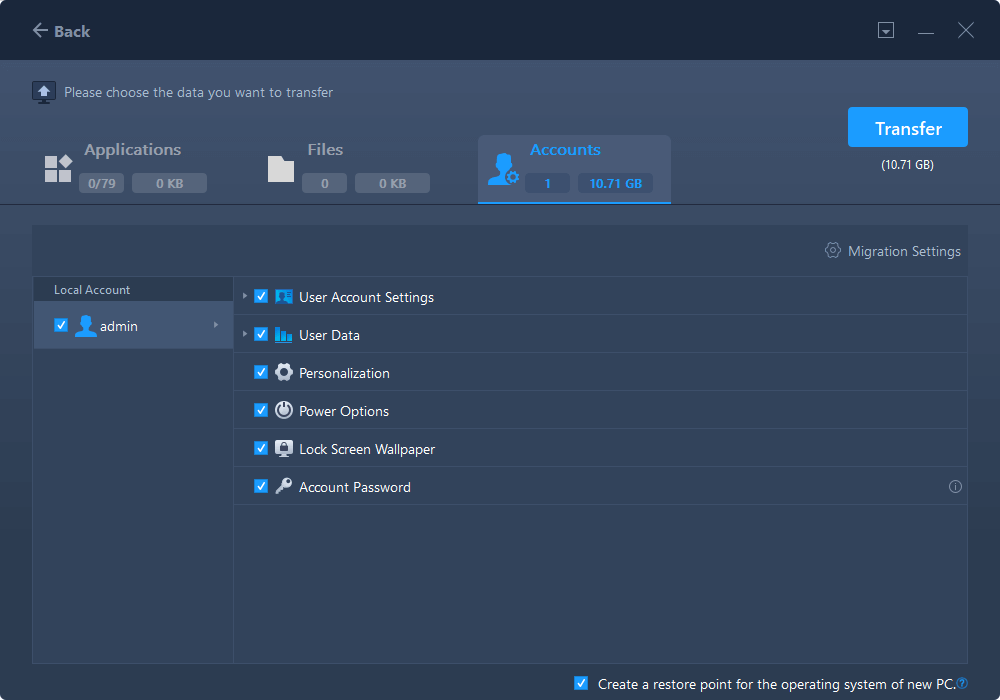
Step 5. After selection, click «Transfer» to start to transfer user accounts and settings.

As you can see, EaseUS Todo PCTrans makes it easy and quick to transfer a user account to a new PC via the network. Next, we will continue to introduce how to transfer via the backup file. If you like this tutorial, you can share it with other people in need.
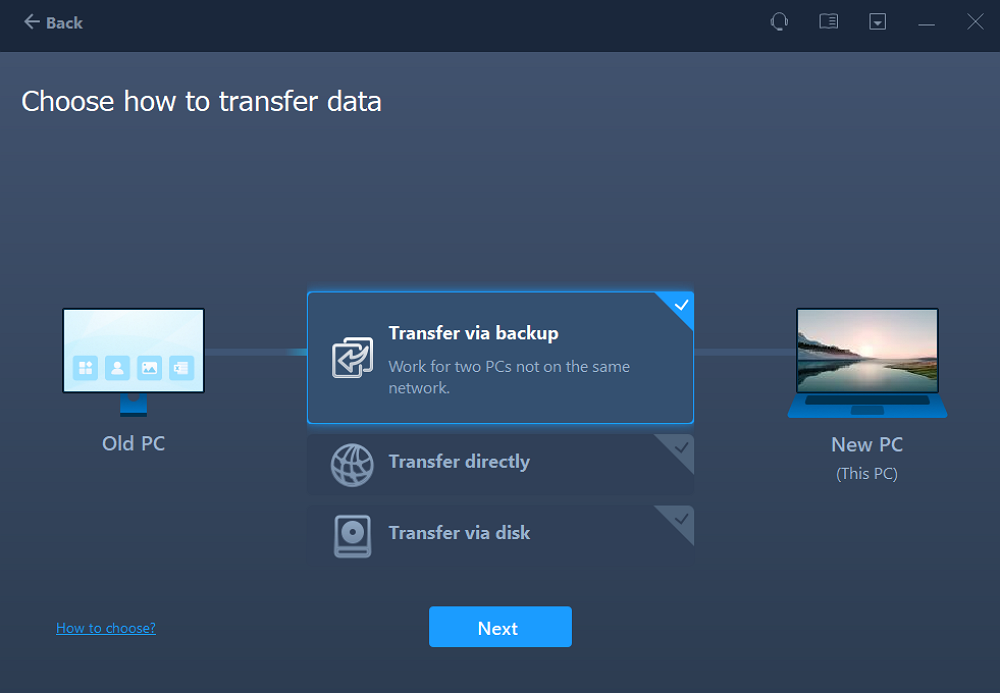
Transfer User Account to a new PC via the backup file
On the old PC:
Step 1. Launch EaseUS Todo PCTrans and click «Data Transfer» on the main screen. Select «This is Old PC» and click the «Next.»
Step 2. Choose the «Transfer via backup» method and click the «Next.»
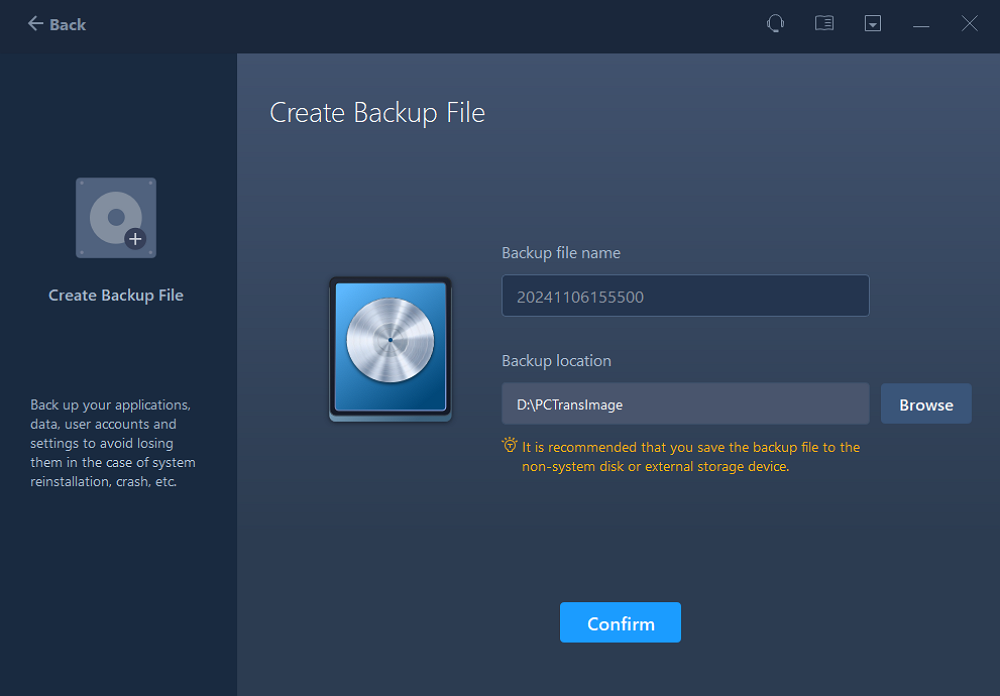
Step 3. Confirm the backup file name and backup location (Please save your files to a location where the new PC can access, like an external hard disk or shared network location.)
Step 4. Tick the Applications, Files, and Accounts that you wnat to backup. Click the «Backup» option to execute the process.

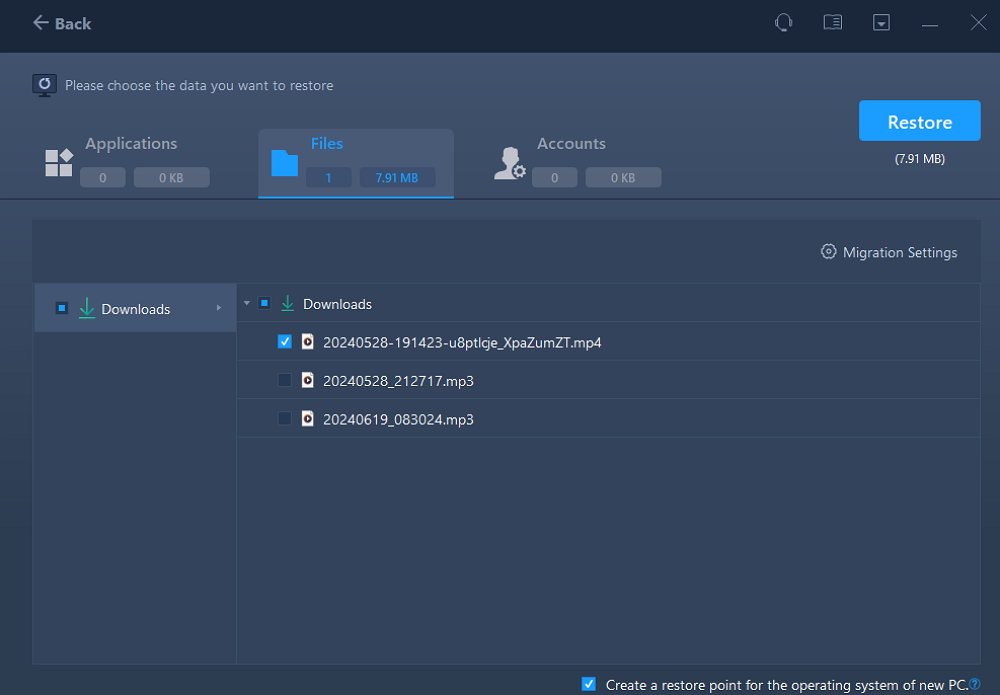
On the new PC:
Step 1. Lauch EaseUS Todo PCTrans on your new PC, and choose «This is New PC» in the «Data Transfer» section.
Step 2. Selcet «Transfer via backup» and click «Next.»
Step 3. Browse the «Backup location» of your existing backup files.
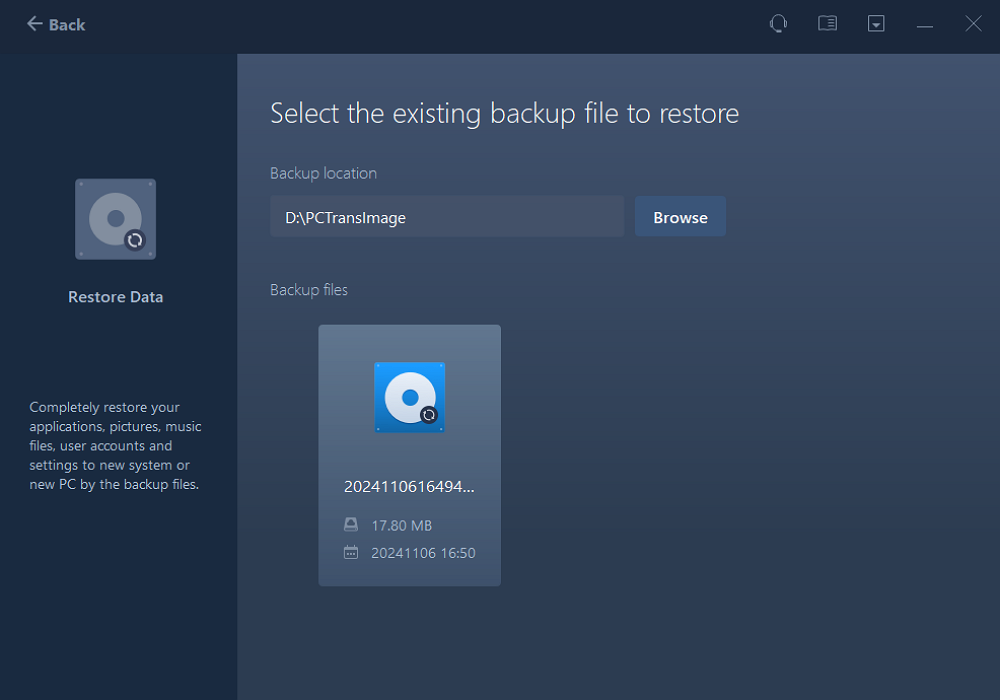
Step 4. Select the wanted Applications, Files , and Accounts to «Restore.»
Conclusion
The user file is a file that contains the user’s Windows account, password, and personal settings. This article provides two practical ways to move Windows 10 user configurations to another computer: transfer user accounts and user profiles over the network and transfer user accounts to a new computer by backing up files.
EaseUS Todo PCTrans provides details on both methods. This versatile transfer tool also supports image and application migration. Download the software for free to see more details.
This section will provide three additional questions and answers related to transferring user accounts in Windows 10/11. If you are interested, keep reading.
1. How to export a user profile to an external hard drive?
You can export your Windows 10 profile through Windows File Explorer:
- Connect the external hard drive to the PC and ensure it works properly.
- Open Windows File Explorer.
- Open the path: This PC/Local Disk (C:)/User/UserName/
- Copy and paste the opened user profile.
2. What is the best Windows 10 profile migration tool?
User profiles are files that contain user-specific data, such as desktop, system files, and application data. User profile migration is the process of moving the above to another account. The best user profile migration wizard should be able to help users transfer their data quickly and securely with minimum hassle. Here, I will provide three of the best tools:
- EaseUS Todo PCTrans Free — simple and secure transfer process.
- Profwiz — easy to use.
- Windows User State Migration Tool (USMT) — requires custom migration.
3. How to back up the Windows 10 user profile?
Windows provides built-in tools to back up and copy user profiles:
- In This PC, open Properties > Advanced System Settings > User Profile > Settings.
- Then, select the default profile and copy and paste it.
Related Articles
-
[Easy and Fast] How to Transfer Everything to a New Laptop
Brithny/2025/01/23
-
How to Migrate User Profiles to New Server 2021
Daisy/2025/03/27
-
How to Transfer Avast with License to A New Computer
Tracy King/2025/03/27
-
How to Uninstall Once Human Completely
Oliver/2025/01/23
Quick Links
-
Easy Transfer Used To Make Things Easy
-
What’s the Best Way to Move a Windows User Profile?
-
Option 1: Use a Microsoft Account and Transfer Files
-
Option 2: Download TransWiz (Free)
-
Option 3: Buy PCmover ($30)
Microsoft removed Easy Transfer from Windows 10, but you can still move user profiles between PCs. Microsoft accounts are easy to transfer; you can move files manually. Transwiz (free) and PCmover (paid) also do a good job.
Easy Transfer Used To Make Things Easy

Microsoft introduced Windows Easy Transfer with Windows Vista and supported it in Windows 7, 8, and 8.1. It was a great free option to bring your settings and local user profiles from an old computer to a new computer. Starting with Windows 8, you could choose to sign in with a Microsoft account. Signing in with that same account on any device would transfer many of your settings.
When Microsoft released Windows 10, it did not bring forward Easy Transfer. Instead, Microsoft chose to partner with Laplink and for a short period offered free access to its PCmover software. Unfortunately, that free offer is no longer available. If you want to use PCmover, you’ll need to spend at least $30 now.
What’s the Best Way to Move a Windows User Profile?
We investigated several methods of manually moving Windows user profiles from one PC to another. But, in each case, we couldn’t consistently move the profile without some further troubleshooting afterward. We can’t recommend a process that requires so much manual fixing of file permissions and other complicated work.
That leaves you with a few reliable options to move your account: Convert your Local account to a Microsoft account, use free software like Transwiz, or purchase PCmover. Each has benefits and downsides.
- Converting your local Account to a Microsoft account is free and easy, and you won’t need to download any outside software. But it won’t move everything over. Files you have outside OneDrive, and settings for third-party apps like Photoshop won’t make the move.
- TransWiz is free and simple software that will transfer a single profile account from one device to another. If you have quite a few profiles, you’ll spend extra time exporting and importing since it doesn’t handle multiple accounts well. Additionally, it can’t transfer the account you’re signed into, so you’ll need at least two accounts on the source machine. You’ll also need an external drive to move your data.
- PCmover is the more powerful option. It can move multiple profiles at once, and you can facilitate the transfer over your network, a USB transfer cable, or an external hard drive. Additionally, it can transfer files, settings, and even some programs. However, it is the most expensive option, starting at $30 and going up from there.
Option 1: Use a Microsoft Account and Transfer Files
If you’re using Windows 8.1 or Windows 10, your Microsoft account user profile will automatically transfer with a sign-in. If you currently use a local account instead of a Microsoft account, you may want to consider converting it to a Microsoft account. Some features, like OneDrive and device encryption, won’t work without it.
This won’t bring everything over; you’ll still need to manually transfer any important files and reinstall programs with an external hard drive. Think of this as a quick way to bring over Windows settings and get cloud sync going.
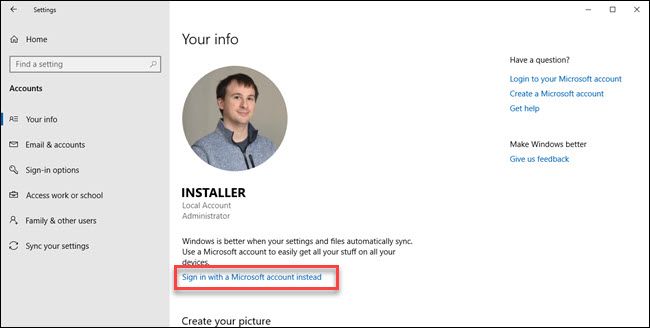
The conversion process is easy, especially if you already have a Microsoft account. If you don’t, you’ll need to make one. You’ll need to start this process on the PC with the account you want to transfer.
Click on the Start button then the Settings gear. Then choose Accounts, followed by «Sign in with a Microsoft account» instead. Then follow the setup wizard.
Next, we’ll manually move over data using Window 10’s File History tool. After connecting a hard drive go to Settings > Update & Security > Backup. Select add a drive, then your external hard drive.
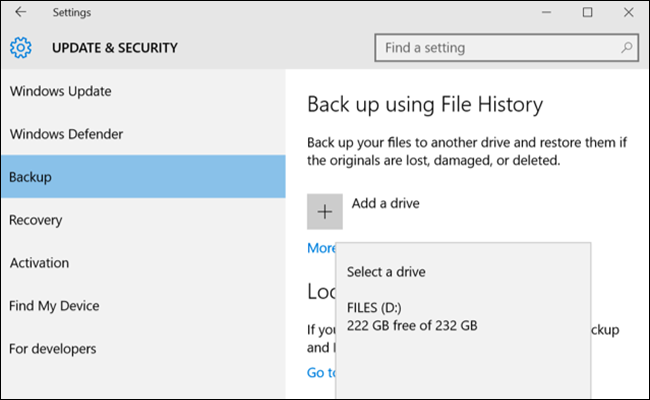
Windows will start making a backup automatically. By default, the backup includes the Desktop, Documents, Downloads, Music, Pictures, Videos folders. If you want additional folders, click on the «More options» text and choose the folders to add.
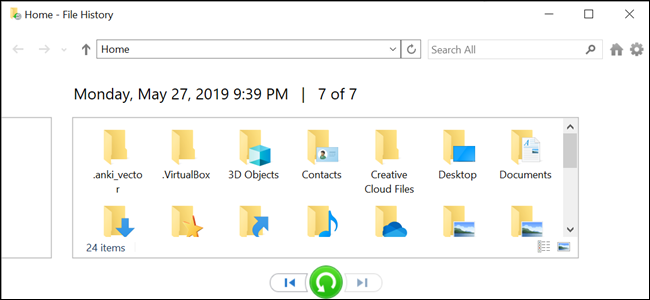
Take your external to your new machine and plug it in. Go back to Settings > Update & Security > Backup, and setup file history again using the external drive from before. Click more options, scroll to the bottom (past the list of folders) and click «restore files from a current backup.»
Browse to your most recent backup, choose the folders you want to restore then click on the green button.
You will need to reinstall any programs to finish things up.
Option 2: Download TransWiz (Free)
Transwiz is an excellent option to consider if you need want to transfer one or two local accounts, and don’t want to convert to a Microsoft account. You’ll still need to manually move some things over, just like the Microsoft account conversion process, however. You’ll also need an external hard drive.
First, download and install Transwiz on both the old and new machine. The program is free.
On the old machine, if you only have one profile, create a new one with admin rights. Then switch to it. If you have more than one profile, make sure at least two have admin rights and change to whichever profile you aren’t currently transferring. Transwiz can’t transfer a profile if you’re currently signed into it.
Start Transwiz and select «I want to transfer data to another computer» and click Next. Then choose the profile you want to switch and click Next.
Choose your external drive as the location to save; click next. Then enter a password if you want one. If you don’t, leave both fields blank and click OK.
Transwiz will create a zip file on your external drive. Take it to your new machine, open Transwiz there, and choose the restore data option. Point it to the zip file on the drive (no need to unzip it yourself), and Transwiz will do the rest. A machine restart is required to finish adding the profile.
Transwiz brings over user profiles, but not any data. If you want your files and folders, use the file history process described above. You’ll need to reinstall programs, too.
Option 3: Buy PCmover ($30)
The previous two options will work for moving profile data, but it’s up to you to transfer files, folders, and reinstall programs. PCmover will not only migrate your user profile, but it will move files as well. More expensive options also transfer applications.
You’ll need to download and pay for PCmover to get started. Several levels exist at different pricing, but if you want to move all users and applications the «Express» version for $30 will do the trick. Laplink offers ethernet and USB transfer cables you can purchase. The program will transfer data over your network, so the cables aren’t required, but they can speed up the transfer process depending on the speed of your network. However, another benefit to this method if you can skip the external drive.
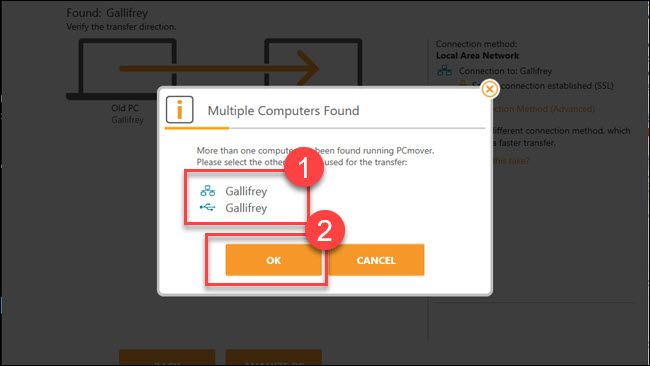
Once you’ve installed PCmover on each PC, open it and click through the Next buttons, providing the serial number when prompted. If you purchased a transfer cable, connect it to both PCs.
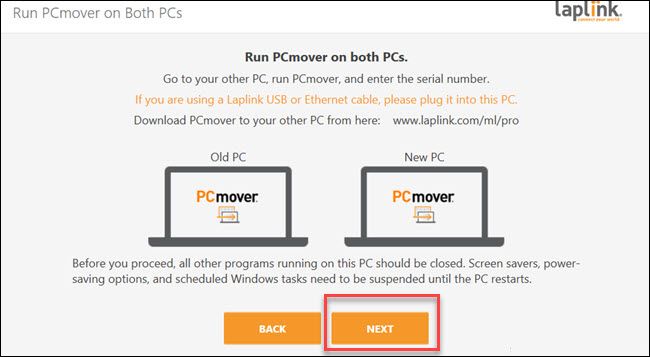
On each PC, choose the other PC to connect. If you have a transfer cable plugged in, you may see two entries for your devices, one for network connection and one for a cable connection. Select the cable connection for both. Then click «OK.»
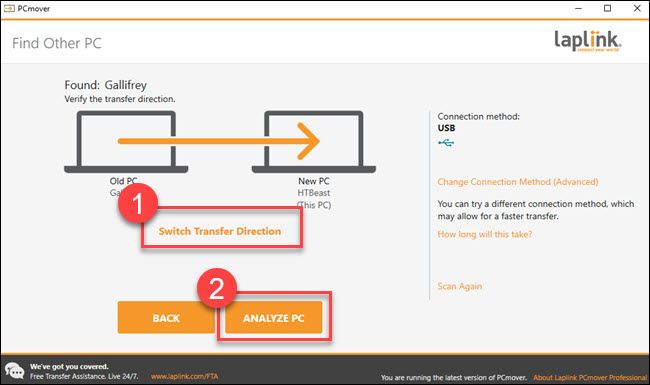
PCmover will try to guess the direction to move data. If it gets it wrong, you can click on the words «Switch transfer direction.» Then on the «new PC» (that is, the PC you’re moving data to) click «Analyze PC.»
Depending on the amount of data to look through, you may need to wait awhile while the program scans your PC. Eventually, you’ll see an amount of data to be transferred. If you’d like more granular control, click «View details.»
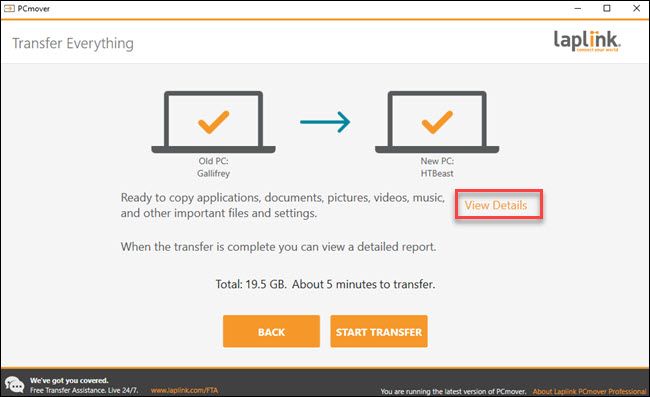
From here, you can drill down into different categories and uncheck anything you don’t want to transfer. Once you have everything to your liking, click «Start Transfer.»
In our case, it took about five minutes to transfer 20 gigs of data over a USB 3 transfer cable. If you have more to move, or you are using a network connection (or both), it may take longer. When PCmover finishes, it will prompt to restart your computer. Once you the reboot completes, you’re done.
It’s a shame Microsoft removed EasyTransfer in Windows 10, but with Microsoft accounts and cloud options like OneDrive and Dropbox or large external drives, it is less necessary than it used to be. Transwiz can still do a decent job if you’re looking for a free solution. And, while Laplink’s PCmover does have a cost associated to it, the program works very well and is extremely easy to use.
If you need to move everything in your PC, you should take a closer look at PCmover.
2023-09-26
·
2 мин. для прочтения
1 Утилиты переноса данных пользователя
1.1 User Profile Wizard
- Сайт: https://www.forensit.com/
- Лицензия: EULA, FreeWare
- Видео: https://www.youtube.com/watch?v=-YRqK_eLrQo
- Программа устанавливается как переносимый исполняемый файл.
1.1.1 Описание
- Для ситуации, когда в компании внедряется доменная сеть и необходимо компьютеры пользователей подключать к домену.
- Необходимо перенести локальные профили пользователей а домен.
- Утилита связывает доменную учётную запись с локальным профилем.
- В результате пользователь так же работает в том же самом окружении, но уже в домене.
- Программа можно запускать до ввода компьютера в домен, ввод в домен можно сделать через саму утилиту.
- После входа под доменной учётной записью видим, что все настройки сохранились.
- Папка профиля доменного пользователя совпадает с папкой профиля исходного пользователя.
1.1.2 Использование
- Учётную запись в которую собираетесь имортировать настройки лучше создать заблаговременно иначе программа выдаст ошибку: Account does not exist.
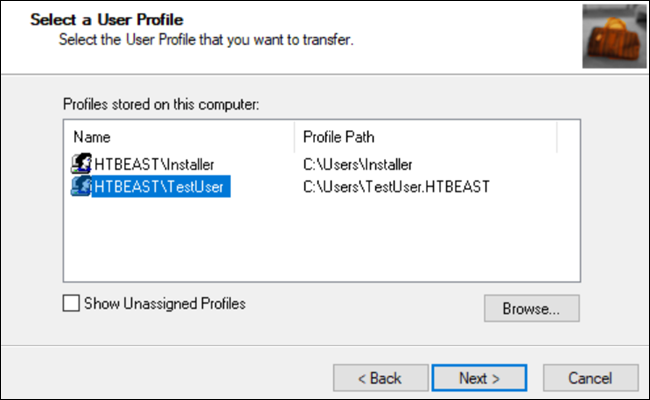
- Запускаем программу, жмем далее и видим окно Select a User Profile. Выбираем из списка профиль пользователя, который нужно перенести в нашу учетную запись.
- Опции:
- Если включить опцию Show Unassigned Profiles, то программа покажет профили пользователей, которые не подключены к текущей ОС Windows.
- Disable Account — отключит аккаунт, профиль которого был перенесён.
- Delete Account — удалит аккаунт после переноса.
- Следующий шаг User Account Information — Информация об учетной записи пользователя. Здесь указывается информация о профиле в который будут импортированы настройки другого профиля.
- Enter the domain — указываем домен в котором зарегистрирован пользователь.
- Если включить опцию Join Domain, то программа попытается присоединить компьютер к этому домену.
- Тогда вводим имя пользователя и пароль администратора, имеющего право ввести компьютер в домен.
- Enter the accont name — имя учетной записи пользователя, в профиль которого будут перенесены настройки.
- Если отметить Set as default logon, программа установит профиль этого пользователя как загружаемый по умолчанию.
- Запускается процесс переноса профиля. При завершении работы будет выдано сообщение Migration Complete!
- После работы программы может потребоваться перезагрузка для обновления профилей пользователей.
1.2 Transwiz
- Сайт: https://www.forensit.com/
- Лицензия: EULA, FreeWare
- Видео: https://www.youtube.com/watch?v=BsznBtuD8Xg
- Программа устанавливается как переносимый исполняемый файл.
1.2.1 Описание
- Утилита предназначенная для переноса профиля на другой компьютер.
- Утилита просто правит все необходимые пути, чтобы можно было пользоваться учётной записью и локально и в домене.