
Обновление контроллеров домена на месте с Windows Server 2016 до Windows Server 2019
Windows Server 2019 уже доступен для установки. По опыту я знаю, что первая функция, которую клиенты просят перенести, — это Active Directory. Поэтому я хотел попробовать обновление на месте, которое было улучшено в Windows Server 2019. Чтобы попробовать эту функцию, я обновил лес, который обрабатывается двумя контроллерами домена, работающими под управлением Windows Server 2016. Это не был процесс «щелчка и удовольствия», но Microsoft действительно улучшила обновление на месте. Давайте рассмотрим, как перенести Windows Server 2016 DC в 2019 год.
Этапы Предварительной Миграции
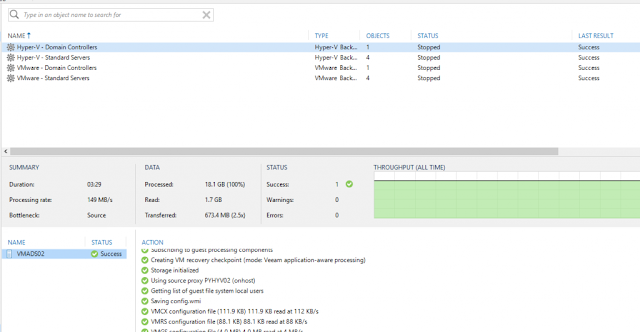
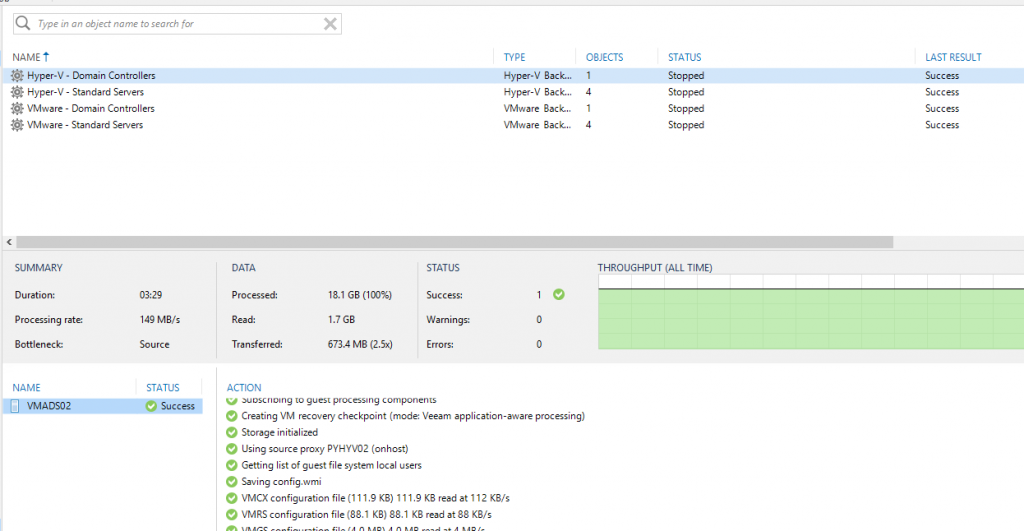
Во-первых, проверьте резервную копию вашего контроллера домена, прежде чем переносить его. Последовательное резервное копирование позволяет быстро выполнить откат. Этот шаг часто забывается, но он действительно важен. На следующем снимке экрана показана резервная копия контроллера домена с помощью Veeam.
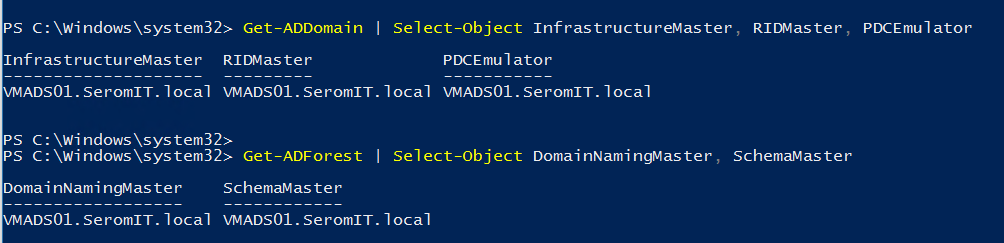
Затем выполните следующий командлет, чтобы проверить, где расположены роли FSMO. Я не хочу обновлять DC, который владеет ролями FSMO. Следует отметить владельца роли schema master, так как позже мы запустим некоторый командлет adprep против этого сервера.
|
Get—ADDomain | Select—Object InfrastructureMaster, RIDMaster, PDCEmulator Get—ADForest / Select—Object DomainNamingMaster, SchemaMaster |

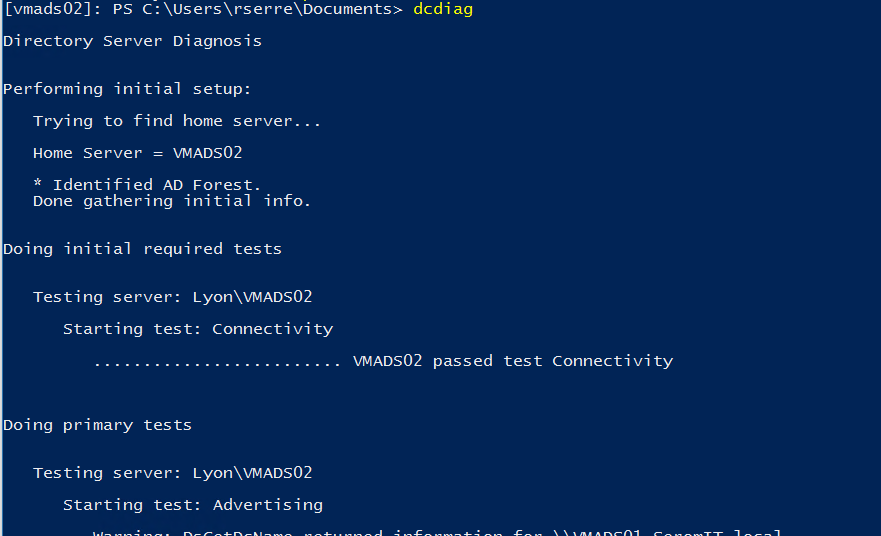
Затем дважды проверьте работоспособность контроллеров домена. Проверьте, что репликация работает нормально, DCs здоровы и так далее. Вы можете использовать соответствующие команды, такие как dcdiag, repadmin или Средство просмотра событий.

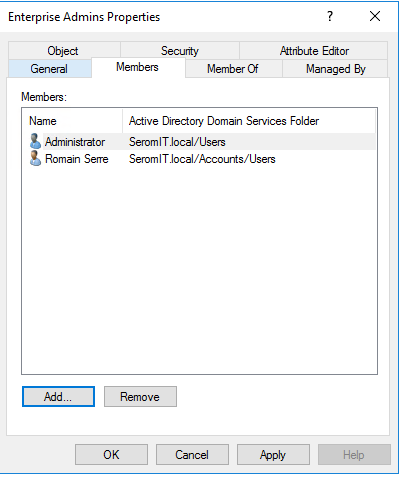
Для миграции (и только во время миграции) добавьте свою учетную запись Active Directory в группы администраторов предприятия и администраторов схемы. Это требуется командлетом adprep. Когда миграция будет завершена, удалите свою учетную запись из этих групп.

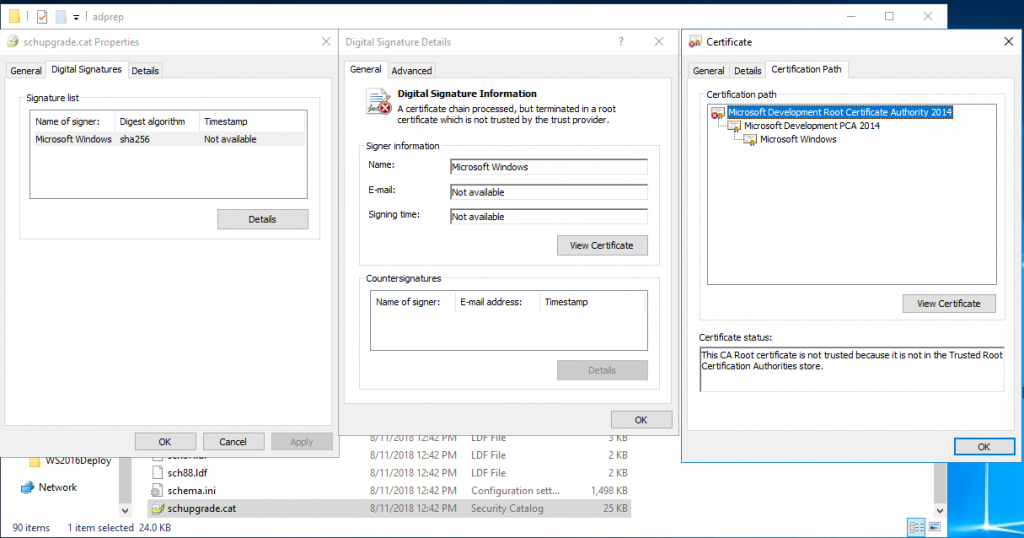
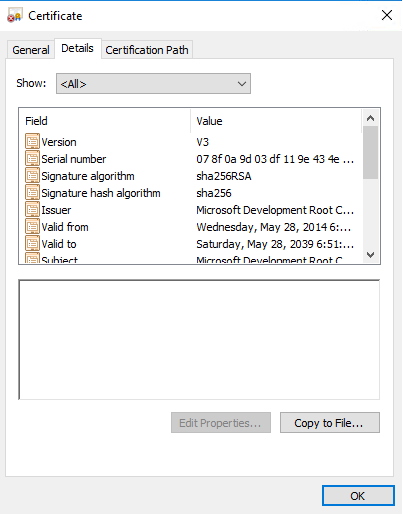
А теперь самое интересное. В настоящее время существует ошибка в команде adprep из сборки Windows Server 2019 17338. Для запуска adprep сертификат должен быть установлен на всех серверах. Смонтируйте ISO-файл Windows Server 2019 на машине с графическим интерфейсом пользователя. Перейдите в раздел <ISO Drive>:\Support\adprep<ISO Drive>. Щелкните правой кнопкой мыши на schupgrade.cat и выберите пункт Свойства. Затем откройте вкладку цифровые подписи и нажмите кнопку подробности. Далее нажмите на кнопку Просмотреть сертификат. Нажмите на путь сертификации и выберите корневой сертификат CA (верхний). Нажмите на кнопку Просмотреть сертификат.

Сведения
нажмите кнопку
Копировать в файл
. Сохраните сертификат в выбранном вами месте.

Затем добавьте сертификат в
хранилище доверительных корневых центров сертификации
каждого контроллера домена. Я использовал MMC, потому что мои контроллеры домена установлены в Core edition. Вы также можете использовать Центр администрирования Windows или PowerShell.

Не забывайте: эта часть должна быть применена для предварительного просмотра Windows Server 2019 и должна быть решена с окончательным выпуском.
Подготовьте лес и домен
Смонтируйте ISO-файл Windows Server 2019 на владельце мастера схемы. Затем перейдите к <ISO letter>:\support\adprep<ISO letter>. Выполните следующую команду:

После обновления схемы выполните следующую команду (эта команда должна выполняться на всех контроллерах домена):

Миграция Первых Контроллеров Домена
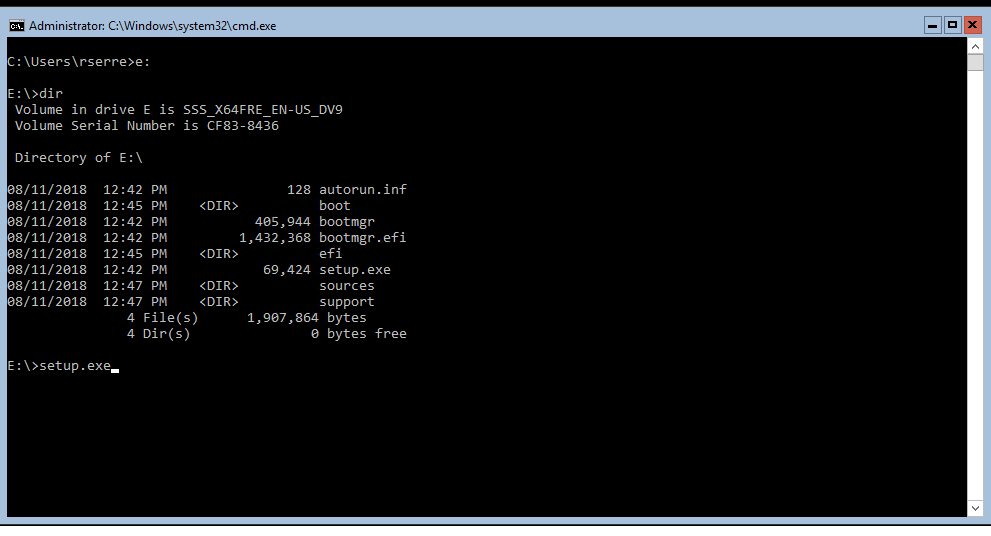
Подключитесь к контроллеру домена, который не владеет никакими ролями FSMO. Затем смонтируйте ISO-файл и запустите программу установки.exe.

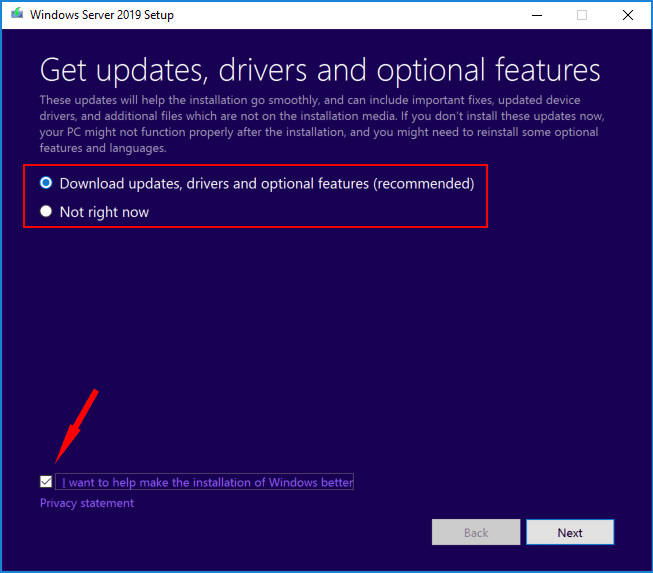
Затем выберите, загружать ли обновления прямо сейчас или нет.

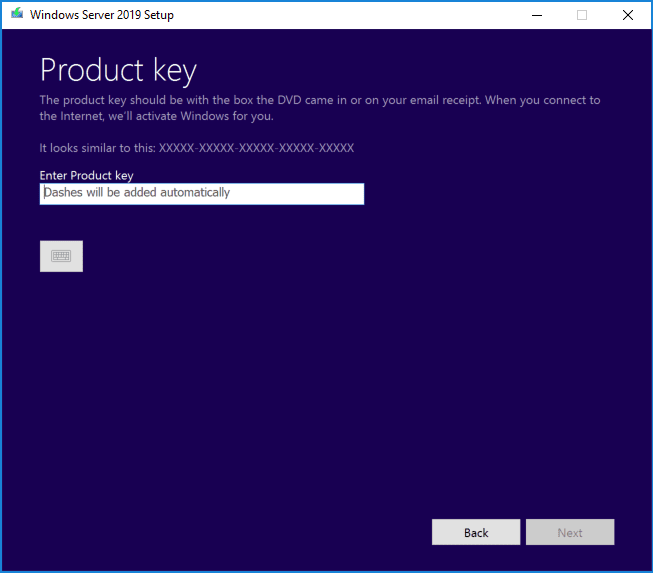
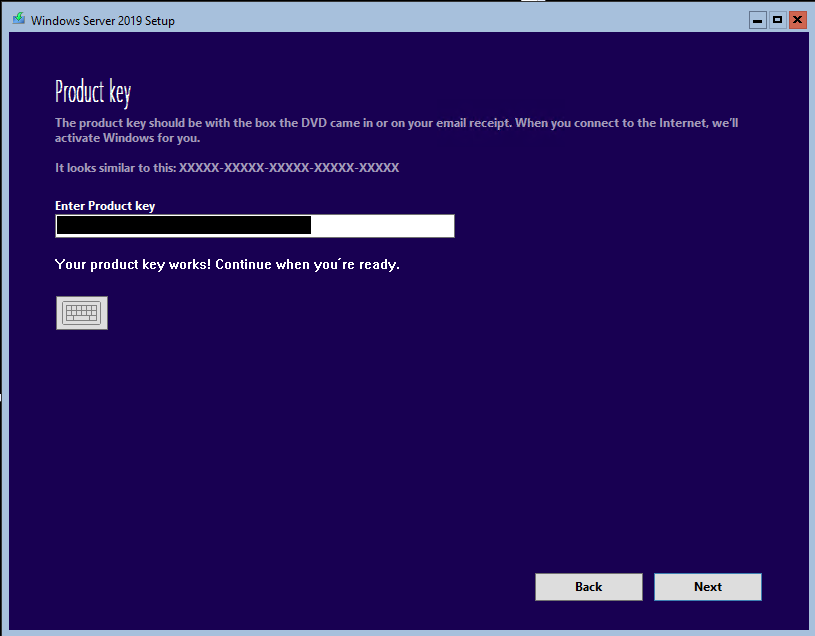
Затем введите ключ продукта.

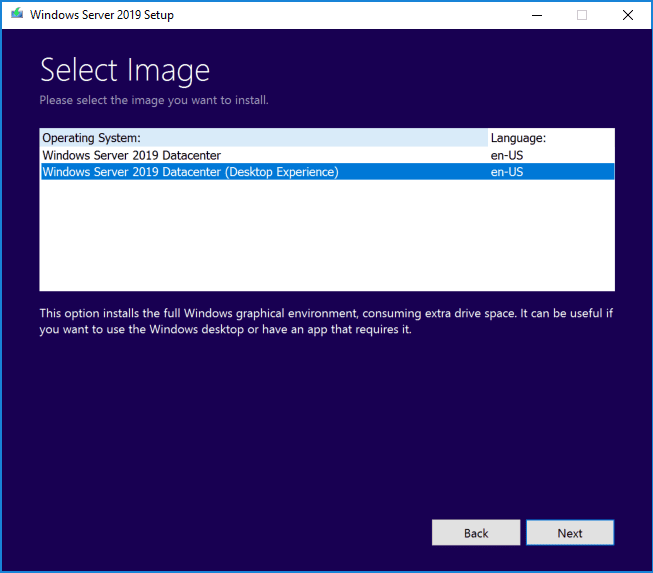
Выберите нужный выпуск Windows Server 2019 (Core edition или нет).

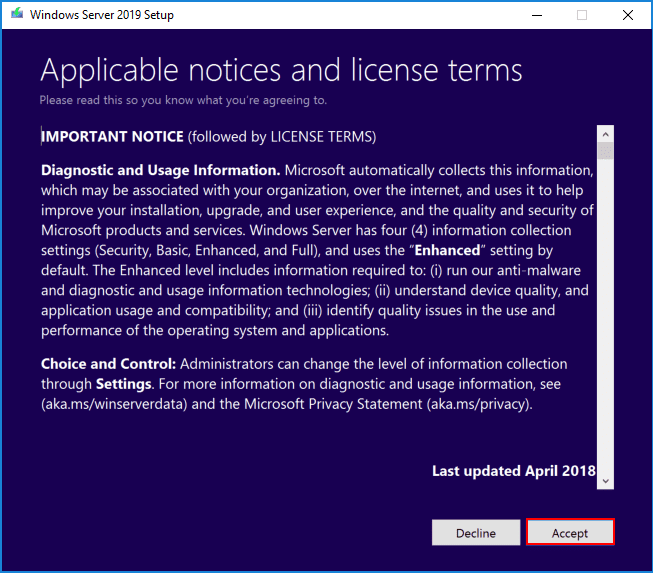
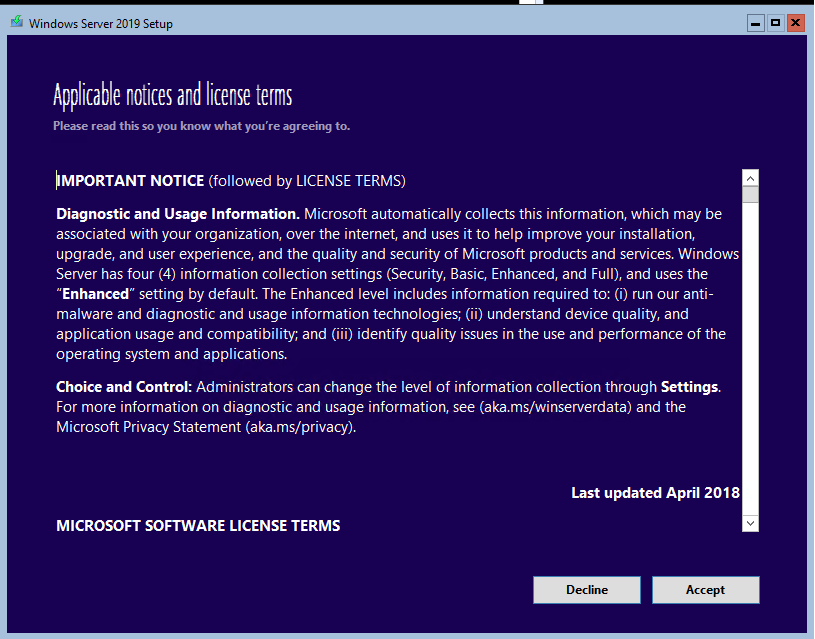
Примите лицензионное соглашение и нажмите кнопку Далее.

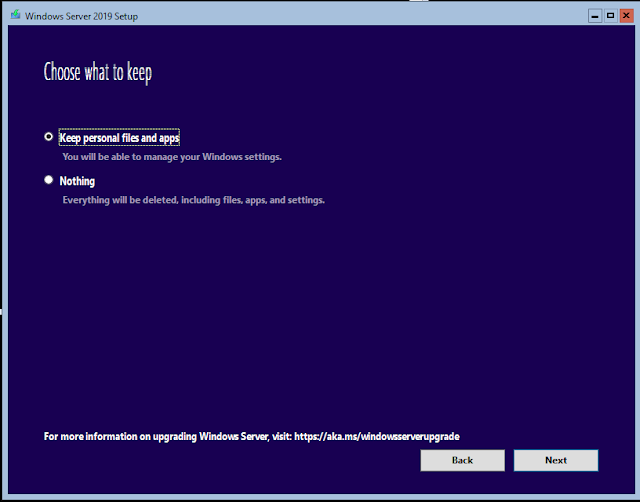
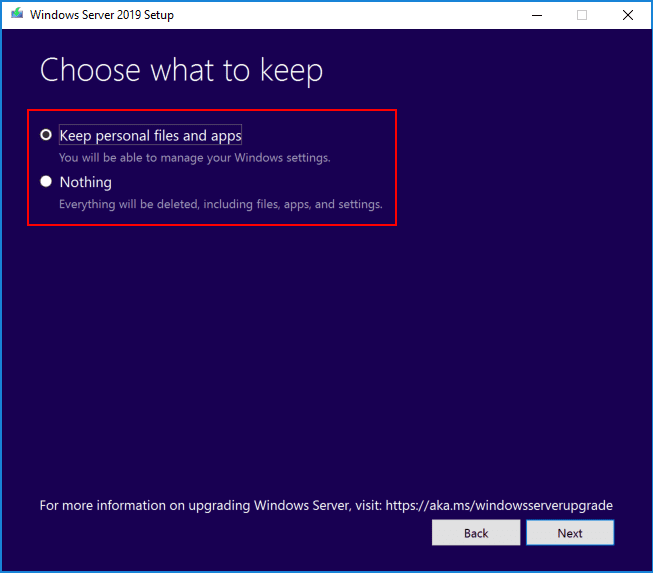
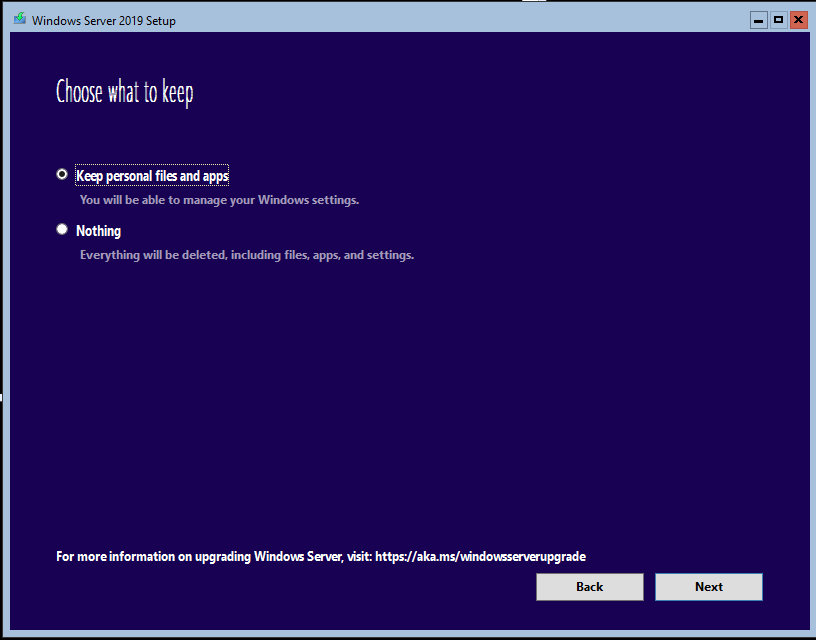
Затем сохраните личные файлы и приложения для запуска обновления на месте.
Когда мастер проверит предварительные требования, он должен позволить вам обновить операционную систему.

Чтобы обновить первый DC, процесс занял почти 30 минут.

Миграция Вторых Контроллеров Домена
Теперь, когда первый DC обновлен, я собираюсь перенести роль FSMO на этот последний. Чтобы передать роль, я запускаю следующий сценарий из DC:
|
$Server = Get—ADDomainController —Identity » VMADS02″ Move—Addirectoryserver Operationmasterrole-Identity $Server —OperationMasterRole SchemaMaster,DomainNamingMaster,PDCEmulator,RIDMaster,InfrastructureMaster |
Затем установите ISO на DC и запустите программу установки.exe. Выполните ту же процедуру, что и для первого контроллера домена.

После завершения миграции вы можете снова передать роль FSMO первоначальному владельцу:
|
$Server = Get—ADDomainController —Identity » VMADS01″ Move—Addirectoryserver Operationmasterrole-Identity $Server —OperationMasterRole SchemaMaster,DomainNamingMaster,PDCEmulator,RIDMaster,InfrastructureMaster |
Не забудьте удалить свою учетную запись из групп администраторов предприятия и администраторов схемы.
функциональный уровень
В настоящее время не существует функционального уровня Windows Server 2019. В настоящее время я не знаю, планирует ли Microsoft что-нибудь для функционального уровня Windows Server 2019.
Заключение
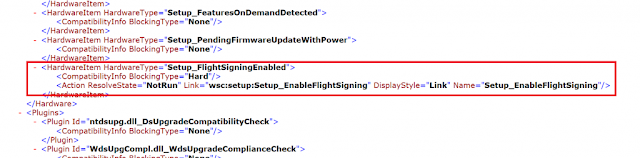
У меня была проблема, которая помешала перенести второй контроллер домена. Если что-то мешает обновлению на месте, вы можете открыть папку c:\$Windows~BT\Sources\Panther. В этой папке находится файл ScanResult.xml. Когда я открыл этот файл, я увидел следующее:
Microsoft PM рассказала мне, как решить эту проблему. Чтобы устранить эту проблему, выполните следующие команды:
|
bcdedit.exe /set flightsigning on bcdedit /set {bootmgr} flightsigning on |
Затем запустите настройку.снова exe.
In this post we are are going to upgrade Domain Controller from “Server 2016” to “Server 2019”, this is also known as in-place Upgrade. There are few Pre-requisites. You will need to run adprep /forestprep and adprep /domainprep manually. Adprep /forestprep needs to be run only once in the forest. Adprep /domainprep needs to be run once in each domain in which you have domain controllers that you are upgrading to Windows Server 2016.
As Windows Server 2022 is also out now, in-place upgrade from server 2016 to Server 2022 is also possible if you are interested doing that.
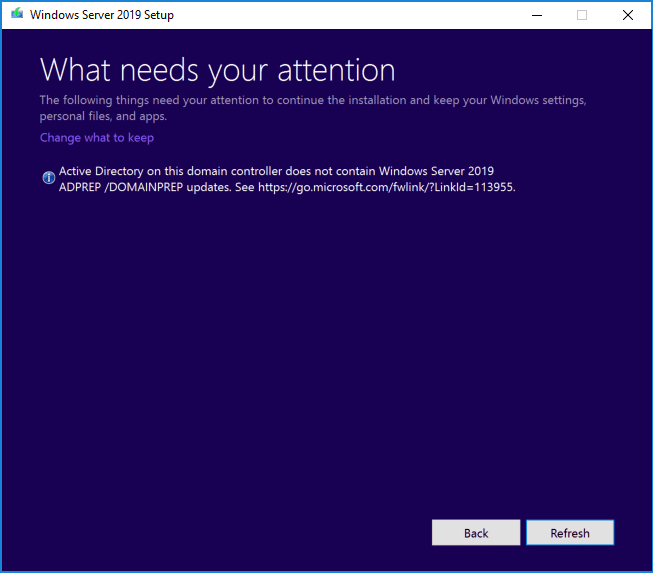
If you try to run in-place upgrade process without running adprep tool you will get following error as shown in the image:
Active Directory on this domain controller does not contain Windows Server 2019 ADPREP /FORESTPREP updates.

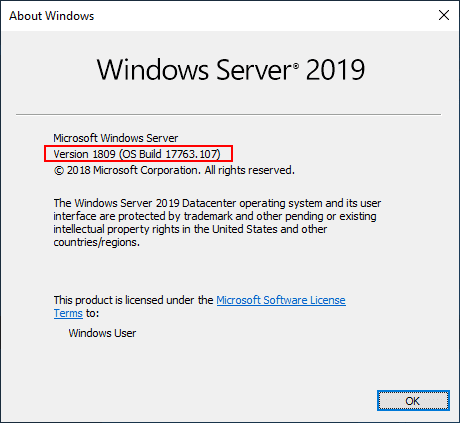
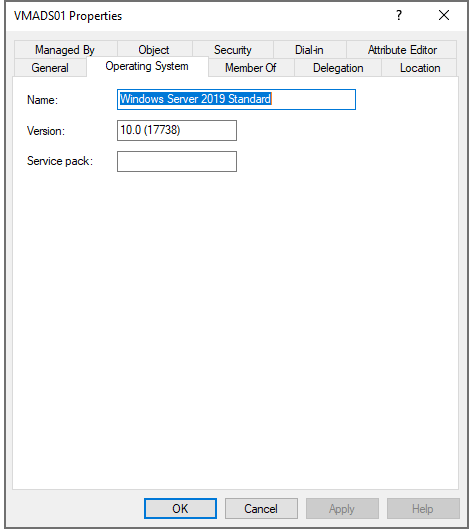
Before starting upgrade, lets verify current OS Version, open Windows + run and type “Winver”, this will show current OS version and build:

Verify Current AD Schema
Verify current AD schema by running Powershell (in elevated mode) and run following command:
Get-ADObject (Get-ADRootDSE).schemaNamingContext -Property objectVersion

You can see objectversion is showing as 87, which means we have “Windows Server 2016” schema, here is more information on various schema numbers:
|
AD version |
objectVersion |
|
Windows Server 2000 |
13 |
|
Windows Server 2003 |
30 |
|
Windows Server 2003 R2 |
31 |
|
Windows Server 2008 |
44 |
|
Windows Server 2008 R2 |
47 |
|
Windows Server 2012 |
56 |
|
Windows Server 2012 R2 |
69 |
|
Windows Server 2016 |
87 |
|
Windows Server 2019 |
88 |
Copy the Windows Server 2019 source to “c:\Server 2019”, this source contains the adprep utility under support\adprep folder:

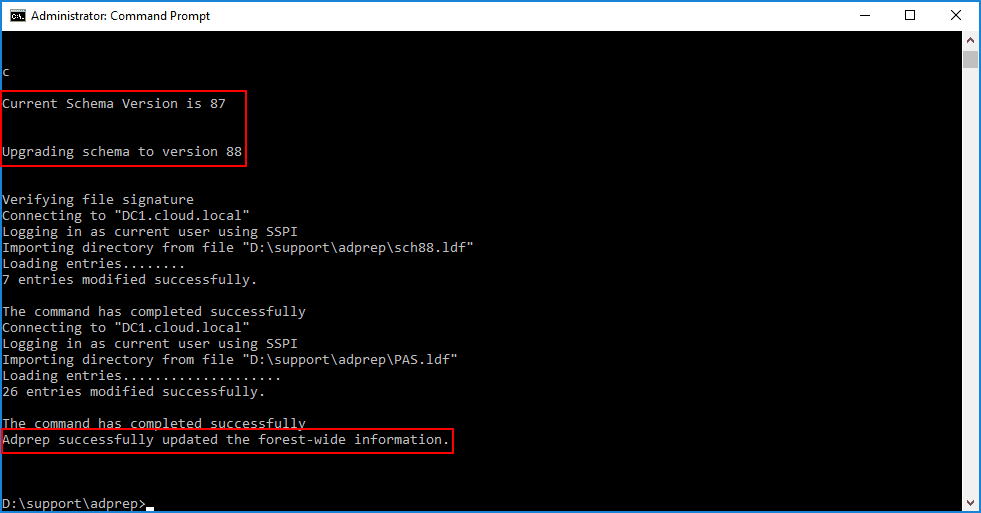
Open command prompt (in elevated mode) and navigate to location c:\Server 2019\support\adprep. Run Command “adprep.exe /forestprep“

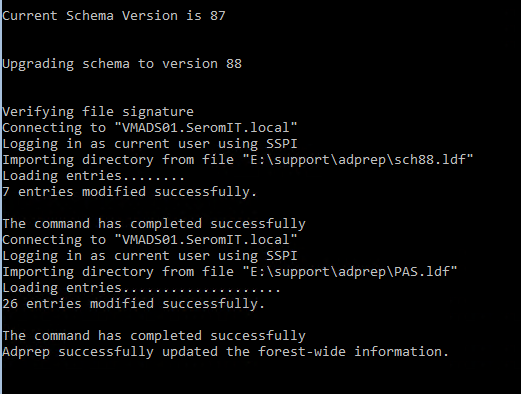
Type C and press Enter to continue with upgrade of Schema. This will upgrade current schema version from 87 to 88.

This process creates 2 log files under c:\windows\debug\adprep\logs\yyyymmddhhmmss with name ADPrep.log & ldif.log.
ADPrep.log will show you successful upgrade of Schema.
ldif.log will show you attributes which has been extended to schema such as ms-PKI-DPAPIMasterKeys, ms-PKI-RoamingTimeStamp and others.

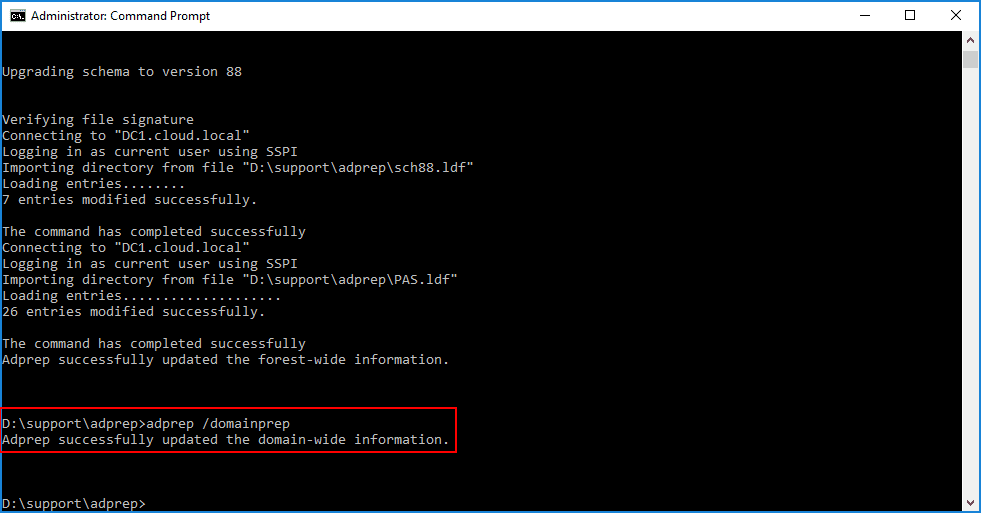
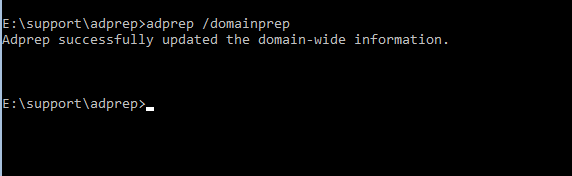
Run “Adprep.exe /domainprep” to update the domain-wide information

Lets begin with Windows Server 2019 in-place Upgrade process by navigating to c:\Server 2019. Right click setup.exe and select “Run as Administrator“.

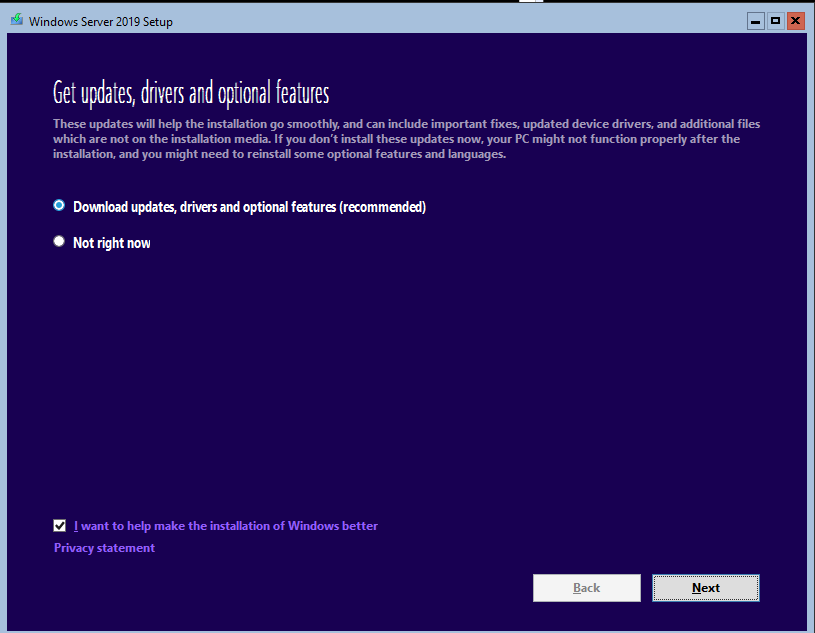
Next page will show the information whether to update , lets select “Not right now” and click on Next.

Select Image “Windows Server 2019 Datacenter (Desktop Experience)” as our current Operating System is Server 2016 Datacenter (Desktop Experience).

Under “Applicable notices and license terms”, click “Accept” to continue

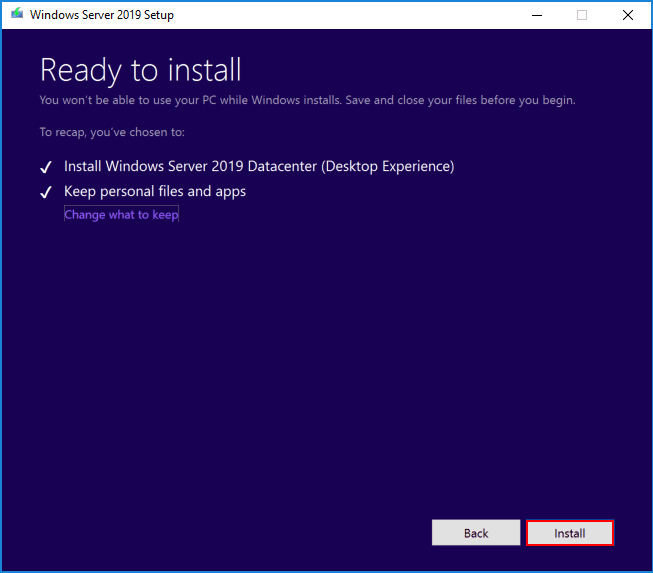
Under “Choose what to keep” page, select “keep personal files and apps” to retain all files and applications and click “Next”

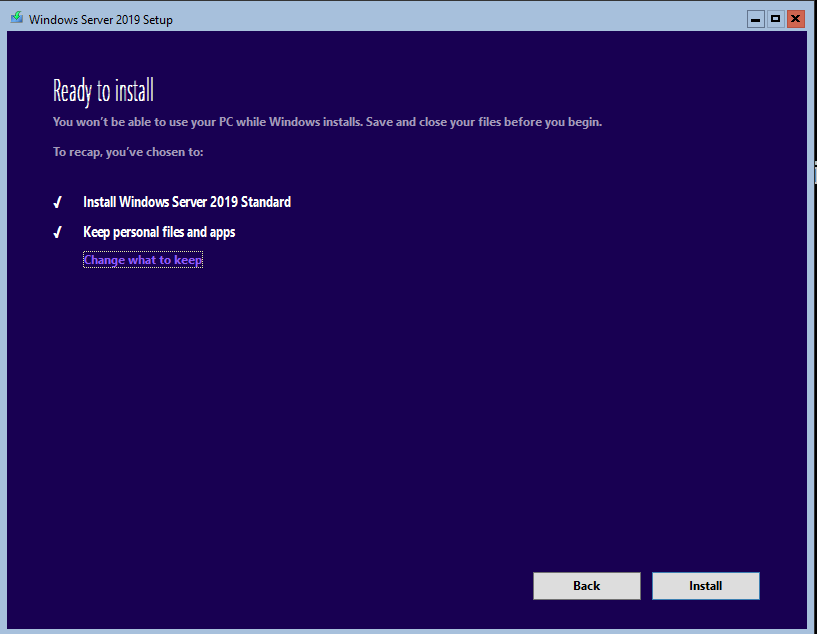
Under “Ready to Install” page, click on “Install” to begin the in-place upgrade process.

This process will first extract binaries under hidden folder “c:\$WINDOWS.~BT“.

Once extracted, system will reboot and server upgrade process will initiate.

Once upgrade process is completed, you can login to Domain Controller. Open Windows + R and run “Winver” to show OS version. This will show OS version as 1809 (ie Server 2019) and build version as 17763.xx

Discover more from SCCM | Intune | Device Management| Enterprise Mobility & Security
Subscribe to get the latest posts sent to your email.

It has certainly been an interesting ride for Microsoft with Windows Server 2019 and the release of their newest Windows Server operating system. Windows Server 2019 was marred with the same issues as Windows 10 1809 and was pulled. However, the latest Windows Server 2019 operating system GA was made available again. I have waiting for a few weeks now before upgrading the home lab environment infrastructure servers to Windows Server 2019. This past weekend, I decided to go ahead and upgrade a few of my infrastructure servers from Windows Server 2016 up to Windows Server 2019. One of the VMs I wanted to go ahead and upgrade was my domain controller for one of my home lab domains. In this post, let’s take a look at Upgrading Windows Server 2016 Domain Controller DC to Windows Server 2019 and take a look at the changes with Active Directory in 2019 which is surprisingly different from past releases.
Windows Server 2019 Active Directory New Features
Well, apparently, this section is going to be surprisingly short. One of the sections or set of features that is a hot item to take a look at when new Windows Server operating system versions are released are the new Active Directory features. Before I made the jump, I decided to take a look at the blogs or whitepapers available on the subject and found the following which was a bit of a shock.
- https://blogs.technet.microsoft.com/389thoughts/2018/12/02/whats-new-in-active-directory-2019-nothing/
The above link makes it plain that it is not an “official” answer as to the fact there are no new features. However, it seems to be corroborated by the “official” document found below in which there is no mention made of Active Directory or any new features:
- https://docs.microsoft.com/en-us/windows-server/get-started-19/whats-new-19
As mentioned in the first article link, there is just one new schema file – “sch87.ldf which adds just one new attribute called msDS-preferredDataLocation and raises the schema version to 88“. Some have speculated this is related to Exchange Online multi-geo capabilities.
Also, I know in my IT career with every release of Windows Server, there has been a new functional level introduced with each new release. Not so with Windows Server 2019. There is no new “Windows Server 2019” functional level. So, this means you won’t be able to enforce a domain of running only Windows Server 2019 domain controllers. At the very least, you can only lock it down to Windows Server 2016 (the latest functional level available) and Windows Server 2019.
It is certainly an interesting juxtaposition by Microsoft. It certainly may be seen as a change in the times for sure. Microsoft has now been pushing Azure Active Directory for some time now and may certainly be focusing their AD functionality and other functionality improvements there. Time will tell on how this plays out for sure, but it is certainly a new age for infrastructure and core infrastructure services like Active Directory.
So, now that there are no functionality differences per se between Windows Server 2016 Active Directory and Windows Server 2019 Active Directory, let’s upgrade 🙂 (sarcastic laugh here).
So, here, I have simply uploaded the Windows Server 2019 ISO to my datastore and mounted to my domain controller. I am running the interactive upgrade installer from Windows Server 2016 installed on my domain controller. The first screen that lauches asked if you want to download updates, drivers, and optional features which is usually the recommended approach to take. You can also opt in or out of the CEIP process at the bottom left hand corner of the first screen.
Next, you will be prompted to enter a product key for Windows Server 2019. You will not be able to proceed with the upgrade until you enter a product key.
The upgrade will recognize the variant of legacy OS you are coming from and present the correct option for upgrade. Since I am coming from Windows Server 2016 Datacenter, these are the options that are presented. Here I am choosing the Desktop Experience version to install the GUI.
The next screen is the typical EULA and notices from Microsoft.
You can choose what you want to keep with the user profile(s) during the upgrade. You can choose to keep all user profile files or not keep anything.
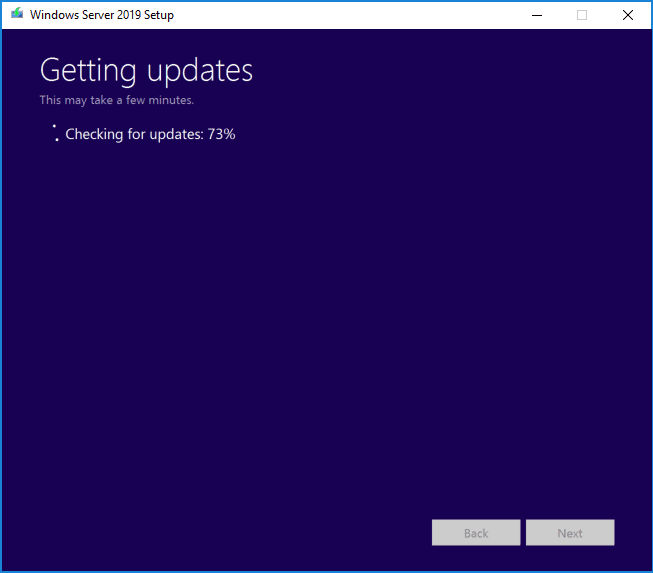
After clicking Next, you will see the upgrade process start checking for updates as we directed it to do with the configuration options.
Since this is a domain controller, the upgrader will recognize whether or not the Forestprep and Domainprep processes have been ran on the domain. Below, is the domain prep screen, however, forestprep will come first.
The process to run the forestprep and domainprep processes is the same as in previous generations. Simply navigate to the Supportadprep folder on the installation media and run the adprep utility with the appropriate switches. First, run forestprep, and then domainprep.

As mentioned, there is only one schema file that is extracted and applied. You should see the forestprep process complete successfully.
Next, we apply the domainprep process. This only takes a second and you will see the adprep successfully updated the domain-wide information message.
Now, the actual upgrade process is ready to run using the configuration selected earlier in the upgrade wizard.
After clicking Next, you will see the Installing Windows Server 2019 splash screen appear.
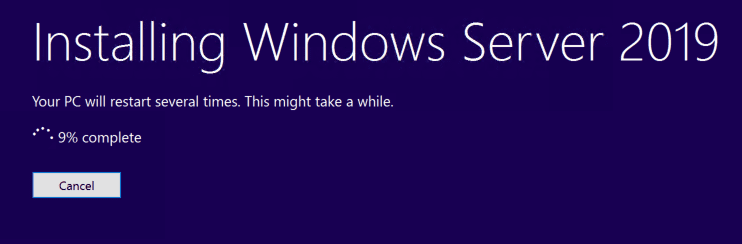
As noted in the screen above, the process will reboot the server several times to complete the upgrade. You will see the familiar Working on updates displayed with a percentage as the process works through.

After a while, you will be able to login to the Windows Server 2019 domain controller that is now upgraded. A quick winver command should display Windows Server 2019, version 1809 (OS Build 17763.107) at the time of this writing and ISO version.
Takeaways
The process of Upgrading Windows Server 2016 Domain Controller DC to Windows Server 2019 is very straightforward. In fact the process aside from running forestprep and domainprep is basically brain dead work with the wizardized experience. Interestingly, outside of simply having the latest and greatest Windows Server operating system, there is apparently not much reason to upgrade to Windows Server 2019 from an Active Directory standpoint. There are basically no new features outside of a new Exchange Online attribute that has been added. For on-premises deployments, this may not be enough of a reason to upgrade. Additionally, it is interesting that with Windows Server 2019, there is no new Forest functional level to be had. Windows Server 2016 is still the latest and greatest in functional level for the forest and domain. More home lab fun to come. Stay tuned.
Brandon Lee is the Senior Writer, Engineer and owner at Virtualizationhowto.com, and a 7-time VMware vExpert, with over two decades of experience in Information Technology. Having worked for numerous Fortune 500 companies as well as in various industries, He has extensive experience in various IT segments and is a strong advocate for open source technologies. Brandon holds many industry certifications, loves the outdoors and spending time with family. Also, he goes through the effort of testing and troubleshooting issues, so you don’t have to.
IT and Virtualization Consultant. Romain is specializing in Microsoft technologies such as Hyper-V, System Center, storage, networking, and MS Azure. He is a Microsoft MVP and MCSE in Server Infrastructure and Private Cloud.
IT and Virtualization Consultant. Romain is specializing in Microsoft technologies such as Hyper-V, System Center, storage, networking, and MS Azure. He is a Microsoft MVP and MCSE in Server Infrastructure and Private Cloud.
Windows Server 2019 should be available in barely two months. So, first migration will start shortly after. From experience, I know that the first feature customers ask for migrating is Active Directory. Therefore, I wanted to try In-Place Upgrade, which has been improved in Windows Server 2019. To try this feature, I upgraded a forest that is handled by two domain controllers running on Windows Server 2016. It was not a “click and fun” process, but Microsoft has really improved In-Place Upgrade. Let’s take a look at how to migrate Windows Server 2016 DC to 2019.
Pre-Migration Steps
Firstly, check the backup of your domain controller before migrating it. A consistent backup enables you to rollback quickly. This step is often forgotten but it is really important. The following screenshot is a backup of a domain controller by using Veeam.
Then, run the following cmdlet to check where FSMO roles are located. I don’t want to upgrade a DC that owns FSMO roles. The schema master role owner should be noted because later we will run some adprep cmdlet against this server.
Get-ADDomain | Select-Object InfrastructureMaster, RIDMaster, PDCEmulator
Get-ADForest | Select-Object DomainNamingMaster, SchemaMaster
Then, double check the health of your domain controllers. Check that replication is working fine, DCs are healthy and so on. You can use the respective commands, such as dcdiag, repadmin or the event viewer.
For the migration (and only during the migration), add your Active Directory account to Enterprise Admins and Schema Admins groups. It is required by the adprep cmdlet. When the migration is finished, remove your account from these groups.
And now for the fun part. Currently there is a bug in the adprep command from Windows Server 2019 17338 build. A certificate must be installed on all servers in order for adprep to run. Mount the Windows Server 2019 ISO on a machine with a GUI. Navigate to <ISO Drive>:\Support\adprep. Right click on schupgrade.cat and select properties. Then open Digital Signatures tab and click on Details. Next, click on view certificate. Click on Certification Path and select the Root CA certificate (the top one). Click on View Certificate.
In the Details tab, click on Copy to file. Save the certificate in a location of your choice.
Then, add the certificate to trust root certification authorities store of each domain controller. I used the MMC because my domain controllers are installed in Core edition. You can also use Windows Admin Center or PowerShell.

Don’t forget: this part should be applied for Windows Server 2019 preview and should be resolved with the final release.
Prepare the Forest and the Domain
Mount the ISO of Windows Server 2019 on the Schema Master owner. Then, navigate to <ISO letter>:\support\adprep. Run the following command:
Adprep /forestprep
Once the schema is upgraded, run the following command (this command should be run on all domain controllers):
Adprep /domainprep
Migrate First Domain Controllers
Connect to a domain controller that doesn’t own any FSMO roles. Then, mount the ISO and run setup.exe.

Next, choose whether download updates right now or not.
Then, enter the product key.
Select the Windows Server 2019 edition you want (Core edition or not).

Accept the license agreement and click on Next.
Next, keep personal files and apps to run an In-Place upgrade.
When the wizard has checked prerequisites, it should allow you to update your operating system.
To upgrade the first DC, the process took almost 30min.
Migrate Second Domain Controllers
Now that the first DC is upgraded, I’m going to transfer the FSMO role to this last one. To transfer the role, I run the following script from a DC:
$Server = Get-ADDomainController -Identity "VMADS02"

Move-ADDirectoryServerOperationMasterRole -Identity $Server -OperationMasterRole SchemaMaster,DomainNamingMaster,PDCEmulator,RIDMaster,InfrastructureMaster
Then, mount the ISO on the DC and run setup.exe. Follow the same procedure applied to the first domain controller.
Once the migration is finished, you can transfer again the FSMO role to the original owner:
$Server = Get-ADDomainController -Identity "VMADS01"

Move-ADDirectoryServerOperationMasterRole -Identity $Server -OperationMasterRole SchemaMaster,DomainNamingMaster,PDCEmulator,RIDMaster,InfrastructureMaster
Don’t forget to remove your account from Enterprise Admins and Schema Admins groups.
Functional Level
Currently, there is no Windows Server 2019 functional level. At present, I don’t know if Microsoft has anything planned for a Windows Server 2019 functional level.
Flight Signing Issue
I had an issue that prevented to migrate the second domain controller. If something prevents the in-place upgrade, you can open the folder c:\$Windows~BT\Sources\Panther. In this folder, there is a file called ScanResult.xml. When I opened this file, I saw the following:
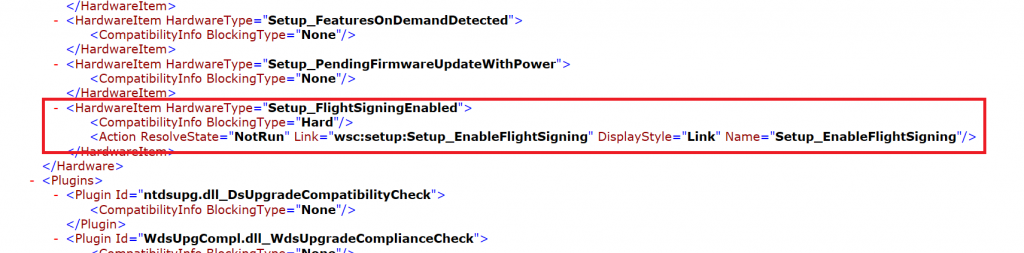
Microsoft PM told me how to resolve this issue. To resolve this issue, run the following commands:
bcdedit.exe /set flightsigning on

bcdedit /set {bootmgr} flightsigning on
Then, start the setup.exe again.
- Windows Server 2019 Insider Preview Build 17709: A Brief Features Overview
- Why you should consider Storage Spaces Direct in Windows Server 2019
To update a domain controller, best practice is to install a server with the newer version of Windows Server and promote it to a domain controller, then demote the older domain controller.
Another way is to do an in-place upgrade from Windows Server to a newer version.
Below I will go through the separate steps to upgrade the domain controllers by using the best practices method.
First I will join the new Windows Server 2019 as a normal member server to the existing Windows Server 2016 Active Directory domain.
After that, I will adding the Active Directory Domain Services (ADDS) role.
After the features where installed successfully, we need to promote the server to a domain controller. Therefore click on the warning icon on the right top of the server manager and on the link Promote this server to a domain controller.
We want to add this domain controller to our existing domain.
In the next step we keep the default settings to setup a DNS server and Global Catalog on the new domain controller, further we need to provide a Directory Sevices Restore Mode (DSRM) password in case you need to repair or recover the Active Directory database.
You can also reset the password later as described in the following article.
How to reset the Directory Services Restore Mode administrator account password in Windows Server
https://docs.microsoft.com/en-us/troubleshoot/windows-server/identity/reset-directory-services-restore-mode-admin-pwd
We will replicate from any domain controller to the new one.
Here you can specify the location of the AD DS database, log files and SYSVOL, I will use the default locations.
The existing domain is on the AD Schema version Windows Server 2016 (87), so for promoting this Windows Server 2019 domain controller, the existing Forest and Domain Schema must be prepared for the new version from Windows Server 2019 (88).
Finally we can click on Install to promote the server to a DC.
The server is now successfully configured as a domain controller and will finally restart to complete the promotion.
Now we can transfer the five Flexible Single Master Operations (FSMO) roles to our new Windows Server 2019 domain controller.
PDC Emulator (Primary Domain Controller)
RID Master – (Relative ID)
Infrastructure Master
Schema Master
Domain Naming MasterSource: https://en.wikipedia.org/wiki/Flexible_single_master_operation
Therefore you can use
- Active Directory Users and Computers console
- Command Prompt
- PowerShell (since 2008 R2)
Using PowerShell
Move-ADDirectoryServerOperationMasterRole -Identity <destination DC> -OperationMasterRole SchemaMaster,RIDMaster,InfrastructureMaster,DomainNamingMaster,PDCEmulator
Instead naming all roles you can also use the command with the numbers of the roles
PDCEmulator -> 0
RIDMaster -> 1
InfrastructureMaster -> 2
SchemaMaster -> 3
DomainNamingMaster -> 4Move-ADDirectoryServerOperationMasterRole -Identity <destination DC> -OperationMasterRole 0,1,2,3,4
That command works only if the source domain controller is online, in case you cannot move the roles online, you can use the same command with the force parameter as follow:
Move-ADDirectoryServerOperationMasterRole -Identity <destination DC> -OperationMasterRole SchemaMaster,RIDMaster,InfrastructureMaster,DomainNamingMaster,PDCEmulator -ForceList the domain controller which hosts the FSMO roles
Get-ADForest | select SchemaMaster,DomainNamingMaster
Get-ADDomain | select PDCEmulator,RIDMaster,Infrastructuremaster
How to find the current Schema Version
Get-ADObject (Get-ADRootDSE).schemaNamingContext -Property objectVersion
Get-ItemProperty ‘AD:CN=Schema,CN=Configuration,DC=contoso,DC=local’ -Name objectVersion
dsquery * “cn=schema,cn=configuration,dc=contoso,dc=local” -scope base -attr object VersionUse ADSIEdit.msc or LDP.exe to navigate to:
CN=Schema,CN=Configuration,DC=contoso,DC=local.
right click on it and review objectVersion attribute.Source: https://docs.microsoft.com/en-us/troubleshoot/windows-server/identity/find-current-schema-version
Windows Server 2000 -> 13
Windows Server 2003 -> 30
Windows Server 2003 R2 -> 31
Windows Server 2008 -> 44
Windows Server 2008 R2 -> 47
Windows Server 2012 -> 56
Windows Server 2012 R2 -> 69
Windows Server 2016 -> 87
Windows Server 2019 -> 88
Windows Server 2022 -> 88 (no upgrade of the schema version)
Demote old Domain Controller
Now we can demote the old domain controller.
Demoting Domain Controllers and Domains
https://docs.microsoft.com/en-us/windows-server/identity/ad-ds/deploy/demoting-domain-controllers-and-domains–level-200-
In the server manager on the old domain controller click on Manage -> Remove Roles and Features
Clear the Active Directory Domain Services check box to remove the features in order to be able to demote the domain controller.
If the server is currently a domain controller, this does not remove the AD DS role and instead switches to a Validation Results dialog with the offer to demote. Otherwise, it removes the binaries like any other role feature.
- Do not remove any other AD DS-related roles or features – such as DNS, GPMC, or the RSAT tools – if you intend to promote the domain controller again immediately. Removing additional roles and feature increases the time to re-promote, as Server Manager reinstalls these features when you reinstall the role.
- Remove unneeded AD DS roles and features at your own discretion if you intend to demote the domain controller permanently. This requires clearing the check boxes for those roles and features.The full list of AD DS-related roles and features include:
- Active Directory Module for Windows PowerShell feature
- AD DS and AD LDS Tools feature
- Active Directory Administrative Center feature
- AD DS Snap-ins and Command-line Tools feature
- DNS Server
- Group Policy Management Console
The equivalent ADDSDeployment and ServerManager Windows PowerShell cmdlets are:
Uninstall-addsdomaincontroller
Uninstall-windowsfeature
The validation process will inform you that it found problems on the server and that you first have to demote the domain controller in order to remove the features.
Therefore click on Demote this domain controller
Don’t check the Force the removal of this domain controller checkbox!
This feature you will only need if the domain controller can’t be demoted the normal way.
If you check this, you will have to clean up the Active Directory Domain Controller server metadata by hand as shown in the following article from Microsoft.Clean up Active Directory Domain Controller server metadata
https://docs.microsoft.com/en-us/windows-server/identity/ad-ds/deploy/ad-ds-metadata-cleanup
Check Proceed with removal
After that the server is a normal member server in your domain and will get restarted. In most cases you will remove it after that completely from the domain and network.
Raise Active Directory domain and forest functional levels
If all domain controllers running the newest Windows Server operating system version in your network, you can raise the domain and forest level.
Functional levels are an extension of the mixed mode and the native mode concepts that were introduced in Microsoft Windows 2000 Server to activate new Active Directory features. Some additional Active Directory features are available when all the domain controllers are running the newest Windows Server version in a domain or in a forest, and when the administrator activates the corresponding functional level in the domain or in the forest.
To activate the newest domain features, all the domain controllers must be running the newest Windows Server operating system version in the domain. If this requirement is met, the administrator can raise the domain functional level.
Source: https://docs.microsoft.com/en-us/troubleshoot/windows-server/identity/raise-active-directory-domain-forest-functional-levels
The most common method to enable the domain and forest functional levels is to use the graphical user interface (GUI) administration tools that are documented in the TechNet article about Windows Server 2003 Active Directory functional levels. This article discusses Windows Server 2003. However, the steps are the same in the newer the operating system versions. Additionally, the functional level can be manually configured or can be configured by using Windows PowerShell scripts. For more information about how to manually configure the functional level, see the “View and set the functional level” section.
For more information about how to use Windows PowerShell script to configure the functional level, view Raise the Forest Functional Level.
Source: https://docs.microsoft.com/en-us/troubleshoot/windows-server/identity/raise-active-directory-domain-forest-functional-levels
Raise Domain Functional Level, right click on your domain and select Raise Domain Functional Level …
Raise Forest Functional Level, right click on Active Directory Domains and Trust and select Raise Forest Functional Level …
For Windows Server 2019 there is no new Forest Function Level (FFL) or Domain Function Level (DFL) when upgrading from Windows Server 2016 to 2019.
The latest level is Windows Server 2016.
Only the AD Schema is moved from version 87 in Windows Server 2016 to version 88 in Windows Server 2019. For Windows Server 2022 there is even no schema update.
Get-ADDomainController -Filter * | select name, operatingsystem