
Время на прочтение5 мин
Количество просмотров202K
Не секрет, что окончание поддержки Windows Server 2003 все ближе. День Х назначен на 17 июля 2015 года, а значит остается все меньше времени, чтобы успеть перевести свою инфраструктуру на более современные версии операционной системы. На Хабре мы уже делали несколько анонсов об окончании поддержки, на портале Microsoft Virtual Academy опубликован курс по материалам Jump Start, есть перевод статьи о переносе файлового сервера. В этой статье будет рассказано о миграции Active Directory и приведен пошаговый алгоритм, которым поможет вам при реализации переноса.
Перенос Active Directory с Windows Server 2003 на Windows Server 2012 R2 является одной из первоочередных задач, которые необходимо решить в процессе миграции.
На самом деле, перенос Active Directory не несет в себе каких-либо сложностей. Нужно выполнить лишь несколько шагов, о которых будет подробно рассказано далее.
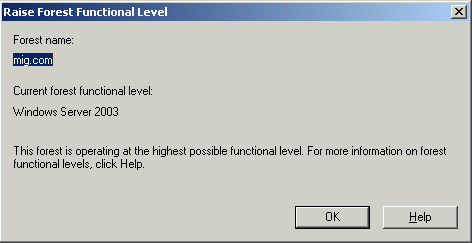
Сначала выполним небольшую настройку на контроллере домена с установленной на нем Windows Server 2003. Обязательно проверьте, что для существующего домена и леса в качестве режима работы (functional level) выбран Windows Server 2003.
Для того, что изменить режим работы домена и леса необходимо запустить оснастку Active Directory Domains and Trust. Для изменения режима работы домена щёлкаем правой кнопкой мыши по домену, для режима работы леса – по Active Directory Domains and Trusts. Выбираем Raise Domain Functional Level и Raise Forest Functional Level соответственно.
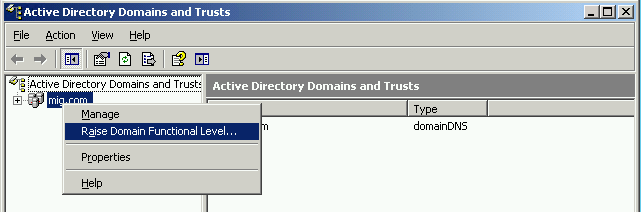
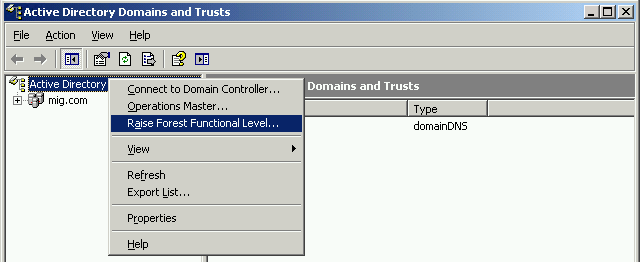
В обоих случаях режим работы должен быть установлен на Windows Server 2003.

Следующим шагом нам нужно добавить к нашей сети второй контроллер домена под управлением Windows Server 2012 R2. Для этого на сервер с Windows Server 2012 R2 устанавливаем роль Active Directory Domain Services.

После установки добавим новый контроллер домена к существующему домену. Для этого нам нужно будет использовать учетную запись, которая входит в группу Enterprise Admins и обладает соответствующими правами.
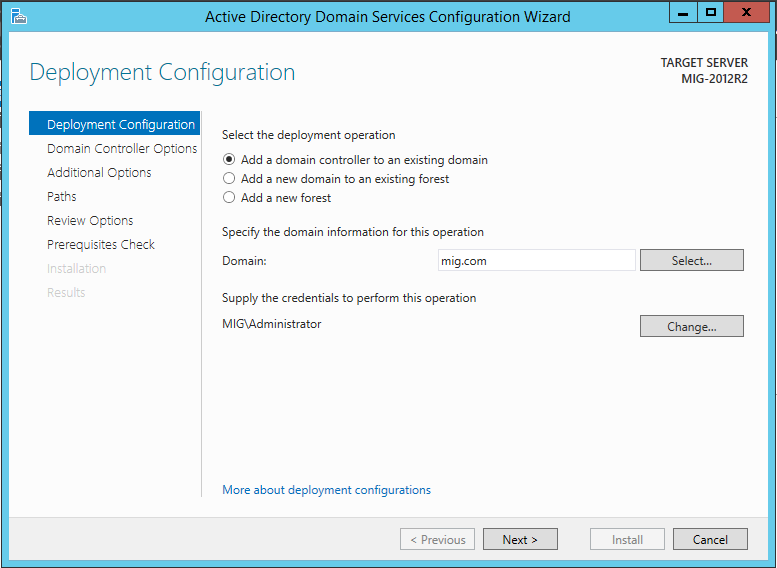
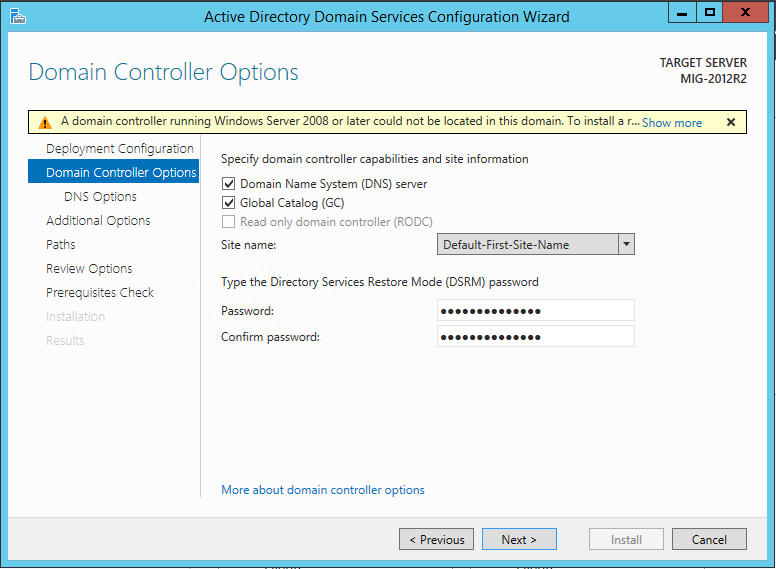
Необходимо указать, будет ли этот сервер выполнять роль DNS сервера и глобального каталога (Global Catalog – GC).
На экране Additional Options нужно указать с какого контроллера домена будет выполнена репликация на существующий. Нужно выбрать контроллер домена под управлением Windows Server 2003.

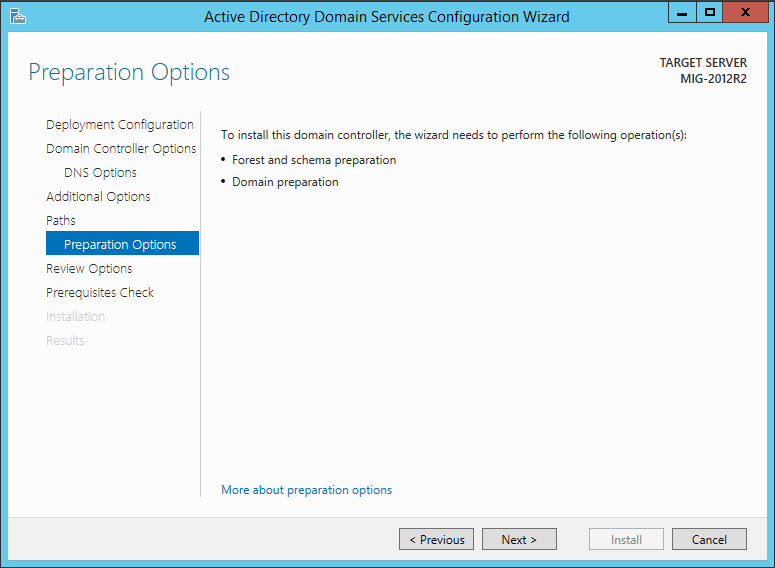
Для установки домена необходимо выполнить подготовку леса, домена и схемы. Если раньше для этого обязательно нужно было запустить команду adprep (причем сделать это надо было до начала конфигурации домена), то теперь эту задачу берет на себя мастер конфигурации ADDS, и подготовка может быть выполнена автоматически.
Далее нужно дождаться завершения установки и перезагрузить компьютер. В итоге, вы получите контроллер домена с установленной на нем Windows Server 2012 R2.
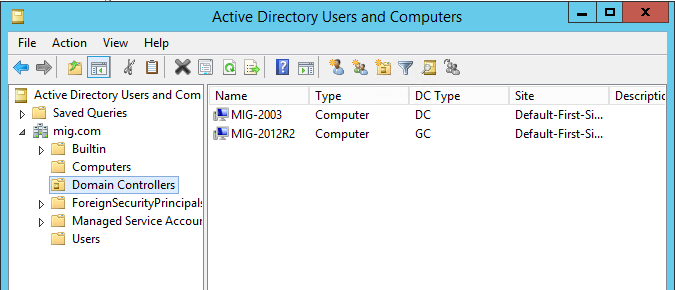
Теперь в оснастке Active Directory Users and Computers мы можем увидеть, что в нашей сети есть два контроллера домена.

После того, как выполнены предварительные шаги, мы можем перейти непосредственно к переносу Active Directory. Выполнять необходимые действия мы будем на контроллере домена под управлением Windows Server 2012 R2 в следующем порядке:
- Перенос роли FSMO (Flexible Single Master Operations)
- Изменение контроллера домена Active Directory
- Изменение Мастера схемы (Schema Master)
- Удаление контроллера домена под управлением Windows Server 2003 из глобального каталога (Global Catalog)
1. Перенос роли FSMO (Flexible Single Master Operations)
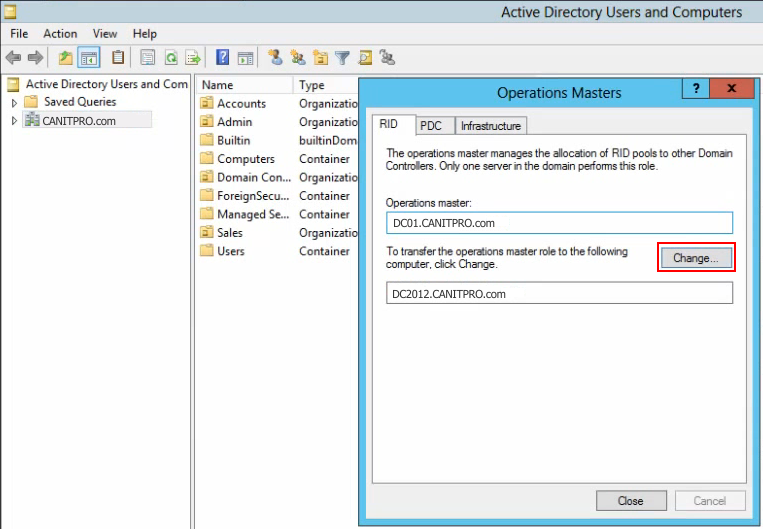
Для того, чтобы перенести роль FSMO, открываем оснастку Active Directory Users and Computers, щёлкаем правой кнопкой мышки по нашему домену и в появившемся подменю выбираем Operations Masters.
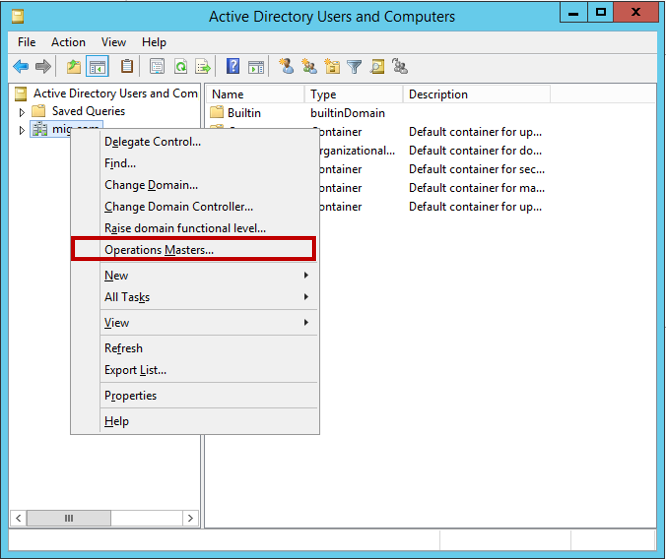
Нам нужно перенести роль хозяина операций. Для этого на каждой вкладке во вновь появившемся окне нажимаем кнопку Change и переносим роль с 2003 сервера на сервер под управлением 2012 R2.
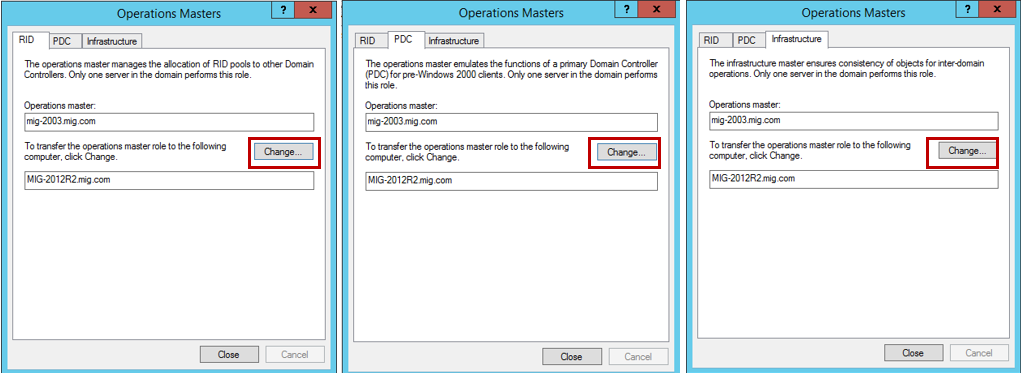
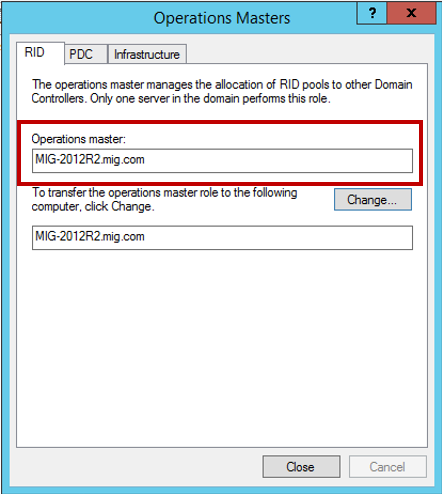
Подтверждаем операцию переноса и дожидаемся ее благополучного завершения. Не забудьте проверить, что в итоге роль хозяина операций теперь находится на сервере под управлением Windows Server 2012 R2:
2. Изменение контроллера домена Active Directory
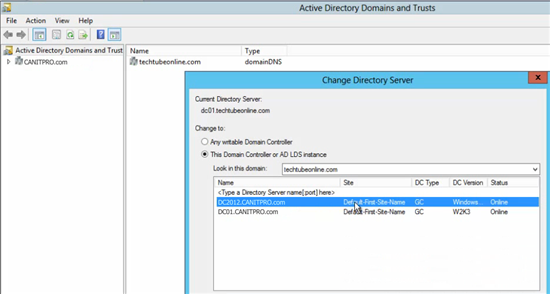
Теперь переходим к изменению контроллера домена Active Directory. Открываем консоль Active Directory Domains and Trusts, щёлкаем правой кнопкой мышки по лесу и выбираем пункт Change Active Directory Domain Controller.
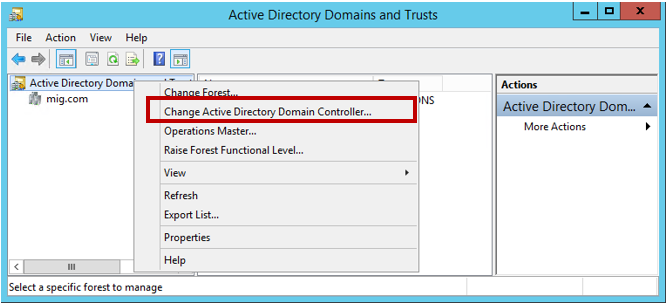
В новом окне выберите пункт This Domain Controller or AD LDS instance и укажите сервер под управлением Windows Server 2012 R2.

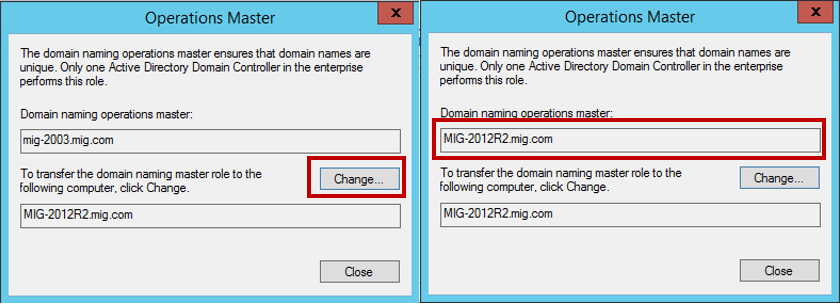
Теперь снова щёлкаем правой кнопкой мышки по лесу и выбираем пункт Operations Master.

Переноси роль хозяина операций именования домена, нажав Change.
3. Изменение Мастера схемы (Schema Master)
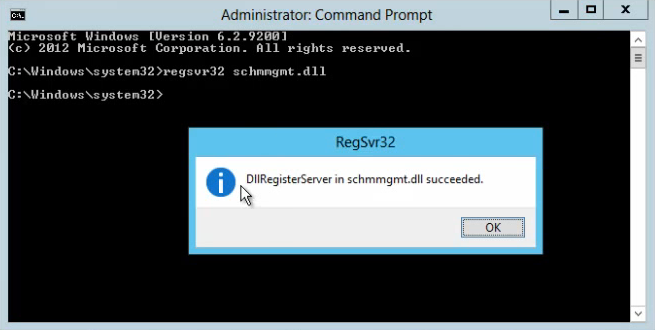
Теперь приступаем к изменению мастера схемы (Schema Master). Запустите командную строку с правами Администратора и введите команду regsvr32 schmmgmt.dll
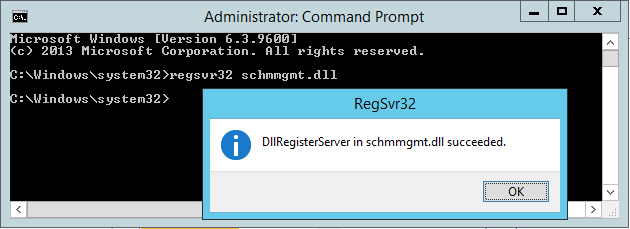
С помощью этой команды происходит первичная регистрация динамической библиотеки DLL, которая является обязательной для оснастки Active Directory Schema.
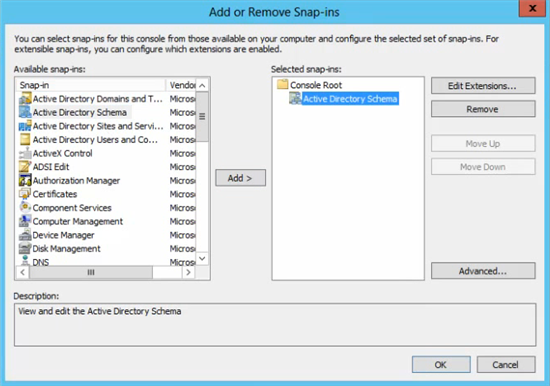
После того, как команда выполнена, можно закрыть командную строку, запустить консоль MMC и добавить оснастку Active Directory Schema (для этого выберите File > Add/Remove Snap—in).
В этой же консоли MMC щёлкаем правой кнопкой мыши по Active Directory Schema и выбираем Change Active Directory Domain Controller. Аналогично действиям, которые мы выполняли в пункте 2, в новом окне выберите пункт This Domain Controller or AD LDS instance и укажите сервер под управлением Windows Server 2012 R2 и нажмите ОК. Появится предупреждение о том, что оснастка схемы Active Directory не подключена. Нажмите ОК для продолжения.
Теперь снова щёлкаем правой кнопкой мышки по лесу и выбираем пункт Operations Master. Для переноса роли хозяина схемы в новом окне нажмите Change.
Теперь можно закрыть MMC консоль, открыть оснастку Active Directory Users and Computers и убедиться, что данные успешно реплицированы на ваш новый сервер под управлением Windows Server 2012 R2. Имейте ввиду, что процесс репликации может занять некоторое время (все зависит от количества объектов Active Directory, которые нужно реплицировать).
4. Удаление контроллера домена под управление Windows Server 2003 из глобального каталога (Global Catalog)
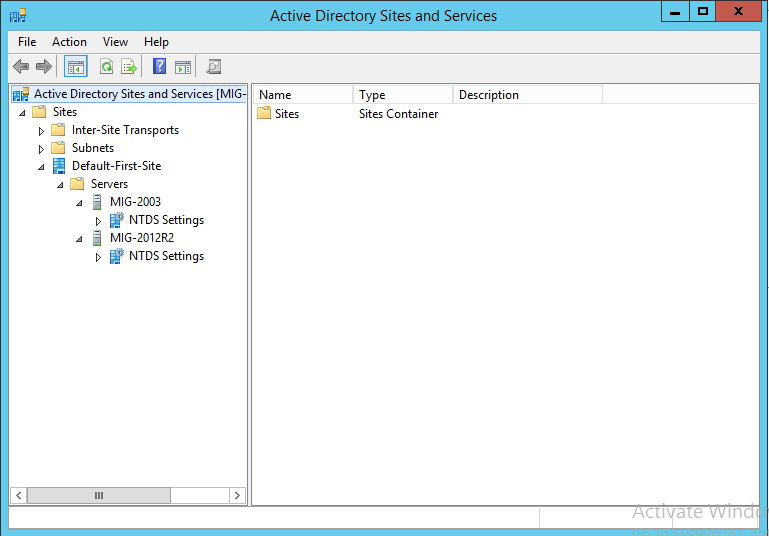
Осталось удалить контроллер домена под управлением Windows Server 2003 из глобального каталога. Для этого открываем Active Directory Sites and Services, разворачивает папку Sites, затем Default-First-Site-Name, затем Servers и, наконец, разворачиваем оба сервера.
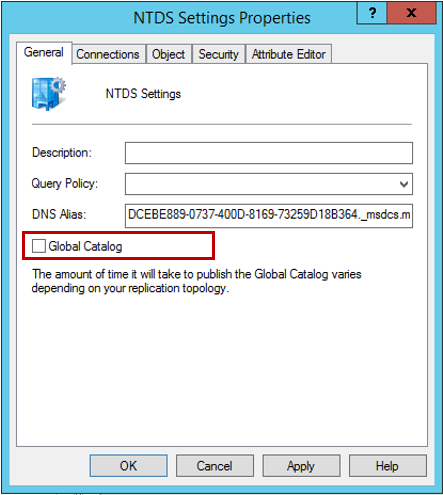
Щёлкните правой кнопкой мышки по NTDS Settings для вашего старого сервера под управление Windows Server 2003, выберите Properties. Во вновь появившемся окне уберите галочку с пункта Global Catalog и нажмите ОК.
В Active Directory Users and Computers контроллер домена на Windows Server 2003 теперь не является глобальным каталогом.
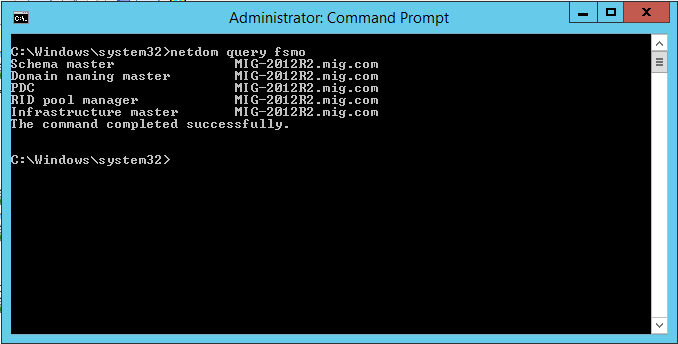
Осталось проверить, что теперь роль FSMO запущена на Windows Server 2012 R2. Для этого в командной строке, открытой с правами Администратора запускаем команду netdom query fsmo
На этом миграция Active Directory завершена. На компьютере под управлением Windows Server 2003 запустите dcpromo (кстати, в Windows Server 2012 R2 dcpromo нет) для того, чтобы понизить роль компьютера с контроллера домена. Если после этого посмотреть на консоль Active Directory Users and Computers, вы увидите, что остался только один контроллер домена – под управлением Windows Server 2012 R2.

Надеюсь, что эта статья будем вам полезной!
Полезные ссылки
- Попробовать Azure бесплатно на 30 дней!
- Изучить курсы виртуальной академии Microsoft
- Основы компьютерной безопасности
- Основы построения доменной сети. Часть 2
- Модернизация инфраструктуры организации с помощью Windows Server 2012 R2
- Переход с VMware на Hyper-V
- Основы построения доменной сети
- Бизнес и облако: лучшие практики решений
- Скачать пробную версию Windows Server 2012 R2
- Загрузить бесплатную или пробную Visual Studio
Одно из преимуществ перевода Active Directory с Windows Server 2003 на Windows Server 2012 R2 – доступ к новым командам Windows PowerShell. Для многих администраторов поиск и перемещение контроллеров домена с ролями хозяев единичной операции Flexible single-master operation (FSMO) в Windows Server 2003 с использованием командной строки – вечный источник неприятностей. К счастью, начиная с версии Server 2008 R2 этот процесс заметно упростился.Вы можете воспользоваться командами Get-ADForest, Get-ADDomain и Move-ADDirectoryServerOperationMasterRole с целевого контроллера домена Windows Server 2012 R2. Имейте в виду, что эти команды не удастся выполнить с контроллера домена Windows Server 2003.Задействовать эти команды можно следующим способом. Чтобы выяснить, на каком сервере в данный момент размещена каждая из ролей, примените следующие команды:
Get-ADForest windowsitpro.ocm | FT SchemaMaster
Get-ADForest windowsitpro.com | FT DomainNamingMaster
Get-ADDomain windowsitpro.com | FT PDCEmulator
Get-ADDomain windowsitpro.com | FT InfrastructureMaster
Get-ADDomain tailspintoys.com | FT RIDMaster
Можно использовать команду Move-ADDirectoryServerOperationMasterRole для перемещения этих ролей. Например, чтобы переместить роль хозяина схемы на сервер с именем SYDNEY-DC2, выполните следующую команду под учетной записью с правами администраторов предприятия и администраторов домена:
Move-ADDirectoryServerOperationMasterRole –Identity SYDNEY-DC2 –OperationMasterRole SchemaMaster
Если сервер, на котором размещен хозяин схемы (или другая роль FSMO), находится в автономном режиме, то можно применить параметр –Force для принудительного перемещения.
При перемещении ролей FSMO следует начать с переноса всех ролей в корневой домен леса из Server 2003 на узлы Server 2012 R2, прежде чем перемещать роли в дочерние домены леса. Помните, что роли хозяина схемы и хозяина именования доменов представляют собой роли уровня леса, а роли эмулятора основного контроллера домена, хозяина инфраструктуры и хозяина RID существуют для каждого домена.
Удаление устаревших контроллеров домена
После того, как вы добавили достаточное количество контроллеров домена Windows Server 2012 R2 к лесу Active Directory, перенесли роли FSMO, убедились, что все пользовательские разделы также размещены на контроллерах домена Server 2012 R2, и сделали пару контроллеров домена 2012 R2 серверами глобального каталога, можно избавиться от старых контроллеров домена Server 2003.
Самый простой способ это сделать — понизить уровень каждого контроллера домена Server 2003 до состояния рядового сервера, удалить его из домена, а затем пройти весь процесс списания, предусмотренный для компьютеров в вашей компании.
Понижение уровня контроллера домена Windows Server 2003 выполняется таким же способом, как и повышение. Скорее всего, прошло некоторое время с тех пор, когда вы последний раз повышали уровень рядового сервера Server 2003 до контроллера домена. В Windows Server 2012 R2 процедура полностью изменилась, поэтому следует запустить dcpromo.exe из командной строки с использованием учетной записи, которая является членом группы администраторов домена (Domain Admins) или администраторов предприятия (Enterprise Admins).
Процесс понижения уровня довольно прост, достаточно следовать указаниям мастера. После того, как будут удалены все контроллеры домена 2003 можно подумать о повышении рабочего уровня домена. Дополнительные сведения о понижении уровня контроллера домена Server 2003 можно найти в документе TechNet по адресу http://technet.microsoft.com/en-us/library/cc740017%28v=ws.10%29.aspx.
Перенос Windows Server 2003: обновление уровней работы домена и леса
После того, как из вашей среды будут удалены все контроллеры домена Windows Server 2003, можно обновить уровни работы домена и леса. Ключ к пониманию изменений в уровне работы в том, что ваши варианты зависят от операционных систем используемых контроллеров домена. Если в домене имеется несколько контроллеров Windows Server 2008, 2008 R2 или 2012, то вам не удастся повысить рабочий уровень до Windows Server 2012 R2, пока эти контроллеры не будут удалены.
Кроме того, если повысить уровень работы домена до Windows Server 2012 R2, этот рабочий уровень определит минимальную версию операционной системы всех будущих контроллеров домена. Другими словами, если имеется домен с уровнем работы Windows Server 2012 R2, то вам не удастся добавить в него контроллеры домена с операционными системами Windows Server 2012, Windows Server 2008 R2 или Windows Server 2008.
Также следует помнить, что минимальный уровень работы домена определяет минимальный уровень работы леса. Если в лесу пять доменов и четыре из них работают с Windows Server 2012 R2, а один — с Windows Server 2008, то высшим уровнем работы леса будет Windows Server 2008. Вы не сможете повысить уровень работы леса до Windows Server 2012 R2, прежде чем измените уровень работы домена Windows Server 2008 до уровня работы Windows Server 2012 R2.
Оценка инфраструктуры DNS 2003 перед миграцией
Перед переходом от Server 2003 на Server 2012 R2 необходимо определить, какие серверы в вашей организации функционируют в качестве DNS-серверов. Кроме того, нужно выяснить, какие зоны DNS размещены на DNS-серверах, и понять природу этих зон. Интегрированная с Active Directory зона хранится в Active Directory. Обычная основная или дополнительная зона хранится в файле. Зоны-заглушки, которые просто содержат записи серверов имен, также могут храниться в Active Directory или в файле.
Развертывания службы DNS в Windows Server 2003 обычно имеют две формы: контроллеры домена работают и как сервер DNS или создаются автономные серверы DNS. Автономные серверы DNS будут настроены для размещения обычного основного или обычного дополнительного варианта зоны. На контроллерах домена также можно размещать обычные основные или обычные дополнительные варианты зоны.
Вы можете определить, хранится зона в Active Directory или в файле, с помощью следующей команды на сервере DNS:
Dnscmd /enumzones
Еще это можно сделать, проверив зоны в консоли диспетчера DNS. Преимущество использования dnscmd в том, что ее можно использовать для дистанционных запросов к DNS-серверам.
Следует также определить, настроены ли посредники запросов DNS и заданы ли дополнительные параметры, такие как циклическое обслуживание или расстановка по адресу, отличные от значений по умолчанию. Как правило, в большинстве компаний значения по умолчанию не изменяются, но полезно выполнить проверку на этапе оценки, иначе можно обнаружить, что вы пропустили важные настройки посреди процесса миграции.
Перевод службы имен доменов с Server 2003 на 2012 R2
Выше мы говорили об оценке инфраструктуры службы DNS. Миграция интегрированных с Active Directory зон DNS осуществляется достаточно просто. Прежде всего, нужно добавить контроллер домена с установленной на нем системой Server 2012 R2. Его необходимо настроить как сервер DNS. Позаботьтесь о том, чтобы соответствующая зона реплицировалась на новом контроллере домена. Если вы настроили зону таким образом, чтобы она реплицировалась в особом разделе, вам придется предварительно создать такой раздел на контроллере домена. Завершив установку интегрированных с Active Directory зон DNS на своих контроллерах доменов 2012 R2, вы можете приступать к мягкому выводу из эксплуатации серверов DNS, на которых эти зоны были размещены ранее.
Если вы выполняете миграцию стандартных основных зон, важно выполнить следующие действия: создать вспомогательную зону на сервере DNS, куда вы переходите, настроить репликацию с основной зоны на вспомогательную и после этого преобразовать вновь реплицированную вспомогательную зону так, чтобы она стала первичной. Тип зоны можно изменить через консоль диспетчера DNS или с помощью утилиты командной строки dnscmd.exe. После того, как вы преобразуете новую вспомогательную зону в первичную, вам придется либо продолжить преобразования и превратить изначальную первичную зону во вспомогательную, либо вывести из эксплуатации данный сервер DNS.
Windows Server 2003: что делать после переноса службы имен доменов
Итак, вы перевели все свои зоны с серверов DNS, функционирующих под управлением Windows Server 2003, на серверы DNS, работающие под Windows Server 2012 R2. И что же делать дальше?
Выполните следующие операции (их очередность особого значения не имеет):
- Выведите из эксплуатации серверы DNS, функционирующие под управлением Windows Server 2003. Если вы провели миграцию корректно, ни один из них не будет выполнять функции сервера основной зоны.
- Перенастройте области DHCP, используя адреса новых серверов DNS. Это задача несложная.
- Проведите перенастройку клиентов, у которых адреса серверов DNS определены статично. Возможно, это не так просто. Если специалисты вашей компании не отличаются особым прилежанием в деле документирования параметров настроек, вам, возможно, неизвестно, настройки DNS каких компьютеров заданы статически.
Дело осложняется тем, что настройки DNS статически назначаются не только компьютерам. Адреса серверов DNS статически назначаются и некоторым приложениям. Перед отключением таких приложений полезно удостовериться, что соответствующие серверы DNS не отвечают на запросы. Эту задачу можно решить посредством настройки процедуры регистрации и выяснения, проходят ли запросы по каналам связи. А можно подойти к вопросу, что называется, без затей: отключить компьютер и посмотреть, начнет ли кто-то из пользователей возмущаться.
Словом, определить, каким образом были настроены адреса серверов DNS, не всегда просто. Поэтому администраторы нередко назначают новому серверу DNS IP-адрес старого сервера DNS.
Сортировка рабочих нагрузок файловых серверов
Вероятно, скромный файловый сервер — самая распространенная роль сервера Windows. Необходимость иметь центр для обмена файлами между сотрудниками офиса отчасти была причиной для разработки сети Ethernet в компании Xerox PARC.
Если вы еще не приступили к миграции, то, скорее всего, среди ваших рабочих нагрузок больше всего файловых серверов с Windows Server 2003. В отличие от других рабочих нагрузок, файловые серверы, как правило, присутствуют во всех подразделениях компании. Это означает, что в рамках миграции необходимо предусмотреть меры для рабочих нагрузок, размещенных в удаленных офисах.
При сортировке рабочих нагрузок файловых серверов учитывайте следующие обстоятельства:
- Является ли файловый сервер частью развертывания службы DFS или автономного файлового сервера?
- Содержит ли файловый сервер только документы или используется для размещения таких рабочих нагрузок, как профили пользователей и домашние папки?
- Как настроены разрешения на доступ к общему ресурсу?
- Как настроены разрешения на уровне папок и файлов?
- Назначены ли квоты NTFS или диспетчера ресурсов файлового сервера?
- Действует ли фильтр блокировки файлов?
- Не проще ли выполнить миграцию, сохранив имя сервера, или новое имя файлового сервера приемлемо?
- Следует ли использовать файловые серверы для документов, или пришло время переходить на такое решение, как SharePoint?
- Хранятся ли на файловых серверах устаревшие данные, от которых лучше избавиться?
Если файловый сервер существует довольно давно, а регулярные чистки не проводились, то некоторые файлы наверняка перестали быть интересными пользователям уже много месяцев или лет назад. Порой оказывается, что вместо гигабайтов файлов достаточно перенести на новое место пару сотен мегабайт данных.
Новые возможности файловых серверов
Администраторы, сохранившие верность файловым серверам с Windows Server 2003, обычно плохо представляют себе достоинства новых версий операционной системы Windows Server.
Перечислим наиболее важные из них:
- Дедупликация. Данная функция появилась в операционной системе Windows Server 2012. В дедупликации используется метод фрагментирования (chunking), при котором операционная система определяет и дедуплицирует наборы идентичных блоков данных. Это может обеспечить значительную экономию места в традиционных сценариях использования файловых серверов.
- Динамический контроль доступа. Вместо того чтобы назначать разрешения для папок и файлов вручную, разрешения назначаются динамически на основе свойств файлов или папок. Например, благодаря динамическому контролю доступа можно автоматически назначать разрешения на основе ключевых слов, содержащихся в документе. Для компаний с десятками, если не сотнями тысяч файлов, динамический контроль доступа более эффективен, чем вручную назначаемые разрешения.
- Репликация DFS. Если в компании используется распределенная файловая система (DFS), то механизм репликации, доступный в более новых версиях операционной системы, лучше применявшегося в Windows Server 2003. Среди улучшений в Windows Server 2012 R2 — создание клонов базы данных для реплик, предшествующих заданию начальных значений, и возможность восстановления файлов.
- Диспетчер ресурсов файлового сервера (FSRM). FSRM стал новшеством Windows Server 2003 R2, это одна из функций, о которых многие администраторы просто не знают. С помощью FSRM можно применять жесткие и мягкие квоты для папок, решать задачи управления папками, в частности, идентифицируя и перемещая файлы, к которым не было обращений в течение определенного времени, и формировать отчеты на основе характеристик файлов (возраст, размер, частота обращений и другое).
Миграция рабочих нагрузок файлового сервера Server 2003
Для переноса рабочей нагрузки файлового сервера Server 2003 на Server 2012 R2 недостаточно просто скопировать файлы с компьютера Server 2003 на компьютер Server 2012 R2. Как отмечалось выше, необходимо помнить о:
- разрешениях для общего ресурса;
- разрешениях для файлов и папок;
- квотах;
- фильтрах блокировки файлов.
В зависимости от ваших настроек и способов использования файлов может потребоваться даже учесть такие факторы, как аудит, дедупликация, сжатие файлов и папок и шифрование EFS.
Существует по крайней мере два метода копирования файлов и папок с исходного компьютера на целевой компьютер.
- Использовать приложение резервного копирования для архивации структуры папок с последующим восстановлением структуры папок на целевом компьютере. Это обеспечит сохранение разрешений для файлов и папок. В общем случае разрешения для общих ресурсов при этом не сохраняются.
- Использовать такую программу, как robocopy.exe с параметром /copyall. В результате будут скопированы не только файлы, но и атрибуты, временные метки, разрешения безопасности, информация о владельце и аудите. Перед копированием убедитесь, что том назначения имеет формат NTFS.
Немного сложнее обстоит дело с разрешениями для общего ресурса. Процедура экспорта описана в статье базы знаний 125996 (http://support.microsoft.com/kb/125996). В сущности, это позволяет убедиться, что путь исходной папки и путь папки назначения одинаковы. Затем выполняется следующая команда на исходном сервере для экспорта имен, путей и параметров безопасности общего ресурса:
reg export HKLM\SYSTEM\CurrentControlSet\Services\LanmanServer\Shares c:\share-permissions.reg
Далее выполняется импорт разрешений с помощью команды:
reg import share-permissions.reg
Если требуется изменить настройки папок расположения общих ресурсов в сценариях и домашних каталогах, можно настроить новый Server 2012 R2 с таким же именем, как у исходного сервера 2003. Дополнительные сведения о переводе файловых серверов с Server 2003 на Server 2012 R2 можно получить по следующей ссылке: http://blogs.technet.com/b/josebda/archive/2014/11/05/migrating-file-server-from-windows-server-2003-to-windows-server-2012-r2.aspx
IPAM.doc
Что такое IPAM
При планировании перевода инфраструктуры сети на версию Windows Server 2012 R2 вам, помимо прочего, придется рассмотреть возможность применения механизма централизованного управления протоколом DHCP средствами IPAM.
IPAM (IP Address Management, управление IP-адресами) — это функция, впервые реализованная в системе Windows Server 2012. Она позволяет осуществлять централизованное управление серверами DHCP. С помощью этой технологии вы можете просматривать итоговую информацию по областям, включая сведения об использовании адресов, глобальном изменении параметров, переносить области с одного сервера DHCP на другие и следить за тем, какие компьютеры и какие пользователи сдают в аренду те или иные адреса в определенный момент времени.
При переводе инфраструктуры DHCP из среды Windows Server 2003 в среду Windows Server 2012 R2 следует внимательно рассмотреть возможность использования IPAM в целях повышения эффективности управления серверами DHCP. В прошлом, когда в разговорах с разными специалистами я затрагивал вопрос об управлении серверами DHCP, мои собеседники, как правило, признавали, что используют решения, специально подобранные для того или иного случая. При этом электронные таблицы Excel применяются в качестве средства централизованного управления IP-адресами чаще, чем любое решение, созданное для этой цели.
Недостаток IPAM состоит в том, что даже после внесения изменений в версию Windows Server 2012 R2 это средство в отношении своих функциональных возможностей не достигло того уровня зрелости, который устроил бы большинство администраторов. Со своей задачей IPAM справляется, но в следующей версии Windows этот продукт, вероятнее всего, станет еще лучше (к тому же позволит администраторам централизованно управлять всеми DNS-серверами организации). С установкой IPAM вам, возможно, придется немного повозиться, и здесь надо отметить, что многие специалисты, пытавшиеся решить проблему данным способом, приходили к выводу, что заставить существующую инфраструктуру серверов DHCP взаимодействовать с этим продуктом слишком сложно, — и оставляли свои попытки. Если же вам предстоит осуществить переход на новые серверы DHCP, все будет проще.
Требования к серверам DHCP, управляемым с помощью IPAM
Выше мы рассмотрели технологию IPAM, которая позволяет централизованно управлять эксплуатируемым в организации сервером DHCP. Однако IPAM может применяться не только для управления серверами DHCP, функционирующими под управлением систем Windows Server 2012 и Windows Server 2012 R2.
Эту технологию можно использовать и для управления серверами DHCP Windows Server 2008 R2 и предыдущих версий. Таким образом, хотя возможность управления серверами DHCP версии 2003 до установки на них новой редакции операционной системы не предусмотрена, если вы перевели серверы DHCP на версию Windows Server 2008 R2, то можете воспользоваться преимуществами технологии IPAM, не отказываясь от этой платформы.
Разумеется, на самом сервере IPAM должна быть установлена Windows Server 2012, Windows Server 2012 R2 или Windows Server vNext, и вам придется в конечном итоге обновлять упомянутые серверы Windows Server 2008 R2. Но на момент написания данной статьи больший интерес вызывают серверы, работающие под управлением системы Server 2003. У нас будет возможность подумать об отказе от использования системы Server 2008 R2, когда до дня прекращения поддержки этого продукта производителем останется всего несколько месяцев.
Сценарии регистрации, предпочтения групповых политик и переход с системы Server 2003
Предпочтения групповых политик Group Policy Preferences — группа технологий, ставших достоянием потребителей с выходом системы Windows Server 2008. Одна из проблем администраторов, все еще эксплуатирующих систему Windows Server 2003 и переходящих на Windows Server 2012 R2, состоит в том, что почти все материалы, привлекающие внимание пользователей интернета в 2015 году, посвящены особенностям версии Windows Server 2012 R2. А ведь имеется ряд любопытных технологий, впервые примененных в версиях Windows Server 2008 и Windows Server 2008 R2 и до сих пор сохранившихся в операционной системе. Но за последние 7 лет эти технологии почти не претерпели изменений, и потому о них больше не пишут.
Сценарии регистрации — проклятие для многих администраторов, отчасти потому, что эти сценарии обычно развиваются методом приращений. В новых обстоятельствах администраторы не хотят переписывать их с самого начала, а стараются «достраивать» такие сценарии по мере необходимости — каждый раз применительно к конкретному случаю. Мне доводилось видеть необычайно длинные сценарии регистрации, предназначенные для выполнения вполне стандартных задач. Администраторы, унаследовавшие их от своих предшественников, ограничиваются «навешиванием» на старый продукт дополнительных фрагментов, вместо того чтобы копать глубже и разбираться в логике процесса, что стало бы предварительным этапом процесса написания сценария, что называется, «с чистого листа».
Идея разработчиков предпочтений групповых политик сводится к тому, чтобы использовать групповые политики для решения задач, традиционно выполнявшихся с помощью сценариев регистрации. Речь идет о таких задачах, как отображение сетевых накопителей, настройка соединений принтеров, конфигурация реестра, а также конфигурация системы локальных файлов. Предпочтения групповых политик не обеспечивают решение всех проблем, с которыми может справиться сценарий регистрации, но они наделены многими функциональными возможностями, характерными для таких сценариев.
В следующей статье я подробно расскажу о том, чего можно добиться с помощью предпочтений групповых политик и почему стоит рассмотреть возможность их использования вместо сценариев регистрации, когда вы завершите процесс перехода с системы Windows Server 2003.
In this blog post , I am going to list the steps involved in transition from a Windows 2003 R2 Small Business Server Domain Controller to a Standard Windows 2012 Domain Controller.
The server involed in this process are:
Windows 2003 Small Business: adc-sbs
Windows 2012 Standard: adc-2012.
First of all, I’ve installed the Windows 2012 Server using a static IP address and set the preferred DNS server “pointing” to adc-sbs ip address. Next we have totally updated both Servers with all the latest Windows, and verified that the date/time is correct.
Backup
First of all: backup !
We always need to ensure that we take a complete backup along with System State Backup of the SBS Server if something goes wrong.
Check AD
To ensure a seamless transition we need to perform an health check of AD in Windows SBS 2003 using tools like dcdiag.exe (contained in Windows 2003 Support Tools) and Microsoft Windows Small Business Server 2003 Best Practices Analyzer (see linkografia).
Uninstall UnUsed Software
In the new Windows 2012 environment I won’t use Exchange, WSUS and other stuff: for this reason, and also to avoid problems, my advice is to uninstall any software or service that is not useful in the Windows 2003 SBS. The procedure I usually follow in such cases is to make to make a list of software to uninstall: after that I uninstall of the first one, wait a few days to see that there are no problems between the users and other installed services, and then uninstall the later program in the list.
Exchange is often very difficult to remove, but we have to uninstall fully, to make sure AD is cleaned up during the migration process.
Remove Legacy GPO
To simplify the transition to the new server, we need to minimize the number of GPOs involved.
Also the Group Policy objects are updated a lot for Windows 2012: these are not simply a superset of the Windows SBS 2003 GPOs, but some of then can be incompatible.
For this reason it is best to just leave the “main” GPOs, deleting all the others: at the end of the migration process we can recreate in the new environment the GPOs taking advantage of the new capabilities.
- Open Server Management: in the navigation pane, click Advanced Management, click Group Policy Management, and then click Forest: <Your Domain Name>.
- Click Domains, click <YourDomainName>, and then click Group Policy Objects.
- Right-click Small Business Server Auditing Policy, click Delete, and then click OK.
- Repeat the step to delete all of the others GPOs: recommend leaving only Default Domain Controllers Policy and Default Domain Policy.
- At the end click WMI Filters, and delete all the items (PostSP2, PreSP2, etc)
Remove Logon Settings
Always to simplify the transition to the new server, and to avoid any issue in this process, we will remove any legacy an unused log script.
Att.: Windows SBS 2003 uses logon scripts to install software and for other tasks. In Windows 2012 these task can be replaced with a combination of GPOs and logon scripts, that work more efficiently.
- Click Start, and then click Run: type \\localhost\sysvol\<DomainName>.local\scripts, and then press ENTER.
- Delete or rename SBS_LOGIN_SCRIPT.bat and check the other cmd or bat files.
After that verify that all users’ profiles are updated to not use a logon script: to verify user profiles follow the next.
- Click Start, click Administrative Tools, and then click Active Directory Users and Computers.
- In the navigation pane, expand <DomainName>, expand My Business, expand Users, and then expand SBSUsers.
- Ctrl-click to select all user accounts, right-click the highlighted user accounts, and then click Properties.
- On the Profile tab, verify that the logon script check box is blank.
Set the minimum functional level
The minimum functional level must be at least Windows Server 2003: please control that the Domain functional level is set to Windows Server 2003, in AD Users and Computers right click the “Domain Name”. Also control that the Forest functional level is set to Windows Server 2003, in AD Domains and Trusts right click “Active Directory Domains and Trusts”.
Join Windows 2012 to the domain
To join a domain, just click the current domain or workgroup name in Server Manager and .
A reboot will be required.
Install Active Directory Domain Services in Windows 2012
1) Start the Server Manager and choose “Add roles and features”, in “Before you begin” click next, in the “Installation Type” use “Role-based or feature-based installation” and click Next.
2) Choose adc-2012 and click Next.
3) Now check the Active Directory Domain Services and in the upcoming window click the “Add features” button.
4) Leave selected Group policy management and then Click Next and then choose “Restart the destination automatically if required” and press Install .
Promote the server to be a domain controller
1) After installing the Active Directory Domain Services feature on your server, it is possible promote it to be a domain controller. If you have just finished the feature installation, the AD DS Configuration Wizard begins automatically: however, if the feature installation has already been closed, you can start the Active Directory Domain Services Configuration Window by clicking the Tasks icon along the top of Server Manager and click “Promote this server to a domain controller”.
2) Supply the credentials for the operation: an administrative user in the domain.
3) Check “Add a domain controller to an existing domain”
4) Choose Domain Name System (DNS) server and Global Catalog (GC) and type the Directory Services Restore Mode password and then click Next.
5) Now you will be prompted with the warning in the next.
A delegation for this DNS server cannot be created because the authoritative parent zone cannot be found or it does not run Windows DNS server. If you are integrating with an existing DNS infrastructure, you should manually create a delegation to this DNS server in the parent zone to ensure reliable name resolution from outside the domain “test.local”. Otherwise, no action is required.
You do not need to be concerned about this warning message: click Next.
6) Choose Next and either use the default. Leave IFM (Install from media) Unchecked and click Next.
7) Location of the AD DS database, Log Files and Sysvol: here you can leave the default and click Next.
 Click Next and then Next: here information about forest, schema and domain update is shown. Click Next and a prerequisite checks will be done.
9) Review the Check (usually all the warning can be ignored) and click Install.
A reboot is required and it happens automatically by default: at the end the Windows 2012 will be a DC. Pls check the event viewer for any possible problems.
Transfer FSMO roles to Windows 2012 server
Att.: After you move the FSMO roles away from Windows 2003 SBS you have 21 days grace period to keep the server box running. After the completion of 21st day, the server simply will stop to work: so it’s recommended to perform these final steps before this period end.
To transfer all 5 of the FSMO roles simply run the following command in PowerShell in Power Shell on Windows 2012 server:
Move-ADDirectoryServerOperationMasterRole -Identity “adc-2012” –OperationMasterRole PDCEmulator,RIDMaster,InfrastructureMaster,SchemaMaster,DomainNamingMaster
Once you transfer the FSMO roles to the new DC, adc-sbs will start to complain and shutdown itself down on regular intervals “by design” (pls see in linkografia Extend 21 day limit).
To check if adc-2012 hold all the AD roles use the next power shell commands.
Enter-PSSession adc-2012
Import-Module activedirectory
Get-ADForest smallbusiness.local
Get-ADDomain smallbusiness.local
Demote Windows 2003 SBS
Now it is possible demote the SBS server so it is no longer a domain controller and remove from network , reformat and use the hardware for any other purpose
Start -> Run -> DcPromo
Att.: Do no select the flag “Delete the domain because this server is the last domain controller in the domain” otherwise all will be deleted !
Final checks
In the windows 2012 server pls verify that in DNS server in Windows 2012 do not remain any reference to the old Windows 2008 server.
DNS zone smallbusiness.local → Properties → Name Server
You have to do the same check in the network connection: WINS, DNS, etc.
Least but not least the time server: in fact it is required to reconfigure the time service on the old and new PDCEmulator, so a recommended external time source is used.
The following command will force the time service in the new Windows 2012 server to do a syncronization, which will be reported in the System Event Log (pls check if all works fine) and set itself like a reliable time source in the AD smallbusiness.local. In the command line in the windows 2012 server the the following.
w32tm /config /syncfromflags:manual /manualpeerlist:pool.ntp.org /reliable:yes
w32tm /config /update
net stop w32time
net start w32time
That’s all……approximately….
Linkografia
Microsoft Windows Small Business Server 2003 Best Practices Analyzer
http://www.microsoft.com/en-us/download/details.aspx?id=5334
Windows 2003 SBS: Extend 21 day limit
http://blog.thesysadmins.co.uk/sbs-2003-to-sbs-2011-migration-extend-21-day-limit.html
- KnowHow ID #:
-
-
admin -
Software/ Windows Server 2003/ Windows Server 2012
65
With the end of support for Windows XP, Office 2003 and Exchange 2003 now upon us, April 8th 2014 to be exact, attention now turns to Windows Server or specifically Windows Server 2003. End of support for Windows Server 2003 is currently slated for July 14th 2015 and a great many organizations still utilize said offering as the cornerstone to their infrastructure to this day. One question to keep in mind though is that with the move on the client end to Windows 8.1, will Windows Server 2003 or 2003 R2 be robust enough to properly enable employees and provide secure access to the plethora of devices in a world now dominated by BYOD? Alternatively an IT administrator might ponder on the further enablement invoked via the deployment of Windows Server 2012 R2 should it be deployed in said organization. Lets explore this possibility via the cornerstone of access enablement offered via Windows Server by investigating the evolution of the Active Directory offering now found in Windows Server 2012 R2
As you may know, Active Directory provides authentication and authorization mechanisms as well as framework from within other related services that can be deployed. As an LDAP compliant database, it commonly contains the most used objects such as users, computers, and groups organized into organizational units or OUs by any number of logical or business needs. Group Policy Objects or GPOs are then linked to OUs to centralize the settings for various users or computers across an organization. Part of the quandaries that IT professionals face is taking advantage of nuances provided in Active Directory in newer server offerings such as Windows Server 2012. As detailed in Pierre’s post, “Windows Server 2012 Active Directory – What’s New?”, Active Directory provided in Windows Server 2012 R2 is provided impactful enhancements. Yet some organizations choose not to migrate due to reasons of uncertainty.
This Step-By-Step has been created to assist with that uncertainty and provide guidance for IT professionals looking to migrate their organizations Active Directory offering from Windows Server 2003 to 2012 R2.
Prerequisites
- Download Windows Server 2012 R2 and create your lab environment. (Instructions can be found here)
- Complete Step-By-Step: Adding a Windows Server 2012 R2 Domain Controller to an Existing Windows Server 2003 network
Transferring the Flexible Single Master Operations (FSMO) Role
- Open the Active Directory Users and Computers console on your new Windows Server 2012 R2 computer.
- Right click your domain and select Operations Masters in the sub menu.
- In the Operations Masters window, ensure the RID tab is selected.
- Select the Change button.
- Select Yes when asked about transferring the operations master role.
- Once the operations master role has successfully transferred, click OK to continue.
- Ensure the Operations Master box now shows your new 2012 R2 Windows Server.
- Repeat steps 4 to 6 for the PDC and Infrastructure tabs.
- Once completed, click Close to close the Operations Masters window.
- Close the Active Directory Users and Computers window.
Changing the Active Directory Domain Controller
- Open the Active Directory Domains and Trusts console on your new Windows Server 2012 R2 computer.
- Right click your domain and select Change Active Directory Domain Controller… in the sub menu.
- In the Change Directory Server window, select This Domain Controller or AD LDS instance.
- Select your new 2012 R2 Windows Server.
- Click OK to continue.
- Back in the Active Directory Domains and Trusts window, hover over the Active Directory Domains and Trusts found in the folder tree on the left hand side to ensure the server now reflects your new 2012 R2 Windows server.
- Right click Active Directory Domains and Trusts found in the folder tree and select Operations Manager… in the sub menu.
- In the Operations Master window, click Change to transfer the domain naming master role to the 2012 R2 Windows Server.
- When asked if you are sure you wish to transfer the operations master role to a different computer, click Yes.
- Once the operations master is successfully transferred, click OK to continue.
- Click Close to close the Operations Master window.
- Close the Active Directory Domains and Trusts console.
Changing the Schema Master
- Open a command prompt in administration view on your new Windows Server 2012 R2 computer.
- On the command prompt window, enter regsvr32 schmmgmt.dll and hit enter.
- Once completed successfully, click OK to close the RegSvr32 window.
- Close the command prompt.
Add the Active Directory Schema Console from MMC
- Open a MMC console on your new Windows Server 2012 R2 computer.
- Click File > Add/Remove Snap-in…
- In the Add or Remove Snap-ins window, select Active Directory Schema and click the Add > button.
- Click OK to continue.

Change the Schema Master
- In the same MMC console, right click Active Directory Schema and select Change Active Directory Domain Controller… in the sub menu.
- In the Change Directory Server window, select This Domain Controller or AD LDS instance.
- Select your new 2012 R2 Windows Server.
- Click OK to continue.
- A warning will appear stating that the Active Directory Schema snap-in in not connected. Click OK to continue.
- Hover over the Active Directory Schema folder in the folder tree to ensure the new Windows Server 2012 R2 computer is shown.
- Now right click Active Directory Schema and select Operations Master… in the sub menu.
- In the Change Schema Master window, click Change to transfer the schema master role to the 2012 R2 Windows Server.
- When asked if you are sure you wish to transfer the schema master role to a different computer, click Yes.
- Once the schema master is successfully transferred, click OK to continue.
- Click Close to close the Change Schema Master window.
- In the MMC, click File > Exit.
- When asked to save the console, click No.
Once completed, open the Active Directory Users and Computers console to verify that the Active Directory database successfully replicated to your new Windows Server 2012 R2 computer. Be aware that the database replication may take some time depending on the number of objects in Active Directory.
Removing the 2003 Windows Server from the Global Catalog Server
- Open Active Directory Sites and Services on your new Windows Server 2012 R2 computer.
- Expand the Sites folder, then the Default-First-Site-Name folder, then the Servers folder.
- Expand both listed servers. One should be your new 2012 Windows Server and one should be you 2003 Windows Server.
- Right click NTDS Settings found under your old 2003 Windows Server.
- In the sub menu, select Properties.
- Under the General Tab, unselect Global Catalog and then click the Apply button.
- Click OK to continue.
- Close the Active Directory Sites and Services window.
- Verify that your new 2012 R2 Windows Server is running the FSMO role by opening the command prompt in Administrative view and running the following command: Netdom query fsmo.
- In the Network and Sharing Center, be sure to change the Preferred DNS server to match the Alternate DNS server, then delete the IP address listed under the Alternate DNS server should it currently be pointed to the old 2003 Windows Server.
All that’s left is to demote the old 2003 Windows server by first adding the new 2012 R2 Windows Server as the Primary DNS, followed by running DCPROMO to demote the old 2003 Windows server. Be sure to also visit Microsoft Virtual Academy created to further enable IT professionals in regards task such as migrating to Windows Server 2012 R2.
For more information here is the link to the original article.
Related Articles
-
How to manually install .Net 3.5 on Windows 7, 8, or 8.1
-
How To Install Microsoft Security Essentials on Windows Server 2012
-
ASUS UEFI Bios Utility
-
Tech Support Phone Numbers
-
Firewall Port Configuration
-
iPad Remote Desktop – Setup Instructions
So as the life of Windows 2003 is finally coming to an end, I am seeing a big push for domain upgrades and the pitfalls that come with it. So I created a walkthrough to help that process go smoother and to help avoid the common issues. I included DHCP in this posting due to the many servers I see that are Domain Controllers and DHCP servers. If you are getting DHCP from another device like another server or router, the steps outlined are still applicable as far as changing the DNS server to point to the new DC before you decommission the old DC.
My environment at the start of the migration:
DC01.matrix.local
OS: Windows 2003 x86 SP1
IP: 192.168.90.1
Subnet: 255.255.255.0
GW: None – completely isolated environment
DNS: 192.168.90.1
Services for clients – DHCP, DNS, Active Directory
DHCP looks like:

Note: Excluded the range 192.168.90.1 – 192.168.90.50 as this is how I would normally deploy DHCP – Statically needed IP Addresses would be within the range that was excluded. Examples would be Routers, Servers and Printers.
DNS zones look like this:

Really everything at this point is default with the exception that I added the reverse zone. Matrix.local and the reverse zone replicated to all DNS servers in domain and the _msdcs zone is replicated to all dns servers in forest.
Client01.matrix.local
OS: Windows 8.1 (I selected this one as client machines tend to get the new stuff especially now with the BYOD or Bring Your Own Device movement)
IP: Dynamically assigned by DC01
Subnet: Dynamically assigned by DC01
GW: None – completely Isolated environment
Client01 is joined to the domain and is able to authenticate, access dns, and gets an IP – the user that is authenticated is Mr. Testy Tester or Matrix\TTester
DC02.matrix.local
OS: Windows 2012R2
IP: Dynamically assigned by DC01
Subnet: Dynamically assigned by DC01
GW: None – completely isolated environment
DNS: 192.168.90.1
Okay, let’s review some configuration items to get us started.
Active Directory:
It’s always best to review the health of active directory to make sure there is no gotchas to sneak up on you. If not installed and you have the install cd for 2003 install the support tools from CD:\Support\Tools\SUPTools.msi or downloaded from http://www.microsoft.com/en-us/download/details.aspx?id=15326.
- From a command prompt run netdom query fsmo as below:

This lets you know where the fsmo’s are located – If any of these has an error where it is unable to locate the role holder, stop because you will need to probably need to seize the role and perform a metadata cleanup.
Seize FSMO Role – http://support.microsoft.com/kb/255504/en-us - Run is a “net share”
These two shares are where your group policies are stored and if they are missing your DC will not act as a domain controller and will not authenticate users.
- Run a repadmin /showreps – if you currently only have 1 dc I would expect the output to look like:
-
Check the Eventlogs for errors relating to Active Directory, File Replication Service, Netlogon, Time
- Directory Service
- System
- File Replication Service


If everything appears normal then we are ready to introduce our 2012 R2 server into the environment. If there are errors stop now and investigate!
Setup the new 2012 R2 Server
- Statically set the IP Address of the server
My IP Address will be 192.168.90.2 / Subnet will be 255.255.255.0 / No Gateway/ DNS 192.168.90.1
Note:
I don’t have a gateway because my test environment does not have internet access, your environment likely does so you will likely have a gateway. - Rename the server and join the domain with your 2012R2 server
- Once you click OK, you will be prompted for credentials – put the credentials of your domain admin account in and press ok.
If you get a message like:Once the server reboots, sign in as the domain admin account
Note: If you are using the default Administrator account, sign into Windows with Domain\Administrator as Windows by default will change the domain to local when it detects a local account with the same name. - Once Server Manager comes up, Click Manage, Add Roles and Features
- The Add Roles and Features Wizard will come up – Click Next
- Make sure Role-based or feature-based installation is selected and click next.
- Verify your sever is the selected server then click next
- Select Active Directory Domain Services, on the popup click Add Features, then Click next
- Click next on the features page
- Click Next on the AD DS page
- Then Click Install


Promote Server to a Domain Controller
- Once that completes Click Close, You will be back on the Server Manager Screen – Click the Flag on the Top Menu and select the link to promote the server to a domain controller
- This will start the process to make this a domain controller
Make sure the Domain information, Add a domain controller to an existing domain, and the current domain administrator is correct.
- This would be a good time to make sure that the user doing the promotion is a member of the Enterprise Admins and Schema Admins group on the 2003 domain controller.
Being a member of these 2 groups will allow you to promote the DC into the domain and perform the necessary schema updates needed for 2012 R2.
- Clicking next on the Active Directory Domain Services Configuration Wizard I received an error
Fixing this issue is fairly simple, we just need to raise the Domain and Forest Functional to 2003
- Open Domains and Trusts on the 2003 DC
Right click on the Active Directory Domains and Trusts, Select Raise Forest Functional Level
If you get a message like:
You will need to do the domain functional level first.
- Open Active Directory Users and Computers
Right click on the domain in the left pain and select Raise Domain Functional Level
Select Windows Server 2003 from the dropdown and click Raise
- Once that completes, and if you have more than one domain controller, replication completes. Go back to Domains and Trusts
Right click and raise Forest Functional Level
Again if there are more than one domain controller it may take a minute to replicate, if not than this change is really quick.
- We are now ready to try the promotion process again, Click Next on the deployment configuration
Note: We get a warning stating that there are no 2008 domain controllers in the domain so this server will be unable to become a read-only domain controller. This is just a warning and nothing to be concerned about.
- Type in the Directory Services Restore Mode password and click next
- Under DNS option there is another warning about DNS delegation, ignore that and click next
- Additional Options: Click Next
- Under Paths, Modify any paths or accept the defaults and click Next
- Under Preparation Options click Next
- Under Review Options, Click Next
- After the Prerequisite Check Runs Click Install
- After install is clicked the forest and domain will be prepped for 2012. Once the install is completed and the server reboots and will then come up as a domain controller in your domain.


Verify Active Directory on the New Server
- One of the first things to validate is that the Netlogon and Sysvol shares
Run net share from PowerShell
- Run repadmin /showreps – notice we get a lot more information this time
- Lets also check that on the 2003 server
- Lets check DNS on the new 2012R2 server
What you want to look at here is to make sure that both DC’s have SRV records inside dns. SRV records is how clients locate available DC’s in which to use for authentication. You can also validate that the same records appear on the 2003 server.
- Check the event logs
- Open Active Directory Users and computers, create a test user validate that it replicates from 2012 to 2003, then rinse and repeat from 2003 to 2012
- Open Group Policy Management console and validate all group policies that are expected to be there are there


Decommission 2003 Server
-
Transfer the FSMO roles to new server
- PDC – http://technet.microsoft.com/en-us/library/cc739670(v=WS.10).aspx
- RID – http://technet.microsoft.com/en-us/library/cc781063(v=ws.10).aspx
- Infrastructure – http://technet.microsoft.com/en-us/library/cc782485(v=ws.10).aspx
- Domain Naming Master – http://technet.microsoft.com/en-us/library/cc738685(v=ws.10).aspx
- Schema – http://technet.microsoft.com/en-us/library/cc759254(v=ws.10).aspx
-
Transfer DHCP services to the new server
- Install the feature on the 2012R2 server
- In Server Manager, Click Manage, Add Roles and Features
- Role-based or Feature-based – Click Next
- Validate 2012 is selected Click Next
- Select DHCP from the list, Click Add features from the Pop-up, Click next
- Click Next
- Click Next
- Click Install
-
Configure the scope for DHCP (I deliberately broke this up into three distinct steps, Setting up DHCP on the new server, deactivating the old server and Activating the new server – this is to allow the cutover to be planned according to a migration schedule. In an actual migration I would lower the lease times to something really short 2 days to allow clients to renew their leases from the new server without administrative intervention)
- Click Complete DHCP configuration
- Click Next
- Select Skip AD Authorization (We already have an Authorized DHCP server)
- Select Commit
- Select Tools, DHCP
- In DHCP MMC, Drill down to IPv4, Right Click and select New Scope
- Under New Scope Wizard select Next
- Name your new Scope and click Next
- Set your Range up and Click Next
- Set up your Exclusion Range
- Setup your Lease Duration Time
- Select Yes to configure the scope Options, Select Next
- Set your gateway address
- On Domain Name and DNS Servers, Remove any old DNS servers so that only the new 2012 Server is listed
- Leave Wins Blank, Click Next
- On Activate Scope, Select No, I will activate this scope later, Then Select Next
- Click Finish
- Click Complete DHCP configuration
-
Deactivate the 2003 DHCP Server
- Right Click the Scope and Select Deactivate – I am deactivating the scope – in case the server is reathorized later – the server will not automatically start handing out IP’s
- Right Click the Server and Unauthorize
- Right Click the Scope and Select Deactivate – I am deactivating the scope – in case the server is reathorized later – the server will not automatically start handing out IP’s
-
Turn on DHCP on the new 2012R2 Server
- In the DHCP MMC, Right Click the Server Name and select Authorize
- Right Click the Scope and Select Activate
- DHCP Console should appear similiarly to:
- In the DHCP MMC, Right Click the Server Name and select Authorize
-
Validate clients receive DHCP Address from the new server
- Check current settings, notice that the lease from the old server is still good so this client has not yet requested a renewal on the lease, this is important because the DNS server for the client has changed – if we were to demote the 2003 server at this time the clients would have issues resolving and authenticating
- On the client run IPConfig /Release
- On the Client run IPconfig /renew
- Then Validate that the 2012 R2 server handed the clients IP Address
- Check current settings, notice that the lease from the old server is still good so this client has not yet requested a renewal on the lease, this is important because the DNS server for the client has changed – if we were to demote the 2003 server at this time the clients would have issues resolving and authenticating
- Once all FSMO’s, DHCP to all clients have been updated shut down the old server for a few days to make sure nothing was missed and that clients are able to authenticate to Active Directory, Get to the internet, etc
-
Last step is to demote the 2003 server
- Run DCPromo on 2003, Click Next
- Do not select this is the last domain controller in the domain, Click Next
- Type a new Local Administrator Password, Click Next
- Click Next on the Summary Screen
- Active Directory will then be removed, and the server will be rebooted
- Run DCPromo on 2003, Click Next


