
Because the legacy WMI PowerShell cmdlets (e.g. Get-WmiObject) are eventually going to be deprecated, I always try to use the newer CIM-based PowerShell cmdlets (e.g. Get-CimInstance) wherever possible.
This can be a bit confusing sometimes though and it can appear that the new CIM cmdlets have less functionality than their older WMI counterparts. This isn’t the case as I explain later on in the blog post.
This perceived difference is especially true when working with TPM chips on devices. Below is an example of running a query against the ‘Win32_Tpm‘ class in WMI using both the old and new cmdlets.
The legacy ‘Get-WmiObject‘ cmdlet shows ‘70‘ Properties/Methods while the newer ‘Get-CimInstance‘ cmdlet shows only ‘20‘.
(Get-WmiObject -Namespace 'root/cimv2/Security/MicrosoftTpm' -Class 'Win32_Tpm' | Get-Member).Count
70

(Get-CimInstance -Namespace 'root/cimv2/Security/MicrosoftTpm' -Class 'Win32_Tpm' | Get-Member).Count
20
One WMI Method that I use regularly with OSD is the ‘SetPhysicalPresenceRequest‘ Method to configure a TPM to be cleared, activated and enabled. If you use the value of ‘14‘ for the request then you need to configure the firmware/BIOS to not require Physical Presence otherwise you’ll need someone to physically press a key to confirm the TPM clear is allowed.
If you can’t configure the firmware/BIOS to disable requiring physical presence confirmation then you can use the request value of ‘10‘ which won’t ask for physical confirmation but is slightly less effective. Using ‘10‘ should still mean your TPM is ready to be accessed by encryption-related commands later on in the Task Sequence though.
To use this command in a MECM Task Sequence I would historically use a ‘Run Command Line‘ task to run the following PowerShell command:
powershell.exe -ExecutionPolicy bypass -Command "(Get-WmiObject -Namespace "root\CIMV2\Security\MicrosoftTpm" -Class Win32_TPM).SetPhysicalPresenceRequest(14)"
Given my previous statement that I want to use the more modern ‘Get-CimInstance‘ cmdlets I looked into how this could be done with the newer cmdlets so that if or when the legacy WmiObject cmdlets are no longer available in Windows, my Task Sequence commands will continue to run successfully without any changes being needed.
By running ‘Get-WmiObject‘ we can see that ‘SetPhysicalPresenceRequest‘ is listed as an available Method for us to use:
Get-WmiObject -Namespace 'root/cimv2/Security/MicrosoftTpm' -Class 'Win32_Tpm' | Get-Member -MemberType Method


   TypeName: System.Management.ManagementObject#root\cimv2\Security\MicrosoftTpm\Win32_Tpm

Name                                  MemberType Definition
----                                  ---------- ----------
AddBlockedCommand                     Method     System.Management.ManagementBaseObject AddBlockedCommand(System.UIn...
ChangeOwnerAuth                       Method     System.Management.ManagementBaseObject ChangeOwnerAuth(System.Strin...
Clear                                 Method     System.Management.ManagementBaseObject Clear(System.String OwnerAuth)
ConvertToOwnerAuth                    Method     System.Management.ManagementBaseObject ConvertToOwnerAuth(System.St...
CreateEndorsementKeyPair              Method     System.Management.ManagementBaseObject CreateEndorsementKeyPair()
Disable                               Method     System.Management.ManagementBaseObject Disable(System.String OwnerA...
DisableAutoProvisioning               Method     System.Management.ManagementBaseObject DisableAutoProvisioning(Syst...
Enable                                Method     System.Management.ManagementBaseObject Enable(System.String OwnerAuth)
EnableAutoProvisioning                Method     System.Management.ManagementBaseObject EnableAutoProvisioning()
GetCapLockoutInfo                     Method     System.Management.ManagementBaseObject GetCapLockoutInfo()
GetDictionaryAttackParameters         Method     System.Management.ManagementBaseObject GetDictionaryAttackParameters()
GetOwnerAuth                          Method     System.Management.ManagementBaseObject GetOwnerAuth()
GetOwnerAuthForEscrow                 Method     System.Management.ManagementBaseObject GetOwnerAuthForEscrow()
GetOwnerAuthStatus                    Method     System.Management.ManagementBaseObject GetOwnerAuthStatus()
GetPhysicalPresenceConfirmationStatus Method     System.Management.ManagementBaseObject GetPhysicalPresenceConfirmat...
GetPhysicalPresenceRequest            Method     System.Management.ManagementBaseObject GetPhysicalPresenceRequest()
GetPhysicalPresenceResponse           Method     System.Management.ManagementBaseObject GetPhysicalPresenceResponse()
GetPhysicalPresenceTransition         Method     System.Management.ManagementBaseObject GetPhysicalPresenceTransition()
GetSrkADThumbprint                    Method     System.Management.ManagementBaseObject GetSrkADThumbprint(System.By...
GetSrkPublicKeyModulus                Method     System.Management.ManagementBaseObject GetSrkPublicKeyModulus()
GetTcgLog                             Method     System.Management.ManagementBaseObject GetTcgLog()
ImportOwnerAuth                       Method     System.Management.ManagementBaseObject ImportOwnerAuth(System.Strin...
IsActivated                           Method     System.Management.ManagementBaseObject IsActivated()
IsAutoProvisioningEnabled             Method     System.Management.ManagementBaseObject IsAutoProvisioningEnabled()
IsCommandBlocked                      Method     System.Management.ManagementBaseObject IsCommandBlocked(System.UInt...
IsCommandPresent                      Method     System.Management.ManagementBaseObject IsCommandPresent(System.UInt...
IsEnabled                             Method     System.Management.ManagementBaseObject IsEnabled()
IsEndorsementKeyPairPresent           Method     System.Management.ManagementBaseObject IsEndorsementKeyPairPresent()
IsFIPS                                Method     System.Management.ManagementBaseObject IsFIPS()
IsKeyAttestationCapable               Method     System.Management.ManagementBaseObject IsKeyAttestationCapable()
IsLockedOut                           Method     System.Management.ManagementBaseObject IsLockedOut()
IsOwned                               Method     System.Management.ManagementBaseObject IsOwned()
IsOwnerClearDisabled                  Method     System.Management.ManagementBaseObject IsOwnerClearDisabled()
IsOwnershipAllowed                    Method     System.Management.ManagementBaseObject IsOwnershipAllowed()
IsPhysicalClearDisabled               Method     System.Management.ManagementBaseObject IsPhysicalClearDisabled()
IsPhysicalPresenceHardwareEnabled     Method     System.Management.ManagementBaseObject IsPhysicalPresenceHardwareEn...
IsReady                               Method     System.Management.ManagementBaseObject IsReady()
IsReadyInformation                    Method     System.Management.ManagementBaseObject IsReadyInformation()
IsSrkAuthCompatible                   Method     System.Management.ManagementBaseObject IsSrkAuthCompatible()
OwnerAuthEscrowed                     Method     System.Management.ManagementBaseObject OwnerAuthEscrowed(System.Str...
Provision                             Method     System.Management.ManagementBaseObject Provision(System.Boolean For...
RemoveBlockedCommand                  Method     System.Management.ManagementBaseObject RemoveBlockedCommand(System....
ResetAuthLockOut                      Method     System.Management.ManagementBaseObject ResetAuthLockOut(System.Stri...
ResetSrkAuth                          Method     System.Management.ManagementBaseObject ResetSrkAuth(System.String O...
SelfTest                              Method     System.Management.ManagementBaseObject SelfTest()
SetPhysicalPresenceRequest            Method     System.Management.ManagementBaseObject SetPhysicalPresenceRequest(S...
TakeOwnership                         Method     System.Management.ManagementBaseObject TakeOwnership(System.String ...
Running the same command with the ‘Get-CimInstance‘ cmdlet brings back significantly fewer Methods and most importantly ‘SetPhysicalPresenceRequest‘ is missing from the list of Methods!!!!
Get-CimInstance -Namespace 'root/cimv2/Security/MicrosoftTpm' -ClassName 'Win32_Tpm' | Get-Member -MemberType Method


   TypeName: Microsoft.Management.Infrastructure.CimInstance#root/cimv2/Security/MicrosoftTpm/Win32_Tpm

Name                      MemberType Definition
----                      ---------- ----------
Clone                     Method     System.Object ICloneable.Clone()
Dispose                   Method     void Dispose(), void IDisposable.Dispose()
Equals                    Method     bool Equals(System.Object obj)
GetCimSessionComputerName Method     string GetCimSessionComputerName()
GetCimSessionInstanceId   Method     guid GetCimSessionInstanceId()
GetHashCode               Method     int GetHashCode()
GetObjectData             Method     void GetObjectData(System.Runtime.Serialization.SerializationInfo info, System....
GetType                   Method     type GetType()
ToString                  Method     string ToString()
“Where’s my bloody Method?” I asked whilst preparing myself to overcome OCD and continue using the legacy command…
However, under the covers the ‘SetPhysicalPresenceRequest‘ method still exists in WMI but we just can’t see it as easily using ‘Get-CimInstance‘. In order to view these hidden Methods we need to run a slightly different PowerShell command as per below:
(Get-CimInstance -Namespace root/cimv2/Security/MicrosoftTpm -ClassName Win32_Tpm).CimClass.CimClassMethods

Name                                  ReturnType Parameters                                                         Qua
                                                                                                                    lif
                                                                                                                    ier
                                                                                                                    s
----                                  ---------- ----------                                                         ---
IsEnabled                                 UInt32 {IsEnabled}                                                        {De
IsOwned                                   UInt32 {IsOwned}                                                          {De
IsActivated                               UInt32 {IsActivated}                                                      {De
IsPhysicalClearDisabled                   UInt32 {IsPhysicalClearDisabled}                                          {De
IsOwnerClearDisabled                      UInt32 {IsOwnerClearDisabled}                                             {De
IsPhysicalPresenceHardwareEnabled         UInt32 {IsPhysicalPresenceHardwareEnabled}                                {De
IsOwnershipAllowed                        UInt32 {IsOwnershipAllowed}                                               {De
IsCommandPresent                          UInt32 {CommandOrdinal, IsCommandPresent}                                 {De
Enable                                    UInt32 {OwnerAuth}                                                        {De
Disable                                   UInt32 {OwnerAuth}                                                        {De
IsEndorsementKeyPairPresent               UInt32 {IsEndorsementKeyPairPresent}                                      {De
CreateEndorsementKeyPair                  UInt32 {}                                                                 {De
TakeOwnership                             UInt32 {OwnerAuth}                                                        {De
Clear                                     UInt32 {OwnerAuth}                                                        {De
IsSrkAuthCompatible                       UInt32 {IsSrkAuthCompatible}                                              {De
ResetSrkAuth                              UInt32 {OwnerAuth}                                                        {De
ChangeOwnerAuth                           UInt32 {NewOwnerAuth, OldOwnerAuth}                                       {De
SelfTest                                  UInt32 {SelfTestResult}                                                   {De
ConvertToOwnerAuth                        UInt32 {OwnerPassPhrase, OwnerAuth}                                       {De
SetPhysicalPresenceRequest                UInt32 {Request, RequestParameter}                                        {De
GetPhysicalPresenceRequest                UInt32 {Request}                                                          {De
GetPhysicalPresenceTransition             UInt32 {Transition}                                                       {De
GetPhysicalPresenceResponse               UInt32 {Request, Response}                                                {De
AddBlockedCommand                         UInt32 {CommandOrdinal}                                                   {De
RemoveBlockedCommand                      UInt32 {CommandOrdinal}                                                   {De
IsCommandBlocked                          UInt32 {CommandOrdinal, IsCommandBlocked}                                 {De
ResetAuthLockOut                          UInt32 {OwnerAuth}                                                        {De
IsReady                                   UInt32 {IsReady}                                                          {De
IsReadyInformation                        UInt32 {Information, IsReady}                                             {De
IsAutoProvisioningEnabled                 UInt32 {IsAutoProvisioningEnabled}                                        {De
EnableAutoProvisioning                    UInt32 {}                                                                 {De
DisableAutoProvisioning                   UInt32 {OnlyForNextBoot}                                                  {De
GetOwnerAuth                              UInt32 {OwnerAuth}                                                        {De
Provision                                 UInt32 {ForceClear_Allowed, PhysicalPresencePrompts_Allowed, Information} {De
ImportOwnerAuth                           UInt32 {OwnerAuth}                                                        {De
GetPhysicalPresenceConfirmationStatus     UInt32 {Operation, ConfirmationStatus}                                    {De
GetSrkPublicKeyModulus                    UInt32 {SrkPublicKeyModulus}                                              {De
GetSrkADThumbprint                        UInt32 {SrkPublicKeyModulus, SrkADThumbprint}                             {De
GetTcgLog                                 UInt32 {TcgLog}                                                           {De
IsKeyAttestationCapable                   UInt32 {TestResult}                                                       {De
GetOwnerAuthForEscrow                     UInt32 {OwnerAuth, OwnerAuthStatus}                                       {De
OwnerAuthEscrowed                         UInt32 {OwnerAuth}                                                        {De
GetOwnerAuthStatus                        UInt32 {OwnerAuthStatus}                                                  {De
IsFIPS                                    UInt32 {IsFIPS}                                                           {De
GetDictionaryAttackParameters             UInt32 {LockoutRecovery, MaxTries, RecoveryTime}                          {De
GetCapLockoutInfo                         UInt32 {LockoutCounter, MaxTries}                                         {De
IsLockedOut                               UInt32 {IsLockedOut}                                                      {De
So we can now see the required ‘SetPhysicalPresenceRequest‘ method. But how do we use it in a MECM Task Sequence in the same manner as the legacy cmdlet?
The answer is below – we need to pipe one cmdlet (Get-CimInstance) into another (Invoke-CimMethod) to achieve the same result as the legacy cmdlet:
powershell.exe -ExecutionPolicy Bypass -Command "Get-CimInstance -Namespace 'root/cimv2/Security/MicrosoftTpm' -ClassName 'Win32_TPM' | Invoke-CimMethod -MethodName 'SetPhysicalPresenceRequest' -Arguments @{Request='14'}"

Running the newer CIM commands in my MECM ‘Run Command Line‘ task now gives me the same result as the legacy command did and balance is once again restored to the galaxy…
/ JC
The Event ID 1796 TPM-WMI error appears when the PC crashes in different situations. From the related forum, we found the inflicted users are undergoing intermittent freezes, crashes, and even BSOD issues. It’s an urgent problem requiring quick solutions. This post from MiniTool will give you some clues.
Event ID 1796 TPM-WMI Error
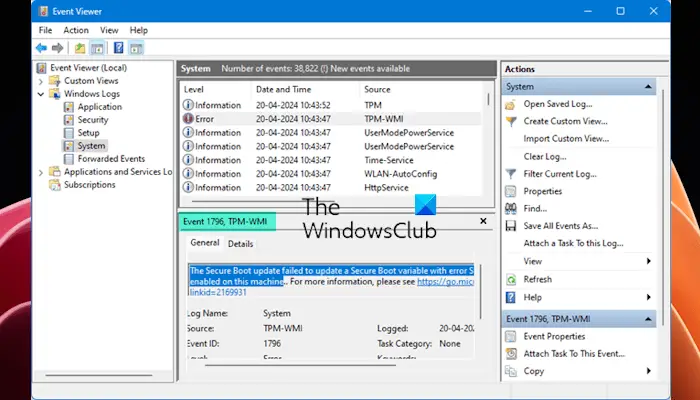
Some people come across crashing issues or intermittent freezes when they perform some tasks, open a program, or play a game, even some of them will be stuck in the blue screens more often. When they checked the event log entry for more detailed information about this disaster, it was created and recorded as Event ID 1796 for the unexpected error.
You may see the event message text showing that the Secure Boot update failed to update a Secure Boot variable with error. Targeting different situations, we conclude some useful methods for troubleshooting here.
Methods for Event ID 1796 TPM-WMI Error
Method 1: Disable and Enable Secure Boot
Secure Boot is useful to prevent Malware infiltration by only allowing the trusted software for booting. If you encounter the Secure Boot update failed error, you can disable and then re-enable the feature to fix the glitches.
You need to disable and enable Secure Boot from BIOS and the steps may be different from motherboards. The following procedures are for reference.
Step 1: Restart your computer and press a designated key, such as F2 and Delete, during the startup to enter the BIOS screen. We have other methods to enter BIOS in this post: How to Enter BIOS Windows 10/8/7 (HP/Asus/Dell/Lenovo, any PC).
Step 2: Go to the Security section and find the Secure Boot option to disable it. You can follow the on-screen instructions to change the options.
Once you have finished the changes, please save that and exit BIOS.
Step 3: Now, you can restart your PC and repeat the same steps as above to enable the Secure Boot feature.
Related post: Secure Boot Is Unsupported or Off in Windows 11/10? [Fixed]
Method 2: Uninstall the Recent Update
If you have downloaded and installed the recent updates, you can try to uninstall them to see if the Event ID 1796 can be fixed.
Step 1: Open Settings from Start and click Update & Security > Windows Update.
Step 2: Click View update history from the right pane and click Uninstall updates.
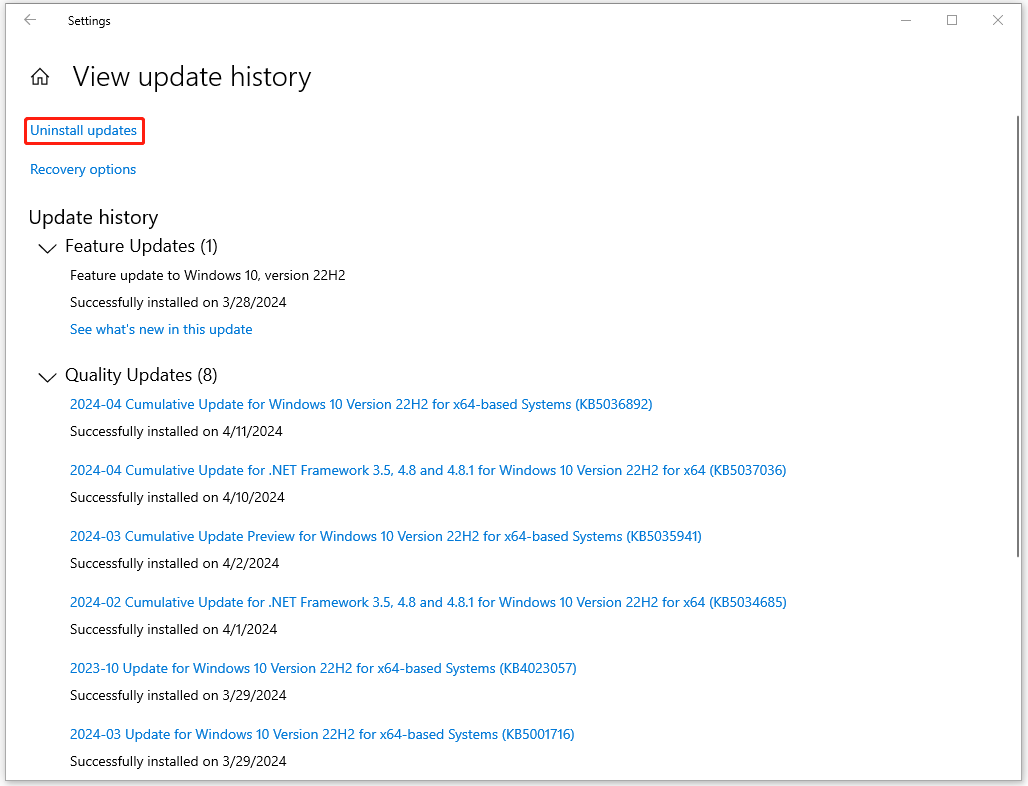
Step 3: Right-click on the latest update and choose Uninstall to follow the prompts for the removal.
Method 3: Reinstall the Problematic Programs
If you run into the Event ID 1796 TPM-WMI issue when using some program, the problem may happen on the program. You can uninstall the problematic program and then reinstall it to fix the bug.
Step 1: Open Settings > Apps > Apps & features.
Step 2: Scroll down from the right pane to choose the app and click Uninstall > Uninstall to remove it.
Then you can download and install the program from the official source.
Method 4: Reset or Update BIOS
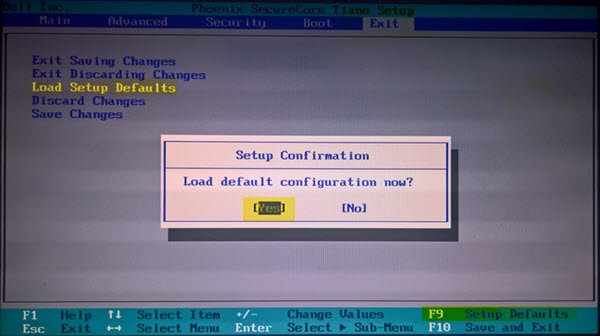
For other solutions to the Event ID TPM-WMI 1796, you can try to reset or update BIOS.
To reset BIOS, you need to enter the BIOS settings window as we have introduced above and find the Setup Default option. The name of the option will be different from the brands of motherboard, such as Load Default, Load Setup Defaults, Load Default Settings, Load BIOS Defaults, Load Optimal Defaults, etc.
After you find it, please follow the on-screen instructions to start resetting BIOS to factory default settings.
Another method is to update BIOS. But before you start it, the first thing you should do is back up your data. Here you can try MiniTool ShadowMaker.
MiniTool ShadowMaker TrialClick to Download100%Clean & Safe
To update BIOS, you need to follow these procedures one by one.
- Check the computer’s model name.
- Find the latest BIOS update from the manufacturer’s website.
- Download and unzip the BIOS file.
- Copy the BIOS file to a flash drive.
- Restart the PC to the BIOS screen.
- Back up the current BIOS file.
- Start updating BIOS.
For detailed steps for the above procedures, you can read this post: How to Update BIOS Windows 10 | How to Check BIOS Version.
Since this error can trigger the BSOD issue or system crashes, you can prevent serious losses by data backup. MiniTool ShadowMaker is a good choice as free backup software. It provides a one-click system backup solution and allows quick data recovery. For a better backup experience, more backup sources are available, such as files & folders and partitions & disks.
NAS backup is supported. If you want automatic backups, you can configure the backup schemes and schedule settings. For more features, you can download and install the program for a 30-day free trial.
MiniTool ShadowMaker TrialClick to Download100%Clean & Safe
Bottom Line
How to fix the Event ID 1796 TPM-WMI error? This post has provided four methods to help fix the system issues. You can follow the solutions and check if this error can be resolved. Hope this article can resolve your concerns.
Do you see Event ID 1796 in your Windows 11/10/Server logs? If the Secure update process cannot complete and fails with an error message— The Secure Boot update failed to update a Secure Boot variable with the error Secure Boot is not enabled on this machine —then this post will help you fix the problem.
This Event may be accompanied by system shutdowns or crashes. According to the reports, users started experiencing this error in the Event Viewer after installing a recent Windows Update. However, the error message says the problem is associated with the Secure Boot.
What is Event ID 1796 in Windows?
Event ID 1796 occurs when an unexpected error is encountered. When the updated DBX revocation list is applied to a device, and an error occurs, an event is logged, and Windows will try to apply the DBX list to the firmware on the next system restart.
The complete error message that appears in the Windows Event Viewer is:
The Secure Boot update failed to update a Secure Boot variable with error Secure Boot is not enabled on this machine.
Event ID 1796 is a system event related to Windows’s secure boot feature, which prevents unauthorized software from loading on boot. If your TPM module is affected, you will face this error. The effects of this error can range from system crashes to lag and delayed boot.
This section will look at fixes for the event ID 1796. Here’s all that’s covered:
- Uninstall a recent Windows Update
- Uninstall and reinstall the problematic application or game
- Check the status of Secure Boot
- Disable and re-enable the Secure Boot
- Reset, Update, or Rollback BIOS.
Let’s follow these methods one by one.
1] Uninstall a recent Windows Update

If you start receiving this error after installing a Windows Update, you can uninstall that particular Windows Update. This should fix this issue.

Alternatively, you can also perform a System Restore and take your system to the previous working state. While performing the System Restore, select the restore point that was created before the error started occurring.
2] Uninstall and reinstall the problematic application or game

It is also possible that a problematic application or game has crashed your system unexpectedly and triggered this Event ID. If you have recently installed an application or game, uninstall it and then repair your system image files with the help of SFC and DISM tools. After that, you can reinstall the application or game.
3] Check the status of Secure Boot
The error message says that the Secure Boot is not enabled on this machine. Therefore, we suggest you check the status of Secure Boot on your system. The following instructions will guide you on this:

- Open System Information tool.
- Select System Summary on the left side.
- You will see the Secure Boot status on the right side.
If Secure Boot is disabled on your device, enable it. Different brands of computers have different methods for enabling Secure Boot in the BIOS. Therefore, visit the official website of your computer manufacturer to learn the correct process for enabling Secure Boot on your device.
This post will help you if you see the Secure Boot can be enabled when System in User Mode message while enabling the Secure Boot in BIOS.
4] Disable and re-enable the Secure Boot

A secure boot ensures that your PC uses only the firmware trusted by the manufacturer, and the event ID 1796 is related to the secure boot update. If your PC meets all the requirements to use Secure Boot, disabling and re-enabling Secure Boot will fix the issue:
If Secure Boot is already enabled, do this. Enter your system BIOS and disable Secure Boot. Save changes and restart your computer. Wait for a few hours, then enable the Secure Boot again. This should work.
- You can enter the BIOS by tapping the BIOS key (F1, F2, F10, DEL, or ESC) while booting your PC.
- Now, in the BIOS, enter the Security section.
- In the Security section, find the Secure Boot option and disable it.
- Now, press f10 to save and exit. This will reboot your PC.
- Follow the same steps to enable Secure Boot on your PC.
The BIOS interface looks different for each motherboard manufacturer. To disable or enable Secure Boot, you only have to find the security settings and the Secure Boot option.
Warning if you are disabling Secure Boot
After disabling Secure Boot and installing other software and hardware, it may be difficult to re-activate Secure Boot without restoring your PC to the factory state.
5] Reset, Update or Rollback BIOS
Resetting BIOS helps to restore the optimal settings for your system. This will also apply the TPM and Secure boot settings, which are recommended for your system, hence preventing the event ID 1796 from occurring:
- You can enter the BIOS by tapping the key (F1, F2, F10, Del, or ESC in most cases).
- Now, in the BIOS, find the option for Setup Defaults.
- In most PCs, BIOS can be reset to default by pressing the F9 key.
See if this helps.
If it doesn’t help, update your firmware and see. If you recently updated your firmware, roll it back or downgrade it to the earlier version and see.
Read: Fix Secure Boot isn’t configured correctly in Windows
We hope that you found the article to be helpful and were able to fix Event ID 1796. The Secure Boot update failed.
What is Event ID 14 in Event Viewer TPM?
Event ID 14 in the Event Viewer indicates a problem with the TPM device. This error prevents Windows from communicating with it for functionalities that rely on TPM, such as BitLocker.
What is TPM event log?
The TPM event log contains information about the error associated with the TPM on a Windows computer. You can use the information in the event log to troubleshoot and fix the issue.
Read next: Alert! TPM device is not detected error on Dell computers.
How do I enable UEFI Secure Boot?
UEFI Secure Boot can be enabled from the BIOS. Tap the BIOS key (typically the F1, F2, or F10 key) while booting your PC to enter BIOS. In the BIOS, find the security options and the secure boot. Now, change the Secure Boot status to enabled, and press F10 to save and exit.
Can I bypass the Windows 11 TPM requirement?
Yes, you can bypass the Windows 11 TPM requirement. You can create an installation media drive using a free and trusted tool called Rufusm. This tool has a specific image option to disable TPM, secure boot, and RAM check. You can also use a slightly lengthy and complex method of entering the registry and making some changes while installing Windows.
Readers help support Windows Report. We may get a commission if you buy through our links.
Read our disclosure page to find out how can you help Windows Report sustain the editorial team. Read more
XINSTALL BY CLICKING THE DOWNLOAD
FILE
Many users noticed an event in the Event Log called TPM-WMI 1796, which usually appears right before the system crashes. So today, we’re going to take a closer look at this error and see how to fix it.
What is the TPM-WMI error crash?
This error appears if Secure Boot isn’t properly enabled. Sometimes damaged installation or certain applications can also cause it.
How do I fix error TPM-WMI 1796?
1. Enable Secure Boot and disable NX Mode
- Restart your computer. During startup, you need to press a key designated by the OEM or computer manufacturer to access the UEFI settings. For HP, it is F10; for Dell, it is F2.
- You will enter the UEFI settings. Locate the Security or System Configuration section.
- Now look for Secure Boot or UEFI Secure Boot, select it, and change the status to Enabled.

- Once done, Save & Exit to save the changes.
- Restart your computer.

If the problem still persists, disable NX Mode by doing the following:
- Access BIOS again.
- Next, go to Advanced settings and choose OC.
- Select Advanced CPU Configuration and from there disable NX Mode.
- Recent Windows 11 update lets you disable profanity filter in voice typing
- Microsoft wants Windows 10 users to upgrade to Windows 11 or Copilot + PCs
- Windows 11 KB5055627 update makes File Explorer more fluid
- A few keyboard settings are moving from Control Panel to Settings app in Windows 11
- Details of Windows 11 25H2 spotted in the wild; likely to be a smaller update
2. Reinstall problematic software
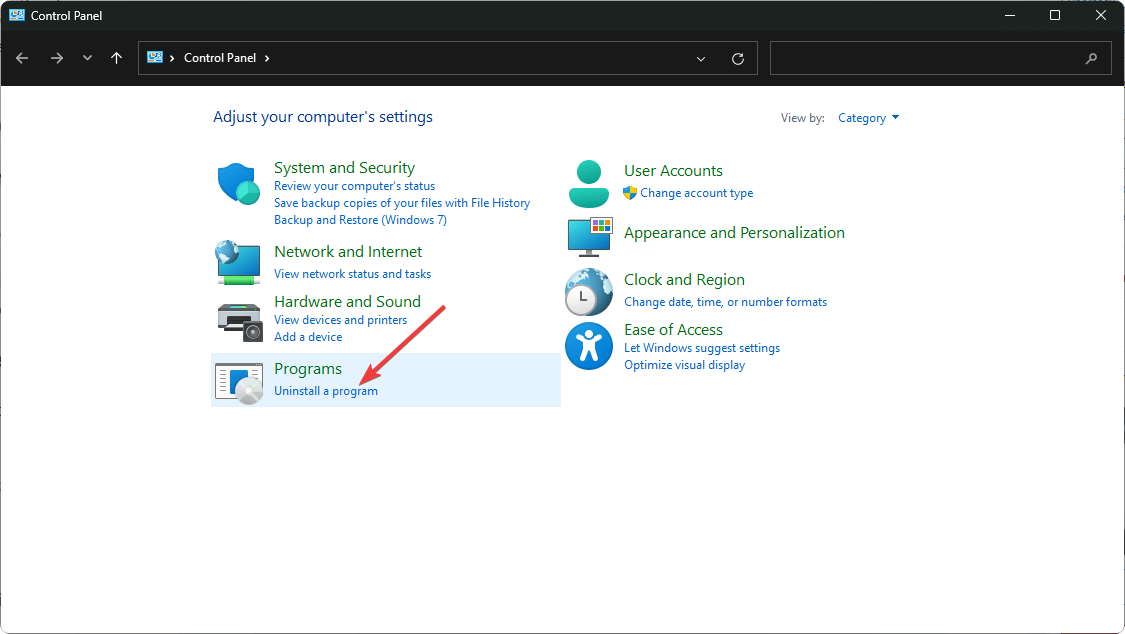
- Click on the Start Menu icon, type Control Panel on the search bar, and click Open.

- Select Uninstall a Program under Programs.

- Find the problematic app, click on it, and select Uninstall.
- Confirm uninstallation in the next pop-up.

Common apps throwing the tpm-wmi 1796 error were the BattleEye anti-cheat software and the Terraria game. From the trend, it indicates that games and gaming software could be behind the PC crash.
- Recent Windows 11 update lets you disable profanity filter in voice typing
- Microsoft wants Windows 10 users to upgrade to Windows 11 or Copilot + PCs
- Windows 11 KB5055627 update makes File Explorer more fluid
- A few keyboard settings are moving from Control Panel to Settings app in Windows 11
- Details of Windows 11 25H2 spotted in the wild; likely to be a smaller update
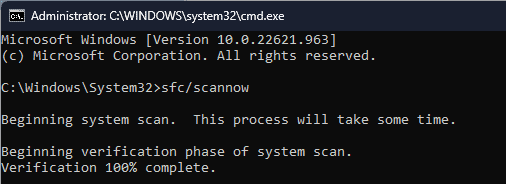
3. Scan your PC
- Press the Windows key + S and type cmd. Choose Run as administrator.

- Run the following command:
dism /online /cleanup-image /restorehealth
- Wait for the scan to finish.
- Next run
sfc /scannow
- Wait for the scan to finish.


4. Check your hardware
- If you have more than one memory module, try removing it and checking and that solves the problem. Do this for all modules. You can also scan your modules with MemTest86+.
- Clean your CPU cooler and radiator. Sometimes overheating can lead to this issue.
- Check if the problem is gone.
Hopefully, one of the above solutions has fixed this error. Still, we’re open to hearing any additional thoughts you may have on this error. Drop us a line below.
This isn’t the only issue, and we also covered event ID 15 TPM error as well as error code 80090034 in TPM.
Claire Moraa
Windows Software Expert
Claire has a knack for solving problems and improving the quality of life for those around her. She’s driven by rationality, curiosity, and simplicity, and always eager to learn more about Microsoft’s products.
With a background in teaching and reviewing, she breaks down complex topics into easily understandable articles, focusing mostly on Windows 11, errors, and software.
TPM or Trust Platform Module version can be found through Powershell. This is in addition to the ways within the Windows operating system that allow you to fetch the TPM version using the command prompt or the TPM management snap-in. For bigger networks, Powershell becomes a preferred choice to collect and organize all sorts of information. This would include the TPM version of the computer as well.
So, we look at three ways by which you can use Powershell on a local or remote computer to find the TPM version of the computer.
You need to launch a Powershell session on the computer before using any of the commands below. Powershell needs to run with administrative privileges on the computer. These commands can be executed on a local computer or a remote computer. For a remote computer, we suggest remoting into it using PSExec and then running the commands locally to pull the relevant information.
Find the TPM version using wmic in Powershell
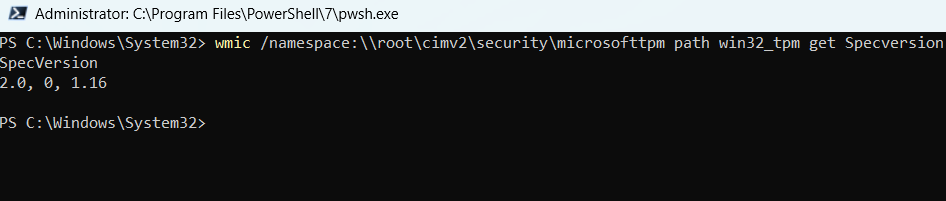
The simplest and quickest approach is to use the wmic command to fetch the TPM version of the Windows computer. The command that can be used is shared below:
wmic /namespace:\root\cimv2\security\microsofttpm path win32_tpm get Specversion
The command above will show you the ‘Specifications version’ of TPM. The SpecVersion is identical to the TPM version on the computer. From the screenshot below, you can see that the Specversion output from the command shows that TPM version 2.0 is valid for this Windows 11 computer.
You can also pull all details related to TPM configuration on a computer using a variant of the wmic command below:
wmic /namespace:\root\cimv2\security\microsofttpm path win32_tpm get * /format:textvaluelist.xsl
The output of this command looks like the screenshot below.
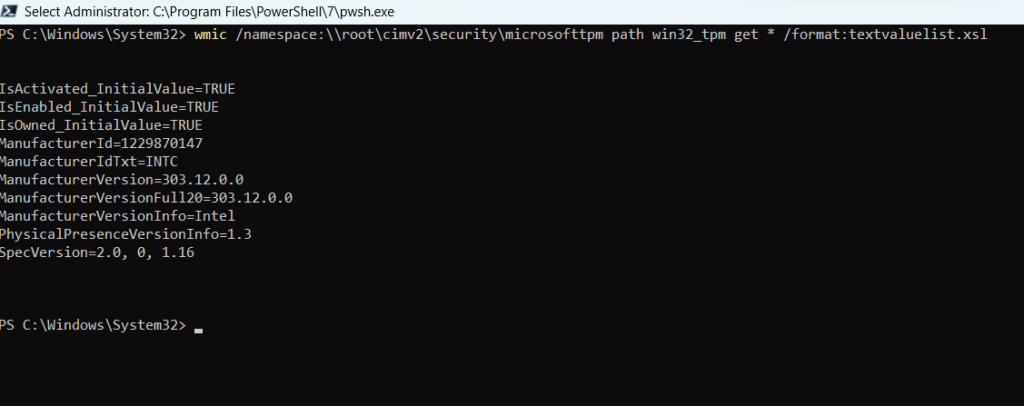
Some important values for this command output include the Specversion, Manufacturerversion, and ‘IsActivated’ value for TPM. ‘IsActivated’ value ‘True’ means that the TPM is already activated on the computer.
Find the TPM version using WMI Object in Powershell
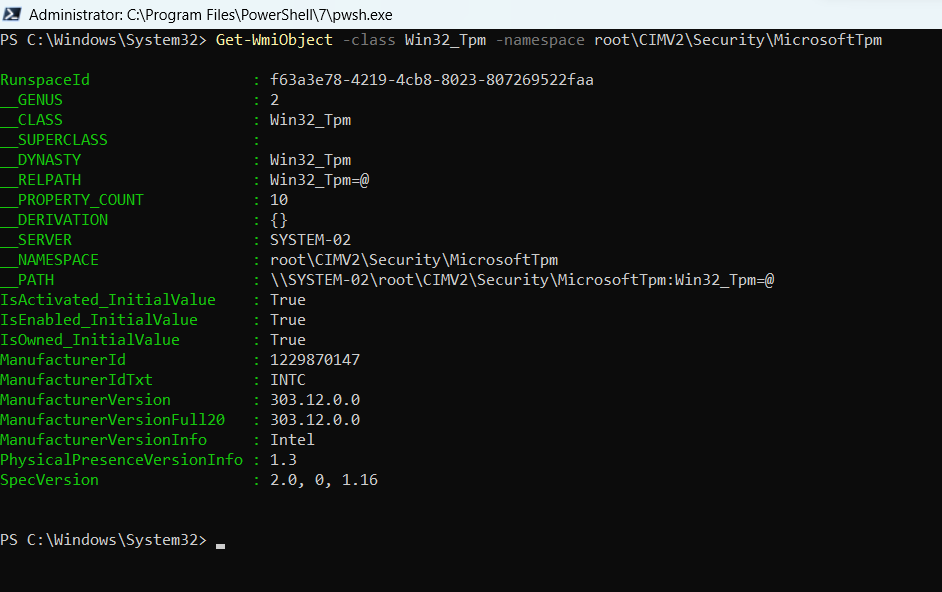
We can find all details of TPM on a local or remote computer through the WMI Object directive. We will use the underlying class Win32_tpm class to query the TPM details of the computer.
The WMI Object command to fetch TPM information for the computer is shared below:
Get-WmiObject -class Win32_Tpm -namespace root\CIMV2\Security\MicrosoftTpm
The output of this command is shared below as a screenshot. You will need administrative privileges on the computer to run this WMI Object directive.
To restrict the output to finding the TPM version only, we can use the following command to limit the output display to display the Specversion attribute only.
Get-WmiObject -class Win32_Tpm -namespace root\CIMV2\Security\MicrosoftTpm | Select SpecVersion
The output of this command will list the SpecVersion on the computer. The SpecVersion is equivalent to the TPM version. The latest SpecVersion value of 2.0 suggests that the local computer has TPM version 2.0.
You can modify this command to include the computer name of a local or remote computer to fetch details of the TPM configuration on your Windows computer.
Get-WmiObject -class Win32_Tpm -namespace root\CIMV2\Security\MicrosoftTpm -Computername $COMPNAME
The variable $COMPNAME can contain the names of Windows computers for which TPM details are needed. Or, you can assign a temporary value to the variable $COMPNAME on the Powershell prompt.
Find the TPM version using CIM Instance in Powershell
You can find all the information about TPM (Trusted Platform Module) using the CIM Instance command directive in Powershell. CIM Instance will use the Win32_tpm class to fetch all details related to TPM configuration on the system. The command is shared below for your ready reference:
Get-CIMInstance -class Win32_Tpm -namespace root\CIMV2\Security\MicrosoftTpm
The output of this command is shared below as a screenshot. You can see all the attributes of the Cim Instance command.

If you wish to restrict the command output to the TPM version only, you can qualify the above command to restrict the output to SpecVersion only, as per the command below.
Get-CIMInstance -class Win32_Tpm -namespace root\CIMV2\Security\MicrosoftTpm | Select SpecVersion
The command output of the CIM Instance command is shared below in the screenshot which contains the values for SpecVersion only.

You can qualify the command further to include the computer name for fetching details of the remote computers as well. I prefer using a variable to substitute computer names from a static file. The command, in such a case, will look like the command below:
Get-CIMInstance -class Win32_Tpm -namespace root\CIMV2\Security\MicrosoftTpm -computername $COMPNAME
For the command above, we are using the $COMPNAME variable. You can assign a static value to it for the name of a remote computer.
Summary
In this Powershell tutorial, we have seen how to find the TPM version of a Windows computer using Powershell. We have seen the wmic command, WMI Object, and CIM Instance commands that work on the Win32_TPM class for organizing the TPM data of a computer.
Rajesh Dhawan is a technology professional who loves to write about Cyber-security events and stories, Cloud computing and Microsoft technologies. He loves to break complex problems into manageable chunks of meaningful information.