
Sound Recorder (known as Voice Recorder in Windows 10) is an audio recording program included in most versions of the Microsoft Windows family of operating systems. Its user interface has been replaced twice in the past.
Sound Recorder
|
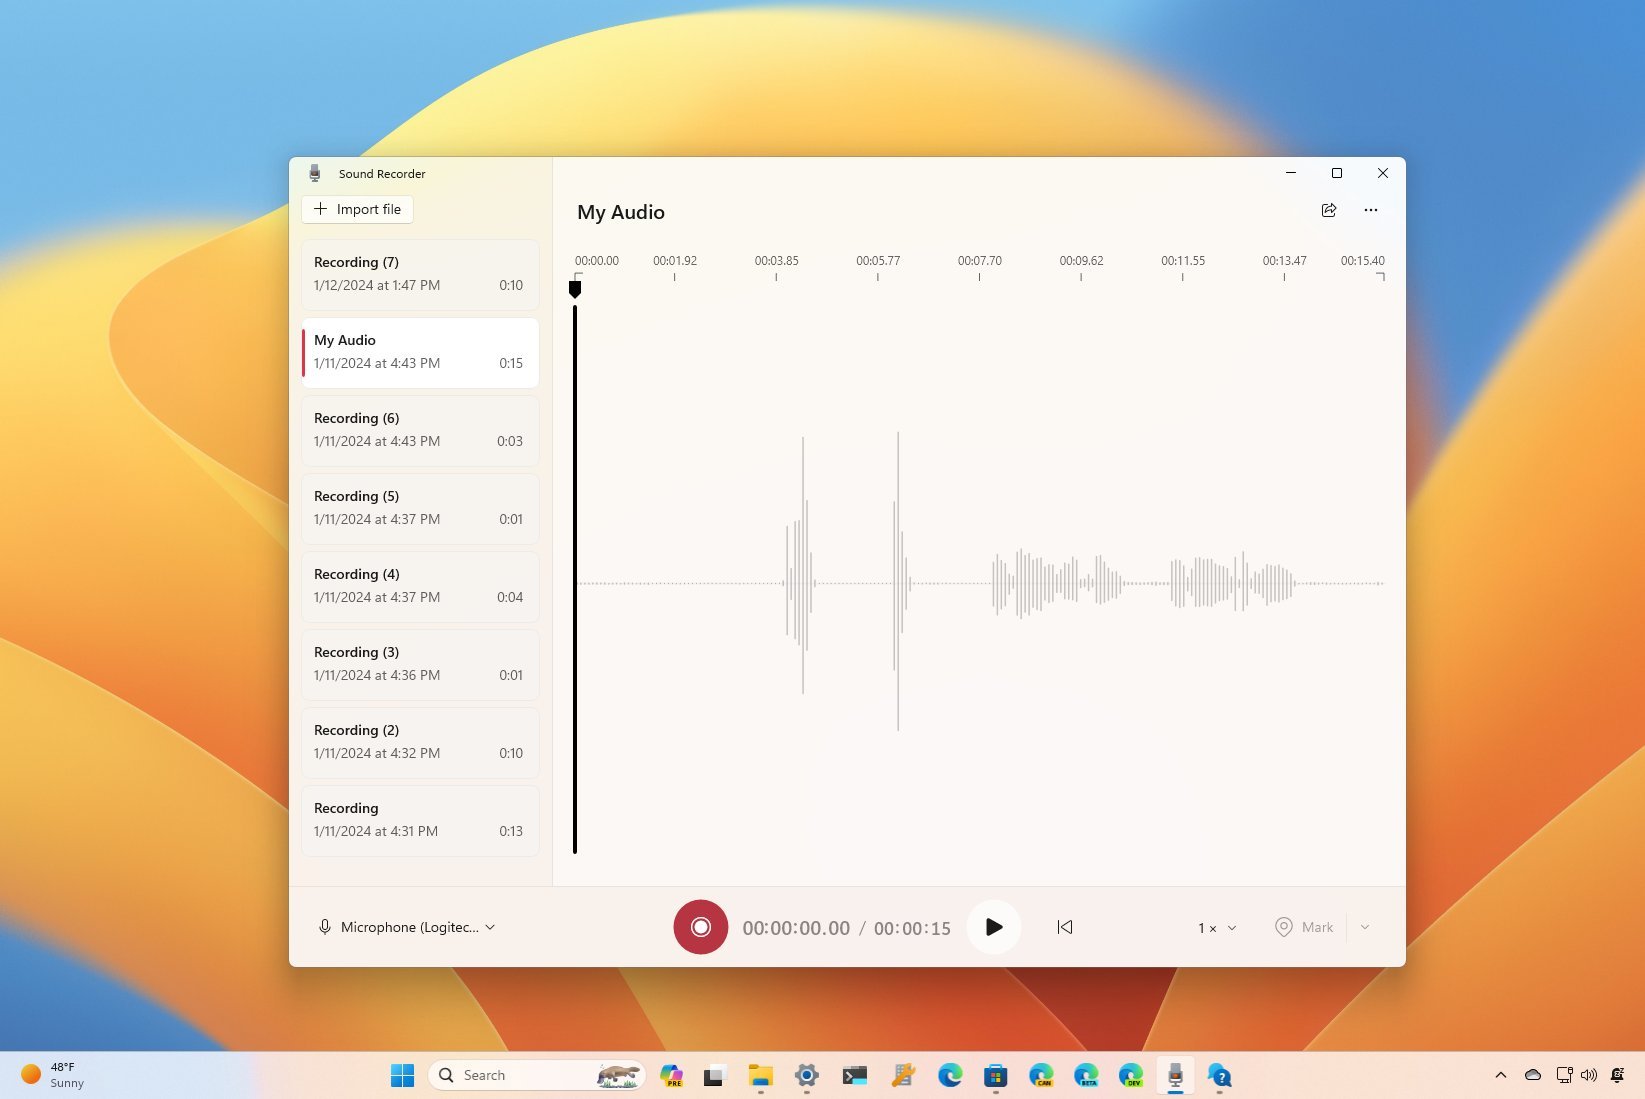
Sound Recorder in Windows 11 |
||||
| Other names | Voice Recorder | |||
|---|---|---|---|---|
| Developer(s) | Microsoft | |||
| Stable release(s) [±] | ||||
|
||||
| Operating system | Windows 10, 11 | |||
| Platform | IA-32, x86-64 and ARM (and historically DEC Alpha, Itanium, MIPS, and PowerPC) | |||
| Type | Sound recorder | |||
| Website | support |
Sound Recorder has been in most versions and editions of Windows since Windows 3.0, including Windows 9x, Windows Server and the client versions of Windows NT. Even Windows Mobile came with one. Its user interface and feature set saw very little change until Windows Vista, when features that lacked practicality were discontinued and Sound Recorder was simplified. This version of Sound Recorder was included in Windows 7, Windows 8 and Windows 8.1, but did not make it to Windows 10.
A second, different Sound Recorder was introduced in Windows 8.1, thus Windows 8.1 has two distinct apps called Sound Recorder. This second app was a Windows Store app and adhered to the design tenets of the Metro design language.[2] Leaked images of a preview version Windows 10 Mobile showed this app too.[3] When Windows 10 released, however, it was renamed Voice Recorder.[4] The original Sound Recorder was removed from Windows 10.
With the release of Windows 11, Voice Recorder was renamed back to Sound Recorder and included new features, such as changing the playback speed and the input source within the app.[5]
Sound Recorder can record audio from a microphone or headset. In addition, many modern sound cards allow their output channels to be recorded through a loopback channel, typically called «Wave-Out Mix» or «Stereo Mix».
Before Windows Vista, Sound Recorder was capable of:
- Playing the audio files that it has recorded
- Converting the bit rate, bit depth and sampling rate of the audio file
- Inserting other audio files at the beginning, end or the desired location of the current audio
- Splitting out parts of the current audio clip
- Increasing or decreasing volume in 25% increments
- Increase or decrease playback speed in 100% increments
- Adding an echo (without reverberation)
- Reversing the current audio clip
These features, however, were either removed in Windows Vista or taken over by other applications.[6] The playback and trimming features reappeared in Voice Recorder, although Voice Recorder can only play its own recordings.[4]
Sound Recorder accepts command-line parameters.[7] This was removed in Windows 8, as Windows Store apps cannot be run with a parameter from the command-line.
Before Windows 7, Sound Recorder could save the recorded audio in waveform audio (.wav) container files. Sound Recorder could also open and play existing .wav files. To successfully open compressed .wav files in Sound Recorder, the audio codec used by the file must be installed in the Audio Compression Manager (ACM); Windows installations dating back to at least Windows 95 came with a selection of standard codecs that included Truespeech, GSM 6.10, G.723.1, IMA ADPCM and CCITT A-law and u-law, with additional codecs being added in later editions.
Starting with Windows Vista, Sound Recorder saves recorded audio in Windows Media Audio (.wma) files instead; the exceptions to this are the Home Basic N and Business N editions, which continue to use .wav.[7] Also, audio metadata such as Artist, Album, Title, and Genre can be added to the sound file directly while saving the file.[6]
Voice Recorder in Windows 10 only records audio in MPEG-4 Part 14 (.m4a) container formats.
Versions of Sound Recorder before Windows Vista recorded audio to memory, rather than to the hard disk, and the length of recording was by default limited to 60 seconds. Microsoft recommends recording 60 seconds and pressing the Record button again to record another minute.[8] In addition, it is possible to use the Sound Recorder’s concatenation feature to increase the length of the audio file. For example, saving an initial 1 minute recording as «1min.wav» and then inserting the «1min.wav» file 9 times creates 10 minutes of recording which can then be saved as «10min.wav». This «10min.wav» file can then be suffixed to itself 5 more times (or as many times as there is room in memory) to create a «1hour.wav» file. By recording over any of these longer sound files, Sound Recorder can have an uninterrupted arbitrary recording time (limited only by primary memory).
In 32-bit versions of Windows before Windows Vista, on computers with more than 2 GB of RAM, after recording (but not when playing), Sound Recorder will return an error message indicating that there is not enough memory. This is a design flaw of older versions of Sound Recorder and officially cannot be resolved except by reducing the amount of available physical memory.[9] There does, however, exist an unofficial patch that resolves this problem.[10] Another solution to the ‘not enough memory’ error is to run the program in compatibility mode. This can be achieved by right clicking on the .exe file, then selecting: properties, compatibility tab, ‘run this program in compatibility for’, and selecting the appropriate option, such as ‘Windows XP Service Pack 2’.
The Sound Recorder in Windows Vista and later uses the hard disk for recording audio and can therefore record audio up to any length as long as there is free space on the hard disk drive.[11]
- ^ a b «Windows Sound Recorder». Microsoft Apps. Retrieved 2025-04-02.
- ^ «Sound Recorder app for Windows: FAQ — Windows Help». Microsoft Support. Microsoft. Retrieved 26 December 2017.
- ^ Bright, Peter (6 February 2015). «Leaked images of Windows 10 for phones show us what to expect». Ars Technica. Condé Nast.
- ^ a b «Windows Voice Recorder». Windows Store. Microsoft. Retrieved 29 July 2015.
- ^ Chin, Monica. «How to record audio on Windows». The Verge. Retrieved 25 March 2023.
- ^ a b Ludington, Jake (January 19, 2009). «Sound Recorder in Windows Vista cannot open existing files». Jakeludington.com. Retrieved 2013-06-07.
- ^ a b «Windows Vista Help: Troubleshoot audio-recording problems». Archived from the original on 2009-11-09. Retrieved 2009-09-07.
- ^ «How to Increase the Maximum Recording Time in the Sound Recorder Utility». Support. Microsoft. 2011-09-24. Archived from the original on 2011-10-06. Retrieved 2013-06-07.
- ^ «You receive a «Not enough memory available to complete this operation» error message when you try to record a .wav file by using Sound Recorder». January 29, 2007. Archived from the original on March 6, 2007. Retrieved April 14, 2008.
- ^ «Devious and terrible sndrec32.exe (in russian)».
- ^ «Record sound». Windows. Microsoft. Archived from the original on October 12, 2009. Retrieved 29 July 2015.
(Image credit: Mauro Huculak)
On Windows 11, you can use the Sound Recorder app to quickly record audio in any situation, such as conversations, interviews, lectures, and podcasts.
In the Microsoft Store and across the web, you can find many different audio recording apps, but the Sound Recorder app is easy to use with the basic features that you may need, and it comes already built into the operating system.
In this how-to guide, I will outline the steps to use the Sound Recorder app on Windows 11.
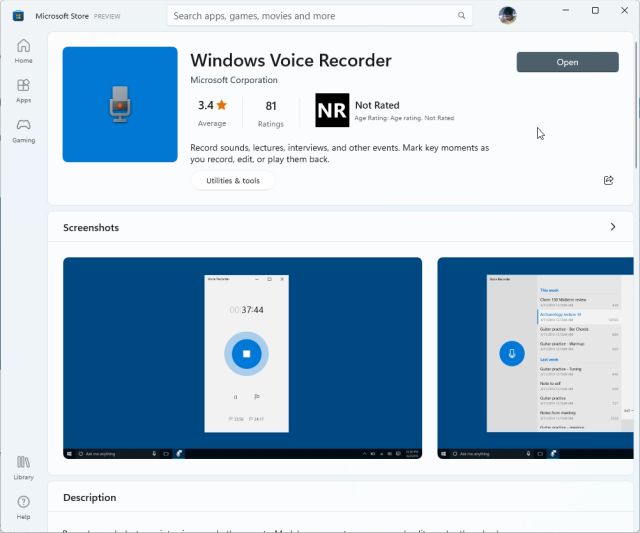
The Sound Recorder app should be installed on your computer, but if not, you can download it directly from this Microsoft Store page by clicking the «Get (or Install)» button.
How to use Sound Recorder on Windows 11
Once you connect a microphone, you can continue with the instructions to start recording audio on Windows 11 without third-party tools.
Record audio
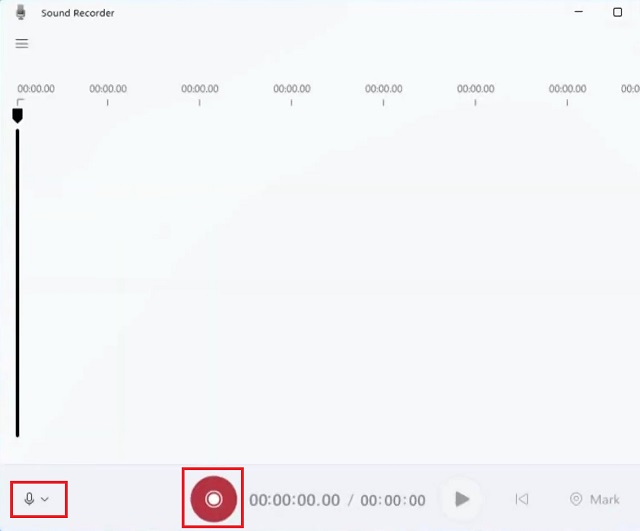
To record audio on Windows 11, use these steps:
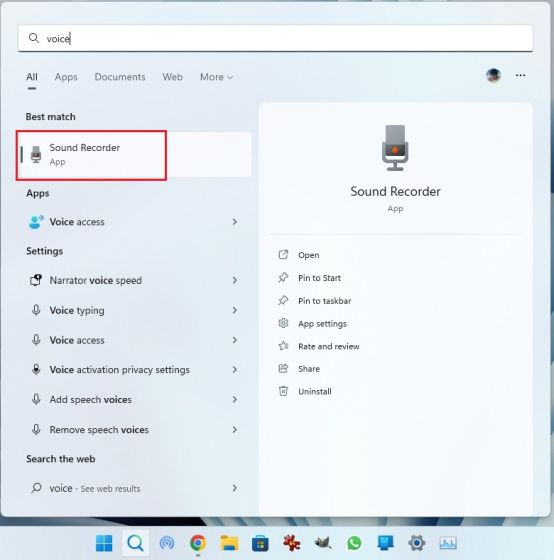
- Open Start.
- Search for Sound Recorder and click the top result to open the app.
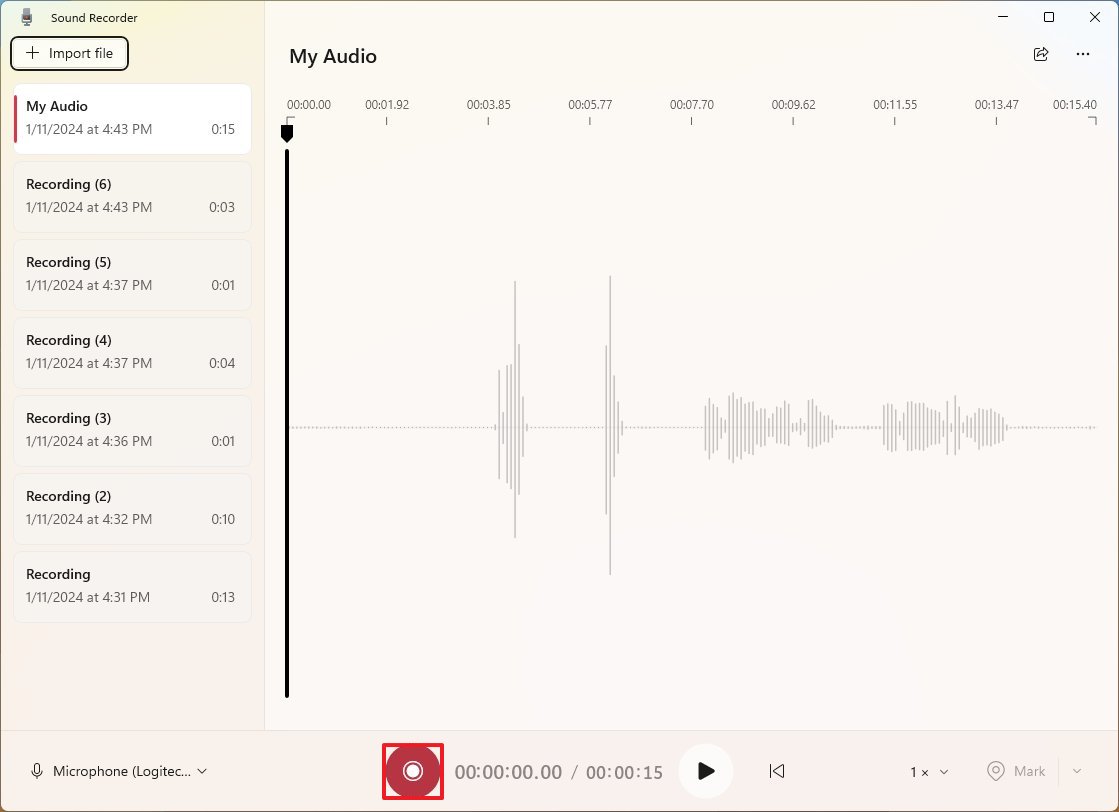
- (Optional) Click the mic button in the bottom-left corner and choose the recording device you want to use if you have multiple microphones.
- Click the Record button («Ctrl + R»).
- Click the Mark button («Ctrl + M») to mark a point in the recording.
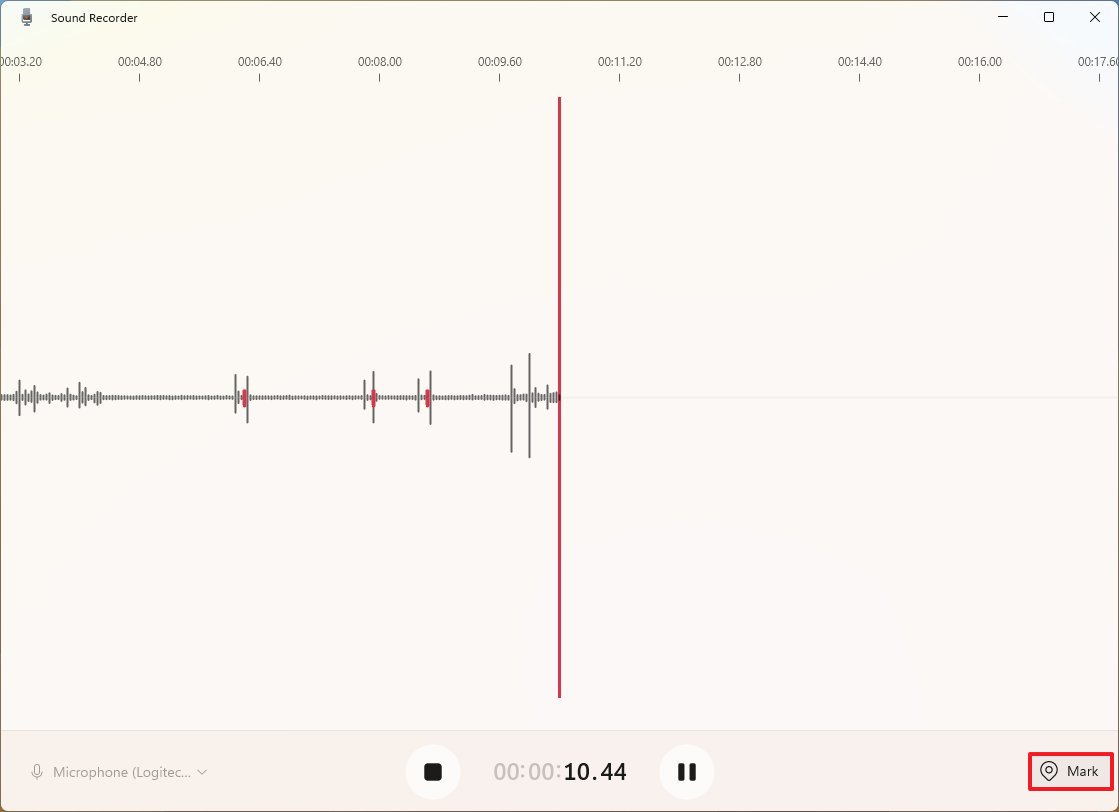
- Quick note: This option won’t interrupt the recording, but you can quickly jump to important parts of the file when listening to the track. The setting is available while recording or listening to the audio file.
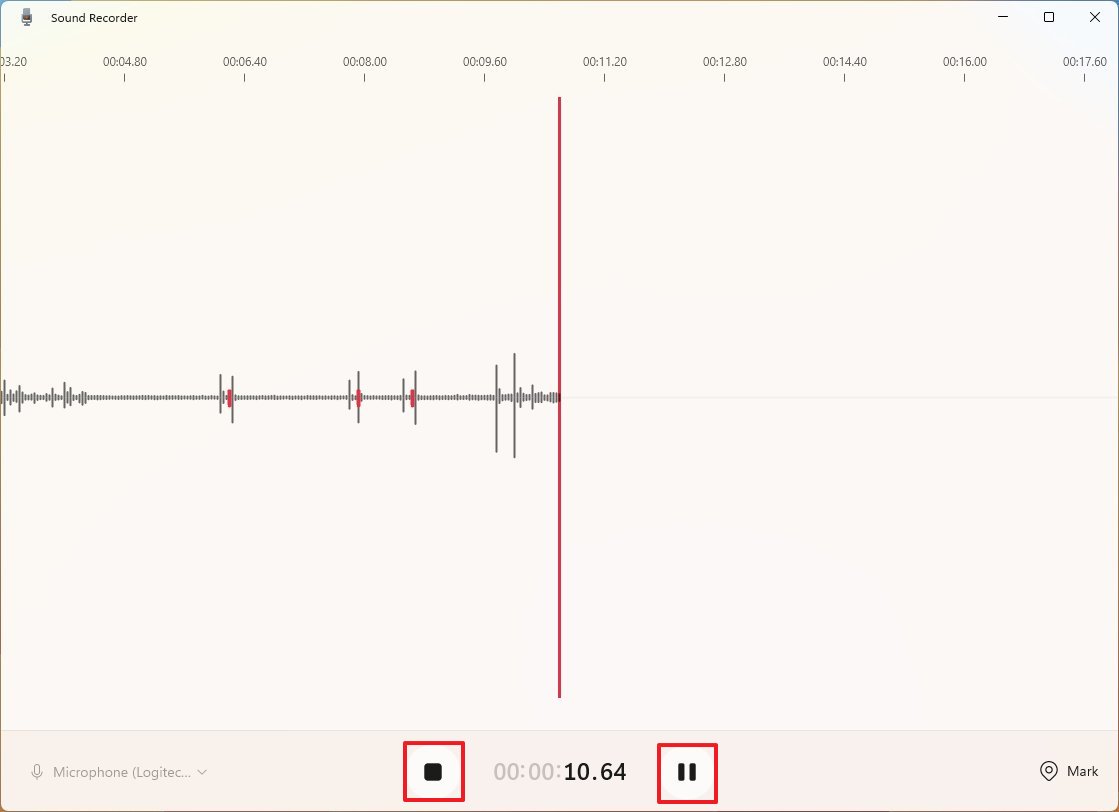
- Click the Pause button («Alt + P» or «Space key») to stop the recording without separating the track to keep everything in one file.
- Click the Stop button («Escape» or «Enter key») to finish the recording.
After you complete the steps, the file with the audio will be saved in the «Sound Recordings» folder available through the «Documents» folder.
All the latest news, reviews, and guides for Windows and Xbox diehards.
Playback audio
To playback audio from the Sound Recorder, use these steps:
- Open Start.
- Search for Sound Recorder and click the top result to open the app.
- Choose the file from the left pane.
- Click the Play button («Space key»).
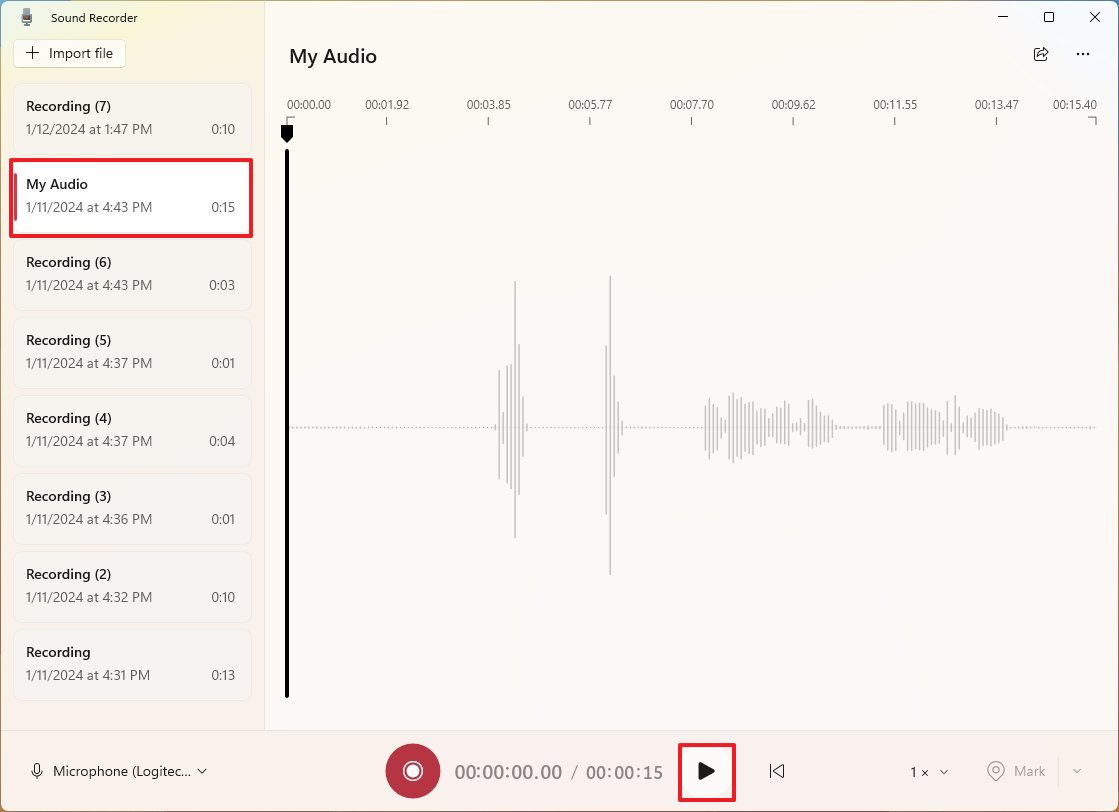
Once you complete the steps, the recording will play, and you can click the «Pause» button to control the audio.
Rename audio
To change the name of an audio file, use these steps:
- Open Start.
- Search for Sound Recorder and click the top result to open the app.
- Right-click the file and choose the Rename option.
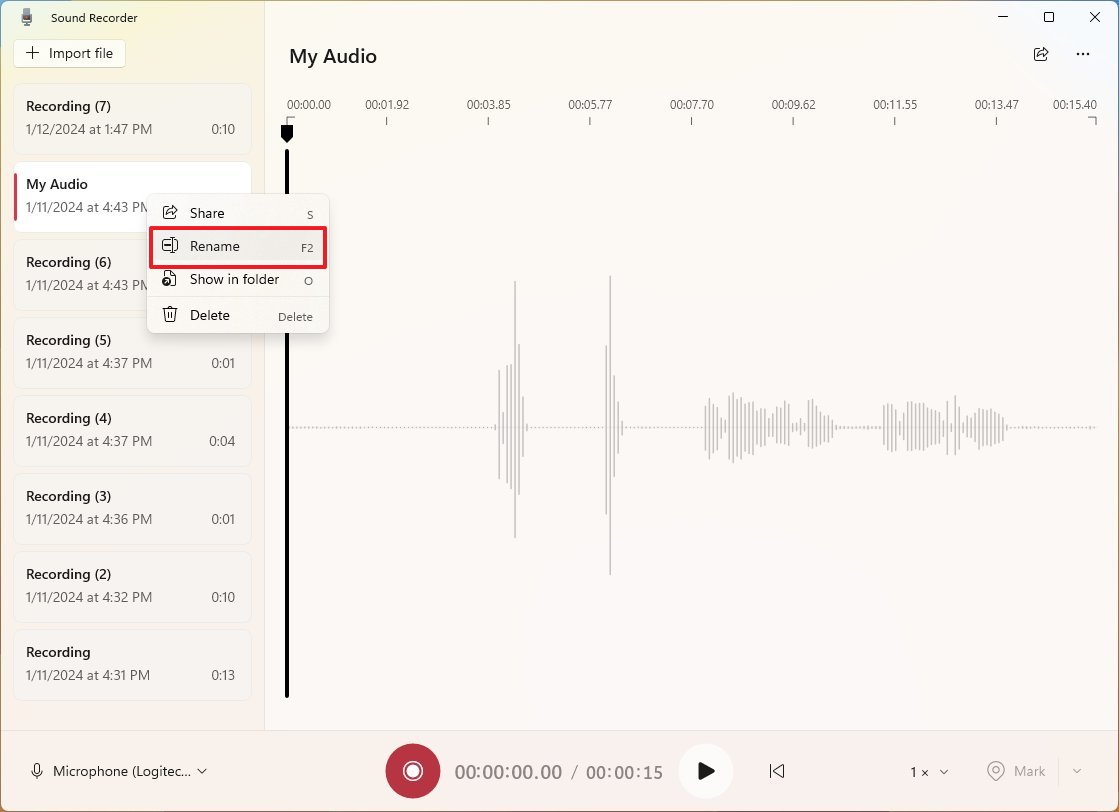
- Confirm the new name.
- Click the Rename button.
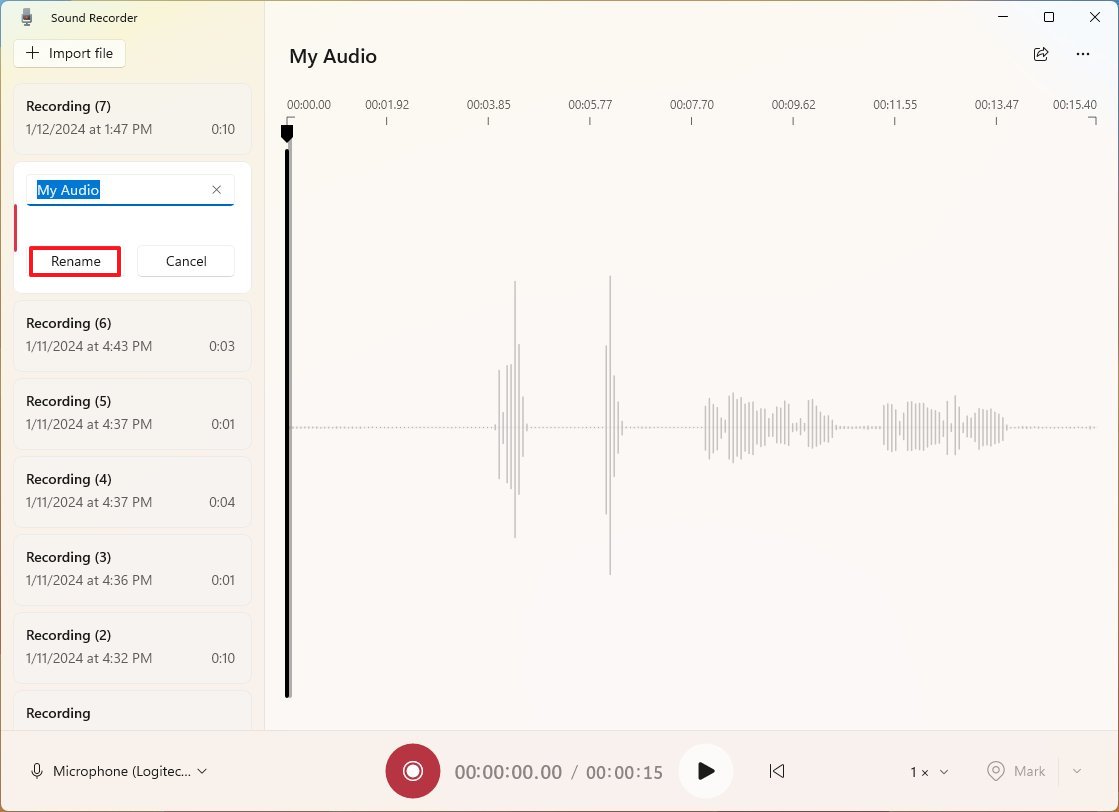
After you complete the steps, the new name will apply in the app and the file. If the file is selected, you can also access the option to change the name from the «More options for recordings» menu in the top-right corner.
If you want to delete a file, right-click the item from the left side and choose the «Delete» option.
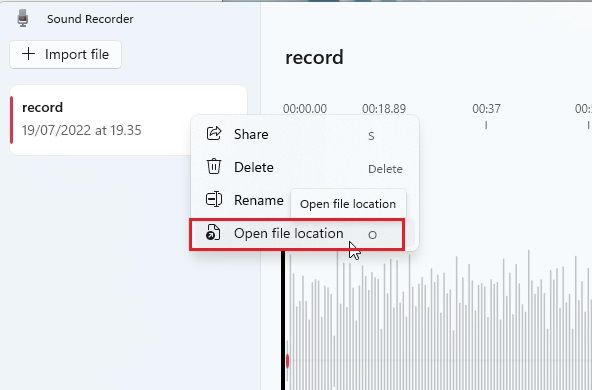
To share an audio file with other people from within the Sound Recorder app, use these steps:
- Open Start.
- Search for Sound Recorder and click the top result to open the app.
- Right-click the file and choose the Share option.
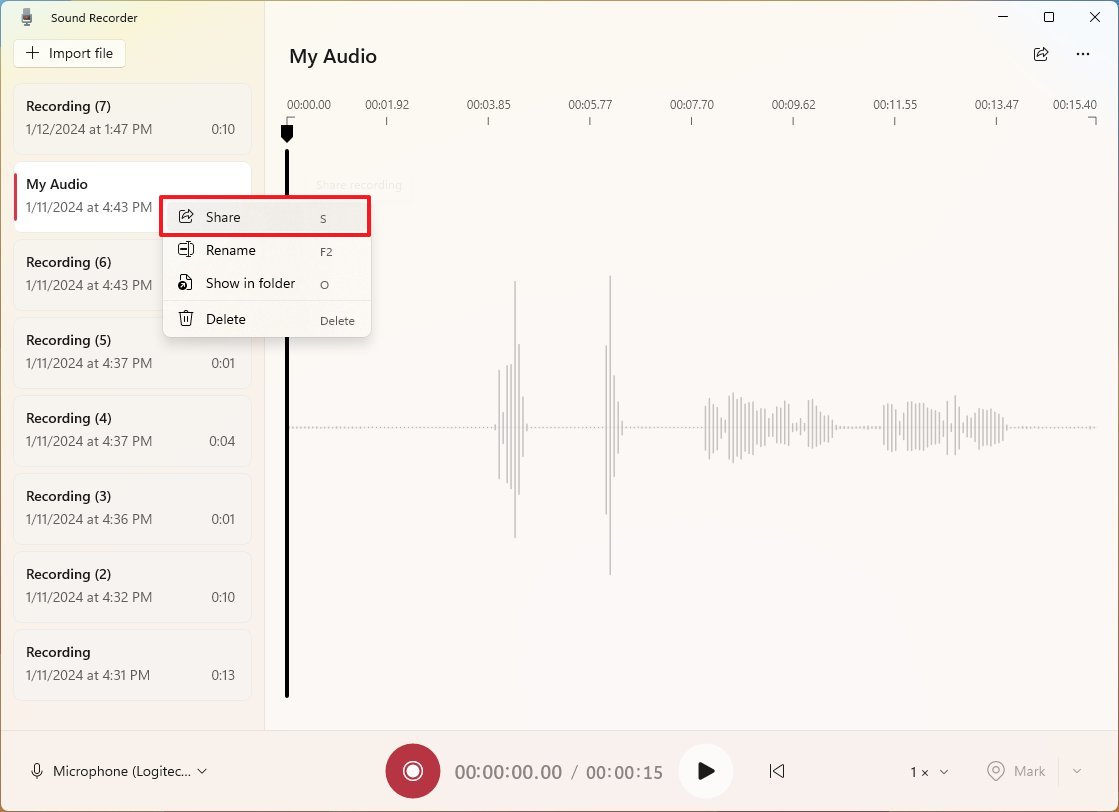
- Choose the sharing method, including email, app, or through the Nearby Sharing feature.
- Continue with the on-screen direction to complete the process.
Alternatively, you can always use the «Show in folder» option from the Sound Recorder context menu to access the folder containing your recordings to grab the file manually for sharing.
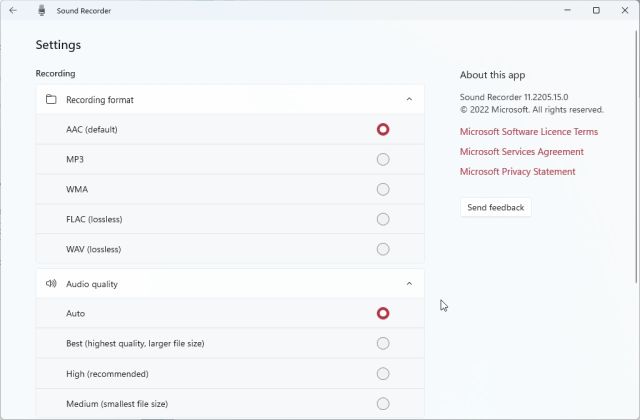
Change settings
To change the audio format or recording quality on Windows 11, use these steps:
- Open Start.
- Search for Sound Recorder and click the top result to open the app.
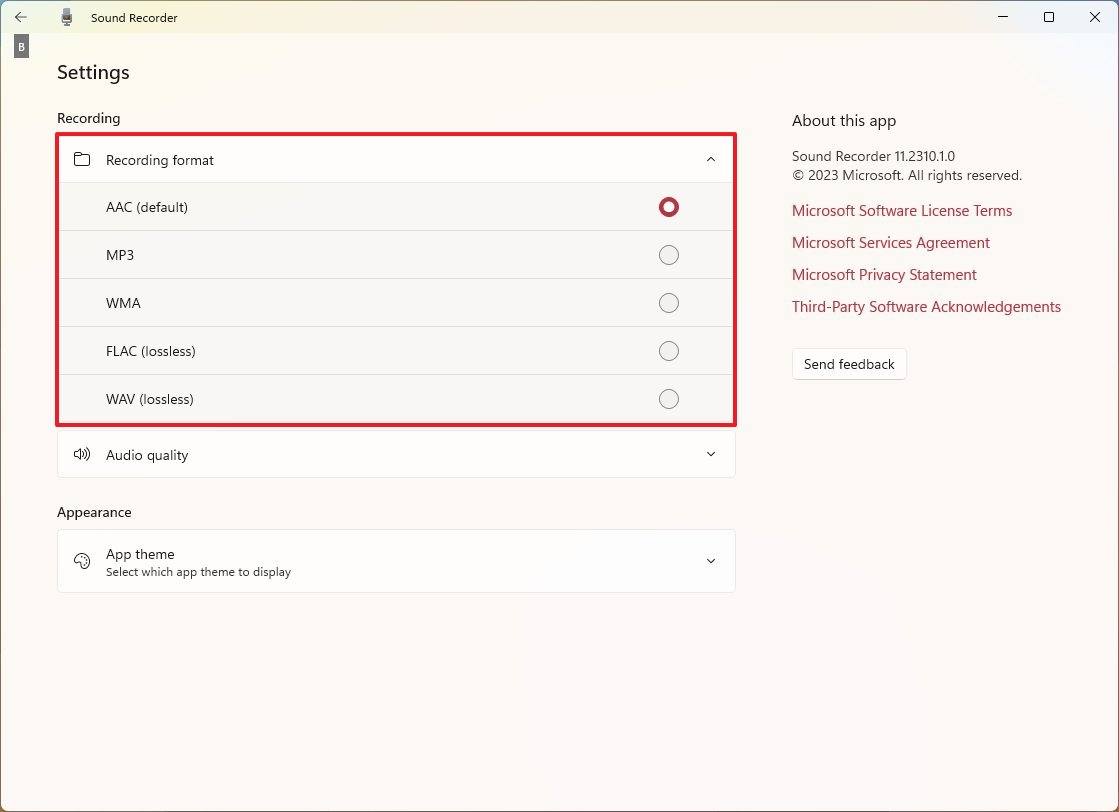
- Click the «More options for recordings» menu from the top-right corner and choose the Settings option.
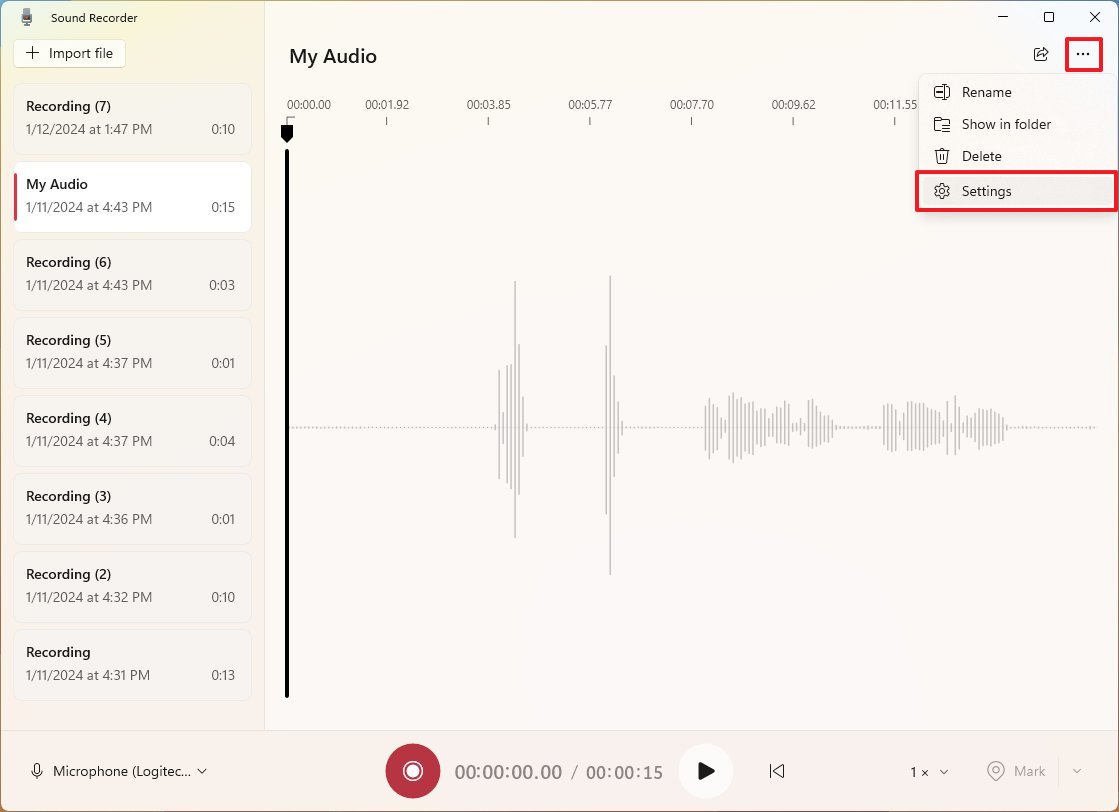
- Click the Recording format setting.
- Select the audio format you want to use, including AAC, MP3, MWA, FLAC, or WAV.
- Click the Audio quality setting.
- Select the quality option for your recording, including Auto, Best, High, or Medium.
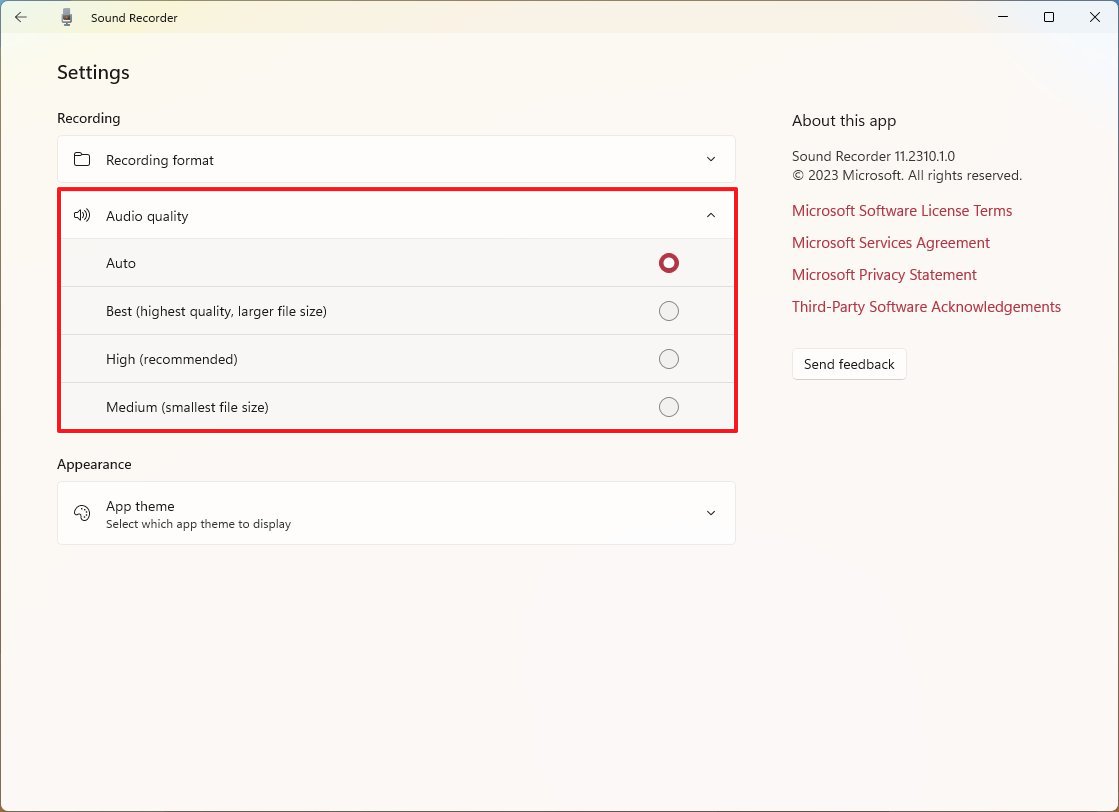
Once you complete the steps, the new configuration will apply, and the app will use these settings on your next recording.
Import audio
To import an audio file to the Sound Recorder app, use these steps :
- Open Start.
- Search for Sound Recorder and click the top result to open the app.
- Click the Import file button.
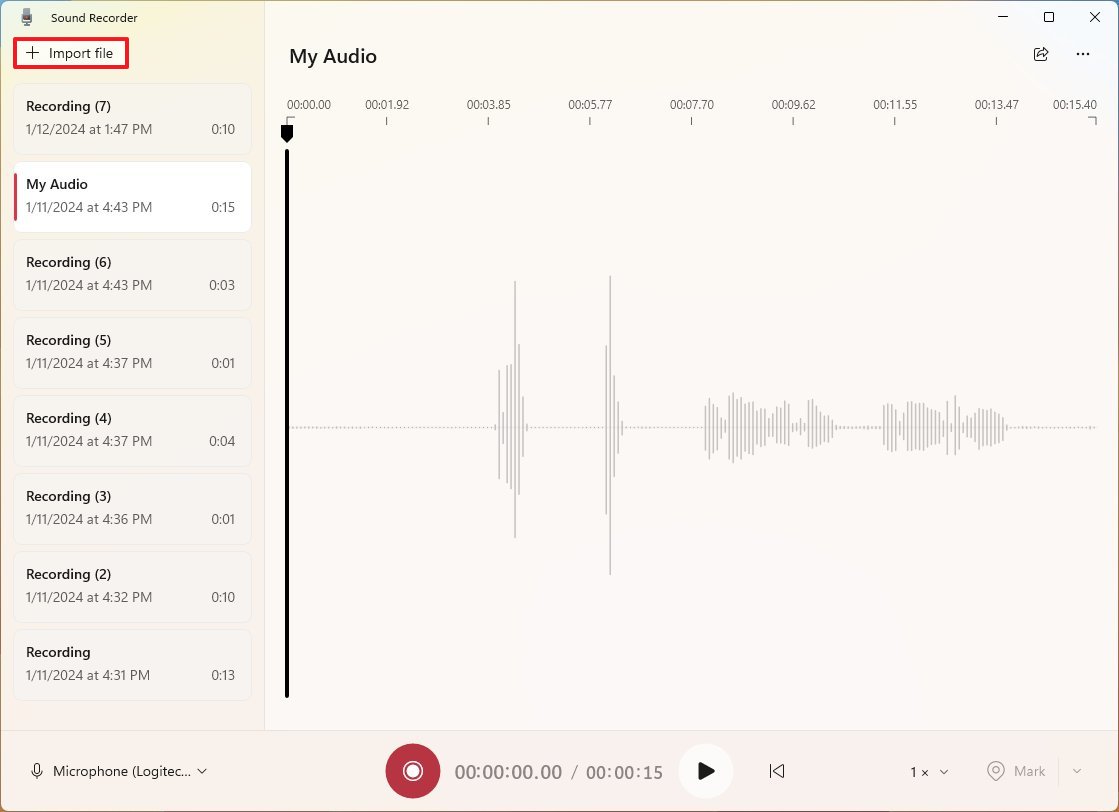
- Select the audio file.
- Click the Open button.
After you complete the steps, the file will appear in the left navigation pane, ready for playback.
How to fix Sound Recorder on Windows 11
If the app doesn’t seem to work, the problem could be related to the microphone or privacy settings.
Fix microphone access
To fix app access to the microphone on Windows 11, use these steps:
- Open Settings.
- Click on Privacy & security.
- Click the Microphone page on the right side.
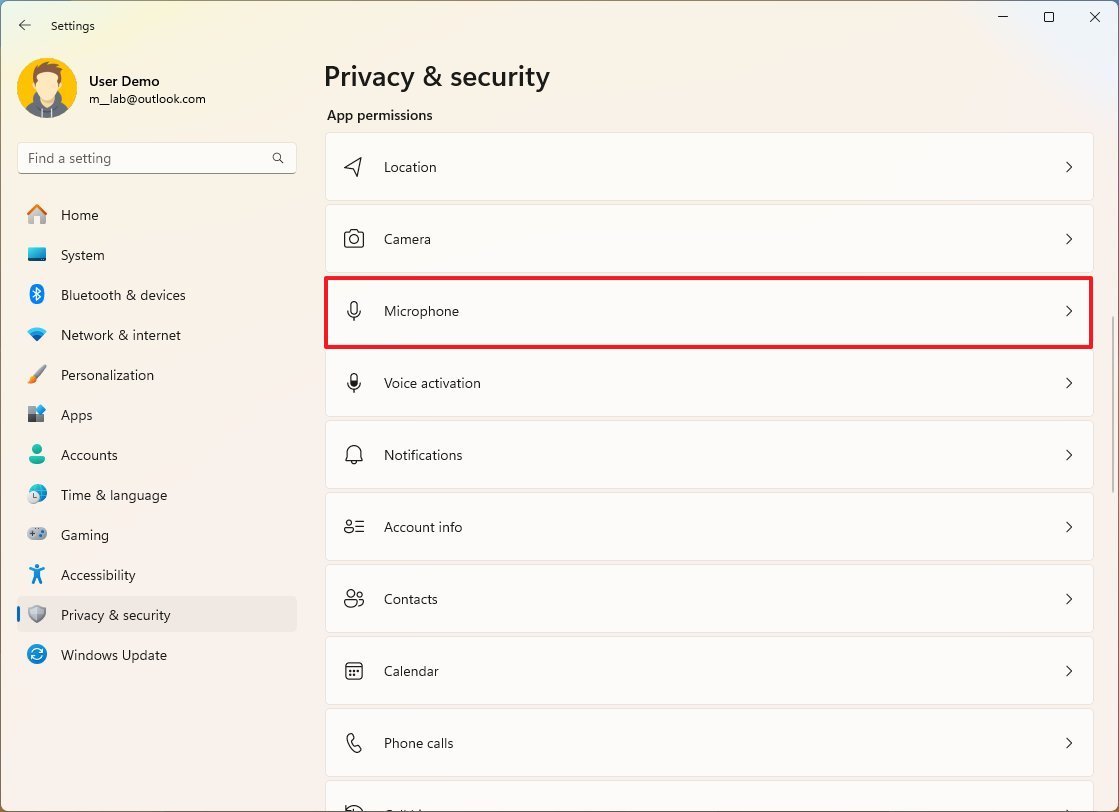
- Turn on the Microphone access toggle switch (if applicable).
- Turn on the Sound Recorder toggle switch.
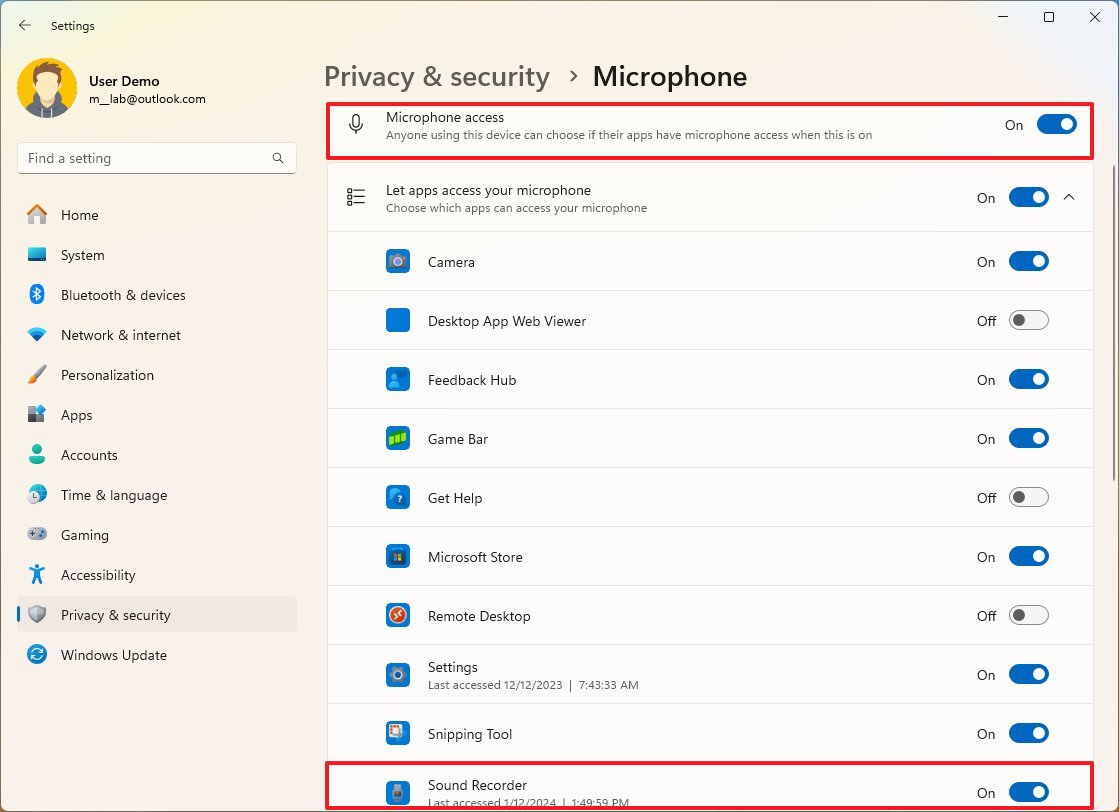
Once you complete the steps, you should be able to use the microphone with the Sound Recorder app.
Fix microphone issues
To troubleshoot and resolve issues with the microphone, use these steps:
- Open Settings.
- Click on System.
- Click the Troubleshoot page on the right side.
- Click the Other troubleshooters setting.
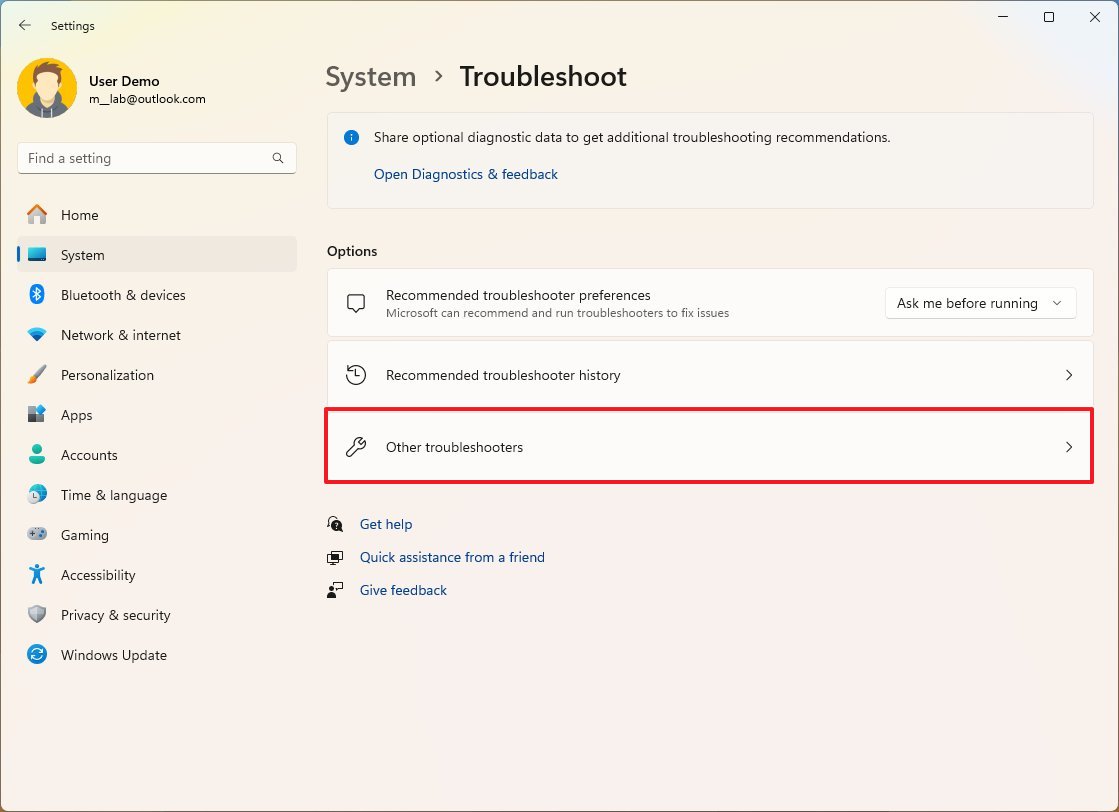
- Click the Run button for the Audio troubleshooter.
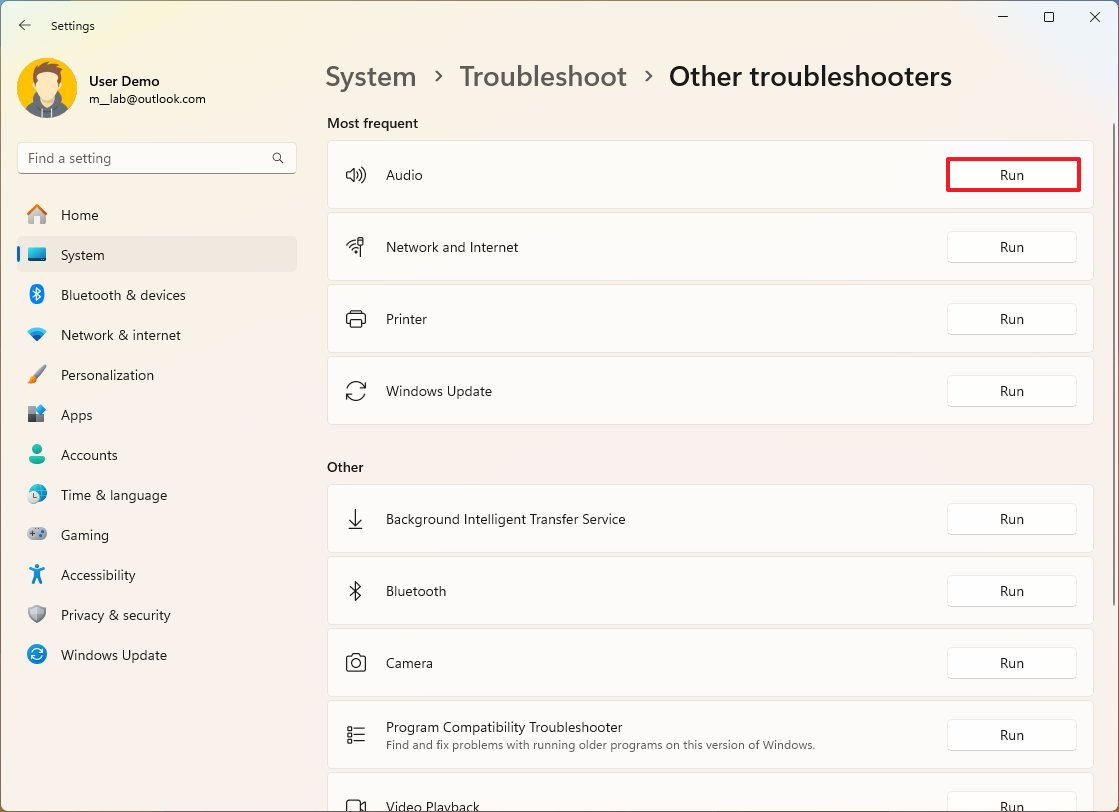
- Click the Yes button in the Get Help app.
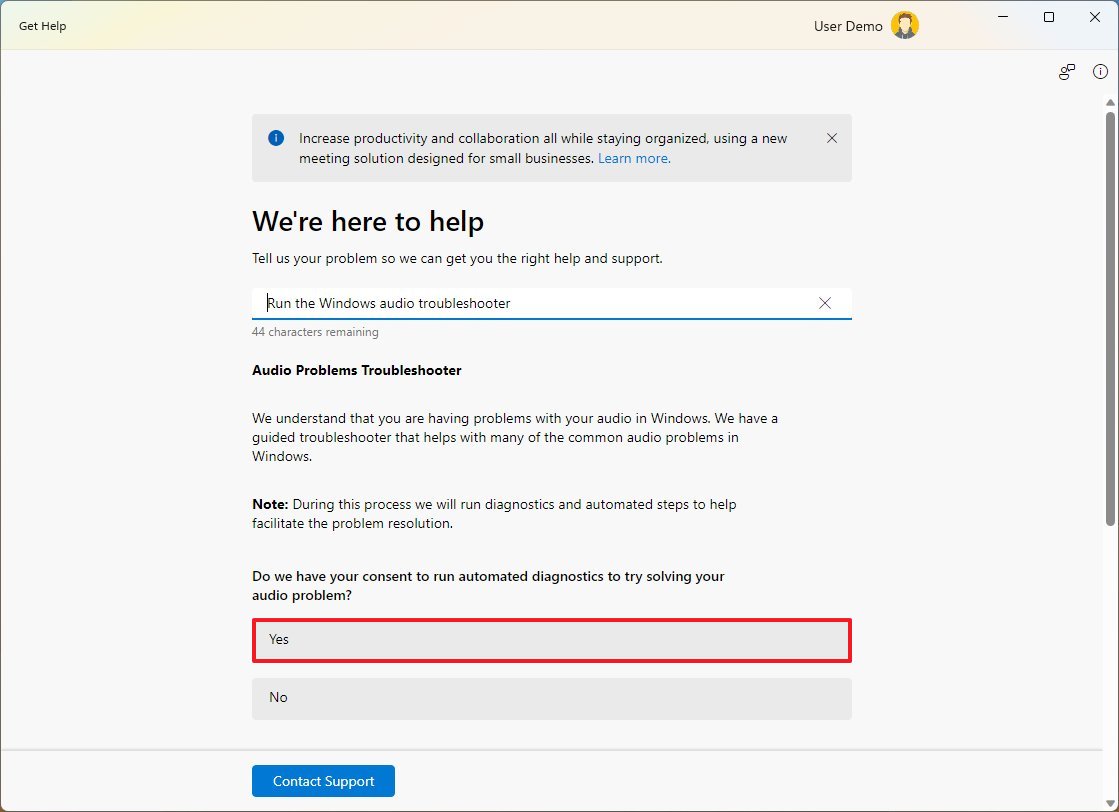
- Continue with the on-screen directions to complete the process.
After you complete the steps, the system will scan and fix the problem with the microphone, and it should now work with the Sound Recorder app.
Fix Sound Recorder problems
To fix problems with the Sound Recorder app on Windows 11, use these steps:
- Open Settings.
- Click on Apps.
- Click the Installed apps page on the right side.
- Click the menu button (three dots) on the right side for Sound Recorder and click on Advanced options.
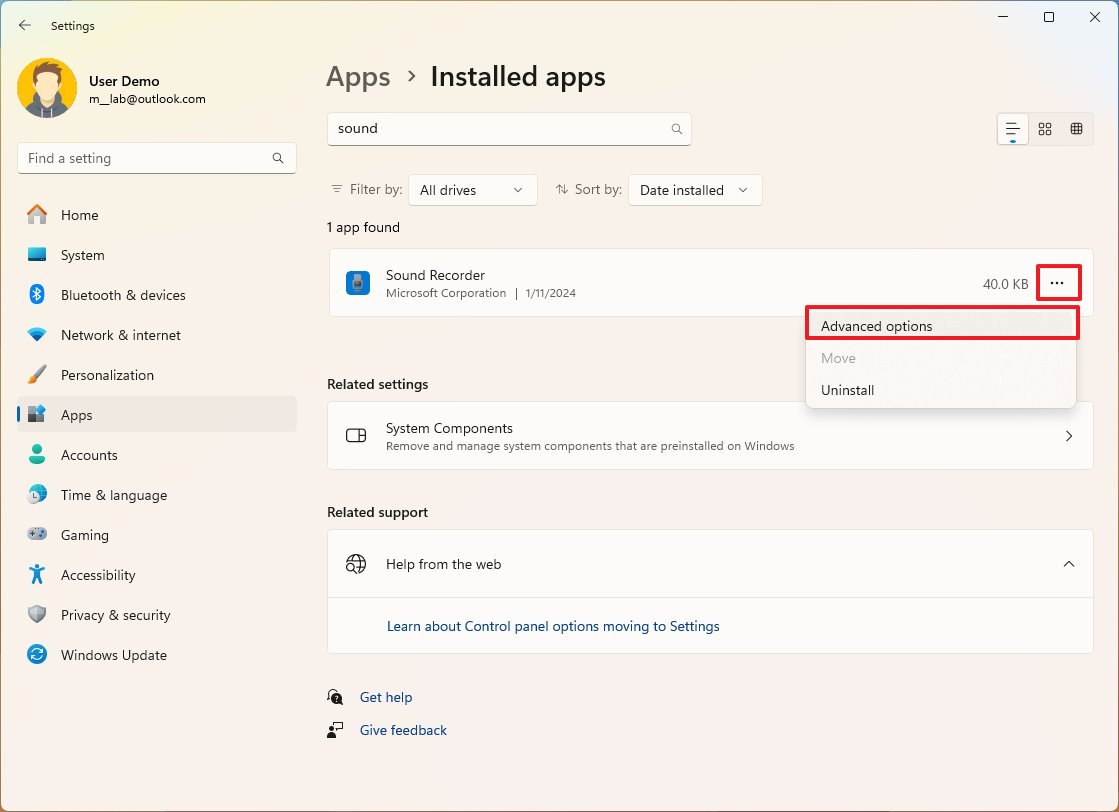
- Under the «Reset» section, click the Repair button.
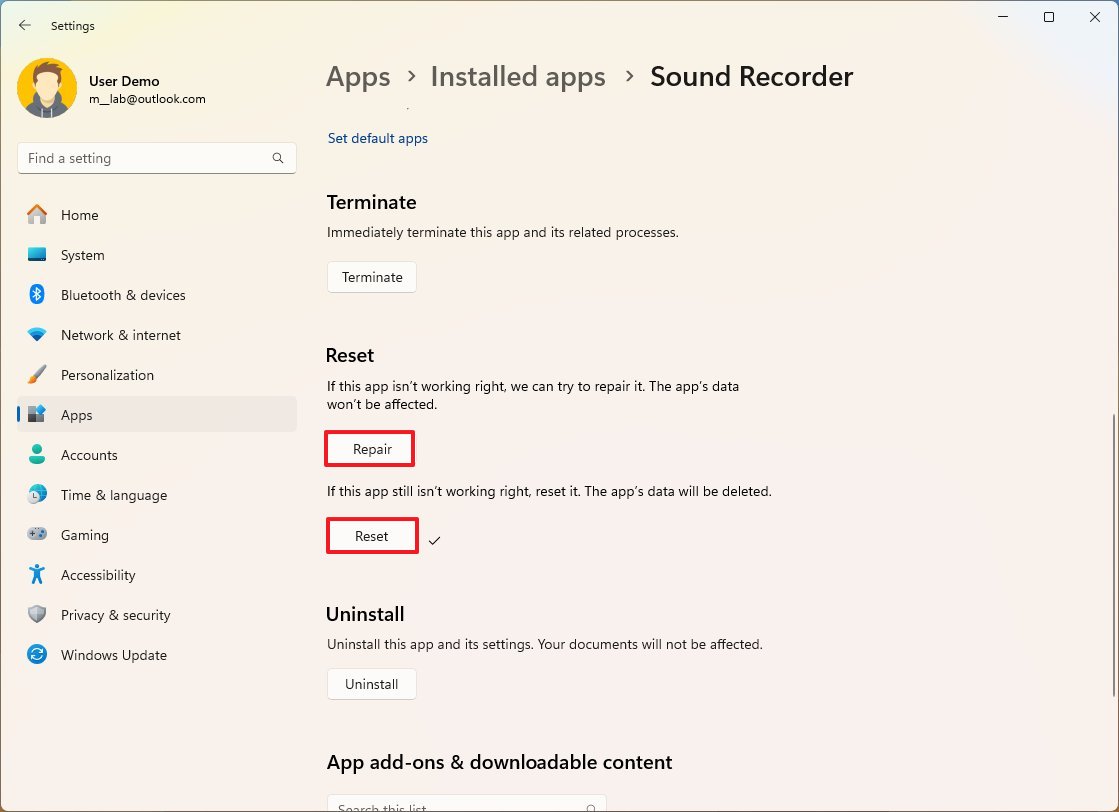
- (Optional) Click the Reset button.
These options won’t delete your recordings, but the reset option will delete the app’s data, meaning that the next time you open the app, the files won’t appear in the left pane. However, you can use the import option to add them again.
Although the Sound Recorder app is similar to the Voice Recorder app on Windows 10, one of the biggest differences is that the app for Windows 11 doesn’t include the audio trimming feature.
More resources
For more helpful articles, coverage, and answers to common questions about Windows 10 and Windows 11, visit the following resources:
- Windows 11 on Windows Central — All you need to know
- Windows 10 on Windows Central — All you need to know
Mauro Huculak has been a Windows How-To Expert contributor for WindowsCentral.com for nearly a decade and has over 15 years of experience writing comprehensive guides. He also has an IT background and has achieved different professional certifications from Microsoft, Cisco, VMware, and CompTIA. He has been recognized as a Microsoft MVP for many years.
Windows Sound Recorder is a basic audio recording application that comes pre-installed with all modern versions of the Windows operating system, including Windows 11. The app was built from the ground up not to manage advanced audio production projects, but to enable users of all ages and proficiency levels to quickly start or resume paused voice recordings with as little complexity as possible.
It is designed to record audio using either the built-in microphone (often found in all modern laptops) or an external microphone connected to the computer either via a 3.5mm audio jack or a USB connection.
Main Features
Windows Sound Recorder by Microsoft features a simplified main dashboard that enables all Windows PC users to start and stop recording with just a few clicks, and the recorded audio is automatically saved in the default location. The app requires no technical knowledge or setup, making it ideal for quick and simple audio recording tasks even on the slowest PC configurations such as older desktop and laptop models.
As for the audio editing tools, this app provides only the bare minimum of options. Users are empowered to trim and delete parts of the recording, with a built-in option to bookmark important parts of the recording.
Due to its streamlined interface and presence of only a basic set of audio editing tools, this lightweight application is best suited for users who just want a quick, easy, and reliable way of recording their voice without any hassle. Microsoft Sound Recorder app can manage recordings of audio messages, lectures, interviews, and much more.
More advanced users will not find many attractive features in this app. It lacks the ability to record from multiple sources, apply effects and filters, or export in different file formats, making it very difficult to use in any kind of complex recording project.
PROS
- Simple and user-friendly interface
- Records audio easily and quickly
- Supports multiple audio formats
- Basic editing features for trimming recordings
- Suitable for quick and simple audio recording tasks
- Integrated with Windows for easy access and sharing
- No additional installation or setup required
CONS
- Limited advanced features compared to other audio recording software
- Limited export options for audio files
- No built-in effects or filters for audio enhancement
Overall
Windows Sound Recorder is a useful application for basic audio recording tasks, making it very attractive for audio recordings that do not require any additional editing or processing.
A Free Utilities & Tools App By Microsoft Corporation
★★★☆☆ 3.9
Downloads: 131
Updated: March 4, 2025
You are downloading the MsixBundle package file for Windows Sound Recorder v2021.2502.0.0 on Windows. Windows Sound Recorder is a free Utilities & Tools App (UWP App / Microsoft Store Edition): Record sounds, lectures, interviews, and other events. Mark key moments as you record, edit, or play them … You can now download the offline MsixBundle package file to install & try it.

Get Latest Version of Windows Sound Recorder from Microsoft Apps Store
Download App Package File (Latest Version)
Microsoft.WindowsSoundRecorder_2021.2502.0.0_neutral_~_8wekyb3d8bbwe.MsixBundle
• Type: Universal Windows Platform App / Windows Runtime API
• Package Format: MsixBundle
• Package Version: 2021.2502.0.0
• Last Updated: March 4, 2025
• File Size: 9.94 MB (10419019 Bytes)
• SHA1: 6add2b4caae9f318d2423d2c708883f65da61da8
• Start Download: Generate Package Download Link >
Please be aware that the Windows Sound Recorder MsixBundle file you are to download is hosted on the Microsoft Store CDN server. You can read more about Windows Sound Recorder or get it from Microsoft Store.
App Features
• Start a recording or resume a paused recording in one click
• Recordings are autosaved and stored in your Documents folder for easy access
• Easily share your recordings with friends and family, or send recordings to other apps
• Play back, trim, rename, and delete your recordings
• Mark key moments in the recording
• A universal app, for PC, tablet, and Windows Phone
What’s New in Version 2021.2502.0.0
Thank you for using Voice Recorder! All of our regular updates include bug fixes and performance improvements to make Voice Recorder better for you.
Windows Sound Recorder Version History
Need old versions of Windows Sound Recorder? Download the old package files now:
- Windows Sound Recorder 2021.2408.6.0 (Updated: September 4, 2024)
- Windows Sound Recorder 2021.2407.1.0 (Updated: July 30, 2024)
- Windows Sound Recorder 2021.2405.0.0 (Updated: June 1, 2024)
- Windows Voice Recorder 2021.2205.15.0 (Updated: May 28, 2022)
- Full Version History >
More Apps to Consider (Similar or Related)
-
Windows Calculator MsixBundle 2021.2502.2.0
Download MsixBundle
-
HP Smart MsixBundle 159.1.1144.0
Download MsixBundle
-
Windows Sound Recorder MsixBundle 2021.2502.0.0
Download MsixBundle
-
MPEG-2 Video Extension AppxBundle 1.2.9.0
Download AppxBundle
-
File Viewer Plus Msix 5.3.2.0
Download Msix
-
AukZip MsixBundle 1.0.20.0
Download MsixBundle
-
HEIC HEIF Convert MsixBundle 5.2.0.0
Download MsixBundle
-
Record Screen — Free Msix 1.0.30.0
Download Msix
Windows 11 does not have a built-in screen recorder, but there are many third-party apps that allow you to record the screen in Windows 11 with audio recording, webcam view, and more. But what if you wish to only record audio in Windows 11? Well, that’s where Windows 11 has not faltered and shipped a native Sound Recorder app, which lets you seamlessly record audio. The app lets you choose the bitrate, save the recorded audio in your choice of media format, import recorded audio files, and more. That said, check out this step-by-step guide to learn how to record audio in Windows 11.
We have added two easy methods to record audio in Windows 11. You can either use the built-in Sound Recorder app or go for a third-party app like Audacity to record sound on Windows 11. But before we begin, don’t forget to check our guide to set up and test the microphone in Windows 11.
Record Audio with Native Sound Recorder App in Windows 11
In case you’re unaware, Windows 11 comes with a built-in Sound Recorder program that works really well and is easy to use. Microsoft only recently updated the Voice Recorder app, which was based on UWP. It has now been rebranded to the Sound Recorder app and comes with the new design language, in line with Windows 11’s aesthetics.
The best part about the new Sound Recorder app in Windows 11 is that it now supports recording in multiple formats, including MP3, M4A, WAV, FLAC, WMA, and more. Not to mention, you can choose the audio quality as well, ranging from auto, medium, and best to high. You can also change the recording device (microphone) within the app, which is great. So to record audio in Windows 11, go ahead and try the native Sound Recorder app. Here is how to use it.
1. First, press the Windows key and type “voice” or “sound“. Click on “Voice Recorder” or “Sound Recorder”.
2. Next, the app will update itself to the latest Voice Recorder version. If for some reason, it’s still the old app, open this link and update the app via the Microsoft Store.
3. Now, launch the Sound Recorder app. At the bottom-left corner, you can choose the recording device from the drop-down menu. Now, you can click the big red “Record” button at the bottom to start recording audio. To stop the recording, click on the same button again. It will have turned into a red “Stop” button.
4. After that, you can simply right-click on the recorded audio and open the file location to instantly locate the file.
5. The recorded audio in Windows 11 will be saved in the “user profile -> Documents -> Sound recordings” folder.

6. You can also mark the audio intervals with timestamps and change the playback speed from the 3-dot menu at the bottom-right corner.
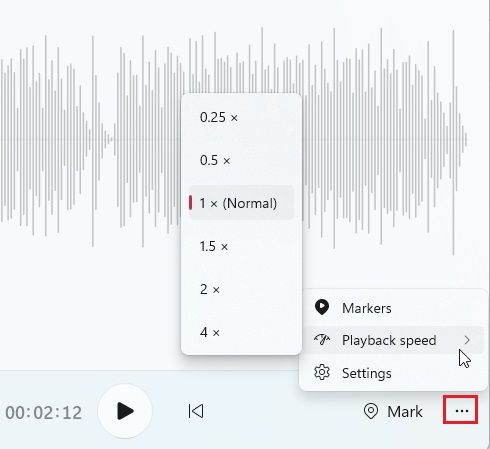
7. And to change the recording quality in Windows 11, open “Settings” within the app. The Settings are also accessible from the three-dot menu at the bottom right corner. Here, you can choose the audio format you prefer. So, this is how you can record audio clips in Windows 11 with the Sound Recorder app.
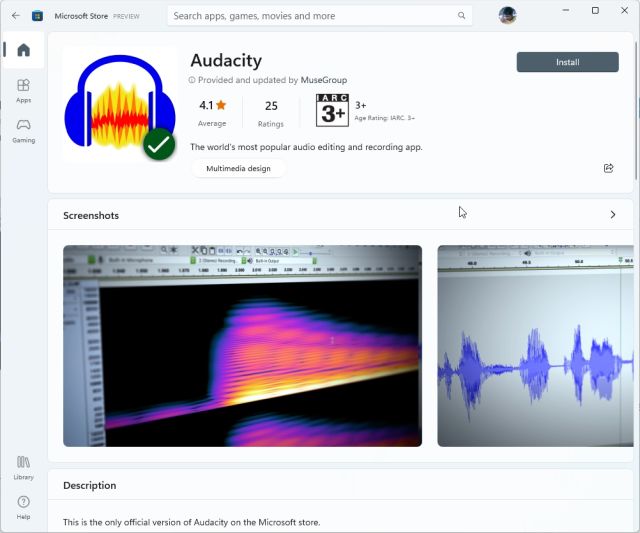
Record Audio with Third-Party App Audacity in Windows 11
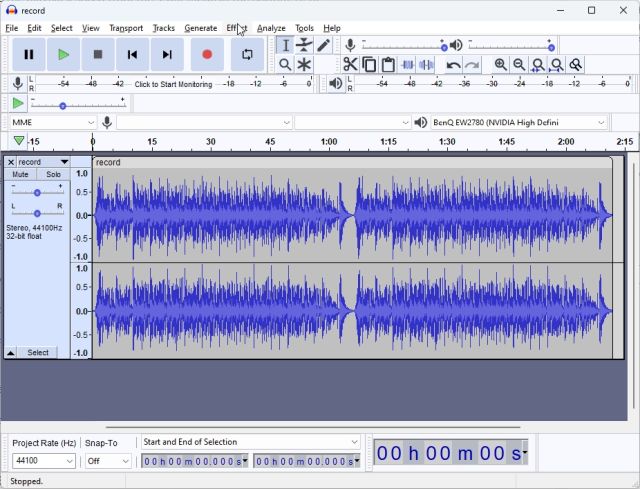
In case you are looking for an advanced program to record audio in Windows 11, let me introduce you to Audacity. It’s ranked among some of the best Windows 11 apps for its laundry list of features. You can record system sound, audio being played via the speakers, microphone audio, etc. The best part is that Audacity is open-source, and it’s completely free to use. So both general users and professionals can take advantage of this awesome audio recording app. Here is how to use Audacity to record audio in Windows 11.
1. Head over to this link and download Audacity. You can also install Audacity in Windows 11 via the Microsoft Store.
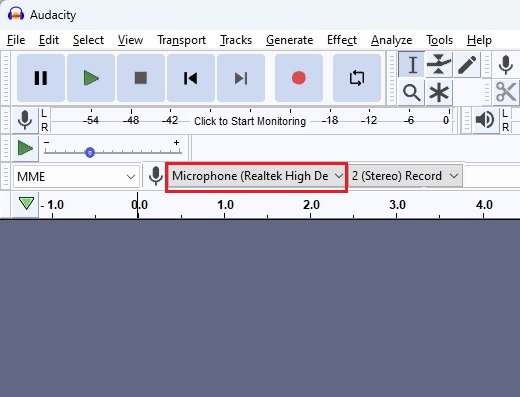
2. Once installed, open the audio recording app to learn how to use it. First, next to the microphone icon at the top, you can choose the input source for recording the audio.
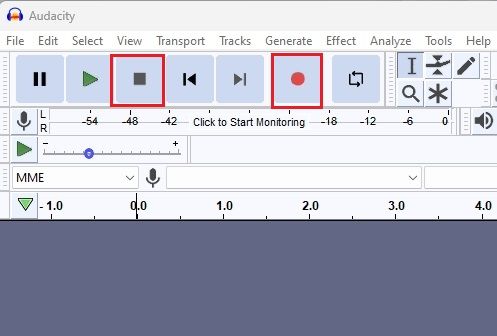
3. Finally, click on the red recording button at the top. To stop the recording, click on the grey “Stop” button.
4. You can now click the green play button to listen to the recording. You can also edit the audio recording, along with mixing, removing noise, trimming, changing speed, etc.
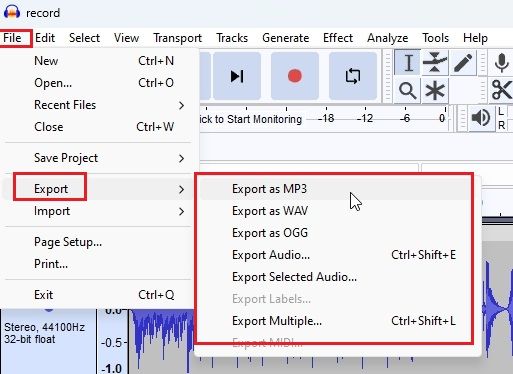
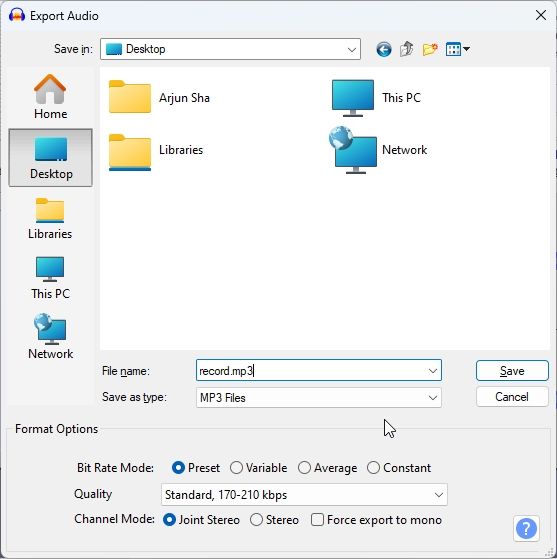
5. To save the audio recording, click on “File” and choose “Export“. Here, select your desired file format.
6. Choose the folder where you want to save the audio recording, and there you have it. There are endless possibilities with Audacity, which you can explore in the app. But this is how you can record audio in Windows 11 using a third-party program like Audacity.
Record Sound in Windows 11 in Two Easy Ways
So there are two ways to record sound in Windows 11. The native Sound Recorder app is excellent, but if you want more features, you can always go for Audacity. Anyway, that is all from us. If you are having issues with the microphone on your Windows 11 PC, head over to the linked guide for an instant fix. Finally, if you have any questions, let us know in the comment section below.