
Windows is an open and flexible platform used by many of the world’s top businesses for high availability use cases where security and availability are non-negotiable.
To meet those needs:
- Windows provides a range of operating modes that customers can choose from. This includes the ability to limit what can run to only approved software and drivers. This can increase security and reliability by making Windows operate in a mode closer to mobile phones or appliances.
- Customers can choose integrated security monitoring and detection capabilities that are included with Windows. Or they can choose to replace or supplement this security with a wide variety of choices from a vibrant open ecosystem of vendors.
In this blog post, we examine the recent CrowdStrike outage and provide a technical overview of the root cause. We also explain why security products use kernel-mode drivers today and the safety measures Windows provides for third-party solutions. In addition, we share how customers and security vendors can better leverage the integrated security capabilities of Windows for increased security and reliability. Lastly, we provide a look into how Windows will enhance extensibility for future security products.
CrowdStrike recently published a Preliminary Post Incident Review analyzing their outage. In their blog post, CrowdStrike describes the root cause as a memory safety issue—specifically a read out-of-bounds access violation in the CSagent driver. We leverage the Microsoft WinDBG Kernel Debugger and several extensions that are available free to anyone to perform this analysis. Customers with crash dumps can reproduce our steps with these tools.
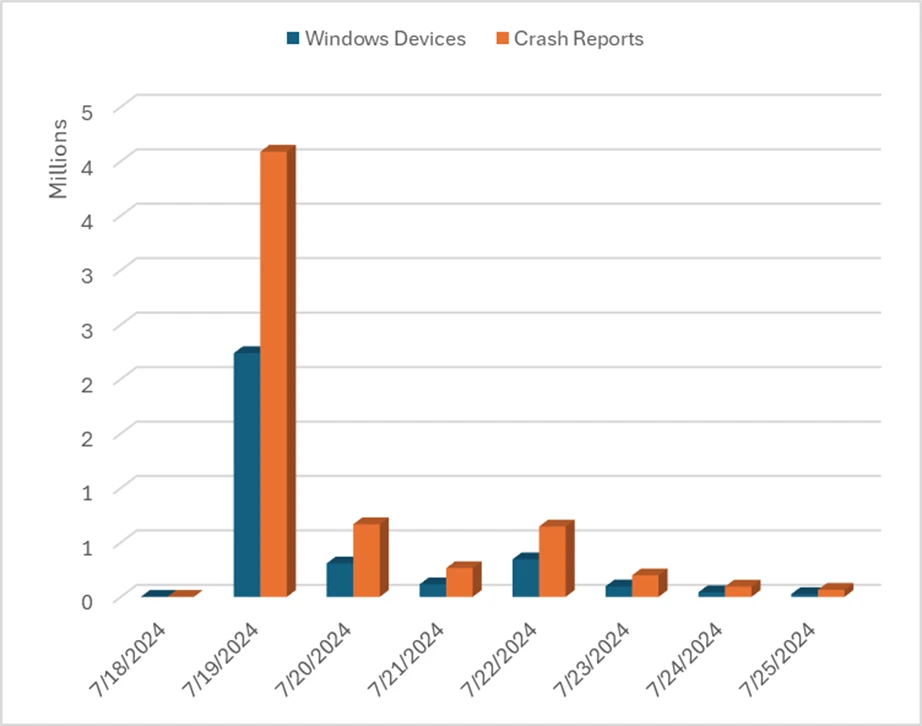
Based on Microsoft’s analysis of the Windows Error Reporting (WER) kernel crash dumps related to the incident, we observe global crash patterns that reflect this:
FAULTING_THREAD:  ffffe402fe868040

READ_ADDRESS:  ffff840500000074 Paged pool

MM_INTERNAL_CODE:  2

IMAGE_NAME:  csagent.sys

MODULE_NAME: csagent

FAULTING_MODULE: fffff80671430000 csagent

PROCESS_NAME:  System

TRAP_FRAME:  ffff94058305ec20 -- (.trap 0xffff94058305ec20)
.trap 0xffff94058305ec20
NOTE: The trap frame does not contain all registers.
Some register values may be zeroed or incorrect.
rax=ffff94058305f200 rbx=0000000000000000 rcx=0000000000000003
rdx=ffff94058305f1d0 rsi=0000000000000000 rdi=0000000000000000
rip=fffff806715114ed rsp=ffff94058305edb0 rbp=ffff94058305eeb0
 r8=ffff840500000074  r9=0000000000000000 r10=0000000000000000
r11=0000000000000014 r12=0000000000000000 r13=0000000000000000
r14=0000000000000000 r15=0000000000000000
iopl=0         nv up ei ng nz na po nc
csagent+0xe14ed:
fffff806`715114ed 458b08          mov     r9d,dword ptr [r8] ds:ffff8405`00000074=????????
.trap
Resetting default scope

STACK_TEXT:
ffff9405`8305e9f8 fffff806`5388c1e4     : 00000000`00000050 ffff8405`00000074 00000000`00000000 ffff9405`8305ec20 : nt!KeBugCheckEx
ffff9405`8305ea00 fffff806`53662d8c     : 00000000`00000000 00000000`00000000 00000000`00000000 ffff8405`00000074 : nt!MiSystemFault+0x1fcf94
ffff9405`8305eb00 fffff806`53827529     : ffffffff`00000030 ffff8405`af8351a2 ffff9405`8305f020 ffff9405`8305f020 : nt!MmAccessFault+0x29c
ffff9405`8305ec20 fffff806`715114ed     : 00000000`00000000 ffff9405`8305eeb0 ffff8405`b0bcd00c ffff8405`b0bc505c : nt!KiPageFault+0x369
ffff9405`8305edb0 fffff806`714e709e     : 00000000`00000000 00000000`e01f008d ffff9405`8305f102 fffff806`716baaf8 : csagent+0xe14ed
ffff9405`8305ef50 fffff806`714e8335     : 00000000`00000000 00000000`00000010 00000000`00000002 ffff8405`b0bc501c : csagent+0xb709e
ffff9405`8305f080 fffff806`717220c7     : 00000000`00000000 00000000`00000000 ffff9405`8305f382 00000000`00000000 : csagent+0xb8335
ffff9405`8305f1b0 fffff806`7171ec44     : ffff9405`8305f668 fffff806`53eac2b0 ffff8405`afad4ac0 00000000`00000003 : csagent+0x2f20c7
ffff9405`8305f430 fffff806`71497a31     : 00000000`0000303b ffff9405`8305f6f0 ffff8405`afb1d140 ffffe402`ff251098 : csagent+0x2eec44
ffff9405`8305f5f0 fffff806`71496aee     : ffff8405`afb1d140 fffff806`71541e7e 00000000`000067a0 fffff806`7168f8f0 : csagent+0x67a31
ffff9405`8305f760 fffff806`7149685b     : ffff9405`8305f9d8 ffff8405`afb1d230 ffff8405`afb1d140 ffffe402`fe8644f8 : csagent+0x66aee
ffff9405`8305f7d0 fffff806`715399ea     : 00000000`4a8415aa ffff8eee`1c68ca4f 00000000`00000000 ffff8405`9e95fc30 : csagent+0x6685b
ffff9405`8305f850 fffff806`7148efbb     : 00000000`00000000 ffff9405`8305fa59 ffffe402`fe864050 ffffe402`fede62c0 : csagent+0x1099ea
ffff9405`8305f980 fffff806`7148edd7     : ffffffff`ffffffa1 fffff806`7152e5c1 ffffe402`fe864050 00000000`00000001 : csagent+0x5efbb
ffff9405`8305fac0 fffff806`7152e681     : 00000000`00000000 fffff806`53789272 00000000`00000002 ffffe402`fede62c0 : csagent+0x5edd7
ffff9405`8305faf0 fffff806`53707287     : ffffe402`fe868040 00000000`00000080 fffff806`7152e510 006fe47f`b19bbdff : csagent+0xfe681
ffff9405`8305fb30 fffff806`5381b8e4     : ffff9680`37651180 ffffe402`fe868040 fffff806`53707230 00000000`00000000 : nt!PspSystemThreadStartup+0x57
ffff9405`8305fb80 00000000`00000000     : ffff9405`83060000 ffff9405`83059000 00000000`00000000 00000000`00000000 : nt!KiStartSystemThread+0x34
Digging in more to this crash dump, we can restore the stack frame at the time of the access violation to learn more about its origin. Unfortunately, with WER data we only receive a compressed version of state and thus we cannot disassemble backwards to see a larger set of instructions prior to the crash, but we can see in the disassembly that there is a check for NULL before performing a read at the address specified in the R8 register:
6: kd> .trap 0xffff94058305ec20
.trap 0xffff94058305ec20
NOTE: The trap frame does not contain all registers.
Some register values may be zeroed or incorrect.
rax=ffff94058305f200 rbx=0000000000000000 rcx=0000000000000003
rdx=ffff94058305f1d0 rsi=0000000000000000 rdi=0000000000000000
rip=fffff806715114ed rsp=ffff94058305edb0 rbp=ffff94058305eeb0
 r8=ffff840500000074  r9=0000000000000000 r10=0000000000000000
r11=0000000000000014 r12=0000000000000000 r13=0000000000000000
r14=0000000000000000 r15=000000000000
000
iopl=0         nv up ei ng nz na po nc
csagent+0xe14ed:
fffff806`715114ed 458b08          mov     r9d,dword ptr [r8] ds:ffff8405`00000074=????????
6: kd> !pte ffff840500000074
!pte ffff840500000074
                                           VA ffff840500000074
PXE at FFFFABD5EAF57840    PPE at FFFFABD5EAF080A0    PDE at FFFFABD5E1014000    PTE at FFFFABC202800000
contains 0A00000277200863  contains 0000000000000000
pfn 277200    ---DA--KWEV  contains 0000000000000000
not valid

6: kd> ub fffff806`715114ed
ub fffff806`715114ed
csagent+0xe14d9:
fffff806`715114d9 04d8            add     al,0D8h
fffff806`715114db 750b            jne     csagent+0xe14e8 (fffff806`715114e8)
fffff806`715114dd 4d85c0          test    r8,r8
fffff806`715114e0 7412            je      csagent+0xe14f4 (fffff806`715114f4)
fffff806`715114e2 450fb708        movzx   r9d,word ptr [r8]
fffff806`715114e6 eb08            jmp     csagent+0xe14f0 (fffff806`715114f0)
fffff806`715114e8 4d85c0          test    r8,r8
fffff806`715114eb 7407            je      csagent+0xe14f4 (fffff806`715114f4)
6: kd> ub fffff806`715114d9
ub fffff806`715114d9
                          ^ Unable to find valid previous instruction for 'ub fffff806`715114d9'
6: kd> u fffff806`715114eb
u fffff806`715114eb
csagent+0xe14eb:
fffff806`715114eb 7407            je      csagent+0xe14f4 (fffff806`715114f4)
fffff806`715114ed 458b08          mov     r9d,dword ptr [r8]
fffff806`715114f0 4d8b5008        mov     r10,qword ptr [r8+8]
fffff806`715114f4 4d8bc2          mov     r8,r10
fffff806`715114f7 488d4d90        lea     rcx,[rbp-70h]
fffff806`715114fb 488bd6          mov     rdx,rsi
fffff806`715114fe e8212c0000      call    csagent+0xe4124 (fffff806`71514124)
fffff806`71511503 4533d2          xor     r10d,r10d

6: kd> db ffff840500000074
db ffff840500000074
ffff8405`00000074  ?? ?? ?? ?? ?? ?? ?? ??-?? ?? ?? ?? ?? ?? ?? ??  ????????????????
ffff8405`00000084  ?? ?? ?? ?? ?? ?? ?? ??-?? ?? ?? ?? ?? ?? ?? ??  ????????????????
ffff8405`00000094  ?? ?? ?? ?? ?? ?? ?? ??-?? ?? ?? ?? ?? ?? ?? ??  ????????????????
ffff8405`000000a4  ?? ?? ?? ?? ?? ?? ?? ??-?? ?? ?? ?? ?? ?? ?? ??  ????????????????
ffff8405`000000b4  ?? ?? ?? ?? ?? ?? ?? ??-?? ?? ?? ?? ?? ?? ?? ??  ????????????????
ffff8405`000000c4  ?? ?? ?? ?? ?? ?? ?? ??-?? ?? ?? ?? ?? ?? ?? ??  ????????????????
ffff8405`000000d4  ?? ?? ?? ?? ?? ?? ?? ??-?? ?? ?? ?? ?? ?? ?? ??  ????????????????
ffff8405`000000e4  ?? ?? ?? ?? ?? ?? ?? ??-?? ?? ?? ?? ?? ?? ?? ??  ????????????????
Our observations confirm CrowdStrike’s analysis that this was a read-out-of-bounds memory safety error in the CrowdStrike developed CSagent.sys driver.
We can also see that the csagent.sys module is registered as a file system filter driver commonly used by anti-malware agents to receive notifications about file operations such as the creation or modification of a file. This is often used by security products to scan any new file saved to disk, such as downloading a file via the browser.
File System filters can also be used as a signal for security solutions attempting to monitor the behavior of the system. CrowdStrike noted in their blog that part of their content update was changing the sensor’s logic relating to data around named pipe creation. The File System filter driver API allows the driver to receive a call when named pipe activity (e.g., named pipe creation) occurs on the system that could enable the detection of malicious behavior. The general function of the driver correlates to the information shared by CrowdStrike.
6: kd>!reg querykey \REGISTRY\MACHINE\system\ControlSet001\services\csagent

Hive         ffff84059ca7b000
KeyNode      ffff8405a6f67f9c

[SubKeyAddr]         [SubKeyName]
ffff8405a6f683ac     Instances
ffff8405a6f6854c     Sim

 Use '!reg keyinfo ffff84059ca7b000 <SubKeyAddr>' to dump the subkey details

[ValueType]         [ValueName]                   [ValueData]
REG_DWORD           Type                          2
REG_DWORD           Start                         1
REG_DWORD           ErrorControl                  1
REG_EXPAND_SZ       ImagePath                     \??\C:\Windows\system32\drivers\CrowdStrike\csagent.sys
REG_SZ              DisplayName                   CrowdStrike Falcon
REG_SZ              Group                         FSFilter Activity Monitor
REG_MULTI_SZ        DependOnService               FltMgr\0
REG_SZ              CNFG                          Config.sys
REG_DWORD           SupportedFeatures             f
We can see the control channel file version 291 specified in the CrowdStrike analysis is also present in the crash indicating the file was read.
Determining how the file itself correlates to the access violation observed in the crash dump would require additional debugging of the driver using these tools but is outside of the scope of this blog post.
!ca ffffde8a870a8290

ControlArea  @ ffffde8a870a8290
  Segment      ffff880ce0689c10  Flink      ffffde8a87267718  Blink        ffffde8a870a7d98
  Section Ref                 0  Pfn Ref                   b  Mapped Views                0
  User Ref                    0  WaitForDel                0  Flush Count                 0
  File Object  ffffde8a879b29a0  ModWriteCount             0  System Views                0
  WritableRefs                0  PartitionId                0
  Flags (8008080) File WasPurged OnUnusedList

      \Windows\System32\drivers\CrowdStrike\C-00000291-00000000-00000032.sys

1: kd> !ntfskd.ccb ffff880ce06f6970
!ntfskd.ccb ffff880ce06f6970

   Ccb: ffff880c`e06f6970
 Flags: 00008003 Cleanup OpenAsFile IgnoreCase
Flags2: 00000841 OpenComplete AccessAffectsOplocks SegmentObjectReferenced
  Type: UserFileOpen
FileObj: ffffde8a879b29a0

(018)  ffff880c`db937370  FullFileName [\Windows\System32\drivers\CrowdStrike\C-00000291-00000000-00000032.sys]
(020) 000000000000004C  LastFileNameOffset
(022) 0000000000000000  EaModificationCount
(024) 0000000000000000  NextEaOffset
(048) FFFF880CE06F69F8  Lcb
(058) 0000000000000002  TypeOfOpen
We can leverage the crash dump to determine if any other drivers supplied by CrowdStrike may exist on the running system during the crash.
6: kd> lmDvmCSFirmwareAnalysis
lmDvmCSFirmwareAnalysis
Browse full module list
start             end                 module name
fffff806`58920000 fffff806`5893c000   CSFirmwareAnalysis   (deferred)
    Image path: \SystemRoot\system32\DRIVERS\CSFirmwareAnalysis.sys
    Image name: CSFirmwareAnalysis.sys
    Browse all global symbols  functions  data  Symbol Reload
    Timestamp:        Mon Mar 18 11:32:14 2024 (65F888AE)
    CheckSum:         0002020E
    ImageSize:        0001C000
    Translations:     0000.04b0 0000.04e4 0409.04b0 0409.04e4
    Information from resource tables:
6: kd> lmDvmcspcm4
lmDvmcspcm4
Browse full module list
start             end                 module name
fffff806`71870000 fffff806`7187d000   cspcm4     (deferred)
    Image path: \??\C:\Windows\system32\drivers\CrowdStrike\cspcm4.sys
    Image name: cspcm4.sys
    Browse all global symbols  functions  data  Symbol Reload
    Timestamp:        Mon Jul  8 18:33:22 2024 (668C9362)
    CheckSum:         00012F69
    ImageSize:        0000D000
    Translations:     0000.04b0 0000.04e4 0409.04b0 0409.04e4
    Information from resource tables:
6: kd> lmDvmcsboot.sys
lmDvmcsboot.sys
Browse full module list
start             end                 module name

Unloaded modules:
fffff806`587d0000 fffff806`587dc000   CSBoot.sys
    Timestamp: unavailable (00000000)
    Checksum:  00000000
    ImageSize:  0000C000

6: kd> !reg querykey \REGISTRY\MACHINE\system\ControlSet001\services\csboot
!reg querykey \REGISTRY\MACHINE\system\ControlSet001\services\csboot

Hive         ffff84059ca7b000
KeyNode      ffff8405a6f68924

[ValueType]         [ValueName]                   [ValueData]
REG_DWORD           Type                          1
REG_DWORD           Start                         0
REG_DWORD           ErrorControl                  1
REG_EXPAND_SZ       ImagePath                     system32\drivers\CrowdStrike\CSBoot.sys
REG_SZ              DisplayName                   CrowdStrike Falcon Sensor Boot Driver
REG_SZ              Group                         Early-Launch
6: kd> !reg querykey \REGISTRY\MACHINE\system\ControlSet001\services\csdevicecontrol
!reg querykey \REGISTRY\MACHINE\system\ControlSet001\services\csdevicecontrol

Hive         ffff84059ca7b000
KeyNode      ffff8405a6f694ac

[SubKeyAddr]         [VolatileSubKeyName]
ffff84059ce196c4     Enum

 Use '!reg keyinfo ffff84059ca7b000 <SubKeyAddr>' to dump the subkey details

[ValueType]         [ValueName]                   [ValueData]
REG_DWORD           Type                          1
REG_DWORD           Start                         3
REG_DWORD           ErrorControl                  1
REG_DWORD           Tag                           1f
REG_EXPAND_SZ       ImagePath                     \SystemRoot\System32\drivers\CSDeviceControl.sys
REG_SZ              DisplayName                   @oem40.inf,%DeviceControl.SVCDESC%;CrowdStrike Device Control Service
REG_SZ              Group                         Base
REG_MULTI_SZ        Owners                        oem40.inf\0!csdevicecontrol.inf_amd64_b6725a84d4688d5a\0!csdevicecontrol.inf_amd64_016e965488e83578\0
REG_DWORD           BootFlags                     14
6: kd> !reg querykey \REGISTRY\MACHINE\system\ControlSet001\services\csagent
!reg querykey \REGISTRY\MACHINE\system\ControlSet001\services\csagent

Hive         ffff84059ca7b000
KeyNode      ffff8405a6f67f9c

[SubKeyAddr]         [SubKeyName]
ffff8405a6f683ac     Instances
ffff8405a6f6854c     Sim

 Use '!reg keyinfo ffff84059ca7b000 <SubKeyAddr>' to dump the subkey details

[ValueType]         [ValueName]                   [ValueData]
REG_DWORD           Type                          2
REG_DWORD           Start                         1
REG_DWORD           ErrorControl                  1
REG_EXPAND_SZ       ImagePath                     \??\C:\Windows\system32\drivers\CrowdStrike\csagent.sys
REG_SZ              DisplayName                   CrowdStrike Falcon
REG_SZ              Group                         FSFilter Activity Monitor
REG_MULTI_SZ        DependOnService               FltMgr\0
REG_SZ              CNFG                          Config.sys
REG_DWORD           SupportedFeatures             f

6: kd> lmDvmCSFirmwareAnalysis
lmDvmCSFirmwareAnalysis
Browse full module list
start             end                 module name
fffff806`58920000 fffff806`5893c000   CSFirmwareAnalysis   (deferred)
    Image path: \SystemRoot\system32\DRIVERS\CSFirmwareAnalysis.sys
    Image name: CSFirmwareAnalysis.sys
    Browse all global symbols  functions  data  Symbol Reload
    Timestamp:        Mon Mar 18 11:32:14 2024 (65F888AE)
    CheckSum:         0002020E
    ImageSize:        0001C000
    Translations:     0000.04b0 0000.04e4 0409.04b0 0409.04e4
    Information from resource tables:
6: kd> !reg querykey \REGISTRY\MACHINE\system\ControlSet001\services\csfirmwareanalysis
!reg querykey \REGISTRY\MACHINE\system\ControlSet001\services\csfirmwareanalysis

Hive         ffff84059ca7b000
KeyNode      ffff8405a6f69d9c

[SubKeyAddr]         [VolatileSubKeyName]
ffff84059ce197cc     Enum

 Use '!reg keyinfo ffff84059ca7b000 <SubKeyAddr>' to dump the subkey details

[ValueType]         [ValueName]                   [ValueData]
REG_DWORD           Type                          1
REG_DWORD           Start                         0
REG_DWORD           ErrorControl                  1
REG_DWORD           Tag                           6
REG_EXPAND_SZ       ImagePath                     system32\DRIVERS\CSFirmwareAnalysis.sys
REG_SZ              DisplayName                   @oem43.inf,%FirmwareAnalysis.SVCDESC%;CrowdStrike Firmware Analysis Service
REG_SZ              Group                         Boot Bus Extender
REG_MULTI_SZ        Owners                        oem43.inf\0!csfirmwareanalysis.inf_amd64_12861fc608fb1440\0
6: kd> !reg querykey \REGISTRY\MACHINE\system\Controlset001\control\earlylaunch
!reg querykey \REGISTRY\MACHINE\system\Controlset001\control\earlylaunch
As we can see from the above analysis, CrowdStrike loads four driver modules. One of those modules receives dynamic control and content updates frequently based on the CrowdStrike Preliminary Post-incident-review timeline.
We can leverage the unique stack and attributes of this crash to identify the Windows crash reports generated by this specific CrowdStrike programming error. It’s worth noting the number of devices which generated crash reports is a subset of the number of impacted devices previously shared by Microsoft in our blog post, because crash reports are sampled and collected only from customers who choose to upload their crashes to Microsoft. Customers who choose to enable crash dump sharing help both driver vendors and Microsoft to identify and remediate quality issues and crashes.
We make this information available to driver owners so they can assess their own reliability via the Hardware Dev Center analytics dashboard. As we can see from the above, any reliability problem like this invalid memory access issue can lead to widespread availability issues when not combined with safe deployment practices. Let’s dig into why security solutions leverage kernel drivers on Windows.
Why do security solutions leverage kernel drivers?
Many security vendors such as CrowdStrike and Microsoft leverage a kernel driver architecture and there are several reasons for this.
Visibility and enforcement of security related events
Kernel drivers allow for system wide visibility, and the capability to load in early boot to detect threats like boot kits and root kits which can load before user-mode applications. In addition, Microsoft provides a rich set of capabilities such as system event callbacks for process and thread creation and filter drivers which can watch for events like file creation, deletion, or modification. Kernel activity can also trigger call backs for drivers to decide when to block activities like file or process creations. Many vendors also use drivers to collect a variety of network information in the kernel using the NDIS driver class.
Performance
Kernel drivers are often utilized by security vendors for potential performance benefits. For example, analysis or data collection for high throughput network activity may benefit from a kernel driver. There are many scenarios where data collection and analysis can be optimized for operation outside of kernel mode and Microsoft continues to partner with the ecosystem to improve performance and provide best practices to achieve parity outside of kernel mode.
Tamper resistance
A second benefit of loading into kernel mode is tamper resistance. Security products want to ensure that their software cannot be disabled by malware, targeted attacks, or malicious insiders, even when those attackers have admin-level privileges. They also want to ensure that their drivers load as early as possible so that they can observe system events at the earliest possible time. Windows provides a mechanism to launch drivers marked as Early Launch Antimalware (ELAM) early in the boot process for this reason. CrowdStrike signs the above CSboot driver as ELAM, enabling it to load early in the boot sequence.
In the general case, there is a tradeoff that security vendors must rationalize when it comes to kernel drivers. Kernel drivers provide the above properties at the cost of resilience. Since kernel drivers run at the most trusted level of Windows, where containment and recovery capabilities are by nature constrained, security vendors must carefully balance needs like visibility and tamper resistance with the risk of operating within kernel mode.
All code operating at kernel level requires extensive validation because it cannot fail and restart like a normal user application. This is universal across all operating systems. Internally at Microsoft, we have invested in moving complex Windows core services from kernel to user mode, such as font file parsing from kernel to user mode.
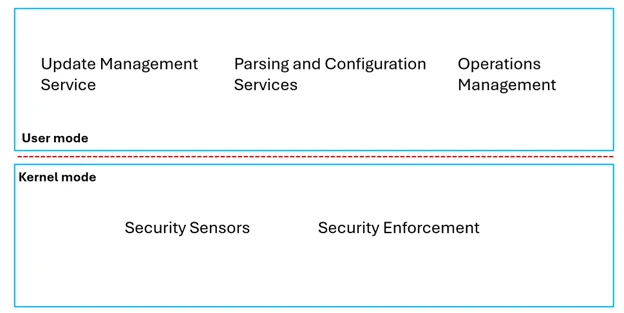
It is possible today for security tools to balance security and reliability. For example, security vendors can use minimal sensors that run in kernel mode for data collection and enforcement limiting exposure to availability issues. The remainder of the key product functionality includes managing updates, parsing content, and other operations can occur isolated within user mode where recoverability is possible. This demonstrates the best practice of minimizing kernel usage while still maintaining a robust security posture and strong visibility.
Windows provides several user mode protection approaches for anti-tampering, like Virtualization-based security (VBS) Enclaves and Protected Processes that vendors can use to protect their key security processes. Windows also provides ETW events and user-mode interfaces like Antimalware Scan Interface for event visibility. These robust mechanisms can be used to reduce the amount of kernel code needed to create a security solution, which balances security and robustness.
Microsoft engages with third-party security vendors through an industry forum called the Microsoft Virus Initiative (MVI). This group consists of Microsoft and Security Industry and was created to establish a dialogue and collaboration across the Windows security ecosystem to improve robustness in the way security products use the platform. With MVI, Microsoft and vendors collaborate on the Windows platform to define reliable extension points and platform improvements, as well as share information about how to best protect our customers.
Microsoft works with members of MVI to ensure compatibility with Windows updates, improve performance, and address reliability issues. MVI partners actively participating in the program contribute to making the ecosystem more resilient and gain benefits including technical briefings, feedback loops with Microsoft product teams, and access to antimalware platform features such as ELAM and Protected Processes. Microsoft also provides runtime protection such as Patch Guard to prevent disruptive behavior from kernel driver types like anti-malware.
In addition, all drivers signed by the Microsoft Windows Hardware Quality Labs (WHQL) must run a series of tests and attest to a number of quality checks, including using fuzzers, running static code analysis and testing under runtime driver verification, among other techniques. These tests have been developed to ensure that best practices around security and reliability are followed. Microsoft includes all these tools in the Windows Driver Kit used by all driver developers. A list of the resources and tools is available here.
All WHQL signed drivers are run through Microsoft’s ingestion checks and malware scans and must pass before being approved for signing. Additionally, if a third-party vendor chooses to distribute their driver via Windows Update (WU), the driver also goes through Microsoft’s flighting and gradual rollout processes to observe quality and ensure the driver meets the necessary quality criteria for a broad release.
Can customers deploy Windows in a higher security mode to increase reliability?
Windows at its core is an open and versatile OS, and it can easily be locked down for increased security using integrated tools. In addition, Windows is constantly increasing security defaults, including dozens of new security features enabled by default in Windows 11.
Security features enabled by default in Windows 11
| Area | Feature |
| Hardware Security Baseline | TPM2.0 Secure boot Virtualization-based security (VBS) Memory integrity (Hypervisor-protected Code Integrity (HVCI)) Hardware-enforced stack protection Kernel Direct Memory Access (DMA) protection HW-based kernel protection (HLAT) Enhanced sign-in security (ESS) for built-in biometric sensors |
| Encryption | BitLocker (commercial) Device Encryption (consumer) |
| Identity Management | Credential Guard Entra primary refresh token (PRT) hardware protected MDM deployed SCEP certs hardware protected MDM enrollment certs hardware protected Local Security Authority (LSA) PPL prevents token/credential dumping Account lockout policy (for 10 failed sign-ins) Enhanced phishing protection with Microsoft Defender Microsoft Defender SmartScreen NPLogonNotification doesn’t include password WDigest SSO removed to reduce password disclosure AD Device Account protected by CredGuard* |
| Multi-Factor Authentication (Passwordless) |
MSA & Entra users lead through Hello enablement by default MSA password automatically removed from Windows if never used Hello container VSM protected Peripheral biometric sensors blocked for ESS enabled devices Lock on leave integrated into Hello |
| Security Incident Reduction | Common Log File Systems run from trusted source Move tool-tip APIs from kernel to user mode Modernize print stack by removing untrusted drivers DPAPI moved from 3DES to AES TLS 1.3 default with TLS 1.0/1.1 disabled by default NTLM-less* |
| OS lockdown | Microsoft Vulnerable Driver Blocklist 3P driver security baseline enforced via WHCP Smart App Control* |
Windows has integrated security features to self-defend. This includes key anti-malware features enabled by default, such as:
- Secure Boot, which helps prevent early boot malware and rootkits by enforcing signing consistently across Windows boots.
- Measured Boot, which provides TPM-based hardware cryptographic measurements on boot-time properties available through integrated attestation services such as Device Health Attestation.
- Memory integrity (also known as hypervisor-protected code integrity or HVCI), which prevents runtime generation of dynamic code in the kernel and helps ensure control flow integrity.
- Vulnerable driver blocklist, which is on by default, integrated into the OS, and managed by Microsoft. This complements the malicious driver block list.
- Protected Local Security Authority is on by default in Windows 11 to protect a range of credentials. Hardware-based credential protection is on by default for enterprise versions of Windows.
- Microsoft Defender Antivirus is enabled by default in Windows and offers anti-malware capabilities across the OS.
These security capabilities provide layers of protection against malware and exploitation attempts in modern Windows. Many Windows customers have leveraged our security baseline and Windows security technologies to harden their systems and these capabilities collectively have reduced the attack surface significantly.
Using the integrated security features of Windows to prevent adversary attacks such as those displayed in the MITRE ATT&CK® framework increases security while reducing cost and complexity. It leverages best practices to achieve maximum security and reliability. These best practices include:
- Using App Control for Business (formerly Windows Defender Application Control), you can author a security policy to allow only trusted and/or business-critical apps. Your policy can be crafted to deterministically and durably prevent nearly all malware and “living off the land” style attacks. It can also specify which kernel drivers are allowed by your organization to durably guarantee that only those drivers will load on your managed endpoints.
- Use Memory integrity with a specific allow list policy to further protect the Windows kernel using Virtualization-based security (VBS). Combined with App Control for Business, memory integrity can reduce the attack surface for kernel malware or boot kits. This can also be used to limit any drivers that might impact reliability on systems.
- Running as Standard User and elevating only as necessary. Companies that follow the best practices to run as standard user and reduce privileges mitigate many of the MITRE ATT&CK® techniques.
- Use Device Health Attestation (DHA) to monitor devices for the right security policy, including hardware-based measurements for the security posture of the machine. This is a modern and exceptionally durable approach to ensure security for high availability scenarios and uses Microsoft’s Zero Trust architecture.
What is next?
Windows is a self-protecting operating system that has produced dozens of new security features and architectural changes in recent versions. We plan to work with the anti-malware ecosystem to take advantage of these integrated features to modernize their approach, helping to support and even increase security along with reliability.
This includes helping the ecosystem by:
- Providing safe rollout guidance, best practices, and technologies to make it safer to perform updates to security products.
- Reducing the need for kernel drivers to access important security data.
- Providing enhanced isolation and anti-tampering capabilities with technologies like our recently announced VBS enclaves.
- Enabling zero trust approaches like high integrity attestation which provides a method to determine the security state of the machine based on the health of Windows native security features.
As we move forward, Windows is continuing to innovate and offer new ways for security tools to detect and respond to emerging threats safely and securely. Windows has announced a commitment around the Rust programming language as part of Microsoft’s Secure Future Initiative (SFI) and has recently expanded the Windows kernel to support Rust.
The information in this blog post is provided as part of our commitment to communicate learnings and next steps after the CrowdStrike incident. We will continue to share ongoing guidance on security best practices for Windows and work across our broad ecosystem of customers and partners to develop new security capabilities based on your feedback.
Last week in our article, we discussed onboarding best practices with Microsoft Intune. I’m happy to report that part one was a huge success with many people finding it to be super useful, which is great. This week, we move onto discussing security (which will actually be cut up into two parts). The security best practice items for this week can be seen below:
- Security Baselines
- Windows Autopatch
- Microsoft Defender for Endpoint (or other EDRs)
- BitLocker
- Personal Data Encryption
- Certificate Authentication Strategies
- Admin Account and Group Protection
- Device Compliance
We will cover some of the most complex technologies like App Control, Endpoint Privilege Management (EPM), App Patch Management, and Device Control in part three. This week we will stick to the core security best practices, which we will kick things off with security baselines.
Check out our previous articles:
- Onboarding
- Advanced Security
- User Experience
Windows 11 Security Baseline Best Practices
I covered some of the core concepts of security baselines back in April in my Workspace ONE Admin Guide to Intune: Security, but now we will focus on how we should be handling them. A few of the challenges we saw recently made me rethink the overall strategy of implementing the spirit of baselines. If you learn nothing else from this section learn this: THEIR. POLICY. IS. NOT. YOUR. POLICY! It’s incredibly important that you step through anything you implement and make sure the settings make sense for your users and environment.
For baselines we have:
- The Windows 11 OS Security Baseline
- Microsoft Defender for Endpoint (MDE) Security Baseline (Covered later on)
- Microsoft Edge Security Baseline
- Microsoft 365 Apps for Enterprise Security Baseline
Before discussing the baselines, I wanted to touch on the overall strategy. The most important thing to learn is DO NOT just implement all of the security baselines and think that is the best practice. It’s easy to make that mistake because it feels like that is the right thing. The overarching strategy is half finesse and half mindfulness.
I’ve decided to shift all of my baselines to the settings catalog (which in the near future it will be moving to), because replication/conflicts/updates do not play particularly well.
Some of the reasons are:
- Settings language on the baselines aren’t consistent with settings catalog
- Resolving conflicts can be problematic as the baselines don’t update/resolve conflicts quickly/easily
- Working with a consistent look and feel just makes management easier
Let’s discuss piece-by-piece so we can start getting to a healthier state.
Windows 11 OS Security Baseline
There are a few ways you can achieve at your ideal state. One option is to use fellow MVP, James Robinson’s baseline from his GitHub, which is exceptional. He’s spent hundreds of hours working on it, which does get you to a really strong state.
The strategy that I am using and consider to be a best practice is leveraging the GPO Objects from the Microsoft Security Compliance Toolkit to craft your group policy in the Settings Catalog. You can grab my versions of them from my GitHub:
- Windows 11 23H2 Security Baseline (Device)
- Windows 11 23H2 Security Baseline (User)
Check out the YouTube video below on how to import them:
Once you have imported and created your baseline settings catalog policy, we go through each setting piece-by-piece to see if it fits your strategy. You can access a spreadsheet of the default policy here:
With most policies, make sure you deploy it out to a small subset of users first. That is a critical part of all security policies that you implement. One last thing to point out, is don’t forget to use filters instead of dynamic groups, because they’re significantly faster and don’t rely on backend Entra processing.
Microsoft Edge Security Baseline
Edge is the one baseline that I will use directly inside of Endpoint Security. It works well, and I never see any conflict issues. The settings are pretty minimal so let’s cover them quickly:
| Edge | Extensions | HTTP Authentication | Native Messaging | Private Network Request Settings | SmartScreen Settings | Typo- Squatting |
| Block unconfigured sites to be reloaded in IE mode | Control what extensions cannot be installed | Block Basic Auth for HTTP | Block user-level native messaging hosts installed without admin | Block insecure websites from making requests to more-private network endpoints | Enable Microsoft Defender SmartScreen | Enable Edge TyposquattingChecker |
| Block proceeding from HTTPs warning page | Allow NTLM and Negotiate as supported Auth Schemes | Allow Defender SmartScreen to block unwanted apps | ||||
| Block automatic opening of downloaded MHT or MHTML files from the web in IE mode | Block bypassing SmartScreen prompts for sites | |||||
| Allow browser legacy extension point blocking | Block bypassing SmartScreen warnings about downloads | |||||
| Enable site isolation for every site | ||||||
| Disable enhance images | ||||||
| Disable Force WebSQL | ||||||
| Block the Reload in IE mode button | ||||||
| Block SharedArrayBuffers use in a non cross-origin-isolated context |
You can find a copy of my Edge Security Baseline file here. This is the recommended security baseline for Edge by Microsoft. A few of the reasons I like moving it to the settings catalog are:
- You can have a single Edge policy that includes customizations, security settings, etc.
- Naming/setting consistency as I’ve mentioned with other policies.
Microsoft 365 Apps for Enterprise Security Baseline
One of the often-overlooked areas is the Microsoft 365 Apps Admin Center because its outside of Intune. When your team doesn’t manage Office, it becomes very helpful to shift roles and responsibilities back to that team. With the Microsoft 365 Apps Admin Center, you can delegate that responsibility with the Office Apps Administrator role, which lets them manage the overall Windows fleet.
One thing to be aware of are the licensing requirements:
- Education (M365 A3/A5)
- Business (M365 Business Standard/Premium)
- Enterprise (M365 E3/E5)
Among the various things you can do with the M365 Apps Admin Center are:
See your devices and get insights on their device information (This replaced the old telemetry server):

Security Update Status (shows you the status on monthly security updates):

Your OneDrive sync health which is super important:

You also have the cloud Office Customization Tool, which lets you build your configuration.xml files, which makes life much easier with Office deployments/changing channels:

The reason we’re covering this portal is because they have shifted/made available security baselines inside of this portal known as “Cloud Policies.” These policies you can scope at a tenant-wide, group wide, and even documents that are accessed anonymously via the web.
In the event that I don’t want to punish everyone, below is an export of all 137 Office baseline settings:
Windows Autopatch
Recently I wrote all about patching here. When it comes to patching, Windows Autopatch is the unequivocal best practice. You can check out this video on configuring Autopatch:
Overall, you can read my article if you want to go really deep into it. The key takeaways are:
- Requirements are:
- Windows 10/11 E3+
- Entra ID P1/P2
- Entra Join or Hybrid Join
- Intune-managed devices
- Co-management requirements (if applicable):
- Intune cloud-attached
- Windows Update, Device Config, and Office C2R workloads are Intune-managed
- Setup your Windows Autopatch Device Registration group to capture all devices to ensure people onboard properly
- Don’t go crazy on Autopatch Groups. You should always use the out-of-the-box groups if possible. You only want to create groups if it’s necessary. Simpler is always better
As I mention in my article, this is what Autopatch manages:
| How the Magic Happens | Target SLA |
| Windows Autopatch deploys CSPs to each update deployment ring to control the rollout. Deferrals, deadlines, and grace periods are used to cultivate the experience. | The goal is to hit 95% updated devices within 21 days. |
| Feature update profiles are created that correlate to Windows Autopatch groups to rollout new feature updates gradually. The profile contains the minimally supported OS at the minute which is 21H2. You can create custom profiles to enforce newer OS versions, which will automatically deactivate the existing ones. | The goal is to keep 99% of devices on a supported OS. |
| Covers the primary suite, Visio, and Project. No policy conflicts can exist. This doesn’t rely on rings as its powered by the Microsoft CDN. The service relies on devices, and they will receive notifications like regular Office updates. Devices must have checked in within the last 5 days and apps must close for the update process to complete. | The goal is to keep 90% of devices on a supported version of the monthly enterprise channel. Supportability is a 2-month window. |
| Must ensure no policy conflicts exist and it requires an Edge restart to apply updates. Updates are checked for every 10 hours. Quality Updates will occur weekly. Feature updates happen every 4 weeks and rollout progressively. | All users see updates within a few days of its release. |
| Device must be signed into the device and Teams. Updates are checked for every few hours. After the download, the device must reach an idle state for 40 minutes to perform the automatic update. | Updates happen once a month or twice a month for members of TAP. |
The last thing that I want to mention is the Autopatch Group Service which you can see in this diagram below. It shows how patches are sliced up into the rings to ensure automated management of your patch strategy:

Microsoft Defender for Endpoint
The best place to start here is by sharing my MDE settings catalog policies that you can use:
- MDE Baseline
- MDE Attack Surface Baseline
these baselines are largely based on the great Nathan McNulty. You can find his GitHub here.
Similarly with OS baselines, we chose to pull them out to more effectively manage conflicts, language differences, and get better consistency.
The settings of the baseline are:
| Enable Microsoft Defender Antivirus | Cloud Block Level: High |
| Remove files from system for severe threats | Cloud Extended Timeout: 50 |
| Quarantine files for moderate, low, and high severity threats | Disable Catchup Full Scan |
| Scan all archive files | Disable Catchup Quick Scan |
| Enforce real-time behavior monitoring | Disable Local Admin Merge |
| Enable Cloud Protection | Enable file hash computation feature |
| Disable Email Scanning | Network Protection Block Mode |
| Disable scanning on removable drives | Enable Hide Exclusions from Local Admins and Users |
| Allow On Access Protection | Enable Intel TDT |
| Enable Realtime Monitoring | Enable PUA Protection |
| Disable Network File Scanning | Quick scans will scan exclusions |
| Scan all Downloaded Files and Attachments | Monitor all files for real time scan direction |
| Scan Scripts | Full Scan |
| Allow Switch to Async Inspection | 120m Quick Scan Time |
| Grant User UI Access | Schedule Day: Friday at 7:35 |
| Avg CPU Load Factor 50 | Sig Update Interval: 1 |
| Check for Signatures Pre-Scan | Send all samples automatically |
These are the settings on my Attack Surface Baseline:
| Audit Mode for Controlled Folder Access | Block execution of potentially obfuscated scripts |
| Use advanced protection to block ransomware | Block executable files from running unless they meet a prevalence, age, or trusted list criterion |
| Block Win32 API calls from Office Macros | Block executable content from email client and webmail |
| Block untrusted and unsigned processes that run from USB | Block credential stealing from the Windows LSA subsystem |
| Block process creations originating from PSExec and WMI commands | Block all Office apps from creating child processes |
| Block persistence through WMI event subscription | Block Adobe Reader from creating child processes |
| Block Office communication application from creating child processes | Block abuse of exploited vulnerable signed drivers (Device) |
| Block Office applications from injecting code into other processes | Audit the use of copied or impersonated system tools |
| Block Office applications from creating executable content | Audit the rebooting machine in Safe Mode |
| Block JavaScript or VBScript from launching downloaded executable content |
BitLocker
Your BitLocker strategy is pretty easy overall. We create a policy inside of Endpoint Security and these are the settings that I use today:
| BitLocker General | Windows Components/BitLocker Drive Encryption | OS Drives | Fixed Data Drives (FDD) | Removable Data Drives (RDD) |
| Require Disk Encryption | Set drive encryption method and cipher strength | Enforce encryption type on OS drives | Enforce full encryption | Enable BitLocker on removable drives |
| Don’t allow warning for other disk encryption | Set XTS-AES 256-bit for OS, removable, and fixed drives | Full encryption type | Allow users to apply BitLocker on removable drives | |
| Enable standard user encryption | Set unique identifiers for our org | Require additional auth at startup | Enforce full encryption | |
| Set recovery password rotation to Refresh on for Azure AD-joined devices | Do not allow startup key and PIN with TPM | |||
| Require TPM at startup | ||||
| Do not allow BitLocker without TPM | ||||
| Require startup PIN with TPM | ||||
| Do not allow startup key with TPM | ||||
| Configure minimum PIN length of 12 | ||||
| Allow enhanced PINs | ||||
| Do not allow standard users to change PIN |
One thing that I do strongly recommend is implementing Network Unlock, which is slightly out of scope for this article.
Network Unlock eases the pain of PIN enforcement by letting users bypass the PIN when on the corporate network for the OS volume. The UEFI firmware must have a DHCP driver, which shouldn’t be a difficult thing to achieve. The requirements overall are:
- Supported OS with UEFI DHCP drivers to serve as a Network Unlock client
- TPM chip and at least one TPM protector
- Internal server running Windows Deployment Services (WDS) role
- BitLocker Network Unlock optional feature installed on the server
- DHCP server
- Public/private key configuration setup
- Settings deployed as above in the BitLocker policy
- Deployed public certificate for Network Unlock via Intune
- Network stack enabled in UEFI
Basically, the way it works is:
- Windows Boot Manager detects Network Unlock in the BitLocker config
- PC uses its DHCP driver in the UEFI to get a valid IP address
- PC broadcasts a vendor-specific DHCP request with a network key (256-bit intermediate key) and AES-256 session key for the reply (this is all encrypted with the 2048-bit public key of the Network Unlock certificate you deployed via Intune)
- Network Unlock on your WDS server recognizes the request and decrypts it with the private key
- WDS sends back the network key encrypted with the session key (also an intermediate key) using a vendor-specific DHCP reply to the PC
- This request, coupled with a local 256-bit intermediate key only decryptable by the TPM will be used to create the AES-256 key which can unlock the volume

Personal Data Encryption (PDE)
Introduced in Windows 11 22H2 was PDE, which provides file-based data encryption in Windows. PDE uses Windows Hello for Business (which we will cover in later parts of this series) to link data encryption keys with user credentials. Once a user authenticates, it allows the user to decrypt files, which is a great enhancement on BitLocker and NOT a replacement (which is a common misconception).
This reduces the effort for accessing encrypted content and provides additional protections beyond BitLocker itself. One of the caveats with it is that you can only use it with Cloud Native devices (e.g. Hybrid cannot use PDE). It’s also good to point out it is only supported in Windows Enterprise and Windows Education A3/A5.
Microsoft provides this table below shows the two potential levels of protection you can leverage with PDE which uses AES-CBC and a 256-bit key to protect your content:
| Item | Level 1 | Level 2 |
|---|---|---|
| PDE protected data accessible when user has signed in via Windows Hello for Business | Yes | Yes |
| PDE protected data is accessible at Windows lock screen | Yes | Data is accessible for one minute after lock, then it’s no longer available |
| PDE protected data is accessible after user signs out of Windows | No | No |
| PDE protected data is accessible when device is shut down | No | No |
| PDE protected data is accessible via UNC paths | No | No |
| PDE protected data is accessible when signing with Windows password instead of Windows Hello for Business | No | No |
| PDE protected data is accessible via Remote Desktop session | No | No |
| Decryption keys used by PDE discarded | After user signs out of Windows | One minute after Windows lock screen is engaged or after user signs out of Windows |
A few fun facts to be aware of:
- If you use your password instead of PIN, you cannot access your files
- Files are not accessible via several remote methods like UNC paths or Remote Desktop
- Non-owners of the content cannot access it when logged into the machine
- Decryption keys are discarded one minute after the lock screen is engaged or at user sign out
- You need to be careful and make sure content is backed up. There have been situations a PIN reset could make PDE content inaccessible
- The next release of PDE, will let you configure folder level protection to Known Windows Folders (Desktop, Documents, Pictures)
The recommended way to create this policy currently is using the Graph APIs: (I recommend just using Graph Explorer to create your PDE policy)
POST https://graph.microsoft.com/beta/deviceManagement/configurationPolicies
Content-Type: application/json
{ "id": "00-0000-0000-0000-000000000000", "name": "PDE Policy", "description": "", "platforms": "windows10", "technologies": "mdm", "roleScopeTagIds": [ "0" ], "settings": [ { "@odata.type": "#microsoft.graph.deviceManagementConfigurationSetting", "settingInstance": { "@odata.type": "#microsoft.graph.deviceManagementConfigurationChoiceSettingInstance", "settingDefinitionId": "device_vendor_msft_policy_config_admx_credentialproviders_allowdomaindelaylock", "choiceSettingValue": { "@odata.type": "#microsoft.graph.deviceManagementConfigurationChoiceSettingValue", "value": "device_vendor_msft_policy_config_admx_credentialproviders_allowdomaindelaylock_0", "children": [] } } }, { "@odata.type": "#microsoft.graph.deviceManagementConfigurationSetting", "settingInstance": { "@odata.type": "#microsoft.graph.deviceManagementConfigurationChoiceSettingInstance", "settingDefinitionId": "device_vendor_msft_policy_config_errorreporting_disablewindowserrorreporting", "choiceSettingValue": { "@odata.type": "#microsoft.graph.deviceManagementConfigurationChoiceSettingValue", "value": "device_vendor_msft_policy_config_errorreporting_disablewindowserrorreporting_1", "children": [] } } }, { "@odata.type": "#microsoft.graph.deviceManagementConfigurationSetting", "settingInstance": { "@odata.type": "#microsoft.graph.deviceManagementConfigurationChoiceSettingInstance", "settingDefinitionId": "device_vendor_msft_policy_config_windowslogon_allowautomaticrestartsignon", "choiceSettingValue": { "@odata.type": "#microsoft.graph.deviceManagementConfigurationChoiceSettingValue", "value": "device_vendor_msft_policy_config_windowslogon_allowautomaticrestartsignon_0", "children": [] } } }, { "@odata.type": "#microsoft.graph.deviceManagementConfigurationSetting", "settingInstance": { "@odata.type": "#microsoft.graph.deviceManagementConfigurationChoiceSettingInstance", "settingDefinitionId": "device_vendor_msft_policy_config_memorydump_allowcrashdump", "choiceSettingValue": { "@odata.type": "#microsoft.graph.deviceManagementConfigurationChoiceSettingValue", "value": "device_vendor_msft_policy_config_memorydump_allowcrashdump_0", "children": [] } } }, { "@odata.type": "#microsoft.graph.deviceManagementConfigurationSetting", "settingInstance": { "@odata.type": "#microsoft.graph.deviceManagementConfigurationChoiceSettingInstance", "settingDefinitionId": "device_vendor_msft_policy_config_memorydump_allowlivedump", "choiceSettingValue": { "@odata.type": "#microsoft.graph.deviceManagementConfigurationChoiceSettingValue", "value": "device_vendor_msft_policy_config_memorydump_allowlivedump_0", "children": [] } } }, { "@odata.type": "#microsoft.graph.deviceManagementConfigurationSetting", "settingInstance": { "@odata.type": "#microsoft.graph.deviceManagementConfigurationChoiceSettingInstance", "settingDefinitionId": "user_vendor_msft_pde_enablepersonaldataencryption", "choiceSettingValue": { "@odata.type": "#microsoft.graph.deviceManagementConfigurationChoiceSettingValue", "value": "user_vendor_msft_pde_enablepersonaldataencryption_1", "children": [] } } }, { "@odata.type": "#microsoft.graph.deviceManagementConfigurationSetting", "settingInstance": { "@odata.type": "#microsoft.graph.deviceManagementConfigurationChoiceSettingInstance", "settingDefinitionId": "device_vendor_msft_policy_config_power_allowhibernate", "choiceSettingValue": { "@odata.type": "#microsoft.graph.deviceManagementConfigurationChoiceSettingValue", "value": "device_vendor_msft_policy_config_power_allowhibernate_0", "children": [] } } } ] }
One final note that I want to mention, I am a bit on the fence if we should implement this before the PDE locations are configurable, but I would suggest at least looking at it. It’s a great move for the enhanced privacy of users but may not be a good fit in many environments.
Certificate Authentication Strategies
Certificate authentication is an interesting conversation overall. Many companies are moving away from on-prem infrastructure, which does lighten the load for certificates. At a minimum, you are likely using certificate authentication/EAP-TLS for your wireless network connections.
In some scenarios, we are now seeing people use certificates in new and fun ways like certificate-based authentication in Entra ID.

The strong recommendation today is to decouple your certificate infrastructure from your internal CAs. I wrote recently about Microsoft Cloud PKI, which is one of two recommended options. I strongly recommend either:
- Cloud PKI
- SCEPman
Both of these solutions, achieve the same end result. You basically put your client-side PKI in the DMZ/Azure infrastructure, etc. By doing this, if someone does compromise a certificate it can only be used on the device and not to access anything internally.
You can see what that architecture looks like below:

The goal today isn’t to discuss which solution is better, but to clearly point out that if you do have use cases for certificates, please separate them. This is one of the core principles of InfoSec and is very easily achievable with different solutions.
Check out this video to see how easy it is to deploy Microsoft Cloud PKI today:
Admin Account and Group Protection
The Microsoft Local Admin Password Solution (LAPS) is the new gold standard for securing local administration access and should 100% be used everywhere.

Essentially, LAPS will take over ownership of a local administrator account, rotate the password, and manage those credentials. As a best practice, we store those credentials in Entra ID, like we do with BitLocker. The setup in Intune is super simple, as seen below:
Additionally, we lockdown the local administrator groups to ensure only the groups we want in place for the local administrator group overall.
- Replace and Update can’t co-exist. Replace will always win out.
- Specify Entra users like AzureAD\[email protected] and groups with their SID (which you can get from the graph API). Oliver also wrote a cool script here to conversion if needed.
- SIDs are not resolved, so there’s no error checking there so be careful.
- Check Applications and Services Logs > Microsoft > Windows > DeviceManagement-Enterprise-Diagnostics-Provider > Admin to look for errors.
Check out my demo from my other blog article on how to set that up:
One last best practice to mention is disabling that delightful new feature that makes all global admins local admins: (that is in Entra Device Settings)

Device Compliance
The last section to cover is device compliance. From a best practice perspective, I recommend using the following ones:
- Secure Boot
- BitLocker
- Code Integrity
- TPM
- Antivirus
- Firewall
- Anti-Spyware
- Defender Risk Score: Low
- Microsoft Defender Antimalware Security Intelligence Up to Date
- Defender Real-Time Protection
That should cover compliance needs in most environments, but some people will want to look at a newer feature with custom compliance scripts. Basically, a custom compliance script will be a PowerShell script that checks for a value, and you pair that with a JSON script to help evaluate the compliance itself.
The people at PatchMyPC wrote a nice one here. Basically, they use a PowerShell script to check the name and the version of Google Chrome with this code here:
## make sure to enter the exact display name shown in Add Remove Programs.
## While you can use wildcards to search for software, the exact display name discovered in appwiz.cpl will be used as the Setting Name for the json compliance check rule
[array]$applicationName = @("Google Chrome","Test App")
# --------------------------------------
# DO NOT EDIT THE LINES BELOW
# --------------------------------------
# Search HKLM for a system-wide app install
[array]$myAppRegEntries = Get-ItemProperty 'HKLM:\Software\Microsoft\Windows\CurrentVersion\Uninstall\*','HKLM:\Software\WOW6432Node\Microsoft\Windows\CurrentVersion\Uninstall\*' -ErrorAction SilentlyContinue | Select-Object DisplayName, DisplayVersion
[array]$appInfo = ForEach ($application in $applicationName) {
    #[array]$myAppRegEntries = Get-ItemProperty 'HKLM:\Software\Microsoft\Windows\CurrentVersion\Uninstall\*','HKLM:\Software\WOW6432Node\Microsoft\Windows\CurrentVersion\Uninstall\*' -ErrorAction SilentlyContinue | Where-Object { $_.DisplayName -like $application } | Select-Object DisplayName, DisplayVersion
    # Flag to indicate if the application is installed
    $appInstalled = $false
    If ($myAppRegEntries) {
        # Check if the app exists in $myAppRegEntries
        Foreach ($myAppReg in $myAppRegEntries) {
            if ($myAppReg.DisplayName -eq $application) {
                $appInstalled = $true
                [string]$displayName = $myAppReg.DisplayName
                [string]$displayVersion = $myAppReg.DisplayVersion
                break  # No need to check further once found
            }
        }
    }
    if (-not $appInstalled) {
        # App not installed, set the display name and version accordingly.
        # If not setting this and the app is not installed, the version check would be null, causing the compliance check to error out.
        # this way, if the software is not installed at all, forcing it to be listed as compliant.
        $displayName = $application
        $displayVersion = "0.0.0.0"
    }
    # Create a custom object and add it to the array
    @{
        $displayName = $displayVersion
    }
}
# adding loop to convert the $appInfo array into a single custom object named $objectJSONoutput
# doing this because we want a single object with all the apps and versions listed as key-value pairs in the JSON output, instead of an array with separate objects for each app. Intune no likey that.
$objectJSONoutput = @{}
foreach ($app in $appInfo) {
    $objectJSONoutput += $app
}
$hash = $objectJSONoutput
return $hash | ConvertTo-Json -Compress
Their matching JSON tells it what to look for and mark a device if not compliant:
{
    "Rules":[
        {
           "SettingName":"Google Chrome",
           "Operator":"GreaterEquals",
           "DataType":"Version",
           "Operand":"116.0.5790.110",
           "MoreInfoUrl":"https://www.liviubarbat.info",
           "RemediationStrings":[
              {
                 "Language": "en_US",
                 "Title": "Google Chrome x64 is outdated.",
                 "Description": "Make sure to patch Google Chrome"
              }
           ]
        },
        {
           "SettingName":"Test App",
           "Operator":"GreaterEquals",
           "DataType":"Version",
           "Operand":"116.0.5790.110",
           "MoreInfoUrl":"https://www.liviubarbat.info",
           "RemediationStrings":[
              {
                 "Language": "en_US",
                 "Title": "Test App is either outdated or not installed.",
                 "Description": "Make sure to install or update it."
              }
           ]
        }
     ]
}
As you can see, these capabilities create a ton of possibilities to meet your specific compliance requirements.
Final Thoughts
Hopefully overall people enjoyed the content today in the first part of Windows 11 Security Best Practices. It surprised me how much I have covered already on best practices and how they align with the key technology running in the Microsoft Cloud. We are relying heavily on the modern CSPs, and core components within Intune to secure Windows 11 effectively. In the next chapter, we will be covering some complicated products, which many struggle to get right. Things like EPM, App Control, and Device Control aren’t 100% required for everyone, but they strengthen your security strategy. I hope everyone enjoys and feel free to join me/connect to drive the conversation further as we work toward our ideal state in Windows 11.
By following these Windows security best practices, you can help protect your computer and personal information from cyber threats. Stay vigilant and keep your software and security measures updated to ensure the best protection for your computer. Protecting your Windows computer is important in order to secure your personal and financial information. The following are some best practices for securing your Windows computer.

Windows Security Best Practices: How to Protect Your PC
Computers have become an essential part of our daily lives, and with the increasing reliance on technology, the need for computer security has become more pressing. The Windows operating system is widely used, and it is essential to understand how to secure your Windows computer to protect your personal and financial information. In this article, we will discuss the best Windows security best practices for computers.
Introduction
As the world becomes increasingly reliant on technology, it’s more important than ever to ensure the security of your computer and personal information. Windows is one of the most widely used operating systems in the world, and with its popularity comes a greater risk of security threats. In this article, we’ll take a look at some best Windows security best practices for security risks.
Keeping Your Windows Operating System Up-to-Date
One of the most important things you can do to keep your Windows computer secure is to keep your operating system and software up-to-date. Updates are from Windows security best practices for vulnerabilities that have been discovered, so it is essential to install them as soon as they become available. To ensure that your Windows computer is always up-to-date, follow these steps:
- Click the Windows Start button and go to Settings.
- Click on Update & Security.
- Click on Windows Update.
- If there are any available updates, click Install Now
Installing Antivirus and Anti-Malware Software
Antivirus software is designed to protect your computer from viruses, malware, and other cyber threats for Windows security best practices. There are many different antivirus programs available, both free and paid. To ensure that your Windows computer is protected, installing an antivirus program and keeping it up-to-date is essential. Some of the most popular antivirus programs for Windows include Avast, AVG, and McAfee.
Enabling Firewall Protection
A firewall is a network security system that monitors incoming and outgoing network traffic and blocks unauthorized access to your computer for Windows security best practices. Windows has a built-in firewall, but it is always a good idea to use a third-party firewall as well. This will provide an extra layer of protection against cyber threats. To turn on the Windows firewall, follow these steps:
- Click the Windows Start button and go to Control Panel.
- Click on System and Security.
- Click on Windows Defender Firewall.
- Click on Turn Windows Defender Firewall on or off.
- Select the option to Turn on Windows Defender Firewall.
Enable User Account Control (UAC)
User Account Control (UAC) is a feature in Windows that alerts you when a program or process tries to make changes to your computer. This feature helps to prevent unauthorized changes to your computer and can also help prevent malware from installing itself on your computer. To enable UAC, follow these steps:
- Click the Windows Start button and go to Control Panel.
- Click on User Accounts.
- Click on User Accounts.
- Click on Change User Account Control settings.
- Move the slider to the highest level to turn on UAC.
Creating Strong Passwords
One of the most basic and important steps to ensure your Windows security best practices are by creating strong passwords for your accounts. A strong password should consist of a combination of letters, numbers, and special characters, and should be at least 8 characters long.
Here are some tips to create a strong password:
- Avoid using easily guessable information such as your name, birth date, or pet’s name.
- Combine uppercase and lowercase letters, numbers, and special characters in random order.
- Make sure the password is at least 8 characters long. The longer the password, the more secure it will be.
- Avoid using the same password for multiple accounts. If a hacker gains access to one password, they will have access to all of your accounts.
- Regularly change your password to prevent unauthorized access.
- Use two-factor authentication (2FA) whenever possible. 2FA adds an extra layer of security by requiring a code from a separate device in addition to your password.
Backing Up Your Data
Backing up your data is a crucial step in protecting your computer from various issues such as hardware failures, viruses, and natural disasters for Windows security best practices. Regularly backing up your data ensures that you will not lose important files and documents in the event of an unexpected problem. Here are some best practices for backing up your data on a Windows computer:
- Choose an appropriate backup method: There are several ways to back up your data, including external hard drives, cloud storage services, and USB drives. Each option has its own pros and cons, so it’s important to choose the one that works best for you.
- Set up an automatic backup schedule: Regular backups ensure that your data is up-to-date, so it’s important to set up an automatic backup schedule that runs at a time when your computer is not in use. This can be done using built-in backup tools such as File History or Windows Backup.
- Encrypt your backup: Encrypting your backup helps protect your data from unauthorized access and theft. Encryption software such as BitLocker can be used to encrypt your backup files.
- Store backups in multiple locations: Storing your backups in multiple locations ensures that you will not lose all your data in the event of a disaster. For example, you can store a backup on an external hard drive and another backup on a cloud storage service.
- Test your backup: Regularly testing your backup ensures that your data is being backed up properly and can be easily restored.
Avoiding Suspicious Emails and Websites
Avoiding suspicious emails and websites is another important step in Windows security best practices from security threats. Here are some best practices for avoiding suspicious emails and websites:
- Be cautious of unsolicited emails: Be wary of emails from unknown sources that contain attachments or links. Do not open attachments or links from unknown sources as they can contain malware.
- Verify the sender’s identity: Before opening an email from someone you know, verify that the sender’s email address is correct. Scammers can impersonate friends or family members, so it’s important to double-check the sender’s identity.
- Use spam filters: Most email providers have built-in spam filters that can help reduce the amount of spam you receive. Enable these filters to help protect your computer from malicious emails.
- Keep your software up-to-date: Regularly updating your software, including your web browser and anti-virus software, helps protect your computer from security threats.
- Use reliable anti-virus software: Installing reliable anti-virus software helps protect your computer from viruses and other malicious software. Make sure to keep your anti-virus software up-to-date and run regular scans.
- Be cautious when downloading files: Be careful when downloading files from the internet, especially if you are unsure of the source. Downloading files from untrusted sources can lead to malware being installed on your computer.
- Use a secure browser: When visiting websites, use a secure browser such as Google Chrome or Microsoft Edge. These browsers have built-in security features that help protect your computer from malicious websites.
Conclusion
By following these Windows security best practices protecting your Windows PC, you can greatly reduce the risk of security threats. Keep your operating system up-to-date, install antivirus and anti-malware software, enable firewall protection, create strong passwords, back up your data, and avoid suspicious emails and websites. By taking these simple steps, you can help ensure the security and protection of your personal information and computer.
Download the article in PDF Form Download
Windows Security Best Practices: Protect Your System
In the ever-evolving landscape of cybersecurity, keeping your Windows system secure is more crucial than ever. As someone who’s been navigating the tech world for quite some time, I’ve seen firsthand how vital it is to stay ahead of potential threats. Whether you’re a seasoned IT professional or a casual user, understanding and implementing Windows security best practices can save you from a world of trouble.
A few years back, I had a close call with a ransomware attack that nearly wiped out my entire digital life. That experience taught me the importance of proactive security measures. In this post, I’ll share some of the most effective strategies to fortify your Windows system against various threats. Let’s dive in!
Essential Windows Security Best Practices
Keep Your System Updated
One of the simplest yet most effective ways to enhance your Windows security is by keeping your system updated. Microsoft regularly releases updates that include security patches, bug fixes, and new features. By ensuring your system is up-to-date, you’re protecting yourself from known vulnerabilities that hackers could exploit.
To check for updates, go to Settings > Update & Security > Windows Update. Make sure to enable automatic updates to stay current without manual intervention.
Use Strong, Unique Passwords
Passwords are the first line of defense against unauthorized access. Using strong, unique passwords for each of your accounts can significantly reduce the risk of a breach. A strong password typically includes a mix of uppercase and lowercase letters, numbers, and special characters.
Consider using a password manager to generate and store complex passwords securely. Tools like LastPass, Dashlane, and Bitwarden are excellent options that can help you manage your passwords effortlessly.
Enable Two-Factor Authentication (2FA)
Two-factor authentication (2FA) adds an extra layer of security to your accounts. Even if someone manages to get your password, they’ll need a second form of verification, such as a code sent to your phone or a biometric scan.
To enable 2FA on your Microsoft account, go to Settings > Accounts > Sign-in options. Select ‘Set up’ under the Two-factor authentication section and follow the prompts.
Install and Update Antivirus Software
Antivirus software is essential for detecting and removing malware from your system. While Windows Defender, the built-in antivirus solution, is quite robust, you might want to consider additional protection from third-party providers like Norton, McAfee, or Bitdefender.
Ensure your antivirus software is always updated to protect against the latest threats. Most antivirus programs offer automatic updates, so make sure this feature is enabled.
Regularly Back Up Your Data
Backing up your data is a critical step in any security strategy. In case of a ransomware attack or hardware failure, having a recent backup can save you from data loss. Use tools like Windows Backup, external hard drives, or cloud storage services like OneDrive, Google Drive, or Dropbox.
Schedule regular backups to ensure your data is always protected. For added security, consider using a combination of local and cloud backups.
Limit Administrative Privileges
Running your system with administrative privileges can leave it vulnerable to attacks. By limiting administrative access, you can minimize the risk of malware gaining control over your system.
Create a standard user account for daily use and reserve the administrative account for tasks that require elevated privileges. To create a new user account, go to Settings > Accounts > Family & other users and select ‘Add someone else to this PC’.
Configure Windows Firewall
The Windows Firewall is a built-in feature that helps protect your system from unauthorized access. It monitors incoming and outgoing network traffic and blocks suspicious activity.
To configure the Windows Firewall, go to Control Panel > System and Security > Windows Defender Firewall. Make sure the firewall is turned on and customize the settings as needed.
Use Secure Browsing Practices
Your web browser is a common entry point for malware and other threats. Using secure browsing practices can help protect your system from online dangers.
Enable browser features like pop-up blockers, ad blockers, and safe browsing modes. Avoid clicking on suspicious links or downloading files from untrusted sources.
Educate Yourself on Phishing Scams
Phishing scams are a common tactic used by cybercriminals to trick users into revealing sensitive information. Educating yourself on how to recognize and avoid phishing attempts can greatly enhance your security.
Look out for suspicious emails, messages, or websites that ask for personal information. Verify the authenticity of any request before providing sensitive data.
Monitor System Performance
Regularly monitoring your system’s performance can help you detect any unusual activity that might indicate a security breach. Use tools like Task Manager and Performance Monitor to keep an eye on resource usage and system health.
If you notice any sudden spikes in CPU or memory usage, investigate the cause to ensure it’s not due to malicious activity.
Disable Unnecessary Services and Features
Windows comes with a plethora of services and features, many of which you might not need. Disabling unnecessary services can reduce your system’s attack surface and improve performance.
To manage services, go to Control Panel > Administrative Tools > Services. Review the list of services and disable any that are not essential for your use case.
Conclusion: Stay Vigilant, Stay Secure
Implementing these Windows security best practices is a proactive step towards safeguarding your system from various threats. However, it’s important to remember that security is an ongoing process. Stay vigilant, keep learning, and adapt to new challenges as they arise.
So, are you ready to take the first step towards a more secure Windows experience? Let’s make it a habit to review and update our security measures regularly. After all, a little effort now can save us from a lot of trouble later.
FAQ
Q: How often should I update my Windows system?
A: It’s recommended to check for updates at least once a week. Enabling automatic updates ensures that your system is always protected against the latest threats.
Q: What is two-factor authentication (2FA)?
A: Two-factor authentication (2FA) is a security process in which users provide two different authentication factors to verify themselves. This adds an extra layer of security to your accounts.
Q: Is Windows Defender enough for antivirus protection?
A: Windows Defender is a robust built-in antivirus solution, but some users prefer additional protection from third-party providers for enhanced security features.
Q: How can I recognize a phishing scam?
A: Phishing scams often involve suspicious emails or messages that ask for personal information. Look out for poor grammar, unfamiliar email addresses, and urgent requests for sensitive data.
Whether you have purchased a new Windows computer, installed a fresh operating system, or simply want to increase the security of your Windows device; there are certain Windows settings that you should change and configure right now to make it more secure and enhance your privacy.
Microsoft introduced Windows 11 with hardened requirements, including TPM 2.0 and Secure Boot, making the system more secure. Even so, there are certain configurations that you should make to make your system even more secure from outside threats and protect your privacy.
In this guide, you will learn what settings you should change on a Windows 11 computer to make sure that there are reduced chances of your device getting hacked, or your privacy being violated. The best security practices include keeping the system updated for the latest vulnerability patches, enabling encryption, biometric authentication, and much more.
Additionally, you will also learn how to perform each of those configurations and where to find those settings, so that you have a seamless experience of making your device more secure as soon as you get your hands on it.
Table of Contents
Windows 11 settings to change for best security protection
The following are the best security-enhancing configurations you get natively on Windows 11. Note that while some need to be configured, the others are configured by default. I have still added them to the list in case you have obtained an old Windows device and the settings have been tampered with by the previous owner.
Install latest Windows updates
The first thing you ought to do is install the latest Windows updates that are available, but not installed on your computer.
Since Windows updates include Common Vulnerabilities and Exposures (CVE) patches, Windows Security (formerly Microsoft Defender) must keep its definitions updated for maximum protection.
-
Press the Windows Key + i to open the Settings app.
-
Click “Windows Update” on the left.
-
Then click “Check for updates.”

Check for OS updates in Windows 11 -
When the scan completes, the pending updates should begin downloading and installing automatically. When completed, restart the computer.

Enable BitLocker encryption
BitLocker is a native encryption feature of Windows that keeps your device secure offline. It is available on almost all Windows editions except for Home. BitLocker encrypts the data in individual drives, including the boot drive, and you can unlock them as needed with the correct encryption key.
Here are the steps to enable BitLocker on Windows 11:
Learn how to manage BitLocker from the command line.
-
Press the Windows Key + E to launch File Explorer.
-
Right-click on the partition to encrypt and click “Turn on BitLocker.”

Turn on BitLocker -
Select “Use a password to unlock the drive,” enter and confirm a password (this password will be used to decrypt the partition when required), and click Next.

Enter a password for BitLocker -
Select “Save to a file.”
Alternatively, you can select another option depending on where you want to store the BitLocker Recovery Key.

Select location to save BitLocker recovery key -
Now save the file to your desired location.
Note: The BitLocker Recovery Key cannot be saved to the same partition that is being encrypted.
-
Back on the BitLocker wizard, click Next.
-
On the next screen, select “Encrypt used disk space only” and click Next.
Encrypt used disk space with BitLocker -
Select “New encryption mode” and click Next.
Select new BitLocker encryption mode -
Now click “Start encrypting.”
The encryption process will now begin. This step may take some time depending upon the amount of data present in the drive.
-
Once the encryption process is complete, close the dialog box.


After performing the steps above, BitLocker encryption will be enabled on the selected drive. However, it is recommended that you enable BitLocker on all drives, including the Boot drive. Once encryption is enabled on the Boot drive, you can even configure a pre-boot PIN for BitLocker for easy access.
Enable Windows Firewall
Windows Firewall is a piece of software that monitors and filters all data and packets coming in and going out from your computer through the network. Disabling it would mean that all sorts of packets can come and go without being detected.
Although this is enabled by default, you must ensure that it is not disabled. Here are the steps to enable Windows Firewall:
-
Press the Windows key + R to launch the Run Command box.
-
Type in “firewall.cpl” and press Enter to launch the firewall applet.
Open the firewall applet -
Click “Turn Windows Defender Firewall on or off” on the left.

Turn Firewall on or off -
Here, select “Turn on Windows Defender Firewall” for all network profiles and then click OK.
Turn on Windows Firewall


Scan for malware
If you just got a new device that was previously in use, you should scan it for malware before you start importing your personal data. You can perform deep scans on your PC for malware using the native Windows Security, which automatically quarantines malicious files and items.
Here are the steps to perform a full, detailed scan of your PC:
-
Open the “Windows Security” app by searching for it in the Start menu.
-
Click “Virus & threat protection” on the left.
-
Click “Scan options.”

Open scan options in Windows Security -
Select “Full scan” and then click “Scan now.”
Perform a full system scan Windows Security will now scan your PC for malware and quarantine any apps or files that are deemed malicious. Note that this scan can take some time and is resource-intensive. Therefore, your PC may lag during this time.
-
Once the scan is complete, go through any quarantined files and remove them from your PC permanently.


Enable Smart App Control
Smart App Control (SAC) is a Windows Security feature that prevents untrusted and dangerous applications from running on your Windows 11 computer. This feature is only enabled on fresh installations of Windows because Microsoft wants to make sure that there aren’t already untrusted apps running on the device when Smart App Control is enabled.
Once the feature is disabled, you must perform a clean Windows 11 installation to enable it again. Otherwise, you will notice that the options are grayed out.

Here are the steps to enable it:
-
Open the “Windows Security” app by searching for it in the Start menu.
-
Click “App and browser control.”
-
Click “Smart App Control settings.”
Open Smart App Control settings -
Select “Evaluation.”
Enable Smart App Control in evaluation mode Alternatively, you may also select “On,” but the chances of the tool blocking even legitimate apps significantly increase, and then Smart App Control becomes a hindrance in your daily work.


Enable Core Isolation (Memory Integrity)
Core Isolation is another Windows Security component that keeps your device secure by preventing malicious code from being run on your PC. This also includes unsigned drivers. Here is how to enable the feature:
-
Open the Windows Security app.
-
Go to “Device Security.”
-
Click “Core isolation details.”
Open Core Isolation details -
Toggle the sliders under “Memory Integrity” and “Microsoft Vulnerable Driver Blocklist” into the On position.
Enable Memory Integrity and Microsoft Vulnerable Driver Blocklist -
Now restart the computer for the changes to take effect.


Enable Reputation-based protection
Reputation-based protection refers to the database of notorious and malicious content that has already infected the internet. Microsoft uses this list to update Windows Security definitions so such malware is automatically blocked before it even enters your device.
Windows Security offers the following reputation-based protection:
- Apps and files: Blocks unrecognized apps and files downloaded from the internet.
- SmartScreen for Microsoft Edge: Block access to malicious sites and downloads.
- Phishing protection: Protects against different types of phishing attacks.
- Unwanted app blocking: Low-reputation apps and apps that are automatically installed with other programs are blocked.
- SmartScreen for Microsoft Store: Checks and blocks unwanted content downloaded from Microsoft Store.
All of these protection settings can be enabled from a single page inside Windows Security, and here is how:
-
Open the Windows Security app.
-
Go to “App & browser control.”
-
click “Reputation-based protection settings.”
Open reputation-based protection settings -
Now toggle the slider under all of the following options into the On position:
- Check apps and files
- SmartScreen for Microsoft Edge
- Phishing protection
- Potentially unwanted app blocking
- SmartScreen for Microsoft Store apps
Enable all reputation-based protection settings


Install Microsoft Defender Application Guard
Microsoft Defender Application Guard is a security feature that helps prevent old and new cyberattacks. This utility works with Microsoft Office, Internet Explorer (deprecated), and Microsoft Edge.
In the case of Microsoft Edge, Application Guard isolates all websites running that are not mentioned in the whitelist created by the IT administrator by running them in a virtualized bubble using a Hyper-V container. Any URL not mentioned in the whitelist will automatically run in an isolated environment.
This way, if an attacker attempts to penetrate your session, and then tries to gain access to your computer or network, they would not be able to. This is because the online session would be in standalone mode.
Similarly, in the case of Microsoft Office, if an employee opens a malicious file in Word or Excel (or any other Office application), it would be isolated from the rest of the network, hence securing it from threats.
Here are the steps to install Microsoft Defender Application Guard:
-
Press the Windows Key + R to open the Run Command box.
-
Type in “optionalfeatures” and press Enter to launch the Optional Features window.
-
Select “Microsoft Defender Application Guard” and click OK.

Enable Microsoft Defender Application Guard -
Click “Restart now” to finalize the installation.

Restart computer


Additionally, you can also perform the following steps if you want to allow copy, paste, saving, printing, camera, and microphone access in Application Guard. Note that these are additional steps and in no way affect the security of your computer.
-
Open Windows Security.
-
Click “App & browser control.”
-
Click “Change Application Guard settings“.

Change Application Guard settings -
Toggle the slider into the On position under the setting that you want to allow.
Allow changes to Application Guard settings -
When done, restart the computer for the changes to take effect.


Enable Controlled Folder Access
Controlled Folder Access is another Windows Security feature that primarily protects your PC against ransomware and other threats. It restricts the modification of critical system folders from external apps and programs that are not trusted.
Here are the steps to enable Controlled Folder Access on your Windows 11 device:
-
Open the Windows Security app.
-
Open the “Virus & threat protection” tab.
-
Scroll down and click “Manage ransomware protection.”
Open ransomware protection settings -
Enable Controlled Folder Access by toggling the slider into the On position.
Enable Controlled Folder Access


Set up Windows Hello (Facial/Biometric recognition)
Windows Hello is a more intuitive method to securely access your Windows computer account by configuring a password, PIN, or any other biometric verification method like facial recognition or fingerprint.
A password prevents your account from physically unauthorized access when you are away from your PC, keeping the data secure. The default Windows settings also lock out the ability to enter more passwords if a certain number of incorrect passwords have been entered, blocking Brute Force attacks.
Learn about Windows’ password complexity requirements.
You can set up Windows Hello from Settings > Accounts > Sign-in Options.

On this page in Windows 11, you can configure the following access security options:
- Password
- PIN
- Fingerprint recognition
- Facial recognition
- Picture password
- Security key
Enable Dynamic Lock
Dynamic Lock is another Windows security feature that automatically locks your account as soon as you are away from the computer. It is based on Bluetooth, and as soon as a paired device’s signals fall below a certain threshold, Windows automatically locks the account.
Dynamic Lock provides an additional layer of security in case a user forgets to lock the account. However, if a perpetrator gains access to the computer before the Bluetooth device is far away and the PC is not idle, the account will not lock.
To enable dynamic lock, you must have a phone paired with your PC. Even after pairing it, the phone must be connected to it via Bluetooth for Dynamic Lock to work.
Here are the steps to enable Dynamic Lock on Windows 11:
-
Open the Settings app.
-
Go to “Accounts” and then “Sign-in options.”
-
Click “Dynamic Lock” to expand it.
-
Select “Allow Windows to automatically lock your device when you’re away.”
Enable Dynamic Lock

The steps above will enable Dynamic Lock. However, it is useless unless you have a phone paired via Bluetooth, and connected, If not, you will see the following message, as in the image above:
Dynamic Lock is not working because Bluetooth is off on your PC. Go to Bluetooth & other devices to turn Bluetooth on.
If so, pair and connect your phone via Bluetooth, and always keep them connected when you are on your PC, so it knows when the device is far away (with you) and Windows will then lock your account automatically.
When a device i connected, it will be shown in the “Dynamic Lock” section.

Manage privacy settings (Windows and app permissions)
Different components within Windows track different activities that we humans perform. While some are allowed to track our typing, others are allowed to collect other data and send it back to Microsoft. By default, these privacy settings allow these components to track, collect, and communicate data, unless you change them from the Out Of Box Experience (OOBE) screens while installing the OS.
In Windows, there are a plethora of different privacy settings that I recommend you look at, and perhaps disable, to protect your privacy, both online and offline.
Here is what I recommend you do:
-
Open the Settings app.
-
Click “Privacy & security.”
-
Click “General” under the Windows permissions section.
Open general privacy settings -
Here, disable the following 4 options:
- Let apps show me personalized ads by using my advertising ID
- Let websites show me locally relevant content by accessing my language list
- Let Windows improve Start and search results by tracking app launches
- Show me suggested content in the Settings app
Disable general privacy controls -
Now go back to “Privacy & security” and click “Inking & typing personalization.”
-
Disable the option “Custom inking and typing dictionary.”
Disable custom inking and typing dictionary -
Return to the “Privacy & security” page and then go to “Diagnostics & feedback.”
-
Here, expand and disable the following options:
- Diagnostic data > Send optional diagnostic data
- Tailored experiences > Let Microsoft use your diagnostic data…
Disable diagnostic and feedback controls -
Now expand “Delete diagnostic data” and click Delete.
Delete diagnostic data -
Return to the “Privacy & security” page and open “Activity History.”
-
Expand “Activity History” and disable the option “Store my activity history on this device.”
-
Click “Clear history.”
Disable and clear activity history -
When asked for confirmation, click Clear.
-
Go back to the “Privacy & security” page and open “Search permissions.”
-
Here, disable the following options:
- Cloud content search > Microsoft account
- Cloud content search > Work or School account
- History > Search history on this device
Restrict search permissions in Windows -
Now back on the “Privacy & security” Settings page, visit the sections under the “App permissions” and disable access to the ones that you do not use. These include the following (but are not limited to):
- Location
- Camera
- Microphone
- Contacts
- Phone calls
- Call history
- Emails
- Messaging
- Documents
- Pictures
- Videos
Manage app permissions from Windows Settings


Once you are done with the steps above, you will have successfully disabled and gone through all the privacy settings in Windows that store your data, share it, or use it to show you personalized content.
Disable Remote Desktop
Remote Desktop is a Windows feature that allows other computers on your network, or even outside the network, to access your PC (or vice versa) remotely. This also opens network ports on your computer, making it vulnerable to attacks. Therefore, I strongly suggest that you disable it if you do not use the service. Here is how:
-
Open the Settings app, click System, and then open the Remote Desktop settings.
-
Toggle the slider in front of “Remote Desktop” into the Off position.
Disable Remote Desktop -
When asked for a confirmation, click Confirm.

Confirm action


Use standard user accounts
There are two types of user accounts on a computer:
- Standard: A standard user account has limited privileges to perform tasks. For example, they cannot change the properties of other user accounts, install computer-wide software, etc. When you create a new user account in Windows, it is a standard account by default, which needs to be manually changed to an administrator account if required.
- Administrator: Administrative accounts have complete control over the computer and the other user accounts on it. The first account created while installing Windows is an administrative account by default and is a member of the Administrators group. However, there is another “Administrator” user account on the computer that is disabled by default and needs to be enabled if needed.
It is recommended that you always use a standard user account for normal day-to-day tasks. This ensures that even if your account is compromised, the attacker will not have sufficient privileges to perform system-specific tasks, like executing malicious scripts that affects all users or system settings.
Using an administrative account is only recommended when you absolutely need it, like when performing legitimate tasks that require those kinds of rights and privileges.
That said, if you are using and administrative account, use the following steps to convert it into a regular standard account:
Note: You need at least one administrator account on your computer at a time that is not disabled. Otherwise, the option to convert an account into a standard account will be disabled and grayed out.
-
Press the Windows key + R to open the Run Command box.
-
Type in “Control” and press Enter to launch the Control Panel.
-
Go to “User accounts“, and then click “User accounts” again.
-
Click “Change your account type“.

Change account type from Control Panel -
Select “Standard” and click “Change Account Type“.
Change account type to standard


As mentioned earlier, if you cannot change the account type to Standard bcause it is grayed out, it is likely that you are using the only administrator account available on your PC. In this case, it is recommended that you stop using this account and create a new standard account, nd make that one your default user account.
Only use this administrative account when dire.
Configure Find My Device
“Find My Device” is a Windows feature that lets you track and lock your computer even if you are away. It can be used to see where your friends and family are located or track the device in case it is stolen, or even lock your device in case of theft, or track it.
Find My Device uses your device’s integrated Global Positioning System (GPS) and transmits the coordinates where it is authorized and requested, using the internet. The coordinates are then displayed on a map to the user who requested the location of the device. Of course, only authorized people can access that kind of information, which includes you; the owner.
To use Find My Device on your Windows PC, you must first ensure that the following requirements are met:
- You should be logged in from an administrative account.
- You should be logged in with a Microsoft account.
- The location services must be enabled.
- The device must have an active internet connection.
Here are the steps to enable Find My Device on Windows 11:
-
Press the Windows Key + i to open the Settings app.
-
Click “Privacy & security” on the left, and then click “Find my device” on the right side.
Open “Find My Device” Settings -
Toggle the slider in front of “Find my device” into the On position.

Enable Find My Device


Once it is enabled, you can track and lock the device remotely in case of theft or loss. Additionally, to make sure that the prerequisites are met, you can follow the complete guide to set up “Find My Device” here.
Configure backups and system restore points
Windows offers several native backup solutions, some of which are automated and regularly back up your data both on the device and off-premise (if configured). Often overlooked, backups can save you a lot of time, data, and a headache when it comes to saving information in case of a disaster.
A bad omen for your data cannot be predicted. May it be a cyber attack, a natural disaster, or a simple hard drive failure, keeping your data backed up can help you preserve it forever.
On Windows 11, you can configure the automatic creation of restore points – these points (in time) let you revert your settings to a previous state when needed.
Here are the steps to create restore points:
Learn how to check if system restore is already enabled.
-
Press the Windows key + R to open the Run Command box.
-
Type in “sysdm.cpl” and press Enter to launch the System Properties applet.
-
Switch to the “System Protection” tab.
-
Select the boot (c) drive and click Configure.

Configure system restore -
Select “Turn on system protection” and then adjust the slider to allow the maximum space the backups can take.
-
When done, click Apply and OK.

Enable system protection -
Back on the System Properties applet, click Create to create a restore point right now as well.
Create a restore point -
Enter a name for the restore point an click Create.

Name the restore point


Once created, you can revert to a restore point later in case of data corruption or any issues faced with Windows.
Additionally, you can also use third-party disk imaging and backup software to create complete backups of your system when needed and keep them off-site. Or, you can create a system image using the Windows-native tool.
Moreover, you can use the following detailed guides to back up different kinds of data from your Windows PC:
- Backup and restore application settings
- Backup device drivers
- Backup printer drivers, queues, and ports
- Backup file versions with file history
Enable Windows Sandbox
Windows Sandbox is a virtualized and isolated desktop environment that allows you to test applications and scripts that are unsafe to run on the actual PC. Whatever happens inside a Sandbox stays within, without affecting the rest of the computer. Moreover, the environment inside the Sandbox is the same as the actual Windows PC.
Windows Sandbox is disabled by default. You have to enable it via the optional features and then run it, like an app, to be able to use it.
Here are the steps to enable Windows Sandbox:
-
Press the Windows key + R to open the Run Command box.
-
Type in “optionalfeatures” and press Enter.
-
Select “Windows Sandbox” and press OK.
Enable Windows Sandbox Windows Sandbox will now be installed.
-
Launch Sandbox by searching for it in the Start menu.

Windows Sandbox will provide you with a secure environment to access emails that seem suspicious or run apps and programs that you do not trust.
Closing words
This article discusses how you can secure your Windows computer immediately after getting your hands on it. This includes the instances when you buy a new Windows 11 PC or perform a fresh, clean installation.
To make sure that you are protected from day one, implement the configurations and settings discussed in this post that will ensure that all the necessary precautions are taken from your end. These will kee your device secure from online and offline threats, as well as protect your privacy.