
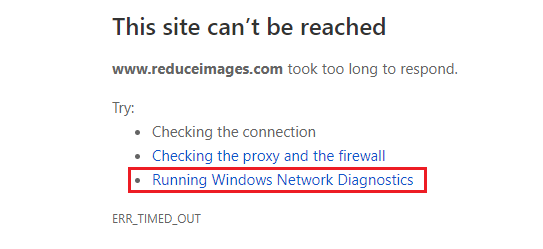
Running Windows Network Diagnostics: Microsoft makes changes to its network interfaces often so that its users get better experience. In windows 7 Microsoft has embedded NDF (network diagnostic framework). You will find notification area that alerts in case any issue is identified. In control panel there is a troubleshooting section that traces the network.
Troubleshoot windows 10 by Running windows network diagnostics
Sometimes Windows fails to detect a particular issue automatically. In such cases you need to go to wizard running windows network diagnostics for general troubleshooting.
- Right click on network icon found in notification area and then select – Troubleshoot problems.
- Click the – Diagnose connection problems in your internet explorer which appears because of internet connection problems.
The Network diagnostic Wizard in Windows will begin by running a few tests to check if the issue can be identified. It checks factors like name resolution, web connectivity, remote host, gateway configuration and network adapter.
Either the wizard running windows network diagnostics will fix the issue automatically or will give you suggestions.
In case if the network diagnostic wizard fails to detect any particular issue, it will display the message as it wasn’t successful in addressing the problem.
Other helpful tutorial: How to setup VPN Windows 10?
You should basically click on the link – View detailed information to get the information and also get ETL (event tracing log) file that you can handover to the administrator to continue detailed troubleshooting.
Run windows network diagnostic to fix the connection issues
In order to run Network diagnostic network to fix the connection issues you can follow the simple steps as stated below
- Click on – Start button
- In search box type- Fix network
- It will display a couple of options you need to click on the option that says – Network troubleshooter.
- Then the troubleshooting window will be displayed here you need to click on the option – Advanced and run program as an administrator. You can also check the box that says – apply repairs automatically.
- Choose the connection type you wish to diagnose for process of troubleshooting and then click – Next
- Windows will start searching for the issues related to network connectivity
The network diagnostic feature is quite useful in cases where there are common network issues for example DNS or Proxy troubleshoot and there are better chances of getting a perfect solution. In case the tool doesn’t succeed in finding a reliable solution for the issue you can contact online support service offered by Microsoft to get the issue resolved or you can try to utilize the tool system restore the PC to its old settings when the problem wasn’t existing or you can also let your hardware guy check your system for network problems.
You can choose to try Network diagnostic tool but if that doesn’t solve the purpose you need to look for better options like getting in touch with your hardware guy or Microsoft help centre.
The problem can be quite frustrating as network issues can halt your work in between. If you are not aware of technical functionalities ensure that you consult someone who is well versed with hardware tasks so that you can get solution for the problem.
Follow Us On:
Ajit Yadav
Author Bio:
Ajit yadav is a professional blogger and co-founder of WindowsClassroom. He is a software engineer by education and blogger & writer by profession.
How to Run Network Diagnostics in Windows 11
In today’s digital age, a stable and efficient internet connection is essential. Whether you’re a casual user browsing the web, a gamer competing online, or a professional relying on cloud services, issues with your network can be frustrating and disrupt your productivity. Windows 11, like its predecessors, provides a range of tools for diagnosing and troubleshooting network problems. In this article, we will explore these tools, providing a detailed guide on how to run network diagnostics in Windows 11.
Understanding Networking Issues
Before diving into the technical aspects of network diagnostics, it’s important to understand common network problems that Windows users may face. These include:
-
Slow Internet Speeds: When your connection seems sluggish, it can be due to various factors such as network congestion, hardware limitations, or distance from the router.
-
Limited Connectivity: If your device shows a “Limited” network status, it indicates that you can connect to the router but have no access to the internet.
-
Unrecognized Network: Sometimes, your Windows device may fail to recognize the network you are trying to connect to, either due to hardware issues or driver problems.
-
Dropped Connections: Frequent disconnections can arise from interference, outdated drivers, or hardware malfunctions.
-
DNS Issues: Problems with the Domain Name System (DNS) can prevent webpages from loading, leading to errors.
Understanding these issues can help you identify what diagnostics to run on your Windows 11 system.
Basic Troubleshooting Steps
Before diving into advanced network diagnostics, consider these basic troubleshooting steps that can often resolve common issues:
-
Restart Your Computer and Router: A simple restart can solve many networking issues, as it refreshes the system and clears temporary glitches.
-
Check Hardware Connections: Ensure that all cables are securely connected, and if using Wi-Fi, verify that you’re within range of the router.
-
Run Windows Updates: Keeping your operating system up to date can resolve driver and security issues that may affect network performance.
-
Disable VPNs and Firewalls: Temporarily disable any VPNs, firewalls, or security software to check if these are causing connectivity issues.
-
Forget and Reconnect to Your Wi-Fi Network: On your device, go to Network settings, select your Wi-Fi network, and choose “Forget.” Then reconnect by entering the password.
If the basic steps do not resolve the issue, you can proceed with more advanced diagnostics offered by Windows 11.
Accessing the Network Troubleshooter
Windows 11 provides a built-in network troubleshooter that automatically diagnoses and fixes common problems related to your internet connection. Here’s how to access it:
-
Go to Settings: Click the Start button or press the Windows key, then click on the gear icon to open the Settings.
-
Network & Internet: In the Settings window, select «Network & Internet» from the left sidebar.
-
Advanced Network Settings: Scroll down and click on «Advanced network settings.»
-
Network Troubleshooter: Under the «More settings» section, you’ll see the option for «Network troubleshooter.» Click on it.
-
Follow the Prompts: A window will open that walks you through the troubleshooting process. Follow the on-screen prompts, and Windows will attempt to diagnose the issue. If it finds a problem, it may offer you the option to fix it automatically.
Using Command Prompt for Network Diagnostics
For more advanced users, Command Prompt offers a suite of commands that can help diagnose network issues under the hood. Here are some essential commands to know:
-
Opening Command Prompt:
- Press Windows Key + X to open the Quick Link menu.
- Select Windows Terminal or Command Prompt.
-
Checking Your Network Configuration:
- Run the command:
ipconfig /allThis command shows all current network interfaces and their configurations, including IP addresses, subnet masks, and gateways.
- Run the command:
-
Testing Connectivity:
- Use the ping command:
ping google.comThis command sends packets to Google’s server and checks for responses. A successful ping indicates that your internet connection is active.
- Use the ping command:
-
Tracing Route:
- To see the path packets take to reach an internet address, use:
tracert google.comThis can help identify where any break in connectivity occurs.
- To see the path packets take to reach an internet address, use:
-
Resetting TCP/IP Stack: If your issue is persistent, resetting the TCP/IP stack may resolve deeper networking problems:
netsh int ip resetAfter running this command, restart your computer.
-
Flushing the DNS Cache: DNS issues can often lead to connectivity problems. To clear your DNS cache:
ipconfig /flushdns
Windows PowerShell for Network Diagnostics
Windows PowerShell is another powerful tool for network diagnosis. Similar to Command Prompt, it provides specific commands that can help further analyze your network.
-
Opening PowerShell:
- Press Windows Key + X, then select Windows PowerShell or Terminal.
-
Getting Network Adapter Information:
- Use:
Get-NetAdapterThis command will give you a quick overview of all network adapters and their statuses.
- Use:
-
View Active Connections:
- You can list all active connections using:
Get-NetTCPConnectionThis command helps identify which connections are currently established.
- You can list all active connections using:
-
Evaluate Network Configuration:
- For detailed configuration, use:
Get-NetIPConfiguration
- For detailed configuration, use:
Network Reset
If all else fails, performing a network reset can often solve complex issues by restoring network settings to their defaults. However, note that this will require you to reconnect to Wi-Fi networks and re-enter any saved passwords.
-
Access Network Reset:
- Go to Settings > Network & Internet.
- Scroll down and select Advanced network settings.
- Click on Network reset.
-
Initiate Reset:
- Click on the Reset now button and confirm the action when prompted.
-
Reboot Your Device: After the reset, your computer will need to restart. Once it boots back up, you will have to reconnect to your networks.
Using Network Diagnostic Tools
While Windows offers many built-in tools, there are additional third-party applications that can enhance your network diagnostic capabilities. Here are a few popular options:
-
Wireshark: A powerful network protocol analyzer that allows users to capture and analyze packets in real-time. It is often used by network engineers and security professionals.
-
NetSpot: This is an application designed for Wi-Fi analysis that allows you to visualize your Wi-Fi network and troubleshoot issues related to coverage and signal strength.
-
TCPView: A Microsoft Sysinternals tool that provides a real-time view of all TCP and UDP network connections on your computer, along with the address and port number for each connection.
-
PingPlotter: A network diagnostic tool that provides a graphical representation of your network’s latency and packet loss over time, helping to visualize intermittent connectivity issues.
Staying Safe Online
While diagnosing network issues, it’s essential to maintain security. Always ensure your firewall is enabled and that you are using a reputable antivirus program. Additionally, consider using a VPN for added protection, especially when connecting to public Wi-Fi.
Conclusion
Diagnosing network issues in Windows 11 involves a combination of basic troubleshooting, built-in tools, and advanced command-line utilities. By understanding how to utilize these methods effectively, you can quickly identify and resolve many common connectivity problems, restoring your internet access and enhancing your overall computing experience. Whether you are a novice user or an experienced network engineer, the steps outlined in this guide will serve as a valuable resource for navigating network diagnostics in Windows 11.
As technology continues to evolve, being proactive about diagnosing and maintaining your network will help ensure that you can enjoy a seamless online experience, regardless of the challenges that may arise.
Whenever we are faced with Network issues it would be really frustrating,sometimes if you are net
addict then that would be the serious problem,though there are hundreds of Ways to diagonise the
network problem,we need to perform every possible solutions like updating drivers, examining the
DNS, configuring the router, Configuring IP like Whether it is static or dynamic and much more
which is the correct procedure whenever it comes to Network. But when we did such tasks,it would make us an intermediate in the Networking,which is a vast concept and following those steps requires
a very much time.
So,in this post let’s see how to perform network diagnostic in Windows 10,with a simple fix it tool.
Note : This is an Official tool from Microsoft,so you don’t need to get panic.
1) Download the tool from the link below
http://aka.ms/diag_networking10
2) Run it..
3) You will find Advanced Option on that window,click on it,which will allow an option to Run as Administrator
4) Click on it.
5) Now,Check the box «Apply repairs Automatically«
6) Click Next.
7) Wait for sometime,it will scan for possible solutions,and will
automatically fix the issue, Click Finish/close.
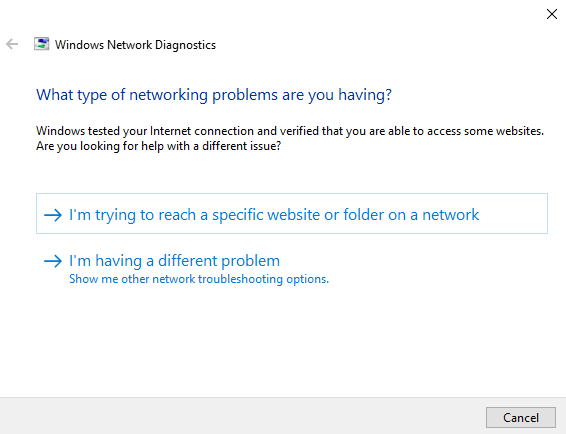
If you have problem in accessing the Particular site,then
Click on I’m trying to reach a specific website or folder on a network,option that comes after
verifing your network.
Enter the Website address for example : Windowsexploredforu.blogspot.com
Click Next.
It will start to collect the info and will fix the issue…
If you a different problem,then click on I’m having a different Problem.
Now,click on Your Problem,for example : Use a specific network Adapter
Now,follow the onscreen instructions,based on your problem..
Hope it helps..
Greetings, Windows User! Are you experiencing network troubles that leave you scratching your head? Don’t despair, for within this comprehensive guide, we’ll delve into the intricacies of running Windows Network Diagnostics, empowering you to troubleshoot and resolve even the most puzzling connectivity issues.
Windows Network Diagnostics is an invaluable tool that can pinpoint the root cause of your network woes. Whether it’s a faulty network adapter, an unstable internet connection, or a misconfigured firewall, this utility will guide you every step of the way towards a swift resolution.
Section 1: Understanding Network Diagnostics
What is Network Diagnostics?
Network Diagnostics is a built-in feature of Windows operating systems that provides a range of diagnostic tools for troubleshooting network connectivity issues. It allows you to quickly identify the source of the problem, whether it’s a hardware or software issue.
How to Launch Network Diagnostics
To access Network Diagnostics, simply type “Network Diagnostics” into the Windows search bar. Alternatively, you can follow these steps:
- Click on the Start button.
- Select Settings.
- Click on Network & Internet.
- Choose Status.
- Scroll down and click on Network troubleshooter.
Section 2: Performing Network Diagnostics
Troubleshooting Network Issues
Once Network Diagnostics is launched, it will automatically start troubleshooting your network connection. It will check for common problems such as:
- Network adapter issues
- Internet connectivity issues
- Firewall or security software conflicts
- DNS issues
Interpreting Results
Network Diagnostics provides detailed reports on the identified issues and potential solutions. If it finds any problems, it will offer step-by-step instructions on how to resolve them.
Source www.getdroidtips.com
Section 3: Advanced Troubleshooting
Using Advanced Options
In some cases, you may need to use advanced troubleshooting options to resolve more complex network issues. These options allow you to:
- Reset network adapters
- Flush DNS cache
- Reset TCP/IP stack
- Change network settings
Command-Line Diagnostics
If you’re comfortable with using the command line, you can also utilize the following commands for advanced network diagnostics:
ping– Checks the connectivity to a specified IP address or websiteipconfig– Displays network adapter and connection informationtracert– Traces the route taken by a packet to reach a destination
Section 4: Troubleshooting Specific Issues
Common Network Issues
Windows Network Diagnostics can assist in troubleshooting a wide range of network problems, including:
- No internet connection
- Slow internet speeds
- Connection drops
- DNS errors
- Firewall issues
Resolving Network Issues
The specific steps for resolving network issues will vary depending on the underlying cause. However, Network Diagnostics provides clear instructions on how to proceed.
Section 5: Troubleshooting Table
| Problem | Solution |
|---|---|
| No internet connection | Check network adapter, cables, and modem/router |
| Slow internet speeds | Optimize network settings, check for interference |
| Connection drops | Troubleshoot Wi-Fi signal strength, check router |
| DNS errors | Flush DNS cache, change DNS servers |
| Firewall issues | Disable firewall temporarily, add exceptions for necessary programs |
Conclusion
Windows Network Diagnostics is a powerful tool that empowers Windows users to troubleshoot and resolve network connectivity issues. By understanding its capabilities and utilizing the provided instructions, you can diagnose and fix a wide range of network problems. If you continue experiencing difficulties, consider checking out our other articles on network troubleshooting or seeking assistance from a qualified technician.
1. What is Windows Network Diagnostics?
Windows Network Diagnostics is a built-in tool in Windows that helps you diagnose and resolve network problems.
2. How do I run Windows Network Diagnostics?
- Press Windows Key + R, type “msdt.exe -id NetworkDiagnostics” and press Enter.
- Alternatively, go to Settings > Network & Internet > Status and click on “Network troubleshooter”.
3. What types of network problems can Network Diagnostics help with?
Network Diagnostics can help with a wide range of network problems, including:
- Internet connectivity issues
- Slow network performance
- Network adapter problems
- DNS issues
- Proxy server issues
4. Will Network Diagnostics fix the network problems automatically?
Not always. Network Diagnostics will diagnose the problem and provide you with a step-by-step guide on how to fix it. You may need to follow the steps manually to resolve the issue.
5. What information does Network Diagnostics collect?
Network Diagnostics collects information about your network adapter, IP settings, DNS settings, and internet connection.
6. Is Network Diagnostics safe to use?
Yes, Network Diagnostics is a safe tool to use. It does not make any changes to your system settings without your permission.
7. What if Network Diagnostics can’t fix my problem?
If Network Diagnostics is unable to resolve your network issue, you can try the following:
- Restart your computer or network devices.
- Update your network drivers.
- Check for malware infections.
- Contact your internet service provider.
8. Can I run Network Diagnostics on older versions of Windows?
Network Diagnostics is available on Windows 10 and later versions.
9. Is there a command-line interface for Network Diagnostics?
Yes, you can run Network Diagnostics from the command line using the netsh command. For example:
netsh winsock reset
netsh int ip reset
10. Is there a third-party alternative to Network Diagnostics?
Yes, there are several third-party network diagnostic tools available, such as PingPlotter, Wireshark, and SolarWinds Network Performance Monitor.
Saran Video Seputar : How To Running Windows Network Diagnostics
The presence of a yellow exclamation mark on your windows connectivity icon means just one thing, your network connection has issues. As simple as resolving it may sound, there may be some occasions where resolving such network issues becomes very difficult. This is where the Network Diagnostics tool comes into play. The network diagnostic helps windows users troubleshoot network problems, and also provides solutions to fixing them. In this article, we explore a tutorial on how to run Windows Network Diagnostics.
The windows diagnostics tool is a highly recommended tool, in troubleshooting fixing the network problem. It is very effective in fixing DNS problems and also helping users find the cause of network termination.
The procedures for using the Windows Network diagnostics tool is a very easy and straight forward. These steps are listed below.
1. Click the start button on your keyboard, and type ”fix network” in the search box provided.
2. From the list of search results provided, click ” Find and fix networking and connection problems “
3. In the Network diagnostics window, click on the advanced option and run the program as an administrator. There is an option to apply repairs automatically here, you tick it if you want repairs to be applied automatically.
4. Choose the type of connection you want to diagnose for troubleshooting and click on the next. here windows will try to locate the network connectivity problem.
Note: Once the problem has been detected by the windows network diagnostics tool, you have the options of solving the problem yourself, contacting Microsoft online support, to get the problem solved remotely or restoring your windows machine to its default settings. You can also seek the help of a local technician, to help you fix the network problem.
There you have it – a complete and comprehensive tutorial on how to run Windows Network Diagnostics. if you have other questions, feel free to drop them in the comment section below.