
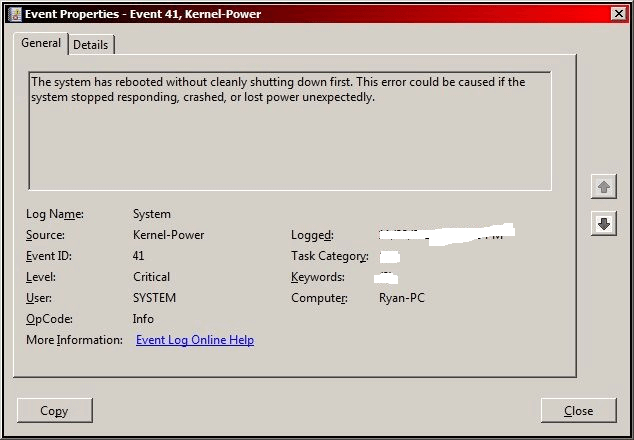
Do you face random system crashes and further an error message on your computer? The issue may be Kernel Power 41 error, accompanied by the code 0x8000400000000002. This nagging problem is characterized by unexpected restart of the computer with the message, “The system has rebooted without cleanly shutting down first”.
Kernel Power 41 error, accompanied by the elusive 0x8000400000000002 code, can be a perplexing ordeal for Windows 11 and 10 users alike. This enigmatic error, marked by unexpected restarts and the irritating message: “The system has rebooted without cleanly shutting down first,” is a conundrum with various origins. While it can be triggered by hardware glitches, driver malfunctions, or power disruptions, its impact resonates through issues such as random restarts and file corruption. Often striking when least anticipated, this error also rears its head after sleep mode or resource-intensive gaming sessions, causing further frustration. As both PC and laptop users grapple with this dilemma, solutions are sought to restore system stability. See: Fix LiveKernelEvent 141 Hardware Error Problem in Windows 11 or 10. Now let’s directly go to the guide:
Kernel Power 41 Error 0x8000400000000002 in Windows 11 or 10
Here is how to fix Fix Kernel Power 41 Error 0x8000400000000002 in Windows:
Install the latest version of the Graphics driver
As per research outdated graphics driver is found culprit in most of the cases when this error appears. So, you need to install the most recent version of display adapter from the manufacturer’s website. Follow the steps:
- Go to the Manufacturer’s website (It may be HP, Dell, Lenovo, Acer, or other).
- Access the software and driver download page. You may need to enter the model number of the laptop or PC for this.
- Download and install the driver.
You can take help from How to update drivers in Windows 11 (Best ways).
Disable identical Audio Drivers
To solve the concerned Kernel Power 41 Error in your system is to disable the duplicate audio drivers. This straightforward approach tackles the error head-on by eliminating conflicting drivers, potentially putting an end to unexpected restarts and system instability.
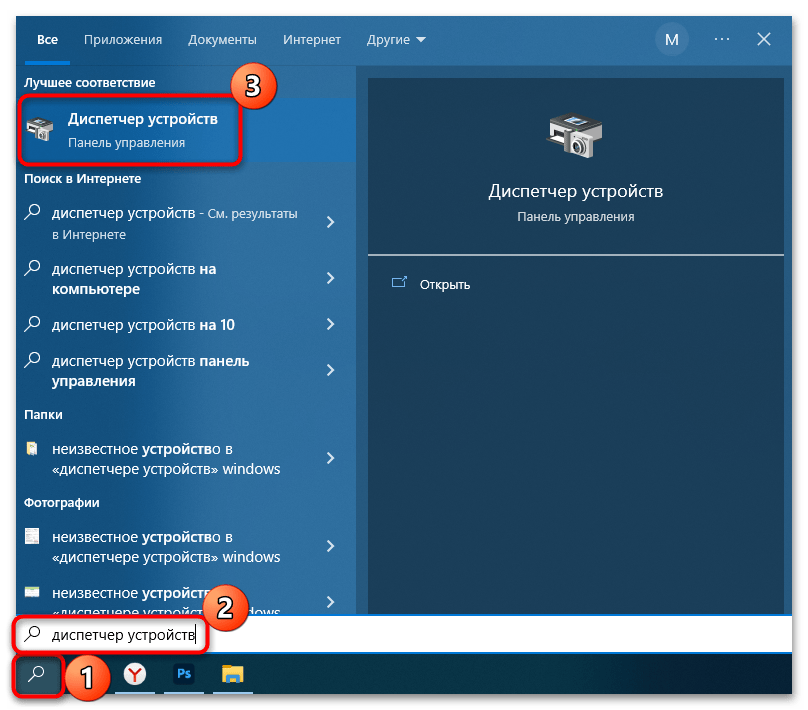
- Right-click on Start and select Device Manager.
- Locate your audio drivers under Sound, video, and game controllers.
- If duplicates are found, right click on an audio driver and select Disable device.
- Even without duplicates, try disabling an audio driver from the list.
- Some users resolved it by disabling ATI High Definition Audio Device.
- If not present, disable any non-High Definition Audio Device audio driver.
Temporarily deactivate Third-Party Antivirus
Often, when encountering Kernel Power error codes like 0x8000400000000002, your third-party antivirus could potentially be the offender, causing interference with your PC or laptop. To troubleshoot, consider temporarily disabling your software by following these steps:
- Find the antivirus icon in the system tray (located on the taskbar).
- Right-click on the “icon”.
- Choose Disable, Turn off, or Pause protection.
- Select temporary disable.
- Confirm prompts.
- To re-enable, repeat the steps and select Enable.
Update your Drivers
Another powerful remedy for tackling the frustrating Kernel Power 41 Error (0x8000400000000002) is by delving into the world of drivers. This solution addresses potential conflicts and instabilities, offering a path toward restoring smooth and uninterrupted system operation.
- Press Windows + R and type devmgmt.msc.
- Check for drivers with exclamation marks.
- Right-click, choose Update driver.
- Select Search automatically for drivers.
- System searches, and installs updates.
- If the issue persists, Uninstall the device.
- Reboot, the system detects and installs a generic driver.
- If not resolved, visit the manufacturer’s website.
- Focus on audio and graphics drivers.
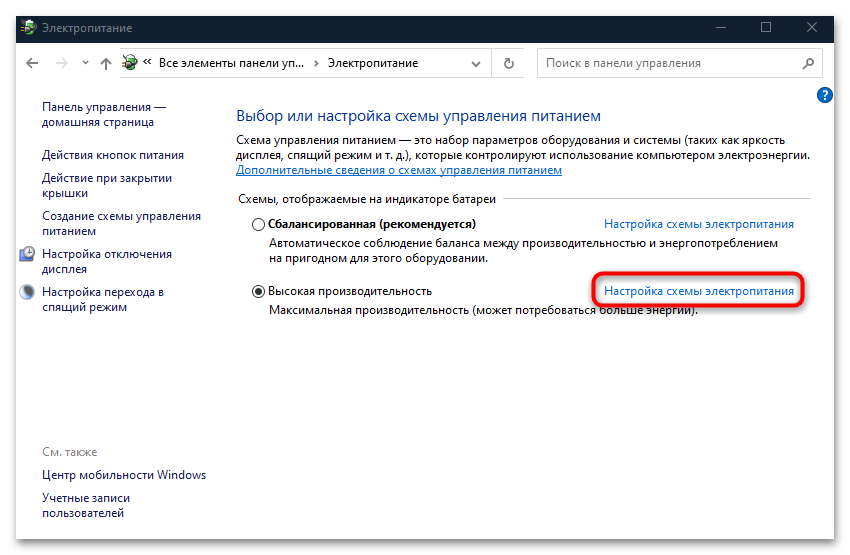
Alter your Power Settings
Adjusting your power settings is another viable solution to fix this aforementioned Kernel Power 41 error. Through power configurations, this solution targets potential triggers for system disruptions and tries to effortlessly clear them.
- Press Windows key + S, type control, and press Enter.
- On the Control Panel, select Power Options.
- Go to the right and click Change plan settings from “Selected plan”.
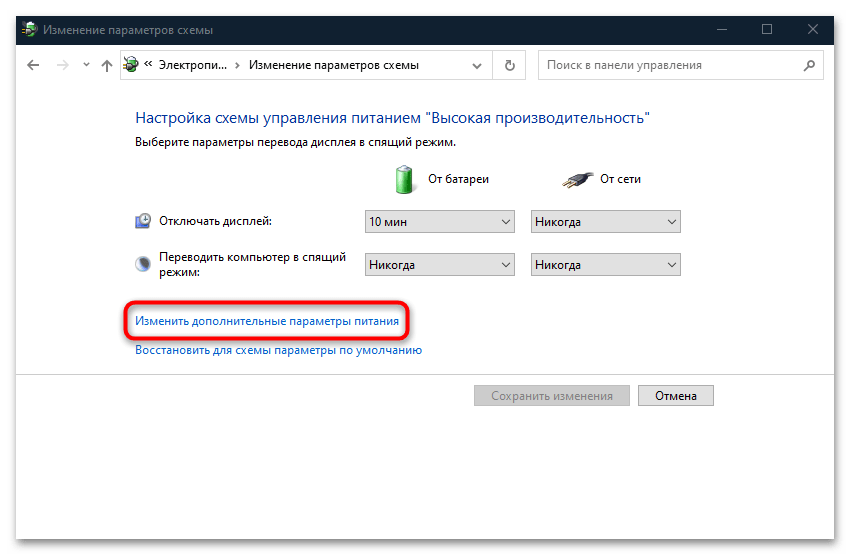
- Then, select the link – Change advanced power settings.
- Expand the Hard disk.
- Click Turn off hard disk after, and On battery (Minutes):, set it to 0.
- For Plugged in (Minutes): change to 0.
- Click on Apply and OK to save changes.
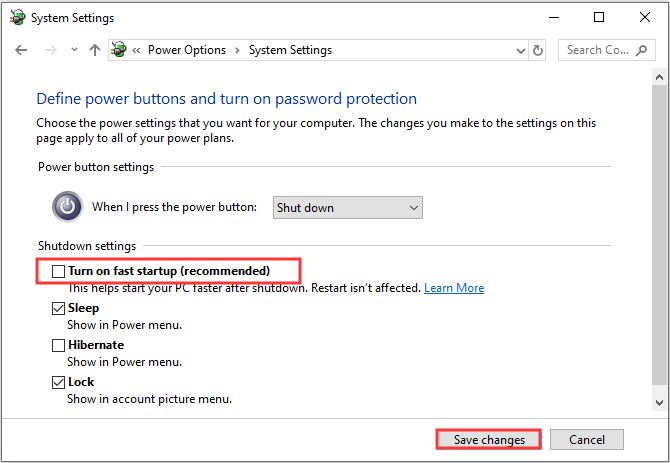
Turn Off Fast Startup
This particular function related to fast startup might act as an efficient and effective fix in eliminating this Kernel Power 41 error code 0x8000400000000002 from your Windows OS. However, disabling the fast startup feature would help in re-configuration and aid in the seamless performance of your system. Follow the below-mentioned steps:
- Press Windows key + R, type control, and hit “Enter”.
- Click on Power Options.
- From the left panel, select Choose what the power button does.
- Click Change settings that are currently unavailable.
- Scroll to Shutdown settings.
- Uncheck Turn on fast startup (recommended).
- Click Save Changes.
Power up the CPU Core Voltage
CPU core voltage, sometimes known as “core voltage,” is the amount of electrical power sent to the processor’s cores to guarantee steady and efficient functioning. It is critical to the CPU’s correct operation since it directly influences its performance, temperature, and power consumption. By increasing the CPU core voltage, you may be able to resolve the Kernel Power 41 Error in your Windows 11 or 10.
This change, by providing a more constant power supply, can help minimize abrupt power fluctuations that might cause system crashes and unexpected restarts. However, it’s important to remember that changing the core voltage should be done with caution and following the CPU’s specifications since extreme voltage changes might cause overheating and damage. Before performing this approach, it is suggested that you examine your CPU’s manual or obtain expert advice. You can use Best System Info tools CPU-Z Or other.
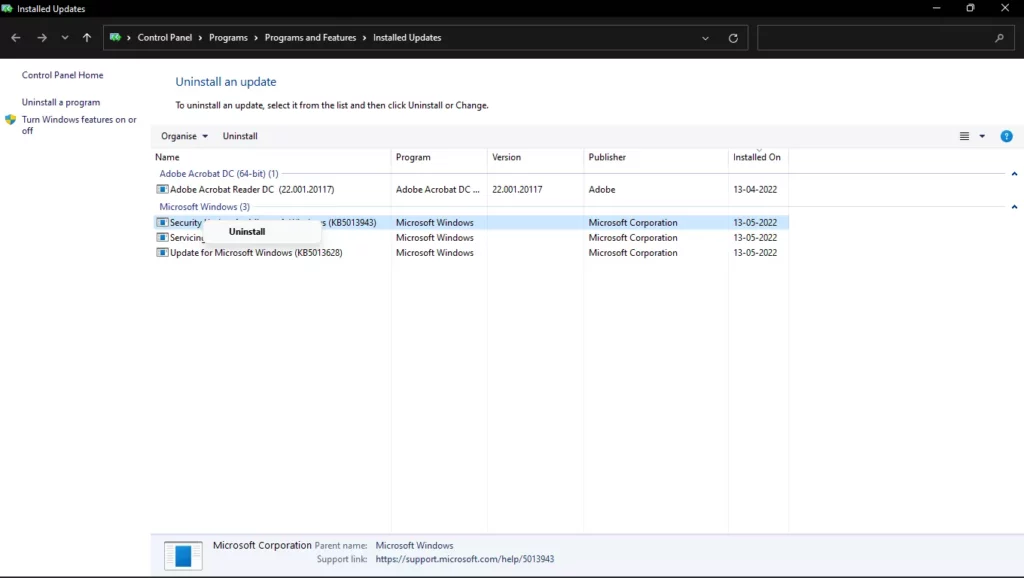
Remove any Recent Updates
Updates usually help your system to work more efficiently but sometimes they may be the main reason behind displaying error codes like 0x8000400000000002. Therefore, rolling back to the state when your system worked fine can be a considerable solution.
- Press the Windows key + I to open Settings.
- Select Windows Update.
- Then, click “Update history”.
- Choose Uninstall updates.
- Find recent updates, especially the latest ones.
- Click on “Uninstall” and confirm the popup.
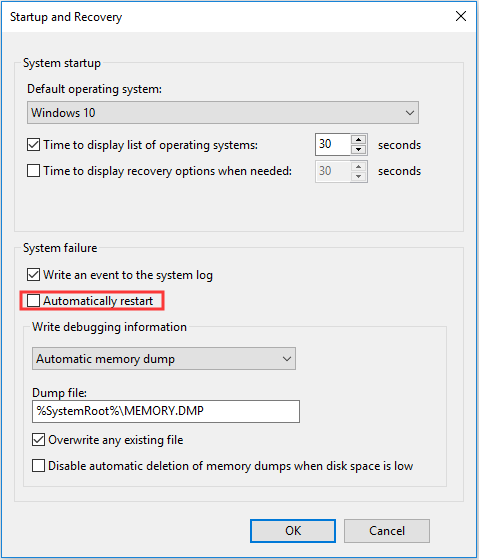
Disable Auto-restart on System failure from the Advanced System Settings
This approach addresses the issue by preventing automatic system restarts, allowing you to diagnose and address the root cause of the error more effectively. To, settle the Kernel Power 41 issue, you must follow these steps:
- Click on Search and type advanced settings.
- Open View advanced system settings.
- Go to the Advanced tab and click on Settings under Startup and Recovery.
- Uncheck Automatically restart located under System failure.
- Click on OK to Confirm changes.
Update Computer BIOS
If you are still battling the Kernel Power 41 along with the 0x8000400000000002 error code, you might want to upgrade your system’s BIOS.
- Go to your PC or Laptop motherboard manufacturer’s website.
- Get the latest BIOS update for your computer.
- Install the downloaded BIOS update.
- Carefully adhere to the provided installation instructions.
- Stay vigilant during the BIOS update to prevent potential issues.
Turn off Hardware Acceleration
Did you know? Hardware acceleration involves using specialized components like graphics cards and sound cards to handle tasks more competently than the main CPU. However, it can enhance performance, it may also lead to compatibility issues. Thus, causing the aforesaid Kernel Power errors within your system. So, its better to disable the Hardware acceleration with the procedure mentioned below:
- Right-click on the desktop and select Display settings.
- Scroll down and choose Graphics.
- Look for the Hardware-accelerated GPU scheduling option.
- Toggle it to off.
- Finally, restart your computer for the changes to take effect.
We hope with these 10 ways you will be able to Fix Kernel Power 41 Error 0x8000400000000002 in your Windows 11 or 10.
Methods:
Install the latest version of the Graphics driver
Disable identical Audio Drivers
Temporarily deactivate Third-Party Antivirus
Update your Drivers
Alter your Power Settings
Turn Off Fast Startup
Power up the CPU Core Voltage
Remove any Recent Updates
Disable Auto-restart on System failure from the Advanced System Settings
Update Computer BIOS
Turn off Hardware Acceleration
That’s all!!
Все способы:
- Способ 1: Решение проблем с драйверами
- Способ 2: Исправление работы ПО видеокарты
- Способ 3: Проверка оперативной памяти
- Способ 4: Редактирование реестра
- Способ 5: Настройки плана электропитания
- Способ 6: Решение проблем с блоком питания
- Вариант 1: Перегрев БП
- Вариант 2: Недостаточная мощность
- Способ 7: Проверка перегрева ПК
- Способ 8: Отключение повторяющихся звуковых драйверов
- Способ 9: Отключение режима сна / гибернации / быстрого запуска
- Способ 10: Отключение аппаратного ускорения браузера
- Способ 11: Переустановка приложения
- Способ 12: Изменение типа запуска службы Luafv
- Способ 13: Сброс настроек BIOS
- Вопросы и ответы: 0
Способ 1: Решение проблем с драйверами
Чаще всего ошибка под кодом 0x8000400000000002 в Windows 10 появляется при проблемах с драйвером какого-либо устройства. В первую очередь нужно выяснить, программное обеспечение какого оборудования дает сбой, затем можно попытаться нормализовать работу ПО.
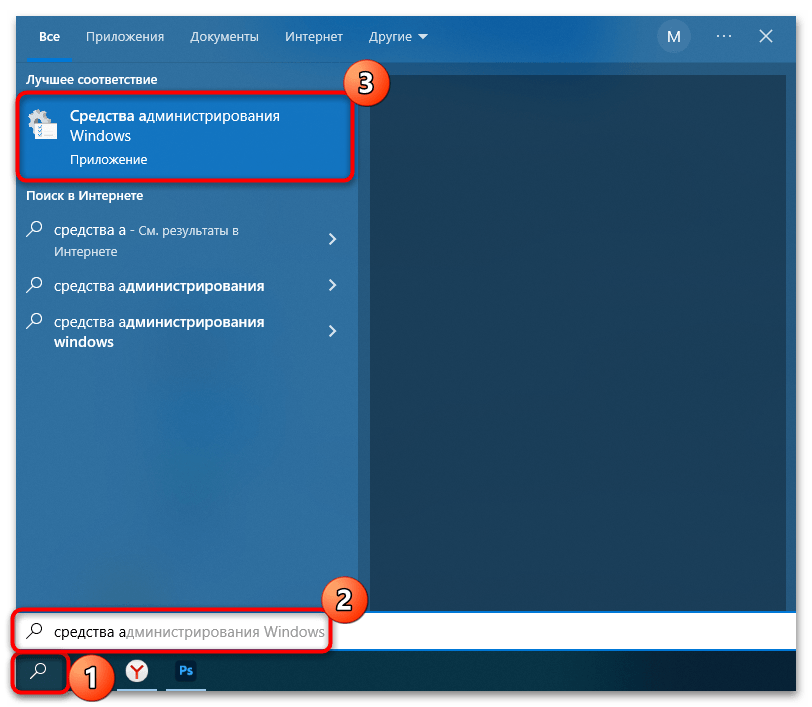
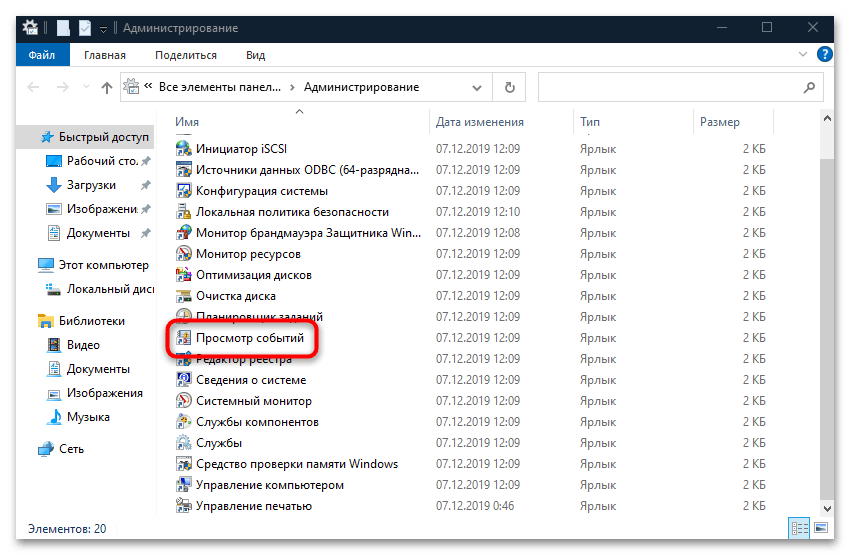
- Сначала посмотрите журнал событий операционной системы, чтобы понять, какой драйвер вызывает ошибку. Для этого через системный поиск найдите раздел «Средства администрирования Windows».
- Через появившееся окно запустите средство «Просмотр событий».
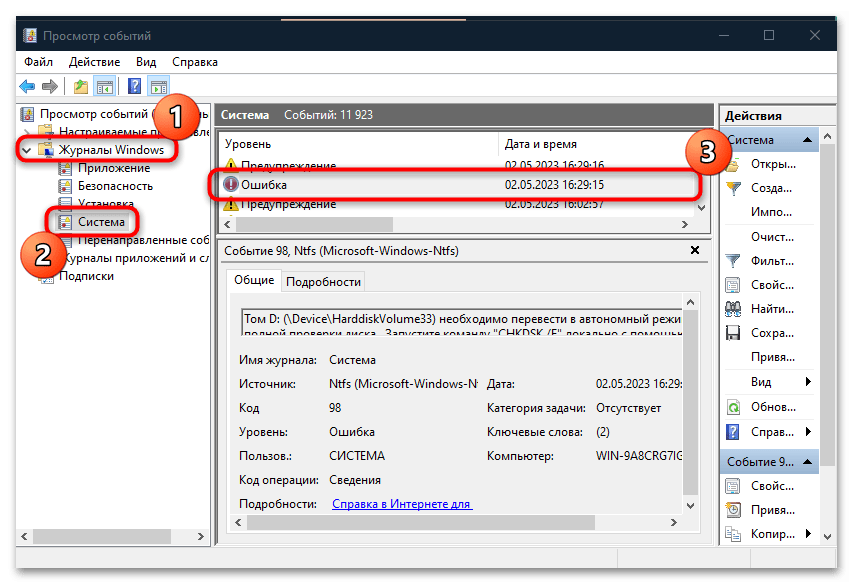
- Разверните ветку «Журналы Windows» на левой панели, затем выберите пункт «Система». В центральной части окна исследуйте журнал и найдите ошибки, которые могли возникать до или после появления рассматриваемой проблемы. В столбце «Источник» можно узнать, какое устройство или оборудование вызвало сбой.
После того как стало известно, какой драйвер сбоит, можно попробовать исправить работу программного обеспечения несколькими способами. Иногда помогает его обновление, откат или полая переустановка. Ранее мы писали о том, как можно проверить наличие обновлений для программного обеспечения, а также переустановить его вручную.
Подробнее:
Как проверить обновления драйверов в Windows 10
Методы ручной установки драйверов в ОС Windows 10
Способ 2: Исправление работы ПО видеокарты
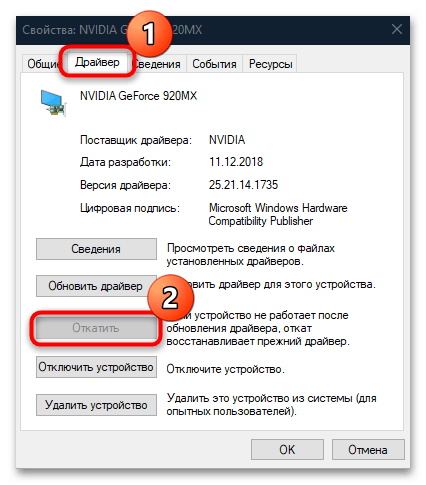
Если ранее проблем в системе не наблюдалось, есть вероятность, что ошибка начала происходить после недавнего обновления ПО для графического адаптера. Попробуйте откатить состояние драйвера до предыдущего значения, что происходит в окне с его «Свойствами». Через «Диспетчер устройств» найдите проблемное оборудование и дважды кликните по нему, чтобы открыть это окно. На вкладке «Драйвер» нажмите на кнопку «Откатить», если она активна.
Читайте также: Что делать, если ПК стал работать хуже после обновления драйвера видеокарты
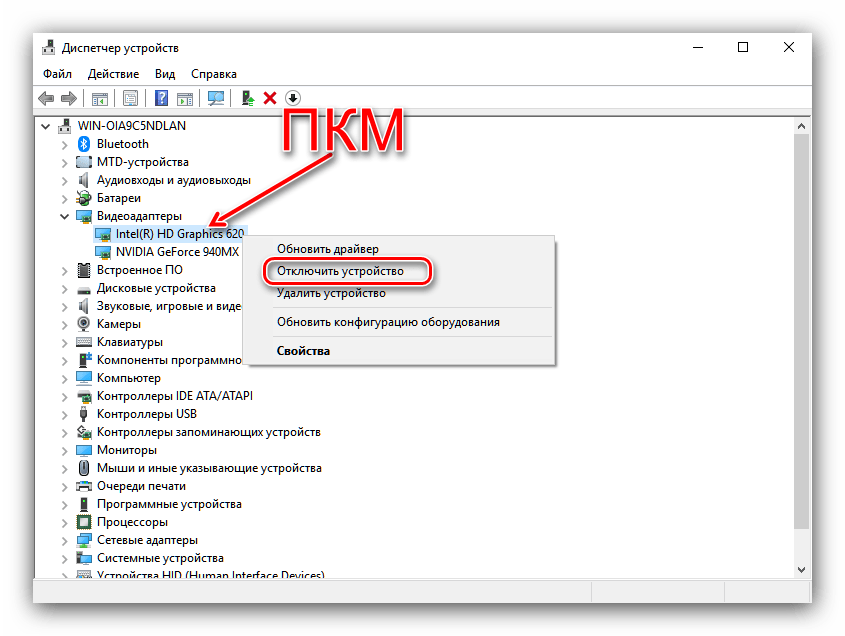
Если на компьютере используются две видеокарты (дискретная и интегрированная), то проблема может крыться в одной из них. Попробуйте переустановить для встроенного графического адаптера драйвер так же, как в Способе 1 (через «Диспетчер устройств») или вовсе отключить само устройство в целях проверки — появится ли после этого рассматриваемая неполадка.
Подробнее: Отключение встроенной видеокарты на компьютере
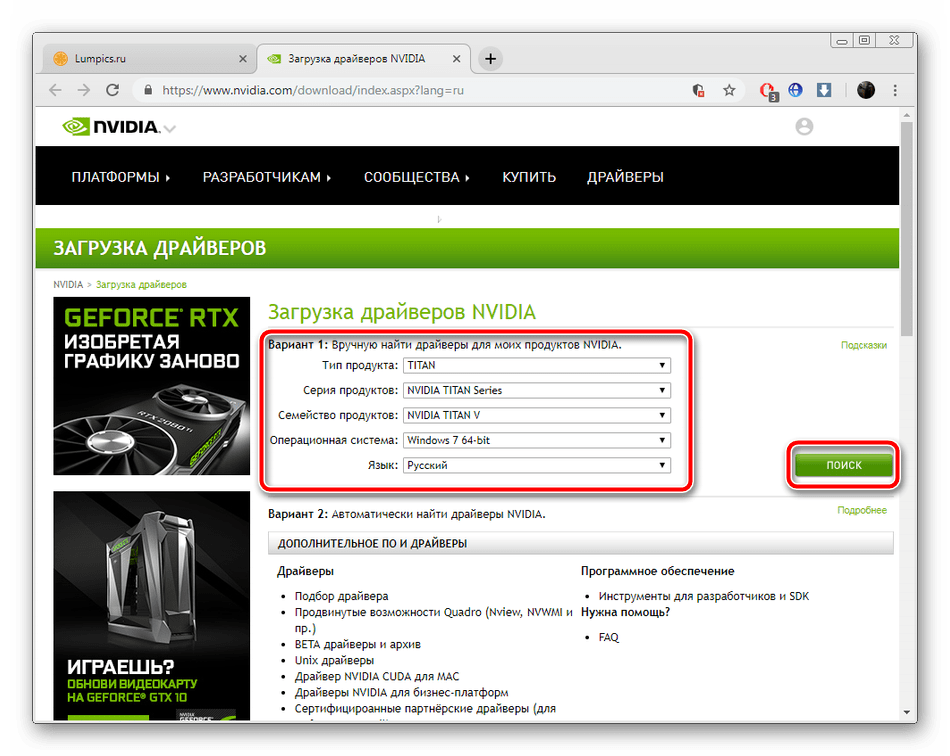
Если дело не во встроенной видеокарте, а предполагается, что в дискретной, проделайте то же самое с ней – обновите программное обеспечение или отключите ее. Для установки последней версии драйвера лучше прибегнуть к фирменным утилитам от производителей компонентов. Об этом мы ранее также писали.
Подробнее: Установка драйверов на видеокарту
К слову, работоспособность дискретной видеокарты (если с драйвером все ок, но есть подозрение в неисправности) можно проверить, используя различные способы, и наиболее эффективные методы диагностики уже разбирал наш автор.
Подробнее: Проверка работоспособности видеокарты
Способ 3: Проверка оперативной памяти
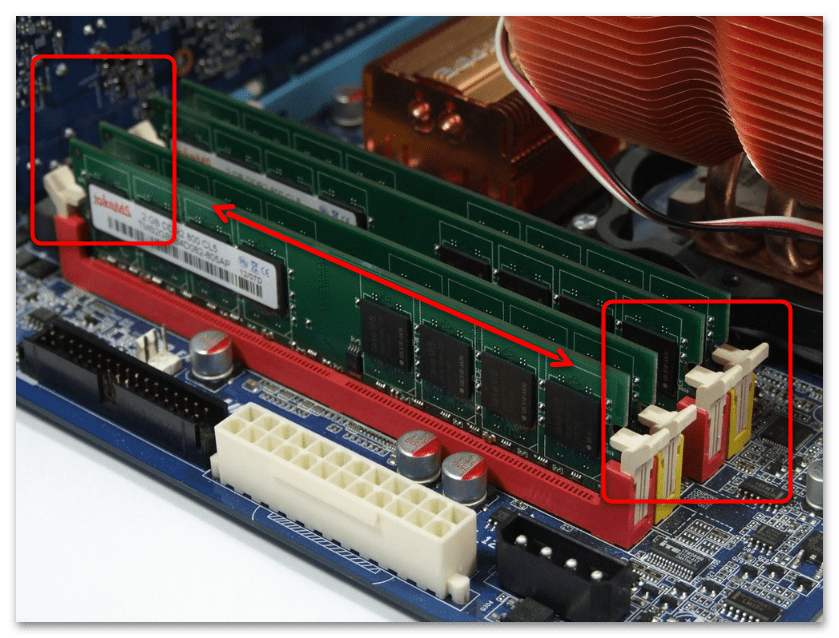
При аппаратных и программных сбоях в работе оперативной памяти также может появляться ошибка с кодом 0x8000400000000002. Вероятно, она не подключена должным образом или возникли проблемы с самим слотом (например, он запылился). В этом случае потребуется выключить ПК и отключить питание, затем снять крышку системного блока или разобрать корпус ноутбука, чтобы проверить, все ли в порядке с ОЗУ.

Для извлечения планки оперативной памяти на ПК нужно отогнуть специальные зажимы по бокам. Достаньте память, при помощи кисточки удалите пыль со слота на материнской плате. Проверьте, не загрязнены ли контакты планки оперативной памяти (обычно очищают их простым ластиком), затем плотно, но аккуратно вставьте ее на место.
Если после физической очистки ничего не изменилось, может потребоваться решение программных ошибок. Для этого в операционной системе предусматривается специальное средство, которое проводит диагностику ОЗУ и исправляет найденные неполадки. Также существуют и специализированные сторонние решения. Ранее мы более детально писали об этом в отдельном материале.
Подробнее: Проверка оперативной памяти в Windows 10
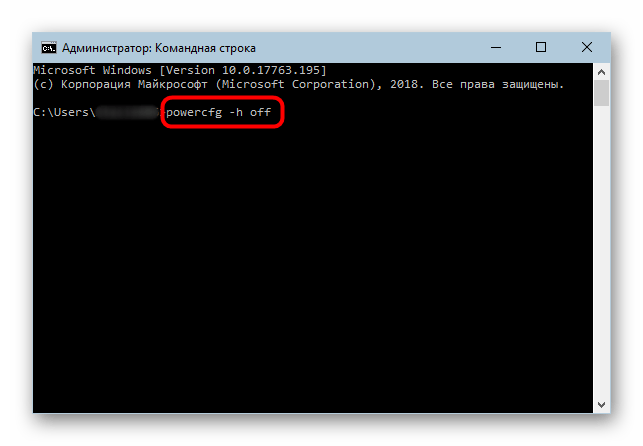
Способ 4: Редактирование реестра
Когда ошибка связана с идентификатором события под кодом 41, то есть вероятность, что произошла проблема в работе файлов реестра. Попробуйте исправить ситуацию, изменив соответствующий параметр в «Редакторе реестра»:
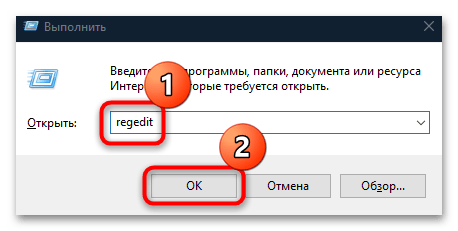
- Одновременно нажмите на клавиши «Win + R», затем в появившемся окне «Выполнить» введите команду
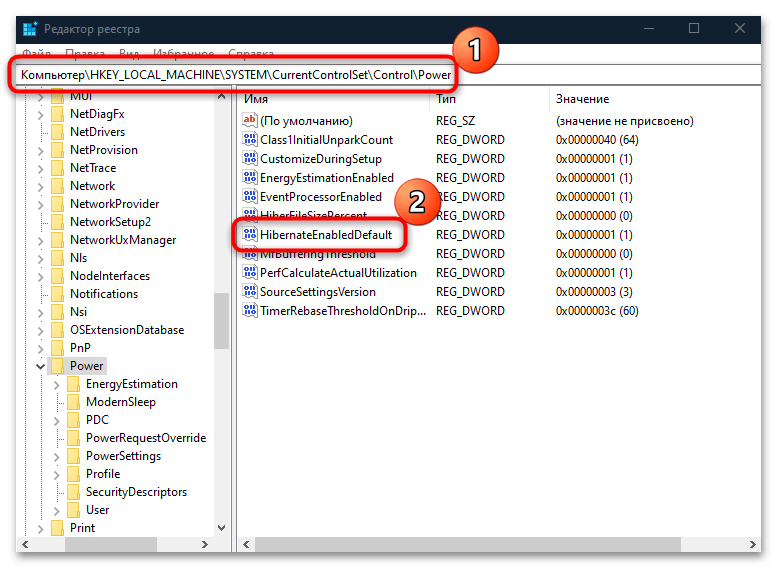
regeditи нажмите на кнопку «ОК» для выполнения действия. - Откроется «Редактор реестра». Разверните следующие ветки:
HKEY_LOCAL_MACHINE\SYSTEM\CurrentControlSet\Control\Power. В центральной части окна найдите параметр под названием «HibernateEnabledDefault» и дважды кликните по нему левой кнопкой мыши. - Измените значения ключа на «0» в соответствующей строке и нажмите на кнопку «ОК».
После останется перезагрузить систему и проверить, пропала ли ошибка под кодом 0x8000400000000002.
Способ 5: Настройки плана электропитания
Если вы заметили, что рассматриваемая ошибка появляется после некоторого бездействия, а при постоянной нагрузке (без простоя) компьютер работает нормально, вероятно, это происходит по следующей причине. Жесткий диск настроен так, что уходит в сон, если компьютером не пользуются и нет запущенных фоновых приложений, а при возобновлении его работы происходит резкая нагрузка на блок питания, с которой тот не справляется, уходя в защиту. С помощью встроенных средств скорректируйте настройки электропитания:
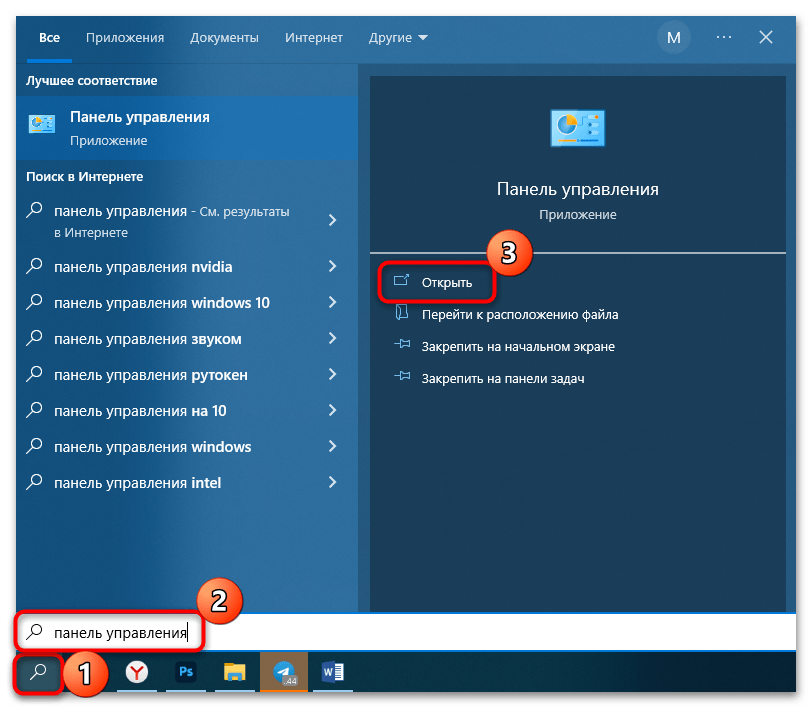
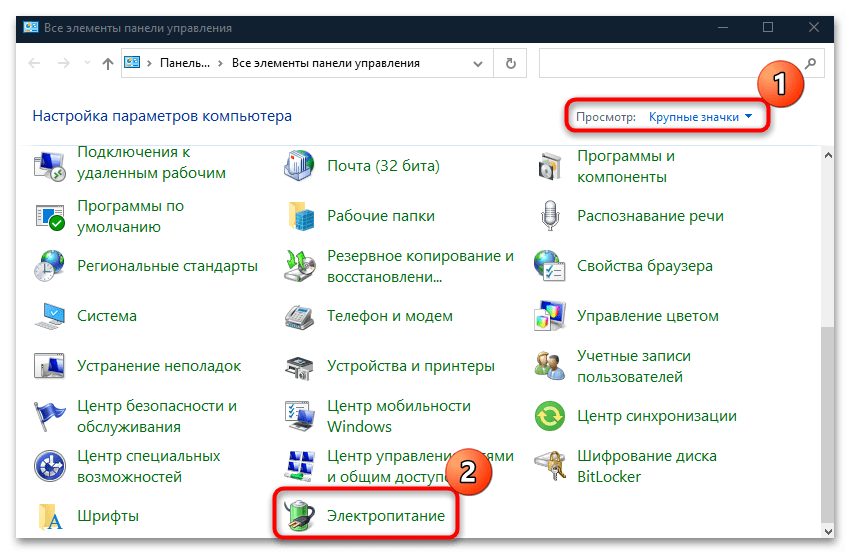
- Через системный поиск отыщите штатное средство «Панель управления».
- Выставьте отображение разделов в виде крупных значков и выберите «Электропитание».
- Кликните по строке «Настройка схемы электропитания» у используемой схемы.
- В следующем окне нажмите по ссылке «Изменить дополнительные параметры питания».
- Далее разверните ветку «Жесткий диск» и у параметра «Отключать жесткий диск через» и выставите значение «0». Если у вас ноутбук, то сделать это можно для работы как от аккумулятора, так и от сети. Нажмите на кнопку «ОК», чтобы применить настройки.

Также можете изменить нагрузку центрального процессора. Для этого разверните раздел «Управление питанием процессора», затем в строках с настройкой минимального и максимального состояний процессора выставите значение «99%», если сейчас он задана полная мощность. Сохраните изменения.
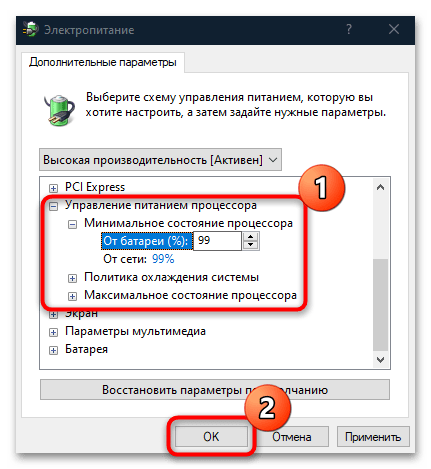
Иногда понижение значения состояния ЦП даже на 1% позволяет избежать сильной перегрузки компьютера, в результате которой ПК может отключаться с ошибкой 0x8000400000000002.
Способ 6: Решение проблем с блоком питания
При условии, что ошибка является следствием проблем с электропитанием, есть несколько путей решения — все зависит от самой неполадки.
Вариант 1: Перегрев БП
Если компьютер начинает зависать или перезагружаться во время игры или при выполнении сложных задач, то вполне вероятно, что блок питания не справляется со своей задачей. Первым делом требуется замерить его температуру, чтобы исключить перегрев.
Подробнее: Как узнать температуру блока питания компьютера
Сразу же отметим: узнать температуру удается не у всех БП — в такой ситуации придется просто проверять нагрев на ощупь. Если в результате проверки вы выяснили наличие перегрева, потребуется предпринять определенные меры.
Причиной перегрева чаще всего является загрязненность, поэтому можете самостоятельно разобрать блок питания и произвести очистку от пыли. Чтобы правильно это сделать, ознакомьтесь с нашей отдельной инструкцией.
Подробнее: Как правильно почистить от пыли блок питания компьютера
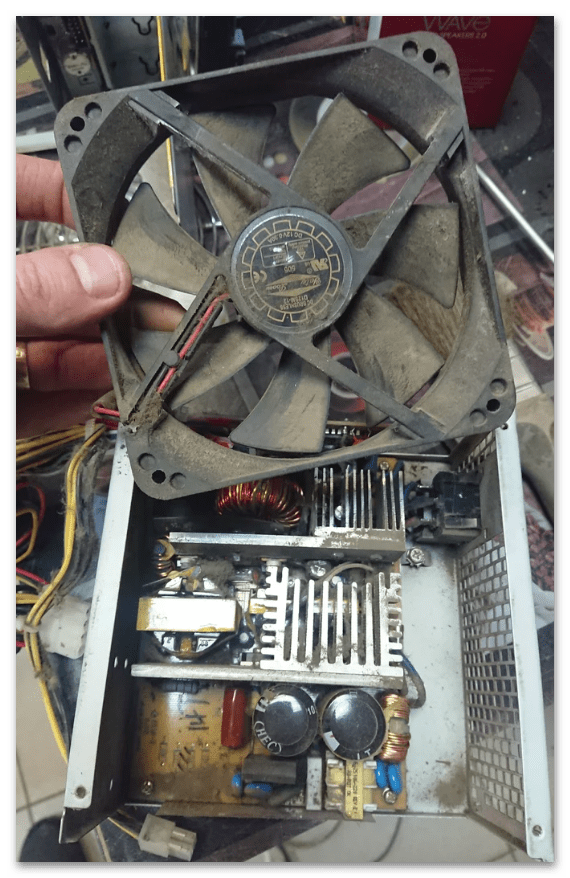
Однако на повышение температуры могут влиять и другие факторы: механическая неисправность (например, у БП не работает кулер, высохла смазка), неправильное расположение кулеров в системном блоке и/или отсутствие притока воздуха и т. п. При наличии знаний и уверенности в том, что вы делаете, попробуйте диагностировать и исправить проблему самостоятельно. Но лучше либо воспользоваться услугами специалистов, либо заменить БП на новый и обязательно более мощный.
Вариант 2: Недостаточная мощность
Обратите внимание и на мощность вашего блока питания. Каждое комплектующее требует определенное количество Ватт для своей работы в стандартном режиме и при повышенной нагрузке, причем для игровых и рабочих ПК показатели, как правило, разные. Например, если проблема появляется только при использовании требовательных программ или игр, может быть, БП попросту не хватает мощности.
Для полноценного функционирования современного игрового компьютера требуется как минимум 650 Вт, а 800 Вт нужны в случае, если вы играете в ААА-игры, у которых довольно высокие системные требования, в том числе и к питанию. Если у вас особо мощный ПК с двумя и более видеокартами, то лучше выбирать модель мощностью от 800 Вт. О том, как вычислить нужную мощность блока питания, написано в нашем отдельном материале.
Подробнее: Как узнать, сколько ватт потребляет компьютер

Если ранее вы разгоняли работу одного или нескольких комплектующих, верните их значения к первоначальному состоянию. С разгоном повышается и энергопотребление, которое может обеспечить не каждый БП.
Способ 7: Проверка перегрева ПК
Другая распространенная проблема – это перегрев компонентов компьютера или ноутбука, что обычно решается очисткой и заменой термопасты. Сначала ознакомьтесь с инструкциями на нашем сайте, где описаны способы измерения температуры компьютера, после чего можно переходить к решению проблемы, если перегрев действительно есть.
Подробнее:
Решаем проблему с перегревом ноутбука
Способ 8: Отключение повторяющихся звуковых драйверов
Иногда критическая ошибка является следствием конфликта работающих звуковых устройств, а точнее – из-за дубликатов драйверов. Проверьте, есть ли в вашей Windows такое программное обеспечение, и отключите лишнее, если это потребуется:
- Запустите «Диспетчер устройств», отыскав встроенное средство через системный поиск.
- Просмотрите раздел «Звуковые, игровые и видеоустройства». При наличии повторяющихся записей отключите их. Для этого достаточно нажать на название драйвера правой кнопкой мыши и выбрать из контекстного меню пункт «Отключить устройство».
- Подтвердите действие в новом системном окне.
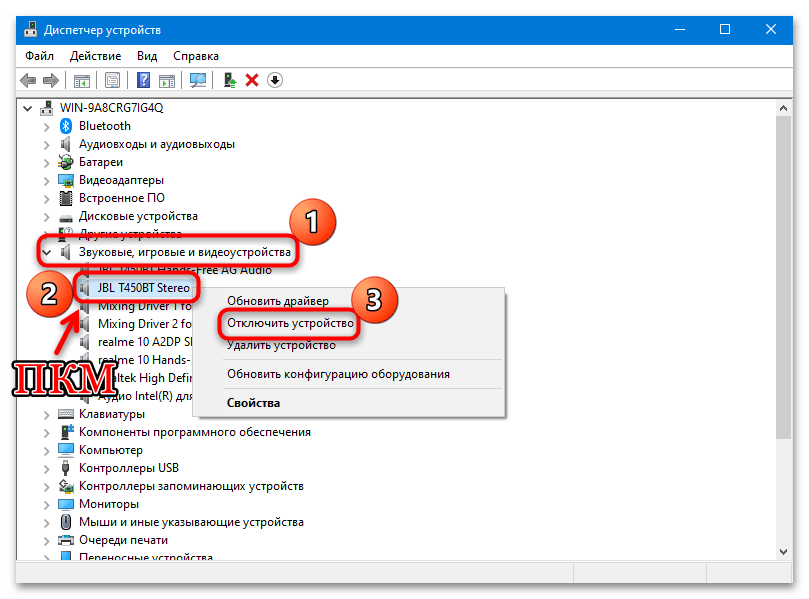
Если в списке нет повторяющихся устройств, попробуйте отключить любое другое неиспользуемое аудиооборудование и проверить, была ли решена проблема.
Способ 9: Отключение режима сна / гибернации / быстрого запуска
Когда компьютером не пользуются в течение какого-либо периода времени, он может уходить в режим сна или гибернации. Потребление энергии на это время снижается, но иногда именно эти режимы, вернее их неправильная работа на программном уровне, могут препятствовать корректному выходу ПК из такого состояния.
То же самое касается и функции быстрого запуска, предназначенной для более быстрого старта вашей системы после включения. Часто она работает не совсем корректно, провоцируя появление самых разных неполадок, включая и рассматриваемую.
Отключите эти режимы все сразу, если не пользуетесь ими, или по отдельности. Как это сделать – описано в наших отдельных инструкциях.
Подробнее: Как отключить режим гибернации / спящий режим / быстрый запуск на компьютере с Windows 10
Способ 10: Отключение аппаратного ускорения браузера
В случае если ошибка 0x8000400000000002 появляется при использовании браузера, то все дело может быть во включенном аппаратном ускорении, которое предназначается для улучшения производительности видеокарты, но пророй может вызывать разные проблемы в работе операционной системы. Отключите функцию, и на примере обозревателя Google Chrome мы разберем, как это сделать:
- Перейдите в главное меню браузера, кликнув по троеточию в верхнем правом углу, затем выберите раздел «Настройки».
- Отыщите раздел «Система», затем отключите функцию «Использовать аппаратное ускорение (при наличии)».
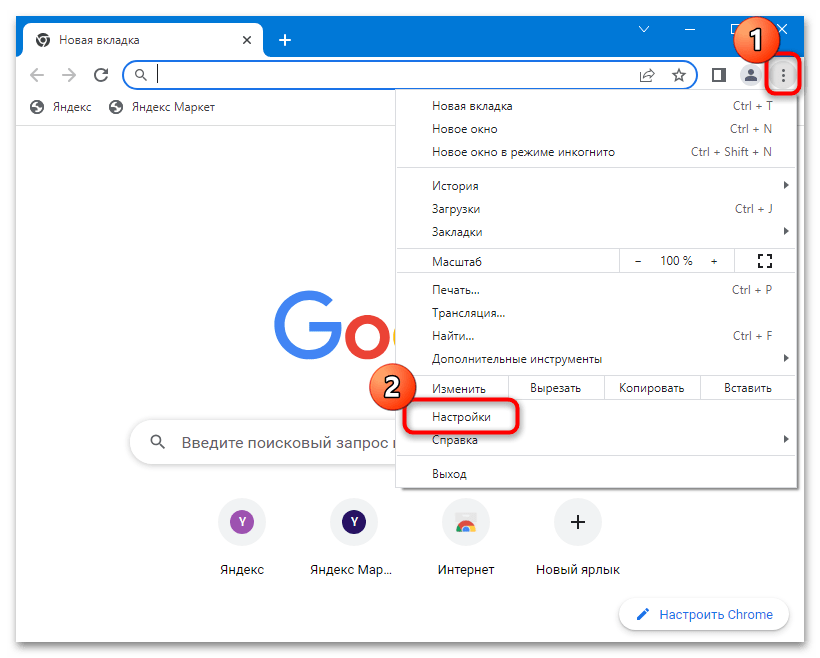
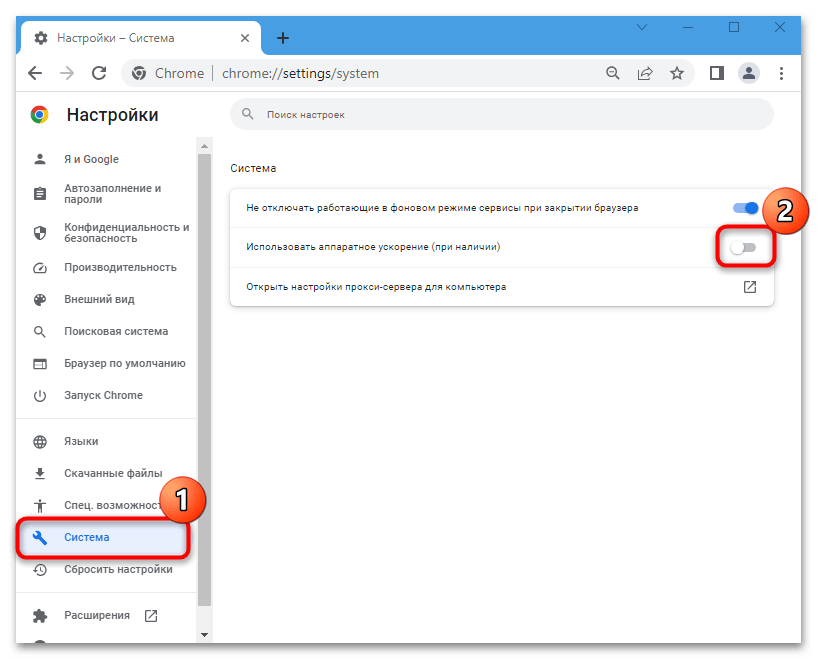
Чтобы настройки вступили в силу, перезапустите Google Chrome.
Способ 11: Переустановка приложения
Когда ошибка возникает при использовании конкретной программы или игры, это бывает связано с неправильной работой софта, например из-за неудачной установки, обновления или повреждения файлов. Скачайте приложение заново, переустановите и протестируйте его на предмет того, исчез ли сбой.
Способ 12: Изменение типа запуска службы Luafv
Случается, что служба Luafv также вызывает ошибку под кодом 0x8000400000000002. Файл «luafv.sys», непосредственно связанный с ней, является частью программного обеспечения Windows и считается разновидностью файла LUA File Virtualization Filter Driver. Чтобы исправить неполадку, можете поменять тип запуска службы на автоматический, воспользовавшись, например, «Редактором реестра».
Запустите средство (диалоговое окно «Выполнить» и команда regedit, как в Способе 4), затем перейдите по пути HKEY_LOCAL_MACHINE\SYSTEM\CurrentControlSet\Services\luafv. В центральной части окна отыщите параметр «Start» и дважды кликните по нему. В окне изменения в графе «Значение» пропишите «2» и нажмите на кнопку «ОК».

Для внесения изменений понадобится перезагрузка.
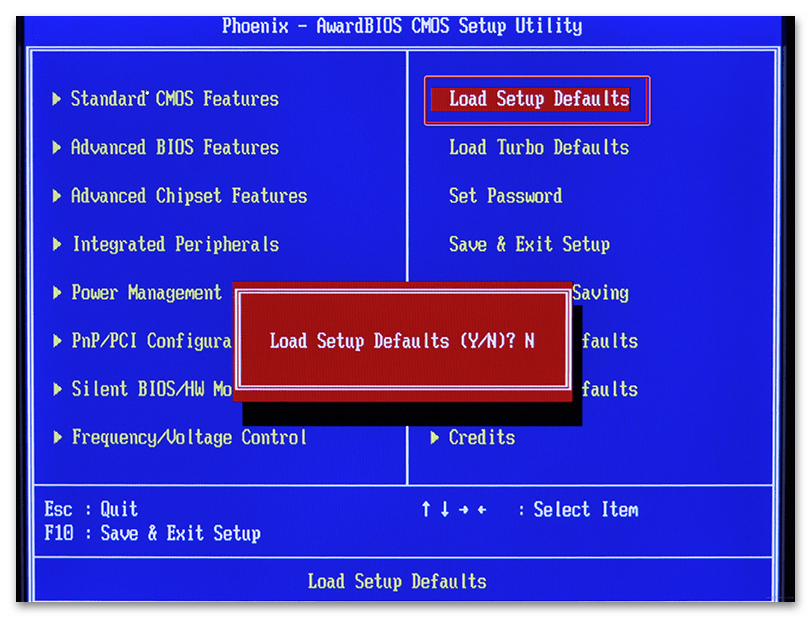
Способ 13: Сброс настроек BIOS
Ошибка 0x8000400000000002 часто возникает при подаче электропитания на компоненты компьютера на программном уровне. Один из способов решения неполадки предполагает сброс всех настроек БИОС к тем, которые были первоначально. Наш автор разбирал все эффективные методы сделать это в отдельной статье.
Подробнее: Сбрасываем настройки BIOS
Наша группа в TelegramПолезные советы и помощь
Windows Blue Screen of Death (BSOD) is a known windows error screen that appears now and then, randomly, when some system drivers get corrupted, incompatible apps get installed, drivers are outdated, etc. One such error is BSOD 0x8000400000000002. This error is related to kernel 41 critical error on Windows 10. If you are facing such an error and your windows computer is displaying 0x8000400000000002 on the blue screen, then this guide is for you. In this article, we will learn how to fix Error 0x8000400000000002 in Windows 10 in step by step guide.
-
1)
Why 0x8000400000000002 error is created? -
2)
How to fix Error 0x8000400000000002 in Windows 10?-
3)
Method 1 – Update the drivers to fix 0x8000400000000002 -
4)
Method 2 – How to fix error 0x8000400000000002 by changing Power Options -
5)
Method 3 – Turn off Fast startup to fix error 0x8000400000000002 -
6)
Method 4 – Restore Previous Settings using the Restore Point feature to fix error 0x8000400000000002 -
7)
Method 5 – Uninstall recent windows updates -

Method 6 – Update BIOS to fix Error 0x8000400000000002
-
3)

Why 0x8000400000000002 error is created?
There are several reasons for error 0x8000400000000002 that causes BSOD.
- Corrupted drivers for Hardware can cause error 0x8000400000000002
- Outdated drivers for windows components may result in such errors.
- Third-Party apps with buggy codes, unsupported functions, unsupported drivers can cause a 0x8000400000000002 error to arrive on Windows 10.
We will see all possible ways to fix such errors and get rid of BSOD. There are several easy fixes that you can perform and solve this error by yourself. We will see the easiest and less time-consuming errors available to fix this issue causing you the errors.
Method 1 – Update the drivers to fix 0x8000400000000002
The quick fix is to update all drivers on windows 10. You can find the specific drivers for your laptop/computer on the manufacturer’s website. Else you can also update drivers online using the “Driver Pack Solution” online drivers update tool.
You may also try to uninstall a particular driver and then re-install it to repair them.
- Open the Windows Device Manager from the Right-Click menu on Start.
- Expand Display Drivers menu.
- Right-click on the display device and click on the “Uninstall Device” option.

- Windows will uninstall the drivers and then begin re-installing the fresh driver.
- Once the driver gets installed successfully, the driver will be repaired.

Close the device manager and restart your PC. You are good to go now; the error 0x8000400000000002 is fixed now. If you are still facing this error and getting a blue screen, then you must read the other methods to fix it, which are explained below.
Must Read – How to extend C Drive in Windows 10 without formatting?
Method 2 – How to fix error 0x8000400000000002 by changing Power Options
- Open the Start menu, and in the search box, type the power options.
- Click on the first result, “Power & sleeping Settings“.
- Click on the “Additional Settings” option in the power options window under related settings.
- In front of the selected power plan, click on the “Change Plan settings” option.

- Click on the “Change advanced plan settings” option on the plan settings window.

- A new window with different settings appears on the screen. Here, under Hard Disk, open Turn off hard disk after and then enter 0 in both On battery and Plugged In option.

- Click Apply to apply the changes, and click on the OK button to close the window.


Re-start your PC and the error 0x8000400000000002 is fixed.
Must Read – How to adjust brightness on an external monitor in windows 10
Method 3 – Turn off Fast startup to fix error 0x8000400000000002
- Open the Start menu, and in the search box, type the power options.
- Click on the first result, “Power & sleeping Settings“.
- Click on the “Additional Settings” option in the power options window under related settings.
- From the left menu, click on “Choose what power buttons do.“
- Then click on “change settings that are currently unavailable“.

- Locate “Turn on fast startup(recommended)” and uncheck the option.
- Click on the “Save Changes” button and close the window.

You can now close all the windows, safely save all the documents and restart your PC to see if the error BSOD 0x8000400000000002 is fixed. If the issue is still haunting you, you can head to the next solution.
Method 4 – Restore Previous Settings using the Restore Point feature to fix error 0x8000400000000002
Windows created a restore point while installing new programs and software. If something happens due to such installation, you can easily restore your system to previous best-known working conditions.
If you are facing error 0x8000400000000002 just after installing some program, you can restore the system to get rid of this issue.
- Click on the start button in the search box type restore.
- Then select the “Windows system restore” option from the menu.
- Under “Advanced Startup” options, click on Restart Now button.
- Now, your PC will restart in advance boot options.
- From the startup boot menu, select the “System Restore” option.
- Wait for the process to complete.
After the system boots into windows 10, you can now see the error 0x8000400000000002 is now fixed.
Also Read – [3 Easy Methods] How to Disable USB Port in Windows 10?
Method 5 – Uninstall recent windows updates
- Click on Start and open settings.
- From settings, open Windows Update & Security option.
- Then select “View Update History.“
- From the new page, click on “Uninstall Updates“.

- Now, right-click on the recently installed update and select Uninstall option.
- Do uninstall all recent updates one by one and then restart your PC.

Method 6 – Update BIOS to fix Error 0x8000400000000002
Sometimes, the BIOS version may become outdated that is causing the error 0x8000400000000002. You can update the BIOS from your computer’s manufacturer’s website.
Head over to the manufacturer’s website and search for your motherboard version/model number. Download the update file and open it to install it. Do not forcefully restart the PC or turn it off during the BIOS update process.
Some computer manufacturers provide CDs with the package or email the drivers when you call customer care. You can request them the latest BIOS drivers and then install them.
Summary –
You can easily fix error 0x8000400000000002 without losing data. We have seen six different methods to fix this BSOD error. In case you have any doubts/queries regarding the information provided about how to fix error 0x8000400000000002, please write to us in the comment section below.
This website uses cookies to ensure you get the best experience on our website
What will you do if you meet the kernel power 41 error on a Windows computer? If you don’t know, then this post from MiniTool is what you need. You can find 6 useful and efficient methods to solve the problem here.
Introduction to the Kernel Power 41 Error
If your PC is shut down unexpectedly such as out of power or your PC reboots unexpectedly, then you may encounter the kernel power event ID 41. The kernel power critical error is a vital error that you should never ignore because it will trigger Windows instability.
When you meet the kernel power 41 error, you will see an error message stating that “The system has rebooted without cleanly shutting down first. This error could be caused if the system stopped responding, crashed, or lost power unexpectedly.”
And the kernel power 41 error is often caused by an underpowered or failing power supply, but there are some other reasons such as an outdated driver. Sometimes the kernel power 41 error often causes a BSOD followed by the 0x8000400000000002 error code.
How to Fix the Kernel Power 41 Error?
After getting some basic information about the kernel power 41 error, then this part will show you how to fix the kernel power 41 error.
Method 1: Change Power Options
The top of the lists is to change Power Options to fix the kernel-power event ID 41 Windows 10 error. Power Options is responsible for managing how your computer uses power, but some of the settings could trigger the kernel power 41 error.
Then changing Power Options could help you to get rid of the kernel power 41 error. Here is the tutorial:
Step 1: Type control panel in the Search bar and then click Control Panel.
Note: If you find that the Search bar is missing on Windows 10, then you can read this post to retrieve it – Windows 10 Search Bar Missing? Here Are 6 Solutions.
Step 2: Set View by: Large icons and then click Power Options.
Step 3: Click Change plan settings next to your current plan and then click Change advanced power settings.
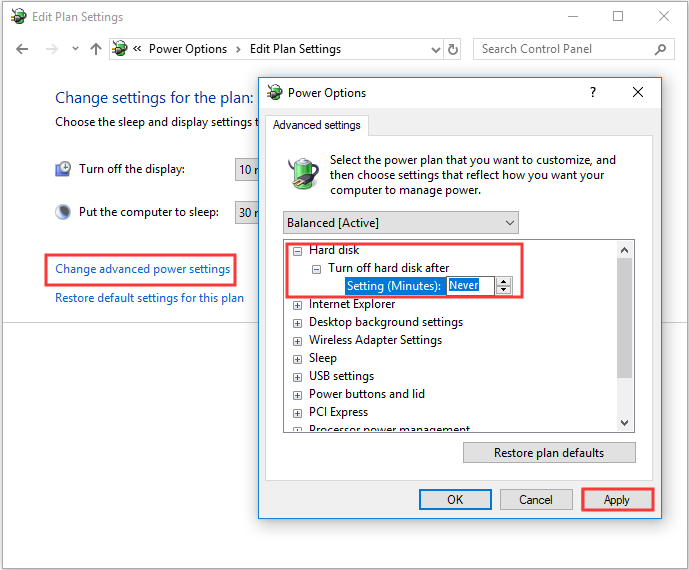
Step 4: Expand Hard disk and then expand Turn off hard disk after. Then set it to Never or input 0 as a value. Click Apply to save changes.
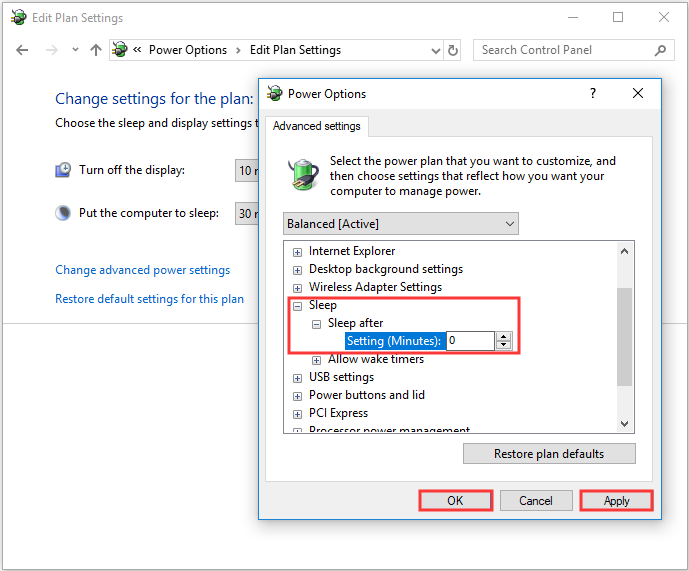
Step 5: Expand Sleep and then expand Sleep after. Then set it to Never or input 0 as a value. Click Apply and OK to exit Power Options.
Step 6: Reboot your computer to check if the kernel power event 41 error still appears.
Method 2: Update All Drivers
You can meet the event ID 41 kernel power when your driver is out of date. Device drivers are very important because they are used to inform your system and other software how to interact with some specific hardware.
In common cases, all drivers will be updated when you update Windows, but there is a possibility that some drivers were not updated. And if you haven’t updated your system for a long time, then your drivers could not be the up to date ones.
Therefore, updating all drivers on your computer could fix the error. Here is a quick guide on how to do that:
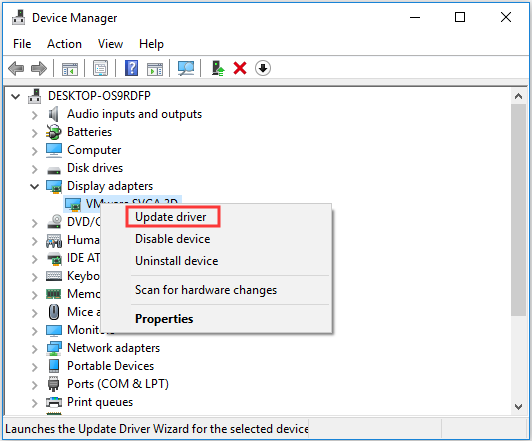
Step 1: Right-click the Start button to choose Device Manager.
Step 2: In Device Manager, you will see all the devices connected to your PC, then expand the device in question and then right-click the device to choose Update driver.
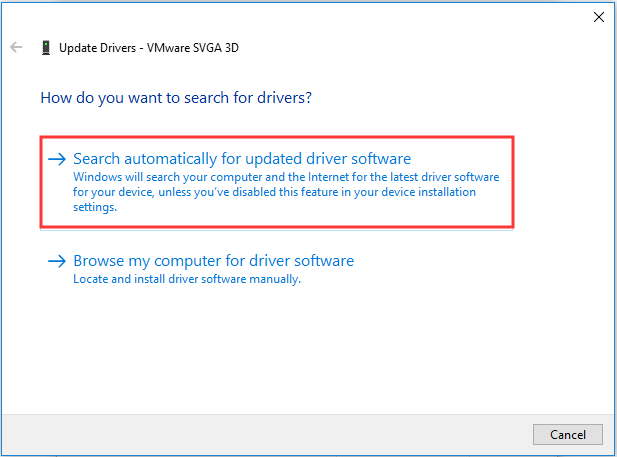
Step 3: There are two choices for you, but it is recommended to choose Search automatically for updated driver software. Then follow the prompts showing on the screen to finish updating your driver.
Step 4: After updating all your drivers, then restart your computer to see if the kernel power 41 Windows 10 error still exists.
Further Reading
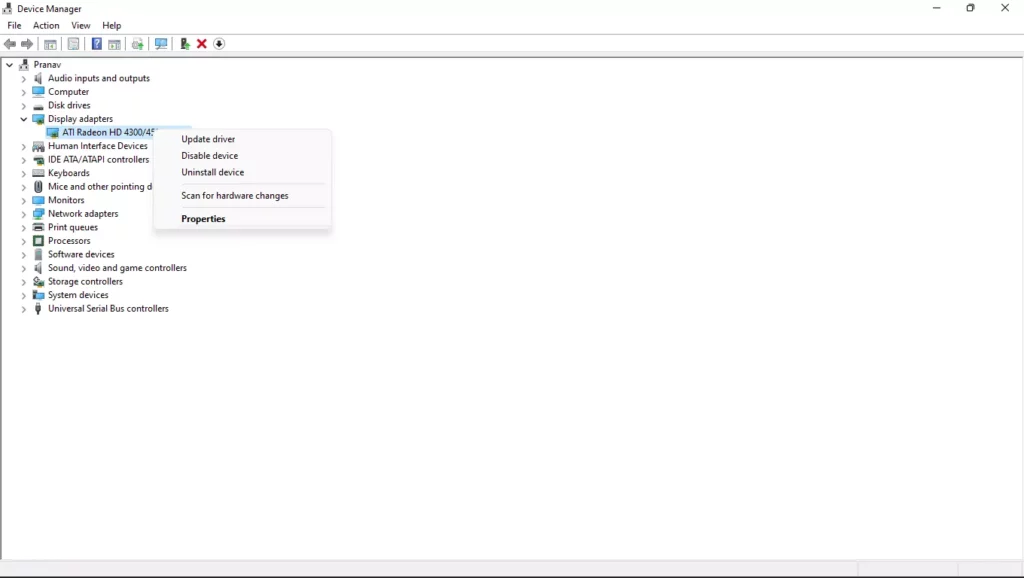
If updating your drivers cannot fix the problem, then you should expand the Sound, video and game controllers section in the Device Manager to check if there are duplicate audio drivers. If there are, then you should right-click one of them to choose Disable device.
And if there is only one audio device, then you can also try to disable it to fix the event ID 41 error.
Method 3: Turn Off Fast Startup
Fast startup is a feature on Windows 10/8, which offers you a faster boot time when you boot your computer. However, the culprit of the kernel power 41 error could be the Fast startup feature. This is because when the feature is enabled, you may think your computer is completely shut down while actually not.
In order to fix the kernel power 41 error, you should disable the Fast startup feature. Here is the tutorial:
Step 1: Open Power Options and then click Choose what the power button does in the left panel.
Step 2: Click Change settings that are currently unavailable. Scroll down to the Shutdown settings section and then uncheck Turn on fast startup (recommended). Click Save changes.
After you have turned off Fast startup, then the error should be fixed. But you should know that it may take a little longer time to boot your computer.
Method 4: Check Your Hardware
Sometimes, your hardware could trigger the kernel power 41 error. Thus, you should check your hardware when you meet a random restart on Windows 10. There are several things you need to check:
- Check if your hardware is overheating or overlocking.
- Check if there is any dust on the RAM.
- Check if the RAM and wires are connected correctly.
- Check if the power connectors are connected for both GPU and motherboard correctly.
Warning: You should never check your hardware if your computer is turned on or connected to a power source.
If you have found any problems with your hardware, then solve them. After you have made sure that all your hardware is in the normal state, then restart your computer to see whether the kernel power 41 error still persists.
Method 5: Disable Automatically Restart in the Advanced System Settings
Only when you are absolutely sure that there is nothing wrong with your hardware, this method may help you fix the kernel power 41 error. You can try to disable the error-inflicted Automatically restart feature to fix the random shutdowns that occur with the same error.
By disabling Automatically restart in the advanced system, you can at least avoid random restarts. Here is a quick guide on how to do it:
Step 1: Type Advanced settings in the Search bar and then click View advanced system settings.
Step 2: In the System Properties window, go to the Advanced tab.
Step 3: Click Settings… under the Startup and Recovery section.
Step 4: Uncheck the Automatically restart box and click OK to confirm changes.
Step 5: Restart your computer to check if the event ID 41 error is gone.
Method 6: Update BIOS
If none of the methods can fix the kernel power 41 error, then you should update your BIOS. BIOS is responsible for waking up all your computer’s hardware components. And you should know that it is very complicated to update your BIOS.
If the process isn’t performed correctly, it may cause permanent damage to your computer, so you’d better check your motherboard manual to update your BIOS.
And if you are worried about causing damage to your computer, then it is recommended to find an expert to do that.
Click to tweet
Top Recommended – Back up Your System
According to the error message, you should know that when the system crashes or stops responding, then the kernel power 41 error may appear. And as you know, a system crash could cause data loss and is very annoying.
Note: You can get some instructions to recover your data when your system crashes by reading this post – [SOLVED] How To Recover Data After Hard Drive Crash On Windows.
Therefore, in order to protect your computer and avoid data loss, you should back up your system regularly when your computer is in the normal state. Then you can try to use the system image to restore your system rather than reinstalling your system.
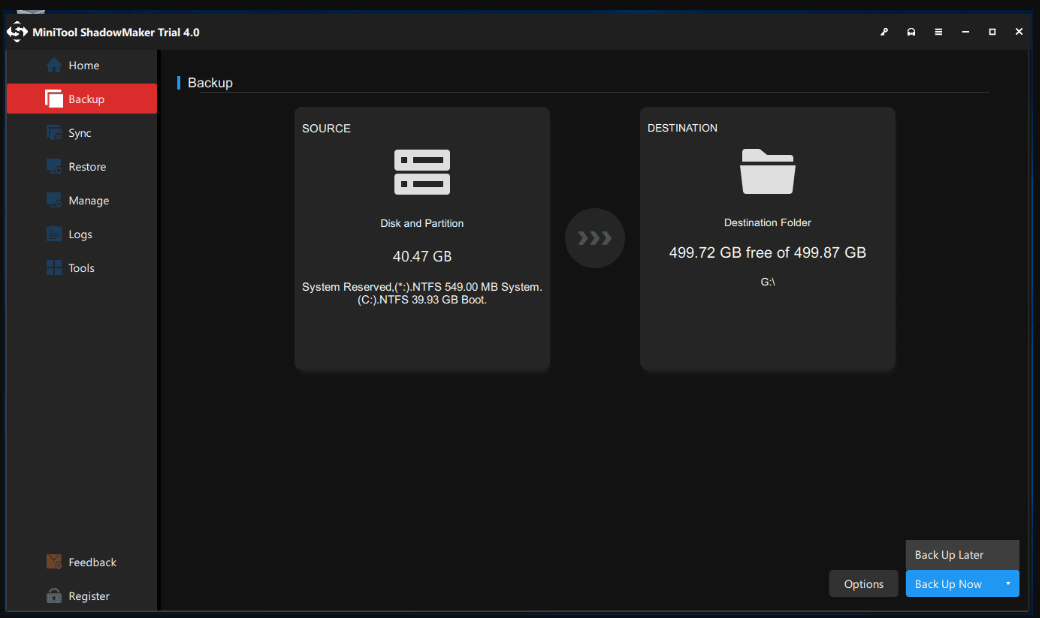
But which one is the suitable and safety backup software? Referring to this, it is highly recommended to use MiniTool ShadowMaker – a piece of powerful and professional backup and restore software. You just need to click several buttons, then you can back up your system successfully.
But except backing up your system, you can also use MiniTool ShadowMaker to back up files and folders, disks and partitions. And there are four different backup locations that you can choose: Administrative, Libraries, Shared and Computer.
There are two other useful and efficient features that you can use: Sync and Clone Disk. The Sync feature allows you to sync files and folders to other locations and the Disk Clone feature allows you to clone OS from HDD to SSD.
And there is one thing that you should never say no to try using MiniTool ShadowMaker: you can use it for free within 30 days.
MiniTool ShadowMaker TrialClick to Download100%Clean & Safe
Follow the instructions below to create a system image using MiniTool ShadowMaker:
Step 1: Download and launch MiniTool ShadowMaker, then click Keep Trial.
Step 2: Go to the Backup page. MiniTool ShadowMaker backs up the operating system and chooses the destination by default. So just click Back Up Now to begin the backup.
Tips:
Tip: If you click Back Up Later, then you need to click Back Up Now to start the backup task on the Manage page.
Step 3: Wait for MiniTool ShadowMaker to complete the backup.
Note: When the system crashes, you cannot boot your computer and perform any recovery solutions, so you’d better create bootable media in advance to boot your computer.
Bottom Line
In conclusion, this post has offered you 6 useful methods to fix the kernel power 41 error and also lists some causes of the error. So if you meet the error, don’t hesitate to try the methods mentioned above.
Besides, backing up your system in advance can not only protect your data but also allows you to restore your system easily and quickly.
If you have any confusion about the methods mentioned above or have any other good solutions, leave a comment below or send an email to [email protected].
Kernel Power 41 FAQ
What does event 41 kernel power mean?
The event 41 kernel power means that there is something happened unexpectedly that blocked Windows from turning off properly and there is a message saying that “The system has rebooted without cleanly shutting down first. This error could be caused if the system stopped responding, crashed, or lost power unexpectedly.”
How do I fix kernel power 41 63?
There are 6 useful methods you can use to fix kernel power 41 63, all of them are shown below:
- Change Power Options.
- Update all drivers.
- Turn off Fast Startup.
- Check your hardware.
- Disable Automatically restart in Advanced System settings.
- Update your BIOS.
What is kernel power manager?
The orderly change in power status for all Windows computers that support power state changes is managed by the kernel power manager. For instance, your Windows PC can go into a sleep or hibernation mode without losing data but consuming less power.
If you’re a windows operator then once in your life maybe you’ve encountered the Blue Screen of Death (BSOD) issue on your windows and one of the most common BSOD errors is the 0x8000400000000002 error.
If you’re also the one who is facing the same problem while trying to operate your windows and don’t know how to fix it then you’re at the right stop. Here in this article, we will be going to tell you how to fix the 0x8000400000000002 error on your windows through some easy and simple ways so we recommend you to keep reading the full article properly.
But before moving to the main topic and discussing the fixes to fix it let’s first discuss why this error is occurring on your Windows PC/laptop. In short, we can say that this error is somewhat related to kernel 41 critical error on Windows 10. Below we stated some main causes why this error issue is showing up on your windows screen.
Table of Contents
There can be several reasons why this error is showing up on your screen also this error is related to the Kernel 41 critical error on windows 10. Below are some of the common causes behind the occurrence of the error:
- Outdated windows drivers.
- Corrupted hardware drivers.
- Downloading of third-party apps with viruses, buggy codes, unsupported functions, and unsupported drivers.
How to fix 0x8000400000000002 error?
It is quite normal for windows users to see such blue screens of death errors in their daily lives but the problem is the solution. Like how can you solve it well you can see the fixes we stated below to fix the 0x8000400000000002 error easily on your Windows.
Fix #1. Update the drivers
One of the easiest and most effective ways to fix this error is by updating your windows drivers and to do so follow the steps below:
- First right click on the windows start option and select the option Windows Device Manager or Device Manager.
- Go to the option Display Drivers.
- Right-click on the option beyond the Display Drivers and select the option “Uninstall Device”.
- After this windows will automatically uninstall the driver and start reinstalling them on your PC.
- Now after installing the new drivers your problem will most probably be solved and if not then move to the next solution.
Fix #2. Disable the Fast Startup feature
Another way to fix the 0x8000400000000002 Error is by disabling the Fast Startup option just follow the steps below to do so:
- Go to the start menu and search “Power Options”.
- Select the option “Power & sleeping Settings“.
- Click on the additional settings under the related settings option.
- Now from the left side menu select the option “Choose what power buttons do.“
- Then click on “change settings that are currently unavailable“.
- Look for the “Turn on fast startup(recommended)” option and uncheck the checkbox next to it.
- At last click on the save changes and close the window.
Try restarting your PC and see if the problem is solved or not. And if not then move to the next solutions below.
Fix #3. Uninstall Recent Windows Updates to fix 0x8000400000000002 Error
Another effective way to solve your problem is by uninstalling the most recent windows update and if you don’t know how to do it then follow the steps below:
- Go to the start menu.
- Open settings from the start menu.
- From settings go to the Windows Update & Security option.
- Select the option View Update History.
- From the new window select the option Uninstall Updates.
- Right-click on the latest windows update and select the option “Uninstall“.
- Uninstall all the latest and recent windows updates and then restart your PC and check if it works or not.
Fix #4. Restore your PC’s old settings
You can try restoring the old settings of your PC and see if the problem is solved or not. To restore the old settings follow the steps below:
- Go to the start menu and search “Restore.”
- Select the option “Windows system restore” from the menu.
- Click on the option Restart now placed under the “Advanced Startup” option.
- After that, your PC will restart in advance boot options.
- From the boot menu select the option “System Restore”.
- Wait until the process is completed.
After restoring your PC’s old setting you will now notice that your 0x8000400000000002 Error is solved.
Fix #5. Update your PC’s BIOS
The last way to fix your problem is to update the BIOS of your PC. An outdated BIOS version may affect your PC performance and many times causes such error messages on your PC so it is best to keep your BIOS updated from time to time.
You can update your BIOS easily just by visiting your Manufacturer’s website from the website search for your Motherboard’s serial and model number download the update file and run it. Try avoiding the forceful restart or turning off your BIOS update midway.
Conclusion
Windows PC is one of the most used and famous operating systems in the world and with its latest updates, many errors and bugs enter our PC daily. 0x8000400000000002 Error is one of those errors which many windows users face every day. To solve it you can simply follow the step-by-step guide we have given above and if you still can’t able to fix your problem we recommend you try contacting us feel free to ask anything about your issue through our contact us page.
Also Read: What does it mean when it says Instagram User on Instagram?