
Making your own icons doesn’t necessarily require advanced designing skills or graphic designing software, as you can take the help of the BEST icon editor software for Windows PC/Laptop.
Icons are versatile & visually appealing elements that can be used for a variety of stuff. Ranging from brand logos, infographics, presentations, designing prototypes for websites, and other visual communication means, Icons are used everywhere. The good part is,
These icon-editing programs are highly utilized by freelancers, marketers, entrepreneurs, and others to create custom icons and illustrations and use them as Windows icons, branding, and for work-related projects.
Based on user’s needs and preferences, we’ve listed out the Best Free Icon Editor Software for Windows with their features set, that are currently ruling the market. Go through them and do not forget to share your favorite one(s) with us in the comments section below!
- Iconion icon editor
- IcoFX
- Junior Icon Editor
- IconDeveloper By Stardock
- SimplyIcon
- ZamZar
- reaConverter
- Pixillion Image Converter
- WebPConv
- Chasys Draw IES
7 Best Icon Editors for Windows 11, 10, 8, 7 PC
Read the following to see what features these free icon editing tools have to offer:
1. Iconion Icon Generator
Iconion Icon Editor is one of the most popular and highly utilized software that can help you craft professional-looking icons without any hassles. The application comes loaded with easy-to-understand tutorials that help users to learn the step-by-step process of making icons.
Using this best icon editor software, you can easily create and edit flat icons, long-shadow icons, iOS icons, custom social media icons, and more.
Highlights: Iconion
- It supports infinite scalability.
- Highly-customizable tool to easily change icon color, size, border, gradient etc.
- Provides tons of icon templates & font options to craft beautiful styles.
- Easy-to-navigate interface for making fantastic icons in a couple of clicks.
- Ability to convert selected vector graphics into BMP, JPG, PNG file formats.
Download Iconion!
2. IcoFX

Next on our list of Best Free Icon Editors is the award-winning IcoFX. The application is a one-stop solution, designed for crafting, extracting and editing icons in a few clicks. IcoFX is equipped with more than 40 effects that allow users to create visually appealing designs in no time.
Using the icon editing program, you can even convert your favorite photos into icons or vice-versa. The tool is highly utilized if you want to create a favicon for your website or blog.
Highlights: IcoFX
- Advanced image editor with a multitude of brushes, effects, blending modes & more.
- Supports popular file formats like BMP, PNG, JPG, SVG, TIF, GIF & more.
- Supports crafting static and animated cursors also.
- Possess batch processing capability to create, convert, extract, and export icons.
- Ability to convert your Macintosh icons to Windows icons and vice versa.
Download IcoFX!
3. Junior Icon Editor
Next on our list of Best Free Icon Editor Software for Windows (2022) is Junior Icon Editor. The tool offers an extensive range of free icons that you can use to customize and craft a new one.
With Junior Icon Editor, you can take advantage of tons of editing options like image checker, skew, merge, resize, adjust text and more. Similar to Iconion, it even offers a simple and elegant user interface that makes designing & customizing icons a hassle-free process.
Highlights: Junior Icon Editor
- Provides you the opportunity to make & edit icons in color depths up to 16 million.
- Transform your favorite pics to icons using tools like pen, airbrush, curve tools, etc.
- Support for transparency effects comes with this icon editor software.
- Supports older OS versions like Windows XP, Vista, 7, 8.
- You certainly don’t need any design skills to craft & customize icons.
Download Junior Icon Editor!
4. IconDeveloper By Stardock
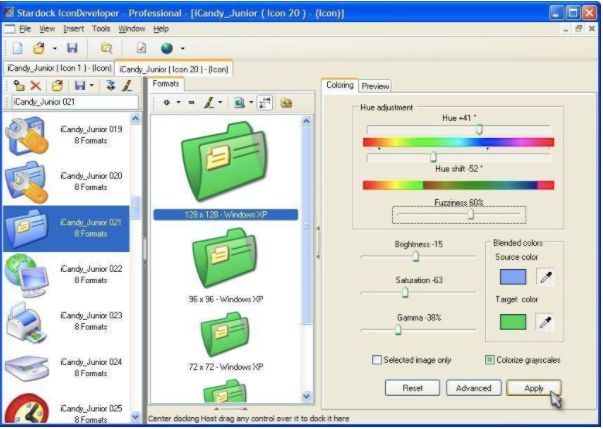
The application is specifically designed for creating, editing, converting and customizing icons for your Windows desktop. The icon editor software provides seamless support for all Windows icon formats and you can just get started with the tool without any hiccups.
Using the software, you can easily turn existing pictures into Windows icons & modify them by resizing, adjusting colors and more.
Highlights: IconDeveloper By Stardock
- The icon editor software works extremely fast and is easy to use.
- Ability to create your own Windows icons from scratch.
- Easily convert your favorite pictures into an icon.
- Export option to convert any icon back to PNG or BMP.
- Highly compatible with Windows 10, 8.1, and 7 OS versions.
Download IconDeveloper!
5. SimplyIcon
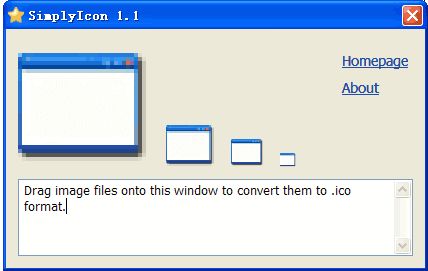
Our list of Best Free Icon Editor Software is certainly incomplete without mentioning SimplyIcon, designed and developed by SmoothDraw. Just like Iconion, this program is also loaded with easy-to-understand tutorials that make you learn how to make Illustrator icons for your personal and professional needs.
With SimplyIcon, you have the opportunity to change the shape, size and transparency of icons. Additionally, you can even choose between different file formats if you are going to create some text or graphics with it.
Highlights: SimplyIcon
- Comes with an extensive library of 400+ icons to choose from.
- Supports drag & drop functionality to ease the process of designing icons.
- Allows you to craft icons in various sizes according to your needs.
- Easy-to-use interface, suitable for both novice & pro users.
Download SimplyIcon!
6. Inkscape
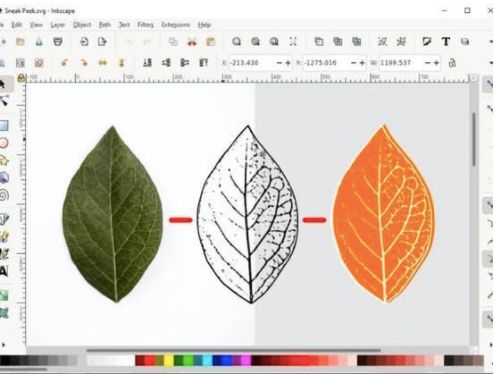
Talking about the best free icon editor software and not mentioning Inkscape is certainly not possible. The application is a complete package of flexible drawing tools, powerful text tools, shape tools, clone tools, calligraphy tools and more.
Additionally, it is compatible with a wide range of file formats, so that you can save, share and use icons anywhere you like. Choose Inkscape, if you are looking forward to creating professional-looking icons in a couple of clicks.
Highlights: Inkscape
- Powerful multi-line and writing tools.
- Tons of fonts to customize and enhance your icon creation process.
- Huge selection of colours and tools to add a gradient, stroke, and other effects.
- Allows you to adjust kerning, letter, and line spacing.
- Loaded with tutorials to help you learn the step-by-step process of creating icons.
Download Inkscape!
7. Krita

Krita is one of the best free icon editors, packed with a comprehensive set of editing tools to produce professional-looking results. Be it a novice or advanced user, you can easily use the tool, as it provides step-by-step instructions for all the operations.
Besides crafting gorgeous icons, Krita allows you to customize the icons with brush, shape, and filter engine so that you can get results according to your needs and preferences. Just like premium editing software, Krita also offers layer management, PSD support, HDR painting, and more.
Highlights: Krita
- Clean and straightforward interface, making it suitable for both novice & pro users.
- Supports simple and powerful 2D Animation as well.
- Built-in vector tools to create comic panels as well.
- Offers over 100 professionally made brushes.
- Supports dark and light color themes.
Download Krita!
8. IconsFlow

Last but not least in consideration, our Best Free Icon Editor Software had to include IconsFlow. The program provides seamless support for popular file formats like SVG, ICO, PNG, and more. It provides several tools to create custom icons in a few clicks that can be used in websites, applications, presentations, and more.
You can find all the essential tools for customizing icons using color changers, adding gradient effects, managing size, and more.
Highlights: IconsFlow
- Adds new icons & trendy styles every week, so that you never run out of ideas.
- Pick a background play with different styles to create spectacular icons.
- Ability to create hundreds of multiple icons in a few moments.
- Manage inner or deep shadows to create classy icons and logos.
- Equipped with plenty of categories with different elements to create & edit icons.
Download IconsFlow!
These were the most popular and effective Icon Editor Software for Windows and other OS versions. Try them and let us know which one worked for you the best!
Conclusion
The best icon editor software offers versatile tools for creating and customizing icons with precision and creativity. Whether for designing app icons, website favicons, or desktop shortcuts, these programs provide intuitive interfaces and robust features like layering, effects, and export options. Choosing the right icon editor depends on specific needs, such as simplicity for beginners or advanced capabilities for professional designers, ensuring high-quality and visually appealing icons tailored to diverse applications.
FAQs On Best Icon Editor Software
Q1. What is the best program to create icons?
Iconion Icon Generator is one of the most popular and highly utilized software that can help you craft professional-looking icons without any hassles. The application comes loaded with easy-to-understand tutorials that help users learn the step-by-step process of making icons.
Q2. How can I edit an icon?
You can use any of the best free icon editor software mentioned above and upload the existing image or icon you wish to edit. Use the tools to customize it and you are done!
Q3. Where can I create free icons?
Take the help of Best Free Icon Editors like Iconion, SimplyIcon, Junior Icon Editor or IcoFX to create free icons in a couple of minutes. All these tools offer templates and tools to make icons from scratch.
Q4. How do I create an icon?
Well, using Adobe Illustrator you an easily create a custom icon on Windows 10:
- Install Adobe Illustrator.
- Navigate to the File tab and choose the New option.
- Set the Pixels & Width/height according to your needs and hit the Create button.
- Start crafting the icon using the available tools.
- Once you are satisfied, click on the File tab and hit the Export button.
- Set the file format and save the file!
Also Read
- Context Menu Editors For Windows
- CPU/GPU Overclocking Software
- NES Emulator for Windows PC
- MIDI Editor Software for Windows
- Best Free DVD Burning Software for Windows PC
- Xbox 360 Emulators for PC
- Dreamcast Emulators for Windows PC
In this post, we will show you how to create an icon in Windows using Microsoft Paint 3D, or any of the free icon maker software or online tools. You can even convert a picture into an icon. Create as many icons as you want. When the icons are ready, you can change icons for desktop shortcuts, folders, etc.
What is an ICO file?
The ICO file format is used in Windows OS for an image that can be used for icons. They contain small images of different standard sizes and color depths.
Creating and saving icons has always been a tough job for amateurs. But it is no longer difficult to create, edit, and save icons. Remember icons do not act like normal images, they are embedded in special formats that are recognized by Windows or other systems. Standard icon sizes are 16×16, 32×32, and 48×48.
While some options help you create an icon from scratch, other options covered in this post can convert an image to an icon directly. The icon maker software and services covered are:
- Paint 3D.
- ICO Convert.
- X-Icon Editor.
- Junior Icon Editor.
- Quick Any2Ico.
Let’s check how to make an icon for Windows 10 using them.
1] Paint 3D
Paint 3D is a built-in application and one of the best options to create icons for Windows 10. The best part that I like is it lets you add 3D shapes to create an icon. You can use its 3D Library to find and insert 3D shapes and create a beautiful icon. Apart from that, it has 2D shapes, different brushes, cool stickers, a text tool, etc. Other than these features, it is also helpful to remove background image in Windows 10, save your drawing as GIF or video, convert 2D shapes to 3D objects, and more.

To create an icon using Paint 3D in Windows 10, launch it using the Start menu or search box. After that, create a new project using Menu. When the project is created, use the available tools visible on the top part of its interface. You can also insert an image (PNG, JPG, ICO, BMP, TIFF, etc.) from PC and use drawing tools to create your icon.
For each of the selected tool, there are multiple options visible on the right side. For example, if you have selected text tool, then you can use options like add text in 2D or 3D shape, change text font, text color, fill the background, make text italic, bold, underline, etc. In a similar way, if you have selected the Brushes tool, then you can use Marker, Calligraphy pen, Crayon, Pixel pen, Spray can, etc. Thickness and color for the selected option can also be set using the sidebar.

Just select a tool and options for the selected tool are visible on the right sidebar. Show your creativity and enhance your icon.
When the final icon is ready, use Save as option under Menu, and then select Image option. Now, set the custom width and height for the output icon. You can also select the output format- PNG, GIF, TIFF, JPG, or BMP.
This is the last step. Press the Save button and save your icon to any folder on your PC.
Read: Extract Icons from DLL, EXE Files using Icons From File
2] ICO Convert

ICO Convert is handy when you already have some image in PNG, BMP, or JPG format that you want to convert into an icon file. However, it is not just an icon converter service. There are some interesting features like crop image, use different shapes (or styles), and size to get the icon. All such features make it a good icon maker service.
This icoconvert.com link will open its homepage. Upload a supported format image (up to 50 MB). When the image is uploaded, crop the image to a selected area or use the entire image. After that, select the available styles. There are 10+ styles such as heart shape, square, round, etc. Select styles or simply ignore them.
Now you need to select the output format- PNG or ICO. Also, there is a Custom Sizes option to select any of the given sizes for the icon file. It has 192*192, 16*16, 64*64, 128*128, and other sizes. Select a size.
Finally, use the Convert ICO button. You will get the zip file that you can download to save icons available in different styles.
3] X-Icon Editor
X-Icon Editor service provides three ways to make an icon. You can import an existing image and convert image to icon, create an icon from scratch, and create an icon along with the uploaded image and icon maker tools. It provides text, pencil, brush, eyedropper, line, rectangle, circle, and eraser tools. You can create an icon in four sizes- 32*32, 24*24, 16*16, and 64*64. After that, you can save icons in ICO format one by one.
To create an icon using this service, open its homepage. After that, import an image or start making your icon using the available tools. You can also change the icon backgrounds using any of the four available backgrounds. The icon preview is visible on the center part of its interface to help you see if the output is coming good. When you’ve done everything, use the Export button to download your icon.
4] Junior Icon Editor
Junior Icon Editor software has some interesting features that make it a good icon maker software. You can open different tabs to create separate icons on a single interface. It also lets you add an existing image and edit it to create icon or make an icon from the beginning. It has a color picker, eraser, filled rounded rectangle, ellipse, rectangle, airbrush, pencil, text, curved line, and other tools to create the icon. You can also choose any of your favorite colors for making the icon.
To create an icon, download this software. After installation, open its interface and use File menu to open a new icon file or insert an image. It supports ICO, PNG, XPM, BMP, and PNG format images.
When the new file is created, use Tools menu on the left sidebar to start making your icon. The right-hand side menu helps to pick colors, set background opacity, foreground opacity, and preview the icon. Show your creativity and make a beautiful icon. To save the final output, use Save as option in the File menu.
5] Quick Any2Ico

Quick Any2Ico is another good icon maker software. You can add a JPG, PNG, or BMP image and convert it to icon file in ICO or PNG format. Apart from this, it has two unique features that make it a bit special. It lets you extract icon from an opened application and binary files (DLL, EXE, etc.). Also, if the source image is not squared for output, it lets you set the image to crop, stretch, or center mode so that you will have a better icon file.
This is a portable software so you won’t need to install it. Just execute its EXE and its interface will open. There, you will have three options- add an image file to convert it to an icon, add a binary file, or extract the icon from an application window. Use any option to add the input image.
When image is fetched from the source, select the output folder. By default, it will generate an icon in ICO format. If you want, you can change it to PNG format by selecting Save as PNG instead of ICO option. After that, select the icon size. 512*512, 16*16, 256*256, 24*24, 64*64, and other sizes are available.
This is the last step. Press Extract it! button and it will save icon in the folder set by you.
Here I close this list that shows how to make an icon for Windows. The best and quickest way is to convert an image to an icon. If you want to make an icon from the beginning, then Microsoft Paint 3D is probably the best option.
What is the best free icon maker?
There are tons of free icon-maker apps available for Windows computers. However, you can take a look at the Junior Icon Editor. It is one of the best and free icon makers that is compatible with Windows 11, Windows 10, and some other older versions. Whether you want to edit an icon or create one, you can do that with the help of this app.
Which software is best for making icons?
As said earlier, there are tons of free apps available in the market for making icons. However, you need to use more than one to find the most suitable one. You can start testing by using the Paint 3D app.
Readers help support Windows Report. We may get a commission if you buy through our links.
Read our disclosure page to find out how can you help Windows Report sustain the editorial team. Read more
Adding new shortcut icons to the desktop is a great way to customize Windows. You can download myriad icon packs from various websites.
However, some prefer to design their own icons for Windows with third-party software. You can make use of infinite icon styles and templates from professional tools included in the list.
Although you can utilize some image editors to set up your own icons, there are also specialized icon creators for Windows 10.
We encourage you to test and compare a few tools and then choose the ideal one that meets all your design needs.
These are the best programs to design icons with on your Windows 10 computer.
What are the best icon maker software for PC?
Adobe Illustrator – Variety of icon designs
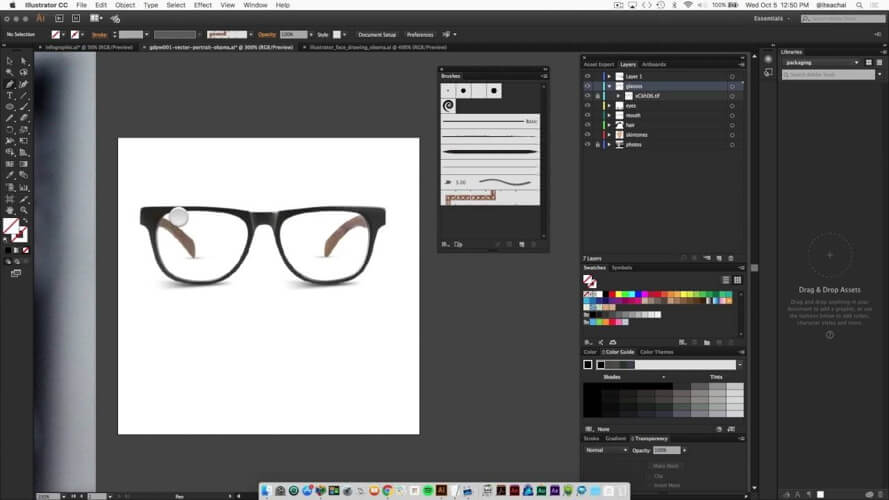
Adobe Illustrator is the go-to icon maker software for PC when planning to design your own Windows desktop icons easily and intuitively.
With Adobe Illustrator, you may start with a simple graphic and turn it into a memorable icon for your digital business or holiday projects.
The best thing about this icon maker tool is that it comes as vector-based design software.
This means that you can bring your designs into reality as it easily scales down for mobile screens and lets you go as far as billboard sizes.
The icons finally look crisp and beautiful, yet various effects, styles, and individual characters may be further selected when you plan to give the finishing touches to your icons.
Despite all these countless different options you may choose from, Adobe Illustrator is still incredibly easy to use and has a very intuitive interface.
Therefore, this tool is designed for professionals and newbies alike who need all the bells and whistles to level up their game.
Don’t hesitate to be one of them. You just need to let your imagination run wild and trust your design skills.
Adobe Illustrator
Adobe Illustrator is an excellent publishing tool but you can use it for a world of purposes, including icon making.
Softorbits Icon Maker – PNG icon creator
When talking about creating icons or other UI elements that are smaller in size, few programs come close to Softorbits Icon Maker.
As far as the toolset goes, it has everything you may ever need in order to create a new icon, a new cursor, and generate an icon from pictures in batch.
In fact, If you want to create multiple icons that follow the same style, you can make great use of the program’s bulk mode.
Additionally, Softorbits Icon Maker oversimplifies the icon creation process by introducing a tool that efficiently transforms pictures into icons by simply reducing their size.
The icons that you create will seem all the more original thanks to the variety of editing tools that you can use.
They include blurring, brightness, contrast, adding perspective, sharpening, adjusting colors, transparency, and much more.
However, the best part about this tool is not what it offers, but how it offers it. The UI is incredibly intuitive, and you don’t need experience with similar programs in order to get around it.
Softorbits Icon Maker
Design the most creative icons for your projects with this useful tool.
IcoFX – Import & export options

IcoFX is among the best all-in-one icon maker software for Windows platforms from XP to 10. This is an icon maker package that includes many of the tools and options you would expect to find in full image editors.
The software enables its users to extract and edit icons for both Windows and Macintosh OS X. IcoFX is not free but you can benefit from a 30-day trial of the software you can try out.
IcoFX has all the options you’ll probably need to design great icons from scratch.
It includes more than 30 tools to edit icons with, which include various brushes and pencil, selection, text, gradient, eraser, shape, and retouching options.
The software provides more than 40 effects, color correction tools, and layer-based editing for image processing.
IcoFX users can also apply icon customizations to Windows folders. In addition, you can convert various image formats directly to ICO files with resolutions up to 1024 x 1024 and extract icons with this software.
So this is a great program for designing icons, and you can also utilize it for more general photo editing.
IcoFX
Take advantage of this comprehensive icon creator and editing solution.
Junior Icon Editor – Free tool for Windows icons
Junior Icon Editor 4.37 enables users to create icons from scratch or existing images.
This might not have as many tools and options as IcoFX, but it’s a lightweight freeware alternative you can run on most Windows platforms.
Junior Icon Editor includes a brush, pen, airbrush, shape, line, flood fill, arc, text, color picker, and eraser drawing tools with which to set up new icons.
The software doesn’t come with much in the way of image-processing tools but does include options for flipping, rotating, zooming, and shifting images.
Junior Icon Editor enables you to set up 16 x 16, 32 x 32,, and 48 x 48 icons with a 32-bit color depth. You can also create icons for Windows Mobile, iOS, Linux, and Android platforms with this software.
⇒ Get Junior Icon Editor
Axialis IconWorkshop – A development industry standard

You can design and convert icons for the Windows, Android, iPhone OS, and Mac platforms with Axialis IconWorkshop.
This is also one of the few icon-maker programs with which developers can set up image strips for software toolbar icons.
Axialis IconWorkshop is compatible with 64-bit Windows 10, 8.1, 8, and 7 platforms.
Axialis IconWorkshop has an intuitive drag-and-drop UI design. The UI includes a Librarian file manager on the left, and a built-in folder browser at the bottom.
It also has the drawing and editing tools on the right of the software’s window and a multi-image UI that enables you to open and edit multiple icons within the same window.
For editing icons, Axialis IconWorkshop includes a range of brushes, pencils, color pickers, shapes, lines, flip and rotate, color fill, and text tools. This isn’t entirely a full-blown image editor, but it does include 13 effects.
It also provides color correction options for adjusting contrast, hue, saturation, etc.
Another good thing about Axialis IconWorkshop is its Adobe Photoshop and Illustrator compatibility.
Axialis IconWorkshop users can import PSD files directly from Photoshop and quickly transfer files between the applications with the IconWorkshop plug-ins.
This software also has 15 Photoshop templates that you can quickly set up icons with.
⇒ Get Axialis IconWorkshop
Greenfish Icon Editor Pro – Freeware image edits
Greenfish Icon Editor Pro is a highly rated open-source icon maker package for 32 and 64-bit Windows platforms.
You can utilize this software for designing 256 x 256 icons, editing animated cursors, extracting icons, and converting images to ICO formats. There’s also a portable version of the software for USB drives.
Greenfish Icon Editor Pro includes a drawing toolkit from which you can select pencil, line, shape, text editing, and advanced selection options.
There’s a Color Picker tool on the right of Icon Editor Pro’s window with which you can adjust colors. Greenfish Pro users can select a range of effects on the software’s Filters menu.
The software supports layer editing, and you can also select Create Windows icon from image and Create Mac icon from image options on its Icon menu.
So this program has most of the tools and options you’ll need for editing icons.
⇒ Get Greenfish Icon Editor Pro
Those are six noteworthy icon makers for Windows that include a wide selection of editing options and tools to design innovative shortcut icons and modify existing icon sets.
They are also graphics editors that you can utilize for designing custom cursors and other graphic content. Also, note that you can set up custom icons with web apps such as X-Icon Editor and Free Icon Maker.
Matthew Adams
Windows Hardware Expert
Matthew is a freelancer who has produced a variety of articles on various topics related to technology. His main focus is the Windows OS and all the things surrounding it.
He is passionate about the tech world, always staying up-to-date with the latest and greatest. With an analytical view, he likes problem-solving, focusing on errors and their causes.
In his free time, he likes to read and write about history and tries to always develop new skills.
Download Article
Make an icon with Paint or photo editing software
Download Article
- Using Microsoft Paint
- Using Photo Editing Software
- Applying the Icon to a Shortcut
- Video
- Expert Q&A
- Tips
- Warnings
|
|
|
|
|
|
Want to create simple desktop icons for your Microsoft Windows apps? You can start with an image and convert it to an icon in a program like GIMP, or draw one from scratch in an app like Paint. If you want a transparent background, you’ll want to use GIMP, or make sure you’re using the Windows 11 version of Microsoft Paint. We’ll show you two simple ways to make icons in Windows and explain how to apply them to shortcuts for any program on your PC.
Creating Icons for Your Windows Desktop
Open an image in MS Paint or GIMP, or draw your icon from scratch. Be sure to use a square image or canvas. Export the image as an .ico file, or save it as a .png and convert it to .ico online.
-

You can use Paint to create a simple Windows icon, save it as an image, and convert it to the ICO format with a third-party app or website. To open Paint, type paint into the Windows Search bar, then click Paint in the search results.
- If you want to convert an image to an icon, press Ctrl + O, select the image, and click Open.
-
If you’re going to draw your icon, this will help you keep your drawing aligned properly. Click the View tab at the top of the Paint window, then check the «Gridlines» box at the top.
Advertisement
-

Icon files should be square, so you’ll want to resize your canvas to ensure you’re working with a square image. Note that if you’re working with an existing picture that isn’t already a square, this may warp the image—you might want to crop it first.
-
Windows 10:
- Click the Home tab and select Resize.
- Check the «Pixels» box and uncheck the «Maintain aspect ratio» box.
- Type 256 into both the «Horizontal» and «Vertical» text boxes to create a 256×256 canvas and click OK.
-
Windows 11:
- On the «Image» area of the toolbar, click the Resize and Skew icon, which looks like a picture inside a dotted square with an arrow.
- Select the radio button next to «Pixels.»
- Click the link icon between «horizontal» and «vertical» to unlink the values.
- Type 256 into both the «Horizontal» and «Vertical» text boxes to create a 256×256 canvas and click OK.
-
Windows 10:
-
Since your canvas is relatively small, click the + icon in the bottom-right corner of the window until your canvas is large enough for you to work freely.
-
Once your canvas is the proper size and scale, you can begin drawing your icon in Paint.
- Design experts recommend making icons simple, vibrant, and easy to read. Remember your icon will be much smaller when it’s on your desktop, so try not to add too many tiny words or details.[1]
- You will most likely have to resize your brush. You can do this by clicking the list of horizontal lines at the top of the Home tab (Windows 10) or the Brushes menu (Windows 11) and selecting a thinner line.
- Drawing an icon with a mouse can be frustrating and inefficient, so use a drawing tablet if possible.
- Design experts recommend making icons simple, vibrant, and easy to read. Remember your icon will be much smaller when it’s on your desktop, so try not to add too many tiny words or details.[1]
-

If you drew an icon on a blank canvas and want to remove the canvas background, you can now do so in Paint for Windows 11.
- Click Layers at the top-right to display the layers in your icon.
- The layer at the bottom is your background, and it will usually be white.
- Click the background layer to hide the background. You’ll now see a gray checkerboard background behind the icon, indicating that you have a transparent background.
-

Save the image as a PNG file. To do this, click the File menu and select Save as > PNG Picture. Select a location where you’d like to save the file and click Save.
-
In a web browser, go to https://www.icoconverter.com, click Choose File, and then select the PNG file you just created. You can then select which icon sizes you want to create (16px, 32px, and 48px are selected by default) and the bit depth (32 bits is selected by default). Click Convert to create and download your new Windows icons.
Advertisement
-
You can use any image file to make the icon in photo editing software — this can be a preexisting image or one you draw yourself. This method will go over how to use GIMP to make the image into an icon, but these steps apply to any photo editing software with layers (including Photoshop).
- This method will go over the basic steps. For more details, see the full guide on how to create icons here.
- A square image has the same width and height lengths. If needed, you can make the image square later in the photo editing software.
- There are various places to find an image for your icon:
- Google search a description of the image you’re looking for and check the Images results.
- Browse stock image websites like Pexels or Shutterstock.
- Take a photo. You can turn anything into an icon. Here are some ideas to get you started: Your pet, houseplants, a painting, or your favorite brand of oat milk.
-
You can download GIMP from https://www.gimp.org.
- If you have Adobe Photoshop, you can use that app to create a Windows icon.
- We’ll focus our steps on GIMP, since it’s a free program, but the process will be similar in Photoshop.
-
Right-click the image layer in the Layers panel and select Add Alpha Channel. This layer of transparency will allow your icon to have a transparent background.
-
If you want to make the background transparent, leaving only the subject, follow these steps:
- Press Shift + Q to insert a Quick Mask.
- Use the Eraser tool to erase the mask over the parts you want to keep.
- Press Shift + Q to turn off the mask, leaving the parts you erased selected.
- Press Ctrl + I to invert the selection.
- Press Del to delete the selection, leaving only the subject.
-
The icon file needs to be square. Follow these steps to adjust the canvas size:
- Go to Image > Canvas Size.
- Click the chain icon to unlink width and height.
- Set the width and height to the same number.
- Use the Offset values to center the image.
- Click Resize.
- Right-click the layer.
- Select Layer to Image Size.
-
This will allow the icon to scale when it appears in different areas of Windows. Each icon size will be a newly added layer.
- Duplicate the layer 5 times by right-clicking the original layer and selecting Duplicate Layer. Repeat this until you have 4 copies plus the original layer, 5 total.
- Scale the original layer to 256 X 256 px by right-clicking it and selecting Scale Layer.
- Go to Image > Fit Canvas to Layers.
- Scale the 4 copies to:
- 128 X 128
- 48 X 48
- 32 X 32
- 16 X 16
-
Follow these steps to do so:
- Go to File > Export As.
- Change the extension to .ico.
- Save the icon to a location where you can find it again.
- Choose to compress the two biggest layers.
- You’re done! You can now apply the icon to a shortcut on your desktop.
Advertisement
-
Icons can be applied to any shortcut. Shortcuts, which are links to EXE files, are typically found on the desktop, though you can apply an icon to any shortcut.
- The one exception to the shortcut rule is the «This PC» app icon on the desktop. While you can create a shortcut for This PC and then edit its icon, the This PC icon on the desktop cannot be edited.
- If you don’t have a shortcut for a program, you can make one before proceeding.
-
It’s at the bottom of the drop-down menu.
- If you instead see Personalize at the bottom of the list, click the icon once and then right-click it again.
-
You’ll see this option at the bottom of the window.
- If you don’t see this option, first click the Shortcut tab at the top of the window.
-
-
It’s in the bottom-right corner of the window.
-
This is at the bottom of the window.
-
Doing so closes the open windows and applies your icon to the selected shortcut.
- To create a shortcut with your icon, left-click on the item you want to create a shortcut for, then right-click on that item and click «Create Shortcut.»[2]
- To create a shortcut with your icon, left-click on the item you want to create a shortcut for, then right-click on that item and click «Create Shortcut.»[2]
Advertisement
Add New Question
-
Question
How do I create a shortcut icon?
Yaffet Meshesha is a Computer Specialist and the Founder of Techy, a full-service computer pickup, repair, and delivery service. With over eight years of experience, Yaffet specializes in computer repairs and technical support. Techy has been featured on TechCrunch and Time.
Computer Specialist
Expert Answer
To create a shortcut to any program or file, left-click on that item, then right-click on it and click «Create Shortcut.» A shortcut of that file or program will be made in the same file path that can then be moved to anywhere on your computer.
-
Question
How can I switch back to the traditional Excel icon?
Do the same procedure, but when selecting an icon just select the Excel.exe file and it will extract the icon from the application.
-
Question
Why do Windows 10 icons shrink and expand on their own?
It might be that you held CTRL and scrolled. That changes the icon size, like zooming on a web browser.
See more answers
Ask a Question
200 characters left
Include your email address to get a message when this question is answered.
Submit
Advertisement
Video
-
The main icon resolutions are 16×16, 24×24, 32×32, 48×48, and 64×64. 32×32 and 96×96 are the most commonly used sizes.[3]
-
In a pinch, you can also find icons online to download. Just make sure you only download from sites you trust.
-
These steps are just for creating Windows icons; you’ll need to use a different process if you want to change an avatar for a forum or create a Favicon (a feature built into your website).
Thanks for submitting a tip for review!
Advertisement
-
Download any software or images at your own risk. Always use antivirus and anti-malware software to protect your PC.
Advertisement
About This Article
Article SummaryX
1. Find or draw an image.
2. Go to https://icoconvert.com.
3. Click Choose File.
4. Select the image and click Open.
5. Click Upload.
6. Crop the image.
7. Click Select None.
8. Select ICO for Windows.
9. Click Convert ICO.
10. Click Download your icon(s).
Did this summary help you?
Thanks to all authors for creating a page that has been read 1,525,133 times.
Is this article up to date?
Sign in to your MUO account
Many users add shortcuts for opening software and tools to the Windows 11 desktop. Shortcuts added will have default icons, but you don’t have to stick with them. You can instead design custom icons and add them to shortcuts on the desktop.
To set up custom Windows 11 desktop icons, you’ll need to have suitable design software installed. Paint 3D and Junior Icon Editor are two freeware software packages with which you can create icons. This is how you can set up desktop icons with Junior Icon Editor and Paint 3D.
How to Set Up Custom Desktop Icons With Paint 3D
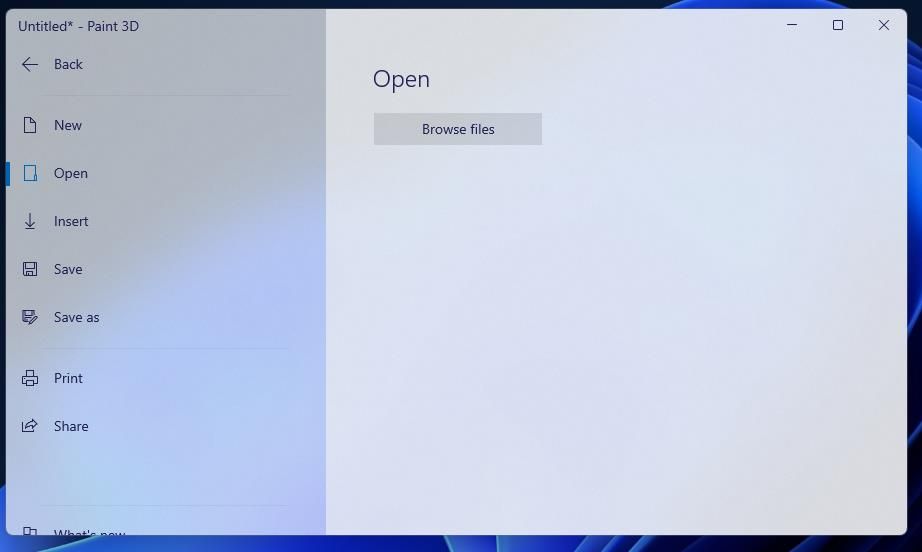
Paint 3D is a more advanced Paint version with additional tools for adding 3D shapes and stickers. Windows 10 includes that app, but it doesn’t come pre-installed on Microsoft’s latest platform. Nevertheless, it’s easy to restore that app in Windows 11. You can create a desktop icon with Paint 3D in Windows 11 like this:
- Click Start and Microsoft Store on the menu.
- Type the keyword Paint 3D in the Search apps box.
- Select Paint 3D to view the MS Store page for that app.
- Click Get to install the design app.
- Then select Open on Paint 3D’s page.
-
Click the New button.

- Select Canvas at the top of Paint 3D.
- Uncheck the Lock aspect ratio box.
- Input 32 in the Width and Height boxes.
-
Turn on the Transparent canvas option.

- Click the Zoom (+) button to expand the small canvas.
-
Then select the Brushes tab to access and utilize Paint 3D’s drawing tools with which to design your icon. You can also create your icon by adding shapes or stickers to the canvas from the 2D Shapes, 3D Shapes, and Stickers tabs.

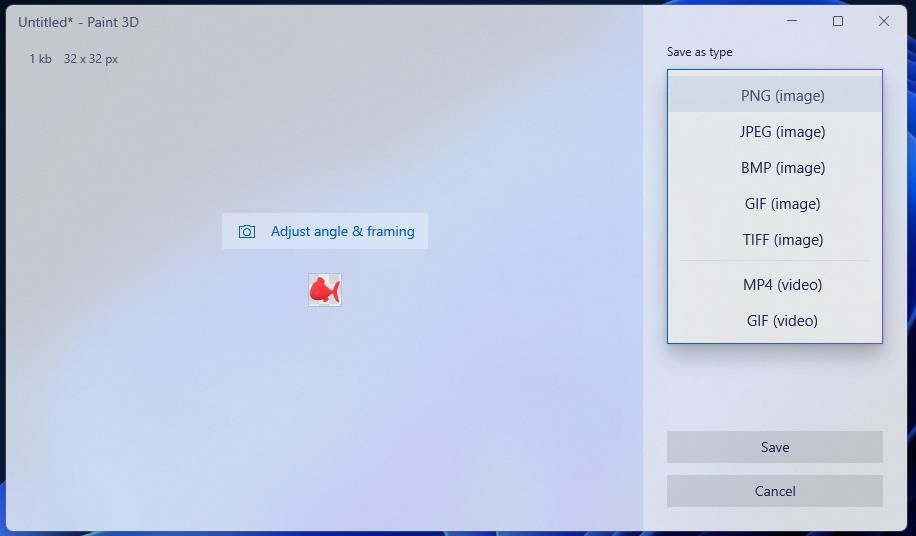
- When you’ve finished designing your icon, click the Menu button.
-
Select Paint 3D’s Save as option.

- Click the Image button.
-
Select the PNG (Image) format on the Save as type menu.

- Press Save to bring up a directory selection window.
- Choose a folder to save the icon image
- Click Save to save the image.
An alternative option is to save your image as a BMP file in Paint 3D. You can select to add icon-sized images with the BMP format to desktop shortcuts. However, BMP image icons won’t have transparent backgrounds.
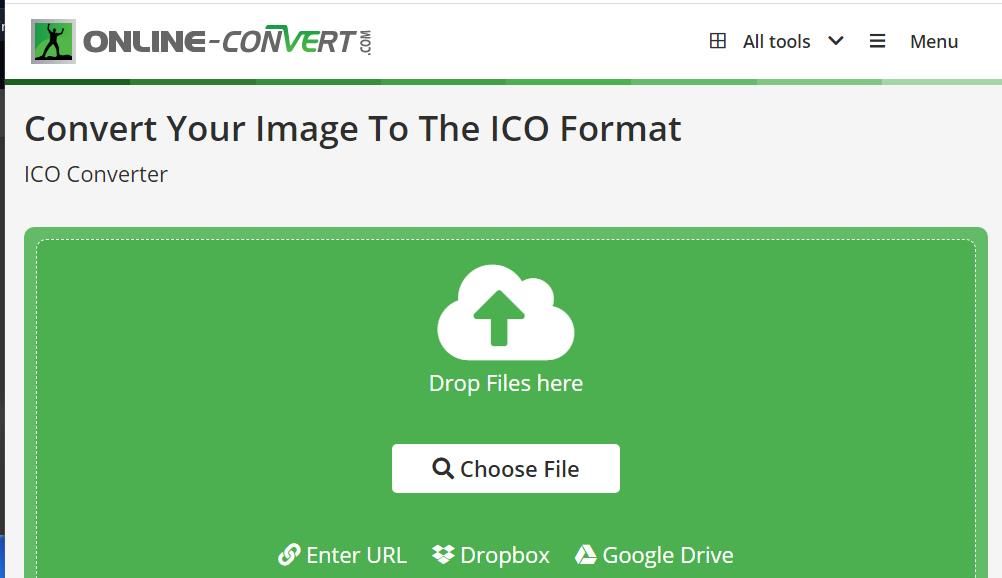
If you want your icon to have a transparent background, you’ll need to save the image as a PNG as instructed above. Then you can convert that PNG image to a transparent icon with the required ICO format. This is how you can convert your icon’s PNG file to ICO with Online-Convert.com’s conversion web app:
- Open the ICO Converter web app in browser software.
-
Select the Choose File option.

- Next, select your icon’s PNG image file from the directory it’s saved in and click Open.
-
Press the conversion tool’s green Start button.

- Click Download to save the icon file in your browser’s default download folder.

Now you can add your icon to a shortcut on Windows 11’s desktop. Right-click a shortcut you want to apply the new icon to and select Properties. Press Change Icon to bring up an icon selection window. Click Browse, select your custom icon and press Open to confirm. Select the OK > Apply options to add it.
How to Set Up Custom Desktop Icons With Junior Icon Editor
Junior Icon Editor is software designed specifically for creating custom icons. That software enables you to design and save icons with the ICO format, so you don’t need to convert images. However, it doesn’t include any options for adding 3D shapes and stickers to icon designs like those in Paint 3D. You can create custom icons for your desktop with Junior Icon Editor like this:
- Open the Junior Icon Editor website.
- Select the Download free icon editor option.
- To open the setup wizard, bring up your browser’s Downloads tab first. Chrome’s and Edge’s Downloads tabs share the same Ctrl + J hotkey.
- Click junior-icon editor.exe at the top of the Downloads tab.
- Select Next in the Installing Junior Icon Editor window.
- Click the setup wizard’s I agree option.
-
Keep selecting Next to install Junior Icon Editor with default installation options.

- Click Finish with the Launch application now option selected.
-
Select a size option in the New Icon window. The 32 x 32 radio button is a mid-size icon option to go for.

- Choose a color setting for the icon on the right side of the New Icon window.
- Click OK to open the canvas and design tools.
-
Design your icon with the drawing tools on the left side of the Junior Icon Editor window. You can select colors from the palette on the right.

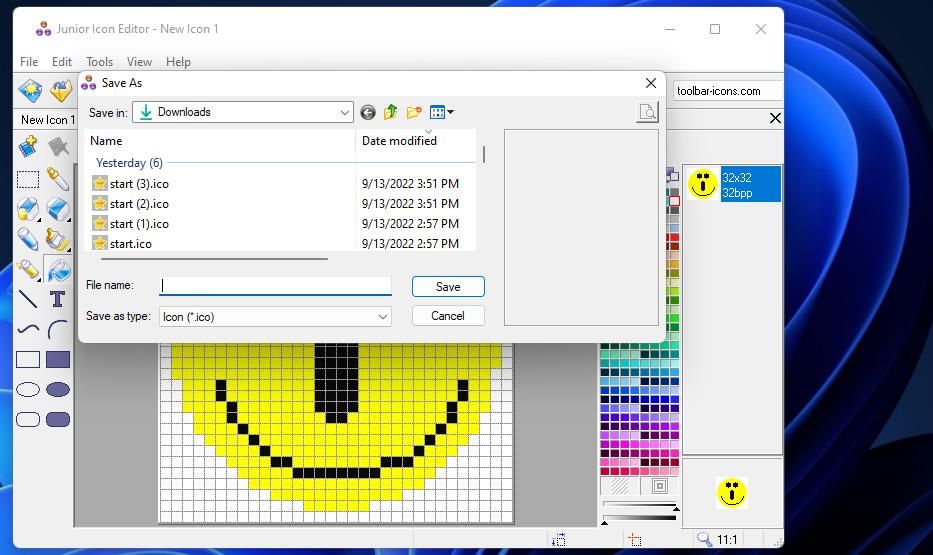
- To save a finished icon design, click the File option.
-
Select Save as to bring up a window for saving files.

- Input a title in the File name box.
- Choose somewhere to save your icon.
- Click Save to finish.
- Now add your custom icon to a desktop shortcut.
Junior Icon Editor has relatively standard-fare design tools to set up icons with. You can select Pencil, Airbrush, and Paintbrush options in its toolkit. Click the small arrows on the Paintbrush and Airbrush buttons to select different brush styles and thickness levels for those tools.
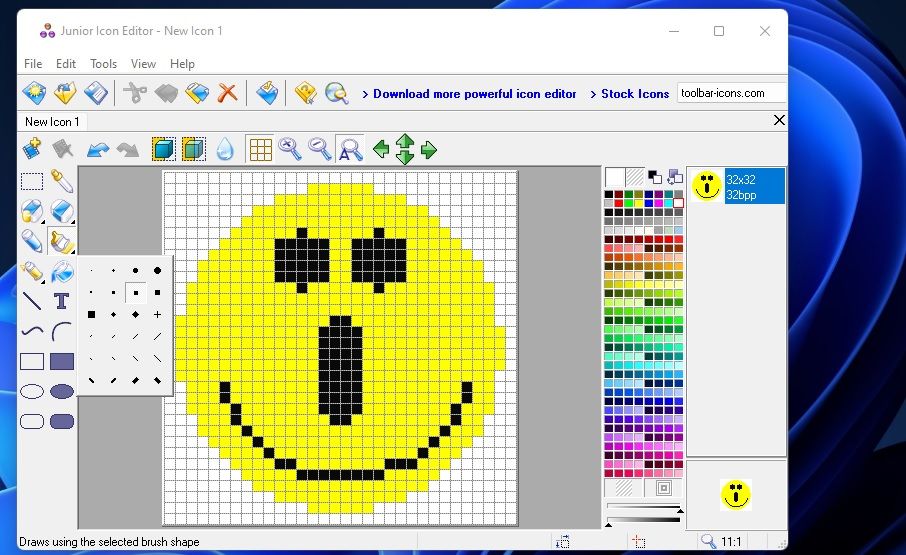
This design software includes options for adding basic filled or empty rectangles and squares to icons. Plus you can select to add straight and curved lines and arcs. Paint 3D has 24 2D shape options along with 3D objects and models, which is somewhat better.
Junior Icon Editor’s grid feature, enabled by default, is a useful addition. Its grid consists of many small squares that help you design cleaner, symmetrical icons. Zooming in up close to the grid will give you greater design control over finer details.
You don’t necessarily have to start icons from scratch in Junior Icon Editor. Instead, you can import and edit existing software icons or those downloaded from the web by clicking File > Open. However, you’ll need to extract application icons with IconViewer first before you can import them. Alternatively, you can select to open image files and then save them in the ICO format.
Add More Stylish Custom Icons to Your Desktop
So, now you can liven up your Windows 11 desktop by replacing some dull default icons with more stylish custom-designed alternatives. There are many other apps with which you can design icons, but Paint 3D and Junior Icon Editor probably pack in enough editing tools to satisfy the majority of users. You can easily set up visually appealing shortcut icons in Windows 11 and 10 with both software packages.