
После рассказов товарища о сгоревшем маршрутизаторе и последующем факапе было принято решение обезопасить себя от подобных ситуаций путем создания резервного шлюза. Поскольку финансирование it в моей текущей компании находится у руководства не в первой десятке самых важных вещей, в качестве шлюзов мы будем использовать виртуальные машины с Ubuntu 14.04 LTS на Hyper-v, а в качестве железа — 2 системника, собранных из
говна и палок
того, что было на складе. Сказано это было не ради того, чтобы услышать слова сочувствия, а дабы подчеркнуть, что не требуется большого финансирования для создания резервирования основного шлюза.

Требования к железу:
— процессор с поддержкой виртуализации и x64
— 2 сетевые карты с поддержкой 802.1q
Представим, что у нас уже имеется системник с установленным windows hyper-v server 2012 r2 и виртуальной машиной второго поколения. Начнем с настроек хоста hyper-v.
Первым делом настроим объединение сетевых карт. Открываем оснастку диспетчер серверов, щелкаем правой кнопкой по нашему серверу и выбираем «настройка объединения сетевых карт»:

все манипуляции с оснастками windows проводятся под windows 8.1

Настройки могут меняться в зависимости от инфраструктуры. Объединение карт сделано для доступности шлюза в случае выхода из строя сетевой карты или свитча.
Далее создадим виртуальные коммутаторы для локальной сети и интернета. Сделать это можно через оснастку «диспетчер hyper-v» или через powershell.
Открываем оснастку, выбираем наш сервер и в правой части оснастки щелкаем «диспетчер виртуальных коммутаторов». Нам нужно создать 2 внешних виртуальных коммутатора.

Назначаем имя свитчу и выбираем соответствующие сетевые карты. Microsoft networkadapter multiplexor driver — наши объединенные сетевухи. Бывают случаи, когда сетевые карты называются одинаково и различаются они лишь номером в конце. Для определения соответствия можно использовать коммандлет powershell get-netadapter и определить карту по mac адресу, либо статусу up -down. Для виртуального свитча интернета снимаем галочку «разрешить управляющей операционной системе …», для локальной сети оставляем, если, конечно, у вас нет отдельной сетевой карты для управления гипервизором. Это опция необходима для того, чтобы операционная система гипервизора могла использовать эту сетевую карту для доступа к сети.
Создать виртуальный свитч так же можно через командлет powershell new-vmswitch.
Далее необходимо создать сетевые адаптеры для нашей виртуальной машины. Через оснастку, либо командлет powershell add-vmnetworkadapter.
Создание сетевого адаптера не представляет сложности и, как мне кажется, описания не требует. Если в вашей сети используются VLAN, то вам нужно настроить интерфейсы для каждой сети. Это можно сделать несколькими способами:
- создание виртуальных интерфейсов на уровне хоста гипервизора
- создание интерфейсов на уровне виртуальной машины
- создание подинтерфейсов на уровне виртуальной машины
Первый способ не для нас, т.к. в server core версии и мне не удалось открыть эти настройки в графическом режиме, а редактируя реестр вручную можно что-нибудь да поломать. И если я не ошибаюсь, такой способ не рекомендуем самой майкрософт.
Второй способ удобен и прост. Мы можем создать необходимое нам количество сетевых адаптеров и указать нужный нам vlan в настройках.

Единственное, чем неудобен этот способ, при появлении нового vlan добавление сетевого адаптера возможно только при выключенной виртуальной машине.
Третий способ нас устраивает всем. На нем и остановимся.
Для того, чтобы трафик из всех vlan, которые мы хотим маршрутизировать, нам нужно настроить транк на сетевой карте виртуальной машины. Сделать это можно только через powershell.
Set-VMNetworkAdapterVlan -Trunk -AllowedVlanIdList "100" -VMName "router" -VMNetworkAdapterName "localnet" -NativeVlanId 0
Так уж случилось, что когда я устроился на работу, в сети использовался только 1 vlan, а всё оборудование, находившееся в сети, включая сервера и пк, ходили без тега. При настройке транка я долго не мог понять, почему нетегированный трафик не доходит до моей виртуальной машины, пока не наткнулся на пост, в котором увидел команду powershell с vlan 0, поэтому в качестве native vlan и указан 0.
Далее нам нужно настроить виртуальную машину.
Начнем с адресации.
Пример файла /etc/network/interfaces
# The loopback network interface
auto lo
iface lo inet loopback

auto eth0
iface eth0 inet static
address 192.168.0.1
netmask 255.255.255.0

# подинтерфейс для маршрутизацияя трафика из 100 vlan
auto eth0.100
iface eth0.100 inet static
address 192.168.100.1
netmask 255.255.255.0
vlan_raw_device eth0

#internet
auto eth1
iface eth1 inet dhcp
далее разрешим нашей виртуальной машине делать forwarding. Изменим значение net.ipv4.ip_forward на 1 в файле /etc/sysctl.conf и применим изменения путем выполнения команды sysctl -p /etc/sysctl.conf.
И последним штрихом будет настройка nat при помощи iptables.
iptables -t nat -A POSTROUTING -o eth1 -j SNAT --to-source xxx.xxx.xxx.xxx
где xxx.xxx.xxx.xxx ваш ip адресс. Хоть в моем случае и используется dhcp внешний адрес назначается всегда один.
Для динамических адресов следует использовать
iptables -t nat -A POSTROUTING -o eth1 -j MASQUERADE
Для того, чтобы правила iptables сохранялись после перезагрузки, установим пакет iptables-persistent. Название может отличатся в зависимости от дистрибутива.
Теперь пользователи имеют доступ в интернет и всё работает, осталось только настроить репликацию. Делается это через ту же оснастку Диспетчер hyper-v. Открываем оснастку, выбираем наш гипервизор и заходим в параметры hyper-v через панель действие. В параметрах выбираем конфигурация репликации. Далее подробнее:

Включаем реплику.
Использовать Встроенную проверку подлинности Windows — менее безопасная. Работает только в домене active directory и не требует дополнительных настроек.
Использовать проверку на основе сертификатов (HTTPS) — более безопасная. Используйте ее в режиме паранойи и вне домена.
Можно разрешить репликацию со всех серверов hyper-v либо только с указанных. Выбираем второй вариант и указываем там сервер реплику с установленным hyper-v. Группа может иметь произвольное название. Далее делаем аналогичные настройки на сервере реплике.
Чтобы при Переключении машины на сервер реплику не возникло проблем, виртуальные коммутаторы должны называться так же, как и на основном сервере.
Readers help support Windows Report. We may get a commission if you buy through our links.
Read our disclosure page to find out how can you help Windows Report sustain the editorial team. Read more
Previously we have shown you how to add network adapter to Windows 10 Hyper-V virtual machine. In this post, we look at how to create Hyper-V Virtual Switch in Windows virtual machines.
Knowing how to create and manage Hyper-V virtual switches is a critical aspect of managing and maintaining your Hyper-V virtual machines. In this article, we will show you all the methods to configure and deploy Hyper-V virtual switches.
Follow the steps in this article to create Hyper-V virtual switches on Windows computers. There are two ways to do this, and we have listed both of them.
Steps to create Hyper-V virtual switch
1. Create virtual switch using Hyper-V Manager
- Creating virtual switches using the Hyper-V virtual manager is easy. Here is how to configure it.
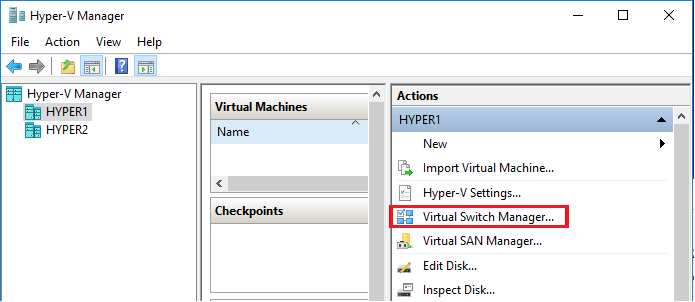
- Open Hyper-V Manager on your Windows computer.

- From the right pane click on “Virtual Switch Manager” under Actions. It will open the Virtual Switch Manager wizard.
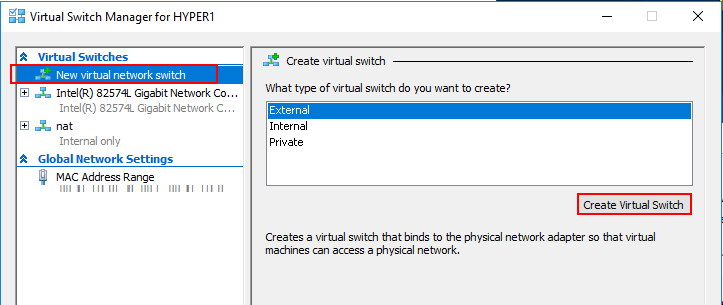
- In the wizard, choose the “New virtual network switch” option.

- Next, select the type of virtual switch you want to create. There are three types of the virtual switch which I have explained below.
Private Virtual Switch – This switch only allows communications between the connected VMs that are connected to the private virtual switch.
Internal Virtual Switch – This switch only allows communication between virtual adapter connected to connected Virtual Machines and the operating system.
External Virtual Switch – This switch allows communication outside the host. This is due to the switch being connected to a physical network adapter installed in the Hyper-V. - Select you prefered type of virtual switch and click on Create Virtual Switch button.
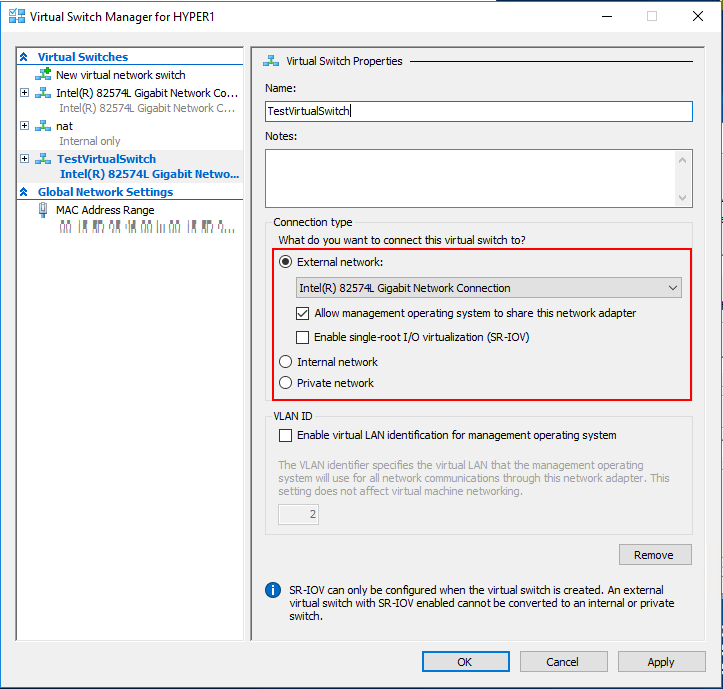
- Name your new virtual switch.

- For Connection Type, select “External Network” and select the network connection from the drop-down menu.
- Check “Allow management operating system to share this network adapter” box. These options depend on the virtual switch type selected by the user.
- There is an option to enable “VLAN ID” for LAN identification. Leave it unchecked, if you don’t know what it does.
- Once done, click on Apply and OK to complete new virtual switch configuration.
How to fix the Hyper-V Error applying hard drive changes
2. Create Hyper-V virtual switch using PowerShell
- One advantage of using PowerShell to create a virtual switch is the automation it offers in the Hyper-V environment. It also expedites the process by creating virtuals switch with a few commands.
- Right-click on “Start” and select Windows PowerShell (admin).
- In the PowerShell window, enter the following command and hit enter:
- This command will show network adapters. Take note of the names.
Get-NetAdarpte - External Switch – The following command creates a new External switch. Make sure to replace switch name and network adapter name accordingly.
New-VMSwitch -name < switch name > -NetAdapterName < network adapter name > -AllowManagementOS $true - Internal Switch – The following command creates a new Internal Switch. Make sure to replace the switch name and network adapter name accordingly.
New-VMSwitch -name < switch name > -SwitchType Internal - Private Switch – The following command create a new Private Switch. Make sure to change the switch name and network adapter name accordingly.
New-VMSwitch -name < switch name > -SwitchType Private - Execute any one of the above commands to create Hyper-V virtual switch.
Conclusion
These are the two ways to create Hyper-V virtual switch in Windows virtual environment. Do let us know your thoughts in the comments below.
RELATED STORIES YOU MAY LIKE:
- How to fix the Hyper-V ran out of memory error
- FIX: Hyper-V could not be realized due to validation errors
- How to export Virtual Machine in VMware
Tashreef Shareef
Tashreef Shareef is a software developer turned tech writer. He discovered his interest in technology after reading a tech magazine accidentally. Now he writes about everything tech from Windows to iOS and streaming services to IoT at WindowsReport.
Настройка сети в Hyper-V с помощью Powershell может являться достаточно распространенным сценарием, ведь во многих случаях хост Hyper-V представляет из себя систему с интерфейсом Server Core. Факт однообразия конфигурации хостов виртуализации только способствует такому подходу.
В статье вы увидите пример решений одной из задач администрирования реальной инфраструктуры в продакшене.
Если вам интересна тематика Windows Server, рекомендую обратиться к тегу Windows Server на моем блоге.
Содержание
- 1 Настройка сети в Hyper-V с помощью Powershell
- 1.1 Окружение
- 1.2 Последовательность операций
- 1.2.1 Удаление старого виртуального коммутатора
- 1.2.2 Сохранение сетевых настроек
- 1.2.3 Создание тиминг-группы
- 1.2.4 Создание виртуального коммутатора
- 1.2.5 Возвращение сетевых настроек
- 1.2.6 Подключение адаптеров ВМ
- 1.2.7 Настройка VLAN виртуальных машин
- 1.2.8 Настройка VLAN хоста
Если читать лень и хотите сразу получить скрипт, то пожалуйста – NetReconfigure(rev.1.0.0). Есть также расширенная версия, которая обрабатывает некоторые возможные ситуации – NetReconfigure(rev.1.0.1).
Но все же я советую прочесть хотя бы раздел ниже, чтобы понимать для чего предназначен сценарий.
Также не забудьте установить переменные в актуальные для вас значения.
Окружение
Что было: парк серверов виртуализации, которые нужно перенастроить. Конфигурация типовая, на каждом сервере одна встроенная сетевая карта с двумя интерфейсами.
- Один интерфейс использовался для управления хостом;
- На втором интерфейсе висел единственный виртуальный коммутатор, через который ВМ выходили наружу.
То есть достучаться до хоста можно было по одному единственному адресу.
Что нужно было сделать: на базе двух интерфейсов создать тиминг-группу, на базе этой тиминг-группы создать внешний виртуальный коммутатор и подключить к нему все ВМ.
Если интересуют детали реализации на уровне сетевого оборудования, то конечно же каждый из двух сетевых интерфейсов сервера планировалось что будет смотреть в отдельный коммутатор. То есть была цель реализовать избыточность на уровне сетевого оборудования.
Примечание: внимательный читатель спросит зачем все это нужно, если избыточности на уровне сетевых карт сервера нету. Все верно, но хоть что-то. На моей памяти коммутаторы выходили из строя значительно чаще, чем сетевые карты на серверах, так что есть смысл обеспечить резервирование хотя бы на таком уровне.
Последовательность операций
Коротко пройдемся по основным этапам настройки.
Удаление старого виртуального коммутатора
Вы не сможете удалить виртуальный коммутатор, если к нему будут подключены ВМ. Отключаем все адаптеры всех ВМ одной командой:
|
Get—VM | Get—VMNetworkAdapter | Disconnect—VMNetworkAdapter |
Теперь можно удалить виртуальный коммутатор:
|
Get—VMSwitch | Remove—VMSwitch —Force |
Напомню, что в моем окружении на каждом сервере был только один vSwitch.
Сохранение сетевых настроек
На каждом сервере был всего лишь один адаптер со статическими сетевыми настройками, а потому можно их легко запомнить, чтобы потом назначить тиминг-адаптеру.
Сохраняем ip-адрес:
|
$IpAddress = ( Get—NetIPAddress | Where—Object IPAddress —Like $NetworkPrefix | Select—Object —First 1 ).IPAddress |
Маску подсети:
|
$PrefixLength = ( Get—NetIPAddress | Where—Object IPAddress —Like $NetworkPrefix | Select—Object —First 1 ).Prefixlength |
Шлюз (пришлось погуглить, чтобы дойти до такой конструкции)
|
$DefaultGateway = ( Get—WmiObject —Class Win32_IP4RouteTable | where { $_.destination —eq ‘0.0.0.0’ —and $_.mask —eq ‘0.0.0.0’ } | Sort—Object metric1 | select —First 1 nexthop, metric1, interfaceindex ).nexthop |
Серверы DNS:
|
$DnsServers = Get—DnsClientServerAddress —AddressFamily IPv4 | Select—Object –ExpandProperty ServerAddresses —Unique |
Все настройки сохранены.
Создание тиминг-группы
Создается одной командой:
|
New—NetLbfoTeam —Name $NicTeamName —TeamingMode SwitchIndependent —LoadBalancingAlgorithm HyperVPort —TeamMembers ( Get—NetAdapter —Physical ).Name —Confirm:$False |
Конструкция ( Get-NetAdapter -Physical ).Name возвращает список имен всех физических интерфейсов. Если ваша конфигурация отличается, вам стоит обратить внимание на этот момент.
Создание виртуального коммутатора
Тиминг-группа создана, можно на её основе создать виртуальный коммутатор:
|
New—VMSwitch —Name $VMSwitchName —NetAdapterName $NicTeamName —AllowManagementOS $true —Confirm:$False |
Параметр -AllowManagementOS $true создаст виртуальный сетевой адаптер хоста.
Возвращение сетевых настроек
Тиминг-группа создана, виртуальный коммутатор на её основе тоже. После этого создался виртуальный сетевой адаптер хоста (имя по умолчанию vEthernet (External)), которому мы должны назначить ранее сохраненные сетевые настройки:
|
New—NetIPAddress —InterfaceAlias «vEthernet (External)» —IPAddress $IpAddress —PrefixLength $PrefixLength —DefaultGateway $DefaultGateway |
DNS-настройки восстанавливаются отдельно:
|
Set—DnsClientServerAddress —InterfaceAlias «vEthernet (External)» —ServerAddresses $DnsServers |
После завершения работы скрипта хост должен быть доступен по старому адресу.
Подключение адаптеров ВМ
Подключаем все адаптеры всех ВМ к единственному виртуальному коммутатору:
|
Get—VM | Get—VMNetworkAdapter | Connect—VMNetworkAdapter —VMSwitch ( Get—VMSwitch | Select—Object —First 1 ) |
Далее самое интересное.
Настройка VLAN виртуальных машин
Порты коммутаторов, к которым подключен сервер, должны быть выставлены в trunk-режим. Каждой виртуальной машине выставим идентификатор VLAN:
|
Get—VM | Get—VMNetworkAdapter | Set—VMNetworkAdapterVlan —VlanId $VMVlanId —Access |
Примечание: такой подход более гибкий. Каждой виртуальной машине вы можете выставить произвольный идентификатор VLAN.
Команда PowerShell выше эквивалентна ручному выставлению VLAN ID в настройках сетевого адаптера виртуальной машины:
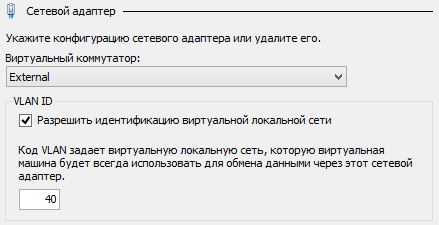
Остался последний этап.
Настройка VLAN хоста
Установим идентификатор VLAN на виртуальном адаптере хоста:
|
Set—VMNetworkAdapterVlan —ManagementOS —Access —VlanId $HostVlanId |
Где $HostVlanId – идентификатор VLAN, который определен в этой переменной в самом начале скрипта.
Команда PwerShell выше эквивалентна ручному выставлению VLAN ID в настройках виртуального коммутатора.
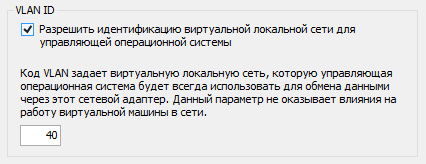
Примечание: Внимание! При изменении этих настроек вы можете потерять соединение с хостом.
На этом работа скрипта завершена, доступ к хосту и всем ВМ должен восстановиться.
This article will examine how to create and configure an internal virtual switch to enable the running of virtual machines wholly isolated from a physical network with Hyper-V Manager, an excellent virtualization solution used in Windows 10 or Windows 11 operating systems.
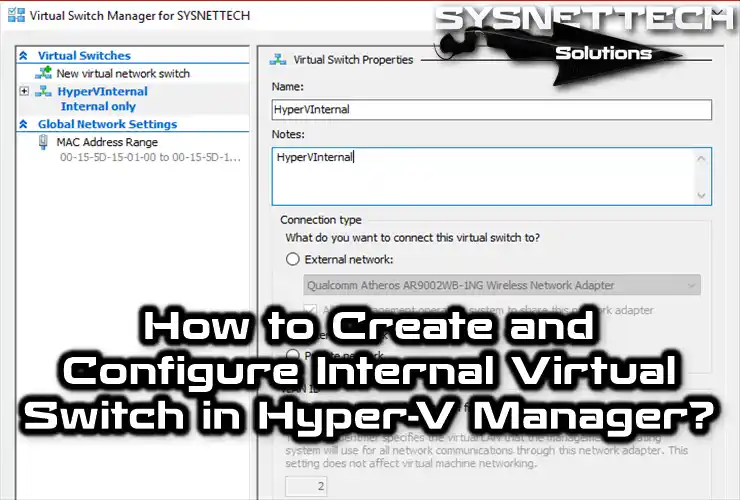
How to Create an Internal Network on Hyper-V
The main reason for using an Internal network in the Hyper-V Manager virtualization program is to ensure that the virtual machines are entirely independent of the physical network and only communicate with the host computer.
Creating an Internal Switch with Hyper-V is very simple. Before making this network structure, you can take a look at our article, Create External Virtual Switch.
To better understand the Internal network using Hyper-V, create two virtual machines and follow the steps in this article. Ping between virtual machines will be successful, and Ping will also be available on the physical computer’s network card.
How to Configure an Internal Network
Here are the steps to configure the Internal Switch with Hyper-V on the Windows 10/11 operating system:
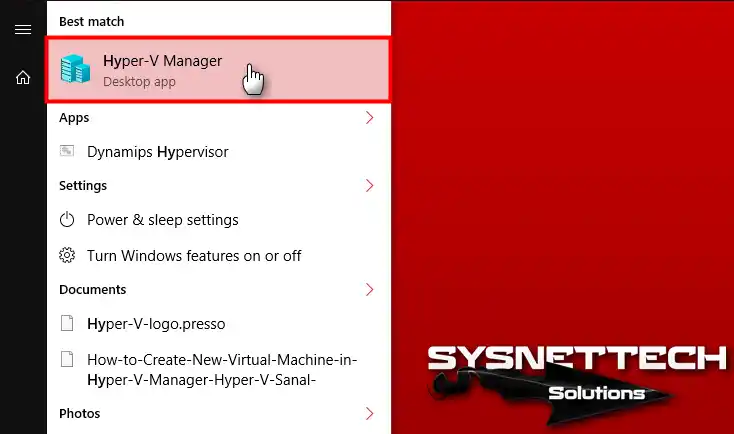
Step 1
First, run Hyper-V Manager from the Windows menu.
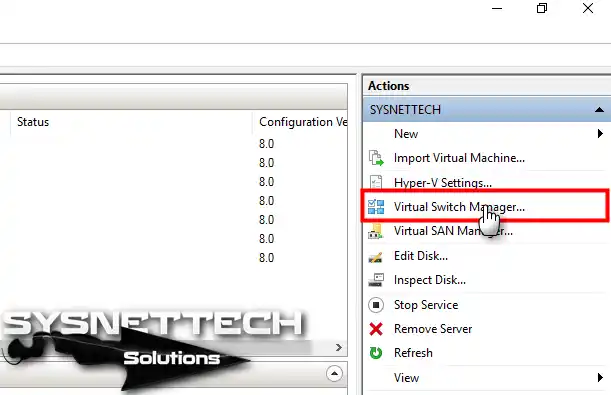
Step 2
From the Actions panel, click the Virtual Switch Manager option.
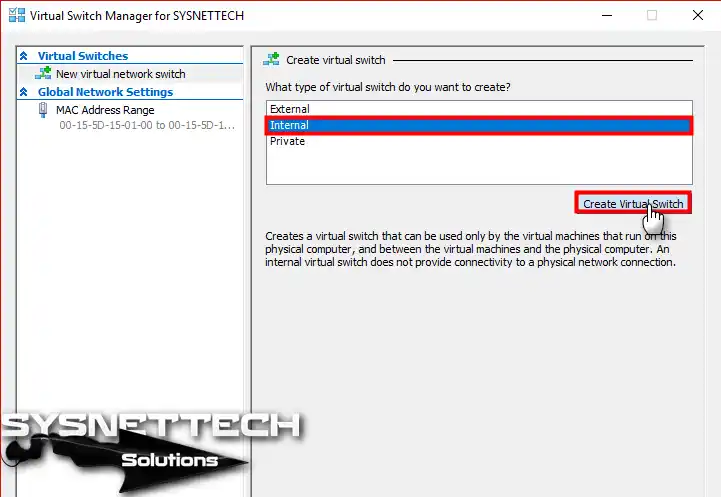
Step 3
In the Switch Manager window, select the Internal network and click the Create Virtual Switch button.
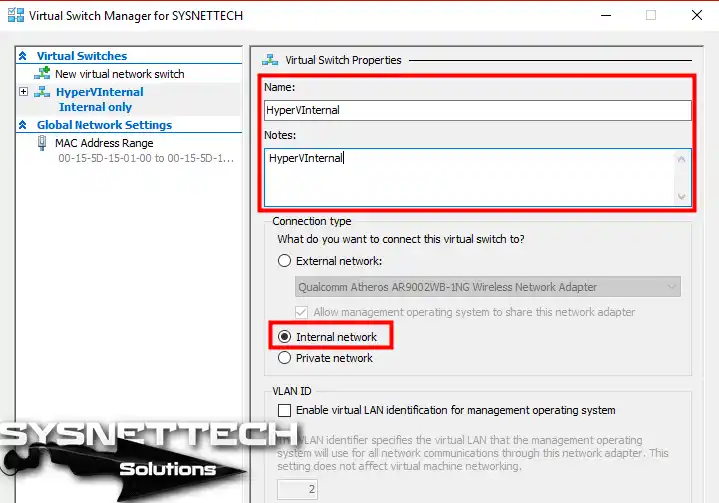
Step 4
Type a name for the Internal Switch and click the OK button.
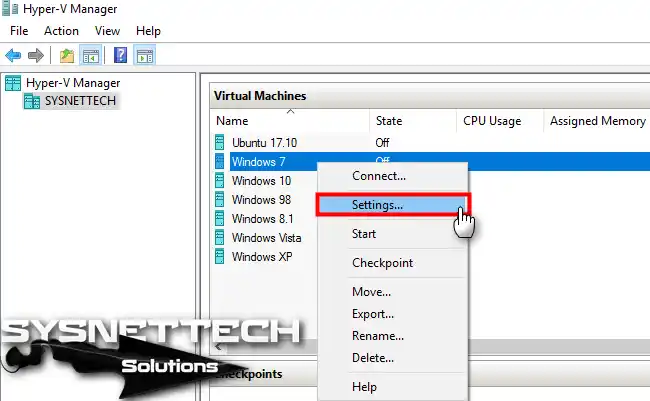
Step 5
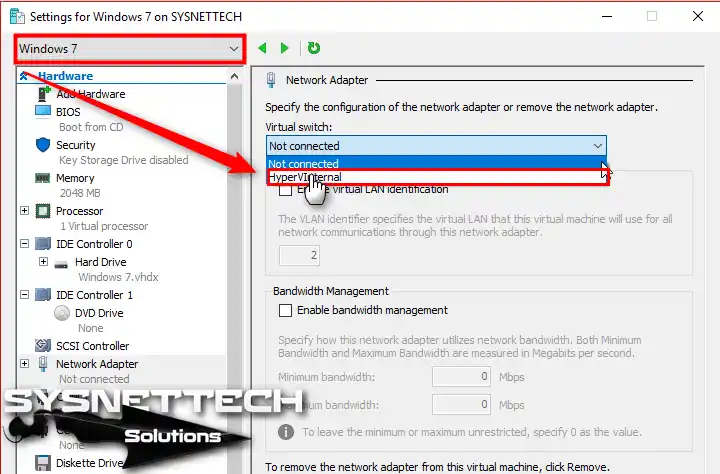
To configure the settings of a virtual pc installed on Hyper-V, you need to open its settings window within the Hyper-V Manager. For example, you can access the settings by clicking the Right Button / Settings on the Windows 7 virtual machine.
Step 6
Click Network Adapter in the left panel, select the HyperVInternal you created from the Virtual Switch setting, and click OK.
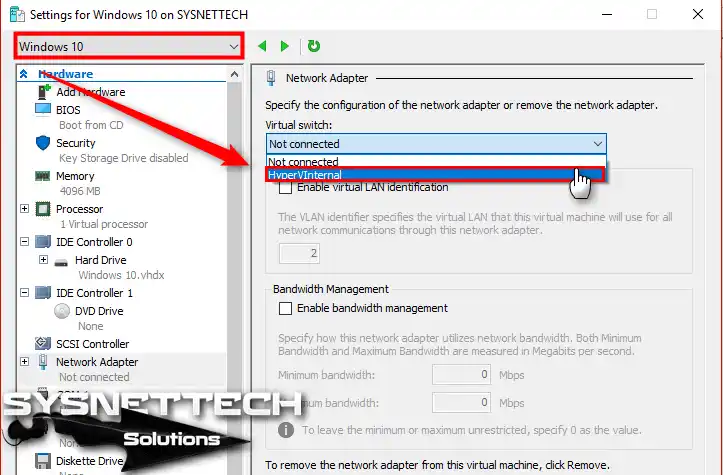
Step 7
Configure a second virtual machine configuration to test the network structure. Select HyperVInternal for Windows 10 as below and click OK.
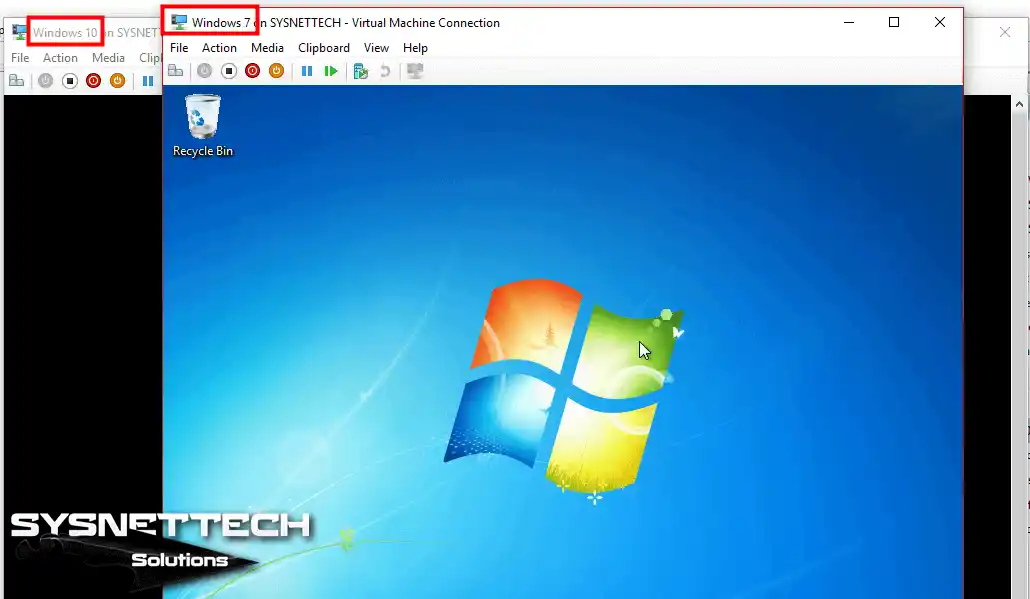
Step 8
Run the Windows 7 and Windows 10 virtual machines.
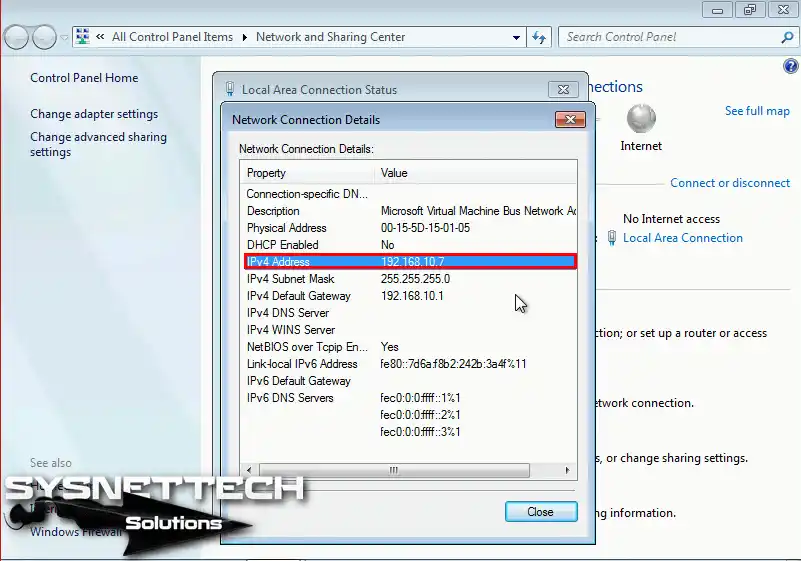
Step 9
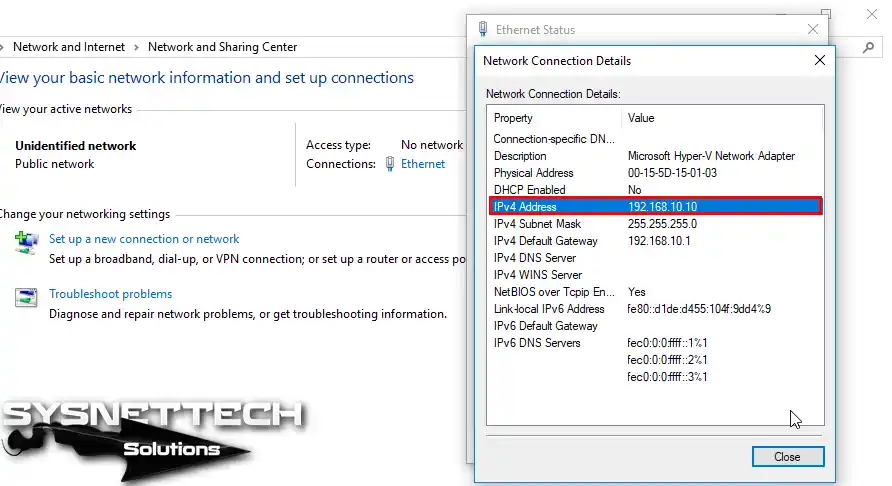
Configure the Windows 7 network adapter IP settings as follows.
Step 10
Configure the Windows 10 virtual machine IP settings as follows.
Step 11
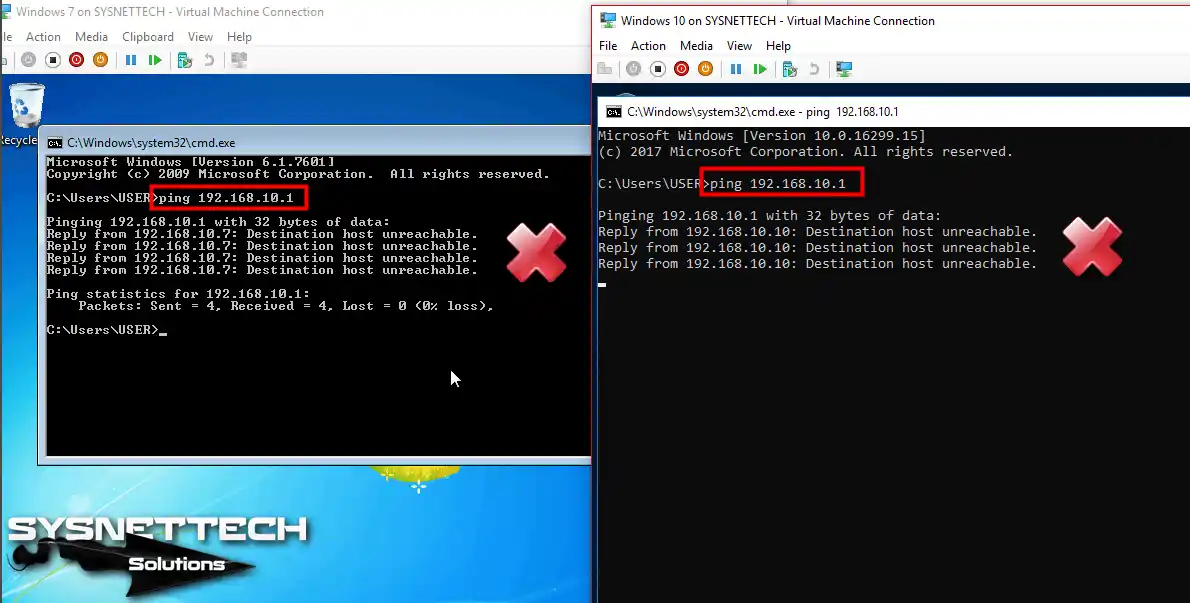
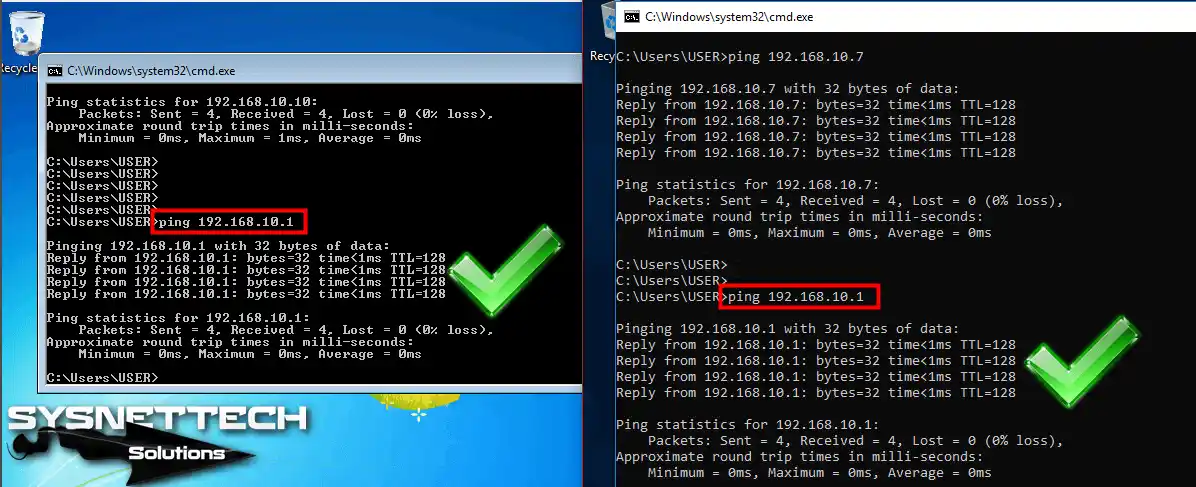
To test the network connection, ping the default gateway of 192.168.10.1 from the virtual appliances. The ping operation will fail, as shown in the following image.
Step 12
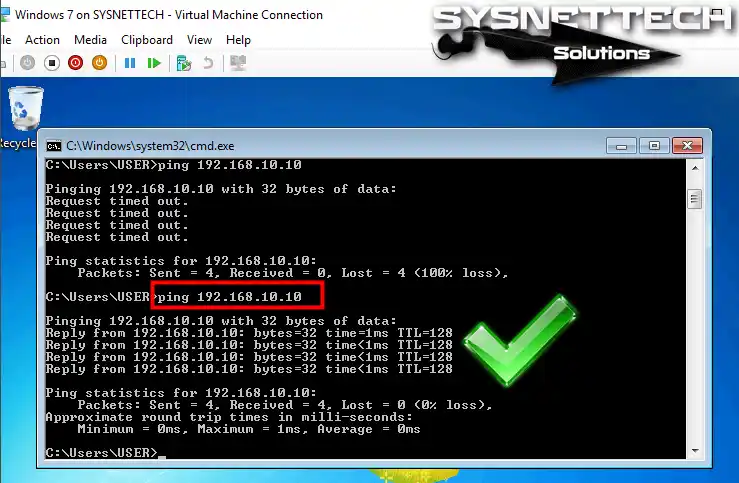
Ping from Windows 7 to Windows 10 virtual machine will be successful.
Step 13
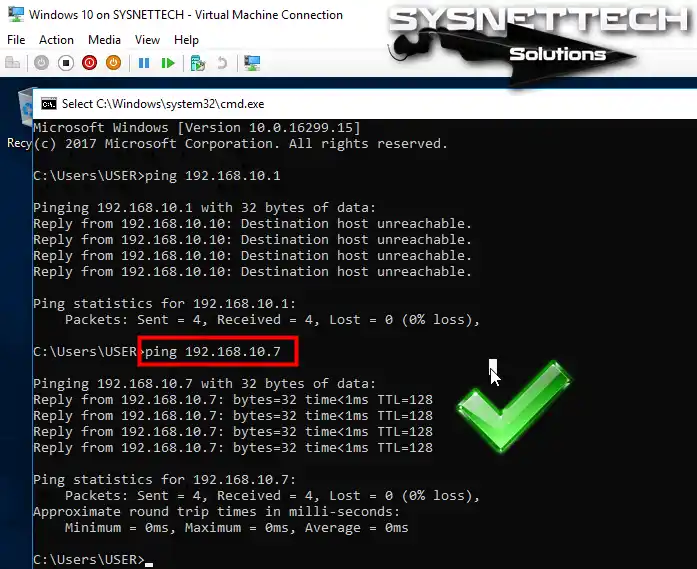
Pinging from Windows 10 to Windows 7 machines will be successful as follows.
Step 14
The reason for the failed result when pinging the default gateways of the virtual machines is the absence of a configured Internet Network Switch on your physical computer.
Step 15
Configure the vEthernet IP configuration and click OK to save the settings.

Step 16
Finally, the network connection can be tested by pinging the virtual machines to the default gateway. The image below illustrates that pinging the IP address 192.168.10.1 from Windows 7 and Windows 10 guest machines is successful.
Hyper-V Internal Network Configuration ⇒ Video
You can watch the video below to perform the Internal network configuration steps using Hyper-V and subscribe to our YouTube channel to support us!
Conclusion
In this article, we have created an Internal Virtual Switch and examined how virtual machines communicate in this network structure. In short, with this type of network, virtual machines operate independently of the physical network. Also, virtual machines can only access the physical device. Thanks for following us!

TolgaBagci
Hi, I’m Tolga, a computer expert with 20 years of experience. I help fix computer issues with things like hardware, systems, networks, virtualization, servers, and operating systems. Check out my website for helpful info, and feel free to ask me anything. Keep yourself in the loop about the newest technologies!
The hyper-v is the Microsoft version of the hypervisor for windows machines. Many users who are comfortable with the VMware and the VirtualBox start using the hyper-v they get confused about how the networking is set up in the hyper-v world.
So in this blog, I want to dedicate some time and write about the different types of virtual switches available in the hyper-v and how you can use each network in different scenarios.
Read also,
How to Configure Different Network Types in VMware Workstations?
How to Configure VirtualBox Network Settings ?
How to FIx VMware Bridged Network Not Working in Windows?
How to Connect KVM VM to Host Network?
What is a virtual switch in hyper-v?
A virtual switch will enable ethernet frame switching between the VM’s virtually in the virtualization world. So in hyper-v, it is the same concept, you create VM’s in the hyper-v hypervisor and connect those VM’s to the virtual switch using the virtual adapter, and VM’s can communicate with each other.
Different types of Hyper-V switches.
There are, however, different switches that can be used in different scenarios. Those are
- Default switch.
- External Switch.
- Internal Switch.
- And Private switch.
Let’s look at each of them in detail with examples, so I hope by the end of this article you will get some idea of what switch can be used in what scenarios.
1. Default Switch.
The default switch is enabled by default when you enable the hyper-v on a windows environment. In the default switch, the VM’s will get NATed IP from the host machine. With the help of that NAT IP, it can go out to the internet. But the host machine or the devices in your local area network cannot talk to the VM’s that are in the default switch. Let’s take a look at that in action.
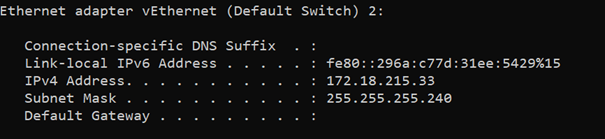
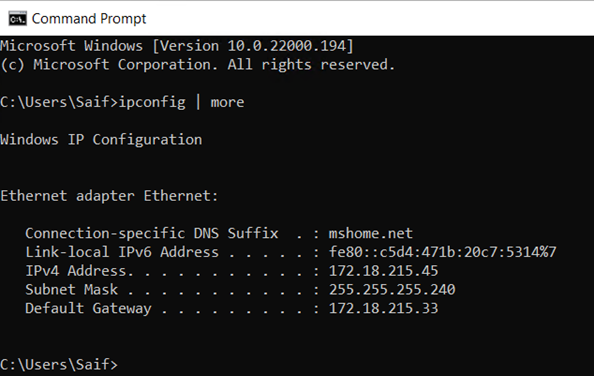
I have already enabled the hyper-v on my windows 11 machine. As you can see, it created a default switch with the IP address 172.18.215.33/28
I just spun up a Windows 11 and Ubuntu VM in the hyper-v and will connect the switch to those VM’s, and let us see how it will work.
To change the network configuration on hyper-v virtual machine.
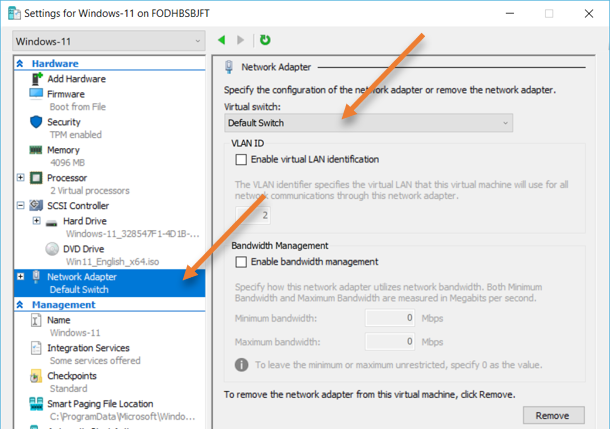
- Right-click on the VM and click on settings.
- Choose the network adapter in the pop up, and choose the default switch in the Virtual switch drop-down.
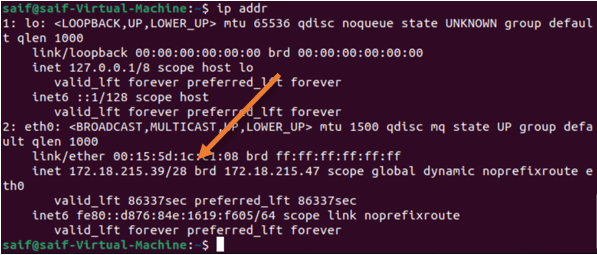
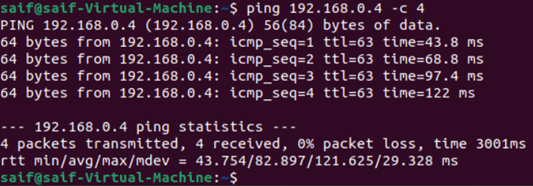
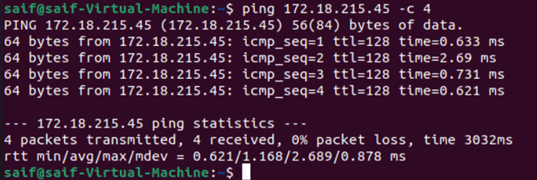
After I made the changes, I went ahead checked the IP configuration. As you can see, the windows 11 virtual machine got the IP 172.18.215.45 and the Ubuntu VM got 172.18.215.39 address from the same default switch subnet.
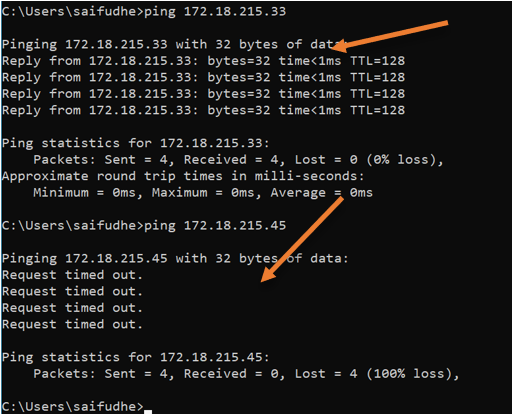
From My host machine, when I tried to ping, I can reach the IP address of the default switch, which is 172.18.215.33 but not the VM (172.18.215.45).
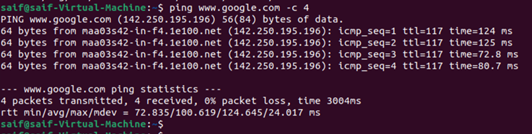
When I try to ping the internet from the VM, it is working fine.
I can also talk to my local area network devices.
Also the VM to VM communication works fine as well.

Where do you use the default switch?
A default switch will be ideal when you want your VM to talk to the internet, the host machine, and the local area network. Though your VM can initiate the communication to the local area network, the same is not true in reverse. The devices in the local area network cannot talk to the VM.
In the default switch, the VM can talk to;
- Host Machine.
- Internet
- LAN Devices.
- Other VM’s in the same default switch.
And
- LAN devices and Host machines can not directly initiate communication to the VM.
2. Hyper-V External Switch.
You can think of an external switch as a bridged network if you are coming from the Vmware, virtual box side. In an external switch, the VM’s will talk directly to your local area network. And your local area router’s DHCP service will assign an IP address to your hyper-v virtual machine. The VM will act like another host in the same local area network. The external network switch will be useful when you want your VM to talk directly to your local area network and talk to the internet directly.
Since the VM is part of your local area network, it can work as a different machine with the same network access as your host machine.
How do I create an external switch in hyper-v?
- Open the Hyper-V.
- On the right side, click on Virtual switch manager.
- The virtual switch manager wizard will now open.
- Click on the New Virtual network switch.
- Choose External, and click on Create Virtual switch.
- In the new virtual switch properties.
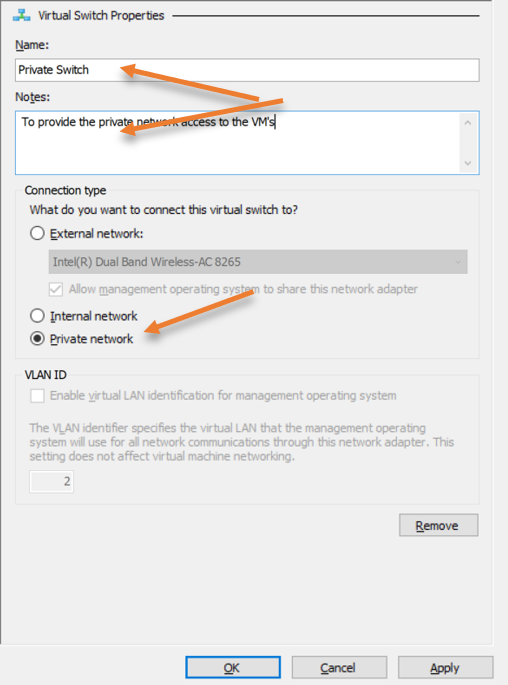
- Name the switch.
- Provide some description in notes.
- Choose External network:
- You need to ensure that you selected the physical interface that your host machine connected to the LAN. In my case it is my wireless adapter, hence I selected that.
- If you are connected using wired, you will have to choose a wired network instead.
- VLAN ID –(Optional) For general usage, you don’t need to specify the VLAN, however if you want to carry VLAN tagging, you can do that here.
Test the External switch connection to the VM.
My LAN network has the IP address of 192.168.0.0/24 network, and when I connect any VM’s in the external switch, it should get an IP address from the same subnet. Let’s take a look at that.
With the same windows 11 and Ubuntu VM’s, I will switch the network from the default switch to the external switch created.
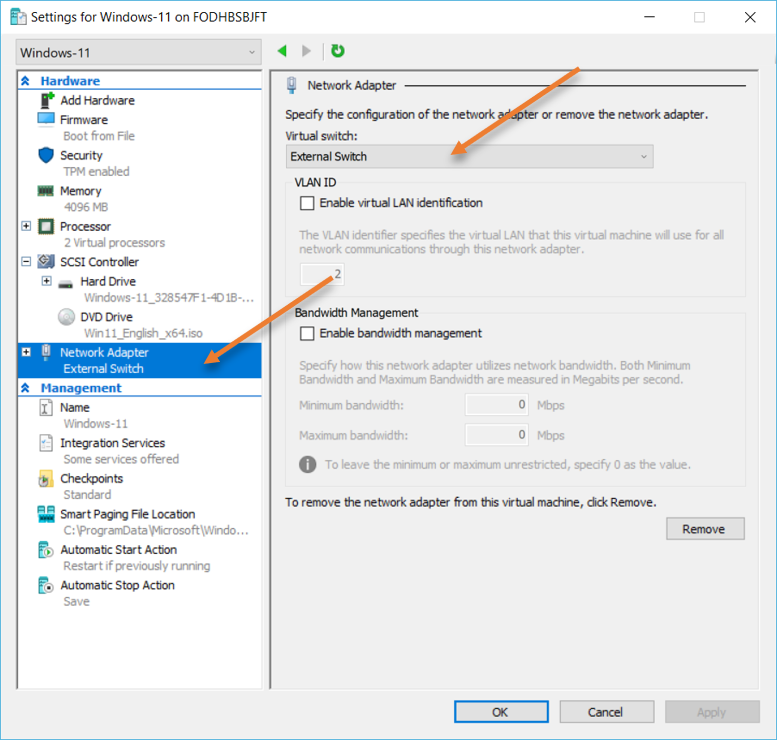
Right-click on the VM and click on Settings.
- In the network adapter, choose the external switch.
- Click on Apply and ok.
Verify the network.
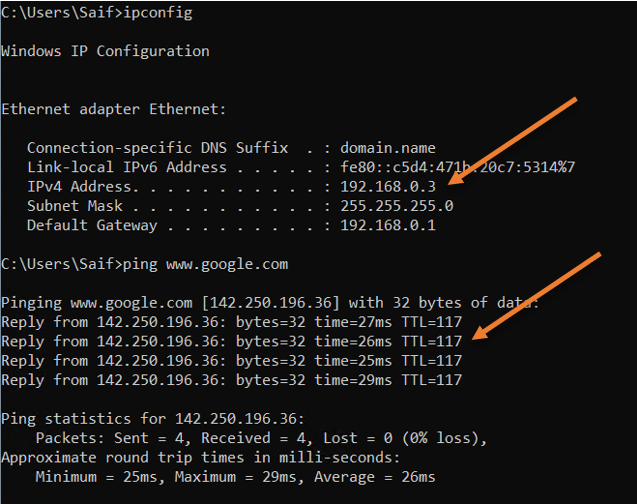
Login to the VM and check the IP address.
As you can see I got the IP address from my local area network router.
And I can reach the internet just fine.
Windows 11 vm has got IP address – 192.168.0.3
Ubuntu VM has got an IP address – 192.168.0.2
I can also ping other devices in the same network. Also, if the VM’s are connected to the same external switch, I should be able to connect to that because it will treat as another host in the LAN segment.
When to use an external switch in hyper-v?
If you would like your VM to have the same network access as your host machine in the Local area network, an external network will be a great choice. Since the router and the devices in the local area network can talk to the VM directly without any involvement of NAT, we can also make the VM be available towards the internet by doing port forwarding on the router side.
In External Switch the VM can talk to;
- The host machine.
- Devices on the LAN segment.
- Other VM’s in the external switch connected to the same LAN (wired/Wireless)
- Internet.
3. Hyper-V internal network.
If you want your VM’s to talk to each other and the host machine, the internal network will be helpful, but it cannot get to the internet. If you want the internal host to connect to the internet, you will have to use a router or firewall as a VM and connect to the internal switch and the other side connected to the external side.
Let’s take a look at the internal network configuration.
- Open Hyper-V manager.
- Click on Virtual switch manager on the right side.
- The virtual switch manager window would pop up.
- Click on New virtual network switch.
- Choose Internal and click on Create a switch.
- Name the VM.
- Type internal Switch and click on Apply and ok.
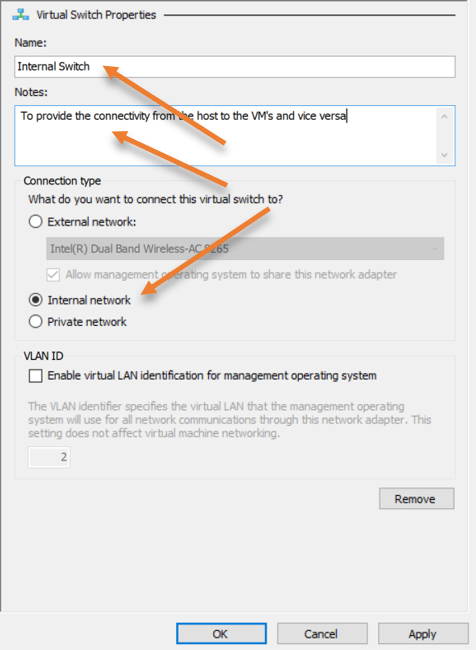
The Internal switch is now created.
Test the connectivity in the internal network.
Unlike external and the default switch, where you get the IP address automatically from your DHCP service. In the internal network, you will have to create the IP address manually. You can also keep a DHCP server in the internal network and start handing out IP addresses as well. We will check that out as well.
Configure the IP address statically.
We created an internal switch, and it does not have any IP address assigned to it. Hence your windows 11 VM will get an APIPA IP address. And no IP on the Ubuntu side.
Let’s configure the static IP address on the internal switch on your HOST machine.
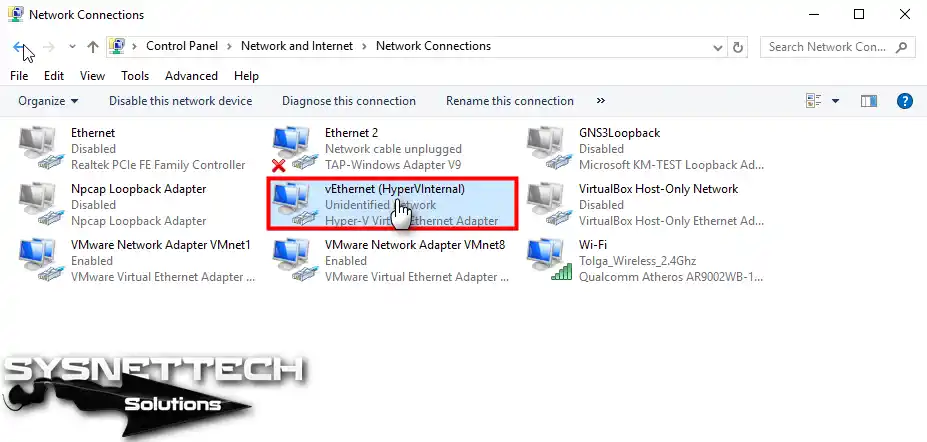
On your host machine, Goto àStartàRunàType ‘ncpa.cpl’
- Right click on the internal switch adapter and click on properties.
- Choose internet protocol version 4, and click on Properties.
- Enter the IP address of your choice.
I am choosing the 10.100.1.0/24 subnet.
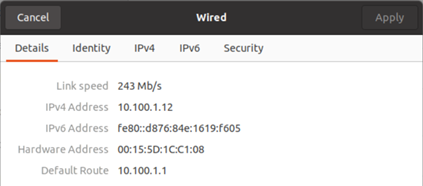
Basically, your host machine has the IP address 10.100.1.1 on the internal network.
Assign the internal network to the hyper-v VM’s.
Right-click on the VM and click on settings. Under the network adapter, choose the internal network that we just created.
Just like how we configured the IP address on the host machine, you may also configure the IP address on the virtual machine.
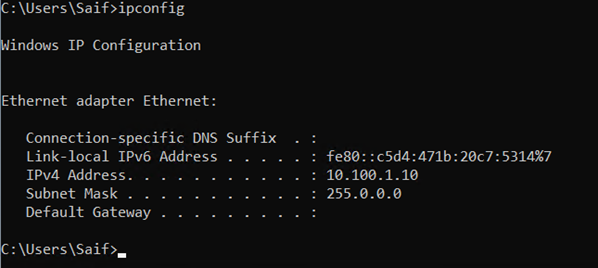
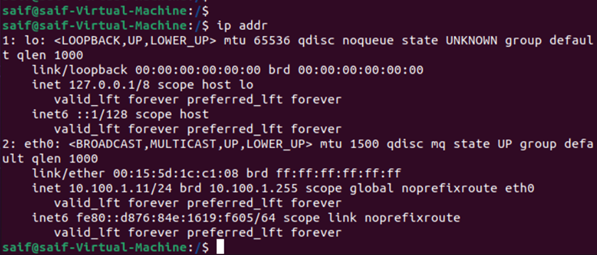
As you can see, I configured 10.100.1.10 from the same subnet 10.100.1.0/24 on windows 11 VM.
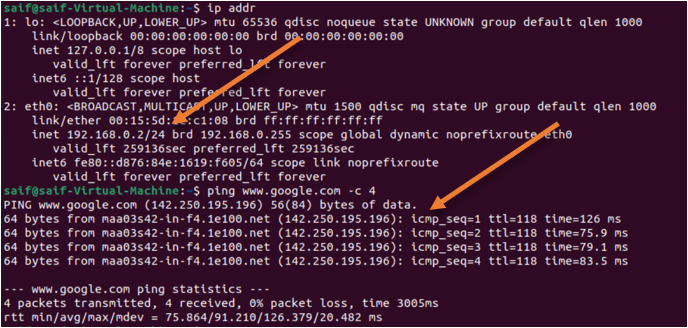
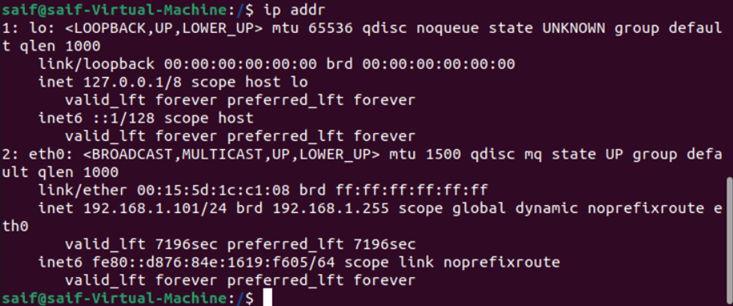
And 10.100.1.12 on the Ubuntu.
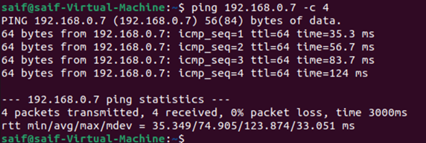
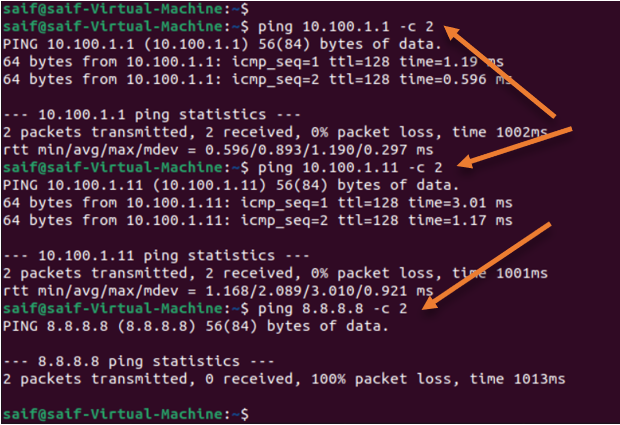
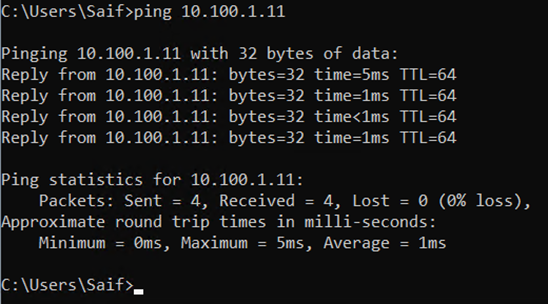
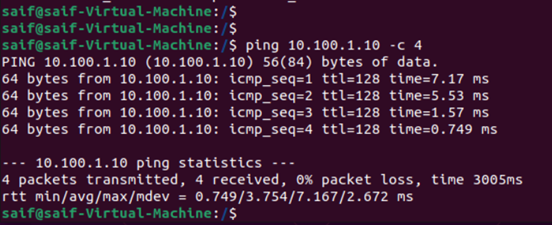
Lets try to ping the host IP address, as you can see we can reach the host IP address just fine.
Also the windows 11 VM, But you cannot reach the internet.
Test with DHCP server in an internal switch.
I have spun up another VM that acts as a DHCP server and is connected to the internal switch.
I have configured both the windows 11 and Ubuntu VM as DHCP clients.
As soon as the DHCP server came up, both got the IP address from the DHCP server.

In Internal switch the VM can talk to;
- The host machine.
- Other VM’s.
Cannot talk to;
- Internet.
- Local area network.
4. Hyper-v Private network.
As the name suggests the private network is kind of like an isolated network where the VM’s in the hyper-v can communicate with the other VM’s in the same private network, but not to the HOST machine, and neither toward the internet. It is very appropriate for a testing environment.
It will be useful, when you want to simulate, for example a firewall network, where the WAN side of the firewall can connect to the external network and the LAN side can connect to the private network. To get to the internet in the private network has to go via the firewall. But by default Private switch VM’s cant talk to anything but to each other.
How to create a private switch in hyper-v?
- Open Hyper-V Manager.
- Click on Virtual switch manager on the right side.
- The virtual switch manager window would pop up.
- Click on New virtual network switch.
- Choose Private and click on Create a switch.
- Name the VM.
- Choose a private network and click on Apply.
Switch the VM to a private network and test the connectivity.
Just like before switch the virtual network switch from external to the private switch in hyper-v.
Test the private network in Hyper-v.
I moved windows 11 and the Ubuntu machine to the private network.
On both the VM’s I disabled the network adapter and enabled back.
Similar to the internal networks both of them don’t have an IP address assigned to it. Because there is no DHCP service, the only difference between the internal and the private network is that in an internal network, not only you can communicate with the VM’s, but you can also communicate with the host machine, whereas in a private switch you can communicate with the VM’s. However, you cannot communicate with the host.
Test the private connectivity with the static IP.
- On the host machine, if you try to change the IP, you can not because there is really no adapter. As you can see only, Default, External and Internal have the network adapters created on the host machine. There is no private adapter, which proves that there is no way you can make the VM to communicate with the host machine.
- Windows 11 and the Ubuntu are are configured with the IP address from the same network, and there is no default gateway configured because there aren’t any.
Windows 11 IP configuration.
Ubuntu IP configuration.
And you can ping between them as well.
In Private switch the VM’s can talk to;
- Other VM’s in the same internal switch.
Cannot talk to;
- Hosts.
- LAN.
- Internet.
Conclusion.
In conclusion, Hyper-V virtual switches offer a powerful tool for optimizing your virtual network configuration. By understanding the different types of virtual switches and when to use them, you can create a more efficient and streamlined network. With the step-by-step instructions provided, you can confidently manage your virtual switches in Hyper-V and ensure your network is running smoothly.