
You are here:
Home » Windows 10 » How To Install Windows Fax And Scan In Windows 10
Windows 10 ships with several apps. One of them is Scan. The Scan app was introduced to replace the classic Windows Fax and Scan program, as it has not seen updates for a long time. Additionally, the Fax function is no longer required.
The new inbox Scan app is pretty good. It offers all the features available in Windows Fax and Scan. However, the Scan app, at times, fails to detect the scanner or throws errors during a scan. Because of this, many users prefer using the old Windows Fax and Scan program.
While Windows Fax and Scan is very much part of Windows 10, many users have noticed that Windows Fax and Scan is missing from their Windows 10 installations. If the Windows Fax and Scan app is missing from your Windows 10 PC and you would like to use it instead of the Scan app, luckily, you can install it again with a few clicks.
Here is how to install Windows Fax and Scan in Windows 10.
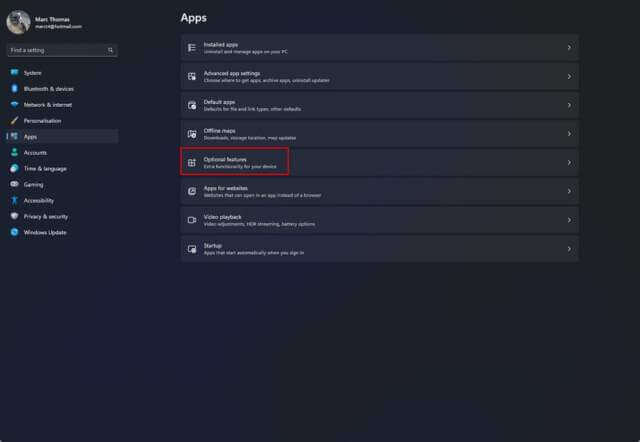
Step 1: Launch the Windows 10 Settings app using search or Windows logo + I hotkey. On the Settings app home page, click System and then click Optional features located in the left pane.
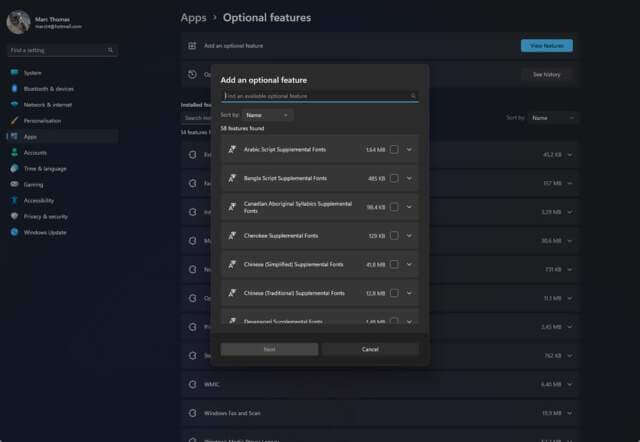
Step 3: Next, click the Add a feature button.

Step 4: On the resulting dialog box, scroll down the list to see Windows Fax and Scan. Select the Windows Fax and Scan entry and then click the Install button to begin installing the Windows Fax and Scan program.

NOTE: If the Windows Fax and Scan is missing from the list, it’s likely because the program has already been installed on your Windows 10 computer. Please use the Start/taskbar search again to find the program.
The installation process might take a few minutes. The Settings app shows the installation progress. Once installed, if asked, please restart your Windows 10 PC once. That’s it!

If you are using Windows Fax and Scan, you might like to read our guide on how to save scanned documents in PDF.
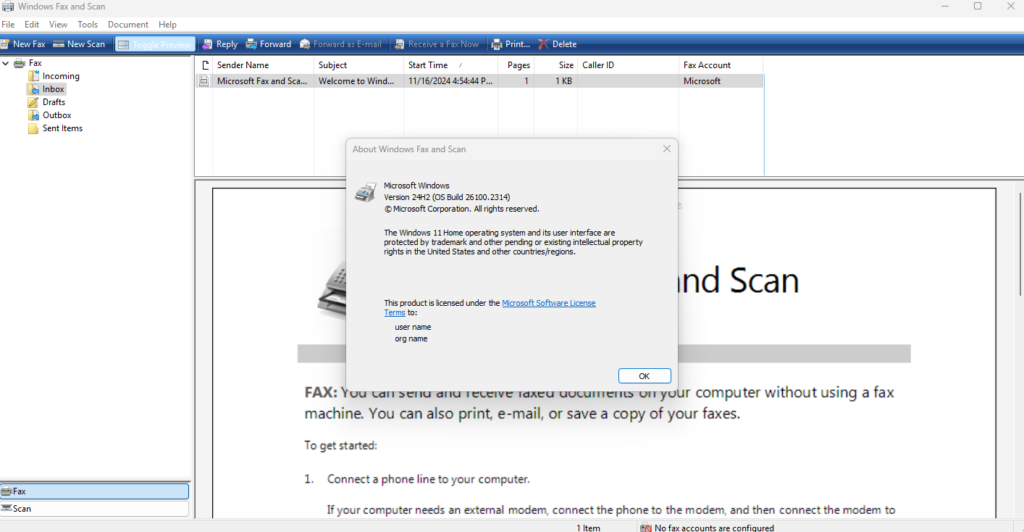
Windows Fax and Scan is an integrated faxing and scanning application introduced in Windows Vista and included in the Business, Enterprise, and Ultimate Windows Vista editions as the replacement for the Fax Console of Windows XP; it is available in all versions of Windows 7, Windows 8, Windows 10 (x86/x64) and Windows 11 (x64),[1] but not on ARM64 versions of Windows 10 and Windows 11.[2]
Windows Fax and Scan
|
Windows Fax and Scan running on Windows 10 |
|
| Developer(s) | Microsoft |
|---|---|
| Operating system | Windows Vista, Windows 7, Windows 8, Windows 8.1, Windows 10, Windows 11 |
| Predecessor | Fax Services of Windows XP |
| Type | Fax and scan application |
Windows Fax and Scan supports sending and receiving faxes, faxing or emailing scanned documents, and forwarding faxes as email attachments.
With Windows Fax and Scan users with computers that have fax modems can send and receive faxes, and fax scanned documents. Without a fax modem, users can email scanned documents and forward faxes as email attachments from their computer. WFS supports one-click scanning of documents from locally connected scanners, network-connected scanners and multifunction devices. Even though this can be used for most types of documents, WFS is optimized for scanning, viewing and storing text documents.[3]
WFS is available in Windows Vista Ultimate and as an optional component in Windows Vista Enterprise. WFS is not available on Vista Home Basic or Vista Home Premium. It is also available in all x86 and x64 versions of Windows 7, Windows 8, Windows Server 2008 and Windows Server 2012.[4]
The Fax View of WFS is an enhancement of the Fax Services component which was an installable option in the Windows XP operating system. New features include a fax account model, improved composition features, the ability to save faxes in composition as drafts, and a preview pane. It is also possible to right click on a file and send it as a fax. To send and receive faxes users can create either a local fax modem account to use a locally attached fax-capable modem or a shared fax server account to use a network fax server.[5] The Windows Fax and Scan software is not an internet fax application. Therefore, it must be used with an analog phone line.[6]
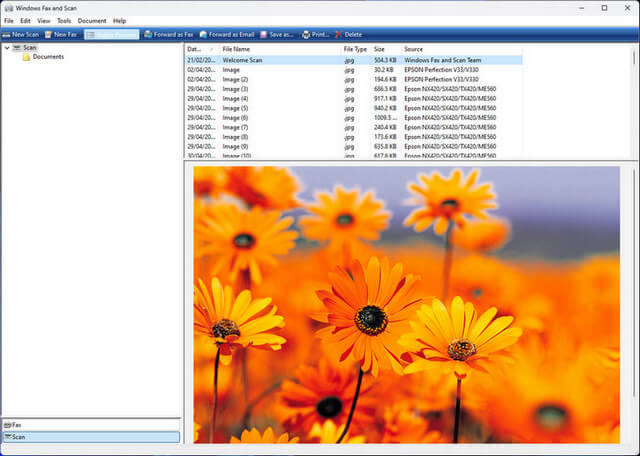
The Scan View of WFS has a user interface to manage scanned documents. It allows the creation, renaming and moving of folders from a single view. The preview pane shows documents scanned. Users can create profiles for particular scanners and save them for future scanning, and can directly route the scanned documents to their mailboxes after configuring the mail settings. The ‘Fax from Scanner’ feature allows directly faxing the document from the scanner.
Beyond the basic capabilities, is a step towards Unified Messaging, in bringing together the management of related media like faxes, emails, digital documents, etc.[4]
- Microsoft Fax
- ^ «Overview of Fax Server and Fax Service Manager». TechNet. Microsoft. November 17, 2009. Retrieved February 21, 2021.
- ^ «Windows Arm-based PCS FAQ».
- ^ Windows Photo Gallery is better suited for scanning photos and pictures and can store them in the Pictures folder.
- ^ a b Brien M. Posey (September 12, 2006). «Why Windows Vista’s Fax and Scan is Worth Paying Attention to». Windows Networking. TechGenix Ltd. Archived from the original on August 18, 2010. Retrieved June 28, 2010.
- ^ Harvey, Greg (2007). Windows Vista for Dummies Quick Reference. Wiley Publishing. p. 122. ISBN 978-0-471-78326-8.
- ^ «Windows help & learning — Microsoft Support». Archived from the original on 2012-01-06. Retrieved 2012-01-04.
- Simpson, Alan; Todd Meister (2007). «Faxing and Scanning». Alan Simpson’s Windows Vista Bible. Indianapolis: John Wiley & Sons. pp. 853–868. ISBN 978-0-470-04030-0. OCLC 71833410.
- Windows Vista: Faxing and Scanning Windows Vista Features; Microsoft.
Windows Fax and Scan is a useful built-in utility program in Windows that allows users to:
- Scan documents using a connected scanner
- Send and receive faxes through a fax modem or fax server
- View, edit, and organize scanned documents and faxes
- Save scanned documents in various formats (like PDF, JPEG, or PNG)
In Windows 11, it is not included by default, unlike the previous versions. So here is how to add it:
Open Windows Settings (Win key + I) and click on System.
From the right pane, scroll down and click on Optional features.
Then, click on Add an optional feature > View features.

Either search for Windows Fax and Scan or scroll down and select it from the list of available features that can be added.
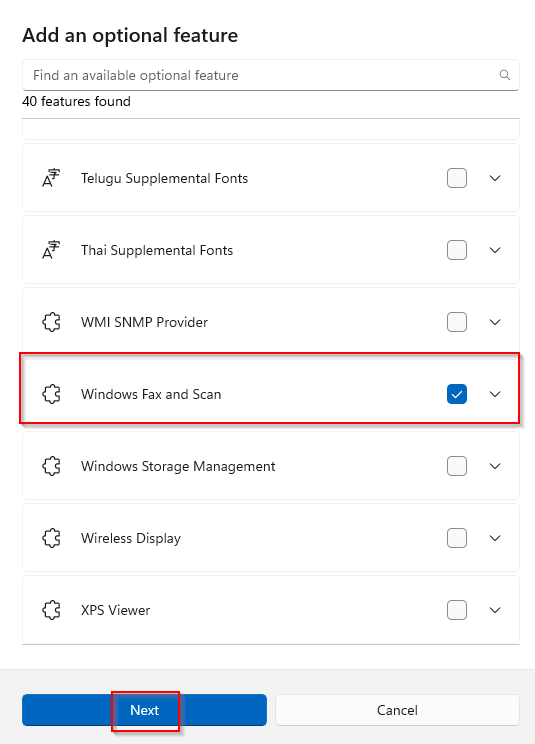
Click the Next button to proceed.
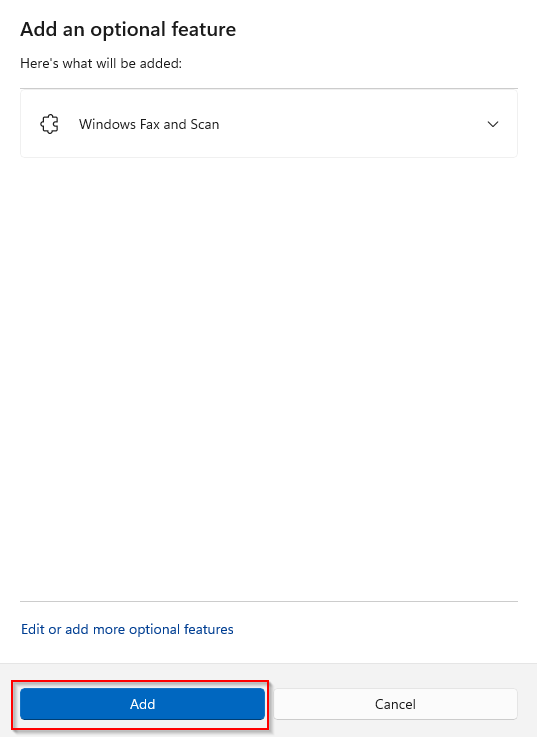
Click Add to begin installation. It will be shown as being added under the Recent actions section.
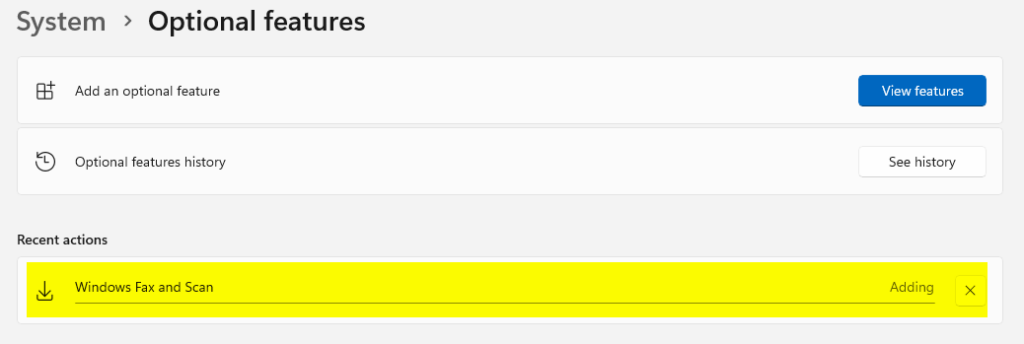
Wait for the installation to complete.
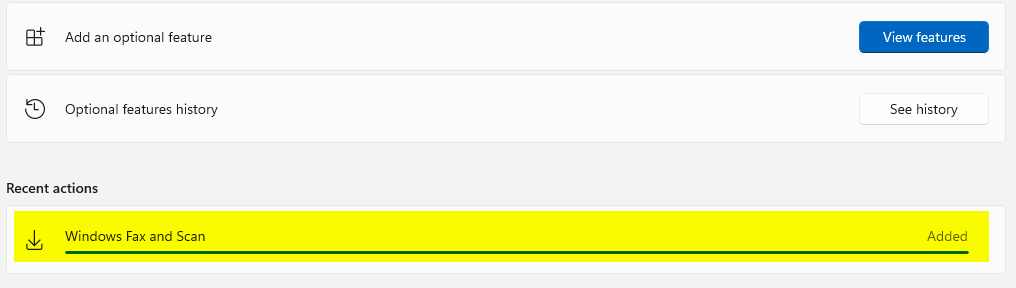
You can then search for it from the Start menu and launch it.
All done.
Windows Fax and Scan is a useful built-in tool in Windows 10 that allows you to send and receive faxes, as well as scan documents and images directly from your computer. It eliminates the need for a separate fax machine and streamlines your document management process. In this tutorial, we will guide you through the step-by-step process of setting up Windows Fax and Scan in Windows 10.
Step 1: Open the Windows Fax and Scan application. You can do this by typing «Fax and Scan» in the Windows search bar and selecting the corresponding result.
Step 2: Click on the «Tools» menu at the top of the application window and select «Fax Accounts.«
Step 3: In the «Fax Accounts» window, click on the «Add» button.
Step 4: Follow the on-screen instructions to set up a new fax account. You will need to provide your fax number and configure the settings for receiving and sending faxes.
Step 5: Once your fax account is set up, click on the «New Fax» button in the application window to create a new fax.
Step 6: In the new fax window, enter the recipient’s fax number and add any attachments or cover pages as needed.
Step 7: Click on the «Send» button to send your fax. Windows Fax and Scan will handle the rest, including dialing the recipient’s fax number and transmitting the fax.
| Pros | Cons |
|---|---|
| 1. Eliminates the need for a physical fax machine. | 1. Requires a fax modem or an Internet faxing service. |
| 2. Allows easy management of received and sent faxes. | 2. May require additional configuration for proper operation. |
| 3. Integrates seamlessly with the Windows 10 operating system. | 3. Limited customization options compared to dedicated fax software. |
Setting up Windows Fax and Scan in Windows 10 can be a convenient and efficient way to manage your faxing needs directly from your computer. By following the steps outlined in this tutorial, you can easily configure Windows Fax and Scan and start sending and receiving faxes hassle-free.
Video Tutorial:Why won t Windows Fax and Scan work?
How do I enable Windows Fax and Scan in Windows 10?
To enable Windows Fax and Scan in Windows 10, you can follow these steps:
1. First, click on the Start Menu or press the Windows key on your keyboard to open the Start menu.
2. In the search bar, type «Windows Fax and Scan» and select the app from the search results.
3. If you don’t see the app in the search results, it may not be installed on your system. In that case, you can install it by following these steps:
a. Open the Control Panel by typing «Control Panel» in the search bar and selecting it from the results.
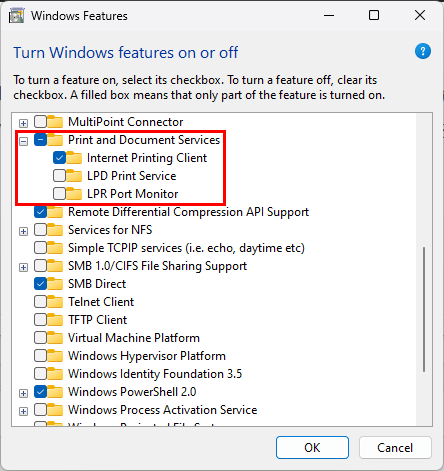
b. In the Control Panel, click on «Programs» and then select «Turn Windows features on or off» under the «Programs and Features» section.
c. In the Windows Features dialog box, scroll down and locate «Print and Document Services.» Expand the option by clicking on the «+» sign next to it.
d. Check the box next to «Windows Fax and Scan» and then click «OK.«
e. Windows will install the necessary components, and once the process is complete, you can access Windows Fax and Scan from the Start menu as mentioned in step 2.
4. After opening the Windows Fax and Scan app, you can set up your fax settings and configure a fax connection if necessary. The app provides options for receiving, sending, and managing faxes, as well as accessing scanned documents.
By following these steps, you will be able to enable and use the Windows Fax and Scan feature on your Windows 10 system.
How do I set up a Windows Fax and Scan printer?
Setting up a Windows Fax and Scan printer is a straightforward process. Here’s how you can do it:
1. Ensure you have a compatible fax modem or a multifunction printer with fax capabilities connected to your computer.
2. Go to the Start menu and search for «Windows Fax and Scan.» Click on the corresponding result to open the application.
3. In the Windows Fax and Scan window, click on «New Fax» in the toolbar. This will launch the Fax Setup wizard.
4. The wizard will guide you through the setup process. Firstly, you’ll need to choose whether to connect to a fax modem or a fax server over the network. Select the appropriate option and follow the on-screen instructions.
5. If you’ve chosen to connect to a fax modem, you’ll need to specify the fax device and configure the settings, such as the incoming/outgoing fax routes and telephone dialing rules. Again, carefully follow the prompts to complete this step.
6. Once the setup is complete, you can start using the Windows Fax and Scan printer. You can send faxes either by creating a new fax or by printing a document directly to the fax printer.
7. To send a new fax, click «New Fax» in the toolbar. Fill in the recipient’s fax number, attach any necessary documents, and compose your message. Then click on the Send button to transmit the fax.
8. Additionally, you can send a fax from other applications by selecting the Print option and then choosing the Windows Fax and Scan printer from the list of available printers.
9. To receive faxes, ensure your computer is turned on and connected to the fax modem or fax server. Incoming faxes will be routed to the Windows Fax and Scan application automatically, and you can view, save, or print them from there.
Setting up a Windows Fax and Scan printer allows you to send and receive faxes directly from your computer, providing a convenient and paperless solution for your faxing needs.
Is Windows 10 fax free?
Windows 10 does not include a built-in faxing feature. However, there are third-party software options available that allow users to send and receive faxes on a Windows 10 computer.
Here’s how you can send and receive faxes on Windows 10 using third-party software:
1. Research and choose a reliable third-party fax software: Look for reputable fax software providers that are compatible with Windows 10. Read reviews and compare features to find the one that best suits your needs.
2. Install the fax software: Download and install the chosen fax software on your Windows 10 computer. Follow the installation instructions provided by the software provider.
3. Set up your fax account: Launch the fax software and set up your fax account credentials. This typically involves providing your fax number and configuring the necessary settings.
4. Send a fax: To send a fax, open the fax software and create a new fax message. Enter the recipient’s fax number and attach any necessary documents. Follow the software’s instructions to send the fax.
5. Receive a fax: When a fax is sent to your fax number, the third-party software will receive it and store it on your computer. You can access the received faxes through the software’s interface.
Remember, using third-party software may incur costs associated with fax services. Be sure to review the pricing plans and any applicable fees before selecting a fax software provider.
Yes, Windows 10 does have the Windows Fax and Scan feature. This feature allows users to send and receive faxes using a fax modem or an installed fax device. Here are the steps to locate and use the Windows Fax and Scan feature on Windows 10:
1. Click on the Start menu and type «Windows Fax and Scan» in the search bar.
2. Click on the Windows Fax and Scan app that appears in the search results. The app will open.
3. To send a fax, click on the «New Fax» button in the toolbar. Follow the prompts to compose and send your fax.
4. To receive a fax, make sure your fax device or fax modem is properly connected to your computer. Incoming faxes will be automatically detected and displayed in the Windows Fax and Scan app.
It’s worth mentioning that the availability of the Windows Fax and Scan feature may depend on the edition of Windows 10 you are using. Some versions, such as Windows 10 Home, might not have this feature included by default. In such cases, you can explore the possibility of installing third-party fax software as an alternative.
Note: The information provided regarding Windows 10 and its features is based on the assumption that this is the information available up until 2023 and the features related to Windows Fax and Scan are accurate as of that time.
Why is Windows Fax and Scan not on my computer?
Windows Fax and Scan is a built-in feature in the Windows operating system that allows users to send and receive faxes directly from their computer. However, there could be several reasons why it is not available on your computer. Here are some possible explanations:
1. Windows Edition: The availability of Windows Fax and Scan can vary depending on the edition of Windows that you are using. This feature is typically included in the professional and enterprise editions of Windows but may not be available in the home or basic editions. Check your Windows edition to determine if it includes this feature.
2. Windows Components: It is possible that Windows Fax and Scan has not been installed or enabled on your computer. In some cases, certain Windows components or features are not automatically installed during the operating system installation process. You can manually check if Windows Fax and Scan is installed by following these steps:
– Go to the Control Panel.
– Select «Programs» or «Programs and Features.«
– Click on «Turn Windows features on or off» option.
– Look for «Windows Fax and Scan» in the list of features. If it is not checked, select it and click «OK» to install it.
3. Missing Driver or Hardware Support: Windows Fax and Scan requires a compatible fax modem or an all-in-one printer with fax capabilities to function properly. If your computer does not have the necessary hardware or if the drivers for the hardware are not installed correctly, Windows Fax and Scan may not appear. Ensure that you have the appropriate hardware and that the required drivers are installed.
4. Regional and Language Settings: The availability of Windows Fax and Scan can also vary depending on your region and language settings. It is possible that the feature is limited or not supported in your specific language or region. Check the regional and language settings in your computer’s control panel to verify if there are any limitations.
In conclusion, the absence of Windows Fax and Scan on your computer could be due to various reasons, including the Windows edition, installation status, missing drivers or hardware support, and regional and language settings. Checking these factors will help you determine why the feature is not present and take necessary steps to resolve the issue.
Windows Fax And Scan was first introduced in Windows Vista back in 2007 and has been an integral part of Windows ever since… if you can find it. Some may wonder why I’m writing about a program that’s 16 years old, especially since hardly anyone uses Fax anymore, apart from during the pandemic when the beleaguered machines saw a mini-resurgence, but that’s another story. It’s the scanning part of the program that I enjoy using, but in recent versions of Windows 11 it isn’t available by default and you have to go looking for it.
Avoid The Windows Scan App
Clearly, Microsoft wants you to move on and never touch their legacy programs ever again, but they can’t fool me. I recently carried out a clean Windows 11 installation on a machine I use solely for VHS digitalisation, scanning, and other customer-based work, only to find that Windows Fax And Scan (WFS) was not available through traditional routes, no matter how hard I tried. In the end, I was forced to install the quite atrocious Windows Scan from the Microsoft Store until I could find a solution.
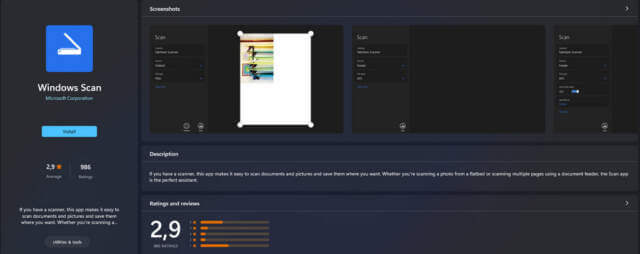
Let’s get one thing clear – a computer program is usually a fully featured, serious piece of software, which is what WFS is, but more on that in a minute. Windows Scan on the other hand is a hideous piece of software masquerading as a scanning program, but in reality, is nothing more than a dumbed-down crap app.

If WFS isn’t available, the normal route would be to look in Windows Optional Features by hitting the Win key + R, then typing optionalfeatures and looking in Print and Document Services, but in recent Windows updates to Windows settings, that has been changed. When installed, WFS.exe would normally be found in the Windows/System32 folder, by the way.
Instead, we need to go to Windows settings, Win + I, select Apps, then Optional Features, and finally, View Features. In the Search bar, you can specify which feature or program you are looking for.
I can’t replicate the WFS installation here because once it’s installed, it doesn’t show up in the list for some reason, but you can be sure that the program is there and will install as it did for me. The reason I enjoy this little program is that it’s simple to use, and has many useful features such as file type to Save as, and cropping of the preview image, among other features. Besides, one gets used to using programs that one feels comfortable with.
In conclusion, if you want to use an excellent scanning program with plenty of features that are sadly lacking in the Store app, this is the way to go.
—