
Networking / Beginners
Configuring a Windows client for DHCP is easy. The DHCP client is automatically
included when you install the TCP/IP protocol, so all you have to do is
configure TCP/IP to use DHCP. To do this, bring up the Network Properties
dialog box by choosing Network or Network Connections in the Control Panel
(depending on which version of Windows the client is running). Then, select
the TCP/IP protocol and click the Properties button. This brings up the TCP/IP
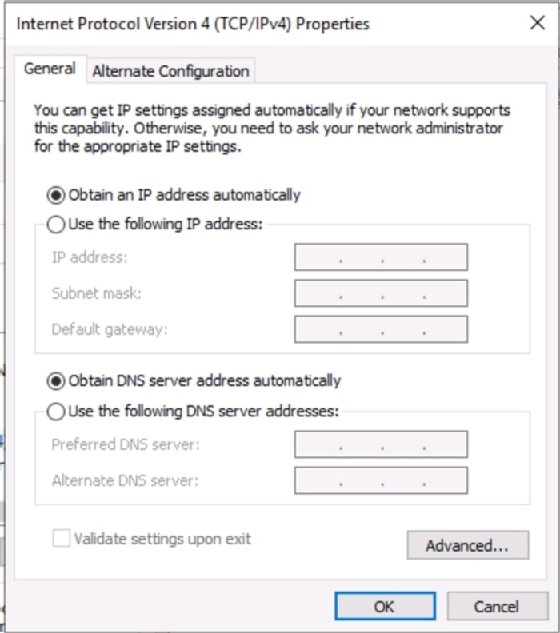
Properties dialog box. To configure the computer
to use DHCP, select the Obtain an IP Address Automatically option and the
Obtain DNS Server Address Automatically option.
Automatic Private IP Addressing
If a Windows computer is configured to use DHCP but the computer can’t
obtain an IP address from a DHCP server, the computer automatically
assigns itself a private address by using a feature called Automatic Private IP
Addressing, or APIPA for short. APIPA assigns a private address from the
169.254.x.x range and uses a special algorithm to ensure that the address is
unique on the network. As soon as the DHCP server becomes available, the
computer requests a new address, so the APIPA address is used only while
the DHCP server is unavailable.
Renewing and releasing leases
Normally, a DHCP client attempts to renew its lease when the lease is halfway
to the point of being expired. For example, if a client obtains an eight-day
lease, it attempts to renew the lease after four days. However, you can renew
a lease sooner by issuing the ipconfig /renew command at a command
prompt. You may want to do this if you’ve changed the scope’s configuration
or if the client’s IP configuration isn’t working correctly.
You can also release a DHCP lease by issuing the ipconfig /release
command at a command prompt. When you release a lease, the client computer
no longer has a valid IP address. This is shown in the output from the
ipconfig /release command:
C:\>ipconfig /release

Windows IP Configuration

Ethernet adapter Local Area Connection:

	Connection-specific DNS Suffix . :
	IP Address. . . . . . . . . . . . : 0.0.0.0
	Subnet Mask . . . . . . . . . . . : 0.0.0.0
	Default Gateway . . . . . . . . . :
Here, you can see that the IP address and subnet masks are set to 0.0.0.0 and
the Default Gateway address is blank. When you release an IP lease, you
can’t communicate with the network by using TCP/IP until you issue an
ipconfig /renew command to renew the IP configuration or restart the computer.
IP addresses serve as one of the primary ways of identifying nodes on the network. Administrators use these logical addresses to place devices on the network in specific segments, control access to the devices via routers and firewalls, and map network devices for client machines.
IP addresses are configured on client systems in two ways:
- Manual assignment. Referred to as static IP addresses, the addresses are manually configured on the device. No typographical errors or duplicates are acceptable.
- Automatic assignment. Referred to as dynamically assigned addresses, the IP settings are leased from a Dynamic Host Configuration Protocol (DHCP) server that holds a pool of available addresses.
Most end-user devices — e.g., desktop computers, laptops, phones, tablets, etc. — are configured as DHCP clients by default. This is an OS setting controlled by administrators. Client systems receive their IP address configurations dynamically because these devices are often transient on the network and frequently move between networks. Because they frequently move, they need different IP configurations depending on location. For example, a laptop in a business office needs one set of network configurations for internet connectivity. But, when that laptop is moved to a coffee shop or home network, it needs a different set of configurations.
While most OSes typically default to DHCP clients, administrators still need to know how to manipulate and troubleshoot these settings, whether on Windows, Linux or macOS.
Windows DHCP client configuration
It may be easiest to discover whether a Windows device is configured as a DHCP client by using the command line.
Windows command line
Open a command prompt or Windows PowerShell console, and then type ipconfig /all. Look for a line in the output that reads DHCP Enabled and a corresponding Yes or No value. Yes means the device is a DHCP client and receives its IP address configuration from a DHCP server. A little further below in the output are the DHCP server’s IP address and info about when the lease was obtained and expired.
Administrators can refresh the DHCP lease by using two simple commands:
PS C:\> ipconfig /release
PS C:\> ipconfig /renew
The ipconfig /release command clears the current IP address configuration. The ipconfig /renew command causes the client to initiate the four-step DHCP lease generation process. This process provides the client with an updated IP address configuration, which likely includes the IP address, subnet mask, name resolution server and router information.
Windows GUI
For administrators who are more comfortable with the Windows GUI, various consoles display much of the same information. Admins can access network configuration information in Windows using several methods.
On Windows Server, launch Server Manager, select Local Computer and then select the IP address information in the Ethernet entry. Likely, this information reads IPv4 address assigned by DHCP.
The two available radio buttons configure the device as a DHCP client or a static IP address assignment.
Linux DHCP client configuration
Many common Linux distributions exist, so managing DHCP from the Linux GUI can vary a great deal. Managing Linux from the Bash shell is usually more consistent.
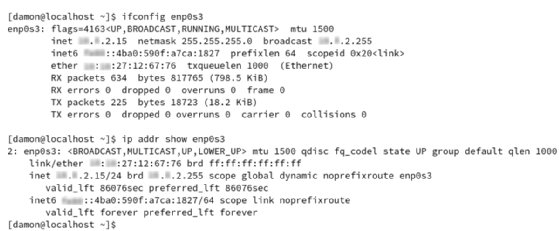
Recall that two common commands display IP address settings in Linux: ifconfig and ip. The ifconfig command is older, simpler and less comprehensive. Some distributions make both commands available, while, on other distros, only one or the other is present.
Type the following commands to display the current IP address settings for a given interface, such as enp0s3:
$ ifconfig enp0s3
$ ip addr show enp0s3
To see whether a system is configured as a DHCP client, administrators can view the contents of network configuration files. The file name and path vary by distribution.
Ubuntu
To view the DHCP configuration status on older Ubuntu Linux versions, display the contents of the /etc/network/interfaces file. If the system has more than one network interface card, you need to know which interface to look for.
Note that, in the above example, the lines auto eth0 and iface eth0 inet dhcp indicate the interface is a DHCP client. If an IP address was statically assigned, the lines would display an IP address, subnet mask and other network information.
To renew the configuration, type the following commands:
$ dhclient -r
$ dhclient
The first command uses the -r option, which releases the current configuration. The second command initiates the lease generation process.
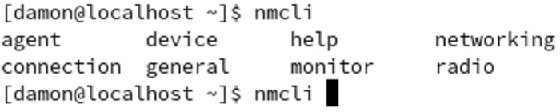
Ubuntu 20.04 uses Network Manager to handle network configurations. Type the nmcli command to display the current interfaces. Note the interface ID, which will be something like enp0s3.
Refresh the DHCP configuration by downing and upping the interface:
$ nmcli con down enp0s3
$ nmcli con up enp0s3
Use the ip addr command to display the updated IP address settings.
Fedora
Fedora Linux, another popular distribution, also relies on Network Manager for IP address settings. The nmcli commands and GUI interface are similar to those found on Ubuntu. Again, various distributions handle networking differently, so be sure to check the documentation for the specific distro and version.
Linux GUI
Various Linux distributions have graphical tools for managing network settings. These tools enable administrators to configure IP address settings. The following example shows possible settings on an Ubuntu system.
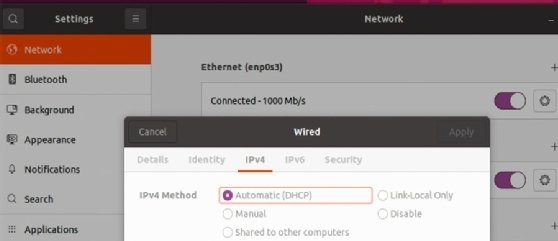
The settings in the GUI are basically the same as those found in the Windows GUI tools.
MacOS DHCP client configuration
The configuration of a macOS DHCP client is equally straightforward.
MacOS command line
The zsh is the default shell in macOS. To manipulate network settings from the command line, first, open the Terminal, and then use the following command:
% sudo ipconfig getpacket en0 dhcp
In this example, en0 represents the interface identity. Type the ifconfig command to identify the interfaces.
To configure an interface as a DHCP client, type the following command:
% sudo ipconfig set en0 DHCP
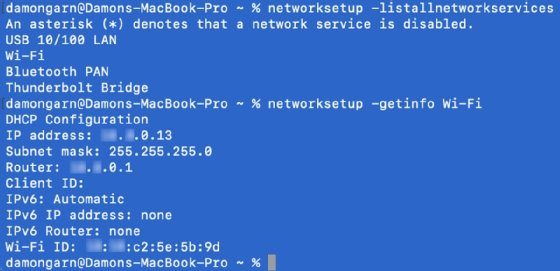
The newer networksetup command can also be used to display DHCP lease information for specific interfaces. First, determine which interface to gather information for, and then display that information — in this case, for the Wi-Fi interface — using the following commands:
networksetup -listallnetworkservices
networksetup -getinfo Wi-Fi
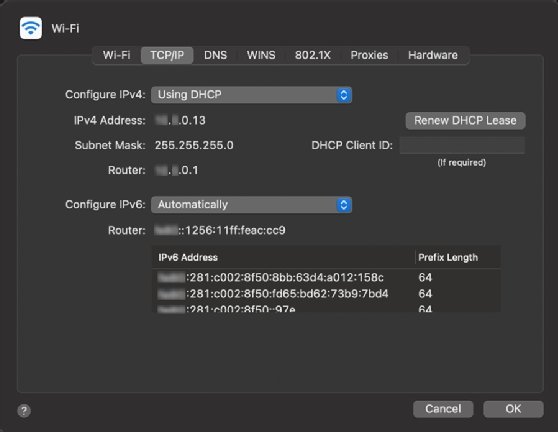
MacOS GUI
It is simplest to manage DHCP client status via the macOS GUI. Here is the path for the Wi-Fi interface:
System Preference > Network > Wi-Fi > Advanced > TCP/IP
Note there is a button to renew the IP address configuration. The Configure IPv4 pull-down menu allows the Using DHCP and Manually options for setting the IP address.
Wrap-up
Whether on Windows, Linux or macOS, IP address configuration and troubleshooting are critical. These OSes default to DHCP client settings. While managing systems via the GUI can be convenient, using command-line tools is often more efficient. Further, command-line tools are more flexible and scriptable. In some cases, such as Windows Server Core and many Linux deployments, a GUI is not available.
One of the most common troubleshooting steps for network connectivity issues is to renew the IP address configuration. Knowing the appropriate commands for each of the client types in a given network is a timesaver.
Последнее обновление: 12/14/2024
[Время, требуемое для чтения: 3,5 мин.]
Файлы Windows 7 Event Log, такие как Microsoft-Windows-Dhcp-Client%4Admin.evtx, считаются разновидностью файла System (Windows 7 Event Log). Они соотносятся с расширением EVTX, разработанным компанией Microsoft для Windows 10.
Первая версия Microsoft-Windows-Dhcp-Client%4Admin.evtx была выпущена для операционной системы Windows 8.1 10/18/2013 в составе Windows 8.1.
Последнее обновление для Windows 10 состоялось 07/29/2015 [версия файла 10].
Файл Microsoft-Windows-Dhcp-Client%4Admin.evtx включен в Windows 10, Windows 8 и Windows 7.
Ниже приведены подробные сведения о файле, порядок устранения неполадок, возникших с файлом EVTX, и бесплатные загрузки некоторых версий файла Microsoft-Windows-Dhcp-Client%4Admin.evtx.
Что такое сообщения об ошибках Microsoft-Windows-Dhcp-Client%4Admin.evtx?
Общие ошибки выполнения Microsoft-Windows-Dhcp-Client%4Admin.evtx
Ошибки файла Microsoft-Windows-Dhcp-Client%4Admin.evtx часто возникают на этапе запуска Windows, но также могут возникать во время работы программы.
Эти типы ошибок EVTX также известны как «ошибки выполнения», поскольку они возникают во время выполнения Windows. К числу наиболее распространенных ошибок выполнения Microsoft-Windows-Dhcp-Client%4Admin.evtx относятся:
- Не удается найти Microsoft-Windows-Dhcp-Client%4Admin.evtx.
- Microsoft-Windows-Dhcp-Client%4Admin.evtx — ошибка.
- Не удалось загрузить Microsoft-Windows-Dhcp-Client%4Admin.evtx.
- Ошибка при загрузке Microsoft-Windows-Dhcp-Client%4Admin.evtx.
- Не удалось зарегистрировать Microsoft-Windows-Dhcp-Client%4Admin.evtx / Не удается зарегистрировать Microsoft-Windows-Dhcp-Client%4Admin.evtx.
- Ошибка выполнения — Microsoft-Windows-Dhcp-Client%4Admin.evtx.
- Файл Microsoft-Windows-Dhcp-Client%4Admin.evtx отсутствует или поврежден.
Библиотека времени выполнения Microsoft Visual C++
Ошибка выполнения!
Программа: C:\Windows\System32\winevt\Logs\Microsoft-Windows-Dhcp-Client%4Admin.evtx
Среда выполнения получила запрос от этого приложения, чтобы прекратить его необычным способом.
Для получения дополнительной информации обратитесь в службу поддержки приложения.
В большинстве случаев причинами ошибок в EVTX являются отсутствующие или поврежденные файлы. Файл Microsoft-Windows-Dhcp-Client%4Admin.evtx может отсутствовать из-за случайного удаления, быть удаленным другой программой как общий файл (общий с Windows) или быть удаленным в результате заражения вредоносным программным обеспечением. Кроме того, повреждение файла Microsoft-Windows-Dhcp-Client%4Admin.evtx может быть вызвано отключением питания при загрузке Windows, сбоем системы при загрузке или сохранении Microsoft-Windows-Dhcp-Client%4Admin.evtx, наличием плохих секторов на запоминающем устройстве (обычно это основной жесткий диск) или заражением вредоносным программным обеспечением. Таким образом, крайне важно, чтобы антивирус постоянно поддерживался в актуальном состоянии и регулярно проводил сканирование системы.
Как исправить ошибки Microsoft-Windows-Dhcp-Client%4Admin.evtx — 3-шаговое руководство (время выполнения: ~5-15 мин.)
Если вы столкнулись с одним из вышеуказанных сообщений об ошибке, выполните следующие действия по устранению неполадок, чтобы решить проблему Microsoft-Windows-Dhcp-Client%4Admin.evtx. Эти шаги по устранению неполадок перечислены в рекомендуемом порядке выполнения.
Шаг 1. Восстановите компьютер до последней точки восстановления, «моментального снимка» или образа резервной копии, которые предшествуют появлению ошибки.
Чтобы начать восстановление системы (Windows XP, Vista, 7, 8 и 10):
- Нажмите кнопку «Пуск» в Windows
- В поле поиска введите «Восстановление системы» и нажмите ENTER.
- В результатах поиска найдите и нажмите «Восстановление системы»
- Введите пароль администратора (при необходимости).
- Следуйте инструкциям мастера восстановления системы, чтобы выбрать соответствующую точку восстановления.
- Восстановите компьютер к этому образу резервной копии.
Если на этапе 1 не удается устранить ошибку Microsoft-Windows-Dhcp-Client%4Admin.evtx, перейдите к шагу 2 ниже.

Шаг 2. Запустите средство проверки системных файлов (System File Checker), чтобы восстановить поврежденный или отсутствующий файл Microsoft-Windows-Dhcp-Client%4Admin.evtx.
Средство проверки системных файлов (System File Checker) — это утилита, входящая в состав каждой версии Windows, которая позволяет искать и восстанавливать поврежденные системные файлы. Воспользуйтесь средством SFC для исправления отсутствующих или поврежденных файлов Microsoft-Windows-Dhcp-Client%4Admin.evtx (Windows XP, Vista, 7, 8 и 10):
- Нажмите кнопку «Пуск» в Windows
- В поле поиска введите cmd, но НЕ НАЖИМАЙТЕ ENTER.
- Нажмите и удерживайте CTRL-Shift на клавиатуре, одновременно нажимая ENTER.
- Появится диалоговое окно запроса разрешения.
- В поле нажмите «ДА».
- Должен отображаться черный экран с мигающим курсором.
- На этом черном экране введите sfc /scannow и нажмите ENTER.
- Средство проверки системных файлов (System File Checker) начнет поиск неполадок, связанных с Microsoft-Windows-Dhcp-Client%4Admin.evtx, а также других неполадок с системными файлами.
- Для завершения процесса следуйте инструкциям на экране.
Следует понимать, что это сканирование может занять некоторое время, поэтому необходимо терпеливо отнестись к процессу его выполнения.
Если на этапе 2 также не удается устранить ошибку Microsoft-Windows-Dhcp-Client%4Admin.evtx, перейдите к шагу 3 ниже.
Шаг 3. Выполните обновление Windows.
Когда первые два шага не устранили проблему, целесообразно запустить Центр обновления Windows. Во многих случаях возникновение сообщений об ошибках Microsoft-Windows-Dhcp-Client%4Admin.evtx может быть вызвано устаревшей операционной системой Windows. Чтобы запустить Центр обновления Windows, выполните следующие простые шаги:
- Нажмите кнопку «Пуск» в Windows
- В поле поиска введите «Обновить» и нажмите ENTER.
- В диалоговом окне Центра обновления Windows нажмите «Проверить наличие обновлений» (или аналогичную кнопку в зависимости от версии Windows)
- Если обновления доступны для загрузки, нажмите «Установить обновления».
- После завершения обновления следует перезагрузить ПК.
Если Центр обновления Windows не смог устранить сообщение об ошибке Microsoft-Windows-Dhcp-Client%4Admin.evtx, перейдите к следующему шагу. Обратите внимание, что этот последний шаг рекомендуется только для продвинутых пользователей ПК.

Если эти шаги не принесут результата: скачайте и замените файл Microsoft-Windows-Dhcp-Client%4Admin.evtx (внимание: для опытных пользователей)
Если ни один из предыдущих трех шагов по устранению неполадок не разрешил проблему, можно попробовать более агрессивный подход (примечание: не рекомендуется пользователям ПК начального уровня), загрузив и заменив соответствующую версию файла Microsoft-Windows-Dhcp-Client%4Admin.evtx. Мы храним полную базу данных файлов Microsoft-Windows-Dhcp-Client%4Admin.evtx со 100%-ной гарантией отсутствия вредоносного программного обеспечения для любой применимой версии Windows . Чтобы загрузить и правильно заменить файл, выполните следующие действия:
- Найдите версию операционной системы Windows в нижеприведенном списке «Загрузить файлы Microsoft-Windows-Dhcp-Client%4Admin.evtx».
- Нажмите соответствующую кнопку «Скачать», чтобы скачать версию файла Windows.
- Копировать файл в соответствующий каталог вашей версии Windows:
- Перезагрузите компьютер.
Windows 7: C:\Windows\System32\winevt\Logs\
Windows 8: C:\Windows\System32\winevt\Logs\
Windows 8.1: C:\Windows\System32\winevt\Logs\
Windows 10: C:\Windows\System32\winevt\Logs\
Если этот последний шаг оказался безрезультативным и ошибка по-прежнему не устранена, единственно возможным вариантом остается выполнение чистой установки Windows 10.
СОВЕТ ОТ СПЕЦИАЛИСТА: Мы должны подчеркнуть, что переустановка Windows является достаточно длительной и сложной задачей для решения проблем, связанных с Microsoft-Windows-Dhcp-Client%4Admin.evtx. Во избежание потери данных следует убедиться, что перед началом процесса вы создали резервные копии всех важных документов, изображений, установщиков программного обеспечения и других персональных данных. Если вы в настоящее время не создаете резервных копий своих данных, вам необходимо сделать это немедленно.
Скачать файлы Microsoft-Windows-Dhcp-Client%4Admin.evtx (проверено на наличие вредоносного ПО — отсутствие 100 %)
ВНИМАНИЕ! Мы настоятельно не рекомендуем загружать и копировать Microsoft-Windows-Dhcp-Client%4Admin.evtx в соответствующий системный каталог Windows. Microsoft, как правило, не выпускает файлы Windows EVTX для загрузки, поскольку они входят в состав установщика программного обеспечения. Задача установщика заключается в том, чтобы обеспечить выполнение всех надлежащих проверок перед установкой и размещением Microsoft-Windows-Dhcp-Client%4Admin.evtx и всех других файлов EVTX для Windows. Неправильно установленный файл EVTX может нарушить стабильность работы системы и привести к тому, что программа или операционная система полностью перестанут работать. Действовать с осторожностью.
Problem Description
Today, I have updated my Nvidia Graphics Card Driver and rebooted my Windows 10 PC (Version 1909). Once I logged in to my PC, I realized that I don’t have an Internet Connection anymore. I immediately checked my network cable and eveything was ok. Afterwards I opened the Event Viewer (Start > Run > EventVwr.msc) and checked the administrative events and saw that my Network Adapter (Intel(R) Ethernet Connection (5) I219-LM) couldn’t get an IP Address from the DHCP and ended up with error code 0x79.
[SquareFixedAdInParagraph]
Event Log
Log Name: Microsoft-Windows-Dhcp-Client/Admin
Source: Microsoft-Windows-Dhcp-Client
Date: 4/1/2020 11:23:56 PM
Event ID: 1003
Task Category: Address Configuration State Event
Level: Warning
Keywords: (1)
User: LOCAL SERVICE
Computer: ComputerName
Description:
Your computer was not able to renew its address from the network (from the DHCP Server) for the Network Card with network address 0x54E1AD63FA01. The following error occurred: 0x79. Your computer will continue to try and obtain an address on its own from the network address (DHCP) server.
Microsoft’s legendary “Microsoft Error Lookup Tool” was already installed on my PC so I checked for error code 0x79. Unfortunately, this error code wasn’t defined inside the related *.h file.
[SquareFixedAdInParagraph]
Error Code
C:\Users\Cengiz Kuskaya>err 0x79
# for hex 0x79 / decimal 121
SQL_121_severity_15                                            sql_err
# The select list for the INSERT statement contains more
# items than the insert list. The number of SELECT values
# must match the number of INSERT columns.
MISMATCHED_HAL                                                 bugcodes.h
csierrOdc_ScopeError                                           csiErrorDefinitions.h
NMERR_NO_DLLS_FOUND                                            netmon.h
ERROR_SEM_TIMEOUT                                              winerror.h
# The semaphore timeout period has expired.
# as an HRESULT: Severity: SUCCESS (0), FACILITY_NULL (0x0), Code 0x79
# for hex 0x79 / decimal 121
ERROR_SEM_TIMEOUT                                              winerror.h
# The semaphore timeout period has expired.
# 6 matches found for "0x79"
I have decided to disable and enable the Network Adapter to get an new IP Address from the DHCP Server and to flush the DNS Cache but with no luck.
[SquareFixedAdInParagraph]
Solution
As last option I decided to reboot my PC and BINGO. I was able to get an IP Address from the DHCP. I haven’t further investigated into this problem but it looks like that somehow the Network Card Drivers couldn’t be loaded properly therefore if you continuously experience this problem I would strongly recommend to delete the Network Card Driver from Device Management and use the Microsoft’s built-in Inbox Drivers.
Good luck !
If you wonder how basic network configuration is managed across your environment, today is your lucky day. You’ll learn how to connect to your Microsoft DHCP server and manage all of the common components from DHCP scopes, DHCP policies, DHCP reservations, and DHCP leases!
Not a reader? Watch this related video tutorial!
Not seeing the video? Make sure your ad blocker is disabled.
Prerequisites
This article is a tutorial. If you plan on following along step-by-step, you will need the following:
- A Microsoft DHCP Server in an Active Directory environment- This tutorial uses Windows Server 2019, but any server from 2008R2 onwards would work. The server is called dc01.stevesherry.com.
- An Active Directory account that is a member of the DHCP Administrators group or equivalent.
DHCP Scopes
At its simplest, a Microsoft DHCP server is a machine on a network that hands out IP addresses to clients. It ensures all clients receive IP addresses so they can communicate on the network. It does this through DHCP scopes.
A DHCP scope represents contains various components such as:
- Assignable IP addresses for a particular group of devices (address pools)
- A client’s DNS server and default gateway
- IPs to only assign to certain devices (DHCP reservations)
- Address pools (groups of assignable IP addresses)
The DHCP scope is a core element on a network and that allows you to configure network settings common to all of the clients on that network.
Creating a DHCP Scope via Server Manager
Let’s kick off this tutorial by learning how to add DHCP scopes to an existing DHCP server. For this first demo, you’re going to learn how to set up a DHCP scope via the Windows Server Manager.
Assuming you’re at the Windows desktop of a test DHCP server:
1. Click on your Start menu and type dhcpmgmt.msc to open the DHCP Microsoft Management Console (MMC).
2. Once the DHCP MMC opens, click on the dropdown to the left of the server name and then on IPV4.
Microsoft DHCP Server supports both IPv4 and IPv6 address allocation to clients. This tutorial will only focus on IPv4 scopes.
3. Right click on IPv4 and select New Scope to start the New Scope Wizard, and click Next on the introduction screen.
4. Provide a name of your choice for the Name and Description. This tutorial will create a scope for the company’s head office. Click Next when complete.
Scopes are commonly assigned to physical buildings or sometimes IP subnets.
5. Next, define an IP Address Range indicating the IP address range you’d like to assign to the DHCP server’s clients. The tutorial will ensure the first IP address allocated to clients will be 10.0.0.100 and the last IP address will be 10.0.0.200. These start and end IP addresses create the scope’s address pool which you’ll learn about later.
Also on this screen, enter a CIDR Length or Subnet mask which will be assigned to all clients.
It is common to deliberately leave the beginning and end of the address pool free to allow for any statically assigned addresses.
6. Click Next to skip past the Add Exclusions and Delay step.
If you know of one or more IP addresses that are already in use within the defined address range, an exclusion prevents the DHCP server from attempting to assign a particular IP address in its address pool.
7. For now, click Next to accept the default Lease Duration. You’ll learn a lot about DHCP leases later in this tutorial.
8. Leave the default setting of Yes, I want to configure these options now and click Next on the Configure DHCP Options step. You will configure various scope options shortly in this tutorial.
9. Next, provide an IP address of 10.0.0.1 for the Router (Default Gateway). Once the DHCP scope is available to clients, the DHCP server will hand out this IP address as the clients’ default gateway. The default gateway is the primary way clients can communicate with other networks or the Internet in general.
10. Since this tutorial is using an environment that has a DNS server located at 10.0.0.10, provide the IP address on the Domain name and DNS Servers step. This IP address will be handed out as the DNS client for DHCP clients to translate names into IP addresses.
The Parent domain should automatically populate based on the Active Directory domain the DHCP server is a member of.
11. If your environment still uses a WINS server, provide its IP address on the WINS Server step. This tutorial does not use one, so click Next to continue.
12. Finally, activate the new DHCP scope and make it available to clients by ensuring that Yes, I want to activate this scope now is selected. Then click Next to continue.
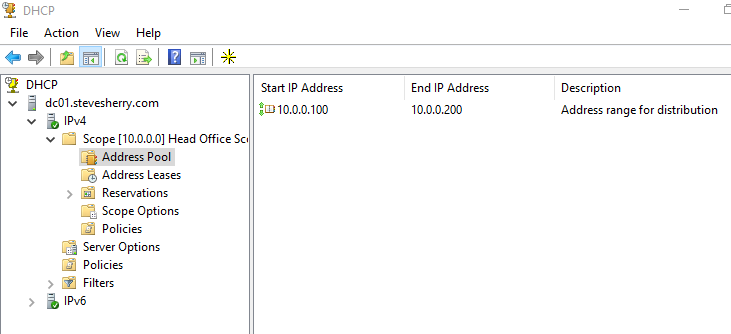
Once all of the above steps are followed, you should now see the new scope under IPv4 as shown below.
Creating a DHCP Scope with PowerShell
If you’re not a fan of the GUI or simply need to automate DHCP tasks, look no further than PowerShell. Let’s now cover the same process as just performed via the Server Manager, only this time with PowerShell.
Assuming you’re at the Windows desktop of a test DHCP server:
1. Open Windows PowerShell as administrator.
2. Run the Get-DhcpServerv4Scope cmdlet to find all existing DHCP scopes.
As you’ll see in the below example, this server only has the scope that you’ve created using the GUI in the previous steps.

3. Run the Add-DhcpServerv4Scope cmdlet to create a new DHCP scope. Since this cmdlet has many parameters, save time by defining each parameter in a PowerShell hashtable and using splatting to pass all parameters to the cmdlet.
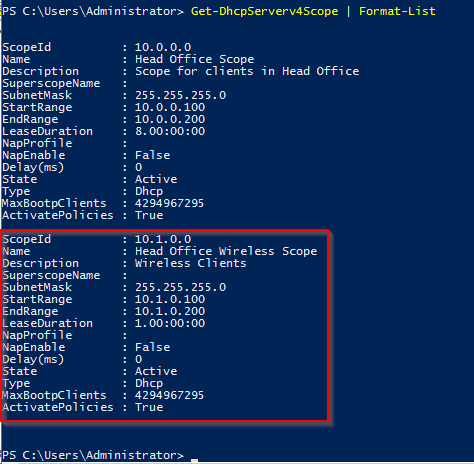
This cmdlet will create a DHCP scope called Head Office Wireless Scope that, when activated, will hand out IP addresses 10.1.0.100 – 10.1.0.200 with a subnet mask of 255.255.255.0 with a lease that expires after one day (day.hrs:mins:secs).
# Create an IPv4 DHCP Server Scope
 $HashArgs = @{
     'Name' = 'Head Office Wireless Scope';  # This sets the name of the wireless scope
     'Description' = 'Wireless Clients';     # This is the human-readable description of the scope
     'StartRange' = '10.1.0.100';            # Specifies the starting IP address in the scope
     'EndRange' = '10.1.0.200';              # Specifies the end IP address in the scope
     'SubnetMask' = '255.255.255.0';         # Specifies the subnet mask of the scope
     'State' = 'Active';                     # Activates the scope
     'LeaseDuration' = '1.00:00:00';         # Specifies the length of the lease duration
 }
 Add-DhcpServerv4Scope @HashArgs
4. Now, run Get-DhcpServerv4Scope again to verify PowerShell successfully created the DHCP scope.
Piping output to the
Format-ListPowerShell cmdlet allows you to see each property name and it’s value rather than a truncated row.
Managing Scope Options
Once you’ve created a scope, you can modify any attribute you’d like. Microsoft DHCP has an area specifically called Scope Options which allows you to change some common DHCP attributes sent to DHCP clients.
Let’s now walk through the available scope options and cover their affect on your clients.
While in the DHCP MMC:
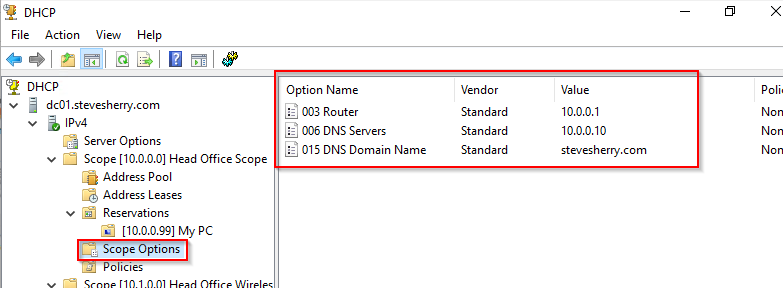
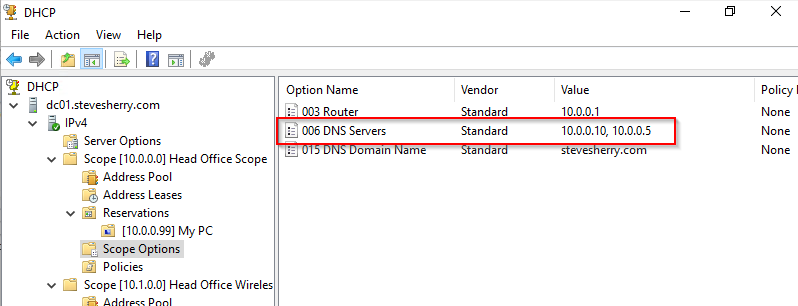
- Click on Scope Options under <server name> —> IPv4 —> Scope [X.X.X.X]. In the screenshot below, you can see the scope previously created. Here you can see the Router, DNS Servers, and DNS Domain Name that this scope will hand out to DHCP clients.
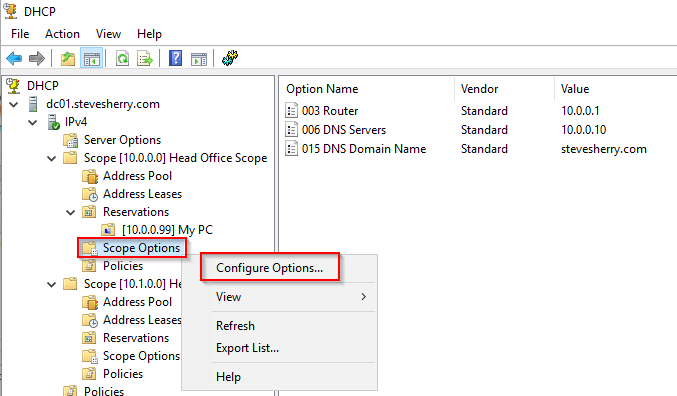
2. Right click on Scope Options and choose Configure Options to navigate to the Scope Options box to change these options.
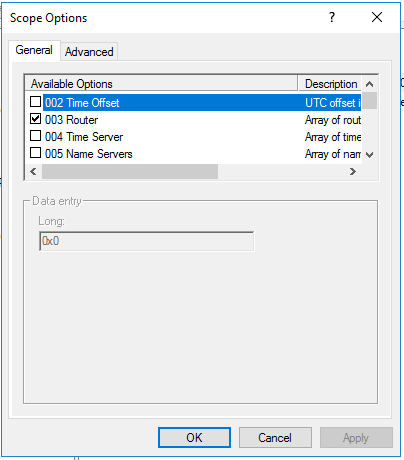
3. Scroll down the available options under the General tab. You’ll see dozens of options that the DHCP server can assign to clients.
If you have a specific setting that is not available to you by default, you’ll need to follow the vendor’s specific information using the Advanced tab to create a custom Option.
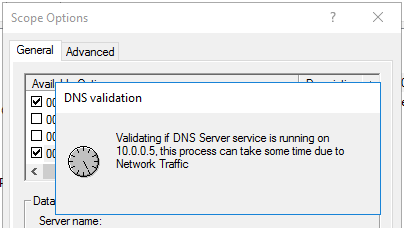
4. Perhaps you forgot to add one of your DNS servers. Find the 006 DNS Servers option, enter it’s IP address, click Add, and OK. This tutorial will be using the IP address of 10.0.0.5.
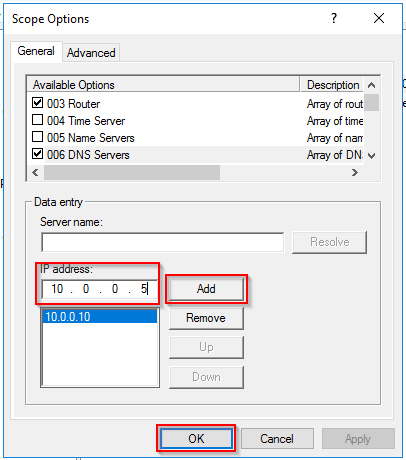
Once you click OK, Windows will then validate if DNS services are available on your provided IP address.
5. Return to the main screen and review the Options pane. You’ll now see two IP addresses listed under 006 DNS Servers.
DHCP Leases
An important part of DHCP is the lease. A device is known to “lease” an IP address from a DHCP server for a certain period of time (lease time).
Network administrators typically configure DHCP servers to lease IP addresses based on different use cases. For example, for devices on a wired connection that rarely leave the network, administrators may assign a longer lease time like eight days. If the device never leaves the network, it’s not efficient to go through the lease renewal process.
On the other hand, if a wireless device roams on and off the network several times a week, administrators may assign a shorter lease period (12-24 hours) to save available IP addresses for other devices.
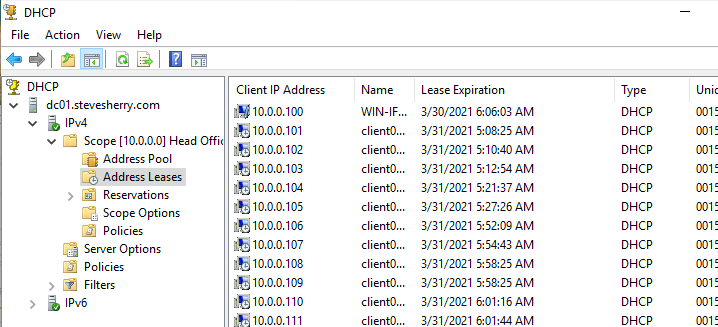
While in the DHCP console, you can find all current leases in <server name> —> IPv4 —> Scope [X.X.X.X] —> Address Leases as shown below.
Once on the Address Leases window, you’ll see each IP address that the DHCP server has assigned along with the Lease Expiration date.
Setting the Microsoft DHCP Lease Period
Let’s now discover how to set the DHCP lease period at the server level for DHCP clients.
While still in the DHCP console on the DHCP server:
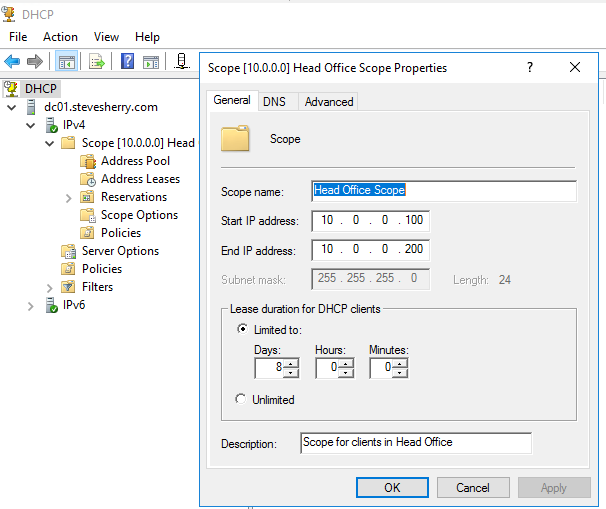
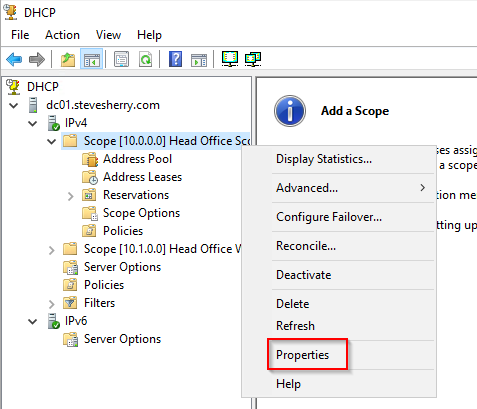
1. Find the scope containing the IP address pool you’d like to look at, right-click on the scope name, and select Properties.

2. Within the Properties window, you’ll now see a Lease duration for DHCP clients. This setting is the DHCP lease time for all IP addresses in that scope.
The default DHCP lease period on Microsoft DHCP servers is eight days, but it can be updated to any period of time to suit the business needs.
3. Click Cancel to close the Properties box.
Finding Assigned DHCP Lease Times
DHCP services can only assign one IP address per device. How does the DHCP server know when it can re-use an IP address in the pool? The DHCP lease time.
If a device doesn’t renew its dynamically assigned IP address within the lease time, the lease expires and is available to other devices to lease.
How do you actually discover the lease time on a device? Unfortunately, each operating system (OS) has a different way of exposing the DHCP lease time. This tutorial will cover how to determine lease time on Windows 10.
In Windows 10, you see your DHCP lease time on the command-line either with the command prompt (cmd.exe) or PowerShell. This tutorial assumes you are an IT pro so let’s use PowerShell.
To find a Windows DHCP client’s lease time, on the Windows client console, open Windows PowerShell and run the ipconfig /all command.

You’ll see the time the lease was made (Lease Obtained) and when it expires (Lease Expires). The Lease Obtained field is the exact time the DHCP server assigned the IP address to this device. The Lease Expires field indicates the time the device will ask the DHCP server to renew its lease.
Subtract the Lease Expires value from the Lease Obtained value and you have your DHCP lease time.
DHCP Address Pools
Once you’ve configured the scope, you already have an address pool. The address pool is the range of IP addresses the DHCP server will assign to clients in a lease. Let’s navigate through the address pool already set up.
Updating the Address Pool
IP address scopes are not fixed in stone. It’s inevitable that after some time you’ll need to expand the address pool to allow more devices to connect to your network. Rather than creating a new address pool, it’s often easier to expand an existing pool. To do that:
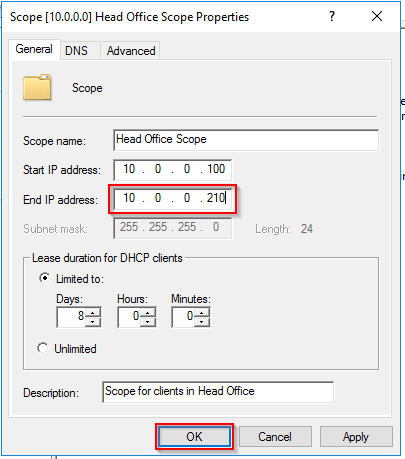
1. Right click on <server name> —> IPv4 —> Scope [X.X.X.X] and click on Properties to open the Scope Properties configuration wizard.
2. Update the fields to increase the range of IP addresses for your existing address pool so that more addresses are available for any future allocation. Once complete, click OK.
3. Click on <server name> —> IPv4 —> Scope [X.X.X.X] —> Address Pool to bring up the address pool. Notice below that it now shows the expanded Address Pool in the scope.

Adding Exclusion Ranges to the Address Pool
Imagine that you need to create a small list of IP addresses within the address pool that are not assigned to any new devices on the network. Exclusion ranges are how you’d achieve this.
Assuming that you still have the DHCP console open:
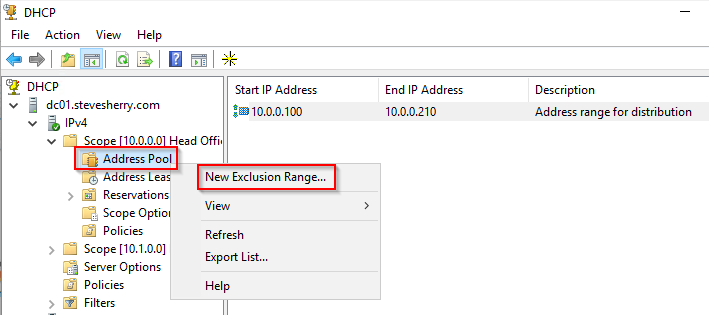
1. Click on <server name> —> IPv4 —> Scope [X.X.X.X] —> Address Pool to bring up the address pool.

2. Right-click on Address Pool and click on New Exclusion Range to open the Add Exclusion wizard.
3. Complete the fields to create a small range of IP addresses within your existing address pool that will not be included in any future allocation of leases. Once complete, click Add.
4. Back on the DHCP console, refresh the screen and note that the exclusion is now in place.
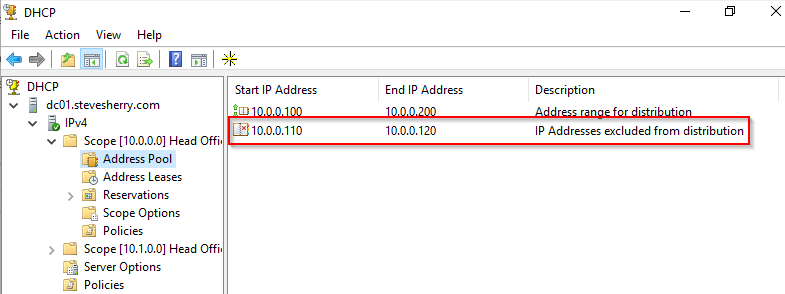
At this point, whenever a new device connects to the network, your DHCP server will not lease an address from within this exclusion range.
DHCP Reservations
IP addresses are, by their nature, dynamic. Most of the time this is OK as you typically don’t care what the IP address of your PC is. Occasionally you’ll need to manually specify the address of a device such as an admin laptop or a printer.
When you need to statically assign an IP address to a particular device, use a DHCP reservation.
Adding Reservations
Let’s start out by adding a reservation to a scope previously created. While in the DHCP console on the DHCP server:
1. Select <server name> —> IPv4 —> Scope [X.X.X.X] —> Reservations to open the Reservations window. You’ll see no reservations exist.
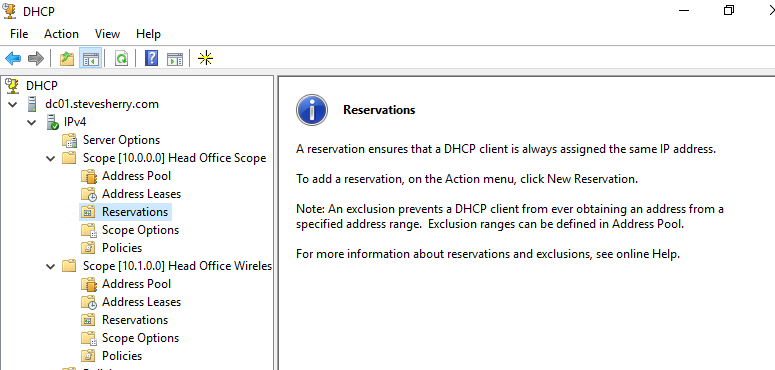
2. Right-click on Reservations and then choose New Reservation to open the New Reservation input box.
3. Complete the fields with details that are relevant to a device you’d like to assign a “static” IP address to.
- The Reservation name – This name is commonly as a hostname for the device or other identifying attribute.
- The IP address to reserve for the device.
- The MAC address of the device
Find the MAC address of a device from either the label that is on the back, or by using these methods.
- The Description – Be sure to make sense here so that other administrators can understand what this reservation is for.
Once complete, click Add.
4. Back on the DHCP console, refresh the screen and note that the reservation is now in place.
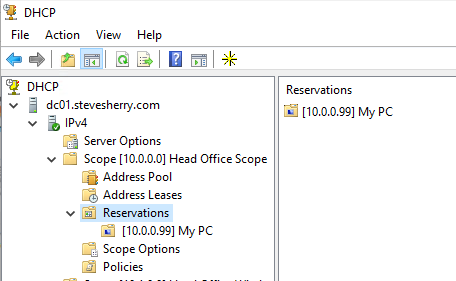
At this point, when the device that has the MAC address you’ve provided in the reservation goes through its DHCP lifecycle, it will be assigned the expected reserved IP address.
Removing Reservations
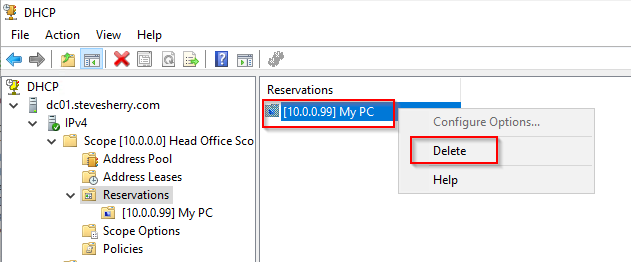
As part of the general lifecycle of devices within your organization, you’ll occasionally have to retire old devices, some of which will have DHCP reservations.
Assuming you’re still in the DHCP console, removing DHCP reservation requires a right click on the reservation and clicking Delete.
DHCP Policies
Previously, you learned how to set reservations by MAC address. Although reservations are useful, they don’t allow you to assign addresses or specific scope options based on other criteria. Using a DHCP policy, you can define various conditions a client must meet to assign an IP address.
Using a DHCP policy, you can assign a specific category of devices a different DNS server, default gateway, or TFTP server, for example.
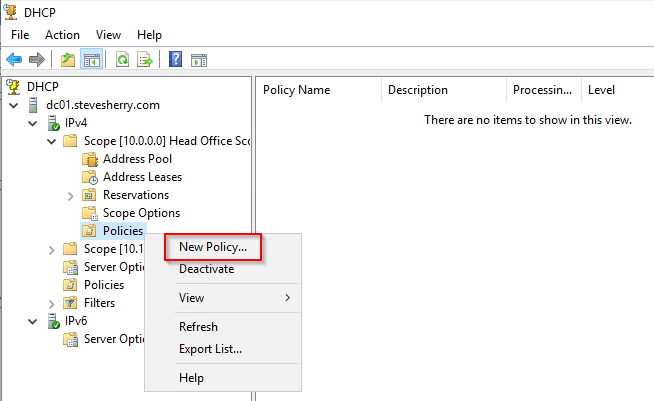
To create a DHCP policy:
1. Right click <server name> —> IPv4 —> Scope [X.X.X.X] —> Policies and click on New Policy to open the Policy configuration window.
2. Complete the fields with details of the Policy Name and a Description for the policy. Click Next, once complete.

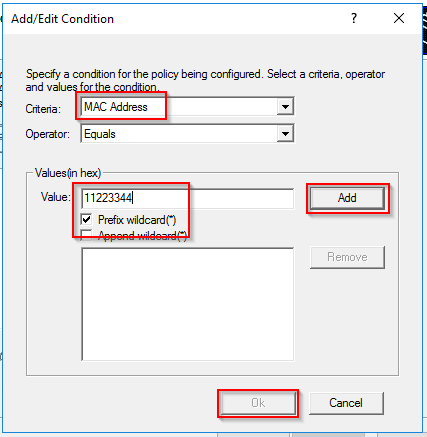
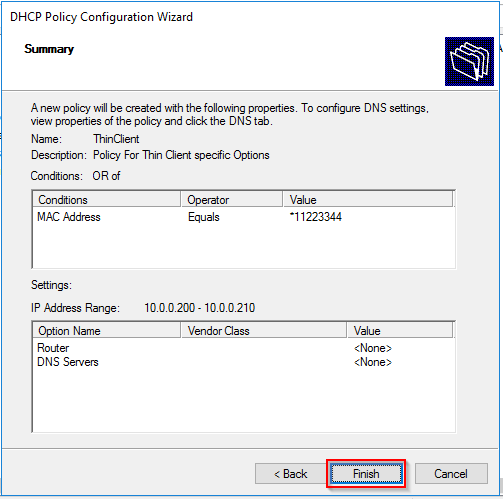
3. Click on the Criteria dropdown and notice the many conditions you can check for on a client. For this tutorial, select MAC Address and add a relevant Value, selecting Wildcard.
Click Add, and then OK to move along.
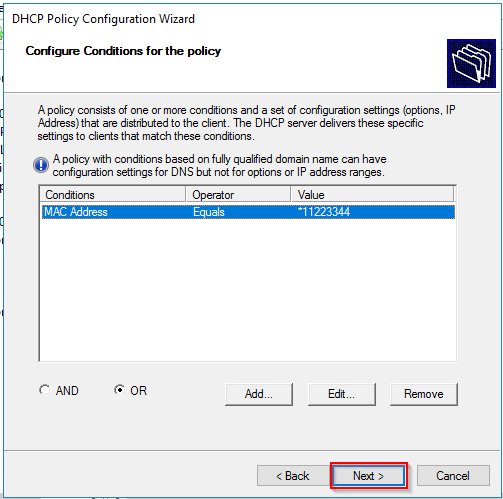
4. Either Add another condition for the policy or click Next to continue.
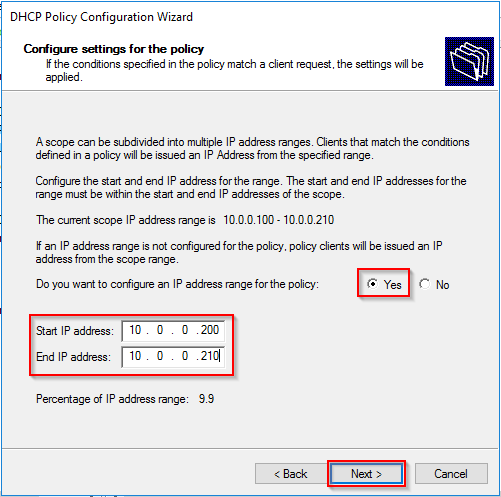
5. Next, add a subset of IP addresses from within your existing range. The DHCP server will assign devices matching the conditions defined earlier an IP address from this range. Once complete, click Next.
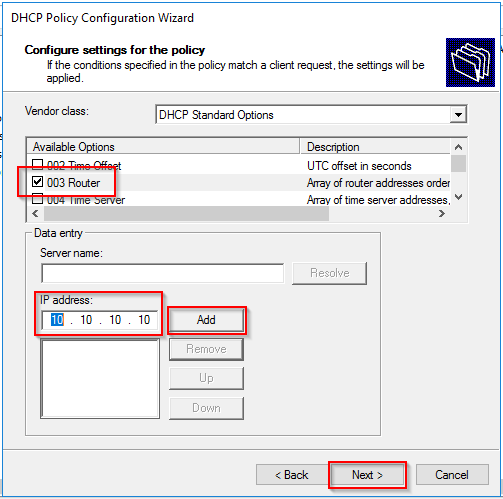
6. Now it’s time to define the options the client will receive if it meets the condition. For this tutorial, select 003 Router to modify the default gateway clients matching the condition will receive.
Enter an IP address for the new gateway, click Add and then Next.
7. Review the screen and confirm that the details are correct. Click Finish to close the wizard.
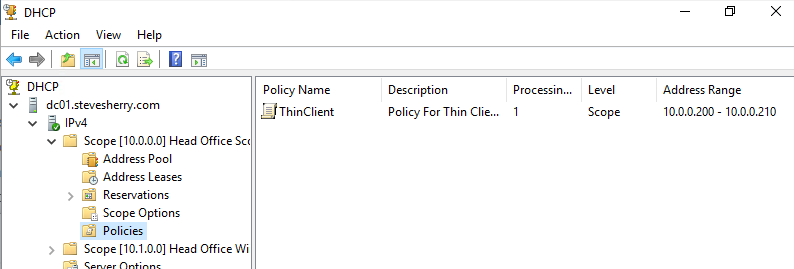
8. Refresh the screen to confirm that the new policy is in place.
Conclusion
In this article, you’ve covered a lot of ground when it comes to DHCP. You’ve learned how to set up DHCP scopes and everything that comes with them. You also learned how DHCP assigns IP addresses and other information to clients.
Armed with all of this new information, you can now confidently tackle DHCP like a champion. How are you planning on using this knowledge?