
*7-day Free Trial w/Credit card, no charge upfront or if you cancel up to 2 days before expiration; Subscription price varies per region w/ auto renewal unless you timely cancel; notification before you are billed; 30-day money-back guarantee; Read full terms and more information about free remover.
If you’re reading this, chances are you’ve noticed some abnormal activity on your computer lately, such as strange program errors, slower performance, sudden system crashes, or random alerts on your screen. These issues could have various origins, and one of the potential culprits is the Script Host Trojan. This crafty threat is adept at mimicking regular system processes and files, slowly but steadily undermining your computer’s normal operation. To infiltrate your system, Script Host employs diverse tactics, camouflaging itself within spam messages and harmless-looking email attachments, pretending to be legitimate software, or hiding within malicious websites that trick you into downloading the danger while believing you’re getting a helpful app.

What is Script Host?
The Windows Script Host (WSH) serves as an inherent automation utility within the Windows operating system, affording system administrators the capability to run assorted scripts such as VBScript and JScript. Although tasks performed via Script Host are generally prevalent and inconspicuous, occasional occurrences of issues such as “Windows Script Host cannot find script file” might emerge. Such errors typically find their origins in registry discrepancies, malware infiltration, difficulties with VBS script files, or the presence of other compromised data. Unfortunately, it is difficult for less experienced users to detect and remove Script Host before the damage is done because, in most cases, the Trojan operates without giving its presence away. Therefore, the best way to protect your system is to embrace safe internet practices

Is Script Host a Virus?
Frequently, errors within the Script Host arise as a result of malware infestation. To rectify your Script Host error, you can enlist the assistance of an antivirus application to initiate a comprehensive system scan, detecting and eliminating malicious software. With all this being said, let’s not mistake Script Host for an average virus; it’s a formidable Trojan Horse with a sinister agenda. Unlike traditional computer viruses that spread independently on files and connected devices, Script Host relies on stealth to mislead web users about its malevolent objectives. Skillfully disguised as legitimate software, it tricks the unsuspecting victims into downloading and executing it without a second thought. When the Script Host Trojan gets installed, the malicious actors gain complete control over the compromised system and can launch different types of attacks or insert Ransomware, viruses and other Trojans. For the victims, understanding the severity of this threat is crucial to implementing the necessary protection measures.
Windows Based Script Host Virus
Even though some users may mistakenly call Script Host as “the Windows Based Script Host virus”, this threat sets itself apart from most computer viruses with its stealth and advanced capabilities. Operating in the shadows, this malware can secretly acquire sensitive information from its victims, such as passwords, usernames, credit card numbers, and other personal data, posing a significant risk of fraud and identity theft. Moreover, the Trojan’s destructive potential can lead to the corruption of personal or company files, resulting in data loss and potential system corruption. And these are just a few of the malicious activities the “Windows Based Script Host Virus” could be employed for because this threat could be programmed to do absolutely anything that the cyber criminals could imagine.
Microsoft Based Script Host Virus
In contrast to typical threats, the Microsoft Based Script Host virus operates in a silent and undetectable manner. It can remain dormant on your system for long periods of time or until the hackers decide to activate it, and launch a specific attack. Skillfully camouflaging itself as ordinary system files, this malware , like Pinaview and Taskbarify, can easily avoid detection by inexperienced users. It can even disable certain antivirus programs, leaving the system exposed and helpless. Therefore, in most cases, removing the Microsoft Based Script Host virus requires specialized removal software or a detailed guide. If your computer has fallen prey to this type of malware, we strongly advise you to follow the comprehensive removal steps below to promptly eliminate any malicious traces left in your system.
SUMMARY:
Script Host Virus Removal
To try and remove Script Host quickly you can try this:
- Go to your browser’s settings and select More Tools (or Add-ons, depending on your browser).
- Then click on the Extensions tab.
- Look for the Script Host extension (as well as any other unfamiliar ones).
- Remove Script Host by clicking on the Trash Bin icon next to its name.
- Confirm and get rid of Script Host and any other suspicious items.
If this does not work as described please follow our more detailed Script Host removal guide below.
If you have a Windows virus, continue with the guide below.
If you have a Mac virus, please use our How to remove Ads on Mac guide.
If you have an Android virus, please use our Android Malware Removal guide.
If you have an iPhone virus, please use our iPhone Virus Removal guide.
Some of the steps may require you to exit the page. Bookmark it for later reference.
Next, Reboot in Safe Mode (use this guide if you don’t know how to do it).
Uninstall the Script Host app and kill its processes
The first thing you must try to do is look for any sketchy installs on your computer and uninstall anything you think may come from Script Host. After that, you’ll also need to get rid of any processes that may be related to the unwanted app by searching for them in the Task Manager.
Note that sometimes an app, especially a rogue one, may ask you to install something else or keep some of its data (such as settings files) on your PC – never agree to that when trying to delete a potentially rogue software. You need to make sure that everything is removed from your PC to get rid of the malware. Also, if you aren’t allowed to go through with the uninstallation, proceed with the guide, and try again after you’ve completed everything else.
-
Uninstalling the rogue app
-
Killing any rogue processes
Type Apps & Features in the Start Menu, open the first result, sort the list of apps by date, and look for suspicious recently installed entries.
Click on anything you think could be linked to Script Host, then select uninstall, and follow the prompts to delete the app.

Press Ctrl + Shift + Esc, click More Details (if it’s not already clicked), and look for suspicious entries that may be linked to Script Host.
If you come across a questionable process, right-click it, click Open File Location, scan the files with the free online malware scanner shown below, and then delete anything that gets flagged as a threat.
Each file will be scanned with up to 64 antivirus programs to ensure maximum accuracy
This scanner is free and will always remain free for our website’s users.
This file is not matched with any known malware in the database. You can either do a full real-time scan of the file or skip it to upload a new file. Doing a full scan with 64 antivirus programs can take up to 3-4 minutes per file.
Drag and Drop File Here To Scan
Analyzing 0 s
Each file will be scanned with up to 64 antivirus programs to ensure maximum accuracy
This scanner is based on VirusTotal’s API. By submitting data to it, you agree to their Terms of Service and Privacy Policy, and to the sharing of your sample submission with the security community. Please do not submit files with personal information if you do not want them to be shared.
After that, if the rogue process is still visible in the Task Manager, right-click it again and select End Process.
Undo Script Host changes made to different system settings
It’s possible that Script Host has affected various parts of your system, making changes to their settings. This can enable the malware to stay on the computer or automatically reinstall itself after you’ve seemingly deleted it. Therefore, you need to check the following elements by going to the Start Menu, searching for specific system elements that may have been affected, and pressing Enter to open them and see if anything has been changed there without your approval. Then you must undo any unwanted changes made to these settings in the way shown below:
Type in Start Menu: View network connections
Right-click on your primary network, go to Properties, and do this:
Type in Start Menu: C:\Windows\System32\drivers\etc\hosts
Type in the Start Menu: Startup apps
Type in the Start Menu: Task Scheduler
Type in the Start Menu: Services
Type in the Start Menu: Registry Editor
Press Ctrl + F to open the search window
WScript.exe is a command-line scripting engine that is included with Microsoft Windows operating systems. It is designed specifically for running scripts written in VBScript or JScript scripting languages through Windows Script Host (WSH).
WSH is a Windows component that allows scripts to be executed in the Windows environment, providing access to a wide range of system objects and functions. WScript.exe is the default script host for WSH, and is used to execute scripts that have been associated with the .vbs, .js, and .jse file extensions.
WScript.exe provides a number of features and options for running scripts, including the ability to specify script files, command-line parameters, and options such as output redirection and error handling. It can also be used in conjunction with the Windows Task Scheduler to schedule and automate the execution of scripts at specific times or intervals.
Like any other system tool, WScript.exe can be abused by malicious actors to carry out malicious activities on a Windows computer. Malware authors often use legitimate system tools like WScript.exe to execute malicious code or scripts on a victim’s computer, in order to avoid detection by security software.
They may also disguise malicious scripts as harmless or legitimate files, such as documents, images, or videos, and use WScript.exe to execute them. Therefore, if you encounter WScript.exe running on your system unexpectedly, or if it is being used to execute suspicious or unknown scripts or commands, it could be a sign of malware infection.
Should you be uncertain as to whether WScript.exe is malicious or a false positive detection, you can submit the affected file to VirusTotal to be scanned with multiple antivirus engines.
In this article, we will cover the WScript.exe file which is a component of a Trojan virus that is designed to perform a variety of malicious actions on an infected computer. These actions may include stealing sensitive information, installing additional malware, and allowing attackers to gain unauthorized access and control of the affected system.

What is the WScript.exe Trojan ?
WScript.exe is a file that is a component of a Trojan virus. It is designed to perform various malicious actions on an infected computer, such as stealing sensitive information, installing additional malware, and allowing attackers to gain unauthorized access and control of the affected system.
The WScript.exe file is a malicious program utilized by Trojans to carry out various malicious actions, such as:
- Download and install other malware.
- Use your computer for click fraud.
- Record your keystrokes and the sites you visit.
- Send information about your PC, including usernames and browsing history, to a remote malicious hacker.
- Give remote access to your PC.
- Display advertisements and redirect your browser search queries.
- Use your computer resources for mining cryptocurrencies.
How was WScript.exe Trojan installed on my computer?
WScript.exe is malware that is commonly distributed through malicious advertisements, spam emails that have infected attachments, and by utilizing vulnerabilities found in the operating system and software that are installed on a computer. This malicious software can also be spread by using cracks.
To remove the WScript.exe Trojan and check your computer for other malicious programs, please use the free malware removal guide below.
Removal Instructions for WScript.exe Trojan
The below WScript.exe removal instructions are for Windows users, however, we also have an Android Guide and a Mac Guide which should help clean up your device.
This malware removal guide may appear overwhelming due to the number of steps and numerous programs that are being used. We have only written it this way to provide clear, detailed, and easy-to-understand instructions that anyone can use to remove malware for free.
Please perform all the steps in the correct order. If you have any questions or doubts at any point, stop and ask for our assistance.
To remove the WScript.exe Trojan from your computer, follow these steps:
- STEP 1: Uninstall malicious programs from Windows
- STEP 2: Reset browsers back to default settings
- STEP 3: Use Rkill to terminate suspicious programs
- STEP 4: Use Malwarebytes to remove for Trojans and Unwanted Programs
- STEP 5: Use HitmanPro to remove Rootkits and other Malware
- STEP 6: Use AdwCleaner to remove Malicious Browser Policies and Adware
- STEP 7: Perform a final check with ESET Online Scanner
STEP 1: Uninstall malicious programs from Windows
In this first step, we will manually check if any unknown or malicious programs are installed on the computer. Sometimes adware and browser hijackers can have a usable Uninstall entry that can be used to remove them.
Windows 11Windows 10Windows 8Windows 7
-
Press the Windows key + I on your keyboard to open the Settings app.
First, open Windows Settings by pressing Windows+I on your keyboard. You can also right-click your Start button and select “Settings” from the list.

-
In the Settings app, click on “Apps” and then “Apps & features”.
When Settings opens, click “Apps” in the sidebar, then select “Apps & Features”.

-
Find the malicious program in the list of installed apps and uninstall it.
In Apps & Features settings, scroll down to the app list and search for unknown or suspicious programs. To make things easier, you can sort all installed programs by their installation date. To do this, click “Sort by” and select “Install date”.
Look out for any suspicious program that could be behind all the drama – anything you don’t remember downloading or that doesn’t sound like a genuine program. When you find a malicious program, click the three dots button beside it and select “Uninstall” in the menu that appears.
If you have checked your computer for malicious programs and did not find any, you can proceed with the next step in this guide.
-
Follow the prompts to uninstall the program.
In the next message box, confirm the uninstall process by clicking on Uninstall, then follow the prompts to uninstall the malicious program.
Make sure to read all of the prompts carefully, because some malicious programs try to sneak things in hoping that you won’t read them closely.


-
Press the Windows key + I on your keyboard to open the Settings app.
Press the Windows key + I on your keyboard to open the Settings app. You can also ope the Settings app by clicking the Start button on the taskbar, then select “Settings” (gear icon).

-
In the Settings app, click on “Apps”.
When the “Windows Settings” window opens, click on “Apps“. By default, it should open “Apps and Features” but if it doesn’t, select it from the list on the left.

-
Find the malicious program in the list of installed apps and uninstall it.
In Apps & Features settings, scroll down to the app list and search for unknown or suspicious programs. To make things easier, you can sort all installed programs by their installation date. To do this, click “Sort by” and select “Install date”.
Look out for any suspicious program that could be behind all the drama – anything you don’t remember downloading or that doesn’t sound like a genuine program. When you find a malicious program, click on it and select “Uninstall” in the menu that appears.
If you have checked your computer for malicious programs and did not find any, you can proceed with the next step in this guide.
-
Follow the prompts to uninstall the program.
In the next message box, confirm the uninstall process by clicking on Uninstall, then follow the prompts to uninstall the malicious program.
Make sure to read all of the prompts carefully, because some malicious programs try to sneak things in hoping that you won’t read closely.


-
Go to “Program and Features”.
Right-click on the Start button in the taskbar, then select “Programs and Features”. This will take you directly to your list of installed programs.

-
Search for malicious program and uninstall it.
The “Programs and Features” screen will be displayed with a list of all the programs installed on your computer. Scroll through the list until you find any unknown or suspicious program, then click to highlight it, then click the “Uninstall” button.
Look out for any suspicious program that could be behind all the drama – anything you don’t remember downloading or that doesn’t sound like a genuine program.
If you have checked your computer for malicious programs and did not find any, you can proceed with the next step in this guide.

-
Follow the on-screen prompts to uninstall malicious program.
In the next message box, confirm the uninstall process by clicking on Yes, then follow the prompts to uninstall malicious program. Make sure to read all of the prompts carefully, because some malicious programs try to sneak things in hoping that you won’t read closely.


-
Open the “Control Panel”.
Click on the “Start” button, then click on “Control Panel“.
-
Click on “Uninstall a Program”.
When the “Control Panel” appears, click on “Uninstall a Program” from the Programs category.

-
Search for malicious programs and uninstall them.
The “Programs and Features” screen will be displayed with a list of all the programs installed on your computer. Scroll through the list until you find any suspicious or unknown program, then click to highlight it, then click the “Uninstall” button.
Look out for any suspicious program that could be behind all the drama – anything you don’t remember downloading or that doesn’t sound like a genuine program.If you have checked your computer for malicious programs and did not find any, you can proceed with the next step in this guide.

-
Follow the on-screen prompts to uninstall malicious program.
In the next message box, confirm the uninstall process by clicking on Yes, then follow the prompts to uninstall malicious program. Make sure to read all of the prompts carefully, because some malicious programs try to sneak things in hoping that you won’t read closely.


If you are experiencing difficulty while attempting to uninstall a program, you can use Revo Uninstaller to completely remove the unwanted program from your computer.
Now that the malicious programs have been removed from your computer, we can proceed with the next step in this guide.
STEP 2: Reset browsers back to default settings
In this step, we will remove spam notifications, malicious extensions, and change to default any settings that might have been changed by malware.
Please note that this method will remove all extensions, toolbars, and other customizations but will leave your bookmarks and favorites intact. For each browser that you have installed on your computer, please click on the browsers tab below and follow the displayed steps to reset that browser.
ChromeFirefoxMicrosoft EdgeInternet Explorer
Reset Chrome for Windows to default settings
We will now reset your Chrome browser settings to their original defaults. This will reset your startup page, new tab page, search engine, and pinned tabs. It will also disable all extensions and clear temporary data like cookies. Your favorites, history, and saved passwords will not be cleared.
-
Click the three dots in the top-right corner and then click on “Settings”.
Open Chrome and click on the menu button (represented by three vertical dots) in the top right corner of the window. In the dropdown menu that opens, click “Settings“.

-
Click “Advanced”.
Chrome’s “Settings” should now be displayed in a new tab or window, depending on your configuration. In the left sidebar, click on the “Advanced” link.

-
Click “Reset and clean up”.
In the left sidebar, under the “Advanced” section, click on “Reset and clean up“.

-
Click “Reset settings to their original defaults”.
In the main window, the “Reset and clean up” section is visible, as shown in the screenshot below. Click on “Reset settings to their original defaults“.
-
Click “Reset settings”.
A confirmation dialog will now be displayed, detailing the components that will be restored to their default state should you continue with the reset process. To complete the restoration process, click on the “Reset settings” button.

-
(Optional) Reset Chrome Data Sync.
In case a malicious extension reinstalls itself even after performing a browser reset, you have an additional option to reset the data sync for your browser. To do this, navigate to chrome.google.com/sync and click on the Clear Data button.


Reset Firefox for Windows to default settings
We will now reset your Firefox browser settings to their default. The reset feature fixes many issues by restoring Firefox to its factory default state while saving your essential information like bookmarks, passwords, web form auto-fill information, browsing history, and open tabs.
-
Click the three horizontal lines in the top-right corner and then click on “Help”.
Click on Firefox’s main menu button, represented by three horizontal lines. When the drop-down menu appears, select the option labeled “Help“.

-
Click “More troubleshooting information”.
From the Help menu, click on “More troubleshooting information“.

-
Click on “Refresh Firefox”
When the “Troubleshooting Information” page opens, click on the “Refresh Firefox” button.

-
Confirm that you want to reset your browser settings.
To finish the reset process, click on the “Refresh Firefox” button in the new confirmation window that opens.
-
Click “Finish”.
Firefox will now close itself and will revert to its default settings. When it’s done, a window will list the information that was imported. Click on “Finish“.
Your old Firefox profile will be placed on your desktop in a folder named “Old Firefox Data“. If the reset didn’t fix your problem you can restore some of the information not saved by copying files to the new profile that was created. If you don’t need this folder any longer, you should delete it as it contains sensitive information.


Reset Microsoft Edge to default settings
We will now reset your Microsoft Edge browser settings to their default. This will reset your startup page, new tab page, search engine, and pinned tabs. It will also disable all extensions and clear temporary data like cookies. Your favorites, history, and saved passwords will not be cleared.
-
Click the three dots in the top-right corner and then click on “Settings”.
In the top right corner, click on Microsoft Edge’s main menu button, represented by three horizontal dots. When the drop-down menu appears, click on “Settings“.

-
Click on “Reset Settings”.
On the left side of the window, click on “Reset Settings“.
-
Click on “Restore settings to their default values”.
In the main window, click on “Restore settings to their default values“.

-
Click “Reset”.
A confirmation dialog should now be displayed, detailing the components that will be restored to their default state should you continue with the reset process. To complete the restoration process, click on the “Reset” button.
Microsoft Edge will now erase all your personal data, browsing history, and disable all installed extensions. Your bookmarks, though, will remain intact and still be accessible.


Reset Internet Explorer to default settings
We will now reset your Internet Explorer browser settings to their default. You can reset Internet Explorer settings to return them to the state they were in when Internet Explorer was first installed on your computer.
-
Go to “Internet Options”.
Open Internet Explorer, click on the gear icon in the upper-right part of your browser, then select “Internet Options“.
-
Select the “Advanced” tab, then click “Reset”
In the “Internet Options” dialog box, select the “Advanced” tab, then click on the “Reset” button.
-
Click on “Reset”.
In the “Reset Internet Explorer settings” section, select the “Delete personal settings” checkbox, then click on the “Reset” button.
-
Click on “Close”.
When Internet Explorer has completed its task, click on the “Close” button in the confirmation dialogue box.
Close your browser and then you can open Internet Explorer again.
STEP 3: Use Rkill to terminate suspicious programs.
In this thrid step, we will download and run Rkill to terminate suspicious programs that may be running on your computer.
RKill is a program that was developed at BleepingComputer.com that attempts to terminate known malware processes so that your normal security software can then run and clean your computer of infections. When RKill runs it will kill malware processes and then removes incorrect executable associations and fixes policies that stop us from using certain tools.
-
Download Rkill.
You can download RKill to your computer from the below link. When at the download page, click on the Download Now button labeled iExplore.exe. We are downloading a renamed version of Rkill (iExplore.exe) because some malware will not allow processes to run unless they have a certain filename.
-
Run RKill.
After downloading, double-click the iExplore.exe icon to kill malicious processes. In most cases, downloaded files are saved to the Downloads folder.
The program may take some time to search for and end various malware programs.
When it is finished, the black window will close automatically and a log file will open. Do not restart your computer. Proceed to the next step in this guide.

STEP 4: Use Malwarebytes to remove for Trojans and Unwanted Programs
In this next step, we will we will install Malwarebytes to scan and remove any infections, adware, or potentially unwanted programs that may be present on your computer.
Malwarebytes stands out as one of the leading and widely-used anti-malware solutions for Windows, and for good reason. It effectively eradicates various types of malware that other programs often overlook, all at no cost to you. When it comes to disinfecting an infected device, Malwarebytes has consistently been a free and indispensable tool in the battle against malware. We highly recommend it for maintaining a clean and secure system.
-
Download Malwarebytes for Windows
You can download Malwarebytes by clicking the link below.
-
Install Malwarebytes
After the download is complete, locate the MBSetup file, typically found in your Downloads folder. Double-click on the MBSetup file to begin the installation of Malwarebytes on your computer. If a User Account Control pop-up appears, click “Yes” to continue the Malwarebytes installation.

-
Follow the On-Screen Prompts to Install Malwarebytes
When the Malwarebytes installation begins, the setup wizard will guide you through the process.
-
You’ll first be prompted to choose the type of computer you’re installing the program on—select either “Personal Computer” or “Work Computer” as appropriate, then click on Next.

-
Malwarebytes will now begin the installation process on your device.

-
When the Malwarebytes installation is complete, the program will automatically open to the “Welcome to Malwarebytes” screen.

-
On the final screen, simply click on the Open Malwarebytes option to start the program.

-
-
Enable “Rootkit scanning”.
Malwarebytes Anti-Malware will now start, and you will see the main screen as shown below. To maximize Malwarebytes’ ability to detect malware and unwanted programs, we need to enable rootkit scanning. Click on the “Settings” gear icon located on the left of the screen to access the general settings section.

In the settings menu, enable the “Scan for rootkits” option by clicking the toggle switch until it turns blue.

Now that you have enabled rootkit scanning, click on the “Dashboard” button in the left pane to get back to the main screen.
-
Perform a Scan with Malwarebytes.
To start a scan, click the Scan button. Malwarebytes will automatically update its antivirus database and begin scanning your computer for malicious programs.

-
Wait for the Malwarebytes scan to complete.
Malwarebytes will now scan your computer for browser hijackers and other malicious programs. This process can take a few minutes, so we suggest you do something else and periodically check the status of the scan to see when it is finished.
-
Quarantine detected malware
Once the Malwarebytes scan is complete, it will display a list of detected malware, adware, and potentially unwanted programs. To effectively remove these threats, click the “Quarantine” button.

Malwarebytes will now delete all of the files and registry keys and add them to the program’s quarantine.
-
Restart your computer.
When removing files, Malwarebytes may require a reboot to fully eliminate some threats. If you see a message indicating that a reboot is needed, please allow it. Once your computer has restarted and you are logged back in, you can continue with the remaining steps.


STEP 5: Use HitmanPro to remove Rootkits and other Malware
In this fifth step, while the computer is in normal back, we will download and run a scan with HitmanPro to remove Trojans, rootkits, and other malicious programs.
HitmanPro is a second-opinion scanner that takes a unique cloud-based approach to malware scanning. HitmanPro scans the behavior of active files and also files in locations where malware normally resides for suspicious activity. If it finds a suspicious file that’s not already known, HitmanPro sends it to its clouds to be scanned by two of the best antivirus engines today, which are Bitdefender and Kaspersky.
Although HitmanPro is shareware and costs $24.95 for 1 year on 1 PC, there is no limit on scanning. The limitation only kicks in when there is a need to remove or quarantine detected malware by HitmanPro on your system and by then, you can activate the one-time 30-days trial to enable the cleanup.
-
Download HitmanPro.
You can download HitmanPro by clicking the link below.
HITMANPRO DOWNLOAD LINK
(The above link will open a new web page from where you can download HitmanPro) -
Install HitmanPro.
When HitmanPro has finished downloading, double-click on “hitmanpro.exe” (for 32-bit versions of Windows) or “hitmanpro_x64.exe” (for 64-bit versions of Windows) to install this program on your computer. In most cases, downloaded files are saved to the Downloads folder.

You may be presented with a User Account Control pop-up asking if you want to allow HitmanPro to make changes to your device. If this happens, you should click “Yes” to continue with the installation.

-
Follow the on-screen prompts.
When HitmanPro starts you will be presented with the start screen as shown below. Click on the “Next” button to perform a system scan.


-
Wait for the HitmanPro scan to complete.
HitmanPro will now begin to scan your computer for malicious programs.
-
Click on “Next”.
When HitmanPro has finished the scan, it will display a list of all the malware that it has found. Click on the “Next” button to have HitmanPro remove the detected items.

-
Click on “Activate free license”.
HitmanPro may now require to activate the free 30-days trial to remove the malicious files. To do this, click on the “Activate free license” button to begin the free 30 days trial and remove all the malicious files from your computer.

When the malware removal process is complete, it will display a screen that shows the status of the various programs that were removed. At this screen, you should click on the Next button and then if prompted you should click on the Reboot button. If HitmanPro does not prompt you to reboot, please just click on the Close button.


STEP 6: Use AdwCleaner to remove Malicious Browser Policies and Adware
In this next step, we will use AdwCleaner to remove malicious browser policies and unwanted browser extensions from your computer.
AdwCleaner is a free popular on-demand scanner that can detect and remove malware that even the most well-known anti-virus and anti-malware applications fail to find. This on-demand scanner includes a lot of tools that can be used to fix the side effects of adware. browser hijackers and other malware.
-
Download AdwCleaner.
You can download AdwCleaner by clicking the link below.
-
Double-click on the setup file.
Double-click on the file named “adwcleaner_x.x.x.exe” to start AdwCleaner. In most cases, downloaded files are saved to the Downloads folder.

AdwCleaner program will now open and you will be presented with the program’s license agreement. After you read it, click on the I agree button if you wish to continue. If Windows prompts you as to whether or not you wish to run AdwCleaner, please allow it to run.

-
Enable “Reset Chrome policies” to remove malicious browser policies.
When AdwCleaner starts, on the left side of the window, click on “Settings” and then enable “Reset Chrome policies“.

-
Click on the “Scan” button.
On the left side of the AdwCleaner window, click on “Dashboard” and then click “Scan” to perform a computer scan.

-
Wait for the AdwCleaner scan to finish.
AdwCleaner will now scan your computer for malware. This process can take a few minutes.
-
Click on “Quarantine” to remove malware.
When the AdwCleaner scan is completed it will display all of the items it has found. Click on the “Quarantine” button to remove the malicious programs from your computer.

-
Click on “Continue” to remove the malicious programs.
AdwCleaner will now prompt you to save any open files or data as the program will need to close any open programs before it starts to clean. Click on the “Continue” button to finish the removal process.

AdwCleaner will now delete all detected malware from your computer. When the malware removal process is complete, you may be asked to restart your computer.


STEP 7: Perform a final check with ESET Online Scanner
This final step involves installing and running a scan with ESET Online Scanner to check for any additional malicious programs that may be installed on the computer..
ESET Online Scanner is a free second-opinion scanner, designed to rescue your computer from malware (viruses, trojans, rootkits, etc.) that have infected your computer despite all the security measures you have taken (such as anti-virus software, firewalls, etc.).
-
Download ESET Online Scanner.
You can download ESET Online Scanner by clicking the link below.
-
Double-click on esetonlinescanner.exe to run the installer.
When ESET Online Scanner has finished downloading, double-click on “esetonlinescanner.exe” to install it program on your computer. In most cases, downloaded files are saved to the Downloads folder.

-
Install ESET Online Scanner.
When ESET Online Scanner starts you will be presented with the start screen as shown below. Select your desired language from the drop-down menu and click Get started.

In the Terms of use screen, click Accept.
Select your preference for the Customer Experience Improvement Program and the Detection feedback system and click Continue.
-
Start a Full Scan with ESET Online Scanner
Click on Full Scan to perform an in-depth inspection of the entire computer.
Select Enable for Detection of Potentially Unwanted Applications, then click Start scan.
-
Wait for the ESET Online Scanner scan to finish.
ESET Online Scanner will now begin to scan your computer for malware. This process can take quite a while, so we suggest you do something else and periodically check on the status of the scan to see when it is finished.
-
ESET Online Scanner will automatically remove the malicious files.
At the end of the scan, the Found and resolved detections screen will be displayed. You can click View detailed results to view specific information. Detected threats are automatically cleaned and quarantined.


Your computer should now be free of the WScript.exe Trojan and other malware.
If your current antivirus allowed this malicious program on your computer, you may want to consider purchasing Malwarebytes Premium to protect against these types of threats in the future.
If you are still having problems with your computer after completing these instructions, then please follow one of the steps:
- Run a computer scan with ESET Online Scanner
- Ask for help in our Windows Malware Removal Help & Support forum.
Here are 10 basic security tips to help you avoid malware and protect your device:
To avoid potential dangers on the internet, it’s important to follow these 10 basic safety rules. By doing so, you can protect yourself from many of the unpleasant surprises that can arise when using the web.
What is wscript.exe?
The wscript.exe file belongs to the Microsoft Windows Operating System. Note that wscript.exe is also known as Windows Script, a service that provides the Windows system with scripting abilities. Unfortunately, cyber criminals often use the names of legitimate processes and files to disguise malware. It is possible that the wscript.exe might also be used for this purpose.
More about wscript.exe
Typically, the wscript.exe executable can be located in «C:\Windows\System32«, a Windows folder that contains operating system files, however, if the wscript.exe filename is used to disguise malware, this file is placed in another folder and/or will have a different name (for example, wcript.exe).
Typically, cyber criminals give names very similar to legitimate files to avoid suspicion. Furthermore, when a malicious process is running in Task Manager, it usually contains a graphic icon beside it, when in fact it should have a system icon. Note that virus detection engines sometimes detect legitimate files as threats (provide ‘false positive’ results).
This usually happens due to errors/mistakes in databases. Fortunately, these issues are generally fixed quickly, however, in some cases, the reverse can happen: malicious files are named as legitimate system files, and thereby bypass virus engines and infect computers.
These malicious files can be used to infect computers with high-risk malware that might be designed to steal sensitive, personal details (passwords, logins of personal, banking accounts, and so on), log keystrokes, proliferate other viruses, etc.
In summary, such programs might cause data/financial loss, privacy, browsing safety issues, and various other problems. If a computer is infected with a program of this type, it should be eliminated immediately.
Threat Summary:
| Name | wscript.exe trojan |
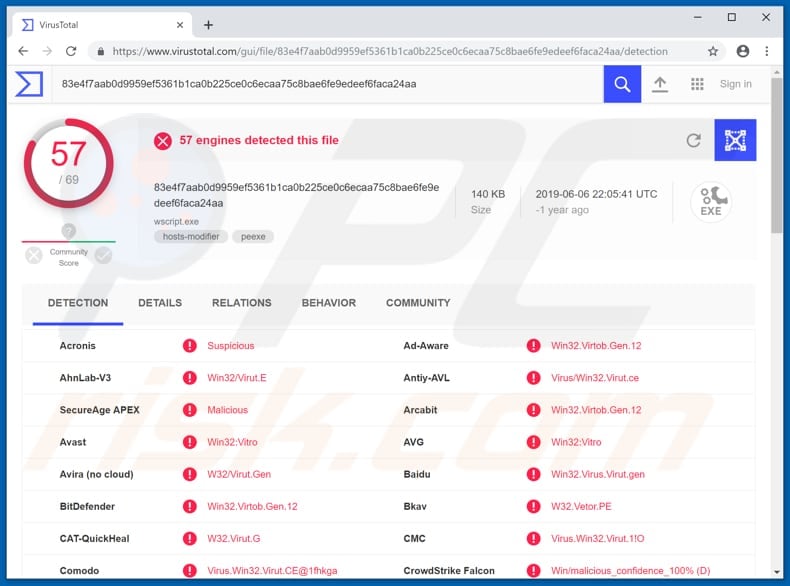
| Threat Type | Trojan, False positive detection, Password-stealing virus, Banking malware, Spyware |
| Detection Names (malicious wscript.exe file) |
Avast (Win32:Vitro), BitDefender (Win32.Virtob.Gen.12), ESET-NOD32 (Win32/Virut.NBP), Kaspersky (Virus.Win32.Virut.ce), Full List (VirusTotal) |
| Malicious Process Name (malicious wscript.exe file) |
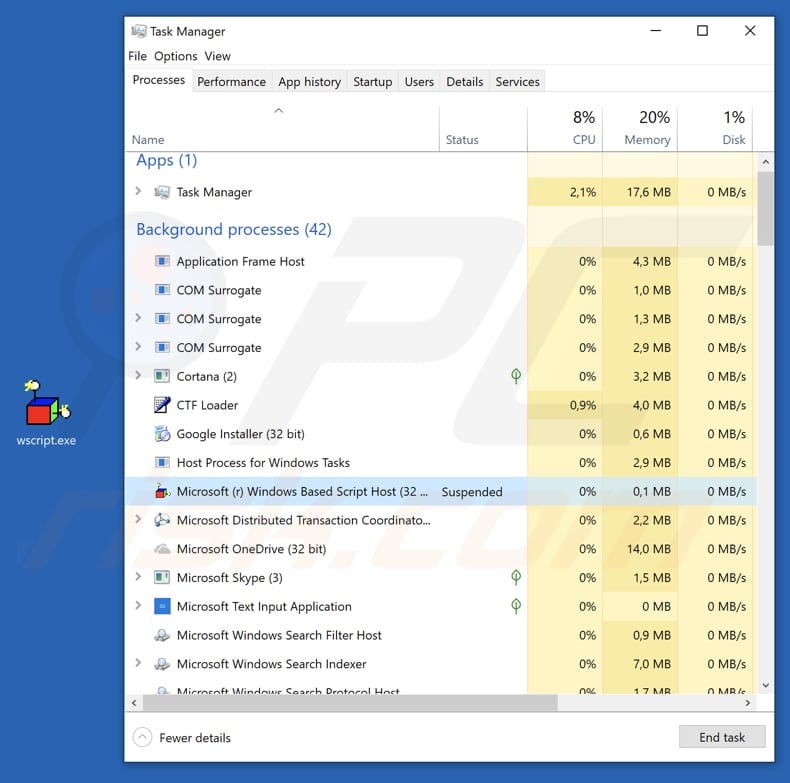
Microsoft (r) Windows Based Script Host |
| Symptoms | Trojans are designed to stealthily infiltrate the victim’s computer and remain silent, and thus no particular symptoms are clearly visible on an infected machine. |
| Distribution methods | Infected email attachments, malicious online advertisements, social engineering, software ‘cracks’. |
| Additional Information | wscript.exe is a genuine Microsoft Windows process. However, some cyber criminals use it to disguise malware. |
| Damage | Stolen banking information, passwords, identity theft, victim’s computer added to a botnet. |
| Malware Removal (Windows) |
To eliminate possible malware infections, scan your computer with legitimate antivirus software. Our security researchers recommend using Combo Cleaner. Download Combo Cleaner To use full-featured product, you have to purchase a license for Combo Cleaner. 7 days free trial available. Combo Cleaner is owned and operated by RCS LT, the parent company of PCRisk.com. |
More examples of malicious processes used to disguise malware
Cyber criminals use names of various legitimate processes/files to disguise malicious files. Some examples of files that could also be used to disguise malware are csrss.exe, msfeedssync.exe, and gwx.exe. Be sure that any detected files are genuine threats, and only then remove them, otherwise this might lead to loss of legitimate operating system files.
How did wscript.exe infiltrate my computer?
There is more than one way to distribute/proliferate malicious files and programs. Frequently, cyber criminals use spam campaigns, fake software updaters, trojans, software ‘cracking’ tools, or untrustworthy software download sources.
Spam campaigns send emails with files attached, which are usually MS Office documents, archive files, PDF documents, executables (like .exe), JavaScript files, and so on. If opened, these download and install malware.
Fake software update tools infect systems by downloading and installing malicious programs rather than installing updates, or by exploiting bugs/flaws of installed and outdated software. Trojans are malicious programs. To cause any damage, however, they must already be installed. Once installed, they cause download and installation of malware.
Activation (‘cracking’) tools are programs that allow users to illegally bypass activation of software free of charge, however, cyber criminals can use them to proliferate malware.
Third party downloaders, freeware download websites, free file hosting websites, Peer-to-Peer (P2P) networks such as eMule, torrent clients and other dubious download sources are often used to present infected files as legitimate. People who download and open them, often cause installation of malicious programs.
How to avoid installation of malware?
Avoid opening attachments or links that are included in irrelevant emails that are received from unknown, suspicious addresses. Emails of this type should not be trusted or their contents (web links, attachments) opened. Download software from official, trustworthy websites. Do not use the tools mentioned above.
Keep installed software up-to-date, however, use tools or functions provided by official software developers. Do not use third party tools to activate software. This is illegal and often causes damage to the system (computer infections). Have reputable anti-virus or anti-spyware software installed and perform regular virus scans.
If you believe that your computer is already infected, we recommend running a scan with
Combo Cleaner Antivirus for Windows to automatically eliminate infiltrated malware.
Screenshot of a malicious wscript.exe file detected as a threat by multiple virus engines:
Instant automatic malware removal:
Manual threat removal might be a lengthy and complicated process that requires advanced IT skills. Combo Cleaner is a professional automatic malware removal tool that is recommended to get rid of malware. Download it by clicking the button below:
DOWNLOAD Combo Cleaner
By downloading any software listed on this website you agree to our Privacy Policy and Terms of Use. To use full-featured product, you have to purchase a license for Combo Cleaner. 7 days free trial available. Combo Cleaner is owned and operated by RCS LT, the parent company of PCRisk.com.
Quick menu:
- What is wscript.exe?
- STEP 1. Manual removal of wscript.exe malware.
- STEP 2. Check if your computer is clean.
How to remove malware manually?
Manual malware removal is a complicated task — usually it is best to allow antivirus or anti-malware programs to do this automatically.
To remove this malware we recommend using
Combo Cleaner Antivirus for Windows. If you wish to remove malware manually, the first step is to identify the name of the malware that you are trying to remove. Here is an example of a suspicious program running on a user’s computer:
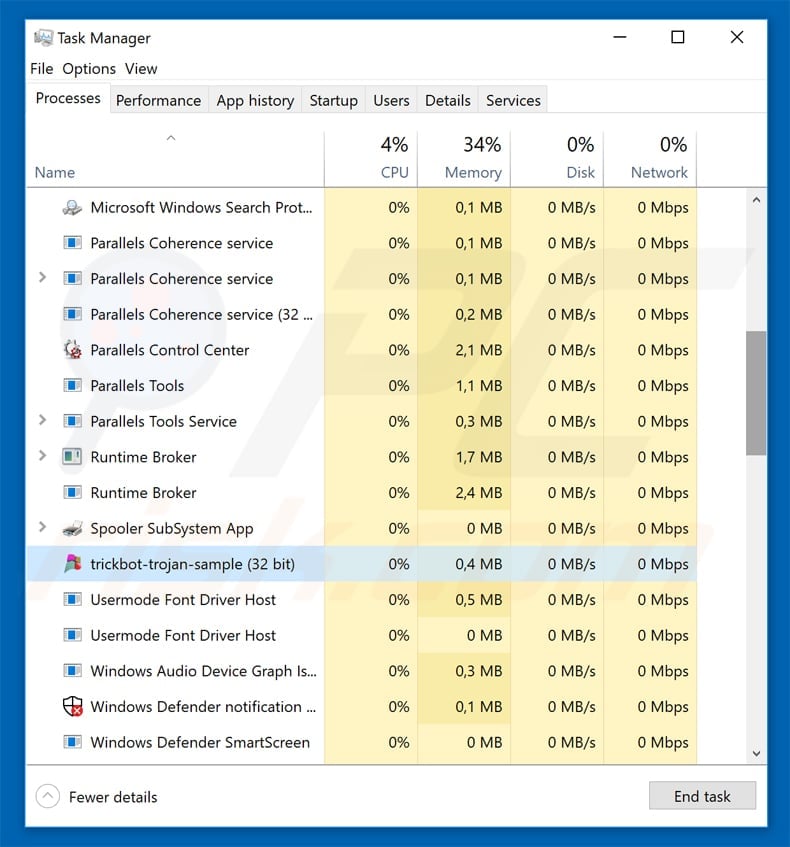
If you checked the list of programs running on your computer, for example, using task manager, and identified a program that looks suspicious, you should continue with these steps:
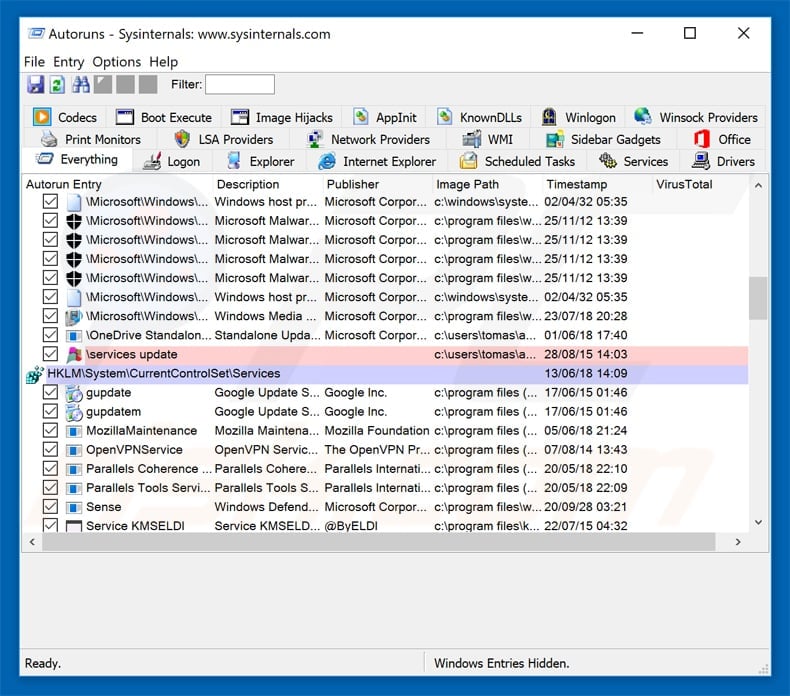
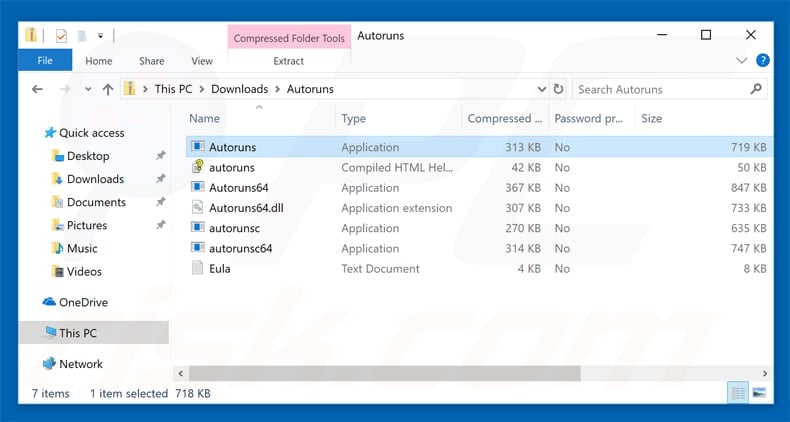
Download a program called Autoruns. This program shows auto-start applications, Registry, and file system locations:
Restart your computer into Safe Mode:
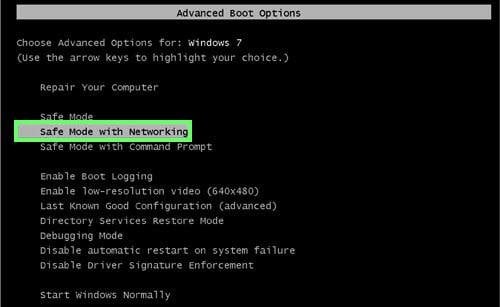
Windows XP and Windows 7 users: Start your computer in Safe Mode. Click Start, click Shut Down, click Restart, click OK. During your computer start process, press the F8 key on your keyboard multiple times until you see the Windows Advanced Option menu, and then select Safe Mode with Networking from the list.
Video showing how to start Windows 7 in «Safe Mode with Networking»:
Windows 8 users: Start Windows 8 is Safe Mode with Networking — Go to Windows 8 Start Screen, type Advanced, in the search results select Settings. Click Advanced startup options, in the opened «General PC Settings» window, select Advanced startup. Click the «Restart now» button.
Your computer will now restart into the «Advanced Startup options menu». Click the «Troubleshoot» button, and then click the «Advanced options» button. In the advanced option screen, click «Startup settings». Click the «Restart» button. Your PC will restart into the Startup Settings screen. Press F5 to boot in Safe Mode with Networking.
Video showing how to start Windows 8 in «Safe Mode with Networking»:
Windows 10 users: Click the Windows logo and select the Power icon. In the opened menu click «Restart» while holding «Shift» button on your keyboard. In the «choose an option» window click on the «Troubleshoot», next select «Advanced options». In the advanced options menu select «Startup Settings» and click on the «Restart» button.
In the following window you should click the «F5» button on your keyboard. This will restart your operating system in safe mode with networking.
Video showing how to start Windows 10 in «Safe Mode with Networking»:
Extract the downloaded archive and run the Autoruns.exe file.
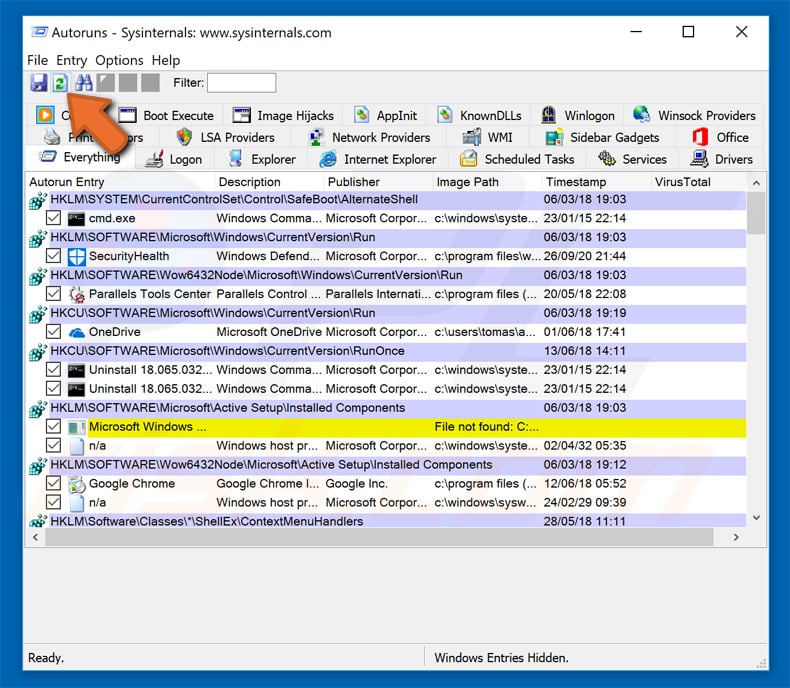
In the Autoruns application, click «Options» at the top and uncheck the «Hide Empty Locations» and «Hide Windows Entries» options. After this procedure, click the «Refresh» icon.
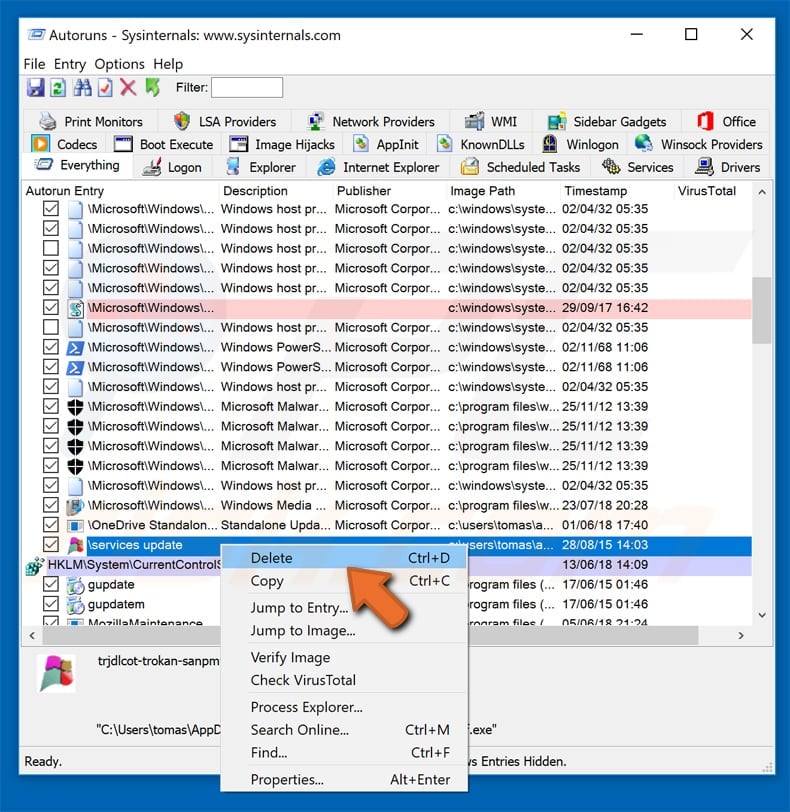
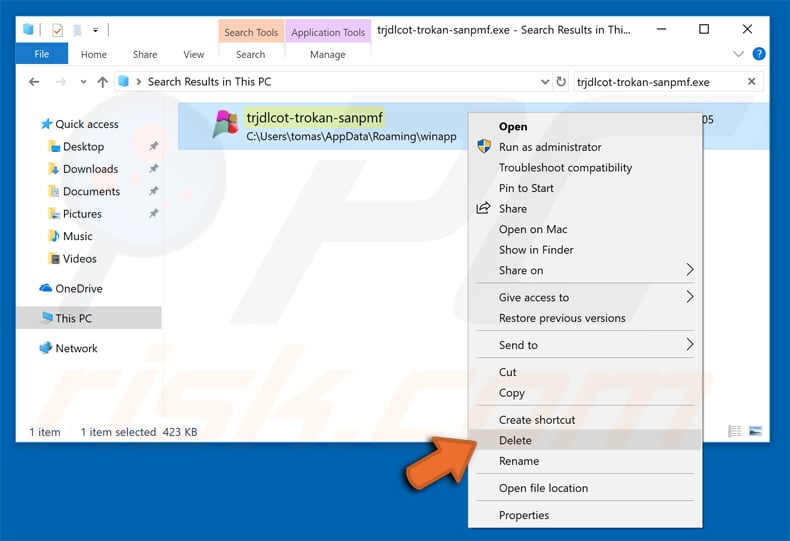
Check the list provided by the Autoruns application and locate the malware file that you want to eliminate.
You should write down its full path and name. Note that some malware hides process names under legitimate Windows process names. At this stage, it is very important to avoid removing system files. After you locate the suspicious program you wish to remove, right click your mouse over its name and choose «Delete».
After removing the malware through the Autoruns application (this ensures that the malware will not run automatically on the next system startup), you should search for the malware name on your computer. Be sure to enable hidden files and folders before proceeding. If you find the filename of the malware, be sure to remove it.
Reboot your computer in normal mode. Following these steps should remove any malware from your computer. Note that manual threat removal requires advanced computer skills. If you do not have these skills, leave malware removal to antivirus and anti-malware programs.
These steps might not work with advanced malware infections. As always it is best to prevent infection than try to remove malware later. To keep your computer safe, install the latest operating system updates and use antivirus software.
To be sure your computer is free of malware infections, we recommend scanning it with
Combo Cleaner Antivirus for Windows.
Frequently Asked Questions (FAQ)
My computer is infected with malware, should I format my storage device to get rid of it?
In most cases, malware can be removed without formatting. It can be achieved by following the steps provided in our removal guide.
What are the biggest issues that malware can cause?
It depends on the type of malware. It can encrypt files, steal sensitive information, launch DDoS attacks, inject additional malware, steal files, etc. In most cases, having a computer infected with malware leads to identity theft, monetary loss, data loss, and loss of access to personal accounts.
What is the purpose of a malware?
As a rule, cybercriminals use malware to generate revenue. In some cases, they may use malware for personal reasons, interrupt certain processes (for example, make websites inaccessible), disturb companies, etc.
How did a malware infiltrate my computer?
The most popular ways to distribute malware are to hide it in cracked software distribution pages or send emails containing malicious attachments or links. In other cases, malware infects computers via malicious drive-by downloads, files downloaded from questionable sources (like P2P networks, torrent sites, dubious pages), and fake installers.
Will Combo Cleaner protect me from malware?
Yes, Combo Cleaner can detect and remove almost all known malware. If your computer is infected with high-risk malware, run a full system scan. High-end malware can hide deep in the operating system, so running a quick scan is not enough to detect it.
Readers help support Windows Report. We may get a commission if you buy through our links.
Read our disclosure page to find out how can you help Windows Report sustain the editorial team. Read more
Wscript.exe, also known as Windows Script Host is a genuine Windows process file by Microsoft Corporation. This executable file imparts scripting abilities to the Windows operating system and offers a range of system objects and functions.
The wscript.exe file is also responsible for launching VBScript and JScript components, and it is also capable of interpreting and running plain text Jscript (.JS and .JSE files) and VBScript (.VBS and .VBE files).
Is the Wscript.exe malware?
Wscript.exe being a core Windows application file is a relatively safe one. But there have been several instances when cyber criminals name trojan horses and worms as the wscript.exe file to avoid seeking users’ attention.
However, in some cases, antivirus software also flags legitimate Windows executables as threats providing false positives. In such cases, you should verify the authenticity of the file.
- Bring up the File Explorer window using the Windows + E shortcut.
- Copy and paste the following path in the address bar to navigate to the following location in the C drive.
C:WindowsSystem32 - Scroll down and find the wscript.exe file, right-click it, and select Properties from the context menu.
- Access the Digital Signatures tab of the Properties window and check whether Microsoft Corporation is mentioned as the name of the signer.


If the signer is not verified, there is a high probability that a virus or trojan is masquerading as wscript.exe.
How to fix the issues with the wscript.exe file?
1. Temporarily disable wscript.exe
- Right-click the Windows icon on the taskbar and choose Task Manager from the context menu.

- Look for wscript.exe in the Processes tab, right-click it, and select the End Task option.


Disabling the wscript.exe background process should fix the issues like system freeze due to high CPU usage. However, the solution is temporary, and you should implement the methods discussed below to investigate and analyze the situation.
2. Get rid of trojans and worms
- Bring up the Settings app using the Windows + I shortcut.
- Access Privacy & security settings from the left sidebar and Windows Security from the right.

- Choose Virus & threat protection located under Protection areas.

- Next, click Scan options located in the Current threats section.
- Finally, choose the Microsoft Defender Antivirus (offline scan) option and press the Scan now button.

- Wait for the scan to complete and reboot your system.


Of course, if you have access to an efficient third-party antivirus, you can scan your PC to get rid of the threats.
- Plugin-container.exe: What is it & Should I Remove it?
- Conhost.exe: What is it & how to Fix Its High CPU Usage
- HydraDM.exe: What is It & Should I Remove It?
- Fix: An Error Occurred While Loading a Higher Quality Version of This Video
3. Repair the wsript.exe file
- Hit the Windows key to bring up the Start menu, type cmd in the top search bar, and select Run as administrator from the search results section.

- Type or paste the following command and press the Enter key to run the SFC scan.
sfc /scannow
- Wait for the command prompt to display the Verification is 100% complete message and type the following command and press the Enter key to initiate the DISM tool.
DISM.exe /Online /Restorehealth


Performing the System File Checker (SFC) and Deployment Image Servicing and Management (DISM) scans will repair or replace the protected system files with the ones stored in the compressed folder, thus fixing the corrupt or infected wscript.exe.
4. Modify the registry
NOTE
We recommend you back up the Windows registry before proceeding and perform the procedure with caution to avoid tampering with the registry keys.
- Use the Windows + R shortcut to launch the Run dialog box, type the following command in the text box, and press Enter.
regedit
- Navigate to the following path in the address bar to directly access the concerned key.
HKEY_CURRENT_USER/Software/Microsoft/Windows/CurrentVersion/Run - Look for other names of this trojan, such as OUzzckky, Shakira, and I-WORM.LEE, VBS/VBSWG.AQ@mm, LEE in the right section, and if you find any, right-click them and choose Delete from the context menu.

- After all the suspicious keys and successfully deleted, exit the registry editor and reboot your PC as you normally would.


There have been reports of the wscript.exe hiding dangerous worms named VBS_VBSWG.AQ. If such is the case, it will be evident by a malicious registry file that will reside in the above directory.
5. Perform a system restore
- Bring up the Start menu by pressing the Windows key, type system restore in the search box, and select Create a restore point from the search result.

- Click the System Restore button present in the System Protection tab of the System Properties window.

- Press the Next button on the System Restore wizard to proceed further.
- Choose a suitable restore point from the list when you did not witness any issues and press the Next button.

- Review the restore point and press the Finish button on the Confirm your restore point window to initiate the system restoration process.


If the issue isn’t resolved yet, restoring your PC to a previous point in time should roll back all the changes that may have commenced the wscript.exe-related problem.
In case you still witness suspicious activity by the malware disguising as wscript.exe, performing a clean install of Windows is recommended.
That’s pretty much it! Hopefully, the tactics explained in this guide proved beneficial in diagnosing and resolving the problems caused by wsript.exe.
You may also be interested in knowing about the view.exe file and whether you should be concerned about it. Many also reported Dltray.exe, and we have a special guide dedicated to it.
If you need further assistance in this regard, feel free to reach out to us in the comments section.
Taiba Hasan
A postgraduate in Computer Applications, she is an avid technical writer who loves to craft content revolving around Windows, Android, and emerging technologies like SaaS. With How-To and troubleshooting guides, she aims to provide the best solutions for the problem and make technology less complicated for novice users.
Besides writing, she also loves to cook delicacies and spent time in her garden. In her free time, you will find her binge-watching web series or gazing the night sky.
What is wscript.exe?
wscript.exe is a legitimate file. This process is known as Microsoft Windows Based Script Host and belongs to software Microsoft Windows Operating System. It is developed by Microsoft. It is commonly stored in C:\Windows\System32. The malware programmers or cyber criminals write different types of malicious programs and name it as wscript.exe virus to damage the software and hardware.
Affected Platform: Windows OS
How to check if your computer is infected with wscript.exe Virus?
Malicious authors try to infect the systems with different types of malicious programs. Each form of malicious software is designed to infect the system that creates different issues and impact on the system. One can notice the following changes once the system is infected with wscript.exe Virus
- If the internet connection fluctuation is high
- If the wscript.exe file is taking more of your CPU memory
- If the system performance is very low
- If the system is redirected to some strange websites
- If the system is getting some annoying popup ads
- If the system freezes quiet often
- If it invites other malware to infect and damage the system and exploits the same to collect the user private informaton
When one of these happens then you can be sure that your system is infected with setup.exe malware. To confirm that go to task manager by pressing the combination of keys ctrl+alt+del and go to the process tab and right click on the wscript.exe and open the location, if the location is subfolder C:\Windows\System32 files then the system is not affected by wscript.exe, if the location is somewhere else then the system is affected by wscript.exe virus.
How to remove wscript.exe malware from system using Comodo Antivirus?
Step 1: Download the award-winning Free Antivirus.
Step 2: Installation configuration frames will be displayed. Select the configuration you would like to apply.
Step 3: After network detection is complete, press “Close” button for a scan window.
Step 4: Restart your PC.
Step 5: It will take some time for the Comodo Internet Security to update the antivirus.
Step 6: Proceed with a quick scan that automatically begins after the update.
Step 7: If threats are found during the scanning, you will be prompted with an alert screen.
Step 8: Comodo Antivirus will remove the wscript.exe virus from your computer including all other malwares!
Related Resources:
- CDN Security
- What is Endpoint Security?
- What is Network Security?
- Free Virus Protection
- Best Antivirus
- Malware Removal
- Malware Analysis
- Types of Computer Virus
- Vulnerability Scanner
- URL Scanner
- BEAST Attack
- Online Site Malware Scan
- WordPress Scanner
- Check Website Trust
- HTTPS
Website Malware Directory Resources:
- PHP:GENERIC:07
- PHP:MAILER:33
- Website Malware Directory
- Check Site Security
- Website Malware Removal
- Link Scanner