In Visual Studio up to version 2010, Templates for Windows Forms projects are pre-installed, but not as of Visual Studio 2012. For these newer versions of Visual Studio you have to install an extension.
This tutorial is for Visual Studio 2022, but applies essentially the same to other versions of Visual Studio (2019, 2017, 2015 and earlier).
Installing the extension for Windows Forms projects with C++
This extension is installed in Visual Studio 2022 under Extensions|Manage Extensions
After clicking Download at “C++ Windows Forms for Visual Studio 2022 .NET Framework”

and closing Visual Studio you get the message


Click Modify to install the extension.
After the next start of Visual Studio under File|New|Project you will find the CppCLR_WinformsProject template:
With this template you can create Windows Forms projects written in C++. Such a project creates a Windows application with a graphical user interface (buttons, menus, etc.), for example:

Standard C++ (including almost all extensions of C++11, C++14, C++17) is used as programming language for the business logic. Only for accessing Windows controls C++/CLI is necessary. This is a simple C++ dialect for the .NET Framework.
The book „C++ mit Visual Studio 2019 und Windows Forms-Anwendungen“
The following is a brief excerpt from my book (in German)
which is still up to date with Visual Studio 2022. All examples and projects can be created and compiled in Visual Studio 2022 as in Visual Studio 2019.
Installing Visual Studio for Windows Forms Projects
In order to create Windows Forms projects in Visual Studio, particular components must be installed during the installation of Visual Studio. If this was forgotten during the installation, start the Visual Studio Installer either under Windows|Start
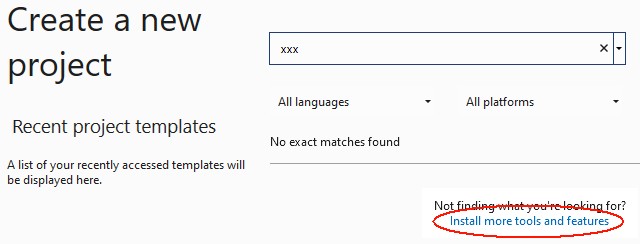
or in Visual Studio under File|New|Project|Create new project (at the end of the project list)
In the installer, check .NET desktop development, desktop development with C++ and C++/CLI support:

Create a Windows Forms project
After restarting Visual Studio, Windows Forms projects are available under Create New Project or File|New|Project:

Click the Next button. Then you will be prompted to enter the name of the project and a directory:

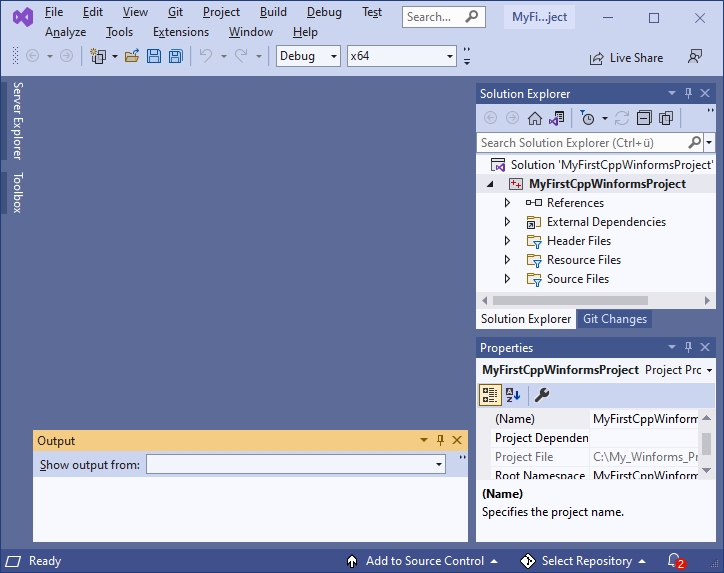
After clicking the Create button, Visual Studio looks something like this:
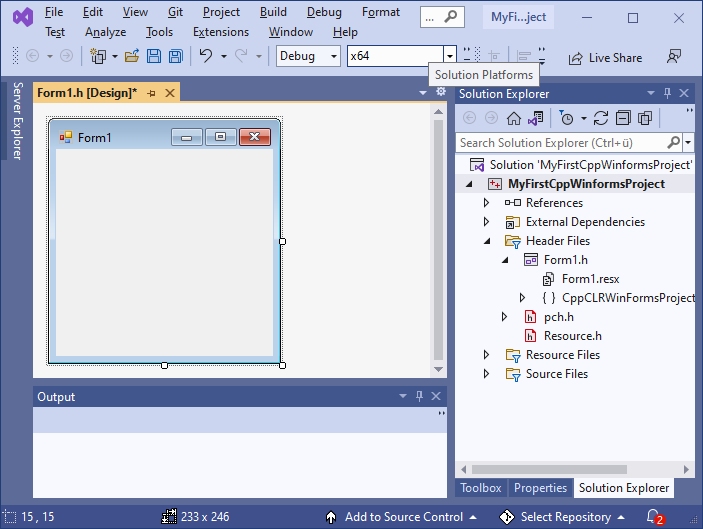
If you now click on Form1.h in the Solution Explorer, the form is displayed:
Normally, everything is done and you can continue with the next section. However, if you get something like this

you have clicked Form1.h too fast. Close this window

and click again on Form1.h in the Solution Explorer.
Visual Programming: A first small program
Now, before we get started with our first little program, let’s rearrange Visual Studio a bit to make it easier to use.
After installing Visual Studio, the Toolbox is offered at the left margin.
To prevent the toolbox from covering the form, drag the toolbox to the frame with the Solution Explorer (press the left mouse button on the title bar of the toolbox, then move to the title bar of the Solution Explorer with the mouse button pressed and release the mouse button).
Drag the properties window analogously to the Solution Explorer.
Since we initially only need the Toolbox, Solution Explorer and Properties window, you can close all other windows here (e.g. Git Explorer, etc.). Then the right frame looks something like this:
With the Windows Forms project from Section 1.4, Visual Studio then looks like this:

Next, we will now write a first small program.
The form (here Form1) is the starting point for all Windows Forms applications. It corresponds to the window that is displayed when the program is started:
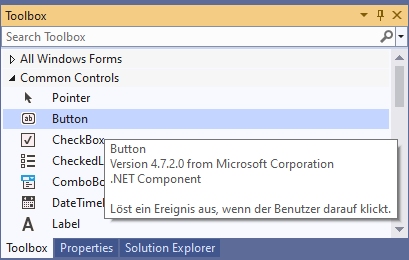
Controls from the Toolbox can be placed on a form. The Toolbox contains essentially all the controls commonly used in Windows. They are located in various groups (e.g. General Controls, Containers, etc.), which can be expanded and collapsed. Most of these controls (such as a button) are displayed on the form while the program is running. If you stop with the mouse pointer briefly on a line of the toolbox, a small hint appears with a short description:
To place an element from the toolbox on the form, simply drag it from the toolbox onto the form. Or click on it in the toolbox first and then click on the position in the form where you want the upper left corner to be.
Example: After placing a Label (line seven in Common Controls, with the capital A), a TextBox (fourth line from the bottom, labelled ab) and a Button (second line labelled ab) on the form, it looks something like this:
By playing around like this, you have already created a real Windows program – not a particularly useful one, but still. You can start it as follows:
- with Debug|Start Debugging from the menu, or
- with F5 from any window in Visual Studio or
- by starting the exe file generated by the compiler.
This program already has many features that you would expect from a Windows program: You can move it with the mouse, resize and close it.
Do not forget to close your program before you continue editing it. As long as the program is still running, you cannot restart the compiler or modify the form.
This way of programming is called visual programming. While conventional programming means developing a program solely by writing instructions (text) in a programming language, visual programming means composing it wholly or in part from out-of-the-box graphical controls.
With Visual Studio, the user interface of a Windows Forms program can be designed visually. This allows you to see how the program will look later at runtime as soon as you design it. The instructions that are to take place as a response to user input (mouse clicks, etc.), on the other hand, are written conventionally in a programming language (e.g. C++).
The Properties Window
The control that was clicked last on a form (or in the pull-down menu of the Properties window) is called the currently selected control. You can identify it by the small squares on its edges, the so-called drag handles. You can drag them with the mouse to change to resize the control. A form becomes the currently selected control by clicking on a free position in the form.
Example: In the last example, button1 is the currently selected control.
In the Properties window (context menu of the control on the form, or View|Properties window – do not confuse with View|Property pages).
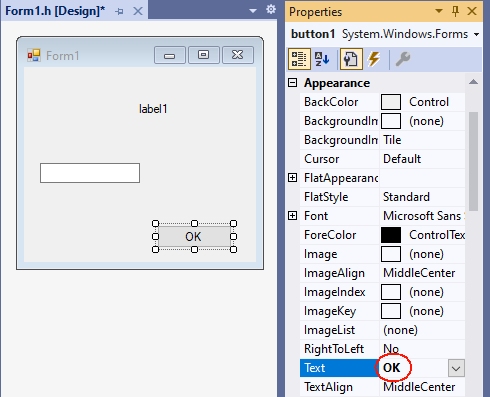
the properties of the currently selected control are displayed. The left column contains the names and the right column contains the values of the properties. With F1 you get a description of the property.
The value of a property can be changed via the right column. For some properties, you can type the new value using the keyboard. For others, after clicking on the right column, a small triangle is displayed for a pull-down menu, through which a value can be selected. Or an icon with three dots „…“ is displayed, which can be used to enter values.
Example:
- For the Text property, you can enter a text with the keyboard. For a button this text is the inscription on the button (e.g. „OK“), and for a form the title line (e.g. „My first C++ program“).
- For the BackColor property (e.g. from a button) you can select the background color via a pull-down menu.
- If you click the right column of the Font property and then the „…“ icon, you can select the font of the Text property.
A control on the form is not only adjusted to its properties in the Properties panel, but also vice versa: if you resize it by dragging the drag handles on the form, the values of the corresponding properties (Location and Size in the Layout section) in the Properties panel are automatically updated.
First steps in C++
Next, the program from Section 1.5 is to be extended so that instructions are executed in response to user input (e.g., a button click).
Windows programs can receive user input in the form of mouse clicks or keyboard input. All inputs are received centrally by Windows and passed on to the program. This triggers a so-called event in the program.
Such an event can be assigned a function that is called when the event occurs. This function is also called an event handler.
For the time being, our program should only react to the clicking of a button. The easiest way to get the function called for this event is to double-click on the button in the form. The cursor is then placed at the beginning of the function. This causes Visual Studio to generate the following function and display it in the editor:

Between the curly brackets „{“ and „}“ you then write the statements to be executed when the Click event occurs.
Essentially all instructions of C++ are possible here. In the context of this simple tutorial, only some elementary instructions are to be introduced, which is necessary for the basic understanding of Visual Studio. If terms like „variables“ etc. are new to you, read on anyway – from the context you will surely get an intuitive idea which is sufficient for the time being.
A frequently used instruction in programming is the assignment (with the operator „=“), which is used to assign a value to a variable. Initially, only those properties of controls that are also displayed in the properties window are to be used as variables. These variables can then be assigned the values that are also offered in the properties window in the right column of the properties.
For the BackColor property, the allowed values are offered after the pull-down menu is expanded:
These values can be used in the program by specifying them after Color::. If you now write the statement
textBox1->BackColor = Color::Yellow;between the curly brackets
private: System::Void button1_Click(System::Object^  sender, System::EventArgs^  e)
{
 textBox1->BackColor = Color::Yellow;
}
the BackColor property of textBox1 gets the value Color::Yellow, which stands for the color yellow, when button1 is clicked during the execution of the program. If you now start the program with F5 and then click button1, the TextBox actually gets the background color yellow.
Even if this program is not yet much more useful than the first one, you have seen how Visual Studio is used to develop applications for Windows. This development process always consists of the following activities:
- You design the user interface by placing controls from the Toolbox on the form (drag and drop) and adjusting their properties in the Properties window or the layout with the mouse (visual programming).
- You write in C++ the instructions that should be done in response to user input (non-visual programming).
- You start the program and test whether it really behaves as it should.
The period of program development (activities 1. and 2.) is called design time. In contrast, the time during which a program runs is called the runtime of a program.
A simple Winforms application
Next, a simple Winforms application is to be created based on the previous explanations. It contains a button and TextBoxes for input and output:
However, you do not have to create this project yourself. If you install the Visual Studio extension

a project template with exactly this project is available in Visual Studio:

You can use this project as a basis for many applications by adding more controls and functions.
The main purpose of this project is to show how the application logic is separated from the user interface:
- The functions, classes, etc. of the application logic are written in standard C++ and are contained in a header file that is added to the project.
- The instructions for the user interface, on the other hand, are written primarily in C++/CLI and are often included in the form class in Form1..
- The functions of the header file are called when clicking a button.
The following is a simplified version of chapter 2.11 from my book „C++ mit Visual Studio 2019 und Windows Forms-Anwendungen“. There I recommend such a project for the solutions of the exercises. In the header file of such a project you can include the solutions of several exercises or distribute them to different header files. For each subtask you can put a button (or menu options) on the form. This way you don’t have to create a new project for each subtask.
Of course, outsourcing your own instructions to an extra file (as in 3.) and accessing the controls via function parameters is somewhat cumbersome: however, it leads to clearer programs than if all instructions are located in the form file within the Form1 class. This saves many programming errors that lead to obscure error messages, and makes it easier to search for errors.
1. Create the project
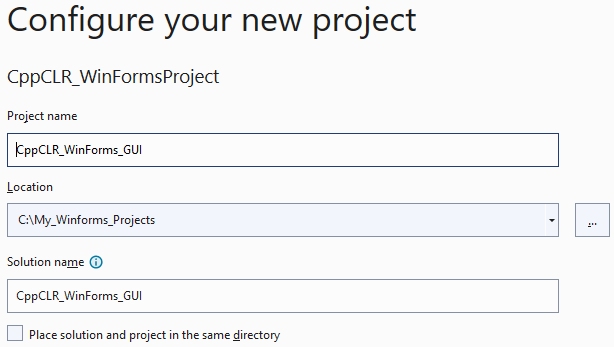
Create a new project with File|New|Project|CppCLR_WinformsProject (see section 1.1).

The following examples assume a project named CppCLR_Winforms_GUI.
2. Design the user interface (the form)
The form is then designed to contain all the controls needed to input and output information and start actions. This is done by dragging appropriate controls from the toolbox onto the form.
For many projects (e.g. the exercises from my book) the following controls are sufficient:
- A multiline TextBox (see Section 2.3.2 of my book) to display the results.
- A single-line TextBox for entering data
- One or more buttons (or menu options, etc.) to start the instructions
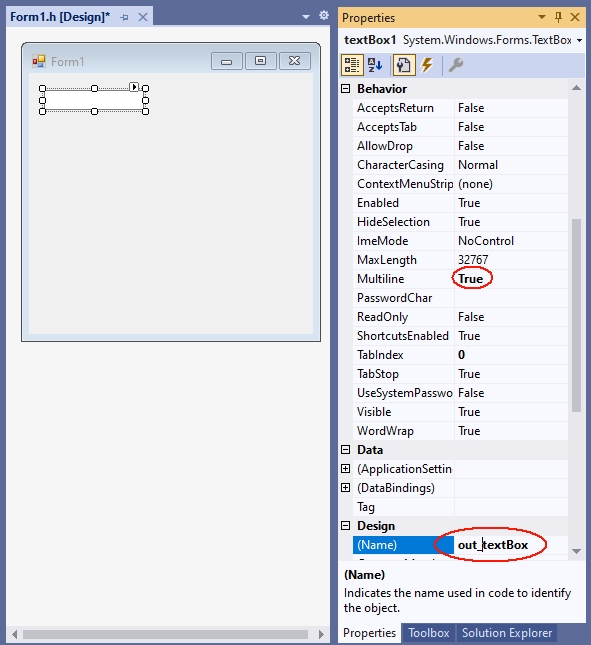
A TextBox becomes multiline TextBox by the value true of the MultiLine property. The TextBox for output is to be named out_textBox:
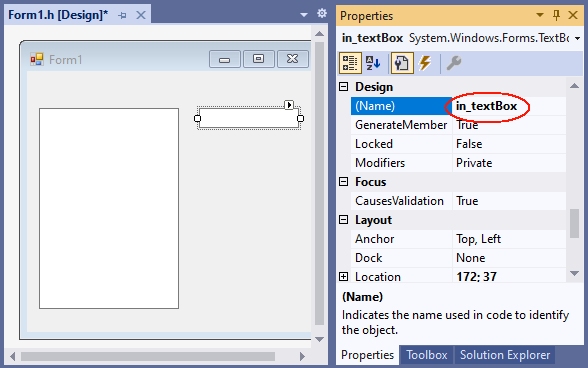
The TextBox for entering data will be named in_textBox:
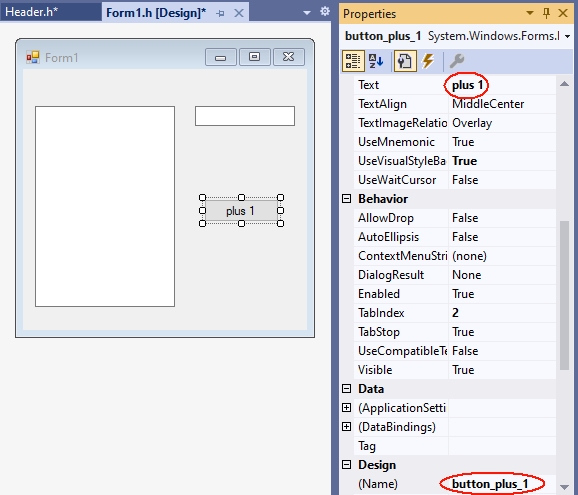
Since the function plus_1 is called when the button is clicked, it is given the caption „plus 1“ and the name button_plus1:
The functions, declarations, classes etc. of the so-called application logic are placed in a separate header file, which is added to the project with Project|Add new element|Visual C++|Code as header file(.h) with the name Header1.h. In practice, however, you should group functions and classes that belong together conceptually in a header file, and then give the header file a more meaningful name than Header.h.
The application logic is then included in the header file. These are mostly functions, classes, etc. written in C++. In our first example, this should be a function with the name plus_1, which returns the value of the argument increased by 1:
In a C++ Windows Forms project, the application logic consists primarily of functions, classes, etc. written in C++, without C++/CLI language elements. In our first example, this should be a function named plus_1, which returns the value of the argument incremented by 1:
int plus_1(int x)
{
  return x + 1;
}
Diese Datei wird dann vor dem namespace des Projekts mit einer #include-Anweisung in die Formulardatei (z.B. Form1.h) aufgenommen:
This file is then included in the form file (e.g. Form1.h) before the namespace of the project with an #include statement:
#pragma once
#include "Header1.h" // <-- manuell einfügen. nach dem Eintippen von
                     // "#include " bietet Visual Studio die Datei an.
namespace CppCLRWinFormsProject {
  using namespace System;
    ...
}
4. Calling the functions
By double-clicking the button on the form, Visual Studio creates the function (the event handler) that will be called when the button is clicked when the program is running:
private: System::Void button_plus_1_Click(System::Object^ sender, System::EventArgs^ e)
{
}
In this event handler you then call the corresponding function. In this simple tutorial this is the function plus_1 from the file Header.h.
- If this function uses user input, you read it in via a TextBox. In this simple tutorial, it will be a number that is read from the in_TextBox.
- If a parameter of the called function does not have type String (the type of the property in_textBox->Text), the string must be converted to the type of the parameter. This is possible with one of the Convert:: functions.
- The results are to be displayed in the out_textBox. This can be done with the function out_textBox->AppendText. The string that AppendText expects can be created with String::Format. In the first argument (a string) you specify {0} for the first value after the string, {1} for the second and so on.
private: System::Void button_plus_1_Click(System::Object^ sender, System::EventArgs^ e)
{
int n = Convert::ToInt32(in_textBox->Text);
int result = plus_1(n);
out_textBox->AppendText(String::Format("plus_1({0})={1}\r\n",n,result));
}
If you enter a number in the input field after starting this program with F5 and then click on the button, the value incremented by 1 is displayed in the output text box:
For each further function whose result is to be displayed, a button is placed on the form and given a suitable name (Name property) and a suitable label (Text property). This function is then called in the associated event handler.
With this all relevant parts of the ??? CppCLR_Winforms_GUI are presented. You can enhance it as you like with additional controls (buttons, menus, etc.). See chapter 2 of my book for more information.
5. GUI and application logic not so strictly separated
In the version created under 1. to 4. the application logic is strictly separated from the user interface: The access to the user interface with C++/CLI is exclusively done in Form1.h. In Header1.h, however, only standard C++ is used. This has in particular the advantage that one can use this header also in other platforms (e.g. console applications, Qt, Mac).
However, in the early stages of a project, when there is still a lot of experimenting going on, it can be a bit cumbersome if you have to change the calls in another file every time you change a parameter list. And for applications that are not intended to be used for other platforms at all, this strict separation doesn’t help much. This often applies to exercise tasks as well.
This jumping back and forth between different files can be avoided by relaxing the strict separation between the application logic and the user interface by including access to the controls in the header file as well.
Accessing controls in a header file is enabled by inserting
using namespace System;
using namespace System::Windows::Forms;
into the header file at the beginning. Then you can also use the types of the controls in the header file (e.g. as parameters) and include the statements that were in the buttonClick function in Form1.h under 4.
This procedure is implemented in the Header2.h file:
#pragma once
using namespace System;
using namespace System::Windows::Forms;

int plus_2(int x)
{
  return x + 2;
}

void plus_2_Click(TextBox^ in_textBox, TextBox^ out_textBox)
{
int n = Convert::ToInt32(in_textBox->Text);
int result = plus_2(n);
out_textBox->AppendText(String::Format("plus_2({0})={1}\r\n", n, result));
}
Here you pass a parameter for the control to the function. Please note that you must specify a ^ after the name of a .NET type (e.g. TextBox, Button). In the function you then address the control under the name of the parameter.
This function can be called when a button is clicked:
private: System::Void button_plus_1_Click(System::Object^ sender, System::EventArgs^ e)
{
plus_2_Click(in_textBox, out_textBox);
}
6. Analogy to console applications
Comparing of this Windows Forms project with a corresponding console application shows the analogy of the two types of projects. This analogy shows how to convert a console application into a forms application: If you have a console program like
#include<iostream>
int main()
{
int n;
std::cin >> n;
int result = plus_2(n);
std::cout << "plus_2(" << n << ") = " << result << std::endl;
return 0;
}
you can port it to a form application with relatively little effort. You just need to replace the I/O statements and call the functions in response to a ButtonClick, etc:
private: System::Void button_plus_1_Click(System::Object^ sender, System::EventArgs^ e)
{
int n = Convert::ToInt32(in_textBox->Text);
int result = plus_1(n);
out_textBox->AppendText(String::Format("plus_1({0})={1}\r\n",n,result));
}
Excerpt from the preface to my book „C++ mit Visual Studio 2019 und Windows Forms-Anwendungen“
The preface to my book (in German)
teaches C++ with Windows Forms applications in more detail.
Preface
The starting point for this book was the desire for a C++ textbook in which programs for a graphical user interface (Windows) are developed from the beginning, and not console applications as is usually the case. Programs in which inputs and outputs are done via a console are like stone-aged DOS programs for many beginners and discourage them from wanting to deal with C++ at all.
Windows Forms applications are an ideal framework for C++ programs with an attractive user interface: access to Windows controls (Buttons, TextBoxes etc.) is easy. The difference to a standard C++ program is mostly only that inputs and outputs are done via a Windows control (mostly a TextBox)
textBox1->AppendText(„Hello World“);
while in standard C++ the console is used with cout:
cout << "Hello world" << endl;
But not only students can benefit from C++ with a graphical user interface. With Windows Forms projects, existing C or C++ programs can be enhanced with a graphical user interface without much effort. And those who know C or C++ and do not want to learn a new language for a GUI can make their existing programs more beautiful and easier to use with simple means.
C++ has developed rapidly in recent years: The innovations of C++11, C++14, C++17 and C++20 have brought many improvements and new possibilities. Much of what was good and recommended in 2010 can be made better and safer today.
As a book author and trainer who has accompanied this whole evolution, you notice this particularly clearly: many things that have been written in the past should be done differently today. True, it would still be compiled. But it is no longer modern C++, which corresponds to the current state of the art and uses all the advantages.
This book introduces C++ at the Visual Studio 2019 level in May 2020. This is the scope of C++17.
Последнее обновление: 25.11.2023
Для создания графических приложений на C# можно использовать .NET CLI, но также можно
использовать бесплатную и полнофункциональную среду разработки — Visual Studio Community 2022, которая в ряде случаев облегчает проектирование
приложения. Так, загрузим установщик Visual Studio по адресу:
https://www.visualstudio.com/en-us/downloads.

Чтобы добавить в Visual Studio поддержку проектов для Windows Forms и C# и .NET, в программе установки среди рабочих нагрузок нужно
выбрать только пункт Разработка классических приложений .NET. Можно выбрать и больше опций или вообще все опции, однако стоит
учитывать свободный размер на жестком диске — чем больше опций будет выбрано, соответственно тем больше места на диске будет занято.
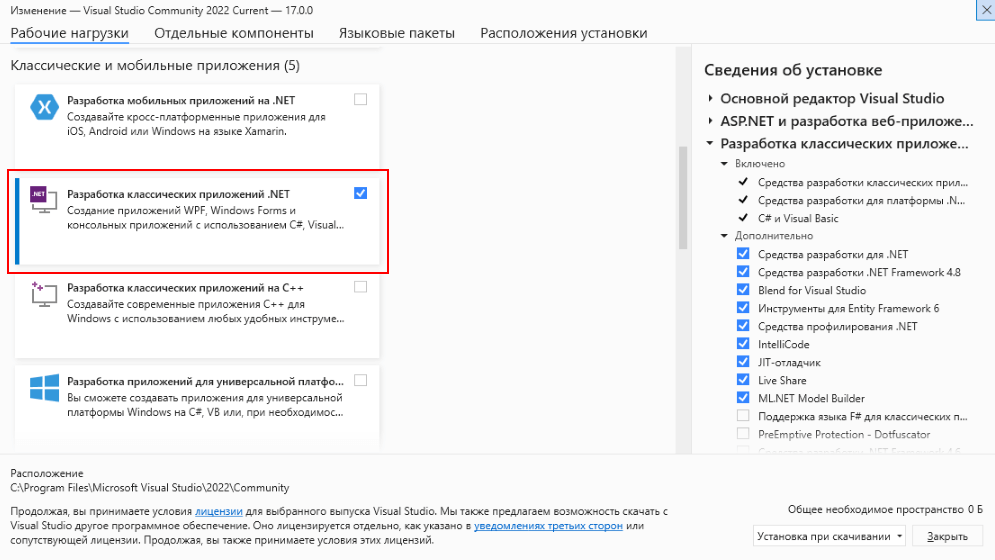
После установки среды и всех ее компонентов, запустим Visual Studio и создадим проект графического приложения.
На стартовом экране выберем Create a new project (Создать новый проект)

На следующем окне в качестве типа проекта выберем Windows Forms App:

Стоит отметить, что среди шаблонов можно увидеть еще тип Windows Forms App (.NET Framework) — его НЕ надо выбирать, необходим именно тип
Windows Forms App.
Далее на следующем этапе нам будет предложено указать имя проекта и каталог, где будет располагаться проект.

В поле Project Name дадим проекту какое-либо название. В моем случае это HelloApp.
На следующем окне Visual Studio предложит нам выбрать версию .NET, которая будет использоваться для проекта. Выберем последнюю на данный момент версию — .NET и нажмен на кнопку Create (Создать) для создания проекта.

После этого Visual Studio откроет наш проект с созданными по умолчанию файлами:

Справа находится окно Solution Explorer, в котором можно увидеть структуру нашего проекта. Практически этот тот же проект, который создается с
помощью .NET CLI:
-
Dependencies — это узел содержит сборки dll, которые добавлены в проект по умолчанию.
Эти сборки как раз содержат классы библиотеки .NET, которые будет использовать C# -
Form1.Designer.cs: он содержит определение компонентов формы, добавленных
на форму в графическом дизайнере -
Далее идет файл единственной в проекте формы — Form1.cs, который по умолчанию открыт в центральном окне.
-
Program.cs определяет точку входа в приложение
Запуск приложения
Чтобы запустить приложение в режиме отладки, нажмем на клавишу F5 или на зеленую стрелочку на панели Visual Studio.

После этого запустится пустая форма Form1 по умолчанию.
После запуска приложения студия компилирует его в файл с расширением exe. Найти данный файл можно, зайдя в папку проекта и далее в каталог
\bin\Debug\net8.0-windows
Рассмотрев вкратце создание проекта графического приложения, мы можем перейти к обзору основных компонентов и начнем мы с форм.
Готовы окунуться в мир программирования? Тогда этот материал специально для вас! Внимательно прочитайте статью до конца, чтобы научиться создавать простые приложения в Visual Studio. Здесь вы найдете пошаговую инструкцию и пример кода, которые помогут вам начать свой путь в программировании. Не бойтесь экспериментировать и погружаться в детали — только так вы сможете создавать действительно качественные приложения. Итак, давайте начнем!
Visual Studio является одним из наиболее популярных инструментов разработки программного обеспечения. Эта интегрированная среда разработки обеспечивает разработчикам все необходимые инструменты и ресурсы для создания различных приложений. В данной статье мы рассмотрим основные этапы создания приложения с помощью Visual Studio.
| Характеристика | Описание |
|---|---|
| Тип | Интегрированная среда разработки (IDE) |
| Лицензия | Коммерческая (есть также бесплатная Community-версия) |
| Операционные системы | Windows |
| Поддерживаемые языки | C#, Visual Basic.NET, C++, F#, JavaScript, TypeScript и др. |
| Разработка веб-приложений | Да |
| Разработка мобильных приложений | Да |
| Создание графических интерфейсов | Да |
| Отладка и тестирование | Встроенные инструменты для отладки и тестирования кода |
| Интеграция с системами контроля версий | Поддержка Git, TFS и др. |
| Расширяемость | Возможность создания плагинов и расширений |
| Командная работа | Возможность совместной работы в команде, совместная отладка |
| Инструменты для анализа кода | Статический анализ, поиск ошибок и уязвимостей |
| Встроенная документация | Просмотр справочной информации и документации |
| Развертывание | Возможность развертывания приложений на различных платформах |
ОНЛАЙН-ПРАКТИКУМ
КАК «ХАКНУТЬ» PYTHON С ПОМОЩЬЮ CHATGPT

ЧТО БУДЕТ НА ОБУЧЕНИИ?
- Прямо в эфире решим типичные задачи программиста только с помощью ChatGPT
- Возможности Python — расскажем что можно делать и сколько на этом зарабатывать?
- Что ждет рынок программирования и почему мы решили сюда пойти
В Visual Studio можно использовать несколько языков программирования. Вот список некоторых языков, поддерживаемых в Visual Studio:
- C# (C Sharp) — это основной язык программирования, используемый в Visual Studio. Он разработан Microsoft и предназначен для создания разнообразных приложений под платформу .NET.
- Visual Basic.NET — это ещё один язык программирования, который используется в Visual Studio. Он также основан на платформе .NET и предлагает удобный синтаксис для разработки приложений.
- C++ — язык программирования C++ также поддерживается в Visual Studio. Он обеспечивает более низкоуровневое программирование и широкий спектр возможностей.
- F# — это функциональный язык программирования, также поддерживаемый в Visual Studio. Он предназначен для разработки приложений, основанных на функциональном подходе.
- JavaScript — язык JavaScript широко используется для разработки веб-приложений и сайтов. Visual Studio предоставляет инструменты для разработки на этом языке.
- TypeScript — это язык программирования, основанный на JavaScript, но с добавленной поддержкой статической типизации. Visual Studio предлагает хорошую поддержку для разработки на TypeScript.
Кроме этих основных языков, Visual Studio также поддерживает множество других языков программирования, таких как Python, Java, Ruby и другие. В зависимости от версии Visual Studio и используемых плагинов, список поддерживаемых языков может варьироваться.
В Visual Studio вы можете создавать различные виды приложений. Вот список некоторых из них:
- Приложения для Windows Forms: Создание приложений с графическим интерфейсом пользователя, используя библиотеку Windows Forms.
- Приложения для WPF (Windows Presentation Foundation): Разработка более современных приложений с богатым графическим интерфейсом, используя технологию WPF.
- Приложения для ASP.NET: Создание веб-приложений с использованием фреймворка ASP.NET, позволяющего разрабатывать динамические и масштабируемые веб-сайты и веб-службы.
- Приложения для мобильных устройств: Разработка мобильных приложений для операционных систем Android и iOS с использованием соответствующих инструментов и платформ, таких как Xamarin или React Native.
- Консольные приложения: Создание приложений, работающих в командной строке и взаимодействующих с пользователем через текстовый интерфейс.
- Библиотеки классов: Создание библиотек классов, которые могут быть использованы другими приложениями для обеспечения переиспользования кода и функциональности.
- Службы Windows: Создание фоновых служб, которые выполняются на компьютере без прямого взаимодействия с пользователем.
- Расширения Visual Studio: Создание плагинов и расширений для самой среды разработки Visual Studio, чтобы добавлять новые функциональные возможности и инструменты.
Это лишь некоторые из видов приложений, которые можно создавать в Visual Studio. Среда разработки предлагает широкие возможности для создания разнообразных программных решений в различных областях разработки.
Подготовка к созданию приложения
Первым шагом является установка Visual Studio. Для этого необходимо загрузить установщик с официального сайта Microsoft и следовать инструкциям по установке. После установки открываем Visual Studio и создаем новый проект. Мы выберем шаблон приложения, который соответствует нашим потребностям и задачам. Интерфейс Visual Studio включает в себя ряд окон, таких как окно редактора, окно свойств и окно инструментов.
Создание приложения на языке C#
ОНЛАЙН-ПРАКТИКУМ
КАК «ХАКНУТЬ» PYTHON С ПОМОЩЬЮ CHATGPT

ЧТО БУДЕТ НА ОБУЧЕНИИ?
- Прямо в эфире решим типичные задачи программиста только с помощью ChatGPT
- Возможности Python — расскажем что можно делать и сколько на этом зарабатывать?
- Что ждет рынок программирования и почему мы решили сюда пойти
Создадим новое приложение на языке C#. Для этого необходимо добавить элементы интерфейса, написать код для логики приложения и настроить свойства элементов. Например, мы можем добавить кнопки, текстовые поля, таблицы и т.д. Используя код на языке C#, мы можем настроить логику приложения. В данном случае мы создадим простое приложение для учета задач.
Отладка и тестирование приложения
После создания приложения мы можем запустить его в Visual Studio и проверить его работу. Если возникают ошибки, мы можем использовать инструменты отладки, чтобы определить и исправить проблемы. Для тестирования приложения можно использовать автоматические тесты или тесты, созданные вручную.
Компиляция и публикация приложения
Когда приложение готово, мы можем скомпилировать его в Visual Studio и выбрать оптимальную конфигурацию сборки. Это позволяет упаковать приложение и готовить его к публикации. Мы можем выбрать платформу, на которой будет работать приложение, и опубликовать его на сайте или в магазине приложений.
Для создания примера приложения мы будем использовать язык C# и Windows Forms.
- Откройте Visual Studio.
- Выберите «Create a new project» (создать новый проект) на стартовом экране.
- В окне «New Project» (новый проект) выберите «Windows Forms App» (приложение с формами Windows).
- Укажите имя проекта и место, где вы хотите сохранить проект.
- Нажмите кнопку «Create» (создать).
- В окне «Form1.cs» нарисуйте любой объект на форме (например, кнопку или текстовое поле) и измените его свойства в свойствах элемента управления.
- Дважды щелкните на форме, чтобы создать обработчик событий для события «Load» (загрузка формы).
- В обработчике событий добавьте код, который будет выполняться при загрузке формы. Например, вы можете использовать метод MessageBox.Show() для вывода сообщения на экран.
- Сохраните проект.
- Нажмите кнопку «Start» (запустить) в Visual Studio, чтобы запустить приложение.
- Посмотрите на результат. Вы увидите форму с объектом, который вы добавили, а при запуске приложения также должно появиться сообщение.
- Если вы хотите изменить свойства формы или объектов на форме, просто выберите их в дизайнере и измените свойства в окне «Properties» (свойства).
Вот и все! Теперь у вас есть простое приложение на Windows Forms. Вы можете дальше улучшать его, добавляя новые элементы управления и функции.
Перейдем к практике. Вот пример кода на языке C# для создания простого приложения, которое выводит текст на форму при запуске:
using System;

using System.Windows.Forms;

namespace MyApplication

{

public partial class Form1 : Form

{

public Form1()

{

InitializeComponent();

this.Text = "Моё первое приложение";

}

private void Form1_Load(object sender, EventArgs e)

{

label1.Text = "Привет, мир!";

}

}

}
В этом примере мы создаем новую форму приложения с помощью класса Form, который содержит множество элементов управления, таких как метки, кнопки и т.д. Мы также используем класс EventArgs для обработки событий, которые происходят в нашем приложении.
При запуске приложения текст «Привет, мир!» будет отображен на метке с именем «label1», которую мы разместили на форме приложения. Мы также установили заголовок приложения, который отображается в верхней части окна приложения.
Это очень простой пример, но он демонстрирует основы создания приложения в Visual Studio и работу с элементами управления на форме.
Заключение
В данной статье мы рассмотрели основные шаги создания приложения с помощью Visual Studio. Visual Studio предоставляет разработчикам мощные инструменты для создания различных приложений на различных платформах. Используя Visual Studio, разработчики могут ускорить процесс создания приложений и улучшить качество своей работы.
3-дневный курс
НАУЧИСЬ СОЗДАВАТЬ TELEGRAM-БОТОВ НА PYTHON С CHATGPT
C НУЛЯ ЗА 3 ДНЯ
- Освой Python и нейросети и узнай, как гарантированно получить первые 10 заказов
- УЧАСТВОВАТЬ ЗА 0 РУБ.
- Создай и прокачай собственного чат-бота
Участвовать бесплатно
Вебинар
ФРИЛАНС И ПРОЕКТНАЯ РАБОТАДЛЯ PYTHON-РАЗРАБОТЧИКА
- Подарим подборку бесплатных инструментов для написания кода
Участвовать бесплатно
Предисловие
В этой статье речь пойдет о создании простейших приложений с использованием форм на языке C++. Сразу хочу внести ясность: разработка «формовых» С++ приложений будет осуществляться в среде Microsoft Visual Studio (обойдем стороной главного конкурента от компании Borland Software). Стоит отметить, что в Visual Studio есть два способа сделать приложение с формами, решение принимается в момент создания нового проекта.

Первый из них — использовать Windows Forms, реализующий графический интерфейс пользователя и входящий в Microsoft.NET Framework. Данный подход упрощает доступ к интерфейсным элементам Microsoft Windows благодаря созданию обёртки для Win32 API в управляемом коде. Если изложить свои мысли в более понятной форме, то данный подход очень схож с построением консольного приложения, но чуть более сложен т.к. использует формы.
Второй способ основан на использовании Microsoft Foundation Classes (MFC), библиотеке, которая берет на себя заботу о создании каркаса приложения. В отличие от первого, MFC «из коробки» использует патерн MVC (Model-View-Cont
Создание приложения в MS Visual Studio
Давайте создадим новое приложение: File->New->Project. В появившемся окне как на рисунке выше найдите и выберите Windows Forms Application, далее укажите название (app1) и расположение нового проекта и подтвердите его создание нажатием кнопки «OK».
Прежде чем приступить непосредственно к программированию
- Activated — событие, возникающее при активизации элемента.
- Click — возникает при одиночном нажатии на элемент.
- DoubleClick — двойной щелчок по элементу.
- HelpRequested — срабатывает при нажатии клавиши <F1>.
- Paint — возникает, когда элемент перерисовывается
. - MouseLeave — событие срабатывает, когда курсор покидает границы элемента.
Не стоит забывать, что свойственные элементу события зависят от его типа. Чтобы просмотреть все доступные для объекта формы события следует выделить его и в окне свойств выбрать значок молнии. Ниже показана часть событий для элементаForm1. Как можете видеть для события Load выбрана функция Form1_Load, следовательно код, содержащийся в этой функции будет вызван при загрузке формы.
Откройте файл Form1.h, там будет такой код:
private: System::Void Form1_Load(System::Object^ sender, System::EventArgs^ e){

}
Это та самая функция Form1_Load, срабатывающая при загрузке формы. Давайте убедимся в этом, добавив на форму компонент TextBox.
Для этого откройте ресурс формы и выделите его. Далее выберите панель с инструментами Toolbox и перетащите компонент TextBox на форму. Модифицируйте функцию Form1_Load следующим образом:
private: System::Void Form1_Load(System::Object^ sender, System::EventArgs^ e) {
   textBox1->Text = "Hello, World!"; //textBox1 – имя добавленного вами текст бокса
}
Запустите проект, в итоге должно появиться следующее сообщение:
На этом пока все, продолжение в следующих уроках.
Для создания оконного приложения воспользуемся версией Microsoft Visual Studio Community. Рассмотрим процесс создания приложения на базе версии 2022 года.
Для создания оконного приложения выберем меню создания пустого проекта:
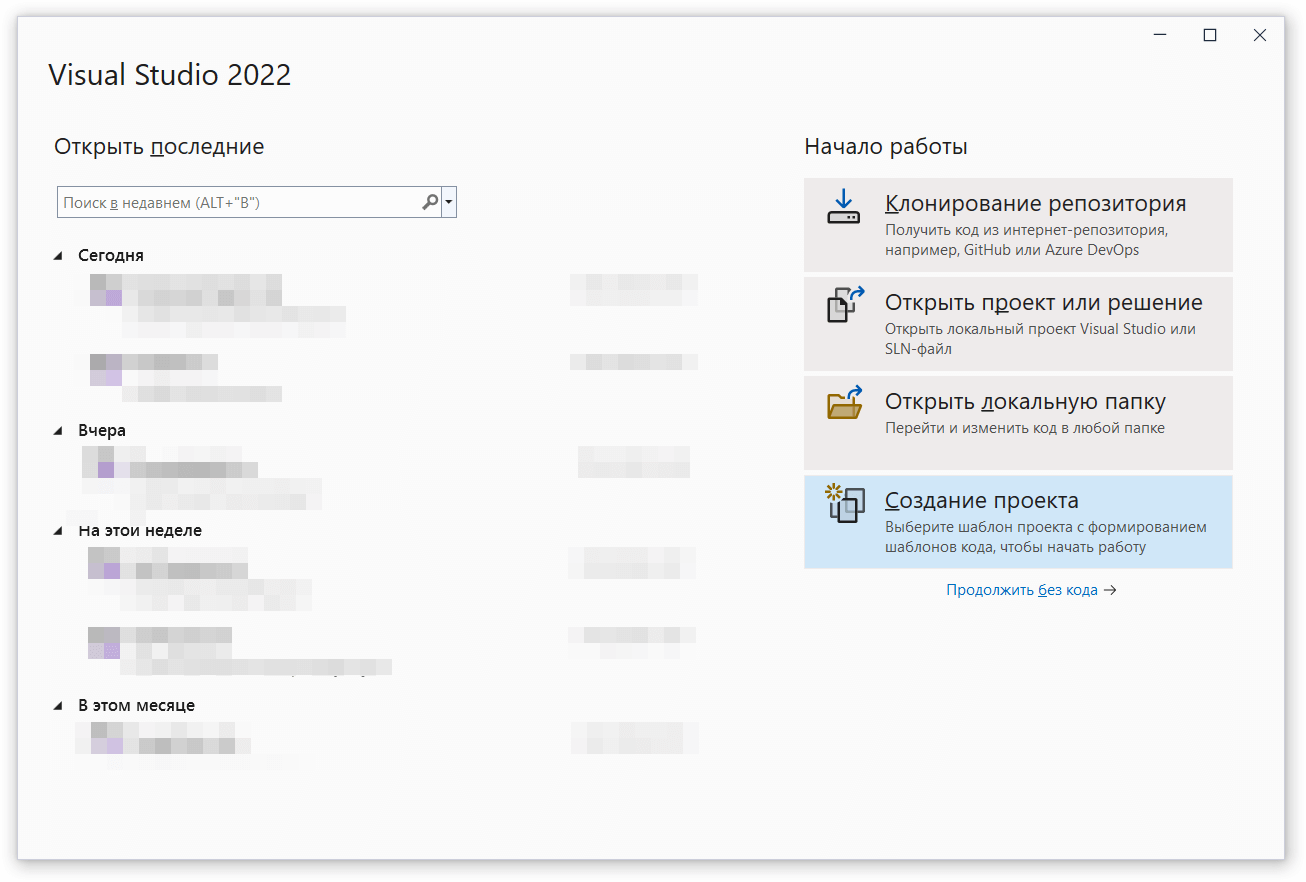
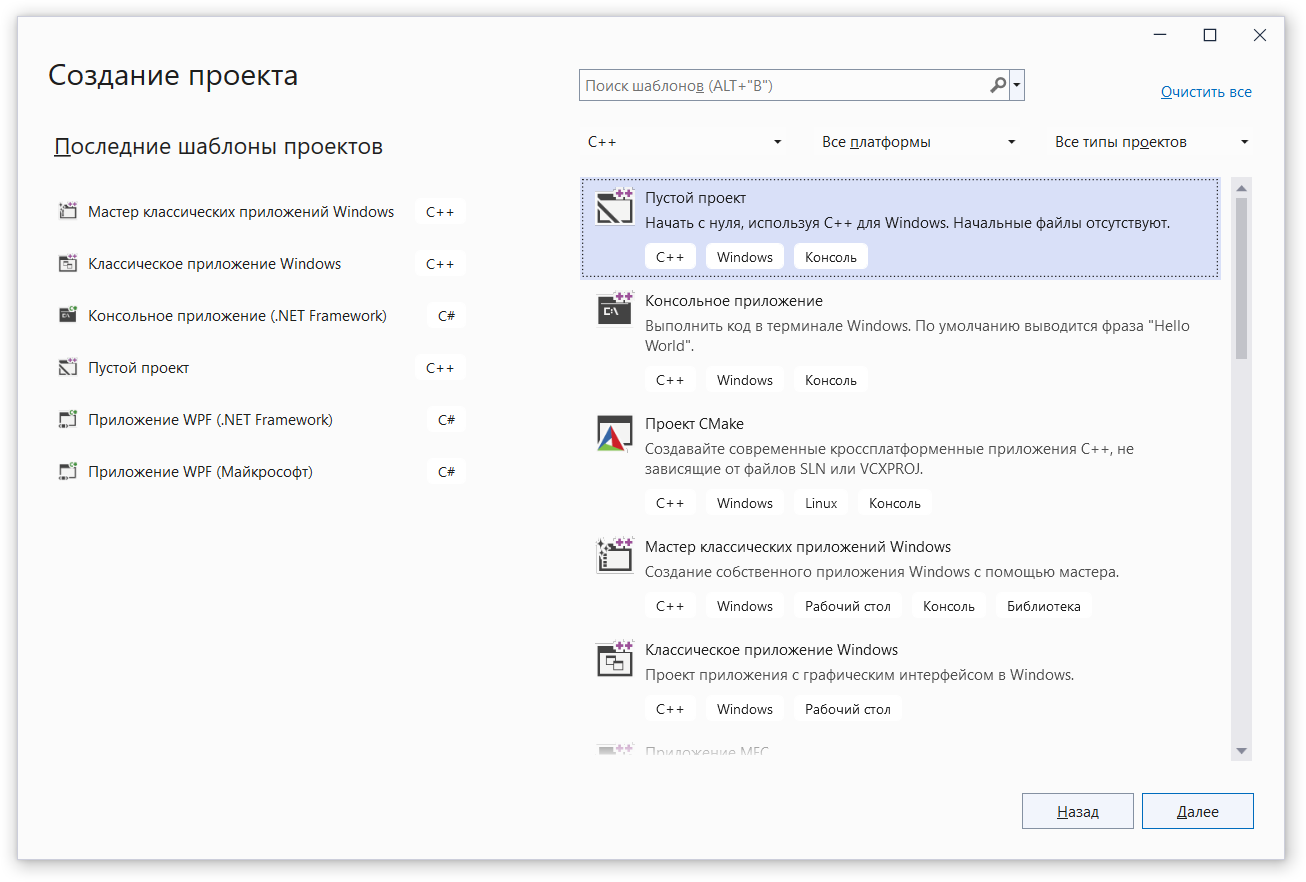
Далее добавляем файл исходного кода.

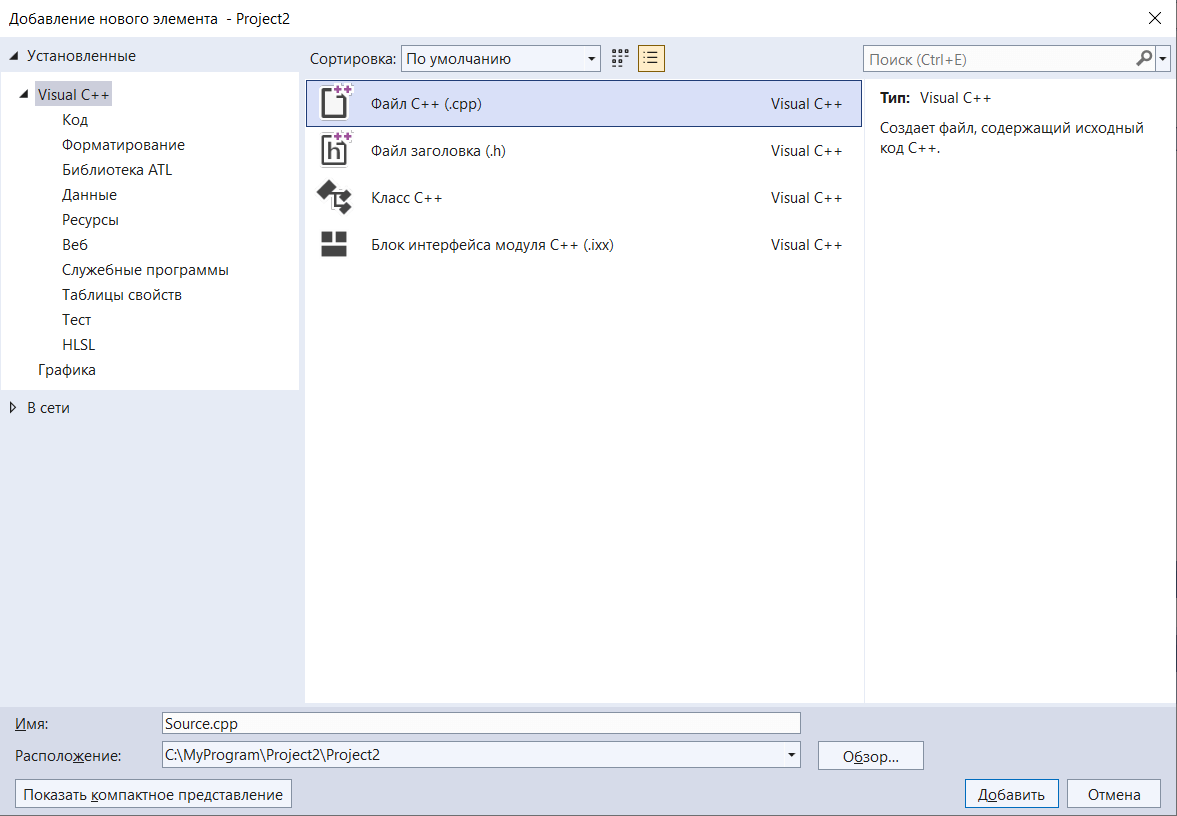
Открываем добавленный файл на редактирование и добавляем содержимое файла.
Пример простейшей программы, выводящей окно «Привет всем!» приведен ниже:
1
2
3
4
5
6
7
8
9
#include <windows.h>
#include <tchar.h>
int WINAPI WinMain(HINSTANCE, HINSTANCE, LPSTR, int)
{
MessageBox(NULL, _T(«Привет всем!»),
_T(«Программа»), MB_OK);
return 0;
}
Для успешной компиляции программы необходимо изменить платформу с консоли на Windows. Для этого по правой кнопке мыши заходим в свойства проекта.

Далее в настройках меняем подсистему с консоли на Windows.

Для компиляции программы выбираем меню Сборка → Пересобрать решение.
И после успешной компиляции запускаем программу на выполнение через меню Отладка → Начать отладку.
После запуска программы видим первое диалоговое окно.
