
Running into the “Microsoft Teams installation has failed” error on your Windows 10 or 11 PC? You’re not alone. This issue usually happens due to leftover files, permission issues, or missing dependencies like WebView2. Here’s a step-by-step guide to fix the problem and get Microsoft Teams installed properly.
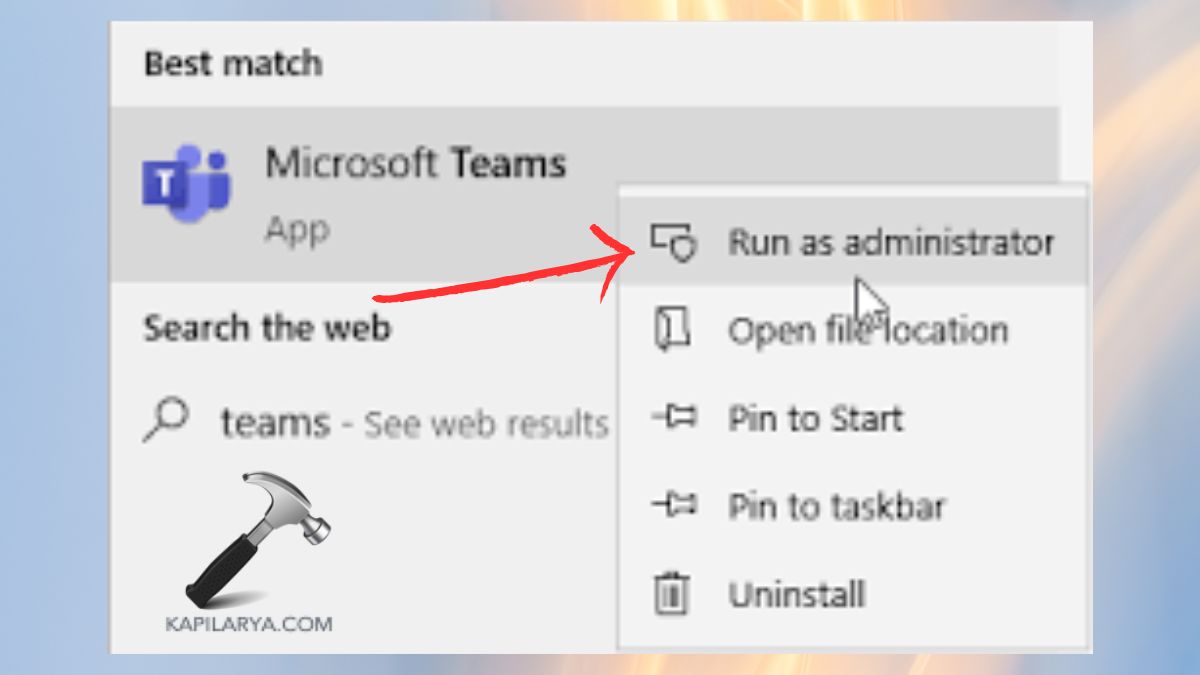
1. Run the Installer as Administrator
Always run the Teams installer with admin rights to avoid permission errors.
- Right-click the Teams installer file.
- Select Run as administrator.
2. Uninstall Any Existing Teams Installation
Old or partial installs can block the new installation.
- Go to Settings > Apps > Installed Apps.
- Search for Microsoft Teams and Teams Machine-Wide Installer.
- Uninstall both if they appear.
- Restart your PC after uninstalling.
3. Clear the Teams Cache
Clearing the cache removes temporary files that might interfere.
- Press
Win + R, type%appdata%, and hit Enter. - Delete the Microsoft Teams folder.
- Restart your computer.
4. Delete Leftover Files from Program Files
Check for Teams folders under Program Files and remove them manually.
- Open File Explorer.
- Navigate to:
C:\Program Files (x86)\Microsoft\C:\Users\<your-username>\AppData\Local\Microsoft\
- Delete any folders named Teams or TeamsMeetingAdd-In.
5. Clean the Registry (Optional – Be Careful)
Orphaned registry entries can sometimes block installation.
⚠️ Only proceed if you’re comfortable using the Registry Editor.
- Press
Win + R, typeregedit, and press Enter. - Navigate to:
HKEY_CURRENT_USER\Software\Microsoft\Office\TeamsHKEY_LOCAL_MACHINE\Software\Microsoft\Office\Teams
- Delete any Teams-related folders.
- Close the Registry Editor and restart your PC.
6. Install WebView2 Runtime
Microsoft Teams depends on the WebView2 Runtime to run. If it’s missing, the installation might fail.
- Download it from the official Microsoft page:
Download WebView2 Runtime - Install it and restart your system.
7. Check Group Policy Settings (Windows Pro and Enterprise)
Some Group Policy settings might block app installations.
- Press
Win + R, typegpedit.msc, and hit Enter. - Navigate to:
Computer Configuration > Administrative Templates > Windows Components > App Package Deployment - Make sure these policies are Not Configured:
- Prevent non-admin users from installing packaged Windows apps
- Allow all trusted apps to install
Still Not Working?
If none of these steps work:
- Try installing Teams using the offline installer from Microsoft’s official website.
- Check for pending Windows updates.
- Try installing in Safe Mode with Networking.
- Contact your IT admin if you’re on a managed device.
Bonus: Watch the Fix in Action
Here’s a helpful video tutorial that walks through the common solutions:
▶️ Fix Microsoft Teams Installation Has Failed Error (YouTube)
Installation errors become frustrating when you want to set up Microsoft Teams for work, school, or personal use. The Microsoft Teams installation has failed error emerges because of system conflicts and corrupted files, together with antivirus interference issues.
Hence, this guide provides the most effective step-by-step solutions to installing Microsoft Teams on Windows without any trouble.
Page Contents
The following section introduces common causes that lead to “Microsoft Teams installation has failed” errors before we explore potential solutions.
1. Antivirus or Firewall Interference
Third-party antivirus solutions together with firewalls can mistakenly interpret Microsoft Teams as harmful software thus blocking its installation. The installation process will fail when the installer gets flagged or quarantined by security systems.
2. Corrupted or Incomplete Installation Files
A corrupted or incomplete Microsoft Teams setup file often causes installation failure to occur.
3. Previous Microsoft Teams Installation Conflicts
Previous incomplete uninstallation of Microsoft Teams can generate files and registry entries that disrupt the installation of a new version.
4. Lack of Administrator Privileges
System settings need administrator privileges to correctly install software. The installation of Teams will not succeed when you attempt to install it with insufficient administrative privileges.
5. System Conflicts with Background Programs
The installation of Teams may fail when background applications such as Microsoft services or collaboration tools including Skype for Business run concurrently.
6. Issues with Windows Updates
Microsoft Teams needs particular Windows system components to operate properly therefore maintaining your system update status remains fundamental.
7. Low Disk Space
Insufficient storage on your system drive (usually C:) leads to installation problems or failures during the process. A successful Microsoft Teams installation needs sufficient empty storage space on the system.
Fix Microsoft Teams Installation has failed error
Fix 1: Disable Third-Party Antivirus Temporarily
Third-party antivirus tools mistakenly view Microsoft Teams as a potential security risk which prevents them from allowing its installation. To fix this-
1. Right-click on the antivirus icon in the taskbar.
2. Choose Pause protection or Disable temporarily from the antivirus options that differ by program type. Set a specific period for the protection pause either in minutes or until the system restarts.
3. You should obtain the newest Microsoft Teams setup by visiting the Microsoft Store. Return to your antivirus application after installation is finished to enable its protection features.
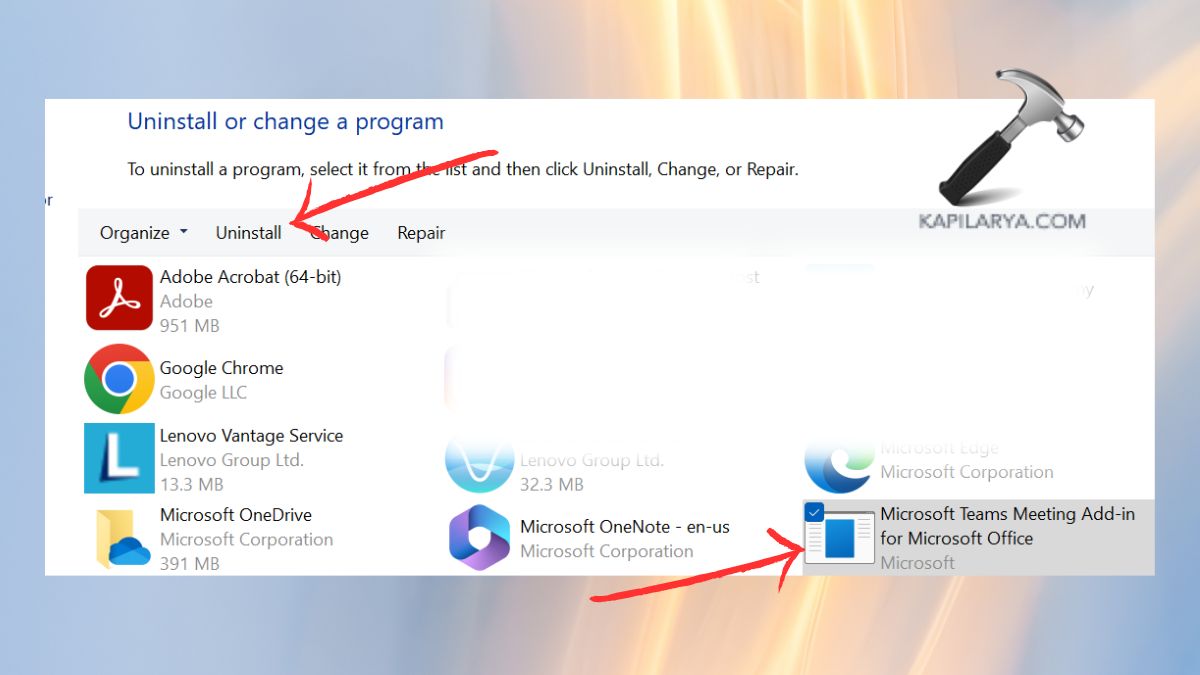
Fix 2: Clean Previous Installations
The problem can be resolved by completely removing all previous Teams installation files.
1. Open the Windows + R dialog box then enter the following command followed by pressing Enter.
appwiz.cpl

2. Right-click Microsoft Teams from the list and choose “Uninstall”.
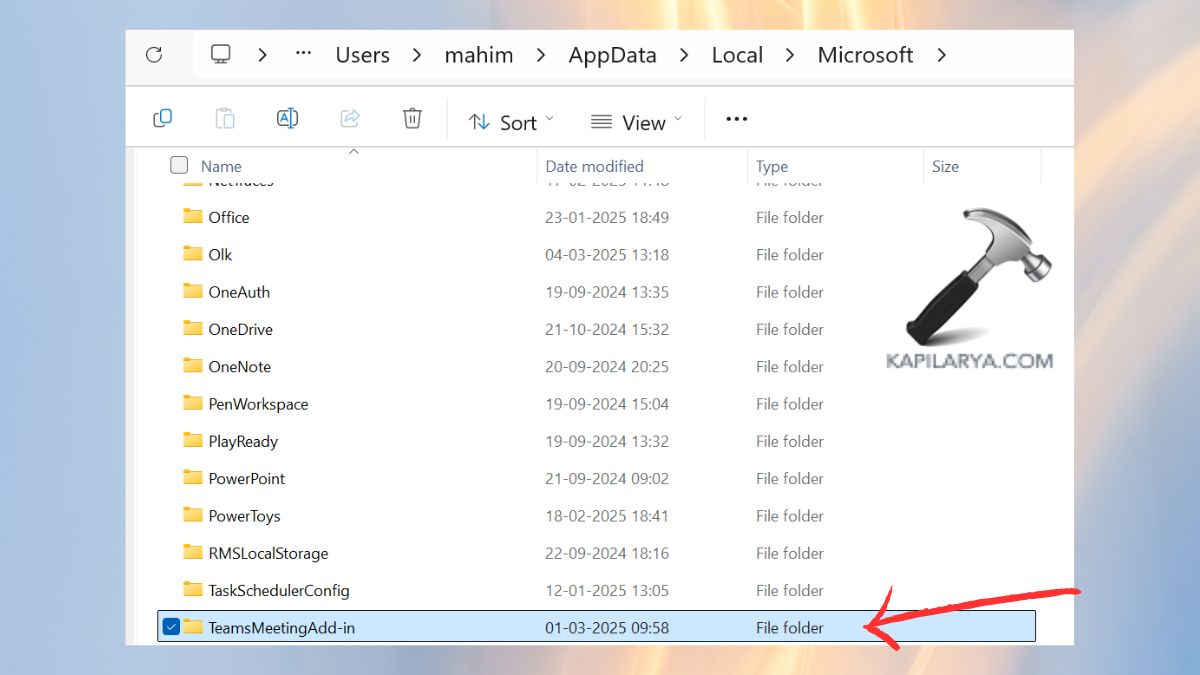
3. Open File Explorer (Windows + E). Navigate to-
C:\Users\YourUsername\AppData\Local\Microsoft\Teams
Delete the Teams folder.
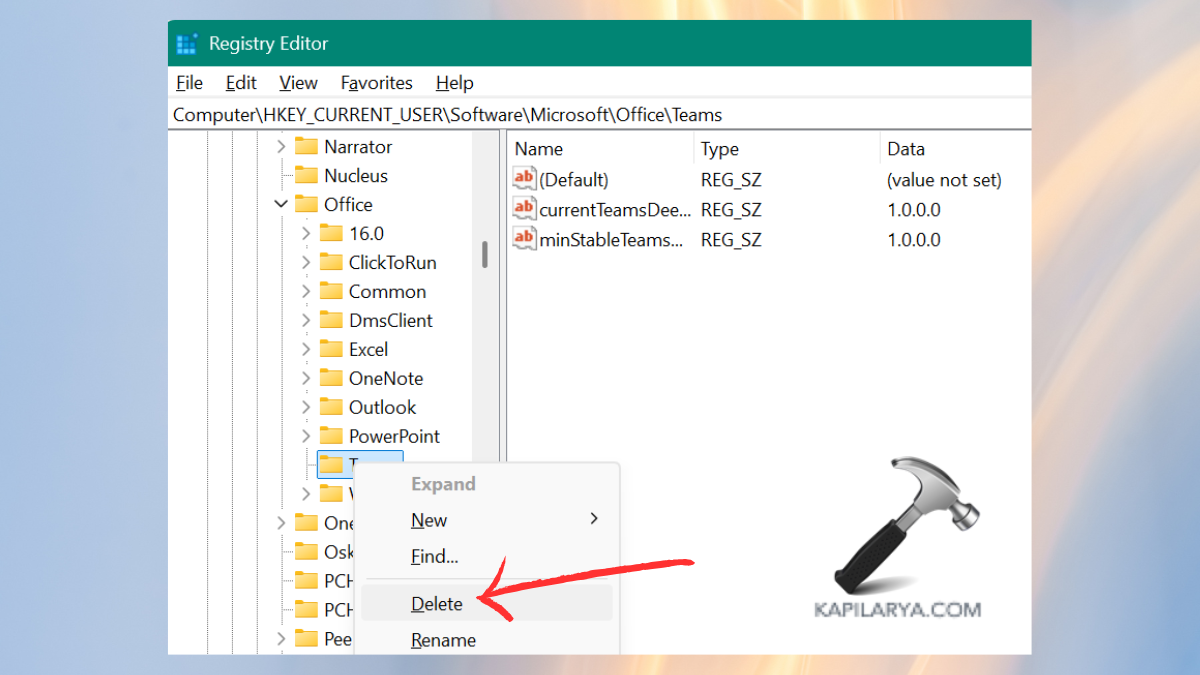
4. Open the Registry Editor app from the search console.

5. Navigate to the below path-
HKEY_CURRENT_USER\Software\Microsoft\Office\Teams
Delete the Teams registry folder. After restarting your system attempt to reinstall Microsoft Teams.
Fix 3: Run Installer as Administrator
Running the installer with administrative privileges can help bypass permission-related installation issues.
1. Navigate to the folder where the Microsoft Teams setup file is downloaded.
2. Right-click the setup file (Teams_windows_x64.exe or similar). Select Run as administrator.
3. Proceed with the on-screen instructions to install Microsoft Teams. If the installation still fails, move to the next solution.
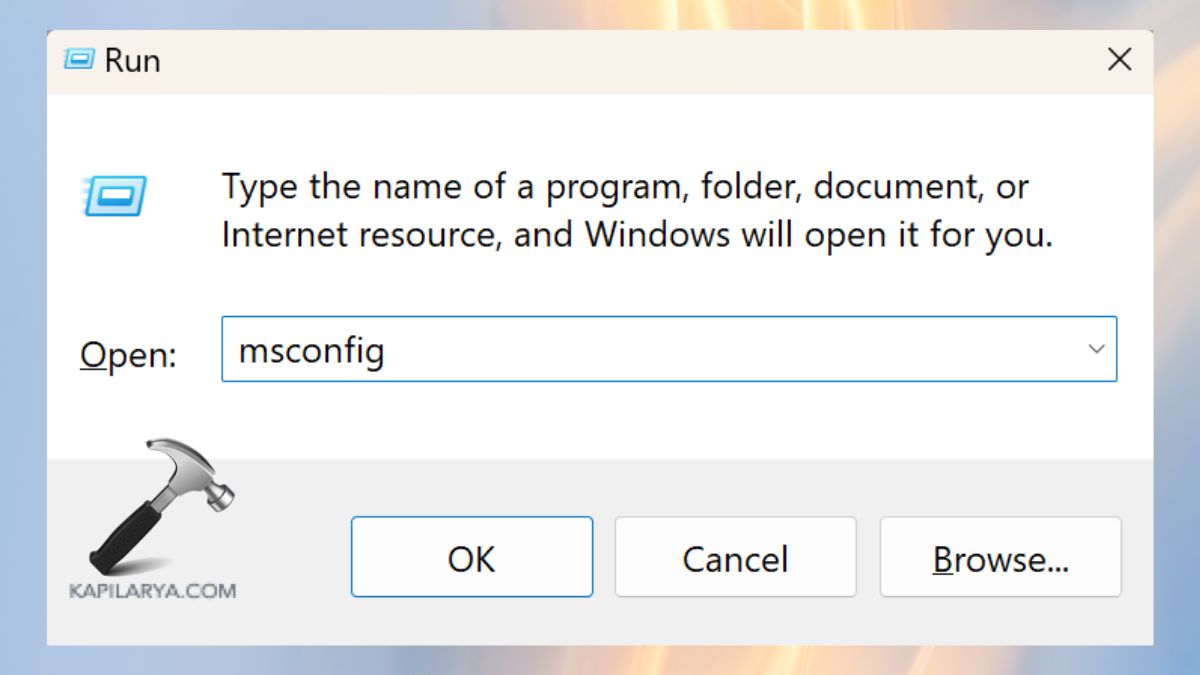
Fix 4: Perform a Clean Boot
A clean boot prevents conflicting software from disrupting Microsoft Teams installation.
1. Open the Run dialog by pressing Windows + R then enter the below command and press Enter.
msconfig
2. Go to the Services tab. Select the option to “Hide all Microsoft services (to prevent disabling critical Windows services)” from the list. You can disable all third-party services by selecting “Disable all”.

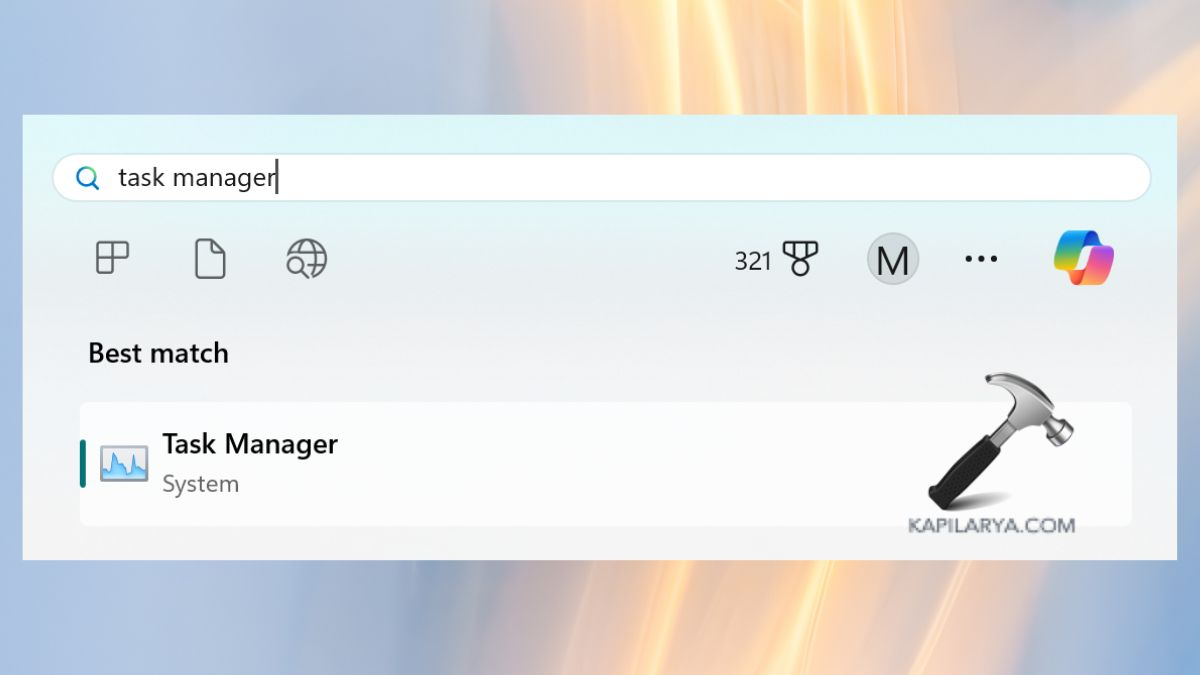
3. Open Task Manager (Ctrl + Shift + Esc) or search it from menu console. Go to the Startup tab.
4. Use right-click to disable all startup programs that are not essential.
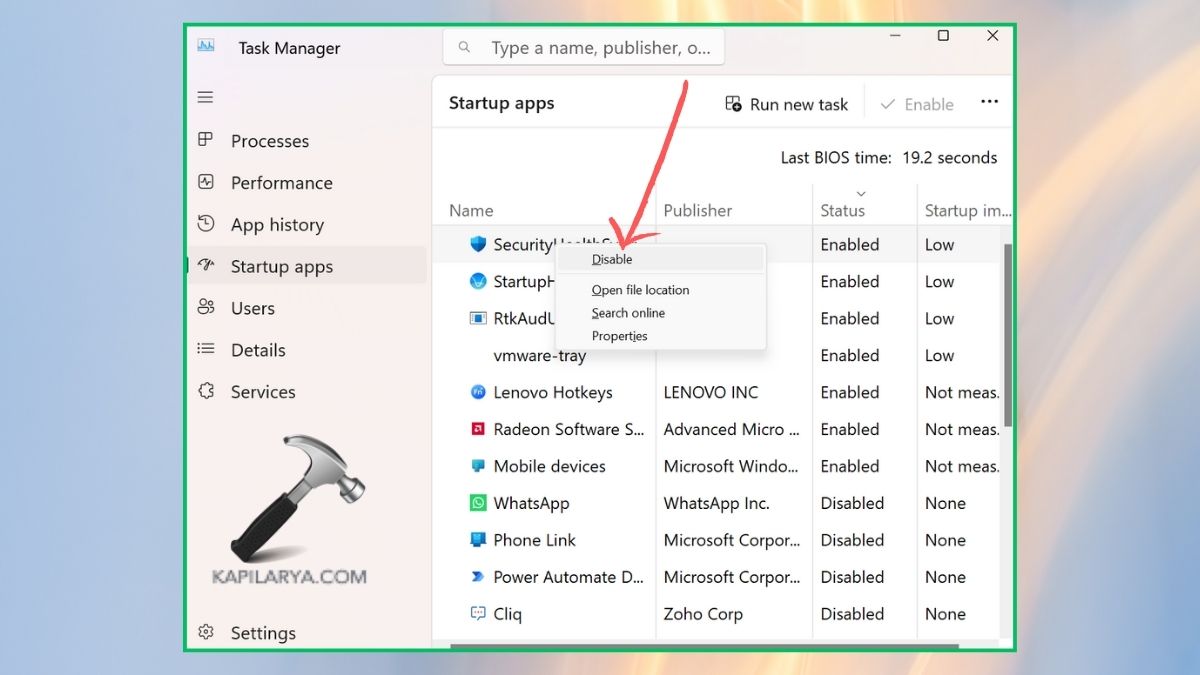
Restart your computer. Check if the installation problem with Microsoft Teams has been fixed by running the installer.
You can restore startup programs after successfully installing Teams through the reversal of these installation steps.
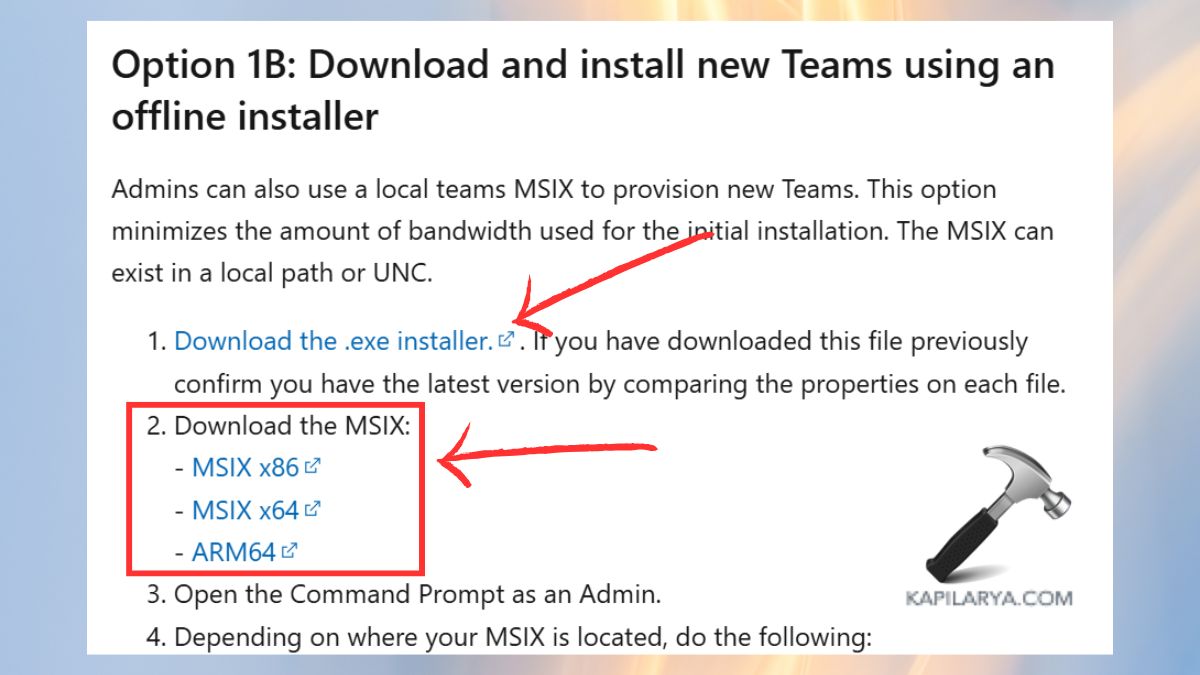
Fix 5: Use the MS Teams MSIX Version
Microsoft provides an MSIX version of Teams specifically designed to work with Windows 11 and contemporary Windows operating systems. The alternative version helps users overcome installation problems.
1. Users should access the Microsoft Teams MSIX download page (https://learn.microsoft.com/en-us/microsoftteams/new-teams-bulk-install-client) from the official website. Download the MSIX package by selecting it from the available options. Also, download the exe file.
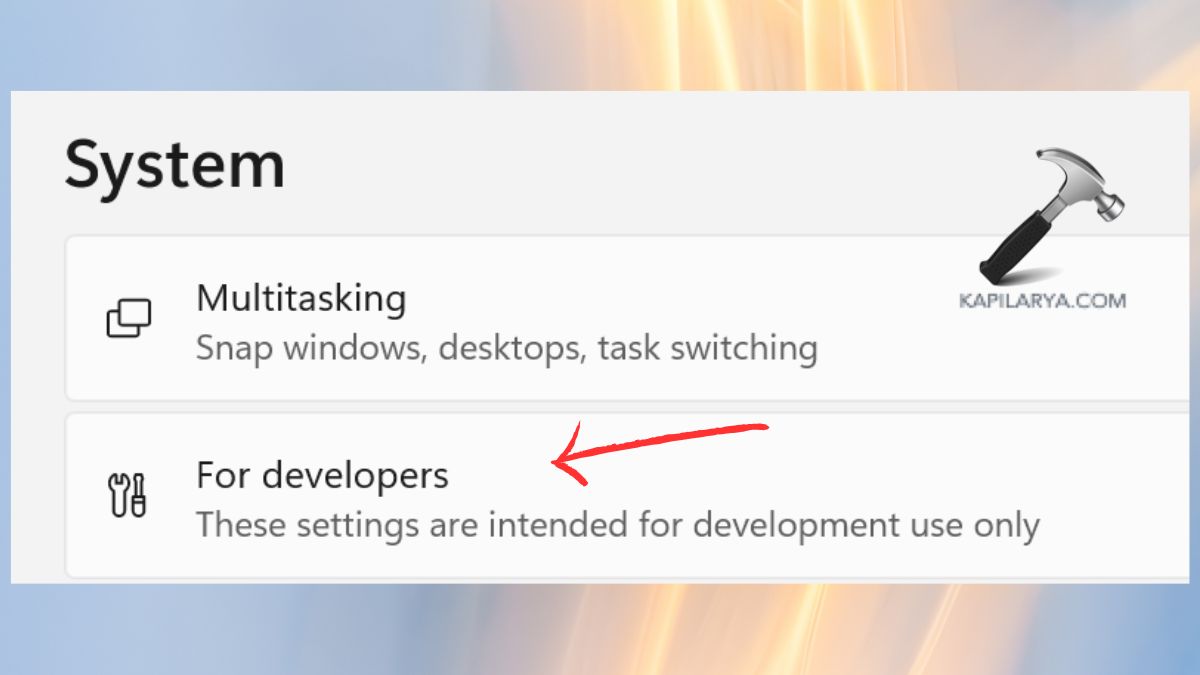
2. Users can access Settings by pressing Windows + I. Access System then select For Developers from the menu.
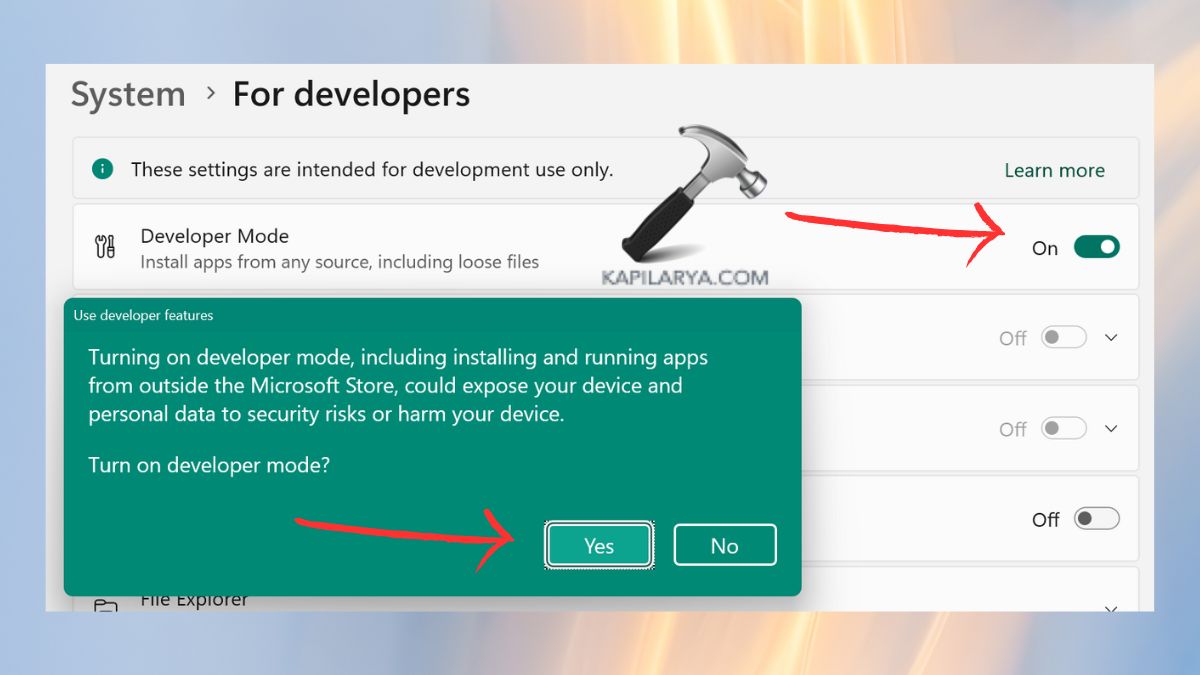
3. Turn on Developer Mode and tap “Yes”.
4. Double-click the downloaded MSIX file. The installation process requires users to follow the on-screen instructions.
Frequently Asked Questions (FAQs)
#1 Why is the Microsoft Teams app showing “Microsoft Teams Installation has failed error”?
The error typically appears because of these main factors:-
- Corrupt or incomplete installation files
- The installation process fails because antivirus or firewall software prevents it from happening.
- The absence of administrator privileges prevents users from installing the software.
- Conflicting previous Team installations.
- System compatibility issues alongside Windows updates that are missing can lead to this problem.
To fix this, the solutions described in this article will help you.
#2 How do I repair Microsoft Teams installation?
You can fix Microsoft Teams when it fails to work properly after installation, by performing these steps.
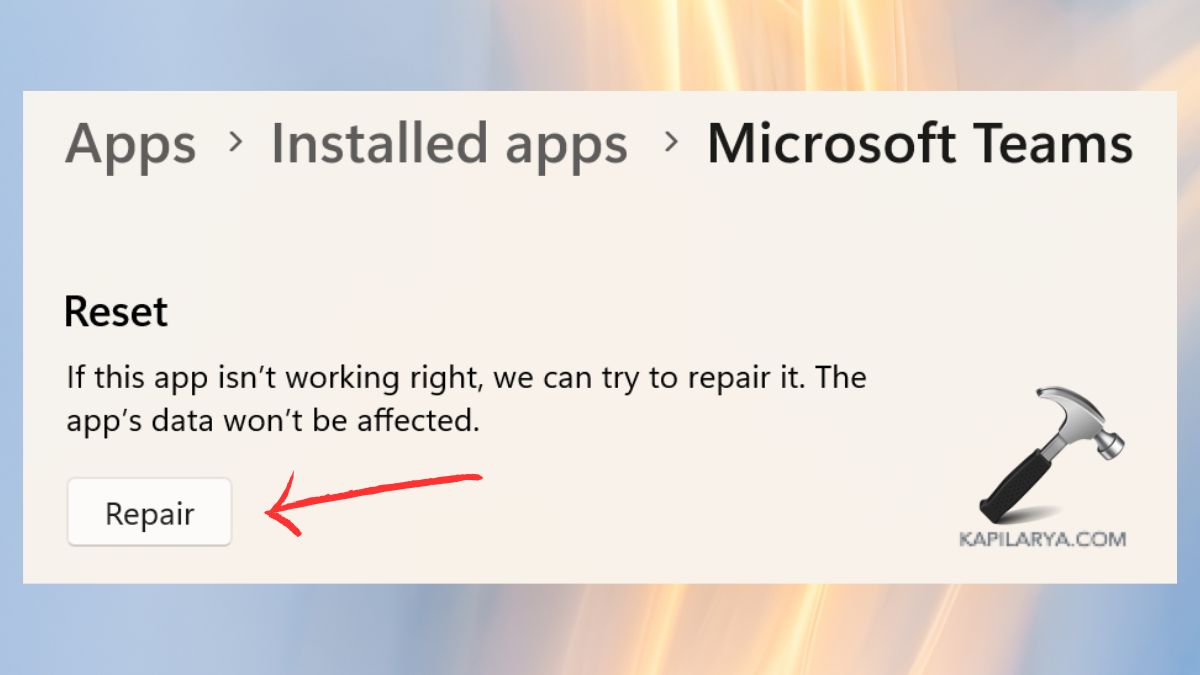
1. To access Settings users should press Windows + I. Go to Apps > Installed apps.
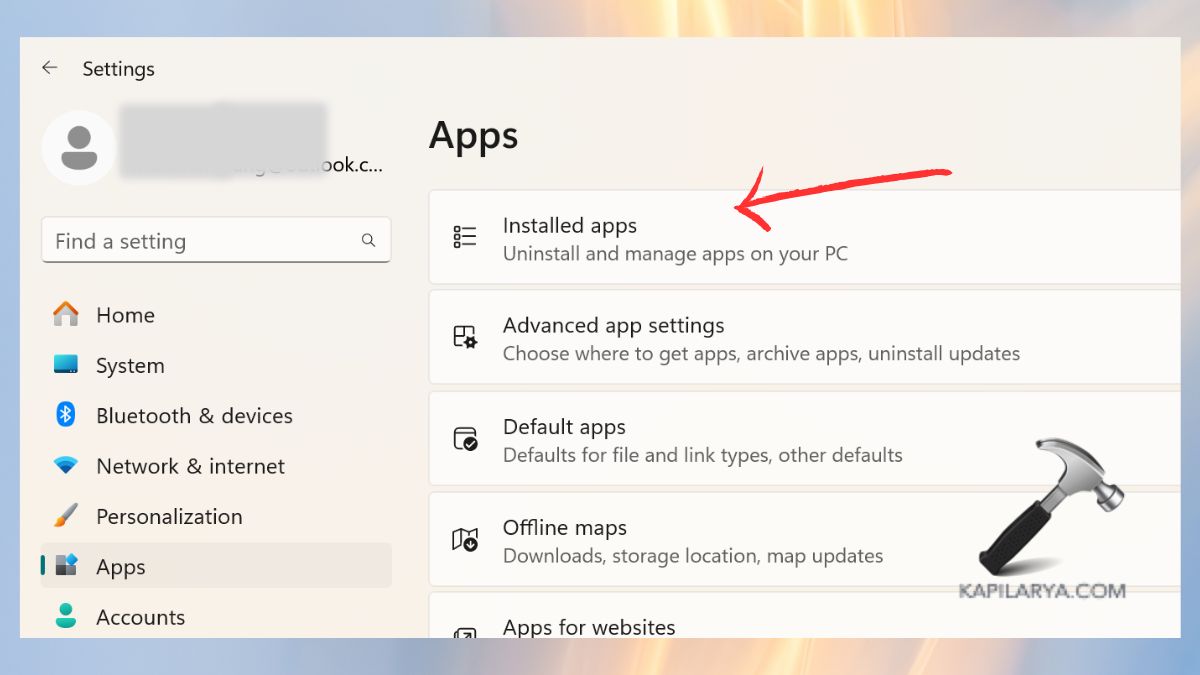
2. To access Advanced options for Microsoft Teams click the three dots next to its entry.

3. Tap the “Repair” option to fix issues without modifying any stored data.
#3 Can I use Microsoft Teams without installing it?
Yes! The Microsoft Teams Web Version operates without requiring users to install the application.
1. Open your browser to access https://teams.microsoft.com.
2. Login to your Microsoft account.
Users can access chats, meetings, and calls through the browser interface.
That’s it!
Table of Contents
Fix Cannot Install New Microsoft Teams on Windows
In some cases, you got the below error when trying to install the new Microsoft Teams app on your Windows 11 computer.
To fix this, let’s hold the Shift key on keyboard and right-click on the downloaded msix package then select Copy as path to copy the path of the file to the clipboard.
Next, right click on the Windows Start icon then open an elevated PowerShell window.
Now, run the following command to install the new Microsoft Teams app. You can right click to paste the path of the file that you’ve copied in the previous step.
Add-AppxPackage -Path "Path of the msix package"The installation starts automatically without any user prompts.

After installation, open the newly installed Microsoft Teams app to ensure it is functioning properly.

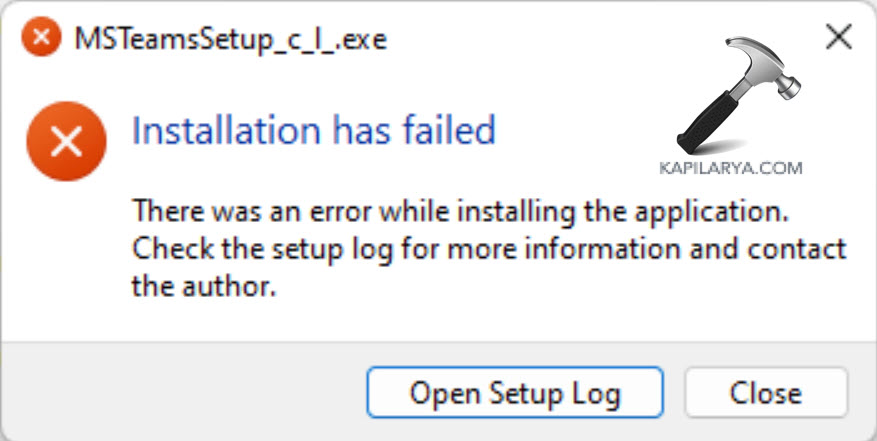
I’m betting that most people absolutely hate using Microsoft Teams for a range of different reasons but are forced to do work purposes. Apart from being clunky, unintuitive and outright dull it’s also got a done of problems hidden away inside of it, with the biggest and most common being installation error — “Installation has failed. There was an error while installing the application. Check the setup log for more information and contact the author.” This prevents you from doing anything else with Microsoft Teams, so follow along as we guide you through quite a few troubleshooting steps that should solve this problem.

Takeaways:
- Fixing Microsoft Teams error — “Installation has failed. There was an error while installing the application. Check the setup log for more information and contact the author.”
- Why can’t I install Microsoft Teams on Windows 11? Fixing installation has failed error.
Table of Contents
As with most Microsoft software and tools, there are quite a few different things that cause this error message 5 of the most common are listed below.
- Security software interference: Antivirus programs may block the installer from making necessary system changes.
- Corrupt or incomplete installation files: Failed or interrupted installations can leave behind problematic files.
- Insufficient user permissions: The installer may require elevated privileges to access system directories.
- Conflicts with existing installations: Residual files from previous installations can disrupt new setups.
- Windows Installer service issues: If this service isn’t functioning properly, software installations may fail.
Run the Teams Installer as Administrator
While it probably won’t solve your problem it only takes a second to do so try running your Teams installer with admin privileges.
- Locate the Microsoft Teams setup file.
- Right-click the file and select Run as administrator.
- Confirm any User Account Control (UAC) prompts.
- Follow the installation steps and check if the issue is resolved.
Uninstall Previous Versions of Teams
Make sure any older versions of Teams are completely removed before trying to install a new version of Teams. Microsoft Teams is super fragile and gets corrupted and confused very easily.
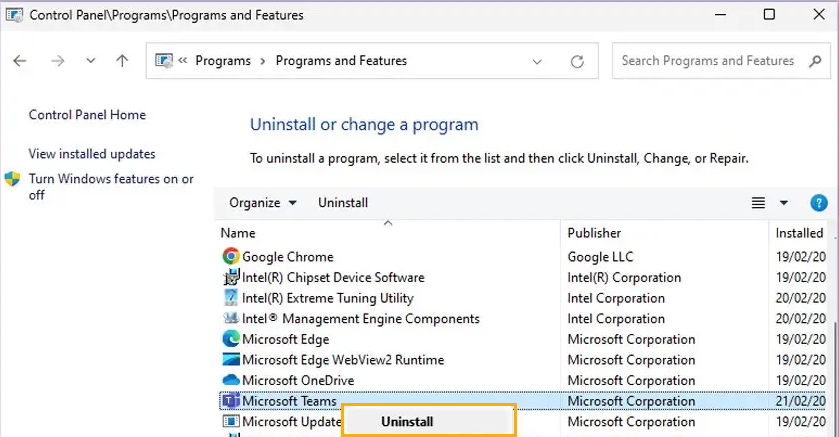
- Open Control Panel and navigate to Programs > Uninstall a Program.
- Locate Microsoft Teams, right-click, and select Uninstall.=
- Follow the prompts to remove the application.
- Open File Explorer with Win + E and enable hidden files under the View tab.
- Navigate to C:\Program Files\WindowsApps and delete or rename the Microsoft Teams folder.
- Type %AppData% in Windows search and press Enter.
- Delete the Teams folder.
- Restart your system and reinstall Teams.
Temporarily Disable Antivirus and Firewall
If you are using a third-party antivirus or firewall tool it could be causing problems so disable it/them then try to install Teams. If you are using Windows Defender you can skip this step as it won’t cause any issues with the installation.
- Temporarily disable your third-party security software.
- Open Control Panel > System and Security > Windows Defender Firewall.
- Select Allow an app or feature through Windows Defender Firewall.
- Click Change settings and enter your administrator password if prompted.
- Find Microsoft Teams and check both Private and Public boxes.
- Click OK to save your changes.
Clear Teams Installation Cache
Corrupt cache files can block the installation process.
- Close Microsoft Teams completely.
- Open File Explorer with Win + E and ensure hidden files are visible.
- Navigate to %appdata%\Microsoft\teams.
- Delete the contents of these folders:
application cache\cache
blob_storage
Cache
databases
GPUcache
IndexedDB
Local Storage
tmp
- Empty the Recycle Bin or use Shift + Del to permanently delete files.
- Restart your system and try installing Teams again.
Can’t Install Teams on Windows 11? A Comprehensive Guide
With the advent of remote work and digital collaboration tools, Microsoft Teams has become an integral part of many organizations’ communication infrastructure. As Windows 11 continues to gain popularity, users are looking to install Microsoft Teams to stay connected with their colleagues and clients. However, some may encounter issues during the installation process. If you’re facing difficulties installing Teams on Windows 11, this article will guide you through the possible reasons behind the problem and provide solutions to ensure a successful installation.
Understanding Microsoft Teams
Before diving into the installation issues, let’s have a brief overview of what Microsoft Teams is. Microsoft Teams is a collaboration platform that combines workplace chat, video meetings, file storage, and application integration. It is part of the Microsoft 365 suite, allowing seamless collaboration among team members.
Common Reasons You Can’t Install Teams on Windows 11
When you encounter problems installing Microsoft Teams on Windows 11, it could be due to a variety of reasons:
-
System Requirements: One of the first things to check is whether your device meets the minimum system requirements for Microsoft Teams. Microsoft typically recommends Windows 10, version 1903 or later, and Windows 11 is obviously compatible. However, make sure you’re running the latest updates for optimal compatibility.
-
Corrupted Installation Files: Sometimes, the files you download to install Teams may become corrupted during the download process. This could lead to installation failures.
-
Existing Teams Installation: If Teams is already installed on your device, it can cause conflicts with new installations or updates. Multiple versions of Teams (like the desktop app and the web version) can also impact the installation process.
-
Admin Rights: Installing applications often requires administrator rights. If you’re logged in as a standard user, the system may block the installation.
-
Antivirus or Firewall Settings: Security software such as antivirus programs or firewalls can inadvertently block the installation of new applications, including Microsoft Teams.
-
Network Connectivity Issues: A weak or unstable internet connection can interfere with the download and installation of Teams.
-
Outdated Windows: Ensure that your Windows 11 is updated to the latest version. Microsoft frequently releases updates that include improvements and fixes that can affect software installations.
-
Missing Windows Components: Certain components and features within Windows 11 are required for Teams to function correctly. If they are missing or malfunctioning, it could lead to installation issues.
Installing Microsoft Teams on Windows 11
Here’s a step-by-step guide to installing Teams on your Windows 11 device:
-
Download Teams:
- Go to the Microsoft Teams Download page.
- Click on «Download for desktop.»
- The installation file should start downloading immediately.
-
Run the Installer:
- Locate the downloaded file, usually found in your «Downloads» folder.
- Double-click the file (it should be named something like «Teams_windows_x64.exe» or similar).
- Follow the on-screen prompts to begin the installation process.
-
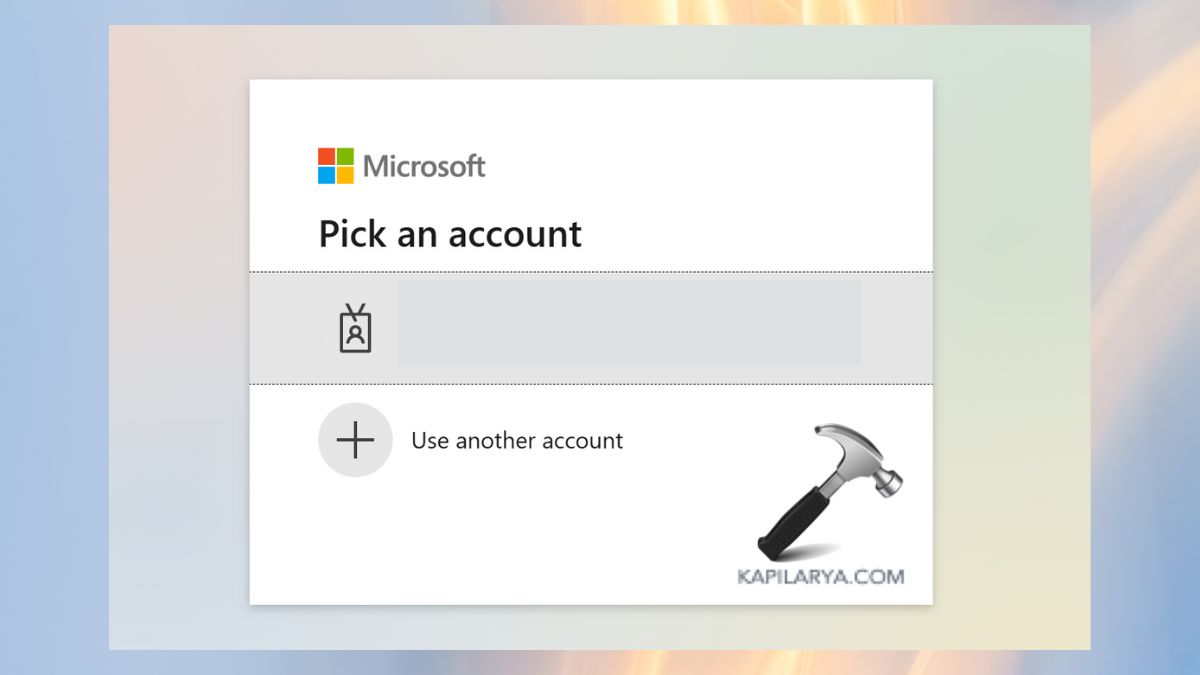
Sign In: Once installed, launch the application. You can either sign in with your Microsoft account or create a new account if you don’t have one.
Troubleshooting Installation Issues
If you find that Teams still won’t install, try the following troubleshooting steps:
1. Checking System Requirements
Verify the following:
- Your operating system is Windows 11 (make sure it’s updated).
- You have at least 2 GB of RAM (4 GB is recommended for optimal performance).
- You have a compatible 64-bit processor.
2. Cleaning Up Previous Installations
If you suspect that an old version of Teams is causing conflicts:
- Press
Win + Xand select «Apps and Features.» - Search for «Microsoft Teams» and select it.
- Click «Uninstall.»
After uninstalling, check for other Teams components:
- Open the “Run” dialog (Win + R), type
%appdata%, and hit Enter. - Delete the “Microsoft” folder if it exists.
After cleaning the old installations, attempt to reinstall Teams.
3. Running as Administrator
To install Teams with the necessary permissions:
- Right-click the Teams installation executable.
- Select «Run as administrator» and provide your admin password if prompted.
4. Temporarily Disable Antivirus
To rule out your antivirus software as the source of the problem:
- Temporarily disable your antivirus and firewall.
- Attempt the installation again.
Make sure to re-enable your security software afterward.
5. Checking Network Connection
Ensure that you’re connected to a stable internet connection. Disconnect from Wi-Fi and reconnect if necessary, or switch to a wired connection if possible.
6. Updating Windows 11
Ensure Windows is fully updated:
- Click the Start menu and select «Settings.»
- Navigate to «Windows Update» and click «Check for updates.»
- Install any pending updates and restart your PC if necessary.
7. Repairing Windows Components
If you suspect missing components, you can use the following commands:
- Press
Win + Xand select «Windows Terminal (Admin).» - Type the command
sfc /scannowand press Enter. This will check for corrupted system files and repair them. - After completion, run
DISM /Online /Cleanup-Image /RestoreHealth.
Using the Web Version of Teams
If you still cannot install Teams, you can use the web version as an alternative:
- Open your preferred web browser.
- Go to the Microsoft Teams web app.
- You can sign in using your Microsoft account and use Teams directly in the browser.
When to Seek Professional Help
If none of the above solutions resolve the issue, it may be time to consult with IT support if you are part of an organization, or consider contacting Microsoft Support. They can provide more in-depth assistance, especially regarding unique system configurations.
Conclusion
Installing Microsoft Teams on Windows 11 should ideally be a seamless process. However, if you encounter difficulties, understanding the potential causes can help you work towards a solution. By checking system requirements, cleaning previous installations, running the installer as an administrator, and ensuring your OS is updated, most common installation issues can be resolved.
Should problems persist, using the web version of Teams is an excellent interim solution until the desktop application is successfully installed. If all else fails, don’t hesitate to seek help from professional sources to ensure you can effectively utilize this powerful collaboration tool. By addressing installation issues promptly, you can minimize downtime and maintain effective communication in your team.