
Don’t know how to fix Microsoft Solitaire Collection not working on Windows 11?
Solitaire games have always been a part of Microsoft since the very start. But while each game had separate applications in the earlier version of Windows, now they’re all included in a single hub called Microsoft Solitaire Collection in the latest Windows operating systems.
Without a doubt, this card game which includes Klondike, Spider, Freecell solitaire, etc., is the best way to kill time, especially when your internet is down, or you have nothing to do. But you may occasionally run into a situation where the Microsoft Solitaire Collection app stops working, fails to launch, freezes midway, etc.
But before you reach for your real deck of cards, try troubleshooting the issue on your own by taking help with this guide. Below we’ve covered various fixes for Microsoft Solitaire Collection not working on Windows 11.
So without any delay, let’s get started!
1. Run the Windows App Troubleshooter.
Since Windows offers several built-in troubleshooters for its various apps and services, running that should be your first approach to fixing whatever issue you’re facing. The Windows app troubleshooter diagnoses any problem related to Windows Store apps and fixes them if possible.
Below are the steps you should follow:
- From the taskbar, click on the Search icon.
- Then, type “Troubleshoot settings” in the search bar and click on the first result below.
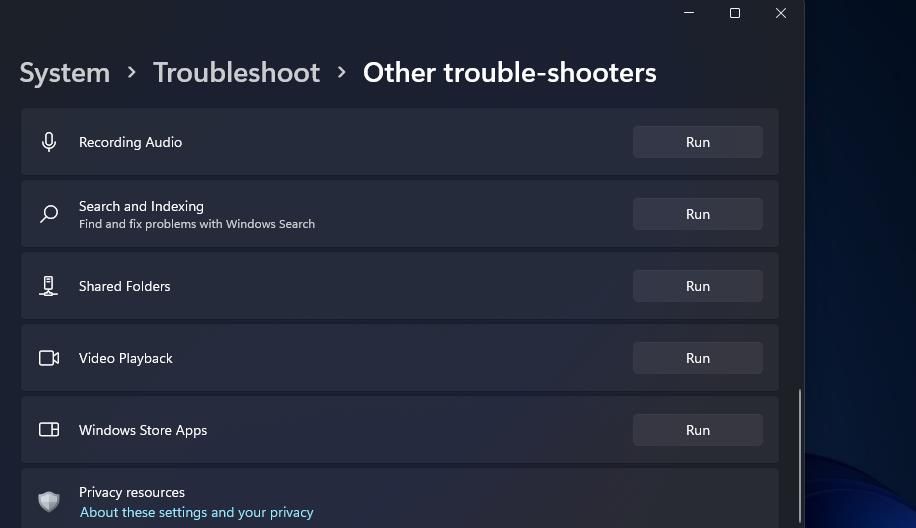
- Once the windows open, select Other troubleshooters.
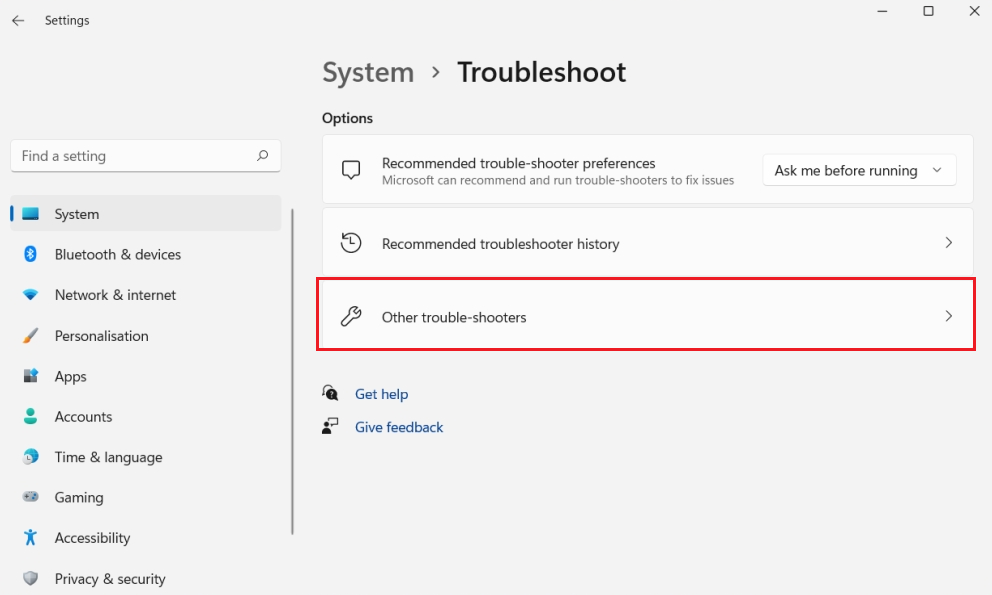
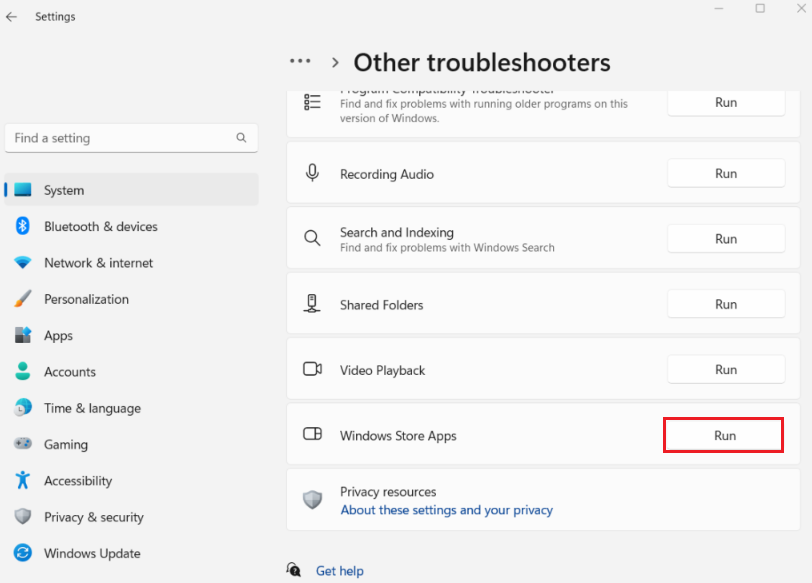
- Scroll down, locate Windows Store Apps, then click on the Run button next to it.
2. Repair/Reset Microsoft Solitaire Collection App.
If running the troubleshooter doesn’t work, the app might be corrupted. Luckily, Windows allows you to repair the app files and even reset the entire program to return it to its default settings.
Here’s how you can do it:
- Start by pressing the Windows + S shortcut keys from your keyboard. This will open the search menu.
- Type in “Solitaire Collection” in the search bar.
- Then, click on App settings on the right side.
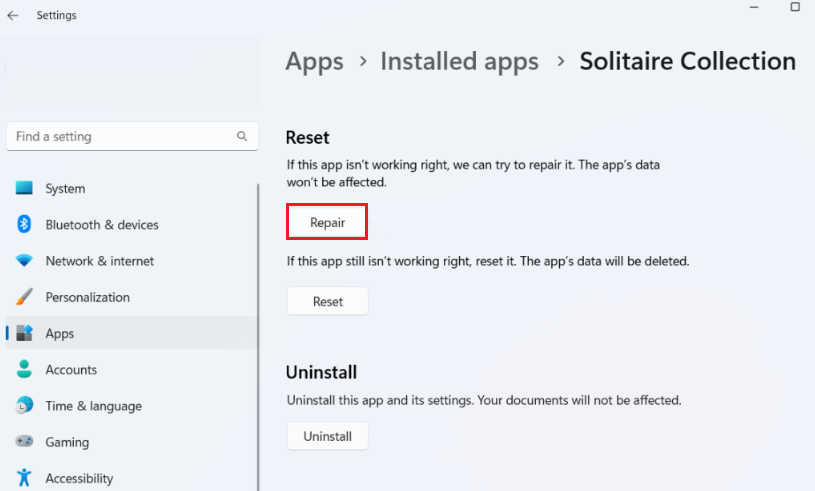
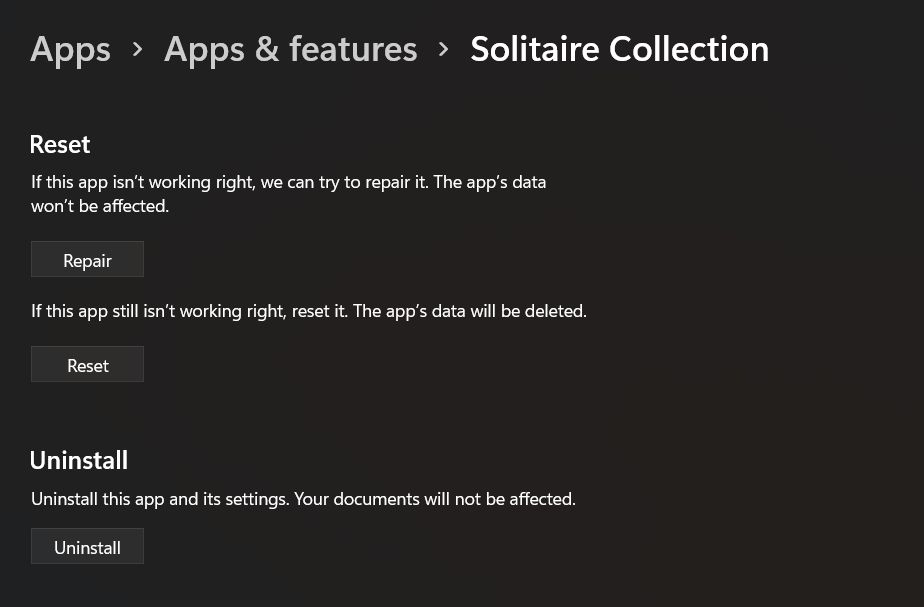
- Scroll down until you locate the Reset section, then click on the Repair button. This will let Windows fix the app.
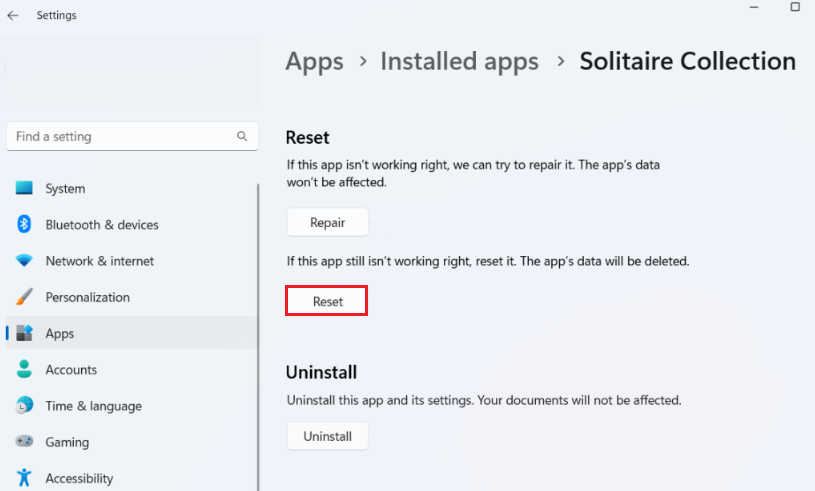
- Once done, try out Solitaire Collection once again, and if the issue remains, you can try clearing the app’s data and resetting it to default settings.
- In order to do that, click on the Reset button under the Reset section from the same window.
3. Change the Display Scaling.
Misconfigured Display settings are another reason the Microsoft Solitaire Collection will fail to launch. This is because if you’ve set the display scaling to a certain value that the program doesn’t fit inside the display, it will have trouble launching. You can try increasing this value and check if that works.
Below are the steps you must follow:
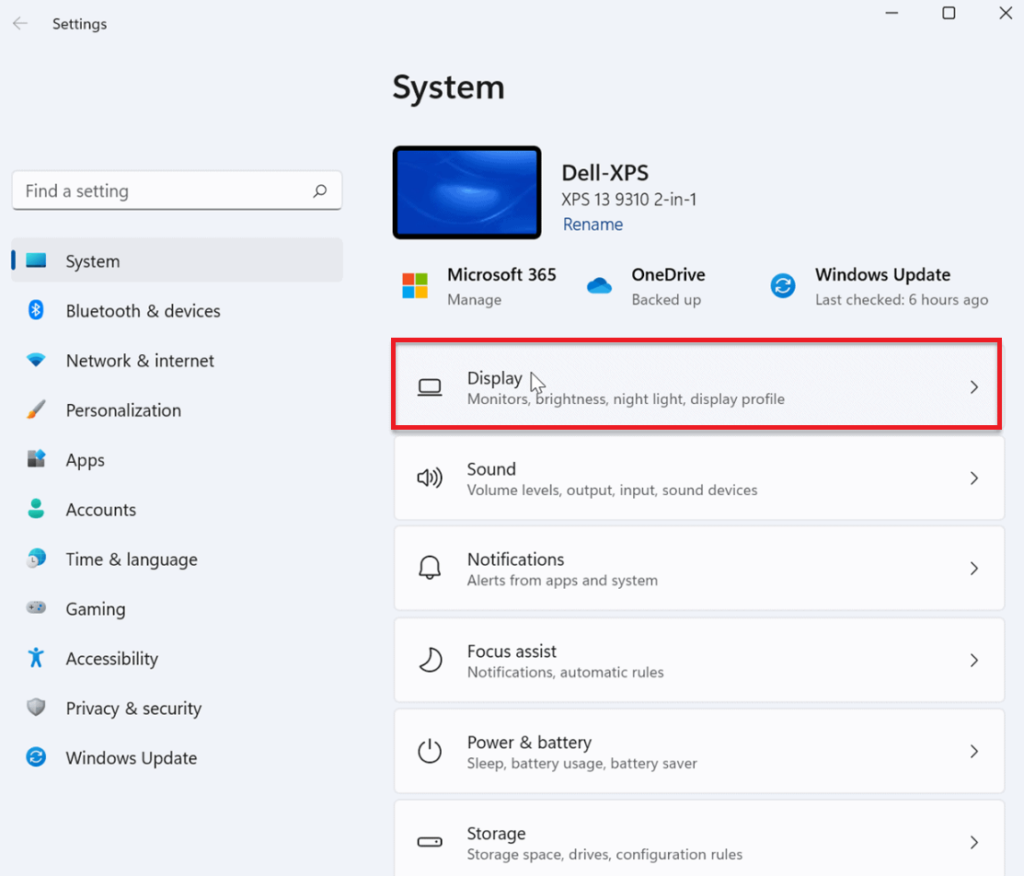
- First, launch the Windows Settings by pressing Windows + I shortcut keys from your keyboard.
- Then, click on System and select Display from the left pane.
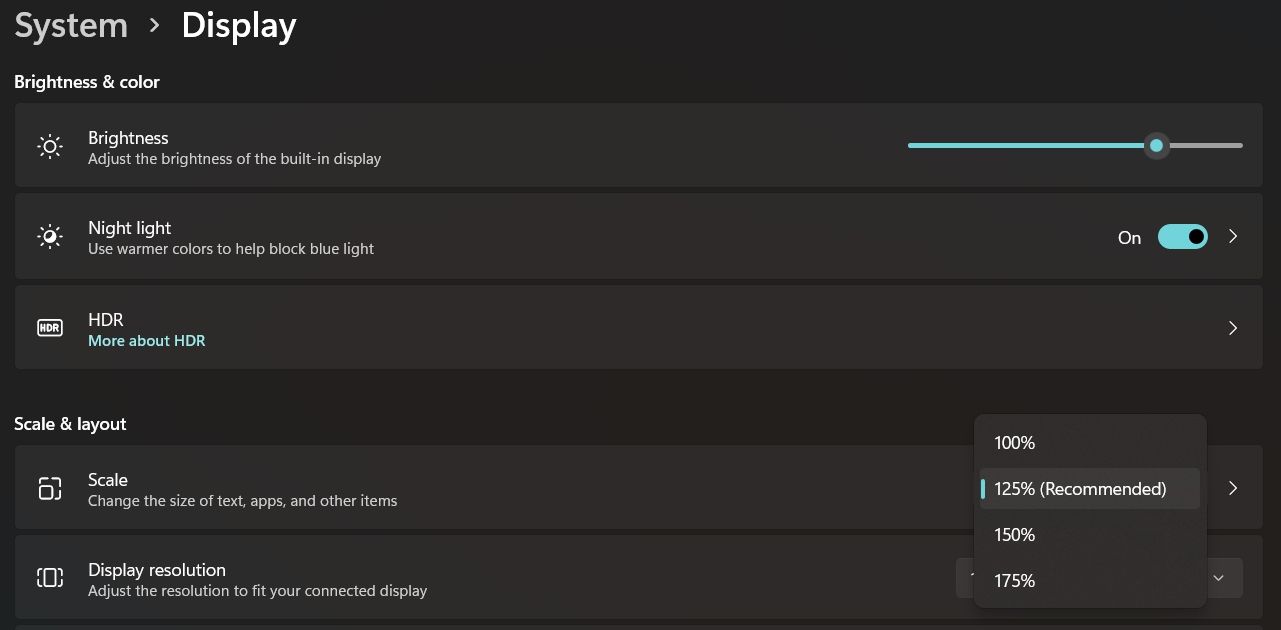
- After that, click on the drop-down menu under Scale and layout.
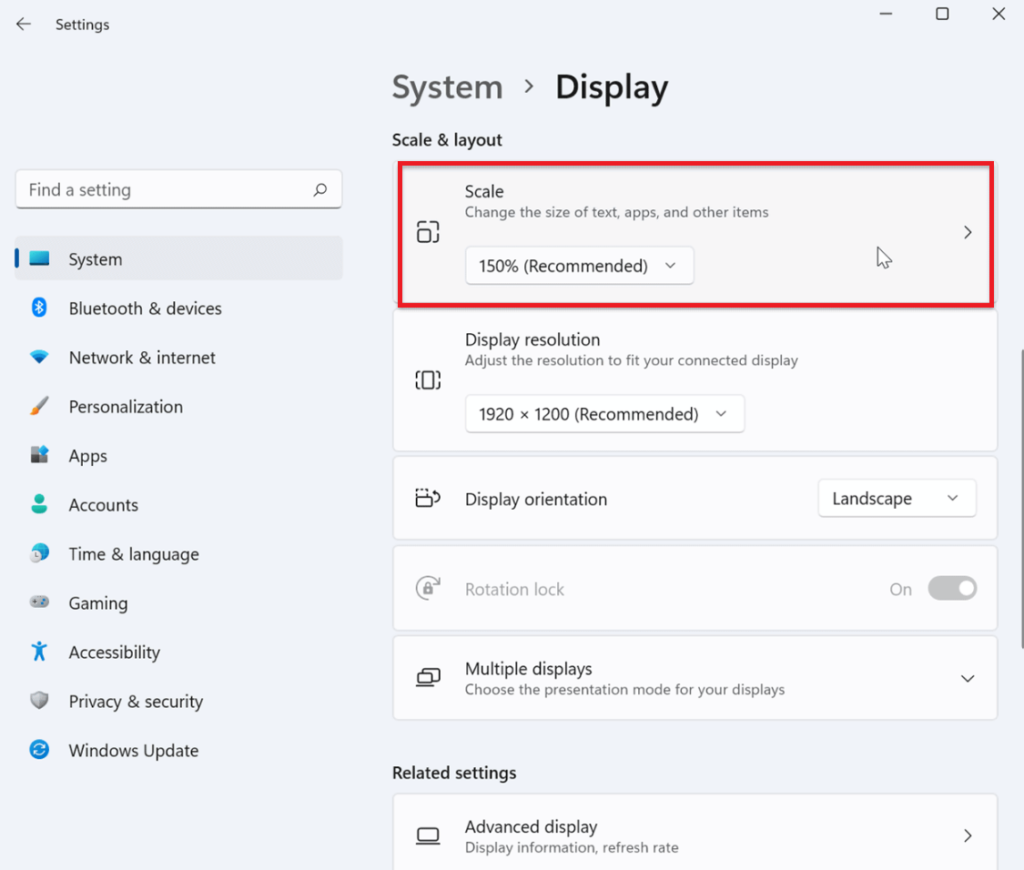
- Select the recommended option and close the window. Try launching the game to check if it works.
4. Update Microsoft Solitaire Collection App.
Outdated software of the app might also be the reason behind Microsoft Solitaire Collection not working on Windows 11. To avoid such issues, check to see if a newer version of the app is available in the Microsoft Store and install it immediately.
Here’s what you need to do:
- Click on the Microsoft Store icon from the taskbar.
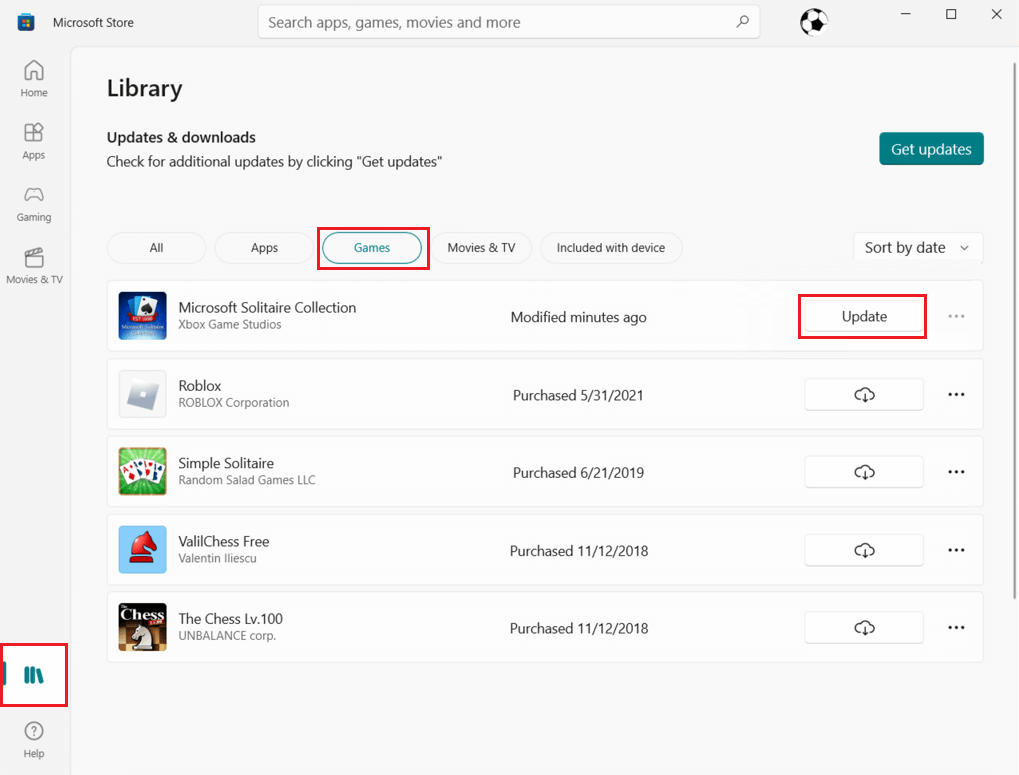
- Once the window opens, click on Library in the bottom left corner of the screen.
- Go to the Games tab, then look for Microsoft Solitaire Collection.
- If any updates are available, click on the Update button next to it. If you do not see this option, the app is already up to date.
5. Update/Uninstall Graphics Driver.
Occasionally, your graphics card can encounter unknown bugs or glitches, resulting in problems with the apps and games on your computer. This issue is mostly resolved by reinstalling or updating the graphics driver.
Here’s how to do it:
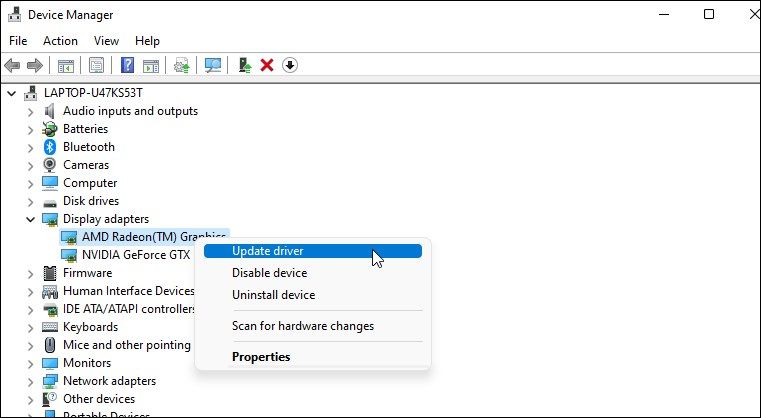
- Start by right-clicking on the Start menu on the taskbar.
- Click on Device Manager from the list of options.
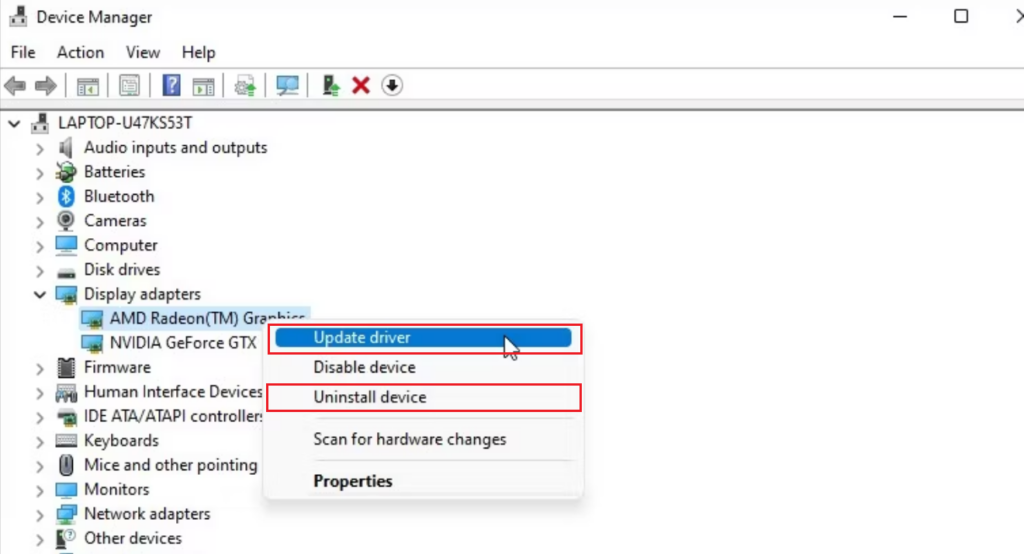
- Then, click on the drop-down arrow next to Display adapters to expand its options.
- From there, right-click on your graphics adapter and click on the Update driver or Uninstall device option.
- After that, follow the on-screen commands and restart your PC to finish the process.
6. Download the Windows 11 Latest Version.
Similar to how outdated applications cause all kinds of errors, an older version of Windows results in the same. It hides several unknown bugs within the software, which could be the culprit behind Microsoft Solitaire Collection not working on Windows 11.
You can check if a newer version Windows version is available by following the steps below:
- Press the Windows + I shortcut keys from your keyboard to open Settings.
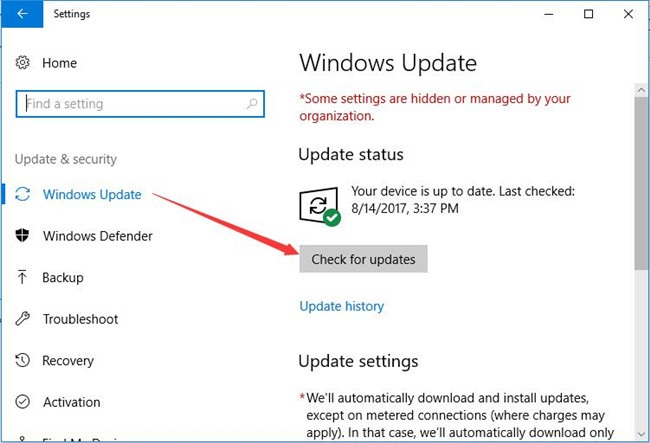
- From the left pane, select Windows Update.
- Then, click on Check for Updates.
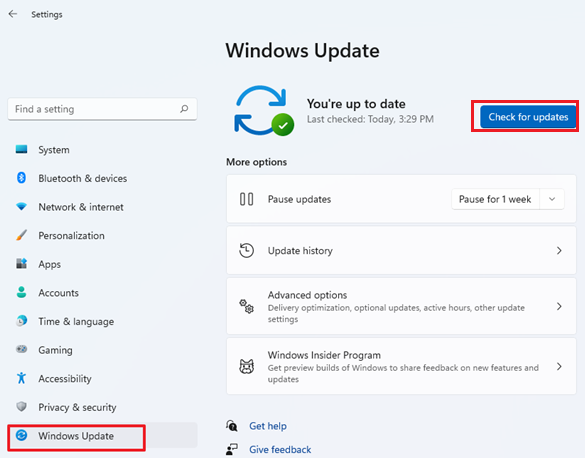
- If there are any pending updates, download and install all of them. Then, check to see if the issue has been solved.
7. Clear Microsoft Store Cache.
Applications store cache files for faster performance. But if the cache gets full, it results in lags, crashes, and various unknown errors within the software. You can resolve this issue by simply purging the existing cache.
Follow the steps below to do so:
- Start by pressing the Windows + R shortcut keys from your keyboard to open the Run dialog box.
- Then, type “wsreset.exe” in the box and press the Enter key.
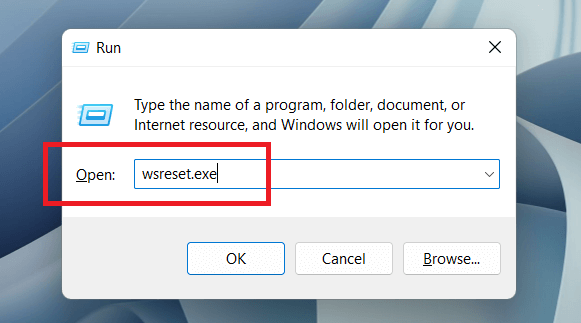
- A blank command prompt will be shown on the screen and then disappear. Next, the Microsoft Store will launch automatically.
8. Disable Microsoft Defender Firewall.
The Windows Defender Firewall may sometimes become too overprotective, preventing even the safest applications from launching and running in your system. The same might be happening with the Microsoft Solitaire Collection app, as Firewall could’ve blocked it as a false positive.
You’ll have to disable the Firewall for the time being in order to resolve the issue. Here’s how:
- Click on the Start menu from the taskbar.
- Type “Windows Defender Firewall” in the search bar, then press the Enter key.
- Then, select Firewall & network protection from the left pane.
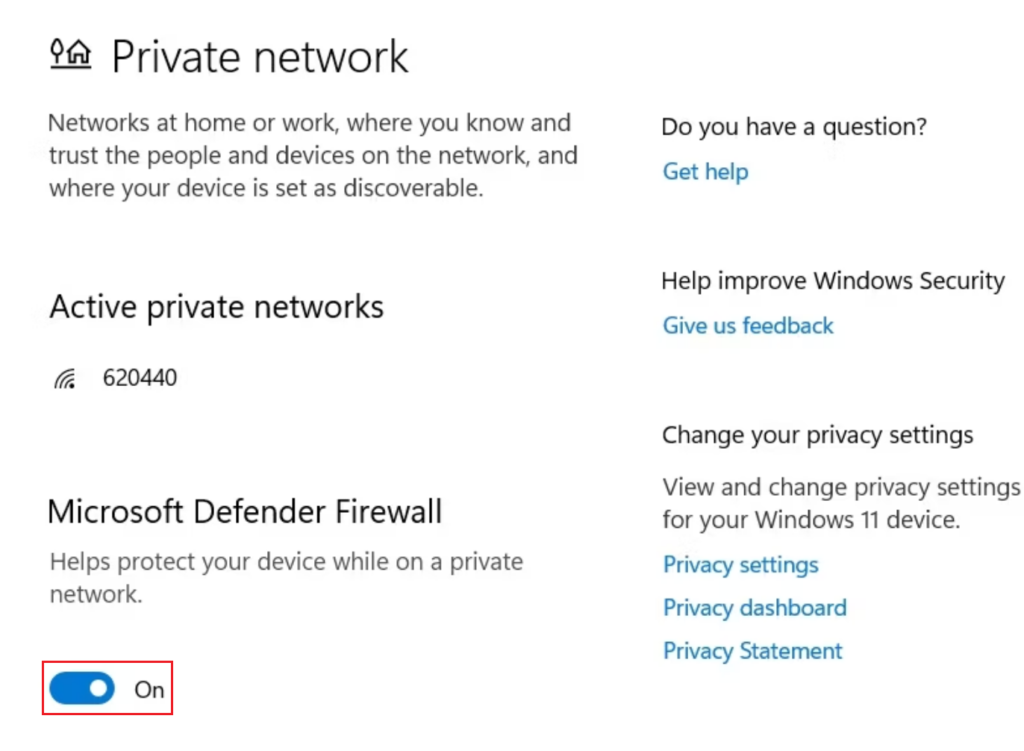
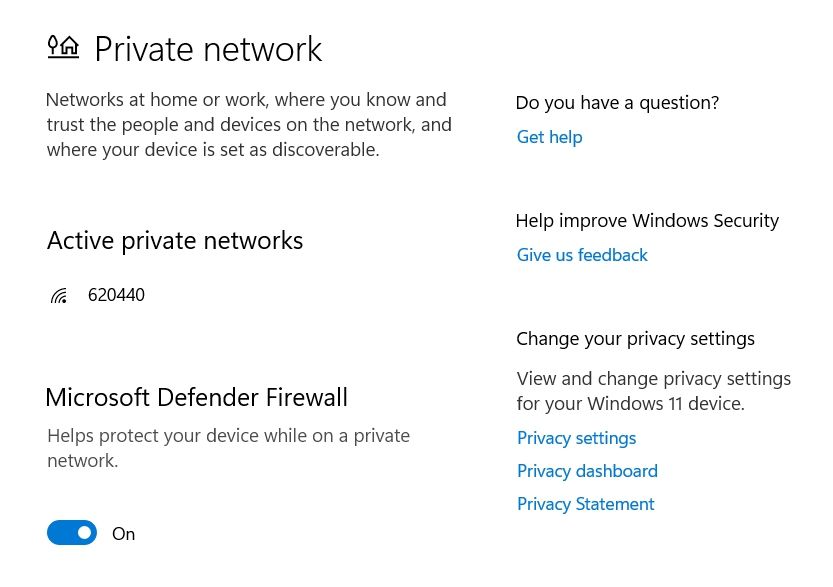
- After that, choose Private network.

- Switch off the toggle below Microsoft Defender Firewall to disable it.
9. Move Game Files to a New Directory.
If you’re having trouble launching the Microsoft Solitaire Collection on your PC, there’s a high probability that Windows has corrupted the application’s file path. One quick way to resolve this issue is by moving the game files to another location to refresh the game path.
Here’s how to do it:
- Make a new folder in a location other than the default path for the built-in games.
- Navigate to the following path and copy the content inside that folder by selecting the game folders, right-clicking them, and clicking on Copy.
C:/Program Files/Microsoft Games10. Re-Register Microsoft Solitaire Collection App.
If, after following all the above-mentioned fixes, you’re still facing issues with the Microsoft Solitaire Collection app, chances are it is not registered correctly or that its registry entries have been damaged.
Try registering it again and see if that resolves the issue. To do so, follow the steps below:
- Click on the Search icon from the Taskbar.
- Type in “Windows PowerShell” in the search bar.
- Then, click on Run as Administrator on the right side.
- A User Account Control prompt will appear on the screen. Click on the Yes button.
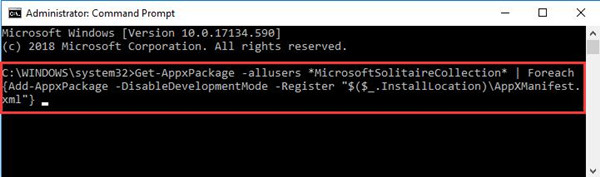
- Type in the following command in the console and hit Enter:
Get-AppxPackage -allusers *MicrosoftSolitaireCollection* | Foreach {Add-AppxPackage -DisableDevelopmentMode -Register “$($_.InstallLocation)\AppXManifest.xml”}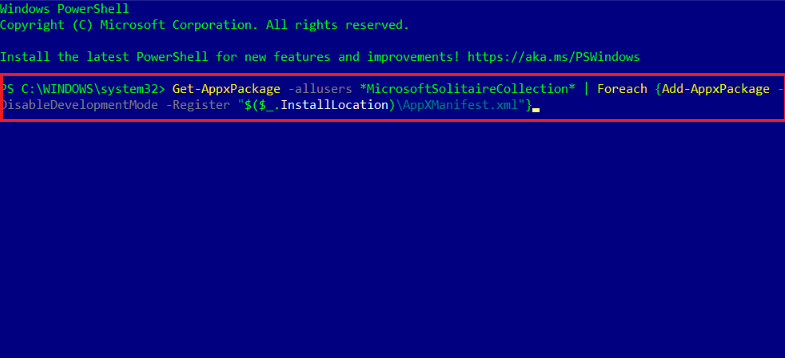
- Once done, restart the PC to determine if the problem is fixed.
11. Try Microsoft Solitaire Collection Alternatives.
If nothing is helping you fix Microsoft Solitaire Collection not working on Windows 11, there are several alternate options of this game, like Solitaire HD, Spider Solitaire, and Simple Solitaire, that you can try. Though they have a different interface, the rules are pretty similar and should be a good replacement until you get the Microsoft Solitaire Collection back up and running.
This brings us to the end of our guide on how to fix the Microsoft Solitaire Collection not working on Windows 11. If you still have any queries, feel free to deliver them to us through the comment section below. We’ll get back to you as soon as we can.
If this guide helped you, please share it. 😊
-
Aimen Choudhry is an architecture student who has always been fascinated by science. She now finds her therapy researching and writing about the latest technology and the issues that come alongside. Otherwise, you’ll find her playing video games, listening to music, or watching fantasy/sci-fi movies.
View all posts
Microsoft Solitaire Collection is a great way to spend some time if you’re up for a card game, but what if the game is not working on Microsoft Windows? Don’t reach for that real deck of cards just yet; there are some ways you can fix this problem and get back into your game.
As such, here are the different solutions to try if Microsoft Solitaire Collection is not working on Windows 11.
Why Is Microsoft Solitaire Collection Not Working on Windows 11?
There can be multiple reasons why Microsoft Solitaire Collection is not working on Windows 11. Some of the common culprits responsible for the problem are:
- If you are running an outdated Windows version, you’re most likely to come across the problem in the question.
- The issue can occur due to corrupt Windows Store cache data.
- And finally, the Windows Defender blocks Solitaire Collection due to a false flag restriction, it’ll not open in Windows 11.
Fortunately, it’s pretty easy to solve the issue and run the game without any problem. Here are the solutions you can try in this situation.
1. Download the Latest Version of Windows 11
One of the primary reasons behind any UWP apps issue is often an outdated copy of Windows. Try downloading the latest Windows update to fix the problem.
Here’s how to download the latest Windows 11 update:
- Open Settings using Win + I.
- Choose Windows Update from the left pane.
- Click on Check for Updates.
Windows will display all the pending updates. Download and install all the updates to resolve the issue.
2. Update the Graphics Driver
It’s a good idea to keep your graphics card driver updated to ensure that th Microsoft Solitaire Collection runs without an issue. If this isn’t the case, you’re most likely to come across the mentioned problem. You will have to download the latest graphics driver update to fix the issue.
Here’s how to update the graphics driver on Windows.
- Press Win + X and choose Device Manager.
- Double-click on Display adapters to expand the option.
-
Right-click on the installed graphics driver and select Update driver from the context menu.

- Choose Search automatically for drivers.
- Windows will search for and install the best available driver on the device.
Next, reboot the system and launch the game. Check if you are still facing the problem.
3. Disable the Microsoft Defender Firewall
If the Microsoft Defender Firewall blocked the Windows Microsoft Solitaire Collection as a false positive, Windows 11 won’t open it. You will have to temporarily disable Microsoft Defender Firewall to resolve the issue.
Below are the steps to disable Microsoft Defender Firewall on Windows 11.
- Open the Start menu, type Windows Security and press Enter.
- Choose Firewall & network protection from the left pane.
- Click on Private network.
-
Disable the toggle present under the Microsoft Defender Firewall.

Try to launch the game and check if the problem continues. If yes, re-enable the Firewall by going through the above steps again.
4. Run Windows Store Apps Troubleshooter
The next solution on the list is to run the Windows Store Apps troubleshooter. It is a Windows built-in utility that looks for and solves issues related to UWP apps.
You can run the Windows Store Apps troubleshooter by following the below steps.
- Open Settings.
- Choose System from the left pane.
- Click on Troubleshoot.
- Choose Other troubleshooters.
-
Click on Run next to Windows Store Apps.

The troubleshooting window will pop up and look for any available issues. Follow the on-screen instructions to resolve the problem.
5. Change the Display Scaling
Microsoft Solitaire Collection will fail to launch on your system if you have a misconfigured display scaling. If the game struggles to fit inside the current Windows scale, it will face launch issues.
You’ll have to adjust the display scaling to resolve the issue. Here’s how:
- Open Settings.
- Click on System from the left panel.
- Choose Display.
- Under Scale & layout, click on the drop-down icon next to Scale.
- Choose the Recommended option.
Launch the game, and check for the issue.
6. Reset Microsoft Solitaire Collection
The problem can occur if there’s an issue with the Microsoft Solitaire Collection game files. In this case, you will have to reset the game files to solve the problem.
Here’s how to reset Microsoft Solitaire Collection on Windows 11.
- Launch Settings
- Choose Apps from the left pane.
- Click on Apps & features.
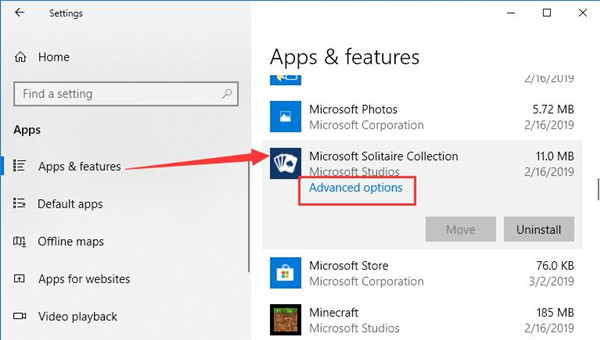
- Click on three dots next to Solitaire Collection, and choose Advanced options from the context menu.
-
Under the Reset section, click on Reset.

Next, reboot the system and check if you’re still facing the problem. If yes, continue with the guide.
7. Reset the Windows Store Cache
Like any other application, Windows Store stores data as well. But with time, these cache data can get corrupt and directly impact the performance of the UWP apps.
Resetting the Windows Store cache is the best thing you can try in this situation. Here’s how to do it.
- Open the Run dialogue box using Win + R hotkeys.
- Type wsreset.exe and click on OK.
- Windows will take a few seconds to reset the Store.
Once the process is complete, Windows Store will open automatically. Reboot the system and check if the problem.
8. Register Again to Microsoft Solitaire Collection
If you’re still facing the problem, there’s a big chance that the Microsoft Solitaire Collection is not registered correctly on your Windows PC. You will have to register the game again to the system to fix the issue. Here’s how.
- Open Windows PowerShell with admin rights.
-
Type the following command and press Enter.
Get-AppxPackage -allusers *MicrosoftSolitaireCollection* | Foreach {Add-AppxPackage -DisableDevelopmentMode -Register “$($_.InstallLocation)\AppXManifest.xml”} - Wait until the command is executed.
Next, reboot the system, launch the game, and check for the issue.
9. Create A New Local User Account
If none of the steps was helpful, you can consider creating a new local user account. As it turns out, the problem can be associated with the account you’re currently using. You will have to create a new local account to continue playing the game.
So, go through the process and check if it fixes the problem.
Play Microsoft Solitaire Collection With Ease
Microsoft Solitaire Collection is a popular card game you can try to kill your free time. But if it is not working on your Windows 11, you can try the solutions above to fix the issue.
Microsoft Solitaire Collection is a popular collection of card games that has been enjoyed by millions of people for years. However, some Windows 11 users have been experiencing issues with the game, which can be frustrating. If you are one of these users, don’t worry! We’ve compiled a list of six ways to fix Microsoft Solitaire Collection not working on Windows 11.
1. Check for updates
The first thing you should do is make sure your version of the game is up to date. Sometimes, new updates are released to fix bugs and improve performance. To check for updates, open the Microsoft Store, click the three dots in the upper-right corner, and select “Downloads and updates”. If there are any updates available for the game, download and install them.
2. Clear Cache and Cookies
The Microsoft Solitaire Collection app may not work properly if the cache and cookies in your browser are bogged down or corrupted. You can try clearing the cache and cookies, which may fix the issue for you. To clear the cache, launch the Microsoft Solitaire Collection app and go to the “Settings” section. Select “Clear Cache” and “Clear Cookies”.
3. Reset the App
If clearing the cache and cookies doesn’t work, try resetting the app. This will restore the app to its original settings and may fix any problems that were preventing it from functioning properly. To reset the app, go to the “Settings” section of the game and choose “Reset”.
4. Reinstall the App
If all else fails, try reinstalling the app. Sometimes, files can become corrupted or missing, preventing the app from working properly. To reinstall the app, go to the “Apps and Features” section in Windows 11 settings and click on the Microsoft Solitaire Collection app. Select “Uninstall” and then visit the Microsoft Store to download and reinstall the app.
5. Check for Compatibility Issues
The version of Microsoft Solitaire Collection you’re using may not be compatible with Windows 11. If this is the case, you may experience issues with the game. To check for compatibility issues, right-click on the game’s icon and select “Properties”. Go to the “Compatibility” section and select “Run this program in compatibility mode for” and choose a previous version of Windows. Click “Apply” and “OK” to save the changes.
6. Run the Troubleshooter
Lastly, try running the Windows 11 troubleshooter to fix any issues with the game. To do this, go to Windows 11 Settings and click on “Update and Security”. Select “Troubleshoot” and then select “Additional troubleshooters”. Find Microsoft Solitaire Collection on the list of apps and click on “Run the troubleshooter”.
In conclusion, if you’re experiencing issues with Microsoft Solitaire Collection not working on Windows 11, try these six methods to fix the problem. With a little bit of troubleshooting, you’ll be back to playing the popular card game in no time.
You are here:
Home » Windows 11 » How To Reinstall Microsoft Solitaire Collection In Windows 11
Solitaire Collection or Microsoft Solitaire Collection is a game developed by Microsoft. Although it was initially created for Windows operating system, the Solitaire Collection game is now available on iOS and Android as well.
On Windows 11, Solitaire Collection is an inbox app. That is, it’s shipped with Windows 11.
The Microsoft Solitaire Collection in Windows 11 includes Klondike (Classic Solitaire), Spider, FreeCell, Pyramid, and TriPeaks games.

Yes, Microsoft Solitaire Collection is a free game for Windows and other operating systems. That said, if you do not want to see ads in the app, you need to pay for the premium edition.
Reinstall Microsoft Solitaire Collection in Windows 11
If the Solitaire Collection app or one of the games in the app is not working correctly, you can reinstall the Solitaire Collection app to fix the issue. Here is how to do it.
Step 1: Open the Windows 11 Settings app. In the left pane, click Apps and then click Apps & features on the right side.

Step 2: The resulting Apps & features page displays a list of all inbox apps and apps installed by you. Here, look for Solitaire Collection.
Step 3: Click on the hamburger icon next to the Solitaire Collection entry and click the Uninstall option.

Step 4: When asked for confirmation, click the Uninstall button to uninstall the Solitaire Collection from your Windows 11.

Step 5: Once the app is uninstalled, open the Store app, search for Solitaire Collection and then install the same. That’s it! You have successfully reinstalled Microsoft Solitaire Collection.

Reinstall Solitaire Collection on iPhone
Step 1: On your iPhone, touch and hold the Microsoft Solitaire Collection app.
Step 2: Tap the Remove app option.
Step 3: When asked for confirmation, tap the Delete App option to uninstall the app from your iPhone.
Step 4: Next, open the App Store app. Search for Microsoft Solitaire Collection, and then tap the Get button next to it to install the same.
Reset Microsoft Solitaire Collection in Windows 11
Before reinstalling the Solitaire Collection, you can try resetting the game. Here is how to do just that.
Step 1: Open the Settings app. Go to Apps > Apps & features page.
Step 2: Click on the hamburger menu (three vertically stacked dots) next to the Solitaire Collection entry and click Advanced options.

Step 3: Scroll down the page to see the Reset section. Here, click on the Repair button to repair the app and the Reset button to reset the app to default settings by deleting all data.

How to reinstall the Mail app in Windows 11 guide might also interest you.
Contents:
- Microsoft Solitaire Collection Overview
- What is the Microsoft Solitaire Collection?
- How to Fix Microsoft Solitaire Collection Not Working on Windows 10?
- Bonus Tip: Run Games in Game Mode
Microsoft Solitaire Collection Overview
Many clients complained that Microsoft Solitaire stops working suddenly weeks after Windows 10 upgrade or update. You may either find Solitaire can’t launch and keeps loading or it is not working with the error code 124 or 101, 107 on Windows 10/11.
As you can see, whatever your Solitaire issue is, it implies there is something went wrong with the Microsoft Solitaire Collection. Or for users who stumbled upon Microsoft Solitaire Collection won’t open and shows you a splash screen right after upgrading or updating Windows 10, perhaps the culprit lies in the system.
Based on these analyses, this article will walk you through how to fix Microsoft Solitaire Collection not working on Windows 10/11 with powerful ways.
What is the Microsoft Solitaire Collection?
Replacing FreeCell, Spider Solitaire on previous Windows systems, as a video game, Microsoft Solitaire Collection comes along with Windows 10 with new features like Pyramid and TriPeaks.
Though this card game becomes popular and classic for Windows 10 users, Microsoft Solitaire Collection not opening can also pop up now and then. So you need to remove it to play the free Windows 10 Solitaire in your spare time.
How to Fix Microsoft Solitaire Collection Not Working on Windows 10/11?
Just like the above-mentioned content, you are to resolve Microsoft Solitaire Collection stuck on loading issue in terms of Solitaire Collection itself and Windows 10/11 system error.
Now get started to fix the Solitaire issue for Windows 10/11. If you have any problems with Microsoft Spider Collection on Windows 7, 8, you can the ways below as a reference to help you get out of the spider collection problem.
Solutions:
- 1: Reset Windows Store Cache
- 2: Reset Microsoft Solitaire Collection
- 3: Re-register Windows 10 Solitaire
- 4: Check for Windows 10 Updates
- 5: Run Windows 10 App Troubleshooter
- 6: Uninstall and Reinstall Microsoft Solitaire Collection
Solution 1: Reset Windows Store Cache
Being a Windows-based application, Microsoft Solitaire can be downloaded from Microsoft store. In this way, when it hits upon Solitaire Collection won’t start on Windows 10/11, you can first try to reset Windows store in case the cache in it leads to any issues Windows Store applications issue.
1. Type in wsreset in the search box and then hit Enter to reset Windows store caches.
2. Restart Windows 10 to take effect.
Then you can notice that the Windows Store has been reset. The cache in it won’t cause Solitaire not opening and Solitaire error 124 has been fixed.
Related: Windows Store Cache May be Damaged Windows 10/11
Solution 2: Reset Microsoft Solitaire Collection
Even if resetting Windows Store doesn’t work for your unavailable Solitaire Collection, you can also attempt to reset the Microsoft Solitaire Collection itself.
If the error happens due to the MS Solitaire corruption, your problem will be solved.
1. Go to Start > Settings > Apps.
2. Under Apps & Features, locate Microsoft Solitaire Collection and then click Advanced options under it.
3. Scroll down to find Reset and then hit the Reset button to reset Microsoft Solitaire.

4. Reboot your PC to take effect.
You will see that Microsoft Solitaire Collection won’t start issue has disappeared. But once the Microsoft Solitaire is reset, all the preferred settings will back to default, if necessary, you may as well configure again. Here for people coming across the FreeCell not working on Windows 8, you can also try to reset it.
Solution 3: Re-register Windows 10 Solitaire
If it is of no use resetting Microsoft Solitaire, it is also necessary to register it to check it can be helpful when Solitaire won’t work after latest Windows 10 updates.
1. Type in Command Prompt in the search box and then right click it to Run as administrator.
2. In Command Prompt, enter the command below and then stroke Enter keyboard key to re-register Solitaire for Windows 10.
Get-AppxPackage -allusers *MicrosoftSolitaireCollection* | Foreach {Add-AppxPackage -DisableDevelopmentMode -Register “$($_.InstallLocation)\AppXManifest.xml”}
3. You can attempt to reboot your PC to take effect.
Once the Solitaire Collection is registered, you can find you are able to start Microsoft Solitaire Collection and play this card game on Windows 10.
Solution 4: Check for Windows 10 Updates
As you all know, along with Windows system updates, Microsoft Solitaire updates as well, hence Microsoft Spider Collection, Microsoft Solitaire Collection shows up on different Windows OS.
From this perspective, you would better make sure you have updated Windows 10. Maybe the new features can bring the Solitaire Collection back to work.
1. Go to Start > Settings > Update & Security.
2. Under Windows Update, click Check for updates.
With the updated Windows 10, you can open the card game to see if it can launch and run.
Solution 5: Run Windows 10/11 App Troubleshooter
Now that Microsoft Solitaire Collection belongs to Microsoft applications. While the Solitaire on Windows 10 stops working, there is much need to run the system troubleshooter for Windows 10 programs.
1. Search Troubleshoot in the search box and then press Enter to move on.
2. Under Troubleshoot, slide down to find out Windows Store Apps and then Run the troubleshooter.
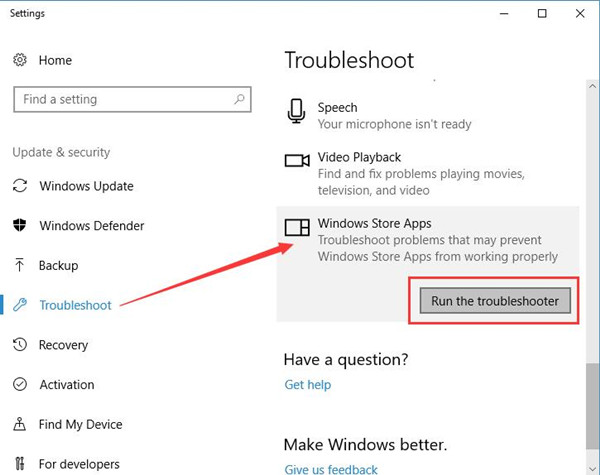
This troubleshooter can detect and fix the problems preventing Microsoft Solitaire Collection from working properly. If possible, you will see Windows 10 Solitaire stuck in loading perished.
Solution 6: Uninstall and Reinstall Microsoft Solitaire Collection
Lastly, if the methods above failed to fix the Solitaire Collection not working properly on Windows 10, you may have to get of it from your computer and then reinstall it via Microsoft Store for your PC.
Here since Solitaire is one of the Microsoft applications, if you try to uninstall it in the Start menu, you can find there is only Pin to start without Uninstall option. That is also what confuses numerous users when they feel like uninstalling this Solitaire for Windows 10/11.
Unfortunately, if both Control Panel Program and Features and App settings failed to let you uninstall Solitaire Collection, it is a necessity to turn to Windows 10 PowerShell and run the command to delete this system card game.
1. Input Powershell in the search box and then right click it to Run as administrator.
2. In Windows PowerShell, copy and paste the following command and then press Enter to run it.
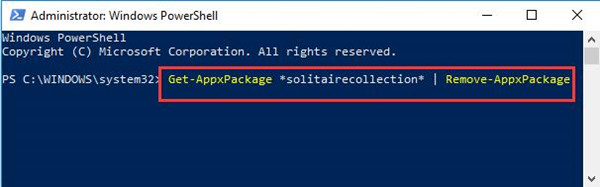
3. After Windows PowerShell uninstalled the Microsoft Solitaire Collection, reboot Windows 10.
4. Soon after Windows 10 signs in, open Windows Store and search Microsoft Solitaire Collection in its search bar.
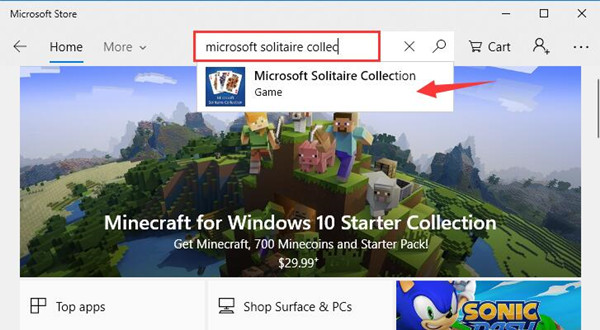
5. Then click Get to download Microsoft Solitaire Collection.
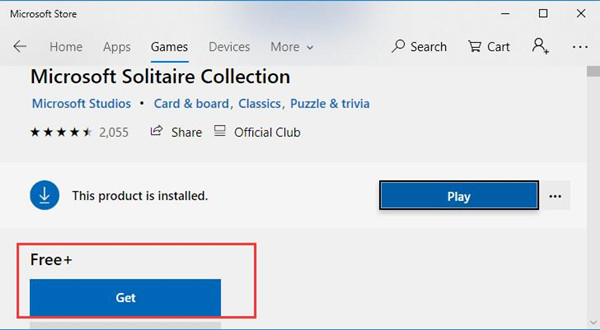
After installing Windows 10 Solitaire on your PC, it is up to you to play this card game.
Here you can also search Solitaire only, which will show you all the related Windows Solitaire games, like classic Solitaire for Windows 10, FreeCell, and Windows Spider Solitaire.
Of course, the newly downloaded free Microsoft Solitaire Collection will work well with no interruption on Windows 10. If you are on Windows 7 or 8, here you can try to uninstall and then download FreeCell in Windows Store.
Bonus Tip: Run Games in Game Mode
Not limited to Microsoft Solitaire Collection, it is every gamer’s wish to enjoy games as smooth as it can. So there makes sense to make sure the common but rather vital game driver, game components or game running priority are ready and maximized for Microsoft games or any other games, like Minecraft, PUBG, League of Legends, etc.
For the sake of convenience and accuracy, it is worth a shot to let Driver Booster to update the game drivers and support automatically. And meanwhile, make full use of this tool to check whether there are too many unnecessary applications starting and running in the background. To put it in other, prepare your PC for Game Mode.
Update Game-needed Drivers and Components Automatically:
1. Download, install and run Driver Booster.
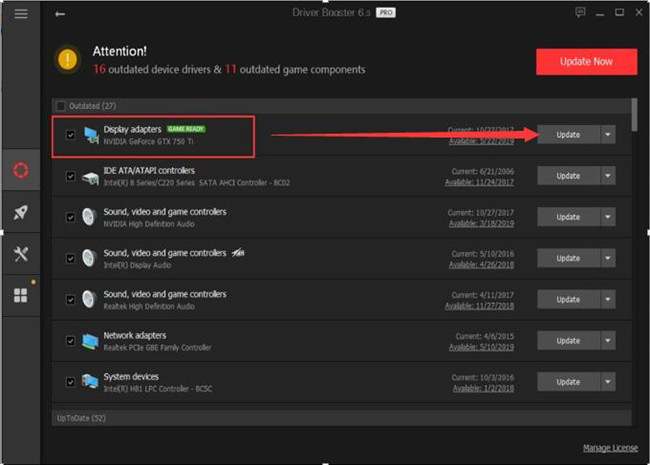
2. Click the Scan.

3. Update the outdated or missing drivers, such as the network and graphics driver.
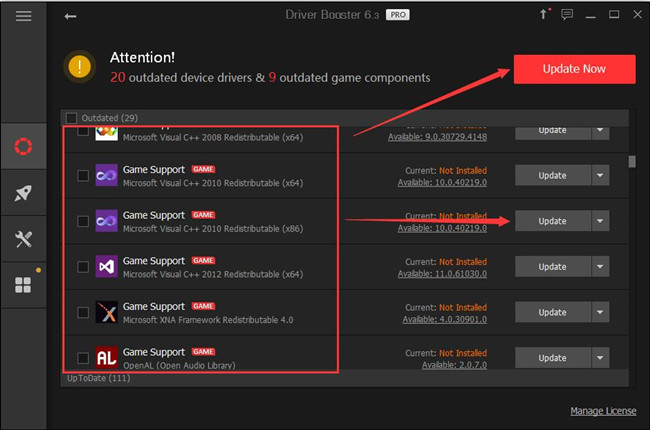
4. Find out Game Support and Update it or them.
Optimize your Game in Game Mode:
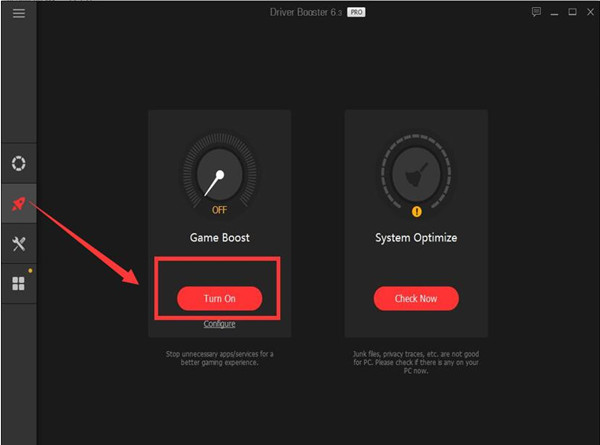
You can improve games’ performance on Windows 11, 10, 8, 7 using Driver Booster to turn off unrequired programs or services in game mode.
After getting Driver Booster, aim at Boost and then Turn on Game Boost on the right side.
In this sense, whatever game you are playing, Microsoft Solitaire Collection or games on Steam or Origin, you can enjoy yourself as expected.
In summary, this post shows you the most effective solutions to fix Microsoft Solitaire Collection not opening on Windows 10. These ways also hold true for Spider Collection or FreeCell not working on Windows 7, 8.
More Articles:
Fixed: Steam Download Stopping
Fixed: Fallout4 Crashes on Startup
Solved: League of Legends Won’t Open on Windows 10/11