xign_omg
Пользователь
Регистрация:
28.03.2013
Сообщения: 779
Рейтинг: 420
Регистрация:
28.03.2013
Сообщения: 779
Рейтинг: 420
мне нужно найти корневую папку с офисом, это сделать не могу, я гуглил, все варианты не подходят, у меня стоит 2007 версия, я хочу скопировать все данные с настройками на новый ноут
IIopHo AkTep
Пользователь
Регистрация:
14.09.2012
Сообщения: 515
Рейтинг: 206
Регистрация:
14.09.2012
Сообщения: 515
Рейтинг: 206
C:\Program Files (x86)\Microsoft Office
xign_omg
Пользователь
Регистрация:
28.03.2013
Сообщения: 779
Рейтинг: 420
Регистрация:
28.03.2013
Сообщения: 779
Рейтинг: 420
IIopHo AkTep сказал(а):↑
C:\Program Files (x86)\Microsoft Office
Нажмите, чтобы раскрыть…
допустим я перенесу всю эту папку на ноут, как дальше, я не могу найти рабочих экзашных файлов, чтобы запустить к примеру ворд
VASYA_URSA1999
Пользователь
Регистрация:
01.04.2014
Сообщения: 427
Рейтинг: 602
Регистрация:
01.04.2014
Сообщения: 427
Рейтинг: 602
xign_omg
Пользователь
Регистрация:
28.03.2013
Сообщения: 779
Рейтинг: 420
Регистрация:
28.03.2013
Сообщения: 779
Рейтинг: 420
VASYA_URSA1999 сказал(а):↑
Нажмите, чтобы раскрыть…
тунца отведай
IIopHo AkTep
Пользователь
Регистрация:
14.09.2012
Сообщения: 515
Рейтинг: 206
Регистрация:
14.09.2012
Сообщения: 515
Рейтинг: 206
xign_omg сказал(а):↑
допустим я перенесу всю эту папку на ноут, как дальше, я не могу найти рабочих экзашных файлов, чтобы запустить к примеру ворд
Нажмите, чтобы раскрыть…
C:\ProgramData\Microsoft\Windows\Start Menu\Programs\Microsoft Office
а office вроде не переносится надо новый ставить, тоесть новые комп, новыя установка
Berglol
Пользователь
Регистрация:
20.09.2013
Сообщения: 934
Рейтинг: 1737
Регистрация:
20.09.2013
Сообщения: 934
Рейтинг: 1737
ПКМ по ярлыку — св-ва — и путь посмотри.
xign_omg
Пользователь
Регистрация:
28.03.2013
Сообщения: 779
Рейтинг: 420
Регистрация:
28.03.2013
Сообщения: 779
Рейтинг: 420
IIopHo AkTep сказал(а):↑
C:\ProgramData\Microsoft\Windows\Start Menu\Programs\Microsoft Office
а office вроде не переносится надо новый ставить, тоесть новые комп, новыя установка
Нажмите, чтобы раскрыть…
а как же мне быть со всеми настройками и шрифтами?
Berglol сказал(а):↑
ПКМ по ярлыку — св-ва — и путь посмотри.
Нажмите, чтобы раскрыть…
я так пробовал, не дает инфы, этот офис вообще странно установлен
collage
Пользователь
Регистрация:
27.11.2013
Сообщения: 8
Рейтинг: 0
Регистрация:
27.11.2013
Сообщения: 8
Рейтинг: 0
xign_omg сказал(а):↑
а как же мне быть со всеми настройками и шрифтами? я так пробовал, не дает инфы, этот офис вообще странно установлен
Нажмите, чтобы раскрыть…
Скорее всего настройки хранятся в реестре windows
Тема закрыта
-
Заголовок
Раздел
Ответов Просмотров
Последнее сообщение
-
Сообщений: 3
05 May 2025 в 12:01 -
Сообщений: 11
05 May 2025 в 11:54Сообщений:11
Просмотров:16
-
Сообщений: 14
05 May 2025 в 11:41Сообщений:14
Просмотров:17
-
Сообщений: 12
05 May 2025 в 11:12Сообщений:12
Просмотров:20
-
Сообщений: 26
05 May 2025 в 11:11Сообщений:26
Просмотров:42
Hoping to be useful, I’m setting up a public list of all the installation paths of the various versions of Office (from XP to 2016) for all Windows systems.
Installation Paths
All the applications provided by the Office suite (Word, Excel, Outlook, Access, Powerpoint), if installed, can be found within the given folder(s). The executable files have kept the same names since Office XP, which are the following:
- Word:
WINWORD.EXE
- Excel:
EXCEL.EXE
- PowerPoint:
POWERPNT.EXE
- Access:
MSACCESS.EXE
- Outlook:
OUTLOOK.EXE
- Visio:
VISIO.EXE
- Project:
WINPROJ.EXE
Office XP
- Windows 64-bit:
C:\Program Files\Microsoft Office\Office10\
- Windows 32-bit:
C:\Program Files (x86)\Microsoft Office\Office10\
Office 2003
- Windows 64-bit:
C:\Program Files\Microsoft Office\Office11\
- Windows 32-bit:
C:\Program Files (x86)\Microsoft Office\Office11\
Office 2007
- Windows 64-bit:
C:\Program Files\Microsoft Office\Office12\
- Windows 32-bit:
C:\Program Files (x86)\Microsoft Office\Office12\
Office 2010
- Windows 64-bit:
C:\Program Files\Microsoft Office\Office14\
- Windows 32-bit:
C:\Program Files (x86)\Microsoft Office\Office14\
Click-To-Run
- Windows 64-bit:
C:\Program Files\Microsoft Office 14\ClientX64\Root\Office14\
- Windows 32-bit:
C:\Program Files (x86)\Microsoft Office 14\ClientX86\Root\Office14\
Office 2013
- Windows 64-bit:
C:\Program Files\Microsoft Office\Office15\
- Windows 32-bit:
C:\Program Files (x86)\Microsoft Office\Office15\
Click-To-Run
- Windows 64-bit:
C:\Program Files\Microsoft Office 15\ClientX64\Root\Office15\
- Windows 32-bit:
C:\Program Files (x86)\Microsoft Office 15\ClientX86\Root\Office15\
Office 2016
- Windows 64-bit:
C:\Program Files\Microsoft Office\Office16\
- Windows 32-bit:
C:\Program Files (x86)\Microsoft Office\Office16\
Click-To-Run
- Windows 64-bit:
C:\Program Files\Microsoft Office 16\ClientX64\Root\Office16\
- Windows 32-bit:
C:\Program Files (x86)\Microsoft Office 16\ClientX86\Root\Office16\
If you never heard of Click-To-Run installation mode, read here.
GUID
In case you also need the installation GUIDs, for example to retrieve some Office-related installation data from Windows Installer and/or Registry Editor, I’m also enumerating those (source: https://support.microsoft.com/en-us/kb/234788):
Office XP
- Word: {8E46FEFA-D973-6294-B305-E968CEDFFCB9}
- Excel: {5572D282-F5E5-11D3-A8E8-0060083FD8D3}
- PowerPoint: {FC780C4C-F066-40E0-B720-DA0F779B81A9}
- Access: {CC29E967-7BC2-11D1-A921-00A0C91E2AA3}
- Office: {20280409-6000-11D3-8CFE-0050048383C9}
Office 2003
- Word: {1EBDE4BC-9A51-4630-B541-2561FA45CCC5}
- Excel: {A2B280D4-20FB-4720-99F7-40C09FBCE10A}
- PowerPoint: {C86C0B92-63C0-4E35-8605-281275C21F97}
- Access: {F2D782F8-6B14-4FA4-8FBA-565CDDB9B2A8}
- Office: {90110409-6000-11D3-8CFE-0150048383C9}
Office 2007
- Word: {0638C49D-BB8B-4CD1-B191-051E8F325736}
- Excel: {0638C49D-BB8B-4CD1-B191-052E8F325736}
- PowerPoint: {0638C49D-BB8B-4CD1-B191-053E8F325736}
- Access: {0638C49D-BB8B-4CD1-B191-054E8F325736}
- Office: {0638C49D-BB8B-4CD1-B191-050E8F325736}
Office 2010
32-bit
- Word: {019C826E-445A-4649-A5B0-0BF08FCC4EEE}
- Excel: {538F6C89-2AD5-4006-8154-C6670774E980}
- PowerPoint: {E72E0D20-0D63-438B-BC71-92AB9F9E8B54}
- Access: {AE393348-E564-4894-B8C5-EBBC5E72EFC6}
- Office: {398E906A-826B-48DD-9791-549C649CACE5}
64-bit
- Word: {C0AC079D-A84B-4CBD-8DBA-F1BB44146899}
- Excel: {8B1BF0B4-A1CA-4656-AA46-D11C50BC55A4}
- PowerPoint: {EE8D8E0A-D905-401D-9BC3-0D20156D5E30}
- Access: {02F5CBEC-E7B5-4FC1-BD72-6043152BD1D4}
- Office: {E6AC97ED-6651-4C00-A8FE-790DB0485859}
That’s it for now. If you have other PATH and/or GUID that you would like to add to this list, write a comment about it and I’ll update the post.
IT Project Manager, Web Interface Architect and Lead Developer for many high-traffic web sites & services hosted in Italy and Europe. Since 2010 it’s also a lead designer for many App and games for Android, iOS and Windows Phone mobile devices for a number of italian companies. Microsoft MVP for Development Technologies since 2018.
View all posts by Ryan →
Removing Microsoft Office from the registry can be a daunting task, but with the right approach, it can be done smoothly and efficiently. Did you know that the registry is a database in Windows that stores settings and configuration information for the operating system and installed programs? When it comes to Microsoft Office, removing it from the registry requires careful navigation and attention to detail.
When removing Microsoft Office from the registry, it is important to have a clear understanding of the history and background. Microsoft Office is a popular suite of productivity tools that has been around for decades, helping individuals and businesses alike. However, sometimes it becomes necessary to uninstall or remove the software completely. By removing Microsoft Office from the registry, you can ensure a clean uninstallation and avoid any lingering traces that could interfere with future installations or system performance. Taking the time to remove Microsoft Office from the registry is a proactive solution that can help optimize your computer’s performance and ensure a smooth uninstallation process.
If you’re looking to remove Microsoft Office from your computer’s registry, here are the steps to follow:
- Open the «Run» dialog box by pressing Windows key + R.
- Type «regedit» and hit Enter to open the Registry Editor.
- Navigate to HKEY_CURRENT_USER\Software\Microsoft\Office.
- Right-click on the «Office» key and select «Delete» to remove it.
- Confirm the deletion when prompted.
- Repeat steps 3-5 for the following registry keys: HKEY_LOCAL_MACHINE\Software\Microsoft\Office and HKEY_USERS\Software\Microsoft\Office.
After completing these steps, Microsoft Office should be removed from your computer’s registry. It’s important to exercise caution when making changes to the registry, as any mistakes can cause system instability.

Understanding the Registry: A Key Step in Removing Microsoft Office
If you’re looking to remove Microsoft Office from your computer, it’s important to understand the role of the Windows Registry. The Registry is a hierarchical database that stores low-level settings and configurations for the Windows operating system and installed applications, including Microsoft Office. Removing Office using the Registry requires caution and precision to avoid damaging your system or causing unintended consequences. In this article, we will guide you through the process of safely removing Microsoft Office from the Registry.
1. Backup Your Registry
The first step before making any changes to the Registry is to create a backup. This allows you to restore the Registry to its previous state if anything goes wrong during the removal process. To backup the Registry, follow these steps:
- Open the Registry Editor by clicking on the Start menu and typing «regedit.»
- Right-click on the «regedit» application and select «Run as administrator» to open the Registry Editor with administrative privileges.
- In the Registry Editor, click on «File» in the top left corner, and select «Export.»
- Choose a name and location for the backup file, and click «Save.»
By following these steps, you’ll have a backup file that can be used to restore the Registry if necessary.
1.1 Restoring the Registry Backup
To restore the Registry backup, simply double-click on the backup file you created. You will be prompted to confirm the restoration of the Registry. Once confirmed, the Registry will be restored to the state captured in the backup file.
It’s essential to perform the backup step before making any changes to the Registry, as it provides a safety net in case anything goes wrong during the removal process.
2. Uninstall Microsoft Office using Control Panel
Before diving into the Registry, it’s best to attempt uninstalling Microsoft Office through the Control Panel first. This is the safest and most recommended method for removing Office. To uninstall Office using the Control Panel, follow these steps:
- Open the Control Panel by clicking on the Start menu and searching for «Control Panel.»
- Click on «Uninstall a program» under the «Programs» section.
- Locate Microsoft Office in the list of installed programs and click on it.
- Click on «Uninstall» and follow the prompts to complete the removal process.
If the Control Panel method is successful in uninstalling Microsoft Office, you won’t need to make any further changes in the Registry.
2.1 Availability of the Control Panel Method
It’s important to note that the availability of the Control Panel method may vary depending on the version of Windows and Microsoft Office you are using. In some cases, newer versions of Office may not be listed in the Control Panel, requiring alternative methods for removal.
3. Removing Microsoft Office Entries from the Registry
If the Control Panel method didn’t successfully remove Microsoft Office, you may need to manually remove the corresponding Registry entries. However, it’s crucial to exercise caution when making changes to the Registry, as any mistakes can lead to system instability or functionality issues. Follow these steps to remove Microsoft Office entries from the Registry:
- Open the Registry Editor by clicking on the Start menu and typing «regedit.»
- Right-click on the «regedit» application and select «Run as administrator» to open the Registry Editor with administrative privileges.
- Navigate to the following location:
HKEY_LOCAL_MACHINE\SOFTWARE\Microsoft\Office - Expand the «Office» folder and delete any subfolders related to the version of Office you want to remove.
- Additionally, navigate to the following locations and delete any subfolders related to Office:
HKEY_LOCAL_MACHINE\SOFTWARE\WOW6432Node\Microsoft\OfficeHKEY_CURRENT_USER\SOFTWARE\Microsoft\OfficeHKEY_CURRENT_USER\SOFTWARE\WOW6432Node\Microsoft\Office
It’s crucial to only delete the subfolders that correspond to the version of Office you want to remove. Removing any unrelated subfolders or making incorrect deletions can cause system issues.
4. Cleaning up the Registry
After removing the Microsoft Office entries from the Registry, it’s a good practice to clean up any leftover or orphaned Registry entries. This helps ensure a clean and optimized Registry. To clean up the Registry, follow these steps:
- Open the Registry Editor by clicking on the Start menu and typing «regedit.»
- Right-click on the «regedit» application and select «Run as administrator» to open the Registry Editor with administrative privileges.
- Click on «Edit» in the top left corner of the Registry Editor and select «Find.»
- In the search box, enter «Microsoft Office» and click «Find Next.»
- If any entries related to Microsoft Office are found, right-click on them and select «Delete.»
- Press «F3» to continue searching for additional Microsoft Office entries and delete them until no more entries are found.
By cleaning up the Registry, you ensure that no orphaned Microsoft Office entries remain, minimizing the risk of potential conflicts or errors in the future.
Exploring Additional Removal Methods
If the previous methods didn’t successfully remove Microsoft Office, there are additional methods you can explore:
1. Using Microsoft Office Uninstall Support Tools
Microsoft provides specialized support tools to aid in the removal of their software, including Microsoft Office. These tools are designed to handle complex scenarios where standard uninstallation methods may fail. To use Microsoft’s Office Uninstall Support Tools, follow these steps:
- Visit the official Microsoft website and search for the Office Uninstall Support Tools.
- Download and install the appropriate support tool for your version of Office and Windows.
- Follow the provided instructions to use the tool to uninstall Microsoft Office.
Microsoft’s support tools are designed to handle unique cases and can be helpful if other methods haven’t been successful.
2. Using Third-Party Uninstaller Software
If all else fails, you can explore third-party uninstaller software specifically designed to remove stubborn applications, including Microsoft Office. These software tools use advanced techniques to thoroughly remove software and associated Registry entries. When using third-party uninstaller software, carefully read reviews and select a reputable and trustworthy program.
3. Seeking Professional Assistance
If you’re unsure about making changes in the Registry or have exhausted all other methods, it may be best to seek professional assistance. IT professionals or computer technicians have the expertise to safely and efficiently remove Microsoft Office from your system without risking damage or errors.
In conclusion, removing Microsoft Office from the Registry requires caution and precision. It’s crucial to create a backup of the Registry before making any changes and attempt uninstallation through the Control Panel first. If these methods are unsuccessful, carefully remove the Microsoft Office entries from the Registry and clean up any leftover entries. If needed, explore additional removal methods such as Microsoft’s Office Uninstall Support Tools or third-party uninstaller software. When in doubt, seek professional assistance to ensure a safe and successful removal process.

Removing Microsoft Office From the Registry
Microsoft Office is a popular suite of productivity software that includes programs like Word, Excel, and PowerPoint. However, there may come a time when you need to remove Microsoft Office from your computer entirely, including any traces of it in the Windows Registry. Here’s how you can do it:
Step 1: Backup your Registry
Before making any changes to the Registry, it is crucial to create a backup to ensure you can revert any changes if something goes wrong. To do this:
— Open the «Registry Editor» by pressing «Windows + R» and typing «regedit» in the Run dialog box.
— Click on «File» in the top menu and select «Export» to create a backup of your Registry.
Step 2: Uninstall Microsoft Office
To remove Microsoft Office completely:
— Open the «Control Panel» by searching for it in the Start menu.
— Click on «Programs» or «Programs and Features» and select «Microsoft Office» from the list of installed programs.
— Click on «Uninstall» and follow the prompts to remove Microsoft Office from your computer.
Step 3: Delete Microsoft Office Registry Keys
To remove any leftover traces of Microsoft Office from the Registry:
— Open the «Registry Editor» again by typing «regedit» in the Run dialog box.
— Navigate to the following locations in the Registry Editor:
— HKEY_CURRENT_USER\Software\Microsoft\Office
— HKEY_LOCAL_MACHINE\Software\Microsoft\Office
— HKEY_USERS\.DEFAULT\Software\Microsoft\Office
— Right-click on the «Office» folder and select «Delete» to remove it.
After following these steps, Microsoft Office should be completely removed from your computer, along with any associated entries in the Windows Registry. Remember to always exercise caution when modifying the Registry, as it contains critical system information.
Key Takeaways:
- Removing Microsoft Office from the registry requires caution and technical expertise.
- Editing the registry incorrectly can cause system instability or even render your computer inoperable.
- Always create a backup of your registry before making any changes.
- Uninstalling Microsoft Office using the Control Panel is the recommended method for most users.
- If you need to remove Microsoft Office from the registry, consult Microsoft support or a professional technician.
Frequently Asked Questions
Are you looking for ways to remove Microsoft Office from your computer’s registry? Here are some commonly asked questions and their answers to guide you through the process.
1. Can I remove Microsoft Office from the registry manually?
Yes, it is possible to remove Microsoft Office from the registry manually. However, it is a complex and risky process that should only be attempted by experienced users. Modifying the registry incorrectly can cause serious issues with your computer’s operating system.
If you are not comfortable editing the registry manually, it is recommended to use a reliable uninstaller tool or the official Microsoft Office uninstallation utility to remove the software completely.
2. What are the steps to remove Microsoft Office from the registry?
The steps to remove Microsoft Office from the registry manually are as follows:
- Create a backup of your registry.
- Open the Registry Editor by pressing Windows Key + R, typing «regedit» in the Run dialog box, and pressing Enter.
- Navigate to the following key: HKEY_CURRENT_USER\Software\Microsoft\Office
- Right-click on the «Office» folder and select «Delete».
- If you have multiple versions of Microsoft Office installed, repeat steps 3 and 4 for each version.
- Exit the Registry Editor.
- Restart your computer to complete the removal process.
Remember to proceed with caution when making changes to the registry, and always create a backup before proceeding.
3. Are there any risks involved in removing Microsoft Office from the registry?
Yes, there are risks involved in removing Microsoft Office from the registry, especially if done manually. Making incorrect changes to the registry can cause system instability, software malfunction, or even prevent your computer from booting up properly.
To minimize the risks, it is recommended to use a reliable uninstaller tool or the official Microsoft Office uninstallation utility provided by Microsoft. These tools are specifically designed to remove the software without causing any harm to your computer’s system files or registry.
4. Can I reinstall Microsoft Office after removing it from the registry?
Yes, you can reinstall Microsoft Office after removing it from the registry. However, you will need to have the installation files or product key to reinstall the software.
It is recommended to uninstall Microsoft Office using the official uninstallation utility or a reliable uninstaller tool before reinstalling it. This ensures a clean removal of the software and helps prevent any compatibility issues or installation errors.
5. Are there any alternative methods to remove Microsoft Office from the registry?
Yes, there are alternative methods to remove Microsoft Office from the registry. Apart from the manual method and using uninstaller tools, you can also try using cleanup utilities or third-party software designed specifically for removing stubborn applications and cleaning up registry entries.
Before using any alternative method, it is important to research and choose a reliable and trusted solution to avoid any potential risks or compatibility issues with your computer’s operating system.
In summary, removing Microsoft Office from the registry is a delicate process that requires caution and attention to detail. By following the steps outlined in this article, you can ensure a thorough removal of Microsoft Office from your computer’s registry.
Remember to back up your registry before making any changes and always proceed with caution. Removing Microsoft Office from the registry can help resolve issues with the software or free up space on your computer. If you encounter any difficulties or have any questions, it is always recommended to seek assistance from a professional or Microsoft support.
Вернуться к списку статей

Зачем нужно полное удаление Microsoft Office? Иногда бывает такое, что при установке нового MS Office выходят различные ошибки установки, либо новая установка Office конфликтует со старой, хотя старую установку Вы удаляли стандартными средствами из меню «Удаление программ» и т.п.
Как удалить Microsoft Office из реестра?
— Нажимаем горячие клавиши Win + R => Вводим в окно ввода команду regedit и нажимаем «Ок».
— Далее, заходим в ветку Компьютер\HKEY_LOCAL_MACHINE\SOFTWARE\Microsoft\Office и удаляем в этой ветке папки 14.0, 15.0, 16.0, 19.0 если они есть.
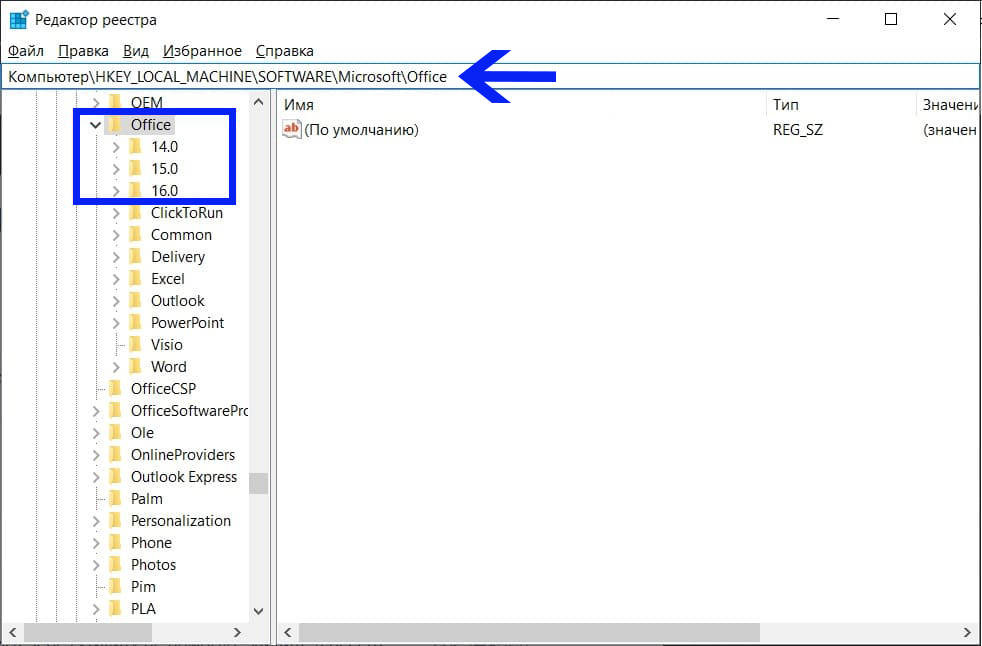
На этом удаление Microsoft Office (а так же Visio и Project, если они у вас были установлены) из реестра закончена.
Вам могут быть интересны эти товары
Хит продаж
Хит продаж
Хит продаж
В данной статье рассмотрим как полностью удалить Microsoft Office в ручную из реестра, а так же с помощью официальной утилиты от Microsoft — Microsoft Support and Recovery Assistant.
— Для чего нужно полное удаление Microsoft Office? Иногда бывает такое, что при установке нового MS Office выходят различные ошибки установки, либо новая установка Office конфликтует со старой, хотя старую установку Вы удаляли стандартными средствами из меню «Удаление программ» и т.п.
1) Как удалить Microsoft Office из реестра?
— Нажимаем горячие клавиши Win + R => Вводим в окно ввода команду regedit и нажимаем «Ок».
— Далее, заходим в ветку Компьютер\HKEY_LOCAL_MACHINE\SOFTWARE\Microsoft\Office и удаляем в этой ветке папки 14.0, 15.0 и 16.0, если они есть.
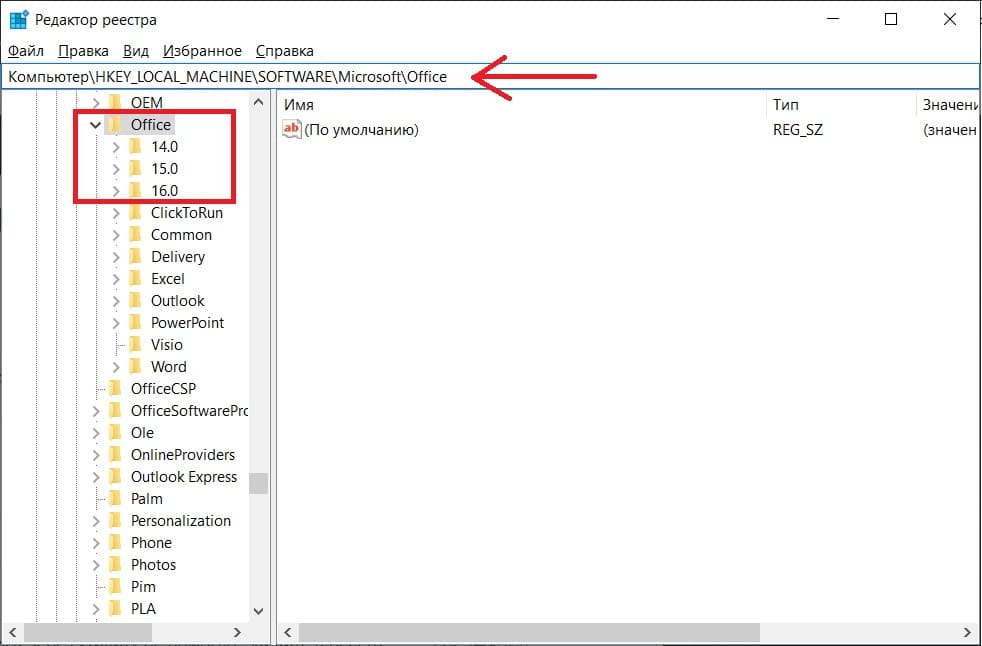
На этом удаление Microsoft Office (а так же Visio и Project, если они у вас были установлены) из реестра закончена.
2) После удаления Microsoft Office из реестра мы рекомендуем удалить его остатки из Вашей системы с помощью официальной утилиты для удаления Офиса — Microsoft Support and Recovery Assistant. Скачать утилиту и ознаомиться с инструкцией по ее использованию можете в нашей прошлой статье.
После того как Вы удалили Microsoft Office с Вашего ПК — теперь Вы можете установить дистрибутив заново. Мы настоятельно рекомендуем использовать только оригинальные дистрибутивы Microsoft Office во избежании ошибок при работе в нем в дальнейшем. Скачать оригинальные дистрибутивы Вы можете в нашем каталоге на следующей странице.