
Item Preview
There Is No Preview Available For This Item
This item does not appear to have any files that can be experienced on Archive.org.
Please download files in this item to interact with them on your computer.
Show all files
83
Views
DOWNLOAD OPTIONS
Uploaded by
AWM2004
on
SIMILAR ITEMS (based on metadata)
Here you can download Lync 2010 For PC, and use this Business app on your Mac or Windows laptop or computer.
Lync 2010 is free Business app available on the play store and app store. This app has over 1,000,000+ downloads from the google play store.
Lync 2010 app is developed by the Microsoft Corporation and last updated on Jun 18, 2013 with the 4.0.6509.3001 (6509001) on the play store.
More about this Lync 2010 app is Lync 2010 for Android extends the power of Lync to your mobile device!.
As this Lync 2010 app has size of 4 MB, it can take longer to download and install on your pc depending on your internet connection.
I hope now you have an idea about this Lync 2010 app so now let’s discuss some frequently asked questions.
Lync 2010 PC App FAQs
Before you continue with this article and download this Business app on your pc. Take a look at the FAQs below for a quick idea.
Is Lync 2010 app available for free?
Yes, this Lync 2010 app is available for free and you can download this Business app from the play store and app store for free.
How to use the Lync 2010 app on windows pc?
To use the Lync 2010 app on your windows or mac you need to download an android emulator like bluestacks or ldplayer. And then install this Business app on that android emulator.
What is the latest version of Lync 2010 app?
The latest version of Lync 2010 app is 4.0.6509.3001 (6509001).
Now let’s see how we can download and install this Business app on our windows and mac computers.
How to Install Lync 2010 on PC? [Windows 10, 11]
Now let’s see the complete step-by-step installation process of the Lync 2010 app on our windows or mac pc.
- Go to the official website of Nox Player, download it, and install it on your windows or mac pc. Or you can also try Bluestacks, LDPlayer, etc.
- Now open the android emulator, click on the play store icon and search for the Lync 2010 app to install it on our pc. As shown in the above image.
- As you can see above click on the install button and it will start the installation Lync 2010 app on your pc emulator.
- Once this Business app is installed, you can see the open button there, click on that to open the app.
- Or you can click on the Lync 2010 app icon available on the main dashboard to start the app and use it with an android emulator.
The installation process of the Lync 2010 app is the same for the mac and windows pc. Only download the emulator according to your operating system.
Lync 2010 For PC Download (With Apk File)
Now if you are getting any errors with the installation with the first method then use the below image to download this Lync 2010 app on windows and mac with Lync 2010 apk file.
- Follow all the steps to install the android emulator as we discussed in our first method but here no need to sign in with google.
- Here you will also need a Lync 2010 apk file to install it on the pc android emulator because we will not download it from the play store.
- Drag and drop this Business app file into the emulator, and it will start installing, and in a few seconds, it will be installed.
- Once it is installed you can see the Lync 2010 icon available on the main dashboard and you can click on that to start the app.
So this is the complete step-by-step installation process of this Lync 2010 app and also the same on the mac pc.
Now if you like to use android apps on pc then do check out Web – Workspace ONE For PC, Office Documents Viewer For PC, and Splashtop Personal Access For PC apps that we install with the same method like this one.
Conclusion
Here we have covered the complete process to download the Lync 2010 app on pc. And also cover how to use the Lync 2010 app on windows and mac computers or laptops. If you are getting any errors while installing this Business app on pc then let us know in the comment box.
The Lync 2010 client for Windows comes in two installer flavors:
32-bit and 64-bit. The functionality is identical, so simply choose the
version that matches the operating system you are running. To install
the client, follow these steps:
1. Double-click LyncSetup.exe.
2. When prompted by User Account Control, click Yes.
3. Browse to the location where you want to install the Lync client and choose whether to share information with Microsoft. Click Install, which will launch the installer as shown in Figure 1.
Figure 1 Installing the Lync 2010 Client
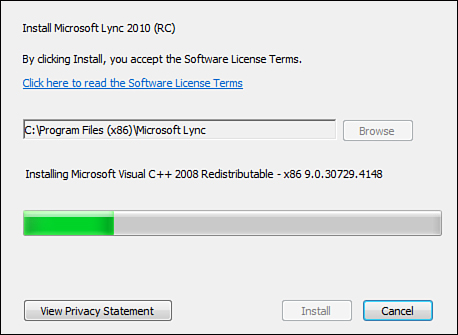
At this step, you might notice two items
that seem slightly odd. First, the default installation path for the
64-bit installer is c:\Program Files (x86). Second, if the 32-bit
version of Visual C++ redistributable isn’t already installed, it is
installed as part of the Lync client installation. Although the
installer is 64-bit, the client is actually 32-bit. Attempting to
install through the 32-bit installer on a 64-bit operating system
generates an error telling you it is the incorrect version.
4. When the installation is finished, click Close. If the box is checked, Lync begins.
When the Lync 2010 client launches, it will be at the sign-in
prompt. Enter the SIP address of the user you want to log on as and
click Sign In, as shown in Figure 2.
Figure 2 Signing in with Lync 2010 Client
If the DNS records are configured correctly to support Lync Server
2010, you are prompted for Active Director credentials. If the
necessary SVR records are not present, manually override the logon
setting with these steps:
1. Click the downward-pointing arrow located to the right of the gear icon in the upper right of the client.
2. Choose Tools and then choose Options.
3. Next to the Sign-in address, click Advanced.
4. Choose Manual configuration and enter the name of the Lync 2010 Server.
5. Click OK, and then click OK again.
6. Click Sign In.
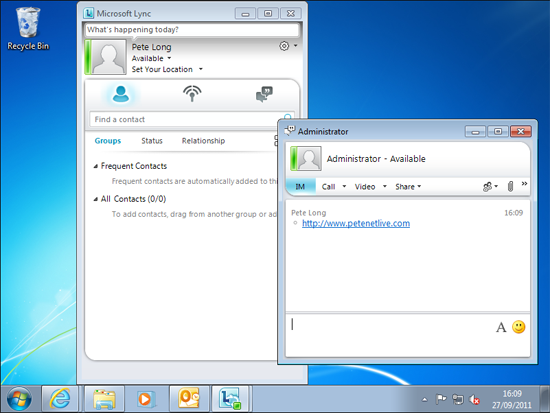
At this point, you should see the Lync client logged in successfully, as shown in Figure 3.
Figure 3 The Lync 2010 Client
KB ID 0000522
Problem
A few weeks ago my boss asked me to take a look at Microsoft Lync. Because he was interested in the Lync Client (formally Microsoft Communicator) for instant messaging.
Decent info is a bit thin on the net, and I don’t have the patience to read stupidly long PDF files. So to redress the balance I thought I would publish my findings below.
Solution
Note: The following procedure is carried out on Server 2008 R2 with Windows 7 Clients, on my VMware test network.
Walkthrough
I know a lot of people don’t like watching videos so heres my notes:
Pre-Requisites
1. Download and install, Microsoft Silverlight. (link)
2. IIS (Roles > Add Roles > Web Server IIS) > Next.
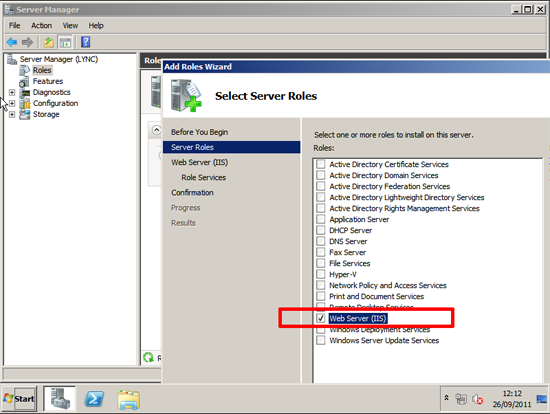
Also add:
i. ASP.NET
ii. Logging Tools
iii. Tracing
iv. Client Certificate Mapping Authentication.
v. Windows Authentication
vi. IIS Management Scripts and Tools
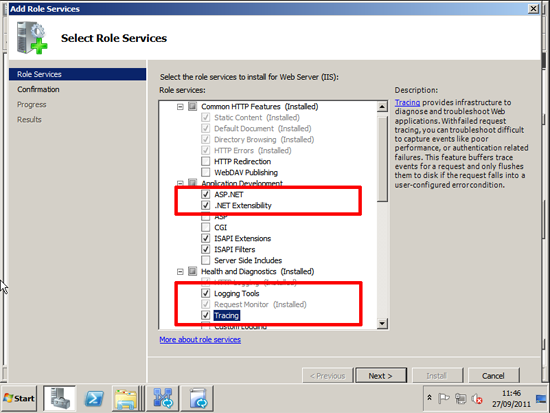
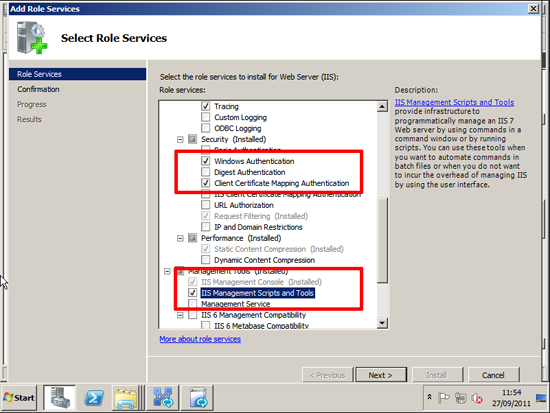
Next > Install > Finish.
3. RSAT Tools (Features > Add Features > Remote Server Administrative Tools > AD DS and LDS Tools) > Next > Install > Close > Select Yes to Reboot > Post Reboot Installation will continue > Close.

4. Have a Certification authority set up in your domain. OR a certificate ready for the Lync Server to import.
Install
1. Run Setup > It will ask to Install C++ let it do so.
2. Once it’s finished, It will ask for the install location > change if required > Install.
3. Accept the EULA > OK.
4. When the Deployment Wizard starts > Select “Prepare Active Directory”.
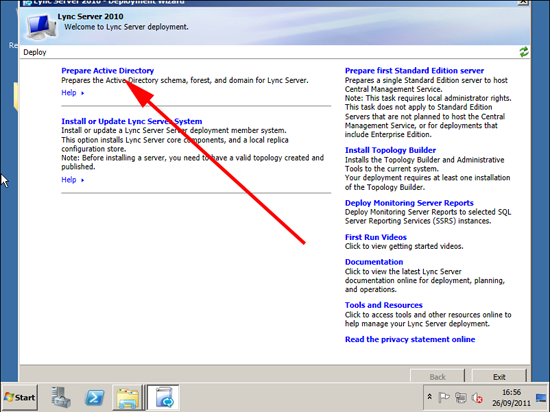
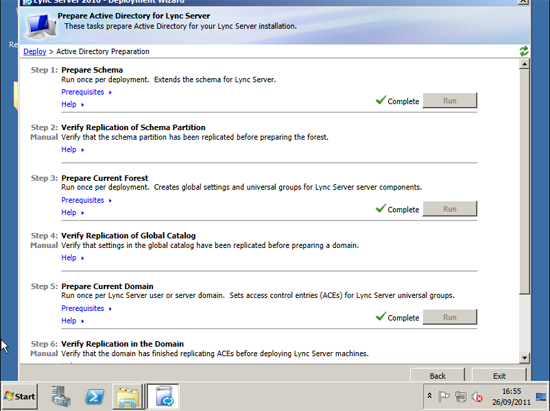
5. Prepare Schema > Run > Next > Finish.
6. Allow domain replication.
7. Prepare Current Forest > Run > Select Local Domain > Next > Finish.
8. Allow domain replication.
9. Prepare Domain > Run > Next > Finish.
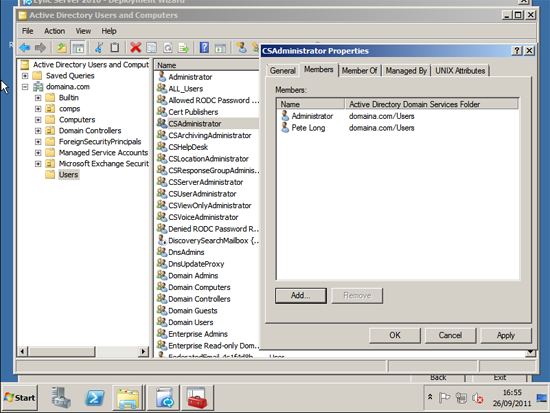
10. When all are completed, add your administrators to the newly created AD group CSAdministrators > Then click “Back” to return to the main page of the Deployment Wizard.
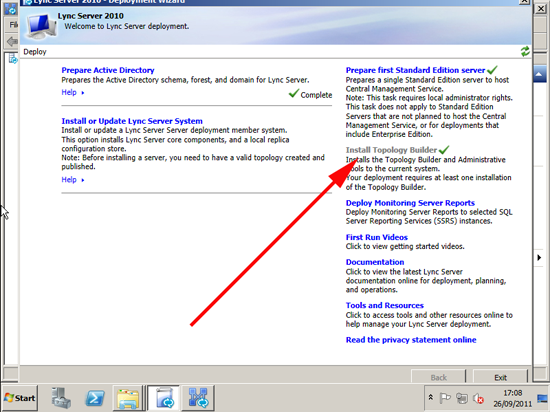
11. Prepare First Standard Edition Server > Next > SQL Express will install > Finish.

12. Install Topology Builder > It installs very quickly and gets a green tick when complete.
13. Start > All Programs > Microsoft Lync Server 2010 > Lync Server Topology builder > When promoted select > New Topology > OK.
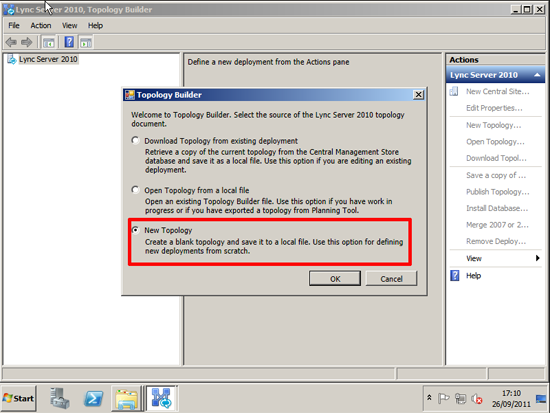
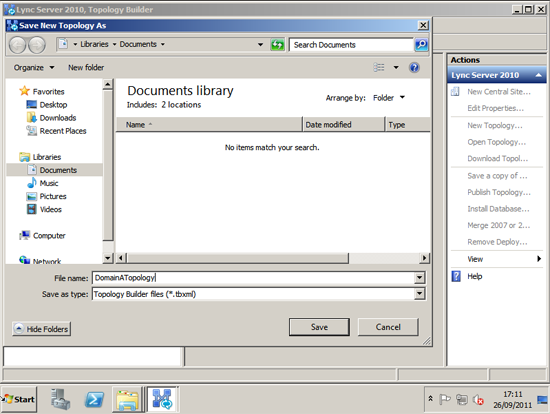
14. Save the topology as requested.
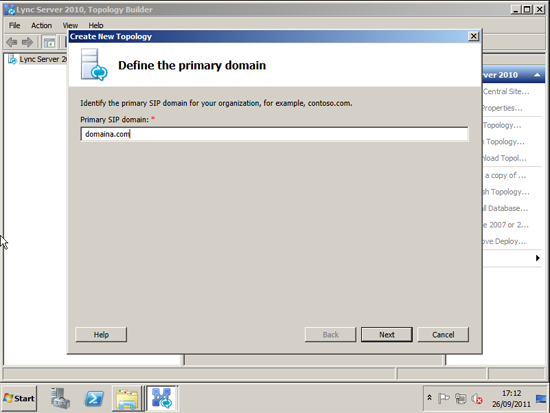
15. Under “Primary SIP Domain” > enter your domain name > Next.
16. Enter any additional domains if required > Next.
11. Give the site a name and description > Next.
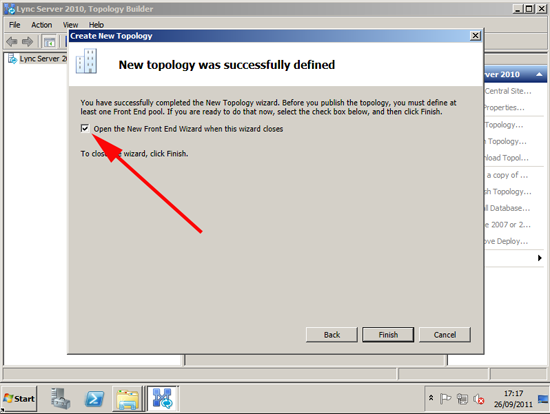
12. Enter site details > Next > With the option to “Open the new front end wizard..” selected > Finish.
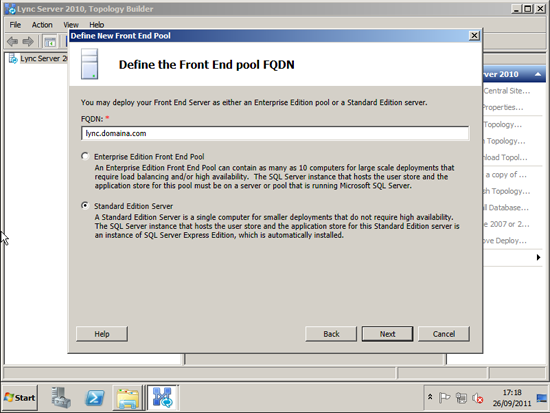
13. At the “Define a new front end pool” wizard > Next > Enter the FQDN of the server and select Standard Edition > Next.
14. Select features (Everything except PSTN, because I don’t have a PSTN gateway) > Next.

15. Choose to Collocate Mediation Server > Next.
16. Don’t add any further server roles > Next > Next.
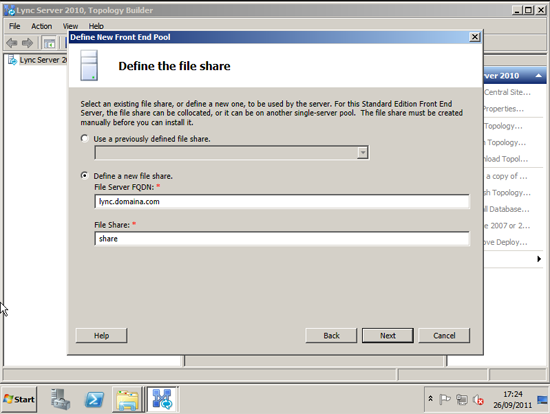
17. Let it create a new share > Next.
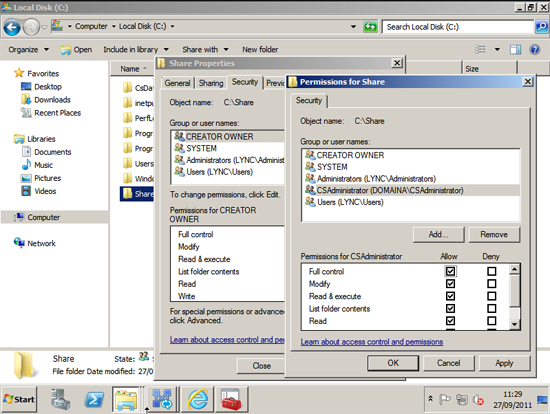
(Note manually create the share and make sure it has appropriate permissions).
18. Set external URL if required > Next > we are not adding PSTN > Finish.
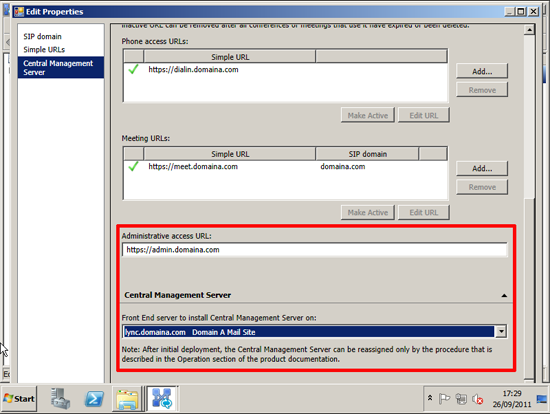
19. On the Topology Builder Select > Edit Properties > Central Management Server.

20. Add in the admin URL (Note: Make sure this resolves in DNS), and FQDN of the server > OK.
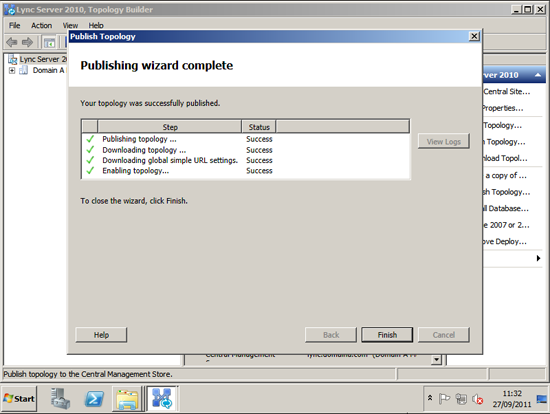
21. Select Publish Topology > Next > Next > Finish.
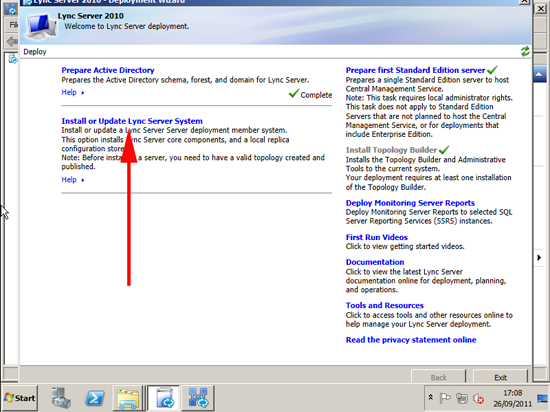
22. Re-launch or swap back to the Lync Server Deployment Wizard > Select Install or Update Lync Server System.
24. Run step one “Install Local Configuration Store” > Select “Retrieve directly…” > Next > Finish.
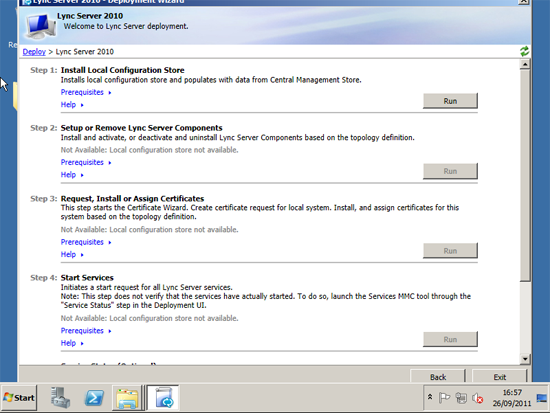
25. Run Step two “Setup or Remove Lync Server Components” > Next > (If you get a Prerequisite installation failed: Wmf2008R2 click the link) > Finish.
26. Run Step three “Request, Install, or Assign Certificates” > Request > Next > Send request immediately > Next.
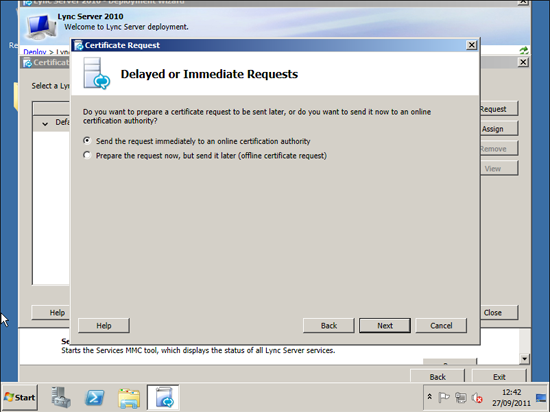
27. Select your CA > Next > Next > Next.
28. Choose a friendly Name > Next.
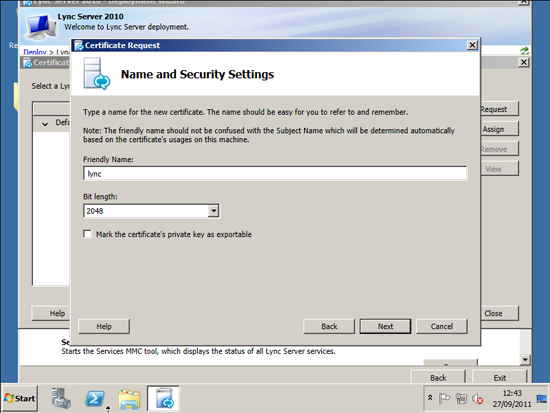
29. Fill in your Organisation information > Next > Enter country > State and City > Next > Next > Next > Next > Next > Next > Finish. > Close.
30. Run Step 4 “Start Services” > Next > Finish.
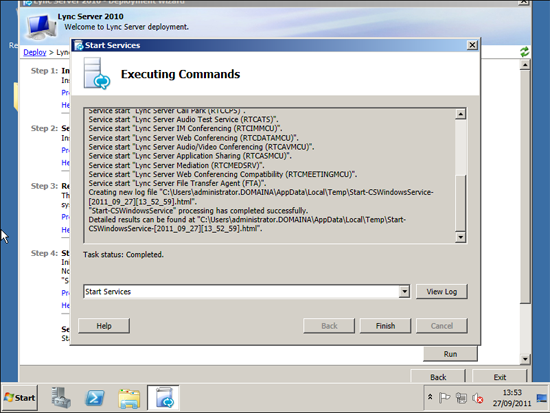
31. Check the service status if you wish.
32. Close the deployment wizard.
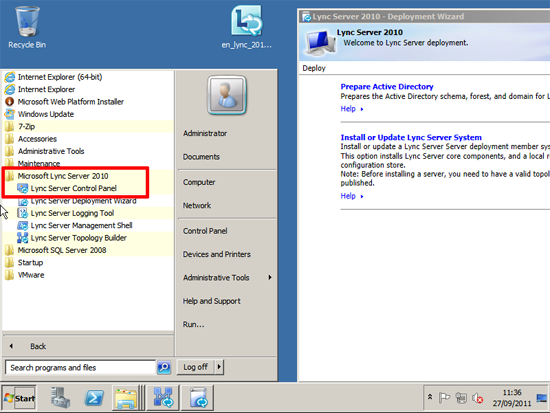
Launch “Lync Server control Panel” and Configure
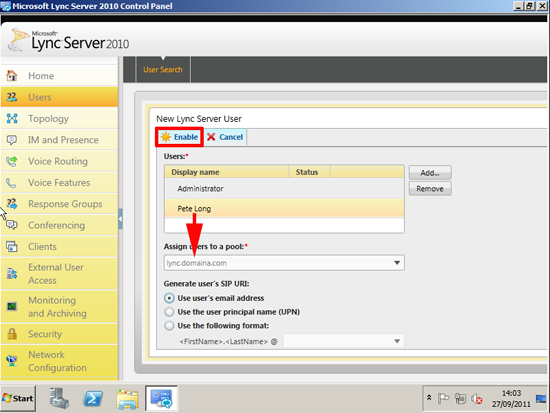
1. Launch the ” Lync Server Control Panel” > Log in with an admin account (created above at step 10).
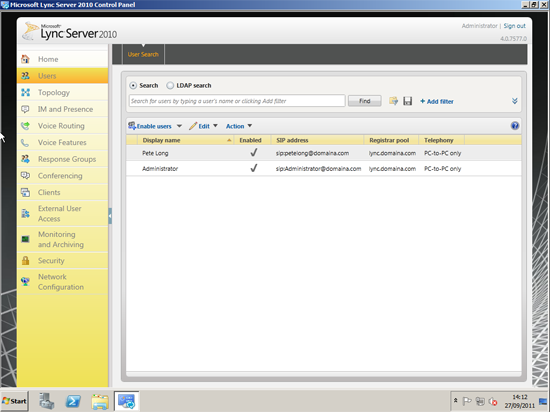
2. Navigate to Users > Add.
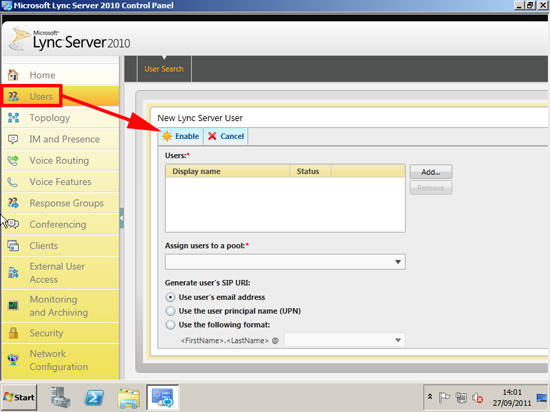
3. Add in your users and assign them to your pool.
Post Install Tasks
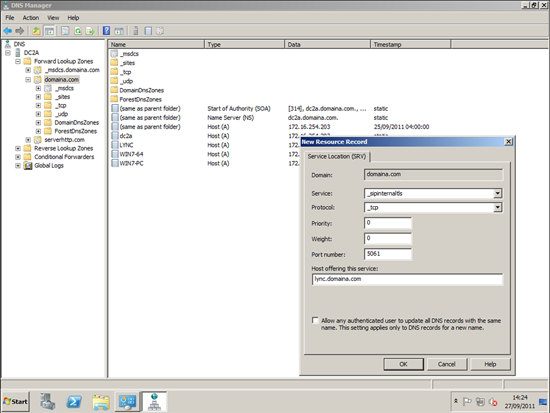
1. You need to create a DNS SRV (Service Location) so the client can locate the Lync server:
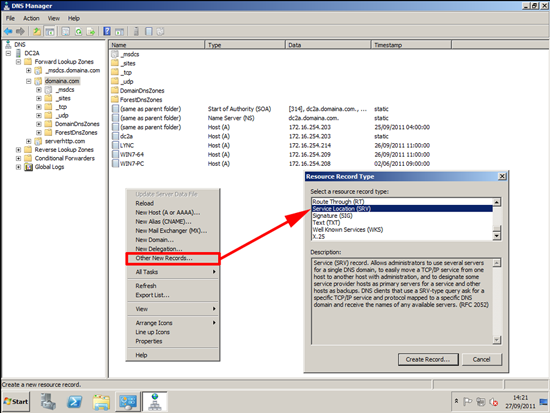
i. service: _sipintenaltls
ii. Protocol: _tcp
iii. Port Number: 5061
iv. Host offering service: the FQDN of the Lync Server.
Install the ‘Lync Client’ on the client machines.
Related Articles, References, Credits, or External Links
NA