
Windows 11 Installation Assistant
This is the best option for installing Windows 11 on the device you’re currently using. Click Download Now to get started.
Note: Windows 11 Installation Assistant doesn’t run on Arm-based PCs; it only works for x64 processors.
-
Before you begin, check to see if the following conditions apply to you:
- You have a Windows 10/11 license.
- Your PC must have Windows 10, version 2004 or higher installed to run Installation Assistant.
- Your PC must have 9 GB of free disk space to download Windows 11.
Note: Your PC meets the Windows 11 device specifications for upgrade requirements and supported features. Certain features require additional hardware. We also recommend that you visit your PC’s manufacturer’s website for information about updated drivers and hardware compatibility.
After you download the Installation Assistant:- Select Run. You need to be an administrator to run this tool.
- Once the tool confirms the device hardware is compatible, you will be presented with the license terms. Select Accept and Install.
- Once the tool is ready, click the Restart Now button to complete installation on your computer.
- It might take some time to install Windows 11, and your PC will restart a few times. Make sure you don’t turn off your PC.
Note: Windows 11 Installation Assistant doesn’t run on Arm-based PCs. It’s only supported for PCs using x64 processors. If you need installation media to install Windows 11 on a different PC, see Create Windows 11 Installation Media.
Create Windows 11 Installation Media
If you want to perform a reinstall or clean install of Windows 11 on a new or used PC, use this option to download the media creation tool to make a bootable USB or DVD.
Note: Windows 11 media creation tool cannot be used to create installation media for Arm-based PCs; it can only create media for x64 processors.
-
To get started you first need a license to install Windows 11 or have a Windows 10 device that qualifies for an upgrade to Windows 11.
Make sure you have:
- An internet connection (internet service provider fees may apply).
- Sufficient data storage available on the computer, USB, or external drive you are downloading the .iso file to.
- A blank DVD disc with at least 8GB (and DVD burner) to create a bootable disc. We recommend using a blank USB or blank DVD, because any content on it will be deleted during installation.
- If you receive a “disc image file is too large” message while attempting to burn a DVD bootable disc from an ISO file, consider using a higher capacity Dual Layer DVD.
Ensure the PC you want to install Windows 11:
- Has a 64-bit CPU: Windows 11 can only run on 64-bit CPUs. To see if your PC has one, go to Settings > System > About, or search “System Information” in Windows and look under “System Type.”
- Windows 11 Media Creation Tool creates installation media only for x64 processors. For Arm-based PCs, you should wait until you are notified through Windows Update that the upgrade is ready for your PC.
- Meets system requirements: Not all devices running Windows 10 are eligible to receive a Windows 11 upgrade. See the Note below with the link to: Windows 11 device specifications for upgrade requirements and supported features. Certain features required for additional hardware.
- WARNING: Installing Windows 11 media on a PC that does not meet the Windows 11 minimum system requirements is not recommended and may result in compatibility issues. If you proceed with installing Windows 11 on a PC that does not meet the requirements, that PC will no longer be supported and won’t be entitled to receive updates. Damages to the PC due to lack of compatibility aren’t covered under the manufacturer warranty.
- Matches your current language: You’ll need to choose the same language when you install Windows 11. To see what language you’re currently using, go to Time & language in PC settings or Region in the Control Panel.
Note: See the Windows 11 device specifications for upgrade requirements and supported features. Certain features require additional hardware. We also recommend that you visit your PC’s manufacturer website for information about updated drivers and hardware compatibility.
Using the Media Creation Tool to create installation media:
- After downloading, run the media creation tool. You need to be an administrator to run this tool.
- If you agree to the license terms, select Accept.
- On the What do you want to do? page, select Create installation media for another PC, and then select Next.
- Select the language, edition, and architecture (64-bit) for Windows 11.
- Select which media you want to use:
- USB flash drive: Attach a blank USB flash drive with at least 8GB of space. Any content on the flash drive will be deleted.
- ISO file: Save an ISO file to your PC. This can be used to create a bootable DVD. After the file is downloaded, you can go to location where the file is saved, or select Open DVD burner, and follow the instructions to burn the file to a DVD.
After the installation media is created, follow the steps below to use it.
- To check for updates now, select the Start button, and then go to Settings > Windows Update, and select Check for updates. You may also wish to visit your device manufacturer’s support site for any additional drivers that may be needed.
Note: Drivers for Surface devices may be found on the Download drivers and firmware for Surface page.
Before you install Windows 11, it’s a good idea to save any work and back up your PC before you start. If you used the Media Creation Tool to download an ISO file for Windows 11, remember to burn it to a DVD before following these steps:
- Attach the USB flash drive or insert the DVD on the PC where you want to install Windows 11.
- Restart your PC.
- If your PC does not automatically boot to the USB or DVD media, you might have to open a boot menu or change the boot order in your PC’s BIOS or UEFI settings.
- To open a boot menu or change the boot order, you’ll typically need to press a key (such as F2, F12, Delete, or Esc) immediately after you turn on your PC. For instructions on accessing the boot menu or changing the boot order for your PC, check the documentation that came with your PC or go to the manufacturer’s website.
- If you do not see the USB or DVD media device listed within the boot options, you may need to reach out to the PC manufacturer for instructions for temporarily disabling Secure Boot in your BIOS settings.
- If changing the boot menu or order doesn’t work, and your PC immediately boots into the OS you want to replace, it is possible the PC had not fully shut down. To ensure the PC fully shuts down, select the power button on the sign-in screen or on the Start menu and select Shut down.
- On the Install Windows page, select your language, time, and keyboard preferences, and then select Next.
- Select Install Windows.
Important Note: If you made changes to the boot order in step 2, you may face a scenario where the initial Install Windows page will display after the installation process is complete. To resolve this, you will need to revert the changes you made to the boot order. This ensures that the internal drive you just installed Windows on will boot normally.
Download Windows 11 Disk Image (ISO) for x64 devices
This option is for users that want to create a bootable installation media (USB flash drive, DVD) or create a virtual machine (.ISO file) to install Windows 11. This download is a multi-edition ISO which uses your product key to unlock the correct edition.
Windows 11 ISOs for Arm64 devices are available here.
Select an edition from the drop down menu.
-
- An internet connection (internet service provider fees may apply).
- Sufficient data storage available on the computer, USB, or external drive you are downloading the .iso file to.
- A blank DVD disc with at least 8GB (and DVD burner) to create a bootable disc. We recommend using a blank USB or blank DVD, because any content on it will be deleted during installation.
- If you receive a “disc image file is too large” message while attempting to burn a DVD bootable disc from an ISO file, consider using a higher capacity Dual Layer DVD.
Ensure the PC you want to install Windows 11:
- Has a 64-bit CPU: Windows 11 can only run on 64-bit CPUs. To see if your PC has one, go to Settings > System > About , or search “System Information” in Windows and look under “System Type.”
- Meets system requirements:
Not all devices running Windows 10 are eligible to receive a Windows 11 upgrade. See the Note below for details.- WARNING: Installing Windows 11 media on a PC that does not meet the Windows 11 minimum system requirements is not recommended and may result in compatibility issues. If you proceed with installing Windows 11 on a PC that does not meet the requirements, that PC will no longer be supported and won’t be entitled to receive updates. Damages to the PC due to lack of compatibility aren’t covered under the manufacturer warranty.
Once the download completes you can use the Verify your download option to ensure the integrity of the file.
Note: See the Windows 11 device specifications for upgrade requirements and supported features. Certain features require additional hardware. We also recommend that you visit your PC’s manufacturer website for information about updated drivers and hardware compatibility.
Installation instructions (DVD):
- Locate the folder where you downloaded the Windows 11 ISO to.
- To use Windows Disk Image Burner to create the installation DVD, right-click on the ISO file and select Properties . Under the «General tab», click «Change…» where it says, «Opens with:» and select Windows Explorer. Select Apply . This will enable the Burn disc image to display when you right-click on the ISO file.
- To use a third-party DVD burning program, you can right-click on the ISO file and select Open with .
Installation instructions (ISO):
- If you want to install Windows 11 directly from the ISO file without using a DVD or USB flash drive, you can do so by mounting the ISO file. This will perform an upgrade of your current operating system to Windows 11.
- To mount the ISO file:
- Go to the location where you downloaded the ISO file. Then, right-click the ISO file and select Properties .
- On the «General» tab, click »Change…» where it says, “Opens with:» and select Windows Explorer for the program you would like to use to open ISO files and select Apply .
- Right-click the ISO file and select Mount .
- This will create a “virtual” bootable disc. Double-click on it to view the files within. Double-click setup.exe to start Windows 11 setup.
Select the product language
You’ll need to choose the same language when you install Windows. To see what language you’re currently using, go to Time and language in PC settings or Region in Control Panel.
Select a language from the drop down menu.
Error
We encountered a problem processing your request. Please try again later.
Download — {{GetProductDownloadLinksBySku.ProductDownloadOptions.0.LocalizedProductDisplayName}}
-
If you would like to verify the data integrity and authenticity of your download, you can follow these steps:
- Download the desired product ISO file and follow the installation guidelines.
- Launch Windows PowerShell. If you need help finding the location of PowerShell for your operating system, get help in finding the location of PowerShell here: Get Help in finding the location of PowerShell.
- In PowerShell, compute the hash value for the ISO file you downloaded using the Get-FileHash cmdlet. For example:
Get-FileHash C:\Users\user1\Downloads\Contoso8_1_ENT.iso
- If the SHA256 output matches the value in the below table, for the product that you downloaded, this confirms that the file has not been corrupted, tampered with or altered from the original.
Get additional information on the Get-FileHash command.
Hash values for the ISO files for Each Language
Hash values for the ISO files for Each Language
Country Locale Hash Code Arabic 64-bit 97ED2DF27DEBE5A8E94FB37BE4383EB8516D5C24117793BDA5C1E13568D3F754 Bulgarian 64-bit 1C1BD6E96290521B7E4F814ACA30C2CC4C7FAB1E3076439418673B90954A1FFC Chinese Simplified 64-bit BD1ECBA89BC59B7B62EF12C88C4E70D456EDAC10B969ECB3299EBD458B1F0FB3 Chinese Traditional 64-bit B92C3D6D428D12CF78A8D287B8FB28FFBC44D4A36B74C1B121C3CF443DC67ED2 Croatian 64-bit 95C7008AB1B0BA65212A36FB728AC93B9D7611400A78393FE7B319ED5B74AC5C Czech 64-bit 76120E535DB895D0EA69F47D55B836940821352A010DEDFCBCFC1E22E619FC4B Danish 64-bit D5D34DFFE45BA557581ADA14AC025DB8AA58989D054706061B7D0E5B47F5FDB9 Dutch 64-bit EE9BC545673D8F954A1EDAC691D749438D3E4DFA10A75D2519F79E3708D79FDC English 64-bit B56B911BF18A2CEAEB3904D87E7C770BDF92D3099599D61AC2497B91BF190B11 English International 64-bit D5A4C97C3E835C43B1B9A31933327C001766CE314608BA912F2FFFC876044309 Estonian 64-bit D12DC03FA15A7F436A800692E9BA30DBDDAA4CD6122DD71719A2898E953B5407 Finnish 64-bit D6057E058021A9DF8A02B7BB16331D88C38E8BB63D5AD897D094E0DF6C6ADB5A French 64-bit B73AA55DB50D2AD348F61C6537DA05C0D6DED78A143763454E977BE85B444119 French Canadian 64-bit 3CA47351DAD16BD3F7AFA27CDEB321DD726B79859DE8D2769359C7621DE38EC4 German 64-bit 96E036F1219F9EE59F96312CE43EC7DF093E768383A77132750271940926A013 Greek 64-bit 92248F9F5A8735337D4B0DCCE4DD13348F8718858590FD9D1EB00020B5AFB33A Hebrew 64-bit 27D8090B9266A2DAC04E403FE63E46ADE661A5661BF26CA5EBB1A2F13245E86F Hungarian 64-bit 7B58807592AEB2FC5DDF5AF9749FA023CE9165AA4A1BF4F4741709F8AA2EE9D3 Italian 64-bit D95EC65EC06B4036835C7571FE0108159848D2883EF5DA3A67E480130B1F5862 Japanese 64-bit A1E1BCB6C014F39E4A324EC24DB1B745EE62617D29A450BF7B2596A3DCCECD7D Korean 64-bit 63ED86ADFC53F464649478F931EAE39A42DB3FD86C266C9B5AF7F8E19D318C51 Latvian 64-bit F4C2BF7C16576E6D631070D7B7CF6F55E8359D0729B571C570DC6F39D77D9EA6 Lithuanian 64-bit 23B14643B0AD6FDD0231EA201C5E1B000912EE3A0542F1B1F6907DB470AE7D7B Norwegian 64-bit 6CBD6C3FED9CE08AF85420F19D01C287FC58EC0C42DC7409D1D5C341CEB6492B Polish 64-bit 654273603A945EBA3B185FD5D2C22207A0EB788B5E3402F71E6D0839B3026943 Brazilian Portuguese 64-bit 1BC63E9C62FE3EB7E46778F24C790933770FA7430304583BBDF96B47A5D61F1F Portuguese 64-bit FAAFEDFC301A381B0712FC8DB9F0A16ADE2716B998DD4855D0A38172A9A87AB4 Romanian 64-bit 8B23AD43DF35EB75FADDFDFC85D616A001A4D72C757E5286011E3DC9452A5862 Russian 64-bit D0FBDB93864BF6C8ADE844473C9600EBB031C8BB656A272C736E45DFBD9B3BC9 Serbian Latin 64-bit 566047460EEA2F0E0D36E7A378DCFEEA79D7D3C0328227646BE4AB9AC39A9E36 Slovak 64-bit 5B77F2B5F7C77ABF68E628AC37A8841BB1058B7173C1C76DC5A5F6C5BBA855FD Slovenian 64-bit 73F0DC7CC15885F565C76D78D54E4E4D9934720FFE583B52EFDDA2E2457402D7 Spanish 64-bit 708AF7C9AC63B7EB045CA9B196568758B6C1749E8D13CADE61FAACBC7C66D142 Spanish (Mexico) 64-bit BA7A9B9A2052DEF8C24BCB88C76A47B2E6A6C6EE547EED226B9702C5C63AFC69 Swedish 64-bit F3674D377253E2D12635FDEAB76193E80BD80C56A41D10AB9CCEFDB0CDF1AD82 Thai 64-bit CAD5590347376103E369D7E04941B94C037F4CC6C75D81DC50E194FFA87C8CF8 Turkish 64-bit A47E054FE0B762F5B48D08E2B6F768F4B1CA0BC6DB831A76E829F92E578483AF Ukrainian 64-bit 68BABB954E4BFDF8A03ABC188D5120CF12D4DCA3CAE68EB1BFD4B64F872826E2
Links valid for 24 hours from time of creation.
Links expire: {{GetProductDownloadLinksBySku.DownloadExpirationDatetime}} UTC
Error
We encountered a problem processing your request. Please try again later.
*Your use of the media creation tools on this site is governed by the Microsoft Terms of Use for this website.
Если раньше носителями служили диски, то теперь дистрибутив почти любой программы можно скачать, и Windows не исключение.
Microsoft находится в числе компаний, поддерживающих антироссийские санкции. Так, 23 июня 2022 года производитель ПО объявил о постепенном сворачивании бизнеса в России. Скачать с официального сайта Windows 10 и Windows 11 с российского IP-адреса сейчас невозможно: официальный сайт выдает «ошибку 404».
Разберем, как же скачать ОС в условиях блокировки.
Скачивание Windows 11 в условиях блокировки
Скачать Windows 11 из России с официального сайта Micrisoft на сегодняшний день нельзя — сервис недоступен на территории РФ.
Установка Windows 11 (русская и английская версия)
Рассмотрим основные нюансы установки операционной системы
Обновление по умолчанию
Если используется лицензионная версия Windows, все обновления всегда доступны: это и собственно обновление Windows 10 -> Windows 11, а также критические обновления системы и установленных пакетов, к примеру Office.
Обновления «по умолчанию» скачиваются на прежних условиях. Все последние патчи устанавливаются без особых сложностей, и даже необязательные апдейты все так же доступны.
Можно предположить, что компания прекратила загрузку ISO-образов ОС в связи с остановкой продажи новых лицензий в России. Но все ранее приобретенные ключи обслуживаются в том же порядке относительно жизненного цикла системы. Подчеркнем, что никаких официальных заявлений от Microsoft анонсировано не было.
Установка с нуля
Перед тем как будет выполнена установка ОС с нуля, необходимо убедиться, что используемое оборудование полностью соответствует всем функциональным требованиям.
Кроме того, нужно проверить устройство на совместимость с Windows 11 можно в центре обновления Windows или при помощи специальных утилит. Они выполняют автоматическую проверку, в результате которой проводятся тесты по всем критериям совместимости.
Microsoft PC Health Check — официальная программа, которая определит совместимость ПК с новейшей ОС. Загрузить инструмент можно с сайта разработчика. После установки будет достаточно нажать «Проверить сейчас» в интерфейсе программы.
WhyNotWin11 — это неофициальный инструмент, задача которого аналогична официальной утилите, то есть, определить совместимость с Windows 11. Программу можно скачать с официального канала разработчика на GitHub или же с сайта производителя. Замечено, что антивирусы «ругаются» на WhyNotWin11, но ложные это срабатывания или нет, неизвестно. Поэтому использование этой утилиты (и всех неофициальных) требует осмотрительности пользователя.

Создание загрузочного диска
Если компьютер совместим с Windows 11, нужно создать загрузочный диск для установки системы. Это выполняется следующим образом:
- Загрузить Windows 11 Media Creation Tool с сайта Microsoft. Этот инструмент можно скачать даже в условиях блокировки, однако загружаемые им пакеты будут недоступны.
- В разделе «Что вы хотите сделать» выбрать пункт «Создать носитель для другого компьютера».
- Нажать кнопку «Далее».
- Задать язык, выпуск и архитектуру для ОС (домашняя, профессиональная, x86/x64)
- Выбрать необходимый носитель для загрузки:
- USB-накопитель — требуется не менее 8 GB свободного места. В этом случае Media Creation Tool выполнить автоматическую загрузку на носитель.
- Файл ISO, который необходимо сохранить на ПК. Его используют для создания загрузочного DVD-диска. Переходим в папку расположения ISO-файла, либо щелкаем «Открыть устройство записи DVD-дисков». Операцию выполняем согласно пошаговой инструкции на экране.
Установка с загрузочного диска
В большинстве случаев в наши дни установка системы производится с USB-накопителя:
- Вставляем флешку в компьютер и при успешной загрузке появится меню установки Windows 11, где желательно выбрать русский язык для установки. Нажимаем кнопку «Далее».
- В открывшемся окне щелкаем «Установить» и соглашаемся с условиями с помощью клавиши «Далее».
- Затем выберем раздел «Выборочная: только установка Windows».
- Задаем диск или его раздел для расположения системы и щелкаем «Далее» — начнется установка системы. Весь процесс установки происходит в автоматическом режиме и почти не требует вмешательства пользователя.
После завершения установки ОС произойдет перезагрузка компьютера. После этого в «Параметрах входа» необходимо выбрать раздел «Создание автономной учетной записи». Задайте ее имя и нажмите «Далее».
Установка на несовместимое устройство
Если ПК не соответствует минимальным рекомендуемым требованиям, к примеру шифрующий модуль TPM не имеет версии 2.0, у центрального процессора неподдерживаемое семейство или модель, можно попробовать установить Windows 11, обойдя такие проверки при установке.
Попробовать установить Windows 11 можно следующим способом:
- открыть «Редактор реестра» с помощью комбинации клавиш Win+R и ввода команды regedit;
- выбрать раздел HKEY_LOCAL_MACHINE\SYSTEM\Setup\MoSetup ;
- создать параметр с типом DWORD на 32 бита;
- задать для этого параметра имя AllowUpgradesWithUnsupportedTPMOrCPU ;
- установить число «1» для нового документа.
Метод считается самым простым и доступным. Но здесь обязательным условием является поддержка ТРМ 1.2 на используемом устройстве. Перед выполнением операции этот модуль должен быть включен, иначе установка не получится. Отметим, что успешность подобной манипуляции не гарантирована на 100%, поэтому всегда при установке Windows 11 на несовместимые устройства следует помнить о возможных рисках.
Скачивание и установка пакетов обновлений Windows 11
После проведенных манипуляций в течение 30-40 минут будет происходить автоматическое скачивание обновлений. Обязательно нужно дождаться их полной загрузки. Затем необходимо произвести их установку:
- дважды щелкните на файл, содержащий пакет обновления;
- дождитесь выполнения проверки, которая длится пару минут;
- в появившемся запросе примите приглашение к началу установки;
- дождитесь перезагрузки компьютера после установки всех обновлений.
В результате проведенных операций Windows 11 будет обновлена до самой актуальной версии.
Как установить пакеты обновлений в условиях блокировки
В условиях санкционных ограничений могут появиться проблемы с выполнением проверки файлов обновлений, что приведет к их блокировке. Чтобы этого избежать, рекомендуется скачать с сайта GitHub «Universal MCT wrapper script» и выполнить следующее:
- После загрузки Universal MediaCreationTool скачать и разархивировать MediaCreationTool.bat-main.zip;
- перейти в папку bypass11;
- правой кнопкой мыши кликнуть на файл Skip_TPM_Check_on_Dynamic_Update.cmd;
- выбрать команду «Запуск от имени администратора»;
- при появлении уведомления «Система Windows защитила ваш компьютер» в пункте «Дополнительная информация» нажать «Выполнить в любом случае»;
- подтвердить запрос контроля учетных данных — UAC.
После произведенных действий открывшееся окно PowerShell будет подтверждением, что изменения для установки пакетов обновлений Windows 11 были применены.
Популярные вопросы и ответы
Специалист сервисного центра по ремонту электроники Григорий Цыганов ответил на частые вопросы читателей КП:
Можно ли «легализовать» пиратскую копию Windows?
Пиратские копии были широко распространены еще в эпоху Windows 7. Для легализации по-прежнему требуется ESD-лицензия Windows с правом переноса ОС на другой ПК или же лицензия Windows PGG (без права переноса). Это особо актуально для компаний, где более чем на 5 устройствах нужно легализовать Windows.
По официальному заявлению Microsoft, все ранее купленные лицензии будут действительны. Однако в реальности на данный момент при попытке активации Windows можно получить сообщение, что «Серверы активации недоступны».
Обязательно ли обновлять Windows 11 постоянно?
Обновление — это не только исправление ошибок, но и полезные нововведения. Например, последний апдейт позволяет изменять браузер по умолчанию. Пользоваться ли доработанной версией или нет, решать только вам. Загрузить обновление можно через Центр обновления Windows или установить вручную с сайта.
Как отключить автоматические обновление Windows 11?
Автоматическое обновление легко отключить в Центре обновления Windows, находится он в «Пуск -> Параметры -> Обновления и безопасность». Для этого во вкладке «Общие» нужно выбрать «Остановить», затем «Применить». Но перед этим убедитесь — действительно необходимо выполнить данное действие.

Источники
- https://www.microsoft.com/en-us/software-download/windows11
Если для чистой установки системы на компьютер, ноутбук или в виртуальную машину, задач восстановления или создания загрузочной флешки вам требуется оригинальный образ Windows 11, получить его можно с официального сайта Майкрософт, причем для этого предусмотрено более одного способа. Доступны и неофициальные методы загрузки.
В этой инструкции подробно о способах скачать ISO образ Windows 11 x64 или ARM64 для ваших задач, во всех случаях это будет именно оригинальный установочный образ с финальной версией системы. Пошаговое руководство по процессу установки вы можете найти здесь: Установка Windows 11 с флешки на компьютер или ноутбук.
Способы скачивания Windows 11 в России
Загрузка оригинальных образов ISO в Windows 11 из РФ затруднена и те способы их скачивания, которые описаны в следующих разделах инструкции могут не работать без различных ухищрений, если вы находитесь в России. Однако, варианты остаются, среди них:
Во всех приведённых вариантах вы получите либо сразу оригинальный образ Windows 11, загруженный напрямую с сайта Майкрософт, либо образ, созданный из файлов, которые также были скачаны оттуда — это оптимальные варианты.
Загрузка Windows 11 в виде различных «сборок» и со сторонних сайтов также доступна, но тут каждый решает для себя сам и под свою ответственность. Способы, описанные ниже, исправно и без каких-либо ухищрений работают только за пределами РФ.
Официальный сайт Майкрософт
Если вам требуется скачать оригинальный Windows 11 x64 или ARM64, самый разумный и быстрый путь сделать это — использовать официальный сайт Майкрософт (примечание: способ может не работать в РФ):
- Зайдите на официальную страницу «Скачать Windows 11» — https://www.microsoft.com/ru-ru/software-download/windows11
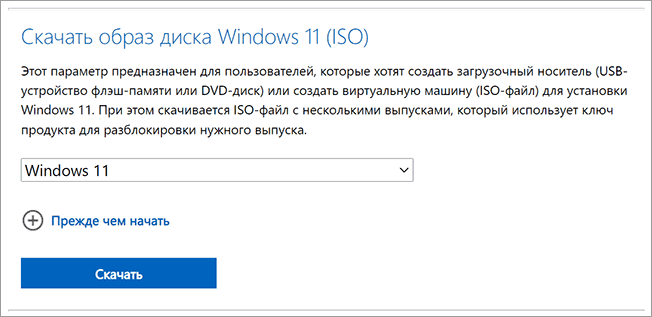
- В разделе «Скачать образ диска Windows 11 (ISO)» в поле для выбора укажите «Windows 11» и нажмите кнопку «Скачать».

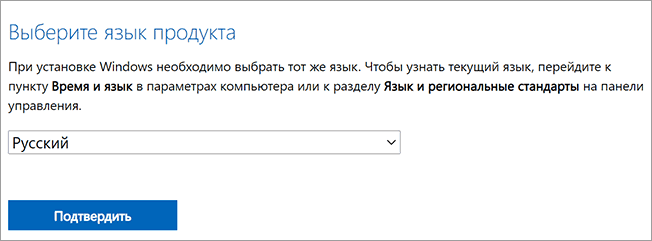
- В разделе «Выберите язык продукта» укажите требуемый язык, например, «Русский» и нажмите кнопку «Подтвердить».

- Нажмите по кнопке «64-bit Скачать» для начала загрузки.

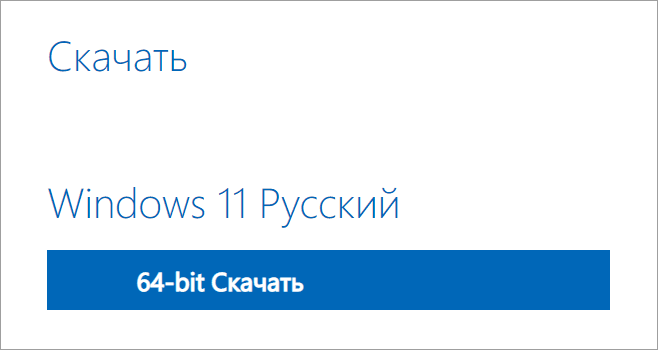
Образ ISO будет загружен в указанную вами папку или папку «Загрузки». Как видите, с новой версией всё максимально просто — искать какие-то изощрённые методы не требуется, но они существуют.
Обратите внимание: скачанный образ содержит и домашнюю (Home) и профессиональную (Pro) редакции системы, выбор появится при установке. Если после запуска установки у вас сразу устанавливается Windows 11 Домашняя без выбора версии, это говорит о том, что на устройстве ранее была установлена именно эта редакция системы и ключ хранится в UEFI, «подхватываясь» автоматически.
Media Creation Tool
Как и раньше, для Windows 11 доступна официальная утилита Installation Media Creation Tool, предназначенная в первую очередь для создания загрузочных установочных накопителей. Но, при необходимости, мы можем использовать её, чтобы получить оригинальный образ ISO:
- На официальном сайте в разделе «Создание установочного носителя Windows 11» нажмите «Скачать», загрузите утилиту Media Creation Tool (MediaCreationToolW11.exe) и запустите её. Примечание: загрузка заблокирована в РФ.
- Примите условия лицензионного соглашения (при условии, что вы с ними соглашаетесь).
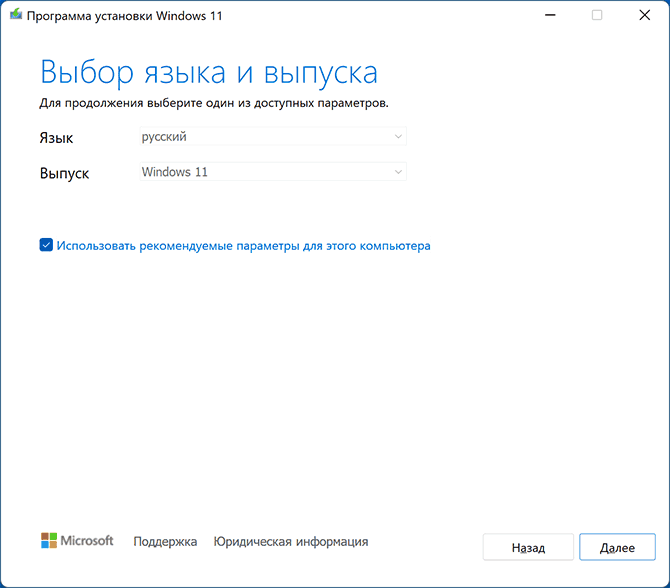
- На следующем экране, сняв отметку «Использовать рекомендуемые параметры для этого компьютера», вы можете выбрать язык системы. В поле выпуск в любом случае будет указано «Windows 11». Будет загружен образ 64-bit, содержащий различные редакции (Pro, Home). Нажмите «Далее».

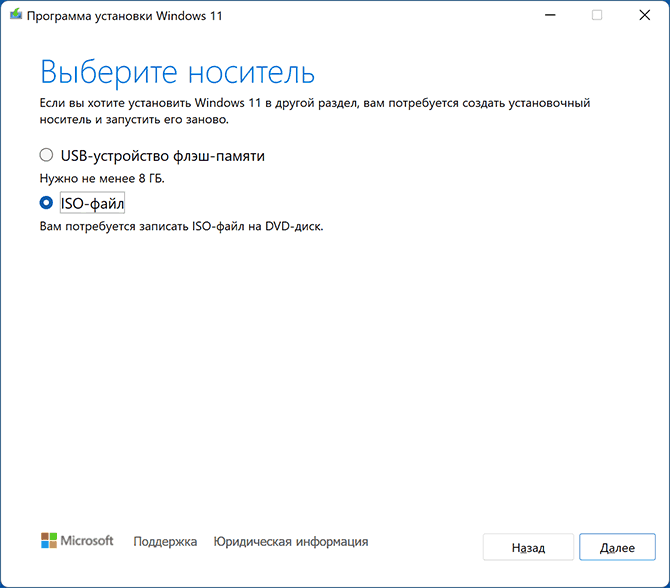
- Вам будет предложено сразу создать загрузочную установочную флешку (USB-устройство флэш-памяти) или ISO-файл. В контексте этой инструкции выбираем второй вариант.
- Нажмите «Далее» и укажите место сохранения образа ISO, после чего останется дождаться загрузки файлов и создания образа ISO с Windows 11.
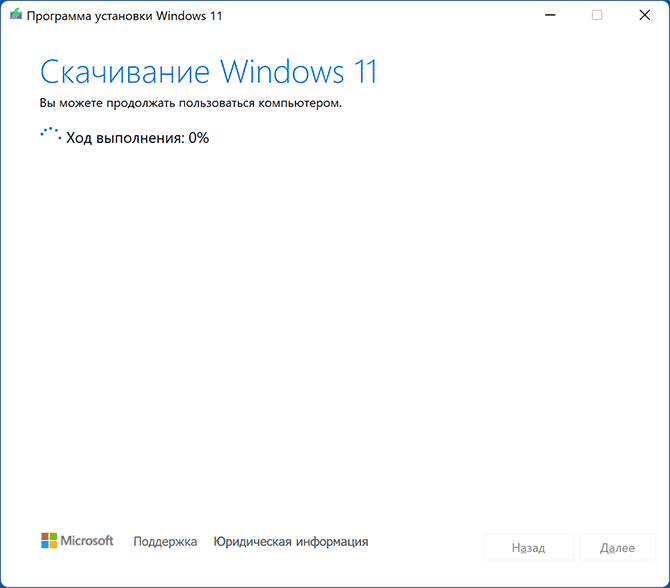
Этот способ отличается от прямой загрузки Windows 11 с сайта Майкрософт, описанного в первом разделе: скачивается не цельный файл ISO, а набор необходимых файлов, из которых затем формируется образ уже на вашем компьютере.
Получение Windows 11 в Rufus
Известная большинству пользователей бесплатная программа Rufus, предназначенная для создания загрузочных флешек, умеет, в том числе, скачивать образы. При этом загрузка выполняется с официальных сайтов. Её можно использовать и для получения образа Windows 11:
- Скачайте Rufus с официального сайта https://rufus.ie/ru/ (можно выбрать Portable-версию, не требующую установки на компьютере).
- При первом запуске на запрос о проверке обновлений ответьте «Да», это действие обязательно для возможности выполнять следующие шаги.
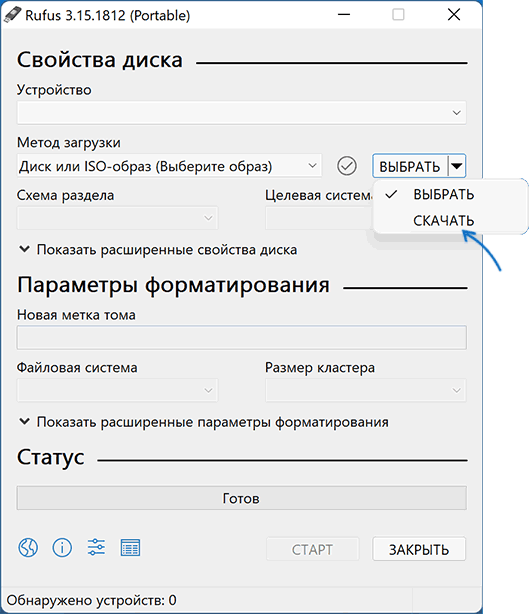
- В главном окне программы нажмите по стрелке справа от кнопки «Выбрать» и выберите пункт «Скачать».

- Нажмите кнопку «Скачать», затем выберите «Windows 11» и нажмите «Продолжить».
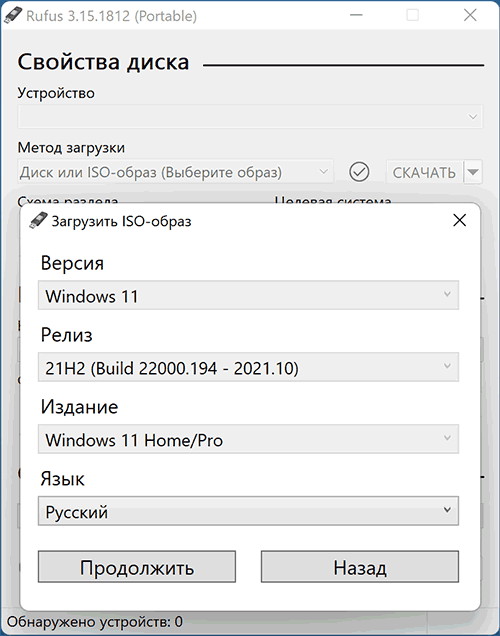
- Выберите версию Windows 11 для загрузки. Как правило, по умолчанию доступен финальный релиз. Нажмите кнопку «Продолжить».
- Укажите издание (будет указано Home/Pro, обе версии в одном образе ISO).
- Укажите язык системы и нажмите «Продолжить».
- В поле «Архитектура» уже будет указано x64, оставляем.

- Нажмите кнопку «Скачать» для начала загрузки. Если отметить «Скачать с помощью браузера», будет запущен браузер с открытой прямой ссылкой на файл ISO Windows 11 (и вы сможете убедиться, что загрузка производится именно с официального сайта).


Останется дождаться завершения загрузки файла на компьютер.
Существуют и другие способы загрузки образа, например, ранее демонстрировавшийся на сайте способ с помощью скрипта Universal Media Creation Tool сейчас работает и для Windows 11.
Скачать Windows 11
На этой странице вы можете бесплатно скачать официальные образы Windows 11, включая версии:
- Windows 11 Pro и Home: Эти версии предоставляются единым дистрибутивом, с возможностью выбора при установке через Bios / UEFI. Они идеально подходят как для домашнего, так и для корпоративного использования, особенно версия Pro, благодаря своим минимальным системным требованиям: процессор 1 ГГц или выше, 4 Гб ОЗУ, 64 Гб на диске, TPM 2.0.
- Windows 11 Enterprise (Корпоративная) LTSC: cпециальная версия для корпоративных клиентов с расширенным сроком поддержки, оптимизированная для стабильных и безопасных рабочих сред в крупных организациях. Обычно она используется на специализированных устройствах, таких как банкоматы, медицинское оборудование и производственные системы.
- Windows 11 Enterprise (Корпоративная): разработана специально для корпоративного сектора, предлагая повышенную надежность и долгосрочную поддержку. Эта версия получает только самые стабильные обновления и включает дополнительные приложения для обеспечения безопасности корпоративной сети.
- Windows 11 Education: предназначена для образовательных учреждений и включает специализированные функции безопасности.
- Windows 11 Pro for WorkStations: предназначена для высокопроизводительных систем, благодаря уникальной файловой системе ReFS, которая расширяет возможности хранения и обработки данных.
- Windows 11 IoT Enterprise: специализированная версия для встраиваемых систем, предлагающая расширенные функции управления и безопасности для устройств Internet of Things, обеспечивая надежную основу для разработки интеллектуальных устройств.
Теперь Windows 11 доступна исключительно для архитектуры x64. Все дистрибутивы, доступные для загрузки, являются официальными версиями, полученными напрямую с официального сайта Microsoft или через подписку MSDN.
Windows 11 23H2, the 2023 Update, shines with slick features like Windows Copilot and revamped File Explorer tabs, but chasing a safe windows 11 23h2 download can feel like wandering a maze. The newer 24H2’s gaming stutters have users scrambling for 23H2 instead. Installation errors like low storage or hardware blocks only add to the hassle. This guide lays out official and unofficial download paths to get 23H2 smoothly, plus WPS Office, a free productivity suite, to keep your workflow sharp post-install.
Part 1: Official Methods to Download Windows 11 23H2

Microsoft’s official channels are the safest bet for a windows 11 23h2 download, even if direct ISOs are now scarce with 24H2 taking over. This section covers two beginner-friendly methods—Windows Update’s enablement package and the Installation Assistant—for a quick, secure upgrade or install. Here’s how to nail it step by step.
Windows Update with Enablement Package (KB5027397):
Step 1: Open Settings > Windows Update, toggle on “Get the latest updates as soon as they’re available.”

Step 2: Find KB5027397, download, and install it to upgrade from 22H2 to 23H2 (build 22631).

Step 3: Restart your PC to wrap up the upgrade, usually in one reboot.
Windows 11 Installation Assistant:
Step 1: Visit Microsoft’s Windows 11 download page and grab the Installation Assistant.

Step 2: Run the tool, select the upgrade option (23H2 if available), and follow prompts.
Step 3: Keep a stable internet connection and restart as needed to complete the process.
Make sure your PC hits 23H2 specs (64GB storage, 4GB RAM, TPM 2.0). I tested Windows Update on a 22H2 laptop, and KB5027397 installed 23H2 in 20 minutes with one restart—smooth as silk. The Installation Assistant needs reliable Wi-Fi, so don’t try it on a shaky connection.
Why It’s Recommended:
Official, secure, no third-party risks.
Enablement package is fast, needing just one restart.
Installation Assistant preserves your files and apps.
Part 2: Unofficial Methods to Download Windows 11 23H2 ISO
When Microsoft’s official paths don’t cut it for a windows 11 23h2 iso download official, unofficial sources like UUP Dump and Internet Archive offer 23H2 ISOs for clean installs or older PCs. This section walks you through two trusted options, focusing on safety and verification. Let’s dive in.
UUP Dump:

Step 1: Head to uupdump.net and pick Windows 11 23H2 (build 22631.4317).

Step 2: Select English, download the ISO creation script, and save it securely.

Step 3: Run the script to build the ISO and store it in a safe folder.
Step 4: Verify the ISO’s SHA-256 hash (e.g., 36DE5ECB7A0DAA58DCE68C03B9465A543ED0F5498AA8AE60AB45FB7C8C4AE4 2) in PowerShell with Get-FileHash.
Internet Archive:

Step 1: Visit archive.org and find the 23H2 ISO (build 22631.2861).

Step 2: Download the ISO to a secure folder.

Step 3: Check the ISO’s hash in PowerShell to ensure it’s legit.
Step 4: Use Rufus to create a bootable USB, enabling TPM/Secure Boot bypass for unsupported hardware.
I grabbed a 23H2 ISO from UUP Dump, and the script built it in 15 minutes—hash verification matched a trusted source, calming my malware worries. Internet Archive’s ISO worked, but Rufus’ bypass was a lifesaver for my old CPU. Stick to verified sources to dodge sketchy downloads.
Why It Works:
Provides 23H2 ISOs when Microsoft pushes 24H2.
Enables clean installs or older hardware support.
Hash verification ensures file safety.
Part 3: Fix Common Issues When Installing Windows 11 23H2
Installation roadblocks like error codes or hardware limits can derail your windows 11 23h2 download and setup. This section offers step-by-step fixes for three common issues to help you fix windows 11 23h2 installation errors and get 23H2 running smoothly. Here’s how to troubleshoot.
Download Failure (Error 0x8007371b):
Step 1: Go to Settings > System > Troubleshoot > Other troubleshooters, run Windows Update Troubleshooter.

Step 2: If unresolved, open Command Prompt as admin, type net stop wuauserv, and press Enter to stop the update service.
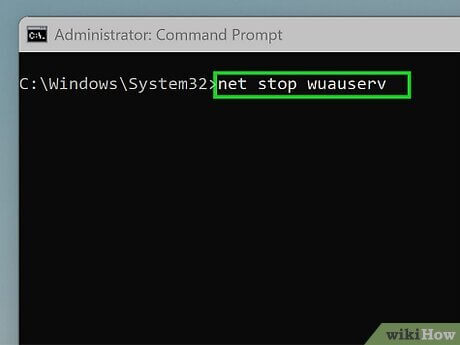
Step 3: Delete all files in C:\Windows\SoftwareDistribution, then restart the service with net start wuauserv.
Insufficient Storage:
Step 1: Open Disk Cleanup (This PC > Properties > General > Free up space) to clear temporary files.

Step 2: Move non-essential files to an external drive to free up 64GB.
Unsupported Hardware:
Step 1: Download Rufus, select the 23H2 ISO, and create a bootable USB.

Step 2: In Rufus, enable options to bypass TPM 2.0 and Secure Boot.

Step 3: Boot from the USB and follow Windows setup prompts.
I hit error 0x8007371b on a 23H2 update, but the Troubleshooter fixed it in 5 minutes. Rufus’ TPM bypass got 23H2 running on my old PC without a hitch. Freeing up 64GB via Disk Cleanup is non-negotiable—don’t skip it.
Why These Fixes Work:
Troubleshooter clears corrupted update files.
Disk Cleanup ensures space for 23H2’s 6.2GB ISO.
Rufus bypasses hardware restrictions safely.
Part 4: After Installing 23H2—Boost Your PC with WPS Office

You’ve nailed the windows 11 23h2 download and setup, so now it’s time to supercharge your PC with tools that match its fresh, zippy vibe. WPS Office, a free, lightweight alternative to Microsoft Office, is the perfect first install for your Windows 11 23H2 system, handling documents, spreadsheets, and PDFs without bloating your setup. It’s a lifesaver for students, pros, or anyone diving back into work with 23H2’s sleek performance.
Features:
-
All-in-One Suite: Writer, Spreadsheets, and Presentation tackle DOCX, XLSX, PPTX formats flawlessly.
-
PDF Powerhouse: View, annotate, convert, or merge PDFs in one slick app.
-
WPS AI: Summarizes, polishes, or generates content for your documents.
-
Tiny Footprint: 200MB installer keeps your system lean and fast.
-
Cloud Sync: Autosaves to WPS Cloud (1GB free) for secure, multi-device access.
Benefits:
-
Seamlessly opens files, syncing with 23H2’s smooth performance.
-
AI tools streamline reports or tidy system logs post-install.
-
10,000+ free templates for resumes, budgets, or slides save time.
-
Low CPU/RAM usage ensures your PC stays snappy.
-
Cross-platform sync with iOS/Android for work on the go.
WPS Office’s compact design is a godsend for a freshly installed 23H2 system, dodging the hefty 4GB+ footprint of Microsoft Office. Its AI can polish drafts or summarize setup notes in seconds, while cloud backup keeps your files safe from future glitches. I’ve used WPS on 23H2, and it’s like a breath of fresh air for getting work done without slowdowns.
After installing 23H2, I opened a DOCX proposal in WPS Writer—it loaded in a flash, no formatting woes. WPS AI cleaned up my draft in moments, and cloud sync let me share it to my phone, saving me a ton of time.
WPS Office is like a trusty co-pilot—light, powerful, and ready to fuel your 23H2 productivity without the baggage.
FAQs
Q1: Why isn’t Windows 11 23H2 showing up in my Windows Update?
Microsoft rolls out 23H2 gradually, prioritizing newer devices, and safeguard holds may delay it due to hardware or driver issues. Check Settings > Windows Update > Advanced options > Optional updates or use the Installation Assistant.
Q2: What is the difference between 23H2 and 24H2?
23H2 (October 2023) brings Windows Copilot and File Explorer tabs, while 24H2 (2024) adds advanced AI and UI tweaks but has gaming stutter issues, making 23H2 a stabler choice for some users.
Q3: How big is the 23H2 update?
The 23H2 ISO is ~6.2GB, requiring 64GB free storage for installation. Windows Update’s enablement package is smaller (~500MB), needing less space but a stable internet connection.
Summary
This guide unlocks the windows 11 23h2 download with official methods like Windows Update and Installation Assistant for easy upgrades, plus unofficial ISOs from UUP Dump or Internet Archive for clean installs or older PCs. It tackles hurdles to fix windows 11 23h2 installation errors, from download failures to hardware blocks, ensuring a smooth setup. Post-install, WPS Office, a free, 200MB suite, powers your workflow with Writer, Spreadsheets, Presentation, and PDF tools, enhanced by WPS AI and cloud sync. WPS Office keeps your 23H2 system light and productive, making it the ideal partner for your upgraded PC.