
Большинство современных материнских плат поддерживают два режима загрузки: новый UEFI и устаревший Legacy. В некоторых случаях для загрузки с определённого накопителя или при возникновении проблем с запуском ОС после сброса настроек БИОС, может потребовать переключить тип загрузки с одного на другой.
В этой простой инструкции о том, как изменить один UEFI на Legacy или Legacy на UEFI с примерами переключения для разных БИОС и дополнительная информация, которая может быть полезной в контексте рассматриваемой темы.
Изменение режима загрузки в настройках БИОС/UEFI
Прежде чем приступить, отдельно отмечу, что материал касается только изменения типа загрузки в БИОС/UEFI, но не изменения типа загрузки уже установленной системы. Если вас интересует вопрос изменения типа загрузки уже установленной Windows 11/10 с Legacy на UEFI, вы можете использовать встроенный инструмент mbr2gpt.
Действия по изменению типа загрузки производятся в настройках БИОС, перейти в которые обычно можно, нажав клавишу Del при включении на настольных ПК или какую-любо клавишу (обычно — F2, но есть и другие варианты) на ноутбуке. На сайте есть отдельная инструкция по входу в БИОС на различных устройствах.
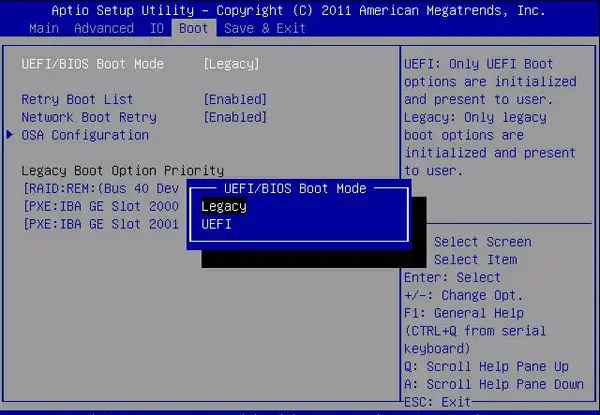
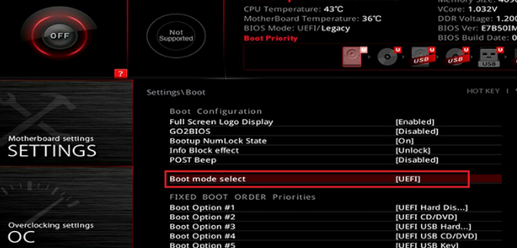
В большинстве случаев нужная настройка находится на вкладке «Boot» (Загрузка) в настройках БИОС, иногда для доступа к ней необходимо перейти в «Advanced Mode» по клавише F7 (информация об этом будет указана внизу экрана конфигурации). Далее — примеры того, как может называться и где находится нужный параметр переключения типа загрузки между UEFI и Legacy:
- Пункт может называться «Boot Mode» или похожим образом, с возможностью выбора между UEFI и Legacy режимом, на некоторых устройствах есть опция «UEFI с поддержкой CSM/Legacy», при таком выборе будет работать оба типа загрузки.

- На некоторых материнских платах информация о режиме загрузки (Boot Mode) на вкладке Boot может быть предназначена только для получения сведений, а само переключение выполняться в другом расположении, например, на некоторых материнских платах MSI — в разделе Advanced — Windows OS configuration — BIOS Mode.
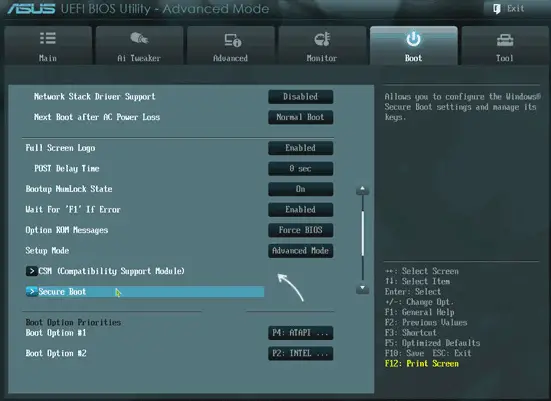
- CSM, Compatibility Support Module, Legacy Support — требуется отключить (установить в Disabled) если требуется только UEFI загрузка, включить, если необходима поддержка двух типов загрузки: в последнем случае тип загрузки будет определяться подключенным накопителем, а если он поддерживает оба типа загрузки, то выбором этого накопителя с пометкой или без пометки UEFI в настройках устройств загрузки или Boot Menu.

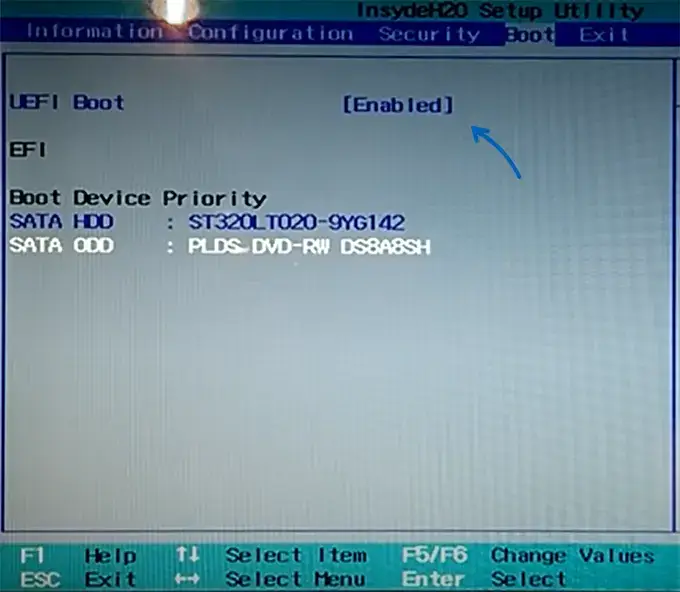
- UEFI Boot — с опциями Enabled (Включена UEFI) и Disabled (Отключено).

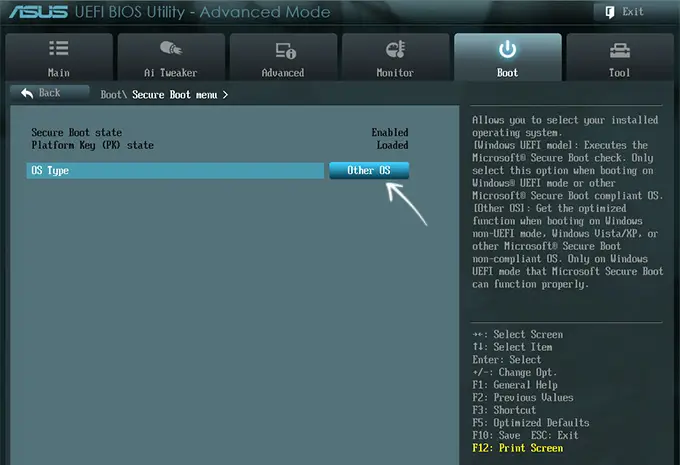
- OS Type — выбор типа ОС между UEFI и Legacy (CSM, Other OS), либо между Windows и «Другой ОС», в последнем случае Windows будет означать UEFI загрузку, а «Другая ОС» — Legacy загрузку.

- Загрузка модуля CSM, Windows 10/8 Features — если требуется только Legacy загрузка, включить модуль CSM, также можно установить Windows 10/8 Features в Other OS (Другая ОС) и наоборот.


Это лишь несколько примеров, но по аналогии вы, вероятно, сможете найти нужную опция и поменять UEFI и Legacy загрузку или наоборот на вашем компьютере или ноутбуке. После изменения настроек не забудьте сохранить их, обычно это выполняется нажатием клавиши F10 и подтверждением сохранения.
Если найти необходимый пункт не удалось, либо возникли иные проблемы, напишите модель устройства в комментариях, я подскажу и, возможно, добавлю информацию выше.
Что следует учитывать при переключении между режимами UEFI и Legacy в БИОС:
- Если система была установлена в другом режиме, она перестанет запускаться, поскольку для них используются разные загрузчики.
- Secure Boot (Безопасная загрузка) работает только для UEFI-загрузки. В некоторых случаях без предварительного отключения Secure Boot нельзя включить Legacy загрузку. Если вам требуется использовать только Legacy загрузку, отключите Secure Boot (обычно где-то в разделе Security).
- Для отключения Secure Boot и включения возможности переключиться на Legacy режим в некоторых БИОС может потребоваться установить пароль администратора, сохранить настройки, после чего зайти в БИОС с установленным паролем.
- При включении режима загрузки UEFI и полном отключении Legacy загрузки флешки и другие накопители без UEFI-загрузчика перестанут отображаться в меню настройки порядка устройств загрузки.
- Некоторые новые ноутбуки (на ПК пока не встречал) не имеют возможности переключения загрузки на Legacy (CSM) режим, в этом случае единственный вариант — подготовить загрузочную флешку для UEFI-режима и выполнить загрузку именно в нём.
Будет отлично, если вы сможете поделиться информацией о том, где нужная настройка находилась в вашем случае, при условии, что вариант не был представлен в списке выше — это может помочь другим читателям.
-
Home
-
News
- How To Install Windows 11 In Legacy BIOS Mode On Your PC
By Sarah |
Last Updated
What if you’re having a PC that supports only Legacy BIOS? Can you install Windows 11 on it or not? Luckily, you can make it possible to install Microsoft’s latest version of operating system on a PC without Secure Boot and TPM 2.0. MiniTool Solution offers this article to tell you how to install Windows 11 in Legacy mode.
Microsoft has released the exact system requirements for Windows 11 as soon as the new system announcement. Users can take a look at the requirements page to see whether their processor, RAM, storage, system firmware, TPM, graphics card, display, and internet connection and Microsoft accounts support Windows 11.
Can You Install Windows 11 on Legacy BIOS
According to the official system requirements from Microsoft, your computer should be UEFI with Secure Boot and TPM (Trusted Platform Module) 2.0 for installing Windows 11. However, many users’ computers use Legacy BIOS and don’t support Secure Boot. Does this mean they won’t be able to install Windows anymore if the PC doesn’t meet the Windows 11 BIOS requirements and TPM version requirement? Of course not. They can still install Windows 11 on Legacy BIOS.
As for the detailed steps to install Windows 11 in Legacy mode, they will be explained in the next section.
Tip: You’d better back up your current system or at least the important data on the hard disk before trying to install Windows 11. In this case, you can restore your PC to the previous system or restore the data easily if any problems occur. Besides, you should prepare a powerful and safe recovery tool so as to use it to recover lost files and folders in time.
MiniTool Power Data Recovery TrialClick to Download100%Clean & Safe
How to Check Whether Your PC Supports Windows 11
Some users may don’t know the exact hardware information of their PC or don’t want to look at the Windows 11 requirements in detail. For them, the Windows PC Health Check tool released by Microsoft is a good choice. They can download, install, and run the PC Health Check tool; then, it will check the hardware on computer for you to see if it meets the requirements.
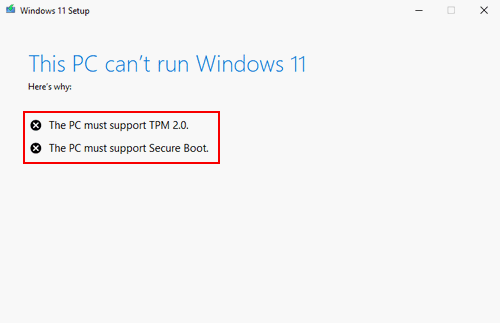
You’ll get the “This PC can’t run Windows 11” error.
Here’s why:
- The PC must support TPM 2.0.
- The PC must support Secure Boot.
How to check if your CPU is supported by Windows 11?
How to Install Windows 11 on Legacy BIOS without Secure Boot or TPM 2.0
Some people are using the older computer with the Legacy BIOS Mode and don’t have the option to enable TPM 2.0. Don’t worry if the PC Health Check tool says Windows 11 can’t run on this PC. There are two methods for you to bypass the Windows 11 Secure Boot and TPM 2.0 requirements.
Do you want to try Windows 11 online?
#1. Boot Install in Legacy Mode by Replacing Windows 11 ISO File
First, make sure you have the following things:
- Windows 11 ISO file
- Windows 10 bootable USB drive
- USB flash drive with at least 8GB of storage
- Computer running Windows 10
How to install Windows 11 BIOS:
- Navigate to the Windows 11 ISO file.
- Right click on it and choose Mount.
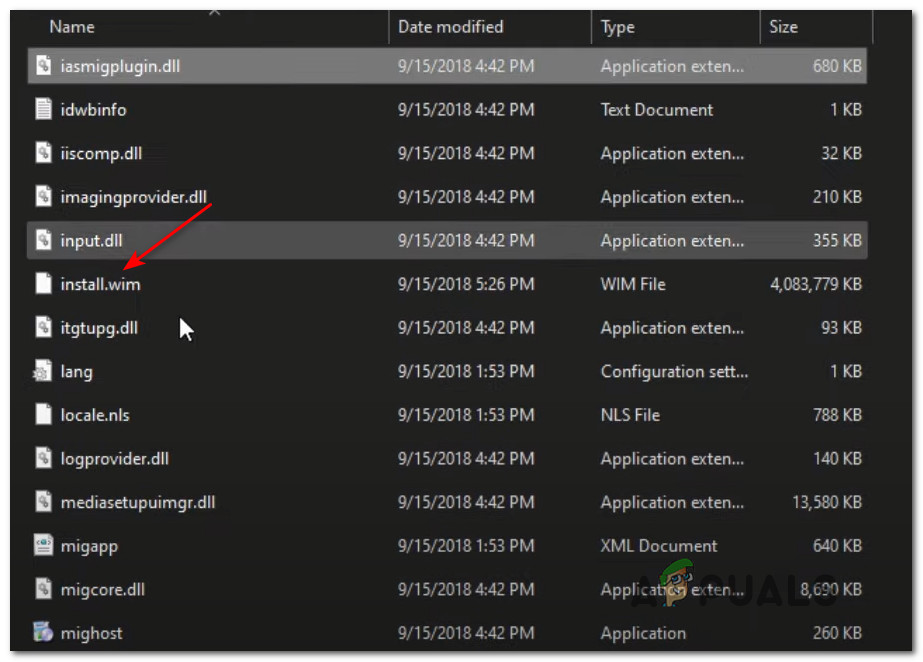
- Open the mounted ISO image and open the sources folder inside.
- Look for the install.wim file, select it, and press Ctrl + C.
- Connect the bootable Windows 10 USB drive to PC and open it.
- Also, find and open the sources folder inside.
- Press Ctrl + V to copy the install.wim file you’ve copied.
- Click Replace the file in the destination in the pop-up dialog window.
- Reboot your computer into BIOS and enter the boot menu.
- Change the boot device order: adjust your bootable USB drive to be the first option.
- Exit BIOS and save changes.
- Your computer will restart and you’ll be asked to select and install a Windows 11 version.
What Is HP Boot Menu? How To Access Boot Menu Or BIOS?
#2. Bypass Secure Boot and TPM 2.0 Check by Editing Registry
- Press Windows + R to open Run.
- Type regedit and click OK.
- Click Yes if you see a User Account Control window.
- Copy and paste this into the address bar of Registry Editor: Computer\HKEY_LOCAL_MACHINE\SYSTEM\Setup. Then, press Enter.
- Right click on the Setup folder and select New -> Key.
- Name the new key as LabConfig and keep it selected.
- Right click on the blank space in the right pane and select New -> DWORD (32-bit) Value.
- Name it as BypassTPMCheck.
- Repeat step 7 & 8 to create a BypassSecureBootCheck DWORD value.
- Double click on BypassTPMCheck -> change the Value data to 1 -> click OK.
- Double click on BypassSecureBootCheck -> change the Value data to 1 -> click OK.
- Close the Registry Editor and restart your computer.
That’s how you can install Windows 11 on unsupported PC. Also, you can install the new OS on a virtual machine:
- How to install Windows 11 on VMware workstation?
- How to install Windows 11 on VirtualBox?
About The Author
Position: Columnist
Sarah has been working as an editor at MiniTool since she graduated from university. Sarah aims at helping users with their computer problems such as disk errors and data loss. She feels a sense of accomplishment to see that users get their issues fixed relying on her articles. Besides, she likes to make friends and listen to music after work.
В этой статье мы рассмотрим, как изменить режим загрузки Windows на компьютере с BIOS (Legacy) на UEFI + Secure Boot без переустановки операционной системы и без потери данных. Так как в режиме Legacy компьютеры (виртуальные машины) могут загружаться только с дисков с таблицей разделов MBR, при переключении на режим загрузки UEFI нужно будет сконвертировать таблицу разделов диска на GPT (GUID).
В системных требованиях к Windows 11 указано обязательное наличие чипа TPM 2.0 и режим загрузки UEFI+Secure Boot. Есть обходной способ установки Windows 11 без TPM, UEFI и Secure Boot, но он не рекомендуется для использования на продуктивных системах. Поэтому, например при обновлении Windows 10 до 11 на компьютере с MBR загрузчиком желательно включать UEFI (либо воспользоваться неподдерживаемым официально способом обновления до Windows 11 на несовместимом компьютере).
Прежде, чем приступать к конвертации Windows, установленной на Legacy BIOS устройстве в режиме UEFI, проверьте, что ваше окружение соответствует следующим условиям:
- Прошивка материнской платы компьютера поддерживает режим загрузки UEFI. На текущий момент включен режим совместимости с BIOS (проверьте это в настройках BIOS/UEFI устройства и в спецификации к материнке).
- На компьютере установлена x64 версия Windows, с версией как минимум Windows 10 1703 (или Windows Server 2016)
- На компьютере не используется двойной режим загрузки нескольких ОС (Dual-Boot)
- Шифрование Bitlocker для системного диска отключено
- На системном диске используется таблица разделов MBR (количество разделов не более трех)
- На диске достаточно свободного места для создания загрузочного EFI раздела (размер по-умолчанию 100 Мб)
Откройте командную строку PowerShell и проверьте, что компьютер загружается в режиме BIOS (Legacy):
$env:firmware_type

С помощью PowerShell проверьте, что на диске используется таблица разделов MBR и создано не более 3 primary разделов:
Get-Disk
Get-Disk |Get-Partition
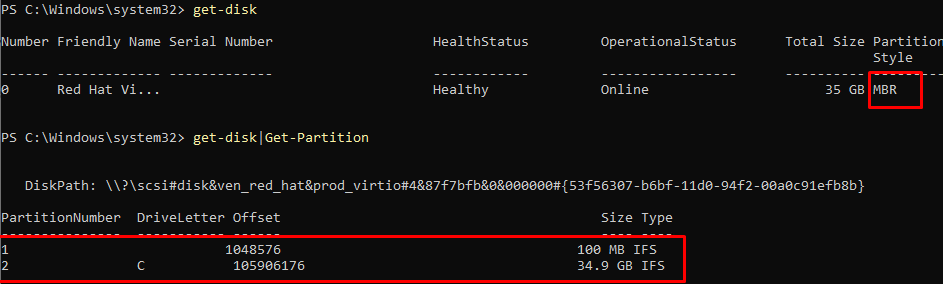
Начиная с Windows 10 1703 доступна встроенная утилита Mbr2gpt, позволяющая сконвертировать таблицу разделов диска из MBR в GPT без потери данных. Конвертацию можно выполнить даже в онлайн режиме.
Сначала протестируйте, возможно ли сконвертировать MBR таблицу разделов системного диска в GPT:
mbr2gpt /validate /allowfullos
Если конвертация MBR в GPT возможна, утилита вернет:
MBR2GPT: Validation completed successfully

Если появится ошибка
Disk layout validation failed for disk 0
:
- Проверьте, что на вашем MBR диск создано не более 3 основных (primary) разделов
- Расширенные (Extended), логические (Logical) и динамические разделы должны отсутствовать
- На диске есть как минимум 500 Мб свободного места для создания системных разделов и размещения основной и резервной таблиц разделов GUID
Другая возможная ошибка
Cannot find OS partition(s) for disk 0
указывает на то, что в конфигурации загрузчика BCD отсутствует запись на загрузку в среде восстановлений Wingows. Проверьте это:
reagentc /info
Windows RE status: Disabled
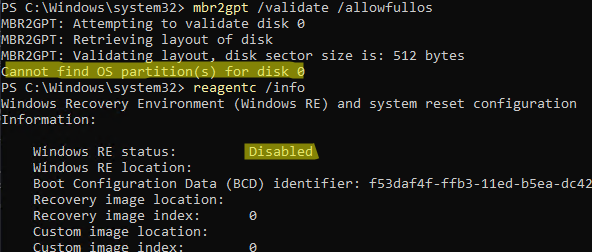
Как включить среду восстановления WinRE описано по ссылке.
После того, как все предварительные проверки пройдены, запустите конвертацию системного диска из MBR в GPT непосредственно из запущенной Windows:
MBR2GPT.EXE /convert /allowfullos
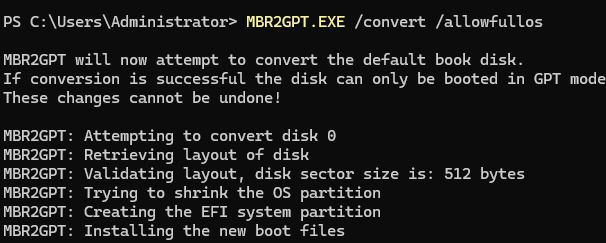
После завершения работы команды, проверьте что таблица разделов была изменена на GPT:
get-disk

Затем нужно перезагрузить компьютер, войти в меню настроек BIOS/UEFI отключить режим Legacy BIOS и переключиться в режиме UEFI+Secure Boot.
На физическом компьютер, чтобы войти в настройки UEFI, нужно при загрузке нажать клавишу
F2
,
Delete
или
F1
. Название и местоположение пункта меню, которые обеспечивает загрузку в режиме Legacy BIOS, отличается в зависимости от прошивки и версии материнской платы. Возможные названия пунктов — CSM (Compatibility Support Module), Legacy Mode, CSM Boot, Legacy OS и т.д. Измените его на UEFI.
Если это виртуальная машина VMware, нужно в настройках ВМ в разделе Boot Options переключиться в режим EFI и включить опцию Secure Boot.
После загрузки проверьте, что используется режим UEFI+ Secure Boot:
Confirm-SecureBootUEFI
Если режим Secure Boot отключен, проверьте что включен режим UEFI командой:
$env:firmware_type
На старых компьютерах с BIOS, которые не поддерживают режим UEFI, можно загружать Windows с внешней USB флешки с MBR. В этом случае на системном разделе можно использовать таблицу разделов GPT. Смотри статью Загрузка Windows с GPT диска на BIOS компьютере (без UEFI).
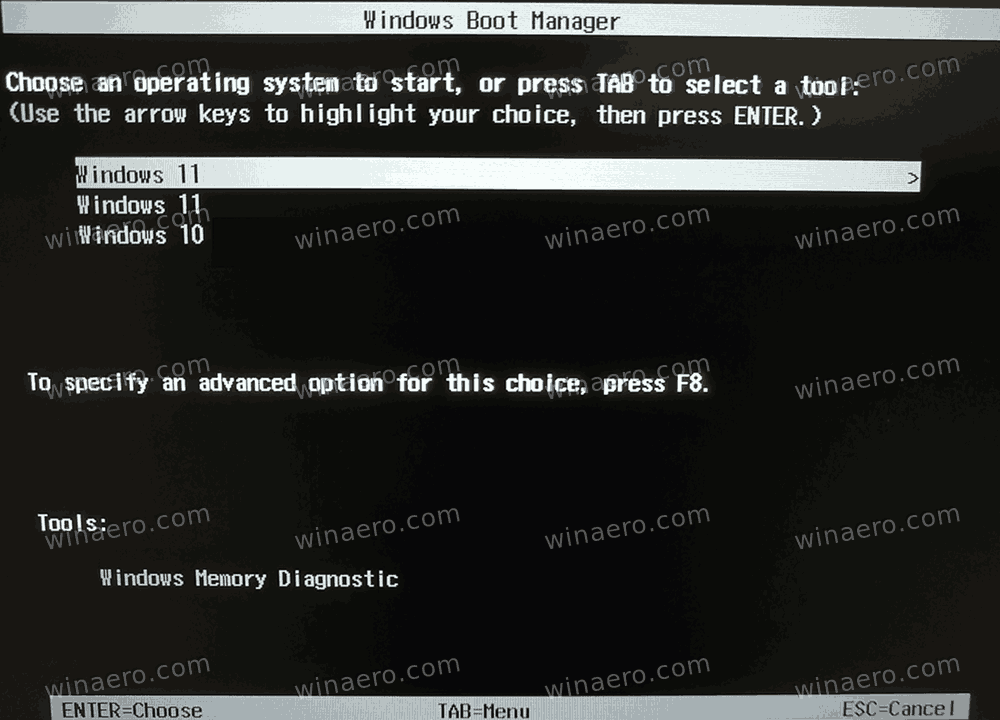
Here’s how to enable the classic Windows 7-like legacy boot menu in Windows 11. It helps avoid double restart when switching between the installed operating systems.
Users that update from Windows 7 to Windows 10 and 11 will notice that Microsoft has fully redesigned the boot menu in newer operating systems. Instead of the simple classic menu with the black background and a list of available operating systems, Windows shows a more modern interface that requires an additional restart.
This article will show you how to how to restore the Windows 7-like boot menu in Windows 11. It prevents Windows from restarting when choosing another OS.
This is useful for those who use more than one operating system on a single computer (dual-boot). The procedure is straightforward and only requires a couple of commands in the Command Prompt.
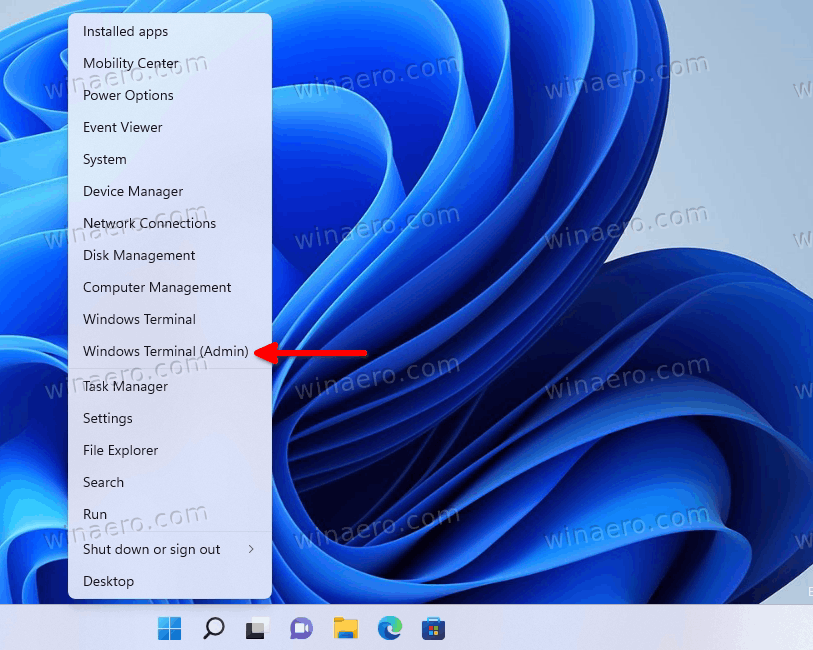
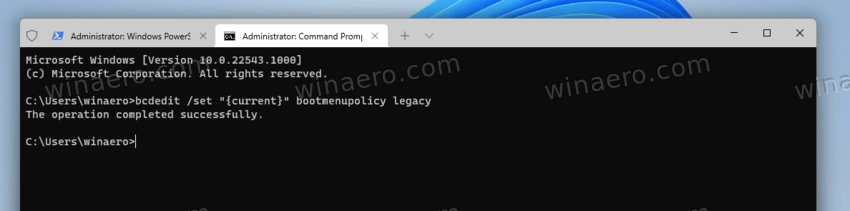
- Launch Windows Terminal with Administrator privileges. Right-click the Start menu button and select Windows Terminal (Admin).

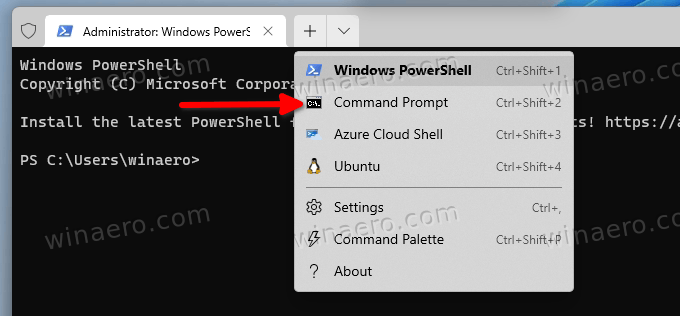
- Switch Windows Terminal to the Command Prompt profile. Click the arrow-down button on the tab strip and select Command Prompt.

- Enter the following command:
bcdedit /set "{current}" bootmenupolicy legacy. Press Enter to execute the command.
- Restart your computer to see the changes in action.
You are done. One simple command turns on the legacy Windows 7-like boot menu on systems with Windows 11.
Please keep in mind that upgrading Windows 11 to a newer build will automatically restore the newer boot menu appearance and disable the legacy boot manager. This situation is very common among Windows Insiders, who regularly receive new builds in the Dev channel.
Restore the default bootloader in Windows 11
Going back from the legacy boot menu to the modern one is the same. The only difference is the command you use in Windows Terminal.
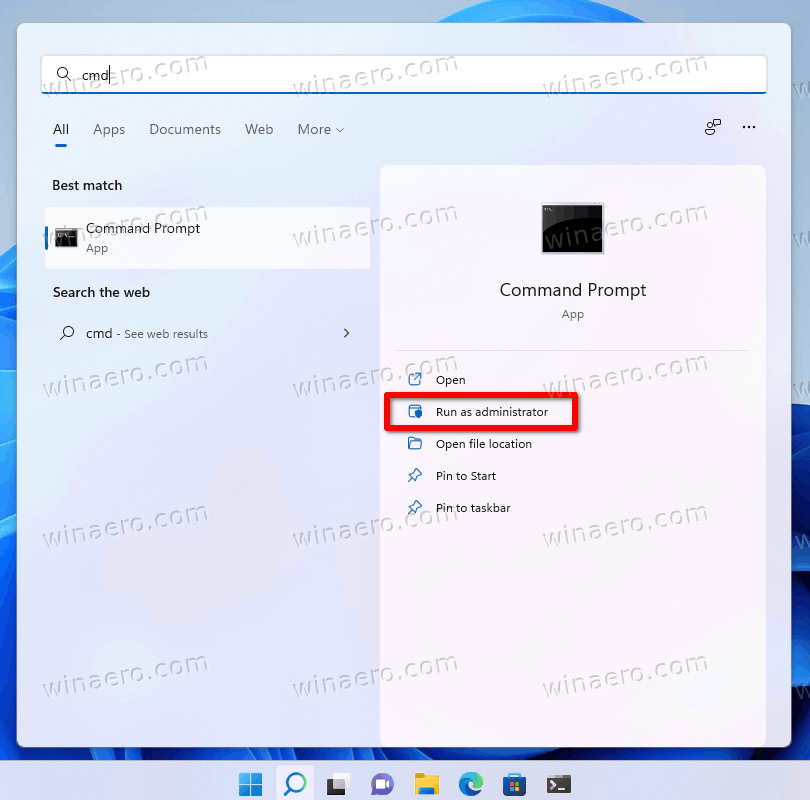
- Run Windows Terminal as Administrator. Press Win + X and select Windows Terminal (Admin).
- Open Windows Terminal to the command prompt. Or, you can open the Start menu, type cmd, and click «Run as Administrator.«

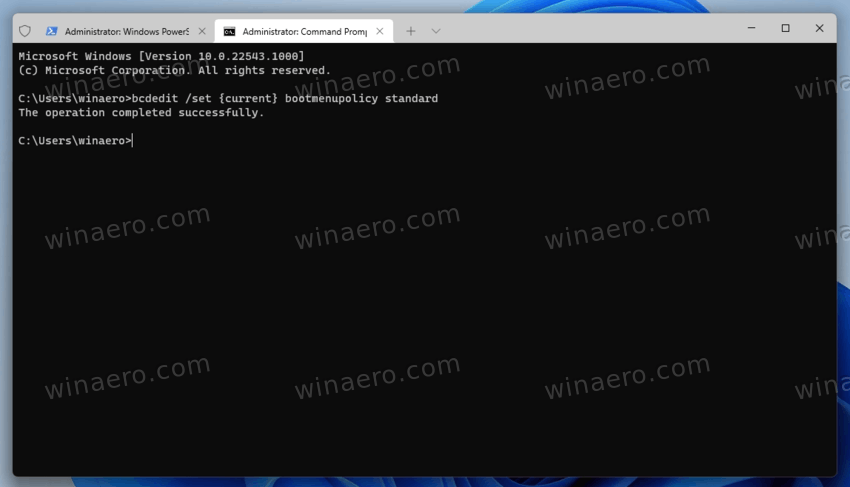
- Enter the following command:
bcdedit /set {current} bootmenupolicy standard. Press Enter.
- Restart your computer to see the updated boot menu.
That is it. Now you know how to enable the Windows 7-like boot menu in Windows 11. It is also worth mentioning that this guide also works in older Windows versions, such as Windows 10, 8.1, and 8.
Windows 8 was the first operating system with a new blue boot menu. Ten years since the release, many users still prefer the classic variant.
Support us
Winaero greatly relies on your support. You can help the site keep bringing you interesting and useful content and software by using these options:
If you like this article, please share it using the buttons below. It won’t take a lot from you, but it will help us grow. Thanks for your support!
There’s a lot of buzz around the requirements that Microsoft has put in place for Windows 11. If you take a look at the requirement list for Windows 11, you’ll see that Secure Boot and TPM 2.0 are mandatory, and there’s a clear indication that this new OS version can only be installed on UEFI.
Fortunately for those of us with older PC configurations, there is a workaround that will allow you to install Windows 11 in Legacy (MBR) Mode even if Secure Boot and TPM 2.0 are not supported on your PC.
Even if your PC is UEFI-capable if you’re currently on Legacy Mode and you plan on making the switch to UEFI be prepared for a complete disk wipe.
Fortunately, the massive community around Windows OS managed to find a workaround for users finding themselves in this situation.
If you’re not using a UEFI-based system or making the switch is not worth the trade-off, you’ll need to make some adjustments in order to be able to install Windows 11 on a Legacy (MBR) BIOS. But first, let’s take a look at the requirements of this method:
- Windows 10 ISO
- Windows 11 ISO
- NTLite
- A computer running either Windows 10 or Windows 11
- A USB Flash disk with at least 8 GB of space
- Rufus (Only if you are installing via USB)
The idea of this method is simple – You’ll end up taking a file from the Windows 11 installation ISO, then putting it among the Windows 10 installation file making it a hybrid ISO.
NOTE: This method is tested and proven to work for the latest Windows 11 builds available but this is subject to change as Microsoft releases new builds on the Insider Channel.
IMPORTANT: If you already have a Windows 11 and Windows 10 ISO, skip the first 2 steps altogether and start directly with Step 3.
Get the Windows 11 ISO
There are several different ways to fetch the Windows 11 ISO file, but our preferred approach is to use UUP Dump. This way, you’ll make sure you always use the latest version available directly from the Windows Insider program.
Follow the steps below to get the latest Windows 11 ISO file using the UUP Dump service:
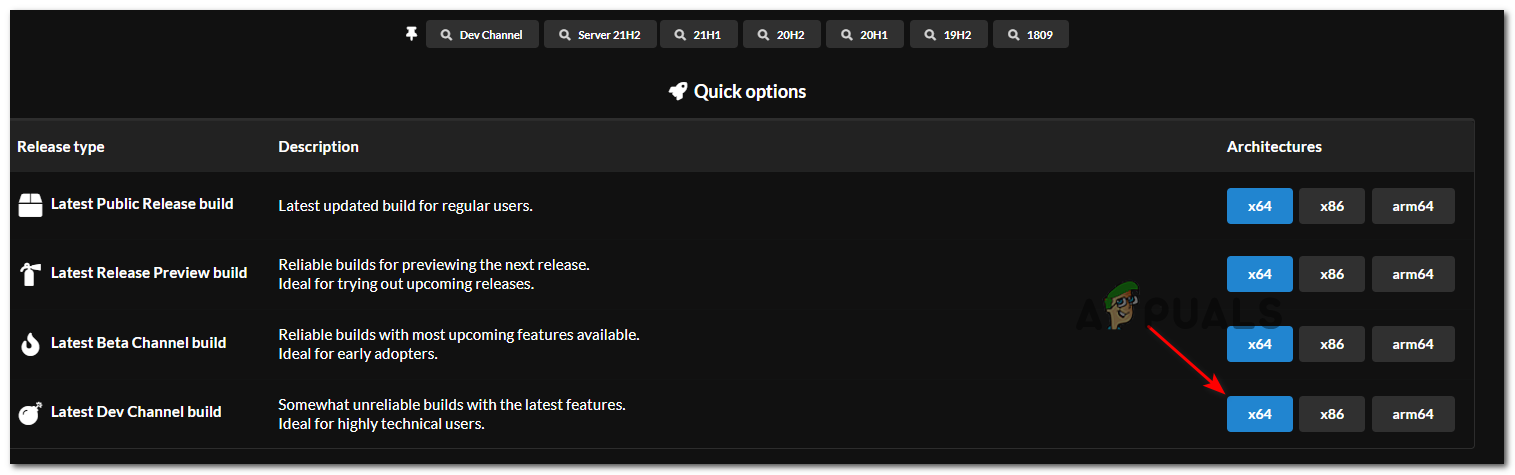
- Open any browser on your PC and access the download page of UUP dump.
- Inside the download page of UUP dump, use the Quick Options menu to click the x64 button associated with Latest Dev Channel build.

Downloading the Windows 11 build Note: As of now, only the Dev Channel build is available for Windows 11. This will eventually transition to the Bet Channel and then to the Public Release build (once Windows 11 is officially out).
- Once you get to the next page, chose the latest available build from the list, then select your default language and hit Next.
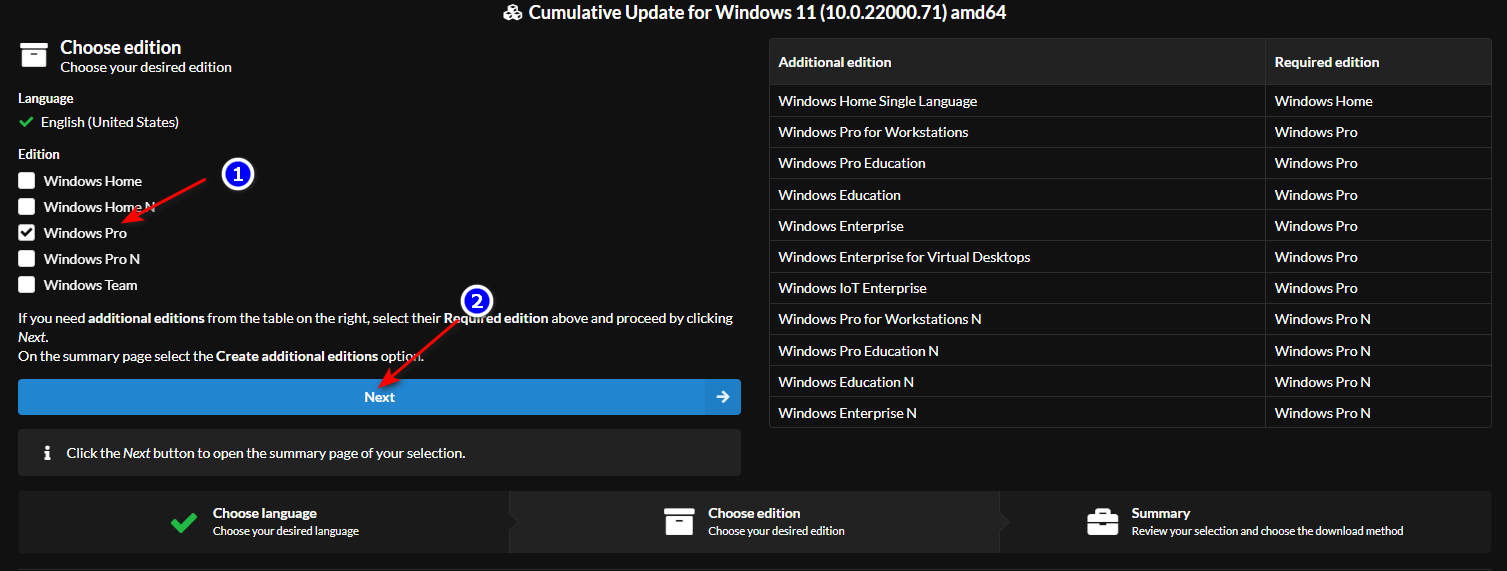
- Once you get to the Choose edition stage, select the Windows 11 edition that you want to install and check the associated box, then click on Next to advance to the next screen.

selecting the correct version Note: If you want to make use of tools like Gpedit, our recommendation is to download the PRO version. Also, stay away from N versions unless you don’t care about the Media Player components.
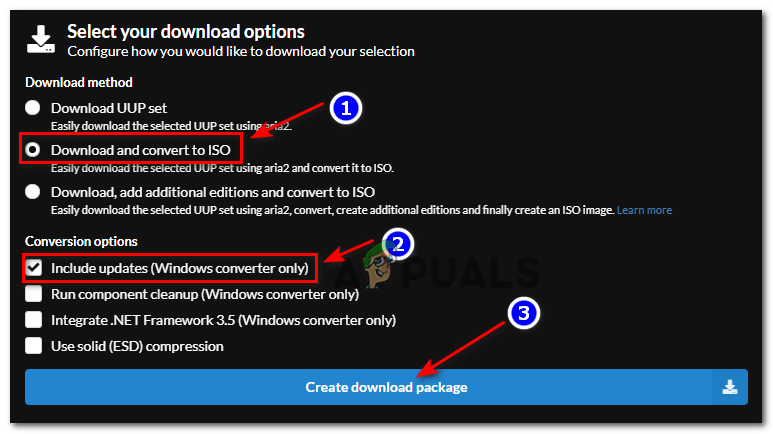
- At the next prompt, you’ll be asked about your preferred download method. When this happens, select Download and convert to ISO from the list of options.
- Next, check the Include Updates and click on Create download package boxes to ensure that that all ulterior updates come preinstalled.

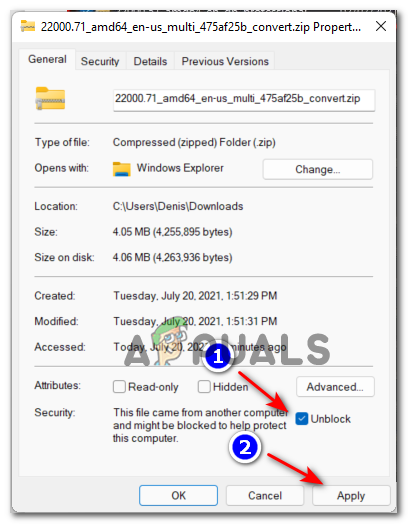
Downloading the Windows 11 package - After the download is complete, open the location where the files were downloaded, then right-click on the archive file from the list and choose Properties from the context menu that just appeared.
- In the Properties screen, access the General tab and unlock the file by clicking the Unblock button. Once the modification is done, enforce it by clicking on the Apply button.

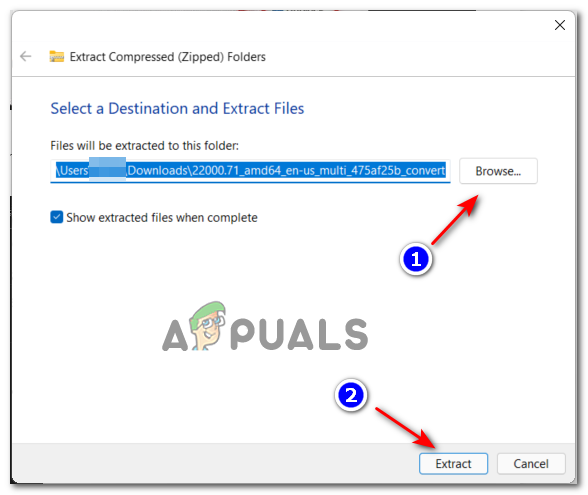
Unblocking the file for the Windows 11 installation - Now that the file has been unblocked, you can safely extract its contents by right-clicking and selecting Extract All from the context menu.
- Next, use the Extraction menu to click on Browse, then select a viable location where to extract the files. Once you are ready to start, click on Extract.

Extracting the Windows 11 build files Note: Our recommendation is to move the archive to a location with plenty of space before you do this.
- Once the process is complete, navigate to the location where you extracted all these files and double-click on uup_download_windows.cmd.

Downloading the Windows 11 file locally Note: This will ensure that the actual Windows 11 ISO will be downloaded locally via the official Windows Update servers.
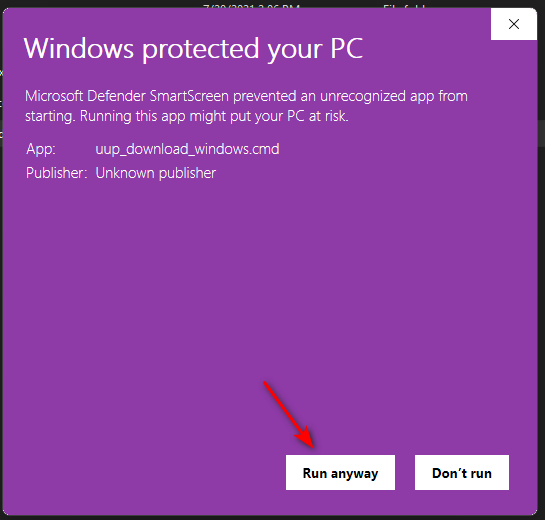
- When you are prompted by the SmartScreen window, click on View More, then click on Run Anyway to get past the default publisher restrictions.

Running the UUP .bat file anyway Note: If you’re also interrupted by the UAC (User Account Control) grant admin administrative privileges by clicking on Yes.
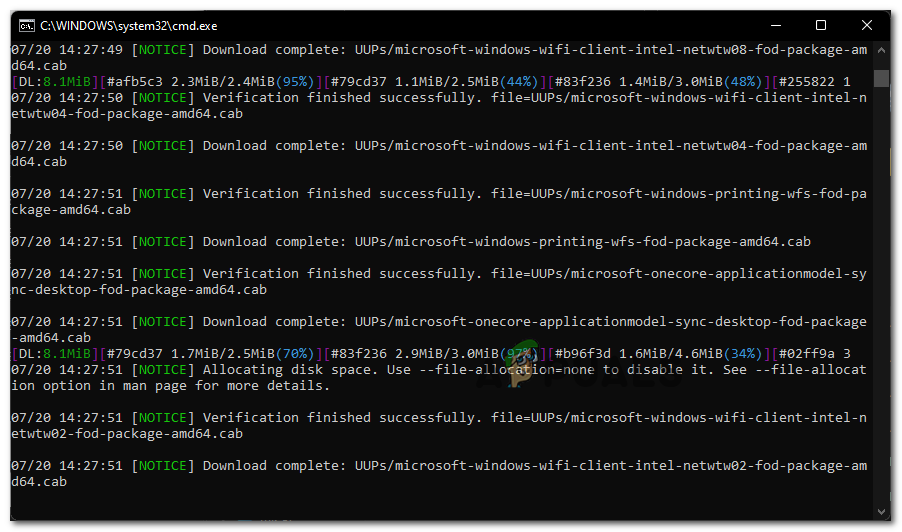
- Once you see the CMD window, wait patiently until the Windows 11 ISO is completely downloaded.

Downloading the Windows 11 files Note: If this process goes through instances where the utility looks like it is frozen, don’t close the window and wait patiently as it will eventually recover.
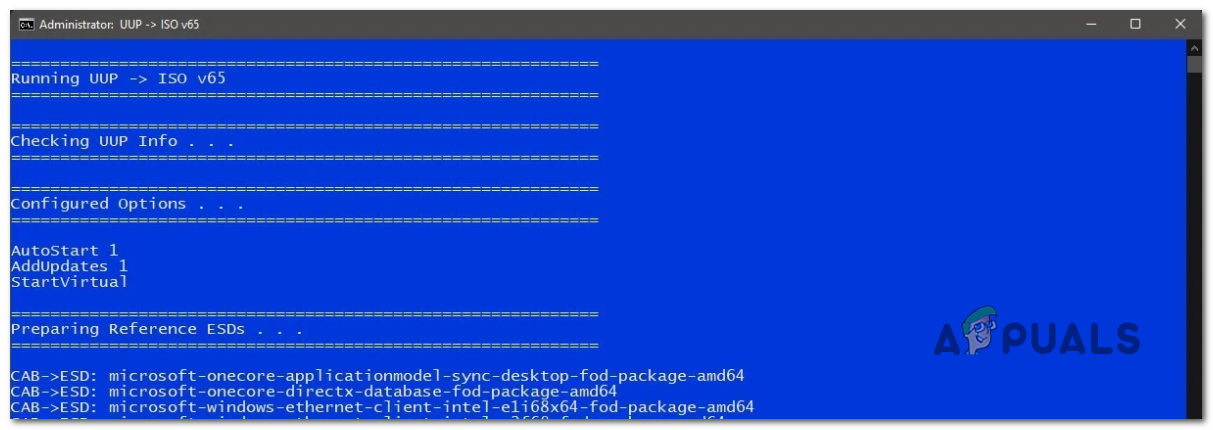
- At some point, you will notice that the background color of the CMD prompt will change from black to blue – This is evidence that the download phase is over and your PC is now busy building the ISO by piecing all those files that the .BAT files have previously downloaded.

Windows 11 building stage - After the ISO is successfully created, you will find it inside the same folder where you originally opened the uup_download_windows.cmd from.

Once you go through every step above and you already have the Windows 11 at the ready, move down to the next step below.
Get a Windows 10 ISO
If you don’t have a Windows 10 ISO at the read, follow these instructions to download an ISO for the latest official Windows 10 build using the Microsoft Media Creation Tool + RUFUS – There’s no need to make the ISO bootable and put it on a USB stick for now.
Making Windows 11 Compatible with Legacy BIOS
- First things first, right-click on the Windows 10 ISO that you created at Step 2, choose Extract All from the context menu, then pick a viable location to unpack the Windows 10 ISO.

Extracting the Windows 10 ISO - Once the ISO is successfully unpacked, open File Explorer and navigate to the location of the extracted Windows 10 ISO files.
- Inside the Windows 10 ISO folder, navigate to Sources and look for the Install.wim file. Once you see it, right-click on it and choose Delete from the context menu to get rid of it.

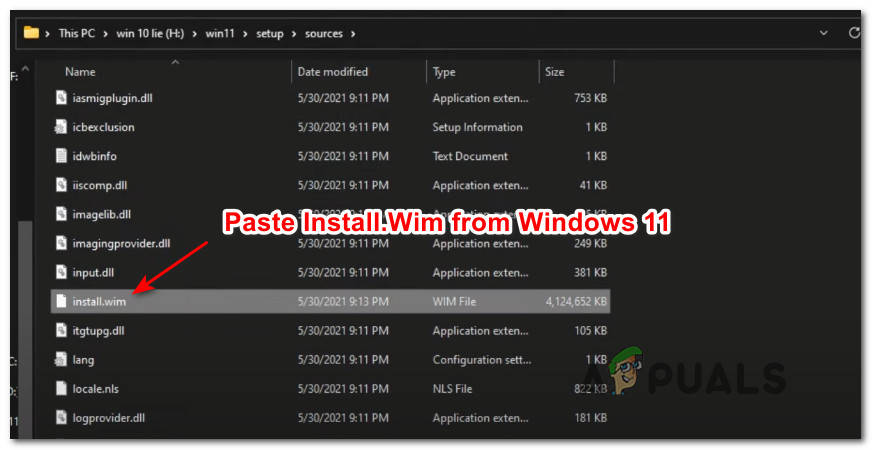
Deleting the Install.wim files - Now that the install.wim file is deleted from the Win 10 folder, extract the contents of the Windows 11 ISO (in the same way we did for Windows 10), navigate to the Sources folder and copy the install.wim file of Windows 11 to your clipboard.
- Next, return to the extracted Windows 10 files and paste the install.wim (from Windows 11) that you previously copied to your clipboard inside the Sources folder.

Paste the Install.wim file from Windows 11 - Once you’ve successfully swapped out the Install.wim file from Windows 10 ISO with the Windows 11 equivalent, go ahead and open NTLite. If you don’t have it already installed on your PC, you can get the latest version from this page.

Downloading the latest version of NTLite Note: Use the 64-bit version if your system supports it.
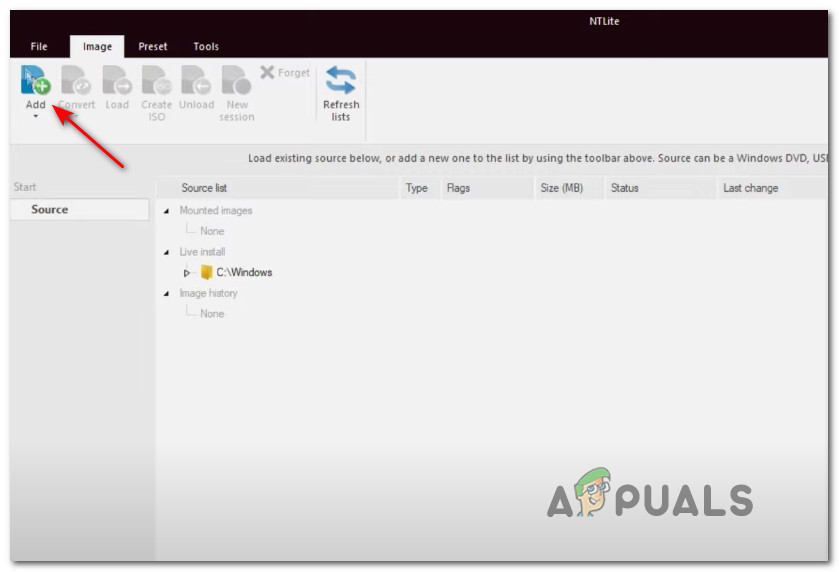
- Once you’re inside the home screen of NTLite, click on the Add icon (top-right corner) then choose Image Directory from the context menu that just appeared.

Adding a new directory to NTLite - Next, use the following prompt to navigate manually to the path where you extracted the Windows 10 ISO (the one that you modified with the Windows 11’s install.wim file)
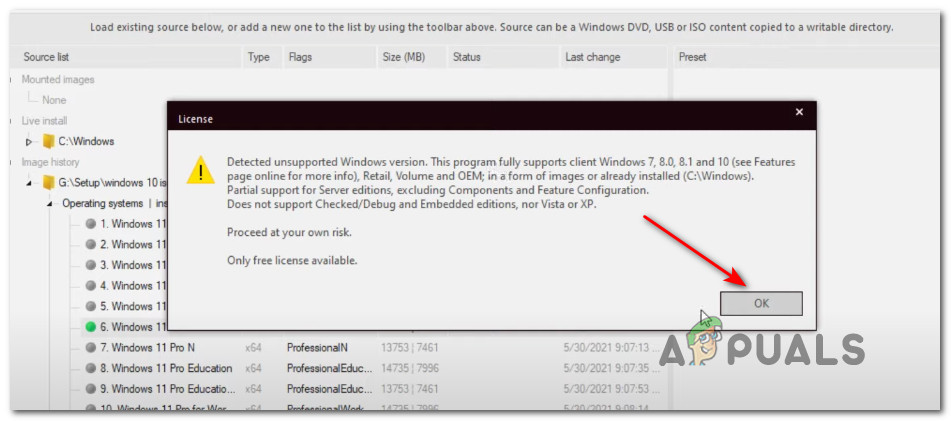
- Wait until the files are all loaded inside NTLite, then click Ok when you’re prompted by the Detected unsupported Windows version. This error is triggered because the utility detects an improper install.wim file, but that’s not an issue.

Mounting the Windows 10 ISO inside NTLite - Once the ISO is successfully loaded, select it from the central menu then name it however you want by clicking Save in the top-left screen.
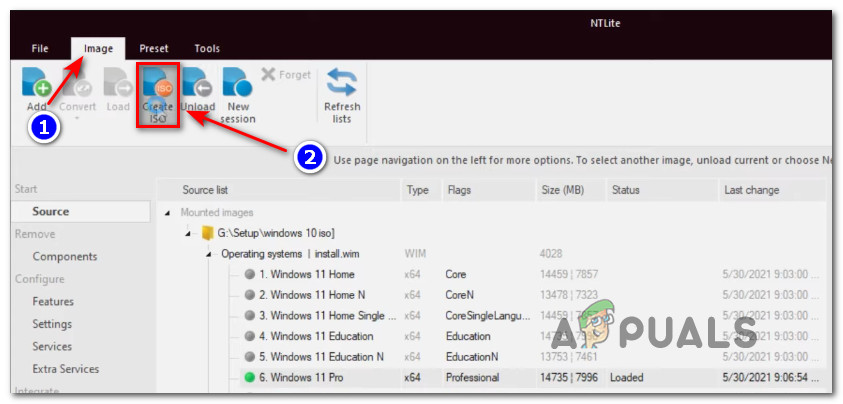
- Next, access the Image tab from the ribbon menu at the top, and click on Create ISO from the list of available options.

Creating the ISO file inside NTLite - At the next prompt, name the newly created ISO as you want if you haven’t done this already, then select a suitable location where you want to generate the ISO file before clicking on Save.
- At the confirmation prompt, click Yes to initiate the process of creating your modified ISO file.
- Once the operation is complete, you can flash it to any USB flash disk of at least 8 GB and use that USB stick to install Windows 11 on a computer with Legacy BIOS. If you don’t know how to make your USB flash drive bootable with Windows installation media, follow these step-by-step instructions and learn how to do it using RUFUS.Note: Just make sure to change the boot order to make the Legacy (MBR) computer boot first from your USB drive.
Kamil Anwar
Kamil is a certified MCITP, CCNA (W), CCNA (S) and a former British Computer Society Member with over 9 years of experience Configuring, Deploying and Managing Switches, Firewalls and Domain Controllers also an old-school still active on FreeNode.