
Applies ToWindows 10 Windows 11
A metered network connection will try to control and reduce data usage on the network, so some apps might work differently on a metered connection. Also, some updates for Windows won’t be installed automatically.
You can manually set Wi-Fi and Ethernet network connections to metered if you want to reduce the amount of data used by apps and services on that network. A cellular data network connection is set as metered by default.
To set a network as a metered connection
-
Wi-Fi: In Settings, select Network & internet > Wi-Fi > the Wi-Fi network you’re connected to, then turn on Metered connection.
-
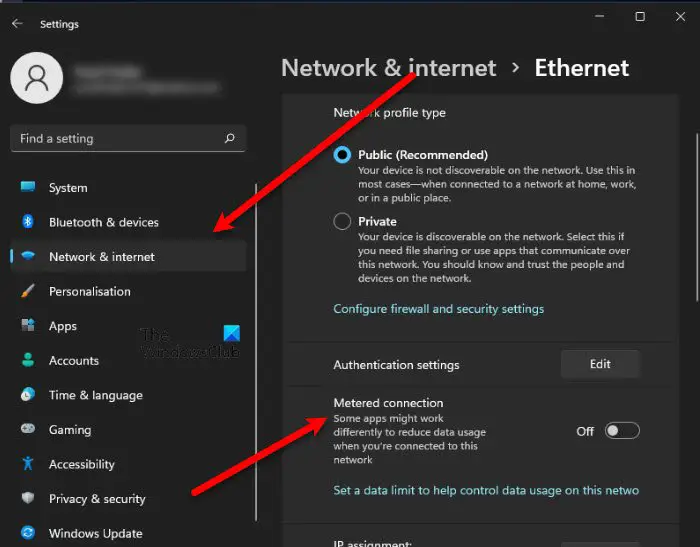
Ethernet: In Settings, select Network & internet > Ethernet > the network you’re connected to, then turn on Metered connection.
-
Cellular: In Settings, select Network & internet > Cellular, then turn on Metered connection.
You might notice that the Metered connection setting is greyed out in any of the places mentioned above. If it is, check with your IT support person. The metered connection setting might be set by your organization, so you can’t change it.
Note: If you set a network connection as an unmetered connection but it has a limited data plan, you might go over your data limit for that network and incur charges.
Frequently asked questions
Here are answers to some common questions about metered Internet connections. If your Internet service provider charges you for the amount of data that you use, you may find this information useful.
Internet service providers can charge by data used (the amount of data sent and received by your device). That’s called a metered Internet connection. These plans often have a data limit, and if you exceed the limit you might have to pay extra. In some cases, you aren’t charged extra, but your connection speed becomes slower until the billing cycle ends.
If you have a metered Internet connection, setting your network connection to metered in Windows can help you reduce the amount of data you send and receive.
It depends on whether your Internet service provider charges you by the amount of data you use. Some general guidelines:
-
Wi‑Fi networks. By default, Windows sets Wi‑Fi networks to non-metered. But if your Internet service provider charges you by the amount of data you use, setting your network connection to metered can help you limit your data usage.
-
Mobile broadband networks. By default, Windows sets mobile broadband networks to metered. But if your mobile broadband service is actually unlimited, then you might want to change the network setting to non-metered.
If you’re not sure what to do, keep a record of your data usage. If you find that you’re being billed for extra data usage, setting your network connection to metered can help you manage this.
Any app that relies on an Internet connection to update or display info may be limited in the amount of data it can download or display. You might notice these and other effects:
-
Windows Update will only download priority updates.
-
Apps downloading from the Microsoft Store might be paused.
-
Offline files might not sync automatically.
If you notice that the metered connection setting is turned on and greyed out and you can’t turn it off, try one of the following:
-
Remove the data limit if one is set. Go to Network & Internet settings, then select Data usage, select the network connection, and then select Remove limit > Remove.
-
Make sure you’re signed in with an account that has administrator rights. In the Settings app, select Accounts > Your info. Look under your account name and see if it says Administrator.
-
Check with your IT support person. The metered connection setting might be set by your organization, so you can’t change it.
-
In Windows 11, go to Settings > Windows Update. In Windows 10, go to Settings > Updates & Security.
-
Select Advanced Options and then select Download updates over metered connections.
Need more help?
Want more options?
Explore subscription benefits, browse training courses, learn how to secure your device, and more.
When your Internet operator charges you based on the amount of data consumed by you, such connections are called used Metered Connections. They may offer you a fixed rate up to a certain data usage figure and after that, they either charge you extra or reduce your connection speed.
Metered Connection is one of the many new features introduced in Windows. This feature is quite helpful in limiting the data usage so that you don’t get shocked while billing the data consumed payments. Many operators have provided the plan which can be supposed as Metered Connection. Especially talking about 4G and 5G unlimited plans, after a certain limit, you’ll observe that your bandwidth is reduced to a lower rate; this is generally known as the FUP limit.
Theoretically, Metered Connection is the condition when your operator charges you with direct proportionality of the amount of data used so far. As soon as the data is consumed and bypasses the predefined limit, the operator charges you extra or reduces the Internet speed. If you have a Metered Internet Connection, setting your network connection to metered in Windows can help reduce the amount of data you send and receive.
Like it was in Windows 8.1, if you set your Windows 11/10 network connection to Metered Connection, you will be able to save data costs, as some data usage activities get curtailed. Let us see how to set Wi-Fi or a wireless connection as a metered connection in Windows 11/10.
Setting your network connection to ‘Metered’, can also stop Windows 11/10 from automatically downloading the Updates. You can do it as follows – Settings app > Network & Internet > WiFi > Advanced options. Move the slider to On position for Set as metered connection.
If you enable Metered Connection on a network, your Windows 11 computer won’t automatically download the update when connected to that particular network. Follow the given steps to do the same.
- Open Settings from the Start Menu.
- Click Network & Internet > Properties.
- Now use the toggle to enable Metered connection.
Now, your computer will download updated automatically when connected to that network.
You can also use CMD to set metered Connection in Windows 11/10
You can also use the Command Prompt to set a metered connection. TechNet has listed the commands that can help us here.
To see the list of Wi-Fi profiles on your computer, copy-paste the following command and hit Enter:
netsh wlan show profiles
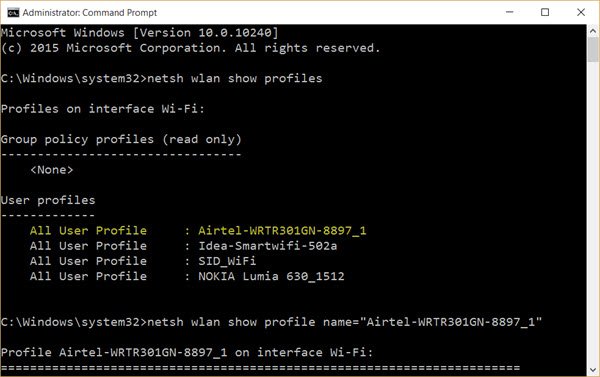
Note down the name of the Wi-Fi connection here which you wish to set as a metered connection. Here I am using the example of Airtel.
Now type the following in the CMD windows, replacing Airtel-WRTR301GN-8897_1 name with your connections name, and hit Enter:
netsh wlan show profile name="Airtel-WRTR301GN-8897_1"
This will show the details of the selected connection.
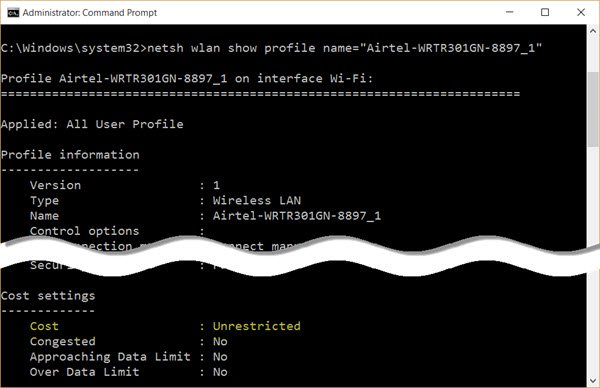
Scroll down till you see Cost settings. Here against Cost, you see Unrestricted in my case. This means that the connection is un-metered or unlimited. To change it to metered, you have to set it to Fixed. Use the following command and hit Enter:
netsh wlan set profileparameter name="Airtel-WRTR301GN-8897_1" cost=Fixed
You will see a command executed successfully message and the connection will be set as a metered connection.
You can also make this work for mobile data broadband plans. You have to just replace wlan with wbn in the above-mentioned commands. This will also work if you are tethered to your mobile phone’s Wi-Fi hotspot.
Read: How to Manage the Data Usage Limit on Windows.
Read: How to remove Metered connection warning in Outlook
How to set Metered Connection in Windows 10
To set a Wi-Fi network connection as metered:
- Open Windows 10 Settings
- Open Network & Internet settings
- Select the Wi-Fi tab.
- Click on the Wi-Fi network name
- Scroll down to Metered connection
- Turn on Set as metered connection.
Open Settings > Network & Internet > Wi-Fi to open the following window.
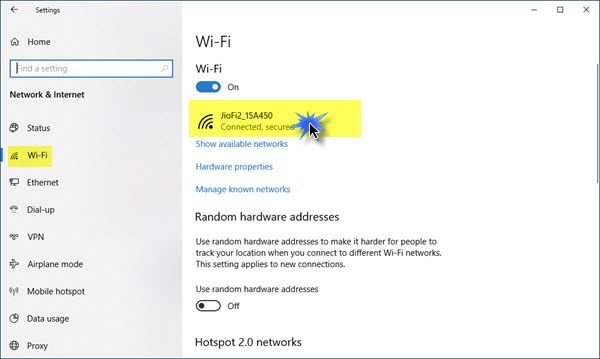
For the desired network connection, click on the WiFi name itself to open the following panel.
You can see a section named Metered connection. Move the slider to the On position. If you have a limited data plan and want more control over data usage, setting it to On will help.
If you wish you manage or set other WiFi networks as a metered connection, click on the Manage known networks link to open this panel.
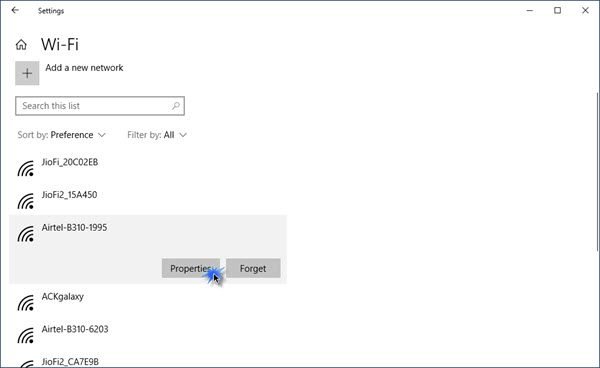
Select the WiFi > Properties, and you will see the desired setting.
When you set a connection as a metered connection Windows Update will not download automatically. Now, will updates for Windows Store apps. Live tiles will also not update in order to show the latest information. Offline files will also not sync. Some Windows Store apps will however work with limited functionality in the background when you set it so.
Data usage high? This post will show you how to limit and monitor Data Usage.
Metered connections are essential for users with limited data plans, as they allow you to put limits on how much data you’re using. In Windows 10, you can set any Wi-Fi, Ethernet, or cellular connection as metered, and this setting helps you control data usage by limiting background data and postponing some non-critical updates. If you want to have a way to control how much data you’re using and benefit from a more cost-effective internet experience on a Windows 10 computer, read on. I’ll tell you more about what metered connections mean, how to enable one on your computer, and how to turn off a metered connection in Windows 10 when you no longer need it:
NOTE: This guide is about setting up and turning off metered connections in Windows 10. If you want to do the same on a Windows 11 device or an Android phone, check these guides instead: How to enable or turn off a metered connection in Windows 11 and How to check the data usage and limit it on Android.
What is a metered connection?
A metered connection means a network connection that has limited data usage per a specified period of time, like a month or day. If you go over its allotted amount, you may get billed extra. Landline phones were the first to offer this. Today, metered connections are mostly used when referring to smartphones and mobile devices with a cellular connection from a telecom provider. Most telecom providers offer monthly data plans of several (tens of) gigabytes, and when you exceed the limit, they automatically charge you for each gigabyte or megabyte.
A metered network connection
The same concept can be applied to other devices, including tablets (with Windows, Android, or iOS), hybrid devices, and more. Also, wireless network connections can be metered, especially public Wi-Fi networks that enforce all kinds of limits, including maximum data usage per day, week, or month. Sometimes, even wired (Ethernet) internet connections can be metered, like the ones found in some hotels.
What kind of connections can be set as metered in Windows 10?
In Windows 10, you can set any network as metered. This includes both Wi-Fi networks, Ethernet networks, and cellular connections.
What happens when a network is set as a metered connection in Windows 10?
When you set your active network connection as metered in Windows 10, the following things take place:
- Windows Update stops downloading most updates. Only the critical ones are automatically downloaded and installed. Instead, you get a Download button that you can use to install all the updates.
- Apps from the Microsoft Store are no longer automatically updated. However, desktop apps act as usual and are updated based on their settings.
- App tiles on the Start Menu may not update themselves automatically. The Windows 10 apps with live tiles on the Start Menu might not update themselves while connected to a metered connection.
- The peer-to-peer download of Windows updates is disabled. As long as you connect to a metered network, Windows 10 stops delivering updates in the background through peer-to-peer connections. This feature is also called Windows Update Delivery Optimization, and Windows 10 turns it off when you use metered connections.
- Apps may behave differently. Depending on the apps you’re using, some may stop downloading data in the background or update their data less often. For example, OneDrive stops automatically synchronizing your files in the background to save on bandwidth costs. This behavior varies from app to app, depending on how it was programmed.
Obviously, it’s always better to get an unmetered data plan, but unfortunately, sometimes you don’t have the option to do so. In such a case, you’ll want to know how to configure your Windows 10 device to treat a network as a metered connection. Here’s…
How to set a network as a metered connection
If you connect to a wireless network you want to set as metered, start by opening the Settings app and going to Network & Internet.
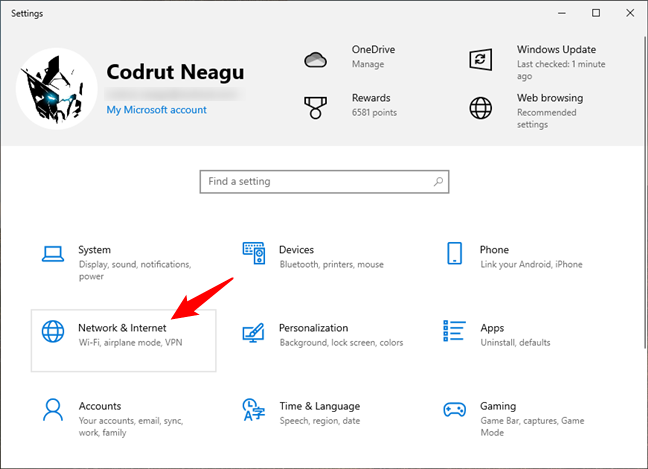
The Network & Internet category from Windows 10 Settings
Depending on the type of network you want to set as metered, select Wi-Fi, Ethernet, or Cellular in the left sidebar. I’ll take Wi-Fi as an example, as that’s what I’m using on both my laptop and desktop PC and what most people probably use, too. Just keep in mind that the next steps are the same for all three situations. Once you’ve chosen the type in the left sidebar, click or tap your network connection’s name on the right-hand pane of the Settings window.

The Wi-Fi section in the Windows 10 Settings
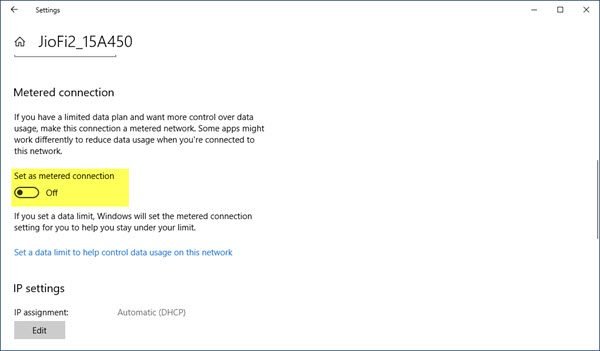
Then, you see a summary of all the settings and properties of the network you are connected to. Scroll down and look for the Metered connection section.
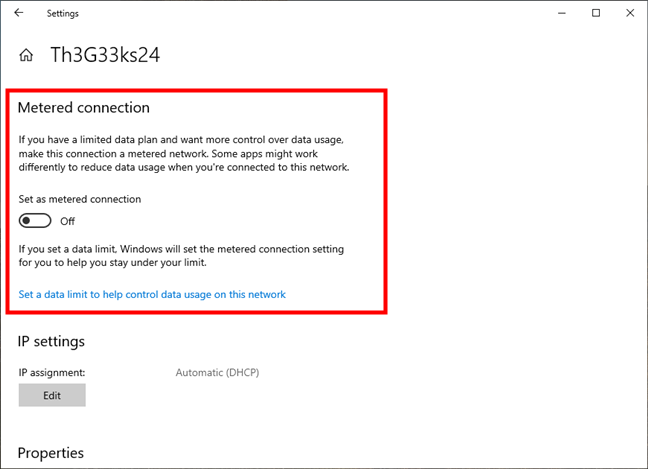
The Metered connection settings from Windows 10
Now turn On the “Set as metered connection” switch.
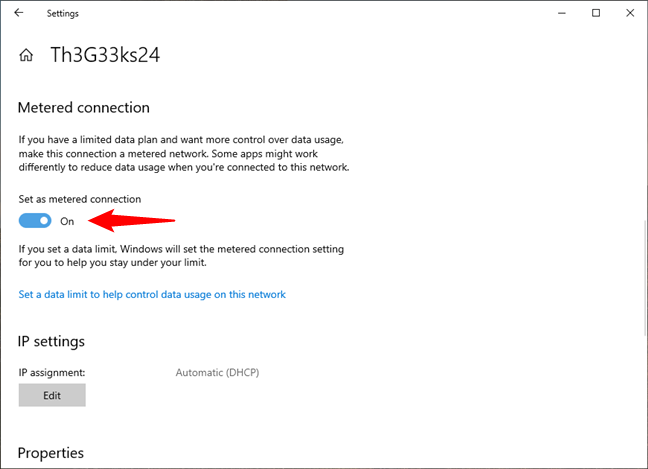
Setting a Wi-Fi connection as metered
After you’ve set your network as metered, you’ll likely want to configure its data limit too. This can be useful if you know how much data your internet plan allows you to use before having to pay extra. Here’s how that goes:
How to set a data limit for a metered connection
To enforce a data cap, click or tap the “Set a data limit to help control data usage on this network” link under the Metered connection switch.
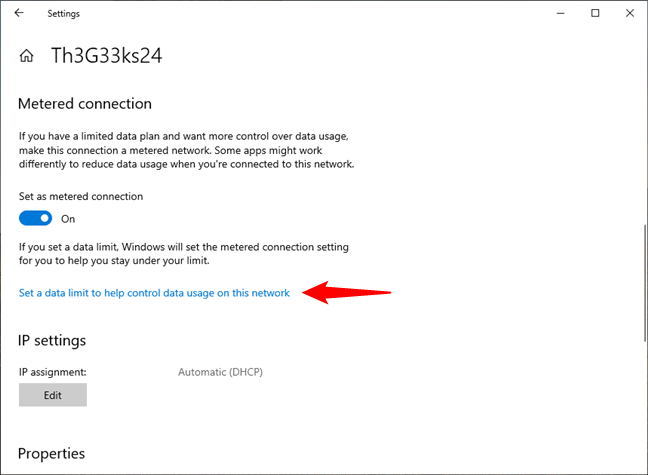
Set a data limit to help control data usage on this network
That brings you to the Status page from the Network & Internet section of the Settings. Here, click or tap the Data usage button under your network.
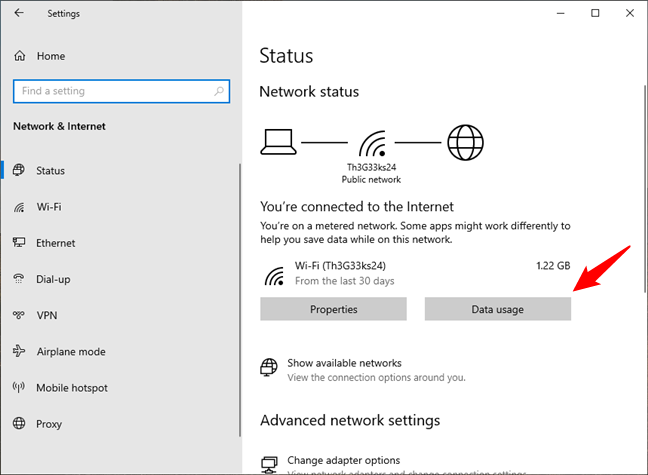
Click or tap the Data usage button
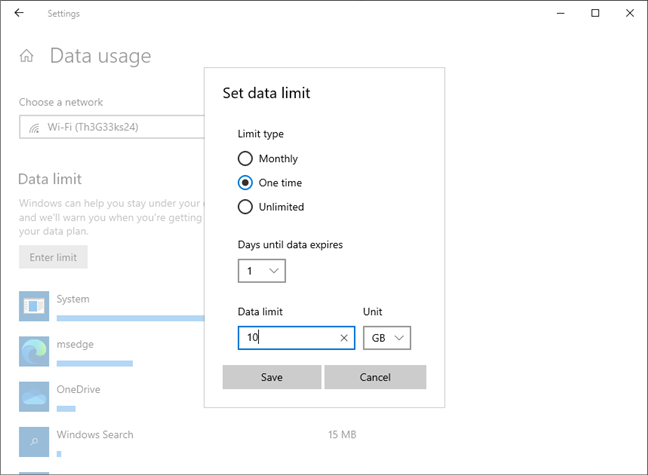
Then, you’ll see a page called Data usage, listing usage statistics for the apps on your computer. The apps are automatically sorted in descending order according to the bandwidth they used in the last 30 days. At the top of the list, there’s a button called Enter limit: click or tap it.
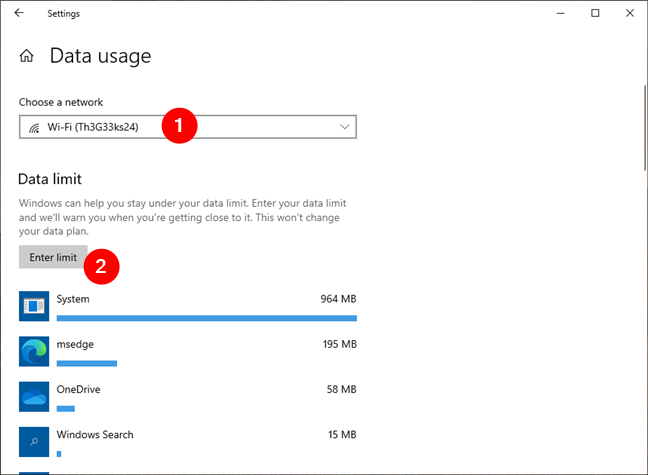
Press the Enter limit button
The previous action triggers a popup window where you can set a data cap for your connection. Select the type of limit (Monthly, One time, Unlimited), the reset date for monthly limits or the days until the limit expires, and the data cap number in megabytes or gigabytes. Be careful to input the correct data allowance in your internet plan to avoid extra charges for exceeding this limit. Then, when you’re done, press the Save button to apply the new limit for your metered connection.
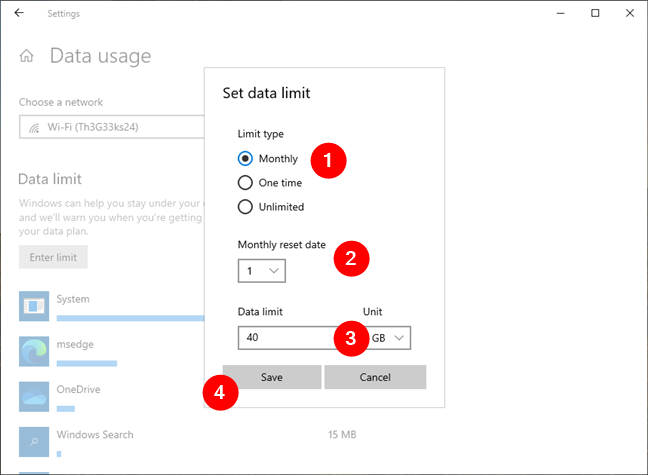
Set data limit for the metered connection
From now on, Windows 10 enforces the data limit you set, and the operating system will let you know when you’re close to reaching it.
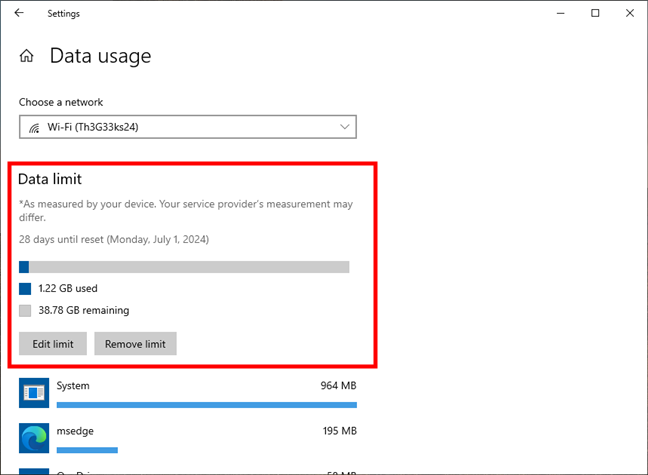
The Data limit is now set for the metered connection
TIP: Later, if you change your data plan to include more or fewer gigabytes, or if you no longer need to cap your usage, you can use the Edit limit or Remove limit buttons on this page.
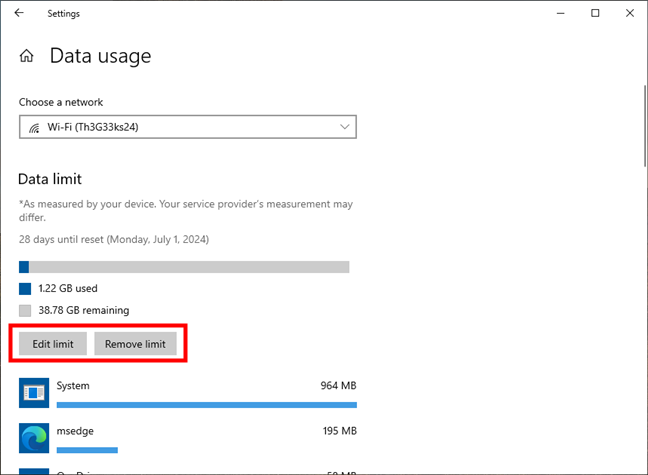
Edit limit or Remove limit for a metered connection
What about turning off a metered connection? Let’s see:
How to turn off a metered connection in Windows 11
If you no longer want a metered connection to be, well, metered, disabling this setting is quite easy. To begin, open Settings (Windows + I), go to Network & Internet, and make sure you’re on the Status page. Then, on the right-hand pane, click or tap the Data usage button under your metered connection.
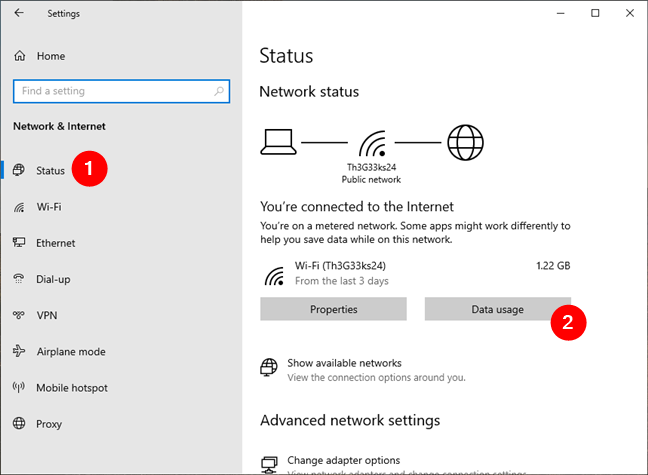
Access the Data usage settings
Next, on the Data usage page in Settings, click or tap the Remove limit button. This is a mandatory step to take. If you don’t do it, you won’t be able to disable the metered connection switch later, as it will be grayed out by Windows 10.
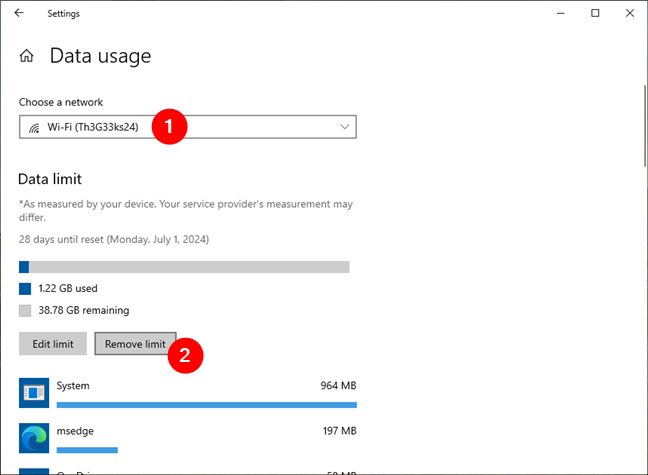
Remove limit for a metered connection
Windows 10 then asks you if you’re sure you want to eliminate the data cap for the metered connection. Choose Remove to continue.

Confirm that you want to remove the data limit
Next, go back to the Wi-Fi, Ethernet, or Cellular page in the Settings app, depending on what type of metered connection you’re using. Once you’ve gotten there, click or tap its name.
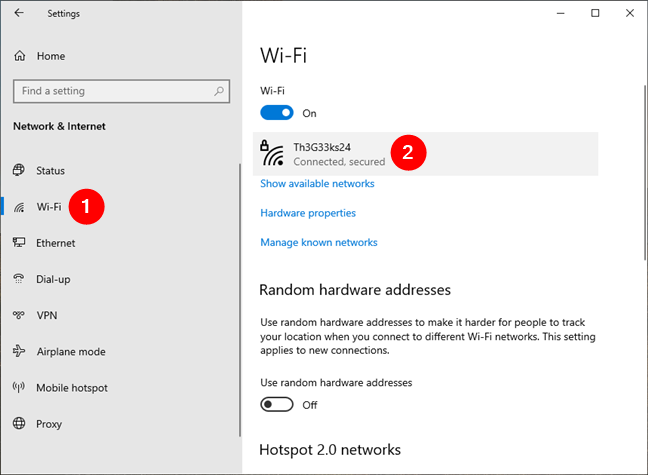
Go to the metered connection in Settings
As you want to turn off the metered connection, on the network’s page, find and make sure that the “Set as metered connection” switch is disabled.
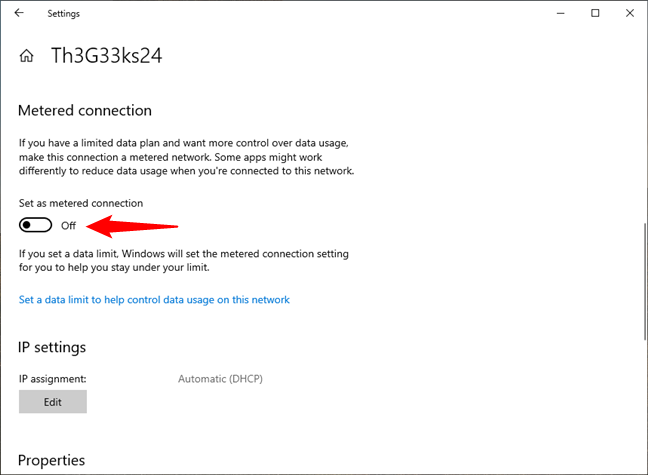
How to turn off a metered connection in Windows 10
That was it!
Do you have issues with metered connections in Windows 10?
Now you know what metered connections mean and how they can help you manage data usage on networks with limited internet traffic. You’ve learned how to enable and enforce data caps on metered connections, and you’ve seen how to turn off metered networks. These are all pretty straightforward processes with steps that should be easy to take for anyone. However, if you encounter any problems along the way, don’t hesitate to let me know in a comment, and I’ll do what I can to help you.
Когда ваш интернет-оператор взимает с вас плату в зависимости от объема потребляемых вами данных, такие соединения называются использованными Измеренные соединения . Они могут предложить вам фиксированную скорость до определенного показателя использования данных, а после этого они либо начисляют вам дополнительную плату, либо снижают скорость вашего соединения.
Как и в Windows 8.1, если вы установите для сетевого подключения Windows 10 значение Metered Connection, вы сможете сэкономить на стоимости данных, поскольку некоторые действия по использованию данных будут сокращены. Давайте посмотрим, как настроить Wi-Fi или беспроводное соединение в качестве измеряемого соединения в Windows 10.
Установить дозированное соединение в Windows 10
Чтобы установить подключение к сети Wi-Fi в качестве измеряемого:
- Откройте настройки Windows
- Открыть настройки сети и интернета
- Выберите вкладку Wi-Fi.
- Нажмите на название сети Wi-Fi
- Прокрутите вниз до Измеренное соединение
- Включите Установить как дозированное соединение.
Вы можете сделать это через Настройки или с помощью командной строки. Давайте посмотрим на это более подробно.
Через приложение “Настройки”
Откройте Настройки> Сеть и Интернет> Wi-Fi, чтобы открыть следующее окно.

Для желаемого сетевого подключения, нажмите на само имя WiFi, чтобы открыть следующую панель.

Вы можете увидеть раздел с именем Metered connection. Переместите ползунок в положение Вкл. . Если у вас ограниченный тарифный план и вы хотите больше контролировать использование данных, то для него будет задано значение Вкл .
Если вы хотите управлять другими сетями WiFi или установить их в качестве измеряемого соединения, нажмите ссылку Управление известными сетями , чтобы открыть эту панель.

Выберите WiFi> Свойства, и вы увидите желаемую настройку.
Когда вы устанавливаете соединение как дозированное соединение, Центр обновления Windows не загружается автоматически. Теперь будут обновления для приложений Магазина Windows. Живые плитки также не будут обновляться, чтобы показать последнюю информацию. Автономные файлы также не будут синхронизироваться. Однако некоторые приложения Магазина Windows будут работать с ограниченными функциональными возможностями в фоновом режиме, если вы установите его так.
Использование CMD
Вы также можете использовать командную строку, чтобы установить дозированное соединение. TechNet перечислил команды, которые могут помочь нам здесь.
Чтобы увидеть список профилей Wi-Fi на вашем компьютере, скопируйте и вставьте следующую команду и нажмите Enter:
netsh wlan show профили

Запишите здесь имя Wi-Fi-соединения, которое вы хотите установить как замеренное соединение. Здесь я использую пример Airtel.
Теперь введите следующее в окнах CMD, заменив Airtel-WRTR301GN-8897_1 на имя вашего подключения , и нажмите Enter:
netsh wlan show profile name = "Airtel-WRTR301GN-8897_1"
Это покажет детали выбранного соединения.

Прокрутите вниз, пока не увидите настройки стоимости. Здесь в отношении цены вы видите Неограниченный в моем случае. Это означает, что соединение неизмеренное или неограниченное. Чтобы изменить его на измеренный, вы должны установить его на Исправлено . Используйте следующую команду и нажмите Enter:
netsh wlan set имя_параметра профиля = “Airtel-WRTR301GN-8897_1” стоимость = фиксированная
Вы увидите сообщение, что команда успешно выполнена, и соединение будет установлено как дозированное соединение.
Вы также можете сделать это для мобильных широкополосных тарифных планов. Вы должны просто заменить wlan на wbn в вышеупомянутых командах. Это также будет работать, если вы привязаны к точке доступа Wi-Fi вашего мобильного телефона.
Уровень использования данных высокий? Этот пост покажет вам, как ограничивать и контролировать использование данных.
Conserving bandwidth usage can help you maximize your data connection and make sure you are using only what you need. Windows 10 has an excellent way for users to maximize their data usage through a metered connection.
When you set to a metered connection, your bandwidth usage will be reduced when connected to a network. Some updates will not be installed automatically and apps may function differently to minimize data usage.
You can set your Ethernet connections and Wi-Fi as a metered connection. By default, cellular data connections are already set as metered connection.
You also have the option to set the data usage limits when you set your connections as metered.
How do you Use the Metered Connection Settings in Windows 10

Use Ethernet Connection with Metered Connection Settings
- Go to Settings.
- Choose the Network & Internet.
- Click Ethernet.
- Look for your Ethernet Connection and click to open.
- Enable the Set as metered connection option.

Setting Wi-Fi as a Metered Connection
- Open the Windows Settings by pressing the Windows key + I.
- On the search box, type wi-fi.
- Select Wi-Fi settings.
- Look for the Manage known networks option and click to open.
- Now, select the Wi-Fi network you want to set as metered.
- Next, select Properties.
- Look for Metered connection.
- Toggle the button to On to set your Wi-Fi to a metered connection.
Take note that only the Wi-Fi network that you set as metered will include the data limitations. When you switch to a different Wi-Fi connection, your Internet activities will resume as usual without the metered connection.
Features Affected by the Metered Connection
You can indeed reduce data consumption when you use a metered connection but remember that there are features compromised to fulfill this goal. For instance, some updates will not automatically be installed hence risking your system to infections. While you consider using a metered connection most of the time, it is ideal to evaluate when only to use such connection and when to turn it off.
What are your thoughts regarding the use of metered connection in Windows 10? Tell us in the comments below.
Windows Dispatch is a website supported by its readers & community. Some pages may contain affiliate links which may allow us to earn a little money when you buy through them.
Eddie Mendoza Jr
Eddie has a degree in Information Technology with a natural inclination towards troubleshooting devices. With more than 10 years of blogging experience in different niches, he has found it most satisfying when writing easy-to-follow guides and simplified articles related to computers, smart TVs, mobile devices and Internet-based services.