
Время на прочтение5 мин
Количество просмотров4.1K
Недавно случайно узнал, что BitBucket, где лежат мои Mercurial-репозитории, прекращает поддержку Mercurial: новые репозитории создавать уже нельзя, а существующие будут удалелы с 1.06.2020. Возможные варианты действий: перейти на Git, выбрать один из других сервисов, или настроить хостинг Mercurial на своём сервере. Сервер у меня есть, отказываться от Mercurial и менять привычки как-то не хочется, альтернативы BitBucket мне тоже не приглянулись — поэтому выбрал последний вариант. Задача вроде несложная, вот только сервер у меня под Windows, и, кажется, в процессе настройки я умудрился наступить на максимум возможных граблей. Надеюсь, эта статья поможет кому-нибудь избежать этого и сэкономить время.
Различные варианты организации Mercurial-хостинга описаны в документации. Их можно разделить на 3 группы:
- hg serve — т.е. сам Mercurial запускается в режиме сервера.
- HgWeb.cgi — официальный скрипт, входящий в дистрибутив Mercurial.
- Решения от внешних разработчиков — более функциональные, но со своими ограничениями и зачастую платные.
HG SERVE
Наиболее простым и логичным выглядит 1-й вариант. Как гласит документация, в Mercurial имеется встроенный веб-сервер, исполняющий HgWeb — именно он и работает, когда мы запускаем hg serve. Этот сервер не умеет делать аутентификацию, т.е. не умеет запрашивать логин/пароль пользователя, однако умеет делать авторизацию, т.е. давать/не давать тот или иной вид доспупа к репозиториям в соответствии с настройками доступа. Если нам нужны приватные репозитории, то для аутентификации можно использовать Nginx в качестве прокси-сервера, который будет запрашивать пароль. Настройка такой схемы описана здесь.
Для удобства hg serve запускается в виде сервиса с помощью winsw — утилиты, позволяющей запускать в виде сервиса любую команду (в данном случае это вообще bat-файл). Впрочем, для запуска можно обойтись и без сервиса, а, например, создать таск в Task Scheduler с триггером «At system startup» — такой таск будет запускаться при старте системы. Но это менее надёжный вариант: в случае сбоя таск не будет перезапущен, да и в логах информации об этом не будет.
Будьте внимательны с файлами конфигурации (hgweb.conf / hgrc):
- Их содержимое чувствительно к регистру: если, например, написать
[Web]вместо[web]— работать не будет. - Знак равенства обязательно должен быть окружен пробелами: если написать
push_ssl=false— работать не будет, нужно писатьpush_ssl = false.
Ещё обратите внимание на то, что Mercurial делает push в репозиторий одним запросом, и если ваш проект не «Hello world», то этот запрос может быть объёмным и длительным. Пропишите в конфиге Nginx достаточно большие значения:
    client_max_body_size 500M;
    proxy_read_timeout 120s;
чтобы не оказаться в ситуации, когда вроде бы всё работает, а залить реальный проект на сервер не получается.
Проблема авторизации
В hgweb.conf задаётся общая для всех репозиториев конфигурация. Если нужны специфические настройки для каждого репозитория (а они нужны), то они указываются внутри репозитория: /.hg/hgrc Там можно, например, перечислить конкретных пользователей, имеющих доступ к данному репозиторию.
Чтобы это работало, Mercurial должен знать имя пользователя, который авторизовался в Nginx. И тут возникает проблема: на практике Mercurial видит всех пользователей, которых пропускает к нему Nginx одинаково безымянными. В различных источниках рекомендуют в конфигурации Nginx передавать имя пользователя в заголовках так:
proxy_set_header REMOTE_USER $remote_user;или так:
proxy_set_header X-Forwarded-User $remote_user;но у меня это не сработало  Судя по коду HgWeb, имя пользователя берется из ENV(‘REMOTE_USER’), но вот как его туда поместить — загадка.
Если сложная авторизация не требуется, можно настроить её непосредственно в конфигурации Nginx либо создать 2 (или более) экземпляров hg serve, использующих различные файлы hgweb.conf. Недостаток в гибкости последнего метода в том, что настройки hgweb.conf глобальны и касаются всех (перечисленных в нем) репозиториев. Впрочем, комбинируя эти два метода можно добиться практически любых схем авторизации. В конце статьи я ещё коснусь этой темы.
HgWeb.cgi
Описанные выше манипуляции попахивают извращением, поэтому я решил попробовать официальный Python-скрипт HgWeb. В бинарном дистрибутиве Mercurial его нет, поэтому нужно скачать дистрибутив исходников и взять оттуда. Там, кроме основной (CGI) версии, имеются также более эффективные — WSGI и FCGI.
Поскольку Nginx не умеет запускать CGI, а для WSGI нужен WSGI-сервер (поставить который на Windows отдельная проблема), я решил использовать FCGI — то есть FastCGI. Для его запуска нужен Python, причём документация гласит, что Python должен быть такой же версии, какая используется в бинарном дистрибутиве Mercurial — то есть 2.7. Окей, установил 2.7. Для запуска HgWeb в Python также необходимо установить библиотеку Flup, причём не просто установить, а определённой версии (ибо последняя не поддерживает Python 2.7). Вот так работает:
pip install flup==1.0.3.dev-20110405Теперь нужно отредактировать сам hgweb.fcgi — прописать путь к файлу конфигурации (что очевидно) а также указать параметры запуска, как минимум обязательный параметр используемого локального адреса (что совершенно неочевидно):
WSGIServer(application, bindAddress=("127.0.0.1",5500)).run()Осталось добавить конфигурацию Nginx:
    location / {
        auth_basic "My Repos";
        auth_basic_user_file passwd;    # файл с паролями
        include fastcgi.conf;
        fastcgi_split_path_info ^()(.*)$;
        fastcgi_param  SCRIPT_NAME        "";
        fastcgi_param  PATH_INFO          $fastcgi_path_info;
        fastcgi_param  AUTH_USER          $remote_user;
        fastcgi_param  REMOTE_USER        $remote_user;
        fastcgi_pass 127.0.0.1:5500;
    }
    location /static/ {
        root e:/Mercurial/templates;
    }
Я специально не редактировал файл fastcgi.conf, а вынес все дополнительные настройки fastcgi в секцию location для наглядности. Обратите внимание на параметр PATH_INFO — он важен для работы скрипта. В моём случае имя скрипта в url вообще отсутствует, а весь оставшийся путь идёт в PATH_INFO.
Теперь запускаем сам скрипт:
python hgweb.fcgiи всё работает!
Еще немножко настроек
Как и в случае с hg serve, разумно сделать запуск HgWeb в виде сервиса. Для этого использую всё тот же winsw. Он выполняет такой bat-файл:
    @echo off
    if "%1"=="start" (goto :start)
:stop
    taskkill /F /IM python-hg.exe /T
    goto :end
:start
    "c:\Python27\python-hg.exe" e:\Mercurial-5.3\hgweb.fcgi
:end
Обратите внимание, что я скопировал python.exe в python-hg.exe чтобы taskkill легко нашел единственный нужный процесс для остановки.
Не стоит забывать и о безопасности: выполнять сервисы для публичного доступа под юзером «Local System» — плохая идея! Нужно создать отдельного юзера, дать ему доступ только к нужным папкам и запускать сервис под ним.
Публичный доступ к репозиториям
Чтобы организовать публичный беспарольный доступ к некоторым репозиториям, документация рекомендует запускать два экземпляра HgWeb (или hg serve) с разными конфигурациями. Но можно сделать проще: для каждого репозитория, к которому нужен публичный доступ, добавить в конфигурацию Nginx отдельную секцию location без защиты паролем. Примерно так:
    location /Base/ {   # Base - имя репозитория, к которому нужен публичный доступ
       include fastcgi.conf;
       fastcgi_split_path_info ^()(.*)$;
       fastcgi_param  SCRIPT_NAME        "";
       fastcgi_param  PATH_INFO          $fastcgi_path_info;
       fastcgi_param  AUTH_USER          "pub";   # любое подходящее имя пользователя для hg (можно пустое)
       fastcgi_param  REMOTE_USER        "pub";
       fastcgi_pass 127.0.0.1:5500;
    }
Все — репозиторий Base доступен без пароля.
Надеюсь, эта статья поможет вам сэкономить время. Лично у меня на всё это ушло примерно полтора дня (с учётом того, что Python я увидел, можно сказать, впервые в жизни 
Windows Install
You probably want the prepackaged Windows version from here.
In this web page firstly you will find a ‘standard’ procedure to install and config Mercurial from sources under Windows. It should satisfy you generally. If not, you could continue reading for various tips and references provided by various contributors in history. Some of them are valuable although some of them are a bit out of date.
Contents
-
Compile and install
- «Standard» procedure for building optimized version
- Building pure Python alternative
- Setup environment
-
Various tips and references
- Overview
- Build tips
- Install tips
- Hardlinks on Windows
- Default editor
- External links
1. Compile and install
When installing Mercurial from source, you have two choices: Compile optimized version with C extensions for increased performance, or use the pure Python method. The latter doesn’t require a C compiler to be present on Windows system (which it usually isn’t).
You’ll need Python and Mercurial source in either case.
1. Download Python binary such as python-2.6.2.msi from http://www.python.org/download/. Install it to somewhere you can find later — C:\Python26 as default.
2. Download Mercurial source such as mercurial-1.3.tar.gz from http://www.selenic.com/mercurial/release/?M=D. Unpack it to C:\Mercurial_src.
Caution: Check to make sure you didn’t unpack it to C:\Mercurial_src\mercurial-1.3 or similar.
1.1. «Standard» procedure for building optimized version
Caution: Don’t use Active Python in http://www.activestate.com/activepython/, or you will probably fail to build Mercurial from source.
3. Download the MinGW binary (such as MinGW-5.1.4.exe) from http://sourceforge.net/project/showfiles.php?group_id=2435&package_id=240780. Download it to a writable directory. Install it to C:\MinGW as default, with other default opinions («Current», and then «min»).
4. Add C:\MinGW\bin to PATH env. It should look like
C:\Python26;bla bla bla;C:\MinGW\bin
Caution: The order is important. Keep it or you will probably fail to build.
5. In Windows command prompt, change dir to C:\Mercurial_src. Then run following commands:
python setup.py build --force -c mingw32
python setup.py install --force --skip-build
1.2. Building pure Python alternative
3. Change dir to C:\Mercurial_src and run following commands:
C:\Python26\python.exe setup.py --pure build_py -c -d . build_ext -i build_mo --force
C:\Python26\python.exe setup.py --pure install --force
2. Setup environment
6. Download KDiff3 such as KDiff3Setup_0.9.95.exe from http://sourceforge.net/project/showfiles.php?group_id=58666. Install it into C:\Program Files\KDiff3 as default.
7. Add C:\Program Files\KDiff3 to PATH env.
8. Create Mercurial config file:
notepad «C:\Documents and Settings\[your_name]\Mercurial.ini»
Or:
notepad «C:\Users\[your_name]\Mercurial.ini»
Fill in content below into the config file:
[ui]
editor = Notepad
username = your_name <your_email_address>

[merge-tools]
kdiff3.priority=-1
kdiff3.args=--L1 base --L2 local --L3 other $base $local $other -o $output
kdiff3.regkey=Software\KDiff3
kdiff3.regappend=\kdiff3.exe
kdiff3.fixeol=True
kdiff3.gui=True
9. (Nice to have) Copy from C:\Python26\Scripts\hg to C:\Python26\hg.py. As C:\Python26 is in your PATH env already, you could call hg.py to run Mercurial at any location. As you may installed or will install binary Mercurial or TortoiseHG, you could always call hg.py to run this script version of Mercurial, or call hg which will lead you to the binary version.
3. Various tips and references
3.1. Overview
To install Mercurial from sources under Windows, you need
-
a Python interpreter (such as the one from python.org, or ActivePython)
- a C compiler (this is needed to compile some extensions used by Mercurial, so it’s needed at setup-time only and not to run Mercurial itself)
- Mercurial’s own sources, of course
- a three-way merge program
If you are using python.org’s Python, you will find that the win32 API extensions make a huge performance difference when you use the clone command (but see the caveats below about hardlinks on Windows). If you are using Python 2.4, you will also need mfc71.dll. (These extensions are already shipped as part of ActivePython, but ActivePython is not completely open source software.)
See BuildingWindowsInstaller for instructions to build a Mercurial installer. BuildingOnWindows has some hints about how to build Mercurial on Windows.
This pages describes some issues you may meet when trying to install Mercurial, and how to solve them.
Ideally, you would only need to run
python setup.py install --force`
in the directory where you unpacked the sources, and everything would «just work». The use of -f/—force switch makes sure that any old installation is overwritten.
3.2. Build tips
3.2.1. MingW32
3.2.1.1. Using MingW32
By default, Python and ActivePython will look for Microsoft Visual C to compile the extensions, so you have to tell setup.py to use the MingW32 compiler instead. You can do this by running:
python setup.py build --force -c mingw32 python setup.py install --force --skip-build
or more briefly:
python setup.py build -f -c mingw32 install -f`
If you are not familiar with mingw32, you will first need to download and install the following packages, in the order given:
msys.exe
msysDTK.exe`
Afterwards, download and install the following package, installing it in the directory where you installed the msys package (i.e. c:\msys\1.0\)
MinGW.exe
You can find them at http://www.mingw.org
Then add the Python and mingw directories to your PATH, and run your build from the command prompt:
set PATH=%PATH%;c:\python24;c:\msys\1.0\mingw\bin`
If you encounter a compiler error in Mercurial versions 0.9.2 and up, you may need libpython24.a in PYTHONPATH\libs. If that’s the case, run this command:
pexports C:\WINDOWS\system32\python24.dll > python24.def
dlltool --dllname C:\WINDOWS\system32\python24.dll --def python24.def --output-lib C:\Python24\libs\libpython24.a
The above setup.py script should then run properly.
3.2.1.2. Easier MingW32 based build via Cygwin
It is easier to install MinGW32 via Cygwin as it has a single graphical installer. After installing, mingw32 via Cygwin installer (setup.exe), add cygwin bin directory to the path and follow the mingw32 build instructions. e.g.
set PATH=%PATH%;c:\python24;c:\cygwin\bin
python setup.py build --force -c mingw32
python setup.py install --force --skip-build
3.2.2. MS Visual Studio
If you are going to use MS Visual C++, you need to use the same version of the compiler as the one which was used to build the Python interpreter. For example:
-
ActivePython 2.3.5 was built with VC6
-
ActivePython 2.4.1 was built with VC7.1
- Python 2.4.4 win32 from python.org was built with VC7.1 (Visual Studio 2003)
- Python 2.5.4 win32 from python.org was built with VC7.1 (Visual Studio 2003)
- Python 2.5.2 amd64 from python.org was built with VC8 (Visual Studio 2005)
- Python 2.6.1 (win32/amd64) from python.org were built with VC9 (Visual Studio 2008)
It is possible to force Python to use the compiler that you currently have, even if it’s not strictly matching, but since Mercurial 1.3 (more precisely since 7de68012f86e and the introduction of posixfile in the osutil.c extension), the resulting Mercurial installation will crash, probably due to mismatches in the runtime.
(Note: If you take care of backing out 7de68012f86e and related changes (b6d0fa8c7685 and 835a51e63c5b), then building Mercurial with a different compiler would still work using the DISTUTILS_USE_SDK=1 trick. Refer to a previous version of this wiki page if you really need to build Mercurial this way.)
3.3. Install tips
3.3.1. Where is my Mercurial?
By default, Mercurial (the executable) gets installed in a Scripts folder under your Python installation folder.
You can create a small batch file in a folder which is present in your path (e.g. your Windows installation folder) to help you launch Mercurial.
If you are running a Windows version of the 9x series (Windows 95, 98, or ME), create a file called hg.bat with the following content:
@echo off
shift python<path-to-Scripts-folder>\hg %0 %1 %2 %3 %4 %5 %6 %7 %8 %9
For example, if you installed Python in c:\Python, the content of the file would be
@echo off
shift python c:\python\hg %0 %1 %2 %3 %4 %5 %6 %7 %8 %9
Under Windows NT, create a file called hg.cmd with the following content:
@python <path-to-Scripts-folder>\hg %*
For example, if you installed Python in c:\python, the content of the file would be
@python c:\python\Scripts\hg %*
An alternative scheme that works better for some is to search for hg on the PATH. If you are using hg.exe it should work fine. For the Python version of hg you should be able to simply rename ‘hg’ to ‘hg.py’ and assuming you have the .py extension configured it will be invoked. It is invoked, but there is a long standing redirection bug in Windows, and on XP there are sometimes problems with exit statuses being lost with this form of execution. So the following batch file is a solution — place it in your PATH and it will find ‘hg’ without a .py extension in you PATH and invoke it properly: (name the file hg.cmd)
@echo off
for /f %%i in ("hg") DO set HGSCRIPT="%%~$PATH:i"
if %HGSCRIPT% == "" (
    echo Cannot find hg on PATH
    exit /b 1
)
python %HGSCRIPT% %*
An alternative is to add .py to the PATHEXT environment variable. Provided you have .py files set-up to run automatically when invoked, this allows you to run Python scripts from the command line without the ending .py. This option also works if you are using UTF-8 in the Windows console (i.e code page 65001) which causes BAT and CMD files to stop working.
3.3.2. Where should I put my initialization/configuration files?
Refer to this manual page for an overview.
Note: For installations of 32-bit Python on 64-bit Windows, the HKLM key should actually be under HKLM/SOFTWARE/Wow6432Node/Mercurial. Put the path to your INI file in the (Default) value that is created when you create the Mercurial key.
3.3.3. Other miscellaneous issues
WinZip7 does not seem to create empty files when extracting from .tar files. But WinZip9 is fine.
Earlier versions of mercurial had trouble handling tildes in glob patterns on windows. Upgrade if you encounter this problem.
3.3.4. Using the SSH protocol
Three solutions:
-
Install PuTTY and follow the instructions here: Accessing SSH Repositories From Windows
- Install cygwin and OpenSSH, then use the cygwin shell where ssh will be automatically in the PATH.
- Install cygwin and OpenSSH, and modify Mercurial.ini to call the cygwin-installed ssh executable.
-
Install git, which has has ssh binaries, or download and unzip this file someplace in your PATH.
Edit the Mercurial.ini file to have the following entry:
[ui] ssh = C:\cygwin\bin\ssh.exe
3.3.5. Fix the PATH problem on Windows
If you try to use hg inside a directory that has a «mercurial» subdirectory (such as when working on the Mercurial sources), Python may not be able to load the binary modules needed by Mercurial, and you may get a stack trace error similar to:
File "C:\projects\hg\mercurial\demandload.py", line 54, in module
     return object.__getattribute__(self, 'importer').module()
File "C:\projects\hg\mercurial\demandload.py", line 30, in module
     self.fromlist)
File "C:\projects\hg\mercurial\mdiff.py", line 9, in ?
     import struct, bdiff, util, mpatch
ImportError: No module named bdiff
See the mail list thread «Fix the path problem on Windows…» but essentially Python on Windows ends up with the current directory automatically added to the Python search path before the site libraries. So if you run hg in its own repository Python gets confused, and can’t find the extensions needed. There is a candidate patch that removes the current directory, but there is an arguably better workaround from K.Thananchayan. Simply add a registry entry (replacing 2.4 with the version of Python)
HKLM/SOFTWARE/Python/PythonCore/2.4/PythonPath/XXX (Default) REG_SZ "YYY"
3.4. Hardlinks on Windows
see HardlinkedClones
3.5. Default editor
The default editor for commit messages is vi. The Windows installer creates a »Mercurial.ini» file that sets it to notepad. You can set the EDITOR (or HGEDITOR) environment variable to specify your preference, or set it in »mercurial.ini»:
[ui]
editor = whatever
4. External links
-
Setting the PYTHONPATH for Windows: http://www.spacemonkey.info/pythonpath_for_win.html
CategoryWindows
Setting up a Mercurial server under IIS7 on Windows Server 2008 R2
This guide walks you through setting up a Mercurial server under IIS7 on Windows Server 2008 R2.
Note: This post uses Mercurial 1.4.3 and Python 2.5.4, although this process will also work with Mercurial 1.5 and Python 2.6.4
Install Mercurial
First you’ll need to download and install Mercurial. I won’t walk through this as it’s a simple case of pressing «next» several times.
Install Python
Next you’ll need to install Python. Note that you need to use the same version of Python that was used to build Mercurial. This guide uses Mercurial 1.4.3 with Python 2.5.4, but if you’re installing Mercurial 1.5 then you’ll need to use Python 2.6 instead.
Be sure to install the x86 version of Python even if you’re running on an x64 system.
Get hgwebdir
Next you’ll need to download hgwebdir.cgi. This is the python script that will allow serving Mercurial repositories through a web server.
Hgwebdir is part of the Mercurial source code, so you’ll need to download the source package to get it. This can be found on the Mercurial site or you can check out the hg source by running the following command:
hg clone http://selenic.com/repo/hg
Once downloaded, hgwebdir.cgi is in the root of the source distribution.
Install IIS
Under Windows Server 2008 you can install IIS under the Server Manager and clicking «Add Roles». Proceed through the wizard and select the «Web Server (IIS)» role.

Under «Role Services» ensure that you enable Basic Authentication as well as CGI extensibility.

Configure Python for IIS
First, create a new directory under the wwwroot directory (C:inetpubwwwroot). I’m going to call it «hg».
In the «Handler mappings» section for this directory select «Add Script Map»:

Next, enter *.cgi as the Request Path and the Executable Path should be set to c:Python25python.exe -u «%s». Enter «Python» as the Name.
At this point, you can test whether Python is working properly by creating a simple python script:
print 'Status: 200 OK'
print 'Content-type: text/html'
print

print '<html><head>'
print ''
print '<h1>It works!</h1>'
print ''
print ''
Save this in the directory that you created (C:inetpubwwwroothg) as test.cgi. Now, when you point your browser to http://localhost/hg/test.cgi you should see the following output:

Enabling hgwebdir.cgi
First, copy hgwebdir.cgi (that you downloaded in step 3) and paste it into c:inetpubwwwroothg. Open this file in a text editor and scroll down to the end. The last lines should look like this:
application = hgwebdir('hgweb.config')
wsgicgi.launch(application)
Change the first line to explicitly specify the path to your hg directory:
application = hgwebdir('c:inetpubwwwroothghgweb.config')
wsgicgi.launch(application)
Next, you’ll need to unzip the Mercurial library into c:inetpubwwwroothg. This can be found in Library.zip under the c:program files (x86)Mercurial directory.
You’ll now need to copy the hgweb templates directory into c:inetpubwwwroothg. This is located in the root of the Mercurial installation directory (C:program files (x86)Mercurial)
Finally, create a file called hgweb.config in c:inetpubwwwroothg. This file can be empty for now (we’ll be putting something in it shortly).
At this point, visiting http://localhost/hg/hgwebdir.cgi will show you an empty repository page:
Configuring Repositories
Now you’ll need to create some repositories to publish. To do this, create a directory in the root of the C: drive called «Repositories». This is where our repositories are going to be stored.
Next, I’m going to create a «test» repository by issuing the following commands:
cd c:repositories
mkdir test
hg init test
Now we have a repository created, we need to tell hgwebdir where to find it. We can do this by opening up the hgweb.config file we created earlier and adding the following lines:
[collections]
C:repositories = C:repositories
Now, visiting http://localhost/hg/hgwebdir.cgi should display our «test» repository

At this point it should now be possible to clone the test repository from the server with the following command:
hg clone http://localhost/hg/hgwebdir.cgi/test

Pretty URLs
Personally, I don’t like having to specify «hgwebdir.cgi» in the URLs. I’d much prefer something like http://localhost/hg/test to access my test repository.
This can be achived by using the URL rewriting extension for IIS which can be downloaded from Microsoft.
Once installed, you can access the URL rewriting settings though the «URL Rewrite» section of the IIS Manager. Select the «hg» subdirectory in the Connections pane and then select «URL Rewrite»:

In the URL rewrite section add a new blank rule. The name of the rule is going to be «rewrite to hgwebdir».
Under the «Match URL» section set «Using» to «Wildcards» and set the «Pattern» to «*»
Under «Conditions» we want to ensure that we do not re-write URLs to any physical files, so add a condition for «Is Not a File»:

In the «Rewrite URL» box at the bottom of the screen enter hgwebdir.cgi/{R:1}
The end result will look like this:

Finally, re-open your hgweb.config and add the following section:
This will ensure that hgwebdir generates urls to /hg rather than /hg/hgwebdir.cgi
Now, visiting http://localhost/hg will display our repositories page and http://localhost/hg/test will show our test repository. Likewise, we can now clone repositories using this url format.
Pushing Changes
By default, all repositores served via hgwebdir are read only – you cannot push changes to them. To change this, we can specify the users that should be able to push to the repositores by adding an «allow_push» section to our hgweb.config:
[collections]
c:repositories = c:repositories

[web]
baseurl = /hg
allow_push = Jeremy
This means that the user account «Jeremy» (a local user account on the server) will have push access to the repository.
However, if we try and push changes we’ll get an error:
c:projectstest>hg push
pushing to http://localhost/hg/hgwebdir.cgi/test
searching for changes
ssl required
For now, we’ll disable SSL by setting push_ssl to false in our hgweb.config:
[collections]
c:repositories = c:repositories

[web]
baseurl = /hg
allow_push = Jeremy
push_ssl = false
Now when we try and push we get a different error:
c:projectstest>hg push
pushing to http://localhost/hg/hgwebdir.cgi/test
searching for changes
abort: authorization failed
This happens because by default IIS is serving up our site without authentication. We need to enable Basic Authentication in the Authentication area of IIS:


Now you’ll be prompted to enter your username and password:

After specifying the credetails, the changes will be pushed up. We can view the commit in our web UI:

Enabling SSL
When you use Basic authentication, your username and password will be sent over the wire in plain text. To make this more secure we can enable SSL. For this example I’m going to use a self-signed certificate, although this will also work with a real SSL certificate purchased from a provider.
First, you’ll need to go into the IIS manager, select «Server Certificates» and click «Create Self-Signed Certificate»

Now, add a binding for your Web Site for https on port 443 by right clicking on the site and selecting «Edit Bindings».
Add a new binding for https on port 443:

Once this is done, you should now be able to access the hgwebdir site by using https (https://localhost/hg). You’ll probably get an invalid certificate warning in your browser.
Now you can re-clone the repository using the secure url (also be sure to remove the «push_ssl = false» line from hgweb.config)
All done!
At this point, you should have successfully set up everything you need to use Mercurial in IIS7.
In this post I will enumerate the resources and the steps required to setup a Mercurial server under a Windows environment running on top of IIS 7.
This is not as straight-forward as it should be but it is not very difficult either.
You will need to download the following:
- Mercurial 1.5.1 http://bitbucket.org/tortoisehg/thg-winbuild/downloads/mercurial-1.5.1.msi
- Python 2.6 x86 installer http://www.python.org/download/releases/2.6/
- if you use another version of Python you will probably end up with a «Bad magic number» error, as pointed by Lloyd in the comments
- if you use the x64 version you will get some other error messages and hg will not work
- hgwebdir.cgi http://selenic.com/repo/hg/raw-file/ff2704a8ded3/hgwebdir.cgi
- IIS UrlRewriter module http://www.iis.net/expand/URLRewrite (optional but very recommended)
I will split the configuration steps into setting up the file system and configuring IIS.
Setting up the file system
1. Install Mercurial. I will assume the default install path: C:\Program Files (x86)\Mercurial
2. Install Python. I will assume the default install path: C:\Python26
3. Create a folder for your Hg web application. I will assume this path: C:\hg
4. Create a subfolder called lib and uncompress the contents of the file C:\Program Files (x86)\Mercurial\library.zip into C:\hg\lib
5. Copy the folder C:\Program Files (x86)\Mercurial\Templates into c:\hg\lib
At this point you should have something like this:
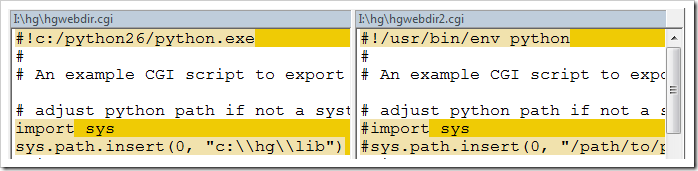
6. Copy the hgwebdir.cgi (link at the top of the post) file into your wep app folder root c:\hg and modify it so that it match your Python installation folder and your lib folder. Using my current path assumptions you should end with something like the one in the left of the following picture:
7. Create a folder named repos in c:\hg\repos. This folder will contain all our mercurial repositories. For testing purposed now we will create a test repository inside there; just run this from the command line «hg init c:\hg\repos\test» (this will create and initialize the test repository)
8. Create a file named hgweb.config at c:\hg\hgweb.config with the following content:
[paths]
/ = repos/*

[web]
baseurl = /hg
push_ssl = false
allow_push = *
here we are telling Mercurial basically 3 things: where are the repositories that it should serve, everybody can push, and it should allow pushes through non-secure connections (so we don’t need to setup https)
Configuring IIS
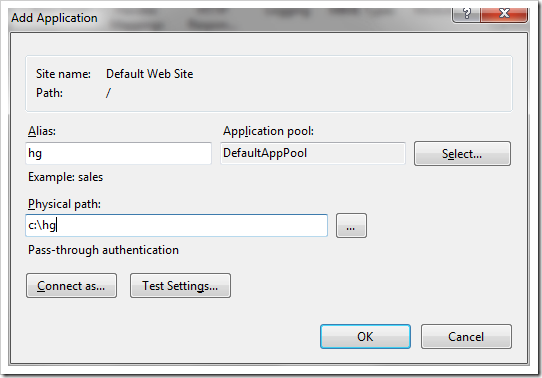
9. Add a new web application to your «Default Web Site», name it «hg» and assign «c:\hg» to its Physical path.
10. Now we need to configure our newly created app to be able to execute Python scripts. Click on the «Handler Mappings»
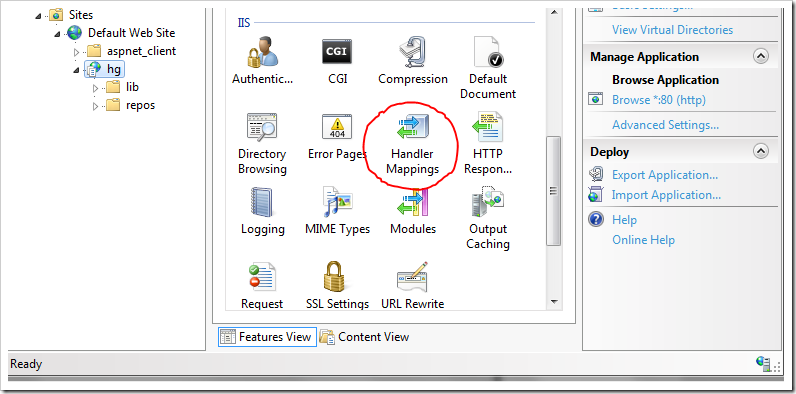
then in «Add Script Map…» from the right menu

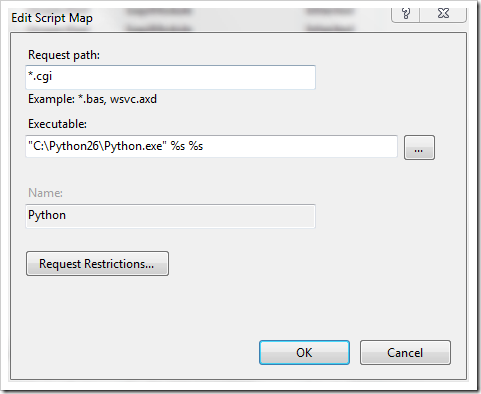
and then enter the script extension and Python executable path as shown in the following picture:
11. The final step is to configure Url Rewriter module correctly to allow us to use our repository with a nice URL like this: http://server/hg/test instead of http://server/hg/hgwebdir.cgi/test. For this you need to install the Url Rewriter module either using Web Platform installer or by manually doing so (link at the top of the post).
Once you have Url Rewriter installed, select it from you application Feature View:
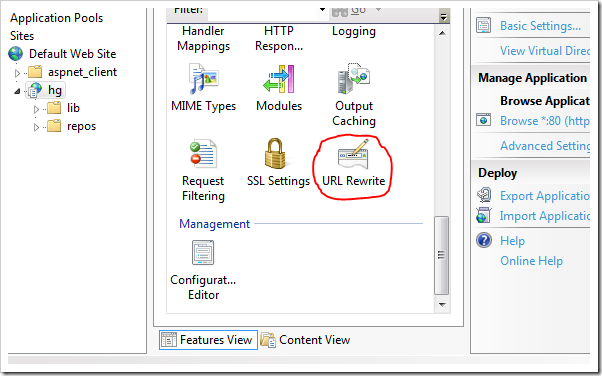
then click on the «Add Rules…» action from the right side panel and select «Blank Rule»:
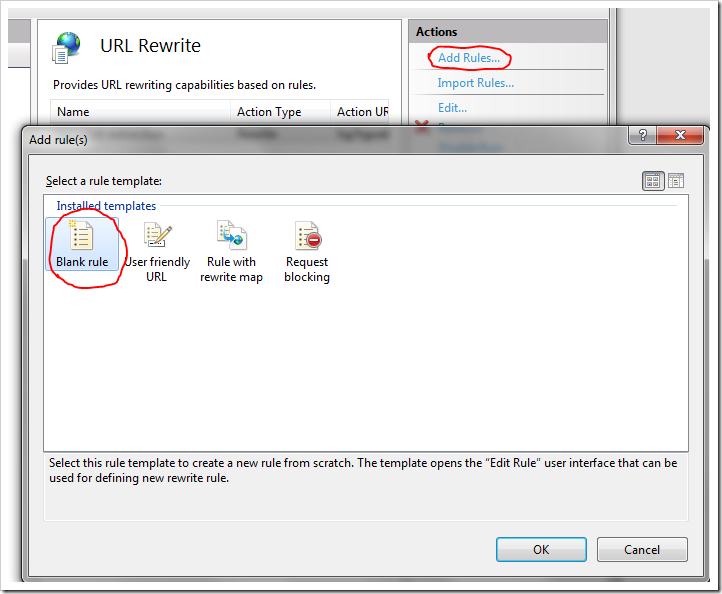
and enter the new rule data as shown in the following picture:
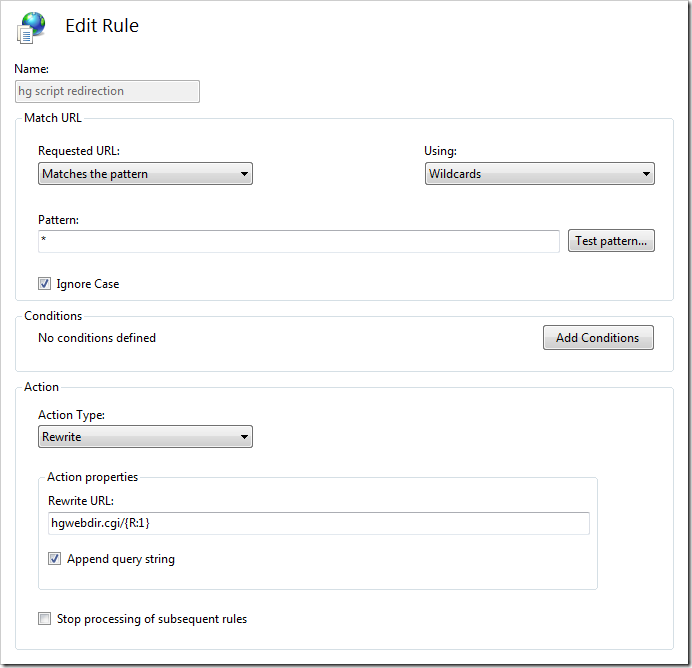
And that should be all.
Now try to navigate to http://localhost/hg with your browser and you should see something like this:

Just remember to setup authentication if you are going to use this server over the internet. I left this to you since you can use any of the standard IIS authentication methods available.
This post shows setting up a Mercurial server on Windows/IIS using hgweb.cgi.
Mercurial is a slippery slope. Sure, at first, you’re just using it to keep a version history of files on your laptop, like a glorified version of CVS. Then you realize how easy it is to clone and sync your project, and pretty soon you’ve got a copy on your desktop and you’re pushing changes back and forth like a pro. Before long, you realize that you probably should have an authoritative copy, so now you share a folder from your desktop and clone it there, too. If you’re not careful, you grant your coworkers access to the file share, maybe just read access at first, but pretty soon you open it up for read/write access, and now everyone’s checking in their scripts, their tools, their half-written blog posts yearning to breathe free…
Ok, so maybe that’s not such a bad thing. Mercurial is easy to pick up and learn, and being able to use Windows file sharing for syncing is pretty powerful in its sheer simplicity. But I found myself wanting to set up a real Mercurial server at home that I could access remotely, over a better protocol than SMB (Windows file sharing). I wanted something free, private, and secure, and I wanted the server and all my project files to live at home. After reviewing TFM, I decided hosting hgweb on IIS was the best bet for me.
If you’re new to Mercurial, start by downloading TortoiseHg and work your way through their Quick Start tutorial.
Set up the server
We’ll be following the steps from the Hg Wiki, so keep that page open to follow along.
- Pick your server. You can use any recent version of IIS on Windows or Windows Server. I decided to create a new VM with Windows Server 2016 TP4, because why not. Mine is domain-joined, because that’s the environment most people will be doing this in.
- Install IIS with these optional features:
- CGI: To be able to call Python.
- Basic authentication: Yes, really. For the HTTP transport, Mercurial clients only speak Basic authentication. This means your passwords are sent in cleartext, so you’ll want to use HTTPS or an SSH tunnel.
- Optional: Failed Request Tracing: If you need to debug HTTP errors.
Install the software
- Download Mercurial and Python.
- You’ll want the latest version of Mercurial that comes as Python modules, and the matching version of Python. Right now, that’s Mercurial-3.6.2 for Py2.7, and Python 2.7.11.
- You can choose 32-bit or 64-bit, as long as you download the same bitness for both. I recommend running native (64-bit), and that’s what I did.
- Of course, the first time I tried, I downloaded 64-bit Mercurial and 32-bit Python, and ended up with HTTP 502 errors.
- Install Python first. I installed into C:\Python27_64.
- Install Mercurial. The MSI here is kind of quirky. It should offer to install into the Python path that it found in the registry. If it doesn’t, that’s a good sign you mismatched the bitness.
- After installing, it might dump a Lib\ and PythonX\ folder in the root of the drive the MSI is stored in. They seem to both contain the same files, so delete the PythonX folder and move Lib into your Python root.
Create your Mercurial site in IIS
- Create a folder to store the Mercurial site in. This will be your HGWEB_ROOT. For example, E:\hg\webroot.
- In IIS Manager, create a new site or virtual directory backed by your HGWEB_ROOT. For example, I created a virtual directory called /hg on the Default Web Site.
- Create web.config in your HGWEB_ROOT. Be sure to replace C:\Python27_64 with your own python root.
<?xml version="1.0" encoding="UTF-8"?> <configuration> <system.webServer> <handlers> <add name="Python" path="*.cgi" verb="*" modules="CgiModule" scriptProcessor="C:\Python27_64\python.exe -u "%s"" resourceType="Unspecified" requireAccess="Script" /> </handlers> </system.webServer> </configuration> - For security reasons, CGI applications need to be whitelisted in IIS. Issue the following command to whitelist Python (substituting the path to your Python root).
%SystemRoot%\System32\inetsrv\appcmd set config /section:isapiCgiRestriction /+"[path='C:\Python27_64\python.exe -u %22%s%22',description='Python',allowed='True']" - Optional: Create test.html to test whether your webroot permissions are set correctly, and your web.config is being parsed correctly. (If necessary, grant permissions to IIS AppPool\YourAppPoolName. This was not necessary for me.)
<html><body><h1>HTML works!</h1></body></html>- If necessary, grant permissions to IIS AppPool\YourAppPoolName. This wasn’t necessary for me, since by default, Users have read and create access on subfolders of the root drive.
- HTTP 500.19 error: Chances are you’re missing CGI or your web.config file is malformed, or IIS can’t access the web root.
- Optional: Create test.cgi to test whether Python is enabled properly.
print 'Status: 200 OK' print 'Content-Type: text/html' print print '<html><body><h1>CGI/Python works!</h1></body></html>'- If you get an HTTP 404 error, make sure you used appcmd to whitelist the Python.exe command exactly as it is listed in web.config.
Set up your repositories
- Create a folder to be your repository root. For example, E:\hg\repos.
- If you have existing repos you want to serve, move or clone them in here.
- Make sure your web app identity (IIS AppPool\YourAppPoolName) has read and write access to the repos. (It should probably own this folder.)
Connect your website to Mercurial
- Add the following files to your HGWEB_ROOT:
- hgweb.config – Be sure to replace E:\hg\repos with the path to your repository root.
[repositories] E:\hg\repos = E:\hg\repos - hgweb.cgi from the Mercurial source code for your specific version
- Be sure to edit the file to set the full path to your hgweb.config.
- hgweb.config – Be sure to replace E:\hg\repos with the path to your repository root.
- Navigate to your hgweb site. You should be able to browse your repositories.
- If you are still getting errors, use IIS Failed Request Tracing to debug the failure.
- HTTP 502 error: indicates that the Python script failed. I got this error when I installed 64-bit Mercurial scripts on top of 32-bit Python. (Don’t do that.)
Your Mercurial server is now available for Anonymous, read-only access.
Enabling write access
- Enable HTTPS. Add a certificate and enable HTTPS bindings as normal for IIS. By default, Mercurial will only allow push requests over SSL (this is a good thing).
- Turn on Basic Authentication. Enable Basic Authentication on the virtual directory and set the default domain and realm to the FQDN of your AD domain. If you’re not on a domain, and you’re using local users, leave these blank. (IIS Manager > Your Hg Site > Authentication)
- Optional: Restrict Read access. By default, the site is open for anonymous read access. As long as you have Basic Authentication in place, you can use standard IIS Authorization rules to restrict read access as necessary. (IIS Manager > Your Hg Site > Authorization Rules)
- If you choose to use Authorization Rules, be sure to require HTTPS so that your server is not requesting passwords over HTTP.
- Grant push access. To grant write/push access, add a section like this to your hgweb.config.
[web]
allow_push = daniel