
Время на прочтение7 мин
Количество просмотров32K

Если вы отвечаете за управление Hyper-V в своей организации, то вам необходимо знать о преимуществах и недостатках шести лучших инструментов управления Hyper-V.
Hyper-V Manager — это инструмент Microsoft, поставляемый в комплекте с ролью Hyper-V. Его можно использовать для управления виртуальными машинами (virtual machine, VM), работающими на локальных или удалённых хостах Hyper-V.
▍ Плюсы Hyper-V Manager
- Он доступен бесплатно и поставляется в составе инструментов Microsoft для управления Hyper-V для Windows Server и Windows 10/11.
- Поскольку это встроенный инструмент, он стабилен и имеет хорошую производительность.
- Он позволяет создавать локальные и удалённые VM, чекпоинты VM, VHD, виртуальные коммутаторы и репликацию, а также управлять ими; по сути, это все функции, которые поддерживает Hyper-V.
- Можно выполнять аутентификацию при помощи учётных данных, отличающихся от локального аккаунта, для подключения к удалённому хосту Hyper-V, используя DNS-имя или IP-адрес хоста.
- Можно экспортировать и импортировать VM, и эта возможность применима как простой способ резервного копирования VM.
▍ Минусы Hyper-V Manager
Hyper-V Manager — отличный инструмент для небольших окружений виртуализации, однако он имеет и недостатки:
- Удаление VM в Hyper-V Manager на самом деле не удаляет соответствующие файлы виртуальных жёстких дисков (VHD), поэтому подчищать их администратору приходится вручную.
- Системе не хватает расширенных функций, например, возможности создания кластеров Hyper-V и автоматического создания VM. Хотя она способна распознавать хосты-кластеры, для кластерных VM не поддерживаются некоторые операции (например, изменение VHD).
- Система поддерживает только хосты Hyper-V; то есть управление хостами VMware ESXi или Citrix XenServer невозможно. Следовательно, её нельзя использовать в гетерогенных окружениях виртуализации.
PowerShell
PowerShell — отличный инструмент управления Hyper-V для администраторов, привыкших работать с командной строкой и скриптами. PowerShell remoting упрощает администраторам удалённое управление несколькими хостами Hyper-V и автоматизацию рабочих процессов при помощи скриптов. PowerShell Direct (PowerShell, запущенный внутри виртуальной машины из хоста Hyper-V) существенно расширяет возможности, позволяя управлять гостевыми VM под Windows без предварительного конфигурирования сети.

Запуск интерактивной сессии PowerShell remoting с сервером Hyper-V
▍ Плюсы PowerShell
Использование PowerShell для управления Hyper-V имеет следующие преимущества:
- PowerShell бесплатен, поставляется в комплекте с Windows и полностью интегрирован с Hyper-V и Windows.
- Поскольку PowerShell также является скриптовым языком, по сути, можно автоматизировать любую задачу управления, не поддерживаемую GUI-инструментами.
- Поддержка кроссплатформенности CLI упрощает администраторам удалённую работу с хостами Hyper-V, запущенными на гостевых VM без Windows (например, с Linux).
- Инструменты командной строки обычно быстры, менее подвержены багам и сбоям по сравнению с GUI-инструментами.
▍ Минусы PowerShell
Как и у любого инструмента, у PowerShell есть свои недостатки. Давайте рассмотрим минусы использования PowerShell в качестве инструмента управления Hyper-V.
- Поскольку это инструмент командной строки, его будет сложно осваивать администраторам, привыкшим к GUI-инструментам.
- PowerShell remoting требует ручного конфигурирования хостов и VM Hyper-V.
- PowerShell Direct работает только с гостевыми VM, на которых запущены Windows 10 и Windows Server 2016 (или выше) на хостах Hyper-V.
Windows Admin Center
Windows Admin Center — это свободный браузерный инструмент, который можно скачать из Microsoft Evaluation Center. Можно установить его или на Windows-сервер, или на присоединённом к домену компьютеру с Windows 10/11. Если инструмент установлен на сервере, он работает в качестве шлюза, позволяя нескольким администраторам вашей организации управлять хостами Hyper-V и другими устройствами, не увеличивая стоимость лицензирования.

Windows Admin Center
▍ Плюсы Windows Admin Center
- Это интегрированный набор инструментов для управления хостами Hyper-V, кластерами Hyper-V, Azure Stack HCI, Windows-серверами, рабочими станциями Windows и Azure VM.
- Он позволяет нескольким администраторам организации удобно управлять хостами Hyper-V через веб-браузер.
- Он использует внутренние технологии Windows (PowerShell, WMI и WMF) и не требует никакой установки агентов на хостах.
- Можно конфигурировать его так, чтобы он безопасным образом управлял хостами из любой точки мира через Интернет.
- Поддерживает современные способы аутентификации и управление доступом на основе ролей, давая вам детальный контроль за тем, кто к чему имеет доступ.
- Также он позволяет использовать расширения, добавляющие функции и возможности.
▍ Минусы Windows Admin Center
На мой взгляд, недостатков у использования Windows Admin Center в качестве инструмента управления Hyper-V нет. Однако существуют некоторые проблемы, которые иногда сложно устранять, в частности, в окружениях рабочих групп без Active Directory. Если вы считаете, что Windows Admin Center имеет недостатки, напишите об этом в комментариях.
System Center Virtual Machine Manager
System Center — это коммерческий пакет Microsoft для управления дата-центрами, содержащий инструмент управления Hyper-V под названием Virtual Machine Manager (VMM), также иногда называемый System Center Virtual Machine Manager (SCVMM). VMM не распространяется как отдельный продукт. Он также может использоваться и для управления Hyper-V, однако в первую очередь рассчитан на использование в гетерогенных системах, состоящих из разных типов гипервизоров, таких как Microsoft Hyper-V, VMware ESXi и Citrix XenServer.

System Center Virtual Machine Manager 2022
▍ Плюсы SCVMM
SCVMM обладает следующими достоинствами:
- Предоставляет все основные и расширенные функции для управления хостами и кластерами Hyper-V в одной плоскости управления. Он может работать не только с Hyper-V, но и эффективно управлять гипервизорами ESXI и XenServer.
- Его интегрированная конверсия physical-to-virtual (P2V) позволяет с лёгкостью виртуализовать физические серверы или машины.
- Позволяет осуществлять быстрое развёртывание и миграцию при помощи шаблонов VM. Администраторы могут создавать и разворачивать VM серийно, что просто необходимо, если вам нужно управлять множеством VM.
- Предоставляет возможность централированного мониторинга и отчётности, что обеспечивает администраторам подробную информацию обо всей инфраструктуре серверов дата-центра.
▍ Минусы SCVMM
С точки зрения малых и средних организаций инструмент имеет следующие недостатки:
- Покупка всего пакета System Center может оказаться слишком дорогой для вашей организации, если он нужен вам только для управления Hyper-V.
- Запуск SCVMM имеет высокие аппаратные и программные требования.
- Из-за сложности продукта администраторам нужно вкладывать больше времени в обучение для использования инструмента.
- SCVMM требует установки агента на каждый хост, которым нужно управлять.
ProHVM компании Probus IT
ProHVM — коммерческий инструмент управления Hyper-V, позволяющий администрировать любую версию Hyper-V, работающую на Windows Server, Server Core, Windows 10/11 или на bare-metal-сервере Hyper-V. Для каждого хоста Hyper-V, которым нужно управлять, требуется приобретение лицензии Professional, а лицензия Technician позволяет одному пользователю управлять неограниченным количеством хостов Hyper-V. Версия ProHVM Standard полностью бесплатна для личного и коммерческого использования.

ProHVM
▍ Плюсы ProHVM
- Поддержка управления хостами Hyper-V в разных доменах и рабочих группах с использованием разных наборов учётных данных.
- Версия Standard бесплатна для коммерческого использования с ограниченным набором функций. Кроме того, коммерческая версия выгоднее, чем у многих других инструментов управления Hyper-V.
- Инструмент позволяет управлять файлами и папками на удалённых хостах.
- Включает в себя cVM — превосходную альтернативу VMConnect.exe или RDP-клиенту. В cVM можно использовать параметры для создания горячих клавиш или скриптов логина для удобного подключения к VM.
- Поддерживает расширенные возможности, например, экспорт и импорт VM, миграцию накопителей, поддержку кластеров, живую миграцию и Hyper-V Replica.
▍ Минусы ProHVM
- Это традиционное десктопное приложение, требующее установки на рабочую станцию каждого администратора. Отсутствует опция централизованной установки и поддержка веб-браузера.
- При использовании стороннего продукта могут возникать сомнения в надёжности, безопасности и поддержке.
Igiko Management Tools
Igiko Management Tools — ещё одно коммерческое веб-приложение, которое можно использовать для удалённого управления хостами и VM Hyper-V, а также их мониторинга. Можно установить его на машину с Windows, а затем использовать веб-браузер для удалённого управления хостами Hyper-V, то есть его можно запускать под Windows, Linux или macOS.

Igiko Management Tools
▍ Плюсы Igiko Management Tools
- Этот легковесный браузерный инструмент предоставляет нескольким администраторам доступ для удалённого управления хостами и VM Hyper-V без необходимости установки на каждой рабочей станции.
- Он имеет возможность подключения гостевых VM в RDP-консоли на основе HTML5 при помощи веб-браузера.
- Он позволяет переносить файлы между локальными и удалёнными хостами.
- Встроенный удалённый шлюз позволяет подключать хосты и VM Hyper-V из любой точки мира через Интернет, а затем управлять ими. Защищённый веб-тоннель даже не требует статического IP-адреса или DNS.
- Он предоставляет живой контроль за хостами и гостевыми VM Hyper-V, передавая информацию о таких параметрах, как потребление ресурсов ЦП, памяти, аптайме и версии ОС.
- Он имеет модель аутентификации с подходом claims-based для пользователей и групп Windows.
- Возможна установка прав на хосты и VM Hyper-V отдельным пользователям или группам.
▍ Минусы Igiko Management Tools
- Первоначальное подключение к удалённым хостам и VM может быть сложным, а ошибки иногда трудно устранять.
- RDP-консоль на основе HTML5 в прошлом имела баги и иногда у неё возникают проблемы с масштабированием экрана.
- Многие функции инструмента доступны и в Hyper-V Manager.
Заключение
Выбор наиболее подходящего для вашей организации инструмента управления Hyper-V сильно зависит от размеров сети и, разумеется, от бюджета. На мой взгляд, если вы работаете в небольшой организации с десятками хостов Hyper-V, то для ваших потребностей хорошо подойдёт Hyper-V Manager (возможно, в сочетании с Failover Cluster Manager). Если вам не нравится Hyper-V Manager, то стоит попробовать ProHVM — превосходную стороннюю альтернативу, имеющую отличное соотношение цены и возможностей.
Если вы работаете в организации средних размеров, имеющей сотни хостов Hyper-V, то эффективно управлять ими вам поможет Windows Admin Center, не требующий трат на лицензирование.
Провайдеры Managed Service Provider (MSP) и крупные организации часто лицензируют System Center, поэтому логичным выбором для их корпоративных сетей является VMM.
RUVDS | Community в telegram и уютный чат

From Wikipedia, the free encyclopedia
| Developer(s) | Microsoft |
|---|---|
| Stable release |
2022 UR2 (10.22.1711.0) |
| Operating system | Windows Server 2016 and later |
| Type | Hardware virtualization |
| License | Trialware |
| Website | https://learn.microsoft.com/en-us/system-center/vmm/?view=sc-vmm-2022 |
System Center Virtual Machine Manager (SCVMM) forms part of Microsoft’s System Center line of virtual machine management and reporting tools, alongside previously established tools such as System Center Operations Manager and System Center Configuration Manager. SCVMM is designed for management of large numbers of Virtual Servers based on Microsoft Virtual Server and Hyper-V, and was released for enterprise customers in October 2007.[1] A standalone version for small and medium business customers is available.
System Center Virtual Machine Manager enables increased physical server utilization by making possible simple and fast consolidation on virtual infrastructure. This is supported by consolidation candidate identification, fast Physical-to-Virtual (P2V) migration and intelligent workload placement based on performance data and user defined business policies (NOTE: P2V Migration capability was removed in SCVMM 2012r2). VMM enables rapid provisioning of new virtual machines by the administrator and end users using a self-service provisioning tool. Finally, VMM provides the central management console to manage all the building blocks of a virtualized data center.
Microsoft System Center 2016 Virtual Machine Manager was released in September 2016. This product enables the deployment and management of a virtualized, software-defined datacenter with a comprehensive solution for networking, storage, computing, and security.
Microsoft System Center 2019 Virtual Machine Manager was released in March 2019. It added features in the areas of Azure integration, computing, networking, security and storage.
Microsoft System Center 2022 Virtual Machine Manager RTM was released in March 2022. It can manage hosts with Windows Server 2022, Windows 11, Azure Stack HCI clusters RTM, and supports dual stack SDN deployment.
Microsoft System Center 2022 Virtual Machine Manager UR1 was released on November 15, 2022. It added features in the areas of support for Azure Stack HCI clusters 22H2, SQL Server 2022, VMware ESXI 7.0, and 8.0.
The latest release is Microsoft System Center 2022 Virtual Machine Manager UR2, which was released in November 2023. It added features in the areas of support for VMware VMs with disk size greater than 2TB, Linux guest operating systems — Ubuntu Linux 22.04, Debian 11, Oracle Linux 8 and 9.
- Microsoft Servers
- Microsoft System Center
- System Center Data Protection Manager
- System Center Advisor
- ^ Virtual Machine Manager FAQ
- Documentation for System Center Virtual Machine Manager 2008/2008 R2 (TechNet Library)
- Documentation for System Center Virtual Machine Manager 2012 (TechNet Library)
- Microsoft’s Virtualization Strategy, circa February 2007
- Blogs on System Center Virtual Machine Manager 2012
- TechNet wiki articles on System Center Virtual Machine Manager 2012
Any network or sys admin dealing with a swathe of virtual machines knows that virtualization is paramount when it comes to cutting costs and saving valuable time by being able to swiftly re-image a troubled VM rather than spending time on extensive troubleshooting. In this article we take a look at the best VM managers and monitoring tools.
Here is our list of the top VM managers and monitoring software:
- ManageEngine OpManager – EDITOR’S CHOICE This network and server monitoring system includes specialist routines for monitoring VMWare, Hyper-V, Citrix, and Nutanix. Available for Windows Server and Linux. Start a 30-day free trial.
- Paessler PRTG – FREE TRIAL This package includes monitoring sensors for many technologies, including VMware, Hyper-V, Citrix, and Nutanix virtualizations. You can also monitor physical and cloud servers with this package, plus networks and applications. Available as a SaaS platform or a software package for Windows Server. Get a 30-day free trial.
- Site24x7 – FREE TRIAL Excels in VM management, providing a comprehensive solution for the monitoring and maintenance of virtualized environments. Its integrated approach and detailed insights into VM performance make it indispensable for ensuring high availability and efficiency, aligning perfectly with the demands of modern IT virtualization. Start a 30-day free trial.
- Acronis Cyber Protect – FREE TRIAL This tool monitors and manages virtualization instances, paying attention to replication, backup, and migration processes. This is a cloud-based system. Start a 30-day free trial.
- IntelliMagic Vision This system monitor tracks the performance of the full stack of a VMWare implementation right down to the supporting servers, networks, and storage clusters. Implemented as a virtual appliance or as a cloud platform.
- Turbonomic A cloud-based infrastructure monitor that can supervise on-site resources, such as virtualizations and cloud resources, too.
- Veeam ONE A performance monitoring package for virtualizations and backup systems, with VMware vSphere, Microsoft Hyper-V, and Nutanix AHV monitoring capabilities. Runs on Windows and Windows Server.
- ESXi Embedded Host Client A free monitoring tool for VMWare hypervisors provided by VMWare itself. Runs on top of the hypervisor.
Both Microsoft and VWmare’s offerings in the realm of hypervisors, ESX(i) and Hyper-V, have their own capabilities and features, but as with any given environment, there are a plethora of tools that expand on that functionality and can make your workload easier to handle while helping prevent catastrophic downtime.
It’s extremely important to be able to easily and swiftly manage your array of virtual machines – whether it’s two or twenty, you have to be able to quickly manipulate them to adjust for the needs of your environment.
Management software for this task can be one of the most powerful tools if you have the right software and know how best to apply it.
It’s easy enough to peruse through your array of VMs and execute scripts, perform updates, and make other various changes, and both Hyper-V and ESX(i) will have some ability to help with this, but a powerful program that can immensely streamline and automate these sorts of tasks, and more, can save untold amounts of time – especially in the case of non-standard updates or configurations, or in an instance of trouble when you need to make fast changes over a number of VMs.
The Best VM Managers and Monitoring Software
We’ve compiled a list of the best VM managers on the market along with some screenshots, main features and anything that we thought would be useful to sys admins who are looking for an option when looking for a management tool for the virtual machines.
Pricing is included and there are free trials for all of them below. We recommend you grab a free trial and see how it works for you and your environment.
1. ManageEngine OpManager – FREE TRIAL
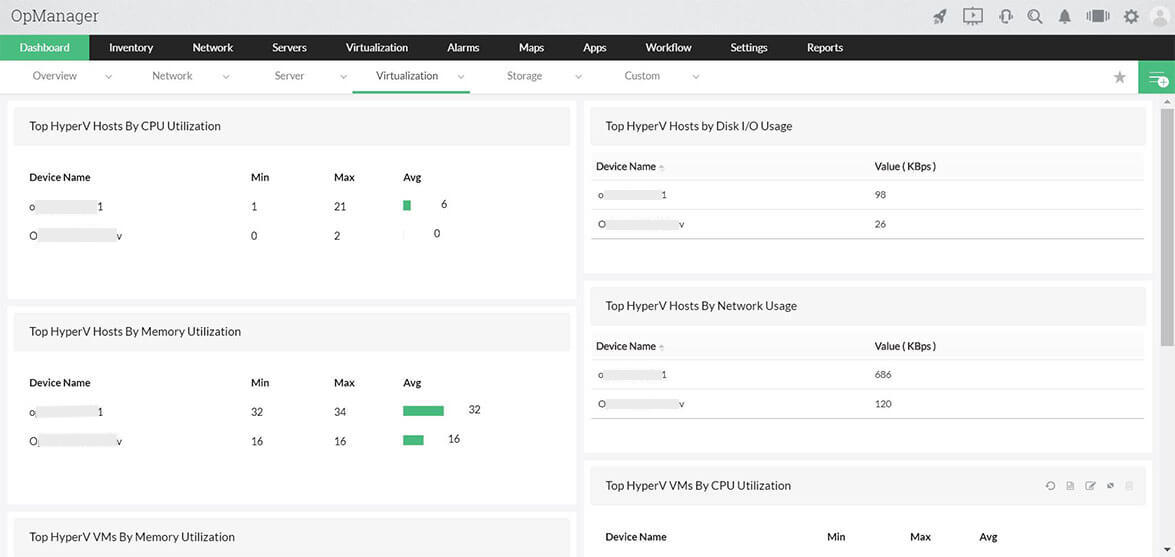
ManageEngine OpManager monitors networks and servers and also some applications, such as web and email servers and Active Directory. This package is particularly strong at monitoring virtualizations, and the OpManager system is able to monitor VMWare vShpere and ESXi, Microsoft Hyper-V, Citrix XenServer, and Nutanix HCI.
Key Features:
- Autodiscovery: Utilizes autodiscovery to find, inventory, and map new devices, streamlining network monitoring setup and configuration.
- Customizable Dashboards: Offers over 200 customizable widgets to build unique dashboards and reports, providing flexibility and adaptability to diverse monitoring needs.
- Intelligent Alerting: Uses intelligent alerting to reduce false positives and eliminate alert fatigue across larger networks, ensuring timely response to critical issues.
- Multiple Alerting Channels: Supports email, SMS, and webhook for numerous alerting channels, enabling organizations to customize alert notifications based on their preferences.
- Seamless Integration: Integrates well within the ManageEngine ecosystem with other products, enhancing operational efficiency and streamlining workflow management.
Why do we recommend it?
ManageEngine OpManager stands out as a comprehensive network monitoring solution, particularly strong in monitoring virtualizations, making it an ideal choice for organizations seeking efficient network and server management. Our recommendation is based on OpManager’s ability to provide immediate insights into network performance, thanks to its autodiscovery feature, which efficiently identifies, inventories, and maps new devices. With over 200 customizable widgets to build unique dashboards and reports, OpManager offers flexibility and adaptability to diverse monitoring needs. Its intelligent alerting system reduces false positives and eliminates alert fatigue across larger networks, ensuring timely response to critical issues. Additionally, OpManager’s seamless integration within the ManageEngine ecosystem enhances operational efficiency and streamlines workflow management.
The monitor starts its service by searching the network for all connected devices and logging them in a network inventory. It then searches through each server that it encounters for the applications and services that it is able to monitor. This phase reveals all of the virtualizations operating on the system.
The OpManager module will prompt you for access credentials to each virtual environment and then it will search through, identifying each server and tracing its virtual infrastructure to its dependent VMs. The service presents a map of these systems. The discovery process is recursive, so it will remap dependencies whenever you make changes in your hypervisors.
The VM monitoring capabilities watch CPU, memory, and disk space allocations for each virtual server and it tracks the usage of resources by each VM. The service presents a summary of all virtualization implementations and enables a drop-down path through to each individual server and its VMs. The summary shows the top 10 resource users overall and then the detail page for a virtual server shows which CVMs are using the most resources.
The OpManager system places performance thresholds on each metric that it measures and also resource availability requirements. If a VM starts behaving unusually or if a resource is running short, the system will raise an alert. The OpManager system is customizable, so you can adjust threshold levels and also specify that alerts should be forwarded to specific staff members by email or SMS.
Who is it recommended for?
ManageEngine OpManager is recommended for organizations of all sizes seeking a feature-rich network monitoring solution that prioritizes ease of use and efficiency. Its immediate usability and customizable dashboards make it suitable for organizations looking to deploy a monitoring solution quickly. Additionally, OpManager’s intelligent alerting system and support for multiple alerting channels, including email, SMS, and webhook, make it ideal for organizations managing larger networks with diverse infrastructure components. While requiring a time investment to properly learn due to its feature-rich nature, OpManager’s scalability and comprehensive feature set make it well-suited for organizations prioritizing efficient network and server management.
Pros:
- Immediate Usability: Designed to work right away, offering immediate insights into network performance without extensive setup or configuration.
- Flexibility and Customization: Provides over 200 customizable widgets to build unique dashboards and reports, catering to diverse monitoring requirements.
- Efficient Alert Management: Reduces false positives and eliminates alert fatigue across larger networks, ensuring efficient alert management and response.
- Integration within ManageEngine Ecosystem: Seamlessly integrates within the ManageEngine ecosystem, enhancing operational efficiency and facilitating workflow management.
Cons:
- Time Investment for Learning: Requires a time investment to properly learn due to its feature-rich nature, necessitating training and familiarization for optimal utilization.
ManageEngine OpManager is on-premises software built for Linux and Windows Server OpManager is available in four editions:
- Free for up to three devices
- Standard starting at a price to monitor 10 devices — $245
- Professional starting at a price to monitor 10 devices — $345
- Enterprise starting at a price to monitor 250 devices — $11,545
Get a 30-day free trial.
ManageEngine OpManager
Start a 30-day FREE Trial
2. Paessler PRTG – FREE TRIAL
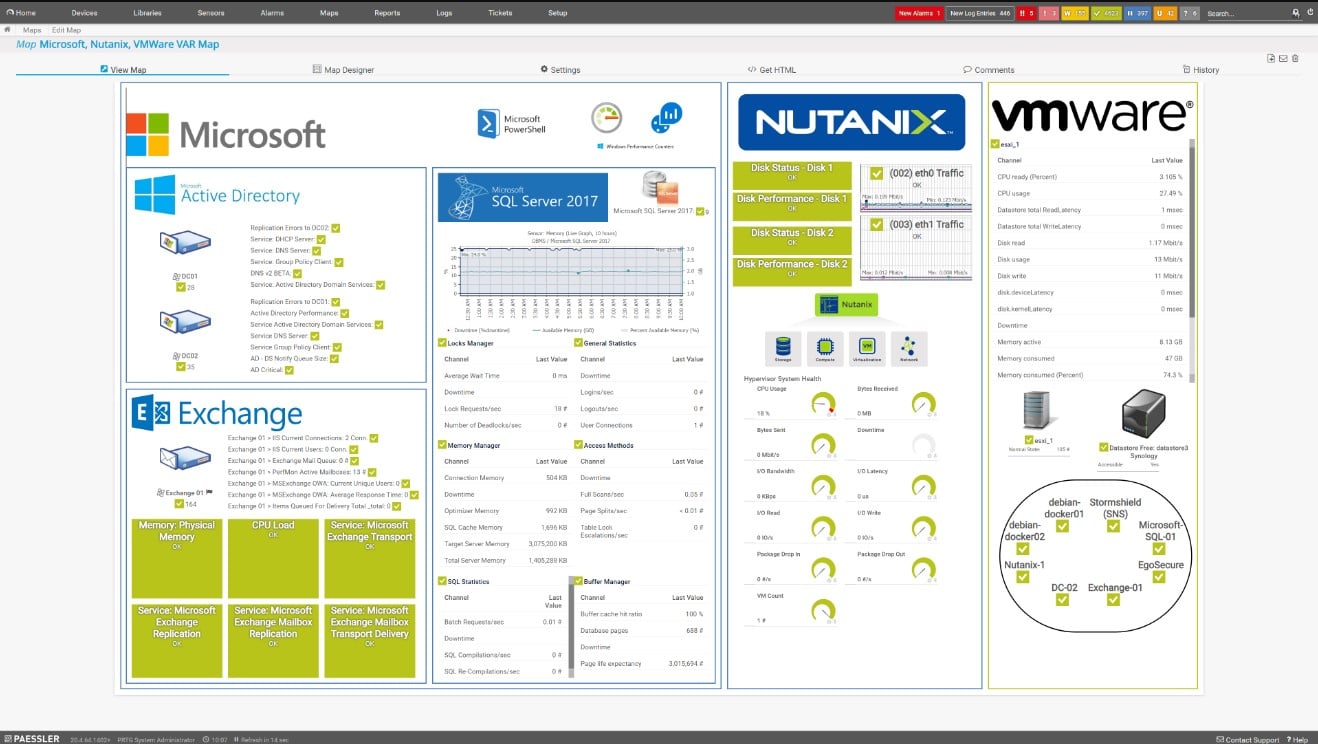
Paessler PRTG is a package of sensors and the buyer chooses which monitoring units to activate. Turning on a sensor adds an associated page in the PRTG dashboard and it is possible to alter these or even create extra new monitoring screens.
PRTG is able to monitor:
- VMWare vShpere and ESXi
- Microsoft Hyper-V
- Citrix XenServer
- Nutanix HCI
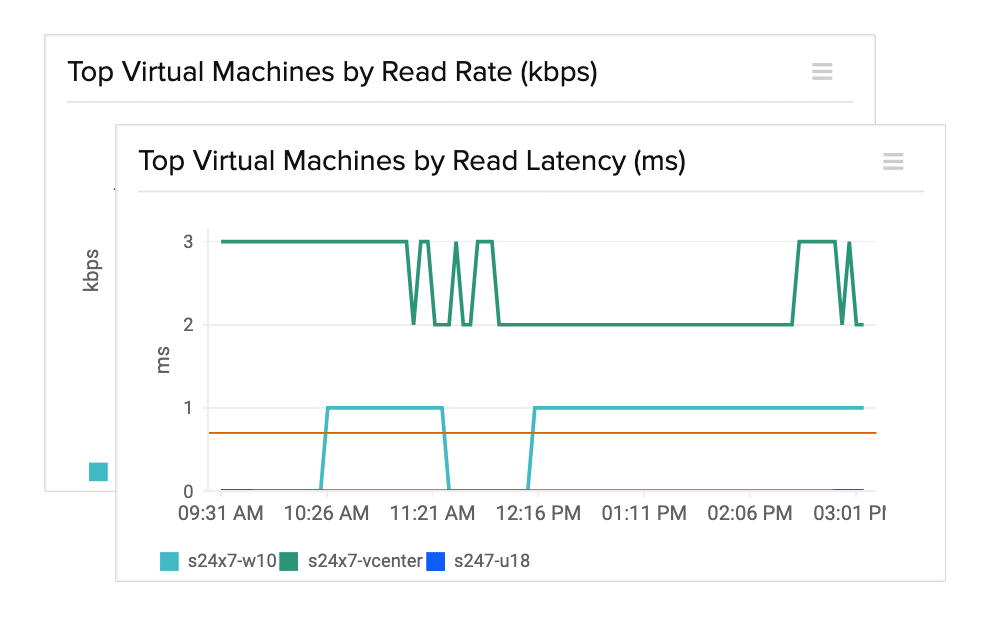
This package will discover and map the relationships between VMs and virtual servers. It then tracks resource usage and the response times of the virtual system. The PRTG package includes monitors for physical servers, so it is possible to add on probes for the physical server resources that support your virtualized environment.
PRTG provides an alerting mechanism and this can be set to trigger if a resource runs short or if an application hosted in a VM slows down. The tool constantly monitors VM activity and will point to which element of your system is at fault if a performance problem develops.
The PRTG system enables automated system monitoring because the system can be set up to forward alerts as notifications by SMS or email. This means that support technicians can get on with other tasks, knowing that they will be called to the monitoring dashboard if they are needed.
The PRTG package also includes monitors for networks and applications, which makes it the ideal package for monitoring multi-level systems, such as virtualizations. It is also able to test internet connections, wireless networks, and cloud services.
Pros:
- Full-stack observability
- Discovers and maps virtual infrastructure
- Monitors VM performance along with virtual server activity
- Tracks the usage of physical server resources
- Alerts for performance problems or resource shortages
Cons:
- No version for Linux
Paessler PRTG is available as a software package for Windows Server or as a SaaS platform.
Paessler PRTG is priced in accordance with the number of sensors that a buyer requires:
- PRTG Free – Up to 100 sensors: $0
- PRTG 500 – Up to 500 sensors: $2,149 per year
- PRTG 1000 – Up to 1,000 sensors: $3,899 per year
- PRTG 2500 – Up to 2,500 sensors: $8,099 per year
- PRTG 5000 – Up to 5,000 sensors: $14,199 per year
- PRTG 10000 – Up to 10,000 sensors: $17,899 per year
You can get a 30-day free trial of PRTG with all sensors activated.
Paessler PRTG
Start a 30-day FREE Trial
3. Site24x7 – FREE TRIAL
Site24x7 stands out in the category of VM (Virtual Machine) management for its comprehensive monitoring capabilities. In today’s IT landscape, where virtualization is key, having a robust tool for managing VMs is crucial. Site24x7 offers an integrated approach to VM monitoring, ensuring the high availability and performance of virtualized environments. It fits seamlessly into the context of the best VM managers, offering detailed insights into VM performance, which is vital for maintaining system integrity and efficiency.
Key Features:
- In-Depth VM Performance Monitoring: Tracks comprehensive VM performance metrics to ensure system integrity and efficiency.
- Customizable Alerts: Set up alerts tailored to VM health and performance issues, enabling proactive management and timely intervention.
- Integration with Popular Virtualization Platforms: Seamlessly integrate with leading virtualization platforms for enhanced compatibility and ease of use.
- Detailed Reporting: Access detailed reports for capacity planning and analysis, facilitating informed decision making.
- Cloud-Based Architecture: Enjoy the flexibility and scalability of a cloud-based solution, ensuring adaptability to varying business needs and workloads.
Why do we recommend it?
Site24x7 earns our recommendation for its comprehensive VM monitoring capabilities, offering deep insights into VM performance metrics. Its cloud-based architecture ensures scalability and flexibility, making it adaptable to the evolving needs of businesses. Tested rigorously, our endorsement is grounded in the tool’s reliability and effectiveness in ensuring the high availability and performance of virtualized environments.
Who is it recommended for?
Ideal for IT administrators and system engineers managing diverse virtual environments, Site24x7 caters to medium to large enterprises seeking a proactive approach to VM management. Its advanced features and customizable alerts make it indispensable for those prioritizing detailed monitoring and preemptive issue resolution.
Pros:
- Comprehensive VM Monitoring: Provides detailed insights into VM health and performance, empowering effective management.
- Scalable and Flexible Cloud-Based Solution: Offers scalability and flexibility, accommodating the evolving needs of businesses.
- Intuitive User Interface: Enhances usability and accessibility.
Cons:
- Learning Curve for Beginners: Extensive features may present a learning curve for beginners or smaller teams, requiring time to fully harness its capabilities.
Get started with a 30-day free trial.
Site24x7 VM
Start a 30-day FREE Trial
4. Acronis Cyber Protect – FREE TRIAL
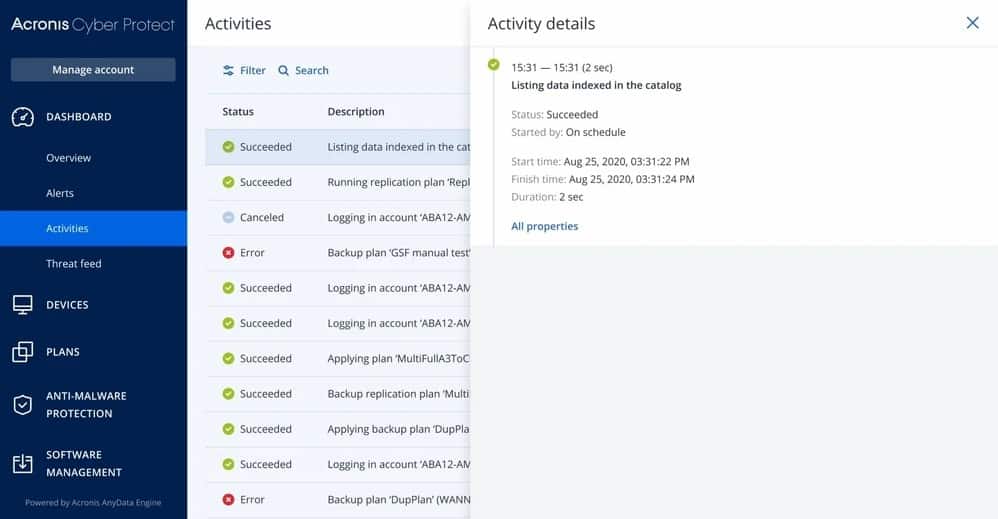
Acronis Cyber Protect is a protection system for a range of applications and infrastructure and it has the capabilities of managing the backup and replication processes of virtualizations. The Acronis system is also geared towards protecting systems from ransomware and helping them recover from any cyber attacks quickly. This service is delivered from the cloud.
Key Features:
- Virtualization Backup and Replication: Manage and protect virtualization systems, including VMware, Hyper-V, Citrix Xen, RedHat VM, KVM, and Oracle VM, with automated backup and replication processes.
- AI-Based Ransomware Detection: Guard against ransomware attacks with an AI-based detection service that blocks potential threats, ensuring the integrity of protected systems.
- Cross-Platform Compatibility: Available for both Windows and Mac platforms, offering a seamless experience for users across different operating environments.
- Scripting and Automation: Clone instances via scripts and automate scheduling tasks, enhancing efficiency and reducing manual intervention.
- Comprehensive Cyber Defense: Supplemental service, Acronis Cyber Protect, provides advanced cyber defense systems for enhanced security.
Why do we recommend it?
Acronis Cyber Protect is highly recommended for its robust protection and management capabilities across various applications and infrastructure. Its integrated backup and replication features ensure the security and resilience of virtualized environments, coupled with rapid recovery from cyber attacks. Tested extensively, our recommendation is founded on the product’s proven effectiveness and reliability in safeguarding systems from ransomware and other cyber threats.
The virtualization systems that Acronis Cyber Backup manages and protects are:
- VMware
- Hyper-V
- Citrix Xen
- RedHat VM
- KVM
- Oracle VM
In the case of virtualizations, the charge is levied per virtual server and there is no extra charge per VM. The system is always on and initially performs a complete backup. After that, it just works on an incremental backup basis. Copies are stored locally, on cloud storage, or on both. Once a virtual server and its infrastructure has been backed up, that backup can be used to move the instance or replicate it.
Your protected systems are guarded by an AI-based ransomware detection service that blocks access to potential threats. A separate service, called Acronis Cyber Protect offers more comprehensive cyber defense systems.
Who is it recommended for?
This tool is an excellent fit for enterprises seeking comprehensive protection and management solutions for their diverse IT environments. Suitable for both Windows and Mac platforms, Acronis Cyber Protect caters to organizations of all sizes, offering advanced features without compromising usability. Ideal for IT professionals tasked with safeguarding critical systems and data, it provides peace of mind and operational efficiency.
Pros:
- Comprehensive VM Monitoring: Provides detailed insights into VM health and performance, empowering effective management.
- Scalable and Flexible Cloud-based Solution: Offers scalability and flexibility, accommodating the evolving needs of businesses.
- Intuitive User Interface: Features an intuitive and user-friendly interface, enhancing usability and accessibility.
Cons:
- Learning Curve for Beginners: Extensive features may present a learning curve for beginners or smaller teams, requiring time to fully harness its capabilities.
Compatibility: Acronis Cyber Backup is a cloud-based system. Its on-site operations run on top of whichever hypervisor you are protecting, so operating system compatibility is not an issue. The console for the service is accessed through any standard Web browser.
Price: Acronis Cyber Backup is offered in two editions:
- Standard includes protection for VMWare and Hyper-V – From $559
- Advanced, which is needed to protect Citrix, KVM, RHV, and Oracle VM – From $929
Download: There is no download needed to set up an account. You can get a 30-day free trial.
Acronis Cyber Protect
Start a 30-day FREE Trial
5. IntelliMagic Vision
IntelliMagic Vision offers a unified monitoring service for systems that run over a wide variety of underlying infrastructure. That means it can deal with hyperconverged systems that cross between remote and cloud-based systems as well as the local network. The system is very well suited to the overlay concept of hypervisors and it can drill through all of the layers to give live statuses on VMWare implementations and the underlying system.
Key Features:
- Unified Monitoring Service: Provides a unified monitoring service for systems spanning various underlying infrastructure configurations, including hyperconverged systems and network storage solutions.
- VMWare Monitoring Integration: Threads VMWare monitoring into SAN monitoring, offering insights into storage cluster utilization and its impact on processors.
- Real-Time Dashboard: Monitor VMs, ESX hosts, servers, networks, and storage fabric in real-time through a customizable dashboard, offering comprehensive visibility into system performance.
- AI-Driven Capacity Planning: Leverages AI processes to identify links between different virtual layers and aid in automatic resizing and virtual remapping, optimizing performance and load distribution.
- Constant System Availability: Adds value to administration efforts by ensuring constant system availability while optimizing settings for improved performance.
Why do we recommend it?
IntelliMagic Vision earns our recommendation for its comprehensive and unified monitoring service, catering to a wide range of underlying infrastructure configurations. With its ability to seamlessly handle hyperconverged systems spanning remote, cloud-based, and local networks, IntelliMagic Vision provides invaluable insights into system performance and availability. Our endorsement is based on extensive testing, confirming its effectiveness in monitoring VMware implementations and underlying infrastructure, coupled with its ability to optimize settings and ensure constant system availability.
The IntelliMagic Vision package is particularly geared towards monitoring network storage solutions, such as SAN and NAS. The VMWare monitoring tool in IntelliMagic Vision threads into SAN monitoring, so you can see the way that your hypervisor is using storage clusters as well as its impact on processors.
Watch your VMs, your ESX hosts, through to servers, network, and the storage fabric in real-time through the IntelliMagic Vision dashboard. The monitor picks up the virtual logical unit number for the storage linked to the VMWare virtualization, so you can see the system as your VMWare setup sees it. SAN monitoring services within the same dashboard carry through to the performance of underlying physical hardware.
The link between VMware and SAN performance is very useful because it untangles the complicated interplay between virtual and physical resources that can often pass through several virtual layers before hitting metal.
The IntelliMagic software uses AI processes to identify links between different virtual layers provided by separate suppliers. It is able to track boundaries for VMs through automatic resizing and virtual remapping. This makes tracking load distribution a lot easier and it also helps you to assess the configuration of all virtual components so you can improve performance and squeeze extra performance out of your physical and virtual infrastructure. IntelliMagic Vision adds value to your administration efforts by ensuring constant system availability while optimizing settings.
Who is it recommended for?
Ideal for enterprises and data centers, IntelliMagic Vision is tailored for organizations requiring advanced monitoring and optimization capabilities for their network storage solutions. Suitable for IT administrators and infrastructure managers tasked with overseeing complex environments, it offers highly customizable dashboards and AI-driven capacity planning features to enhance operational efficiency and performance.
Pros:
- Customizable Admin Dashboard: Highly customizable admin dashboard, offering tailored insights and visibility into system performance.
- Storage Coordination: Coordinates storage activities across the environment, optimizing resource utilization and enhancing efficiency.
- AI-driven Capacity Planning: Leverages AI to aid in capacity planning, facilitating informed decision-making and resource allocation.
Cons:
- Enterprise Focus: Better suited for enterprises and data centers, potentially less suitable for smaller-scale deployments due to its advanced monitoring and optimization capabilities.
IntelliMagic Vision runs on virtualization as a virtual appliance, you can have it on-site or on a cloud platform. As the supporting hypervisor mediates with the operating system, it doesn’t matter what OS the host for the system runs. Contact the Sales Department to get a quote. You can request a free demo of IntelliMagic Vision.
6. Turbonomic
Turbonomic is a Cloud-based monitor for system resources, such as virtualizations. The service can cover on-site infrastructure, multi-site WANs, cloud services, and hybrid environments.
The monitor is able to supervise:
- VMWare vCenter
- Microsoft Hyper-V
- IBM Power VM
- OpenStack Private Cloud
- Nutanix HCI
- Azure
The service is also able to monitor container environments.
Key Features:
- Comprehensive Coverage: Monitor system resources, including virtualizations, across on-site infrastructure, multi-site WANs, cloud services, and hybrid environments.
- Autodiscovery and Workload Organization: Automatically identify and register system resources as workloads, enabling efficient management and optimization.
- Dependency Mapping: Map interdependencies of infrastructure elements and virtualization instances, providing insights into system relationships and performance impact.
- Automated Recommendations: Generate configuration adjustments to improve efficiency and resilience based on system analysis and workload optimization.
- Automated Responses: Set up automated responses to detected problems, such as resizing virtual server memory allocation, streamlining issue resolution.
Why do we recommend it?
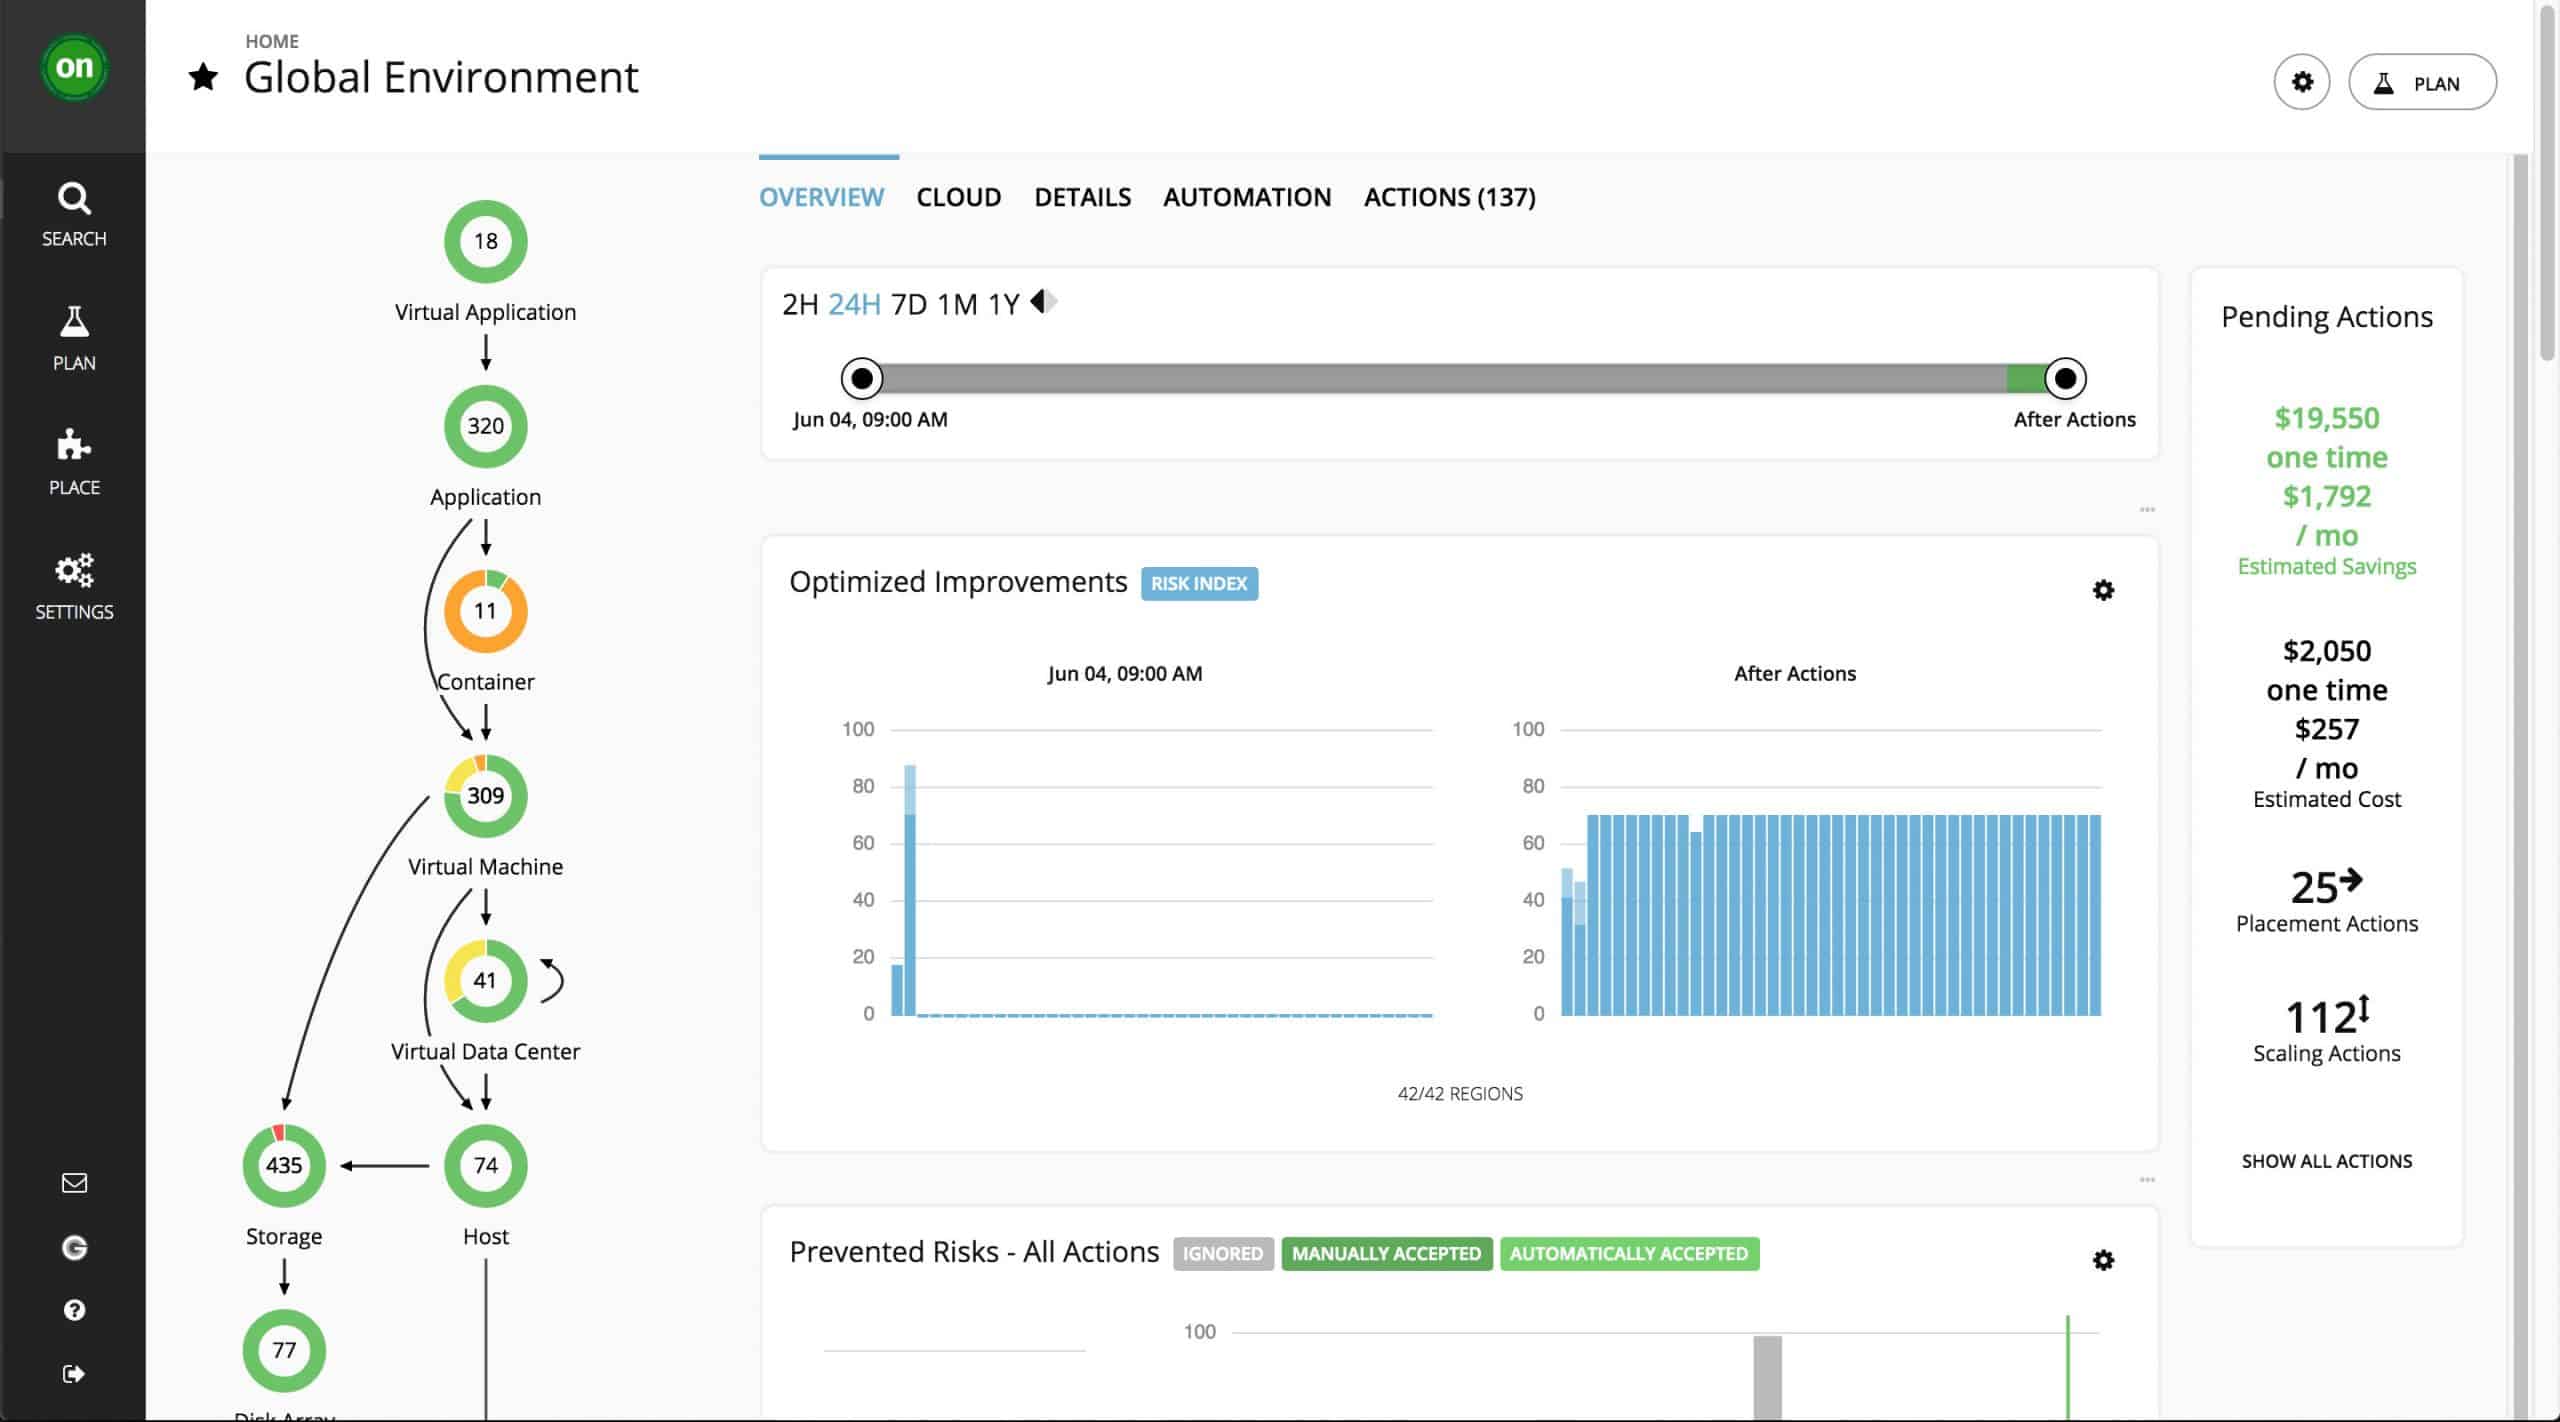
Turbonomic is highly recommended for its cloud-based monitoring capabilities, offering comprehensive coverage for system resources, including virtualizations, across diverse environments. Leveraging autodiscovery and workload-based organization, Turbonomic ensures efficient and resilient operation of infrastructure elements. Tested extensively, our recommendation is rooted in its flexibility, scalability, and effectiveness in optimizing system performance and resource utilization.
Turbonomic is organized as a base package that can be extended by integrations. For each virtualization system that you operate, you need to add on the appropriate integration to get those monitoring capabilities added to the Turbonomic dashboard.
On signing up to the Turbonomic service, you need to give the system access to your network. It will then run an autodiscovery process and identify all of your system resources. Turbonomic calls each monitoring service a “workload” and it registers each of the virtualization instances that it detects as a separate workload.
Although each virtualization is identified individually, they are not monitored in isolation. Turbonomic works out the interdependencies of all of your infrastructure elements. It also searches within each virtualization instance to map its virtual infrastructure. The dependency map is shown in the dashboard of the monitoring service with the status of each element shown in a traffic light system. Turbonomic then produces recommendations on configuration adjustments that will improve efficiency and resilience.
The monitor then periodically rechecks the whole system, updating the statuses shown in the dashboard. Any problems detected with the virtualizations raises an alert. It is possible to set up automated responses to problems, such as resizing of virtual server memory allocation.
The Turbonomic system also watches the server resources that your virtualizations depend on and it can work out what the impact of your hypervisor will be on overall host resource availability.
Who is it recommended for?
Ideal for organizations of all sizes seeking a proactive and automated approach to system monitoring and optimization. Turbonomic caters to both on-site and cloud-based infrastructure, making it suitable for enterprises with hybrid environments. IT professionals and infrastructure managers will benefit from its intuitive dashboard, automated workflows, and compatibility with major virtualization platforms.
Pros:
- Cloud-Based Flexibility: Offers a highly flexible cloud-based solution, enabling seamless monitoring and optimization across diverse environments.
- Autodiscovery and Automation: Leverages autodiscovery to enroll new devices into automated workflows, reducing manual intervention and enhancing efficiency.
- Compatibility: Compatible with major virtualization platforms such as VMWare, Hyper-V, and XenServer, ensuring broad coverage and compatibility.
Cons:
- Complex Features for Non-technical Users: Some advanced features, such as automated remediation, may be complex for non-technical users, requiring familiarity with system configurations.
- Limited Visualization Options: Would benefit from additional visualization options to enhance data representation and analysis capabilities.
As a cloud-based system, Turbonomic isn’t tied to any particular operating system. You can access the system dashboard through any standard Web browser. Contact the Turbonomic sales team for a quote. There are no downloads for Turbonomic. However, you can request a demo at: https://www.turbonomic.com/demo
7. Veeam ONE
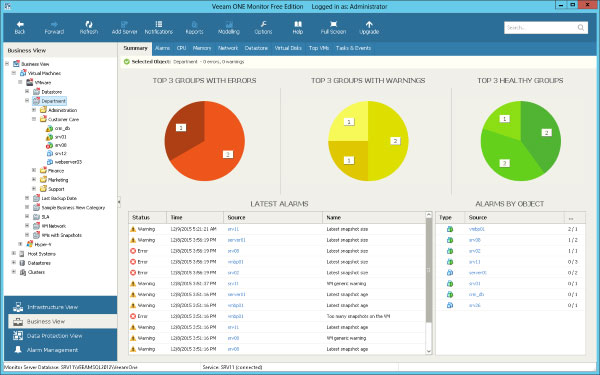
Veeam ONE, which comes in two editions, enterprise and free, is a powerful option for both VMware and Microsoft virtualization environments. It’s focus pushes a bit more to data management, as one of its stronger suits comes in the realm of helping to manage moving, and often more importantly backing up of, large amounts of data.
Key Features:
- Data Management and Backup: Focuses on managing and backing up large amounts of data within virtualization environments, ensuring data integrity and availability.
- Proactive Monitoring: Provides real-time monitoring and alerting, enabling early detection of issues and proactive management to prevent data loss or downtime.
- Forecasting and Alerting: Assesses data usage and needs to forecast potential issues and alert users in advance, facilitating timely intervention and circumvention of potential disasters.
- Free Version: Offers a free version with basic infrastructure health and configuration monitoring, 24×7 monitoring and alerting, on-demand reporting and documentation, and limited guest process monitoring and performance reporting capabilities.
- Versatility: Can run on both Windows and Linux operating systems, providing flexibility and compatibility with diverse IT environments.
Why do we recommend it?
Veeam ONE emerges as a powerful option for managing VMware and Microsoft virtualization environments, offering robust data management capabilities crucial for efficient backup and data movement. Tested extensively, its focus on data management, backup, and proactive monitoring makes it indispensable for data-rich environments with significant backup needs. Our recommendation is based on its reliability, ease of use, and effectiveness in tracking and managing complex virtualized environments.
Virtualization is immensely powerful but can quickly become extremely convoluted, especially when you have several machines tied up and unable to backup, or are running out of space in a certain part of your backup environment, and having a software which makes certain to track all of these, along with the usual collection of VM data, is invaluable for data rich environments with significant back up needs.
Veeam also attempts to asses a forecast of data use and needs to help alert you as early as possible when there may be impending doom to circumvent!
The free version only has a smaller subset of features, which include basic infrastructure health and configuration, 24×7 monitoring and alerting, on-demand reporting and documentation, and VM change rate estimation with a limited ability to monitor and manage guest processes and report on performance and utilization versus the enterprise version.
Who is it recommended for?
Recommended for organizations of all sizes, Veeam ONE caters to both technical and non-technical users, making it suitable for small businesses and home users alike. Its ability to support system-level recovery and backups, coupled with its flexibility to run on both Windows and Linux operating systems, ensures broad applicability across diverse environments.
Pros:
- Ease of Use: User-friendly interface suitable for both technical and non-technical users, ensuring accessibility and ease of adoption.
- System-Level Recovery and Backups: Supports system-level recovery and backups, enhancing data protection and resilience.
- Cross-Platform Compatibility: Can run on both Windows and Linux operating systems, offering versatility and compatibility with diverse IT environments.
- Suitable for Small Businesses and Home Users: Ideal for small businesses and home users with basic backup and monitoring needs.
Cons:
- Limited Integrations: Would benefit from more integrations with hardware storage and NAS solutions to enhance flexibility and compatibility with diverse storage environments.
VMware, Hyper-V; software installs in Windows environment. Free edition with some basic but robust functionality, enterprise version has a 30-day trial, enterprise license is $900+ per socket, subscription options also available.
8. ESXi Embedded Host Client
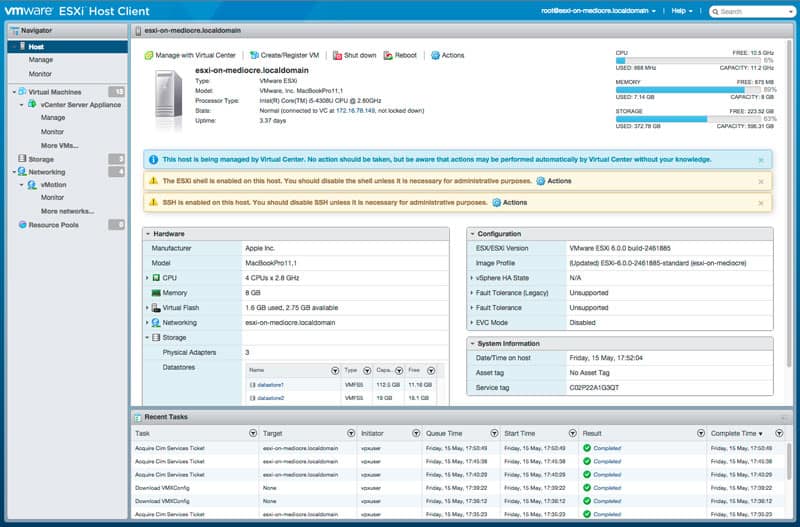
This particular offering is somewhat unique because it comes straight from VMware itself and is made solely to work with the ESXi environment. While it lacks a lot of the powerful and more robust functionality of many third-party enterprise tools, it provides a huge amount of expanded functionality, all manageable via a graphical interface added into your ESXi environment, at no cost whatsoever.
Key Features:
- Seamless Integration: Developed by VMware and native to ESXi environments, offering seamless integration and compatibility.
- Graphical Interface: Manage VM power states, create new VMs from OVF/OVA, configure hosting, view event and task summaries, and configure host metrics through an intuitive graphical interface.
- Cost-Effective: Completely free of charge, providing extensive functionality without any additional cost.
- Thorough Documentation: Well-documented, with ample resources and walkthroughs available to aid in installation and usage.
- Ideal for Small Environments: Suited for small environments, personal setups, or test cases, offering expanded functionality within a user-friendly interface.
Why do we recommend it?
The ESXi Embedded Host Client, developed by VMware itself, is highly recommended for its seamless integration with ESXi environments and its extensive functionality provided at no cost. While lacking some of the advanced features of third-party enterprise tools, it offers expanded functionality through a user-friendly graphical interface directly within the ESXi environment. Tested rigorously, our recommendation is grounded in its reliability, simplicity, and thorough documentation, making it an invaluable tool for small environments, personal setups, or test cases.
It’s application is somewhat limited as it is best suited for environments that are small, personal in nature, or simply setup as a small test case. With the ability to manage VM power states, create new VMs or from OVF/OVA, configure hosting, view summaries of events and tasks, as well as configure a range of host metrics, it’s a powerful offering for the right environment!
Initial installation can be a little tricky if you aren’t familiar with ESXi, but many walkthroughs exist.
Who is it recommended for?
Ideal for small environments, personal setups, or test cases, the ESXi Embedded Host Client caters to users seeking an easy-to-use and cost-effective solution for managing their ESXi environments. Suitable for both beginners and experienced users, its simple interface and comprehensive functionality make it a valuable asset for anyone managing ESXi deployments.
Pros:
- Native to VMware: Developed by VMware, ensuring compatibility and seamless integration with ESXi environments.
- Simple Interface: User-friendly interface makes it easy to learn and use, ideal for beginners and experienced users alike.
- Thoroughly Documented: Extensive documentation available, aiding in installation and usage.
- Completely Free: Provided at no cost, offering extensive functionality without any additional expenses.
Cons:
- Limited for Management Consolidation: Not the best option for users looking to consolidate their management tools or seeking advanced features found in third-party enterprise tools.
VMware; software interface is purely web/java-based and free!
Conclusion
While VMware and Hyper-V both come with their own basic tools and front-ends, which can certainly do the trick, there’s simply no way that those options suffice when a business is running on a need for redundancy and reliability or, in the worst-case scenario, and extremely fast turn around time on addressing an issue.
A powerful VM Manager can aid in that one way more than anything else, and that ability alone more than justifies the cost of many of these software suites when considering the expense a several-hour total outage could cost.
A strong VM Manager makes it easy for an admin to swoop to the rescue.
Alerts quickly bring the problem to your attention at which point you can swiftly adjust allocations across the entire environment, re-image machines, change resources, or any other number of solutions that all would be far slower without the aid of good VM management software.
VM Manager for Monitoring Virtual Machines, ESXi & Hyper-V FAQs
What is a Virtual Machine Manager?
A Virtual Machine Manager (VMM) is software that allows administrators to manage and monitor virtual machines (VMs) on a physical server.
Can Virtual Machine Managers monitor virtual machines running across different hypervisors?
No, Virtual Machine Managers are typically designed to monitor virtual machines running on a specific hypervisor, such as VMware vSphere, Microsoft Hyper-V, or Oracle VM Server.
Can Virtual Machine Managers monitor virtual machines running in different cloud environments?
Yes, some Virtual Machine Managers have the capability to monitor virtual machines running in different cloud environments, such as Amazon Web Services (AWS) and Microsoft Azure.
What are some popular Virtual Machine Managers?
Some popular Virtual Machine Managers include VMware vCenter, Microsoft System Center Virtual Machine Manager, and Oracle VM Manager.
Related Articles:
VM Performance Monitoring Software & Tools for Maximizing & Optimizing Virtual Machine Performance!
Managing your virtualized infrastructure via a centralized management tool may sound too good to be true. Well, say hello to the System Center Virtual Machine Manager (SCVMM).
With SCVMM, you would be walking in what seems like a fantasy land where you can effectively manage and deploy virtual machines (VMs). And in this tutorial, you will learn how to perform various management tasks in a virtualized environment via SCVMM.
Discover SCVMM and start virtualizing your dream infrastructure!
Prerequisites
Before you dive deep into the SCVMM, ensure you have the following in place:
- A domain-joined machine running a Windows Server Standard/Datacenter Edition with Hyper-V roles enabled – This tutorial uses Windows Server 2022 Datacenter Edition 64-bit.
- A Microsoft SQL Server Standard/Enterprise Edition installed – This tutorial uses Microsoft SQL Server 2017 Standard Edition.
- SQL Server Management Studio (SSMS) installed – This tutorial uses SQL Server Management Studio 19.
- Windows Preinstallation Environment and Windows Assessment and Deployment Kit (ADK) installed on your server.
Downloading and Extracting the SCVMM Setup Files
SCVMM is a Microsoft management tool that allows you to manage and deploy VMs across virtualization platforms, such as Hyper-V and VMware. But to take advantage of SCVMM, you must first download and extract the SCVMM files on your Windows Server, as follows:
1. Open your preferred web browser, navigate to Microsoft’s official evaluation center page, and download the SCVMM installation file.
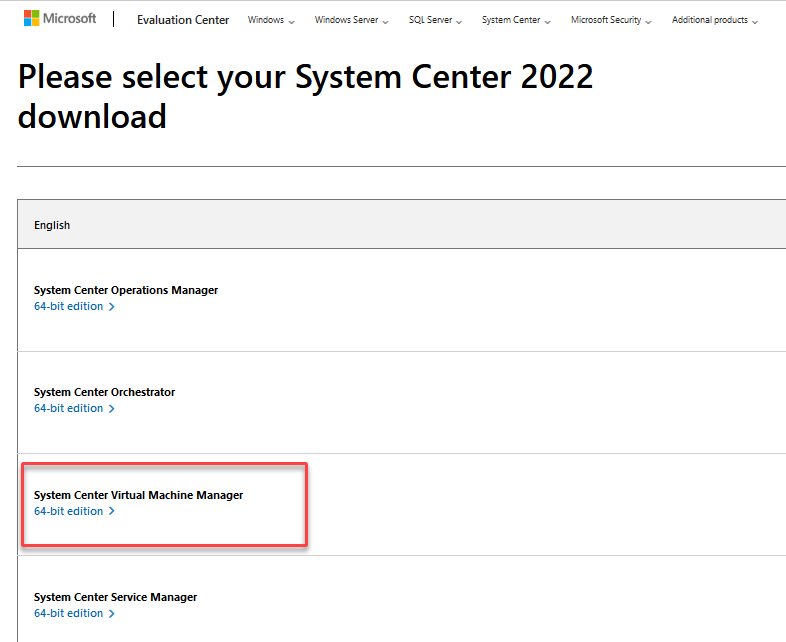
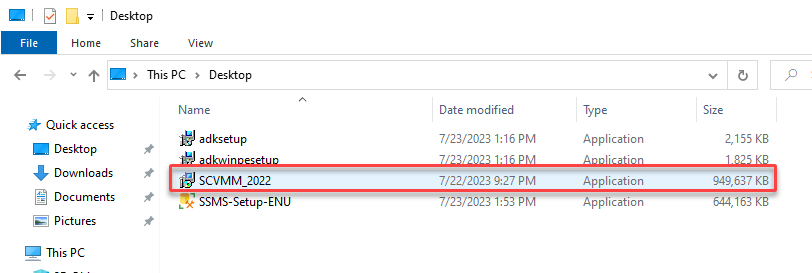
2. Next, open the SCVMM package (i.e., SCVMM_2022).
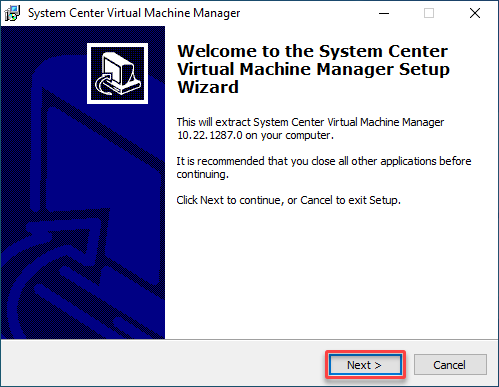
3. On the welcome screen, click Next to extract the SCVMM setup files.
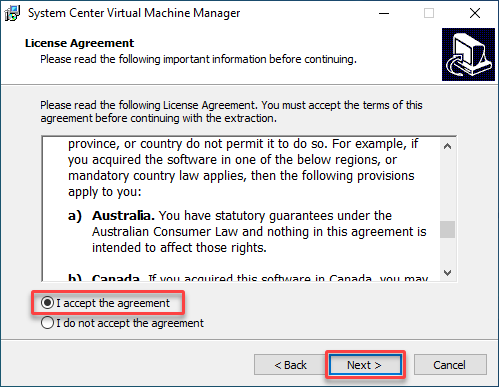
4. Now, accept the license agreement, and click Next.
5. Choose an appropriate folder location to extract files, and click Next.
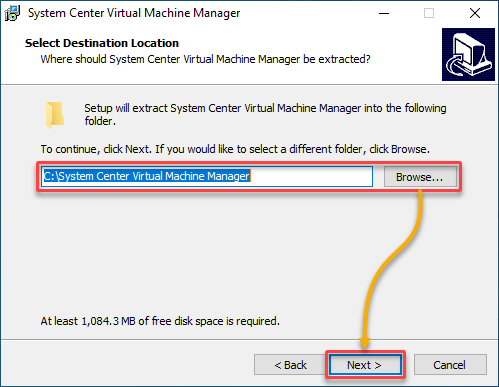
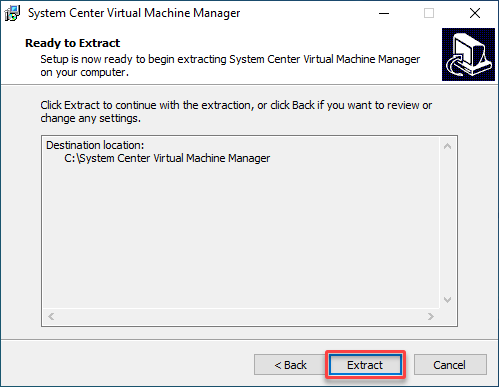
6. Confirm the settings and destination folder, and click Extract to extract the setup files.
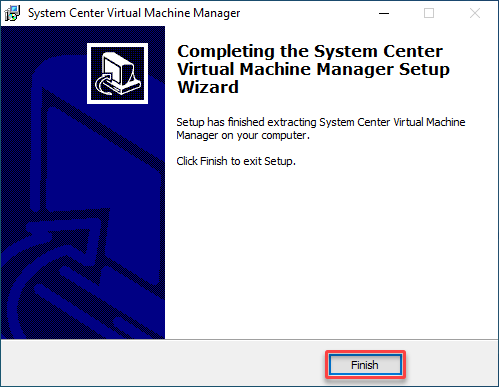
7. Lastly, click Finish to close the wizard.
Installing and Configuring SCVMM on a Windows Server
Extracting the setup files does not automatically install SCVMM. Like any other tools/software, you must install and configure SCVMM on your Windows Server.
To install SCVMM, follow these steps:
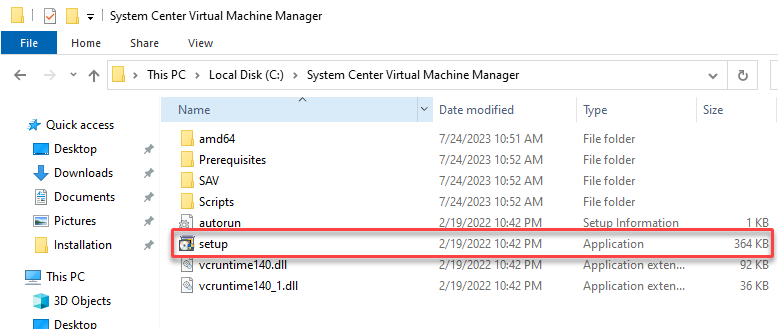
1. Open your file manager, navigate to where you extracted the SCVMM setup files, and launch the setup.exe file in the System Center Virtual Machine Manager folder.
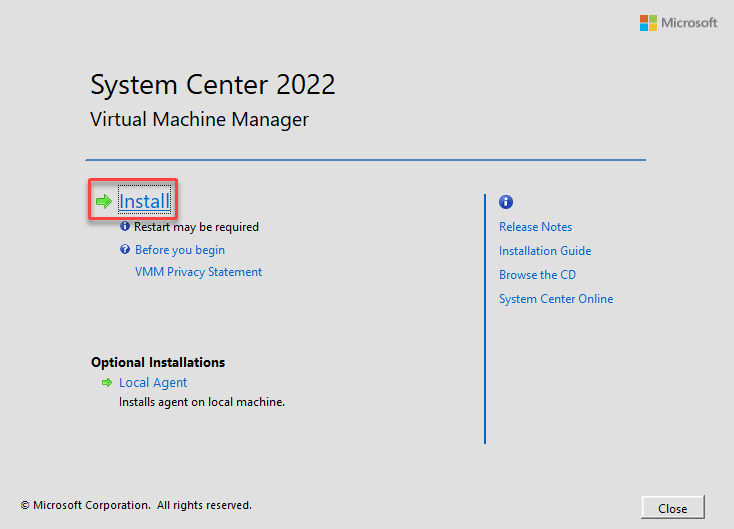
2. Next, in the SCVMM prompt, click Install to begin installing SCVMM.
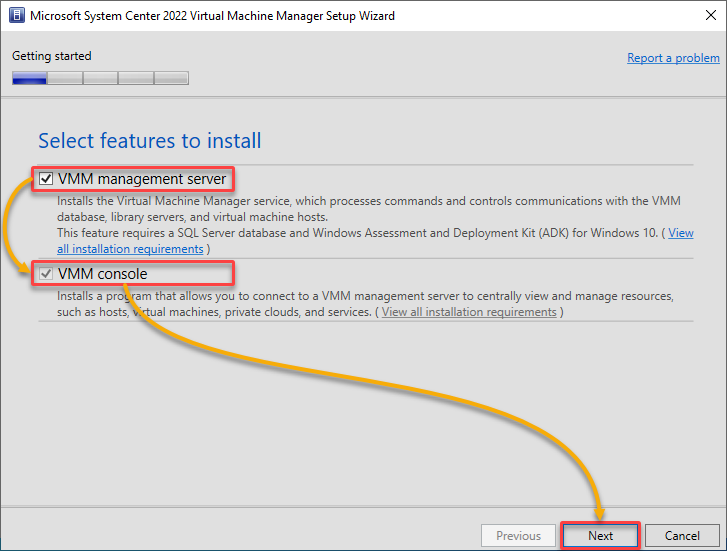
3. Tick the VMM management server box and the VMM console box that appears, and click Next.
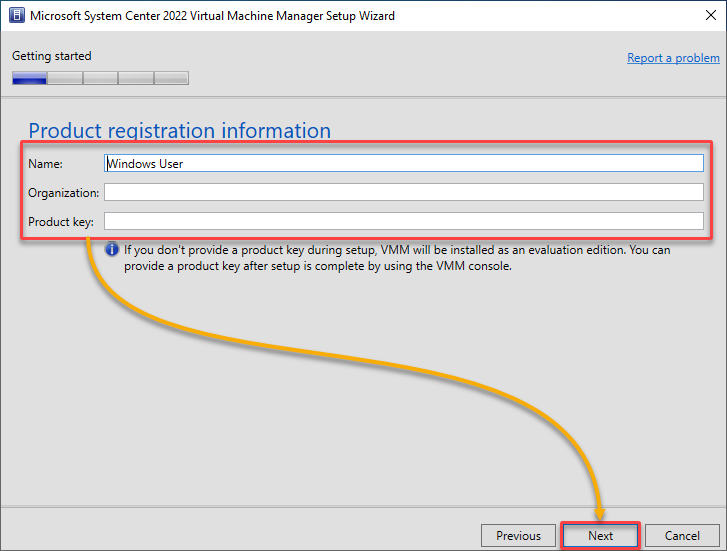
4. Fill in the Product registration information on the next page, and click Next.
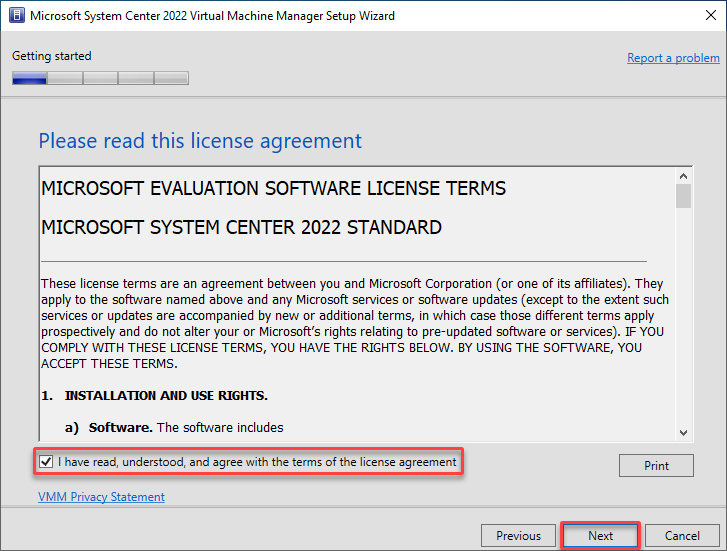
5. Accept the license agreement, and click Next.
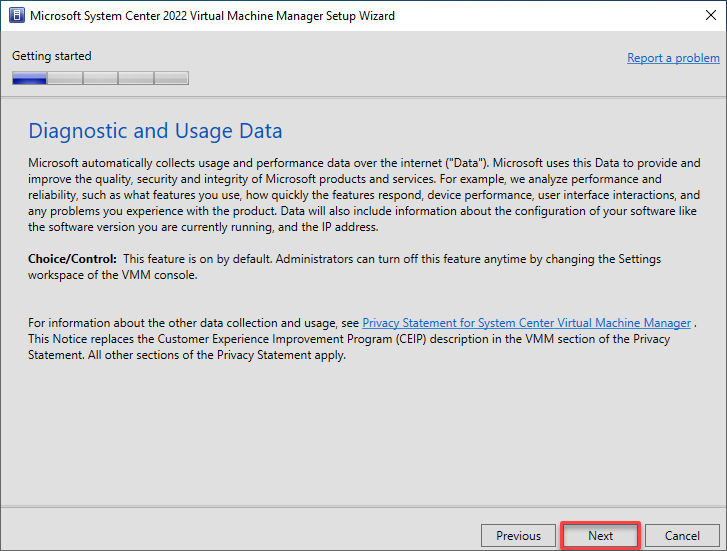
6. Read about the Diagnostic and Usage Data, and click Next.
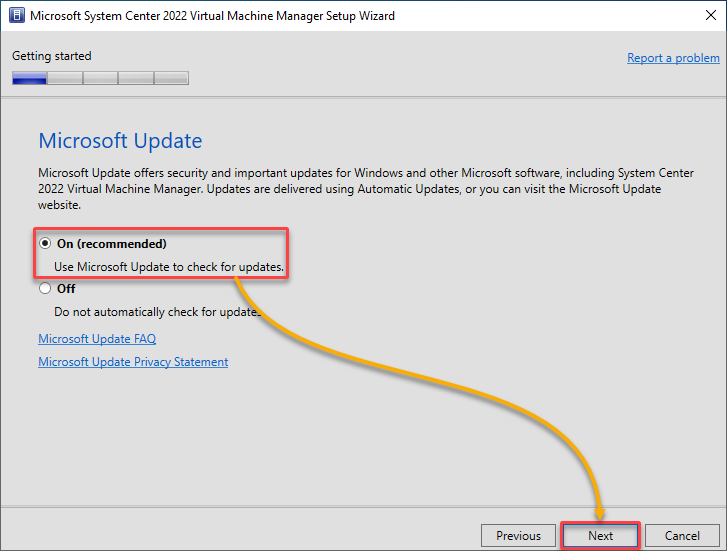
7. Turn On the Microsoft Update for updating SCVMM, and click Next.
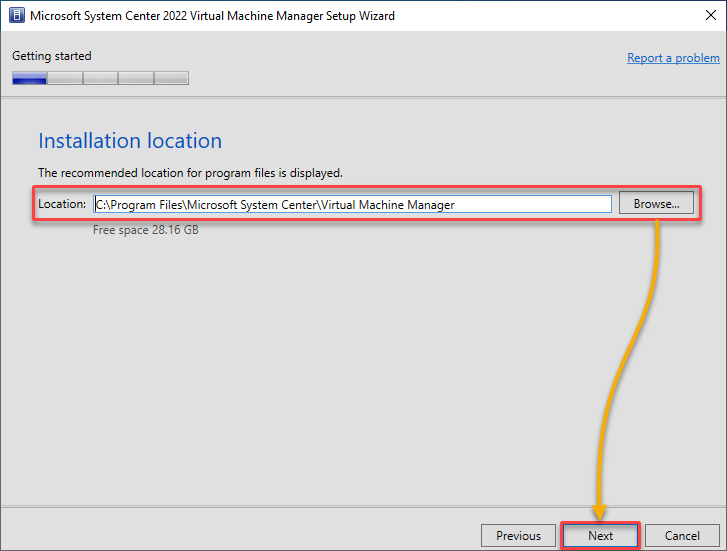
8. Choose a location to install SCVMM, and click Next.
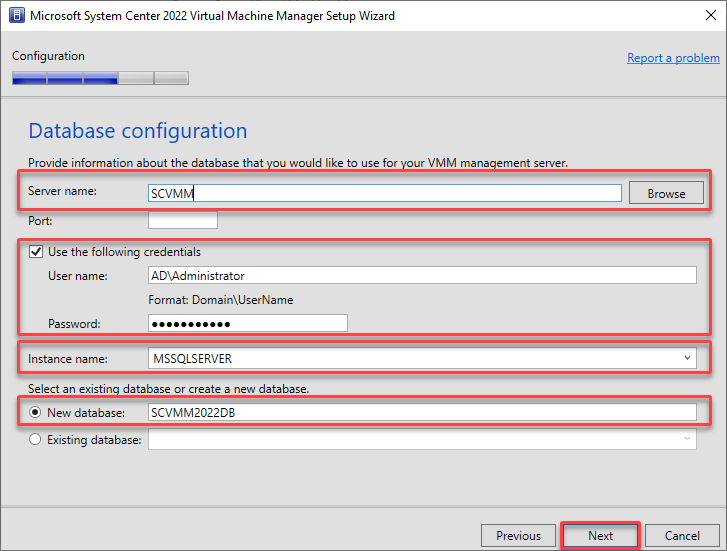
9. Configure your database, as shown below:
- Server name – Browse or input the name of your computer running your SQL Server.
- Use the following credentials – Tick this box, fill in the User name and Password of your computer running the SQL Server.
- Instance name – Choose your Microsoft SQL Server’s instance name.
- New database – Choose this option to create a new database called SCVMM2022DB (arbitrary).
Once configured, click Next to continue.
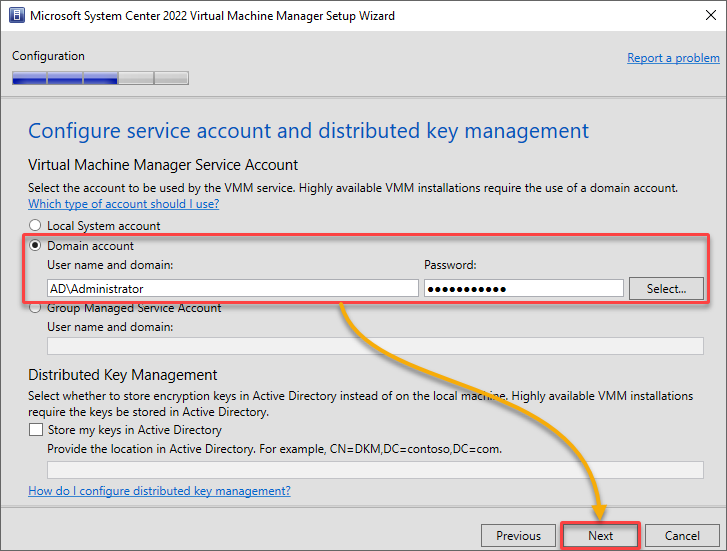
10. Next, provide your domain’s User name and Password, and click Next.
💡 Optionally, you can configure the distributed key management. Distributed key management allows the control of encryption keys for securing data across multiple locations. In SCVMM, the encryption keys are stored in the Active Directory.
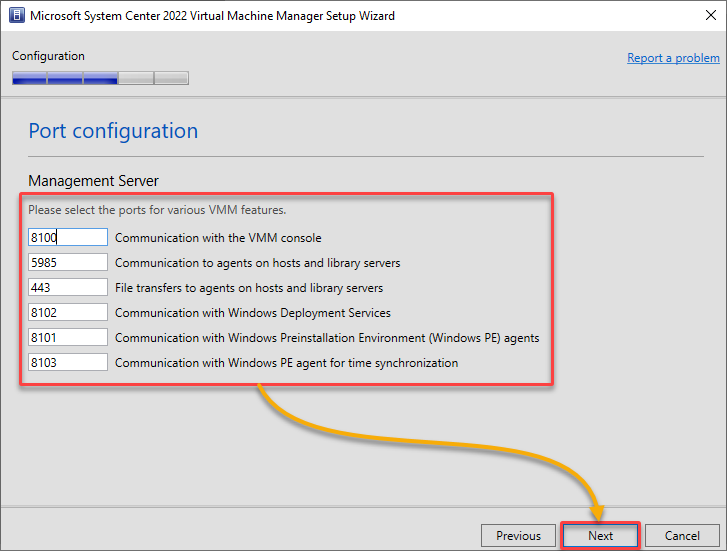
11. Now, configure or leave the default port settings, and click Next to proceed.
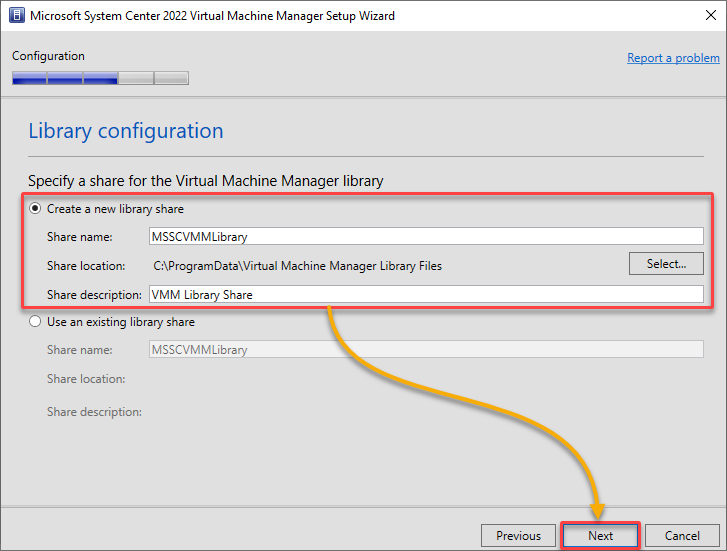
12. Choose the Create a new library share option, specify the VMM library Share name, location, and description, and click Next.
The VMM Share Library allows you to create and manage a centralized library of resources, such as VM templates, ISO images, scripts, and other files. Different SCVMM instances within your virtualized infrastructure can share and access this library.
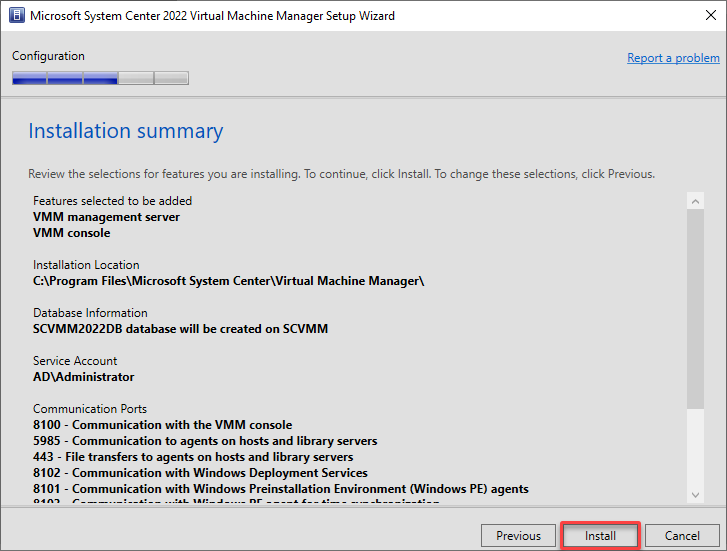
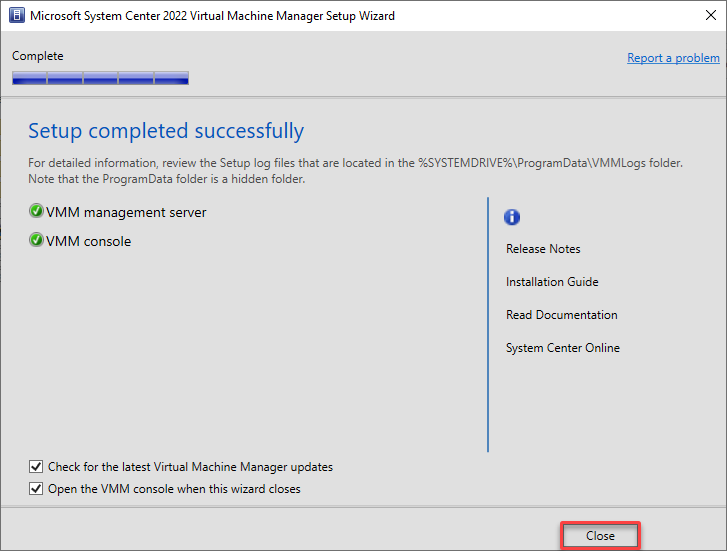
13. Verify the installation summary, and click Install.
14. Once installed, click Close to exit the wizard.
Adding Virtualization Hosts
After completing the installation and initial configuration, you are almost ready to use SCVMM to manage your virtualization environment. But first, you need a virtualization host, a physical server, that runs a hypervisor and hosts VMs.
SCVMM allows you to centrally manage and administer these virtualization hosts, regardless of the underlying hypervisor technology, such as Hyper-V or VMware vSphere.
To add a virtualization host in the SCVMM, do the following:
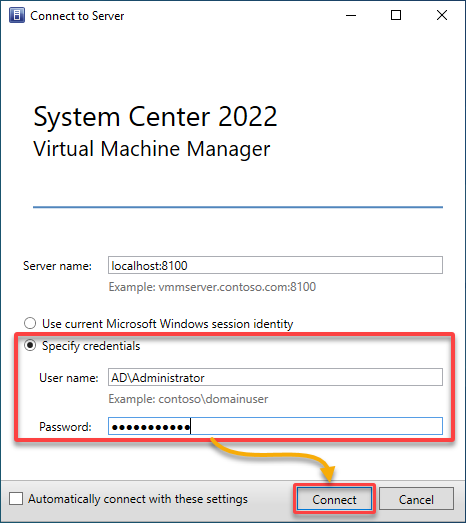
1. Launch SCVMM you installed on your Windows Server.
2. Next, provide your domain credentials to connect to your SCVMM server.
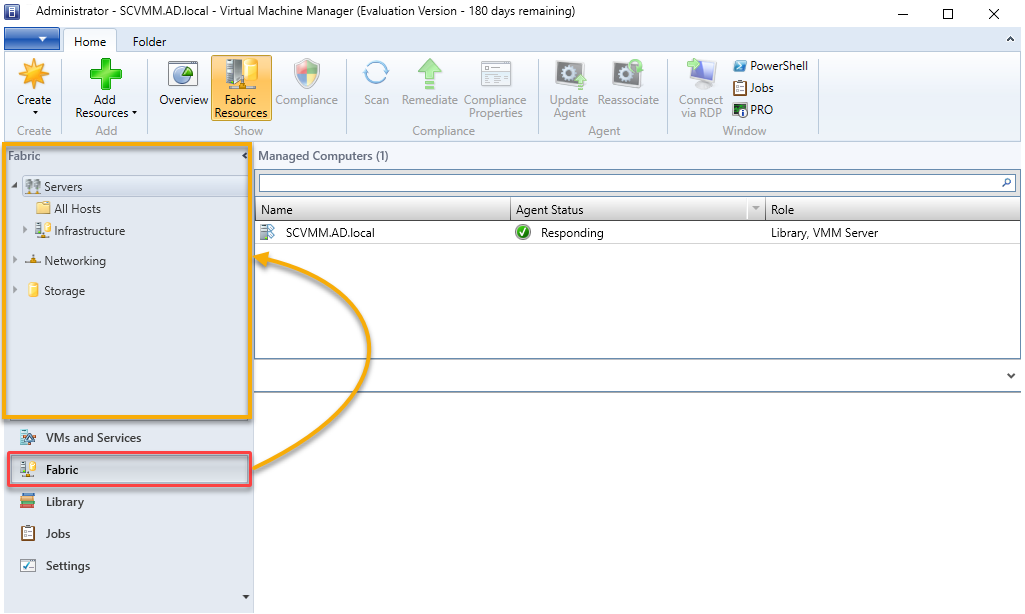
3. In the SCVMM console, navigate to Fabric (bottom-left), which opens the Fabric workspace. This workspace is where you can manage infrastructure elements, including virtualization hosts.
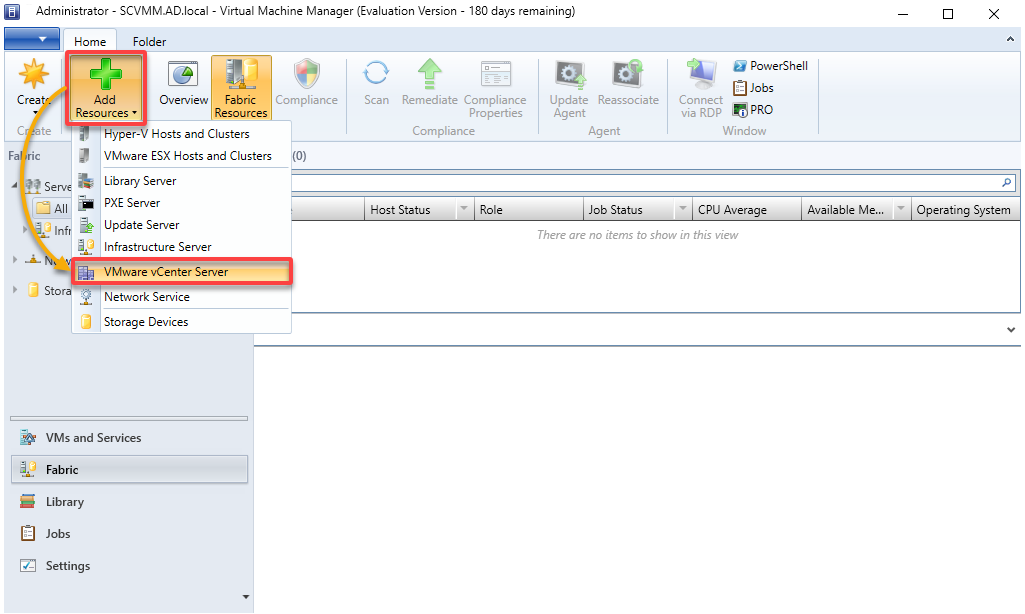
4. Now, click the Add Resources drop-down, and choose VMware vCenter Server to initiate adding a vCenter Server.
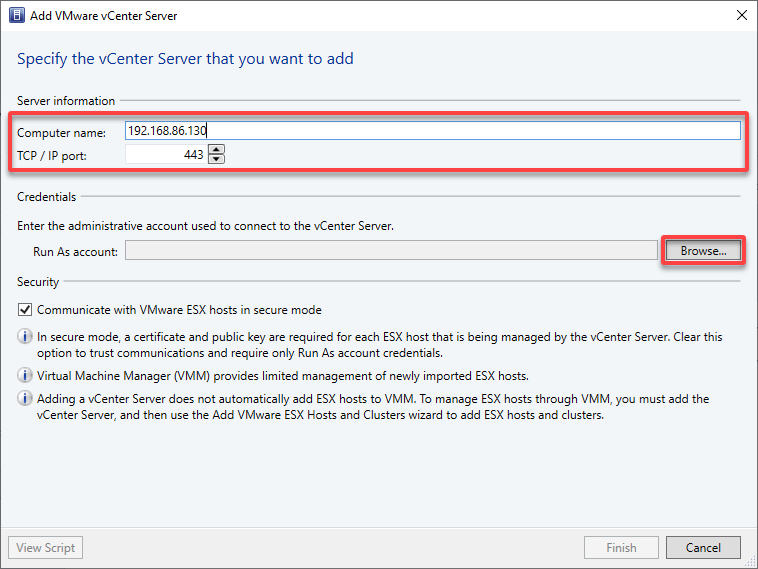
5. Specify the vCenter Server you wish to add as follows:
- Computer name – Specify the name (IP address) of your vCenter Server.
- TCP / IP port – Add the port needed to connect to the vCenter server (443 by default).
- Run As account – Click Browse to choose the administrative account you used to connect to the vCenter Server.
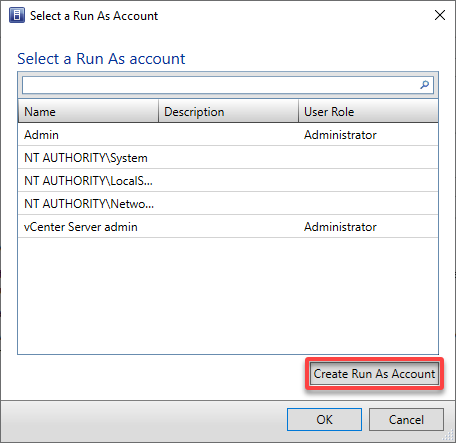
6. Select an existing user from the list on the Select a Run As Account window or click Create Run As Account to create a new one.
But in this example, click Create Run As Account to create a new user account.
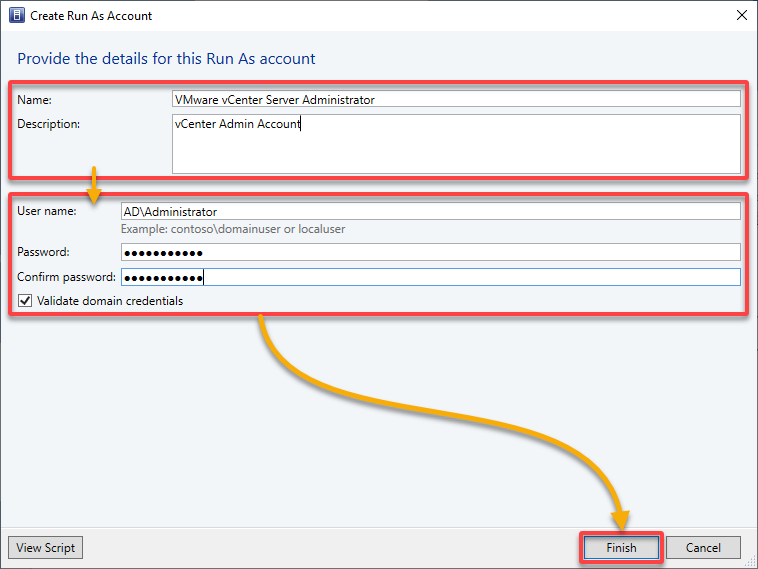
7. Provide a Name and Description for the Run As account, authenticate with your vSphere credentials, and click Finish to save the entry.
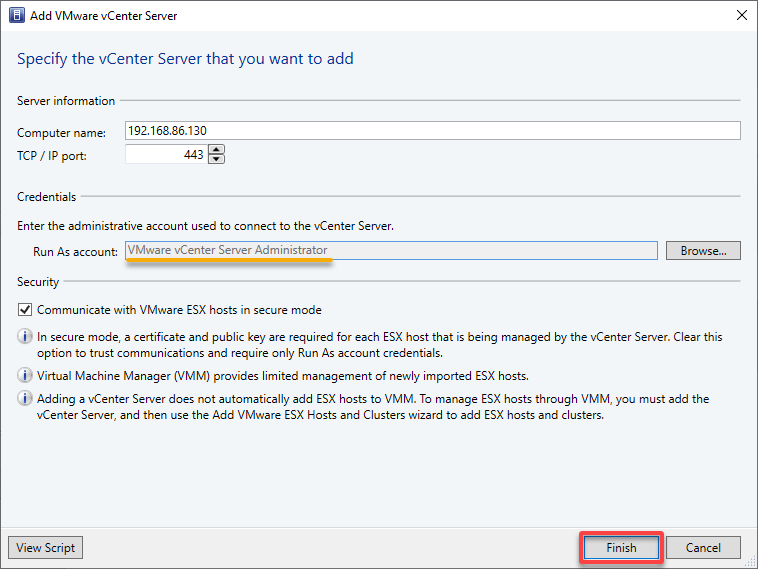
8. With the Run As account created, click Finish to add a vCenter Server.
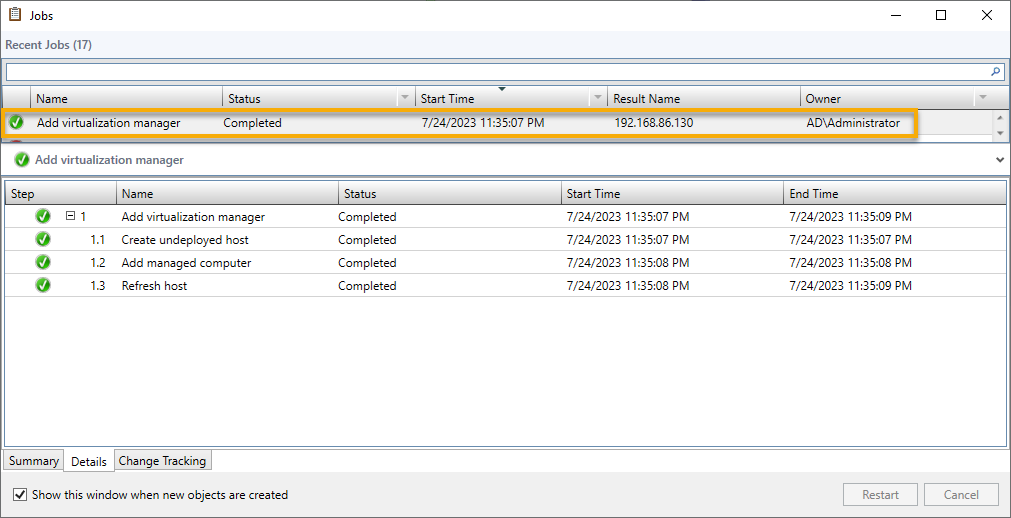
9. Navigate to the Jobs tab, as shown below, to view all jobs.
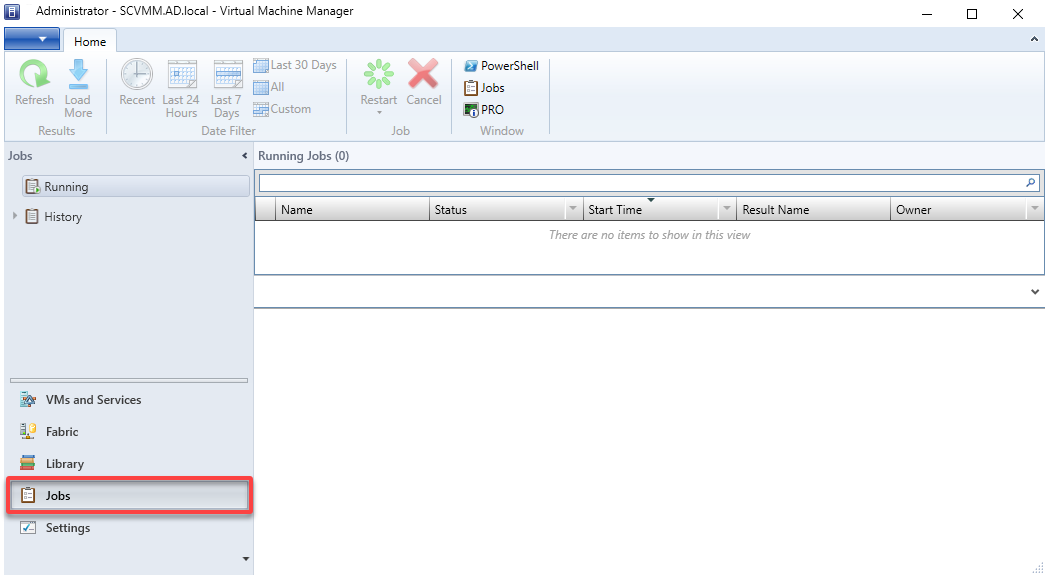
Below, you can see the Add virtualization manager job has been completed, which indicates you have successfully added a vCenter Server.
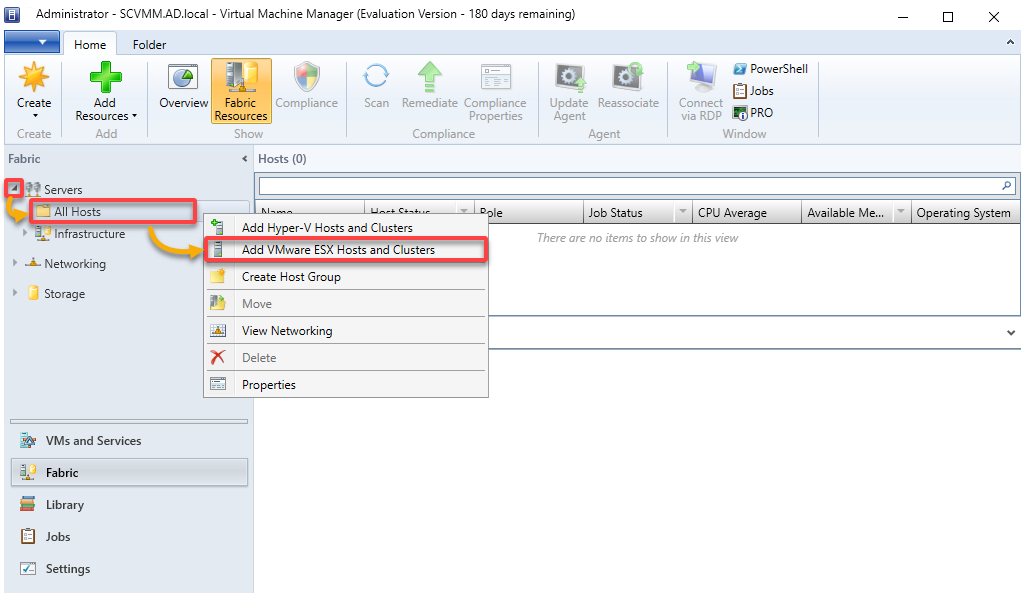
10. Under Fabric, expand Servers, right-click All Hosts, and select Add VMware ESX Hosts and Clusters. A wizard opens where you can add new ESXi host resources (step 11).
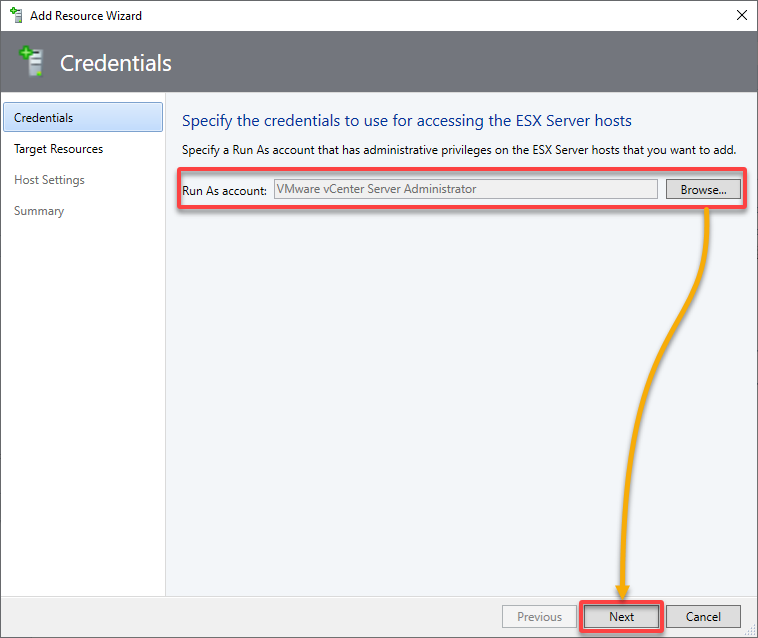
11. Select the credentials for your vCenter Server on the Add Resource Wizard, and click Next.
12. In the Target Resources page, click the Select all button to pull in all the hosts in the cluster, and click Next.
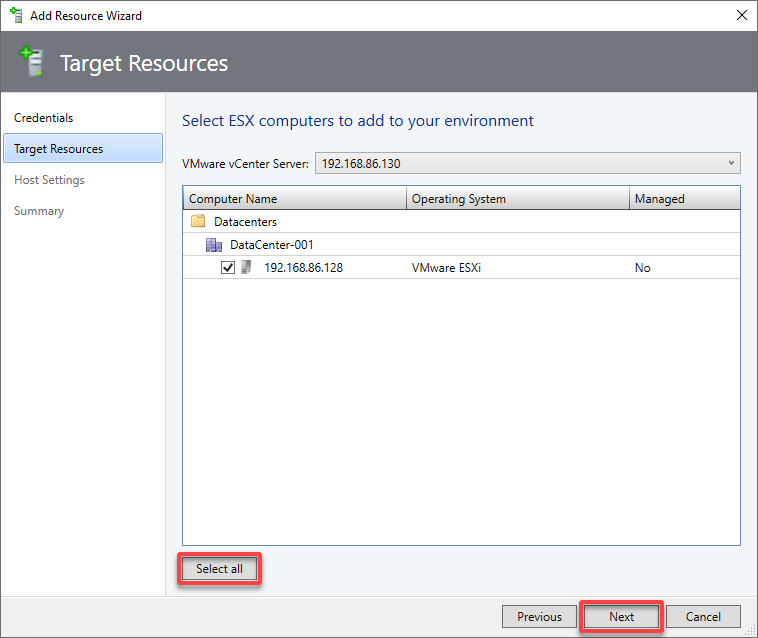
13. Select the location to import the VMware ESXi hosts, and click Next.
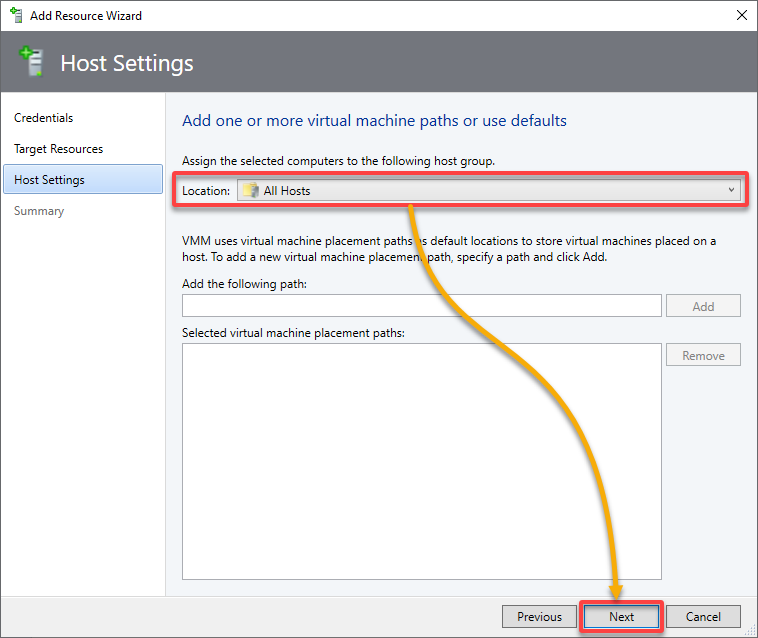
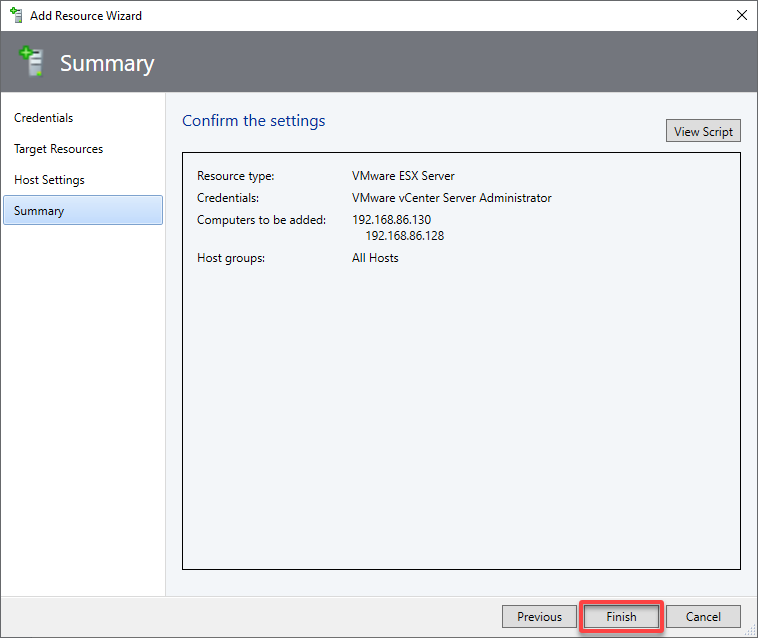
14. Review your selected settings, and click Finish to add ESXi host resources to SCVMM.
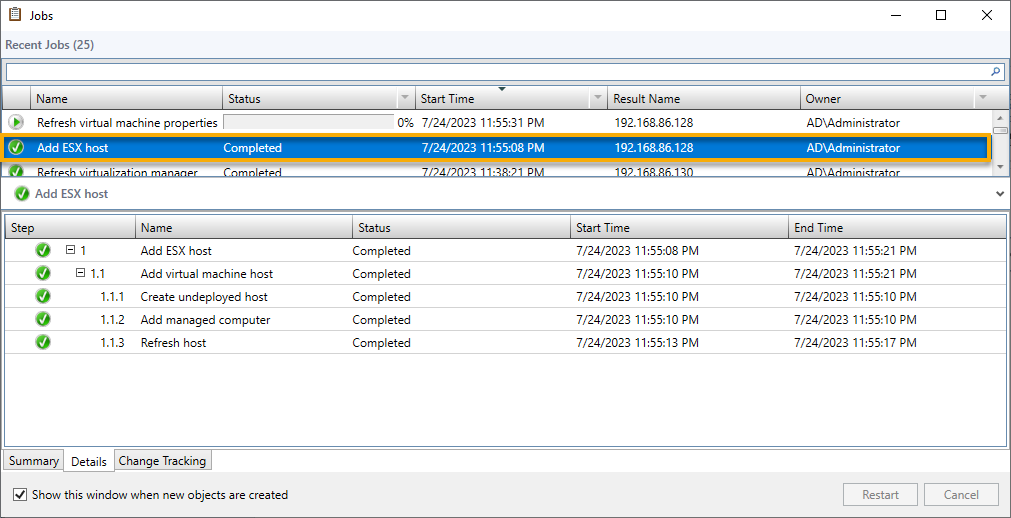
The Jobs window shows the job to add the ESXi hosts to SCVMM completed.
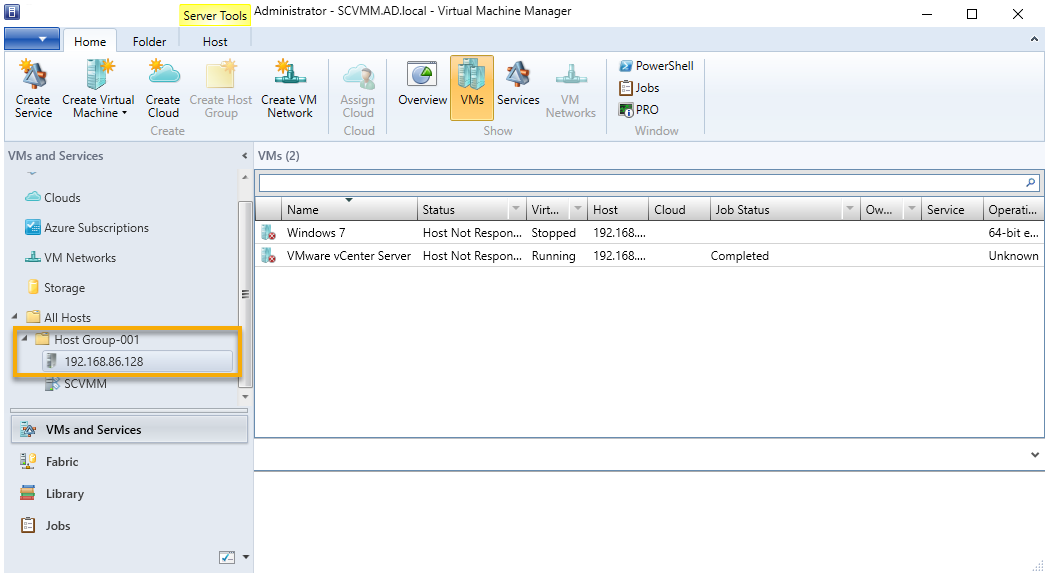
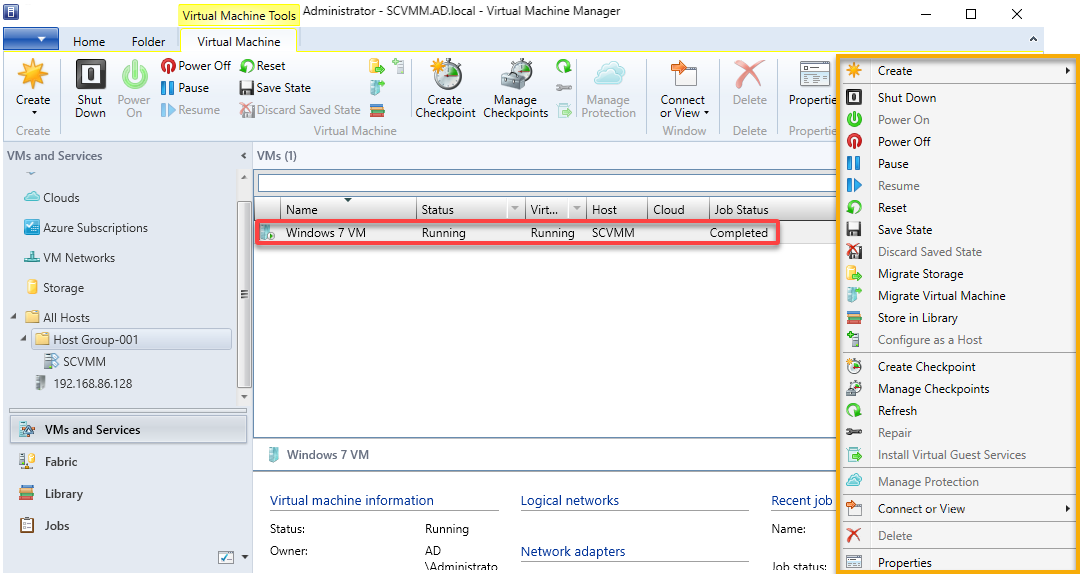
15. Ultimately, navigate to VMs and Services, and right-click on one of the VMs listed to view the available options.

Creating and Configuring Host Groups
As your virtualization hosts are now managed by SCVMM 2022, you can start creating and managing VMs through the SCVMM console. But first, you need a way to organize and manage virtualization hosts.
To create a host group, a local container, within SCVMM, follow these steps:
1. Navigate to Fabric workspace, right-click the All Hosts folder, and choose Create Host Group to create a new host group.
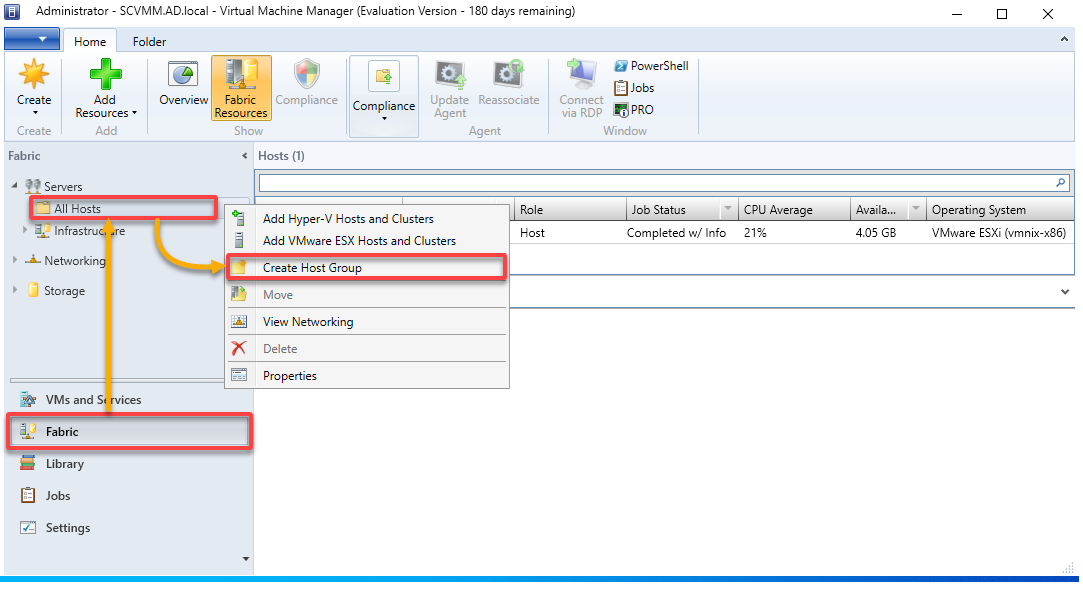
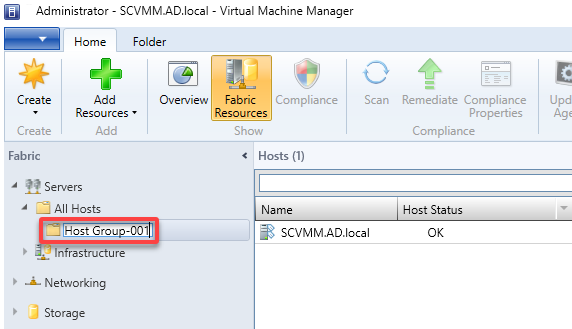
2. Next, provide a descriptive host group name (i.e., Host Group-001).
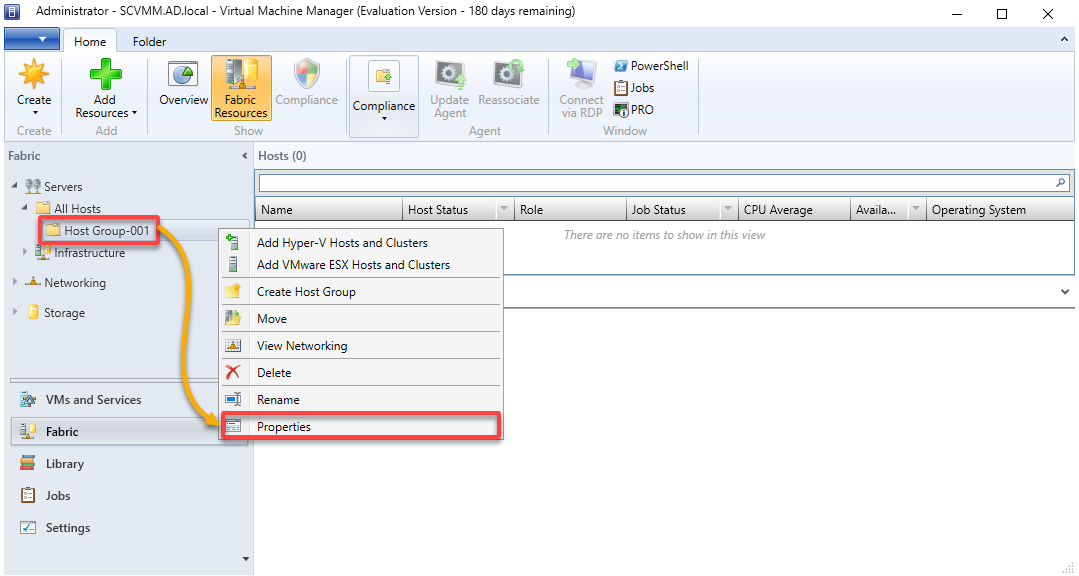
3. Right click on your newly-created host group, and select Properties to access its properties in a new window.
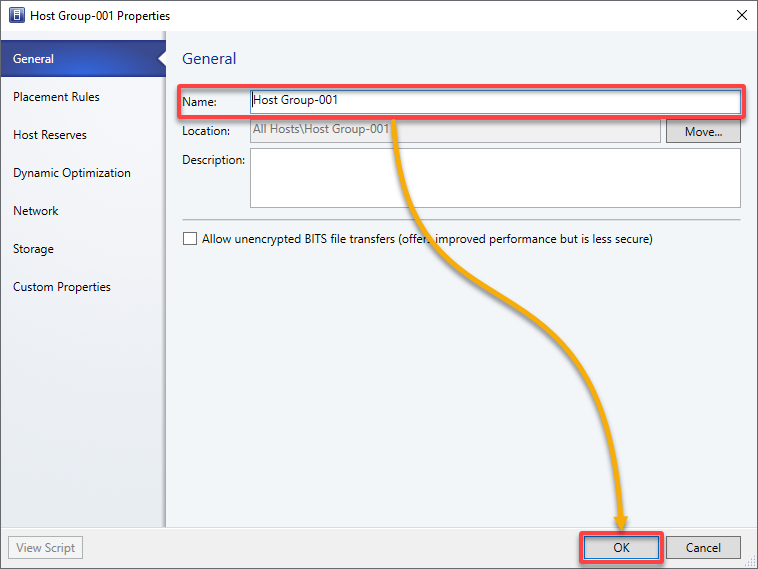
4. Now, change the Name, Location, and Description of your host group as you desire, and click OK.
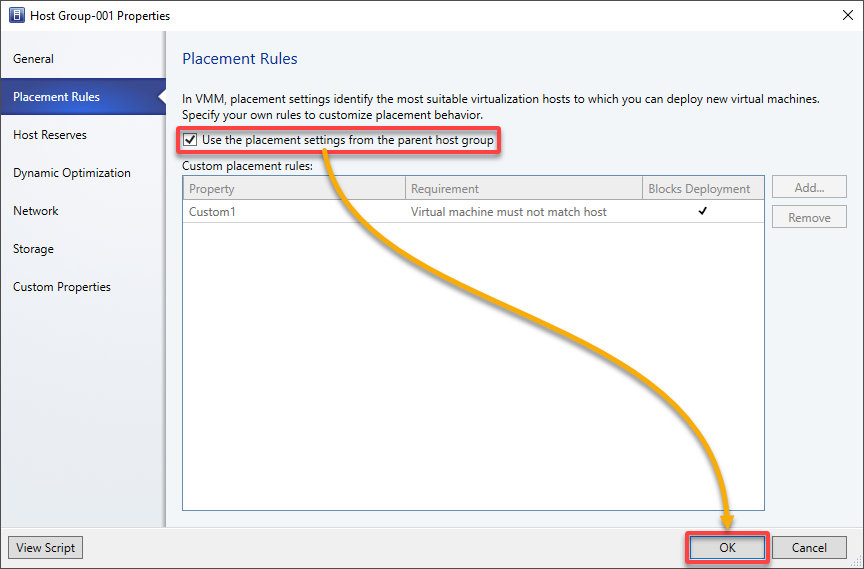
5. Leave the placement rules settings as default, where a host group uses the placement settings from the parent host group, and click OK.
💡 Optionally, configure the placement settings for the Host Group, which define the preferred host ratings, load-balancing settings, and availability options.
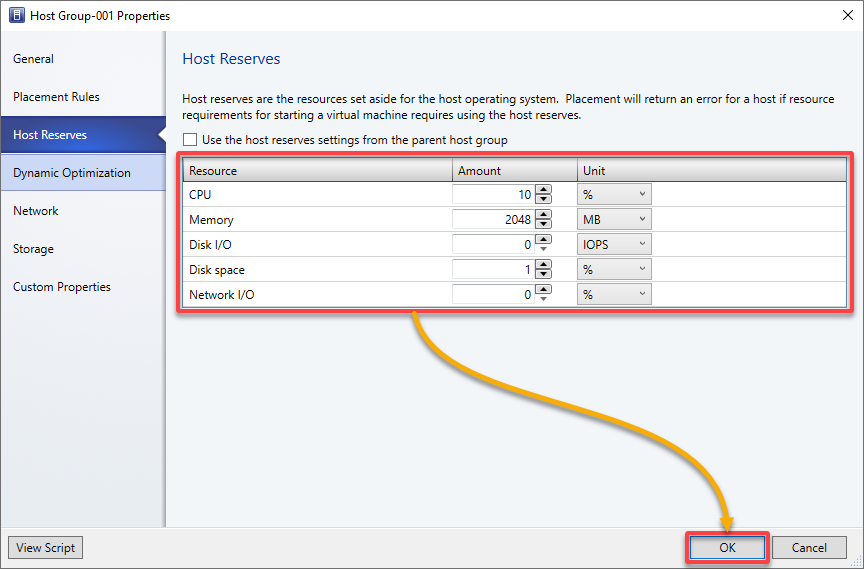
6. Under Host Reserves, configure the host reserve values for the CPU, Memory, Disk I/O, Disk space, and Network I/O, and click OK.
Host reserve settings let you specify the resources VMM sets aside for the host O/S to use.
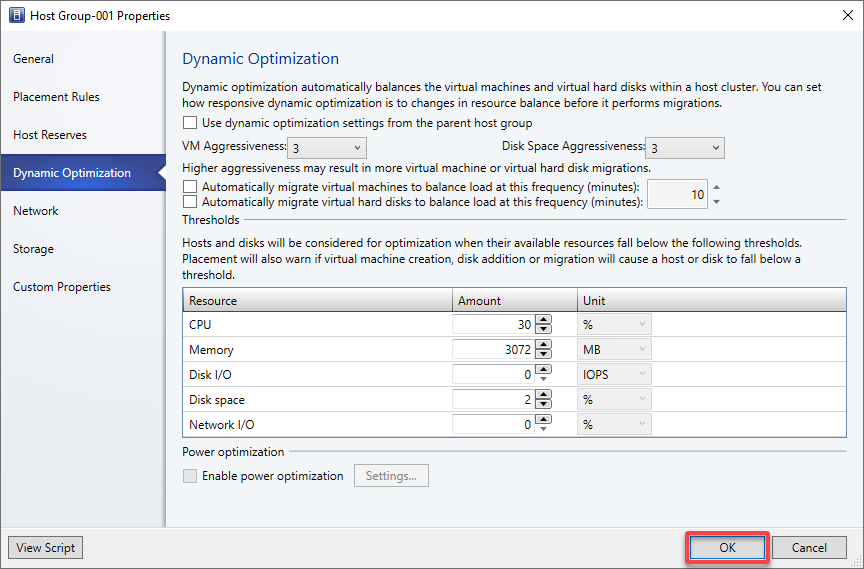
7. Configure dynamic optimization and power optimization settings, and click OK.
Dynamic optimization balances the VM’s load within a host cluster, while Power optimization enables VMM to evacuate hosts of a balanced cluster and turn them off to save power.
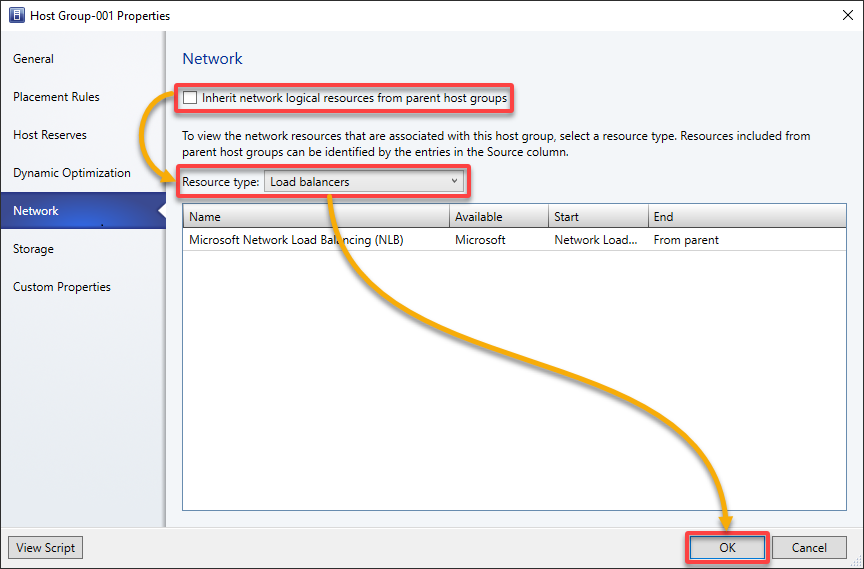
8. Configure the network settings as follows:
- Tick the box to Inherit network local resources from parent host groups.
- Resource type – Select a resource type from the drop-down to view the network resources associated with your selected host group.
Once configured, click OK to proceed.
9. View and allocate storage to your host group, and click OK.
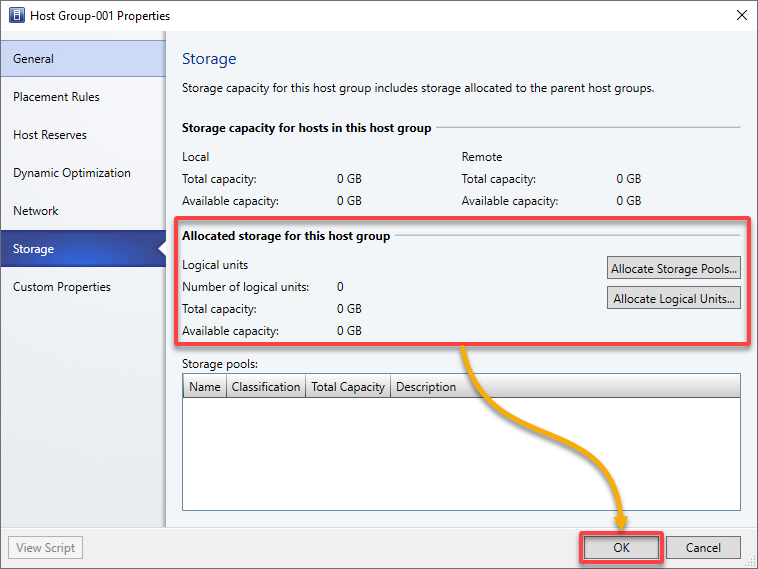
10. Manage custom properties for Virtual Machine, Virtual Machine Template, Host, Host Cluster, Host Group, Service Template, Service Instance, Computer Tier, and Cloud, and click OK.
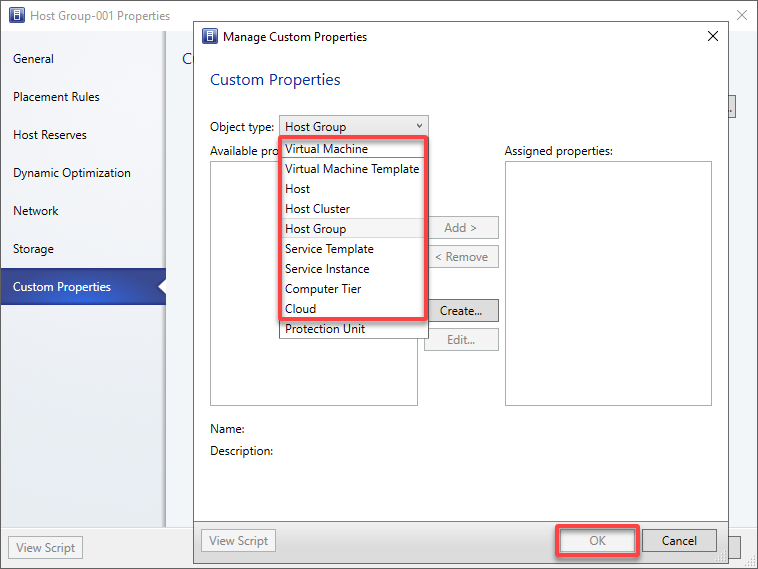
11. Finally, click OK to save the changes.

Assigning a Host to an Existing Host Group
With a host group created in SCVMM, you must assign a host to the host group, so you can quickly manage and apply common settings to multiple hosts simultaneously.
This setup helps streamline your virtualized infrastructure management and simplifies configuring networking, storage, and other host-specific settings across a group of hosts.
To assign a host to your host group:
Right click on the host to assign to your host group and select Move to Host Group to initiate assigning the host.
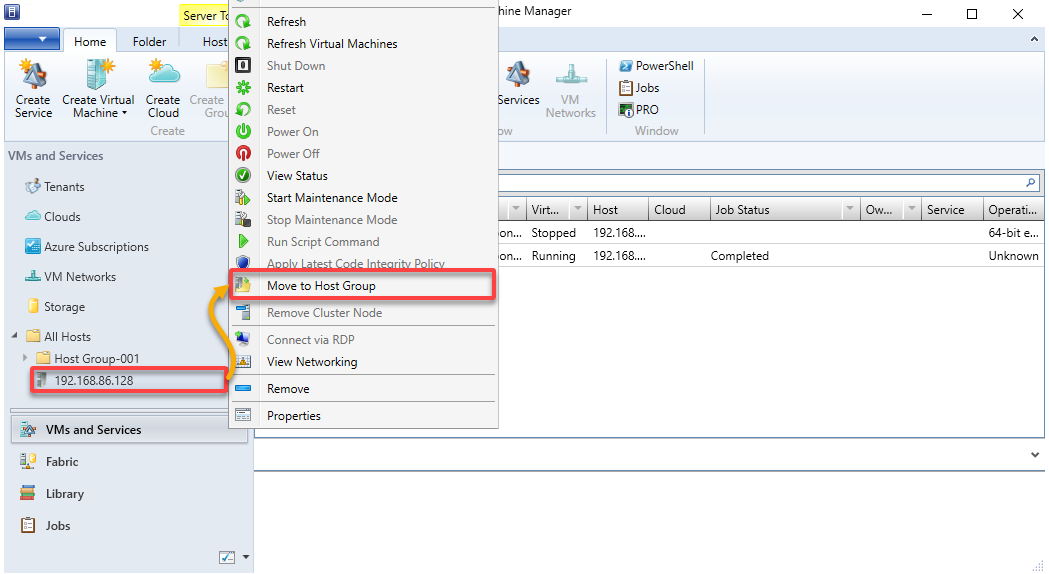
Now, choose the target host group from the Parent host group drop-down list, and click OK to confirm.
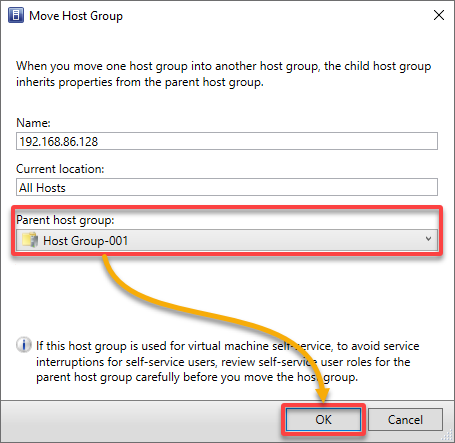
After confirming the move, the host is assigned to the new host group. The host is listed under the corresponding host group, as shown below.
Creating and Deploying VMs in SCVMM
In SCVMM, VMs form the fundamental units of virtualized infrastructure you can create, manage, and operate. With SCVMM’s cross-platform management capabilities, you can create VMs for physical-to-virtual (P2V) and virtual-to-virtual (V2V) migrations.
To create a VM in SCVMM, follow these steps:
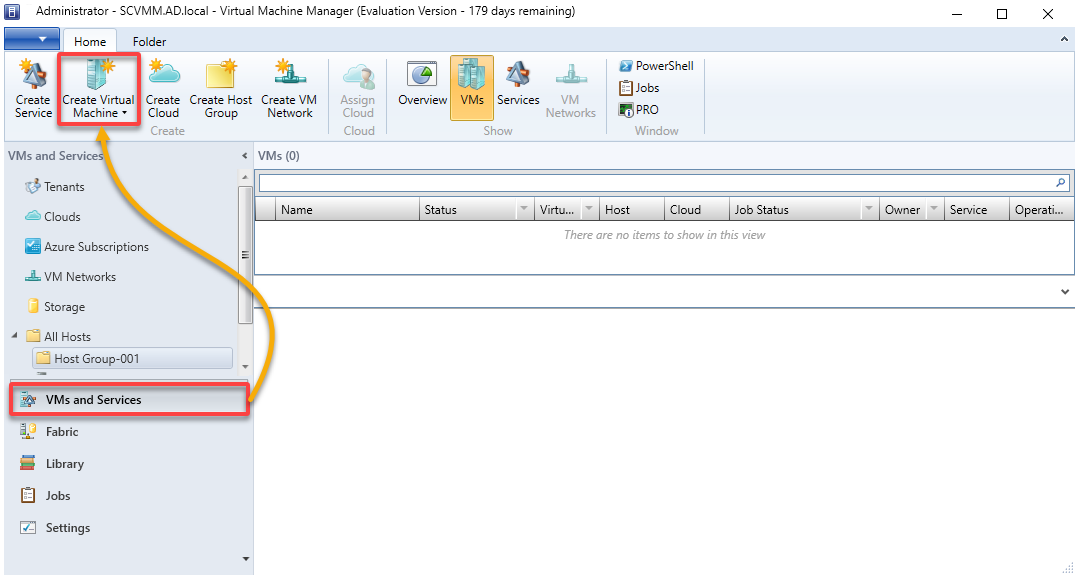
1. Navigate to VMs and Services (left pane), and click Create Virtual Machine in the toolbar to initiate creating a new VM.
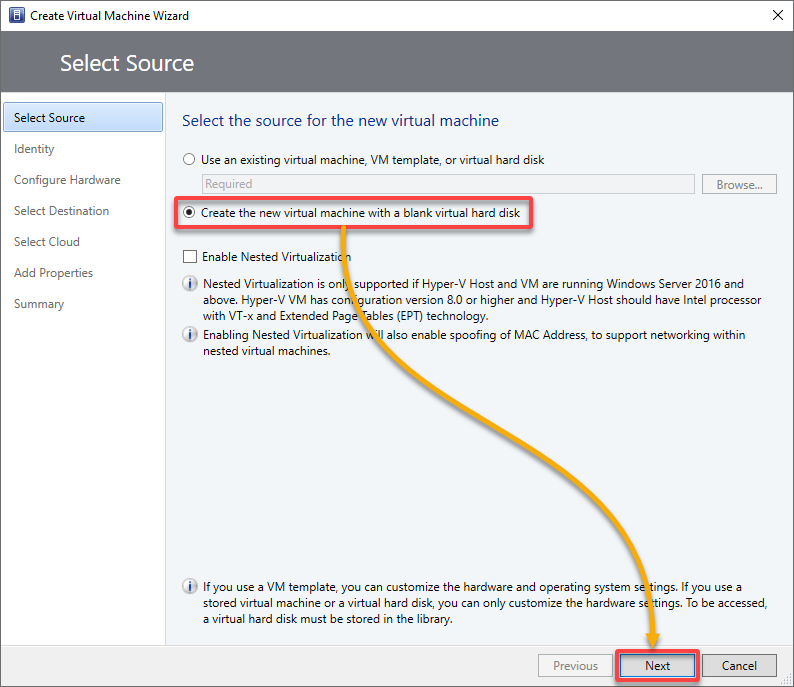
2. In the wizard below, choose the Create the new virtual machine with a blank virtual hard disk option since you are creating your first VM, and click Next.
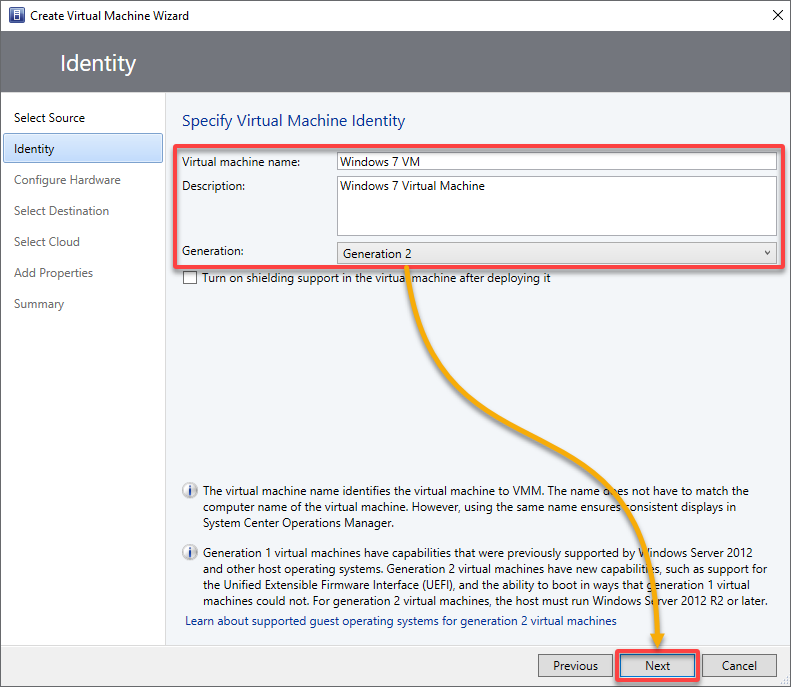
3. Next, configure the VM identity as follows:
- Virtual machine name – Specify a unique name for your VM.
- Description (optional) – Distinguishes your VMs from one another.
- Generation – Choose one below depending on your virtualization environment’s specific needs and the guest OS’s compatibility requirements.
| Generation 1 | VMs are better suited for legacy or less demanding workloads. |
|---|---|
| Generation 2 | VMs offer more modern features and are better equipped to handle newer OSes and security requirements. |
Once configured, click Next to proceed.
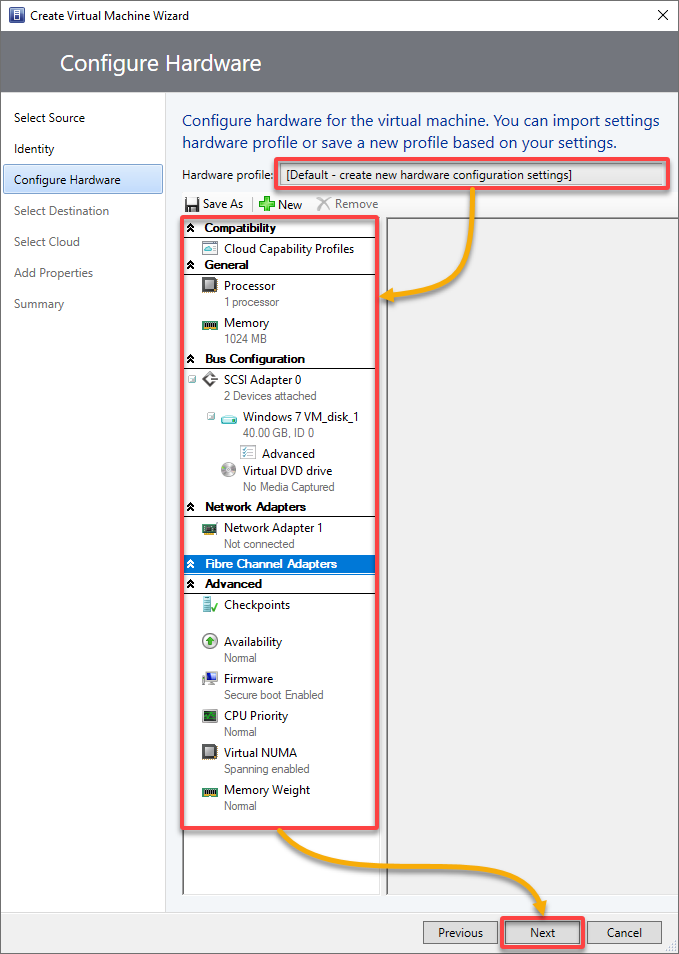
4. Now, select the profile from the Hardware profile list or configure the hardware settings manually, and click Next.
The hardware settings differ depending on your chosen Generation machine (Generation 1 or Generation 2).
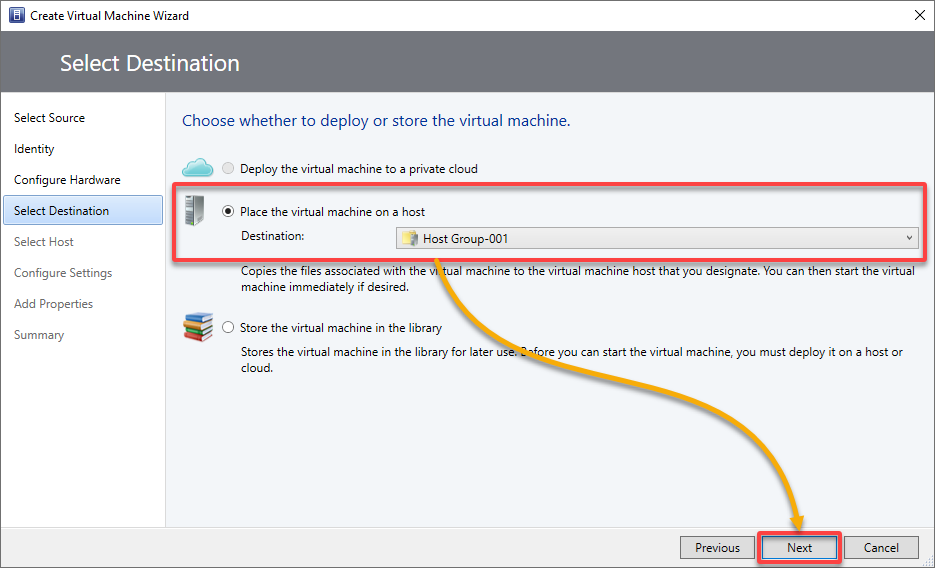
5. In the Select Destination page, specify how the VM should be deployed, and click Next.
This tutorial’s choice is to deploy the VM on a specified destination host.
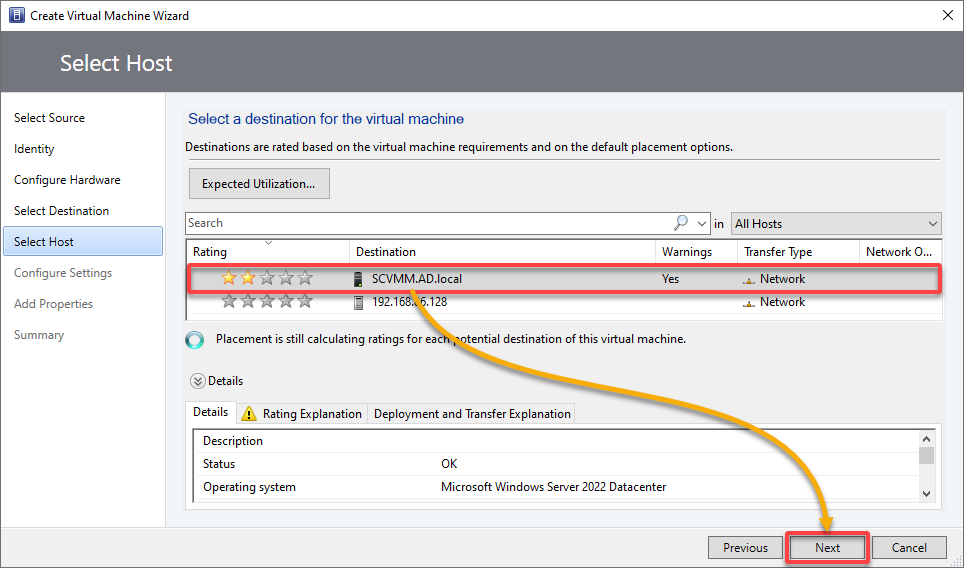
6. View the ratings, choose the host to deploy the VM, and click Next.
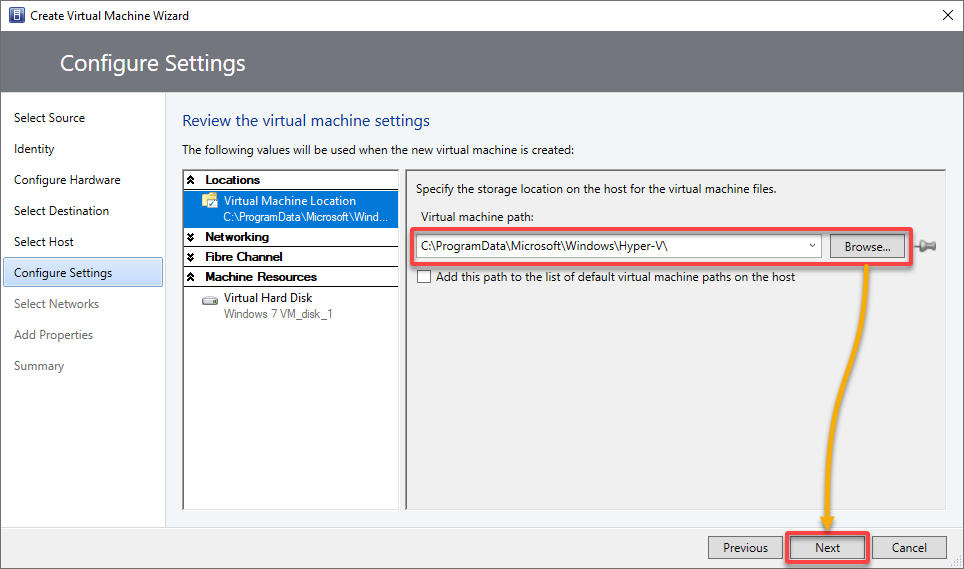
7. Next, review the VM settings, accept the default VM path on the host or specify a different location, and click Next.
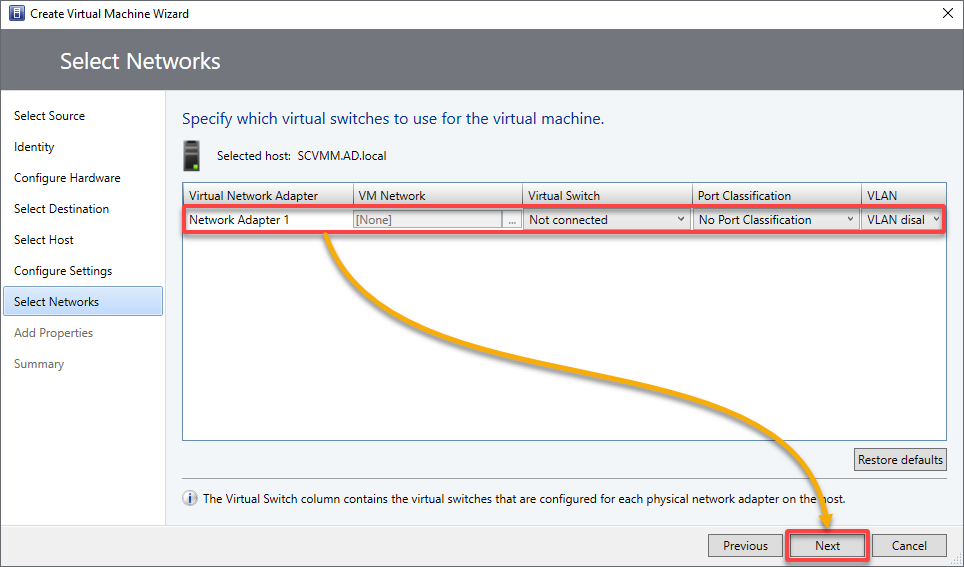
8. In Select Networks, select the network adapter that appears, and click Next.
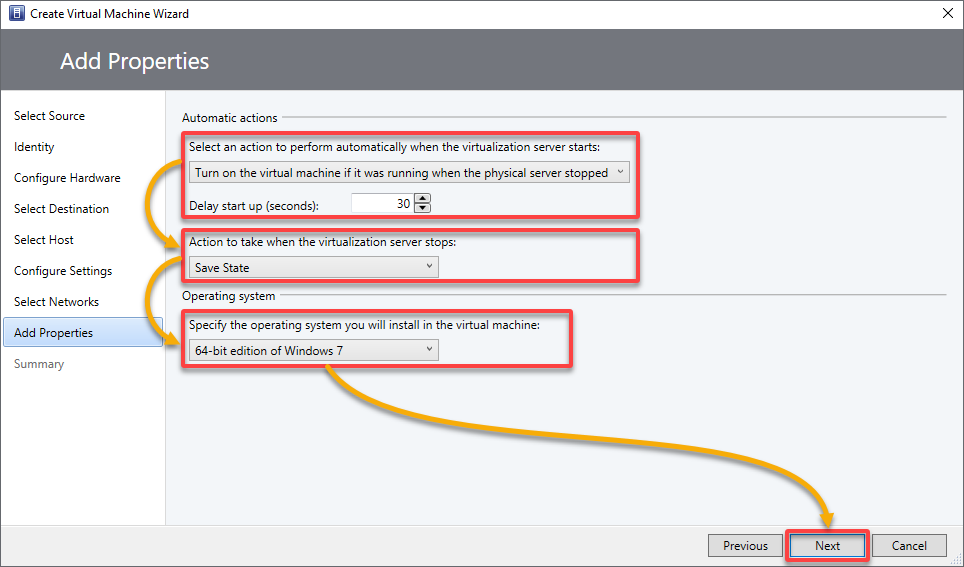
9. Configure the Automatic actions to take when the host starts or stops and the OS to install on your VM, and click Next.
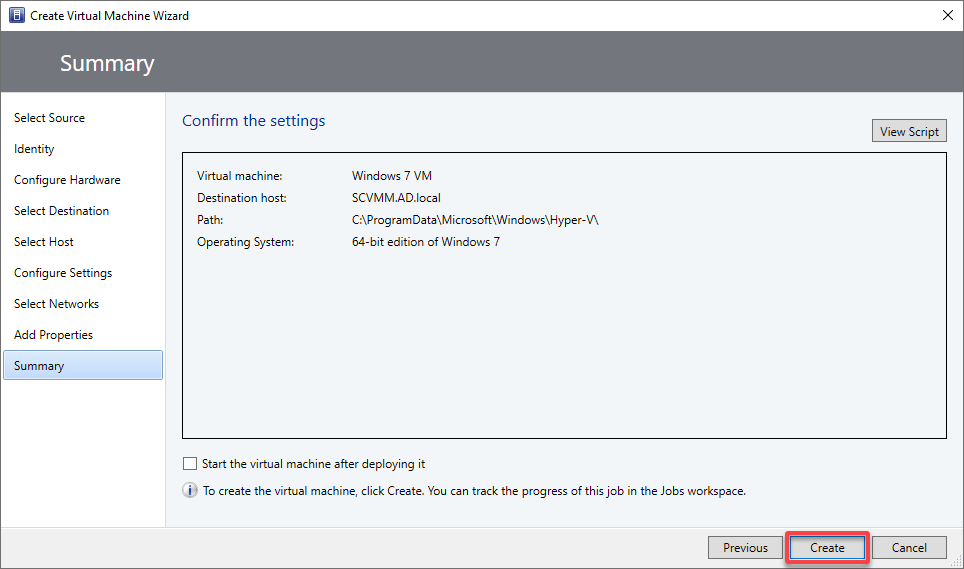
10. Lastly, review your selected settings and click Create to finalize creating your VM.
Below, you can see your newly-created VM in the list within a host group.
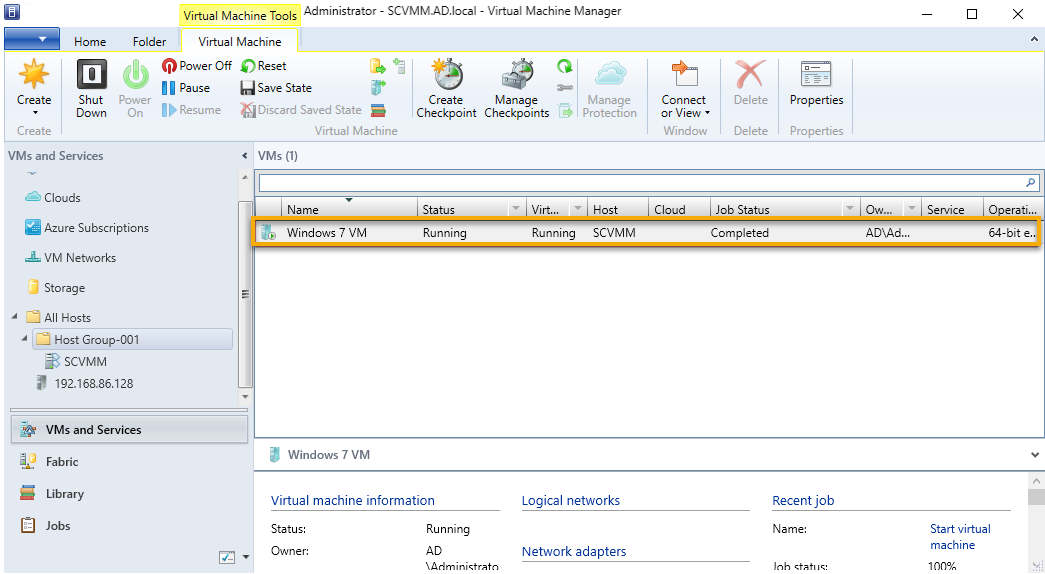
Optionally, you can right-click your VM, as shown below, and modify its configuration and properties as necessary.
💡 Note that some changes require you to restart your VM for the changes to take effect. Additionally, always ensure that you have appropriate permissions and resources and understand the impact of your changes to VM properties.
Creating a Logical Network
Your VM is running but must be connected to your physical network infrastructure. Worry not, though! SCVMM provides tools to create, manage, and configure virtual networks efficiently.
You will connect your VM to your physical network infrastructure by creating a logical network, a physical network in your datacenter. Logical networks provide an abstraction layer allowing you to define and manage VM networking for VMs independently of the underlying physical infrastructure.
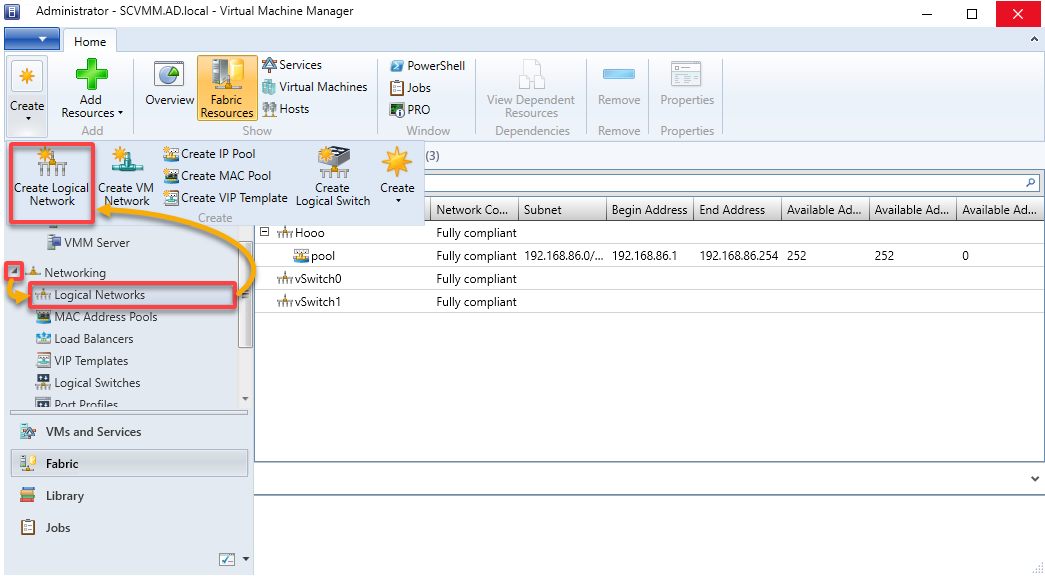
To create a logical network, follow the below steps:
1. In the Fabric workspace, expand Networking, select Logical Networks, and click Create Logical Network to configure your new logical network.
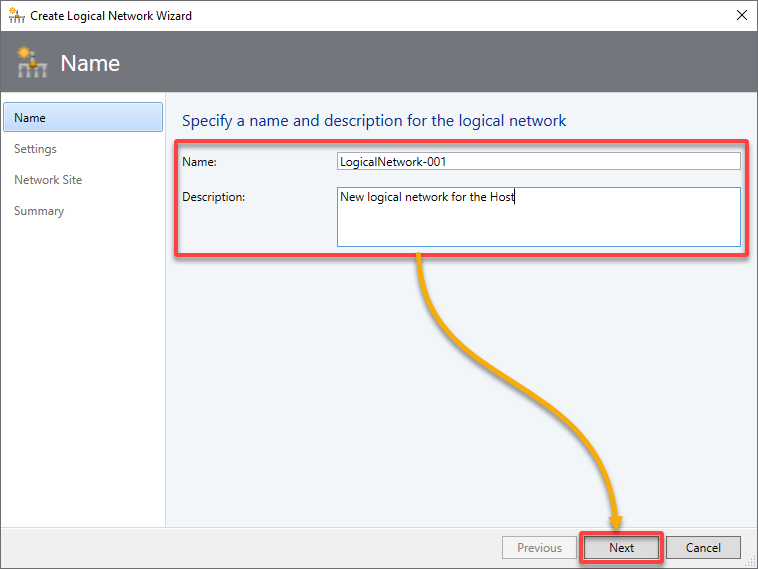
2. Next, provide a descriptive Name and Description for your logical network, and click Next.
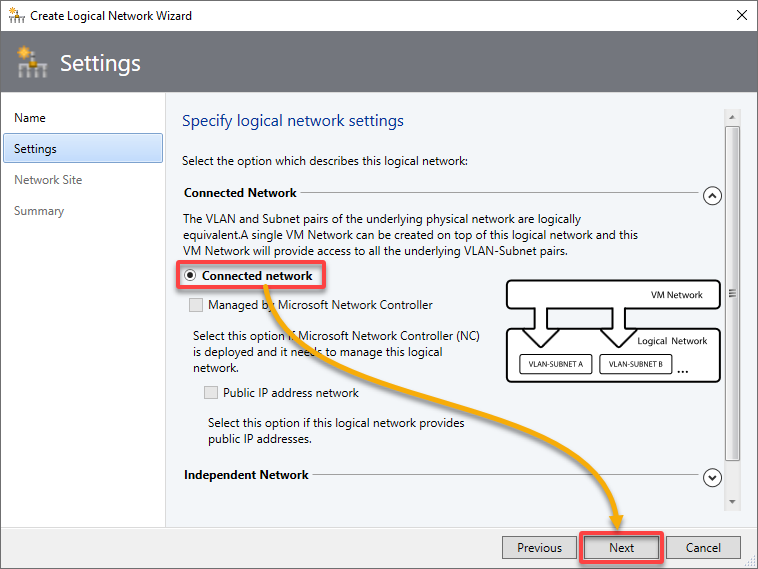
3. Select the Connected network option to link your logical network to your physical network infrastructure, and click Next.
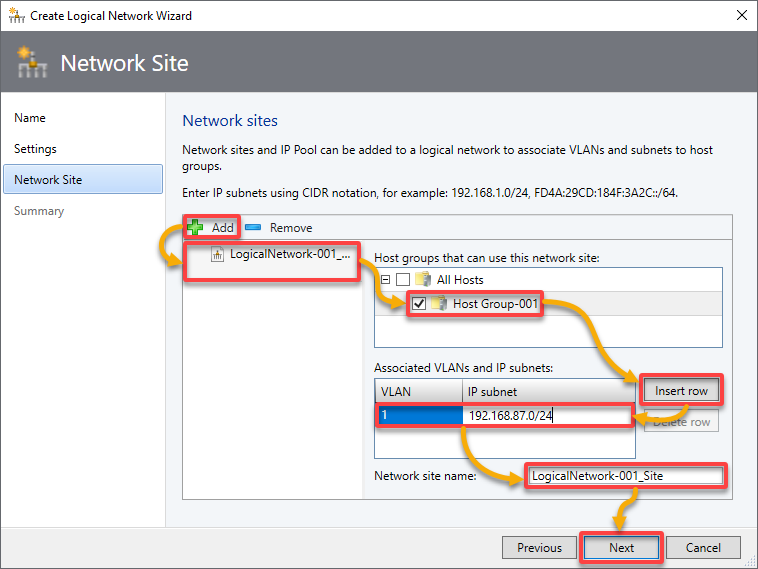
4. On the Network Site page, add a network site to your logical network as follows:
- Click Add, select your logical network (LogicalNetwork-001), and select your host group (Host Group-001) from the list.
- Click Insert row, and enter the VLANs and IP subnets to assign to the logical network definition.
- Name your logical network, and click Next to continue.
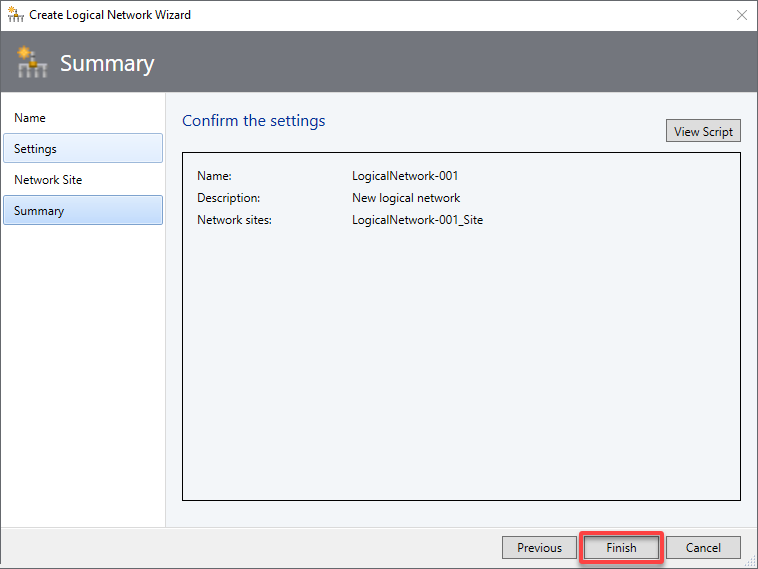
5. Review your selected settings, and click Next to create your logical network.
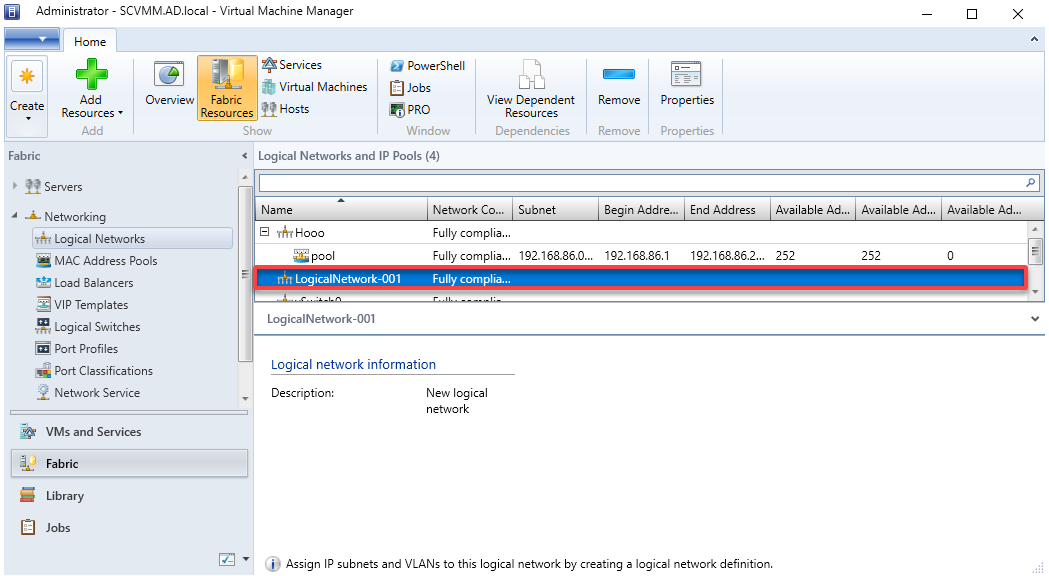
6. Finally, select your newly-created logical network to view its network information and verify the correct settings.
Creating IP Address Pools
Unfortunately, IP address conflict is a thing, so you must ensure IP address assignments for your VMs are in place. How? You must create IP address pools to automatically assign IP addresses to your VMs for quicker network management.
SCVMM allows you to define IP address pools for different logical networks to ensure efficient IP address utilization.
To create IP address pools in SCVMM:
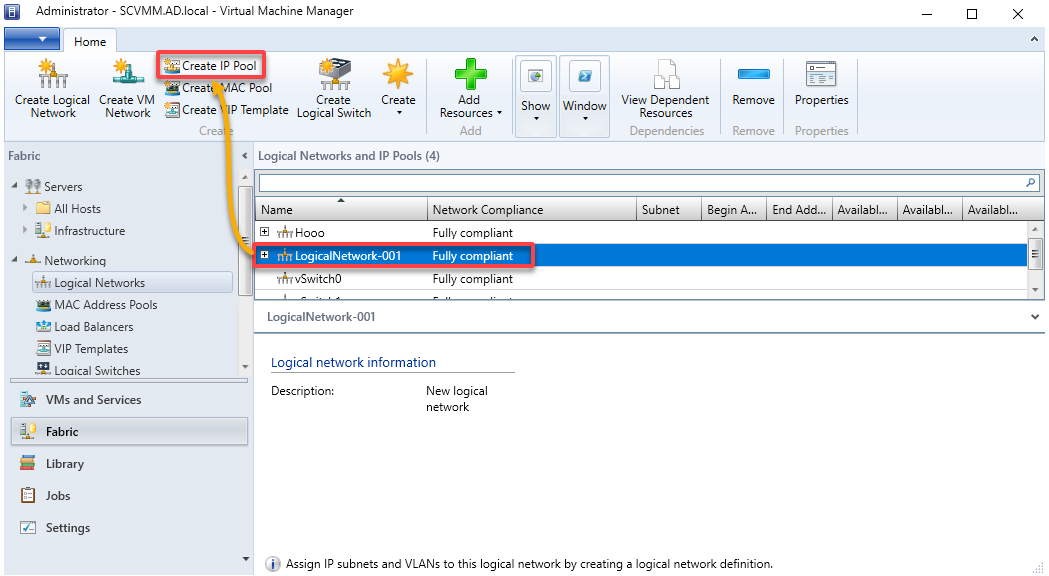
1. In the Logical Networks table, select your logical network (LogicalNetwork-001) where you wish to create the IP pool and click Create IP Pool.
A wizard appears where you will configure your new IP pool (step three).
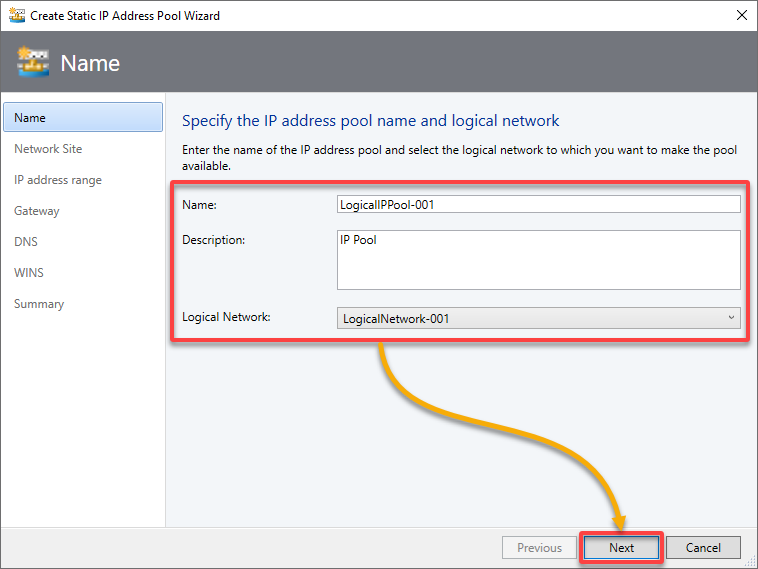
2. In the wizard below, specify a Name and Description (optional) for the new IP address pool, select your Logical Network, and click Next.
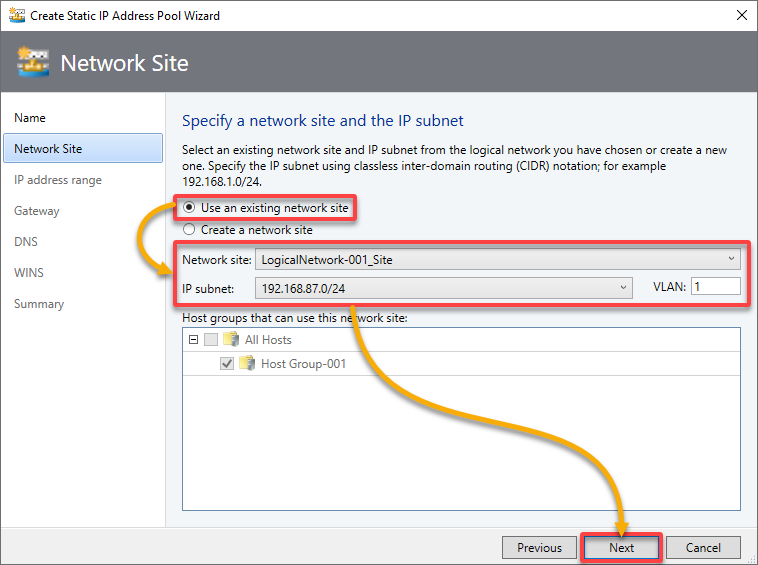
3. Now, in Network Site, choose to Use an existing network site, select the IP subnet (or create a new site) from which to create the pool, and click Next.
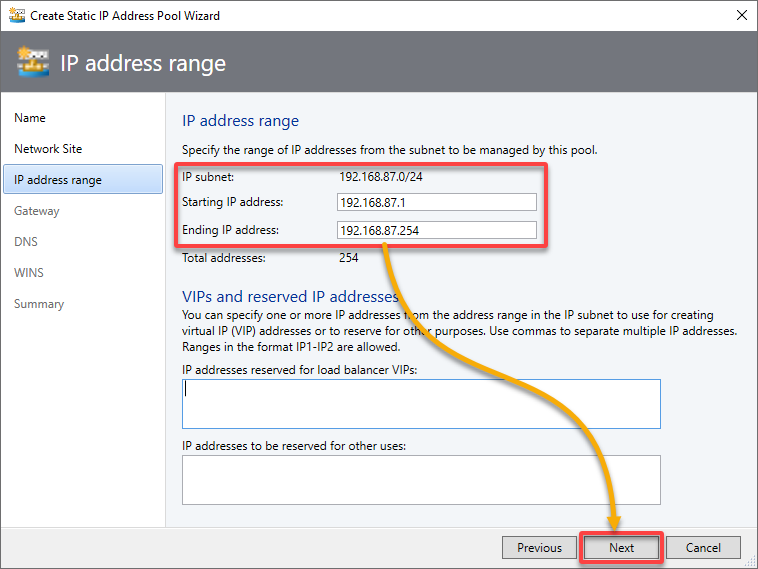
4. For the IP address range, provide the Starting and Ending IP address for the IP pool (which must be contained within the subnet), and click Next.
💡 Optionally, specify the IP address range you want to reserve for VIPs under the VIPs and reserved IP addresses section.
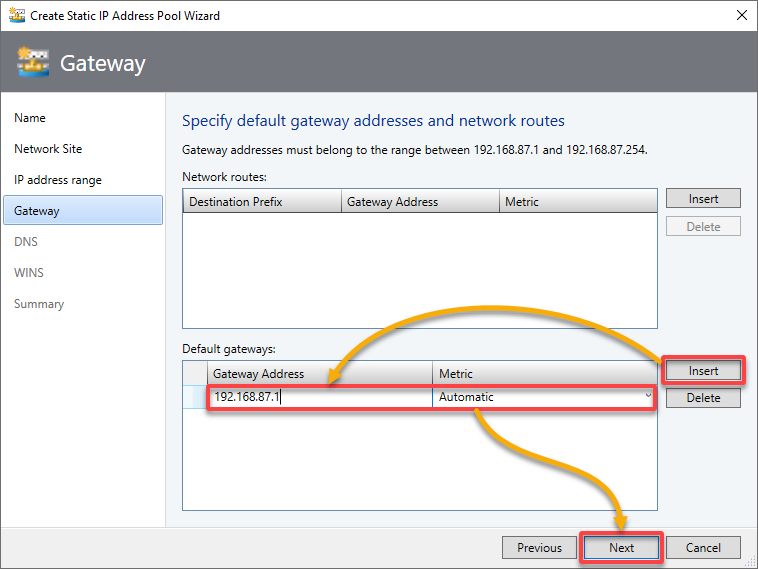
5. On the Gateway page, click Insert, specify one or more default gateways and the metric, and click Next.
The default gateway address must be in the same subnet range as the IP address pool but does need to be part of the pool.
6. For the DNS settings, Insert specific DNS-related information, and click Next.
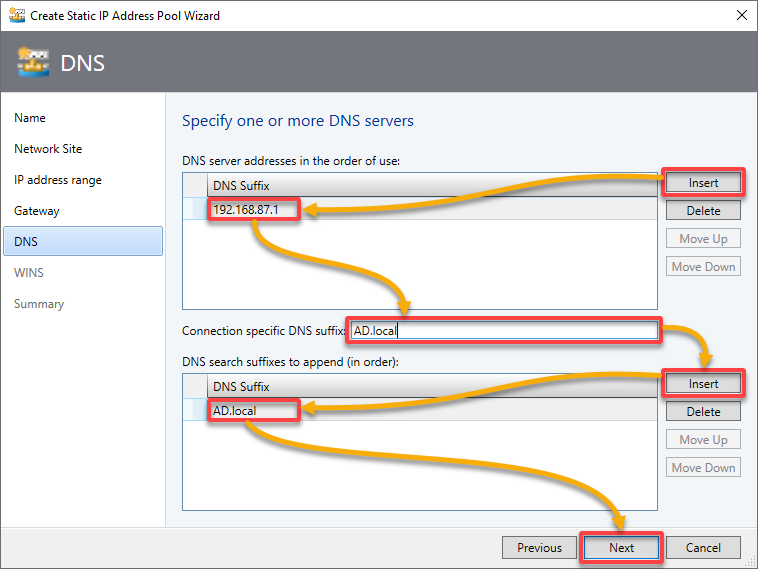
7. Skip specifying a Windows Internet Name Service (WINS) server, and click Next to continue since you will not need one in this tutorial.

8. Review your selected settings, and click Finish

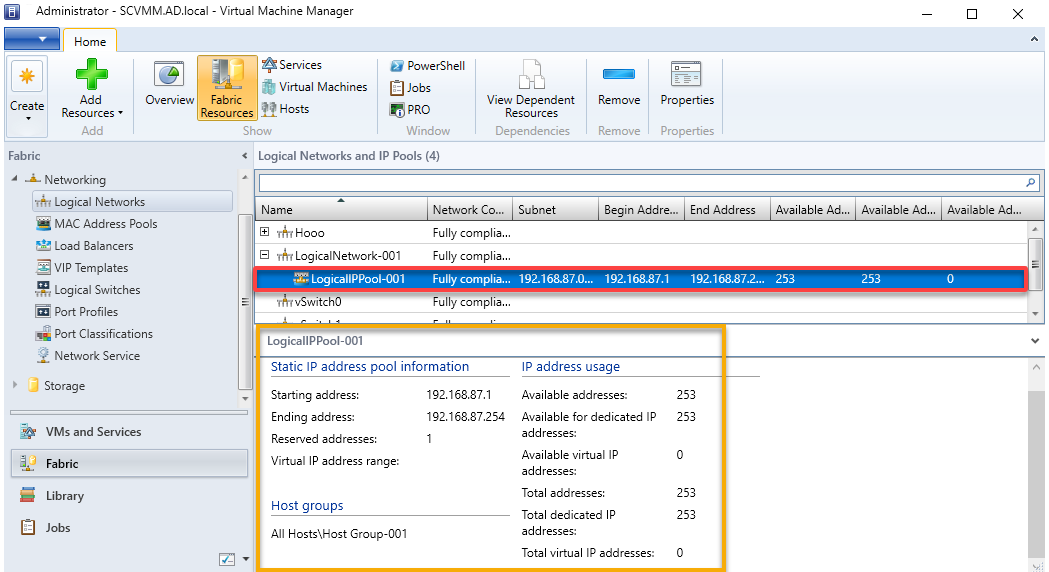
9. Now, expand the subnet where you created your IP address pool, and select the IP Address pool. Doing so lets you view the static IP address pool information in the SCVMM console.
💡 By configuring IP address pools in SCVMM, you reduce the manual effort involved in assigning IP addresses. Moreover, you ensure efficient IP address utilization within your virtualized environment.
Configuring SCVMM for an External Virtual Network
With an IP address pool created, you must enable communication and internet access for your VMs to interact with the outside world. How? By connecting your logical network to an external virtual network.
To make logical networks available to VMs on an external virtual network:
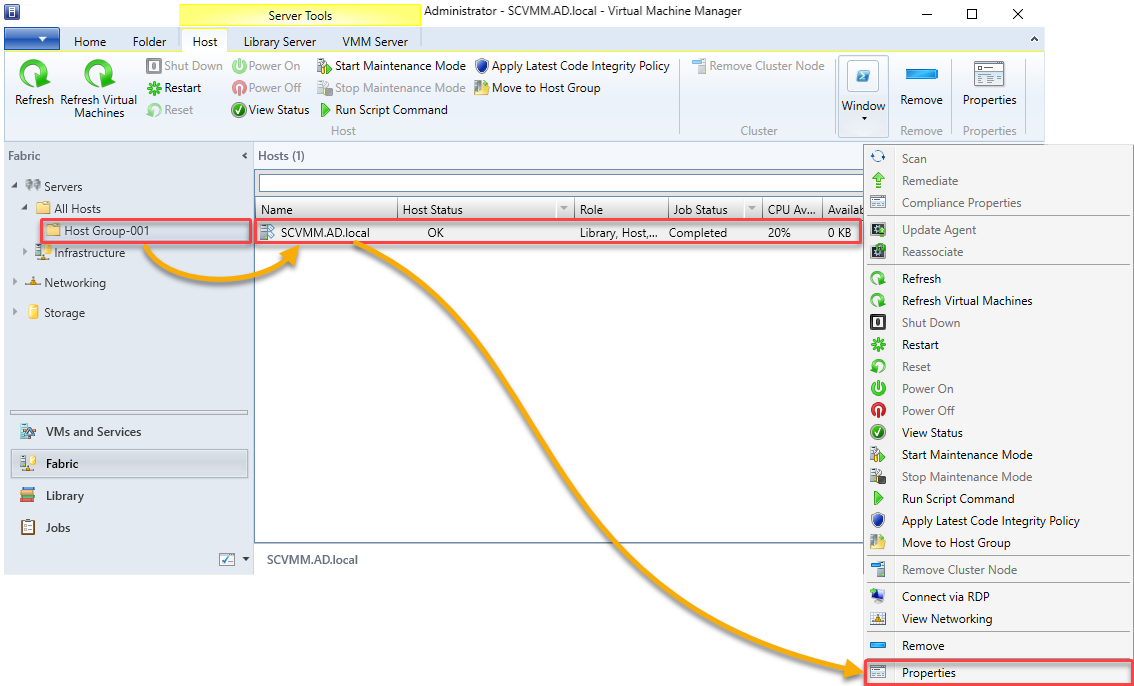
1. Navigate to your host group (Host-Group-001), right-click on your host, and choose Properties.
2. Next, navigate to the Hardware tab (left pane), and configure the following:
- Select the physical network adapter to use for the logical network.
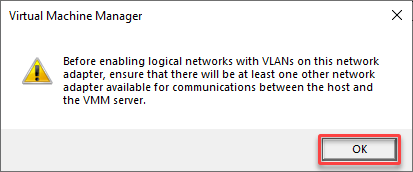
- Tick the box beside the logical network name to associate with your selected adapter.
Once configured, click OK to proceed.
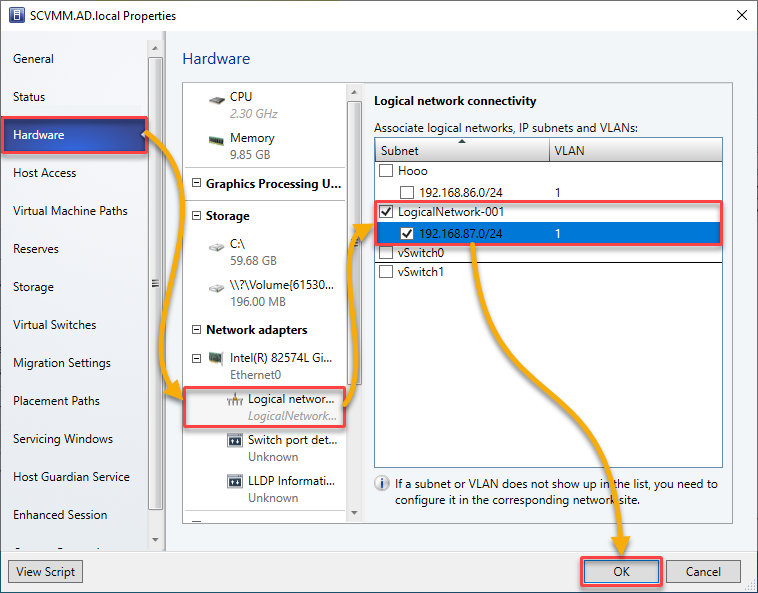
3. Click OK when prompted to enable the logical network.
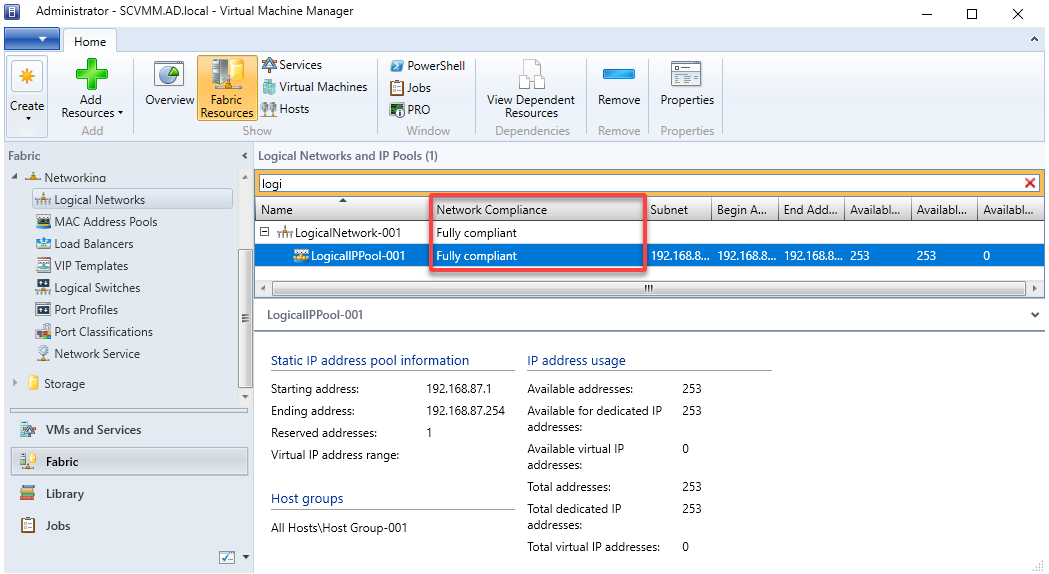
4. Finally, verify that the Network Compliance status of your logical network is Fully compliant, as shown below.
Conclusion
Throughout this tutorial, you have learned to leverage various features the SCVMM provides to administer and manage your virtual infrastructure effectively centrally.
With a solid understanding of SCVMM’s capabilities, why not consider integrating your SCVMM with Azure and Hybrid Cloud? Explore deploying and managing VMs in both on-premises and Azure Cloud environments!
В прошлой статье мы рассмотрели назначение и основные возможности трех продуктов из линейки System Center: Service Manager, Operations Manager и Endpoint Configuration Manager. В текущей статье мы рассмотрим еще три продукта, а именно: Virtual Machine Manager, Data Protection Manager и Orchestrator.
System Center Virtual Machine Manager (VMM)
Virtual Machine Manager – это инструмент для управления всем тем, что так или иначе относится к виртуализации в вашей компании – гипервизоры, виртуальные машины, виртуальные сети и т.д. VMM от Microsoft в плане применения в какой-то степени схож с vCenter от VMWare – туда так же можно добавлять хосты виртуализации, после этого в общей консоли можно лицезреть общий список ВМ, управлять ими и т.д.
Virtual Machine Manager 2019 поддерживает следующие гипервизоры и программные продукты:
- Windows Server: от 2012 R2 до 2019.
- VMWare ESXi: от 5.1 до 6.7.
- VMWare vCenter: от 5.1 до 6.7.
С полным перечнем программных требований и поддерживаемых версий программных продуктов можно ознакомится в документации.
Основные компоненты Virtual Machine Manager:
- Сервер управления. Именно он отвечает за все возможности управления виртуальной средой. В отказоустойчивом сценарии серверов управления может быть несколько – они объединяются в один VMM кластер.
- Сервер баз данных. Здесь хранится база данных VMM. В отличии от Service Manager и Operations Manager у VMM только дна база – оперативная. Базы хранения архивных данных нет.
Ниже перечислю основные возможности Virtual Machine Manager:
- Управление гипервизорами Microsoft Hyper-V и VMWare ESXi.
- Возможность добавить в консоль VMM vCenter от VMWare.
- Управление виртуальными машинами (запуск, остановки, управлением параметрами ВМ).
- Шаблоны и профили виртуальных машин.
- Клонирование виртуальных машин.
- Управление сетью (в т.ч. создание Software Defined Network (SDN) сетей).
- Управление подсистемой хранения.
- Библиотека контента (ISO-образы, VHD/VHDX диски и т.д.).
- Создание кластеров Windows Server прямо из консоли VMM.
- Управление scale-out file server (SOFS).
- Создание и управление Storage Spaces Direct (S2D) кластера. Что-то похожее есть и у VMWare – vSAN.
- Интеграция с Azure (управление виртуальными машина в Azure).
- Ест возможность создать частное облако и “нарезать” его между отделами компании или группами разработчиков.
Для подключения к VMM на рабочие места администраторов устанавливается консоль. Пример консоли изображен на скриншоте ниже.

Стоит отметить, что HTML5 интерфейса управления подобно последним версия ESXi и vCenter от VMWare у VMM нет.
Моё мнение: отличный инструмент для управления гипервизорами и некоторыми сервисами от Microsoft. Есть поддержка гипервизоров VMWare ESXi и средства управления от VMWare – vCenter. Однако, как и с Service Manager не хватает веб-консоли.
System Center Data Protection Manager
Data Protection Manager – система резервного копирования от компании Microsoft. Скажу сразу – далеко не Veeam Backup and Replication, но это лично мое мнение.
Основные компоненты Data Protection Manager:
- Сервер резервного копирования. Собственно, осуществляет всю работу по резервному копированию данных.
- Сервер баз данных. Используется одна база данных – она хранит как оперативные данные, так и данные для отчетов. В отличии от Service Manager и Operations Manager не использует отдельную базу для отчетов, т.к. итоговый набор данных получается небольшой.
Основные возможности Data Protection Manager:
- Резервное копирование гипервизоров Hyper-V.
- Резервное копирование приложений (Microsoft SQL, Microsoft SharePoint, Microsoft Exchnage).
- Резервное копирование физических серверов и рабочих станций под работой Microsoft Windows (в т.ч. бэкап system state).
- Резервное копирование файлов и каталогов.
Полный перечень поддерживаемых продуктов и их версий для резервного копирования средствами DPM 2019 приведен в документации.
DPM умеет складировать резервные копии на следующие носители:
- Локальные диски. Для краткосрочного хранения.
- Ленточные накопители. Для долгосрочного хранения.
- Azure Bakcup Service, т.е. сразу в облако. Как для краткосрочного, так и для долгосрочного хранения резервных копий.
Для работы с Data Protection Manager на рабочие места администраторов и операторов так же устанавливается отдельная консоль, пример которой приведен ниже.

Моё мнение: заточен под резервное копирование приложений и ОС Windows. Linux бэкапть можно, но только если это виртуальная машина на хосте Hyper-V. Продукт находит свое применение. Мы с коллегами даже какое-то время использовали его (DPM 2016), но перешли на Veeam, т.к. он гораздо удобнее: у DPM то агенты отваливались, то задачи фейлились, да и со сжатием итогового бэкапа не всегда все получалось. Однако, если у вас нет никакой системы резервного копирования, но есть лицензия на System Center (т.к. весь пакет покупается сразу), то вполне можно использовать его.
System Center Orchestartor
Вот мы и добрались до последнего продукта про который я хотел бы рассказать – Orchestrator. Orchestrator – это компонент System Center, который позволяет настроить бизнес-логику, либо какую-то последовательность автоматизации действий при возникновении события, либо ручного триггера.
Основные компоненты Orchestrator:
- Сервер баз данных. Хранит базу данных, в которой хранятся все настройки, ранбуки и прочее. База данных одна.
- Сервер управления. Отвечает за доступ к базе через дизайнер ранбуков (это консоль, где непосредственно и происходит настройка ранбуков).
- Сервер ранбуков. Обращается непосредственно к серверу баз данных для получения списка тех ранбуков, которые должны быть запущены.
- Веб-консоль. Позволяет через веб-браузер посмотреть статус ранбуков, либо запустить какой-то ранбук.
Как правило, для установки Orchestrator используется два сервера – сервер баз данных (собственно, для размещения базы данных) и сервер управления (для всех остальных компонентов).
Для интеграции Orchsatrator со сторонними системами используются пакеты интеграции (Integration pack – IP). Orchestrator 2019 поддерживает интеграцию со следующими основными системами и сервисами:
- Microsoft System Center Service Manager.
- Microsoft System Center Operation Manager.
- Microsoft System Center Dataprotection Manager.
- Microsoft System Center Virtual Machine Manager.
- Microsoft System Center Configuration Manager.
- Active Directory.
- Microsoft Exchange.
- HP iLO.
- REST API.
- FTP.
- Microsoft SharePoint.
Полны перечень поддерживаемых систем и сервисов доступен в документации.
Ниже приведен пример ранбука, который отправляет уведомления инциатору при изменении приоритета заявки в Service Manager.
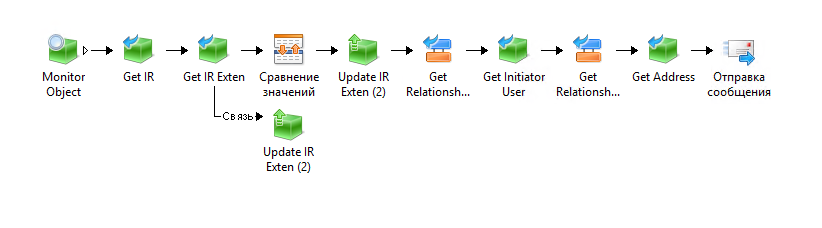
Для работы с ранбуками используется консоль Runbuuk Designer. Пример консоли приведен на скриншоте ниже.

Так же есть веб-консоль для ручного запуска ранбуков (к которым это вообще применимо) и просмотра статуса запущенных ранбуков. Правда, требует Silverlight 🙁 Скриншот консоли приведен ниже.

Мое мнение: если вы не нашли чего-то “из коробки” в System Center, то рассмотрите Orchestrator. Возможно, в его пакетах интеграции вы сможете найти, либо самостоятельно сконфигурировать то, что вам необходимо. В целом довольно интересный и полезный продукт. Я могу ток догадываться, но, предположу, что у облачного Microsoft Power Automate (бывший Microsoft Flow) корни растут от Orchestrator.
Итог
Мы рассмотрели основные продукты линейки System Center: для чего они нужны и что умеют делать. Кратко:
- Microsoft System Center Service Manager – система хелп-деск.
- Microsoft System Center Operation Manager – система мониторинга.
- Microsoft Endpoint Configuration Manager – управление конфигурацией серверов и рабочих станцией.
- Microsoft System Center Virtual Machine Manager – управление гипервизорами и виртуальными машинами.
- Microsoft System Center Data Protection Manager – система резервного копирования.
- Microsoft System Center Orchestrator – система автоматизации ИТ-процессов.
В следующих статья мы рассмотрим процесс установки, первоначальной настройки и основные моменты работы с продуктами линейки System Center.