
В данной статье показаны способы, с помощью которых можно открыть оснастку «Управление печатью» в операционной системе Windows 10.
Управление печатью — оснастка которая позволяет устанавливать, просматривать и управлять локальными принтерами и удаленными серверами печати. С помощью данного инструмента можно просмотреть состояние принтеров, управлять общим доступом к принтеру, а также открыть очередь печати принтера, приостановить печать. Кроме того, при необходимости можно удалить принтер и его драйверы.
Пример папки «Управление печатью» показан на скриншоте ниже.

Содержание
- Как открыть «Управление печатью» в окне «Выполнить»
- Как открыть «Управление печатью» используя «Поиск»
- Как открыть «Управление печатью» используя «Средства администрирования Windows»
Как открыть «Управление печатью» в окне «Выполнить»
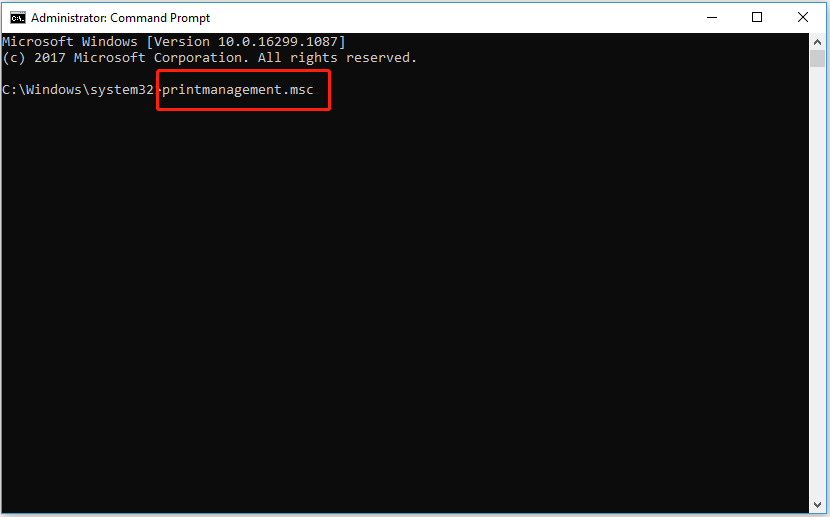
Чтобы открыть оснастку «Управление печатью», нажмите сочетание клавиш + R, в открывшемся окне Выполнить введите (скопируйте и вставьте) printmanagement.msc и нажмите клавишу Enter ↵.

Как открыть «Управление печатью» используя «Поиск»
Чтобы открыть оснастку «Управление печатью», используйте «Поиск в Windows», для этого нажмите на значок поиска в панели задач или нажмите сочетание клавиш + S, в строке поиска начните вводить printmanagement и в результатах поиска выберите Управление печатью.

Как открыть «Управление печатью» используя «Средства администрирования Windows»
Откройте «Средства администрирования Windows» любым из способов и в папке «Администрирование» выберите Управление печатью.

.
Используя рассмотренные способы, можно открыть оснастку «Управление печатью» в операционной системе Windows 10.
-
Home
-
News
- Top 6 Ways to Open Print Management in Windows
By Shirley | Follow |
Last Updated
Do you have any idea what Print Management is? Do you know how to open it? This article from MiniTool provides you with several ways to open Print Management in Windows 11/10 to help you access it quickly.
What Is Print Management
Print Management is a free built-in program on Windows that provides up-to-date details about the status of printers and print servers on your network. You can check and manage all your printing equipment through Print Management in Windows. So, this program can help you save a lot of time in managing and monitoring printers.
How to Open Print Management in Windows 10/11
Way 1. Using the Windows Search Box
The easiest and quickest way to open Print Management is by using the Windows search box.
You just need to type Print Management in the Windows search box, and you can see its icon shows on the screen. Then you need to select the result under Best match.
Way 2. Using the Run Dialog Box
Windows Run dialog box is a convenient tool that can help you access applications on your computer easily. You can also use Run to access Print Management.
Step 1. Right-click the Windows logo key and choose Run from the list.
Step 2. Type printmanagement.msc in the input box and press Enter.
Now you can use Print Management to manage your printers.
Way 3. Creating a Desktop Shortcut
If you need to use Print Management often or prefer to open applications from the desktop, you can create a shortcut for it by referring to the following easy steps.
Step 1. Move on to the desktop of your computer.
Step 2. Right-click in a blank area and choose New > Shortcut.
Step 3. Type printmanagement.msc in the text box and click Next.

Step 4. Set up a name for this shortcut and click Finish.
Now you can see the shortcut you have created on your desktop. You just need to click this shortcut to open Print Management in the future.
Way 4. Using Command Prompt/Windows PowerShell
If you prefer to use the command line to launch applications, you can try to open Print Management by using Command Prompt or Windows PowerShell.
Step 1. Using the Windows search box to find Command Prompt/Windows PowerShell.
Step 2. Right-click Command Prompt/Windows PowerShell to select Run as administrator.
Step 3. Type printmanagement.msc in the command line box and press Enter.
Tips:
Tip: If you accidentally misuse CMD and cause file loss, you can use professional data recovery software – MiniTool Power Data Recovery to get them back. This tool supports recovering files (documents, emails, pictures, videos, etc.) no more than 1GB for free.
MiniTool Power Data Recovery FreeClick to Download100%Clean & Safe
Way 5. Using the File Explorer
If you are in the interface of File Explorer, you do not need to exit it. You can open Print Management in File Explorer directly.
Step 1. In the address bar of File Explorer, type C:\Windows\System32 and press Enter.
Step 2. Using the search box on the new page to find printmanagement.msc.
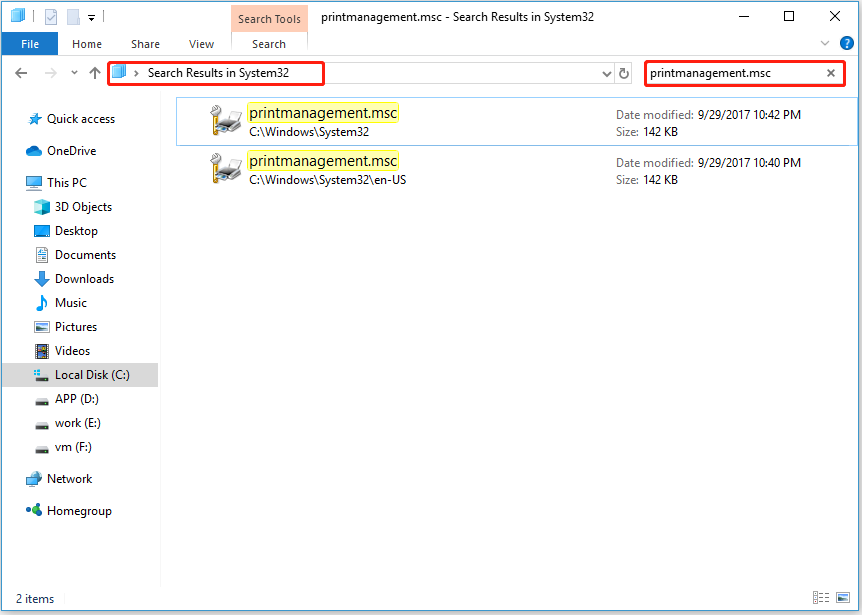
Step 3. Double-click the search result to open Print Management.
Way 6. Using Task Manager
Task Manager is a powerful program in Windows. It helps you terminate applications and processes, and shut down or restart the system as needed so that the computer can perform at its best. Not only that, but it can also help you open various programs, and Print Management is no exception.
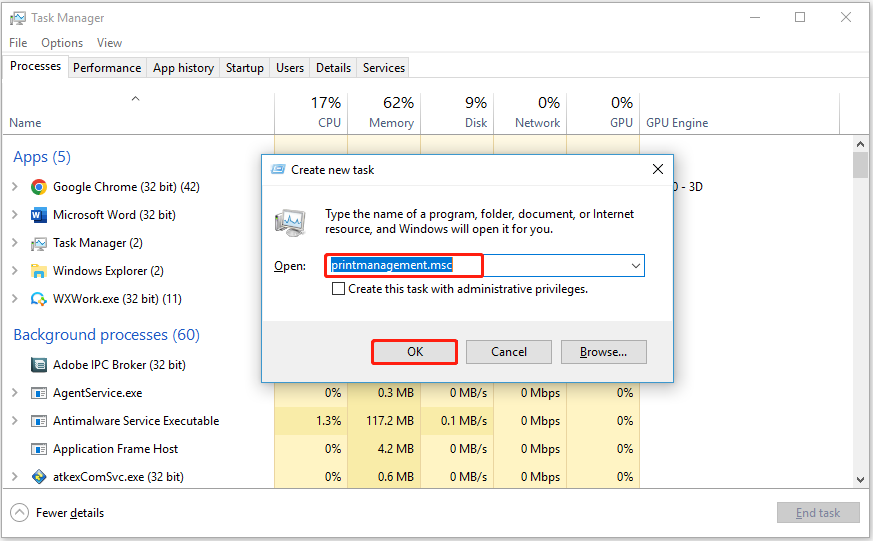
Step 1. Right-click the Start button to select Task Manager (Or you can use Ctrl + Shift + Esc key combinations).
Step 2. Click File > Run new task. Then type printmanagement.msc in the input box and click OK.
There are many ways to open Print Management, but some of them are a little bit cumbersome. If you use Print Management frequently, it is recommended that you pin it on the Windows taskbar.
You just need to right-click Print Management in the taskbar and select Pin to taskbar.
Wrapping Things Up
In a word, this article introduces several ways to open Print Management in Windows 11/10. Hope you can find a way that works for you.
For more information about how to open applications on Windows, you can go to MiniTool News Center.
About The Author
Position: Columnist
Shirley graduated from English major and is currently an editor of MiniTool Team. She likes browsing and writing IT-related articles, and is committed to becoming a professional IT problem solver. The topic of her articles are generally about data recovery, data backup, and computer disk management, as well as other IT issues. In spare time, she likes watching movies, hiking and fishing.
Download Windows Speedup Tool to fix errors and make PC run faster
The Print Management Tool is a utility of Windows 11 that enables you to install and manage printers in an organization or for your personal use. This app will provide you with a platform that has an easy-to-use interface allowing you to keep printing-related work hassle-free. However, few users know about this tool and how to open and use the Print Management Tool in Windows 11. Therefore, in this article, we are going to discuss this in detail.

To open Print Management Tool, you have various options, depending on your convenience and ease of use, you can pick the best method. The following are the methods to open Print Management Tool on a Windows computer.
Via Search Bar
Windows 11 provides you with an easy way to open Print Management Tool from Windows’s search bar. Follow these steps to access Print Management.
- Press Windows Key + S.
- Type Print Management in the Search bar.
- Click on the Open button.
Via Run or Command Prompt or PowerShell
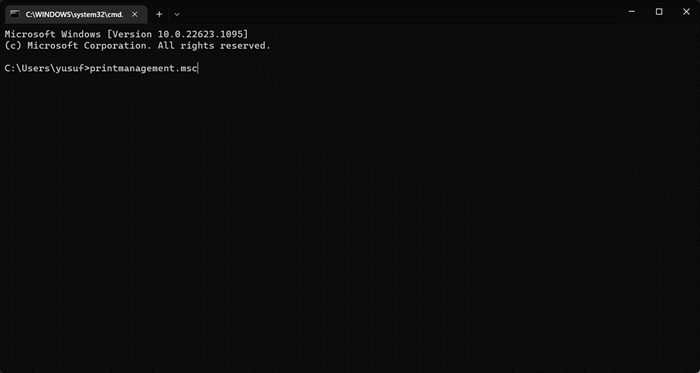
You can use a single command to open the Print Management Tool using either Command Prompt or Run, in order to launch the former, just search out CMD and open it (it is better to open Command Prompt as administrator), when it comes to latter, all you have to do is hit Win + R and Run dialog box will pop up. Finally, run the following command and you will be good to go.
printmanagement.msc
This will launch the Print Management Tool.
Note: Instead of Command Prompt, you can PowerShell or Terminal too.
Via File Explorer
The address bar in File Explorer can be used to open Print Management and from here you can manage printers and printing tasks. Follow the prescribed steps to do the same:
- Press the Windows + E key to open File Explorer.
- In File Explorer, go to the following location: C:\Windows\System32.
- Once it opens, find printmanagement.msc file from the search bar and double-click on it to manage printers.
Via Control Panel
If you want to use Control Panel to open the Print Management Tool:
- Open Control Panel
- Set View by to Large icons
- Go to Windows Tools > Print Management.
Now, that you know how to open the Print Management Tool, let us learn how to use it.
Read: Windows cannot find printmanagement.msc in Windows
How to use Print Management Tool in Windows 11
After launching Print Management Tool, you will see a simple UI.
- First of all, expand Custom Files and select All Printers to view all added Printers.
- Now, you can probe even further, and check what all Printers are added here.
- You can check Queue Status and Jobs in Queue in order to get a better understanding of the job in progress and what are the steps you need to manage your printer.
One of its best features is Print Servers. It lets you remove or add Print Servers to your existing network. All you have to do is click on Print Servers and then follow the on-screen instructions to complete the process. Hopefully, you will be able to do the job pretty easily.
Hopefully, now you know how to open and use Print Management Tool on a Windows computer.
Read: Turn Off Let Windows manage my default printer setting in Windows.
Anand Khanse is the Admin of TheWindowsClub.com, a 10-year Microsoft MVP (2006-16) & a Windows Insider MVP (2016-2022). Please read the entire post & the comments first, create a System Restore Point before making any changes to your system & be careful about any 3rd-party offers while installing freeware.
Print Management in Windows 10 is the present day topic of talk. There are many users who are partially aware of the functioning of the Print Management console on Windows 10. This is not a new thing to note down as it was pretty much famous in the previous editions of Windows. To brief Print Management, its key function is to control numerous print servers or printers. And also it can give a fast performance about the reference resource for relevant driver information. So let us see 2 Ways to Open Print Management in Windows 10, How to handle Custom Filters and Print Servers segments moreover Actions Menu.
Outline of Print Management
Print Management allows the users to observe the print series or queues and gather notifications when the lists of prints stop while carrying out the print sessions. It also activates the users to relocate print servers and positioning printer connections with the help of Group Policy. Print Management also gives the present information about the printers’ condition and also about the print servers of the network. To a certain group of clients, you can install printer connections and also keep an eye on the print lines with the help of Print Management. By using the filters of Print Management, you can trace out the printers which are facing errors. Whenever a printer requires attention, the Print management sends an email alert.
You may like to read
Master Guide to fix Printer Problems in Windows 8 and 8.1
How to Open and Use Print Management in Windows 10
2 Ways to Open Print Management in Windows 10
We present you 2 different ways applying which you can procure the Print Management console in Windows 10.
Way 1: Search
Get yourself into the Taskbar and get your attention to the Search field. There you will enter the phrase printmanagement.msc. On the occurred list of results, you will see an option print management.
Way 2: Administrative Tools
Administrative Tools is another location from where you can procure Print Management. To do so, you need to navigate the following location: Control Panel -> Administrative Tools -> Print Management.
Apply any of the methods; you will see the same result. This is how the Print Management window looks.
How to Work with the Custom Filters Section of Print Management in Windows 10
Take your look in the left column of the Print Management window. You will see that the first section is of Custom Filters. The Printers and Drivers parts are common with Custom Filters and Print Servers section. The new things that we see here are the Printers With Jobs and Printers Not Ready.
The Printers With Jobs lets provides you the information about the printers that are presently printing and also lets you know the numbers of prints (jobs) are in the queue.
What is the Use of Actions Menu or Right Click on Categories?
The options that you find in the Actions menu of the Print Management will be the same that you see when you perform a right click on the categories.
To give an illustration, the Custom Filters section permits you to create custom printer filter or driver filter. See the below screenshot.
Now going to the Print Servers Drivers part, you can add or manage Drivers.
In the Printers section of the Print Servers, you will be offered to export printers to a file or import printers from a file.
How to Work with Print Servers Section of Print Management in Windows 10
This is said to be the most useful and important part of Print Management. You will see the Print Servers located at the second spot in the left column of the Print Management. When you select the Print Servers, you will see your computer listed there. With the possession of administrative authorities, if you are a part of a network, you will be able to see the other computers who are part of the same network domain. For every computer listed, you will see information concerned with the installed drivers, installed printers, ports used and the printing forms.
On the particular computer, the list of installed drivers will be exhibited in the Drivers part. This includes the drivers installed by the software.
Make a right click on any driver and see the range of things that you can manage from here. You can delete the chosen driver or set driver isolation or even take a look at its properties.
Coming to the Forms section you will be able to view all the forms. These forms can be applied for printing. You will find minute details of every form such as its type, width, or height.
The Type column is treated as an important one. If you see carefully, you will notice that the most used values for it were the Printer and Built in. The Printer forms are the ones installed by your printers. You can remove them by making a right click on them followed by a click on the Delete option. But the Built in forms are those with Windows. You cannot change or remove them.
Ports section is on the third spot. The installed printing ports will be exhibited here. Few are the standard ports available in the computers and mostly they never come to use. Right click on a port and you will have options to Configure it or Delete it. Once you have deleted the real printer connected to your PC, you will no longer be able to put into use until you reinstall it.
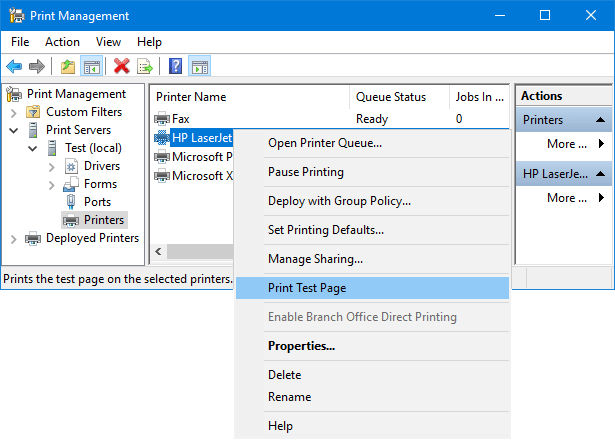
Now, we come to the important section, Printers. All the printers installed along the software ones are listed here. When you perform a right-click on a printer, you will see a lot of configuration options. The options available are open printer queue, pause printing, deploy with group policy, set printing defaults, manage sharing, print test page, properties, delete, rename, and help.
Coming to the End
With the above piece of information about the Print Management, you must have learned that the Print Management is definitely an important tool to work with. This tool is really very helpful. Share with us some of your important reviews about this subject and also enlighten us with your reviews. Please leave your thoughts in the comments below. Eagerly waiting for your reactions!!
April 29, 2024 updated by
Leave a reply »
Print Management missing from Windows 10 Administrative Tools? Print Management is a Microsoft Management Console (MMC) snap-in that enables you to install, view, and manage the printers. In this tutorial we’ll show you the easiest ways to open Print Management in Windows 11 / 10 / 8 / 7.
Method 1: Open Print Management via Run Command
Press the Windows key + R to open the Run command box, type printmanagement.msc and hit Enter.
This will launch the Print Management console immediately. Expand the Print Servers node on the left, you can add / delete the printers and drivers, view printer queue, configure the printer port, print test page, etc.
Method 2: Open Print Management via Control Panel
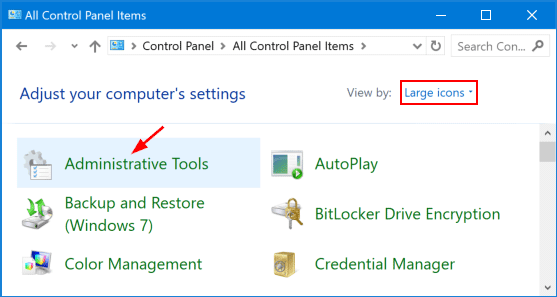
Open the Control Panel and select Large icons under the View by drop-down list. Click Administrative Tools.
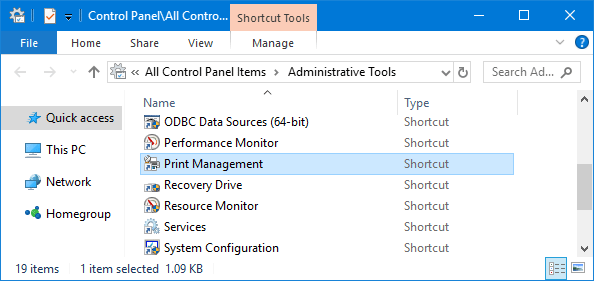
You can find the Print Management shortcut.
Can’t Find Print Management in Windows 10/8/7 Home?
Print Management is not available in the Home edition of Windows. However, you can find an alternative Control Panel applet that can help manage the printers connected to your computer. Follow these steps:
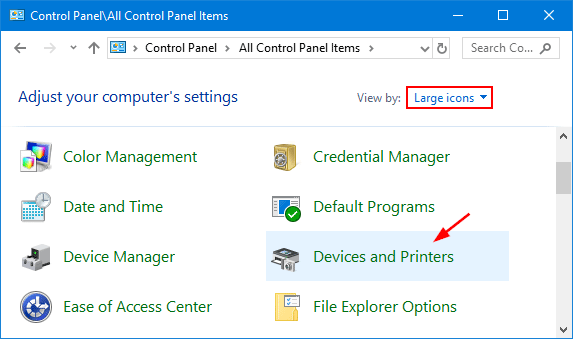
Open the Control Panel in Large icons view. Click Devices and Printers.
In the Devices and Printers window, you can see the connected printers, scanners, Bluetooth and other external devices. Right-click on your printer and you can see how many documents are in the printing queue, set the default paper size for printing, manage the printer properties.
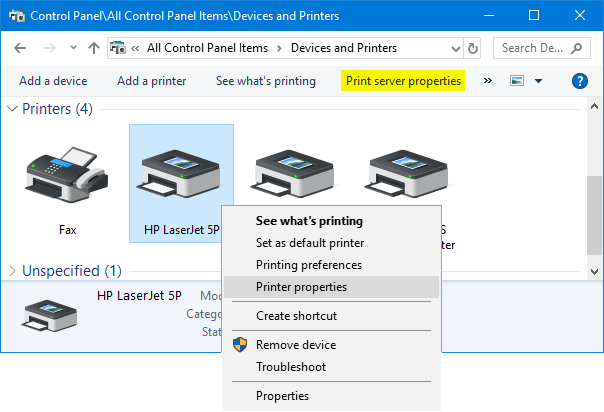
Click the “Print server properties” in the toolbar area and it lets you configure available printer forms and printer ports, add and remove printer drivers, etc. That’s it!
- Previous Post: How to Adjust Screen Brightness on Windows 10 Laptop or Tablet
- Next Post: Add File Explorer or This PC Shortcut to Windows 10 Start Menu