
Applies ToWindows 11 Windows 10
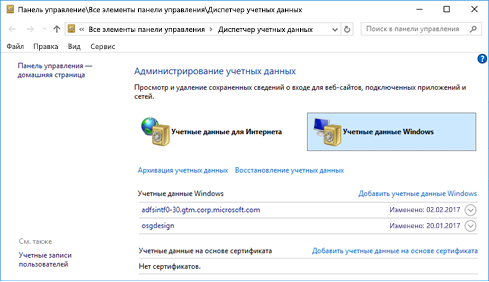
Диспетчер учетных данных позволяет просматривать и удалять сохраненные учетные данные для веб-сайтов, приложений и сетей.
-
Чтобы открыть диспетчер учетных данных, введите диспетчер учетных данных в поле поиска на панели задач и выберите панель управления диспетчера учетных данных.
-
Выберите Учетные данные веб-сайтов или Учетные данные Windows для доступа к учетным данным, которыми вы хотите управлять.

Нужна дополнительная помощь?
Нужны дополнительные параметры?
Изучите преимущества подписки, просмотрите учебные курсы, узнайте, как защитить свое устройство и т. д.
Все способы:
- Управляем учетными записями в Windows 10
- Способ 1: Меню Параметры
- Способ 2: Панель управления
- Способ 3: Локальная политика безопасности
- Способ 4: Вкладка «Безопасность» в свойствах файлов, папок и дисков
- Вопросы и ответы: 8
Как правило, часто за одним компьютером работает несколько пользователей по очереди. Разработчики операционных систем специально для таких случаев добавляют возможность создания разных учетных записей с индивидуальными настройками и правами доступа. Администратору предоставляются все полномочия для управления такими профилями, включая их удаление или полную блокировку на определенный период времени. Осуществляется такое взаимодействие через специальные меню в Windows. Именно о них мы и хотим поговорить далее.
Управляем учетными записями в Windows 10
В рамках этой статьи мы предлагаем изучить несколько меню и оснасток, встроенных в Windows 10, чтобы понять, как именно производится управление профилями через такие средства. Ознакомившись с последующими инструкциями, вы поймете, где можно отыскать нужный для изменения параметр и как именно производится необходимое редактирование. После этого уже можно будет приступить к непосредственной реализации требуемых действий, например, к созданию новой учетной записи или изменению прав доступа.
Способ 1: Меню Параметры
В первую очередь остановимся на одном из разделов в меню «Параметры». Сейчас там находятся еще не все опции, которые позволяли бы взаимодействовать с учетными записями, поскольку разработчики постепенно переносят все пункты из Панели управления. Однако имеющихся там функций будет достаточно, чтобы справиться с некоторыми задачами. Давайте вкратце пробежимся по каждому из них.
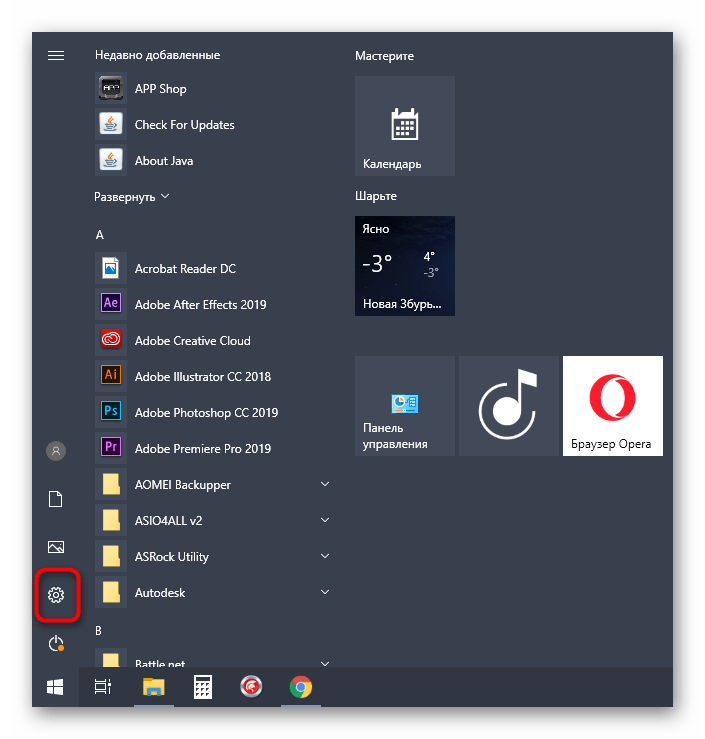
- Для начала откройте «Пуск» и перейдите в меню «Параметры», кликнув по соответствующему значку в виде шестеренки.
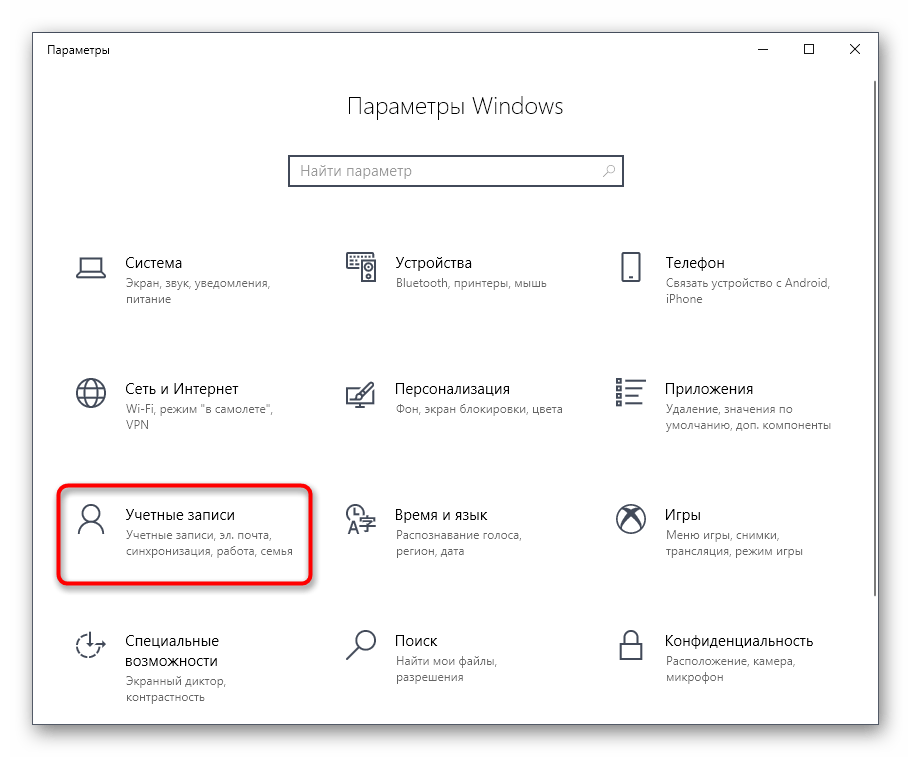
- Здесь вас интересует раздел «Учетные записи».
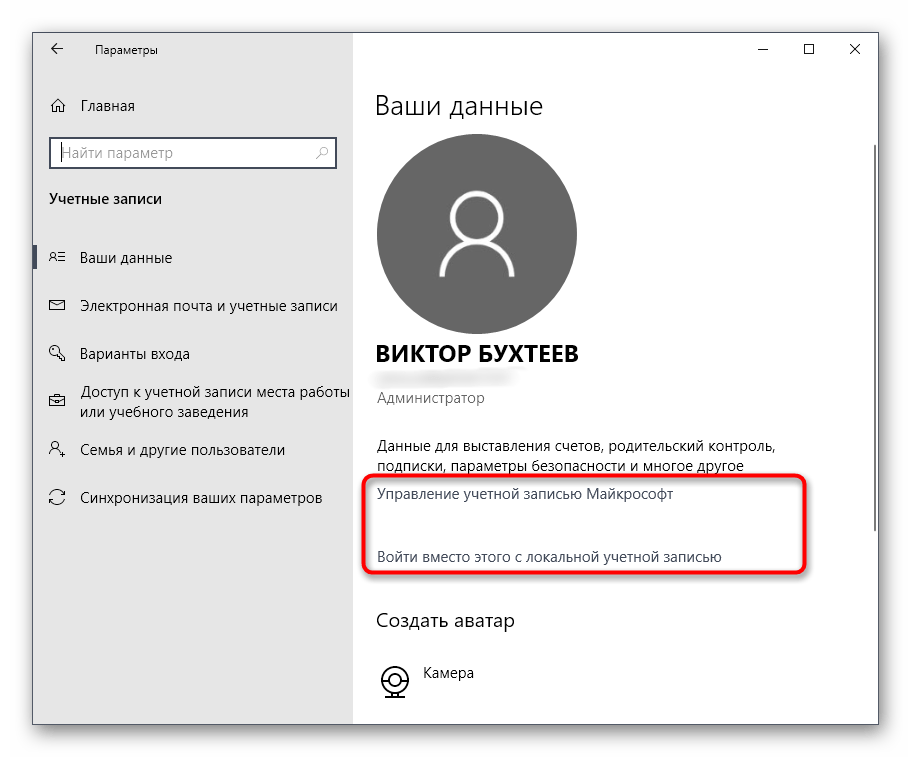
- В первой категории левой панели «Ваши данные» осуществляется редактирование текущего профиля. Например, можно перейти к настройке учетной записи Майкрософт через браузер. Там редактируется имя профиля, год рождения, устанавливается фото и изменяется пароль. Дополнительно в этой категории есть надпись «Войти вместо этого с локальной учетной записью». Она позволяет переключиться на привычный профиль администратора, который не связан с аккаунтом Microsoft.
- Ниже присутствует опция создания аватара. Это можно сделать прямо с веб-камеры или через Проводник выбрать уже имеющееся изображение нужного формата.
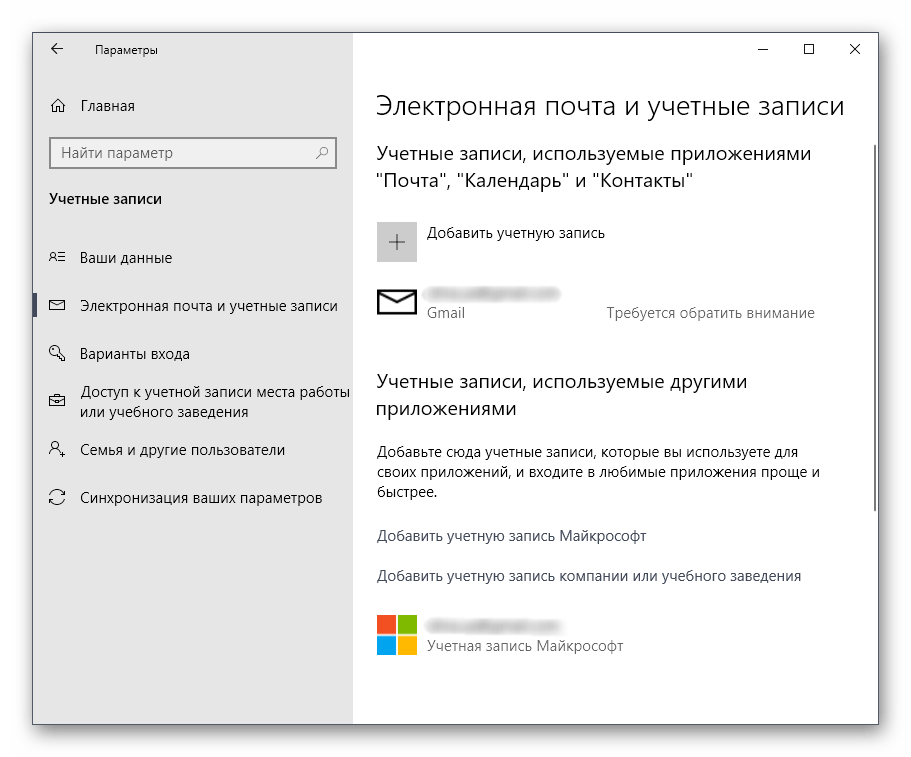
- Вторая категория под названием «Электронная почта и учетные записи» тоже относится к текущему профилю Windows. Именно отсюда осуществляется добавление аккаунтов Microsoft, которые связаны со стандартными приложениями и сторонними программами.
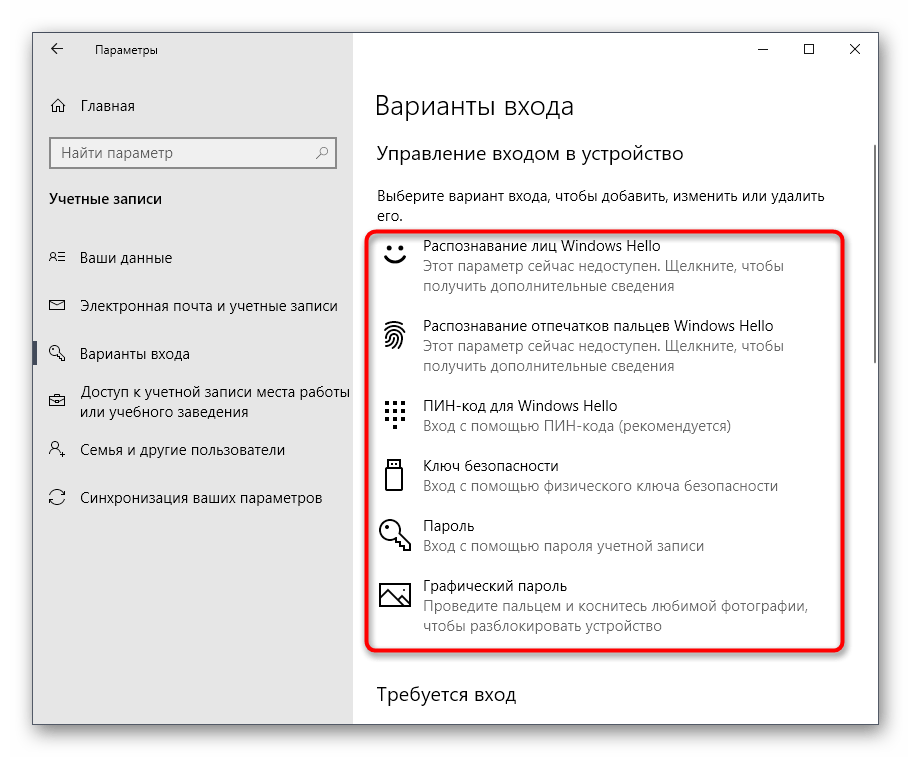
- Далее идет категория «Варианты входа». В ней вы самостоятельно выбираете принцип авторизации учетной записи при запуске операционной системы. На данный момент существует огромное количество разнообразных вариантов для всех типов устройств. В этом же окне находятся детальные описания каждого варианта, поэтому мы предоставим выбор оптимального средства вам.
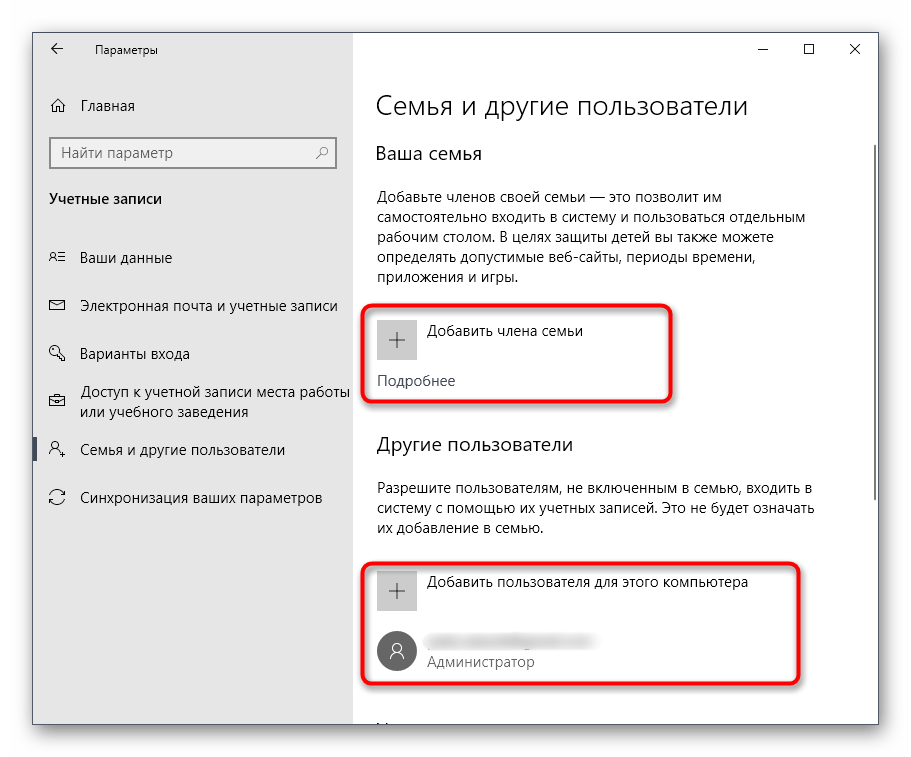
- Ключевой раздел этого меню — «Семья и другие пользователи». Именно отсюда выполняется управление другими учетными записями, например, создание, изменение названия, установка ограничений или изменение типа профиля. Добавить можно как уже существующий аккаунт Microsoft, так и создать локальный аккаунт.
Как видно, это меню по большей части рассчитано на изменение личной учетной записи, хотя в случае с аккаунтом Microsoft все равно произойдет перенаправление на страницу в браузере. Скорее всего, при выходе следующих обновлений содержимое данного раздела поменяется и в нем будет больше опций, перенесенных из Панели управления.
Способ 2: Панель управления
Только что мы упоминали Панель управления как средство, из которого все пункты переносятся в «Параметры» с новой реализацией. Однако пока что это коснулось далеко не всех настроек, включая опции, отвечающие за управления учетными записями, поэтому давайте остановимся на этом меню более детально.
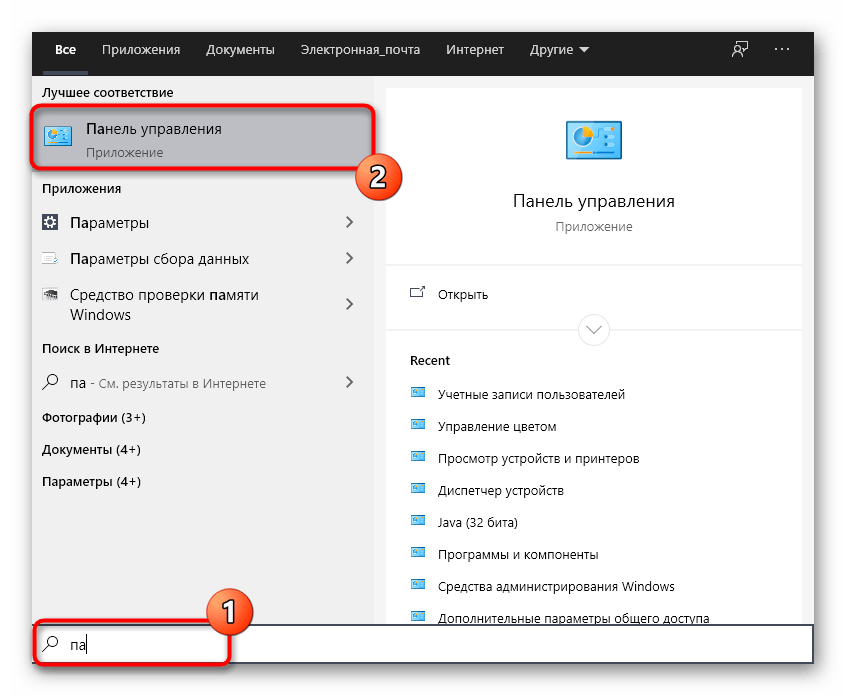
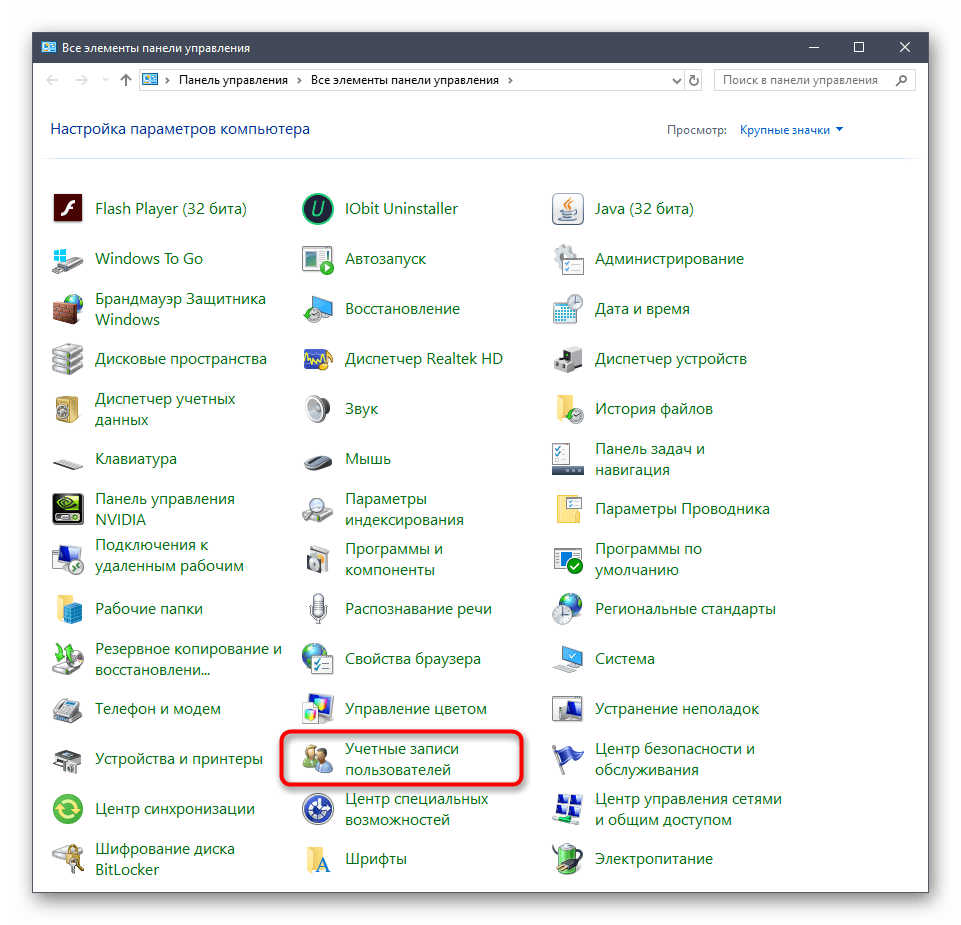
- Откройте «Пуск», через поиск отыщите приложение «Панель управления» и перейдите в него.
- Среди списка всех разделов отыщите «Учетные записи пользователей».
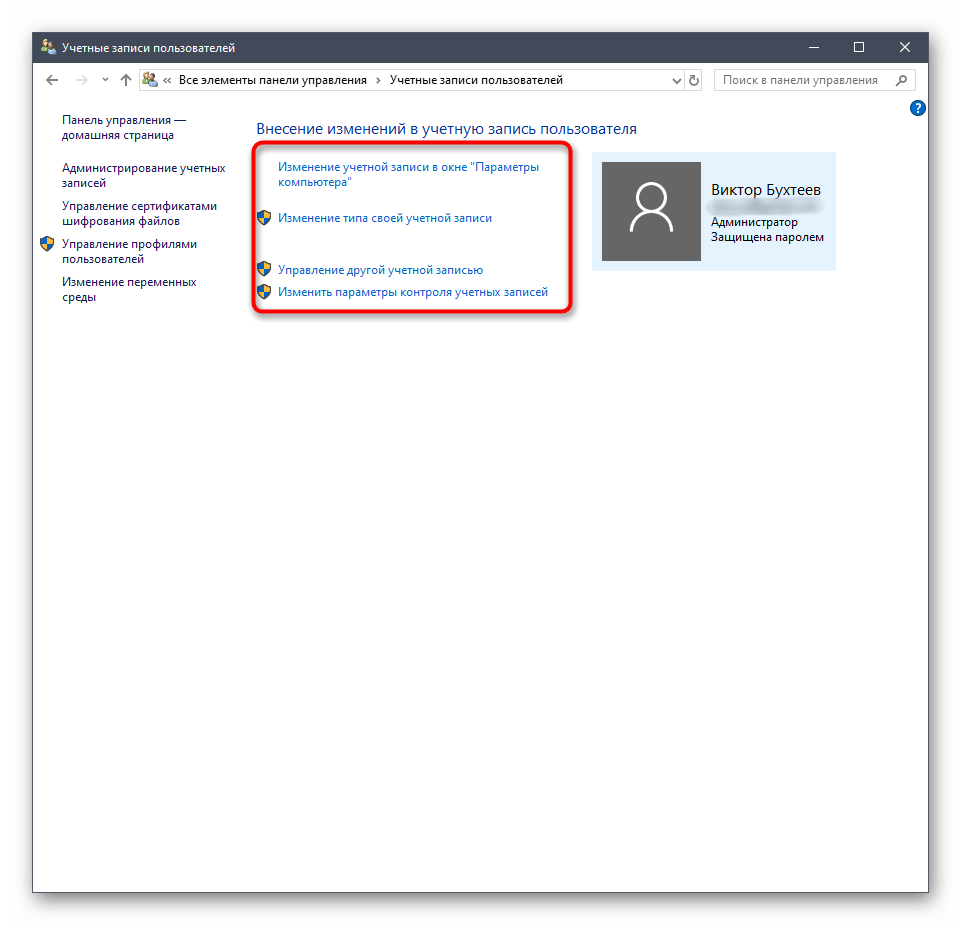
- В главном меню вы можете перейти для изменения текущей учетной записи в меню Параметры, о котором уже шла речь ранее, изменить тип своего профиля, перейти к управлению другим пользователем или изменить особенности контроля учетных записей.
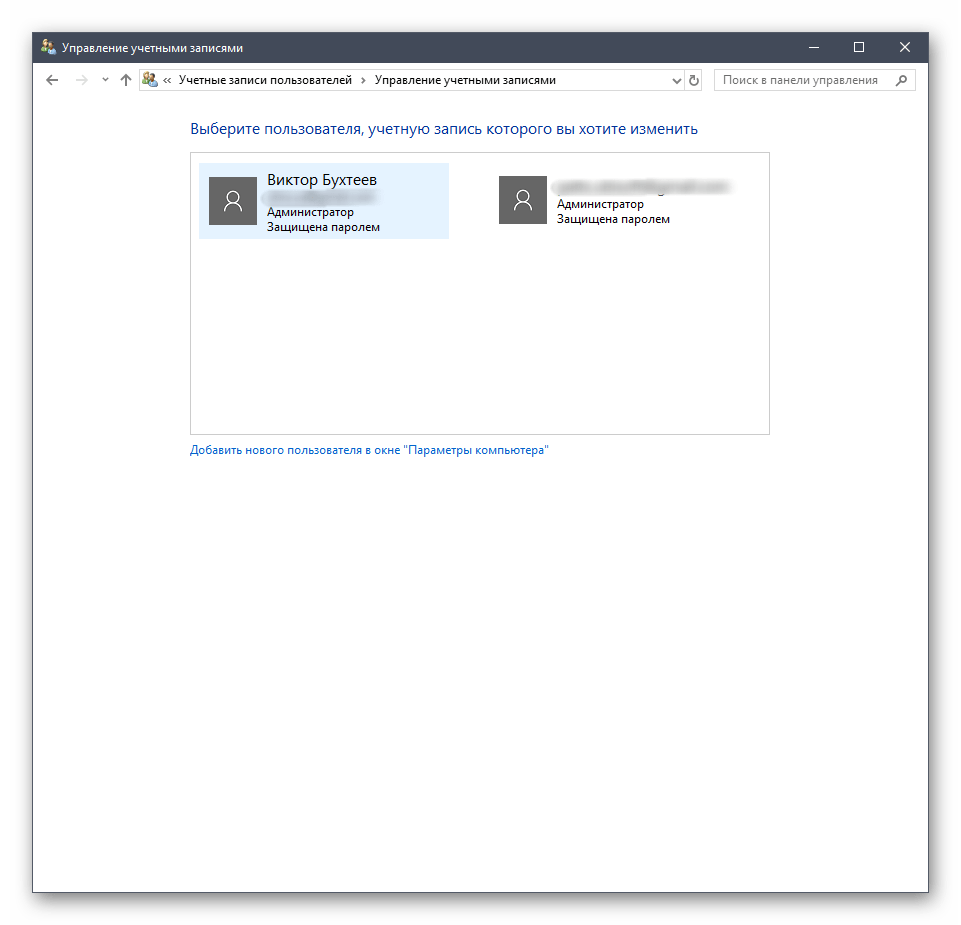
- При переходе к изменению других профилей откроется отдельное меню, где производится выбор.
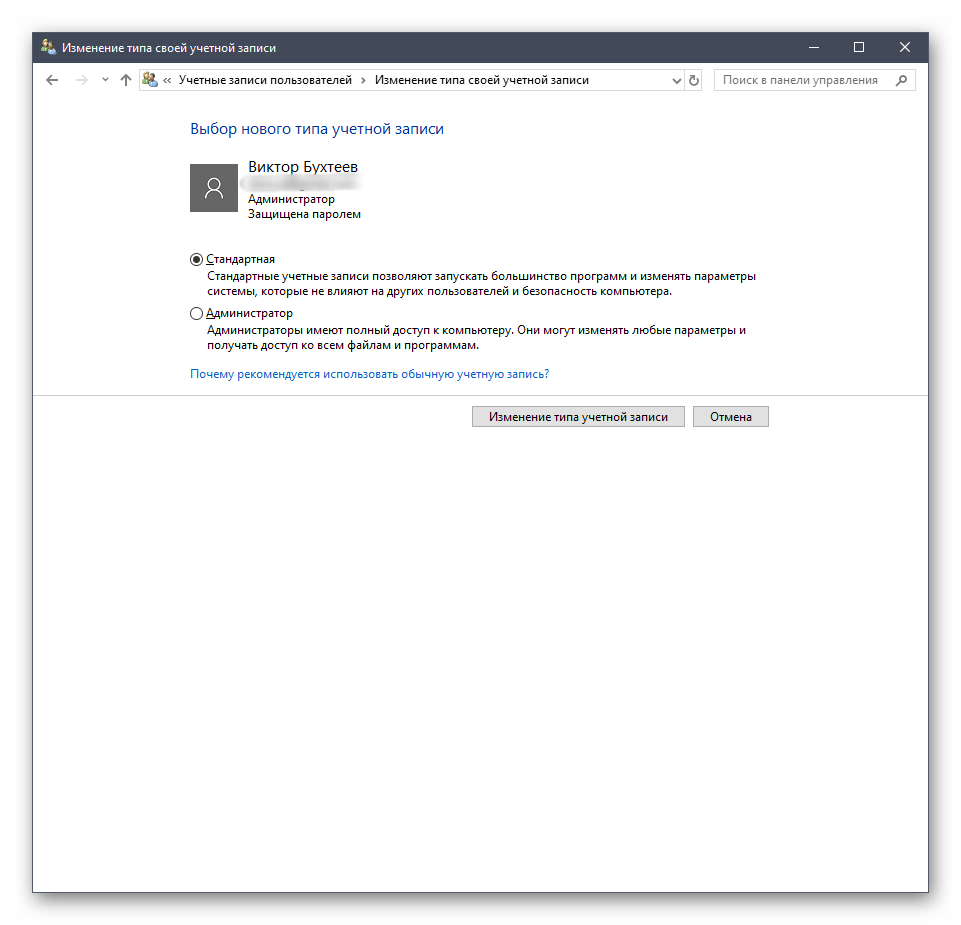
- Теперь вы можете сменить тип профиля, например, на администратора, или задать новое имя.
Более детально обо всех этих процессах рассказывалось в других статьях на нашем сайте. О них мы еще поговорим после рассмотрения всех сегодняшних методов, а пока переходим к следующему меню, в котором можно управлять учетными записями.
Способ 3: Локальная политика безопасности
В каждой сборке Windows 10 имеется оснастка под названием Локальная политика безопасности. В ней осуществляются различные действия, связанные с обеспечением надежности системы, включая настройки для существующих профилей. Благодаря этой оснастке можно установить ограничения на пароли или заблокировать один из профилей. Выполняется это следующим образом:
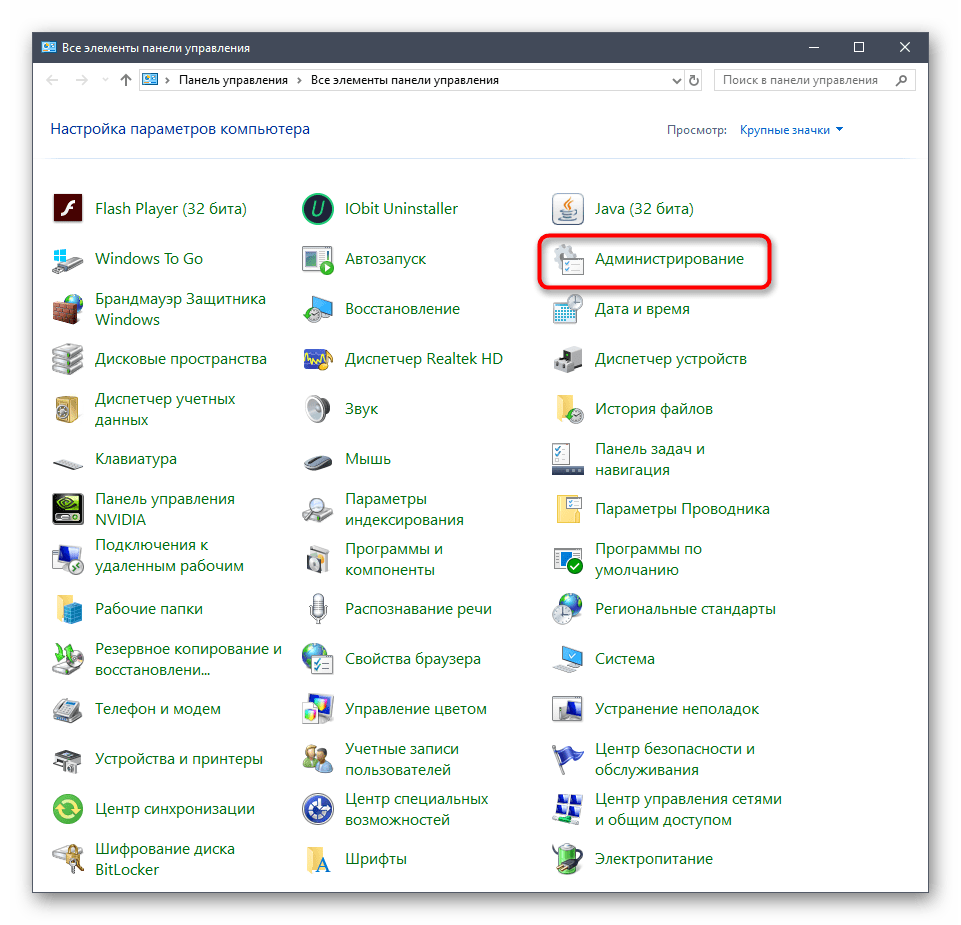
- В меню «Панель управления» перейдите в раздел «Администрирование».
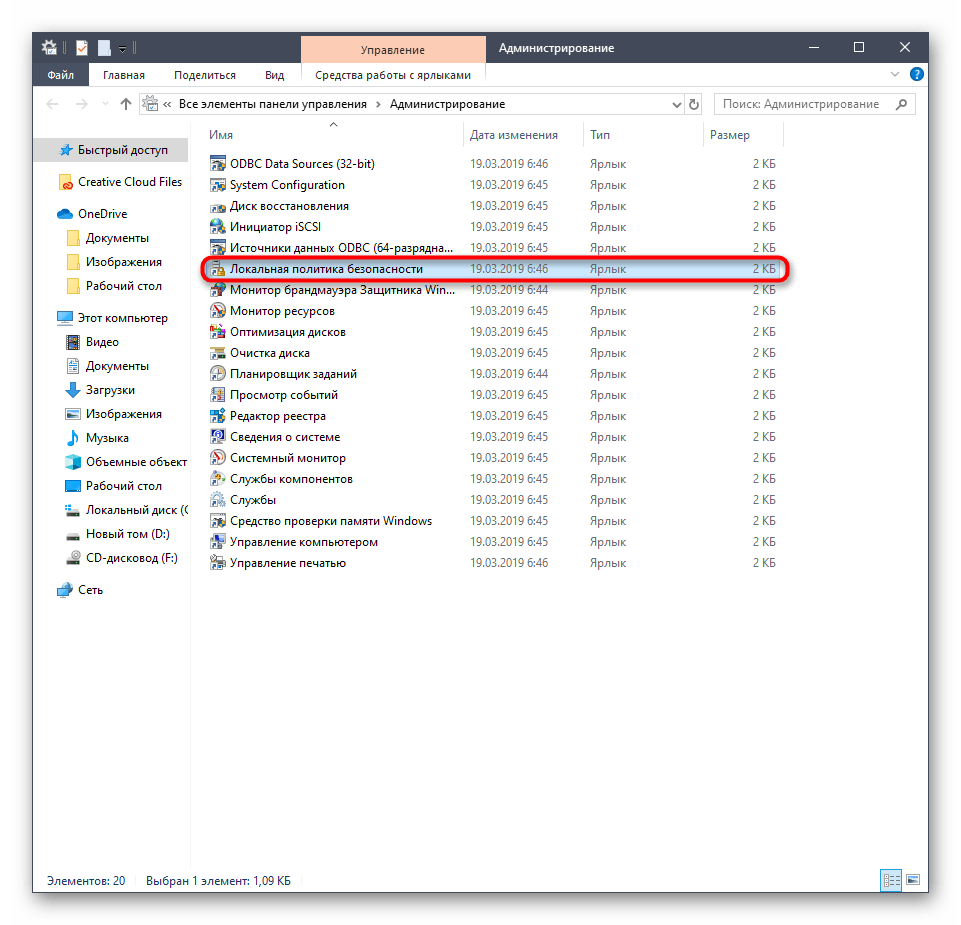
- Здесь вас интересует пункт «Локальная политика безопасности».
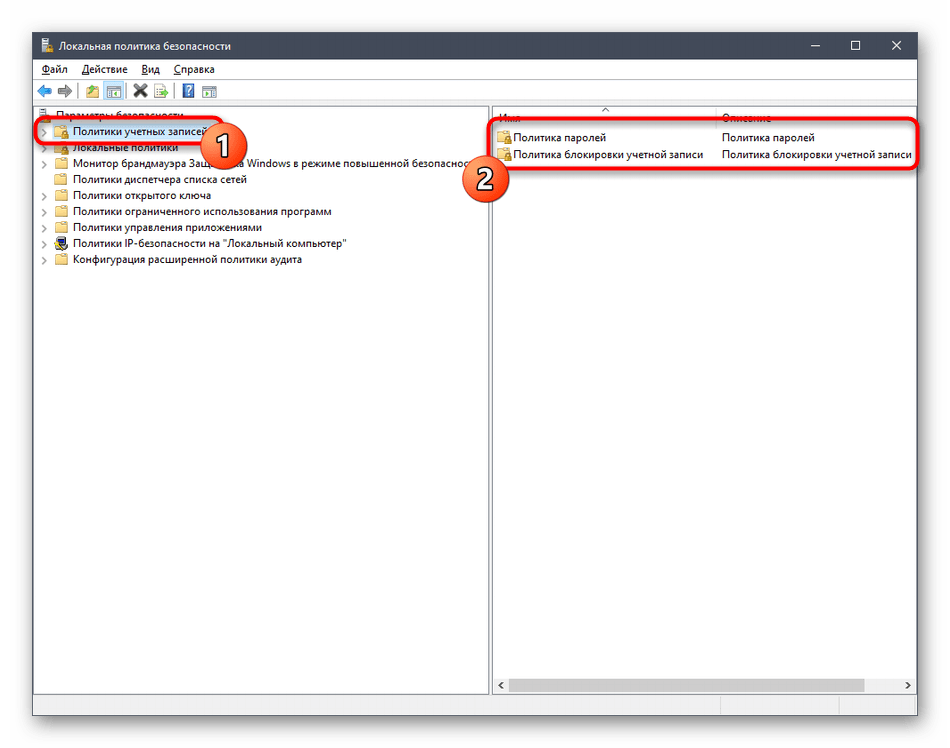
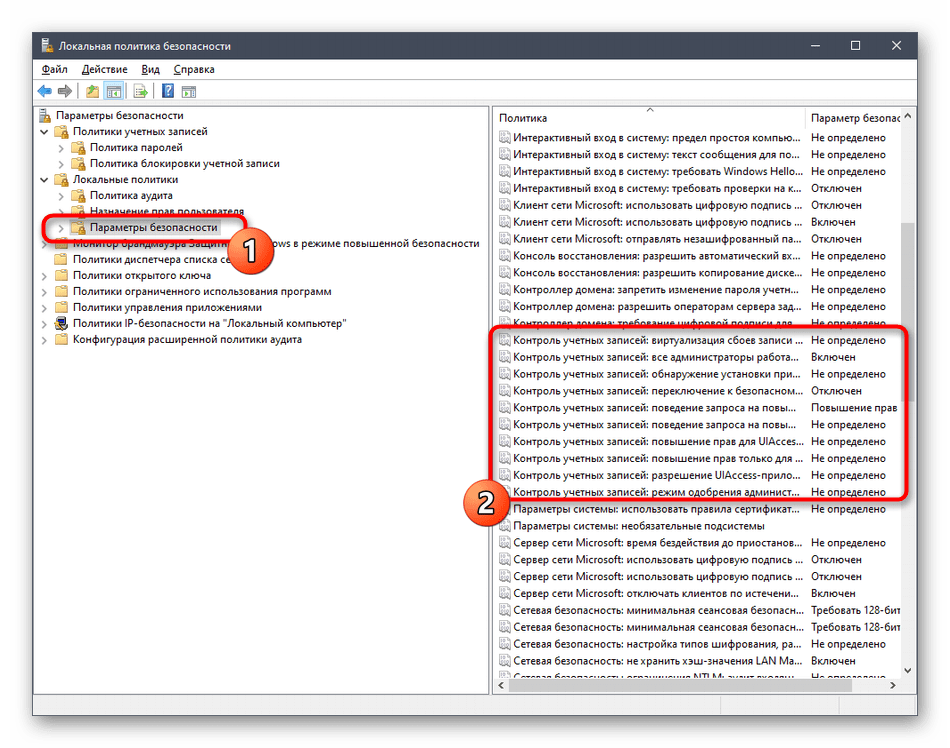
- Разверните каталог «Политики учетных записей». В нем вы видите две папки: «Политика паролей» и «Политика блокировки учетной записи». Эти названия уже говорят сами за себя, поэтому не будем останавливаться на каждой из них.
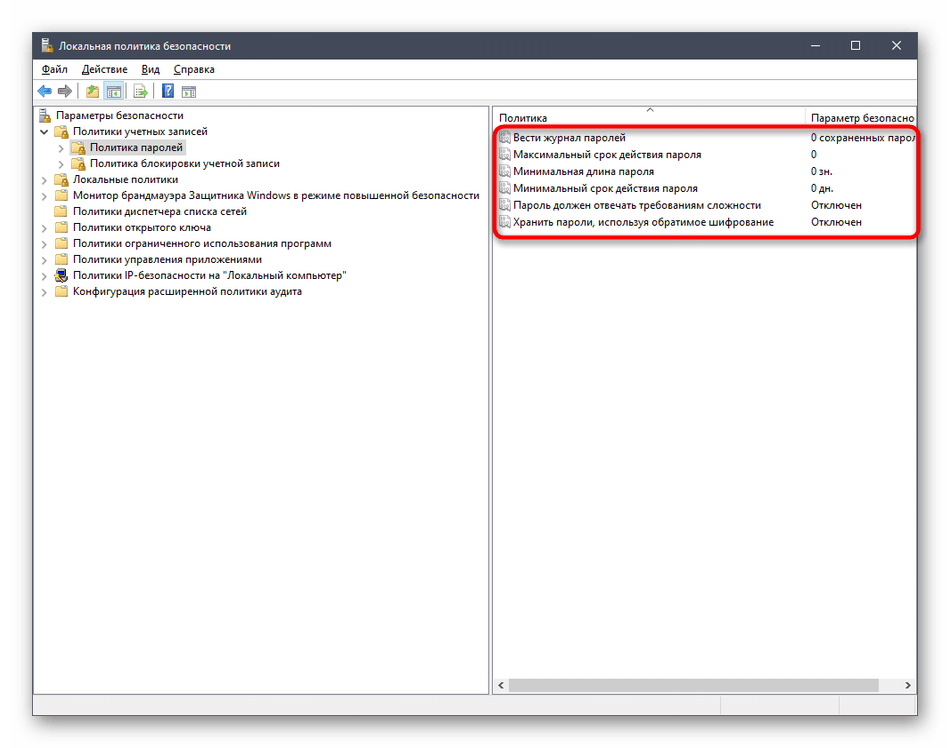
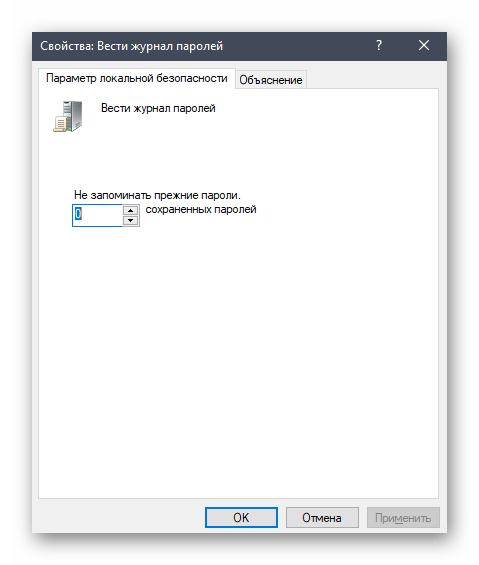
- При открытии такой директории появляется список доступных политик. Их названия как раз и означают опции или действия, осуществляемые через данные параметры. Возьмем за пример «Вести журнал паролей». Как видно, по умолчанию этот параметр не сохраняет вообще никакие пароли. Для редактирования значения нужно дважды кликнуть по строке, чтобы открыть свойства.
- Здесь можете указать, какое количество паролей должно в операционной системе. То же самое происходит и с другими политиками. Например, можно задать срок действия пароля или изменить минимальную длину в символах.
- Дополнительно обратите внимание на каталог «Параметры безопасности». Здесь имеется отдельный раздел «Контроль учетных записей». Он отвечает за предоставление прав доступа для учетных записей без прав администратора. Более детальные описания имеются в окнах свойств данных политик.
Учитывайте, что подобные изменения в Локальной политике безопасности может производить только администратор. К тому же не стоит изменять значения случайных параметров, не изучив их значения, поскольку это может привести к необратимым последствиям.
Способ 4: Вкладка «Безопасность» в свойствах файлов, папок и дисков
Отдельного внимания заслуживает настройка доступа для определенных файлов, папок и дисков, которая осуществляется через меню «Свойства». Там имеется вкладка «Безопасность». Через нее администратор может решить, какие именно действия с указанным объектом разрешить выполнять одному юзеру или целой группе. На примере это выглядит так:
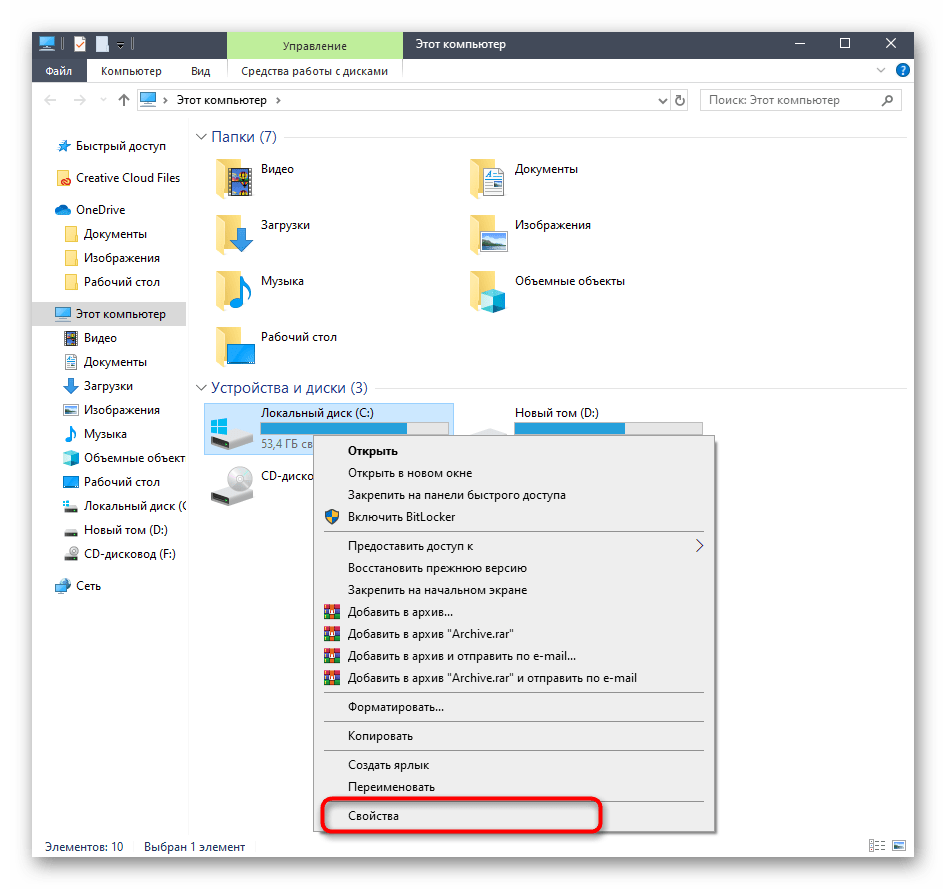
- Щелкните по необходимому объекту правой кнопкой мыши и выберите «Свойства». Учитывайте, что все изменения для папок применяются автоматически и для всех хранящихся там файлов, что касается и логических разделов.
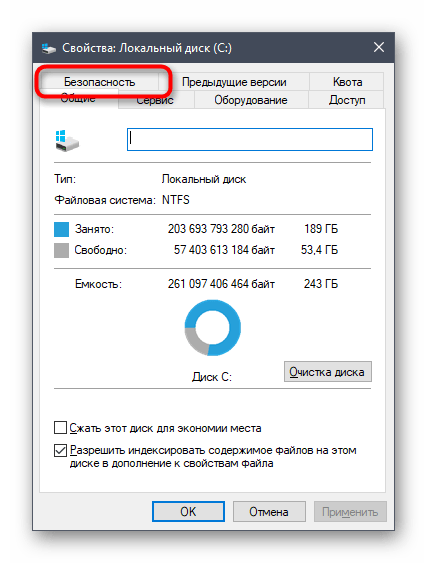
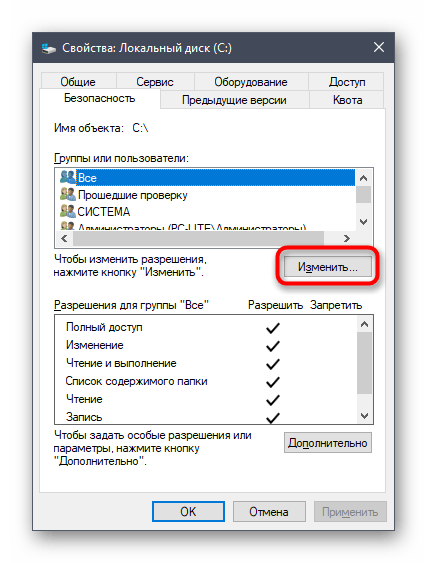
- В появившемся меню вас интересует вкладка «Безопасность».
- Нажмите на кнопку «Изменить», которая находится под блоком «Группы или пользователи».
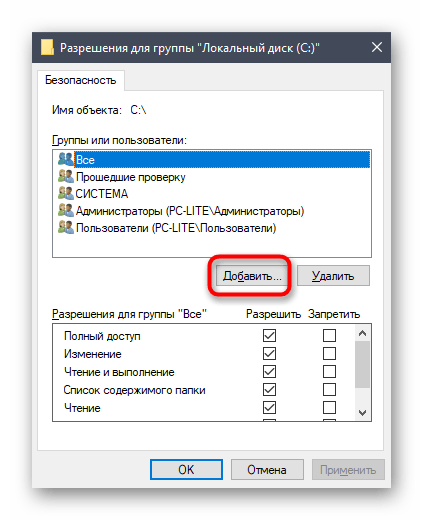
- Вы можете редактировать уже добавленные учетные записи, устанавливая разрешения либо запреты, или нажать на «Добавить», чтобы перейти к выбору профиля.
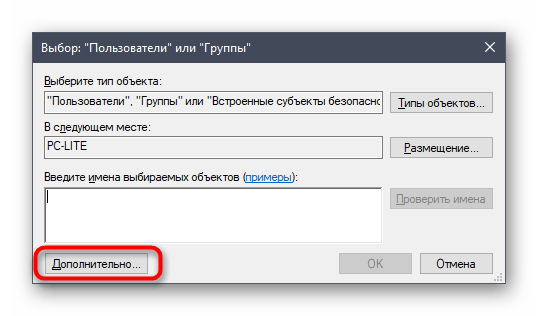
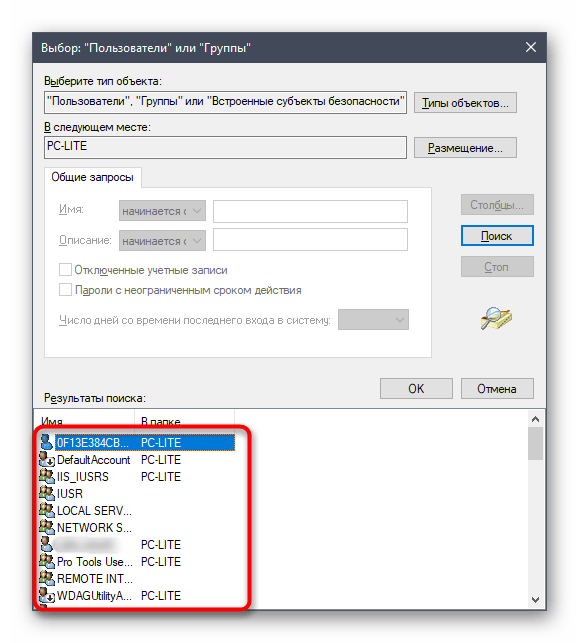
- Введите имена объектов в специально отведенное поле, а затем проверьте их. В качестве альтернативы можно использовать встроенную опцию поиска. Она открывается через «Дополнительно».
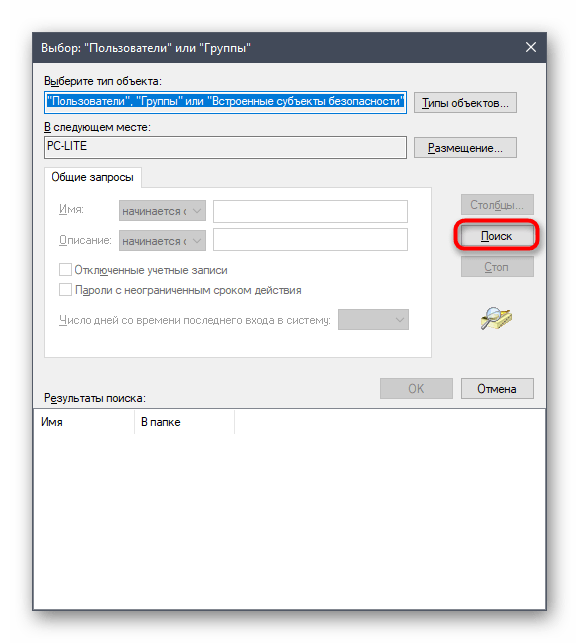
- Щелкните по кнопке «Поиск» и подождите несколько секунд.
- Выберите необходимый профиль или группу из отобразившихся результатов, чтобы потом установить для этого объекта правила доступа к директории или файлу.
В конце давайте затронем тему взаимодействия с учетными записями при помощи рассмотренных выше инструментов. Существует огромное количество задач, которые возникают перед обычными юзерами и администраторами. Их решение просто не уместится в рамках одного материала, поэтому мы предлагаем ознакомиться с отдельными инструкциями на нашем сайте, воспользовавшись указанными далее ссылками. Просто прочтите заголовки и выберите подходящую для себя статью. Там вы найдете все необходимые руководства, позволяющие справиться с поставленной целью разными методами.
Читайте также:
Изменение имени учетной записи администратора в Windows 10
Управление правами учетной записи в Windows 10
Переключение между учетными записями пользователей в Windows 10
Создание новых локальных пользователей в Windows 10
Меняем имя папки пользователя в Windows 10
Отключение UAC в Windows 10
Сбрасываем пароль для учетной записи «Администратор» в Windows 10
Удаление администратора в Windows 10
Вы были ознакомлены с принципами управления учетными записями в Windows 10, а также получили необходимые руководства по решению самых частых задач, связанных с профилями. Осталось только перейти к соответствующему материалу, чтобы изучить и реализовать инструкции.
Наша группа в TelegramПолезные советы и помощь
Most people edit Windows user accounts from the Settings app or the User Accounts section in the Control Panel. However, there’s another way to perform Windows user management, one that gives you access to much more detailed information about the users and groups on your PC and the permissions they have. I’m talking about managing Local Users and Groups using the snap-in console that bears the same name. You can access it from Computer Management or by running its lusrmgr.msc file directly. Here’s how to see and manage all the local users and groups on your Windows 11 or Windows 10 PC:
IMPORTANT: Local Users and Groups (lusrmgr.msc) is available only in the Pro, Enterprise, and Education editions of Windows 11 and Windows 10. Unfortunately, Home editions don’t include this tool. For help in identifying the edition you’re using, check these guides:
- What is the latest version of Windows 10? Check the version you have
- How to check the Windows 11 version and edition
The Local Users and Groups (lusrmgr.msc) in Windows 11 is identical to the one in Windows 10, both in terms of appearance and features offered. Thus, to keep things as simple as possible, most of the screenshots included in this guide are from Windows 11.
How to find all the local users and groups using lusrmgr.msc
In both Windows 11 and Windows 10, the Local Users and Groups snap-in, also known as lusrmgr.msc, offers the best way to see all the users and groups configured on the system. This tool shows you the “visible” user accounts, as well as all the hidden user accounts and groups that are available on the system but are disabled by default, such as the Administrator account. Here’s how to see your local users and groups:
Open Computer Management — a quick way to do it in either operating system is to simultaneously press Win + X on your keyboard and select Computer Management from the menu.
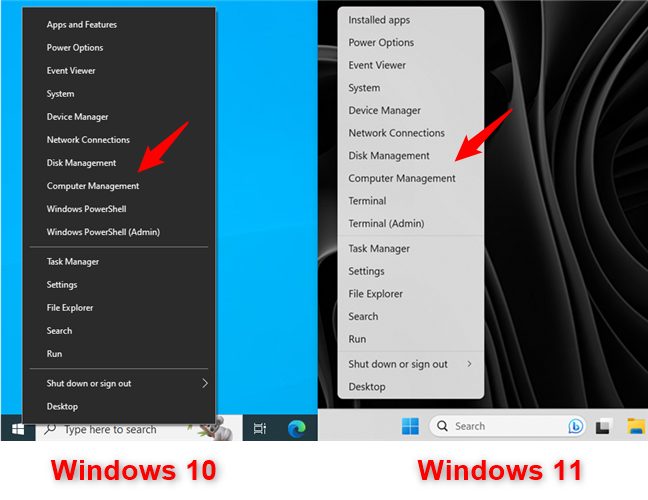
For Windows user management, open Computer Management
In Computer Management, select “Local Users and Groups” in the left panel.
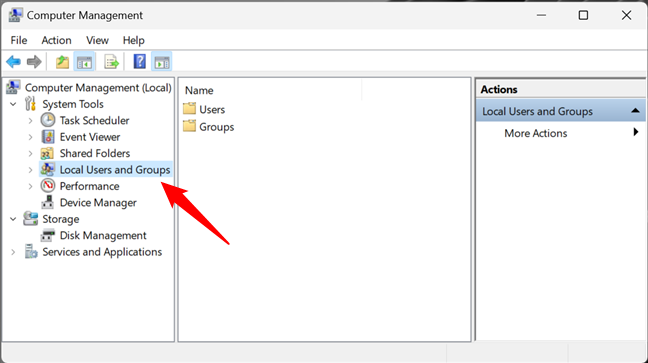
Local Users and Groups in Computer Management
An alternative way to open Local Users and Groups is to run the lusrmgr.msc command. You can do it from the Run window (Win + R), Command Prompt, and PowerShell.
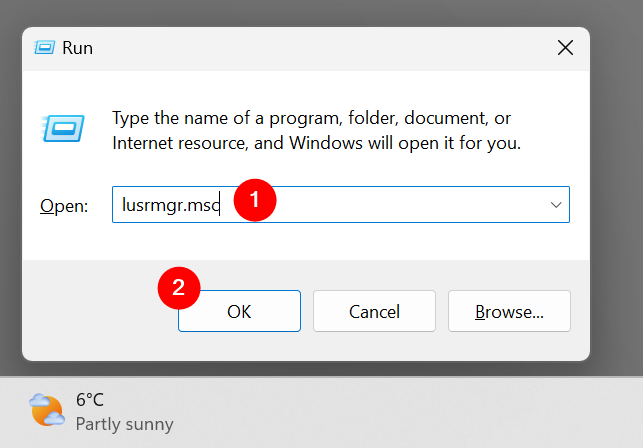
Run lusrmgr.msc in Windows
Running the lusrmgr.msc command opens the Local Users and Groups console directly and without loading it in Computer Management.
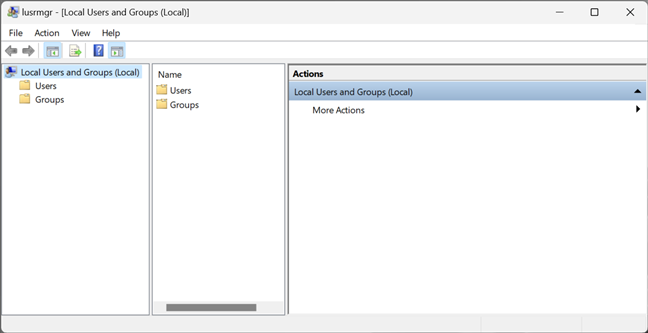
lusrmgr.msc — Local Users and Groups
Regardless of how you choose to open Local Users and Groups (lusrmgr.msc), this is where you find all the user accounts and groups that are configured on your Windows computer or device, split into two folders: Users and Groups.
How to find and manage Windows users with lusrmgr.msc (Local Users and Groups)
In the Users folder, you see all the user accounts available on your Windows 11 or Windows 10 PC. This includes accounts that are hidden or disabled.
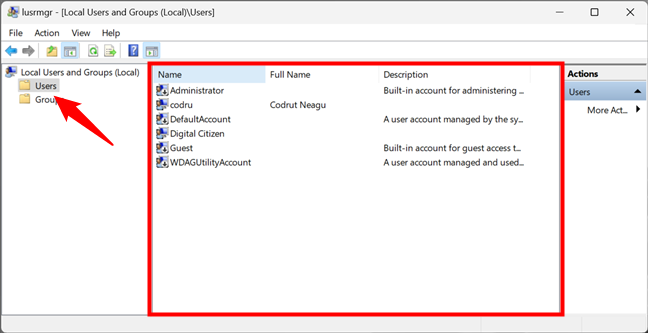
List of user accounts shown by lusrmgr.msc
What are the user accounts found on every Windows computer? There aren’t as many as you might think. You have:
- All the user accounts you have created on your Windows PC;
- Administrator — a built-in account created by Windows for administration purposes, regardless of whether you use it or not;
- DefaultAccount — a user account that’s managed by Windows;
- Guest — a legacy built-in account that, in older versions of Windows, could be used for guest access on the computer or domain — in Windows 11 and Windows 10, it’s no longer operational;
- WDAGUtilityAccount — managed and used by the Microsoft Defender antivirus for running certain processes (like the Microsoft Edge browser) in sandboxed/virtualized environments.
TIP: You can also view a list of all user accounts with PowerShell or Command Prompt. Find out all the ways to do that by reading this tutorial: How to list all the users on a Windows computer.
As you might have noticed, some of the user accounts shown by Local Users and Groups have a small arrow on their icons. The little arrow signals that a user account is disabled and thus can’t be used, even if it is available on your Windows computer.
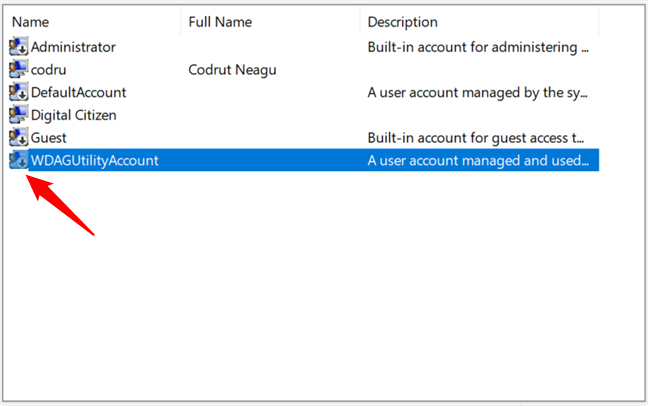
Deactivated users are marked with arrows
Double-clicking or double-tapping on a user account opens a Properties window that displays more information about that account and different customization options. For instance, you can set its password to expire, disable the account, or change the user groups to which it belongs.
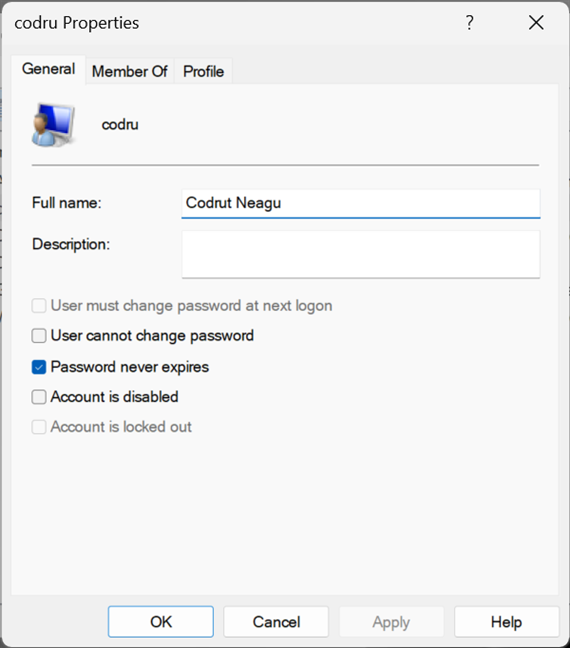
Properties of a user account
TIP: Speaking of which, here’s how to change your user account password in Windows.
How to find and manage user groups in Windows with lusrmgr.msc (Local Users and Groups)
Going back to the Local Users and Groups console (lusrmgr.msc), access the Groups folder to see all the user groups available on your Windows computer. The list is long and includes user groups created by Windows as well as third parties, such as drivers or virtualization software, which need hidden users and groups to operate properly.
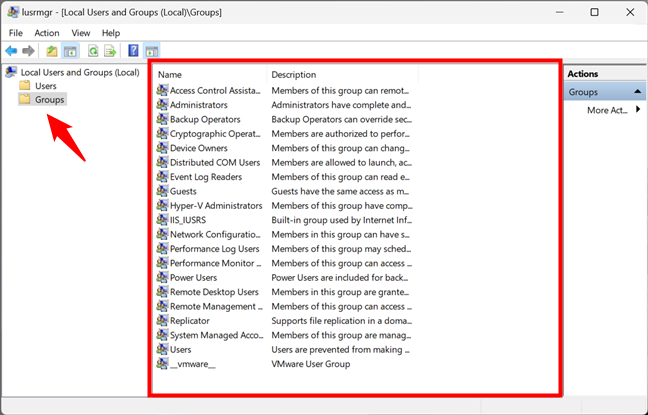
List of user groups in Windows shown by lusrmgr.msc
On most Windows PCs, you should have at least the following groups:
- Access Control Assistance Operators – members of this group can run remote queries for authorization attributes and permissions on your Windows computer. This group is used on computers that belong to a domain, so it’s mainly useful for network administrators in large companies.
- Administrators – it includes all the user accounts with administrative permissions on your computer. The Administrators group can’t be deleted or renamed.
- Backup Operators – user accounts with permission to perform backup and restore operations using tools like Backup and Restore.
- Cryptographic Operators – user accounts with permission to encrypt or decrypt data using tools like BitLocker.
- Device Owners – Windows says that the members of this group can change system-wide settings. However, as far as I know, this group is not currently used in either Windows 11 or Windows 10.
- Distributed COM Objects – this user group is harder to explain. It’s used mostly for user accounts that need to participate in more complex scenarios, such as distributed computing across computers on a network. Therefore, it is mainly used in business environments.
- Event Log Readers – this group gives permission to its members to read Windows 10 and Windows 11 event logs that show what is happening on the system.
- Guests – legacy user accounts (non-operational in Windows 10 and Windows 11) that cannot perform any administrative tasks on your computer. They can be used only for light computing activities like browsing the internet or running the installed applications. They cannot modify the system’s configuration, access or modify another user’s data, etc.
- Hyper-V Administrators – gives its members unrestricted access to all the features available in Hyper-V.
- IIS_IUSRS – this group is used only by the Internet Information Services you may choose to install from the Windows Features panel.
- Network Configuration Operators – this group permits users to configure networking features in Windows.
- Performance Log Users & Performance Monitor Users – members are given permission to perform advanced logging in Windows and collect performance data.
- Power Users – this user group was used in older versions of Windows to provide limited administrative permissions to specific user accounts. It is still present in Windows 10 and Windows 11 but only to provide backward compatibility for old legacy applications.
- Remote Desktop Users – this user group provides its members with permission to log on remotely to the computer via the Remote Desktop.
- Remote Management Users – members can access WMI resources remotely.
- Replicator – this user group is used in network domains and gives its members the permissions required to do file replication across the domains.
- System Managed Accounts Group – the Windows 10 or Windows 11 operating system manages the members of this group.
- Users – it includes the standard user accounts defined on your Windows PC. Its members do not have administrative permissions. They can only run installed applications and cannot make system changes that affect other users.
On your computer, you might also find other groups installed by Windows features, drivers, or third-party applications. Double-clicking or double-tapping on a user group opens a properties window that displays more information about it and several options. For step-by-step guidance on how to work with the available options, read the last part of this tutorial: Create new Windows user accounts and groups like an IT Pro.
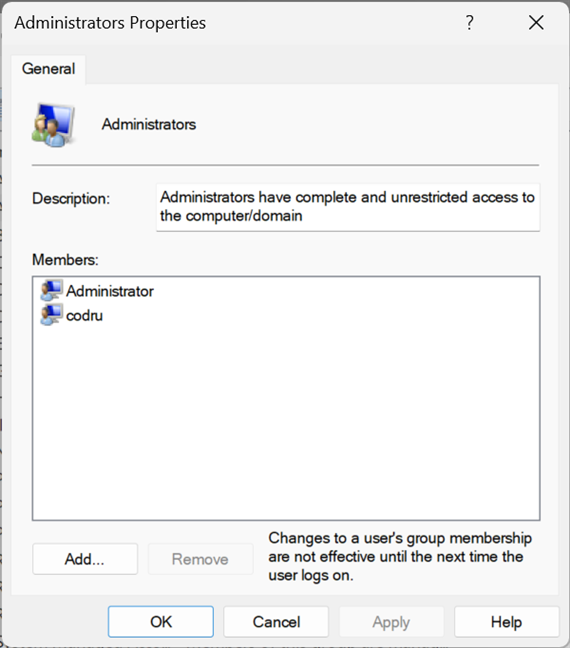
Properties of the Administrators group in Windows
What’s great about user groups is that you can use them to give additional permissions to standard user accounts. For example, if you create a user account that is a member of Users but not Administrators, that user can’t connect remotely to the computer. If you make that user account a member of Remote Desktop Users, it can connect remotely. This principle applies to all user groups. Add a user account as a member, and it receives both the permissions and restrictions of that user group.
NOTE: If you look at all the user groups listed on your Windows computer or device, you will likely notice that the user accounts defined as administrators are not listed as members of the other groups. That’s because administrators already have permission to do everything on your Windows computer, so they don’t need to be part of a special group to inherit its permissions.
Warning: Don’t change the standard Windows users and groups!
You may feel the urge to clean up and delete some of the standard user accounts and groups found on your Windows 11 or Windows 10 PC. If you try to do something like that, you should get a warning from the operating system about the issues that are likely to arise. For example, this is what you see if you try to delete the Administrator account:
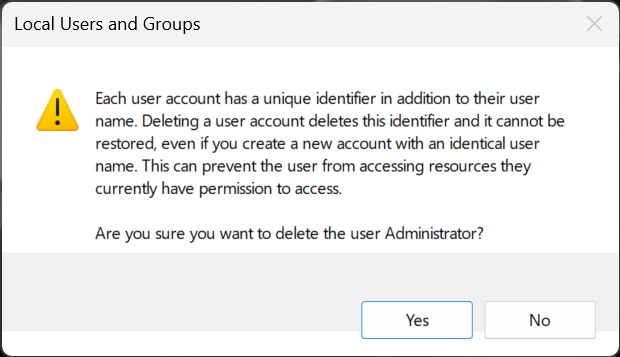
Default users and groups from Windows shouldn’t be altered or removed
Deleting or changing standard user accounts and groups from Windows 11 or Windows 10 can cause apps and system features to malfunction. Understanding all the connections between standard user accounts, user groups, and Windows features is difficult. One minor change can have unexpected consequences on many features and ruin your computing experience, so my strong recommendation is “Don’t touch the standard users and groups from Windows!”
Do you use lusrmgr.msc to manage local users and groups on your Windows PC?
I hope you enjoyed this tutorial and now you know more about Windows user management. If you have anything to add to this guide, let me know in the comments below. Also, don’t hesitate to ask if you have questions about how to work with lusrmgr.msc for managing local users and groups.
Last Updated :
21 Oct, 2024
Knowing how to manage user accounts in Windows 10 is essential for both personal and business use. Whether you’re setting up multiple users on one device or managing Windows 10 user account settings for a family or team, this guide will walk you through the basics of creating, modifying, and removing accounts.
How to Manage User Accounts in Windows 10?
You’ll also learn how to adjust user permissions in Windows 10 and handle Windows 10 account management efficiently.
Table of Content
- How to Manage User Accounts in Windows 10?
- Step 1: View Account Details on Windows 10.
- Step 2: Create a New User Account.
- Step 3: Switch between Local and Microsoft Account.
- Step 4: Change the Account Profile Picture in Windows.
- Step 5: Add Multiple Accounts on Windows 10.
- Add Accounts for Apps
- Add Accounts for Work
- Step 6: Change Administrator on Windows 10.
- Step 7: Delete a User Account on Windows 10.
- Step 8: Change Your Password in Windows 10.
- How to Manage User Accounts in Windows 10 — FAQs
Step 1: View Account Details on Windows 10.
It’s important in Windows 10 to know your account details. This is key to handle your user profile well. You can find important information. These include your username, account type, and linked services.
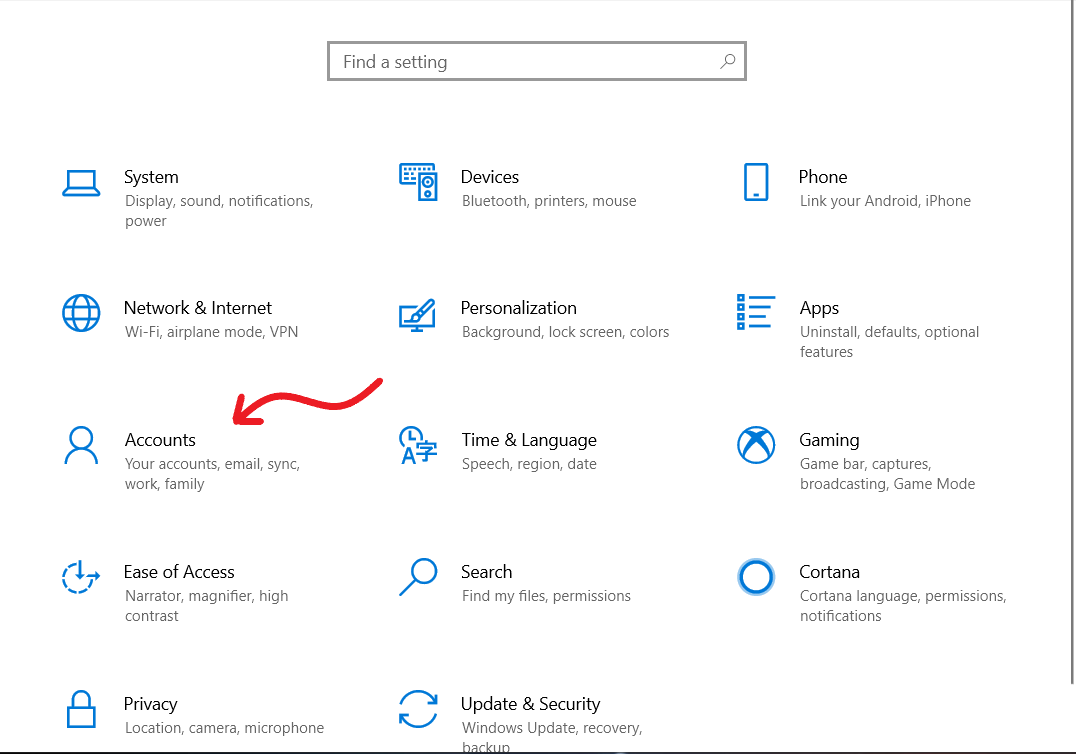
- Open settings by pressing Windows Key + I then Navigate to «Accounts«
- Click on «Your info«. Here, you can view your account details.

Step 2: Create a New User Account.
- Open settings by pressing Windows Key + I then click on «Accounts«
- In the right pane of the window click on the «Family & other users.«
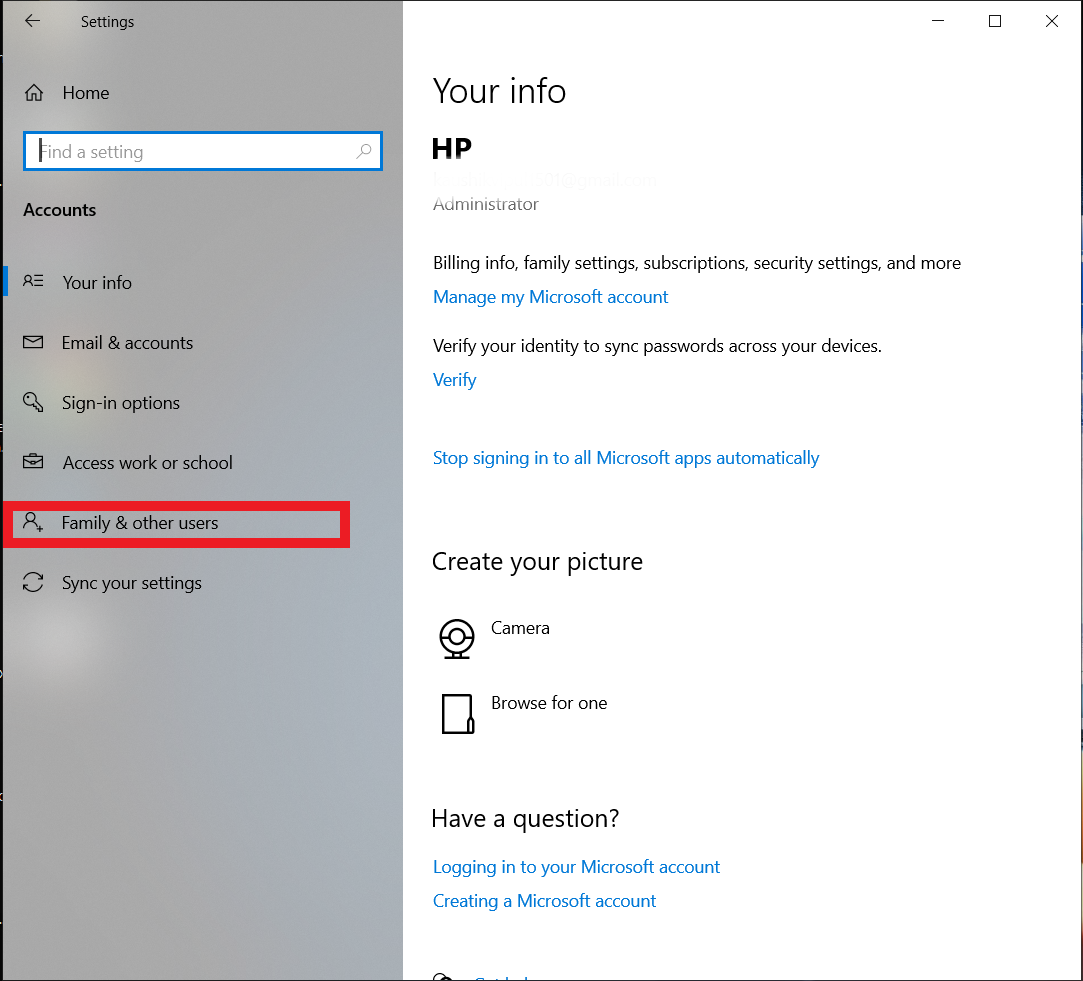
- Then, click on the «Add someone else to this PC.«
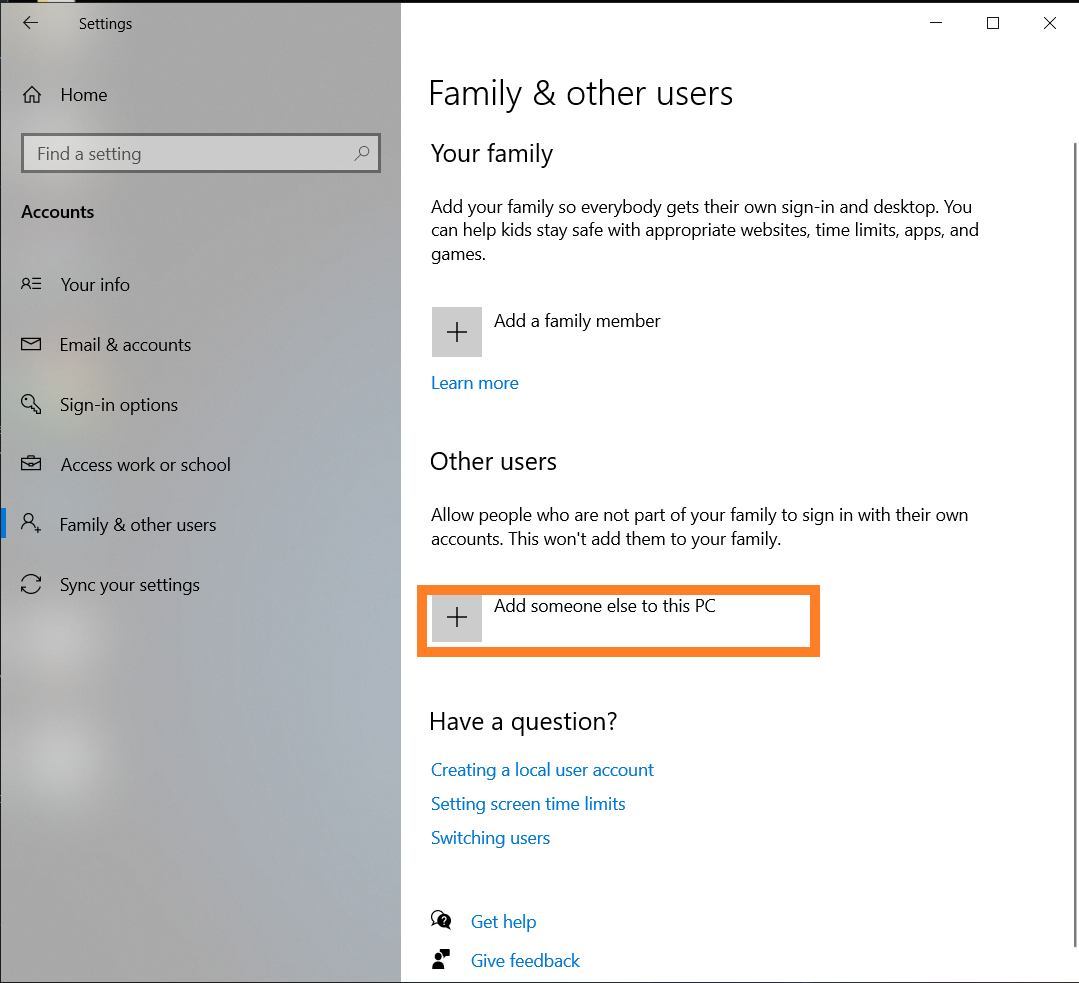
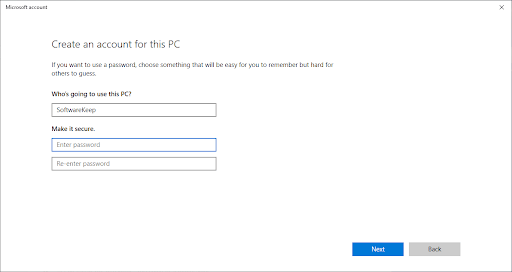
- If you do not have the sign-in information for the new user, click I don’t have this person’s sign-in information. Then click on Add a user without a Microsoft account.
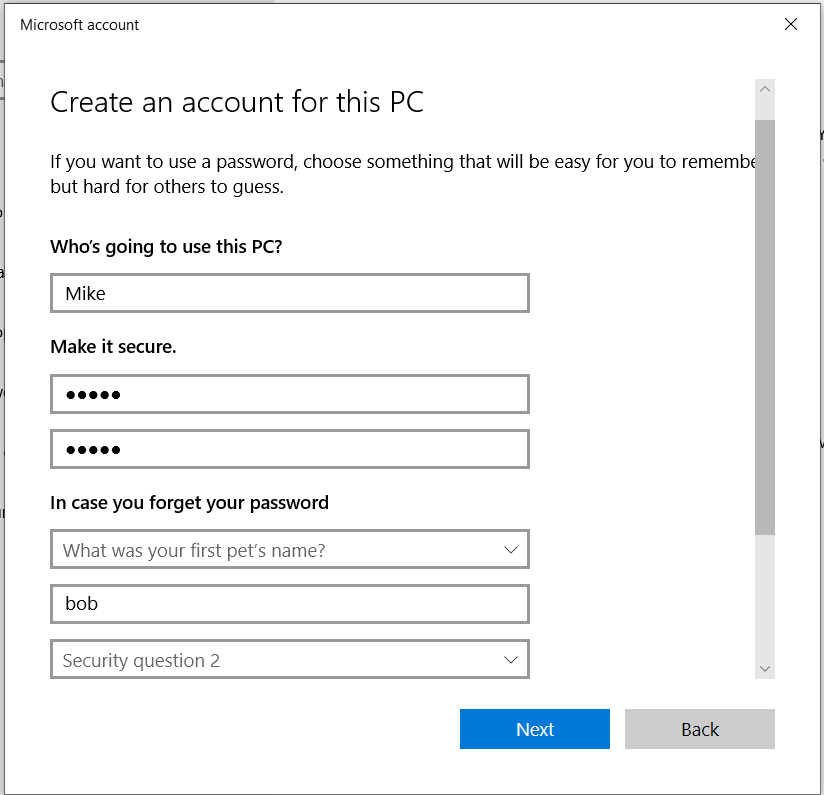
- Enter all the info of the new user and click on Next.
Step 3: Switch between Local and Microsoft Account.
Choosing between a local and a Microsoft account is a fundamental decision when setting up a user profile in Windows 10. While local accounts offer simplicity and autonomy, Microsoft accounts provide integration with various Microsoft services.
- Open settings by pressing Windows Key + I then Navigate to «Accounts«
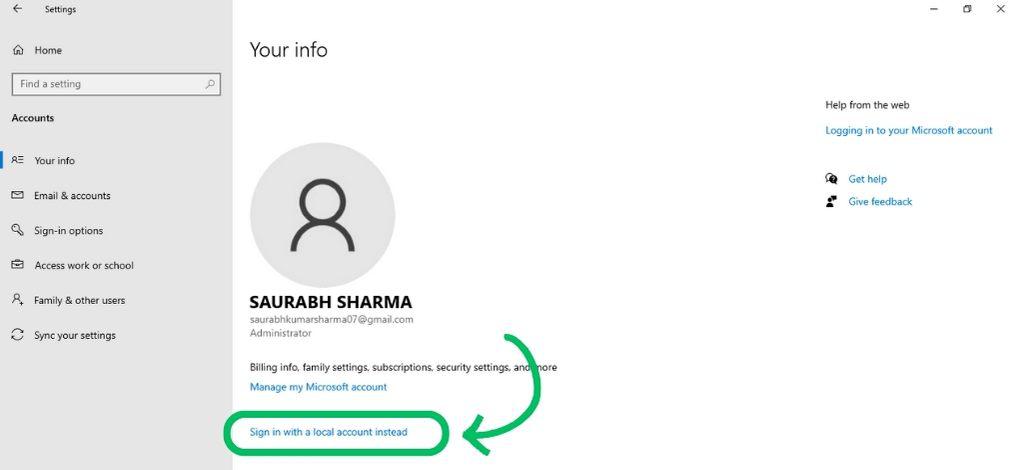
- Click on «Your info«.
- For local accounts, select «Sign in with Microsoft account» to link
- Follow on-screen instructions.
- New account? Verify by clicking «Verify» for full access after entering the code.
- For a Microsoft account, choose «Sign in with local account instead» to switch.
- Follow on-screen directions.
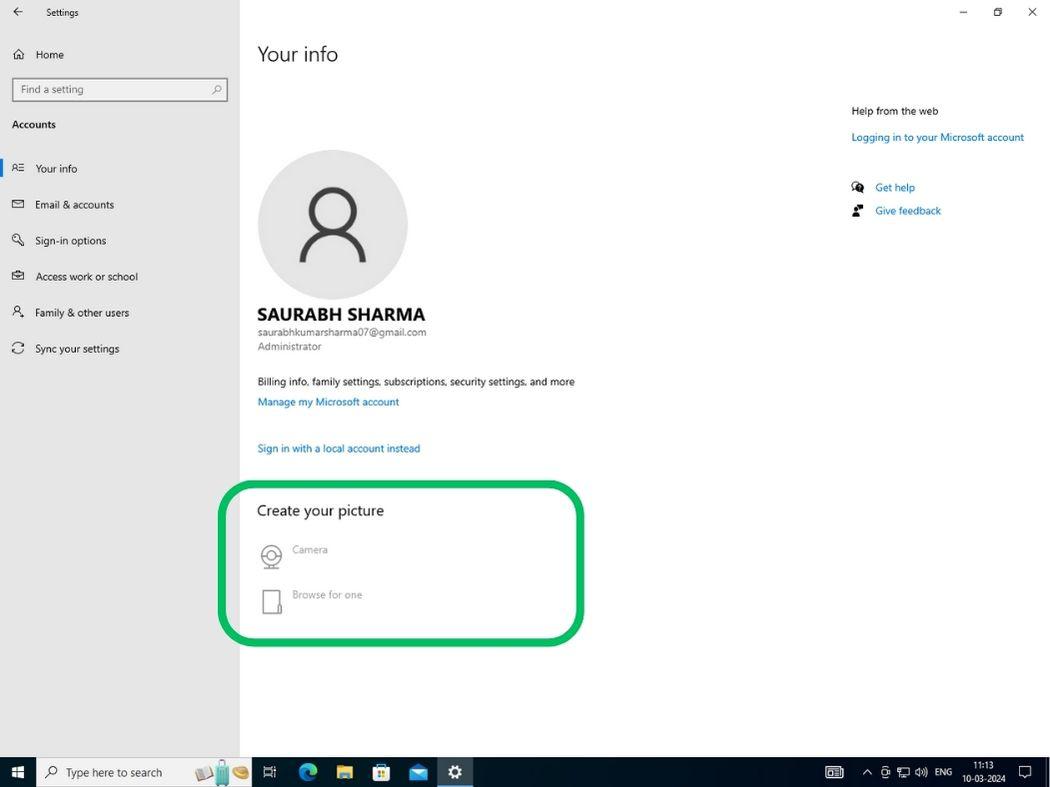
Step 4: Change the Account Profile Picture in Windows.
To change the user account profile picture follow these steps:
- Open settings by pressing Windows Key + I then Navigate to «Accounts«
- Click on «Your info«.
- Under the «Create your picture» section click on the «Browse for one» or «Camera» button.
Step 5: Add Multiple Accounts on Windows 10.
Adding more email and app accounts to Windows 10 makes things easier. It improves how users work. When you add accounts for emails and apps, your work becomes smoothly. All necessary information and tools are in one place. This makes it quicker and easier to get things done.
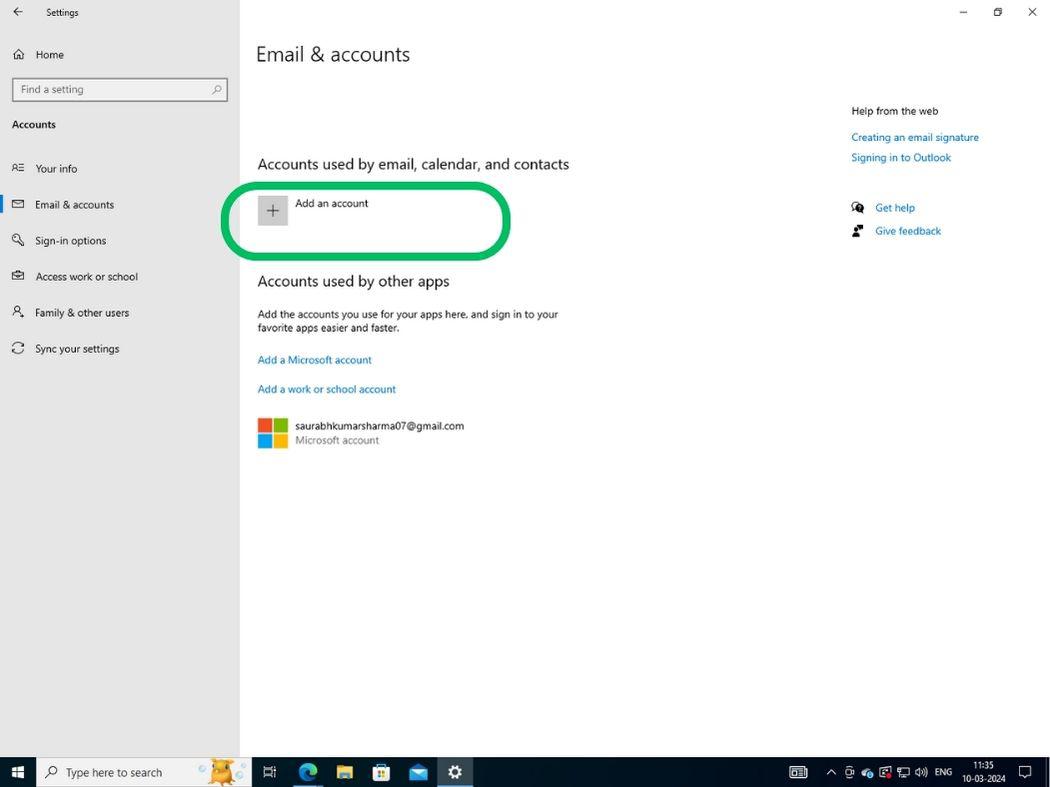
Add Accounts for Apps
- Open settings by pressing Windows Key + I then Navigate to «Accounts«
- Click on the «Email & accounts«
- On the right side pane, click the Add an Account button
- Choose a service provider (e.g., Outlook, Google, iCloud), then follow the on-screen instructions.
Add Accounts for Work
- Open settings by pressing Windows Key + I then Navigate to «Accounts«
- Click on the «Email & accounts«
- On the right side pane, click on the «Add a Microsoft account» button
- On new windows enter your email ID and password then click on the «Next» button
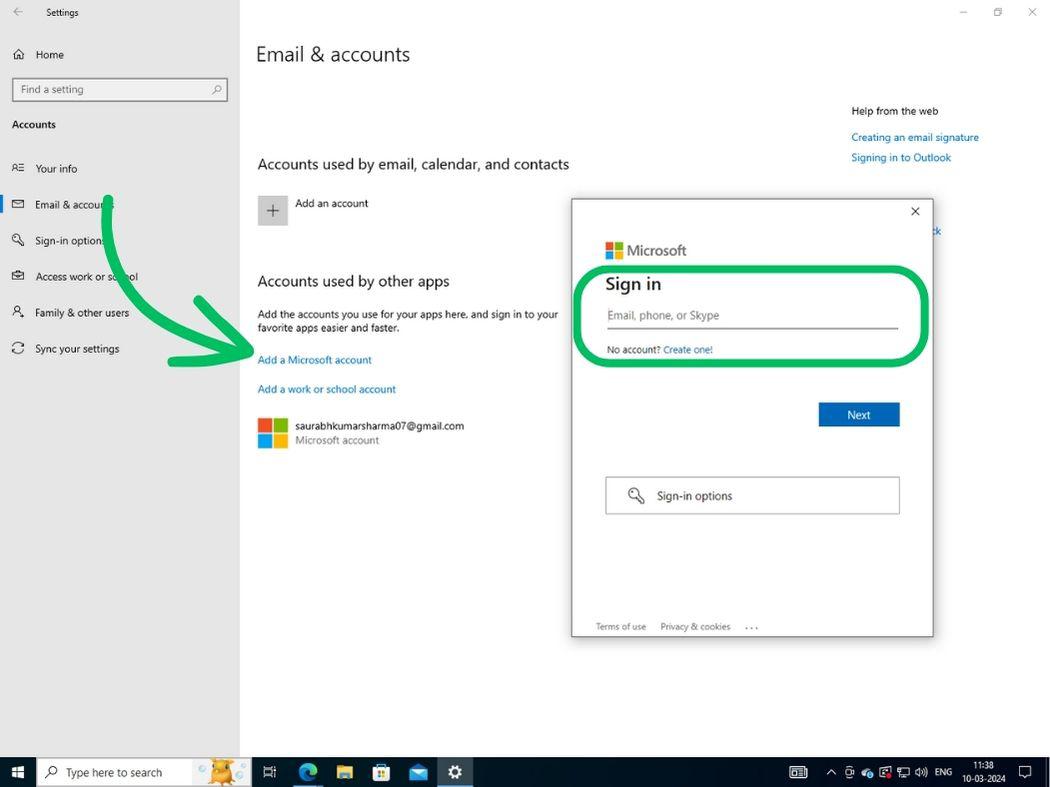
- Then, follow on-screen instructions.
Step 6: Change Administrator on Windows 10.
Windows 10 lets you give a local user admin privileges. This helps manage system settings and do other admin tasks more easily.
- Open settings by pressing Windows Key + I then Navigate to «Accounts»
- On the left side pane, Click on «Family & other users»
- Then, Click on «Add someone else to this PC.» after that enter your name and password
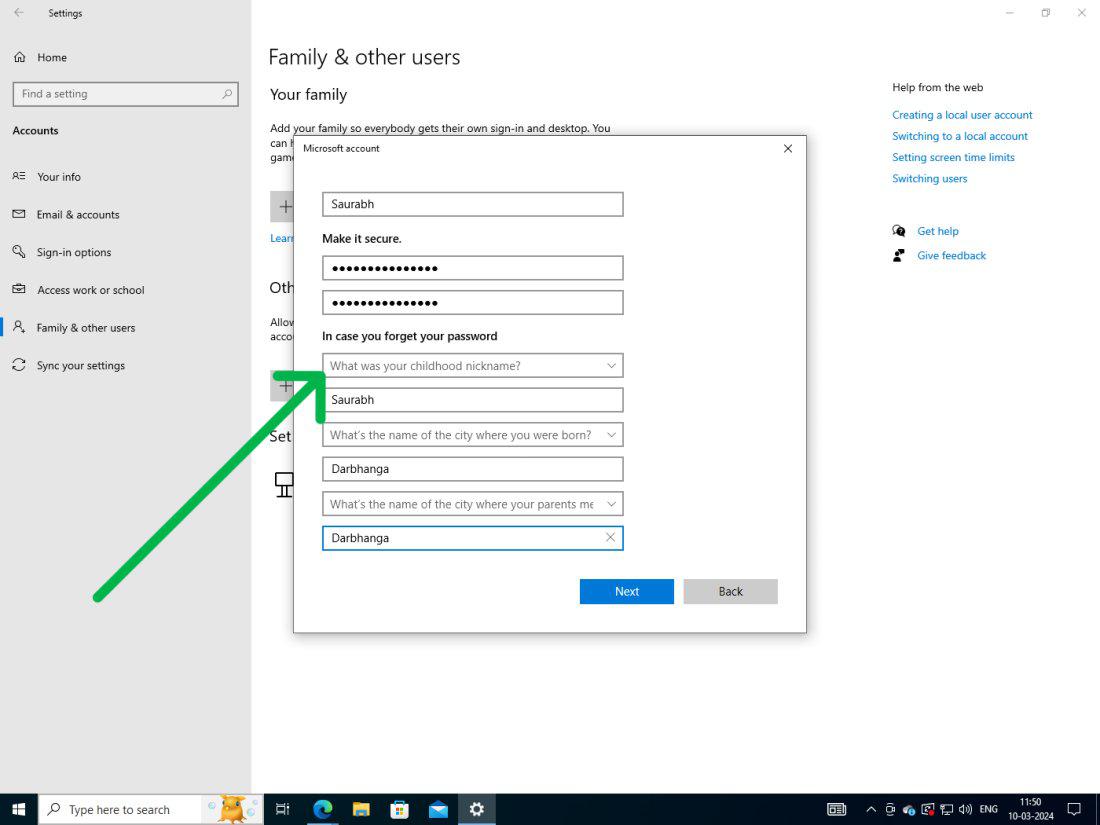
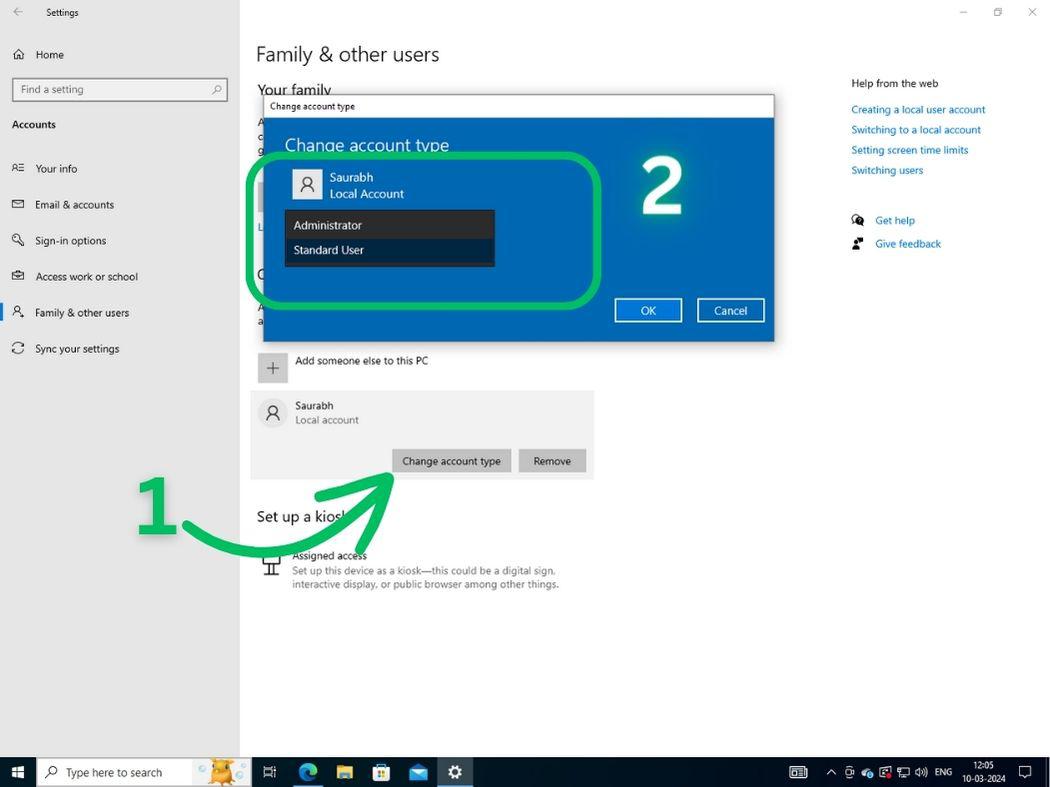
- After creating the local account, return to Accounts. Your new account starts as standard. To upgrade, select it, then click Change account type.
- From the dropdown menu select «Administrator«
Step 7: Delete a User Account on Windows 10.
Deleting a Windows 10 user account helps in managing profiles and improving system functions. Whether you’re cleaning up the system or blocking a user, it helps resource management.
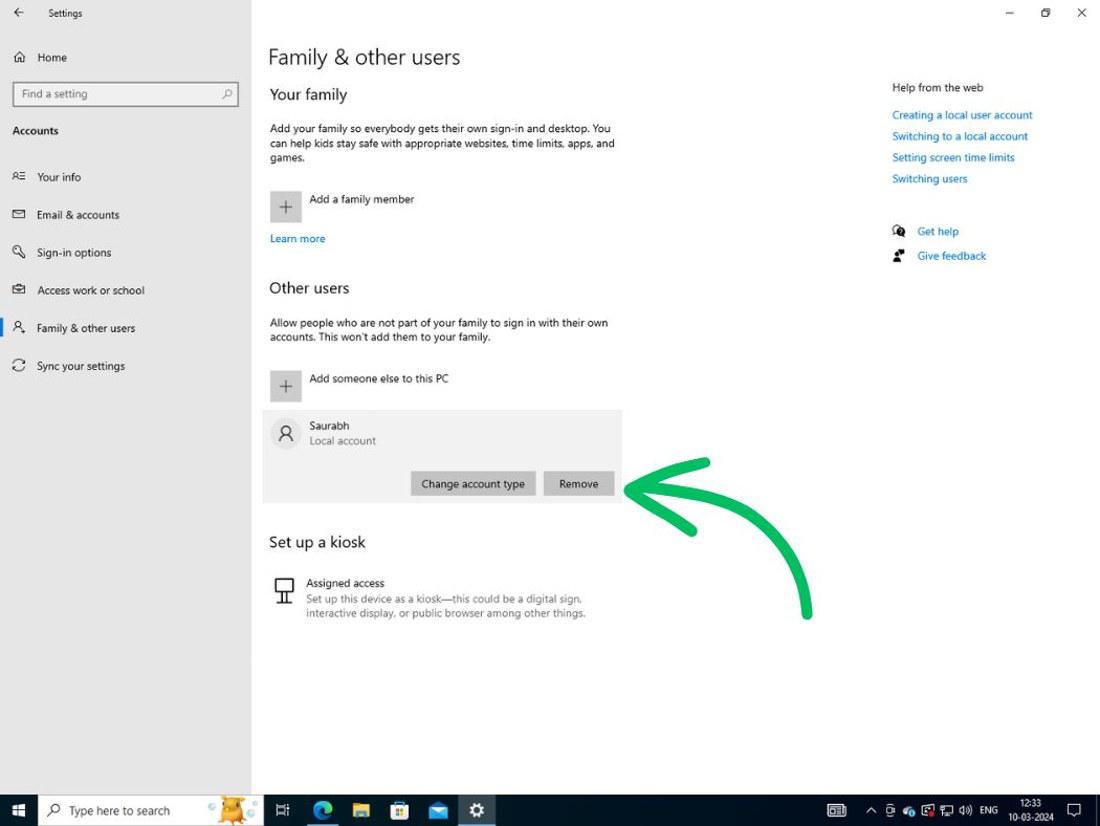
- Open settings by pressing Windows Key + I then Navigate to «Accounts«
- On the left side pane, click on «Family & other users«
- On the right side pane, click on the user account then click on the «Remove» button
Step 8: Change Your Password in Windows 10.
It’s important to often change passwords in Windows 10. It helps keep your information secure.
- Open settings by pressing Windows Key + I then Navigate to «Accounts«
- Click on the «sign-in options«
- Then, Click on the «Password«
- After that click on «Change«
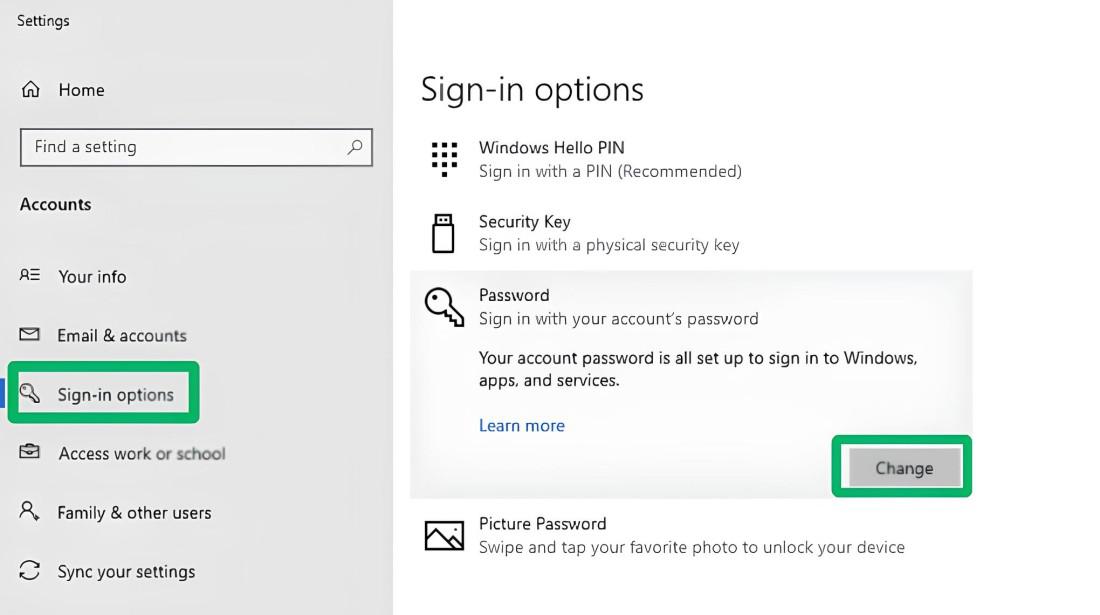
- Enter a new password and confirm it
Similarly if want to change the pin click on the «Windows hello pin«
Conclusion
Effectively managing user accounts in Windows 10 helps maintain the security and organization of your computer. Whether you need to add user accounts in Windows 10, adjust permissions, or delete old profiles, mastering these steps ensures that each user has the appropriate access. By using the built-in Windows 10 account management tools, you can easily control who can access what and ensure a smoother experience for everyone.
Also Read
- How to Upgrade From Windows 10 to Windows 11 For Free?
- How to Boost Performance in Windows 10?
- How to Delete Temporary Files in Windows 10?
Rick Akura
User accounts in Microsoft Windows 10 go beyond Microsoft and Local accounts. Learn how to add, change, or remove users in Windows 10.
If you’ve already read our Get Started with Windows 10 article, you’ll know that Windows 10 allows users to set up multiple local user accounts.
These accounts can be customized and separated from one another, creating unique personal environments on one computer.
Whether you’re planning to share a device with friends or family, or simply want to create more than one account for yourself, follow our guide.
Manage User Accounts in Windows 10
In summary, to manage a user account in Windows 10, do the following:
- In the Settings window, click Accounts, and then click Family & other users.
- Click the account you want to modify, to display your options. Then click Change account type. Click to view a larger image. Any account can be an Administrator account.
- In the Account type list, click Administrator. Then click OK.
Let’s discuss these in detail
It’s important to note that there are two types of user accounts: administrator and standard user. Each computer needs at least one administrator account in order to install new applications, apply updates, and manage system settings.
In this guide, we’ll show you how to change your account to an administrator if needed.
In Windows 10 terminology, a local user refers to an account created without a Microsoft account. This means that you won’t be able to use the same account on a different device and lose some cloud functionality. However, you can still customize and manage your account on your computer locally.
How to manger user accounts in Windows 10.
How to create a new local user in Windows 10
Creating a new user account is easy using Windows 10’s Settings application. You may also create a Microsoft account to be able to transfer accounts and files between computers.
- Click on the Start menu in your taskbar. This icon has the Windows 10 logo on it. If you’re not familiar with the Windows 10 interface, we recommend reading the Get Started with Windows 10 article on our website.
-
Select the Settings icon, indicated by a gear. Alternatively, you can use the Windows + I keyboard shortcut to reach this application quicker.

-
Click on the Accounts tile.
- Switch to the Family & other users category using the panel on the left side of the screen. You should see a list of all the current users on your computer.
-
Click on the Add someone else to the PC button.
-
To add a new local user, select the I don’t have this person’s sign-in information option.
-
Click on the Add a user without a Microsoft account option.
-
Enter the desired username. If needed, you can also include a password and a password hint. This will give extra privacy to the user of the account. In the future, you’re always able to change all of this information.
- Click Next to finalize the new account.


How to customize a local user on Windows 10
Each user account on your computer can change username, picture, and password at any time. The guide below will show you how to customize your local user on a Windows 10 device.
-
Click on the Start menu in your taskbar.
-
You’ll see your current user picture on the left side of the panel. Click on it and select Change account settings from the context menu.
- Here, you can modify your profile picture or take a new one using your camera, and manage your local account.
- If you have a Microsoft account connected, click on the Manage my Microsoft account link to be able to modify settings such as password and security.

You can always come back to this menu and make changes whenever needed.
How to make a local user an administrator in Windows 10
When you create a new account on Windows 10, it’ll automatically be assigned as a standard account without administrative permissions. This means that most accounts on a device won’t be able to install new applications and change system settings without reaching out to an administrator.
If you want to change an existing account into an administrator account with full access, follow the guide below.
- Click on the Start menu in your taskbar.
-
Select the Settings icon, indicated by a gear. Alternatively, you can use the Windows + I keyboard shortcut to reach this application quicker.
- Click on the Accounts tile.
- Switch to the Family & other users category using the panel on the left side of the screen. You should see a list of all the current users on your computer.
-
Select the account you want to modify by clicking on it once. Click on the now visible Change account type button.
-
Click on the drop-down menu and switch from Standard User to Administrator.
- Click the OK button. The account now has full access and administrative permissions on your device.


How to remove a local user in Windows 10
If an account is no longer needed, you can easily remove it using the guide below. Make sure that you save all files stored on the account before permanently deleting it from the device, as this action is not reversible.
When you’re ready to remove a local user, follow this guide.
-
Click on the Start menu in your taskbar.
- Select the Settings icon, indicated by a gear. Alternatively, you can use the Windows + I keyboard shortcut to reach this application quicker.
- Click on the Accounts tile.
-
Switch to the Family & other users category using the panel on the left side of the screen. You should see a list of all the current users on your computer.
-
Select the account you want to delete by clicking on it once. Click on the now visible Remove button.
- Make sure to read the warning before clicking the Delete account and data button. Wait for Windows 10 to process your request and remove the local user.

Final thoughts
We hope that this guide was able to show you everything you need to know about managing user accounts in Windows 10. If you ever need further assistance, our customer service is happy to guide you through any issues you might have.
Do you want to learn more about the Windows 10 operating system? We recommend proceeding with our Set Up Security in Windows 10 article or backtracking to our main Windows 10 tutorials page to find your next lesson.
If you’re looking for more guides or want to read more tech-related articles, consider subscribing to our newsletter. We regularly publish tutorials, news articles, and guides to help you.