
А уже Nvidia выпустила своё исправление на уровне драйвера
Одной из проблем недавнего обновления Windows 11 22H2 стало резкое падение производительности видеокарт Nvidia в играх. И вот компания Microsoft отреагировала на это. Правда, совет выглядит странно.
В Microsoft заявили, что отключение функций «Целостность памяти» (Memory Integrity) и «Платформа виртуальной машины» (Virtual Machine Platform, VMP) может улучшить ситуацию.
«Игроки, которым необходима производительность, могут выключить эти функции во время игры, а затем включить их после завершения игры. Однако при отключении этих функций система становится уязвимой для кибератак», — пояснили Microsoft.
Функция «Целостность памяти» контролирует драйверы в системе. Она проверяет, чтобы те были безопасны и не содержали вредоносного кода. А «Платформа виртуальной машины» поддерживает штатную виртуализацию в системе. По умолчанию эти функции включены. В компании уточнили, что для оптимальной работы и защиты их лучше не отключать.
При этом в Nvidia опубликовали свежий драйвер GeForce 517.48, который исправил эту проблему. Его можно скачать через приложение GeForce Experience.
8 октября 2022 в 19:16
| Теги: Microsoft, Nvidia
| Источник: Windows Latest, Tom
When it comes to Windows 11, one important feature that stands out is Memory Integrity. This feature ensures that your computer’s memory is protected from malicious attacks and unauthorized access. It’s like having a virtual vault for your data, keeping it safe and secure.
Memory Integrity in Windows 11 works by creating a secure environment within your system, where the integrity of the memory is constantly monitored and verified. This helps prevent and detect any attempts to modify or tamper with the memory, ensuring the reliability and trustworthiness of your computer’s operations.
Memory Integrity is a security feature in Windows 11 that helps protect your computer against unauthorized access and malware attacks. It works by safeguarding the system memory from malicious software that may attempt to tamper with it. Memory Integrity uses virtualization-based security to isolate critical processes and code integrity checks to ensure the integrity of system files and drivers. This helps prevent unauthorized changes and enhances the overall security of your Windows 11 device.

Understanding Memory Integrity in Windows 11
Memory Integrity is a crucial security feature introduced in Windows 11 that aims to protect the operating system and the user’s data from potential threats. With the increasing sophistication of malware and cyber-attacks, Microsoft has prioritized the development of advanced security measures to safeguard its users’ systems. Memory Integrity is one of these significant enhancements.
How Does Memory Integrity Work?
Memory Integrity uses the Core Isolation feature, which isolates critical and sensitive aspects of the operating system from potential threats in the system memory. It achieves this by enabling virtualization-based security (VBS) features on compatible devices. This technology creates secure compartments within the operating system, known as «virtualization containers,» which ensure that critical system components and sensitive data are protected and isolated from unauthorized access or tampering.
When Memory Integrity is enabled, it constantly monitors and validates the integrity of system processes and components stored in memory. Any attempts of unauthorized modifications or injections are detected and blocked, preventing malware or malicious actors from compromising the operating system’s security and stability.
Furthermore, Memory Integrity works in conjunction with Windows Hypervisor, also known as Hyper-V, to create a secure execution environment for critical processes and services. The presence of Memory Integrity enhances the overall security posture of the system by minimizing the potential attack surface and reducing the risk of memory-based attacks.
Enabling Memory Integrity in Windows 11
Memory Integrity is not enabled by default in Windows 11, but users can manually enable it to take advantage of the additional security it provides. To enable Memory Integrity:
- Open the Windows Security app by searching for it in the Start menu or clicking on the shield icon in the taskbar notification area.
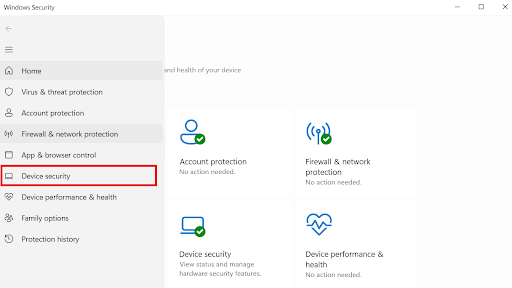
- Click on «Device Security» in the sidebar.
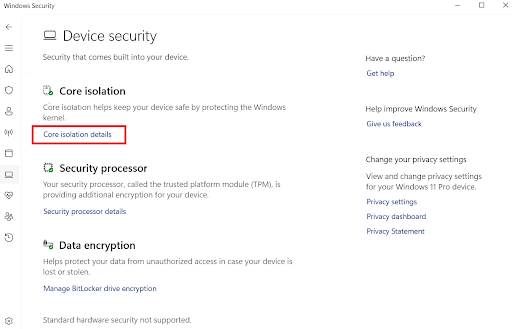
- Under the «Core Isolation» section, click on «Core isolation details.»
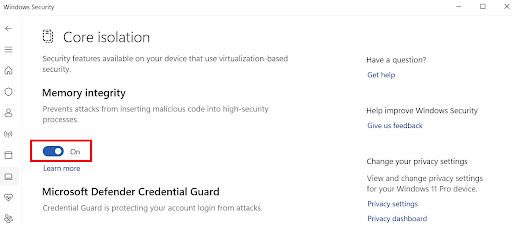
- Toggle the switch next to «Memory Integrity» to enable it.
It is worth noting that enabling Memory Integrity may cause compatibility issues with certain apps or drivers that rely on accessing low-level system resources. If you experience any problems after enabling Memory Integrity, you can disable it using the same steps mentioned above.
Benefits of Memory Integrity
The main benefits of enabling Memory Integrity in Windows 11 are:
- Enhanced Security: Memory Integrity protects the operating system from unauthorized modifications and injections, minimizing the risk of malware attacks.
- Isolation of Critical Components: By creating virtualization containers, Memory Integrity isolates critical system processes and sensitive data, preventing unauthorized access.
- Reduced Attack Surface: Memory Integrity, along with other security features in Windows 11, reduces the potential attack surface by implementing virtualization-based security.
- Improved Stability: By detecting and blocking unauthorized modifications, Memory Integrity enhances the stability and reliability of the operating system.
Limitations of Memory Integrity
While Memory Integrity provides significant security enhancements, it is important to be aware of its limitations:
- Compatibility Issues: Enabling Memory Integrity may cause compatibility issues with certain apps or drivers that require access to low-level system resources. It is advisable to test compatibility before enabling Memory Integrity.
- System Requirements: Memory Integrity requires compatible hardware, including virtualization support in the processor and enabled virtualization-based security.
- User Intervention: Users need to manually enable Memory Integrity as it is not enabled by default in Windows 11.
- False Positives: In some cases, Memory Integrity may generate false positives, incorrectly flagging legitimate processes as suspicious. Users should review and verify detected alerts before taking any action.
Third-Party Security Solutions
While Memory Integrity provides robust security for Windows 11, it is important to consider using additional third-party security solutions for comprehensive protection against various types of threats. These solutions can include antivirus software, firewalls, and network monitoring tools.
To ensure the highest level of security, it is recommended to use a multi-layered approach that combines the built-in security features of Windows 11, including Memory Integrity, with reputable third-party security solutions. This approach provides defense in depth and mitigates potential gaps in protection.
Overall, Memory Integrity in Windows 11 plays a vital role in protecting the system and user data against potential threats. By leveraging virtualization-based security and continuously validating the integrity of system processes, Memory Integrity enhances the security posture of the operating system, reducing the risk of malware attacks and unauthorized access to critical components.

Understanding Memory Integrity in Windows 11
Memory Integrity is a security feature in Windows 11 that helps protect your computer from advanced threats. It ensures that only trusted code runs within the Windows kernel, preventing unauthorized code from being loaded or executed.
Memory Integrity uses hardware virtualization technology (such as Hypervisor-protected code integrity) to create a secure environment for the Windows kernel. It enforces strict code integrity policies and monitors and blocks any attempts to modify kernel code, memory, or data. This helps safeguard against zero-day exploits, kernel-level attacks, and malware tampering.
Enabling Memory Integrity is recommended for users who require higher levels of security, especially those who handle sensitive information or work with critical systems. However, it may cause compatibility issues with certain applications and drivers, as it restricts access to the kernel. Therefore, it’s essential to verify compatibility before enabling this feature.
To enable Memory Integrity in Windows 11, go to Settings > System > Security & Privacy > Device Security, and toggle on the Memory Integrity option. Keep in mind that you may need to enable Secure Boot and other hardware virtualization features in your computer’s BIOS settings for Memory Integrity to work correctly.
Key Takeaways — What Is Memory Integrity Windows 11
- Memory Integrity is a security feature in Windows 11 that protects your system from malicious attacks.
- It works by preventing unauthorized code from accessing the higher-privileged parts of your computer’s memory.
- Enabling Memory Integrity can help protect against malware, ransomware, and other types of cyber threats.
- It uses virtualization-based security technology to isolate critical system processes.
- Memory Integrity is available in Windows 11 Pro, Enterprise, and Education editions.
Frequently Asked Questions
Here are some commonly asked questions about the memory integrity feature in Windows 11:
1. How does memory integrity work in Windows 11?
The memory integrity feature in Windows 11 is designed to protect your computer from malicious attacks by ensuring that only trusted software runs on your system. It uses hardware-based virtualization technology called Memory Protection Extensions (CET) to isolate sensitive parts of the operating system from potential threats.
When memory integrity is enabled, Windows 11 will verify the integrity of the system’s memory before executing any code. This helps prevent unauthorized modifications to the operating system and protects against common attacks such as code injection and kernel tampering.
2. How do I enable memory integrity in Windows 11?
To enable memory integrity in Windows 11, follow these steps:
- Go to «Settings» and click on «Update & Security.»
- Select «Windows Security» and click on «Device security.»
- Scroll down and click on «Core isolation.»
- Toggle the switch next to «Memory integrity» to enable it.
Once enabled, your computer will restart to apply the changes, and memory integrity will be active.
3. What are the benefits of using memory integrity?
Enabling memory integrity in Windows 11 provides several benefits:
- Enhanced security: Memory integrity helps protect your computer from sophisticated attacks by ensuring that only trusted code runs on your system.
- Protection against common threats: It prevents unauthorized modifications to the operating system, reducing the risk of code injection and kernel tampering.
- Peace of mind: With memory integrity enabled, you can have confidence that your system is running securely and that your data is protected.
4. Can I disable memory integrity in Windows 11?
Yes, you can disable memory integrity in Windows 11 if needed. Follow the same steps mentioned earlier to navigate to the memory integrity settings in the Windows Security app. Simply toggle the switch next to «Memory integrity» to disable it. However, we recommend keeping memory integrity enabled for enhanced security.
5. Does memory integrity affect system performance?
Enabling memory integrity in Windows 11 may have a minor impact on system performance. The memory integrity feature checks the system’s memory for integrity before executing code, which could slightly increase the time it takes for certain operations to complete. However, the impact on everyday tasks and overall system performance is generally negligible.
In conclusion, Memory Integrity in Windows 11 is a security feature designed to protect your system from unauthorized modifications to critical parts of your computer’s memory. By enabling Memory Integrity, you can safeguard your system against various types of attacks, such as rootkits and other malicious software.
Memory Integrity uses hardware-based virtualization technology to isolate critical processes and ensure that they are not tampered with. This helps maintain the integrity of your system and protects your sensitive data. It is recommended to enable Memory Integrity in Windows 11 to enhance the security of your computer.
Introduction
In an era where cybersecurity threats are becoming increasingly sophisticated, operating systems are evolving to provide more robust security measures. Windows 11 has introduced a variety of new features aimed at enhancing user security and system integrity. Among these features, Memory Integrity stands out as a fundamental component in protecting user data against various forms of attacks. This article will explore what Memory Integrity is, how it functions, its significance in the context of Windows 11, and best practices for utilizing this feature.
Understanding Memory Integrity
Memory Integrity, also known as Hypervisor-protected Code Integrity (HVCI), is a security feature integrated into Windows 11 that helps prevent malicious code from executing in the kernel memory space. This is crucial because the kernel is the core component of the Windows operating system — managing system resources and communications between hardware and software. Compromising kernel memory can lead to devastating effects, including system crashes, unauthorized data access, and loss of sensitive information.
Memory Integrity uses virtualization-based security (VBS) to isolate critical processes and sensitive data in memory from any potential threats. It operates by loading a hypervisor that creates a secure environment where security-related components can run independently from the rest of the operating system. By running these protective measures in a separate memory space, Memory Integrity can monitor and verify the integrity of the code before it executes in kernel mode.
How Memory Integrity Works
The operation of Memory Integrity involves several key processes and technologies working together to fortify the system:
-
Hypervisor and Virtualization-Based Security: At the core of Memory Integrity is virtualization-based security, which creates isolated environments (containers) to protect sensitive parts of the system. The hypervisor, a layer of software that interacts directly with system hardware, is responsible for running these secure executables separately from the operating system kernel.
-
Code Integrity Verification: Whenever a driver or kernel-mode code is loaded, Memory Integrity verifies its digital signature against a set of approved drivers and code. If the code’s signature is invalid or not recognized, Windows prevents the code from being executed. This is crucial in preventing rootkits and other malicious software that operate in the kernel space.
-
Hardware Requirements: For Memory Integrity to function, specific hardware requirements must be met. It generally requires modern CPUs that support virtualization technologies, such as Intel VT-x or AMD-V, and a system firmware that supports Secure Boot and UEFI.
-
Compatibility Checks: Windows 11 performs compatibility checks before enabling Memory Integrity to ensure that all system components can function effectively. This includes checking installed drivers for verified signatures and compatibility with the Memory Integrity feature.
Significance of Memory Integrity in Windows 11
With the rise of cyber threats, including ransomware and other malware, Windows 11’s Memory Integrity feature is crucial in enhancing the operating system’s overall security posture. Here’s why it matters:
-
Protection Against Kernel-Level Attacks: Kernel-level attacks can bypass traditional security measures, putting user data at significant risk. Memory Integrity safeguards against these attacks by ensuring that only trusted code can execute in the kernel space.
-
Enhanced System Stability and Performance: By isolating critical security processes, Memory Integrity not only protects system integrity but also contributes to overall system performance. When malicious code is blocked from executing, the system experiences fewer crashes and better stability.
-
User Trust and Compliance: For businesses and organizations adhering to regulations regarding data protection, implementing advanced security features like Memory Integrity can help fulfill compliance requirements. This fosters user trust, which is imperative in today’s digital landscape.
-
Improved Device Management: In environments where multiple devices are used, Memory Integrity helps maintain device integrity, making it easier to manage and secure networks. Administrators can confidently implement device policies knowing that the potential for kernel attacks is significantly reduced.
How to Enable Memory Integrity in Windows 11
Enabling Memory Integrity in Windows 11 is a straightforward process, yet it requires administrative privileges. Below are the steps to activate it:
-
Open Windows Security:
- Click on the Start Menu and type «Windows Security.»
- Select the «Windows Security» app from the search results.
-
Navigate to Device Security:
- In the Windows Security window, look for the «Device Security» option on the left panel and click on it.
-
Access Core Isolation Details:
- In the Device Security window, find «Core isolation» and click on «Core isolation details.»
-
Turn On Memory Integrity:
- Within the Core isolation settings page, you’ll see an option for «Memory integrity.» Toggle the switch to turn it on.
-
Restart Your Computer:
- After enabling Memory Integrity, you’ll likely need to restart your device for the changes to take effect.
Troubleshooting and Compatibility Issues
While Memory Integrity provides substantial security benefits, it may also introduce compatibility issues with certain hardware and software. Common problems users may encounter include:
-
Driver Incompatibility: Some older drivers may not support the code integrity checks enforced by Memory Integrity, which can lead to system instability or failure to boot. It’s advisable to check the manufacturer’s website for updated drivers.
-
Performance Issues: In some cases, particularly with older hardware or resource-intensive applications, users might experience performance degradation after enabling Memory Integrity. If this occurs, users can weigh the trade-offs between security and performance based on their specific needs.
-
Software Conflicts: Certain security or virtualization software might conflict with Memory Integrity. Ensure all applications are up to date and consult their support channels if you run into issues after enabling this feature.
-
Disabling Memory Integrity: If you need to disable Memory Integrity temporarily for troubleshooting purposes, you can follow the same steps outlined for enabling it, switching the toggle back to the «Off» position. However, be cautious about leaving it disabled as this increases exposure to potential threats.
Best Practices for Utilizing Memory Integrity
To get the most out of the Memory Integrity feature, consider adopting the following best practices:
-
Regularly Update Drivers: Always keep your system drivers up-to-date to ensure compatibility with Memory Integrity. Use Windows Update or manufacturer websites to find the latest versions.
-
Monitor System Performance: After enabling Memory Integrity, closely monitor your system’s performance and stability. Use Windows Task Manager to keep an eye on resource utilization and address any unusual activities.
-
Educate Users: If you manage devices in an organizational environment, ensure that users are educated about the importance of Memory Integrity and best practices for maintaining secure systems.
-
Utilize Additional Security Features: While Memory Integrity greatly enhances security, it’s essential to utilize other features like Windows Defender, Secure Boot, and BitLocker for a comprehensive security strategy.
-
Regular System Backups: Regularly back up important data and create system restore points. This ensures that you can quickly recover in the event of any unforeseen complications caused by system upgrades or changes.
Conclusion
Memory Integrity in Windows 11 plays a vital role in modern security strategies, emphasizing a proactive approach to system protection. By utilizing virtualization-based security, it effectively guards against the malicious code that threatens the kernel and, by extension, the entire operating system. Enabling this feature represents a crucial step in safeguarding personal and organizational data, ensuring users can leverage the full capabilities of their systems without compromising security.
As cyber threats continue to evolve, features like Memory Integrity do not just enhance system security — they build a foundation of trust in technology that we rely on daily. With an understanding of how it works, its significance, and best practices for implementation, users can take full advantage of this essential security feature in Windows 11.
Table of contents
- What Is Core Isolation?
- What Is Memory Integrity?
- Core Isolation and Memory Integrity: How They Work Together?
- Should You Enable or Disable Memory Integrity?
- How to Turn On/Off Core Isolation Memory Integrity
- Method 1: Use Windows Security
- Method 2: Use the Registry Editor to enable core isolation
- What to Do if Memory Integrity Is Off?
- 1. Check for incompatible drivers
- 2. Remove incompatible drivers
- 3. Check for Windows updates
- 4. Repair system files
- 5. Perform a clean boot
- Core Isolation Memory Integrity: Explained
- FAQ
Is it necessary to enable the memory integrity feature? What happens if memory integrity is off ? Am I vulnerable to attacks? These are valid questions that many users ask. Depending on your situation, you may need to enable or disable memory integrity. In this guide, I’ll explain how core isolation and memory integrity work together and provide other helpful tips. Let’s begin.
What Is Core Isolation?
Windows has a security feature called core isolation, which isolates essential core processes in memory to protect them from malicious programs . Core isolation can protect your PC because it runs the core process in a virtualized environment. Examples of features that fall within core isolation are memory integrity and Kernel-mode Hardware-enforced Stack Protection .
What Is Memory Integrity?
So, what does memory integrity do?
Core isolation memory integrity, or Hypervisor-Protected Code Integrity (HVCI), is a Windows security feature that prevents malicious software from using low-level drivers to take over your computer.
You can access this feature via Windows Defender Security under the Device security section.
Windows memory integrity lets you activate features to improve protection by providing status reporting and managing security integrated into your devices.
However, device security depends on hardware support.
So, your firmware must support virtualization to run programs on your Windows 11 or 10 PC inside a container and restrict their access to other areas of the system.
Hardware and software requirements
Before you can enable core isolation, your device must support second-level address translation (SLAT) and virtualization-based security (VBS).
Keep in mind that some operating systems don’t support memory integrity. But if you’re using Windows 10/11 Enterprise or Pro, you should have this feature.
You should have the core isolation feature if you have a Windows 11 PC. If you can’t find it, it’s possible that it’s not enabled. Skip to the next section to learn how to enable the feature.
PRO TIP
When you turn on memory integrity, it checks for incompatible drivers on your system. If it finds incompatible drivers, it won’t turn on.
If core isolation doesn’t turn on, I recommend using Auslogics Driver Updater to update your drivers automatically.
This software checks for outdated and missing drivers and updates them according to the manufacturer’s version.
Learn more: Auslogics Driver Updater: New Drivers in One Click!
Core Isolation and Memory Integrity: How They Work Together?
Windows 10 or Windows 11 core isolation and memory integrity work together to offer complete security against different types of cyber threats when they are both enabled. Memory integrity ensures the safety of system memory, whereas core isolation establishes a secure environment for system processes. This collaboration reduces the chances of malware attacks and protects important system components, improving your device’s overall security.
Should You Enable or Disable Memory Integrity?
Based on what I’ve outlined so far, if you disable core isolation, the system processes will function with less isolation, which could make your system more susceptible to malware attacks.
In other words, you make it easier for cybercriminals to access sensitive data on your computer and compromise system processes.
However, if you’re a gamer like me, you can optimize Windows 11 for gaming by turning off memory integrity.
That’s because Windows 11 or Windows 10 core isolation uses a lot of CPU resources. If core isolation memory integrity is off , you can use the free resources to run your games.
So, whether you disable or enable Windows memory integrity depends on your preference.
Regardless, we’ll show you how to enable or disable memory integrity on your PC.
How to Turn On/Off Core Isolation Memory Integrity
In this section, we’ll show you how to turn core isolation on or off. Go through the various steps below to enable the feature:
Method 1: Use Windows Security
Here’s how to enable or disable core isolation:
- Type
Windows Securityin the search bar and click to open it. - Click the three horizontal lines in the upper left corner.

- Go to Device security.
- Select the Core isolation details under Core isolation .
- Toggle the switch to turn it on and off.
Restart your computer to apply the changes.
Related:Fix Windows Defender Service That Won’t Start
Method 2: Use the Registry Editor to enable core isolation
Follow the steps below to allow core isolation memory integrity:
Warning
I highly recommend backing up your data before making any changes to the Windows Registry, especially if you are not completely knowledgeable about what you’re doing.
Please read our guide on Windows 10 backup and restore to learn how to back up your data.
- Type
regeditin the search bar and pressEnterto open the Registry Editor. - Enter the following in the search field:
HKEY_LOCAL_MACHINE\SYSTEM\CurrentControlSet\Control\DeviceGuard\Scenarios\HypervisorEnforcedCodeIntegrity
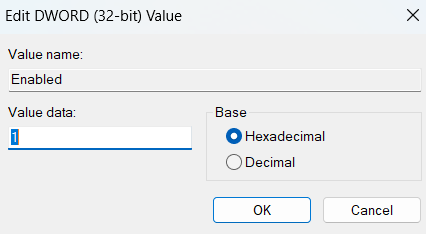
- Double-click on Enabled.
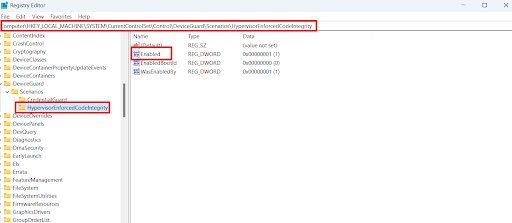
- Set Value date to 1 and click on OK to save the settings.
Restart your computer to implement the changes.
Also read:How to Back Up and Restore the Windows 10 Registry
What to Do if Memory Integrity Is Off?
If you can’t turn on your Windows memory integrity, follow the steps to correct the problem:
1. Check for incompatible drivers
If you can’t enable Windows 11 core isolation, it could be because of incompatible or outdated drivers. Follow the steps below to fix the problem:
If you recently installed any third-party drivers and noticed that you can’t enable memory integrity, roll back your drivers . This may solve the problem.
- Type
Windows securityin the search box and click on it to open. - Select Device security from the left-hand side.
- Click on Core isolation details and enable Memory integrity .
- Click Review incompatible drivers if you get this error message: Resolve any driver incompatibilities and scan again.
- Jot down every driver that you suspect may be the reason why your core isolation memory integrity is off .
- Open Device Manager by typing
Device Managerin the search box and hittingEnter. - Then, click View and select Show hidden devices .
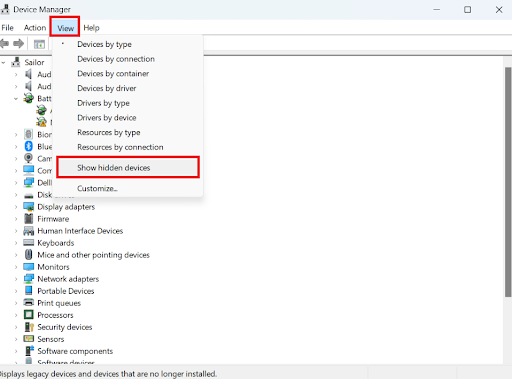
- Right-click the faulty driver, choose Uninstall device , and then follow the on-screen instructions to complete the process.
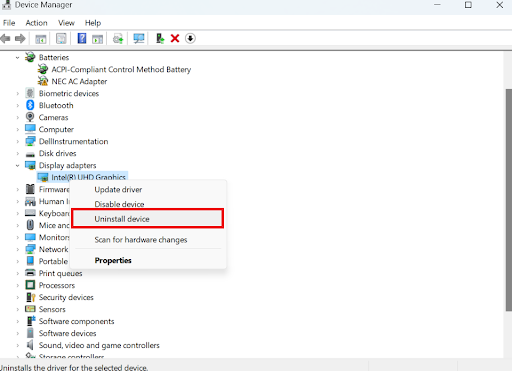
- If it still doesn’t work, you can choose Update driver to update the driver.
Download Auslogics Driver Updater
Prevent hardware errors and ensure problem-free device operation with this advanced tool that detects outdated drivers and safely gets them updated.
2. Remove incompatible drivers
Another way to resolve the problem if your core isolation memory integrity is off is to delete all the incompatible drivers.
Here’s how to do it using the Command Prompt :
- Type
command promptin the search bar, right-click the first option, and select Run as administrator . - Type the following command and press
Enter. Remember to jot down the faulty drivers:
dism /online /get-drivers /format:table

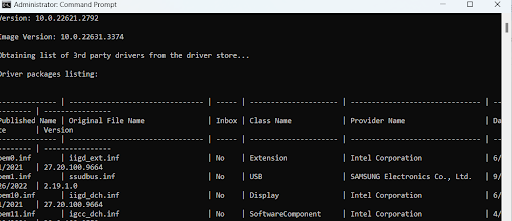
- Next, type the following command to delete the problematic drivers:
pnputil /delete-driver (driver’s published name) /uninstall /force
Enter the faulty driver’s name instead of ( driver’s published name) in the Command Prompt. For example, you can see the driver oem0.inf in the screenshot above.
So, if I want to delete that driver, the command will be:
pnputil /delete-driver oem0.inf /uninstall /force.
Make sure to enter the correct driver’s published name, or you may delete other drivers that are not causing the problem. So, it’s better to copy and paste.
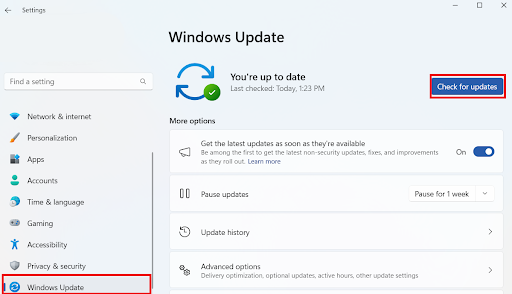
3. Check for Windows updates
Sometimes, you can update your Windows system to get rid of the problem. That’s how I fixed the problem when I couldn’t enable Windows core isolation . All you have to do is press the Windows + I keys, select Windows Update, and click on Check for updates.
Related: How to Fix Windows Update Error 0x80070057
4. Repair system files
Another way to fix the problem if your core isolation memory integrity is off is to use an SFC scan to repair system files. Here’s how to do it:
- Open the Command Prompt with administrative privileges.
- Type
sfc /scannowand pressEnter.
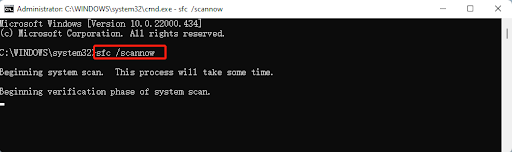
Wait for the process to complete and check if the problem is resolved.
Related:How to Find and Fix Corrupted Files in Windows 10?
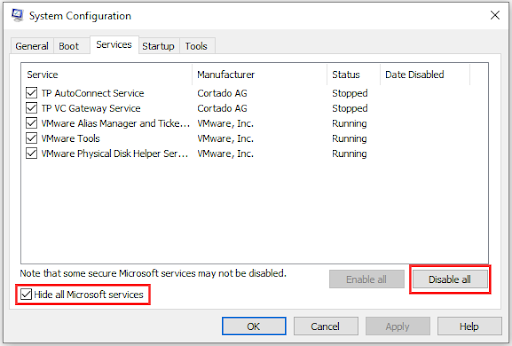
5. Perform a clean boot
Sometimes, performing a clean boot can fix the problem. When you perform a clean boot, your computer will only boot with the essentials, allowing you to troubleshoot the problem. If you find conflicting software, you can uninstall it. Here’s how to do it:
- Type
msconfigin the search box and pressEnter. - Click on the Services tab.
- Check the Hide all Microsoft services option.
- Click Disable all .
- Restart your computer.
Core Isolation Memory Integrity: Explained
Whether you enable or disable Windows core isolation, it is a crucial decision only you can make, since it affects security and performance.
Throughout this tutorial, I’ve examined how these features work together to protect system memory and isolate essential processes to improve system security.
While core isolation and memory integrity offer crucial security advantages, speed optimization is also worth considering, especially if you’re a gamer.
So, your priorities and risk tolerance will ultimately determine whether you activate or disable these features.
Was this article helpful? Share it with your friends who might need it, and let us know your thoughts or additions in the comments below!
FAQ
Why is memory integrity important?
Memory integrity is important because it shields your computer from several types of attacks, including those that use memory vulnerabilities in the operating system. Memory integrity protects against viruses and other harmful applications that could try to change or corrupt your computer’s memory. This feature improves the general security of your device and helps protect sensitive information.
Are there any system requirements for enabling memory integrity?
Yes. There are system requirements to enable memory integrity in Windows 10/11. Your device must fulfill specific hardware and software requirements to use this feature. Your computer’s CPU must support second-level address translation and virtualization-based security. Furthermore, not every operating system version supports memory integrity. Therefore, you must have Windows 10/11 Enterprise or Pro.
How does memory core isolation affect system performance?
The degree to which memory core isolation affects system performance depends on several factors, like your PC’s hardware configuration and the amount of work it processes. Because memory integrity imposes additional security measures, such as runtime integrity checks and memory encryption, it may cause a slight drop in overall system performance. However, for most users, the performance hit is small and is usually offset by the increased security that comes with memory integrity enabled.
In this tutorial, we will explore different methods to enable memory integrity on Windows 11. By turning on the core isolation’s memory integrity feature on Windows 11, you can help prevent malicious code from accessing high-security processes in the event of an attack.
One of the key components that shields your device from harmful attacks is core isolation. Core isolation provides added protection against malware and other attacks by isolating computer processes from your operating system and device.
Memory integrity is a feature of core isolation in Windows security. This feature should be turned on because it helps protect your data and privacy by preventing unauthorized access to your device. It is sometimes referred to as hypervisor-protected code integrity (HVCI) or hypervisor-enforced code integrity.

Memory integrity works better with Intel Kabylake and higher processors with Mode-Based Execution Control, and AMD Zen 2 and higher processors with Guest Mode Execute Trap capabilities. Some applications and hardware device drivers may be incompatible with memory integrity. This incompatibility can cause devices or software to malfunction and, in rare cases, may result in a boot failure (blue screen).
Microsoft
What is Memory Integrity?
Memory integrity is a virtualization-based security (VBS) feature available in Windows. Memory integrity is a critical component that protects and hardens Windows by running kernel mode code integrity within the isolated virtual environment of VBS.
Starting with Windows 11 22H2, users will see a warning in Windows Security if memory integrity is turned off. The warning indicator also appears on the Windows Security icon in the Windows Taskbar and in the Windows Notification Center. The user can dismiss the warning from within Windows Security.
Features of Memory Integrity
The following is a list of the key features that core isolation’s memory integrity provides.
- Prevents attacks from inserting malicious code into high-security processes.
- Restricts kernel memory allocations that could be used to compromise the system.
- Protects modification of the Control Flow Guard (CFG) bitmap for kernel mode drivers.
- Protects the kernel mode code integrity process that ensures that other trusted kernel processes have a valid certificate.
Ways to Enable Memory Integrity on Windows 11
Memory integrity is on by default in Windows 11 and can be turned on using the following methods:
- Windows Security Settings
- Microsoft Intune
- Group Policy
- Configuration Manager (SCCM)
- Windows Registry
Method 1: Turn on Memory Integrity in Windows Security
The memory integrity is found in Windows Security > Device Security > Core Isolation. Let’s see the steps to manually turn on the core isolation’s memory integrity feature on Windows 11 from Windows security.
Select the Start button and type “Core isolation” in the search. Select the Core Isolation system settings from the search results to open the Windows security app.

On the core isolation page, turn on memory integrity. Once you complete these steps, restart the computer to apply the settings to protect your computer from malicious code injecting into high-security processes.
Note: Turning core isolation memory integrity on or off requires a reboot each time.

Method 2: Enable Memory Integrity using Intune policy
You can turn on the core isolation’s memory integrity feature on Windows 11 devices from the Intune admin center. Enabling this feature in Intune requires using the Code Integrity node in the VirtualizationBasedTechnology CSP. Alternatively, you can configure these settings by using the settings catalog policy.
Perform the following steps to create a new policy in the Microsoft Intune admin center to enable memory integrity on Windows devices:
First, sign in to the Microsoft Intune Admin center. Select Devices > Windows > Configuration Profiles > Create New Policy.
On the Create a profile window, configure the following settings and select Create.
- Platform: Windows 10 and later
- Profile Type: Settings Catalog

In the Basics tab, enter the following details:
- Name: Enter a descriptive name for the profile, which you can easily identify later. For example, a good profile name is Enable Memory Integrity on Windows devices.
- Description: Enter a brief description of the profile. This setting is optional but recommended. For example, you can enter the following description for the profile: “Protects your data and privacy by preventing unauthorized access to your device.“
Click Next.

In the Configuration Settings section, under Settings Catalog, click Add Settings.
On the Settings picker window, type “Hypervisor Enforced Code Integrity” in the search box and click Search. From the search results, click on the Virtualization Based Technology category and select the setting Hypervisor Enforced Code Integrity. Close the Settings Picker panel.

The hypervisor enforced code integrity offers three options to choose from:
- (Disabled) Turns off Hypervisor-Protected Code Integrity remotely if configured previously without UEFI Lock.
- (Enabled with UEFI lock) Turns on Hypervisor-Protected Code Integrity with UEFI lock.
- (Enabled without lock) Turns on Hypervisor-Protected Code Integrity without UEFI lock.
From the above options, select (Enabled with UEFI lock) Turns on Hypervisor-Protected Code Integrity with UEFI lock. This will turn on memory integrity within the core isolation.
Click Next.

In Intune, Scope tags determine which objects admins can see. In the Scope tags section, you specify scope tags. Specifying scope tags is optional, and you may skip this step. Click Next.
In the Assignments window, specify the groups to which you want to apply this policy. We recommend deploying the profile to a few test groups first, then expanding to more groups if testing is successful. Select Next.

On the Review + Create page, review all the settings that you have defined to activate the memory integrity via Intune and select Create.

After you perform the above steps, a notification appears: “Policy created successfully.” This confirms that the policy has been created and is being applied to the groups we chose. In Intune, the new profile we created to turn on memory integrity appears in the list of configuration profiles.
You must wait for the policy to apply to the targeted groups, and once the devices check in with the Intune service, they will receive your profile settings. You can also force sync Intune policies using different methods, including PowerShell on your Windows devices. To monitor the deployment, select the policy and review the Device and user check-in status.
Method 3: Enable memory integrity using Local Group Policy Editor
On Windows 11, you can utilize the local group policy editor to enable memory integrity. You’ll need to be an administrator on your Windows 11 PC to make these changes.
The Local Group Policy Editor is available only on Windows Pro and Enterprise editions. Windows 10 Home Edition users don’t have access to the GP Editor on their computer. Learn how to upgrade Windows 11 Home edition to Windows 11 Pro.
If you’re running Windows 10 /11 Pro or Enterprise, the easiest way to enable the memory integrity feature is to use the Local Group Policy Editor with these steps:
- Run the command gpedit.msc to open the Local Group Policy Editor.
- Navigate to Computer Configuration > Administrative Templates > System > Device Guard.
- Double-click the Turn on Virtualization Based Security policy setting.
- Select Enabled and under Virtualization Based Protection of Code Integrity, click the drop-down and select Enabled with UEFI lock.
Click Apply and OK to save the changes. When you restart your computer, memory integrity should be enabled in Windows Security.

Method 4: Turn on Memory Integrity using Registry
The Windows Registry is one of the methods that you can use to turn on the core isolation’s memory integrity feature. If you are going to use this method, make sure you back up the registry keys to a file and save it on your PC.
- Launch the registry editor by running the shortcut command regedit.exe.
- Browse the following path: HKEY_LOCAL_MACHINE\SYSTEM\CurrentControlSet\Control\DeviceGuard\Scenarios\HypervisorEnforcedCodeIntegrity
- Double-click the Enabled key and change its value from 0 to 1.
- Click the OK button.
Restart your computer and open the Windows Security app. Under Core Isolation, you’ll notice that memory integrity has been enabled.

Method 5: Create a GPO to enable Memory Integrity
On Windows devices, you can deploy a group policy to turn on memory integrity on Windows 10 and 11 devices. When your organization does not use Microsoft Intune and computers are joined to an active directory domain, the GPO method is preferred.
To create a new GPO, you can either log in to a domain controller or a member server installed with GPMC. You can also install the GPMC on Windows 11 and configure the group policies.
Use the following steps to create a group policy to enable memory integrity on Windows devices:
- Launch Server Manager from the Start menu and select Tools > Group Policy Management Console.
- In the Group Policy Management console, expand the domain, right-click Group Policy Objects or an OU, and select New.
- Enter the name for the group policy, such as “Enable memory integrity,” and click OK.

Right-click the GPO that you just created and select Edit. In the Group Policy Management Editor, navigate to Computer Configuration > Administrative Templates > System > Device Guard. Right-click the Turn on Virtualization Based Security policy setting and select Edit.

Select Enabled. Under Virtualization Based Protection of Code Integrity, click the drop-down and select Enabled with UEFI lock. Click Apply and OK.

After the group policy object is configured, you need to link the GPO to an OU if you haven’t already. You can also link it to the domain, but doing so will make the GPO applicable to every computer in the domain, so it is not advised. The best approach is to choose a test OU, connect your GPO, and test the policy settings.
It’s time to update the group policy on the client computers and check to see if the access to memory integrity is enabled in Windows security. You can use multiple ways to perform the group policy update on remote computers. On a test client machine, you can manually perform the group policy update by running the gpupdate /force command.
After the group policy has been refreshed, launch the Windows Security app. Now select Device Security > Core Isolation Details. You’ll see that the memory integrity feature has been enabled.
Method 6: Enable Core Isolation and Memory Integrity using SCCM
If your Windows 11 and 10 devices are managed by SCCM, you can deploy Device Guard and Device Guard-enabled apps in your environment.
Configuration Manager assists with the following scenarios:
- Determine which clients meet the prerequisites to support Device Guard
- Enable Device Guard settings
- Deploy Device Guard policy
- Deploy Device Guard-enabled apps
Device guard configurations can be applied in SCCM in two ways:
- Write a script and deploy it via a package or application
- Use the Configuration Manager task sequence.
Microsoft advises incorporating the configuration steps into your Windows 10/11 deployment task sequence to enable Device Guard by default. Check out this useful article by Microsoft on managing Windows devices guard with Configuration Manager.
Still Need Help?
If you need further assistance on the above article or want to discuss other technical issues, check out some of these options.