
Do you see a “Memory inis off. Your device may be vulnerable.” error and can’t turn on the feature on your Windows 11 PC? Your installed device drivers may be faulty, leading to this issue. Here are a few ways to fix corrupt drivers and other causes of this problem on your computer.
Other reasons you see the above error are that your Windows Security app is faulty, you have problematic third-party apps, Windows system files are corrupt, and more.

Force Enable Memory Integrity From Registry Editor
If you have trouble enabling Memory Integrity from the Windows Security app, use an alternative method to activate this security feature. You can tweak a value in your Windows registry to turn on this feature, which is possible using your PC’s built-in Registry Editor tool.
Note that making incorrect changes to the registry can render your system unstable. So, you should only change the recommended values to ensure your PC remains working.
- Open the Run dialog box by pressing Windows + R.
- Type regedit in the box and press Enter to open the Registry Editor tool.
- Head to the following path when Registry Editor opens:
ComputerHKEY_LOCAL_MACHINESYSTEMCurrentControlSetControlDeviceGuardScenariosHypervisorEnforcedCodeIntegrity - Double-click the Enabled key on the right.

- Type 1 in the Value data field and select OK.

- Close Registry Editor.
- Restart your PC by opening the Start menu, selecting the Power icon, and choosing Restart.
Disable Faulty Device Drivers
The most common reason you get the above error and can’t turn on Memory Integrity is that your installed device drivers are corrupt. Faulty drivers often cause many issues, making your PC malfunction or unstable.
You can prevent such bad drivers from loading when you turn on your PC by disabling them with a free tool called Autoruns. This tool highlights the bad drivers for you and allows you to turn those drivers off and back on.
- Open your preferred web browser and launch the Autoruns website.
- Download, extract, and launch the tool on your PC.
- Navigate to the Drivers tab in the tool and let the tool scan for installed drivers.
- Autoruns highlights your faulty drivers. Untick the boxes next to these drivers to turn these drivers off.

- Restart your PC.
Remove Corrupt or Incompatible Drivers
If your Memory Integrity issue is resolved after disabling the faulty drivers, remove those drivers to fix the problem for good. You can then download the proper drivers for your device from your device manufacturer’s site or Device Manager.
- Right-click the Start menu icon and choose Device Manager.
- Select View > Show hidden devices in Device Manager to list all available devices.

- Expand the category for your faulty device, right-click the device, and choose Uninstall device.

- Select Uninstall in the prompt to remove the device.
- Restart your PC.
If you installed your device drivers from a CD, DVD, or USB drive before, then this time around, download and install the latest drivers from the manufacturer’s website. This will update drivers and fix any issues caused by your drivers, allowing you to turn on your device’s security feature.
Reset the Windows Security App
The Windows Security app’s issues can prevent you from enabling the Memory Integrity feature. One way to fix this app’s problems is by resetting the app to the factory defaults. This deletes any custom configuration in the app and fixes the bugs that may be causing your Memory Integrity problem.
You can use Windows’ built-in option to repair your Windows Security app. Doing this also ensures your PC is safe from malware and viruses.
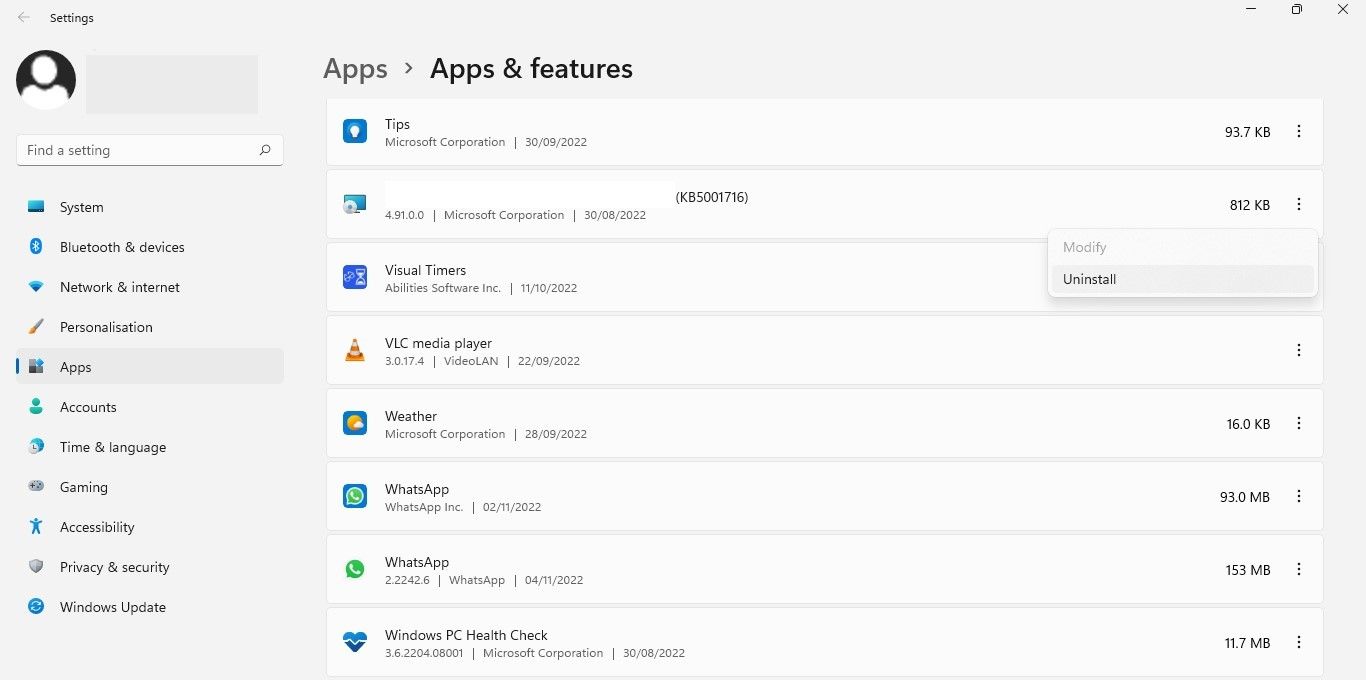
- Open Windows Settings by pressing Windows + I.
- Select Apps in the left sidebar and Apps & features on the right pane.
- Select the three dots next to Windows Security on the list and choose Advanced options.

- Select Reset on the following page.

- Choose Reset in the prompt that opens.
- Reboot your PC when you’ve reset your Windows Security app.
Uninstall Problematic Applications
Your Windows 11 PC may have problematic malicious software installed, causing interference with Windows’ Memory Integrity feature. If you’ve started experiencing this issue after installing a particular app, remove that app from your PC to resolve your issue. Removing bad apps also helps improve system performance.
You can then find a better alternative to your app and continue your tasks.
- Launch Settings by pressing Windows + I.
- Select Apps in the left sidebar and Apps & features on the right pane.
- Choose the three dots next to the problematic app and select Uninstall.

- Select Uninstall in the prompt to remove the app.
- Restart your PC.
Fix Windows’ Corrupt System Files
One possible reason you see a “Memory integration is off. Your device may be vulnerable.” error and can’t turn on Memory Integrity is that your Windows system files are corrupt. These faulty files prevent your system functions from working normally, causing many problems.
Luckily, your Windows 11 PC includes a tool to scan for and fix bad system files. You can use your PC’s SFC (System File Checker) tool to find faulty files and fix those files. This tool runs from Command Prompt and works on its own for the most part.
- Open the Start menu, search for Command Prompt, and select Run as administrator.
- Choose Yes in the User Account Control prompt.
- Type the following command in the CMD window and press Enter. This command requests Windows Update to download the files required to fix your corrupt files.
DISM.exe /Online /Cleanup-image /Restorehealth

- After running the above command, execute the following command to start finding and fixing corrupt Windows files: sfc /scannow

- Wait for the tool to finish its job.
Your system files that went corrupt due to malicious code or another cause are now fixed.
Update Windows 11
Microsoft often pushes various Windows 11 operating system updates, allowing you to patch system bugs, get new features, and optimize your overall experience. However, your “Memory integration is off. Your device may be vulnerable.” issue may have occurred due to a system problem. In this case, update your Windows software to the latest version, which will resolve your issue.
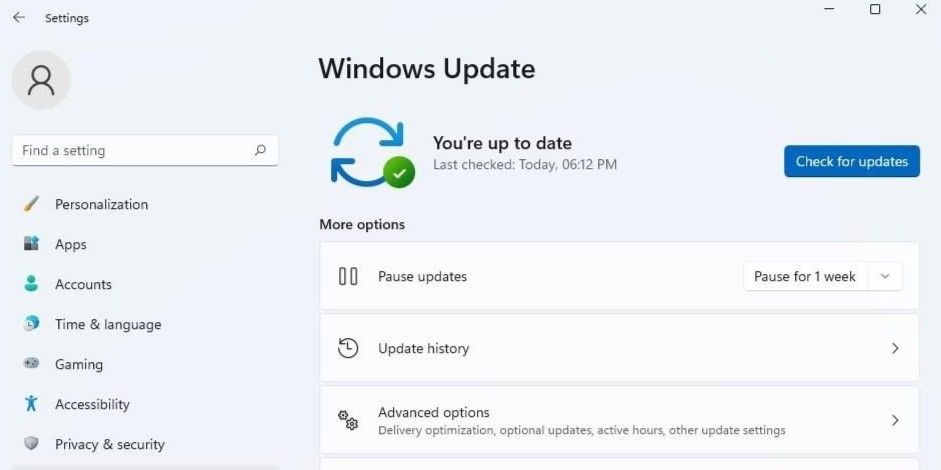
- Press Windows + I to open Settings.
- Select Windows Update in the left sidebar.

- Choose Check for updates on the right pane.
- Download and install the available updates.
- Restart your PC.
Troubleshoot Windows 11 Memory Integrity Problems on Your PC
Windows 11’s Memory Integrity issue occurs for various reasons, with corrupt device drivers being the leading cause. Hopefully, the troubleshooting steps above are all you need to resolve your issue.
You can then turn on and off Memory Integrity as and when you want. Enjoy!
Related Posts
- How to Fix a “This file does not have an app associated with it” Error on Windows
- How to Add OneDrive to Windows File Explorer
- How to Fix an Update Error 0x800705b4 on Windows
- How to Resolve “A JavaScript error occured in the main process” Error on Windows
- How to Fix the Network Discovery Is Turned Off Error on Windows
Все способы:
- Способ 1: Горячая клавиша
- Способ 2: Значок на панели задач
- Способ 3: Поиск через меню «Пуск»
- Способ 4: Контекстное меню «Пуска»
- Способ 5: Утилита «Выполнить»
- Способ 6: «Диспетчер задач»
- Способ 7: Папка рядом с кнопкой выключения в «Пуске»
- Способ 8: Исполняемый файл
- Вопросы и ответы: 1
Способ 1: Горячая клавиша
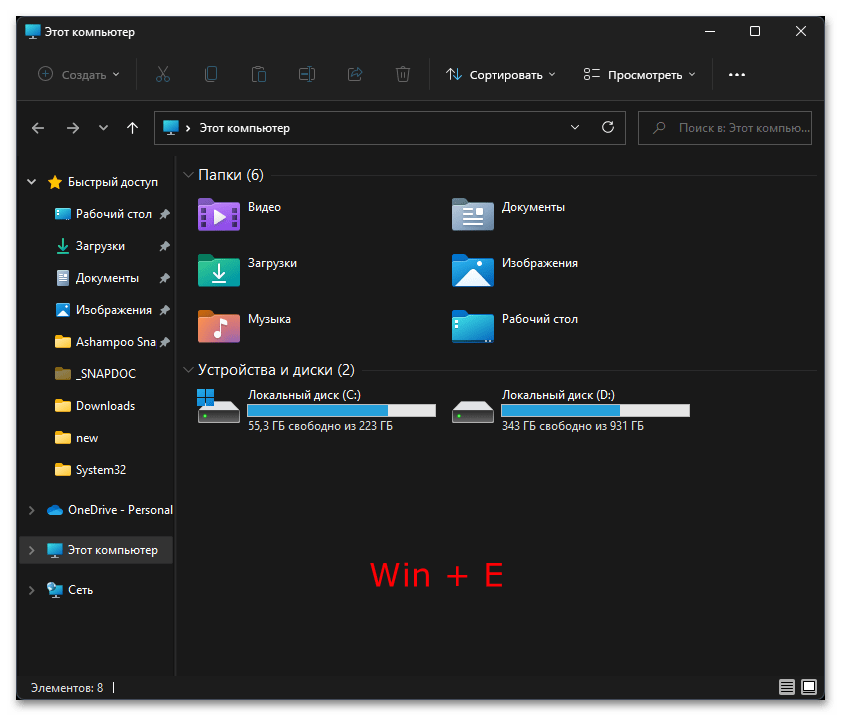
Самый простой метод вызова «Проводника» в Windows 11 — использование стандартной горячей клавиши. Это позволяет открыть новое окно без обращения к графическому интерфейсу, а также метод может быть полезен в тех случаях, когда графический интерфейс вовсе не откликается. Сама горячая клавиша имеет вид Win + E и назначена по умолчанию, поэтому понадобится только нажать ее и подождать буквально секунду, после чего на экране появится соответствующее окно для навигации по дискам и файлам.
Способ 2: Значок на панели задач
Еще один быстрый вариант запуска «Проводника» в операционной системе заключается в нажатии по его значку, который по умолчанию находится на панели задач. Он обязательно там должен быть, если только не удален вручную пользователем, поскольку эта панель имеет заготовленный набор значков, добавляющийся сразу после установки Windows 11. Так вот, вам понадобится просто нажать по данному значку левой кнопкой мыши и дождаться появления соответствующего окна.
Способ 3: Поиск через меню «Пуск»
Существует несколько путей реализации данного метода, поскольку значок «Проводника» в «Пуске» можно найти по-разному. В следующей инструкции предлагаем ознакомиться со всеми ними, а вы сможете решить, какой из них использовать конкретно в своем случае.
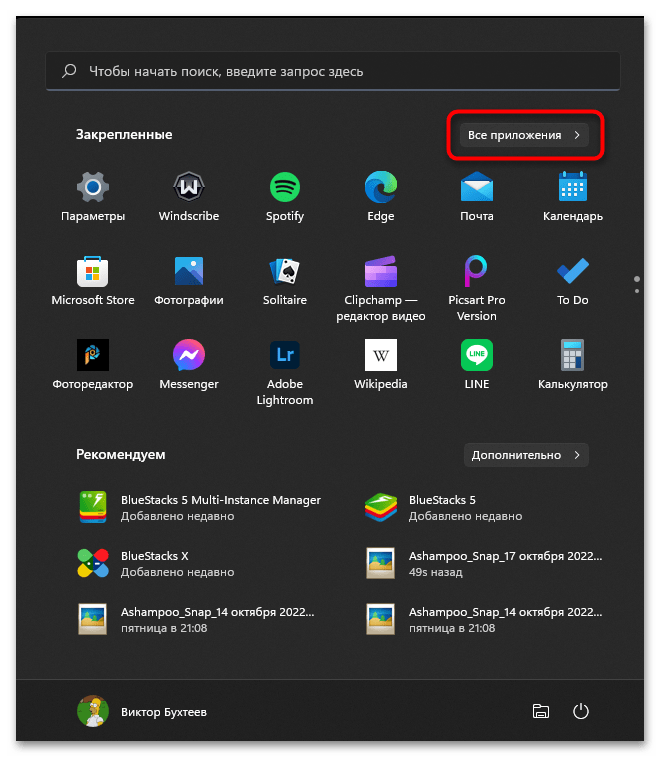
- Для начала откройте меню «Пуск» и ознакомьтесь со списком закрепленных значков, который обычно имеет две страницы. На одной из них найдите «Проводник» и используйте этот значок для запуска нового окна.
- Если значка нет в списке закрепленных, понадобится отобразить перечень всех стандартных приложений, для чего в меню справа есть кнопка с соответствующим названием.
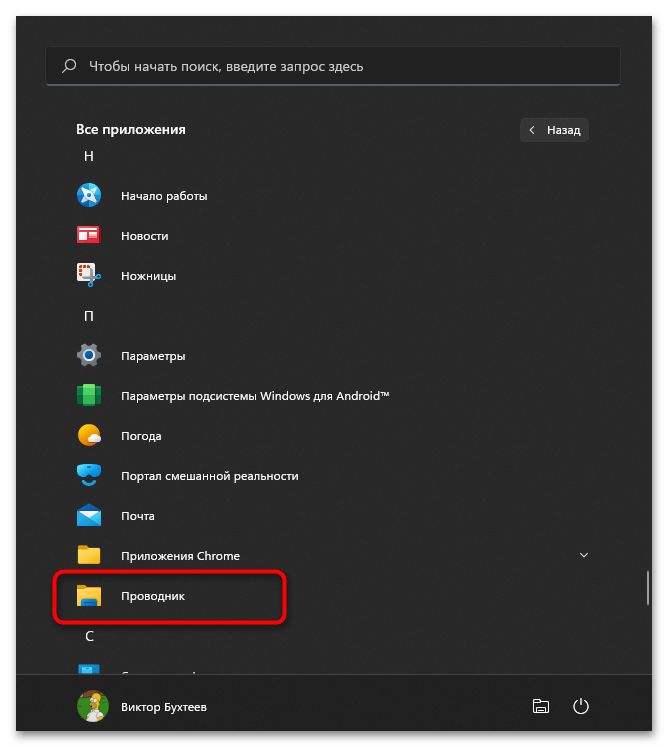
- Иконки приложений отображены по алфавиту, поэтому вам нужно прокрутить перечень вниз и отыскать «Проводник».
- Еще один вариант, который можно реализовать без долгого поиска по значкам, — активация строки поиска в «Пуске». Напишите в ней «Проводник», дождитесь загрузки лучшего соответствия и кликните по нему ЛКМ для запуска нового окна.


Способ 4: Контекстное меню «Пуска»
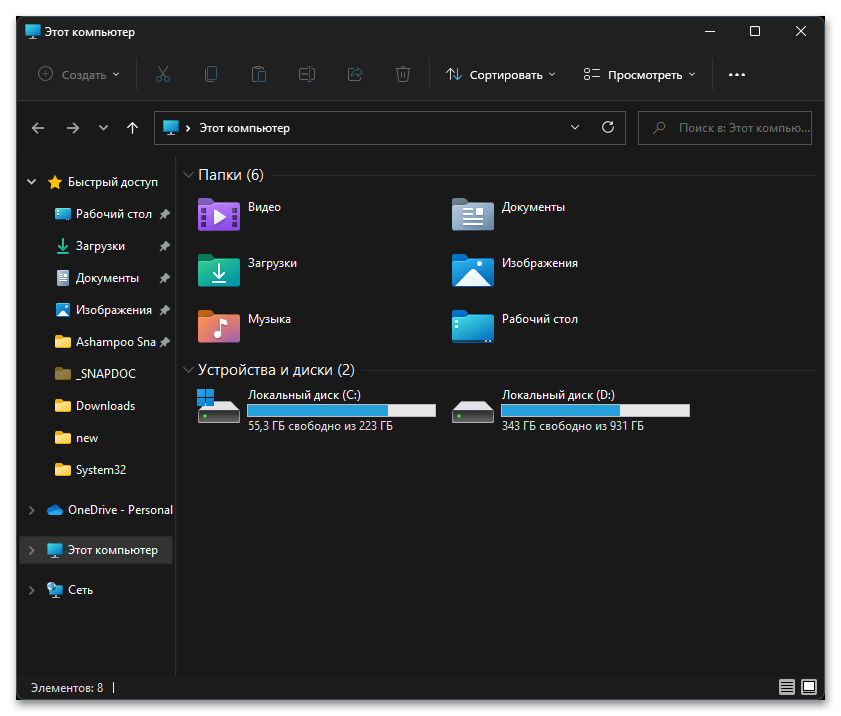
Вкратце остановимся на еще одном методе, который связан с меню «Пуск». Однако на этот раз его нужно не вызвать, а просто щелкнуть правой кнопкой мыши по самому значку, чтобы на экране появилось контекстное меню. Из него выберите пункт «Проводник».
После нажатия по данному пункту открывается новое окно, которое и является «Проводником». Местоположение по умолчанию зависит исключительно от того, что было выбрано пользователем в настройках. Обычно открывается раздел «Этот компьютер», из которого и можно переходить к просмотру содержимого логических разделов HDD или SSD.

Способ 5: Утилита «Выполнить»
Запуск «Проводника» через утилиту «Выполнить» зачастую нужен в тех случаях, когда у пользователя не получается обратиться к основным элементам графического меню Windows 11, чтобы через него отыскать приложение и использовать значок для запуска. Этот же вариант подходит в тех случаях, когда нужно не просто перейти к основному меню просмотра файлов, а запустить процесс «Проводника», организовав тем самым отображение панели задач и других связанных элементов. Вам понадобится использовать стандартную горячую клавишу Win + R для вызова «Выполнить», затем в поле ввода задать explorer и нажать Enter для подтверждения команды. Процесс будет запущен, и вы сможете нормально пользоваться компьютером.

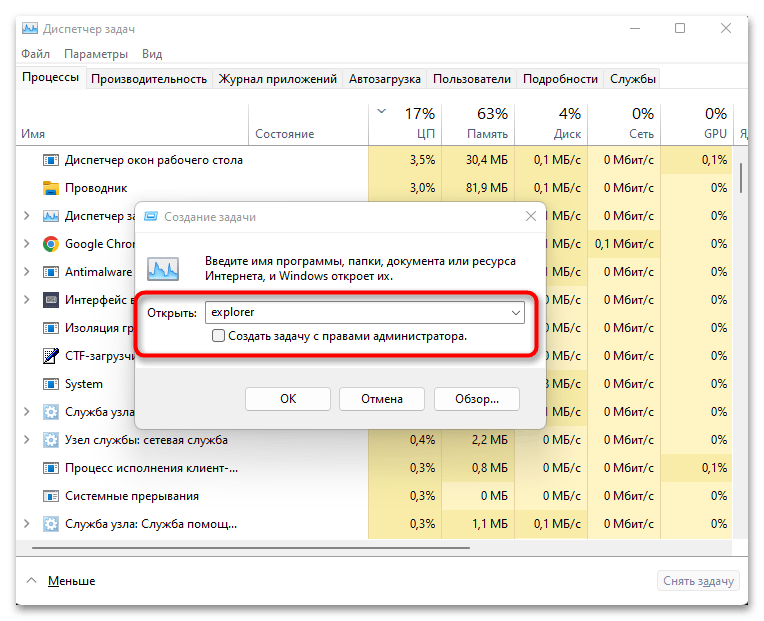
Способ 6: «Диспетчер задач»
Примерно то же самое, о чем было сказано выше, относится и к «Диспетчеру задач». Через него можно запускать различные процессы, что оптимально в тех ситуациях, когда процесс самого «Проводника» не был запущен или аварийно завершился. Давайте более наглядно разберемся с тем, как осуществляется создание новой задачи.
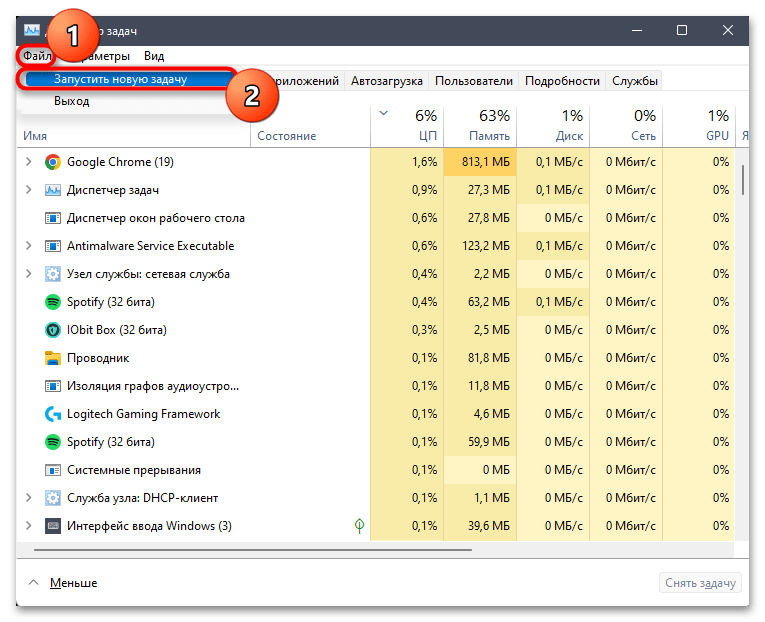
- Запустите «Диспетчер задач» через контекстное меню «Пуск» или используйте сочетание клавиш Ctrl + Shift + Esc, если панель задач недоступна.
- В окне вызовите меню «Файл» и из него выберите пункт «Запустить новую задачу».
- В окне создания задачи введите
explorerи нажмите Enter для подтверждения ее создания. - Если процесса «Проводника» не было среди запущенных, значит, после его старта в Виндовс 11 должна отобразиться панель задач со всеми своими элементами. В тех случаях, когда «Проводник» и так уже работает, будет открыто основное окно для навигации.
Способ 7: Папка рядом с кнопкой выключения в «Пуске»
В прошлой Windows пользователи получали доступ к некоторым приложениям в операционной системе через кнопки, которые отображались слева в меню «Пуск». В текущей ОС разработчики решили отказаться от такого оформления, однако позволяют вручную добавить необходимые папки рядом с кнопкой выключения. Есть возможность и добавления папки «Проводника», чтобы использовать кнопку для быстрого вызова нового окна.
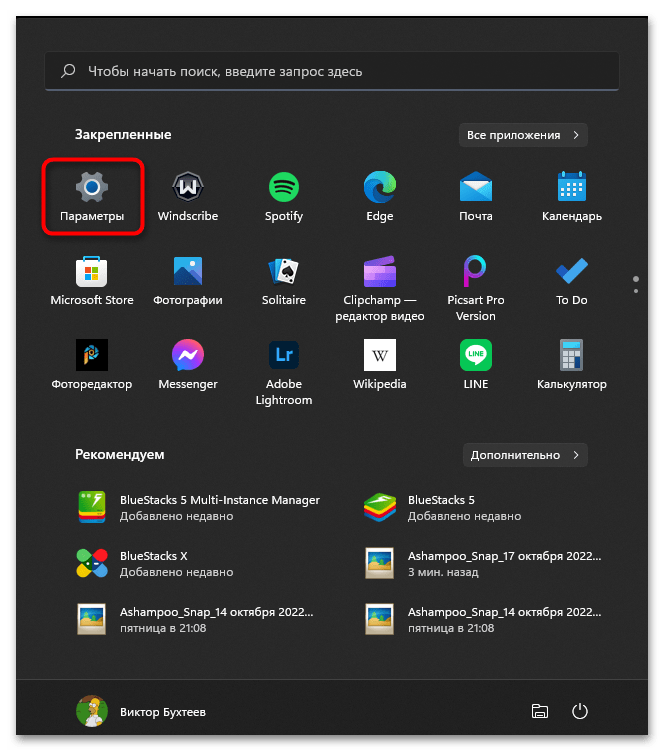
- Откройте меню «Пуск» и перейдите в приложение «Параметры» при помощи закрепленного значка.
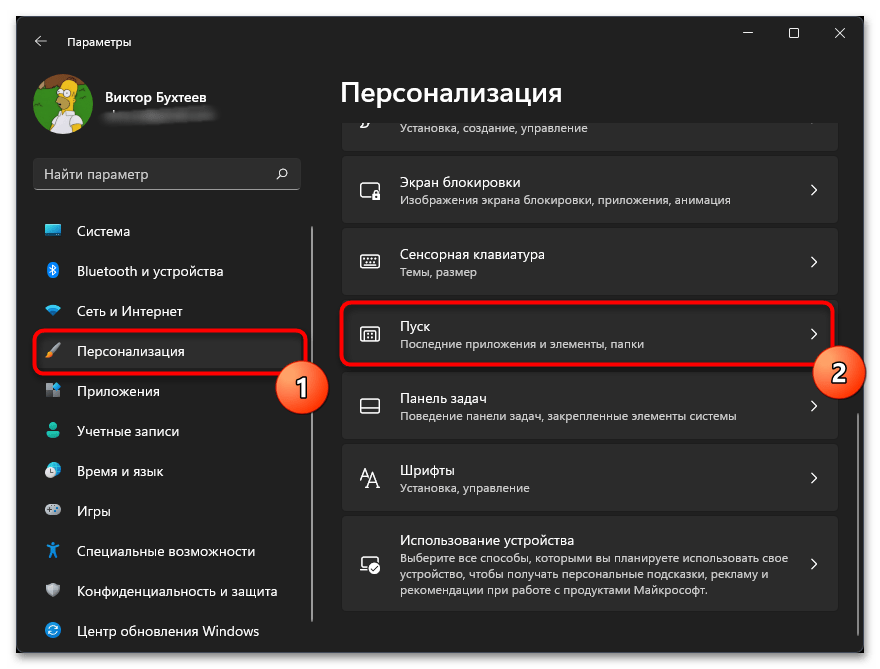
- На панели слева выберите раздел «Персонализация» и откройте «Пуск».
- Прокрутите список с настройками вниз и отыщите в нем «Папки».
- Теперь остается только переместить переключатель «Проводник» в состояние «Вкл.», чтобы соответствующая папка появилась в возле кнопки выключения.
- Снова откройте «Пуск» и теперь используйте новую кнопку для быстрого перехода к «Проводнику».


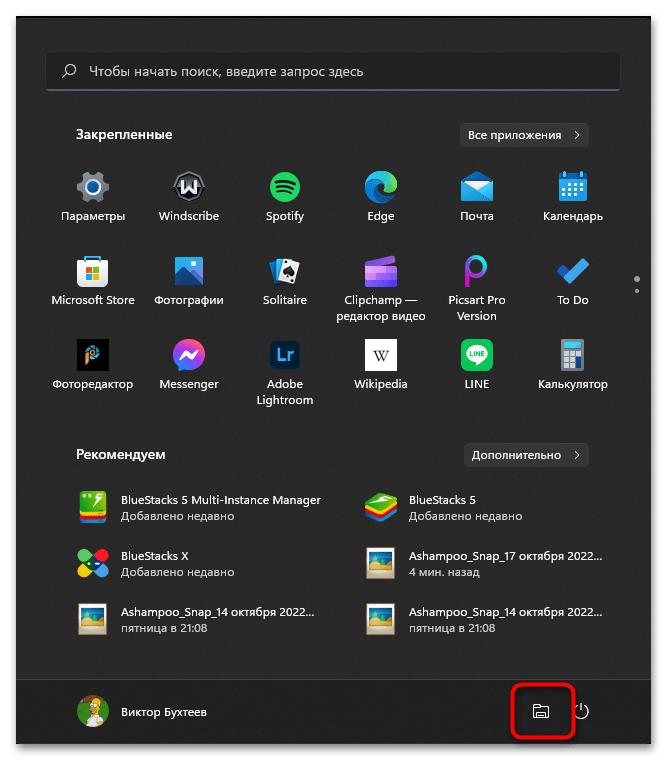
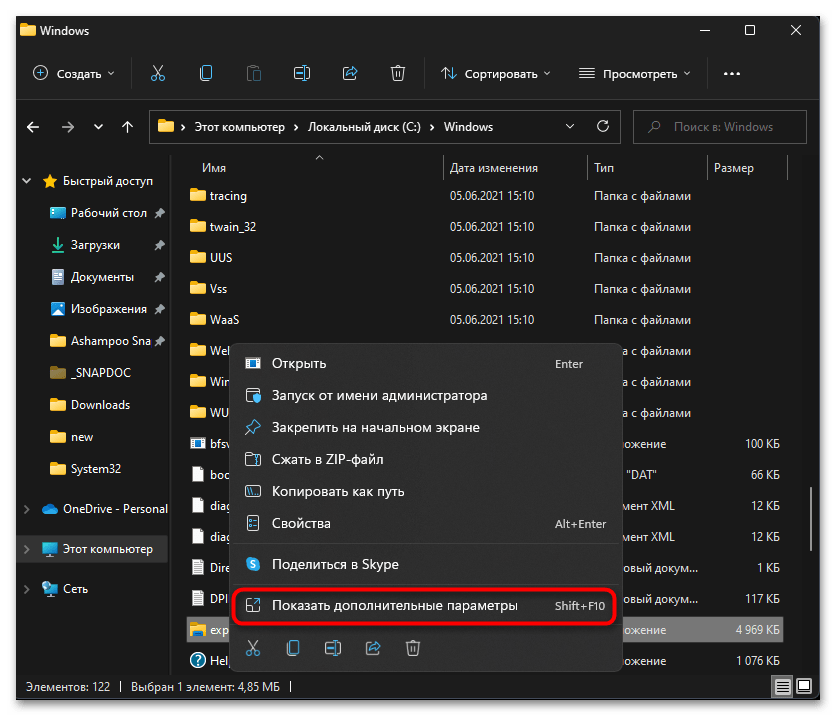
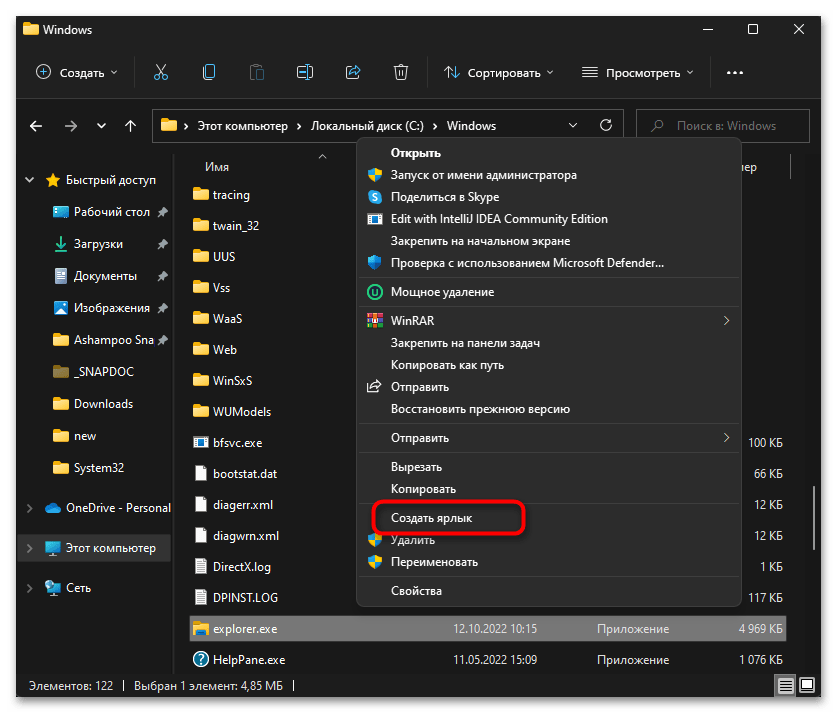
Способ 8: Исполняемый файл
У каждого приложения в операционной системе Windows есть свой исполняемый файл, который и используется для его запуска при нажатии по значкам или иконкам в графическом интерфейсе. Вы можете найти такой файл «Проводника» и использовать его для открытия нового окна, если это вдруг понадобится. Вместе с этим поддерживается и создание ярлыка на рабочем столе, о чем тоже будет сказано в следующей инструкции.
- Вам понадобится открыть системную папку «Windows» в том логическом разделе жесткого диска или SSD, на который как раз и установлена Виндовс 11.
- В папке отыщите «Explorer.exe» и нажмите дважды по данному исполняемому файлу для его запуска.
- Если вас интересует создание ярлыка на рабочем столе, щелкните по объекту правой кнопкой мыши и из появившегося контекстного меню выберите пункт «Показать дополнительные параметры».
- В старой версии контекстного меню отыщите «Создать ярлык» и нажмите по данному пункту.
- Вы будете уведомлены о том, что создание ярлыка в данной папке невозможно, поэтому он будет помещен на рабочий стол. Теперь вам остается только дважды кликнуть по новому ярлыку ЛКМ, чтобы запустить «Проводник».


Наша группа в TelegramПолезные советы и помощь

Windows 10 and 11 have a security feature called Core Isolation Memory Integrity that isolates important core processes from malicious software. It accomplishes this by running those core processes in a virtual environment.
In this post, we provide solutions to the Memory Integrity greyed out or won’t turn on or off for Device Security in the Windows Security app on Windows 11 and Windows 10 computers.
Recently some windows users are facing this issue where when they open their windows security, they get the following message:
Memory integrity is off your device may be vulnerable
And later when they try to fix it, they get an error saying
“memory integrity can’t be turned on try resolving any incompatibilities with your drivers”
Theis error usually occurs when you have some incompatible drivers installed in your windows 10 or windows 11. In this article we will see …
How to fix memory integrity cannot be turned on windows
By removing all those incompatible drivers.
Before we start make sure your windows 10 or 11 is up to date to the latest version.
To check for update open settings by pressing [windows] + [i] and then go to the windows Update section, it should show that you’re up to date, if it shows any update available click on update and restart your windows.

Solution 1: Delete incompatible drivers manually
In order to fix memory integrity cannot be turned on in windows, we will be manually deleting all the incompatible drivers one by one, to do that follow the steps:
- First open setting and then go to privacy and security
- After that go to windows security and click on open windows security
- Under device security click on go to settings
- From there click on review incompatible drivers
- You’ll find a list of incompatible drivers listed with their names.
-

- Now press the [windows] + [x] key and from the list of menus click on device manager.
-

- After opening device manager click on view and the click on devices by driver
-

- There you’ll find a list of drivers by their name, now find those incompatible drivers’ names from step 5 and delete it from the device manager.
-

- To delete those drivers simply find that incompatible driver from step 5 and copy their published name and look for that published name in device manager, after that right click on that driver
- Now click on remove driver and after that check both boxes and click on remove.


Do this for all the incompatible drivers and after that restart your computer, it should solve memory integrity cannot be turned on error.
In case you find this method a little intimidating and are looking for an easy solution to remove those drivers, the below solution might be a good fit.
Solution 2: Delete incompatible automatically using DriverStore explorer
To delete incompatible drivers using driver explorer follow the steps:
- First visit here and download driverstore explorer zip file
-

- Now extract the zip folder somewhere and install the Rapr application.
-

- Now open the app and after a few seconds of scanning it will show you all the drivers.
-

- Now open setting by pressing [windows] + [i]
- then go to privacy and security
- After that go to windows security and click on open windows security
- Under device security click on go to settings
- From there click on review incompatible drivers
- You’ll find a list of incompatible drivers listed with their names.
-

- Now from step 4 look for all the incompatible drivers and uninstall them one by one.
-


After deleting all the incompatible drivers, restart your computer.
Hopefully it should fix your memory integrity won’t turn on issues.
you can also watch this video for better understanding
Also read:
How to take full page scrolling screenshot in windows 10 or 11 easily
steam_api64.dll : Free Download for windows
[Fixed] minecraft stuck on white loading screen problem in windows 10 edition
How To Fix blinking Red Light On Spectrum Router in 2022: Easy Guide
In addition to being a journalist and an editor for windows ground, He is a programmer, writer, and tech enthusiast. He loves exploring new technologies and writing technical how-to tips to help people solve their daily life tech problems. He can be found on Twitter @slim-python
If you come across the Memory integrity is off Windows 11 issue don’t worry you are not alone. Many users complained about the issue and failed to enable it on their Windows devices. The possible reasons behind the issue can be faulty drivers, faulty Windows security Apps, corrupted system files, interruption from third party apps, etc.
Although the ‘device security memory integrity is Off’ issue can be frustrating but it is easily fixable. The following guide explains step-by-step solutions for the issue. So without wasting time, let us begin with our troubleshooting guide.
How to Fix Memory Integrity is Off Windows 11 Issue
The following section explains solutions for Memory Integrity is off Windows 11 problem. No need to implement all the solutions, just move down the list until the problem is fixed.
Fix 1: Uninstall Drivers or Programs Associated
If you are able to determine the program that is running in the background based on the name of the driver, then apply the simple steps to uninstall the faulty app from your personal computer and resolve the issue.
Windows 11 Memory integrity is off issue can be fixed through the underlying steps:
Step 1: Use your right mouse button on the Windows icon i.e Start menu.
Step 2: Select Apps and Features present in the drop-down menu that appears after right-clicking.
Step 3: Scroll down the list by analyzing one program at a time until you reach the app.
Step 4: When using Windows 11/10, uninstalling applications is the only way to restore memory integrity.
Step 5: If the app is located then click the Uninstall button.
If the choice for Apps and Features does not function, try the following steps:
Uninstall Drivers:
Step 1: To access the Device Manager, locate the Search icon present on your Windows taskbar & then type its name.
Step 2: Choose Device Manager from the options presented as a result in the Search window.

Step 3: On the top of your Device Manager select the View tab to display any hidden devices.

Step 4: Now, expand each area of the device one at a time. Right-click on any of them and then choose the Uninstall Device.
Step 5: Simply selecting the Uninstall Device option will delete the faulty device together with its underlying driver.
If the memory integrity is off Windows 11 incompatible drivers issue remains, move to the next solution.
Also Read: How to Solve Exception_Access_Violation Error in Windows PC
Fix 2: Reinstall the Windows Security Program
Because of the problems with the Windows Security software, you might come across the Memory integrity is off Windows 11 issue. Resetting this software to its factory settings is one method you can use to fix the issues.
This eliminates any custom configurations stored within the application and fixes any issues that may be the source of the Memory Integrity issue you are experiencing.
You may fix your Windows Security application by using one of the built-in options that come with Windows. When you do this, you also protect your computer against malicious software and viruses.
To resolve the Windows 11 device security memory integrity is off issue apply the following steps:
Step 1: Simply hit the Windows key and the letter I to open the Settings menu.
Step 2: Choose Apps from the sidebar present on the left side, then Apps & Features from the right panel
Step 3: Click the three dots that appear next to Windows Security on the list, and then select Advanced Settings from the drop-down menu that appears.
Step 4: On the subsequent screen, select the Reset option.
Step 5: In the new prompt that appears, select the Reset option.
Step 6: After you have finished resetting the Windows Security program, you will need to reboot your computer.
Once the system restarts check if the Memory Integrity is off Windows 11 issue is fixed. In case the issue persists, move on to the next method.
Also Read: How to Fix 403 Forbidden Error Windows 10 {Fixed}
Fix 3: Make sure Windows 11 is up to date
Microsoft frequently releases new updates for the Windows 11 operating system. These updates allow you to fix flaws in the system, obtain new features, and improve the quality of your experience as a whole. Similarly, the memory integrity is off your device may be vulnerable
issue can also be a result of a malfunction in the system. In this scenario, you will need to bring your Windows software up to the most recent version in order to fix the problem.
The following instructions must be applied to resolve the Windows security memory integrity is off issue:
Step 1: To launch Settings, press and hold the Windows key & the letter I.
Step 2: Choose Windows Update from the list of options on left panel.
Step 3: Select the option to Check for updates located on right side of the Settings window.

Step 4: Get the latest updates by downloading and installing them.
Step 5: Restart your PC.
In case the memory integrity is off Windows 11 issue is intact move on to the following fix.
Also Read: How to Fix Video Scheduler Internal Error on Windows 10 [Solved]
Fix 4: Execute Clean Boot
If none of the solutions helped you with the memory integrity is off Windows 11 incompatible drivers issue try a clean boot.
Here are the simple steps for the same:
Step 1: Open run and type MSCONFIG into the box.

Step 2: Make your selection under System Configuration.
Step 3: Navigate to the Services tab, and then put a checkmark in the box next to the option to Hide all Microsoft Services.

Step 4: Now, pick the “Disable All” option.

Step 5: After you have clicked the Apply button, the utility will inquire whether you would want to Reboot or Restart the PC.
Step 6: After the restart, launch Windows Security and make an attempt to enable the Memory integrity feature there.
Hopefully, once the system restarts your issue of Memory integrity is off Windows 11 will be fixed.
Also Read: SOLVED whea_uncorrectable_error Windows 10
Memory Integrity is Off Windows 11 Problem: FIXED
We hope with the help of the solutions above you were able to address the Memory Integrity is off your device may be a vulnerable issue. Make sure the drivers installed on your device are regularly updated. To automate this process with 100% reliable and verified drivers use the Win Riser Driver Updater tool. It helps in keeping all your system drivers updated with just one click.
Comment down below if you think we missed out on any of your concerns related to Memory Integrity is off Windows 11 issue. Also, leave your questions or remarks below. If you find the guide helpful don’t forget to subscribe to our blog for more tech solutions.
Does the memory integrity feature in Windows Security appear grayed out? Is your PC saying, «Memory integrity is off. Your device may be vulnerable,» but you can’t turn on the toggle? The memory integrity feature prevents malicious software from accessing high-security processes when your device is invaded by malware.
But what causes this feature to be grayed out? In this article, we’ll discuss why you cannot turn on this feature and how to identify and fix the underlying problem.
What Causes Memory Integrity to Become Grayed Out on Windows 11?
The primary cause of memory integrity not working on Windows 11 is your drivers. When they become outdated or corrupt, you are likely to run into this problem. Likewise, if your system is outfitted with incompatible drivers, the memory integrity feature may stop working.
The error message itself usually explains where the problem lies, so fixing the problem is simple. You can fix faulty drivers, repair corrupted system files, update your operating system, revert an update, or remove incompatible drivers. Let’s discuss some fixes to get the feature working again.
As you apply each fix listed below, go to the Windows Security app and try enabling memory integrity again. It will help you identify what was causing the problem and fix it quickly without going through unnecessary fixes.
1. Identify and Fix Driver Issues
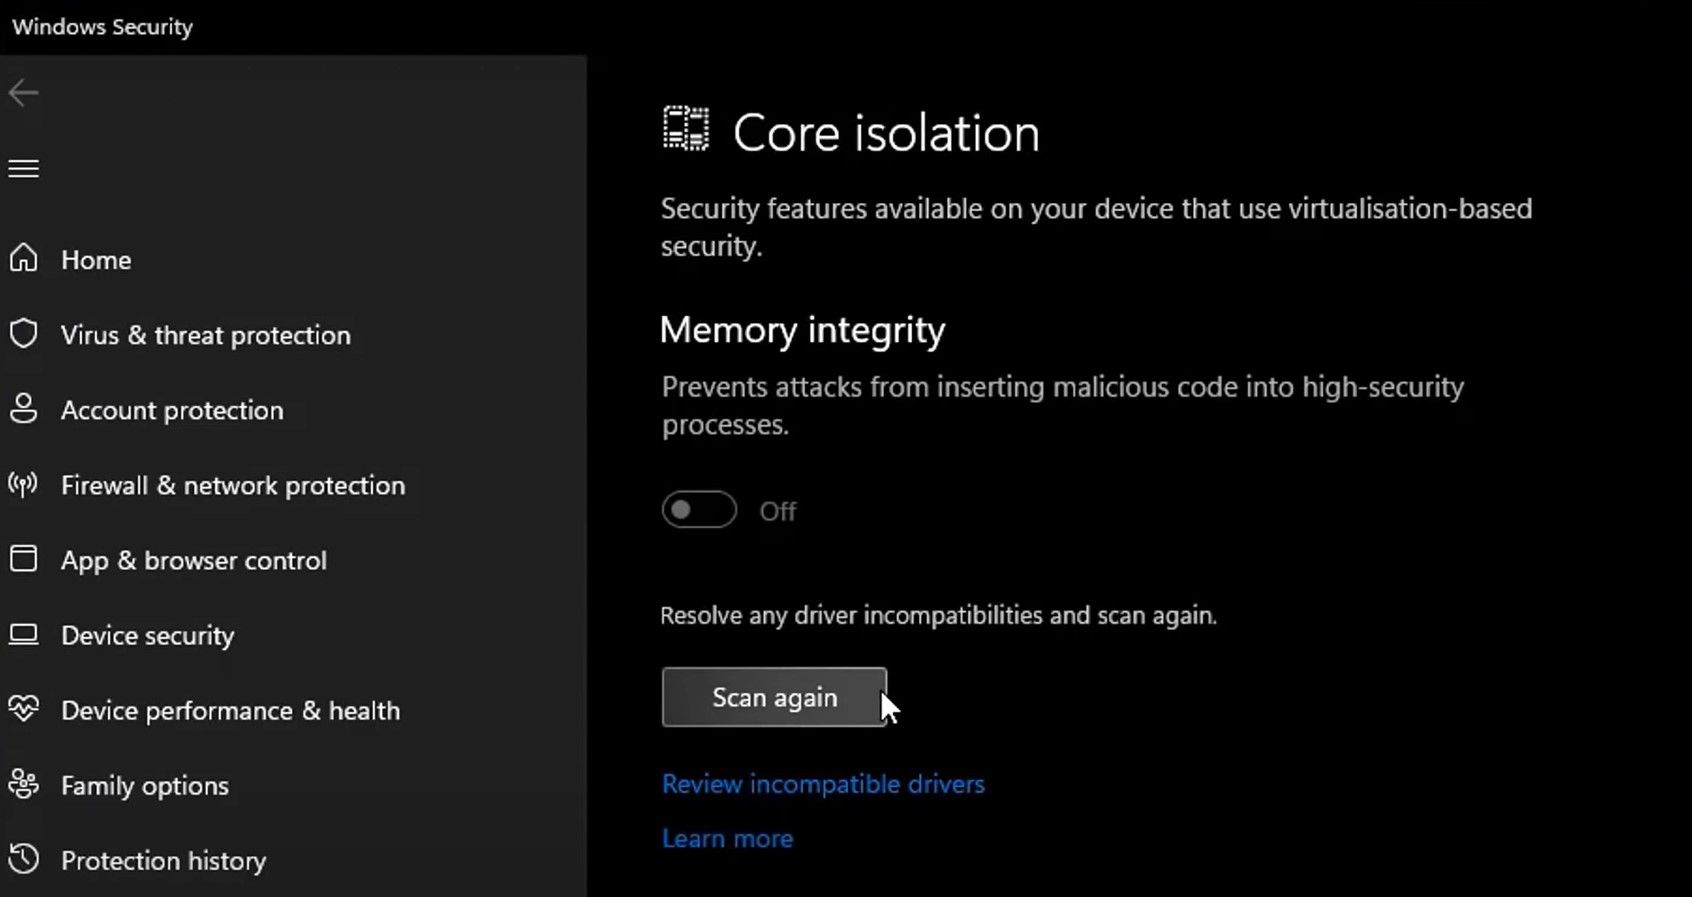
In most cases, the primary cause of the problem under discussion is outdated or incompatible drivers, so let’s start by checking your drivers. To begin with, uninstall any third-party drivers you installed recently. After that, open the Windows Security app, click on the Device security tab from the left sidebar, and click on Core isolation details.
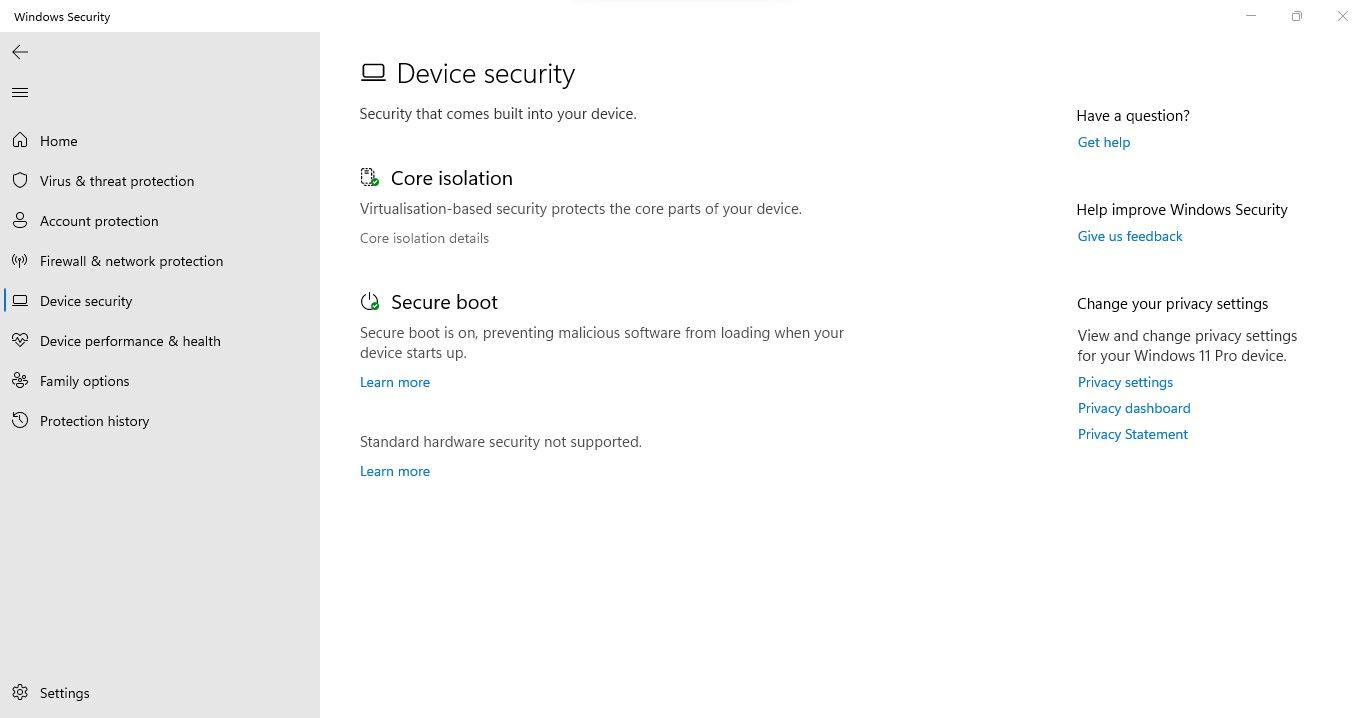
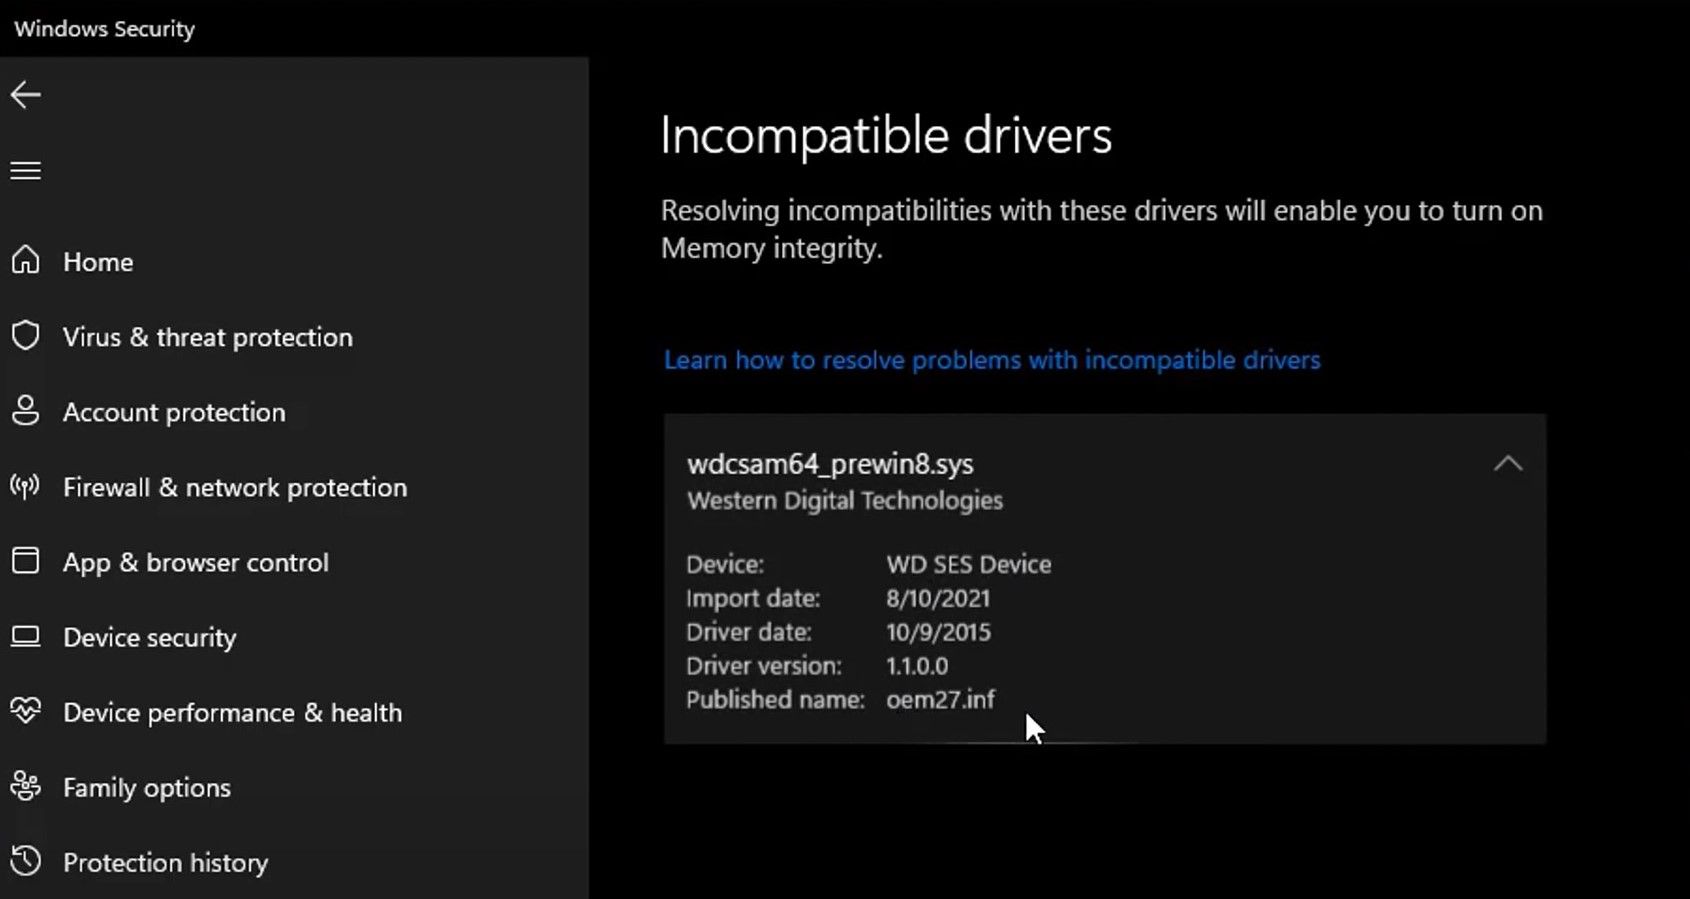
Here, enable Memory integrity. If you encounter an error saying, «Resolve any driver incompatibilities and scan again,» click on the Review incompatible drivers link.
Then, note down any drivers Memory Integrity suspects are incompatible.
Following the above checks, follow these steps to rule out driver-related problems:
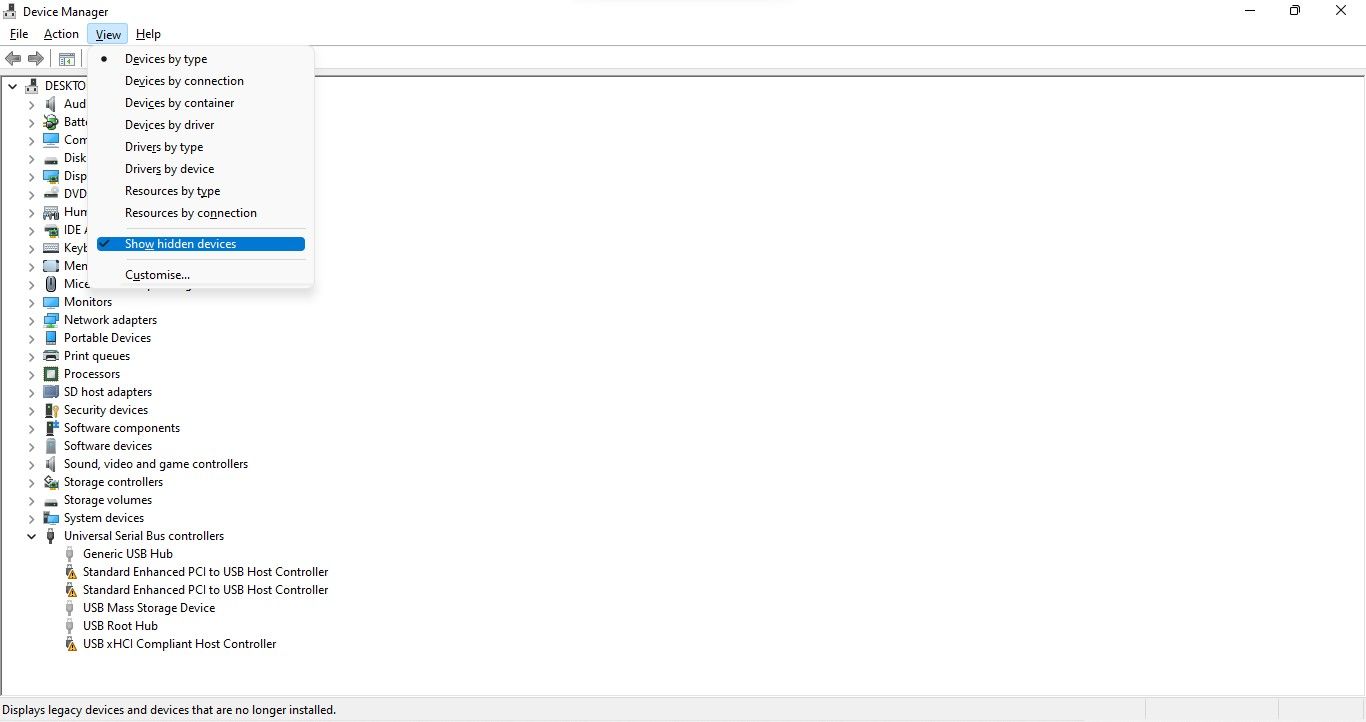
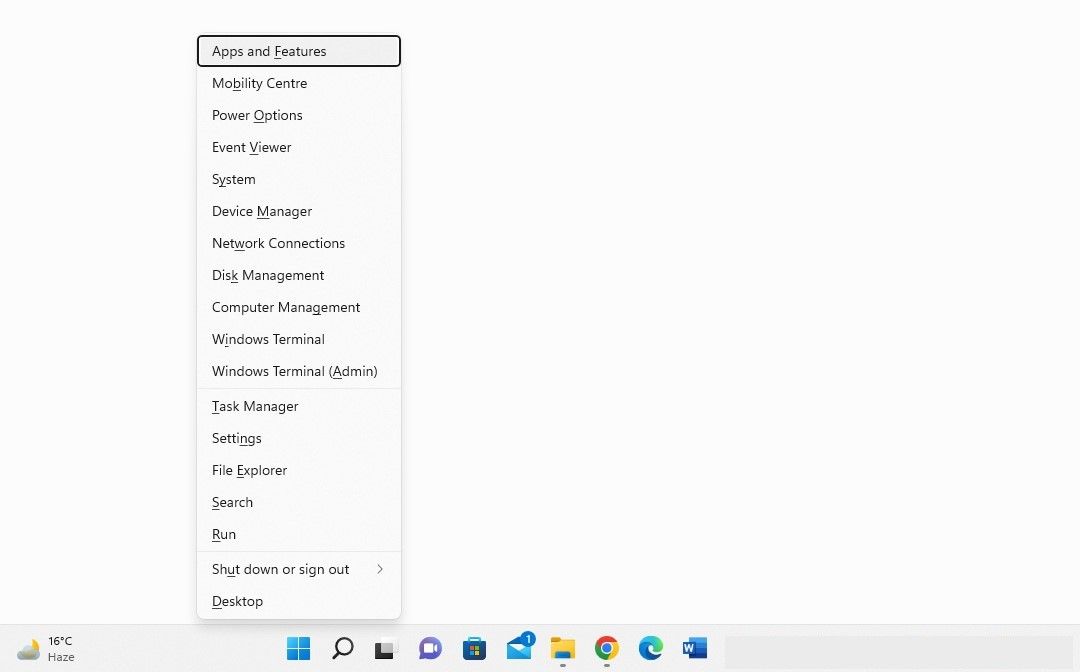
- Right-click on the Windows Start button and select Device Manager.
-
Go to the View tab and click Show hidden devices.

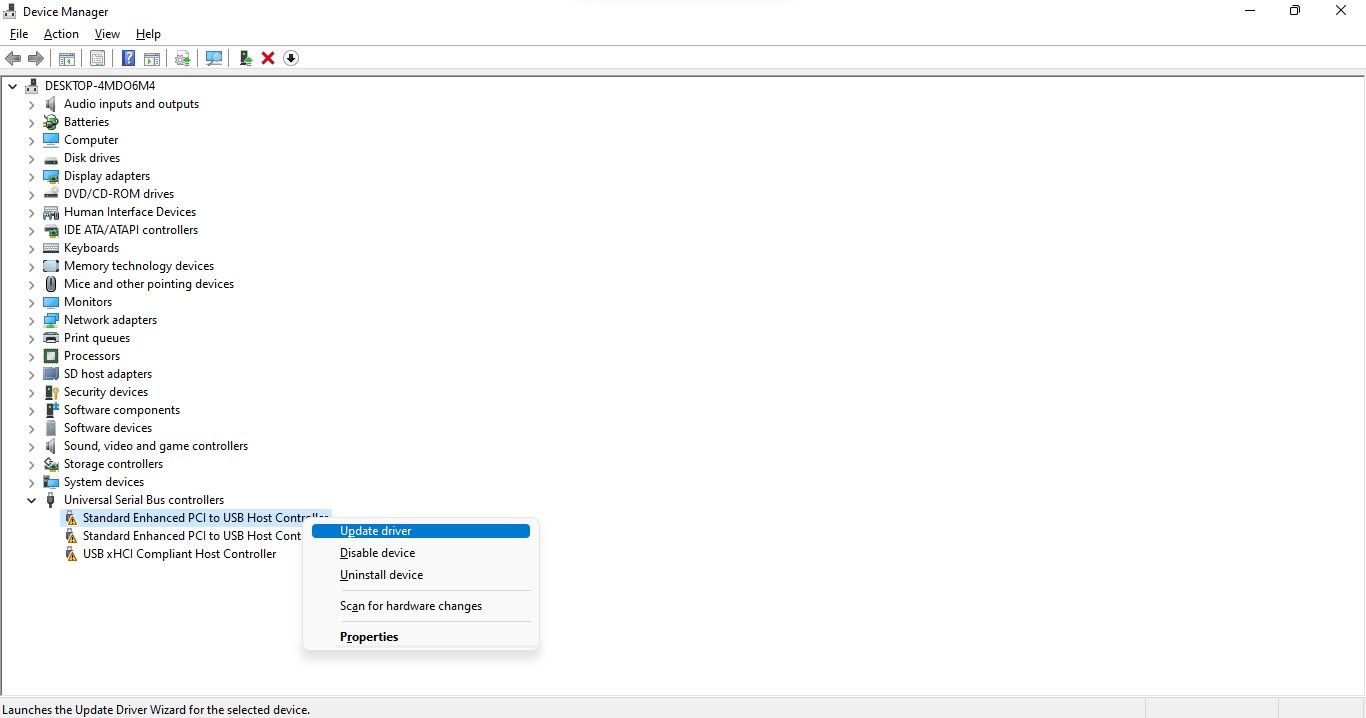
- Look for the device that has a yellow triangle on it with an exclamation mark inside it or the driver(s) with problems indicated by the Memory integrity.
-
Right-click on that device and select Update driver.

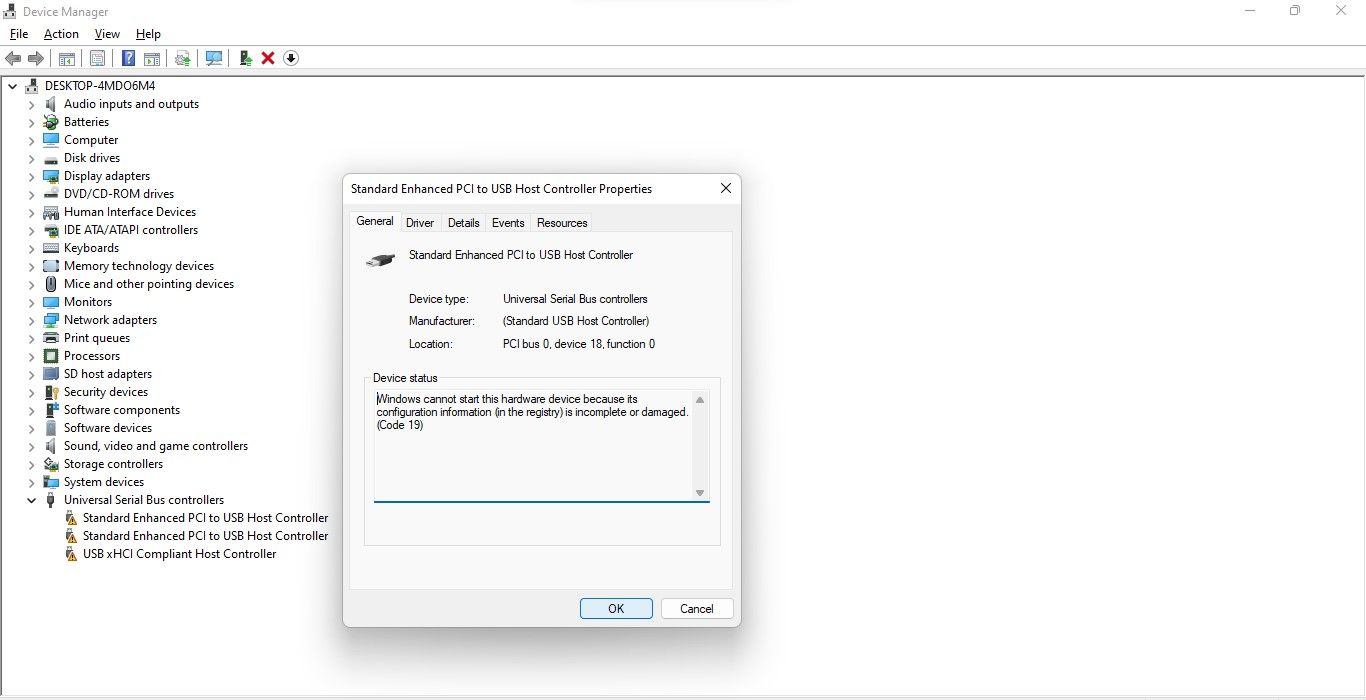
- If updating the driver does not solve the problem, right-click it and select Properties.
-
Under the General tab, read the message in the Device status box.

- Take note of the error code and visit the official Microsoft Support documentation where all Device Manager-related errors are listed.
- Find the relevant code information and apply the Microsoft recommended fix to fix the problem.
What if applying the Microsoft recommended fix doesn’t fix the problem with the driver, or there is no driver with a yellow triangle? In that case, you’ll have to use third-party software to locate and uninstall the incompatible or corrupt driver.
2. Find and Uninstall Incompatible Drivers
If you cannot locate the incompatible driver in Device Manager, use a third-party program, such as Autoruns, to identify corrupt or incompatible drivers and uninstall them.
You can follow these steps to do that:
- Download Autoruns from the Microsoft website.
- Unzip the compressed file.
- To run the app as an administrator, right-click on its executable file and select Run as administrator.
- Go to the Drivers tab.
-
The drivers with issues will be highlighted, so locate them.

-
Once they have been located, uncheck the box to disable them.

- If any driver gives an error when disabling, right-click it and select Delete.
- Install the latest drivers from the official website or reboot your device to let Windows install them automatically.
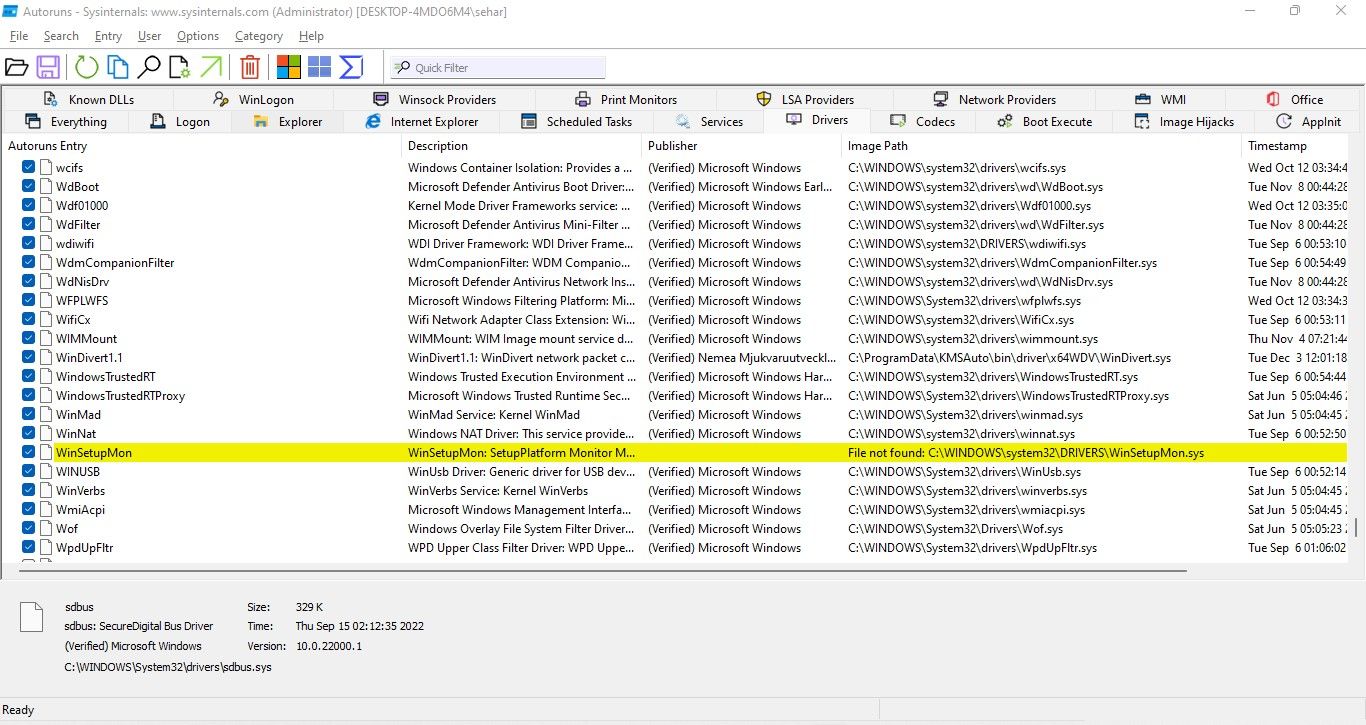
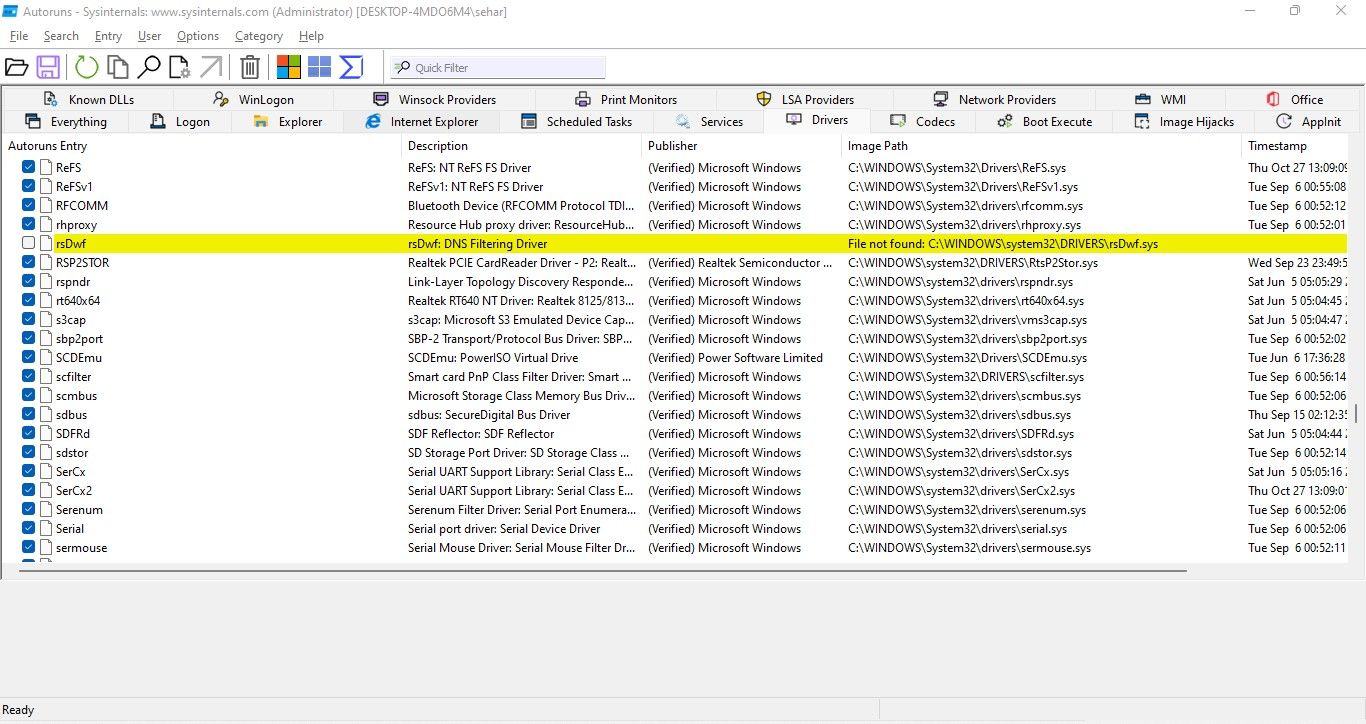
If you can’t locate drivers identified as incompatible by Memory integrity before, the Autoruns app will facilitate finding and removing them.
3. Uninstall Relevant Apps
If uninstalling the incompatible drivers does not work, you should uninstall the apps or software you installed from the same manufacturer as the drivers. Follow these steps to do that:
-
Right-click on the Windows Start button and select Apps and Features.

- In the list of installed apps, locate the software from the same manufacturer.
-
Upon finding them, click on the three vertical dots next to them and select Uninstall.

Uninstalling the relevant apps from the same manufacturer should resolve the issue. If it does not, ensure it isn’t a Windows Update issue.
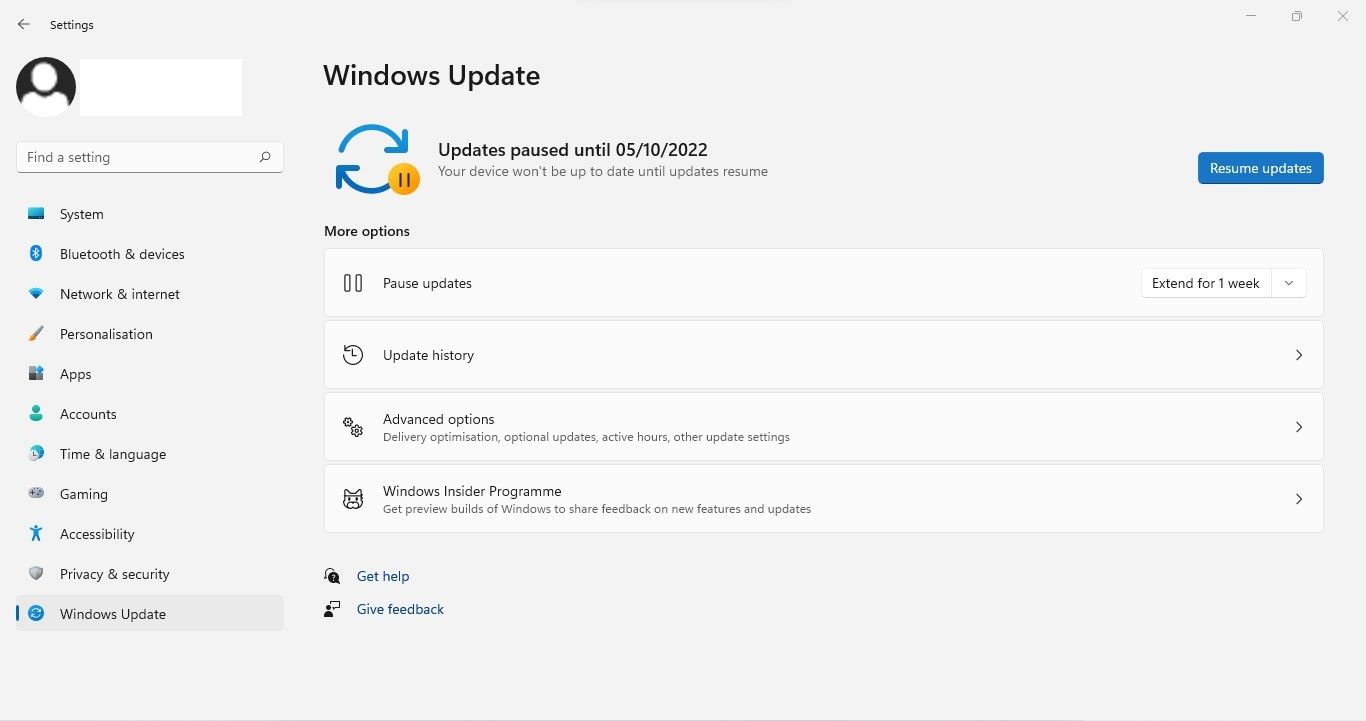
If incompatible or corrupt drivers aren’t the problem, you should ensure your system is up-to-date and no updates are pending. To do this, right-click on the Windows Start button and select Settings. Next, navigate to Windows Update and click the Check for updates button on the right.
If they are paused, click Resume updates to let Windows update your system.
Moreover, if you’ve encountered a problem after installing an update recently, you should uninstall it. Our guide on uninstalling updates in Windows 10 and 11 explains how to do it. If pending or recently installed updates are not to blame, apply the next fix.
5. Fix Corrupt System Files
Corrupt system files are also a major cause of unforeseen issues with Windows features. The Memory integrity feature may have stopped working after a virus invaded your device and corrupted your system files. Thus, you must ensure that your system files are intact to rule out this possibility. An SFC scan can be helpful in this case.
Search for «Command Prompt» in Windows Search, right-click on the Command Prompt in search results and click Run as administrator. Then type «SFC /scannow» and press Enter.
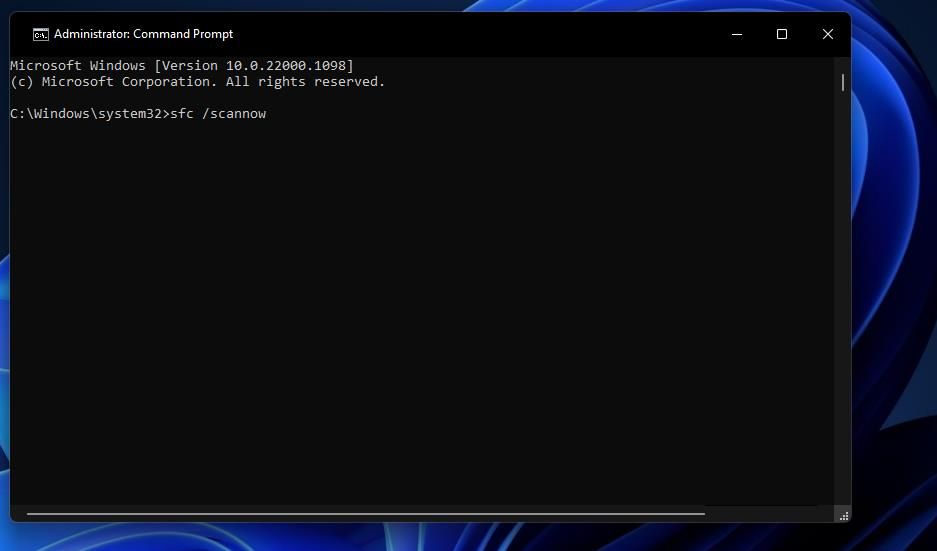
Once the scan is complete, refer to our guide on repairing corrupt system files with Windows built-in tools so you can properly analyze the results.
6. Reset the Windows Security App
Issues with the Windows Security app can also interfere with the functionality of security features, like memory integrity.
One way to rule out such issues is to reset the Windows Security app. Keep one caveat in mind, though: resetting Windows Security will revert any security customizations you’ve made to date. If you don’t mind that, you can reset Windows Security.
The process of resetting Windows Security is similar to resetting any other Windows app. Do that, and hopefully, the grayed-out memory integrity problem will resolve itself.
7. Alternative Method to Enable the Memory Integrity Feature
Using the Windows Security app isn’t the only way to enable Windows’ memory integrity feature. You can also adjust this setting within Registry Editor, which lets you access and modify Windows OS configuration settings. Therefore, if you are unable to turn on this feature from Windows Security, try enabling it from the Registry Editor.
Follow these steps to enable the memory integrity feature from Registry Editor:
- Type «Registry Editor» in Windows Search and open the Registry Editor.
-
Navigate to the following path:
Computer\HKEY_LOCAL_MACHINE\SYSTEM\CurrentControlSet\Control\DeviceGuard\Scenarios\HypervisorEnforcedCodeIntegrity - Right-click on the Enabled key in the right pane and select Modify…
-
Enter «1» under Value data if it is not already there.

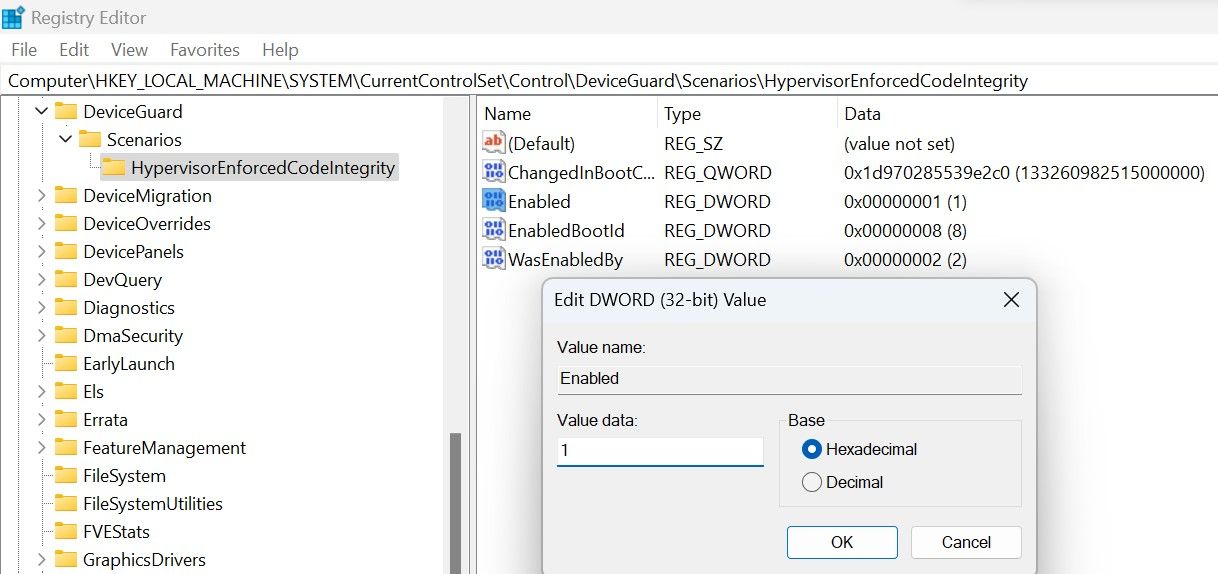
Misconfiguring keys in the Registry Editor can have unintended consequences. If you are unfamiliar with tweaking the registry, you can skip this step.
Turn On the Memory Integrity Feature Again
Memory integrity is a critical security feature, and if it is not enabled, it can seriously compromise the security of your device. Hopefully, by applying the fixes mentioned in the article, you will solve the problem and easily turn on Memory Integrity.