
Функция сжатия оперативной памяти в Windows 10 и 11 используется для оптимизации использования RAM за счет хранения части страниц в оперативной памяти в сжатом виде (компрессия). Благодаря использованию сжатия памяти процессов вы можете размещать больше процессов в физической оперативной памяти без складывания их в своп файла на диске. Нужные данные извлекаются из более быстрой оперативной памяти быстрее, даже с учетом того, что на их сжатие/декомпрессию тратятся дополнительные ресурсы процессора. При использовании сжатия памяти уменьшается использование RAM, снижается нагрузка на жесткий диск за счет меньшего количества операций ввода/вывода к файлу подкачки и сохраняется ресурс SSD.
Впервые Microsoft добавила поддержку сжатия памяти процессом Memory Manager (MM) в Windows 10 и Windows Server 2016. В этой статье мы рассмотрим, как посмотреть статистику по использованию сжатой памяти в Windows, как включить или отключить сжатие RAM (если ваш компьютер работает медленно из-за высокой загрузки процессом Memory Compression).
Содержание:
- Получить информацию о сжатой памяти в Windows 10
- Процесс «Система и сжатая память» сильно грузит компьютер
- Как отключить сжатую память в Windows 10 и 11?
- Как включить сжатие памяти в Windows Server 2016/2019/2022 или Windows 10/11?
Если диспетчер памяти Windows обнаруживает нехватку памяти, он пытается сжать неиспользуемые страницы памяти вместо записи их в файл подкачки на диске и за счет этого освободить ресурсы RAM для других процессов.
Изначально поток, отвечающий за работу подсистемы сжатой памяти, находилась внутри процесса System, что было не очень удобно с точки зрения диагностики.
В современных билдах Windows (Win 10 20H2 и Windows 11) этот функционал выделен в отдельный процесс Сжатая память (Memory Compression), который не доступен в диалоговом окне диспетчера задач. Получить информацию об этом процессе можно с помощью PowerShell командлета Get-Process:
Get-Process -Name "Memory Compression"
Handles NPM(K) PM(K) WS(K) CPU(s) Id SI ProcessName
------- ------ ----- ----- ------ -- -- -----------
0 0 2184 53104 1 810,95 2388 0 Memory Compression

В диспетчере задач Windows можно просмотреть только текущий уровень использования компрессии памяти.
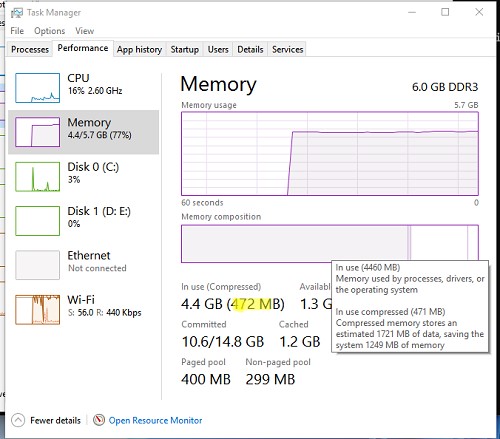
Перейдите на вкладку Производительность (Performance), выберите раздел Память (Memory). Текущее значение использования сжатой памяти отображается в значении параметра Использование (сжатая)/ In Use (Compression). В моем примере Windows использует 4.4 Гб памяти, из которой в сжатом виде хранится 472 Мб. Чтобы понять, какой объем данных получилось сжать, нужно навести мышкой на график Структура памяти (Memory composition):
Используется сжатой памяти (471 Мб). В сжатой памяти хранится примерно 1721 Мб данных, освобождая для системы 1249 Мб памяти.
Как вы видите, уровень компрессии памяти достигает почти 400%, так что экономия RAM довольно большая.
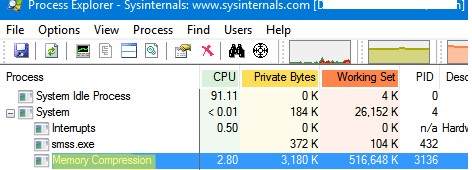
Вы можете найти более подробную информацию о нагрузке на CPU процессом Memory Compression и его размер в памяти Windows 10/11 с помощью утилиты Process Explorer.
Запустите Process Explorer и найдите процесс Memory Compression в дереве процесса System.
Процесс сжатия памяти обслуживаются службой SysMain (ранее – SuperFetch). SysMain обеспечивает сокращение объёма записи на диск путём сжатия и объединения страниц памяти. Если эта служба остановлена, то в Windows не используется сжатие RAM.
Вы можете проверить состояние службы SysMain с помощью PowerShell:
get-service sysmain

В большинстве случаев, если Windows работает нормально и на нем установлен достаточный объём оперативной памяти, процесс «Сжатой памяти» работает отлично и не требует никакого вмешательства.
Процесс «Система и сжатая память» сильно грузит компьютер
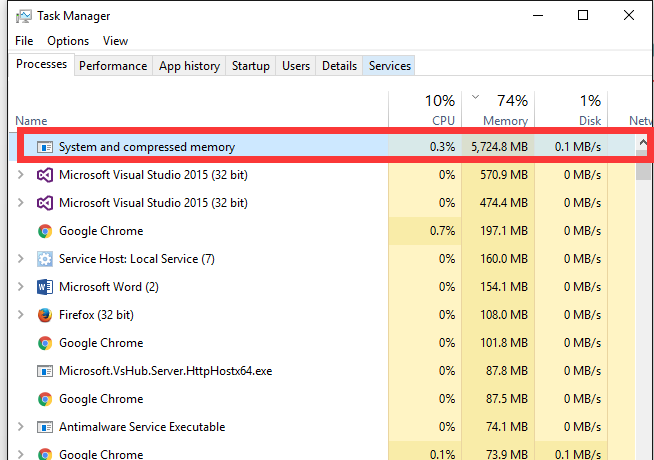
Служба SysMain и процесс Memory Compression в подавляющем большинстве случаем улучшают производительность компьютера. Но иногда случается, когда процесс «Система и сжатая память» начинает сильно грузить процессор или жесткий диск компьютера (вплоть до 100%, это видно в диспетчере задач), или же занимать в памяти слишком много места. Компьютер, при этом, естественно, начинает сильно тормозить и подвисать.
Что делать в этом случае?
Я приведу 2 совета, которые должны помочь исправить проблему с высокой загрузкой системы процессом «Сжатая память».
- Отключите файл подкачки системы (опция Без файла подкачки), перезагрузите компьютер, включите файл подкачки (опция Автоматически выбирать размер файла подкачки) и еще раз перезагрузитесь.
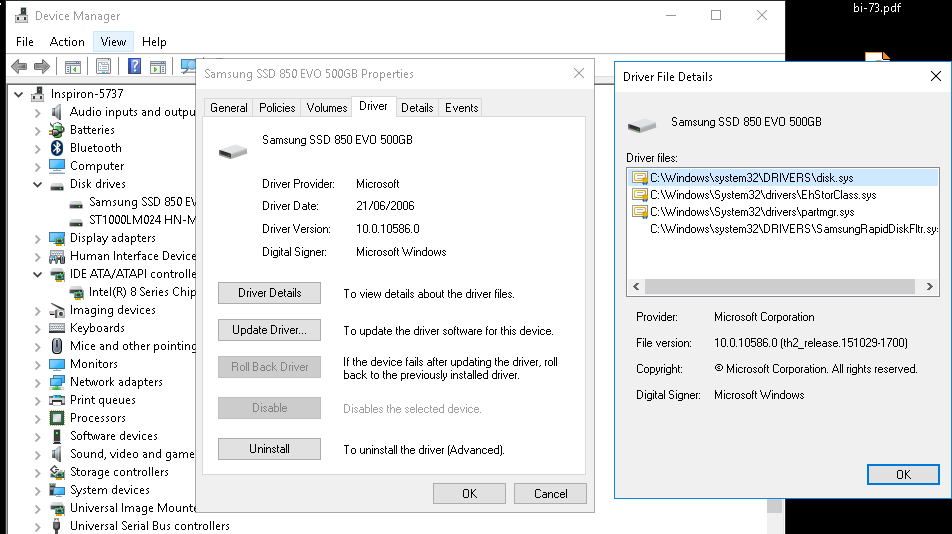
- Если проблема высокой загрузки процессом «Сжатая память» возникает только при выходе из режима сна или гибернации (а после перезагрузки пропадает), попробуйте скачать и установить с сайта производителя последние версии драйверов для ваших дисковых контроллеров (ACPI/AHCI/RAI SCSI), дисков и видеокарты. После чего желательно отключить автоматическое обновление драйверов.

Если указанные манипуляции не помогли, можно попробовать полностью запретить Windows использовать сжатую память.
Как отключить сжатую память в Windows 10 и 11?
Если вы хотите проверить стабильность работы Windows без использования функции «сжатой памяти», можно временно отключать эту функцию. Для этого, откройте консоль PowerShell с правами администратора. Проверьте, включена ли сейчас опция компрессии памяти:
Get-mmagent
ApplicationLaunchPrefetching : True
ApplicationPreLaunch         : True
MaxOperationAPIFiles         : 512
MemoryCompression            : True
OperationAPI                 : True
PageCombining                : True
Строка MemoryCompression : True указывает на то, что сжатие памяти включено.
Чтобы отключить сжатую память, выполните:
Disable-MMAgent –MemoryCompression
И перезагрузите компьютер
Restart-Computer
Проверьте, изменилась ли общая производительность системы после отключения сжатой памяти.
В некоторых случаях пользователям для исправления проблемы со сжатой памятью рекомендуют:
- Отключить службу SysMain или SuperFetch (
services.msc
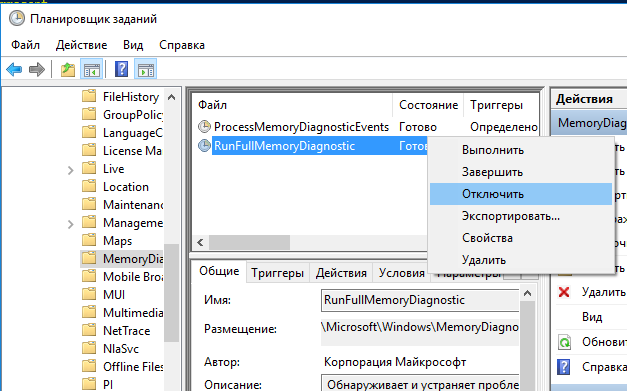
-> SysMain-> тип запуска Отключена). Это отключит в Windows 10/11 современные процессы оптимизации памяти; - Отключит задание обслуживания системы в планировщике RunFullMemoryDiagnosticEntry (Task Scheduler -> Библиотека планировщика -> Microsoft -> Windows -> MemoryDiagnostic -> RunFullMemoryDiagnosticEntry ->Отключить);
- Попробуйте отключить драйвер мониторинга сетевой активности (Network Data Usage — NDU (описано статье про невыгружаемый пул памяти Windows);
- Отключите проверку в реальном времени в вашем антивирусе. Возможно он некорректно работает со сжатой памятью;
- Проверьте целостность системных файлов образа Windows с помощью DISM и SFC.
Эти советы могут помочь избавится от чрезмерной нагрузки на компьютер со стороны процесса «Сжатая память». Но при этом отключаются базовые подсистемы оптимизации производительности Windows, что может негативно сказаться на общей производительности компьютера.
Как включить сжатие памяти в Windows Server 2016/2019/2022 или Windows 10/11?
Во всех версиях Windows Server сжатие памяти по-умолчанию отключено.
Выполните команду
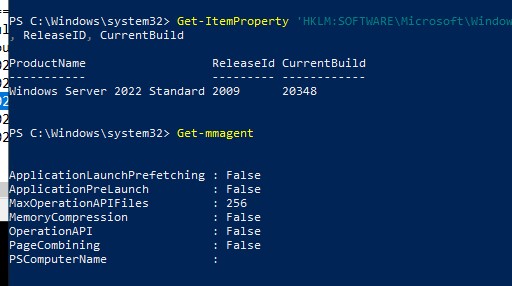
Get-mmagent
, чтобы проверить что сжатие памяти отключено. На скриншоте ниже мы показали, что в Windows Server 2022 значение Memory Comression = False.
Чтобы Windows могла использовать сжатие памяти, должны быть выполнены следующие условия:
- Включен файл подкачки (хотя бы минимального размера – 16 МБ);
- Служба SysMain должна быть запущена;
- Используется Windows 10/11 или Windows Server 2016+ (можно узнать версию Windows с помощью команды winver или с помощью PowerShell).
Чтобы включить сжатие памяти, выполните команду:
Enable-MMAgent -MemoryCompression
Перезагрузите компьютер.
При включении сжатия памяти автоматически включается еще одна функция SysMain — page combining. Эта функция диспетчера памяти используется для объединения страниц памяти с одинаковым содержимым (своеобразная дедупликация в RAM).
Технология «Сжатой памяти» в Windows 10 и 11, как правило работает довольно эффективно и не требует никаких вмешательств. Если сжатие памяти вызывает проблемы на вашем компьютере, скорее всего у вас имеются проблемы с настройками Windows, оборудованием или драйверами. В случае необходимости, функцию сжатия памяти можно совсем отключить.
Do you know what Memory Compression is? Do you have any idea how to enable or disable Memory Compression? In this article from MiniTool, you can learn detailed information about Windows Memory Compression.
What Is Memory Compression
Before learning how to enable or disable Memory Compression in Windows 10, you need to have a basic understanding of Memory Compression.
Memory Compression, as the name suggests, is used to compress your data memory so that your RAM can store more data than normal, so as to ensure the normal running speed of the computer.
When not using memory compression, your PC stores additional data on the page file on the hard drive storage. However, the computer can read data from the hard drive significantly slower than RAM, which can cause your computer to run significantly slower.
How to Enable Memory Compression
Now let us see how to enable Memory Compression in Windows 10.
Step 1. Type PowerShell in the Windows search box and right-click Windows PowerShell to select Run as administrator.
Step 2. Select Yes in the pop-up UAC window.
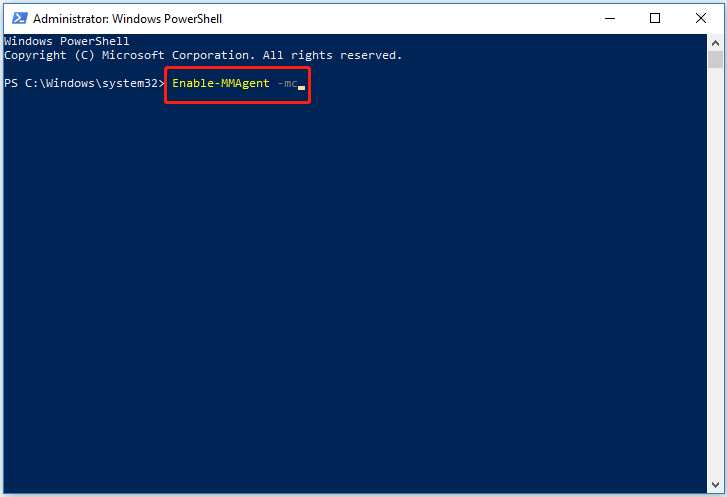
Step 3. In the new window, type Enable-MMAgent -mc and press the Enter key on your keyboard.
Step 4. After the command line is executed, you can restart your computer.
To check whether the Memory Compression has been turned on successfully and see how much memory Windows has compressed, you can do the following steps:
First, right-click the Windows logo key and select Task Manager.
Second, under the Performance section, move on to the Memory tab, then you can see the compressed memory in the “In use (Compressed)” part.

How to Disable Memory Compression
Now you should know how to enable Memory Compression. However, you may ask: Should I disable Memory Compression or keep it turning on?
As mentioned earlier, Memory Compression aims to improve system performance by storing parts of memory pages in compressed form in RAM. Therefore, it is generally not recommended to disable Memory Compression. However, when this memory management process consumes high CPU resources, you may consider turning it off.
Step 1. Run Windows PowerShell as administrator.
Step 2. Input Disable-MMAgent -mc in the command window and press Enter to execute the command line.
Now the feature of Memory Compression has been disabled.
Does Deleting Files Reduce RAM Usage
Searching in Google, you will find that many users are wondering if deleting personal files can reduce RAM usage. Deleting files will only reduce storage usage, but not RAM usage. To reduce RAM usage, you can try restarting your computer, quitting running programs, uninstalling unwanted applications, and scanning for viruses.
For more information about reducing memory usage, you can refer to this post: How to Fix Windows 11 High Memory Usage? Here Are Easy Fixes.
However, what if you have deleted some files by mistake? Can you recover deleted files without bringing any damage to the original data? Fortunately, the answer is positive.
Here the best data recovery software – MiniTool Power Data Recovery is recommended. It is an easy-to-use file restore tool designed for recovering files (documents, pictures, emails, videos, etc.) in various data loss situations, such as OS crash, accidental deletion, viruses attack, and so on.
It supports recovering files from USB flash drives, internal hard drives, external hard drives, CDs/DVDs, and other file storage devices. And it is fully compatible with all Windows systems, such as Windows 11, Windows 10, Windows 8, and Windows 7.
MiniTool Power Data Recovery Free Edition can help you recover up to 1 GB of data totally for free. So, you can click the button below to download it and have a try.
MiniTool Power Data Recovery FreeClick to Download100%Clean & Safe
Final Words
In a word, this article introduces how to enable and disable Memory Compression and how to recover deleted or lost files using the professional data restore tool – MiniTool Power Data Recovery.
If you have any suggestions for MiniTool data recovery software, please feel free to contact us via [email protected].
If you are experiencing high memory usage or notice system slowdowns, adjusting memory compression settings can help. This guide provides a step-by-step walkthrough on how to check, enable, or disable memory compression in both Windows 10 and Windows 11 using PowerShell, a powerful command-line tool.
Whether you are aiming to boost gaming performance, address memory bottlenecks, or fine-tune your system for specific tasks, following these methods will allow you to manage memory compression efficiently.
What is Memory Compression in Windows?
Memory compression is a feature introduced in Windows 10 and continued in Windows 11, designed to optimize system performance by reducing the amount of data stored in physical memory (RAM). It allows Windows to store more data in RAM without needing to increase the actual size of physical memory. This can help improve system responsiveness, but there are situations where disabling it may be more useful, such as during gaming or intensive software usage where every bit of system performance counts.
Memory compression does this by compressing less frequently used data instead of moving it to disk. This process can improve performance on systems with limited RAM, but for some users—especially those using high-performance applications like games—disabling memory compression might be beneficial.
⚠️ Please note: The process described below is the same in Windows 11 as it is in Windows 10.
How to Check If Memory Compression Is Enabled or Disabled
If you want to verify whether memory compression is active on your system, you can easily check using PowerShell. This method will show the current status of memory compression, allowing you to make adjustments as needed.
- Open PowerShell as AdministratorOpen the Windows Terminal or PowerShell with administrative privileges. You can do this by right-clicking the Start button and selecting “Windows Terminal (Admin)” or searching for “PowerShell” in the search bar and choosing the “Run as administrator” option.


- Run the Memory Compression Status CommandIn the PowerShell window, type the following command and press Enter:
Get-MMAgent


How to Enable Memory Compression
Enabling memory compression may help improve system performance, particularly on devices with limited RAM. Here’s how you can enable this feature using PowerShell.
- Run the Enable Memory Compression CommandType the following command and press Enter:
Enable-MMAgent -mc


How to Disable Memory Compression
If you experience issues with high memory usage or want to optimize performance for specific tasks like gaming, disabling memory compression might provide a smoother experience.
- Run the Disable Memory Compression CommandIn the PowerShell window, type the following command and press Enter:
Disable-MMAgent -mc


FAQ – Frequently Asked Questions About Memory Compression
Can adjusting memory compression settings improve gaming performance?
Disabling memory compression may improve gaming performance on Windows systems, particularly those with high-end specifications designed for gaming. When memory compression is disabled, the system avoids the computational overhead associated with compressing and decompressing data, thus potentially reducing latency and improving frame rates in resource-intensive games.
Are there any downsides to disabling memory compression?
The primary downside of disabling memory compression is increased physical memory usage. Without compression, your system might resort more frequently to paging, using slower disk storage to supplement RAM, which can lead to performance degradation especially in memory-intensive applications.
What are the benefits of enabling memory compression?
Enabling memory compression can significantly boost the responsiveness of systems with limited RAM by effectively increasing the amount of information that can be held in physical memory. This compression facilitates smoother multitasking and can decrease the likelihood of system slowdowns due to paging, as less data needs to be written to or read from the disk.
Will disabling memory compression increase physical memory usage?
Yes, disabling memory compression typically results in higher physical memory usage since data that could be compressed within RAM will occupy more space. This can lead to increased paging activities, especially if the available RAM is low relative to the system’s operational demands.
Does memory compression affect all types of applications equally?
Memory compression does not affect all applications equally; it is more beneficial to applications that have moderate memory needs or do not frequently access their full set of in-memory data. High-performance applications like video editing software or large-scale databases often benefit less from compression and may perform better with compression turned off to minimize processing overhead.
What should I do if I notice system slowdowns after disabling memory compression?
If disabling memory compression leads to noticeable system slowdowns, re-enabling the feature could help alleviate the issue. Additionally, consider upgrading your system’s RAM to provide more physical memory space, thereby reducing the need for both compression and heavy paging.
Can I automate the enabling or disabling of memory compression based on specific tasks?
Automating the enabling or disabling of memory compression based on specific tasks requires advanced scripting or the use of dedicated management software. This is feasible, for example, with PowerShell scripts that monitor application launches and trigger compression settings adjustments accordingly.
Should I disable memory compression if I have a high amount of RAM?
The decision to disable memory compression in systems with a high amount of RAM should be based on specific performance requirements and observed impact. While abundant RAM might suggest less need for compression, some workloads might still benefit from having it enabled due to improved data handling efficiency. It is best to test under different conditions to understand the impact on your specific system configuration.
How does memory compression compare with disk paging in terms of performance?
Memory compression typically outperforms disk paging because accessing compressed data in RAM is faster than reading data from a disk, even when factoring in the time to compress/decompress data. Disk paging can significantly slow down system performance as it depends on the speed of the hard drive, which is notably slower than RAM operations.
Is memory compression suitable for servers and professional workstations?
Memory compression can be advantageous for servers and professional workstations handling large data sets or running memory-intensive applications. However, it should be carefully tested on these systems as the benefits and drawbacks can vary significantly based on the specific workload and the server or workstation configuration.
How can I determine if enabling memory compression is worthwhile for my specific system?
To determine the utility of memory compression for your system, monitor and compare the system’s performance metrics with and without memory compression activated. Tools like Windows Performance Monitor or third-party software can be used to track system responsiveness, RAM usage, and paging activities during typical usage scenarios.
Does disabling memory compression require a system restart to take effect?
Changes made to memory compression settings using PowerShell commands are applied immediately and do not typically require a system restart. However, monitoring the system immediately after making such changes is recommended to ensure the settings are properly applied.
What impact does memory compression have on system boot times?
Memory compression generally has minimal impact on system boot times because the feature primarily affects runtime memory management rather than the boot process itself. Any changes to boot time are typically nominal and are more influenced by other system configuration aspects.
Are there any security concerns associated with memory compression?
Memory compression does not inherently introduce additional security risks to the system. It is a system performance feature that manages how memory is utilized and does not compromise security protocols or data protection mechanisms.
Can memory compression settings be managed remotely on multiple machines in a network?
Yes, memory compression settings can be managed remotely across multiple machines using PowerShell scripts executed through remote management tools. This approach allows network administrators to apply uniform settings or make adjustments based on the performance needs of different machines within the network.
Related: How to Disable or Enable Core Isolation Memory Integrity
Core isolation Memory integrity is a relatively recent entry to Windows’s security features that can really save your hide. Through the use of virtualization, it can block malicious actors when they try to tamper with high-level system processes. In our other guide, we show you how to enable or disable Core integrity Memory isolation to resolve issues that might be caused by it.

Related: How to Check RAM Type, Speed and Size on Windows
Whether you’re planning an upgrade, tuning CPU timings, or just curious, it’s handy to know information about your RAM. However, with old methods not being as user-friendly, many are left wondering how to check RAM speed on Windows and find information like its size and type. In our other guide, we show you how to check RAM speed, type, and size using several built-in Windows tools. You can then decide what method works best for you if you want to check hardware information in the future.
Related: How to Optimize Windows Virtual Memory (Pagefile.sys)
Has Windows ever warned you your system is low on virtual memory? This can happen when you start an application that may be intensive on your system. If this happens to you, it is worth knowing how to manage and increase Pagefile (virtual memory) in Windows. In our other guide, we show you how to optimize the Pagefile to set the recommended virtual memory for Windows.
Related: How to Use NTFS Compression for Drives, Files or Folders in Windows
Windows 10 NTFS compression is a feature that works seamlessly and does not change a file´s format. Unlike in the case of a compressed ZIP file, NTFS compressed files (and folders) behave just like any other files and can be used without any further action by you and any software without the need to disable compression beforehand. You can compress a folder (or complete drive) in Windows when you’re struggling for space and have files that you use infrequently or are of low impact. In our other guide, we show you how to compress or uncompress files and folders in Windows via File Explorer properties and the command line and how to enable or disable NTFS compression on your system.

Last Updated on November 7, 2024 2:59 pm CET
Многие пользователи Windows 10 замечают, что процесс Система и сжатая память грузит процессор или же использует слишком много оперативной памяти. Причины такого поведения могут быть разные (а потребление RAM так и вовсе может быть нормальной работой процесса), иногда – баг, чаще — проблемы с драйверами или оборудованием (в случаях, когда загружен процессор), но возможны и другие варианты.
Процесс «Система и сжатая память» (System and compressed memory) в Windows 10 — один из компонентов новой системы управления памятью ОС и выполняет следующую функцию: уменьшает количество обращений к файлу подкачки на диске за счет помещения данных в сжатом виде в оперативную память вместо записи на диск (в теории, это должно ускорить работу). Подробнее: Что такое сжатая память в Windows 11 и Windows 10. Однако, по отзывам, функция не всегда работает как ожидается.
Примечание: если у вас на компьютере большой объем оперативной памяти и при этом вы используете требовательные к ресурсам программы (или открываете по 100 вкладок в браузере), при этом «Система и сжатая память» использует много RAM, но не вызывает проблем с производительностью и не нагружает процессор на десятки процентов, то как правило — это нормальная работа системы и вам не о чем беспокоиться.

Что делать, если система и сжатая память грузит процессор или память
Далее — несколько наиболее вероятных причин того, что указанный процесс потребляет слишком много ресурсов компьютера и пошаговое описание того, что делать в каждой из ситуаций.
Драйверы оборудования
Прежде всего, если проблема с загрузкой процессора процессом «Системная и сжатая память» происходит после выхода из сна (а при перезагрузке все работает нормально), либо после недавней переустановки (а также сброса или обновления) Windows 10, вам стоит обратить внимание на драйверы вашей материнской платы или ноутбука.
При этом следует учитывать следующие моменты
- Наиболее часто проблему могут вызывать драйверы управления питанием и драйверы дисковых систем, в частности Intel Rapid Storage Technology (Intel RST), Intel Management Engine Interface (Intel ME), драйверы ACPI, специфичные драйверы AHCI или SCSI, а также отдельное ПО некоторых ноутбуков (различные Firmware Solution, UEFI Software и подобное).

- Обычно Windows 10 сама устанавливает все эти драйверы и в диспетчере устройств вы видите, что всё в порядке и «драйвер не нуждается в обновлении». Однако, эти драйверы могут быть «не те», что и вызывает проблемы (при выключении и выходе из сна, с работой сжатой памяти и другие). Кроме этого, даже после установки нужного драйвера, десятка может снова «обновить» его, вернув проблемы в работе компьютера.
- Решение — загрузить драйверы с официального сайта производителя ноутбука или материнской платы (а не устанавливать из драйвер-пака) и установить их (даже если они для одной из предыдущих версий Windows), после чего запретить Windows 10 обновлять эти драйверы. О том, как это сделать я писал в инструкции Windows 10 не выключается (где причины перекликаются с текущим материалом).

Отдельно обратите внимание на драйверы видеокарты. Проблема с процессом может быть и в них, причем решаться по-разному:
- Установкой последних официальных драйверов с сайта AMD, NVIDIA, Intel вручную.
- Наоборот, удалением драйверов с помощью утилиты Display Driver Uninstaller в безопасном режиме и последующей установкой более старых драйверов. Часто срабатывает для старых видеокарт, например, GTX 560 может работать без проблем с версией драйверов 362.00 и вызывать проблемы с производительностью на более новых версиях. Подробнее про это в инструкции Установка драйверов NVIDIA в Windows 10 (все то же самое будет и для других видеокарт).
Если же манипуляции с драйверами не помогли, пробуем другие способы.
Параметры файла подкачки
В некоторых случаях проблема (в данном случае — баг) с нагрузкой на процессор или память в описываемой ситуации может решаться более простым способом:
- Отключите файл подкачки и перезагрузите компьютер. Проверьте, нет ли проблем с процессом «Система и сжатая память».
- Если проблем нет, попробуйте снова включить файл подкачки и выполнить перезагрузку, возможно, проблема не повторится.
- Если повторилась, попробуйте повторить шаг 1, после чего задать размер файла подкачки Windows 10 вручную и снова перезагрузить компьютер.
Подробно о том, как именно отключить или изменить параметры файла подкачки, вы можете прочитать здесь: Файл подкачки Windows 10.
Антивирусы
Еще одна возможная причина нагрузки процессом сжатой памяти — неправильная работа антивируса при проверке памяти. В частности, такое может происходить, если вы устанавливаете антивирус без поддержки Windows 10 (то есть какую-либо устаревшую версию, см. Лучший антивирус для Windows 10).
Возможно также, что у вас установлено несколько программ для защиты компьютера, которые конфликтуют между собой (в большинстве случаев, более 2-х антивирусов, не считая встроенного защитника Windows 10, вызывают те или иные проблемы, влияющие на производительность системы).
Отдельные отзывы по проблеме говорят о том, что в некоторых случаях модули фаервола в антивирусе могут быть причиной нагрузки, отображаемой для процесса «Система и сжатая память». Рекомендую проверить, временно отключив защиту сети (фаервол) в вашем антивирусе.
Google Chrome
Иногда манипуляции с браузером Google Chrome позволяют исправить проблему. Если у вас установлен этот браузер и, особенно, работает в фоновом режиме (или же нагрузка появляется после непродолжительного использования браузера), попробуйте следующие вещи:
- Отключите аппаратное ускорение видео в Google Chrome. Для этого зайдите в Настройки — «Показать дополнительные настройки» и снимите отметку «Использовать аппаратное ускорение». Перезапустите браузер. После этого в адресную строку введите chrome://flags/ найдите на странице пункт «Аппаратное ускорение для декодирования видео», отключите его и еще раз перезапустите браузер.

- Там же в настройках отключите «Не отключать работающие в фоновом режиме сервисы при закрытии браузера».

После этого попробуйте перезагрузить компьютер (именно перезагрузить) и обратить внимание, проявляет ли себя процесс «Система и сжатая память» тем же образом, что и раньше при работе.
Дополнительные варианты решения проблемы
Если ни один из описанных способов не помог решить проблемы с нагрузкой, вызываемой процессом «Система и сжатая память», вот еще несколько непроверенных, но по некоторым отзывам иногда срабатывающих способов исправить проблему:
Надеюсь, одно из решений позволит вам справиться с проблемой. Не забывайте также про проверку компьютера на вирусы и вредоносные программы, они также могут оказаться причиной ненормальной работы Windows 10.
January 18, 2022 updated by
Leave a reply »
Memory compression is a new feature introduced in Windows 10, which can store more data in your RAM than it otherwise could, by storing part of the memory pages in RAM in a compressed form. For example, if your applications need to store 4 GB of data in the RAM at the same time, Windows might have 3 GB of uncompressed data and 0.5 GB of compressed data that actually takes up 1 GB in RAM.
With memory compression, Windows can compress a fraction of the memory in order to reduce page swap out. This is very useful when your PC doesn’t have enough physical memory. In this tutorial we’ll show you how to disable or enable memory compression in Windows 11 / 10.
Part 1: Check if Memory Compression is Enabled
Open up Task Manager. Go to the Performance tab and select Memory on the left sidebar. You will see how much memory is compressed under the “In use (Compressed)” section. As you can see in the following screenshot, 2.3 GB of memory is in use, and of that 80.9 MB is compressed.
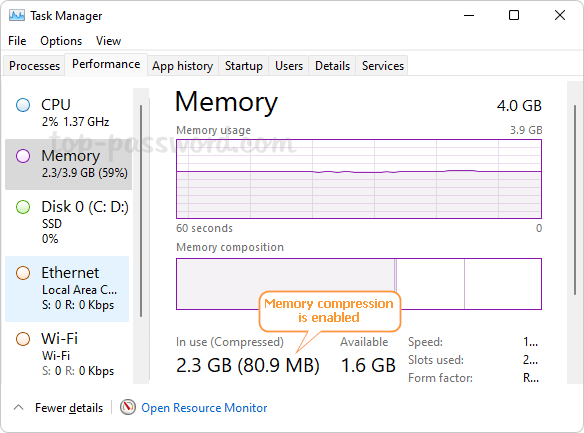
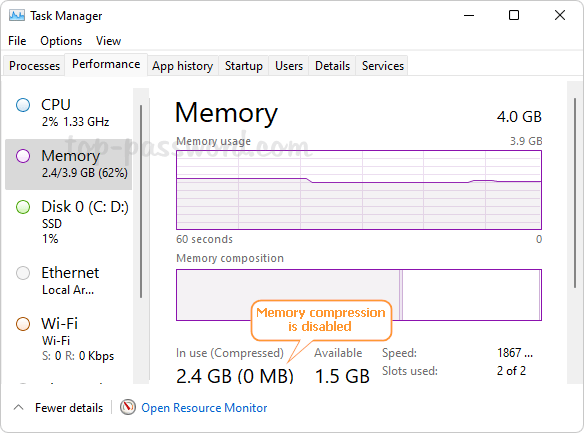
If the compressed memory is shown as 0 MB, it’s likely that the memory compression feature is disabled on your system.
Part 2: Disable or Enable Memory Compression
- Right-click on the Start button in the taskbar and select Windows Terminal (Admin). If you’re running Windows 10, open Windows PowerShell as administrator.
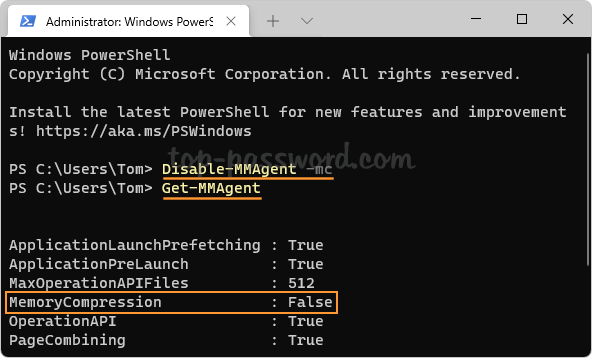
- Then run the
Disable-MMAgent -mccommand to disable memory compression, and afterwards execute the commandGet-MMagentto check if memory compression is disabled successfully.
- If you need to turn on or enable memory compression, enter this command and press Enter.
Enable-MMAgent -mc
- Reboot your computer to apply the changes. The next time you log in to your system, you can launch Task Manager and check if memory compression is running or not.

- Previous Post: 2 Methods to Disable Windows Insider Program Settings in Windows 11
- Next Post: 2 Methods to Hide “Pin to taskbar” from Context Menu in Windows 11