
Иногда поиск необходимых файлов может быть очень долгим. Это связано с тем, что поиск на компьютере с операционной системой Windows не настроен должным образом. В этой статье мы расскажем, как настроить Windows, чтобы запрошенные файлы и папки были найдены в течение нескольких секунд.
Шаг 1: Откройте «Параметры Windows» (зажмите клавиши на клавиатуре: кнопку с логотипом Windows + I ).
Шаг 2: Нажмите на кнопку «Поиск».

Шаг 3: Нажмите на пункт меню «Поиск в Windows».
В открывшемся окне можно увидеть состояние индексирования и общие параметры. По умолчанию активирован классический стиль поиска Windows. То есть поиск осуществляется только в библиотеках и на рабочем столе. К сожалению, данный способ поиска подходит далеко не всем. Во-первых, не все настраивают библиотеки. Во-вторых, иногда требуется искать документы или файлы, которые в библиотеку не попали. Например, вы создали новую папку на диске, и эта папка в процессе поиска задействована не будет.
Поэтому мы рекомендуем активировать расширенный режим поиска Windows. В этом случае поиск будет осуществляться на всем компьютере, включая библиотеки и рабочий стол. Но, обратите внимание, что при выборе расширенного режима и при первом сканировании дисков ноутбук должен быть подключен к электросети. Это связано с тем, что первое сканирование файлов повлечёт за собой снижение уровня заряда и увеличение загрузки процессора.

Шаг 4: Выберите папки, которые не требуется индексировать (папки с программами, играми и т.д.). Их сканирование приведет к увеличению базы индексированных файлов и сделает поиск менее точным. Для этого нажмите «Добавить исключенную папку» в разделе «Исключенные папки».
Шаг 5: Определитесь, требуется ли вам активация настройки «Производительность индексатора».

При включении этой настройки интенсивность индексации файлов будет подстраиваться под пользователя. В версии 2004 Windows 10 при обнаружении проблем с производительностью система может ограничить индексацию файлов. Microsoft утверждает, что служба Windows Search будет приостановлена в следующих случаях:
- если загрузка процессора превысит 80%;
- использование диска будет превышать 70%;
- пользователь активирует игровой режим;
- заряд аккумулятора составит менее 50%.
Поэтому, если у вас ноутбук, или вы периодически испытываете проблемы с производительностью устройства, рекомендуем активировать функцию «Производительность индексатора». Если у проблем с производительностью не наблюдается, рекомендуем не включать эту настройку.
Шаг 6: Запустите расширенные настройки индексатора поиска Windows.
Это позволит выбрать, в каких расположениях будет осуществляться постоянная индексация файлов и их содержимого.

При нажатии «Расширенные настройки индексатора поиска» появится привычное окно «Параметры индексирования».

Шаг 7: Нажмите кнопку «Изменить» и выберите галочками папки, которые необходимо индексировать. Оставьте квадраты для выбора пустыми, чтобы исключить ненужные папки из поиска. Нажмите «ОК», чтобы подтвердить изменения.

Когда индексирование будет завершено, вы сможете быстро искать файлы и папки. Больше не придётся ждать, когда закончится поиск по всему компьютеру. Система уже знает расположение файлов и папок, поэтому по мере набора ключевого слова она будет выводить наиболее подходящие результаты в окно поиска.
-
Home
-
News
- How to Fix Windows Search Bar Slow Windows 10/11
By Shirley | Follow |
Last Updated
Are you suffering from the Windows search bar slow issue in Windows 11/10? How to speed up the slow Windows search feature? Read this post from MiniTool to get a couple of useful solutions.
Windows Search Bar Slow
The taskbar search box helps you quickly find scanned documents, videos, pictures, applications, etc. However, many users reported that their Windows search is loading forever. Here you can see a true example.
I just used my computer for the first time since last week. Now my search bar on the taskbar is slow to show results. The problem does not persist when I do a safe boot. I would like to avoid having to restart my computer as much as possible.answers.microsoft.com
Windows search bar slow greatly affects the computer experience. Try to get rid of this problem by using the ways listed below.
How to Fix Windows Search Bar Slow Windows 11/10
Fix 1. Restart the PC
Before you perform the advanced fixes, try to restart your computer. This is because sometimes the Windows 11 search slow issue is caused by temporary glitches. If after restarting, the search function is still very slow, try the next way.
Fix 2. Restart the Windows Explorer Task
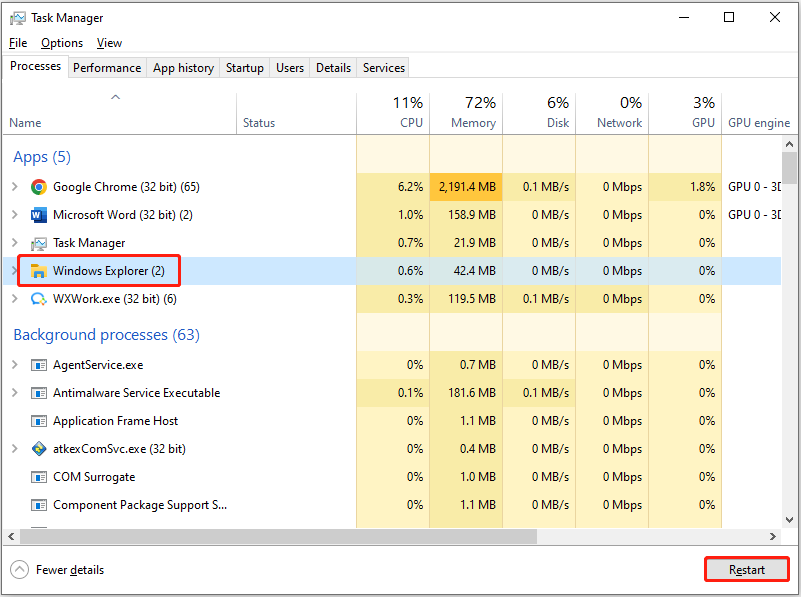
Windows Explorer provides a graphical user interface for accessing the file system. It is also a component of the operating system that presents many user interface items on the screen, such as the taskbar and desktop. So, facing the Windows search slow Windows 11/10 issue, you can fix it by restarting the Windows Explorer task.
Right-click the Windows logo button to select Task Manager.
Find and click the Windows Explorer task, then click the Restart button as depicted below.
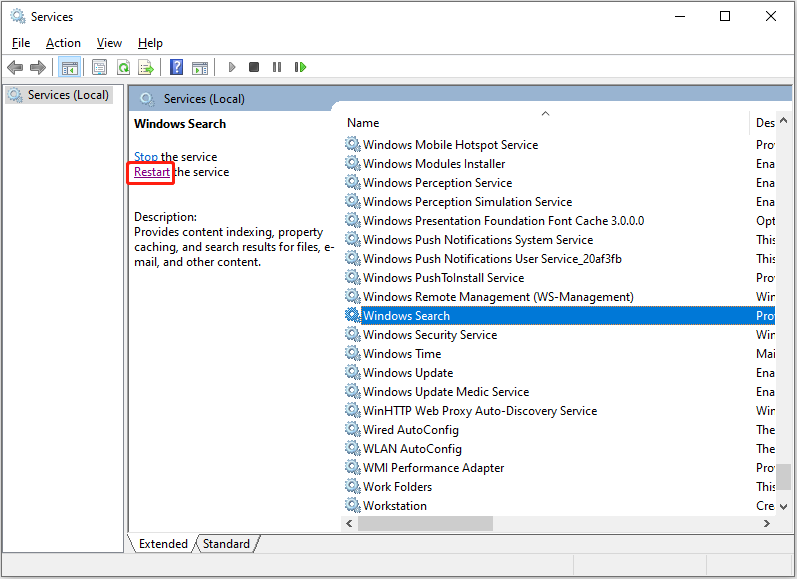
Fix 3. Restart the Windows Search Service
Windows Search service provides content indexing, property caching, and search results for files, e-mail, and other content. If you encounter the issue of “Windows search bar slow”, you can restart the Windows Search service.
Step 1. Press Windows + R key combination to open the Run command window.
Step 2. Type services.msc in the input box and press Enter.
Step 3. In the new window, scroll down to click Windows Search. Then click the Restart button on the left side.
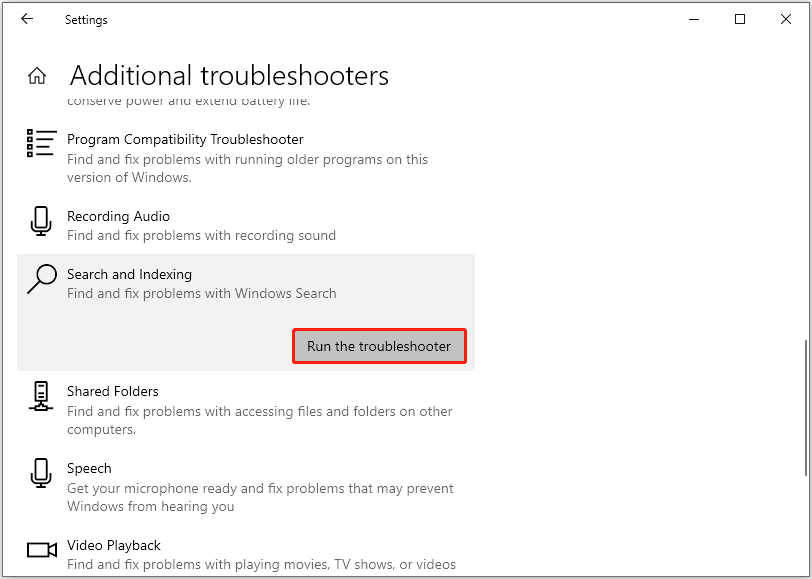
Fix 4. Run the Search and Indexing Troubleshooter
Windows built-in troubleshooters can help to fix various Windows issues. Here, to fix the “Windows search is loading forever” problem, follow the steps below to run the Search and Indexing troubleshooter.
Step 1. Press the Windows + I keyboard shortcut to open Windows Settings.
Step 2. Select Update & Security.
Step 3. Move on to the Troubleshooter tab, then click Additional troubleshooters in the right panel.
Step 4. In the new window, scroll down to click Search and Indexing > Run the troubleshooter.
Finally, wait for the troubleshooting process to complete and check if the Windows search speed is back to normal.
Fix 5. Disable Unnecessary Startup Programs
Unnecessary startup programs may interfere with the Windows search feature. To deal with the matter of “Windows search bar slow”, you can disable unwanted startup applications.
Step 1. Right-click the Windows logo button to select Task Manager.
Step 2. Go to the Startup tab, select the unnecessary program, and then click the Disable button.
Restart your computer and see if the Windows search is faster.
Fix 6. Rebuild the Windows Search Index
The last way to fix the slow Windows search is to rebuild the Windows search index.
Warning:
The duration of rebuilding the search index depends on the volume of items being indexed and the processing power of the system. Depending on user experience, this process can sometimes last for hours or even days. So please think carefully and do it at your own risk.
Press the Windows + I keyboard shortcut to access Windows Settings. Click Search > Searching Windows. In the right panel, scroll down to click Advanced Search Indexer Settings.
In the pop-up window, select Advanced. Then click the Rebuild button.
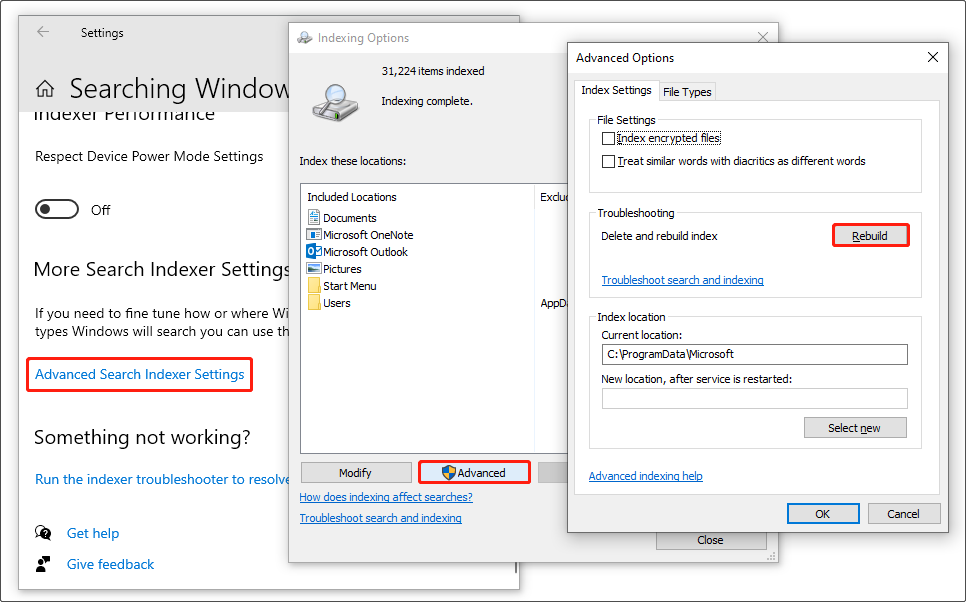
Please be patient until the whole process completes.
Tips:
Apart from the slow Windows search issue, Windows can sometimes have other issues such as a black screen after pressing Alt + Tab, Windows Security shows unknown, etc. These can easily lead to data loss. In such situations, you can use MiniTool Power Data Recovery to recover deleted files for free.
MiniTool Power Data Recovery FreeClick to Download100%Clean & Safe
Bottom Line
In a word, this post explains how to fix the Windows search bar slow issue in Windows 11/10.
If you have come across any other good solutions to this problem, welcome to leave them in the comment zone below. Thank you in advance.
About The Author
Position: Columnist
Shirley graduated from English major and is currently an editor of MiniTool Team. She likes browsing and writing IT-related articles, and is committed to becoming a professional IT problem solver. The topic of her articles are generally about data recovery, data backup, and computer disk management, as well as other IT issues. In spare time, she likes watching movies, hiking and fishing.
Looking for a Windows Search alternative? Learn more about professional search here.
The function that powers most Windows searches is the Windows Search Indexer. It indexes all of the files and locations you have chosen, and subsequently stores them in a database. When you type in your search terms, it will go to the database, instead of making real time search through your computer. This is why searches can be done so quickly on a PC.
Why then, does the Windows Search slow down for some?
Slow Windows 10 Search
The issue is probably going to be very similar across the board no matter what version of Windows you are using. Even through it’s the newest version, Windows 10 search can stop working sometimes too.
Some people believe that slowed search stems from updating from Windows 8 or 7 to Windows 10, meaning that the search index may have some differences so after you update it isn’t making the correct connections. It could also simply be that there was a problem when the index tried to run for the first time on the new version.
Whatever it may be, here’s what you should do to solve it:
- Press Windows Key+X, or right click on the Windows icon, a menu will open up
- Click Control Panel
- Select Indexing Options.
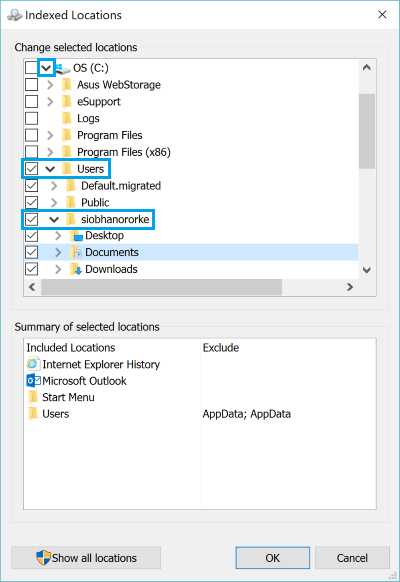
- Now click Modify. Here you can choose which drives you actually want indexed, make sure to keep the drives that contain all of your programs and files.
- NOTE: Most files and folders (eg. ‘My Documents’) are saved in the C: drive, but you shouldn’t index the whole C: drive because it contains lots of files that you won’t want to see in your search results (eg. Program Files), or that may even cause problems down the road (eg. your antivirus quarantine file).
- Instead, click the little arrow next to C: to list all folders on your PC.
- Click the arrow next to Users
- Find your username and check the box next to it.
- This way, only documents and files you create will be indexed.
- Click OK when you’re done.
If Windows 10 search still doesn’t speed up or find the files you need, you might want to try rebuilding your index:
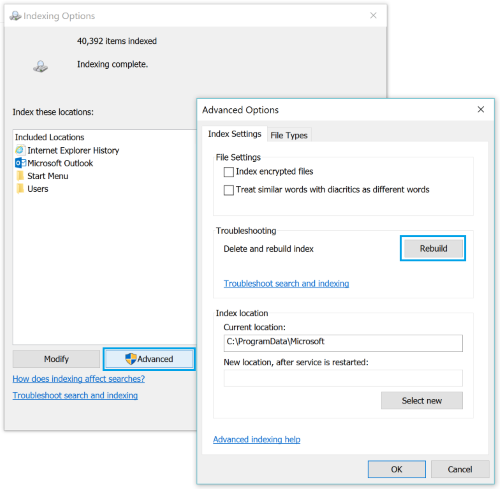
- When you are back in the Indexing Options window, click Advanced
- Inside the Advanced Options, click Rebuild and then click OK
It will take some time to rebuild the index, but once that is done, your Windows Search speed should be much faster.
Slow Windows 8 Start Menu Search
If your Start Screen search is slow in Windows 8, then the following steps will help you fix it. The steps are similar in most versions, but here’s what to do with Windows 8:
- Open the Control Panel by right clicking on the Start Menu button & selecting it from the list
- Click to open Folder Options
- Click the View tab at the top and then uncheck “Hide empty drives”.
- Click Apply and head back into the Control Panel
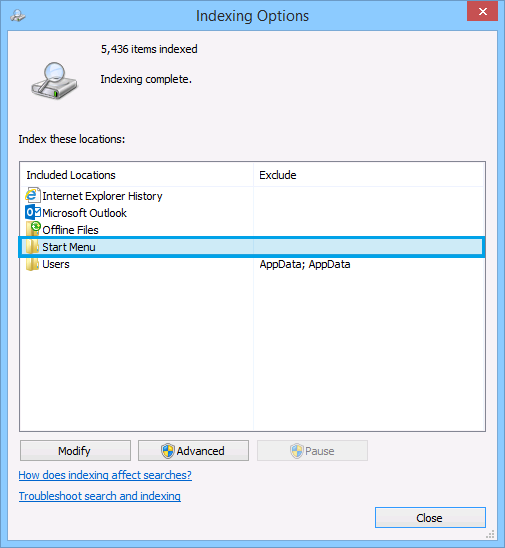
- Find Indexing Options and click on it.
- Under Included Locations the Start Menu folder should be on the list of indexed locations.
- If your Start Menu searches are slow, then most likely you won’t see the folder on the list.
- Click on the Modify
- Then add the Start Menu
- Click OK
Your Start Menu search should be up and running now. If your Windows Search is still slow, you can try rebuilding the index by following the steps outlined for Windows 10 above. Click here if you need more help using Windows 8 Search.
These easy fixes should speed up your desktop search on Windows 10 or Windows 8.
The Windows 10 Search being slow has always been an issue for users. Depending on your hardware, you may find that using the Windows search bar actually slows down your PC to a crawl.
With Windows 10, Windows Search can be hit or miss even with top of the line PC specs. Some users turn off Windows Search together but with the integration of Cortana, you’re losing out on a key feature in Windows 10 by doing so.
We’ll show you how to make search faster in Windows 10 with a few tips, tricks, and tweaks.
1. Disable Web Search
One of the reasons why Windows Search tends to slowdown in Windows 10 is because Cortana uses a combination of local search results and Internet-based results. Depending on what you’re looking for, using both can significantly slow down how fast Windows Search responds.
There are two ways to turn off web search in Windows 10. If you are using Windows 10 Pro, you can use the Group Policy Editor to do so. If not, you might have to enable local group policy editor in Windows 10 Home version.
Once done, you can refer to this follow this guide by Ghacks to disable web search.
2. Customize Windows Index
After turning off web search in your results, the next step is to customize your Windows index. By default, Windows 10 – and other versions of Windows – typically includes every folder and file on your primary drive which can take time to find something in and can slow down Windows Search.
Search for “Indexing Options” with Cortana or open the Control Panel and find it the old fashioned way.

Windows, by default, indexes pretty much the kitchen sink of your hard drive. A majority of these files and folders you’ll never need to search through or access, they contain system files and other irrelevant information.
You want to go through each option in Indexing Options and click “Modify” for each one.
From there, you can uncheck different options to exclude them from Windows Search, reducing the amount of information it has to search through to give you the results you’re looking for.
For example, as you can see from what Windows is indexing on my machine, there’s no reason for it to be indexing my Sticky Notes, my removable drives, or my IE history. For you, the mileage may vary.
When you’ve gone through each folder and removed what you don’t need, now you can move on to indexing’s advanced options.
Click the “File Types” tab.
From here, you can disable file types, excluding them from Windows Search. If there’s certain types of files you don’t ever need, exclude them and see how this speeds up the results. You’d be surprised by how quickly this can change what you’re being presented.
Every time you make changes to your Indexing Options, you want to rebuild your Windows 10 index. You can do that by clicking back to the “Index Settings” and clicking “Rebuild” under the Troubleshooting sub-section.
Should You Disable Windows Search and Indexing All Together?
That really depends on whether or not you use it. Some people disable Windows Search and Index all together because it can reduce CPU usage and disk usage as well. Others find that disabling it causes system instability, especially in Windows 10 where Cortana is integrated into search.
We recommend having recovery media handy, along with a system restore point if you opt to turn off Windows Search and Index in Windows 10.
Related: How to Disable Cortana in Windows 10?
Should You Use Third-Party Software to Manage Windows Search?
There are many third-party software options out there for managing and improving Windows Search. Depending on what you want to accomplish, one program might be better than the other.
Before using third party software, as always, we recommend you create a system restore point along with having recovery media on hand. You never know how third party software might interact or cause trouble with Cortana and Windows Search until you start utilizing it.
Conclusion
Windows Search is much improved in Windows 10, especially when using Cortana with it. However, by tweaking the above indexing options and disabling web search, you can get much more out of Windows Search and make it so much faster.
Windows Search has always been a feature few people truly use and Windows 10 does make it easier and more effective to use than ever.
Related: Make Windows 8 search better with these tips
(Article updated on 15th January 2021)
Увы, с момента публикации статьи об Everything, полезной утилите для мгновенного поиска файлов в Windows, минуло почти 3 года, а «воз и ныне там» – штатная служба поиска все также не радует пользователей. Ситуацию не изменил и долгожданный релиз «десятки» с персональным ассистентом Cortana, который научился искать информацию не только локально, на винчестере, но и в интернете. В данном обзоре нескучно, кратко и в «картинках» будет рассказано о принципах работы и самостоятельной настройке быстрого поиска через добавление востребованных директорий в индексируемую базу данных (индекс).
Как работает поиск в Windows 10
Как и в предыдущих версиях ОС, в «десятке» используется сходный поисковый механизм. Индекс – это набор необходимой информации о файлах на жестком диске, в виде группы файлов хранящийся в папке C:\ProgramData\Microsoft. В индекс попадают различные свойства файлов (путь, название, размер и др.), а индексирование происходит при любых манипуляциях — добавлении, изменении или удалении подконтрольных объектов. По умолчанию Windows индексирует ограниченное количество папок (директорий, расположений), в сей список не попадают в т.ч. системные файлы, папки программ, сетевые диски.
К сожалению, если вы сохраняете скачанные фильмы или книги не в специально отведенных для этого директориях, то их тоже «вычеркивают из списка». Таким образом оказываются «вычеркнуты» из индекса все несистемные логические диски, на которых общепринято хранятся личные файлы: видео, аудио, фото, дистрибутивы софта, документы и т.д. По данной причине штатный сервис поиска такой медленный, ведь система сначала ищет в «своем» списке проиндексированных (индексных) файлов. Более того, по дефолту поиск за пределами индекса ведется только по именам файлов, игнорируя архивы (ZIP, RAR, CAB).
Как ускорить поиск в Windows 10
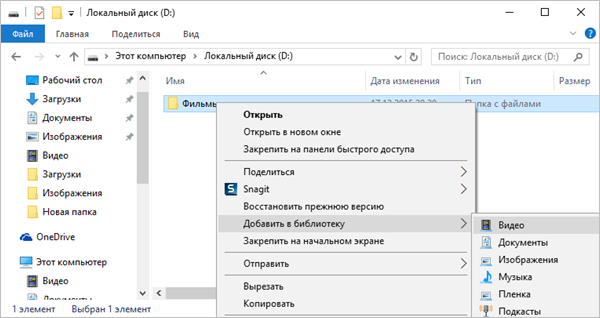
Думаю, вы уже догадались, как надо поступить, чтобы существенно ускорить поиск в системе: проиндексировать папки ежедневного пользования. Самый простой способ это реализовать – попапочно добавить их в библиотеки, через клик правой кнопкой мыши → в выпавшем меню щелкнуть по одноименному пункту → выбрать нужную библиотеку или создать новую (скриншот). В одну библиотеку («Видео», «Документы», «Изображения» и др.) можно объединять папки из различных расположений и затем просматривать и упорядочивать файлы, как в каталоге. При интеграции папки в библиотеку содержимое оной будет автоматически проиндексировано.
Однако есть метод добавить расположение в индекс и без использования библиотек. Но для начала сделаем видимыми скрытые папки и файлы, что пригодится нам в дальнейшем.
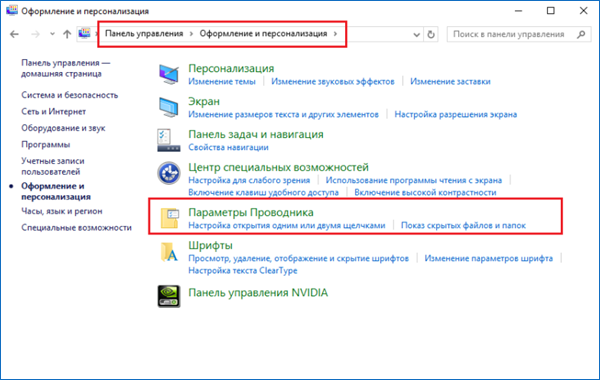
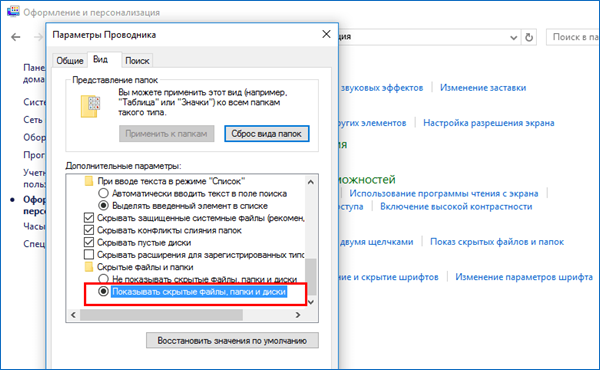
Итак, откройте Панель управления и найдите апплет (раздел) «Оформление и персонализация» → кликнув по подразделу «Параметры Проводника» (скриншот), переключитесь в открывшемся окне на вкладку «Вид» и активируйте опцию «Показывать скрытые файлы, папки и диски» (скриншот ниже).
Закончив с минутной оптимизацией, перейдем ко второму способу настроек параметров индексирования и службы Windows Search «под себя».
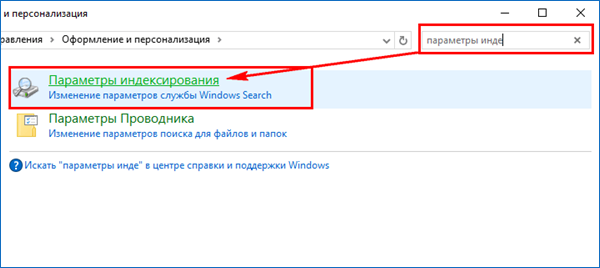
- Воспользовавшись поиском в Панели управления, найдем и откроем подраздел «Параметры индексирования» (скриншот).
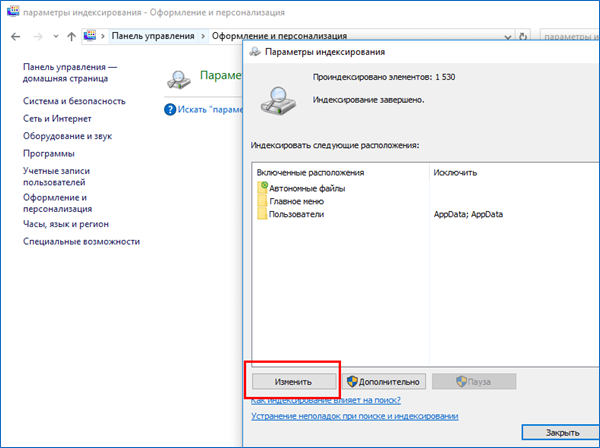
- В новом окне появятся все проиндексированные расположения. Нажмем на кнопку «Изменить» (скриншот) и отметим флажками в раскрывающемся списке те области, в которых чаще всего приходится выполнять поиск. Если компьютер мощный, а решающее большинство папок на несистемном диске D:\ востребовано, то проще добавить в индекс весь диск.
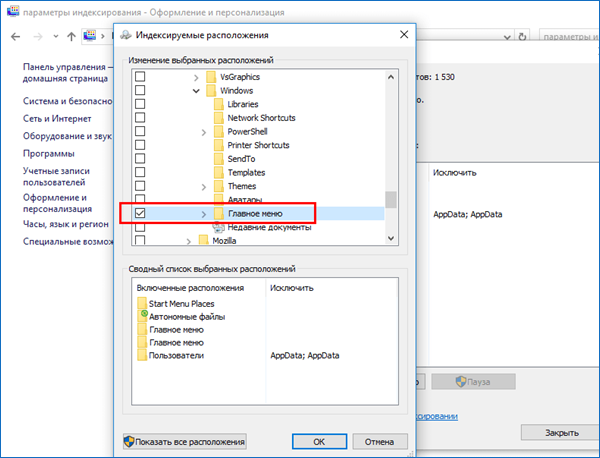
- Также убедитесь, что в список индексируемых директорий включены скрытые каталоги C:\ProgramData\Microsoft\Windows\Главное меню и C:\Users\[Имя_Вашей_Учетной_Записи]\AppData\Roaming\Microsoft\Windows\Главное меню (скриншот).
Подтвердив все изменения кнопкой «ОК«, дадим «Окнам» время на индексацию новых областей. Теперь можно быть уверенным, что интегрированная в службу Cortana станет работать весьма-весьма быстро.
Кому понравилось и помогло озвученное решение вопроса и кто проголосовал за него в соцсетях (что не обязательно, но желательно) – читайте заключительную часть обзора о том, как заменить поле поиска на компактный значок и как отключить поиск (Cortana) в Windows 10. Кстати, отключение персональной помощницы (веб-поиска) еще больше ускорит поисковый процесс.
Примечание №1: В случае к.-л. проблем с работой сервиса Windows Search (не работает поиск в Windows 10), как то замедление или отображение неполных результатов, в окне «Параметры индексирования» через соответствующую ссылку запустите средство устранения неполадок для проведения диагностики (предпоследний скриншот).
Примечание №2: Внимательный и опытный компьютерный пользователь наверняка заметил, что из включенных в индексацию расположений исчез неактуальный «Журнал Internet Explorer».
Дмитрий Евдокимов
www.TestSoft.su