
Если вы пытаетесь обновить Windows 7 до Windows 10 и у вас появляется ошибка 0x80072f8f при запуске Media Creation Tool, то эта инструкция поможет вам. Ниже шаг за шагом описано, как решить эту проблему.
Приобрести оригинальные ключи активации Windows 10 можно у нас в магазине от 1490 ₽
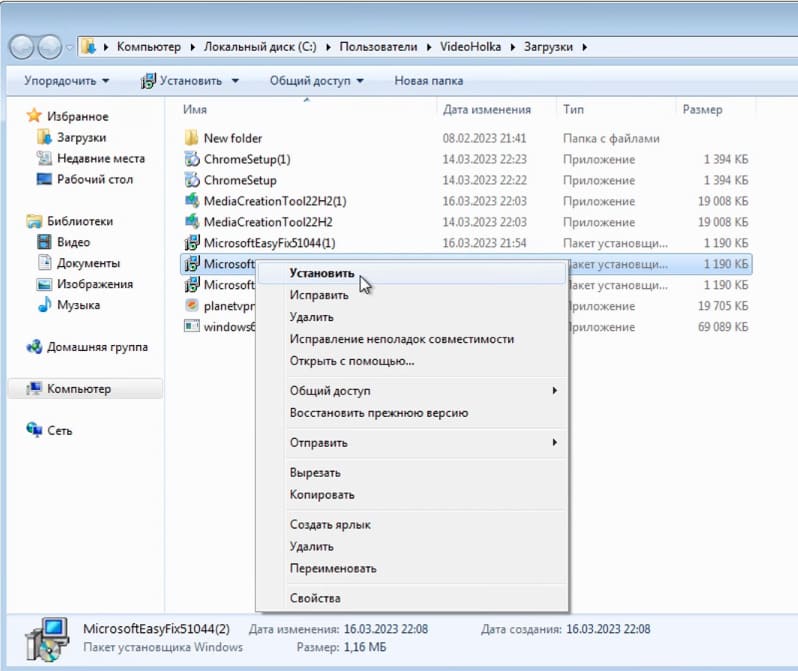
Шаг 1. Скачивание специального исправления
После того как служба обновления настроена, перейдите на официальный сайт Майкрософт для автоматической загрузки специального файла, необходимого для решения проблемы. Выполните следующие шаги:
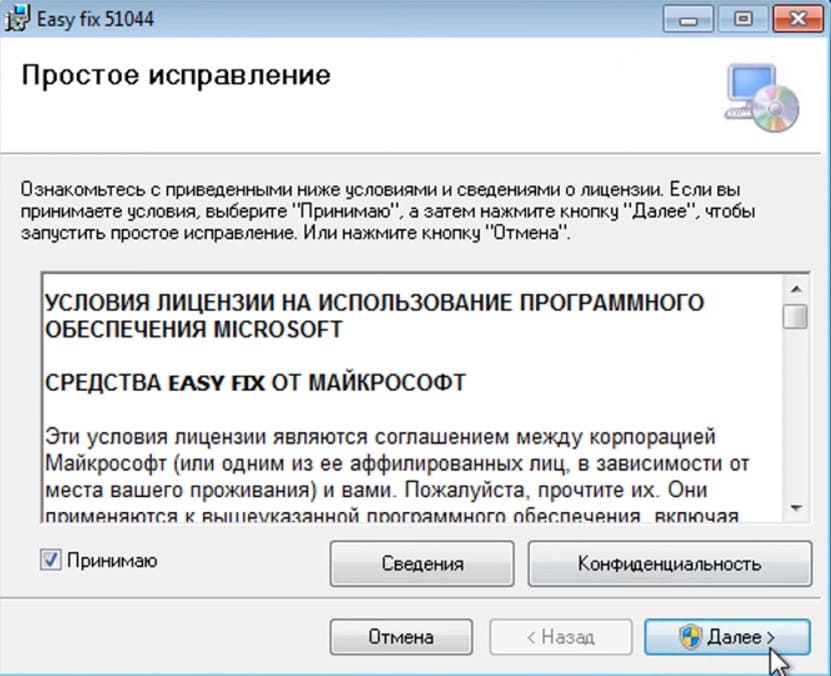
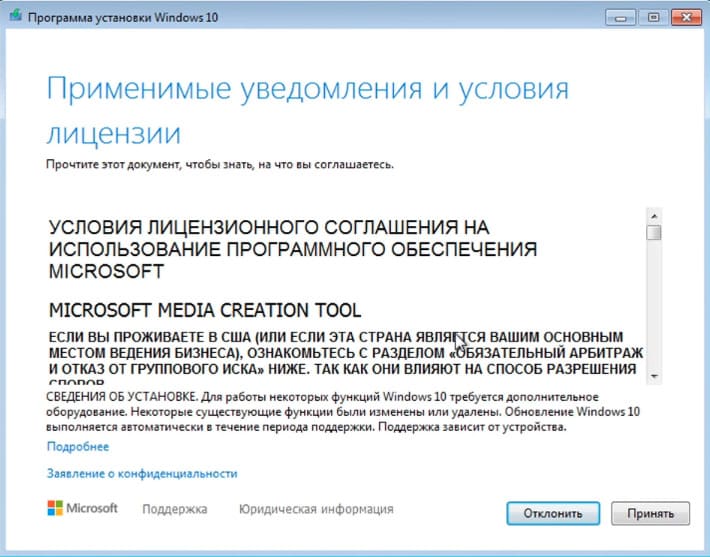
1. Откройте скачанный файл и примите лицензионное соглашение.
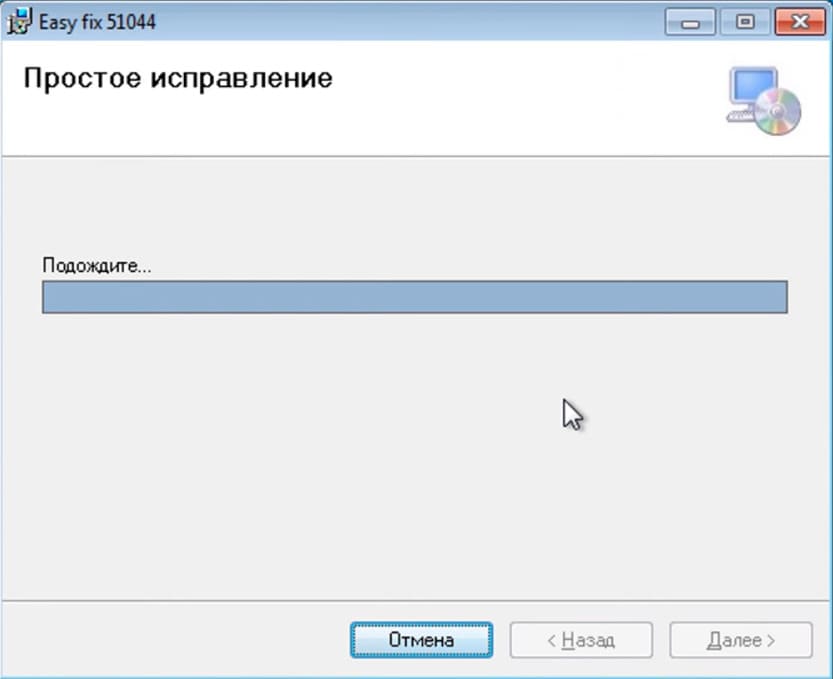
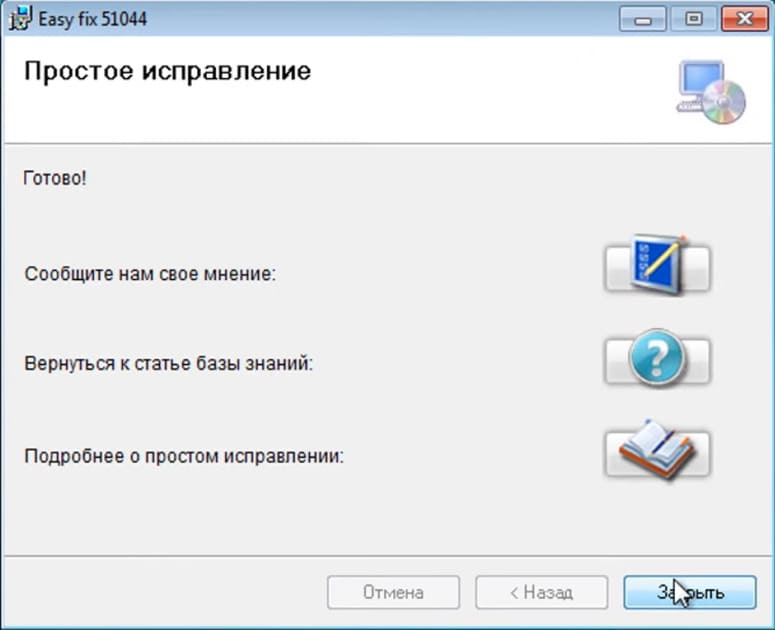
2. Дождитесь завершения установки.
Шаг 2. Включение протоколов TLS 1.1 и TLS 1.2
1. Скачайте .reg файл и запустите его, он внесет измнения в реестр и включит протоколы TLS 1.1 и TLS 1.2
2. Либо сделайте это вручную
— Введите в поиске и откройте «Редактор реестра».
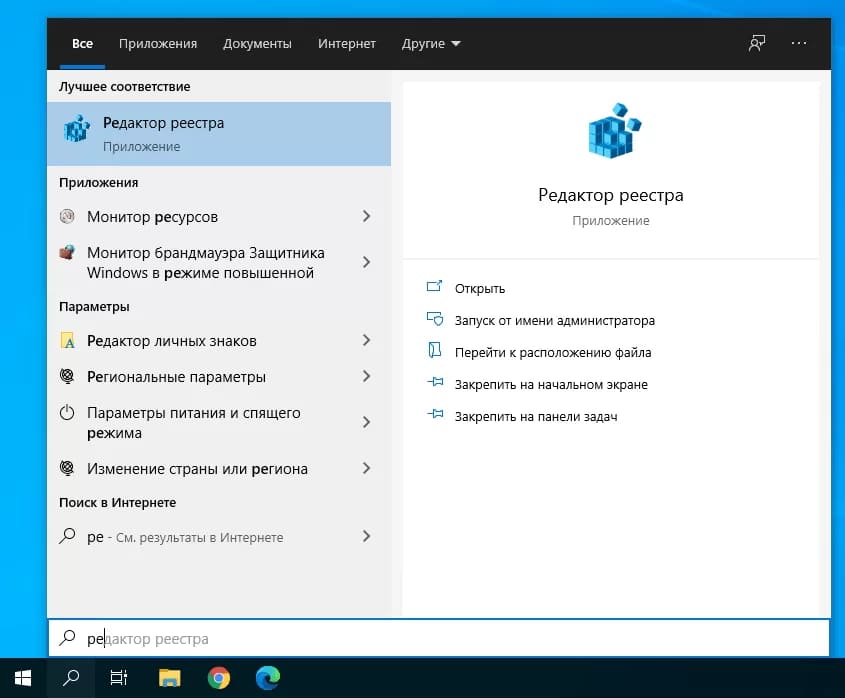
Пройдите по следующему пути:
HKEY_LOCAL_MACHINE\SOFTWARE\Microsoft\Windows\CurrentVersion\Internet Settings\WinHttp
Создайте правой кнопкой мыши Dword32 с названием «DefaultSecureProtocols»
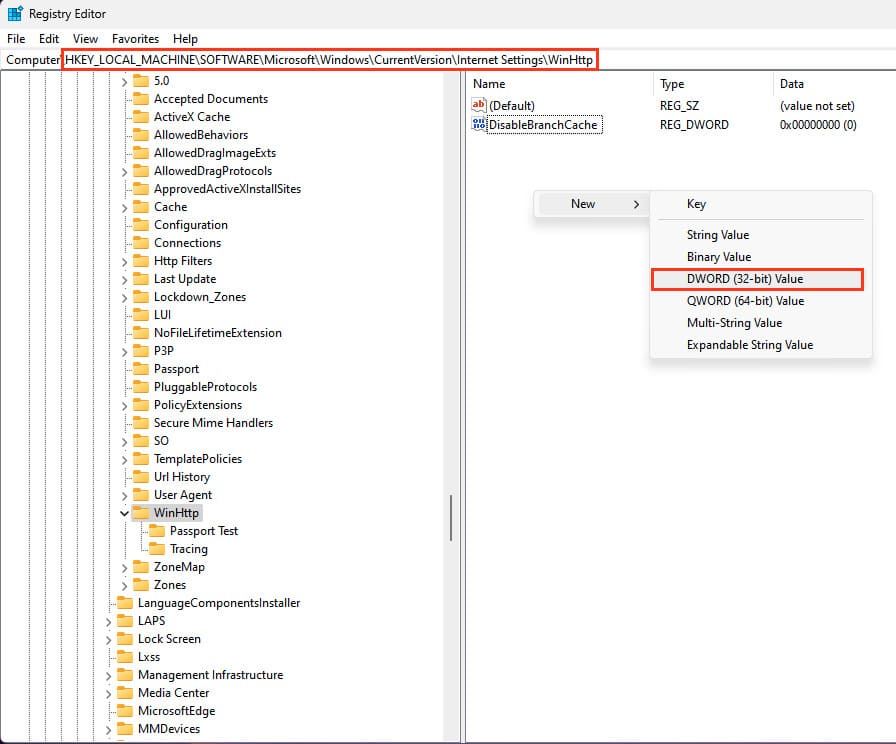
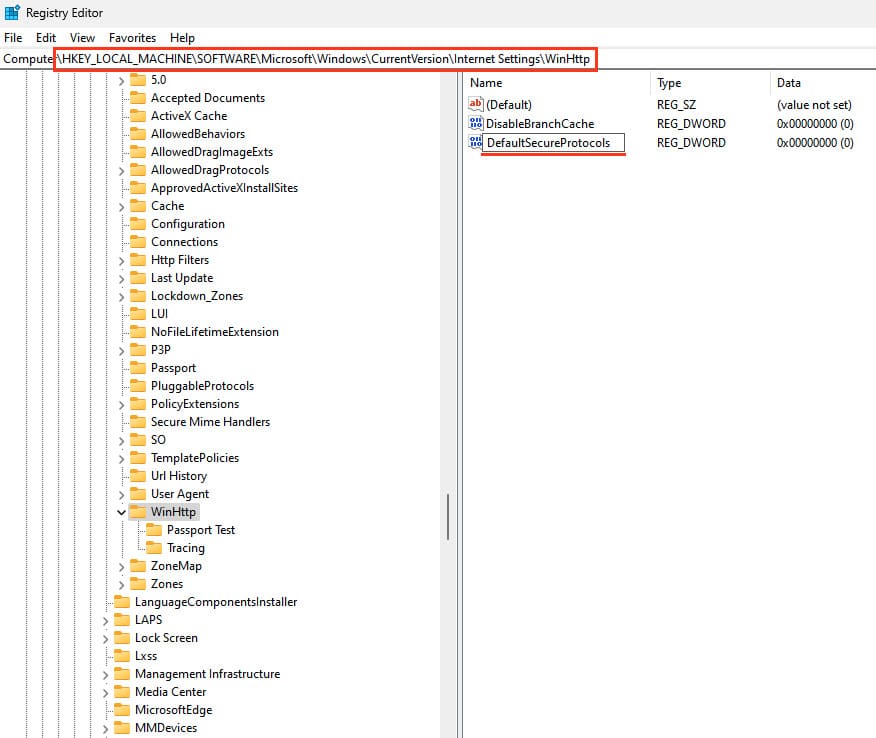
— После чего дайте ему значение «00000a00»

Теперь перейдите в другой раздел
HKEY_LOCAL_MACHINE\SOFTWARE\Wow6432Node\Microsoft\Windows\CurrentVersion\Internet Settings\WinHttp
Если папка WinHttp отсутствует, создайте ее
Вутри создайте Dword32 с названием «DefaultSecureProtocols»
— После чего дайте ему значение «00000a00»
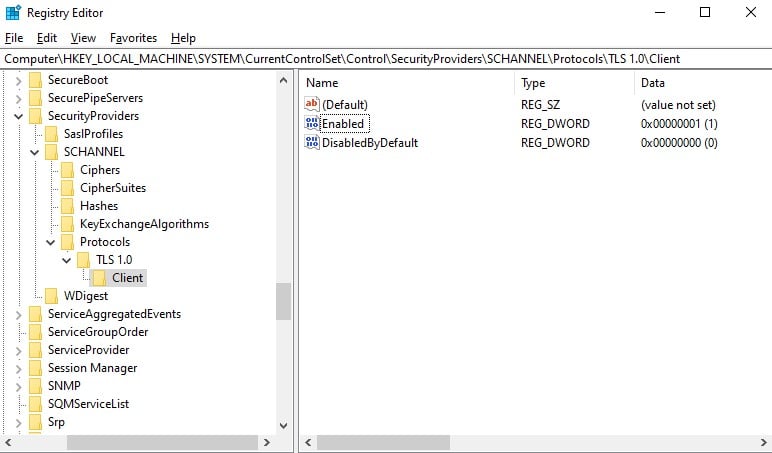
HKEY_LOCAL_MACHINE\SYSTEM\CurrentControlSet\Control\SecurityProviders\SCHANNEL\Protocols\TLS 1.1\Client
Если отсутствует папка TLS 1.1 и под папка Client, создайте их.
— Внутри создайте Dword32 с названием DisabledByDefault
— Дайте ему значение «00000000»
— А так же создайте еще один Dword32 с названием «Enabled» и дайте ему значение «00000001»
HKEY_LOCAL_MACHINE\SYSTEM\CurrentControlSet\Control\SecurityProviders\SCHANNEL\Protocols\TLS 1.2\Client
Если отсутствует папка TLS 1.2 и под папка Client, создайте их.
— Внутри создайте Dword32 с названием DisabledByDefault
— Дайте ему значение «00000000»
— А так же создайте еще один Dword32 с названием «Enabled» и дайте ему значение «00000001»
После чего попробуйте снова обновиться.
Шаг 3. Запуск Media Creation Tool и установка обновлений
Теперь, когда все настройки выполнены, снова запустите Media Creation Tool:
1. Запустите утилиту с правами администратора.
2. Примите лицензионное соглашение.
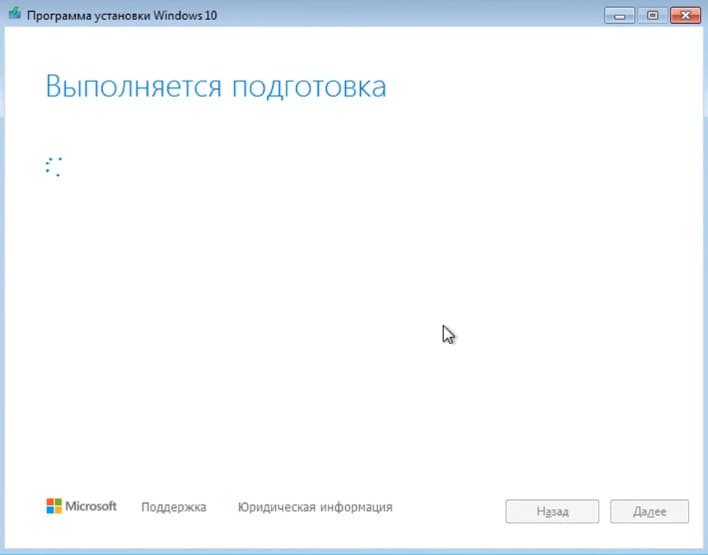
3. Дождитесь завершения всех этапов подготовки и установки обновления до Windows 10.
Теперь ваша система готова к обновлению. Следуя этим шагам, вы сможете устранить ошибку 0x80072f8f и обновить вашу версию Windows 7 до Windows 10 без проблем!
Лицензионный ключ активации Windows 7 от
Ошибка 0x80072f8f 0x20000 появляется при двух распространенных ситуациях. Первая из них – при обновлении с Windows 7 до более свежей версии или просто при установке Windows 10. Вторая частая ситуация заключается в появлении ошибки при запуске Media Creation Tool. Причины появления, как и особенности проявления в каждой них, будут разными. Но есть и хорошая новость, она заключается в том, что есть довольно четкое представление об ошибке и эффективное решение к каждой вариации проблемы.

Почему появляется ошибка 0x80072f8f 0x20000?
Нам придется разделять две ситуации появления ошибки. Хотя они и имеют идентичный код, но во всем остальном сильно отличаются. Основная причина сбой с кодом 0x80072f8f 0x20000 при установке Windows 10 – отсутствие поддержки протоколов безопасности TLS. В Windows 7 Service Pack 1 по умолчанию включена поддержка только TLS 1.0. Сейчас же сервера Microsoft более не поддерживают столь устаревший стандарт. Требуется версия TLS 1.1 и TLS 1.2, которые по умолчанию отключены в старой операционной системе Windows 7. Их включение должно исправить проблему.
Если ошибка появляется при обновлении Windows, в основном через официальную утилиту Media Creation Tool, то проблема в некорректных файлах обновления. Видимо, система пыталась загрузить файлы для апдейта, но они оказались поврежденными. Нужно принудительно удалить их.
Как исправить ошибку 0x80072f8f 0x20000 при установке Windows 10?
Как мы и писали, нам нужно заставить Windows 7 работать с TLS 1.1 и TLS 1.2. Это вполне реально сделать, если подкорректировать реестр операционной системы. Можно запустить Windows в безопасном режиме и сделать необходимые изменения. Это можно сделать вручную, но есть и более быстрый способ – запустить файл. Нам нужен один из файлов Microsoft, вот ссылка. Скачиваем его, запускаем и через пару секунд исправления должны быть внесены. Можно перезагружать ПК и снова пытаться установить Windows 10.
Что нужно сделать вручную:
- Нажимаем комбинацию Win + R, вводим regedit и нажимаем Enter.
- Идем по пути HKEY_LOCAL_MACHINE\SYSTEM\CurrentControlSet\Control\SecurityProviders\SCHANNEL\Protocols\TLS 1.1\Client.
- Изменяем значение параметра DisabledByDefault на 0 (если его нет, то просто создаем его).
- Переходим в ветку HKEY_LOCAL_MACHINE\SYSTEM\CurrentControlSet\Control\SecurityProviders\SCHANNEL\Protocols\TLS 1.2\Client.
- Тоже создаем или изменяем существующий параметр DisabledByDefault в значение 0.
Важно! Есть еще один интересный способ – запустить установку через ISO. Для этого нужно войти на сайт Microsoft с клиентом Windows и скачать его. Обязательно следует использовать для этого телефон. Затем передаем файл на ПК и запускаем его. У многих такое решение сработало.
Как исправить ошибку при обновлении через Media Creation Tool?
Для решения проблемы нужно зачистить файлы в одной из важных директорий, а также запустить обновление другим способом.
Пошаговая инструкция:
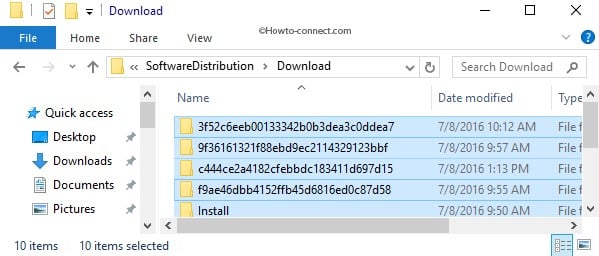
- Переходим по пути C:\Windows\SoftwareDistribution\Download.
- Удаляем все файлы, которые хранятся в этой папке.
- Кликаем правой кнопкой мыши по Пуску и выбираем «Командная строка (администратор).
- Вводим команду wuauclt.exe /updatenow.
Теперь вы знаете, что делать, если появляется ошибка 0x80072f8f 0x20000 при разных обстоятельствах. Включение поддержки TLS 1.1 и новее поможет успешно завершить установку операционной системы, а очистка файлов и обновление через консоль избавит от неполадки при апдейте Windows.
Будем рады увидеть ваши комментарии в отношении данной ошибки. Давайте вместе сделаем статью максимально полной.
You may encounter the Windows 10 Media Creation tool error when you use this tool. This error is followed by some different alphanumeric error codes. You can read this post offered by MiniTool Solution to get some methods to fix this issue.
One of the most common issues you face while running this tool is the inability to download ISO files.
Typically, the tool will remain dormant. Sometimes it throws 0x80080005 – 0x90016 error, which basically indicates that the folder that contains the installation is not completed or may have been damaged during the download.
Another common error is 0x80042405 – 0xa001a. If you are from the desktop to run the program and try to create a bootable media on a USB flash drive, you may encounter the “there was a problem running this tool”. Maybe this post – Top 7 Ways to Fix Media Creation Tool Error 0x80042405 – 0xa001a is what you need.
Reason for the Windows 10 Media Creation Tool Error
If the location of the system does not match the language of the downloaded Windows 10 installation file, the Windows 10 Media Creation Tool error will appear.
Method 1: Run Windows Media Creation Tool as Admin
You can try to run the Windows Media Creation Tool as admin to fix the “here was a problem running this tool” issue. Here are the steps:
Step 1: Press the Windows + R keys together to open the Run dialog. Then type lusrmgr.msc and click the OK button:
Step 2: Go to Users > Administrator and check the box to enable the account. Press the OK button to confirm.
You can now login as an administrator and run the Media Creation Tool. Then check to see if the issue has been fixed.
Method 2: Disable Your Antivirus
You can also try disabling your antivirus. The steps are as follows:
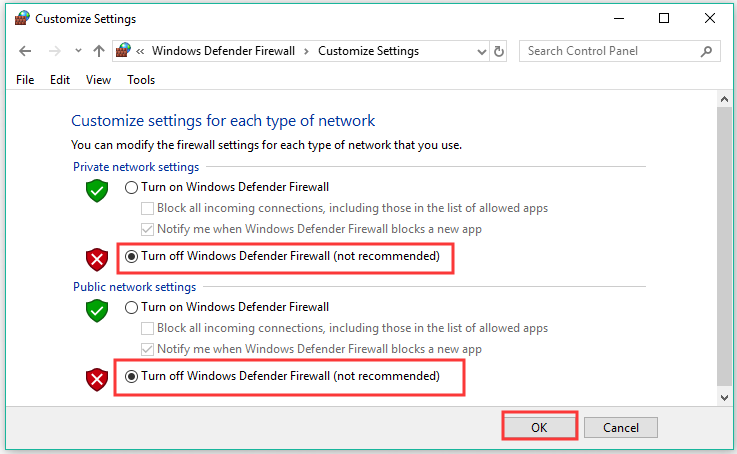
Step 1: Type Windows Defender in the search box and select Windows Defender Firewall from the contextual menu.
Step 2: Navigate to the Turn Windows Defender Firewall on or off tab on the left pane.
Step 3: In the pop-up window, select the checkboxes of Turn off Windows Defender Firewall (not recommended) in private and public network settings. And then click OK.
Restart your computer and re-access the particular web page to see if the Windows 10 Media Creation tool error is resolved or not.
Method 3: Check for Updates
Regardless of the operating system version you are using, it is always considered the good practice to install the latest security updates.
Step 1: Press the Win + I keys at the same time to open Settings and then choose Update & Security.
Step 2: Click Windows Update and then click Check for updates on the right side of the screen.
Step 3: If there are updates available, Windows will start to download them automatically. Then restart your computer to perform the installation process.
Now, check to see if the “there was a problem running this tool Windows 10” error has been fixed.
Method 4: Tweak the Registry
The last method for you is to tweak the registry. Here is how to do that:
Step 1: Type regedit in the Search box to open Registry Editor.
Step 2: Then, navigate to the following path:
HKEY_LOCAL_MACHINE\SOFTWARE\Microsoft\Windows\CurrentVersion\WindowsUpdate\Auto Update
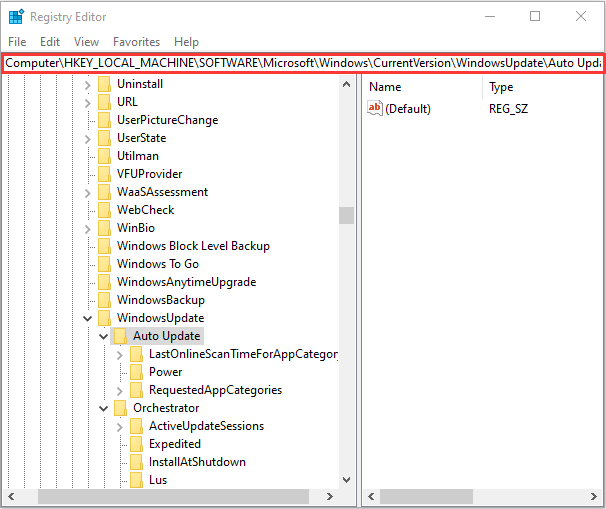
Step 3: Right-click the empty space and choose New > DWORD. Name the new dword AllowOSUpgrade and set its value to 1.
Final Words
From this post, you can know how to fix the Windows 10 Media Creation tool error on Windows 10. If you meet the same issue, you can try the methods above to get rid of it.
When running Windows 10 Media Creation Tool to install Windows 10 or upgrade Windows 10, users may encounter Windows 10 Media Creation Tool error 0x80042405 — 0xa001a, which results in failure to run the Media Creation Tool. This article introduces 7 ways to fix Media Creation Tool error 0x80042405 — 0xa001a with detailed steps and screenshots.
Windows 10 Media Creation Tool is a useful utility that is widely used especially for when Windows OS runs into problem and cannot boot successfully. It allows people to perform a fresh Windows 10 install, upgrade the new Windows 10 version or fix some boot issues.
However, some users have reported that during the process of running Media Creation tool, they have encountered error code 0x80042405 – 0xa001a, which stops them from creating a bootable USB drive with this tool. If you are having troubles from the same issue, don’t panic. This article will demonstrate you top 7 methods to fix Windows 10 Media Creation Tool error 0x80042405 – 0xa001a.
I’ve been trying to install windows onto my new pc, and for some reason, I keep getting this error code. Haven’t been able to find any answers for this. I’ve formatted my USB to fat32, just to make sure it was set to fat32, I’ve had the media tool on my USB and off. Still nothing works and no one has been able to help me.From www.reddit.com
You may have met the same problem like this user when running Windows 10 Media Creation Tool and don’t know how to solve it. But there is no need to worry now, because I will show you how to solve Windows 10 Media Creation Tool error 0x80042405 – 0xa001a with the top 7 methods. Every method has detailed steps and pictures, so you just need to follow every step I mentioned in this post.
The reasons that lead to Windows 10 Media Creation Tool error 0x80042405 – 0xa001a can be various. Here I summarize some possible scenarios where you might encounter error code 0x80042405 0xa001a.
1. You didn’t run the Media Creation Tool from inside the USB drive that you want to use to create an installation media.
2. There isn’t enough space on your USB drive on which you are trying to create installation media.
3. The USB is not formatted as NTFS file system.
4. Some antivirus programs are running when you run the Windows 10 Media Creation Tool.
If you have encountered Windows 10 Media Creation Tool error 0x80042405 – 0xa001a with the above occasions, you may try the following 7 methods. Before you start, you’d better disable all antivirus software and make sure to use a USB drive with at least 8 GB of storage space, as Windows 10 ISO file sizes grow every version.
This solution has fixed Windows 10 Media Creation Tool error 0x80042405 – 0xa001a in most cases and is very simple. So when you come across error code 0x80042405 0xa001a, you should try the first simple solution.
Note: To create Windows 10 installation media, you have to download an ISO file, which combines all Windows installation files.
Step 1. Download the Windows 10 Media Tool into the same USB that you want to use as an installation media. If you download the Media Creation tool on your computer, you can copy it to your USB.
Step 2. Run the Media Creation Tool from the same USB drive directly. The installer will then create an Installation Media/Bootable USB.
Many users tried this solution and successfully fixed Media Creation Tool error 0x80042405 – 0xa001a, but not knowing reasons.
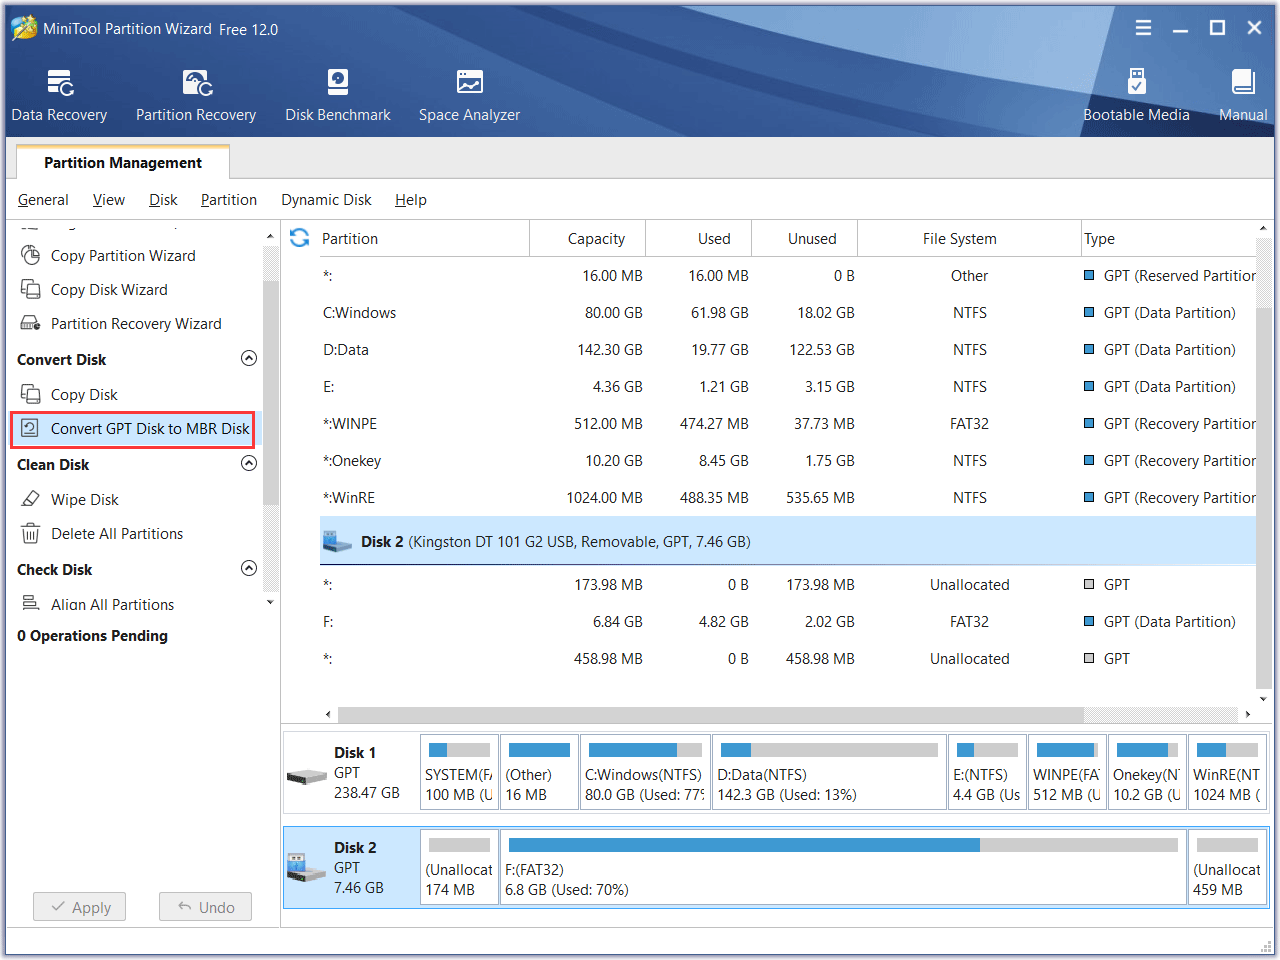
Solution 2. Convert USB Drive from GPT to MBR
According to some users, it seems that media creation tool will fail if the partition type is GPT (GUID Partition Table) even if you format the USB drive to FAT32 and the space is sufficient.
As we all know, GPT disk is more advanced when compared to MBR disk, so some users may initialize their USB drive to GPT disk to enjoy the benefits of GPT disk. However, Windows Media Creation Tool requires that your USB drive is set as an MBR (Master Boot Record) instead of GPT.
In this case, you can use a free partition manager to convert GPT disk to MBR. To convert GPT to MBR without data loss, you will need to use a free partition manager – MiniTool Partition Wizard.
MiniTool Partition Wizard Free Edition is a free partition manager, which can help you create partition, format partition, merge partition, check file system, copy disk, migrate OS to HD/SSD, etc. With MiniTool Partition Wizard Free Edition, you can convert GPT to MBR in just a few clicks.
Step 1. Download MiniTool Partition Wizard Free Edition by clicking the following button. Install it on your computer and launch it to get the main interface.
MiniTool Partition Wizard FreeClick to Download100%Clean & Safe
Step 2. Choose the USB drive of GPT partition style and select Convert GPT disk to MBR disk from the left panel.
Step 3. At this time, you can see that the USB drive has been converted to MBR disk, but this is just a preview. Click on Apply button on the upper left corner at last.
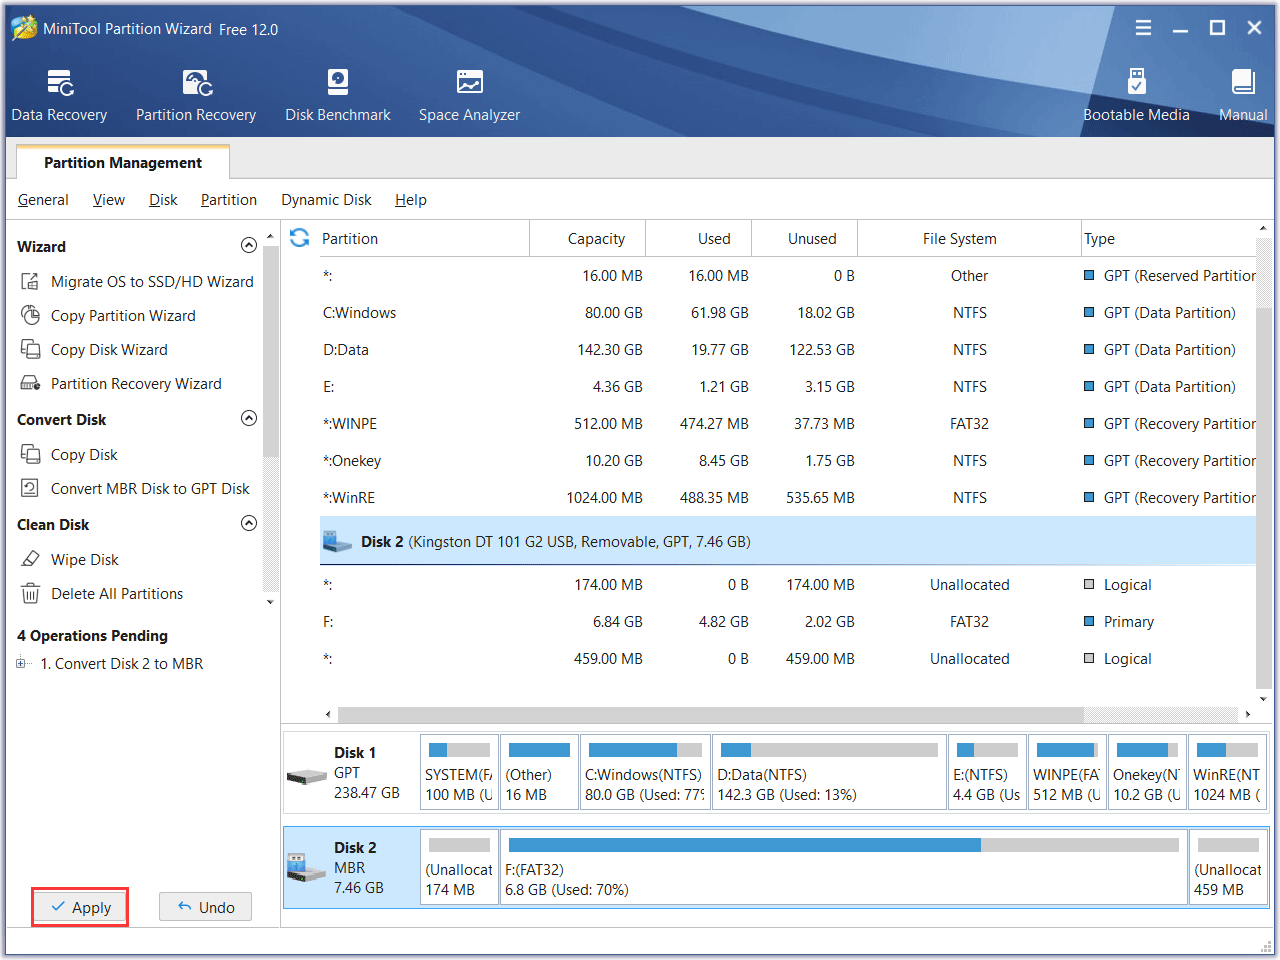
As you can see from the above steps, using MiniTool Partition Wizard Free Edition to convert GPT to MBR without data loss is very simple. If your USB drive is GPT disk and get the error code 0x80042405, you can try this method to convert GPT disk to MBR.
Solution 3. Format the USB Drive to NTFS
Some users reported that when they formatted the USB drive to NTFS, it worked flawlessly. And they are also able to boot the problematic computer from the USB drive.
Normally, using a FAT32 USB drive to create an installation media with Windows 10 Media Creation Tool is perfect. However, when users come across 0x80042405 0xa001a error code, a part of users successfully fixed the problem by formatting their USB drive to NTFS.
You can format the USB drive to NTFS rather than FAT32 to see if Windows 10 Media Creation Tool error 0x80042405 – 0xa001a can be fixed.
Step 1. Download MiniTool Partition Wizard Free Edition by clicking the following button. Install it on your computer and launch it to get the main interface.
MiniTool Partition Wizard FreeClick to Download100%Clean & Safe
Step 2. Select the partition on the USB drive which needs formatting and choose Format Partition feature from the left panel.
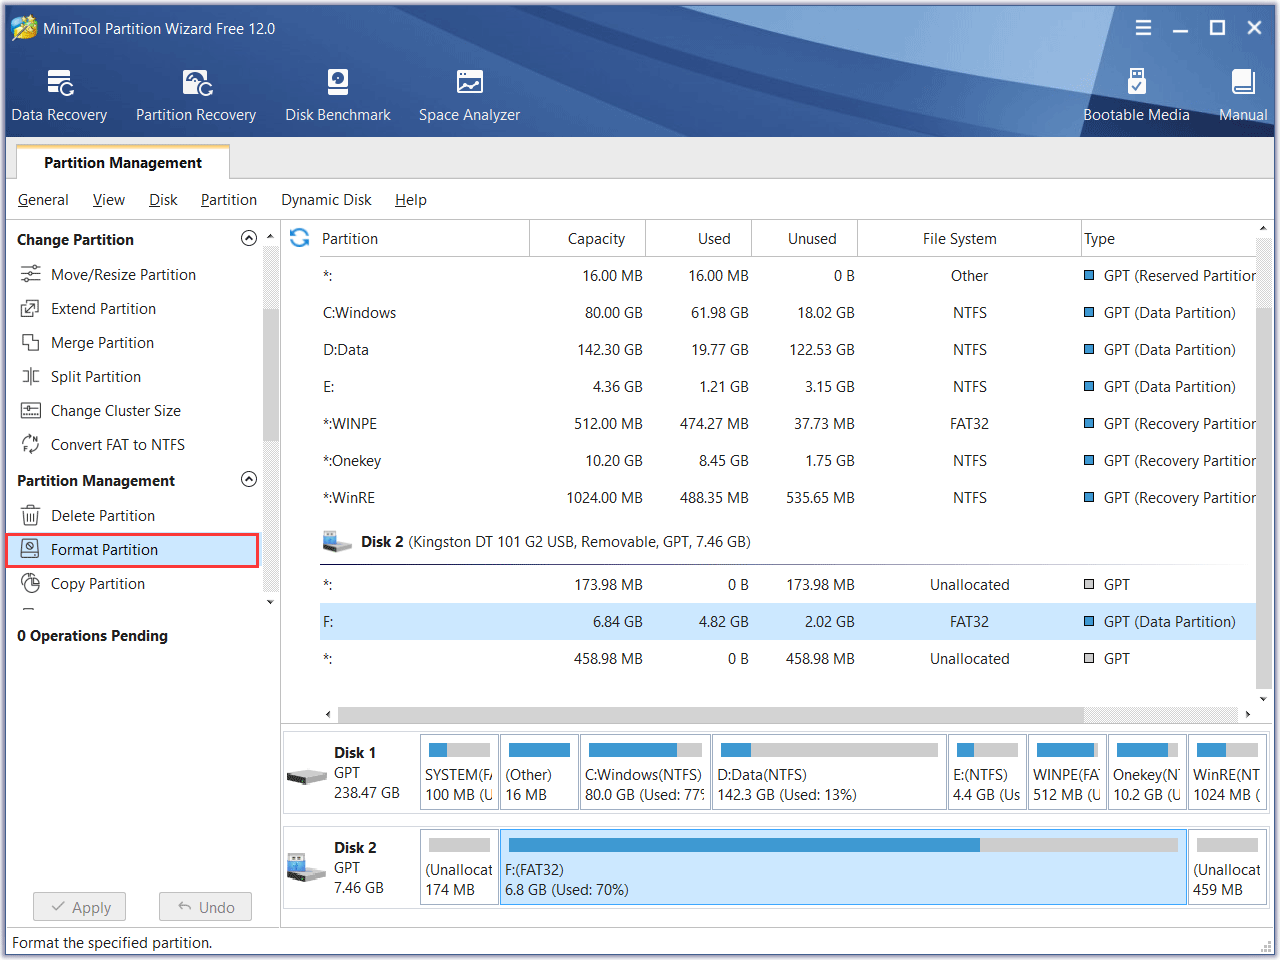
Step 3. Format the partition as NTFS file system. Then click OK.

Step 4. Now you can preview the formatted partition. Then click Apply button on the top to apply the change.
Note: You can also convert FAT32 to NTFS directly via MiniTool Partition Wizard Free Edition if you have copied media creation tool to the USB drive and don’t want to format it.
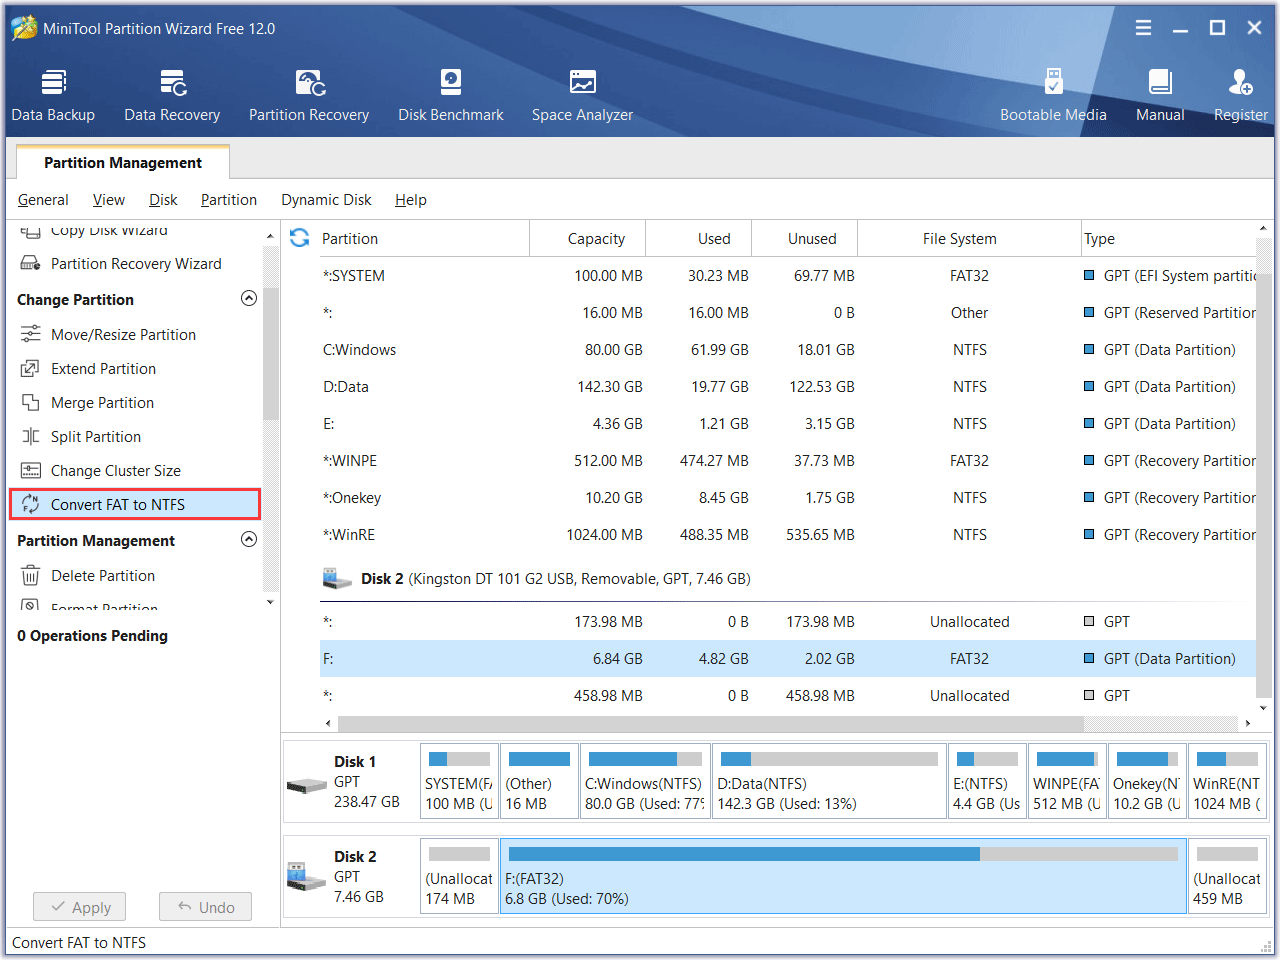
Using MiniTool Partition Wizard to convert FAT to NTFS is totally free. After a successful conversion, you just need to close the program and try again.
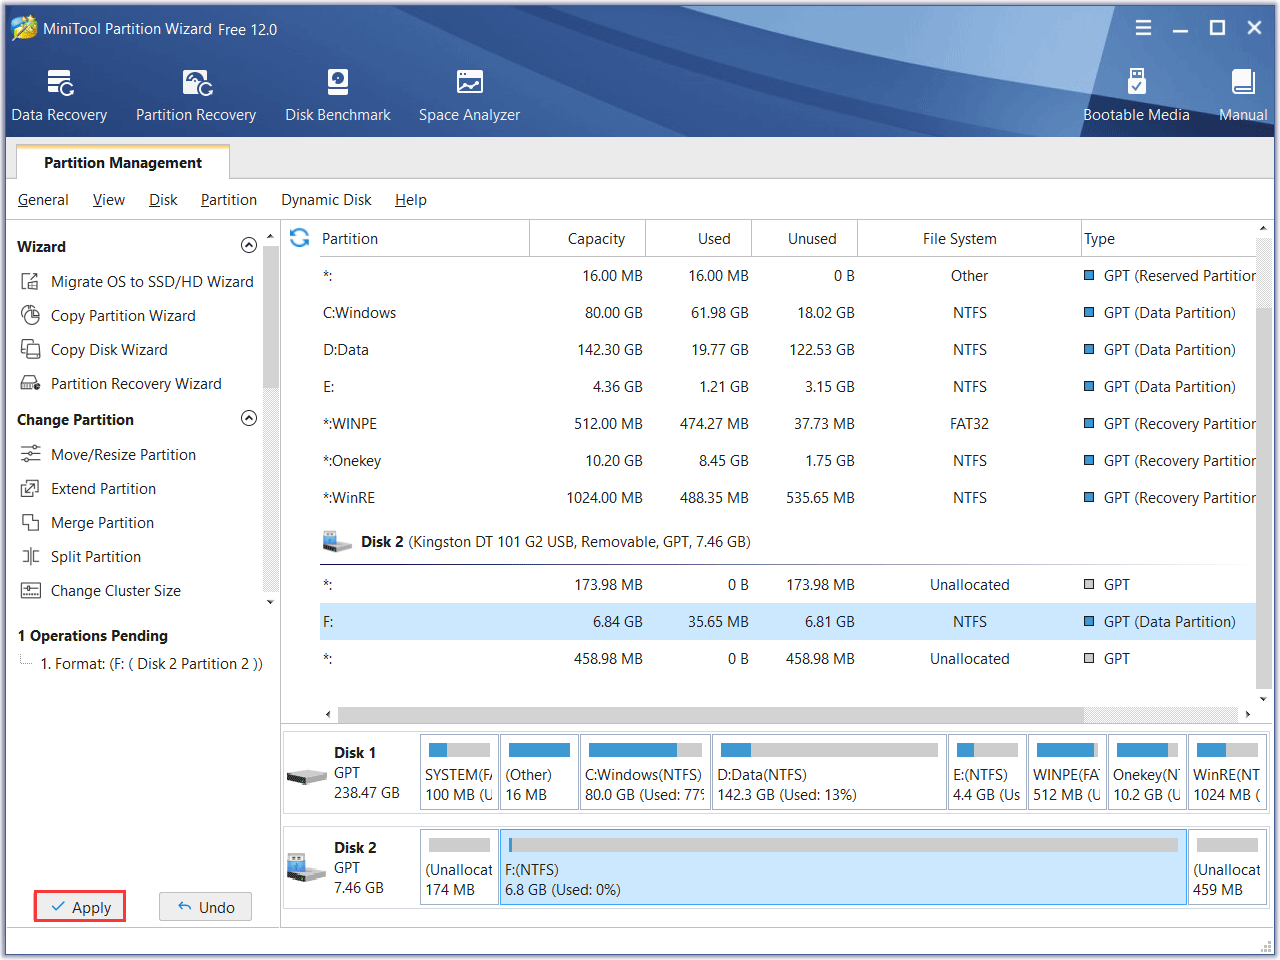
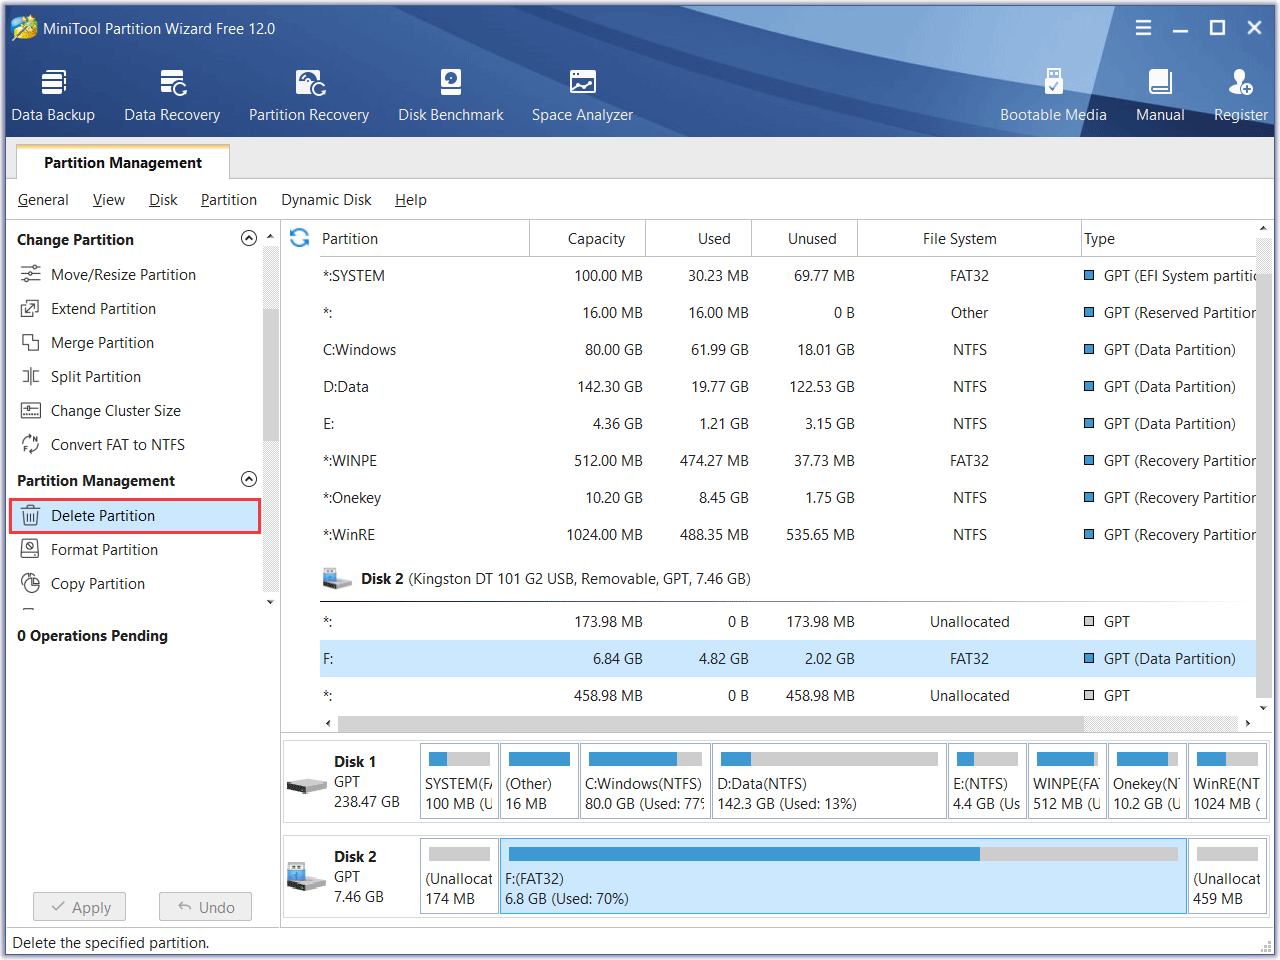
Solution 4. Delete the USB Drive Partition and Create an NTFS Partition
Some users also reported that after clearing the old partitions off of the USB drive and then creating a new NTFS partition, it also worked for them.
Step 1. Download MiniTool Partition Wizard Free Edition by clicking the following button. Install it on your computer and launch it to get the main interface.
MiniTool Partition Wizard FreeClick to Download100%Clean & Safe
Step 2. Select the partition on the USB drive and choose Delete Partition from the left action panel.
Step 3. Then click Create Partition from the left side.
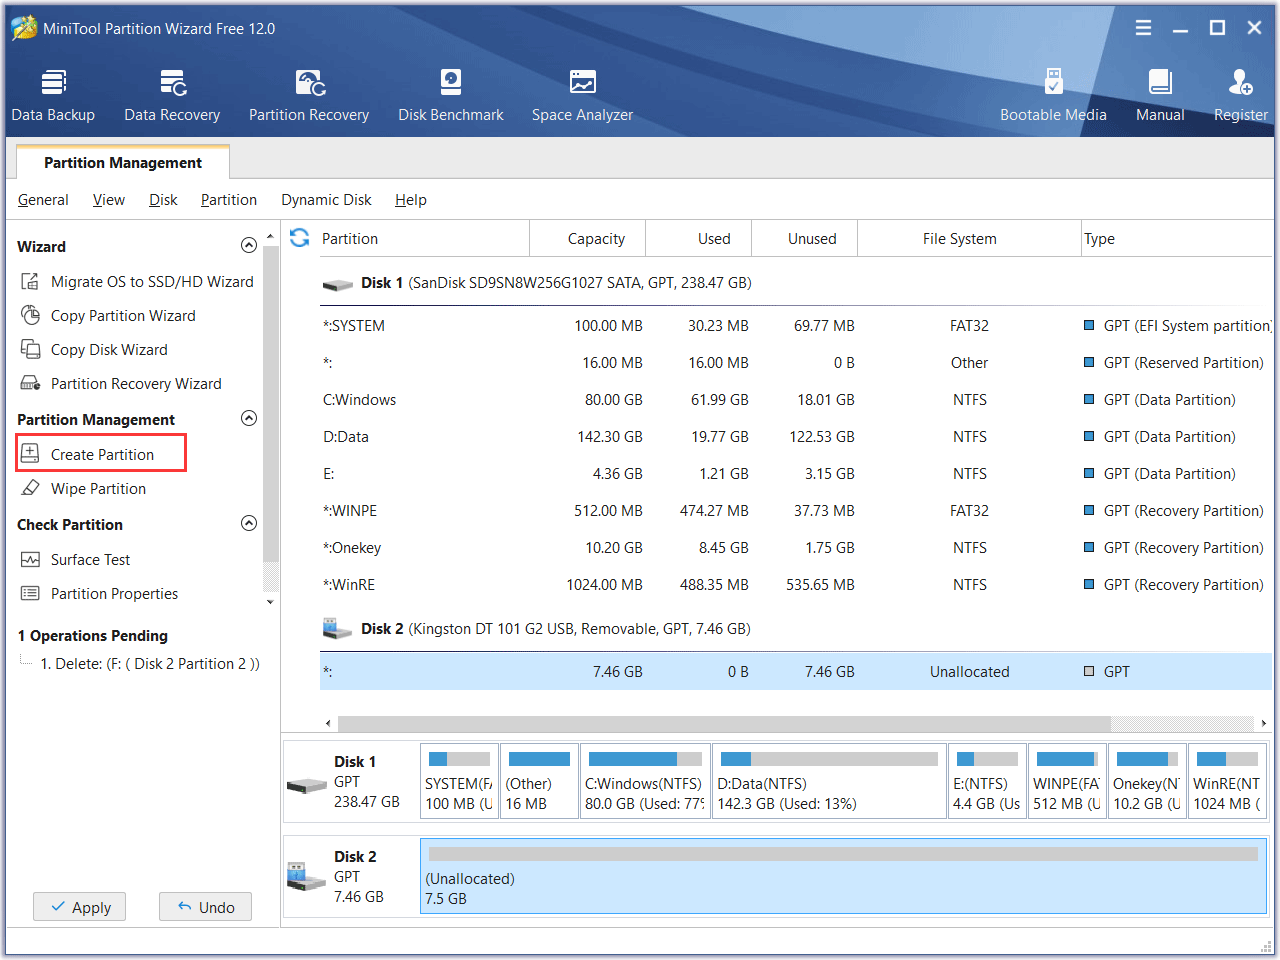
Step 4. Set the partition’s file system as NTFS, then Click OK.
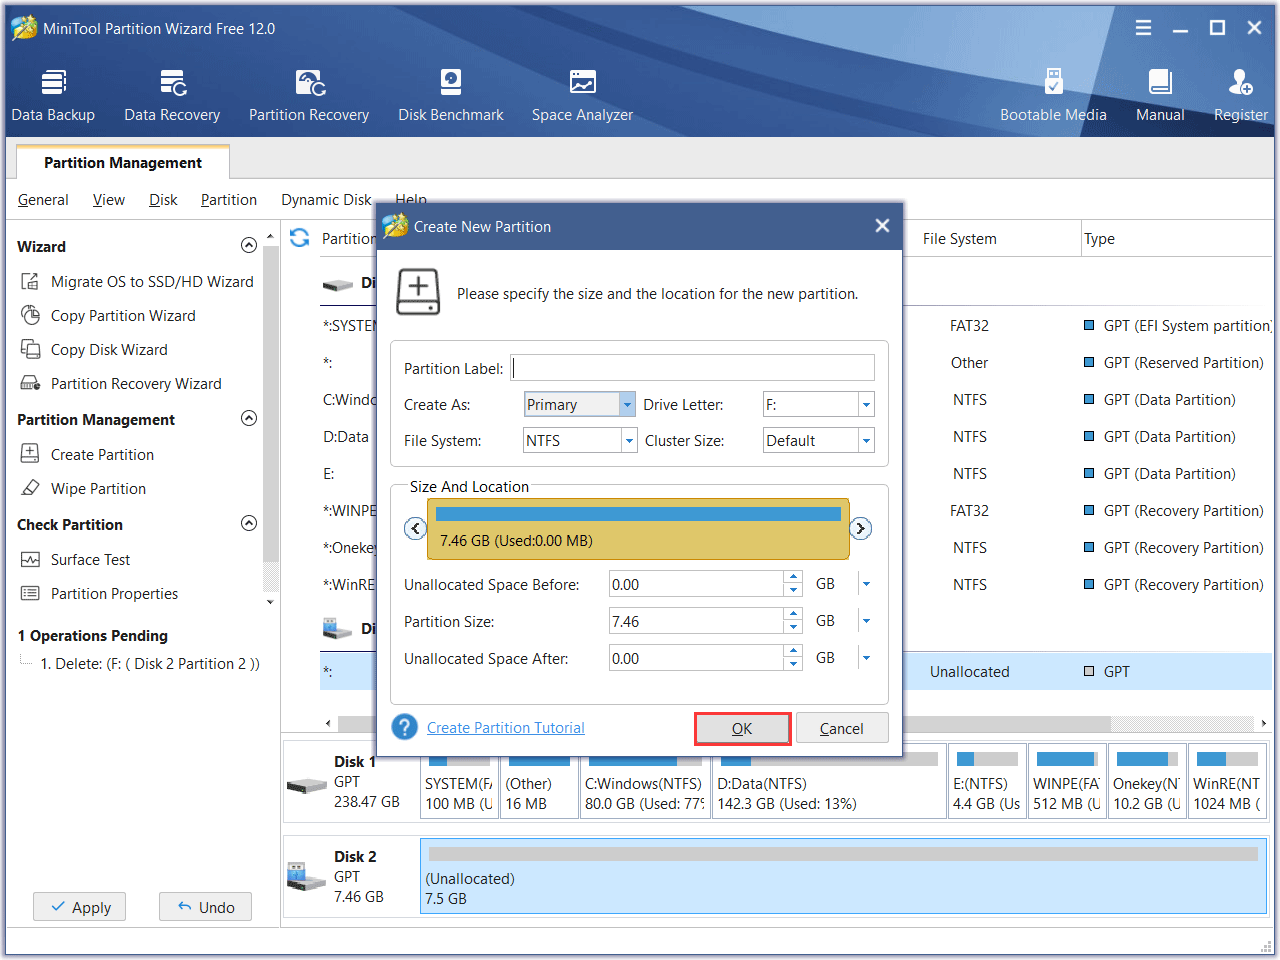
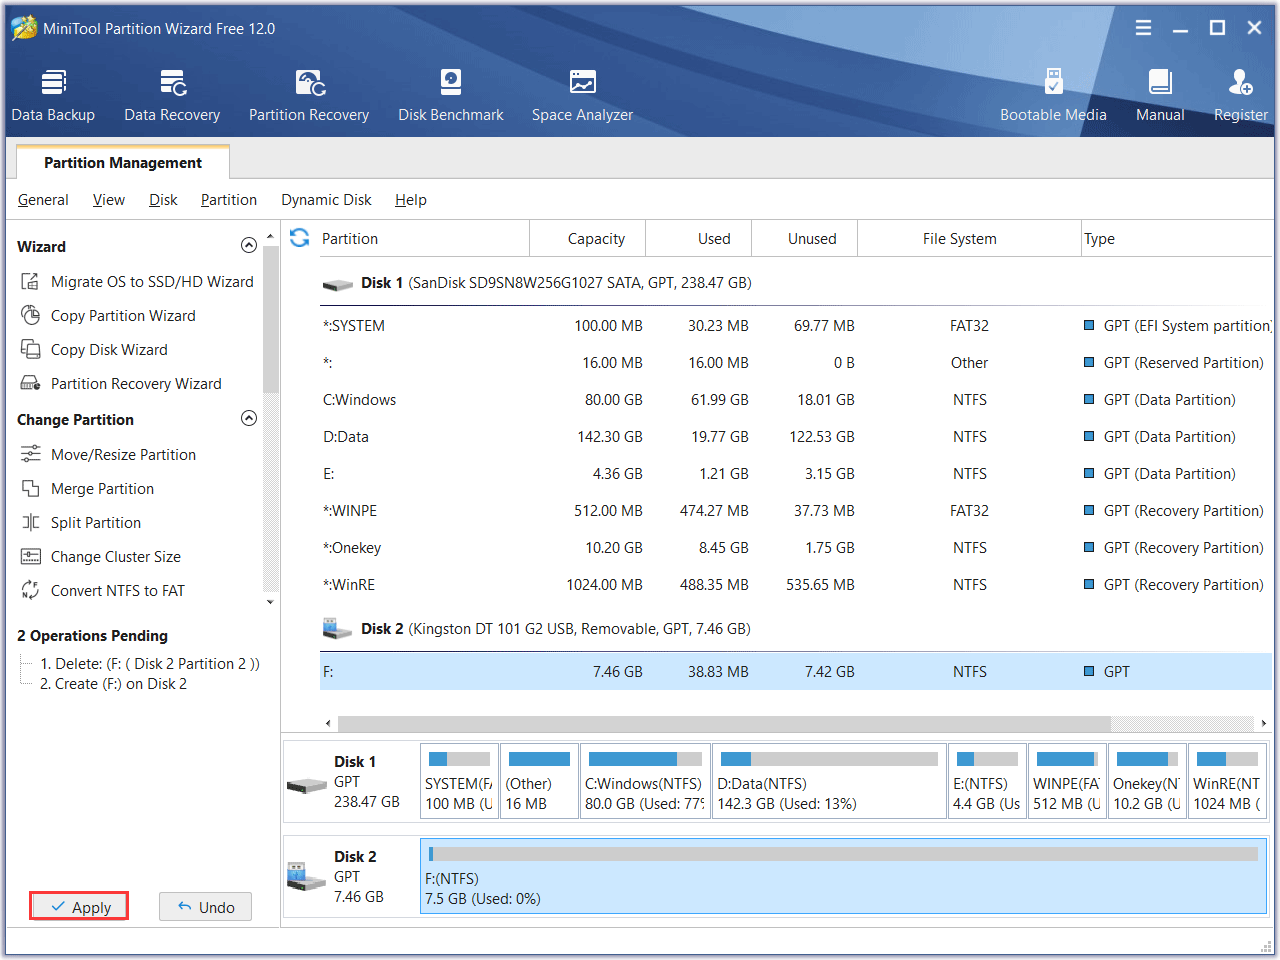
Step 5. Click Apply at last to allow the pending operations.
Solution 5. Disable USB Selective Suspend Setting in Power Options
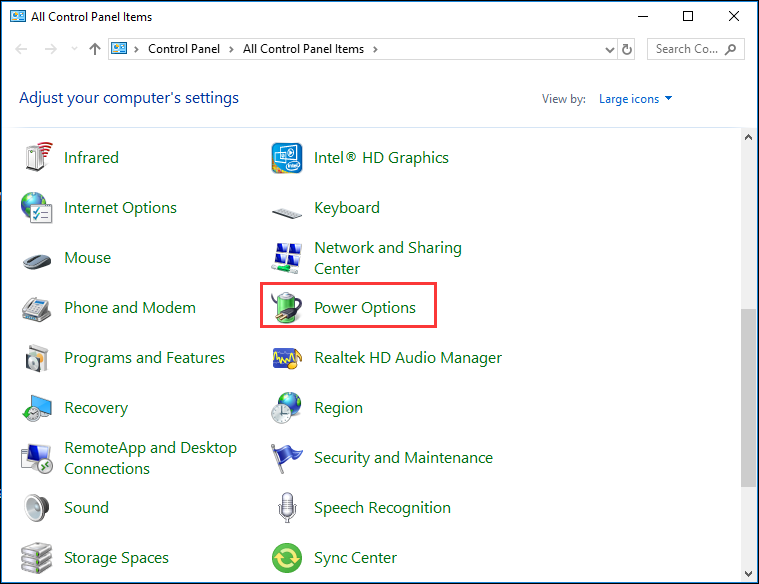
Step 1. Type Control Panel in the Windows search box, and choose the best match to open it.
Step 2. select Power Options.
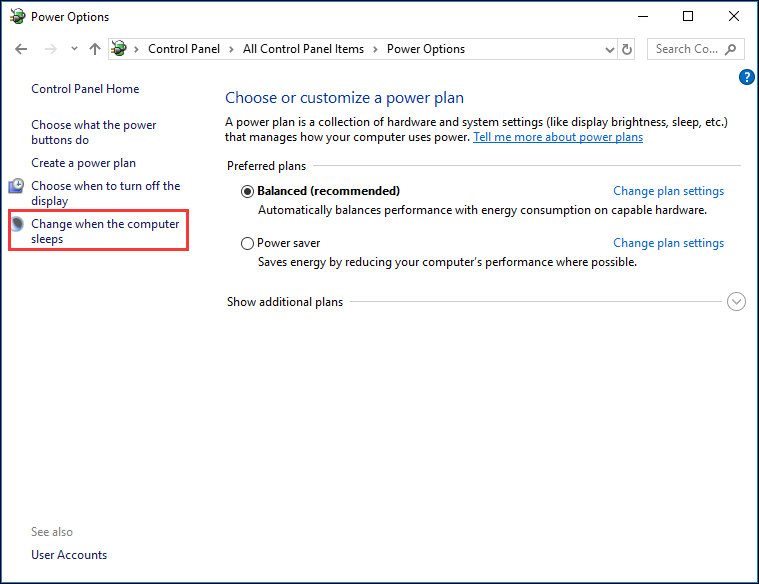
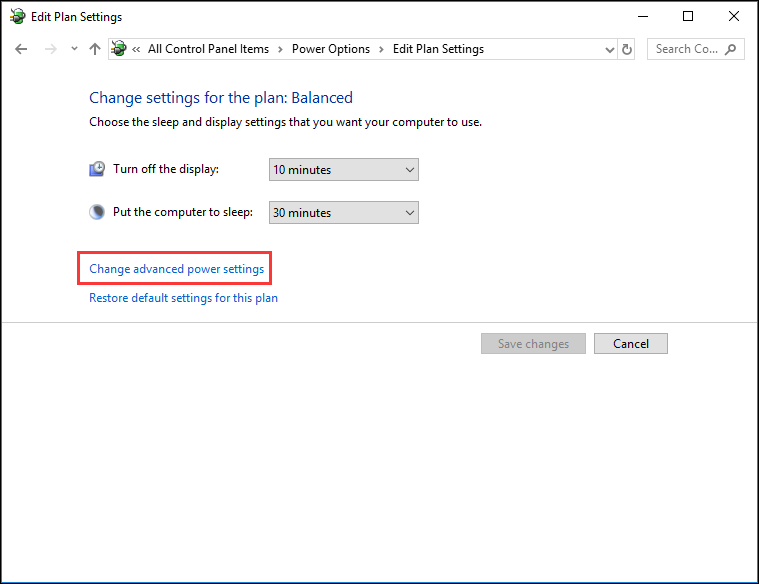
Step 3. Click Change when the computer sleeps from the left.
Step 4. Click on the Change advanced power settings.
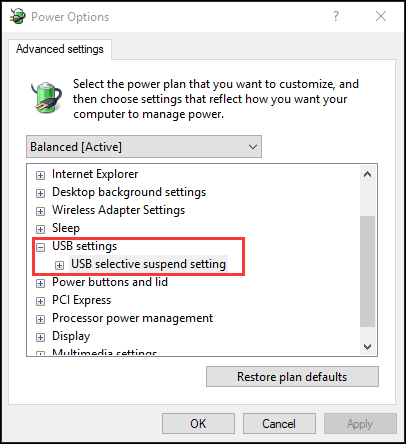
Step 5. Expand USB settings and then expand USB selective suspend setting.
Step 6. Select Disabled in the Setting. Then click OK to close the Power Options window.
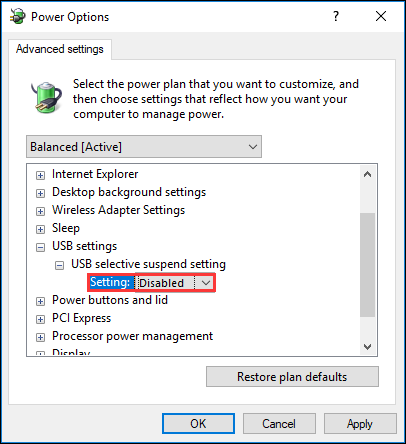
The above steps would prevent your USB drive from going into suspend mode while the Media Creation Tool is making the Windows 10 installation media, which may prevent the error code 0x80042405 0xa001a.
Step 1. Right-click Windows Start menu and choose run, then input services.msc, and press Enter.
Step 2. Find the services listed below and check their status one by one. If any of them are disabled, right-click on it and select Start.
- Windows Update
- Background Intelligent Transfer Service
- Server
- Workstation
- TCP/IP NetBIOS Helper
- IKE and AuthIP IPsec Keying Modules
Step 3. Locate Windows Update from the list of services.
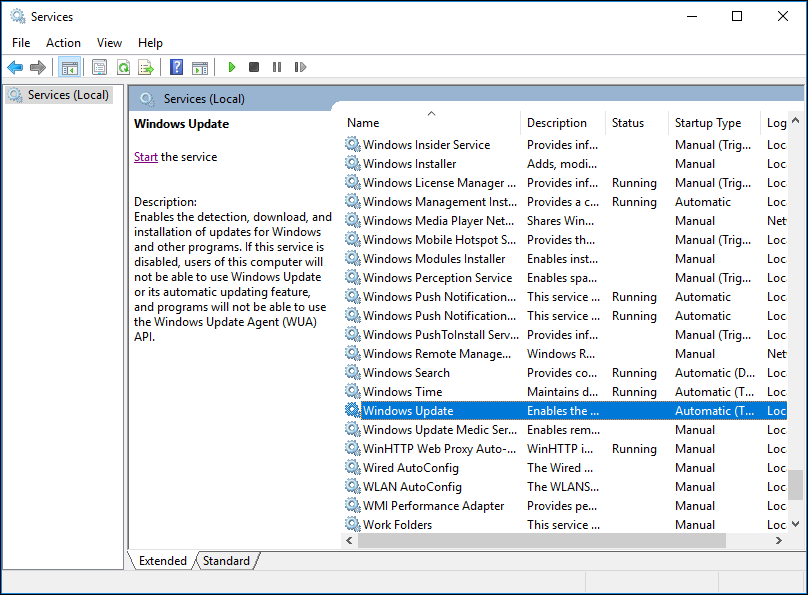
Step 4. Double click on Windows Update and set the Startup Type to Automatic and click OK.

Step 5. Close Services window and try again.
Microsoft also released Windows 7 USB/DVD download tool for Windows 7 users to make installation media. If you come across error code 0x80042405 0xa001a when using Windows 10 Media Creation Tool, you can try Windows 7 USB/DVD download tool as an alternative.
Don’t misunderstand that Windows 7 USB/DVD Tool can only be used for making Windows 7 installation media. Although it is called Windows 7 USB/DVD Tool, it works flawlessly in Windows 10 as well.
This tool also almost performs the same task as Media Creation Tool but you must have the entire ISO file already presented in your system. Now follow the steps as below.
Step 1. Download the Windows 10 ISO file from Microsoft’s official website.
Step 2. Download Windows 7 USB/DVD download tool from Microsoft’s official website and install it on your computer.
Step 3. After installing, run the application as an administrator. In the first step, you will be asked to choose the Windows 10 ISO file. Select the ISO file you download and continue.
Step 4. Then select the target drive (USB drive or DVD). Follow the on-screen instructions and you will be able to make a bootable USB drive in just a few clicks.
After trying the above-listed solutions, have you successfully fixed Windows 10 Media Creation Tool error 0x80042405 – 0xa001a? Hope the above fixes help you resolve the error 0x80042405 – 0xA001A when creating a bootable USB installation disk using the Media Creation Tool.
“By following the steps in this post, I finally fixed Windows 10 Media Creation Tool error 0x80042405 – 0xa001a issue. I’d like to share this post with more friends who come across 0x80042405 – 0xa001a error code when running the Media Creation Tool.”Click to Tweet
Bottom Line
After reading this post, you may find it is not being very complicated to resolve Windows 10 Media Creation Tool error 0x80042405 – 0xa001a issue via the above 7 methods with detailed steps and pictures.
If you have any question about how to fix Windows 10 Media Creation Tool error 0x80042405 – 0xa001a or if you have other better solutions, you can leave a message in the following comment zone and we will reply as soon as possible. If you need any help when using MiniTool software, you may contact us via [email protected].
Большинство пользователей Windows знают о его Media Creation Tool. Запущенный в 2015 году, он позволяет людям обновлять свои текущие операционные системы до Windows 10 или устанавливать ее на другие устройства, создавая загрузочные носители, такие как DVD или USB-флешки. Этот гениальный инструмент сделал установку Windows намного более удобной и эффективной. Таким образом, это может быть очень неприятно, когда вы хотите выполнить аналогичные функции, но обнаруживаете, что ваш Window Media Creation Tool не работает. Что ж, не волнуйтесь! Этот блог проведет вас через процесс устранения неполадок, чтобы вы могли быстро вернуться к обновлению.
Выявление и устранение возможных причин неисправностей
Если ваш инструмент Windows 10 Media Creation не работает, первым шагом всегда должно быть определение проблемы. Как и в случае с любой технологической проблемой, многие глубинные причины могут способствовать возникновению проблемы. Часто можно провести обратную разработку оповещений, чтобы определить, в чем заключается проблема, и соответствующим образом ее устранить.
1. Сбои в программном обеспечении
Прежде всего, иногда машина или программное обеспечение могут спонтанно глючить. Если вы обнаружили, что ваш инструмент создания носителя Windows 10/11 не работает, первым делом следует обратиться к тому, к чему мы прибегаем чаще всего: перезапустить систему.
Выключите систему, подождите несколько минут, а затем включите ее снова. Или просто выберите опцию «Перезагрузить». Это очистит кэш, и любая временная проблема в системе будет автоматически устранена.
2. Недостаточно места для хранения

Идентификация: если процесс неожиданно останавливается или появляется сообщение об ошибке, указывающее на недостаточность места на диске.
Как исправить: Для обновления или установки операционной системы Windows на устройстве должно быть не менее 8–16 ГБ свободного места. В случае недостаточного места на диске появляется сообщение об ошибке, и процесс останавливается. К счастью, это можно быстро исправить.
Освобождение места на компьютере или USB/DVD освободит место для системы загрузки. Вы можете удалить ненужные файлы или перенести их на внешнее устройство хранения. В качестве альтернативы, другие инструменты, предназначенные для очистки устройств, могут помочь оптимизировать весь процесс.
3. Проблемы совместимости

Идентификация: Если на дисплее отображается сообщение вроде «Неподдерживаемая операционная система», это обычно указывает на проблемы совместимости оборудования или программного обеспечения на устройстве.
Как исправить: Для бесперебойной работы инструмента необходимо выполнить некоторые требования к оборудованию и программному обеспечению.
- Процессор должен быть 1 ГГц или выше.
- Объем оперативной памяти должен быть не менее 1 ГБ, но лучше 2 ГБ.
- От 8 до 16 ГБ свободного места на диске
Если вы уверены в своих аппаратных требованиях, рассмотрите возможность поиска программного обеспечения. Устаревшую операционную систему сначала необходимо обновить, чтобы она была совместима с инструментом. Вы можете загрузить последнюю версию через Центр обновления Windows.
4. Нестабильный Интернет

Идентификация: Если загрузка неожиданно останавливается или прерывается с сообщением «Ошибка сети», проблема связана с подключением к Интернету.
Как исправить: Обновите настройки Wi-Fi или измените подключение к Интернету. Убедитесь, что у вас стабильный Интернет, загрузив другие интернет-активности, такие как серфинг на новой вкладке или проверив скорость Интернета, прежде чем обновить инструмент и повторить попытку.
5. Вмешательство антивируса
Идентификация: на экране может появиться сообщение об ошибке «Ограниченный доступ», что указывает на проблемы с брандмауэром или антивирусом.
Как исправить: временно отключите программное обеспечение в случае вмешательства антивируса . Перейдите в антивирусную программу и приостановите защиту. Между тем, для проблемы с брандмауэром,
- Откройте Панель управления.
- Перейдите в раздел «Брандмауэр Защитника Windows».
- Найдите опцию, разрешающую прохождение приложения через брандмауэр.
- Добавьте Media Creation Tool в список приложений и нажмите «Разрешить доступ».
6. Проблемный инструмент
Идентификация: Если инструмент поврежден или неисправен, он будет самопроизвольно зависать при попытке запуска.
Как исправить: поврежденный инструмент l придется заменить. Удалите существующую программу на вашем устройстве и повторно загрузите инструмент с веб-сайта Microsoft . Предпочтительно использовать управляемую загрузку для стабильных загрузок.
7. Административная некомпетентность
Идентификация: Инструменту не удается внести изменения в систему, и отображаются сообщения об ошибках, связанных с доступом.
Как исправить: Для изменения системы инструменту Media Creation требуются права администратора.
- Щелкните правой кнопкой мыши по инструменту и выберите «Запуск от имени администратора».
- Проверьте настройки, чтобы убедиться, что учетная запись пользователя имеет права администратора.
Краткое содержание
Windows Media Creation Tool призван облегчить нам жизнь, но различные проблемы могут привести к его сбоям. Будь то административные ошибки, проблемы с подключением или совместимостью оборудования, шаги, описанные выше, могут помочь вам решить эти проблемы и вернуться к обновлению вашей системы.
Ищете надежное устройство для обеспечения бесперебойных обновлений и беспроблемной работы Windows? Ознакомьтесь с рождественской и новогодней распродажей Chuwi ! Обновляйтесь до устройств вроде Chuwi Hi10 Max, оснащенных мощным оборудованием и достаточным объемом памяти для бесперебойной обработки обновлений. Присматриваетесь к Hi10 Max? Приобретите его с эксклюзивной скидкой 11% с помощью акции Save More with Lucky Draw и воспользуйтесь праздничными скидками, чтобы получить лучшие предложения на премиальные технологии.