
Перед сохранением файлов на новый жесткий диск, необходимо инициализировать этот диск. Затем создать новый том и отформатировать его с файловой системой. При инициализации нового диска в Windows Server 2019, вы можете выбрать либо MBR or GPT. На диске MBR можно создать только 4 основных раздела и использовать максимум 2 ТБ дискового пространства. Если вы инициализируете диск объемом 4 ТБ как MBR, оставшиеся 2 ТБ нераспределенного пространства нельзя использовать для создания нового тома или добавления в другой раздел.
Когда вы устанавливаете Windows Server 2019, системный диск по умолчанию будет инициализирован как GPT. Если вы инициализировали диск как MBR и уже сохранили файлы на этот диск, возможно ли конвертировать MBR в GPT без потери данных? Ответ — да. В этой статье представлены 3 способа конвертации MBR в GPT в Windows Server 2019.
Содержание:
- Конвертировать MBR в GPT в Server 2019 через Управление дисками
- Конвертировать диск с MBR2GPT.exe в Windows Server 2019
- Как конвертировать диск с конвертером MBR в GPT
1. Преобразуйте MBR в GPT в Server 2019 через Управление дисками
Этот метод используется только тогда, когда на MBR-диске нет раздела или вы можете удалить все разделы на нем.
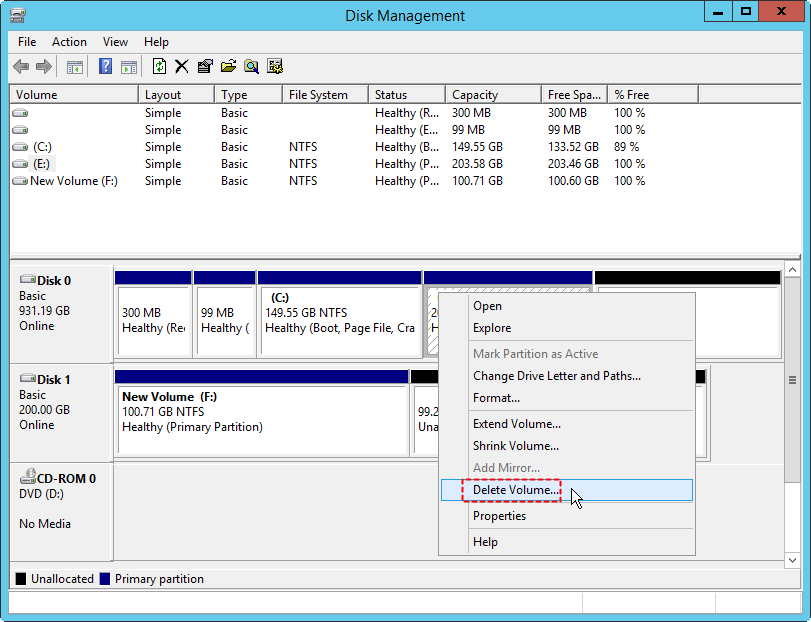
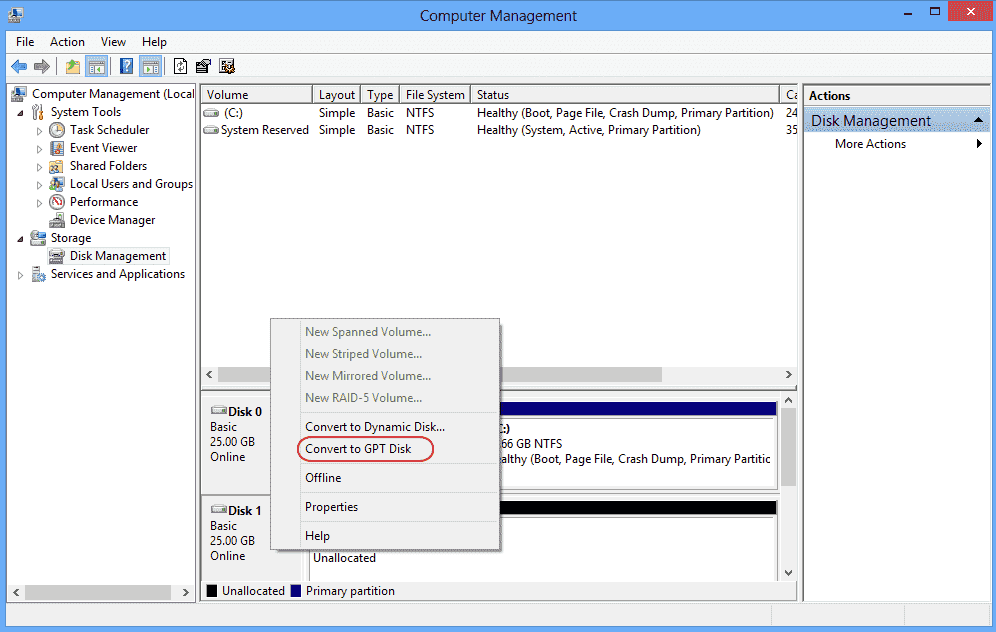
Помимо создания, удаления и форматирования раздела, Windows Disk Management может конвертировать диск между MBR и GPT. Однако на диске не должно быть разделов. Если есть один или несколько разделов, вы должны удалить их заранее. Как вы видите на снимке экрана, опция «Преобразовать в GPT-диск» неактивно in Server 2019 Управление дисками при щелчке правой кнопкой мыши на MBR-диске.

Как конвертировать MBR в GPT в Server 2019 с помощью управления дисками:
- Press Windows + X вместе на клавиатуре и щелкните в списке Управление дисками.
- Создайте раздел на этом MBR-диске и выберите «Удалить том», повторите, чтобы удалить все остальные разделы на этом диске. Не забудьте заранее перенести файлы.
- Щелкните правой кнопкой мыши по передней части этого MBR-диска и выберите «Конвертировать в GPT-диск». Через некоторое время преобразование будет завершено.
Очевидно, что конвертировать диск таким образом — не очень хорошая идея. Есть способ получше конвертировать MBR в GPT без потери данных in Windows 2019 сервер. Перед запуском подтвердите, хотите ли вы преобразовать системный диск в GPT или преобразовать MBR-диск только с данными.
2. Конвертировать диск с MBR2GPT командовать в Windows Server 2019
Этот метод используется только для преобразования системного диска из MBR в GPT.
Вам следует уделять больше внимания, если вы хотите конвертировать системный диск в GPT, поскольку операционная система и программы установлены на этом диске. Немногие инструменты могут гарантировать 100% загрузку сервера и его целостность после преобразования системного диска из MBR в GPT. Поэтому лучше сделать резервную копию заранее и запустить MBR2GPT in Server 2019, который является родным инструментом командной строки. Очень легко преобразовать диск с MBR2GPT команда, но структура разделов вашего диска должна соответствовать некоторым требованиям.
Предварительное условие для конвертации Server 2019 диск с MBR2GPT командный инструмент:
- На этом диске не должно быть логического диска. Если есть, следуйте методу преобразовать логический раздел в первичный.
- На этом диске может быть максимум 3 основных раздела. Если их больше, следуйте методу переместить раздел на другой диск. Вы можете либо сохранить раздел на другом диске, либо переместить его обратно после преобразования в диск GPT.
- Не должно быть Windows Неподдерживаемый тип раздела на диске, например EXT2, EXT3.
Общая конфигурация раздела диска и ошибка при преобразовании MBR в GPT в Windows Server 2019:


Как вы видите на скриншотах, когда я конвертировал MBR-диск в GPT для Windows Сервер 2019, я получил ошибку «Ошибка проверки структуры диска для диска 0«. Потому что на первом снимке экрана есть логический диск, а на обоих снимках экрана есть 4 раздела.
MBR2GPT сначала проверит структуру разделов диска, если проверка не удалась, преобразование не будет продолжено. Если преобразование прошло успешно, изменения не могут быть отменены и нет Windows собственный инструмент для преобразования GPT в MBR без потери данных.
Шаги по преобразованию MBR в GPT в Windows Server 2019 MBR2GPT команда:
- Заранее сделайте резервную копию системы.
- Press Windows + R ключи вместе, ввод CMD и нажмите Enter.
- В окне командной строки введите mbr2gpt /disk:0 /convert /allowFullOS а затем нажмите Enter, если ваш системный диск не равен 0, замените его правильным номером.
Если вы хотите узнать больше о MBR2GPTвход mbr2gpt /? в командном окне или посетите эту страницу.

Есть еще один момент, который вы должны знать. Если вы конвертируете MBR-диск без расширение раздела System Reserved, будет EFI Раздел создан за диском C после преобразования в GPT-диск. Управление дисками ничего не может с этим сделать EFI раздел.
После преобразования MBR в GPT без расширения раздела System Reserved:

Расширенный раздел, зарезервированный системой, перед преобразованием MBR в GPT:

Как вы видите на снимках экрана, преобразование MBR в GPT завершается успешно независимо от того, расширен ли раздел, зарезервированный системой, или нет. Почему EFI раздел можно создать слева или справа от диска C:? MBR2GPT сначала уменьшит раздел System Reserved, если свободного места недостаточно, вместо этого уменьшит загрузочный раздел (диск C). Если вы хотите сделать EFI раздел слева от диска C после преобразования в GPT-диск, следуйте видео, чтобы расширить системный зарезервированный раздел (2гб вполне достаточно).
3. Как преобразовать MBR в GPT в Server 2019 с преобразователем
Этот метод используется для преобразования MBR-диска в GPT без операционной системы.
Конвертировать MBR в GPT очень просто с помощью NIUBI Partition Editor, есть только один момент, что все разделы на MBR диске должны быть NTFS или FAT16/32.
Шаги по преобразованию MBR в GPT в Server 2019 NIUBI Partition Editor:
- Скачать этой программы, щелкните правой кнопкой мыши на передней части этого MBR-диска и выберите «Преобразование в GPT-диск«.
- Просто нажмите «Да» для подтверждения, после чего будет добавлена ожидающая операция.
- Нажмите Применить вверху слева, чтобы вступить в силу, готово.
Посмотрите видео как конвертировать MBR диск в GPT в Windows Server 2019:

Помимо преобразования MBR-диска в GPT в Windows Server 2019/2022 и предыдущий Server 2003/2008/ 2012/2016 NIUBI Partition Editor помогает вам преобразовать раздел между первичным и логическим, преобразовать NTFS в FAT32 без потери данных. Он также помогает вам сжимать, расширять, перемещать и объединять разделы для оптимизации дискового пространства, клонировать диск/раздел для переноса операционной системы и данных, создавать, удалять, форматировать, скрывать, дефрагментировать, стирать разделы и многое другое.
Summary
Were you looking to convert MBR to get server 2019 but needed help finding a suitable way to do that? We have suggested pretty simple forms and a recommended solution to solve your issue in seconds. Now make the conversion from MBR2GPT Server 2019 seamlessly at any time.
Background Introduction
For the configuration of disks, you can use distinct partition styles such as MBR or GPT. However, sometimes with an upgraded PC, you may need to convert disk from MBR to GPT as it allows for several facilities.
Here we are disclosing methods that will help you convert MBR2GPT Server 2022/2019 with and without data loss. You can opt for the suitable method and go ahead with the conversion.
Quick Navi
- Way1: Disk Management to coonvert disk mbr gpt server 2022/2019 [data loss]
- Way2: Diskpart/mbr2gpt cmd to convert gpt server 2022/2019 [data loss]
- Way3: Software to convert gpt server 2022/2019 [no data loss]
- Unable to convert to gpt on Server 2022/2019 fixes
How Can You Convert MBR to GPT on Windows server 2022/2019 — 3 Ways
We will inform you about methods to help you convert disk to GPT using disk management, diskpart cmd, MBR2GPT.exe or one third party software on Server 2019/2022. You can choose from these methods by checking them out individually and deciding which one suits your needs better.
| Disk Management | MBR2GPT.EXE | Partition Resizer* | |
| Convert non OS disk from MBR to GPT (Delete all partitions) | NO | ||
| Convert non OS disk from MBR to GPT (without deleting all partitions) | NO | NO | |
| Convert OS disk MBR to GPT | NO | YES with limits (less than 3 extended partitions, no logical partitions; active partition on the disk; no partition that cannot be detected by Windows ) | (No limits, No data loss) |
| Price | FREE | FREE | FREE |
| Download Win 11-7 (100% Free) Download Win Server (Free Demo) |
#Method 1: Windows Server 2019/2022 Disk Management to Convert MBR to GPT (Loss of Data)
Note: Disk Management can only convert empty disk to gpt in Windows computers.
For your inbuilt Disk Management, you can use the GUI server and make a conversion of an empty disk from GPT to MBR or vice versa. Before the conversion, you must complete the deletion of partitions existing on the MBR disk.
Steps to Use:
Step 1: Start by pressing the ‘Windows+R’ keys to open the ‘Run’ command. Then in the given box, go ahead with typing’ diskmgmt.msc’ and finish the step by pressing the ‘Enter’ key.
Step 2: If you see any volume or partition on your disk, go ahead by right-clicking each one separately. Then press the ‘Delete Volume’ option.
Step 3: On the MBR disk, make a right tap and then tap on the option of ‘Convert to GPT Disk.’
Step 4: Go ahead to finish the conversion process by following the instructions on your screen.
#Method 2: Using Command Line/MBR2GPT to Convert MBR to GPT server 2019/2022 (Loss of Data)
| Diskpart cmd | MBR2GPT.EXE | Partition Resizer* | |
| Convert non OS disk from MBR to GPT (Delete all partitions) | NO | ||
| Convert non OS disk from MBR to GPT (without deleting all partitions) | NO | NO | |
| Convert OS disk MBR to GPT | NO | YES with limits (less than 3 extended partitions, no logical partitions; active partition on the disk; no partition that cannot be detected by Windows ) | (Yes with no limits, no data loss) |
| Price | FREE | FREE | FREE |
| Only available from Windows Server 2019 | Download Win 11-7 (100% Free) Download Win Server (Free Demo) |
Part1: Convert non OS disk to GPT using diskpart cmd
With the Command line, you can make a conversion of MBR2GPT on Windows Servers. However, it should not have any partitions. In the Windows server, you can perform conversion of the non-system disk.
Steps to Use:
Step 1:Open ‘Run’ by typing ‘Windows+R.’ Then go ahead by typing ‘cmd’ in the given space and tap on the Enter key.
Step 2:In the window of Command Prompt, go ahead by typing ‘diskpart’ and then pressing the ‘Enter’ key.
Step 3: Once diskpart.exe gets launched then, type the command;
- list disk
- select disk # (target number gets denoted by #)
- Clean
Part2: To convert the system disk of Server 2019/2022 to GPT using mbr2gpt.exe, follow the steps as:
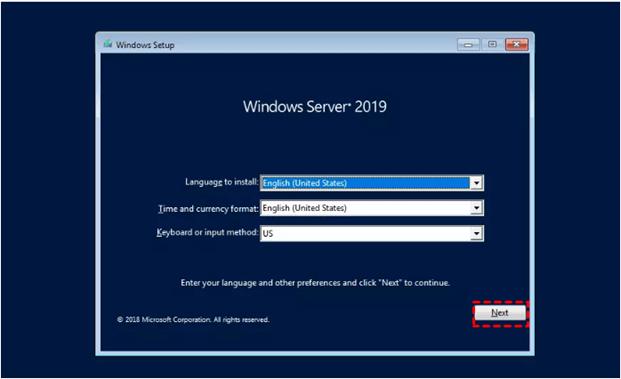
Step 1:Using the CD for installation, boot the computer from server 2019. For creating a bootable USB stick, go ahead for burning the 2019 server to USB.
Step 2:
- Make a selection of language and keyboard layout.
- Time for installation.
Go ahead by tapping on the ‘Next’ option.
Step 3: Tap the ‘Repair your Computer’ option in the next window.
Step 4: Press the ‘Shift+F10’ keys and open the window for Command Prompt.

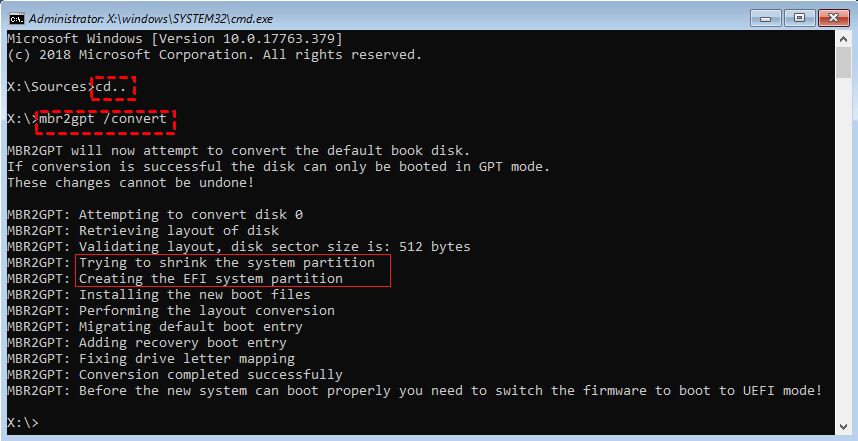
Step 5: Go ahead by executing the following commands.
- cd
- mbr2gpt /convert
Downsides of Conversion of MBR to GPT server 2019 With In-Built Options
You may find the following drawbacks if you use inbuilt options like Command line or Disk Management:
- Loss of data.
- The inconvenience of carrying out the process.
- Time taken.
- No guarantee of proper conversion.
#Method 3: Software to Convert MBR to GPT server 2019/2022 (Without Data Loss, no limits on disks)
In case you want to make a conversion of MBR2GPT, you can make use of professional software. IM-Magic Partition Resizer ensures that you can carry out the conversion process under a few clicks with a 100% safety. In addition, it can work on all the servers for Windows from 2003 to 2022.
What’s special: If the conversion was suspended by unknown causes, such as power failure/surge, shutting down computer by mistake, or other accidents, Partition Resizer ensures OS and data safety that you can undo changes and bring computer back to normal like the way it used to.
Steps to Use:
Step 1: Complete the software’s download, installation, and running. Then, by clicking on the name of the disk you are looking for conversion, choose the ‘Convert to GPT Disk’ option.
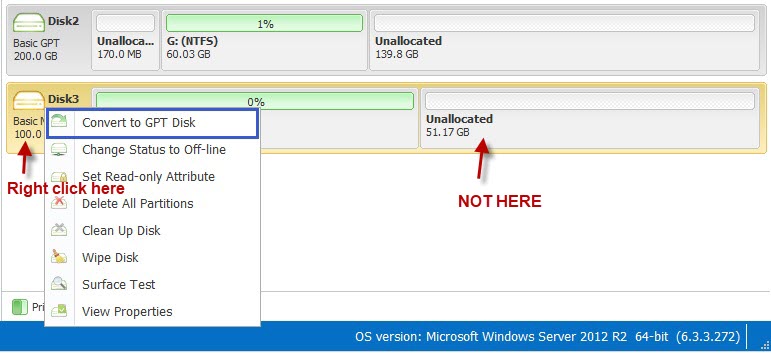
Step 2: Tap on the ‘OK’ option for disk conversion.
Step 3: Tap the ‘Apply’ option to complete the conversion process.
Note: If you have a boot or system partition on your disk, you will not be able to convert it to GPT directly on your PC; otherwise, it will become non-bootable. For this situation, a bootable version gets required to make it work.
In WinPE, you can run the Partition Resizer to convert the system disk from MBR to GPT format without any data loss. Follow the given steps to do this smoothly.
Step 1: First, make a bootable disk by inserting a blank DVD, CD, USB, or running third-party software on your PC. Install Partition Magic Bootable ISO
Download Resizer Server portable version or the partition magic bootable iso
Step 2: Now go ahead by running the IM Magic Partition Software and make a selection of ‘Bootable Media. ( You have to install Windows AIK/ADK)
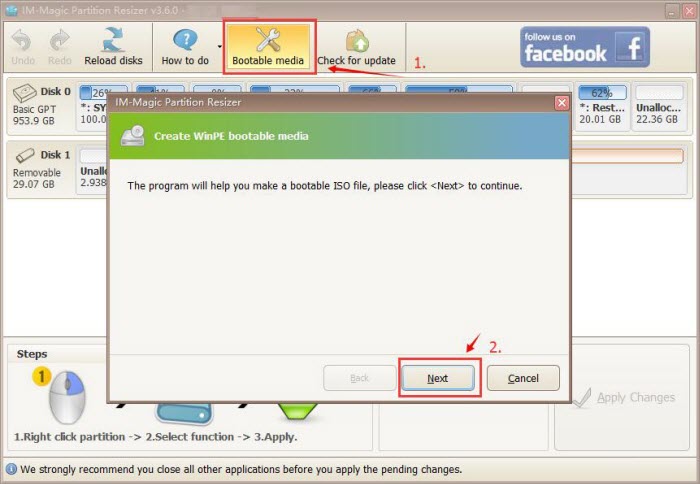
Step 3: To create a bootable disk, make a selection of the required option and follow the wizard on the screen to finish the process.

Step 4: Open Resizer_WinPE.iso, once the software loads the disk map, go ahead by right-clicking on the disk that has the boot volume. Then tap on the option of ‘Convert GPT’ and go ahead by confirming the changes.
Why do users need to convert MBR to GPT server?
Users need to convert MBR to GPT owing to GPT’s edge over MBR due to the following reasons;
- It supports a disk size that is much larger than 2TB.
- There are an unlimited number of partitions that you can make on GPT.
- There are no limits on the partition size.
- Unlike MBR, GPT can find its existence in a media that can’t get partitioned.
Convert to GPT option greyed out in Server 2022/2019 Disk Management Fixes
When the convert to GPT option greyed out on Windows Server 2022 or Server 2019, or when mbr2gpt.exe failed on server 2022/2019, here are some possible causes and fixes that you may try.
Case#1: OS disk, if it’s the OS disk that you want to change it to GPT, you need to run it in Windows PE to run convert to gpt or mbr2gpt.exe cmd
Case#2: If it’s mbr2gpt.exe that you want to change disk from mbr to gpt in Server 2022/2019, here are some terms and conditions:
- The OS disk is set as active partition; -> Set partition active in Disk Management or by Partition Resizer Server
- There are at most 3 extended partitions; -> Delete partitions if there are over 3 extended partitions
- There are only primary partitions, no logical partitions on the disk; -> Convert partitions from logical to primary at first
FAQs
Which one is better, MBR or GPT?
You must go with GPT if you plan to create more than 4 partitions. For example, MBR can hold 4 primary partitions, and GPT supports 128 approx partitions.
What should I use for my SSD, MBR or GPT?
You must go with GPT. Its the best option as it can create approx 128 partitions on a one GPT.
Can I make a conversion of MBR to GPT without Windows reinstallation?
Yes, you can use IM-Magic Partition Resizer’s bootable version to resize a disk with the operating system. However, you can reinstall Windows for it.
Conclusion
We hope now you have a clarity of how to convert MBR to GPT server 2022/2019. By using different methods, you can achieve the results. However, it may result in the loss of your valuable data. Additionally, you may need help to be able to use command prompts like a professional. To go without the data loss, try IM-Magic Partition resizer for the conversion process.
In case you use an IM-Magic Partition Resizer, you will be able to make a conversion of MBR2GPT Server 2019/2022 without any loss of data. With some extended features like extending the partition, move partitions, clone disks etc., it’s easy to manage disk with the program and ensures data safety.
This blog post covers how you can create a bootable USB media drive to install Windows Server 2019 on a physical server. This blog post will not use any third-party tools; it only uses built-in tools that you can find on Windows 10 or Windows Server. Depending on your system you will need it to install it on a BIOS system or a UEFI based system, which is slightly different since UEFI will use GPT disks and BIOS will use an MBR disk. Here is how you create a USB Drive for a Windows Server 2019 installation.
Getting ready to create a USB Drive for a Windows Server 2019 Installation
First, you will need to have all the prerequisites in place.
- Download the Windows Server 2019 ISO File
- A USB Drive with at least 8GB size
Windows Server 2019 USB Thumb Drive for UEFI (GPT) systems
To create the USB drive to install Windows Server 2019 on a UEFI (GPT system, you do the following steps:
- The at least an 8GB USB drive has to be formatted in FAT32
- The USB needs to be GPT and not MBR
- Copy all files from the ISO to the USB drive
This is it, and here is how you do it. First, plug in your USB drive to your computer.
Open a PowerShell using the Run as Administrator option. You will need to change the path of the Windows Server 2019 ISO, and you will need to replace the USB Friendly Name in the script.
REMINDER: The following commands will wipe the USB Drive completely. So backup everything before you run through the PowerShell.
# Define Path to the Windows Server 2019 ISO
$ISOFile = "C:\Temp\WindowsServer2019.iso"

# Get the USB Drive you want to use, copy the friendly name
Get-Disk | Where BusType -eq "USB"

# Get the right USB Drive (You will need to change the FriendlyName)
$USBDrive = Get-Disk | Where FriendlyName -eq "Kingston DT Workspace"

# Replace the Friendly Name to clean the USB Drive (THIS WILL REMOVE EVERYTHING)
$USBDrive | Clear-Disk -RemoveData -Confirm:$true -PassThru

# Convert Disk to GPT
$USBDrive | Set-Disk -PartitionStyle GPT

# Create partition primary and format to FAT32
$Volume = $USBDrive | New-Partition -UseMaximumSize -AssignDriveLetter | Format-Volume -FileSystem FAT32 -NewFileSystemLabel WS2019

# Mount iso
$ISOMounted = Mount-DiskImage -ImagePath $ISOFile -StorageType ISO -PassThru

# Driver letter
$ISODriveLetter = ($ISOMounted | Get-Volume).DriveLetter

# Copy Files to USB
Copy-Item -Path ($ISODriveLetter +":\*") -Destination ($Volume.DriveLetter + ":\") -Recurse

# Dismount ISO
Dismount-DiskImage -ImagePath $ISOFile
After that, you can safely remove the USB drive and use it to boot your server from.
Important:
If Install.wim is larger than 4GB, you cannot copy the file to the drive, because of the FAT32 based partition limitation. The solution for this is to split the wim file into smaller files.
split wim file using dism (you may have to change the drive letters):
dism /Split-Image /ImageFile:e:\sources\install.wim /SWMFile:k:\sources\install.swm /FileSize:4096
Windows Server 2019 USB Thumb Drive for BIOS (MBR) systems
To create the USB drive to install Windows Server 2019 on BIOS (MBR) systems, you can follow these steps:
- The at least an 8GB USB drive has to be formatted in NTFS
- USB drive needs to us MBR
- The partition needs to be set active
- Copy all files from the ISO to the USB Drive
This is it, and here is how you do it. First, plug in your USB drive to your computer.
Open a PowerShell using the Run as Administrator option. You will need to change the path of the Windows Server 2019 ISO, and you will need to replace the USB Friendly Name in the script.
REMINDER: The following commands will wipe the USB Drive completely. So backup everything before you run through the PowerShell.
# Define Path to the Windows Server 2019 ISO
$ISOFile = "C:\Temp\WindowsServer2019.iso"

# Get the USB Drive you want to use, copy the friendly name
Get-Disk | Where BusType -eq "USB"

# Get the right USB Drive (You will need to change the FriendlyName)
$USBDrive = Get-Disk | Where FriendlyName -eq "Kingston DT Workspace"

# Replace the Friendly Name to clean the USB Drive (THIS WILL REMOVE EVERYTHING)
$USBDrive | Clear-Disk -RemoveData -Confirm:$true -PassThru

# Convert Disk to MBR
$USBDrive | Set-Disk -PartitionStyle MBR

# Create partition primary and format to NTFS
$Volume = $USBDrive | New-Partition -UseMaximumSize -AssignDriveLetter | Format-Volume -FileSystem NTFS -NewFileSystemLabel WS2019

# Set Partiton to Active
$Volume | Get-Partition | Set-Partition -IsActive $true

# Mount ISO
$ISOMounted = Mount-DiskImage -ImagePath $ISOFile -StorageType ISO -PassThru

# Driver letter
$ISODriveLetter = ($ISOMounted | Get-Volume).DriveLetter

# Copy Files to USB
Copy-Item -Path ($ISODriveLetter +":\*") -Destination ($Volume.DriveLetter + ":\") -Recurse

# Dismount ISO
Dismount-DiskImage -ImagePath $ISOFile
After that, you can safely remove the USB drive and use it to boot your server from to install Windows Server 2019.
If you have any questions, please let me know in the comments.
Tags: BIOS, Boot from USB, Format Disk, gpt, Install USB Drive, Install Windows Server 2019, installation, iso, MBR, Microsoft, Mount ISO, PowerShell, UEFI, USB, USB Drive, USB media drive, USB Windows Server 2019, Windows Server, Windows Server 2019 Last modified: November 22, 2021
About the Author / Thomas Maurer
Thomas works as a Principal Program Manager & Chief Evangelist Azure Hybrid at Microsoft (Cloud + AI). He engages with the community and customers around the world to share his knowledge and collect feedback to improve the Azure hybrid cloud and edge platform. Prior to joining the Azure engineering team (Cloud + AI), Thomas was a Lead Architect and Microsoft MVP, to help architect, implement and promote Microsoft cloud technology.
If you want to know more about Thomas, check out his blog: www.thomasmaurer.ch and Twitter: www.twitter.com/thomasmaurer
Do you want to convert MBR to GPT in Windows Server 2022/2019/2016/2012? This post from MiniTool offers you 4 ways and 2 of them can do that without data loss. You can have a try.
Overview of Windows Server
Windows Server is a group of server operating systems (OS) that has been developed by Microsoft since 1993, including Windows NT Server 3.1, Windows NT Server 4.0, Windows 2000 Server, Windows Server 2003, 2008, or 2008 R2, Windows Server 2012, 2012 R2, 2016, or 2019, and Windows Server 2022.
Windows Server is a series of operating systems designed specifically for servers, mainly used in business environments. The product allows users to share files and services, while also providing administrators with control over networks, data storage, and applications.
Windows Server has three versions.
- Standard Edition: It is designed for small-scale physical or minimal virtualization environments.
- Enterprise Edition: It is very suitable for small businesses with up to 25 users and 50 devices. Its advantage is the large-scale processing power and memory capacity.
- Datacenter Edition: This version can support high-end hardware versions of the operating system for large-scale data center operations.
Besides, compared to common Windows systems, Windows Server systems also have the following advantages:
- Windows Server allows users to install up to 24TB of RAM, and it can also handle more cores and processors, with 64 CPU sockets.
- Windows Server has tools and software that are not available on Windows. For example, there is a series of software designed specifically for servers, such as active directory and DHCP.
- Common Windows systems have a cap on device connections, while Windows Server provides virtually unlimited connections.
Why Do You Need to Convert MBR to GPT in Windows Server
The main reason is that MBR disks can only use space up to 2TB. The disk space beyond the 2TB boundary will be locked and become inaccessible. However, nowadays, the space of many hard drives has exceeded 2TB.
Besides, servers or data centers usually these large-capacity disks. Therefore, MBR is not suitable anymore. Fortunately, GPT disks can break through this limitation. Then, Windows Server users may want to convert MBR to GPT in Windows Server without losing data.
Tips:
The default OS installation of Windows Server 2012 is MBR partition. If you want to use the GPT style on the system disk, you need to convert it to GPT after the installation.
How to Convert MBR to GPT in Windows Server 2022/2019/2016/1012
In this part, I will show you how to convert MBR to GPT in Windows Server in several ways. You can choose one according to your needs.
Way 1. Use DiskPart Commands
This method is usually used on data disks. It will delete all partitions and data on the disk and then initialize the disk to GPT. Therefore, if there are important files on the data disk, back up them to another disk in advance.
How to convert MBR to GPT in Windows Server using DiskPart commands? Here is the guide:
Step 1: Press the Windows logo key + R to open the Run box. Type “diskpart” and press Enter to open the DiskPart input window.
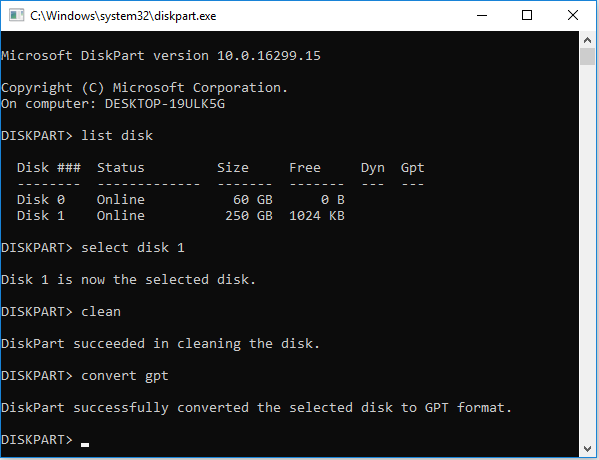
Step 2: On the window, type the following commands one by one and press Enter.
- List disk
- Select disk * (* is the number of the disk that you want to convert to GPT)
- Clean
- Convert gpt
Way 2. Use Disk Management
Similar to DiskPart commands, Disk Management can be also used to convert data disks from MBR to GPT, but it can’t be used to convert the system disk because it also needs to delete all partitions and data on the disk.
How to convert MBR to GPT in Windows Server using Disk Management? Here is the guide:
- Press the Windows logo key + X and then select Disk Management from the menu.
- On the Disk Management window, right-click on a partition on the data disk and choose Delete Volume. Click Yes to confirm this operation.
- Repeat the volume deletion process to delete all partitions on the data disk.
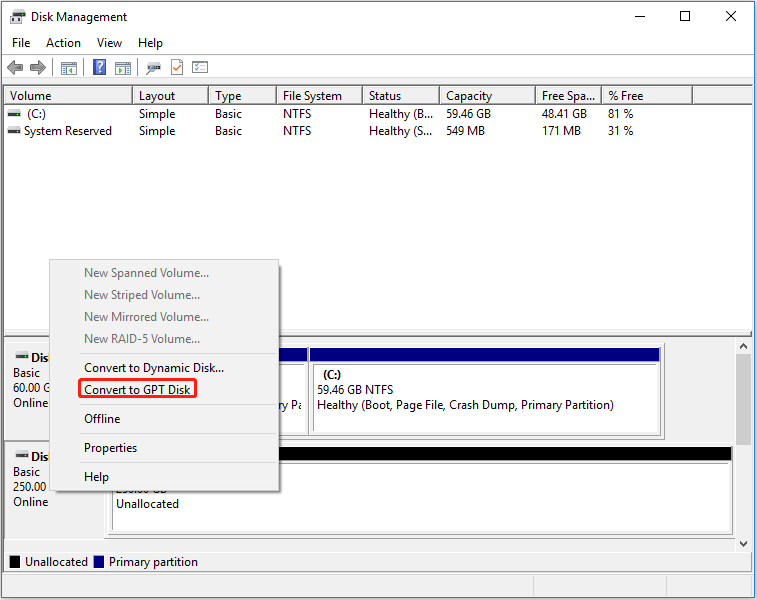
- Right-click on the empty data disk and choose Convert to GPT Disk. The disk will then be converted to a GPT disk.
Way 3. Use MBR2GPT
This tool is only built in Windows Server 2019 and later Server systems. In other words, if you are using Windows Server 2016, 2012, or earlier systems, this tool won’t work.
In addition, to let this tool convert MBR to GPT successfully, the disk to be converted needs to meet the following requirements:
- It must be a system disk, which means that it must have a system (active) partition.
- It doesn’t include any extended partitions or logical partitions. All partitions on the disk are primary partitions.
- All partitions on the disk are recognized by Windows. There should not be Ext4 or any unknown partitions.
How to convert MBR to GPT in Windows Server using MBR2GPT? Here is the guide:
- Press the Windows logo key + S to open the Windows Search tool.
- In the text box, type “cmd” and the Command Prompt app will appear in the result list. Right-click the app and choose Run as administrator to open this app.
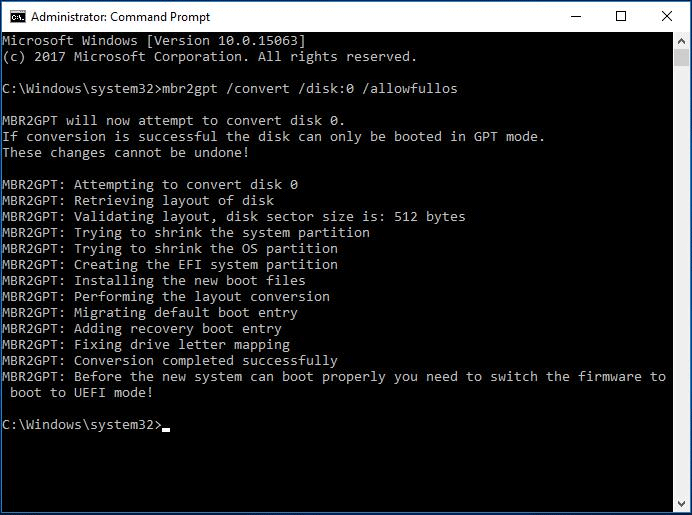
- On the Command Prompt window, type “mbr2gpt /convert /disk: 0 /allowfullOS” and press Enter. Disk 0 is usually the system disk.
Tips:
After you convert the system disk to GPT, you need to change the boot mode from Legacy to UEFI. Otherwise, the computer won’t boot up.
Way 4. Use MiniTool Partition Wizard
Regardless of whether the disk is a system disk or a data disk and whether there are logical partitions on the disk, MiniTool Partition Wizard can help you convert MBR to GPT in Windows Server without losing data.
In addition, this software can also help you clone hard drives, recover hard drive data, partition hard drives, etc. It is a multifunctional program and I recommend it to you.
How to convert MBR to GPT in Windows Server using MiniTool Partition Wizard? Here is the guide:
MiniTool Partition Wizard DemoClick to Download100%Clean & Safe
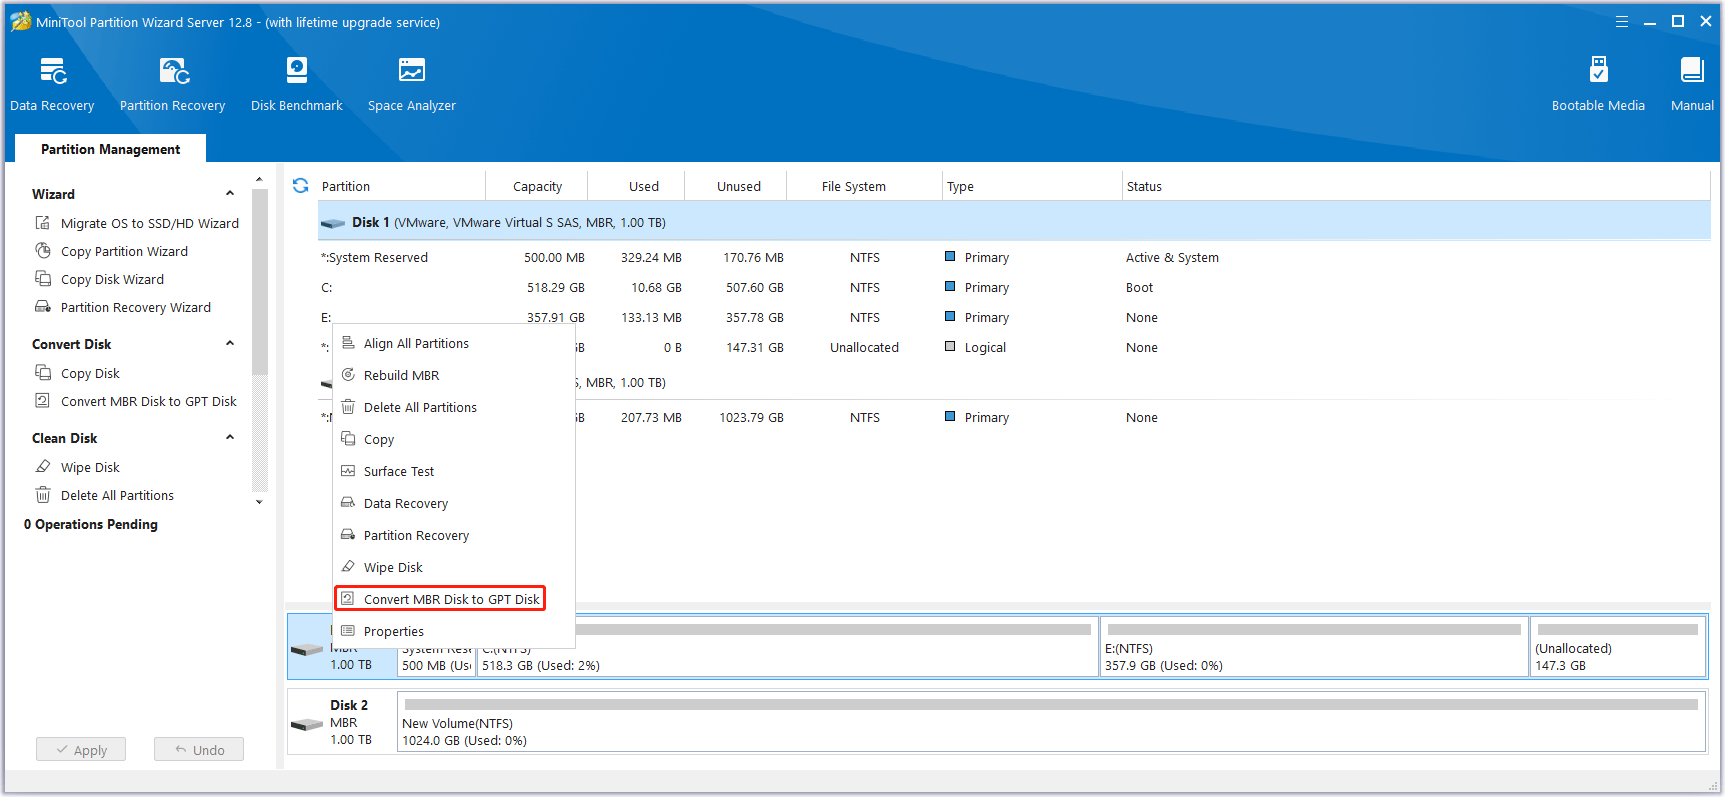
Step 1: Launch MiniTool Partition Wizard Server. Right-click a disk and choose the Convert MBR Disk to GPT Disk option from the context menu. If a warning window pops up, read the information on it and click OK.
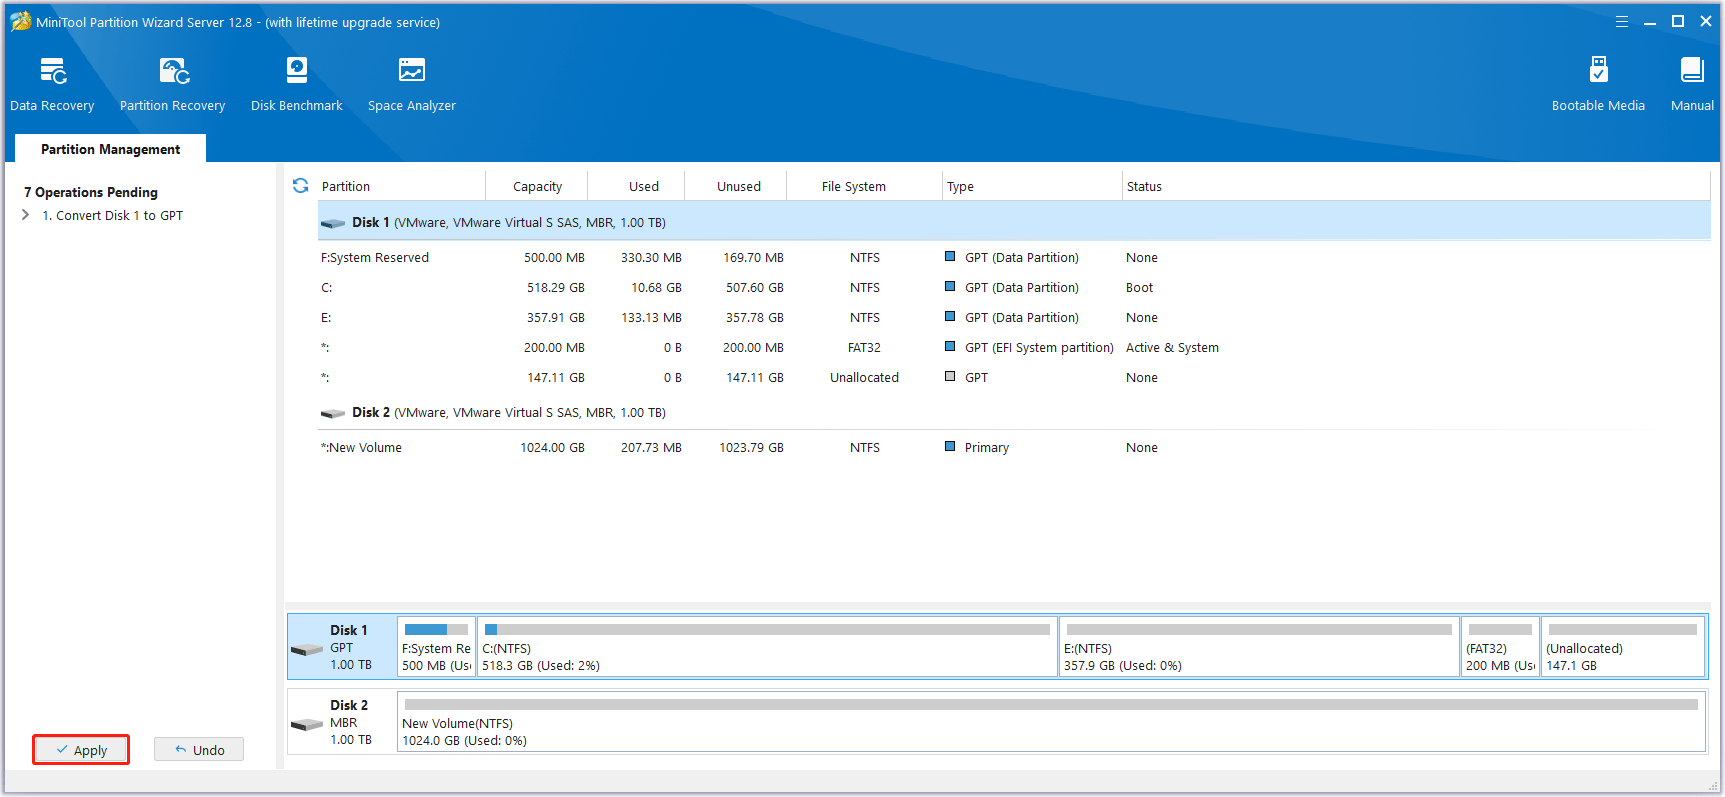
Step 2: Click the Apply button to start converting the disk to GPT. If the disk is a system disk, a PC restart may be needed.
Do you want to convert MBR to GPT in Windows Server 2022/2019/2016/2012? This post offers 4 different ways. You can have a try.Click to Tweet
Bottom Line
This post offers 4 ways to help you convert MBR to GPT in Windows Server. Using MiniTool Partition Wizard is the best way. However, if you encounter problems when using MiniTool Partition Wizard, feel free to contact us via [email protected]. We will get back to you as soon as possible.
Learn how to solve the problem of Windows Server 2019 not recognizing 4TB RAID 1 drives on a Dell PowerEdge R720XD server with a PERC H710p controller.
If you have a Dell PowerEdge R720XD server with a PERC H710p controller and you want to install 4TB drives in RAID 1 configuration, you may encounter a problem where Windows Server 2019 only recognizes the drives as 2TB. This article will explain why this happens and how to fix it.
Table of Contents
- Why Windows Server 2019 Only Sees 2TB Drives
- How to Convert MBR to GPT in Windows Server 2019
- Method 1: Using Disk Management
- Method 2: Using Diskpart
- Frequently Asked Questions (FAQs)
- Question: Can I convert MBR to GPT without losing data?
- Question: Can I convert GPT to MBR in Windows Server 2019?
- Question: Do I need to convert MBR to GPT to install Windows Server 2019?
- Summary
Why Windows Server 2019 Only Sees 2TB Drives
The most likely reason why Windows Server 2019 only sees 2TB drives is that the disk partition style is set to MBR (Master Boot Record) instead of GPT (GUID Partition Table). MBR is an older partition scheme that has a limit of 2TB per disk, while GPT is a newer partition scheme that supports disks larger than 2TB. MBR also has a limit of four primary partitions per disk, while GPT can have up to 128 primary partitions per disk.
To check the disk partition style, you can use the Disk Management tool in Windows Server 2019. To open Disk Management, you can press Windows + R, type diskmgmt.msc, and press Enter. In Disk Management, you can right-click on the disk and select Properties. In the Properties window, go to the Volumes tab and look at the Partition style field. If it says Master Boot Record (MBR), then you need to convert the disk to GPT.
How to Convert MBR to GPT in Windows Server 2019
There are two ways to convert MBR to GPT in Windows Server 2019: using Disk Management or using Diskpart. However, both methods require deleting all the partitions and volumes on the disk, which means you will lose all the data on the disk. Therefore, before you convert the disk, you should back up any important data on the disk to another location.
Method 1: Using Disk Management
To convert MBR to GPT using Disk Management, follow these steps:
- Open Disk Management and right-click on the disk you want to convert. Select Delete Volume for each volume on the disk until the disk becomes unallocated space.
- Right-click on the disk again and select Convert to GPT Disk. The disk will be converted to GPT and you can create new partitions and volumes on it.
- To create a new partition, right-click on the unallocated space and select New Simple Volume. Follow the wizard to assign a drive letter, a file system (NTFS or ReFS), and a volume label. You can also adjust the size of the partition as needed.
- Repeat the previous step to create more partitions if you want. You can also extend or shrink the partitions later by right-clicking on them and selecting Extend Volume or Shrink Volume.
Method 2: Using Diskpart
To convert MBR to GPT using Diskpart, follow these steps:
- Open an elevated command prompt by pressing Windows + X and selecting Command Prompt (Admin).
- Type diskpart and press Enter to launch the disk partitioning tool.
- Type list disk and press Enter to see the list of disks on your system. Note the disk number of the disk you want to convert.
- Type select disk x and press Enter, where x is the disk number of the disk you want to convert.
- Type clean and press Enter to delete all the partitions and volumes on the disk.
- Type convert gpt and press Enter to convert the disk to GPT.
- Type exit and press Enter to exit Diskpart.
- To create new partitions, you can use Disk Management or the format command in the command prompt.
Frequently Asked Questions (FAQs)
Question: Can I convert MBR to GPT without losing data?
Answer: No, you cannot convert MBR to GPT without losing data using the built-in tools in Windows Server 2019. You need to delete all the partitions and volumes on the disk before you can convert the disk partition style. However, there are some third-party tools that claim to be able to convert MBR to GPT without data loss. However, you should always back up your data before using any disk conversion tool, as there is always a risk of data loss or corruption.
Question: Can I convert GPT to MBR in Windows Server 2019?
Answer: Yes, you can convert GPT to MBR in Windows Server 2019 using the same methods as converting MBR to GPT. However, you should be aware of the limitations of MBR, such as the 2TB disk size limit and the four primary partitions limit. You should also back up your data before converting the disk partition style.
Question: Do I need to convert MBR to GPT to install Windows Server 2019?
Answer: It depends on whether you want to boot from the disk or not. If you want to boot from the disk, you need to convert MBR to GPT if the disk is larger than 2TB or if your system supports UEFI (Unified Extensible Firmware Interface) boot mode. UEFI is a newer firmware interface that replaces BIOS (Basic Input/Output System) and requires GPT disks to boot from. To check if your system supports UEFI, you can open System Information by pressing Windows + R, typing msinfo32, and pressing Enter. In System Information, look at the BIOS Mode field. If it says UEFI, then your system supports UEFI boot mode. If it says Legacy, then your system supports BIOS boot mode.
If you do not want to boot from the disk, you can use either MBR or GPT for the disk partition style. However, GPT has some advantages over MBR, such as supporting larger disk sizes and more partitions.
Summary
In this article, we have explained how to fix the problem of Windows Server 2019 not recognizing 4TB RAID 1 drives on a Dell PowerEdge R720XD server with a PERC H710p controller. The problem is caused by the disk partition style being MBR instead of GPT. We have shown how to convert MBR to GPT using Disk Management or Diskpart, and answered some frequently asked questions about disk conversion. We hope this article has been helpful for you.
Disclaimer: This article is for informational purposes only and does not constitute professional advice. You should always consult a qualified IT technician before making any changes to your system. We are not responsible for any data loss or damage that may result from following the instructions in this article.