
#статьи
-
0
Выбираем, на сколько кусочков шинковать жёсткий диск.
Иллюстрация: Оля Ежак для Skillbox Media
Филолог и технарь, пишет об IT так, что поймут даже новички. Коммерческий редактор, автор технических статей для vc.ru и «Хабра».
Представьте себе ситуацию: вы купили новый жёсткий диск или SSD для своего компьютера. Часть памяти планируете оставить под ОС, а часть — для хранения данных. Но как правильно разбить диск на разделы и какие подходы для этого существуют?
В этой статье рассказываем про MBR и GPT — основные схемы таблицы разделов накопителей. Объясняем, чем они различаются и какую схему лучше выбрать.
Содержание
- Что такое таблица разделов
- MBR и GPT: различия
- Плюсы и минусы MBR и GPT
- MBR или GPT: что лучше использовать
- Как преобразовать GPT в MBR и обратно
Таблица разделов — это структура данных на физическом накопителе (жёстком диске или SSD), которая описывает, как накопитель разделён на логические части. В таблице содержится информация о каждом разделе, включая его размер и расположение.
Представьте, что жёсткий диск — это большой книжный стеллаж. В таком случае таблица разделов будет списком, в котором сказано, как разделить стеллаж на полки, сколько книг находится на полках и какого именно жанра книги. С таким списком становится проще искать нужную литературу и пополнять коллекцию.
Схема таблицы разделов — это формат организации данных о разделах на физическом накопителе. Она определяет, как и где хранить данные о разделах, чтобы операционная система могла с ними взаимодействовать. Если таблица разделов — это своеобразный план организации полок стеллажа, то таблица разделов — свод правил, по которым этот план составляется.
Существует два основных вида схем таблиц разделов: MBR (master boot record) и GPT (GUID partition table). MBR — более старая схема, работает практически со всеми операционными системами, но не поддерживает накопители с большим объёмом памяти. GPT — современное и более надёжное решение, а ограничений по объёму дисков практически нет.
MBR (master boot record) — устаревшая, но наиболее популярная схема таблицы разделов накопителя. Впервые её начали использовать в компьютере IBM Personal Computer XT в 1983 году. Схема долгое время считалась стандартом среди производителей железа и разработчиков.
Запись MBR всегда занимает первые 512 байт жёсткого диска или SSD. Это нужно для того, чтобы операционная система быстро нашла запись во время загрузки.
MBR включает в себя:
- Код загрузчика. Основная часть MBR, занимающая 446 байт. В ней содержится код, который во время включения компьютера определяет, какой раздел является активным (загрузочным), и передаёт ему управление для запуска ОС.
- Таблица разделов. Эта часть занимает 64 байта и содержит информацию об основных разделах на диске, которых внутри таблицы MBR может быть максимум четыре. Если хочется больше, можно использовать один из основных разделов как расширенный и хранить в нём произвольное количество других разделов. Минус в том, что расширенный раздел нельзя использовать в качестве загрузочного для ОС.
- Подпись диска. Последние 2 байта содержат уникальный идентификатор диска, который помогает BIOS распознать MBR как действительный.
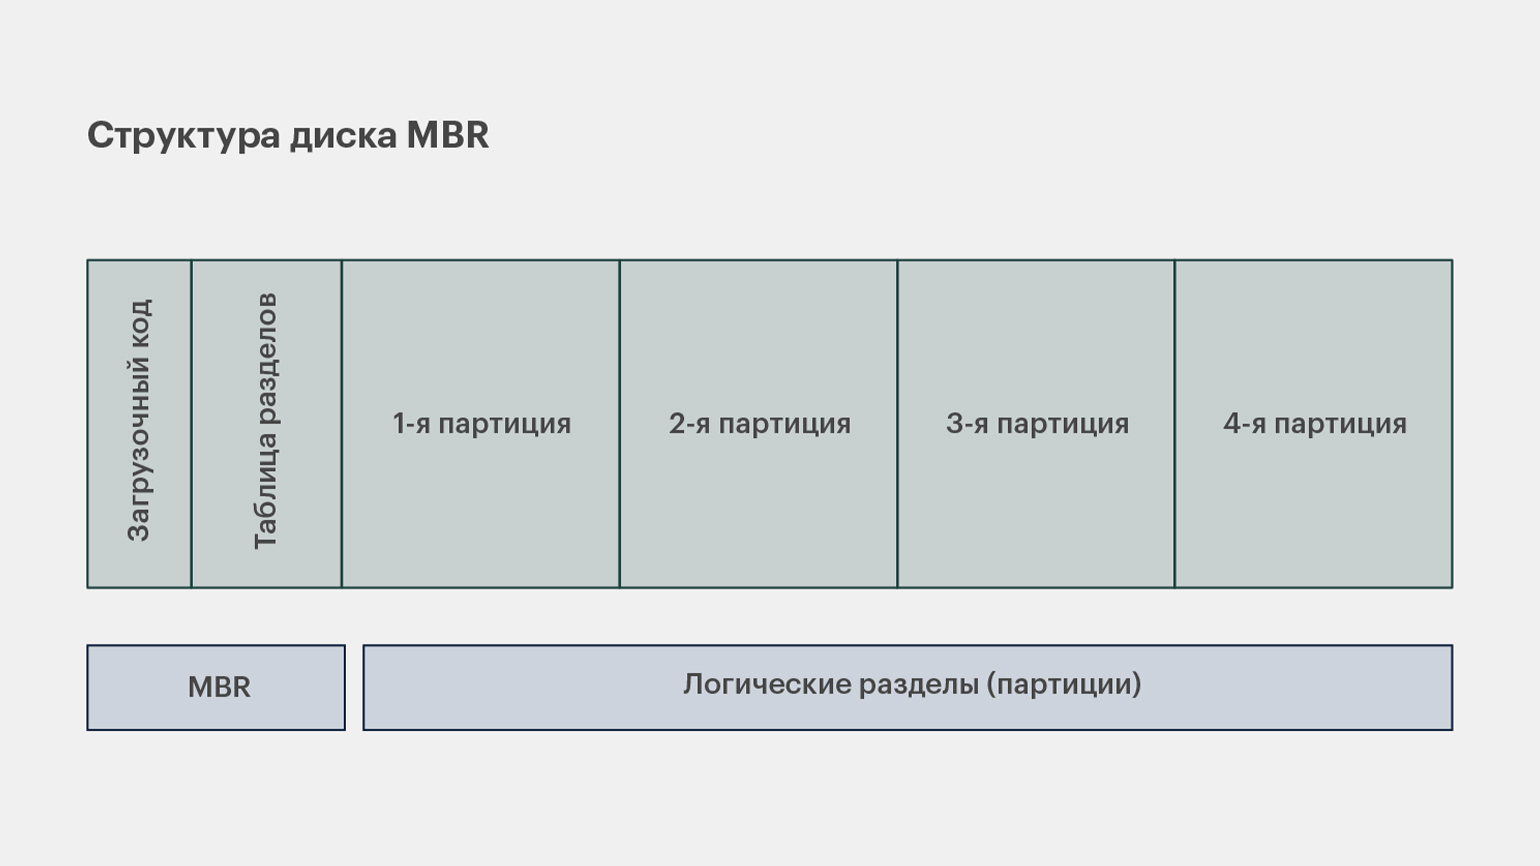
Инфографика: Майя Мальгина для Skillbox Media
GPT (GUID partition table) — это современная схема разбиения дисков, которая пришла на смену MBR. Схему разработали в конце 1990-х годов и официально представили в 2000 году вместе с UEFI, наследником BIOS.
Из чего состоит GPT:
- Защитный MBR. Первые 512 байт также занимает запись MBR. Она нужна для обратной совместимости GPT с системами, которые не поддерживают новую схему записи. Защитный раздел предотвращает случайное повреждение данных.
- GUID partition entries array — область, которая содержит подробное описание параметров накопителя, включая количество и размеры разделов.
- Таблица разделов. Далее в схеме следуют записи о разделах диска. Благодаря схеме GPT жёсткий диск можно разбить на 128 разделов.
- Бэкап таблицы разделов. В конце диска находится резервная копия записей о разделах. Это нужно для защиты данных от повреждения.
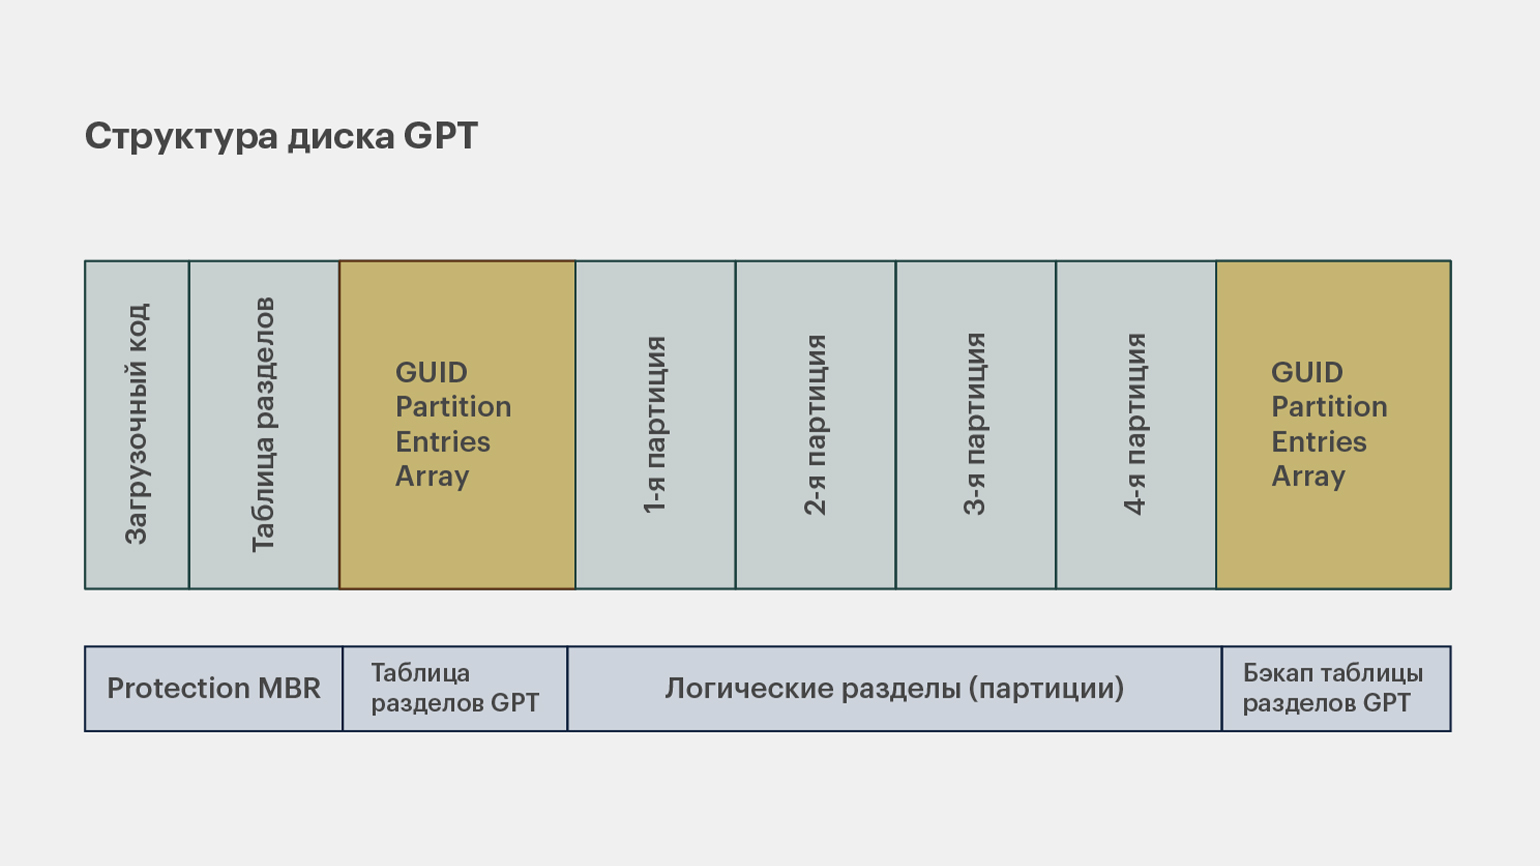
Инфографика: Майя Мальгина для Skillbox Media
Сравним преимущества и недостатки MBR и GPT.
Плюсы:
- MBR совместима с большинством операционных систем и работает с устаревшими ОС.
- Простая структура MBR-дисков упрощает процесс восстановления повреждённых данных.
Минусы:
- Объём накопителя не должен превышать 2 ТБ.
- Можно создавать только четыре логических раздела, а попытка обойти ограничение через расширенный раздел усложняет структуру данных.
- У MBR-записи нет бэкапа. Если с ней что-то случится, то данные жёсткого диска нельзя будет восстановить.
Плюсы:
- GPT поддерживает диски размером до 8 зеттабайт (8 млрд ТБ).
- Диск можно разбить на 128 разделов.
- Есть бэкап, с которым проще восстанавливать данные при повреждении.
Минусы:
- Работает только с современными версиями операционных систем.
- Структура GPT сложнее MBR, поэтому у неопытных пользователей могут возникать проблемы с восстановлением данных.
Чтобы лучше понимать, какую таблицу разделов использовать в вашем случае, рассмотрим, какие схемы поддерживают популярные операционные системы:
- Windows 7, 10. Поддерживают как MBR, так и GPT. Для использования последнего обязательно наличие UEFI.
- Windows 11. MBR-накопители можно использовать только в качестве хранилищ, а для загрузочного диска нужна схема GPT.
- Linux. Современные дистрибутивы Linux поддерживают как MBR, так и GPT.
- macOS. Компьютеры Apple используют собственную реализацию UEFI, с которой совместимы только GPT-накопители.
Мы подготовили сравнительную таблицу GPT и MBR, которая поможет выбрать схему таблицы разделов исходя из характеристик:
| Характеристики | MBR | GPT |
|---|---|---|
| Максимальный объём диска | До 2 ТБ | До 8 ЗБ (8 млрд ТБ) |
| Количество разделов | 4 основных или 3 основных + 1 расширенный | До 128 разделов по умолчанию |
| Резервное копирование | Нет | Есть |
| Совместимость | BIOS | UEFI |
Есть несколько способов преобразовать GPT-накопитель в MBR-диск и наоборот. Главное, учитывать, что некоторые способы полностью стирают информацию на диске, поэтому перед преобразованием стоит сделать резервную копию.
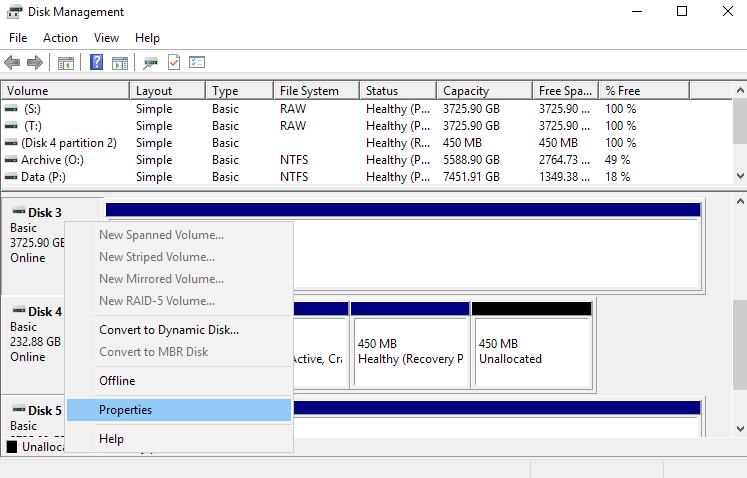
Изменить таблицу разделов диска можно через контекстное меню системной утилиты управления дисками Windows. Этот способ удалит все данные на жёстком диске.
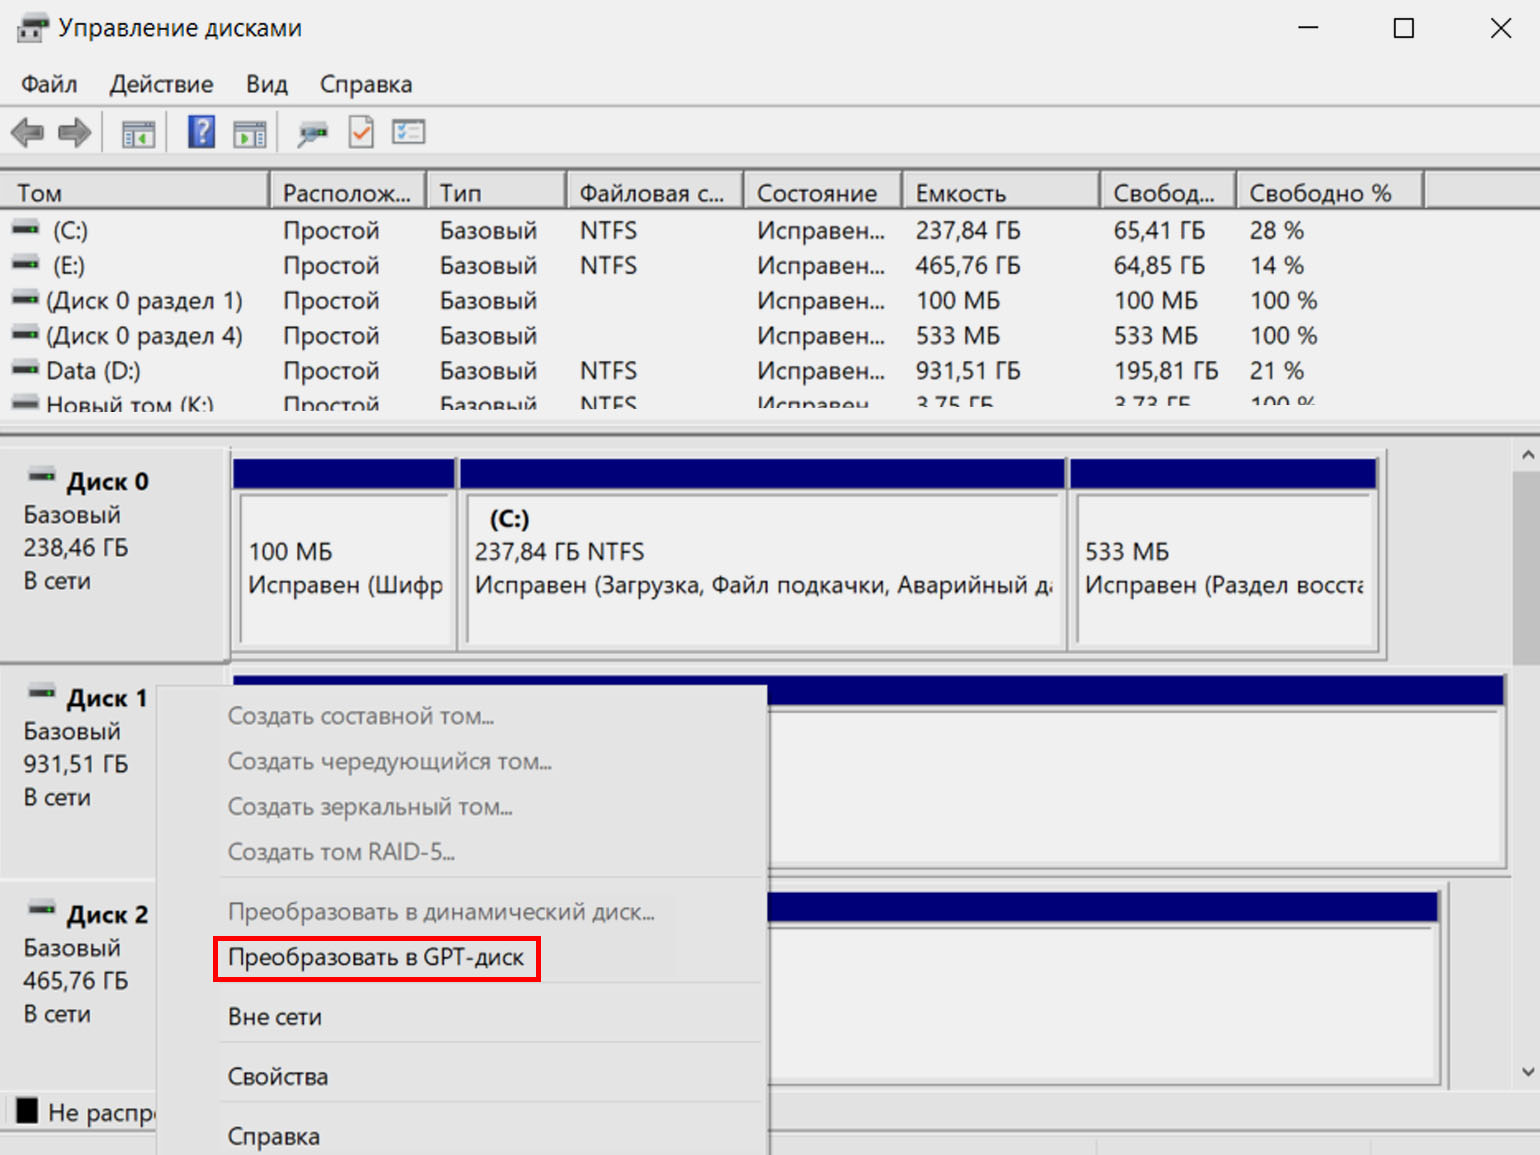
Скриншот: Windows Disk Manager / Skillbox Media
Провести преобразование можно с помощью утилиты diskpart. Данные также потеряются.

Скриншот: командная строка Windows / Skillbox Media
Для конвертации без потери данных можно использовать программу AOMEI Partition Assistant.
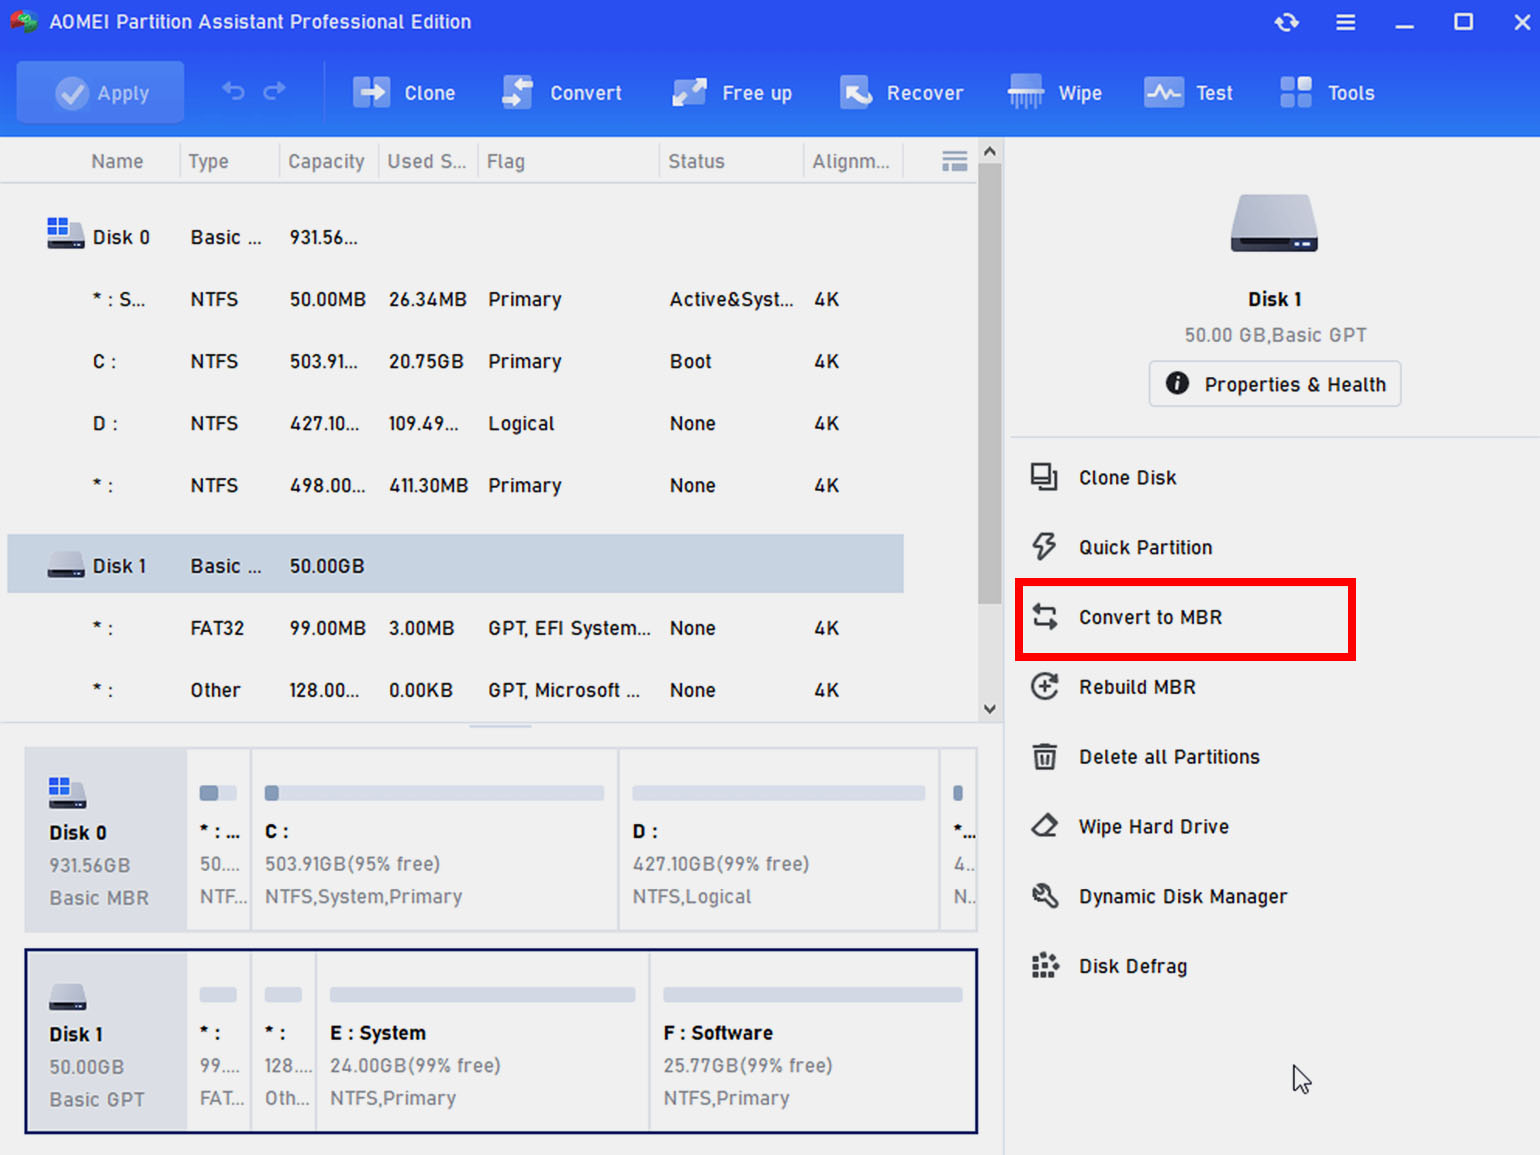
Скриншот: AOMEI Partition Assistant
Для смены схемы таблицы разделов с потерей данных можно использовать программу GParted.
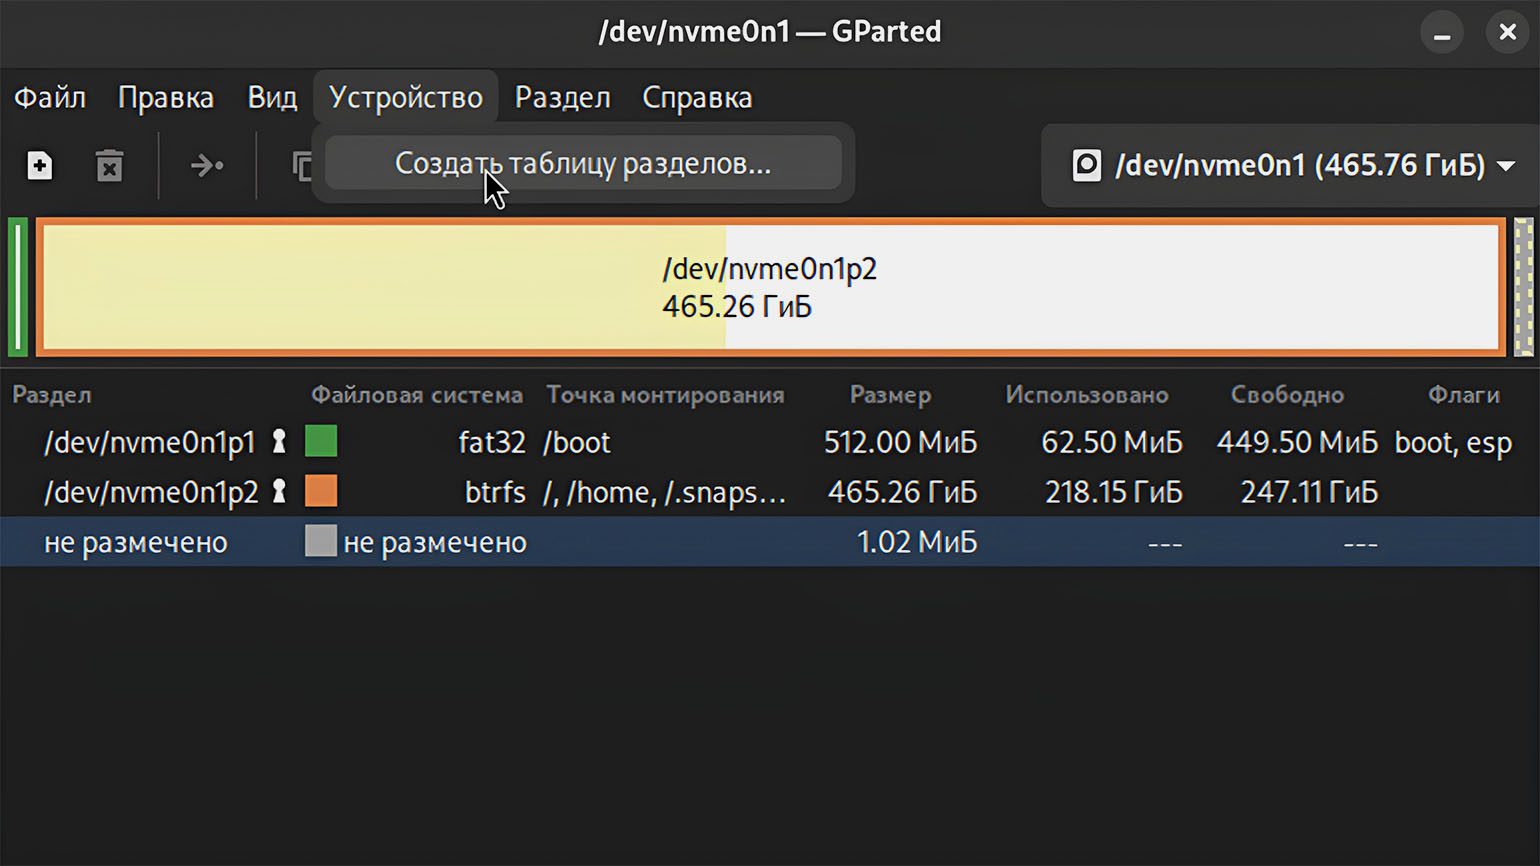
Скриншот: GParted / Skillbox Media
С конвертацией без потери данных поможет консольная утилита gdisk.
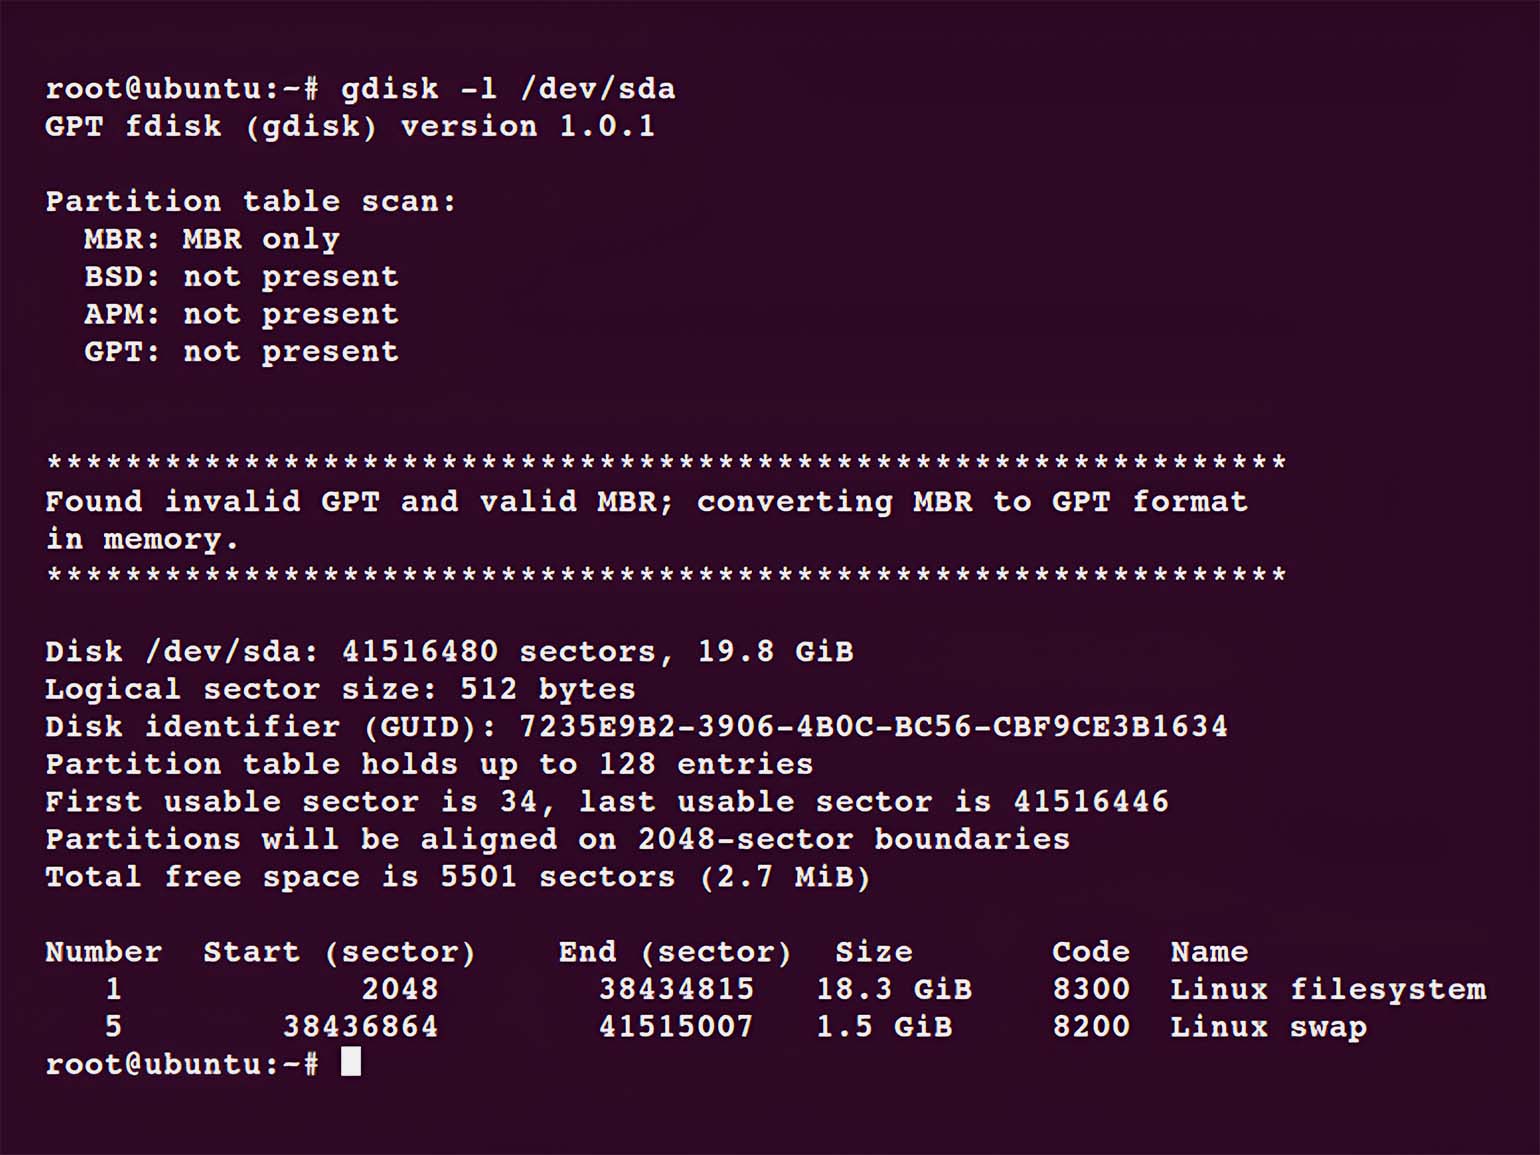
Скриншот: gdisk / Linux Topic
- Таблица разделов — это структура данных, которая показывает, как жёсткий диск или SSD разделён на логические части.
- MBR — устаревшая, но всё ещё популярная схема таблицы разделов. Она поддерживает накопители объёмом до 2 ТБ и работает с BIOS.
- GPT — современное решение для работы с дисками объёмом до 8 ЗБ и UEFI.
- Схему таблицы разделов можно менять с помощью специальных утилит, но перед этим лучше делать бэкап диска.

Бесплатный курс по Python ➞
Мини-курс для новичков и для опытных кодеров. 4 крутых проекта в портфолио, живое общение со спикером. Кликните и узнайте, чему можно научиться на курсе.
Смотреть программу
Время на прочтение11 мин
Количество просмотров699K
Вы когда-нибудь задумывались о том, как загружается компьютер? Независимо от аппаратуры и операционной системы, все компьютеры при загрузке используют или традиционный метод BIOS-MBR, или более современный UEFI-GPT, реализованный в последних версиях ОС.
В этой статье мы сравним структуры разделов GPT и MBR; GPT означает GUID Partition Table, а MBR — Master Boot Record. Начнём с того, что разберём сам процесс загрузки.
В следующих главах выделяются различия между стилями разделов GPT и MBR, в том числе приводятся инструкции, как осуществить преобразование между двумя стилями, и советы, какой из них выбрать.
Понимание процесса загрузки
Когда вы нажимаете кнопку питания на своём ПК, стартует процесс, который в итоге приведёт к загрузке операционной системы в память. Первая команда зависит от того, какова структура разделов на вашем жёстком диске.
Если два вида структур разделов: MBR и GPT. Структура разделов на диске определяет три вещи:
- Структура данных на диске.
- Код, который используется при загрузке, если раздел загрузочный.
- Где начинается и заканчивается раздел.
Процесс загрузки MBR
Вернёмся к процессу загрузки. Если в вашей системе используется структура разделов MBR, то первый процесс выполнения загрузит BIOS. Базовая структура ввода-вывода (Basic Input/Output System) включает в себя микропрограмму загрузчика. Микропрограмма загрузчика содержит низкоуровневые функции, такие как ввод с клавиатуры, доступ к видеодисплею, осуществление дисковых операций ввода-вывода и код для загрузки начальной стадии загрузчика. До того как BIOS может определить загрузочное устройство, он выполняет последовательность функций системной конфигурации, начиная со следующих:
- Самотестирование при включении питания.
- Обнаружение и инициализация видеокарты.
- Отображение стартового экрана BIOS.
- Осуществление быстрой проверки памяти (RAM).
- Конфигурация устройств plug and play.
- Определение загрузочного устройства.
Как только BIOS определил загрузочное устройство, он считывает первый дисковый сектор этого устройства в память. Первый сектор диска — это главная загрузочная запись (MBR) размером 512 байт. В этот размер поместились три объекта:
- Первая стадия загрузчика (446 байт).
- Таблица разделов диска (16 байт на раздел × 4 раздела) — MBR поддерживает только четыре раздела, подробнее об этом ниже.
- Подпись (2 байта).
На этом этапе MBR сканирует таблицу разделов и загружает в оперативную память загрузочный сектор — Volume Boot Record (VBR).
VBR обычно содержит начальный загрузчик программ — Initial Program Loader (IPL), этот код инициирует процесс загрузки. Начальный загрузчик программ включает в себя вторую стадию загрузчика, который затем загружает операционную систему. На системах семейства Windows NT, таких как Windows XP, начальный загрузчик программ сначала загружает другую программу под названием NT Loader (аббревиатура NTLDR), которая затем загружает операционную систему.
Для операционных систем на ядре Linux используется загрузчик GRUB (Grand Unified Bootloader). Процесс загрузки похож на описанный выше, единственная разница в наименовании загрузчиков на первой и второй стадии.

В GRUB первая стадия загрузчика называется GRUB Stage 1. Она загружает вторую стадию, известную как GRUB Stage 2. Вторая стадия загружает получает список операционных систем на жёстких дисках и предоставляет пользователю список для выбора ОС для загрузки.
Процесс загрузки GPT
На том же этапе загрузки в структуре разделов GPT происходит следующее. GPT использует UEFI, в котором нет такой как у MBR процедуры хранения в загрузочном секторе первой стадии загрузчика с последующим вызовом второй стадии загрузчика. UEFI — унифицированный расширяемый интерфейс прошивки (Unified Extensible Firmware Interface) — является более продвинутым интерфейсом, чем BIOS. Он может анализировать файловую систему и даже сам загружать файлы.

После включения вашего компьютера UEFI сначала выполняет функции системной конфигурации, также как и BIOS. Это управление энергопотреблением, установка дат и других компонентов управления системой.
Затем UEFI считывает GPT — таблицу разделов GUID. GUID расшифровывается как «глобальный уникальный идентификатор» (Globally Unique Identifier). GPT располагается в первых секторах диска, сразу после сектора 0, где по-прежнему хранится главная загрузочная запись для Legacy BIOS.
GPT определяет таблицу разделов на диске, на которой загрузчик EFI распознает системный раздел EFI. Системный раздел содержит загрузчики для всех операционных систем, установленных на других разделах жёсткого диска. Загрузчик инициализирует менеджер загрузки Windows, который затем загружает операционную систему.
Для операционных систем на ядре Linux существует версия GRUB с поддержкой EFI, которая загружает файл, такой как grub.efi, или загрузчик EFI, который загружает свой файл, такой как elilo.efi.
Вы можете заметить, что и UEFI-GPT, и BIOS-MBR передают управление загрузчику, но сами напрямую не грузят операционную систему. Однако в UEFI не требуется проходиить через несколько стадий загрузчика, как в BIOS. Процесс загрузки происходит на самой ранней стадии, в зависимости от вашей аппаратной конфигурации.
Различия между структурами разделов GPT и MBR
Если вы когда-нибудь пытались установить Windows 8 или 10 на новый компьютер, то скорее всего видели вопрос: какую структуру разделов использовать, MBR или GPT.
Если вам хочется узнать больше или вы планируете установить новую операционную систему на компьютер, то читайте дальше. Мы уже рассмотрели различия в процессах загрузки, которые стоит держать в уме, разбивая диск или выбирая структуру разделов.
GPT — более новая и продвинутая структура разделов, и у неё много преимуществ, которые я перечислю ниже. MBR используется давно, она стабильная и обладает максимальной совместимостью. Хотя GPT со временем может вытеснить MBR, поскольку предлагает более продвинутые функции, но в некоторых случаях можно использовать только MBR.
Главная загрузочная запись
MBR — традиционная структура для управления разделами диска. Поскольку она совместима с большинством систем, то по-прежнему широко используется. Главная загрузочная запись расположена в первом секторе жёсткого диска или, проще говоря, в самом его начале. Она содержит таблицу разделов — информацию об организации логических разделов на жёстком диске.
MBR также содержит исполняемый код, который сканирует разделы на предмет активной ОС и инициализирует процедуру загрузки ОС.
Диск MBR допускает только четыре основных раздела. Если вам нужно больше, то можно назначить один из разделов расширенным разделом, и на нём можно создавать больше подразделов или логических дисков.
MBR использует 32 бита для записи длины раздела, выраженной в секторах, так что каждый раздел ограничен максимальным размером 2 ТБ.
Преимущества
- Совместима с большинством систем.
Недостатки
- Допускает только четыре раздела, с возможностью создания дополнительных подразделов на одном из основных разделов.
- Ограничивает размер раздела двумя терабайтами.
- Информация о разделе хранится только в одном месте — в главной загрузочной записи. Если она повреждена, то весь диск становится нечитаемым.
Таблица разделов GUID (GPT)
GPT — более новый стандарт для определения структуры разделов на диске. Для определения структуры используются глобальные уникальные идентификаторы (GUID).
Это часть стандарта UEFI, то есть систему на основе UEFI можно установить только на диск, использующий GPT, например, таково требование функции Windows 8 Secure Boot.
GPT допускает создание неограниченного количества разделов, хотя некоторые операционные системы могут ограничивать их число 128 разделами. Также в GPT практически нет ограничения на размер раздела.
Преимущества
- Допускает неограниченное количество разделов. Лимит устанавливает операционная система, например, Windows допускает не более 128 разделов.
Не ограничивает размер раздела. Он зависит от операционной системы. Ограничение на максимальный размер раздела больше, чем объём любых существующих сегодня дисков. Для дисков с секторами по 512 байт поддерживается максимальный размер 9,4 ЗБ (один зеттабайт равен 1 073 741 824 терабайт)- GPT хранит копию раздела и загрузочных данных и может восстановить данные в случае повреждения основного заголовка GPT.
- GPT хранит значения контрольной суммы по алгоритму циклического избыточного кода (CRC) для проверки целостности своих данных (используется для проверки целостности данных заголовка GPT). В случае повреждения GPT может заметить проблему и попытаться восстановить повреждённые данные из другого места на диске.
Недостатки
- Может быть несовместима со старыми системами.
GPT против MBR
- GPT допускает неограниченное количество основных разделов, в то время как MBR допускает только четыре основных, а остальные — дополнительные.
- GPT позволяет создавать разделы любого размера, в то время как MBR имеет ограничение в 2 ТБ.
- GPT хранит копию данных раздела, позволяя восстановить их в случае повреждения основного заголовка GPT; MBR хранит только одну копию данных раздела в первом секторе жёсткого диска, что может привести к потере всей информации в случае повреждении информации о разделах.
- GPT хранит значения контрольной суммы для проверки, что данные не повреждены, и может выполнить необходимое восстановление из других областей диска в случае повреждения; MBR не имеет способа узнать о повреждении данных, вы можете узнать об этом только если компьютер откажется загружаться или исчезнет раздел.
Совместимость с операционными системами
Первый сектор (сектор 0) на диске GPT содержит защитную запись MBR, в которой записано, что на диске один раздел, который распространяется на весь носитель. В случае использования старых инструментов, которые читают только диски MBR, вы увидите один большой раздел размером с весь диск. Защитная запись сделана для того, чтобы старый инструмент ошибочно не воспринял диск как пустой и не перезаписал данные GPT новой главной загрузочной записью.
MBR защищает данные GPT от перезаписи.
Apple MacBook’и используют GPT по умолчанию, так что невозможно установить Mac OS X на систему MBR. Даже хотя Mac OS X может работать на диске MBR, но установка на него невозможна. Я пыталась сделать это, но безуспешно.
Большинство операционных систем на ядре Linux совместимы с GPT. При установке ОС Linux на диск в качестве загрузчика будет установлен GRUB 2.
Для операционных систем Windows загрузка из GPT возможна только на компьютерах с UEFI, работающих под 64-битными версиями Windows Vista, 7, 8, 10 и соответствующими серверными версиями. Если вы купили ноутбук с 64-битной версией Windows 8, то с большой вероятностью там GPT.
Windows 7 и более ранние системы обычно устанавливают на диски с MBR, но вы всё равно можете преобразовать разделы в GPT, как будет рассказано ниже.
Все версии Windows Vista, 7, 8, 10 могут считывать и использовать данные из разделов GPT — но они не могут загружаться с таких дисков без UEFI.
Так GPT или MBR?
Вы можете комфортно себя чувствовать и с MBR, и c GPT. Но учитывая преимущества GPT, упомянутые ранее, и факт постепенного перехода современных компьютеров на эту технологию, вы можете предпочесть GPT. Если цель заключается в поддержке старого оборудования или нужно использовать традиционный BIOS, то вы застряли на MBR.
Проверьте тип раздела жёсткого диска
На каждом жёстком диске под Windows можно проверить тип разделов с помощью «Управления дисками» (Disk Management). Для запуска «Управления дисками» сделайте следующее:
Нажмите сочетание «горячих клавиш» Windows+R, откроется окно для запуска программ.
Наберите diskmgmt.msc и нажмите клавишу Enter.
Windows просканирует жёсткие диски и вскоре покажет их. Для проверки типа разделов любого жёсткого диска нажмите правой кнопкой мыши на плашку диска в нижней части интерфейса. Нужно нажимать на «Диск 0», «Диск 1» и так далее, а не на разделы.
В появившемся контекстном меню выберите «Свойства». Откроется окно со свойствами выбранного диска.
Перейдите на вкладку «Тома» и посмотрите на значение «Стиль раздела».
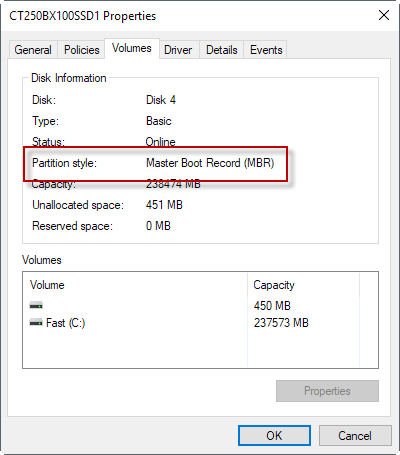
Если вы предпочитаете командную строку, то можете выбрать другой вариант. Его преимущества в том, что он чуть быстрее, поскольку сразу выводит на экран диски и стили разделов.
- Нажмите клавишу Windows, наберите
cmd.exe, удерживая Ctrl и Shift, нажмите Enter. - Подтвердите UAC-сообщение о повышении привилегий в системе.
- Наберите
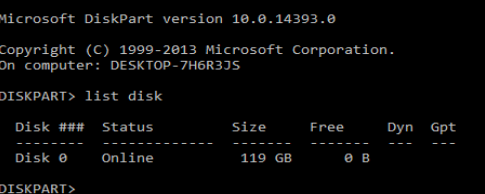
diskpartи нажмите Enter. - Наберите
list diskи снова нажмите Enter.
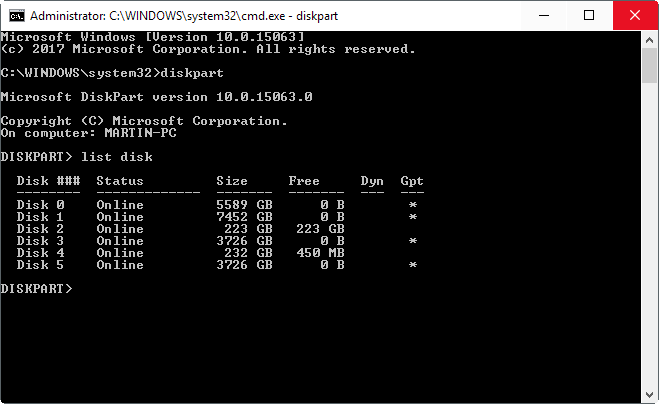
В списке перечислены все диски. В колонке Gpt указан стиль раздела для каждого диска. Если видите звёздочку в колонке, то это GPT, если её нет — это MBR.
Преобразование между MBR и GPT во время установки Windows
Есть два типичных сообщения об ошибке, которые могут возникнуть при установке Windows на жёсткий диск:
- Ошибка № 1: «Windows не может быть установлена на этот диск. Выбранный диск не имеет стиль разделов GPT».
- Ошибка № 2: «Windows не может быть установлена на этот диск. Выбранный диск имеет стиль разделов GPT».
Когда появляется одна из этих двух ошибок, то у вас может не быть возможности выбрать раздел для установки. Но это не значит, что с компьютером что-то не то.
Как вы уже знаете, MBR и GPT — это две абсолютно разные структуры разделов жёсткого диска. MBR — это традиционная структура разделов, а GPT — более новая.
Ошибка № 1 возникает, когда вы пытаетесь установить Windows на компьютер с UEFI, а раздел жёсткого диска не сконфигурирован для режима UEFI или совместимости с Legacy BIOS. Microsoft TechNet предлагает два варианта решения проблемы.
- Перезагрузить компьютер в режиме совместимости с Legacy BIOS. Этот вариант позволит сохранить текущий стиль раздела.
- Переформатировать диск под UEFI, используя стиль раздела GPT. Этот вариант позволит вам использовать функции прошивки UEFI. Переформатирование можно сделать самостоятельно, следуя инструкциям ниже. Всегда сохраняйте резервную копию данных перед форматированием.
Конечно, есть сторонние утилиты для преобразования дисков в GPT с сохранением данных, но всё равно безопаснее сделать резервную копию на случай, если утилита не сможет завершить преобразование.
Инструкции для преобразования жёсткого диска с MBR на GPT
С помощью Windows Setup
- Выключите компьютер и вставьте загрузочный накопитель Windows (USB или DVD).
- Загрузитесь с него в режиме UEFI.
- Выберите «Другое» (Custom) в типе установки.
- Появится экран с сообщением «Куда вы хотите установить Windows?» Выберите все разделы на диске и нажмите «Удалить».
- После успешного удаления диск будет представлять собой единую область нераспределённого пространства.
- Выберите нераспределённое пространство и нажмите «Далее». Windows определит, что компьютер загружен в режиме UEFI, и автоматически переформатирует диск с применением стиля раздела GPT. Процесс установки начнётся сразу после этого.
Преобразование вручную
- Выключите компьютер и вставьте загрузочный накопитель Windows (USB или DVD).
- Загрузитесь с него в режиме UEFI.
- Из установки Windows нажмите Shift+F10, чтобы открыть консоль. После каждой следующей команды нажимайте Enter.
- Запустите инструмент diskpart командой
diskpart. - Чтобы выбрать диск для преобразования, наберите
list disk. - Укажите номер диска для преобразования:
select disk #. - Очистите диск:
clean. - Преобразование в GPT осуществляется командой
convert gpt. - Наберите
exitдля выхода из diskpart. - Закройте консоль и возвращайтесь к установке Windows.
- При выборе типа установки выберите «Другое». Диск будет представлять собой единую область нераспределённого пространства.
- Выберите нераспределённое пространство и нажмите «Далее». Windows начнёт установку.
Инструкции для преобразования жёсткого диска с GPT на MBR
Иногда бывает необходимо преобразовать диск в структуру разделов MBR. Например, если во время установки Windows возникает такое сообщение об ошибке:
«Windows не может быть установлена на этот диск. Выбранный диск имеет стиль разделов GPT»
Загрузка с GPT поддерживается только в 64-битных версиях Windows Vista, 7, 8, 10 и соответствующих серверных версиях на UEFI-системах. Это сообщение об ошибке означает, что ваш компьютер не поддерживает UEFI, а поэтому вы можете использовать только BIOS, который работает со структурой разделов MBR.
Microsoft TechNet предлагает два варианта решения проблемы.
- Перезагрузить компьютер в режиме совместимости с BIOS. Этот вариант позволит сохранить текущий стиль раздела.
- Переформатировать диск, используя стиль раздела MBR. Всегда сохраняйте резервную копию данных перед форматированием. Хотя есть сторонние утилиты для преобразования дисков в GPT с сохранением данных, но всё равно безопаснее сделать резервную копию на случай, если утилита не сможет завершить преобразование.
Если вы выбрали второй вариант, то следуйте пошаговой инструкции:
С помощью Windows Setup
- Выключите компьютер и вставьте загрузочный накопитель Windows (USB или DVD).
- Загрузитесь с него в режиме UEFI.
- Выберите «Другое» (Custom) в типе установки.
- Появится экран с сообщением «Куда вы хотите установить Windows?» Выберите все разделы на диске и нажмите «Удалить».
- После успешного удаления диск будет представлять собой единую область нераспределённого пространства.
- Выберите нераспределённое пространство и нажмите «Далее». Windows определит, что компьютер загружен в режиме BIOS, и автоматически переформатирует диск с применением стиля раздела MBR. Процесс установки начнётся сразу после этого.
Преобразование вручную
- Выключите компьютер и вставьте загрузочный накопитель Windows (USB или DVD).
- Загрузитесь с него в режиме BIOS.
- Из установки Windows нажмите Shift+F10, чтобы открыть консоль. После каждой следующей команды нажимайте Enter.
- Запустите инструмент diskpart командой
diskpart. - Чтобы выбрать диск для преобразования, наберите
list disk. - Укажите номер диска для преобразования:
select disk #. - Очистите диск:
clean. - Преобразование в GPT осуществляется командой
convert mbr. - Наберите
exitдля выхода из diskpart. - Закройте консоль и возвращайтесь к установке Windows.
- При выборе типа установки выберите «Другое». Диск будет представлять собой единую область нераспределённого пространства.
- Выберите нераспределённое пространство и нажмите «Далее». Windows начнёт установку.
Учебные видео
Что такое разделы диска?
Различия между BIOS и UEFI
Таблицы разделов MBR и GPT
Источники
Следующие источники содержат дополнительную информацию о стилях разделов MBR или GPT:
- Загрузка в рехимах UEFI Mode или Legacy BIOS (Microsoft Technet)
- Загрузка из GPT (Род Смит)
- Преобразование диска MBR в диск GPT (Microsoft Technet)
- Различие между GPT и MBR (HowToGeek)
- Таблица разделов GUID (Википедия)
- Проблемы использования Legacy BIOS при использовании GPT (Род Смит)
- Главная загрузочная запись (Microsoft Technet)
- FAQ по Windows и GPT (Microsoft Hardware Dev Center)
- Windows Setup: установка с применением стилей разделов MBR или GPT (Microsoft Technet)
This article is about an IBM PC-specific type of boot sector on partitioned media. For the first sector on non-partitioned media, see volume boot record.
A master boot record (MBR) is a type of boot sector in the first block of partitioned computer mass storage devices like fixed disks or removable drives intended for use with IBM PC-compatible systems and beyond. The concept of MBRs was publicly introduced in 1983 with PC DOS 2.0.
The MBR holds the information on how the disc’s sectors (A.K.A. «blocks») are divided into partitions, each partition notionally containing a file system. The MBR also contains executable code to function as a loader for the installed operating system—usually by passing control over to the loader’s second stage, or in conjunction with each partition’s volume boot record (VBR). This MBR code is usually referred to as a boot loader.
The organization of the partition table in the MBR limits the maximum addressable storage space of a partitioned disk to 2 TiB (232 × 512 bytes).[1] Approaches to slightly raise this limit utilizing 32-bit arithmetic or 4096-byte sectors are not officially supported, as they fatally break compatibility with existing boot loaders, most MBR-compliant operating systems and associated system tools, and may cause serious data corruption when used outside of narrowly controlled system environments. Therefore, the MBR-based partitioning scheme is in the process of being superseded by the GUID Partition Table (GPT) scheme in new computers. A GPT can coexist with an MBR in order to provide some limited form of backward compatibility for older systems.
MBRs are not present on non-partitioned media such as floppies, superfloppies or other storage devices configured to behave as such, nor are they necessarily present on drives used in non-PC platforms.
Support for partitioned media, and thereby the master boot record (MBR), was introduced with IBM PC DOS 2.0 in March 1983 in order to support the 10 MB hard disk of the then-new IBM Personal Computer XT, still using the FAT12 file system. The original version of the MBR was written by David Litton of IBM in June 1982. The partition table supported up to four primary partitions. This did not change when FAT16 was introduced as a new file system with DOS 3.0. Support for an extended partition, a special primary partition type used as a container to hold other partitions, was added with DOS 3.2, and nested logical drives inside an extended partition came with DOS 3.30. Since MS-DOS, PC DOS, OS/2 and Windows were never enabled to boot off them, the MBR format and boot code remained almost unchanged in functionality (except some third-party implementations) throughout the eras of DOS and OS/2 up to 1996.
In 1996, support for logical block addressing (LBA) was introduced in Windows 95B and MS-DOS 7.10 (Not to be confused with IBM PC-DOS 7.1) in order to support disks larger than 8 GB. Disk timestamps were also introduced.[2] This also reflected the idea that the MBR is meant to be operating system and file system independent. However, this design rule was partially compromised in more recent Microsoft implementations of the MBR, which enforce CHS access for FAT16B and FAT32 partition types 0x06/0x0B, whereas LBA is used for 0x0E/0x0C.
Despite sometimes poor documentation of certain intrinsic details of the MBR format (which occasionally caused compatibility problems), it has been widely adopted as a de facto industry standard, due to the broad popularity of PC-compatible computers and its semi-static nature over decades. This was even to the extent of being supported by computer operating systems for other platforms. Sometimes this was in addition to other pre-existing or cross-platform standards for bootstrapping and partitioning.[3]
MBR partition entries and the MBR boot code used in commercial operating systems, however, are limited to 32 bits.[1] Therefore, the maximum disk size supported on disks using 512-byte sectors (whether real or emulated) by the MBR partitioning scheme (without 32-bit arithmetic) is limited to 2 TiB.[1] Consequently, a different partitioning scheme must be used for larger disks, as they have become widely available since 2010. The MBR partitioning scheme is therefore in the process of being superseded by the GUID Partition Table (GPT). The official approach does little more than ensuring data integrity by employing a protective MBR. Specifically, it does not provide backward compatibility with operating systems that do not support the GPT scheme as well. Meanwhile, multiple forms of hybrid MBRs have been designed and implemented by third parties in order to maintain partitions located in the first physical 2 TiB of a disk in both partitioning schemes «in parallel» and/or to allow older operating systems to boot off GPT partitions as well. The present non-standard nature of these solutions causes various compatibility problems in certain scenarios.
The MBR consists of 512 or more bytes located in the first sector of the drive.
It may contain one or more of:
- A partition table describing the partitions of a storage device. In this context the boot sector may also be called a partition sector.
- Bootstrap code: Instructions to identify the configured bootable partition, then load and execute its volume boot record (VBR) as a chain loader.
- Optional 32-bit disk timestamp.[2]
- Optional 32-bit disk signature.[4][5][6][7]
IBM PC DOS 2.0 introduced the FDISK utility to set up and maintain MBR partitions. When a storage device has been partitioned according to this scheme, its MBR contains a partition table describing the locations, sizes, and other attributes of linear regions referred to as partitions.
The partitions themselves may also contain data to describe more complex partitioning schemes, such as extended boot records (EBRs), BSD disklabels, or Logical Disk Manager metadata partitions.[8]
The MBR is not located in a partition; it is located at a first sector of the device (physical offset 0), preceding the first partition. (The boot sector present on a non-partitioned device or within an individual partition is called a volume boot record instead.) In cases where the computer is running a DDO BIOS overlay or boot manager, the partition table may be moved to some other physical location on the device; e.g., Ontrack Disk Manager often placed a copy of the original MBR contents in the second sector, then hid itself from any subsequently booted OS or application, so the MBR copy was treated as if it were still residing in the first sector.
By convention, there are exactly four primary partition table entries in the MBR partition table scheme, although some operating systems and system tools extended this to five (Advanced Active Partitions (AAP) with PTS-DOS 6.60[9] and DR-DOS 7.07), eight (AST and NEC MS-DOS 3.x[10][11] as well as Storage Dimensions SpeedStor), or even sixteen entries (with Ontrack Disk Manager).
Structure of a classical generic MBR
| Address | Description | Size (bytes) |
|
|---|---|---|---|
0x0000 (0)
|
Bootstrap code area | 446 | |
0x01BE (446)
|
Partition entry №1 | Partition table (for primary partitions) |
16 |
0x01CE (462)
|
Partition entry №2 | 16 | |
0x01DE (478)
|
Partition entry №3 | 16 | |
0x01EE (494)
|
Partition entry №4 | 16 | |
0x01FE (510)
|
0x55
|
Boot signature[a] | 2 |
0x01FF (511)
|
0xAA
|
||
| Total size: 446 + 4×16 + 2 | 512 |
Structure of a modern standard MBR
| Address | Description | Size (bytes) |
|
|---|---|---|---|
0x0000 (0) |
Bootstrap code area (part 1) | 218 | |
0x00DA (218)
|
0x0000
|
Disk timestamp[2][b] (optional; Windows 95B/98/98SE/ME (MS-DOS 7.1–8.0). Alternatively, can serve as OEM loader signature with NEWLDR) | 2 |
0x00DC (220)
|
Original physical drive (0x80–0xFF)
|
1 | |
0x00DD (221)
|
Seconds (0–59) | 1 | |
0x00DE (222)
|
Minutes (0–59) | 1 | |
0x00DF (223)
|
Hours (0–23) | 1 | |
0x00E0 (224) |
Bootstrap code area (part 2, code entry at 0x0000)
|
216 (or 222) | |
0x01B8 (440)
|
32-bit disk signature | Disk signature (optional; UEFI, Linux, Windows NT family and other OSes) | 4 |
0x01BC (444)
|
0x0000 (0x5A5A if copy-protected)
|
2 | |
0x01BE (446)
|
Partition entry №1 | Partition table (for primary partitions) |
16 |
0x01CE (462)
|
Partition entry №2 | 16 | |
0x01DE (478)
|
Partition entry №3 | 16 | |
0x01EE (494)
|
Partition entry №4 | 16 | |
0x01FE (510)
|
0x55
|
Boot signature[a] | 2 |
0x01FF (511)
|
0xAA
|
||
| Total size: 218 + 6 + 216 + 6 + 4×16 + 2 | 512 |
Structure of AAP MBR
| Address | Description | Size (bytes) |
|
|---|---|---|---|
0x0000 (0) |
Bootstrap code area | 428 | |
0x01AC (428)
|
0x78
|
AAP signature (optional) | 2 |
0x01AD (429)
|
0x56
|
||
0x01AE (430)
|
AAP physical drive (0x80–0xFE; 0x00: not used; 0x01–0x7F, 0xFF: reserved)
|
AAP record (optional) (AAP partition entry #0 with special semantics) | 1 |
0x01AF (431)
|
CHS (start) address of AAP partition/image file or VBR/EBR | 3 | |
0x01B2 (434)
|
Reserved for AAP partition type (0x00 if not used) (optional)
|
1 | |
0x01B3 (435)
|
Reserved for CHS end address in AAP (optional; byte at offset 0x01B5 is also used for MBR checksum (PTS DE, BootWizard); 0x000000 if not used)
|
3 | |
0x01B6 (438)
|
Start LBA of AAP image file or VBR/EBR or relative sectors of AAP partition (copied to offset +01Chex in the loaded sector over the «hidden sectors» entry of a DOS 3.31 BPB (or emulation thereof) to also support EBR booting)
|
4 | |
0x01BA (442)
|
Reserved for sectors in AAP (optional; 0x00000000 if not used)
|
4 | |
0x01BE (446)
|
Partition entry №1 | Partition table (for primary partitions) |
16 |
0x01CE (462)
|
Partition entry №2 | 16 | |
0x01DE (478)
|
Partition entry №3 | 16 | |
0x01EE (494)
|
Partition entry №4 | 16 | |
0x01FE (510)
|
0x55
|
Boot signature[a] | 2 |
0x01FF (511)
|
0xAA
|
||
| Total size: 428 + 2 + 16 + 4×16 + 2 | 512 |
Structure of NEWLDR MBR
| Address | Description | Size (bytes) |
|
|---|---|---|---|
0x0000 (0)
|
JMPS (EBhex) / NEWLDR record size (often 0x0A/0x16/0x1C for code start at 0x000C/0x0018/0x001E)
|
NEWLDR record (optional) | 2 |
0x0002 (2)
|
«NEWLDR» signature
|
6 | |
0x0008 (8)
|
LOADER physical drive and boot flag (0x80–0xFE, 0x00–0x7E, 0xFF, 0x7F) (if not used, this and following 3 bytes must be all 0)
|
1 | |
0x0009 (9)
|
CHS address of LOADER boot sector or image file (f.e. IBMBIO.LDR) (0x000000 if not used)
|
3 | |
0x000C (12)
|
Allowed DL minimum, else take from partition table (0x80: default; 0x00: always use DL; 0xFF: always use table entry)
|
1 | |
0x000D (13)
|
Reserved (default: 0x000000)
|
3 | |
0x0010 (16)
|
LBA of LOADER boot sector or image file (optional; 0x00000000 if not used)
|
4 | |
0x0014 (20)
|
Patch offset of VBR boot unit (default 0x0000 if not used, else 0024hex or 01FDhex)
|
2 | |
0x0016 (22)
|
Checksum (0x0000 if not used)
|
2 | |
0x0018 (24)
|
OEM loader signature («MSWIN4» for REAL/32, see also offset +0DAhex, corresponds with OEM label at offset +003hex in VBRs (optional)
|
6 | |
| Varies | Bootstrap code area (code entry at 0x0000)
|
Varies | |
0x01AC (428)
|
0x78
|
AAP signature (optional) | 2 |
0x01AD (429)
|
0x56
|
||
0x01AE (430)
|
AAP partition entry №0 with special semantics | AAP record (optional) | 16 |
0x01BE (446)
|
Partition entry №1 | Partition table (for primary partitions) |
16 |
0x01CE (462)
|
Partition entry №2 | 16 | |
0x01DE (478)
|
Partition entry №3 | 16 | |
0x01EE (494)
|
Partition entry №4 | 16 | |
0x01FE (510)
|
0x55
|
Boot signature[a] | 2 |
0x01FF (511)
|
0xAA
|
||
| Total size: 30 + 398 + 2 + 16 + 4×16 + 2 | 512 |
Structure of AST/NEC MS-DOS and SpeedStor MBR
| Address | Description | Size (bytes) |
|
|---|---|---|---|
0x0000 (0) |
Bootstrap code area | 380 | |
0x017C (380)
|
0x5A
|
AST/NEC signature (optional; not for SpeedStor) | 2 |
0x017D (381)
|
0xA5
|
||
0x017E (382)
|
Partition entry №8 | AST/NEC expanded partition table (optional; also for SpeedStor) |
16 |
0x018E (398)
|
Partition entry №7 | 16 | |
0x019E (414)
|
Partition entry №6 | 16 | |
0x01AE (430)
|
Partition entry №5 | 16 | |
0x01BE (446)
|
Partition entry №4 | Partition table (for primary partitions) |
16 |
0x01CE (462)
|
Partition entry №3 | 16 | |
0x01DE (478)
|
Partition entry №2 | 16 | |
0x01EE (494)
|
Partition entry №1 | 16 | |
0x01FE (510)
|
0x55
|
Boot signature[a] | 2 |
0x01FF (511)
|
0xAA
|
||
| Total size: 380 + 2 + 4×16 + 4×16 + 2 | 512 |
Structure of Ontrack Disk Manager MBR
| Address | Description | Size (bytes) |
|
|---|---|---|---|
0x0000 (0) |
Bootstrap code area | 252 | |
0x00FC (252)
|
0xAA
|
DM signature (optional) | 2 |
0x00FD (253)
|
0x55
|
||
0x00FE (254)
|
Partition entry | DM expanded partition table (optional) |
16 |
0x010E (270)
|
Partition entry | 16 | |
0x011E (286)
|
Partition entry | 16 | |
0x012E (302)
|
Partition entry | 16 | |
0x013E (318)
|
Partition entry | 16 | |
0x014E (334)
|
Partition entry | 16 | |
0x015E (350)
|
Partition entry | 16 | |
0x016E (366)
|
Partition entry | 16 | |
0x017E (382)
|
Partition entry | 16 | |
0x018E (398)
|
Partition entry | 16 | |
0x019E (414)
|
Partition entry | 16 | |
0x01AE (430)
|
Partition entry | 16 | |
0x01BE (446)
|
Partition entry №1 | Partition table (for primary partitions) |
16 |
0x01CE (462)
|
Partition entry №2 | 16 | |
0x01DE (478)
|
Partition entry №3 | 16 | |
0x01EE (494)
|
Partition entry №4 | 16 | |
0x01FE (510)
|
0x55
|
Boot signature[a] | 2 |
0x01FF (511)
|
0xAA
|
||
| Total size: 252 + 2 + 12×16 + 4×16 + 2 | 512 |
Partition table entries
[edit]
Layout of one 16-byte partition entry[12] (all multi-byte fields are little-endian)
| Offset (bytes) |
Field length |
Description | ||||||||||||
|---|---|---|---|---|---|---|---|---|---|---|---|---|---|---|
| 0x00 | 1 byte | Status or physical drive (bit 7 set is for active or bootable, old MBRs only accept 0x80, 0x00 means inactive, and 0x01–0x7F stand for invalid)[c] | ||||||||||||
| 0x01 | 3 bytes | CHS address of first absolute sector in partition.[d] The format is described by three bytes, see the next three rows. | ||||||||||||
| 0x01 | 1 byte |
|
||||||||||||
| 0x02 | 1 byte |
|
||||||||||||
| 0x03 | 1 byte |
|
||||||||||||
| 0x04 | 1 byte | Partition type[14] | ||||||||||||
| 0x05 | 3 bytes | CHS address of last absolute sector in partition.[d] The format is described by 3 bytes, see the next 3 rows. | ||||||||||||
| 0x05 | 1 byte |
|
||||||||||||
| 0x06 | 1 byte |
|
||||||||||||
| 0x07 | 1 byte |
|
||||||||||||
| 0x08 | 4 bytes | LBA of first absolute sector in the partition[f] | ||||||||||||
| 0x0C | 4 bytes | Number of sectors in partition[g] |
An artifact of hard disk technology from the era of the PC XT, the partition table subdivides a storage medium using units of cylinders, heads, and sectors (CHS addressing). These values no longer correspond to their namesakes in modern disk drives, as well as being irrelevant in other devices such as solid-state drives, which do not physically have cylinders or heads.
In the CHS scheme, sector indices have (almost) always begun with sector 1 rather than sector 0 by convention, and due to an error in all versions of MS-DOS/PC DOS up to including 7.10, the number of heads is generally limited to 255[h] instead of 256. When a CHS address is too large to fit into these fields, the tuple (1023, 254, 63) is typically used today, although on older systems, and with older disk tools, the cylinder value often wrapped around modulo the CHS barrier near 8 GB, causing ambiguity and risks of data corruption. (If the situation involves a «protective» MBR on a disk with a GPT, Intel’s Extensible Firmware Interface specification requires that the tuple (1023, 255, 63) be used.) The 10-bit cylinder value is recorded within two bytes in order to facilitate making calls to the original/legacy INT 13h BIOS disk access routines, where 16 bits were divided into sector and cylinder parts, and not on byte boundaries.[13]
Due to the limits of CHS addressing,[16][17] a transition was made to using LBA, or logical block addressing. Both the partition length and partition start address are sector values stored in the partition table entries as 32-bit quantities. The sector size used to be considered fixed at 512 (29) bytes, and a broad range of important components including chipsets, boot sectors, operating systems, database engines, partitioning tools, backup and file system utilities and other software had this value hard-coded. Since the end of 2009, disk drives employing 4096-byte sectors (4Kn or Advanced Format) have been available, although the size of the sector for some of these drives was still reported as 512 bytes to the host system through conversion in the hard-drive firmware and referred to as 512 emulation drives (512e).
Since block addresses and sizes are stored in the partition table of an MBR using 32 bits, the maximum size, as well as the highest start address, of a partition using drives that have 512-byte sectors (actual or emulated) cannot exceed 2 TiB−512 bytes (2199023255040 bytes or 4294967295 (232−1) sectors × 512 (29) bytes per sector).[1] Alleviating this capacity limitation was one of the prime motivations for the development of the GPT.
Since partitioning information is stored in the MBR partition table using a beginning block address and a length, it may in theory be possible to define partitions in such a way that the allocated space for a disk with 512-byte sectors gives a total size approaching 4 TiB, if all but one partition are located below the 2 TiB limit and the last one is assigned as starting at or close to block 232−1 and specify the size as up to 232−1, thereby defining a partition that requires 33 rather than 32 bits for the sector address to be accessed. However, in practice, only certain LBA-48-enabled operating systems, including Linux, FreeBSD and Windows 7[18] that use 64-bit sector addresses internally actually support this. Due to code space constraints and the nature of the MBR partition table to only support 32 bits, boot sectors, even if enabled to support LBA-48 rather than LBA-28, often use 32-bit calculations, unless they are specifically designed to support the full address range of LBA-48 or are intended to run on 64-bit platforms only. Any boot code or operating system using 32-bit sector addresses internally would cause addresses to wrap around accessing this partition and thereby result in serious data corruption over all partitions.
For disks that present a sector size other than 512 bytes, such as USB external drives, there are limitations as well. A sector size of 4096 results in an eight-fold increase in the size of a partition that can be defined using MBR, allowing partitions up to 16 TiB (232 × 4096 bytes) in size.[19] Versions of Windows more recent than Windows XP support the larger sector sizes, as well as Mac OS X, and Linux has supported larger sector sizes since 2.6.31[20] or 2.6.32,[21] but issues with boot loaders, partitioning tools and computer BIOS implementations present certain limitations,[22] since they are often hard-wired to reserve only 512 bytes for sector buffers, causing memory to become overwritten for larger sector sizes. This may cause unpredictable behaviour as well, and therefore should be avoided when compatibility and standard conformity is an issue.
Where a data storage device has been partitioned with the GPT scheme, the master boot record will still contain a partition table, but its only purpose is to indicate the existence of the GPT and to prevent utility programs that understand only the MBR partition table scheme from creating any partitions in what they would otherwise see as free space on the disk, thereby accidentally erasing the GPT.
System bootstrapping
[edit]
On IBM PC-compatible computers, the bootstrapping firmware (contained within the ROM BIOS) loads and executes the master boot record.[23] The PC/XT (type 5160) used an Intel 8088 microprocessor. In order to remain compatible, all x86 BIOS architecture systems start with the microprocessor in an operating mode referred to as real mode. The BIOS reads the MBR from the storage device into physical memory, and then it directs the microprocessor to the start of the boot code. The BIOS will switch the processor to real mode, then begin to execute the MBR program, and so the beginning of the MBR is expected to contain real-mode machine code.[23]
Since the BIOS bootstrap routine loads and runs exactly one sector from the physical disk, having the partition table in the MBR with the boot code simplifies the design of the MBR program. It contains a small program that loads the Volume Boot Record (VBR) of the targeted partition. Control is then passed to this code, which is responsible for loading the actual operating system. This process is known as chain loading.
Popular MBR code programs were created for booting PC DOS and MS-DOS, and similar boot code remains in wide use. These boot sectors expect the FDISK partition table scheme to be in use and scans the list of partitions in the MBR’s embedded partition table to find the only one that is marked with the active flag.[24] It then loads and runs the volume boot record (VBR) of the active partition.
There are alternative boot code implementations, some of which are installed by boot managers, which operate in a variety of ways. Some MBR code loads additional code for a boot manager from the first track of the disk, which it assumes to be «free» space that is not allocated to any disk partition, and executes it. A MBR program may interact with the user to determine which partition on which drive should boot, and may transfer control to the MBR of a different drive. Other MBR code contains a list of disk locations (often corresponding to the contents of files in a filesystem) of the remainder of the boot manager code to load and to execute. (The first relies on behavior that is not universal across all disk partitioning utilities, most notably those that read and write GPTs. The last requires that the embedded list of disk locations be updated when changes are made that would relocate the remainder of the code.)
On machines that do not use x86 processors, or on x86 machines with non-BIOS firmware such as Open Firmware or Extensible Firmware Interface (EFI) firmware, this design is unsuitable, and the MBR is not used as part of the system bootstrap.[25] EFI firmware is instead capable of directly understanding the GPT partitioning scheme and the FAT filesystem format, and loads and runs programs held as files in the EFI System partition.[26] The MBR will be involved only insofar as it might contain a partition table for compatibility purposes if the GPT partition table scheme has been used.
There is some MBR replacement code that emulates EFI firmware’s bootstrap, which makes non-EFI machines capable of booting from disks using the GPT partitioning scheme. It detects a GPT, places the processor in the correct operating mode, and loads the EFI compatible code from disk to complete this task.
In addition to the bootstrap code and a partition table, master boot records may contain a disk signature. This is a 32-bit value that is intended to identify uniquely the disk medium (as opposed to the disk unit—the two not necessarily being the same for removable hard disks).
The disk signature was introduced by Windows NT version 3.5, but it is now used by several operating systems, including the Linux kernel version 2.6 and later. Linux tools can use the NT disk signature to determine which disk the machine booted from.[27]
Windows NT (and later Microsoft operating systems) uses the disk signature as an index to all the partitions on any disk ever connected to the computer under that OS; these signatures are kept in Windows Registry keys, primarily for storing the persistent mappings between disk partitions and drive letters. It may also be used in Windows NT BOOT.INI files (though most do not), to describe the location of bootable Windows NT (or later) partitions.[28] One key (among many), where NT disk signatures appear in a Windows 2000/XP registry, is:
HKEY_LOCAL_MACHINE\SYSTEM\MountedDevices\
If a disk’s signature stored in the MBR was A8 E1 B9 D2 (in that order) and its first partition corresponded with logical drive C: under Windows, then the REG_BINARY data under the key value \DosDevices\C: would be:
A8 E1 B9 D2 00 7E 00 00 00 00 00 00
The first four bytes are said disk signature. (In other keys, these bytes may appear in reverse order from that found in the MBR sector.) These are followed by eight more bytes, forming a 64-bit integer, in little-endian notation, which are used to locate the byte offset of this partition. In this case, 00 7E corresponds to the hexadecimal value 0x7E00 (32,256). Under the assumption that the drive in question reports a sector size of 512 bytes, then dividing this byte offset by 512 results in 63, which is the physical sector number (or LBA) containing the first sector of the partition (unlike the sector count used in the sectors value of CHS tuples, which counts from one, the absolute or LBA sector value starts counting from zero).
If this disk had another partition with the values 00 F8 93 71 02 following the disk signature (under, e.g., the key value \DosDevices\D:), it would begin at byte offset 0x00027193F800 (10,495,457,280), which is also the first byte of physical sector 20,498,940.
Starting with Windows Vista, the disk signature is also stored in the Boot Configuration Data (BCD) store, and the boot process depends on it.[29] If the disk signature changes, cannot be found or has a conflict, Windows is unable to boot.[30] Unless Windows is forced to use the overlapping part of the LBA address of the Advanced Active Partition entry as pseudo-disk signature, Windows’ usage is conflictive with the Advanced Active Partition feature of PTS-DOS 7 and DR-DOS 7.07, in particular if their boot code is located outside the first 8 GB of the disk, so that LBA addressing must be used.
Programming considerations
[edit]
The MBR originated in the PC XT.[31] IBM PC-compatible computers are little-endian, which means the processor stores numeric values spanning two or more bytes in memory least significant byte first. The format of the MBR on media reflects this convention. Thus, the MBR signature will appear in a disk editor as the sequence 55 AA.[a]
The bootstrap sequence in the BIOS will load the first valid MBR that it finds into the computer’s physical memory at address 0x7C00 to 0x7DFF.[31] The last instruction executed in the BIOS code will be a «jump» to that address in order to direct execution to the beginning of the MBR copy. The primary validation for most BIOSes is the signature at offset 0x01FE, although a BIOS implementer may choose to include other checks, such as verifying that the MBR contains a valid partition table without entries referring to sectors beyond the reported capacity of the disk.
To the BIOS, removable (e.g. floppy) and fixed disks are essentially the same. For either, the BIOS reads the first physical sector of the media into RAM at absolute address 0x7C00, checks the signature in the last two bytes of the loaded sector, and then, if the correct signature is found, transfers control to the first byte of the sector with a jump (JMP) instruction. The only real distinction that the BIOS makes is that (by default, or if the boot order is not configurable) it attempts to boot from the first removable disk before trying to boot from the first fixed disk. From the perspective of the BIOS, the action of the MBR loading a volume boot record into RAM is exactly the same as the action of a floppy disk volume boot record loading the object code of an operating system loader into RAM. In either case, the program that the BIOS loaded is going about the work of chain loading an operating system.
While the MBR boot sector code expects to be loaded at physical address 0x0000:0x7C00,[i] all the memory from physical address 0x0000:0x0501 (address 0x0000:0x0500 is the last one used by a Phoenix BIOS)[13] to 0x0000:0x7FFF,[31] later relaxed to 0x0000:0xFFFF[32] (and sometimes[j] up to 0x9000:0xFFFF)—the end of the first 640 KB—is available in real mode.[k] The INT 12h BIOS interrupt call may help in determining how much memory can be allocated safely (by default, it simply reads the base memory size in KB from segment:offset location 0x0040:0x0013, but it may be hooked by other resident pre-boot software like BIOS overlays, RPL code or viruses to reduce the reported amount of available memory in order to keep other boot stage software like boot sectors from overwriting them).
The last 66 bytes of the 512-byte MBR are reserved for the partition table and other information, so the MBR boot sector program must be small enough to fit within 446 bytes of memory or less.
The MBR code examines the partition table, selects a suitable partition and loads the program that will perform the next stage of the boot process, usually by making use of INT 13h BIOS calls. The MBR bootstrap code loads and runs (a boot loader- or operating system-dependent) volume boot record code that is located at the beginning of the «active» partition. The volume boot record will fit within a 512-byte sector, but it is safe for the MBR code to load additional sectors to accommodate boot loaders longer than one sector, provided they do not make any assumptions on what the sector size is. In fact, at least 1 KB of RAM is available at address 0x7C00 in every IBM XT- and AT-class machine, so a 1 KB sector could be used with no problem. Like the MBR, a volume boot record normally expects to be loaded at address 0x0000:0x7C00. This derives from the fact that the volume boot record design originated on unpartitioned media, where a volume boot record would be directly loaded by the BIOS boot procedure; as mentioned above, the BIOS treats MBRs and volume boot records (VBRs)[l] exactly alike. Since this is the same location where the MBR is loaded, one of the first tasks of an MBR is to relocate itself somewhere else in memory. The relocation address is determined by the MBR, but it is most often 0x0000:0x0600 (for MS-DOS/PC DOS, OS/2 and Windows MBR code) or 0x0060:0x0000 (most DR-DOS MBRs). (Even though both of these segmented addresses resolve to the same physical memory address in real mode, for Apple Darwin to boot, the MBR must be relocated to 0x0000:0x0600 instead of 0x0060:0x0000, since the code depends on the DS:SI pointer to the partition entry provided by the MBR, but it erroneously refers to it via 0x0000:SI only.[33]) It is important not to relocate to other addresses in memory because many VBRs will assume a certain standard memory layout when loading their boot file.
The Status field in a partition table record is used to indicate an active partition. Standard-conformant MBRs will allow only one partition marked active and use this as part of a sanity-check to determine the existence of a valid partition table. They will display an error message, if more than one partition has been marked active. Some non-standard MBRs will not treat this as an error condition and just use the first marked partition in the row.
Traditionally, values other than 0x00 (not active) and 0x80 (active) were invalid and the bootstrap program would display an error message upon encountering them. However, the Plug and Play BIOS Specification and BIOS Boot Specification (BBS) allowed other devices to become bootable as well since 1994.[32][34] Consequently, with the introduction of MS-DOS 7.10 (Windows 95B) and higher, the MBR started to treat a set bit 7 as active flag and showed an error message for values 0x01..0x7F only. It continued to treat the entry as physical drive unit to be used when loading the corresponding partition’s VBR later on, thereby now also accepting other boot drives than 0x80 as valid, however, MS-DOS did not make use of this extension by itself. Storing the actual physical drive number in the partition table does not normally cause backward compatibility problems, since the value will differ from 0x80 only on drives other than the first one (which have not been bootable before, anyway). However, even with systems enabled to boot off other drives, the extension may still not work universally, for example, after the BIOS assignment of physical drives has changed when drives are removed, added or swapped. Therefore, per the BIOS Boot Specification (BBS),[32] it is best practice for a modern MBR accepting bit 7 as active flag to pass on the DL value originally provided by the BIOS instead of using the entry in the partition table.
BIOS to MBR interface
[edit]
The MBR is loaded at memory location 0x0000:0x7C00 and with the following CPU registers set up when the prior bootstrap loader (normally the IPL in the BIOS) passes execution to it by jumping to 0x0000:0x7C00 in the CPU’s real mode.
- CS:IP = 0x0000:0x7C00 (fixed)
- Some Compaq BIOSes erroneously use 0x07C0:0x0000 instead. While this resolves to the same location in real mode memory, it is non-standard and should be avoided, since MBR code assuming certain register values or not written to be relocatable may not work otherwise.
- DL = boot drive unit (fixed disks / removable drives: 0x80 = first, 0x81 = second, …, 0xFE; floppies / superfloppies: 0x00 = first, 0x01 = second, …, 0x7E; values 0x7F and 0xFF are reserved for ROM / remote drives and must not be used on disk).[35][36]
- DL is supported by IBM BIOSes as well as most other BIOSes. The Toshiba T1000 BIOS is known not to support this properly, and some old Wyse 286 BIOSes use DL values greater or equal to 2 for fixed disks (thereby reflecting the logical drive numbers under DOS rather than the physical drive numbers of the BIOS). USB sticks configured as removable drives typically get an assignment of DL = 0x80, 0x81, etc. However, some rare BIOSes erroneously presented them under DL = 0x01, just as if they were configured as superfloppies.
- A standard conformant BIOS assigns numbers greater or equal to 0x80 exclusively to fixed disk / removable drives, and traditionally only values 0x80 and 0x00 were passed on as physical drive units during boot. By convention, only fixed disks / removable drives are partitioned, therefore, the only DL value a MBR could see traditionally was 0x80. Many MBRs were written to ignore the DL value and work with a hard-wired value (normally 0x80), anyway.
- The Plug and Play BIOS Specification and BIOS Boot Specification (BBS) allow other devices to become bootable as well since 1994.[32][34] The later recommends that MBR and VBR code should use DL rather than internally hardwired defaults.[32] This will also ensure compatibility with various non-standard assignments (see examples above), as far as the MBR code is concerned.
- Bootable CD-ROMs following the El Torito specification may contain disk images mounted by the BIOS to occur as floppy or superfloppies on this interface. DL values of 0x00 and 0x01 may also be used by Protected Area Run Time Interface Extension Services (PARTIES) and Trusted Computing Group (TCG) BIOS extensions in Trusted mode to access otherwise invisible PARTIES partitions, disk image files located via the Boot Engineering Extension Record (BEER) in the last physical sector of a hard disk’s Host Protected Area (HPA). While designed to emulate floppies or superfloppies, MBR code accepting these non-standard DL values allows to use images of partitioned media at least in the boot stage of operating systems.
- DH bit 5 = 0: device supported through INT 13h; else: don’t care (should be zero). DH is supported by some IBM BIOSes.
- Some of the other registers may typically also hold certain register values (DS, ES, SS = 0x0000; SP = 0x0400) with original IBM ROM BIOSes, but this is nothing to rely on, as other BIOSes may use other values. For this reason, MBR code by IBM, Microsoft, Digital Research, etc. never did take any advantage of it. Relying on these register values in boot sectors may also cause problems in chain-boot scenarios.
Systems with Plug-and-Play BIOS or BBS support will provide a pointer to PnP data in addition to DL:[32][34]
- DL = boot drive unit (see above)
- ES:DI = points to «
$PnP» installation check structure
- This information allows the boot loader in the MBR (or VBR, if passed on) to actively interact with the BIOS or a resident PnP / BBS BIOS overlay in memory in order to configure the boot order, etc., however, this information is ignored by most standard MBRs and VBRs. Ideally, ES:DI is passed on to the VBR for later use by the loaded operating system, but PnP-enabled operating systems typically also have fallback methods to retrieve the PnP BIOS entry point later on so that most operating systems do not rely on this.
MBR to VBR interface
[edit]
By convention, a standard conformant MBR passes execution to a successfully loaded VBR, loaded at memory location 0x0000:0x7C00, by jumping to 0x0000:0x7C00 in the CPU’s real mode with the following registers maintained or specifically set up:
- CS:IP = 0x0000:0x7C00[m] (constant)
- DL = boot drive unit (see above)
- MS-DOS 2.0–7.0 / PC DOS 2.0–6.3 MBRs do not pass on the DL value received on entry, but they rather use the boot status entry in the partition table entry of the selected primary partition as physical boot drive unit. Since this is, by convention, 0x80 in most MBR partition tables, it won’t change things unless the BIOS attempted to boot off a physical device other than the first fixed disk / removable drive in the row. This is also the reason why these operating systems cannot boot off a second hard disk, etc. Some FDISK tools allow to mark partitions on secondary disks as «active» as well. In this situation, knowing that these operating systems cannot boot off other drives anyway, some of them continue to use the traditionally fixed value of 0x80 as active marker, whereas others use values corresponding with the currently assigned physical drive unit (0x81, 0x82), thereby allowing booting from other drives, at least in theory. In fact, this will work with many MBR codes, which take a set bit 7 of the boot status entry as active flag rather than insisting on 0x80, however, MS-DOS/PC DOS MBRs are hard-wired to accept the fixed value of 0x80 only. Storing the actual physical drive number in the partition table will also cause problems, when the BIOS assignment of physical drives changes, for example when drives are removed, added or swapped. Therefore, for a normal MBR accepting bit 7 as active flag and otherwise just using and passing on to the VBR the DL value originally provided by the BIOS allows for maximum flexibility. MS-DOS 7.1–8.0 MBRs have changed to treat bit 7 as active flag and any values 0x01..0x7F as invalid, but they still take the physical drive unit from the partition table rather than using the DL value provided by the BIOS. DR-DOS 7.07 extended MBRs treat bit 7 as active flag and use and pass on the BIOS DL value by default (including non-standard values 0x00..0x01 used by some BIOSes also for partitioned media), but they also provide a special NEWLDR configuration block in order to support alternative boot methods in conjunction with LOADER and REAL/32 as well as to change the detail behaviour of the MBR, so that it can also work with drive values retrieved from the partition table (important in conjunction with LOADER and AAPs, see NEWLDR offset
0x000C), translate Wyse non-standard drive units 0x02..0x7F to 0x80..0xFD, and optionally fix up the drive value (stored at offset0x019in the Extended BIOS Parameter Block (EBPB) or at sector offset0x01FD) in loaded VBRs before passing execution to them (see NEWLDR offset0x0014)—this also allows other boot loaders to use NEWLDR as a chain-loader, configure its in-memory image on the fly and «tunnel» the loading of VBRs, EBRs, or AAPs through NEWLDR.
- The contents of DH and ES:DI should be preserved by the MBR for full Plug-and-Play support (see above), however, many MBRs, including those of MS-DOS 2.0–8.0 / PC DOS 2.0–6.3 and Windows NT/2000/XP, do not. (This is unsurprising, since those versions of DOS predate the Plug-and-Play BIOS standard, and previous standards and conventions indicated no requirements to preserve any register other than DL.) Some MBRs set DH to 0.
The MBR code passes additional information to the VBR in many implementations:
- DS:SI = points to the 16-byte MBR partition table entry (in the relocated MBR) corresponding with the activated VBR. PC-MOS 5.1 depends on this to boot if no partition in the partition table is flagged as bootable. In conjunction with LOADER, Multiuser DOS and REAL/32 boot sectors use this to locate the boot sector of the active partition (or another bootstrap loader like IBMBIO.LDR at a fixed position on disk) if the boot file (LOADER.SYS) could not be found. PTS-DOS 6.6 and S/DOS 1.0 use this in conjunction with their Advanced Active Partition (AAP) feature. In addition to support for LOADER and AAPs, DR-DOS 7.07 can use this to determine the necessary INT 13h access method when using its dual CHS/LBA VBR code and it will update the boot drive / status flag field in the partition entry according to the effectively used DL value. Darwin bootloaders (Apple’s
boot1h,boot1u, and David Elliott’sboot1fat32) depend on this pointer as well, but additionally they don’t use DS, but assume it to be set to 0x0000 instead.[33] This will cause problems if this assumption is incorrect. The MBR code of OS/2, MS-DOS 2.0 to 8.0, PC DOS 2.0 to 7.10 and Windows NT/2000/XP provides this same interface as well, although these systems do not use it. The Windows Vista/7 MBRs no longer provide this DS:SI pointer. While some extensions only depend on the 16-byte partition table entry itself, other extensions may require the whole 4 (or 5 entry) partition table to be present as well. - DS:BP = optionally points to the 16-byte MBR partition table entry (in the relocated MBR) corresponding with the activated VBR. This is identical to the pointer provided by DS:SI (see above) and is provided by MS-DOS 2.0–8.0, PC DOS 2.0–7.10, Windows NT/2000/XP/Vista/7 MBRs. It is, however, not supported by most third-party MBRs.
Under DR-DOS 7.07 an extended interface may be optionally provided by the extended MBR and in conjunction with LOADER:
- AX = magic signature indicating the presence of this NEWLDR extension (0x0EDC)
- DL = boot drive unit (see above)
- DS:SI = points to the 16-byte MBR partition table entry used (see above)
- ES:BX = start of boot sector or NEWLDR sector image (typically 0x7C00)
- CX = reserved
In conjunction with GPT, an Enhanced Disk Drive Specification (EDD) 4 Hybrid MBR proposal recommends another extension to the interface:[37]
- EAX = 0x54504721 («
!GPT«) - DL = boot drive unit (see above)
- DS:SI = points to a Hybrid MBR handover structure, consisting of a 16-byte dummy MBR partition table entry (with all bits set except for the boot flag at offset 0x00 and the partition type at offset 0x04) followed by additional data. This is partially compatible with the older DS:SI extension discussed above, if only the 16-byte partition entry, not the whole partition table is required by these older extensions.
- Since older operating systems (including their VBRs) do not support this extension nor are they able to address sectors beyond the 2 TiB barrier, a GPT-enabled hybrid boot loader should still emulate the 16-byte dummy MBR partition table entry if the boot partition is located within the first 2 TiB.[n]
- ES:DI = points to «
$PnP» installation check structure (see above)
Editing and replacing contents
[edit]
Though it is possible to manipulate the bytes in the MBR sector directly using various disk editors, there are tools to write fixed sets of functioning code to the MBR. Since MS-DOS 5.0, the program FDISK has included the switch /MBR, which will rewrite the MBR code.[38] Under Windows 2000 and Windows XP, the Recovery Console can be used to write new MBR code to a storage device using its fixmbr command. Under Windows Vista and Windows 7, the Recovery Environment can be used to write new MBR code using the BOOTREC /FIXMBR command.
Some third-party utilities may also be used for directly editing the contents of partition tables (without requiring any knowledge of hexadecimal or disk/sector editors), such as MBRWizard.[o]
dd is a POSIX command commonly used to read or write any location on a storage device, MBR included. In Linux, ms-sys may be used to install a Windows MBR. The GRUB and LILO projects have tools for writing code to the MBR sector, namely grub-install and lilo -mbr. The GRUB Legacy interactive console can write to the MBR, using the setup and embed commands, but GRUB2 currently requires grub-install to be run from within an operating system.
Various programs are able to create a «backup» of both the primary partition table and the logical partitions in the extended partition.
Linux sfdisk (on a SystemRescueCD) is able to save a backup of the primary and extended partition table. It creates a file that can be read in a text editor, or this file can be used by sfdisk to restore the primary/extended partition table. An example command to back up the partition table is sfdisk -d /dev/hda > hda.out and to restore is sfdisk /dev/hda < hda.out. It is possible to copy the partition table from one disk to another this way, useful for setting up mirroring, but sfdisk executes the command without prompting/warnings using sfdisk -d /dev/sda | sfdisk /dev/sdb.[39]
- Extended boot record (EBR)
- Volume boot record (VBR)
- GUID Partition Table (GPT)
- BIOS Boot partition
- EFI System partition
- Boot engineering extension record (BEER)
- Host protected area (HPA)
- Device configuration overlay (DCO)
- Apple partition map (APM)
- Amiga rigid disk block (RDB)
- Volume Table of Contents (VTOC)
- BSD disklabel
- Boot loader
- Disk cloning
- Recovery disc
- GNU Parted
- Partition alignment
- ^ a b c d e f g The signature at offset 0x01FE in boot sectors is
55hex AAhex, that is 0x55 at offset 0x01FE andAAhexat offset 0x01FF. Since little-endian representation must be assumed in the context of IBM PC compatible machines, this can be written as 16-bit wordAA55hexin programs for x86 processors (note the swapped order), whereas it would have to be written as55AAhexin programs for other CPU architectures using a big-endian representation. Since this has been mixed up numerous times in books and even in original Microsoft reference documents, this article uses the offset-based byte-wise on-disk representation to avoid any possible misinterpretation. - ^ In order to ensure the integrity of the MBR boot loader code, it is important that the bytes at 0x00DA to 0x00DF are never changed, unless either all six bytes represent a value of 0 or the whole MBR bootstrap loader code (except for the (extended) partition table) is replaced at the same time as well. This includes resetting these values to
00 00 00 00 00 00hexunless the code stored in the MBR is known. Windows adheres to this rule. - ^ Originally, status values other than 0x00 and 0x80 were invalid, but modern MBRs treat the bit 7 as active flag and use this entry to store the physical boot unit.
- ^ a b The starting sector fields are limited to 1023+1 cylinders, 255+1 heads, and 63 sectors; ending sector fields have the same limitations.
- ^ a b c d e The range for sector is 1 through 63; the range for cylinder is 0 through 1023; the range for head is 0 through 255 inclusive.[13]
- ^ This entry is used by operating systems in certain circumstances; in such cases the CHS addresses are ignored.[15]
- ^ Zero is reserved and must not be used in normal partition entries. This entry is used by operating systems in certain circumstances; in such cases the CHS addresses are ignored.[15]
- ^ «Quote: [Most] versions of MS-DOS (including MS-DOS 7 [Windows 95]) have a bug which prevents booting on hard disks with 256 heads (FFh), so many modern BIOSes provide mappings with at most 255 (FEh) heads.» RBIL[40][41]
- ^ The address
0000hex:7C00hexis the first byte of the 32nd KB of RAM. The loading of the boot program at this address historically was the reason why, while the minimum RAM size of an original IBM PC (type 5150) was 16 KB, 32 KB were required for the disk option in the IBM XT. - ^ If there is an EBDA, the available memory ends below it.
- ^ Very old machines may have less than 640 KB (
A0000hexor 655,360 bytes) of memory. In theory, only 32 KB (up to0000hex:7FFFhex) or 64 KB (up to0000hex:FFFFhex) are guaranteed to exist; this would be the case on an IBM XT-class machine equipped with only the required minimum amount of memory for a disk system. - ^ This applies when the BIOS handles a VBR, which is when it is in the first physical sector of unpartitioned media. Otherwise, the BIOS has nothing to do with the VBR. The design of VBRs is such as it is because VBRs originated solely on unpartitioned floppy disk media—the type 5150 IBM PC originally had no hard disk option—and the partitioning system using an MBR was later developed as an adaptation to put more than one volume, each beginning with its own VBR as-already-defined, onto a single fixed disk. By this design, essentially the MBR emulates the BIOS boot routine, doing the same things the BIOS would do to process this VBR and set up the initial operating environment for it just as if the BIOS had found that VBR on an unpartitioned medium.
- ^ IP is set as a result of the jump. CS may be set to 0 either by executing a far jump or by loading the register value explicitly before executing a near jump. (It is impossible for jumped-to x86 code to detect whether a near or far jump was used to reach it [unless the code that made the jump separately passes this information in some way].)
- ^ This is not part of the above mentioned proposal, but a natural consequence of pre-existing conditions.
- ^ For example, PowerQuest’s Partition Table Editor (PTEDIT32.EXE), which runs under Windows operating systems, is still available here: Symantec’s FTP site.
- ^ a b c d «Windows support for hard disks that are larger than 2 TB». 1. Microsoft. 2013-06-26. 2581408. Archived from the original on 2017-04-27. Retrieved 2013-08-28.
- ^ a b c Sedory, Daniel B. (2004). «The Mystery Bytes (or the Drive/Timestamp Bytes) of the MS-Windows 95B, 98, 98SE and Me Master Boot Record (MBR)». Master Boot Records. thestarman.pcministry.com. Archived from the original on 2017-08-24. Retrieved 2012-08-25.
- ^ Lucas, Michael (2003). Absolute OpenBSD: Unix for the practical paranoid. No Starch Press. p. 73. ISBN 9781886411999. Retrieved 2011-04-09.
Every operating system includes tools to manage MBR partitions. Unfortunately, every operating system handles MBR partitions in a slightly different manner.
- ^ Norton, Peter; Clark, Scott (2002). Peter Norton’s New Inside the PC. Sams Publishing. pp. 360–361. ISBN 0-672-32289-7.
- ^ Graves, Michael W. (2004). A+ Guide To PC Hardware Maintenance and Repair. Thomson Delmar. p. 276. ISBN 1-4018-5230-0.
- ^ Andrews, Jean (2003). Upgrade and Repair with Jean Andrews. Thomson Course Technology. p. 646. ISBN 1-59200-112-2.
- ^ Boswell, William (2003). Inside Windows Server 2003. Addison-Wesley Professional. p. 13. ISBN 0-7357-1158-5.
- ^ Smith, Roderick W. (2000). The Multi-Boot Configuration Handbook. Que Publishing. pp. 260–261. ISBN 0-7897-2283-6.
- ^ Brouwer, Andries Evert (2004-04-22) [2000]. «Properties of partition tables». Partition types. Archived from the original on 2017-08-24. Retrieved 2017-08-24.
Matthias [R.] Paul writes: «[…] PTS-DOS [uses] a special fifth partition entry in front of the other four entries in the MBR and corresponding AAP-aware MBR bootstrap code. […]»
- ^ Brouwer, Andries Evert (2004-04-22) [2000]. «Properties of partition tables». Partition types. Archived from the original on 2017-08-24. Retrieved 2017-08-24.
Some OEM systems, such as AST DOS (type
(NB. NEC MS-DOS 3.30 and AST MS-DOS partition tables with eight entries are preceded with a signature14hex) and NEC DOS (type24hex) had 8 instead of 4 partition entries in their MBR sectors. (Matthias R. Paul).A55Ahexat offset 0x017C.) - ^ Sedory, Daniel B. (2007-05-18) [2003]. «Notes on the Differences in one OEM version of the DOS 3.30 MBR». Master Boot Records. Archived from the original on 2017-08-24. Retrieved 2017-08-24.
When we added partitions to this NEC table, the first one was placed at offsets 0x01EE through 0x01FD and the next entry was added just above it. So, the entries are inserted and listed backwards from that of a normal Table. Thus, looking at such a Table with a disk editor or partition listing utility, it would show the first entry in a NEC eight-entry table as being the last one (fourth entry) in a normal Partition Table.
(NB. Shows an 8-entry partition table and where its boot code differs from MS-DOS 3.30.) - ^ «Partition Table». osdev.org. 2017-03-18 [2007-03-06]. Archived from the original on 2017-08-24. Retrieved 2017-08-24.
- ^ a b c System BIOS for IBM PC/XT/AT Computers and Compatibles. Phoenix technical reference. Addison-Wesley. 1989. ISBN 0-201-51806-6.
- ^ Brouwer, Andries Evert (2013) [1995]. «List of partition identifiers for PCs». Partition types. Archived from the original on 2017-08-24. Retrieved 2017-08-24.
- ^ a b Wood, Sybil (2002). Microsoft Windows 2000 Server Operations Guide. Microsoft Press. p. 18. ISBN 978-0-73561796-4.
- ^ «An Introduction to Hard Disk Geometry». Tech Juice. 2012-12-06 [2011-08-08]. Archived from the original on 2013-02-04.
- ^ Kozierok, Charles M. (2001-04-17). «BIOS and the Hard Disk». The PC Guide. Archived from the original on 2017-06-17. Retrieved 2013-04-19.
- ^ Smith, Robert (2011-06-26). «Working Around MBR’s Limitations». GPT fdisk Tutorial. Archived from the original on 2017-08-24. Retrieved 2013-04-20.
- ^ «More than 2 TiB on a MBR disk». superuser.com. 2013-03-07. Archived from the original on 2017-08-24. Retrieved 2013-10-22.
- ^ «Transition to Advanced Format 4K Sector Hard Drives». Tech Insight. Seagate Technology. 2012. Archived from the original on 2017-08-24. Retrieved 2013-04-19.
- ^ Calvert, Kelvin (2011-03-16). «WD AV-GP Large Capacity Hard Drives» (PDF). Western Digital. Retrieved 2013-04-20.
- ^ Smith, Roderick W. (2010-04-27). «Linux on 4KB-sector disks: Practical advice». DeveloperWorks. IBM. Archived from the original on 2017-08-24. Retrieved 2013-04-19.
- ^ a b «MBR (x86)». OSDev Wiki. OSDev.org. 2012-03-05. Archived from the original on 2017-08-24. Retrieved 2013-04-20.
- ^ Sedory, Daniel B. (2003-07-30). «IBM DOS 2.00 Master Boot Record». The Starman’s Realm. Archived from the original on 2017-08-24. Retrieved 2011-07-22.
- ^ Singh, Amit (2009-12-25) [December 2003]. «Booting Mac OS X». Mac OS X Internals: The Book. Retrieved 2011-07-22.
- ^ de Boyne Pollard, Jonathan (2011-07-10). «The EFI boot process». Frequently Given Answers. Archived from the original on 2017-08-24. Retrieved 2011-07-22.
- ^ Domsch, Matt (2005-03-22) [2003-12-19]. «Re: RFC 2.6.0 EDD enhancements». Linux Kernel Mailing List. Archived from the original on 2017-08-24. Retrieved 2017-08-24.
- ^ «Windows may use Signature() syntax in the BOOT.INI file». KnowledgeBase. Microsoft.
- ^ McTavish (February 2014). «Vista’s MBR Disk Signature». Multibooters: Dual and Multibooting with Vista. Archived from the original on 2017-08-24. Retrieved 2017-08-24.
- ^ Russinovich, Mark (2011-11-08). «Fixing Disk Signature Collisions». Mark Russinovich’s Blog. Microsoft. Archived from the original on 2017-08-24. Retrieved 2013-04-19.
- ^ a b c Sakamoto, Masahiko (2010-05-13). «Why BIOS loads MBR into
0x7C00in x86?». Glamenv-Septzen.net. Archived from the original on 2017-08-24. Retrieved 2011-05-04. - ^ a b c d e f Compaq Computer Corporation; Phoenix Technologies Ltd.; Intel Corporation (1996-01-11). «BIOS Boot Specification 1.01» (PDF). 1.01. ACPICA. Archived (PDF) from the original on 2017-08-24. Retrieved 2013-04-20. [1]
- ^ a b Elliott, David F. (2009-10-12). «Why does the «standard» MBR set SI?». tgwbd.org. Archived from the original on 2017-08-24. Retrieved 2013-04-20.
- ^ a b c Compaq Computer Corporation; Phoenix Technologies Ltd.; Intel Corporation (1994-05-05). «Plug and Play BIOS Specification 1.0A» (PDF). 1.0A. Intel. Archived from the original (PDF) on 2017-08-24. Retrieved 2013-04-20.
- ^ Paul, Matthias R. (1997-10-02) [1997-09-29]. «Caldera OpenDOS 7.01/7.02 Update Alpha 3 IBMBIO.COM — README.TXT and BOOT.TXT — A short description of how OpenDOS is booted». Archived from the original on 2003-10-04. Retrieved 2009-03-29. [2]
- ^ Paul, Matthias R. (2017-08-14) [2017-08-07]. «The continuing saga of Windows 3.1 in enhanced mode on OmniBook 300». MoHPC — the Museum of HP Calculators. Archived from the original on 2018-05-01. Retrieved 2018-05-01.
[…] SYS […] /O[:nnn] Override IPL reported boot drive unit (n=0..126, 128..254). […] Preparing target disk… Choosing FAT12 CHS Boot Sector (requires IPL to report boot unit). Treating target as diskette or superfloppy medium (boot drive unit 0). Writing new Boot Sector… […]
(NB. SYS writes volume boot records rather than master boot records, but their incoming register interface is similar (with extensions) since they could both be loaded initially by the underlying system.) - ^ Elliott, Robert (2010-01-04). «EDD-4 Hybrid MBR boot code annex» (PDF). Hewlett Packard, T13 Technical Committee. e09127r3. Archived (PDF) from the original on 2017-08-24. Retrieved 2013-04-20.
- ^ «FDISK /MBR rewrites the Master Boot Record». Support. 1. Microsoft. 2011-09-23. 69013. Archived from the original on 2017-02-08. Retrieved 2013-04-19.
- ^ «sfdisk(8) – Linux man page». die.net. 2013 [2007]. Archived from the original on 2017-08-24. Retrieved 2013-04-20.
- ^ Brown, Ralf D. (2000-07-16). «Ralf Browns Interrupt List (v61 html)». Delorie Software. Retrieved 2016-11-03.
- ^ Brown, Ralf D. (2000-07-16). «B-1302: INT 13 — DISK — READ SECTOR(S) INTO MEMORY». Ralf Brown’s Interrupt List (RBIL) (61 ed.). Retrieved 2016-11-03. (NB. See file INTERRUP.B inside archive «INTER61A.ZIP.)
- Gilbert, Howard (1996-01-01) [1995]. «Partitions and Volumes». PC Lube & Tune. Archived from the original on 2016-03-03.
- Knights, Ray (2004-12-22) [2000-12-16]. «Ray’s Place». MBR and Windows Boot Sectors (includes code disassembly and explanations of boot process). Archived from the original on 2017-08-24. Retrieved 2017-08-24.
- Landis, Hale (2002-05-06). «Master Boot Record». How It Works. Archived from the original on 2014-07-01.
- Sedory, Daniel B. (2015-06-25) [2007]. «MBRs (Master Boot Records)». Boot Records Revealed. Archived from the original on 2017-08-24. Retrieved 2017-08-24. [3] [4]
- Article on master boot record
- The MBR and how it fits into the BIOS boot process
Проверенные способы для любой ОС.
Что важно знать
Что такое GPT или MBR
Обе аббревиатуры относятся к стилям таблицы разделов жёстких дисков. GPT расшифровывается как GUID Partition Table, или Globally Unique Identifier Partition Table (таблица разделов со статистически уникальным идентификатором), а MBR — как Master Boot Record (главная загрузочная запись). Они отвечают за структуру дискового пространства и загрузку операционной системы.
Зачем они нужны
И GPT, и MBR выполняют одну и ту же функцию: хранят информацию о разделах накопителя, подсказывая системе, какой из них является загрузочным и к какому разделу относится конкретный сектор диска. Однако разница между вариантами всё же есть.
Чем отличается GPT от MBR
Главный нюанс состоит в том, что GPT является частью интерфейса для управления оборудованием UEFI, а MBR относится к BIOS. Если не вдаваться в ненужные подробности, то можно сказать, что GPT — более новый и улучшенный стандарт, который пришёл на смену MBR, так же как UEFI заменил BIOS.
Всё просто: в современных компьютерах с UEFI используется GPT; в старых с BIOS — MBR.
Что лучше: GPT или MBR
Как таковой вопрос качества не стоит. Сказать, что GPT‑диски работают лучше или быстрее, нельзя, дело лишь в совместимости оборудования и возможностях. Если компьютер и операционная система способны принять GPT, то следует использовать его, если нет — выбирайте MBR.
Из преимуществ последнего можно назвать только более широкую совместимость: MBR работает с UEFI и BIOS, а также поддерживает больше ОС. Однако он не распознаёт диски объёмом свыше 2 ТБ и не позволяет создавать более четырёх разделов.
GPT гораздо функциональнее: он практически не имеет ограничений по количеству разделов и их величине. Максимальный размер равен 9,4 ЗБ (зеттабайта), а это просто невероятно много: такой объём суммарно дадут 940 миллионов 10‑террабайтных накопителей.
Как узнать, какой диск в Windows: GPT или MBR
С помощью утилиты «Управление дисками»

Cочетанием клавиш Windows + R откройте меню «Выполнить», введите diskmgmt.msc и нажмите Enter.

Кликните правой кнопкой мыши по названию диска и выберите «Свойства».

Перейдите в открывшемся окне на вкладку «Тома» и проверьте строку «Стиль раздела». Для GPT там будет указано «Таблица с GUID разделов (GUID)», а для MBR — «Основная загрузочная запись (MBR)».
С помощью консольной команды
Откройте «Командную строку» из меню «Пуск» → «Служебные Windows» или через поиск.

Введите команду diskpart, нажмите Enter, а затем разрешите внесение изменений, кликнув «Да».

В открывшемся окне наберите list disk и нажмите Enter.

Отобразится список дисков с их свойствами. Если в конце строки с названием стоит звёздочка, значит, у вас GPT, если её нет — MBR.
Как узнать, какой диск в Linux: GPT или MBR
Через утилиту «Диски»

Из меню «Стандартные» или через поиск откройте и запустите утилиту «Диски».

Выберите нужный накопитель в боковом меню и обратите внимание на строку «Разметка» в свойствах. Если там указано GUID Partition Table, значит, диск GPT. Если же Master Boot Record — то, соответственно, MBR.
С помощью команды терминала

Запустите командную строку через меню «Администрирование» или поиск.

Введите команду sudo parted ‑l, укажите пароль администратора и нажмите Enter.

Найдите строку «Таблица разделов». GPT‑разметка здесь так и подписана, а MBR обозначается как msdos.
Как узнать, какой диск в macOS: GPT или MBR
Такой вопрос у вас, скорее всего, не возникнет, потому что macOS использует только GPT‑разметку, а с MBR операционка Apple попросту не работает. Так что если у вас Mac, то накопитель в нём точно с таблицей разделов GPT.