
Все способы:
- Способ 1: Штатные средства
- Вариант 1: «Проводник»
- Вариант 2: «Командная строка»
- Вариант 3: Windows PowerShell
- Способ 2: Сторонние приложения
- Вариант 1: Advanced Renamer
- Вариант 2: Total Commander
- Вопросы и ответы: 3
Способ 1: Штатные средства
Массово переименовать файлы в Windows 10 можно с помощью встроенных средств системы. Все они будут в итоге пронумерованы, но с одним и тем же названием. Наиболее простой способ – это штатный «Проводник», также можно воспользоваться одной из командных консолей.
Вариант 1: «Проводник»
Встроенный файловый менеджер предусматривает пакетное переименование файлов в несколько кликов:
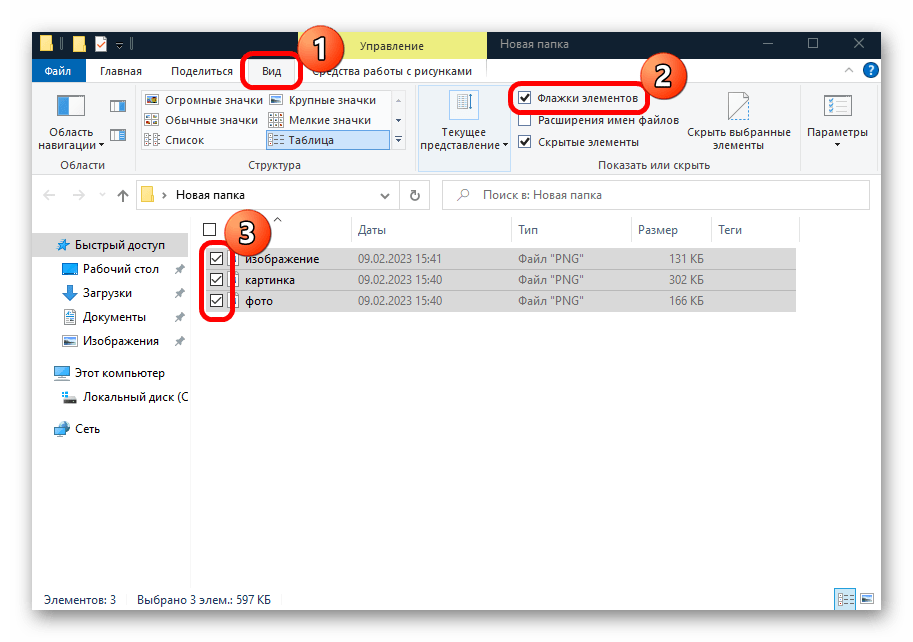
- Выделите несколько файлов в папке. Сделать это можно несколькими способами:
- клавиши «Ctrl + A», чтобы выделить все файлы в выбранном каталоге;
- поочередные клики левой кнопкой мыши по файлам с зажатой клавишей «Ctrl», что позволяет выборочно выделить их;
- выделение первого файла и последнего с зажатой клавишей «Shift». Тогда будут выбраны все элементы в этом диапазоне – от первого до последнего;
- на вкладке «Вид» в блоке «Показать или скрыть» активация опции «Флажки элементов», после чего можно отмечать элементы в чекбоксах.
- Щелкните по выделенному месту правой кнопкой мыши и из контекстного меню выберите пункт «Переименовать». Задайте общее имя для новых файлов.
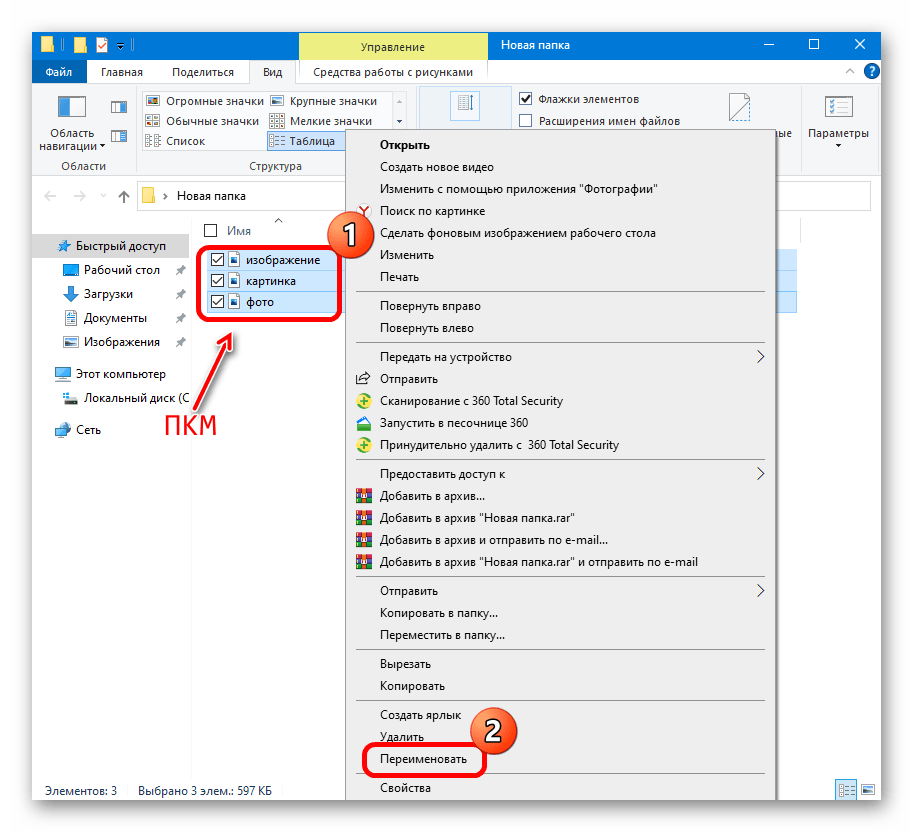
После того как вы введете название, у всех выбранных файлов будет одно и то же имя, но с порядковым номером в конце.
Вариант 2: «Командная строка»
Несколько другие возможности пакетного переименования подразумевает «Командная строка». Этот метод довольно простой и пригодится, если вы, например, хотите сделать так, чтобы документ в формате PDF открывался через браузер, задав ему расширение HTML, или сменить расширение графического файла. Причем сделать это можно не только для одного файла, а для всех с выбранным форматом:
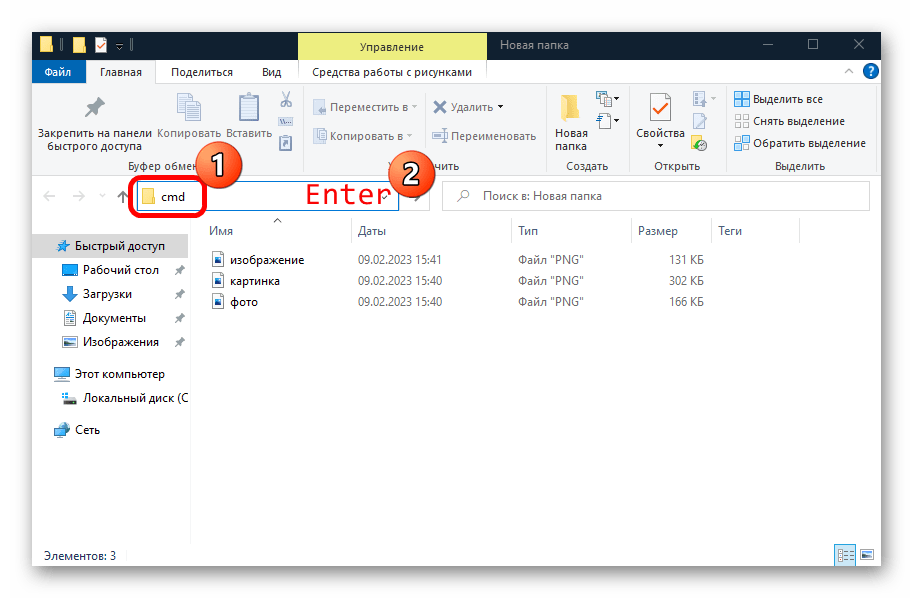
- Перейдите через «Проводник» к папке, где хранятся файлы, расширение которых вы хотите изменить. В адресной строке введите
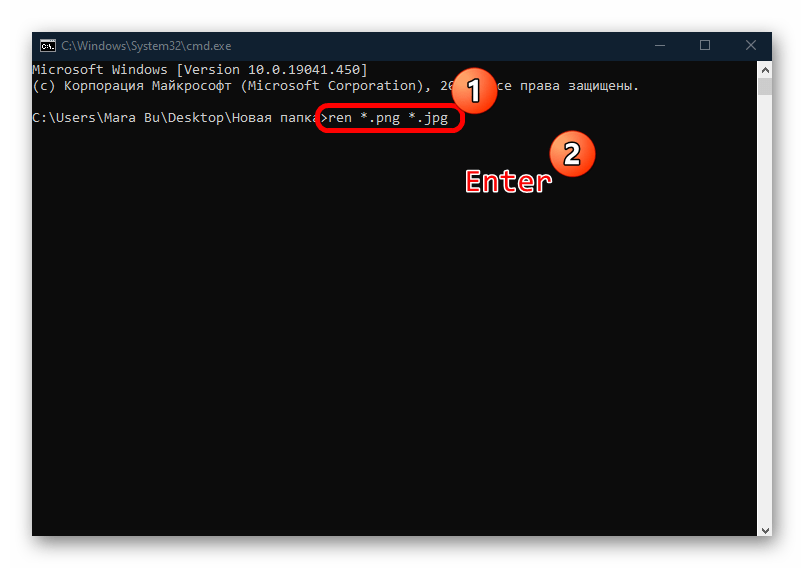
cmdи нажмите на клавишу «Enter», чтобы сразу открыть адрес в интерфейсе «Командная строка». - В окне консоли вы увидите, что там уже прописан адрес. Вам останется ввести
ren *.png *.jpg, заменив форматы своими значениями. Нажмите на клавишу «Enter».
Если у вас не отображаются расширения элементов, на вкладке «Вид» нужно отметить опцию показа расширений имен файлов.
Если у вас изначально одинаковые имена файлов, но вы хотите им всем задать другое имя, то можно выполнить команду ren старое_имя*.* новое_имя*.*.
Вариант 3: Windows PowerShell
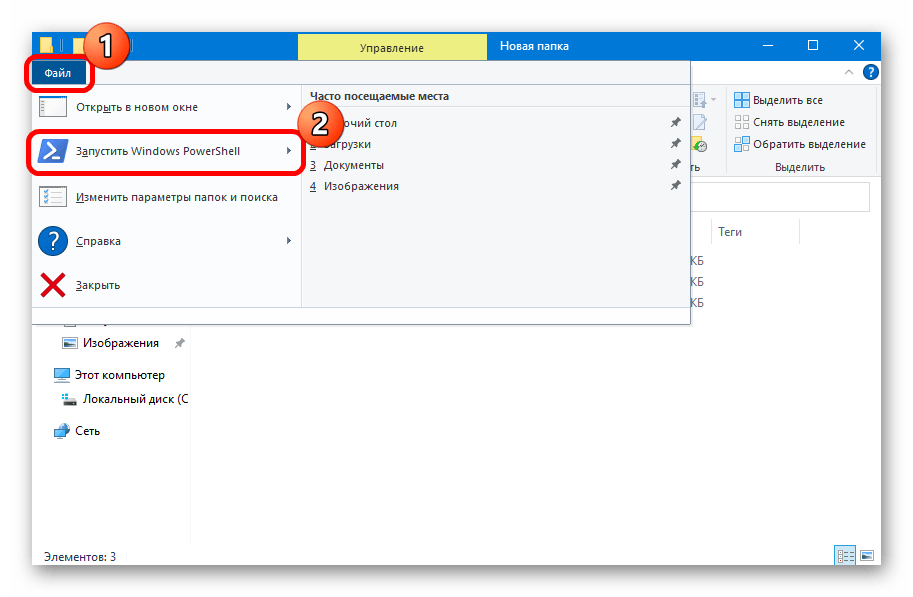
Есть еще несколько комбинаций команд, которые выполняются через консоль Windows PowerShell. Чтобы открыть каталог в ней, перейдите к файлам в папке через «Проводник», нажмите на вкладку «Файл» и выберите пункт «Запустить Windows PowerShell».
Как и в предыдущем варианте, можно массово сменить расширение файлов, а также добавить надписи к уже имеющимся названиям элементов. Все это выполняется командой Rename-Item, но ее можно использовать с другими командами, что расширяет возможности переименования. Разберем несколько примеров:
Get-ChildItem | % { Rename-Item $_ "XXX $_"}– при выполнении этой команды вместо «XXX» впишите слово, которое будет добавлено в начале имени каждого элемента из папки;Get-ChildItem *.png | Rename-Item -NewName { $_.Name.Replace(' ','_') }– в этом случае у всех файлов с расширением PNG (здесь и далее можете заменить расширение на любое другое) все пробелы будут заменены на нижнее подчеркивание;Get-ChildItem -Path *.jpeg | Rename-Item -NewName {$_.name -replace ".jpeg","png"}– применение этой команды изменит все файлы в формате JPEG на PNG;Get-ChildItem *.* | ForEach { Rename-Item -Path $_.FullName -NewName "$($_.DirectoryName)\$($_.BaseName)_$(Get-Date -F DD-MM-YYYY)$($_.Extension)" }– все пробелы в названиях файлов будут заменены на подчеркивание, а в конце имени на примере этой команды можно добавить дату в формате «День-Месяц-Год», то есть вместо «DD-MM-YYYY» нужно вписать свои данные, например 01.01.2023.
Способ 2: Сторонние приложения
Если стандартные методы вам не подходят, воспользуйтесь специализированными приложениями, с помощью которых происходит пакетное переименование в несколько кликов. При этом они предлагают дополнительные функции для работы с файлами и папками. Рассмотрим несколько наиболее популярных решений.
Вариант 1: Advanced Renamer
Бесплатный и функциональный инструмент позволяет одновременно сменить имя у файлов и папок в Windows 10. Причем она располагает расширенными опциями по переименованию, а также проста в использовании за счет русскоязычной локализации.
Скачать Advanced Renamer с официального сайта
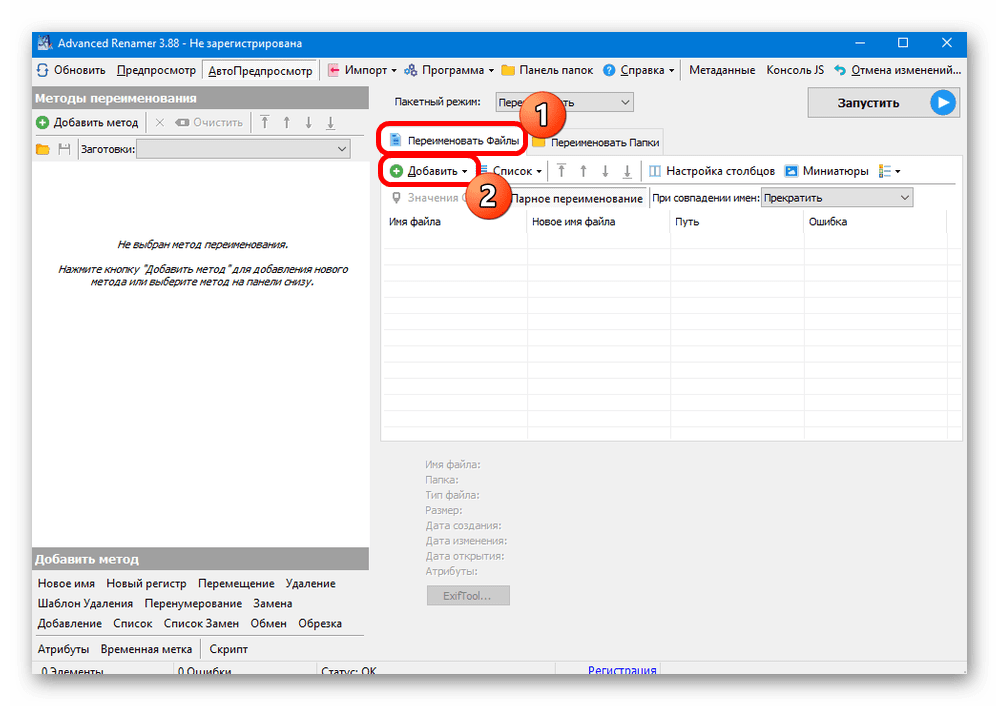
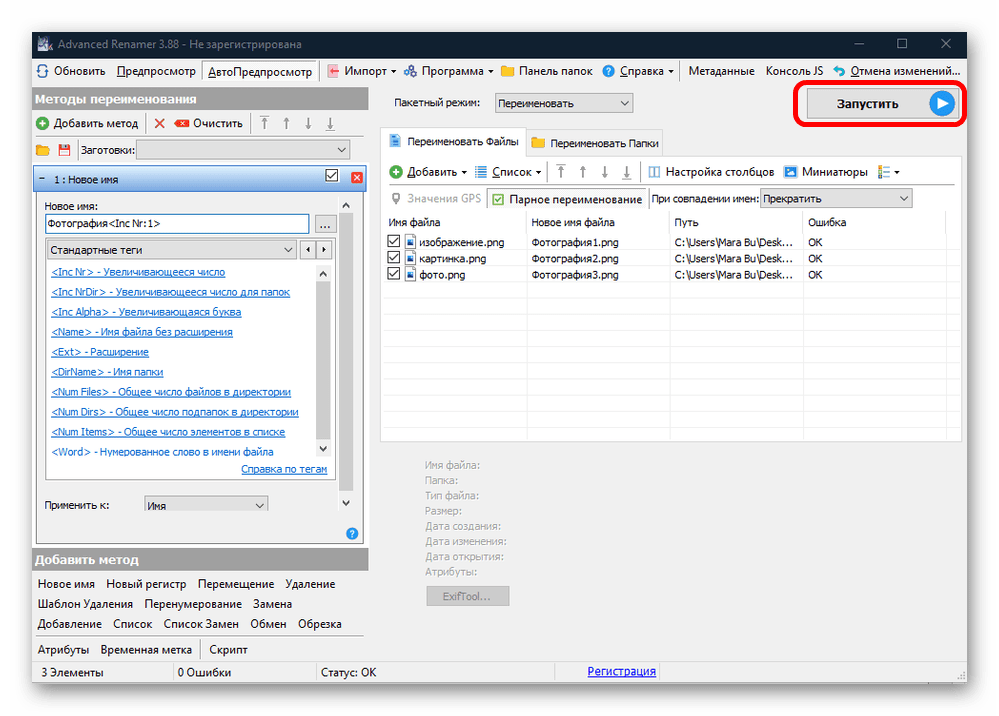
- Скачайте и установите программу. Если у вас портативная версия, то после скачивания достаточно запустить исполняемый файл. Интерфейс разделен на две части: слева — выбор действия, справа – списки файлов и папок, а также другая информация об элементах. В правой части окна выберите вкладку «Переименовать файлы», чтобы массово изменить имена у выбранных элементов, затем нажмите на кнопку «Добавить».
- Укажите путь к файлам через открывшийся файловый менеджер.
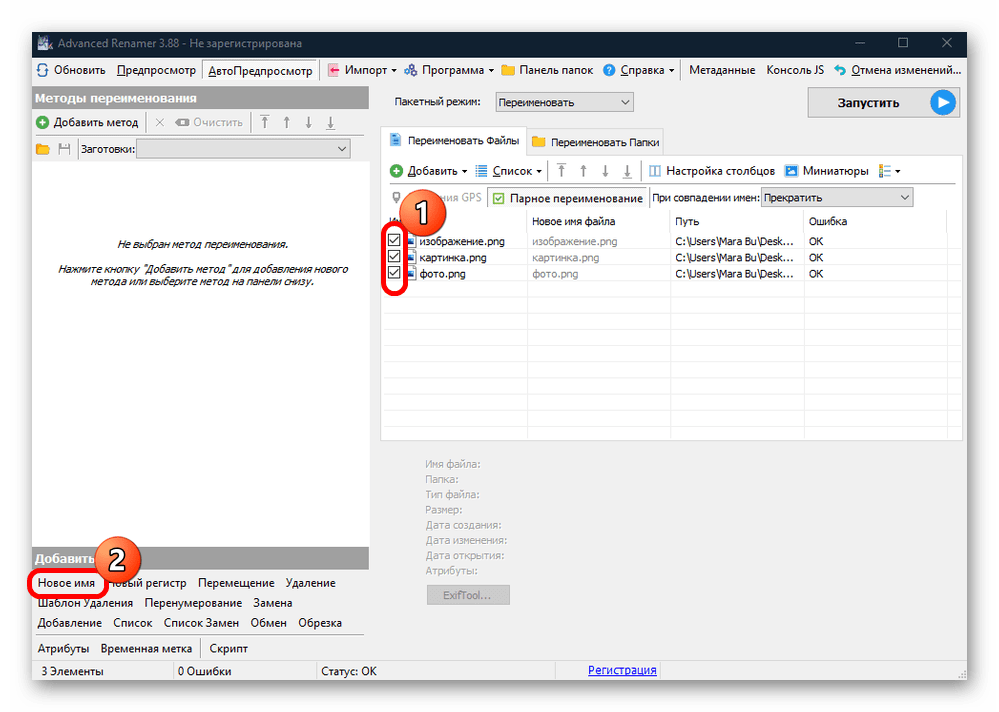
- Отметьте те элементы, которые нужно переименовать, если это потребуется. В левой части окна в блоке «Добавить метод» выберите «Новое имя».
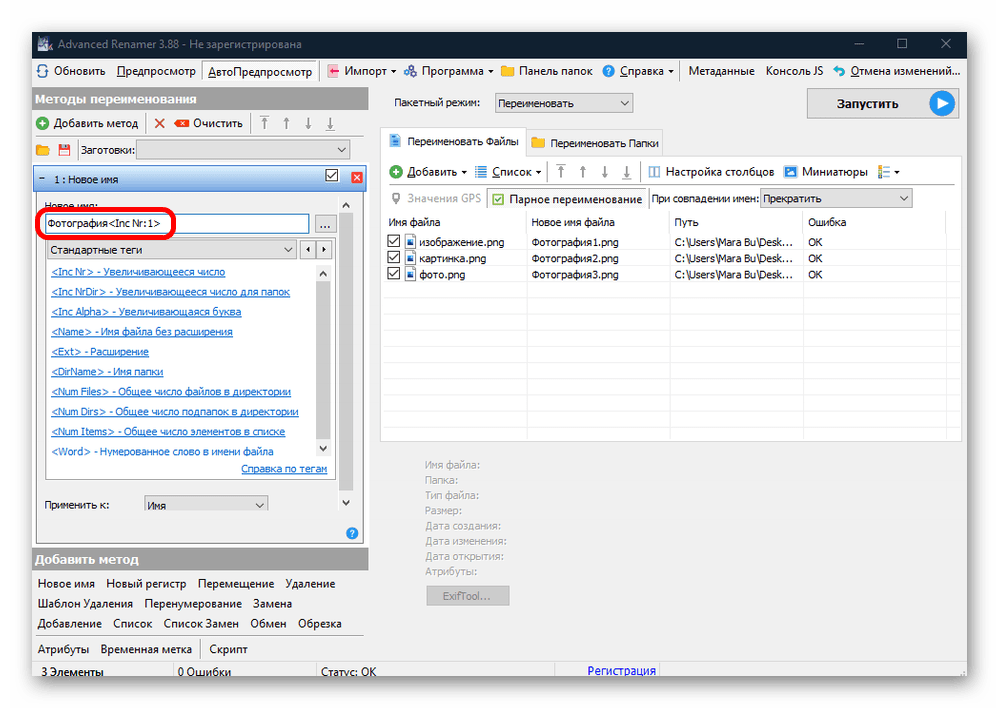
- Выше появится дополнительный блок. В текстовом поле введите новое имя для файлов, затем кликните по «Увеличивающееся число», чтобы добавить после каждого названия порядковый номер. В правой части окна в столбце «Новое имя файла» можно посмотреть результат, который получится по итогу.
- Чтобы сменить имена, нажмите на кнопку «Запустить».

Преимущество данного способа заключается в том, что можно задать различные параметры переименования. Например, добавить не только порядковый номер, но и расширение, имя папки и другие поправки к названию. То же самое можно проделать и с папками, если перейти на соответствующую вкладку в правой части окна Advanced Renamer.
Помимо переименования, функции предусматривают пакетное перемещение, копирование, удаление и другие опции.
Вариант 2: Total Commander
В качестве альтернативы можно воспользоваться функциональными возможностями стороннего файлового менеджера – Total Commander, с которым знакомы многие пользователи. Кроме удобного просмотра файлов и папок на компьютере, в нем реализована функция массового переименования.
Скачать Total Commander
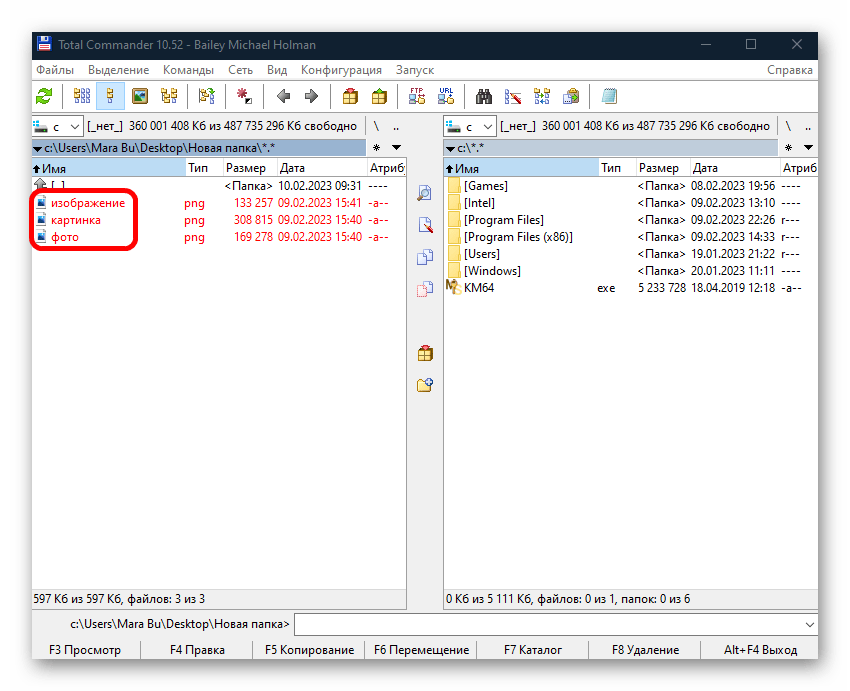
- Установите файловый менеджер, затем после запуска перейдите к каталогу, где располагаются файлы. Если нужно, создайте новую папку и переместите туда все элементы. Выделите их.
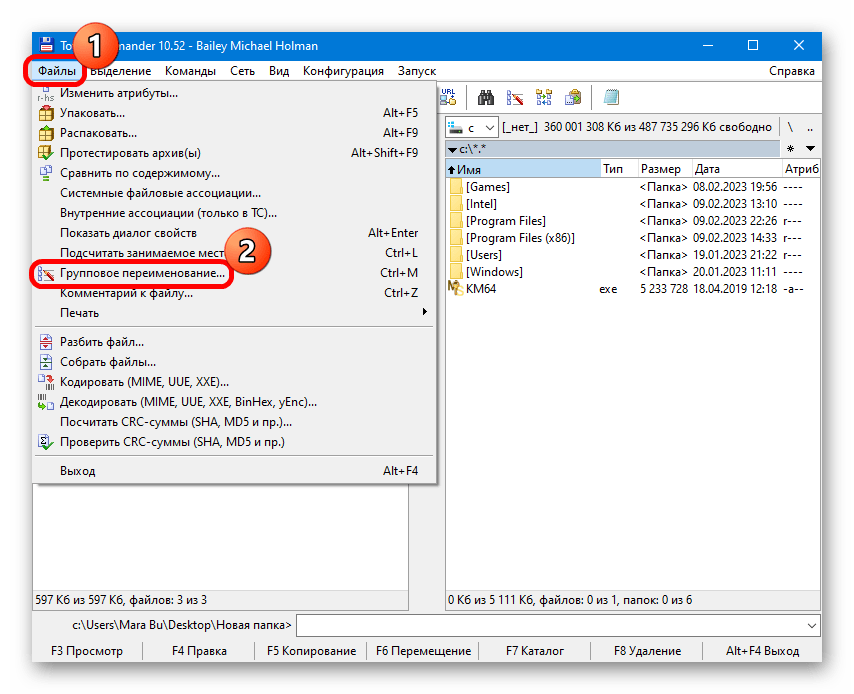
- Нажмите на вкладку «Файлы» и выберите опцию «Групповое переименование». Также можно воспользоваться клавишами «Ctrl + M».
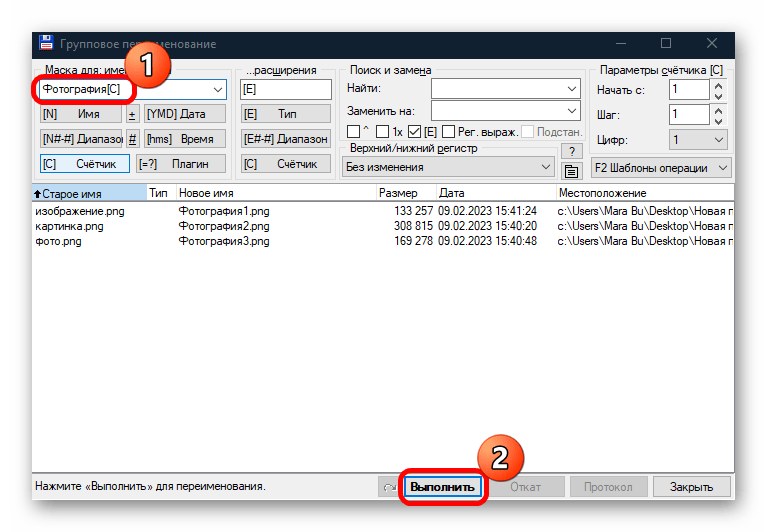
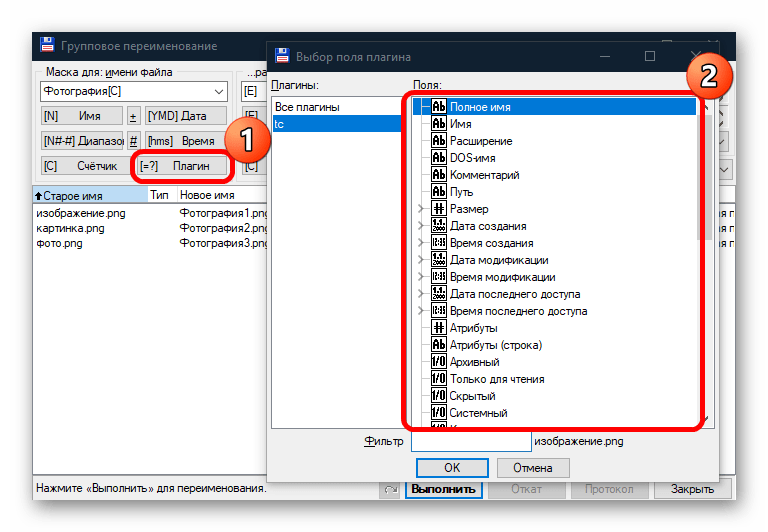
- В текстовом поле «Маска для» задайте параметры переименования. Введите новое имя, используйте предложенные маски или дополнительные плагины. В центральной части окна можно предварительно посмотреть результат в столбце «Новое имя». Нажмите на кнопку «Выполнить».
Дополнительные параметры операции доступны при нажатии по кнопке «Плагин».
Наша группа в TelegramПолезные советы и помощь
Рано или поздно почти каждый пользователь сталкивается с тем, что ему требуется выполнить массовое переименование группы файлов: иногда задача простая — например, нужно дать им имена с номерами по порядку, иногда — более сложная: к примеру, нужно изменить имена группы файлов таким образом, чтобы они имели в имени номер, дату создания, какую-либо дополнительную информацию.
Всё это можно реализовать в том или ином виде, для части сценариев достаточно встроенных средств Windows 10, 8.1 или Windows 7, иногда лучше использовать специальные программы для массового переименования файлов и папок. И те и другие методы будут рассмотрены в этой инструкции. Кстати, функции переименования группы файлов есть в наборе полезных утилит Microsoft PowerToys для Windows 10.
- Advanced Renamer — бесплатная программа для продвинутого массового переименования файлов
- Переименование группы файлов средствами Windows
- Массовое переименование группы файлов в Total Commander
- Видео инструкция
Advanced Renamer
Advanced Renamer — бесплатная программа для массового переименования файлов и папок с использованием настраиваемых шаблонов, которая может очень многое, если с нею разобраться. На официальном сайте доступна на русском языке как в виде установщика, так и portable версии (ZIP-архив, не требующий установки). Приведу пример использования Advanced Renamer для массового переименования группы файлов:
- Есть папка фотографий (но метод подойдет и для любых других типов файлов), снятых в одно время, но на разные устройства (фотоаппарат и смартфон). Часть имеют в качестве имени дату и время без пробелов, часть — номер снимка, сделанного фотоаппаратом. При этом имя файла и расширение файлов с камеры написано в верхнем регистре. Задача — привести имена группы файлов к удобному виду.

- Запускаем Advanced Renamer, затем либо перетаскиваем файлы для переименования в список по центру интерфейса, либо нажимаем кнопку «Панель папок», находим папку с нужными файлами и нажимаем кнопку «Добавить». Откроется окно, где можно задать параметры добавления: в моем случае всё оставляю как есть: нужно переименовать все файлы.

- Следующий этап — нажать «Добавить метод» в панели слева и выбрать «Новое имя» (возможны и иные методы, о них далее), чтобы определить, как именно будут переименовываться файлы. Здесь начинается самое интересное. В качестве новых имен файлов мы можем использовать предопределенные в программе теги, позволяющие легко подставлять в новые имена файлов нужную информацию. При необходимости вы можете нажать «Справка по тегам», чтобы получить более подробную информацию (правда, на английском) на официальном сайте. Но уже из краткого описания каждого тега должно быть примерно ясно, что именно они означают. Например, если в поле «Новое имя» в настройках метода я введу:
photo-<Inc Nr:1>-<Img Day>-<Img Month:X>-<Img Year:X>.jpg
то получу в результате имена файлов вида
photo-увеличивающийся_номер-день_съемки-месяц_съемки-год_съемки.jpg
Причем дата съемки будет браться не из даты изменения файла (что тоже можно сделать), а из данных EXIF, записанных камерой.
- Чтобы у файлов не получилось двойное расширение, при его смене в поле «Применить к» нужно выбрать «Имя и расширение», а не просто «Имя». Если вы не меняете расширение, то оставьте этот параметр со значением по умолчанию (в этом случае шаблон переименования не будет применяться к расширениям файлов).
- Какие имена файлов получатся после переименования вы можете наблюдать сразу на центральной вкладке программы ещё до запуска процесса массового переименования.

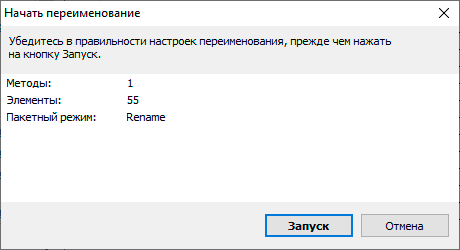
- Чтобы приступить, достаточно нажать кнопку «Запустить» и подтвердить запуск переименования. Если нужно не просто переименовать, а скопировать или переместить файлы в другое расположение, в поле «Пакетный режим» вверху окна программы выберите соответствующий пункт.

- В результате получим группу файлов, переименованных по заданному нами шаблону.


Добавляемые методы (шаблоны переименования) сохраняются в программе, и вы можете выбирать нужный в нужное время. При нажатии правой кнопкой мыши по названию шаблона можно изменить его описание, например «Для фото», «Для архивов» и как угодно ещё. С шаблонов, которые не нужно использовать при текущем процессе переименования достаточно снять отметки.
Также при переименовании можно использовать не единственный шаблон, а сразу несколько (отмечаем соответствующие шаблоны, и они будут применяться в том порядке, в котором расположены в столбце «Методы переименования»): например, первый изменяет имя, второй — регистр в имени файлов, третий — удаляет «мусорные» символы из имени файла (для этого используем метод «Замена»).
Я привел лишь простой пример использования программы, но может она и многое другое: к примеру, вы можете сохранить файл шаблонов, а затем запускать переименование нужной группы файлов по нужному шаблону из командной строки, импортировать список файлов и новых имен из таблиц CSV, массово изменять атрибуты файлов, задавать случайные имена файлов, оптимизировать имена для использования в сети (или превратить кириллицу в транслитерацию), использовать информацию EXIF, данные тегов ID3, видео, GPS и не только.
Чтобы познакомиться с некоторыми готовыми шаблонами, можете нажать кнопку «Открыть» в методах переименования и посмотреть один из 4-х предопределенных в Advanced Renamer шаблонов и как именно они устроены.
Скачать Advanced Renamer можно с официального сайта https://www.advancedrenamer.com/. Примечание: в моем случае при загрузке архива с программой Защитник Windows 10 сообщил об угрозе в файле. Однако, VirusTotal сообщает, что он полностью чист.
Переименование группы файлов средствами Windows 10, 8.1 и Windows 7
Проводник Windows, командная строка и PowerShell могут быть использованы для массового переименования файлов и некоторые простые задачи вполне выполнимы с использованием этих средств (а если вы умеете писать скрипты PowerShell, спектр реализуемых задач становится заметно шире). Далее — примеры переименования в каждой из указанных системных утилит.
Переименование нескольких файлов в Проводнике Windows
Сначала о простом ручном переименовании в проводнике: вы можете выбрать файл, а затем выбрать в контекстном меню пункт «Переименовать». Еще быстрее будет нажать F2 после выделения файла. Не все знают, но, если после ввода нового имени файла нажать клавишу Tab, автоматически будет начато переименование следующего в папке файла.
Еще один вариант, подойдет мало для чего, но знать о нём имеет смысл: выбираем несколько файлов в папке в проводнике (мышью, либо удерживая Shift при выборе, либо удерживая Ctrl и нажимая мышью по отдельным файлам). После этого нажимаем F2 (или выбираем «Переименовать» в контекстном меню) и вводим имя для того файла, изменение имени которого начнется. Нажимаем Enter по окончании.

В результате все файлы будут иметь одинаковое имя, но после каждого имени в скобках будет указан номер по порядку, как на скриншоте.
Возможности переименования в командной строке
Командная строка также позволяет выполнять переименование группы файлов с помощью стандартной команды ren (для начинающих: Как запустить командную строку).
Примеры использования команды для переименования группы файлов, используя которые можно составить и свою команду:
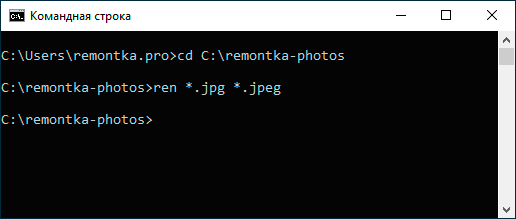
ren *.jpg *.jpeg
В результате выполнения все файлы в текущей папке (на скриншоте выбрана командой cd путь_к_папке) с расширением .jpg приобретут расширение .jpeg. Значок «зведочка» в команде может заменять любой набор символов (как один символ, так и сразу несколько).
ren *.jpeg ?????.jpg
Указанная команда изменит расширение всех файлов в текущей папке с jpeg на jpg, а также сократит их имена до первых 5 символов. Вопросительный знак в команде означает любой один символ. Команда может выдать ошибку, если первые пять букв в имени двух и более файлов будут совпадать.
ren * file-*.old
Команда переименует все без исключения файлы в папке и приведет их к виду: file-старое_имя_файла.old (старое расширение при этом исчезнет).
Массовое переименование файлов в PowerShell
Еще один инструмент Windows, который может быть использован для массового переименования файлов и папок — Windows PowerShell. Самый быстрый способ его запуска — использовать поиск в меню пуск (панели задач) или, если у вас Windows 10 — нажать правой кнопкой мыши по кнопке Пуск и выбрать нужный пункт меню в контекстном меню (Другие способы: Как запустить Windows PowerShell).
В PowerShell есть команда Rename-Item для переименования файлов, которая при работе с единственным файлом может быть использована почти так же, как команда ren в командной строке, но благодаря возможности PowerShell использовать одни команды с другими, rename-item оказывается более функциональной. Несколько примеров:
Get-ChildItem -Path *.jpeg | Rename-Item -NewName {$_.name -replace ".jpeg",".jpg"}
В результате будут изменены все расширения файлов .jpeg на .jpg в текущей папке.
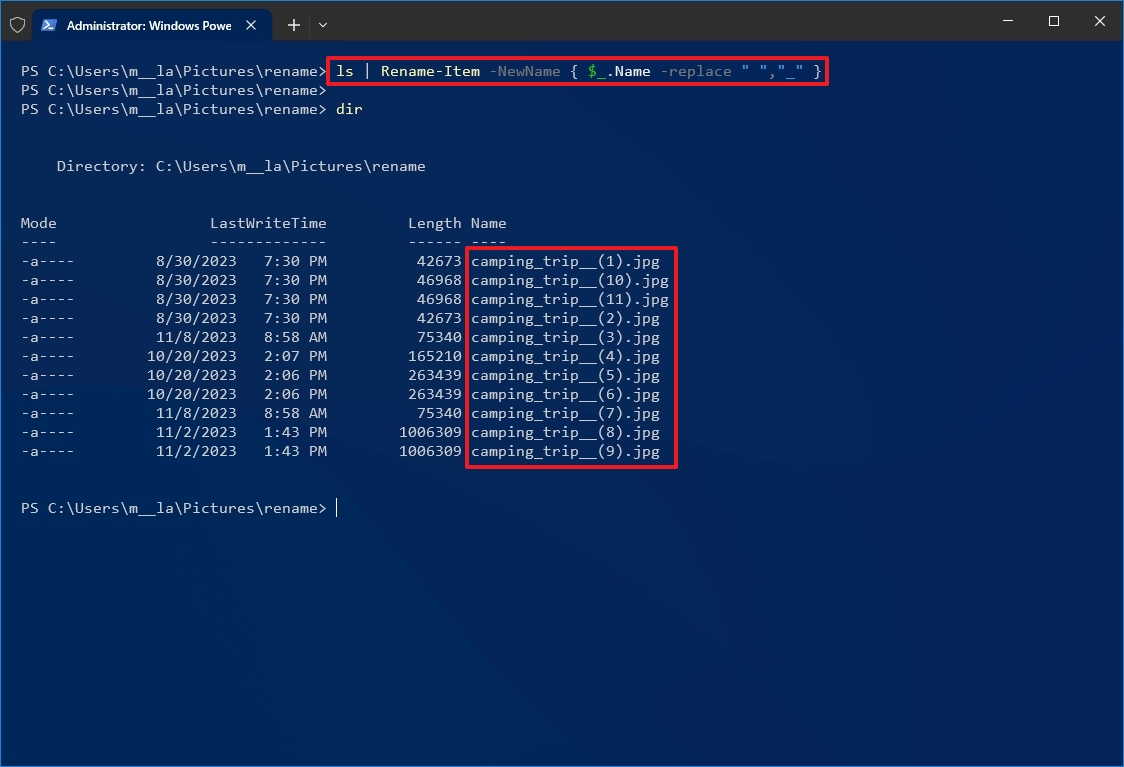
Get-ChildItem *.jpg | Rename-Item -NewName { $_.Name.Replace(' ','_') }
Команда выше заменит все пробелы в именах файлов .jpg в текущей папке на знаки нижнего подчеркивания.
Get-ChildItem | % { Rename-Item $_ "Секретный файл $_"}
К имени каждого файла в начале будет добавлено «Секретный файл» и пробел.
Get-ChildItem *.* | ForEach { Rename-Item -Path $_.FullName -NewName "$($_.DirectoryName)\$($_.BaseName)_$(Get-Date -F dd-MM-yyyy)$($_.Extension)" }
К имени каждого файла будет добавлено нижнее подчеркивание и дата в формате День-Месяц-Год.
Массовое переименование файлов в Total Commander
Многие пользователи используют Total Commander для работы с файлами на диске. Возможности группового переименования есть и в этой программе, реализовано это очень просто:
- Выделите нужные файлы (используйте Shift и стрелки клавиатуры, правым кликом мыши, Ctrl+выбор мышью).

- Нажмите Ctrl+M или выберите в меню «Файл» — «Групповое переименование файлов».
- Задайте параметры переименования в разделе «Маска для имени файла», используя предложенные маски, замены, изменение регистра, счетчик, а также опции из раздела «Плагины». Меняя опции, в окне предварительного просмотра вы сразу будете видеть, как именно будут называться уже переименованные файлы. Для изменения расширения используйте поле «Маска для расширения».

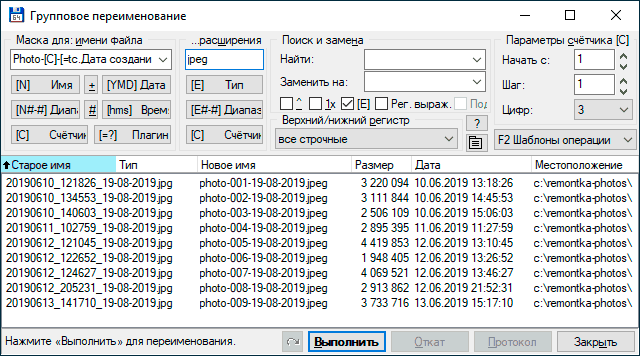
- В примере выше на скриншоте набор файлов будет переименован в Photo- с последующим добавлением счетчика из трех цифр и датой создания в формате ДД-ММ-ГГГГ (доступно в плагинах), расширение будет изменено на jpeg, а имя файла переведено в нижний регистр.


Сначала использование утилиты массового переименования в Total Commander может показаться сложным для кого-то, но, если слегка разберетесь, уверен, инструмент станет полезным и удобным.
Видео инструкция
В завершение видео о массовом переименовании файлов в Total Commander и Advanced Renamer, как самых эффективных способах.
Существуют и другие программы для рассмотренных целей (например, бесплатная Bulk Rename Utility), но, на мой взгляд, приведенных выше будет более чем достаточно почти для любых задач переименования.
Как воспользоваться функцией переименования групп файлов в приложении «Проводник»: пошаговая инструкция
Процесс одновременного переименования группы файлов обычно называют пакетным переименованием. Эта функция очень полезна мне как пользователю, которому приходится часто делать снимки экрана при подготовке коллекций изображений для статей. Однако эту операцию можно провести и с файлами других типов, в том числе со смешанным набором файлов различных типов.
В приложении «Проводник» в Windows 10 процесс переименования файлов целыми пакетами прост, но мало известен большинству пользователей. Сейчас я расскажу вам, как воспользоваться этой функцией «Проводника».
Шаг 1. Выбор изображений или файлов, которые нужно переименовать
В Windows 10 существует несколько способов выполнить большинство задач, поэтому, открыв в «Проводнике» каталог файлов, которые требуется переименовать, вы можете выбрать все файлы с помощью комбинации клавиш CTRL + A или воспользоваться кнопкой Select All («Выделить все») в домашнем представлении «Проводника».
Вы выбираете все изображения или файлы, которые нужно переименовать одновременно; в данном примере я выбрал все изображения в этом каталоге, поскольку все они входят в группу, которой нужно присвоить новое имя (экран 1).

|
| Экран 1. Выбор файлов |
Шаг 2. Переименование файлов
Пакетное переименование файлов происходит так же, как и переименование одного файла. Единственное различие в том, что выбраны два или несколько файлов. После того как выбраны все изображения или файлы, которые нужно переименовать, щелкните правой кнопкой мыши на первом изображении или файле и выберите пункт Rename («Переименовать») из контекстного меню (экран 2).
|
|
| Экран 2. Пункт Rename («Переименовать») в контекстном меню |
Когда появится изменяемое поле имени для первого изображения или файла в последовательности, дайте ему любое имя, выбранное вами для группы изображений или файлов. Введите новое имя и нажмите клавишу Enter (экран 3).
|
|
| Экран 3. Ввод нового имени |
Теперь вы увидите все файлы с новым именем, за которыми следует номер в скобках. Готово, вы успешно переименовали файлы единым пакетом (экран 4).
|
|
| Экран 4. Переименованные файлы |
Примечательная особенность этой функции — если щелкнуть на любом другом изображении или файле в коллекции, ему будет присвоен первый последовательный номер, и нумерация будет продолжена с этого изображения или файла, пока не закончится список. Затем функция вернется к первому файлу в списке и продолжит переименование, пока не будет достигнуто изображение или файл, с которого началось переименование.
Поэтому ключевая особенность данного процесса — убедиться, что файлы пронумерованы в нужном вам порядке, и начинать с первого изображения или файла в каталоге.
Это очень удобное средство для фотографа, так как он может дать всем снимкам с одного мероприятия одно имя, и у каждого будет последовательный номер. Это в свою очередь упрощает поиск файлов по словам из имени в качестве критерия поиска.
Normally, you can rename a file inside a folder in Windows 10 by following these steps:
- Right-click on the file you want to rename.
- Click on the Rename option.
- Type the new file name.
- Hit the Enter button and the file name will get changed.
However, the above method can be applied to rename only one or two files inside a folder. But what if you want to rename multiple files in a folder? Using the above method will consume lots of time as you will have to manually rename each file. It is also possible that the files you need to rename maybe thousands in number. So, it is not feasible to use the above method for renaming multiple files.
So, to solve the above problem and save time, Windows 10 comes with different ways by which you can make the renaming process easier.
For this, there are various third-party apps available in Windows 10. But, Windows 10 also provides several built-in methods for the same process if you do not prefer those third-party apps. There are basically three in-built ways available in Windows 10 by which you can do so and these are:
- Rename multiple files using the File Explorer.
- Rename multiple files using the Command Prompt.
- Rename multiple files with PowerShell.

Table of Contents
So, let us discuss each of them in detail. In the end, we have also discussed two third-party applications for the renaming purpose.
Method 1: Rename multiple files using the Tab key
File Explorer (previously known as the Windows Explorer) is a place where you can find all the folders and files that are available at different locations on your PC.
To rename multiple files using the Tab Key, follow these steps:
1. Open the File Explorer either from the taskbar or the desktop.
2. Open the folder whose files you want to rename.

3. Select the first file.

4. Press the F2 key to rename it. Your file name will be selected.
Note: If your F2 key performs some other function also, then press the combination of the Fn + F2 key.

Note: You can also perform the above step by right-clicking on the first file and selecting the rename option. The file name will be selected.

5. Type the new name you want to give to that file.
6. Click on the Tab button so that the new name will be saved and the cursor will automatically move to the next file to rename.
So, by following the above method, you just have to type a new name for the file and press the Tab button and all the files will be renamed with their new names.
Method 2: Rename Multiple Files using Windows 10 File Explorer
To rename multiple files in bulk on Windows 10 PC, follow these steps:
Note: This method is applicable if you want the same file name structure for every file.
1. Open the File Explorer either from the taskbar or the desktop.
2. Open the folder whose files you want to rename.
3. Select all the files you want to rename.
4. If you want to rename all the files available in the folder, press the Ctrl + A key.
5. If you want to rename random files, click on the file you want to rename and press and hold the Ctrl key. Then, one by one, select the other files you want to rename and when all the files are selected, release the Ctrl button.
6. If you want to rename the files present inside a range, click on the first file of that range and press and hold the Shift key and then, select the last file of that range and when all files are selected, release the Shift key.
7. Press the F2 key to rename the files.
Note: If your F2 key performs some other function also, then press the combination of the Fn + F2 key.

8. Type the new name of your choice.

9. Hit the Enter key.
All the selected files will be renamed and all the files will have the same structure and name. However, to differentiate between these files, as now, all the files will have the same name, you will notice a number inside the parentheses after the name of the file. This number is different for each file which will help you in differentiating between these files. Example: New Image (1), New Image (2), etc.
Also Read: Rename User Profile Folder in Windows 10
Method 3: Rename Multiple Files in Bulk using the Command Prompt
Command Prompt can also be used to rename multiple files in bulk in Windows 10. It is faster as compared to the other methods.
1. Simply, open the Command Prompt and then reach the folder containing the files you want to rename.

2. Now, reach the folder containing the files you want to rename using the cd command.

3. Alternatively, you can also navigate to the folder containing the files you want to rename and then, open the Command Prompt by typing cmd in the address bar.
4. Now, once the Command Prompt is open, you can use the ren command (the rename command) to rename multiple files:
Ren “Old-filename.ext” “New-filename.ext”
Note: Quotation marks are necessary if your file name has space. Otherwise, ignore them.

5. Press Enter and then you will see that the files have now been renamed to the new name.

Note: The above method will rename the files one by one.
6. If you want to rename multiple files at once with the same structure, type the below command in the Command Prompt:
ren *.ext ???-Newfilename.*

Note: Here, the three question marks (???) show that all the files will be renamed as three characters of the old name+new filename which you will give. All the files will have some part of the old name and new name which will be the same for all the files. So in this way, you can distinguish between them.
Example: Two files are named as hello.jpg and sunset.jpg. You want to rename them as new. So, the new filename will be hel-new.jpg and sun-new.jpg
7. If the files you want to rename have long names and you want to shorten their name, then you can do so by using the below command in the Command Prompt:
ren *.* ?????.*

Note: Here, the question marks show how many alphabets of the old name need to be used to rename the file. A minimum of five characters should be used. Then only the file will be renamed.
8. If you want to change the file name but not the whole name, just some part of it, then use the below command in the Command Prompt:
ren old_part_of_file*.* new_part_of_file*.*

Method 4: Rename Multiple Files in Bulk with Powershell
PowerShell is a command-line tool in Windows 10 that provides more flexibility while renaming multiple files and thus, is more powerful than the Command Prompt. It allows manipulating the file names in several ways out of which the two most important ones are the commands Dir (which lists the files in the current directory) and Rename-Item (which renames an item that is the file).
To use this PowerShell, first, you need to open it by following these steps:
1. Open the File Explorer either from the taskbar or the desktop.
2. Open the folder where the files you wish to rename reside.
3. Press the Shift button and right-click on the empty space inside the folder.

4. Click on the Open PowerShell windows here option.
5. The Windows PowerShell will appear.
6. Now to rename the files, type the below command in the Windows PowerShell:
Rename-Item “OldFileName.ext” “NewFileName.ext”
Note: You can also type the above command without the quotation marks only if the file name does not contain any space(s).

7. Hit the Enter button. Your existing file name will change to the new one.

Note: By using the above method, you can only rename each file one by one.
8. If you want to rename all the files of the folder by the same name structure, type the below command in the Windows PowerShell.
Dir | %{Rename-Item $_ -NewName (“new_filename{0}.ext” –f $nr++)
Example if the new file name should be New_Image{0} and the extension is jpg then use the following command:
Dir | %{Rename-Item $_ -NewName (“New_Image{0}.jpg” –f $nr++)

9. Once done, hit the Enter button.
10. Now, all the files in the folder having the .jpg extension will be renamed. You will notice that all the file names will end with different numbers so that you can differentiate between each file.
11. If you want to rename the files by making their existing name shorter, then run the below command in the Windows PowerShell and hit the Enter button:
Dir | Rename-Item –NewName {$_.name.substring(0,$_.BaseName.Length-N) + $_.Extension }
In the above command, ($_.BaseNmae.Length-N) command contains N which indicates how many characters you need to remove or trim from the old name to rename the file. You need to change N with a numerical value.

12. If you want to rename the files by removing some parts from the file names, then type the below command in the Windows PowerShell and hit the Enter button:
Dir | Rename-Item –NewName {$_.name –replace “old_filename_part” , “”}
The characters you will enter at the place of the olf_filename_part will be removed from the names of all the files and your files will be renamed.

Rename Multiple Files in Bulk using Third-party Applications
You can also use third-party applications for renaming multiple files at once. Generally, two third-party applications, the Bulk Rename Utility and AdvancedRenamer are beneficial for renaming files in bulk.
Let us learn more about these apps in detail.
1. Using the Bulk Rename Utility application
Bulk Rename Utility tool is free for personal and non-commercial use. To use this tool, first, you need to install it. After installing, open it and reach the files whose names are to be changed and select them.
Now, change the options in one or more of the many available panels and all these will be highlighted in the orange colour. The preview of your changes will appear in the New Name column where all your files are listed.
We made changes in four panels so they are now appearing in the orange shade. After you are satisfied with the new names, hit the Rename option to rename the file names.

2. Using the AdvancedRenamer application
The AdvancedRenamer application is much simpler, has a simplified interface with various options to rename multiple files easily, and is more flexible.

To use this application to rename multiple files at once, follow these steps.
a. First, install the application, launch it, and select the files to be renamed.
b. In the File Name field, enter the syntax you want to be followed for renaming each file:
Word File_<Year>_<Month>_<Day>_(<Inc Nr:1>).
c. The application will rename all the files using the above syntax.
Recommended:
- 4 Ways To Remove ByteFence Redirect Completely
- How To Start Microsoft Word In Safe Mode
- 3 Ways to Set Alarm on an Android Phone
So, using the above methods you can rename multiple files in bulk at once without moving to each filename individually. But if you still have any questions regarding this tutorial then feel free to ask them in the comment section.
(Image credit: Mauro Huculak)
Renaming a single file on Windows 10 is simple. The challenge comes when you need to rename multiple files in a folder, but don’t worry since there are easy ways to complete this task.
If you have to rename a long list of files, you can speed up the process using File Explorer, PowerShell, Command Prompt, or even the Microsoft PowerToys app.
In this how-to guide, I’ll explain several ways to bulk rename files, including changing the extension.
Recent updates
These instructions has been updated to ensure accuracy and reflect changes to the process in the operating system.
How to rename multiple files using File Explorer
The simplest way to rename one or multiple files on Windows 10 is through File Explorer.
Rename multiple files one at a time
To rename multiple files with the «Tab» key, use these steps:
- Open File Explorer.
- Quick tip: You can quickly open File Explorer with the icon in the taskbar, the «Windows key + E» keyboard shortcut, or by clicking the File Explorer icon from the left pane in the Start menu.
- Open the folder with the files to rename.
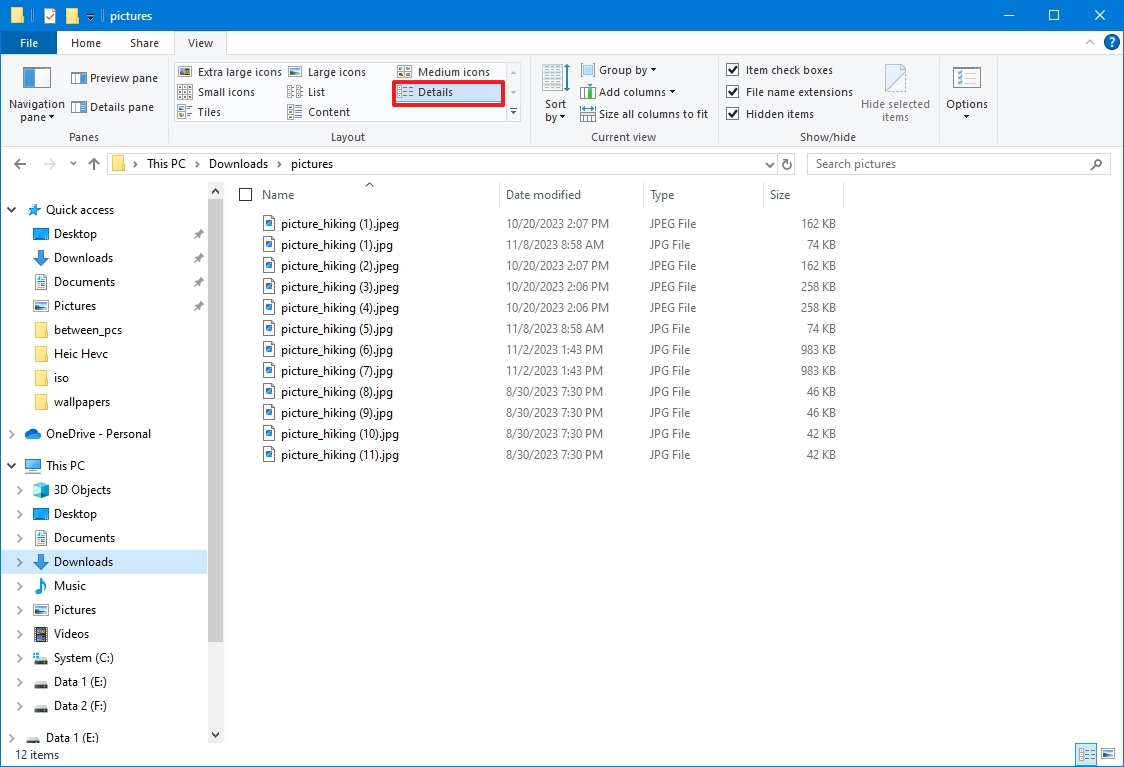
- Click the View tab.
- Select the Details view.
- Select the first file in the folder.
- Click the Home tab.
- Click the Rename button.
- Quick tip: Alternatively, you can press the «F2» button. Right-click the file and select the «Rename» option from the context menu. Or, you can click the file once and slowly click the name again to trigger the rename action.
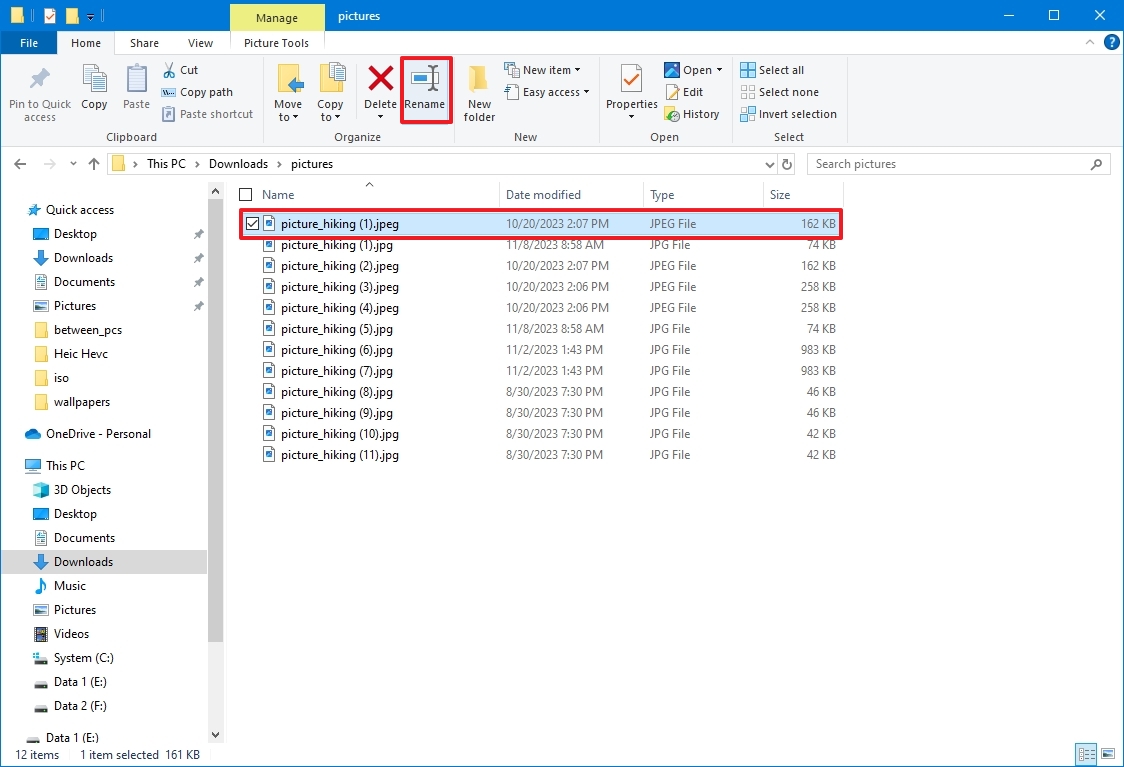
- Confirm a new name for the file.
- Press the Tab key to jump and trigger the rename action for the next file down the list.
- Confirm the new file name.
- Press the Tab key again to jump and trigger the next rename.
- Quick tip: You can keep pressing the «Tab» key to skip the file and continue renaming other files.
- Continue repeating steps 9 and 10 to rename all the files.
Once you complete these steps, keep pressing the «Tab» key to continue renaming files in the location.
Rename multiple files at once
To rename multiple files in bulk with the same name structure on Windows 10, use these steps:
All the latest news, reviews, and guides for Windows and Xbox diehards.
- Open File Explorer.
- Open the folder with the files to change their names.
- Click the View tab.
- Select the Details view.
- Click the Home tab.
- Click the Select all button.
- Quick tip: Alternatively, you can select all files using the «Ctrl + A» keyboard shortcut. You can press and hold the «Ctrl» key and then click each file to rename. Or you can choose the first file, press and hold the «Shift» key, and then click the last file to select a group.
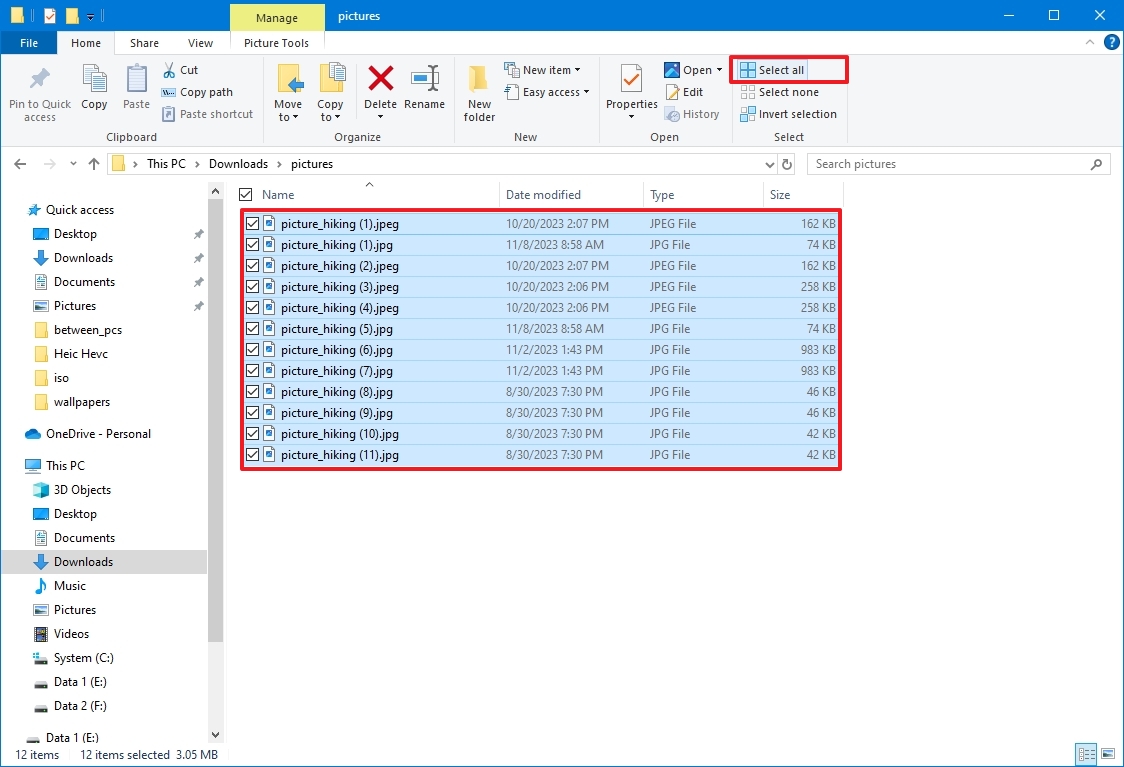
- Click the Rename button from the «Home» tab.
- Confirm the new file name base and press Enter.
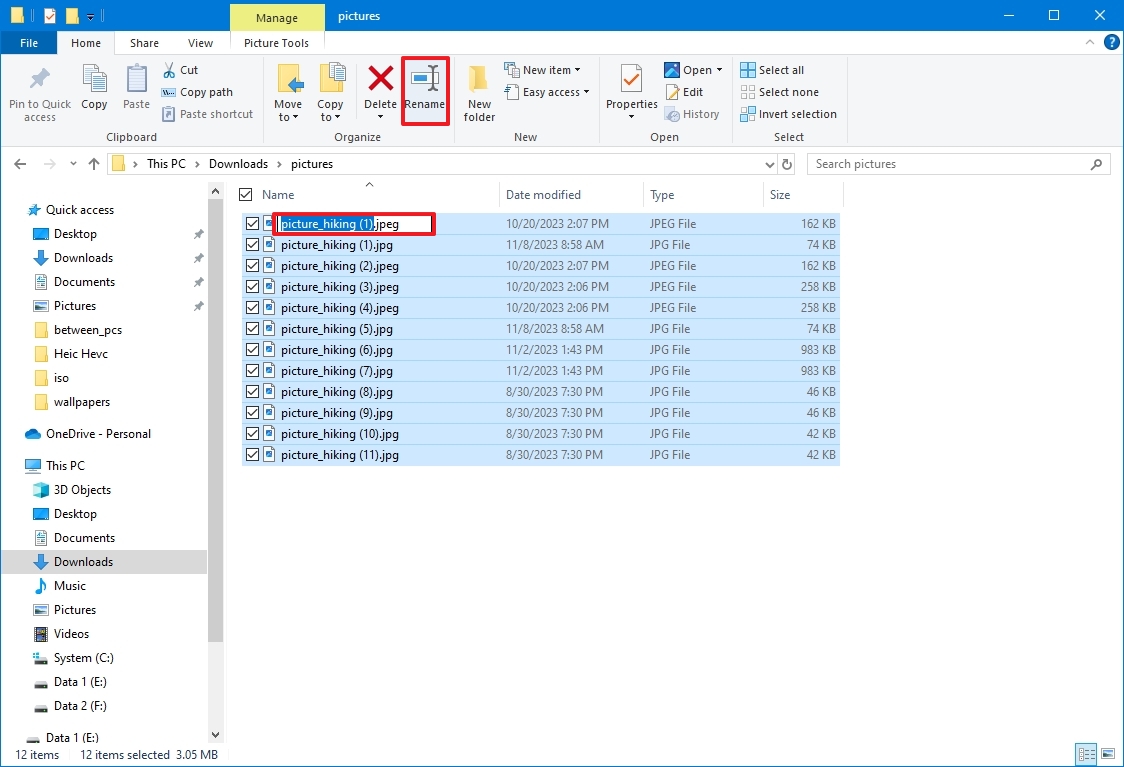
After you complete the steps, the selected files will be renamed using the same naming structure you specified, with a count number in parentheses to make each file name different. For example, «summer_trip_2023 (1).jpg» and «summer_trip_2023 (2).jpg.»
If you make a mistake, you can use the «Ctrl + Z» keyboard shortcut to undo the changes, or you can click the menu button in the title bar and select the «Undo» button.
How to rename multiple files using Command Prompt
Command Prompt also offers multiple ways to change the name of multiple files in bulk on Windows 10.
Rename single file
To rename one file with Command Prompt on Windows 10, use these steps:
- Open Start.
- Search for Command Prompt and click the top result to open the app.
- Type the following command example to navigate to the folder with the files to rename, and press Enter: cd c:\PATH\TO\FILES
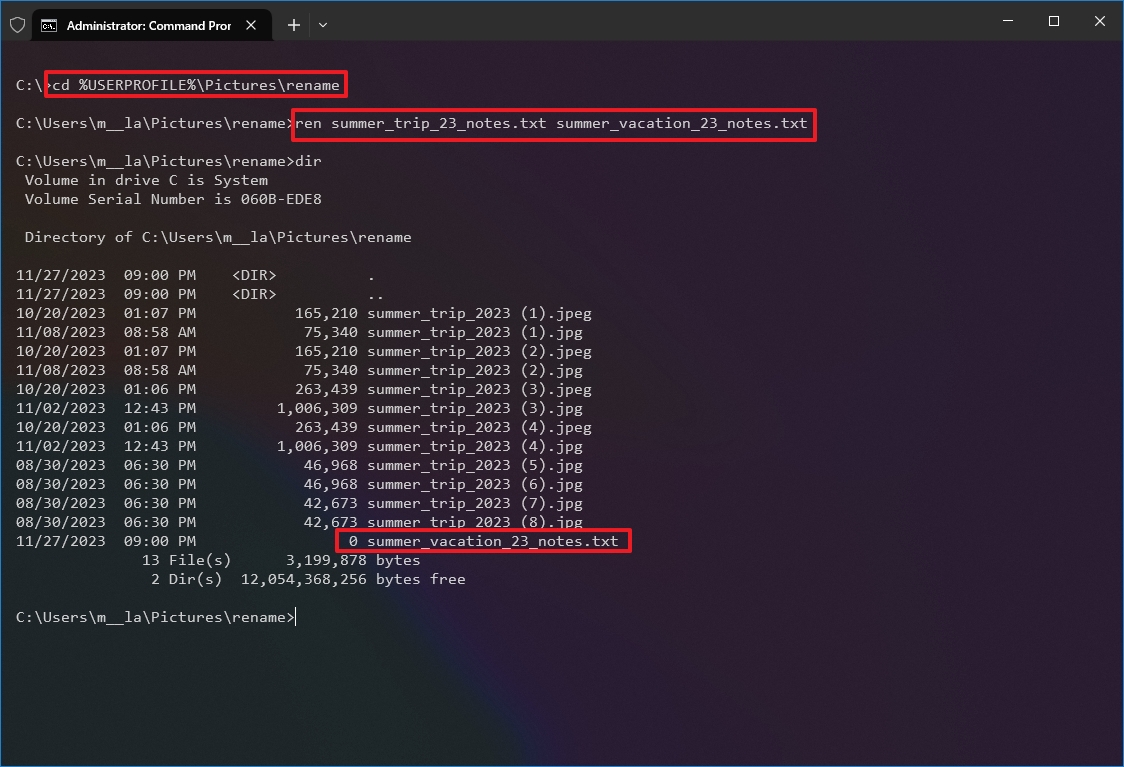
For instance, this example opens the «rename» folder inside «Pictures»: cd %USERPROFILE%\Pictures\rename
- Type the following command to view the files in the location and press Enter: dir
- Type the following command to rename the file and press Enter: ren «OLD-FILENAME.EXTENSION» «NEW-FILENAME.EXTENSION»
In the command, replace «OLD-FILENAME.EXTENSION» and «NEW-FILENAME.EXTENSION» with the old and new file names. The quotation marks are only necessary if the title includes spaces. For instance, this command renames the file to «summer_trip_23_notes.txt»: ren summer_trip_23_notes.txt summer_vacation_23_notes.txt
- Repeat step 5 to change the name of the remaining files.
Once you complete these steps, Command Prompt will rename the file with the new name.
Rename multiple files
To rename multiple files in bulk with the same name structure with Command Prompt, use these steps:
- Open Start.
- Search for Command Prompt and click the top result to open the app.
- Type the following command example to navigate to the folder with the files to rename, and press Enter: cd c:\PATH\TO\FILES
For example, this example opens the «rename» folder inside «Pictures»: cd %USERPROFILE%\Pictures\rename
- (Optional) Type the following command to view the files in the location and press Enter: dir
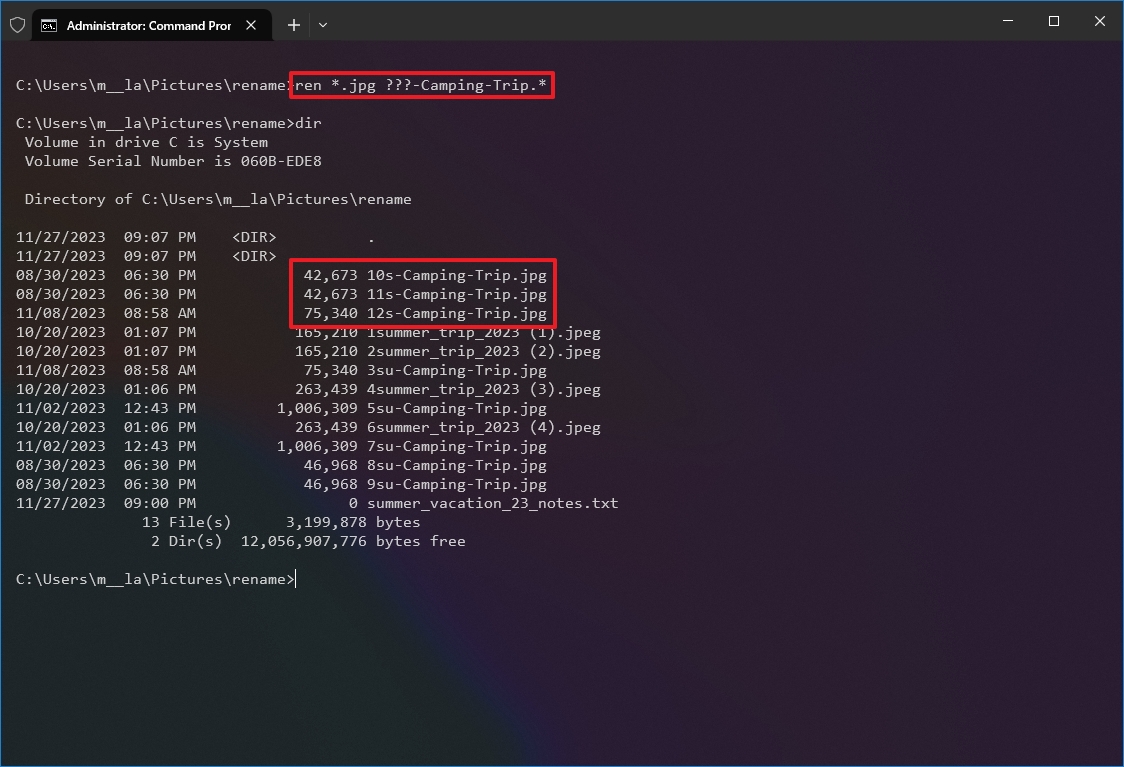
- Type the following command to rename the files in bulk and press Enter: ren *.FILE-EXTENSION ???-FILE-NAME.*
In the command, replace «FILE-EXTENSION» with the extension to change and «FILE-NAME» with part of the name to add to the files. The asterisk (*) is a wildcard that tells the ren command to rename everything with a specific extension. The question mark (?) is also a wildcard, but it represents a character of the original name you want to keep as part of the new name. For example, this command renames all «.jpg» files, leaving the first three characters (which works as a unique identifier to avoid duplication), and appends «-Camping-Trip» to the name: ren *.jpg ???-Camping-Trip.*
- Quick tip: When renaming files, the «ren» command sees a period (.) as the end of the filename. The command may produce unexpected results if you have files with a period as part of the name.
After you complete the steps, the files will be renamed using the settings you specified.
Trim multiple file names
To make file names shorter with Command Prompt on Windows 10, use these steps:
- Open Start.
- Search for Command Prompt and click the top result to open the app.
- Type the following command example to navigate to the folder with the files to rename, and press Enter: cd c:\PATH\TO\FILES
This example opens the «rename» folder inside «Pictures»: cd %USERPROFILE%\Pictures\rename
- (Optional) Type the following command to view the files in the location and press Enter: dir
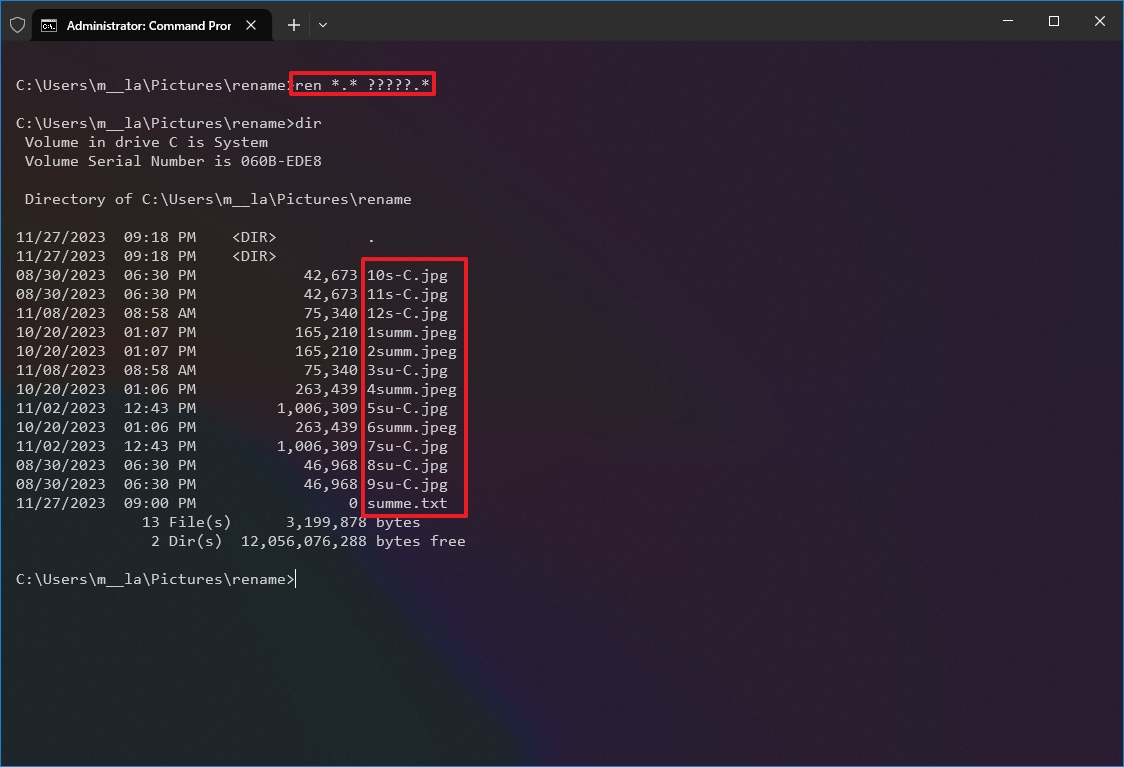
- Type the following command to make file names shorter and press Enter: ren *.* ?????.*
In the command, the asterisk (*) matches all the file names and extensions in the folder, and the question marks (?) indicate how many characters to use for the new file name. For instance, this command trims the file names longer than five characters: ren *.* ?????.*
- Quick note: If the file name has fewer than five characters, the name will not change. (If you want to shorten the file name, add extra question marks in the syntax.)
Once you complete these steps, the command will run and shorten the file name, depending on the question marks (?) available in the command.
Modify multiple file names
To rename part of the name on similar files on Windows 10, use these steps:
- Open Start.
- Search for Command Prompt and click the top result to open the app.
- Type the following command example to navigate to the folder with the files to rename, and press Enter: cd c:\PATH\TO\FILES
This example opens the «rename» folder inside «Pictures»: cd %USERPROFILE%\Pictures\rename
- (Optional) Type the following command to view the files in the location and press Enter: dir
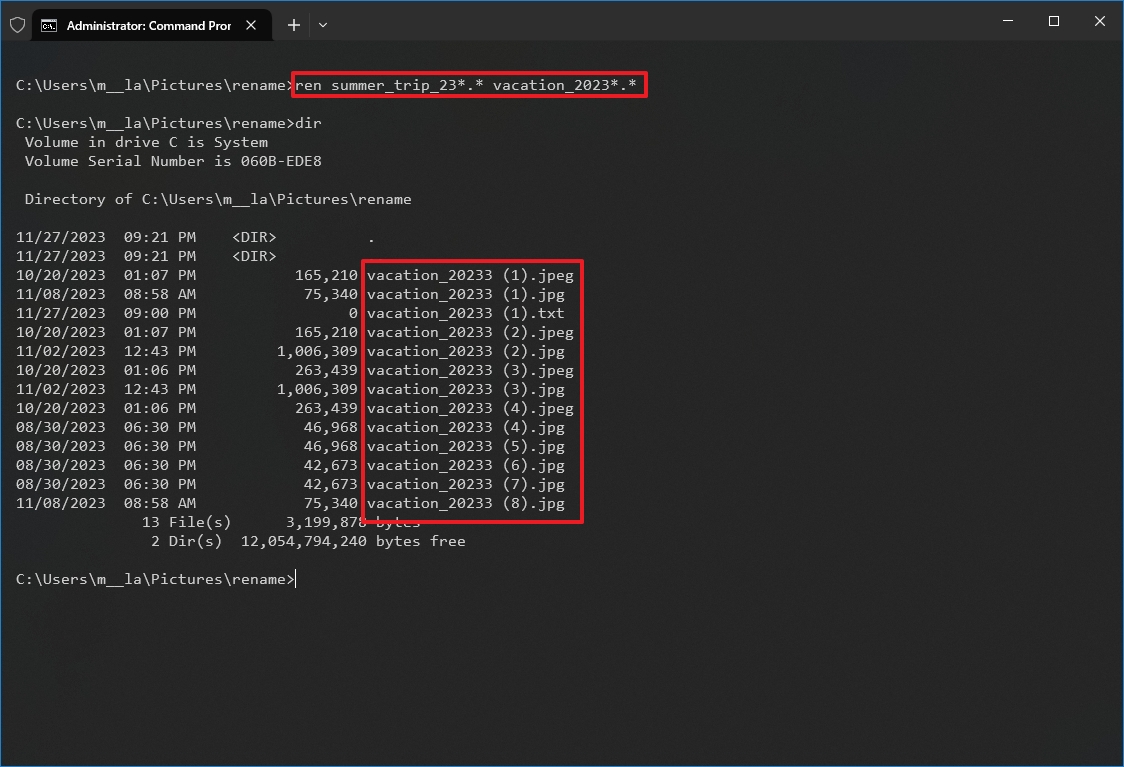
- Type the following command to rename the part of the file name and press Enter: ren OLD-FILE-NAME-PART*.* NEW-FILENAME-PART*.*
In the command, replace «OLD-FILE-NAME-PART» and «NEW-FILENAME-PART» with the old and new parts of the filename. The asterisk (*) is a wildcard that will match the rest of the filename and file extension to append the new part of the name. For instance, this command renames files that start with «summer_trip_23» to «vacation_2023»: ren summer_trip_23*.* vacation_2023*.*
After you complete the steps, the command will modify those files like the new name structure available in the command.
Change file extension
To change the file extension to another, use these steps:
- Open Start.
- Search for Command Prompt and click the top result to open the app.
- Type the following command example to navigate to the folder with the files you want to rename and press Enter: cd c:\PATH\TO\FILES
This example opens the «rename» folder inside «Pictures»: cd %USERPROFILE%\Pictures\rename
- (Optional) Type the following command to view a listing of the files in the location and press Enter: dir
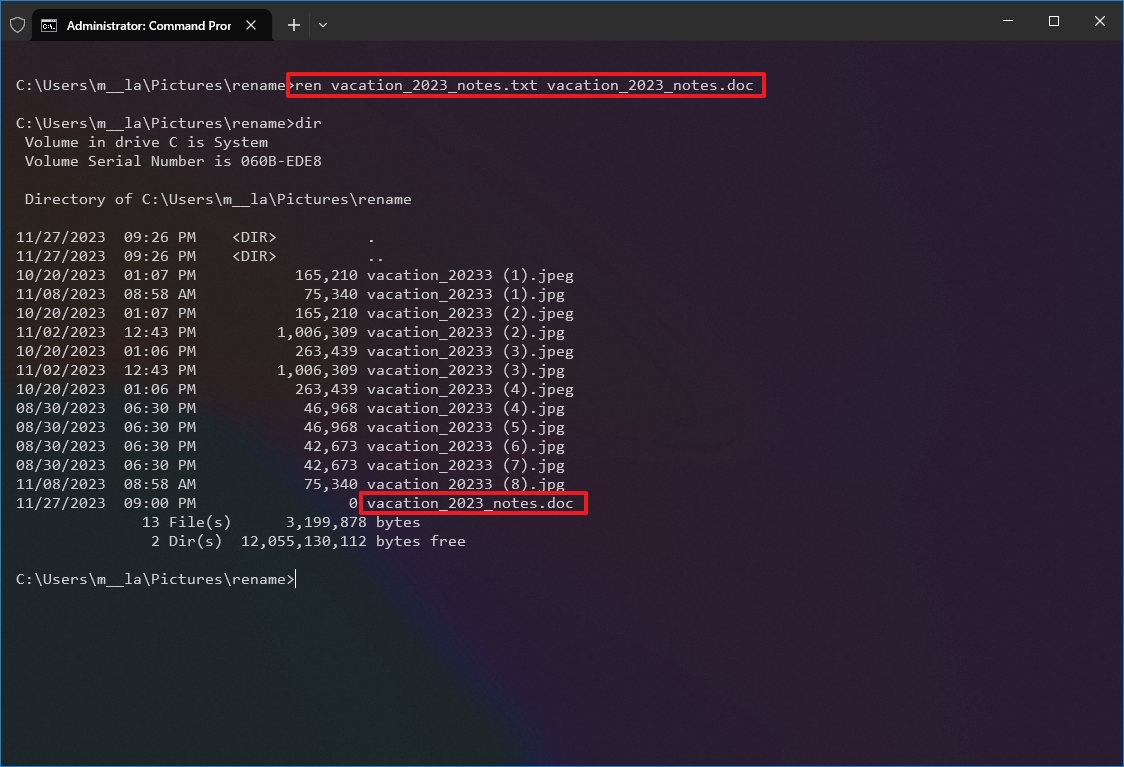
- Type the following command to change the file extension and press Enter: ren *.OLD-EXTENSION *.NEW-EXTENSION
In the command, change «OLD-EXTENSION» and «NEW-EXTENSION» with the old and new file extensions. For example, this command changes the extension from «.txt» to «.doc» compatible with Microsoft Word for the files in the location: ren *.txt *.doc
This example without wildcards (*) changes the only extension of a single file from «.txt» to «.doc»: ren vacation_2023_notes.txt vacation_2023_notes.doc
Once you complete the steps, the file extension will be changed to the new extension in the command.
Rename files with specific extensions
The previous steps rename every file within the location. However, if you want to rename only a group of files with a specific format, you must omit the asterisk (*) and specify the command’s target extension.
To rename files with a specific file extension with Command Prompt, use these steps:
- Open Start.
- Search for Command Prompt and click the top result to open the app.
- Type the following command example to navigate to the folder with the files to rename, and press Enter: cd c:\PATH\TO\FILES
This example opens the «rename» folder inside «Pictures»: cd %USERPROFILE%\Pictures\rename
- (Optional) Type the following command to view the files in the location and press Enter: dir
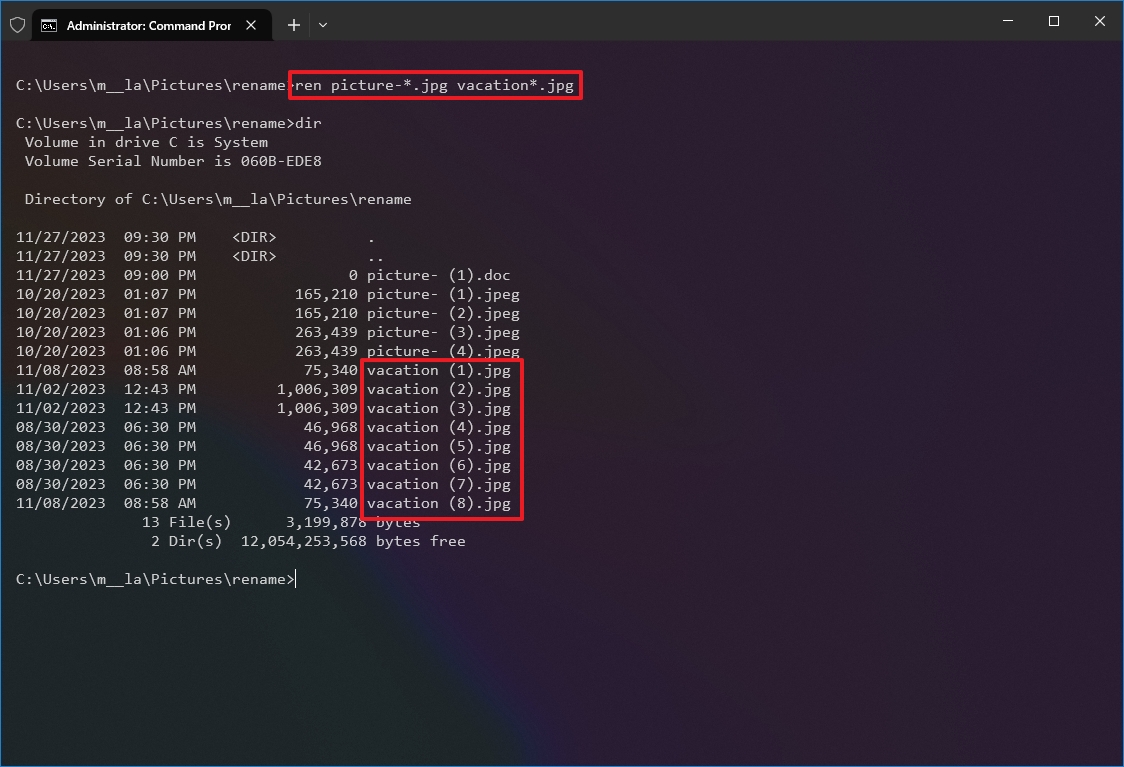
- Type the following command to change the file extension in the location and press Enter: ren OLD-FILE-NAME*.EXTENSION NEW-FILE-NAME*.EXTENSION
In the command, change «OLD-FILE-NAME,» «NEW-FILE-NAME,» and «EXTENSION» with the old and new file name and extension. For instance, this command only renames images with a «.jpg» extension: ren picture-*.jpg vacation*.jpg
After you complete the steps, Command Prompt will rename the files using the specified options.
How to rename multiple files using PowerShell
On Windows 10, you can also use PowerShell to rename multiple files. Although you have many ways to manipulate files using this tool, the instructions in this guide are only meant to get started with the most common scenarios.
Rename single file
To rename only one file with a PowerShell command, use these steps:
- Open Start.
- Search for PowerShell and click the top result to open the app.
- Type the following command example to navigate the folder with the files to rename and press Enter: cd PATH\TO\FOLDER
In the command, replace «PATH\TO\FOLDER» with the actual path to the location. For example, this command navigates the «rename» folder inside «Pictures»: cd C:\Users\USERNAME\Pictures\rename
- (Optional) Type the following command to view the files in the location and press Enter: ls
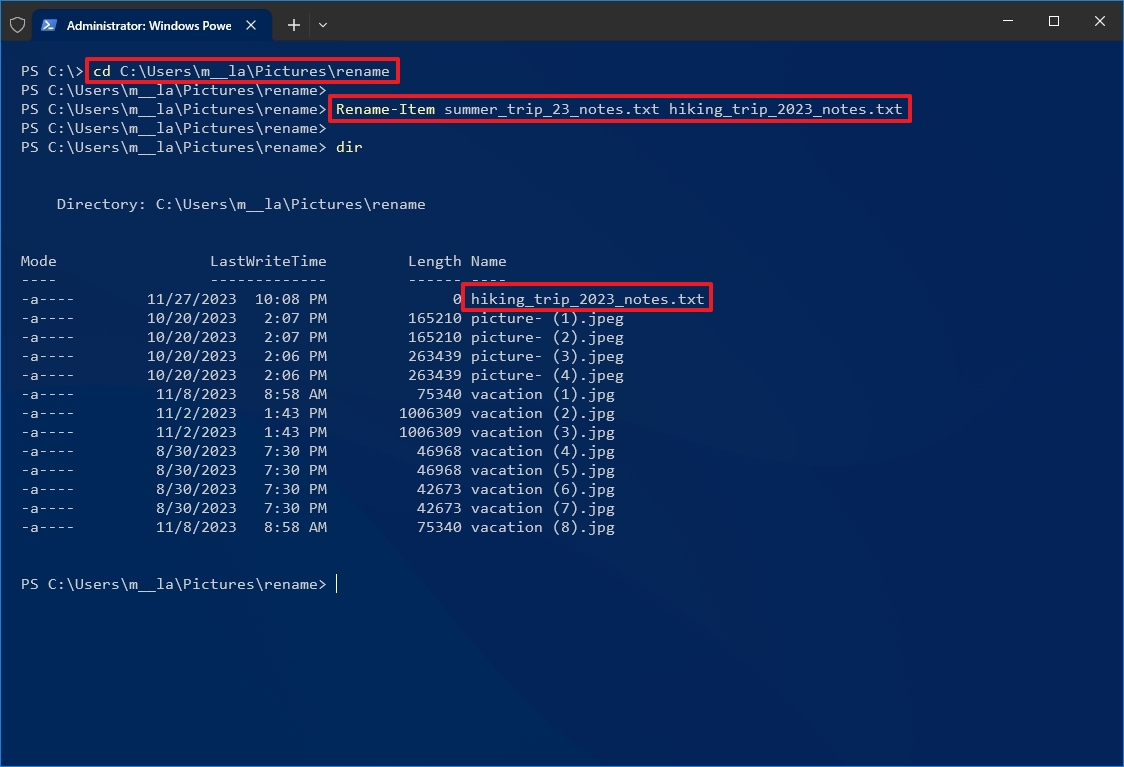
- Type the following command to change the name of a single file and press Enter: Rename-Item «OLD-FILE-NAME.EXTENSION» «NEW-FILE-NAME.EXTENSION»
In the command, specify the old and new file names and extensions. The quotation marks are only required if the name includes spaces. For instance, this command renames the file to «hiking_trip_2023_notes.txt»: Rename-Item summer_trip_23_notes.txt hiking_trip_2023_notes.txt
- Repeat step 5 to continue renaming other files.
Once you complete the steps, the command will change the specified file name.
Rename multiple files in bulk
To rename multiple files in bulk when the name structure is not important, use these steps:
- Open Start.
- Search for PowerShell and click the top result to open the app.
- Type the following command example to navigate to the folder with the files to rename and press Enter: cd PATH\TO\FOLDER
In the command, replace «PATH\TO\FOLDER» with the actual path to the location. For example, this command navigates the «rename» folder inside «Pictures»: cd C:\Users\USERNAME\Pictures\rename
- (Optional) Type the following command to view a listing of the files in the location and press Enter: ls
- Type the following command to rename multiple files in bulk and press Enter: ls | %{Rename-Item $_ -NewName («NEW-FILE-NAME-{0}.EXTENSION» -f $nr++)}
In the command, replace «NEW-FILE-NAME» with the structure name you want to use. For example, this command renames images with a «.jpg» extension using the same («beach-trip-2023-«) naming structure and appends a different number at the end of the name: ls | %{Rename-Item $_ -NewName («beach-trip-2023-{0}.jpg» -f $nr++)}
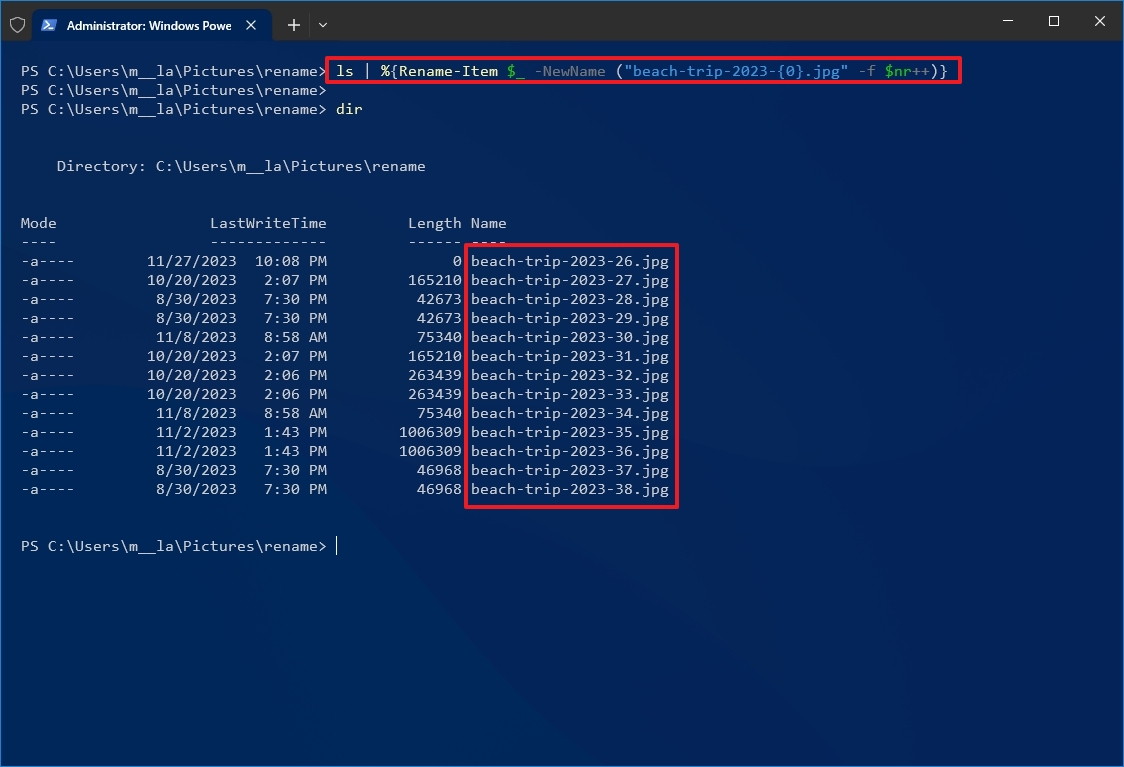
After you complete these steps, the files with the specified format will be renamed using the structure available with the command.
Trim multiple file names
To make file names shorter or trim part of the names by an «N» number of characters, use these steps:
- Open Start.
- Search for PowerShell and click the top result to open the app.
- Type the following command example to navigate the folder with the files to rename and press Enter: cd PATH\TO\FOLDER
In the command, replace «PATH\TO\FOLDER» with the actual path to the location. For example, this command navigates the «rename» folder inside «Pictures»: cd C:\Users\USERNAME\Pictures\rename
- (Optional) Type the following command to view the files in the location and press Enter: ls
- Type the following command to rename files using shorter names and press Enter: ls | Rename-Item -NewName {$_.name.substring(0,$_.BaseName.length-N) + $_.Extension}
In the command, inside «$_.BaseName.length-N» update the value of «N» to specify the number of characters to remove. For instance, this command trims the name of your files by eight characters: ls | Rename-Item -NewName {$_.name.substring(0,$_.BaseName.length-8) + $_.Extension}
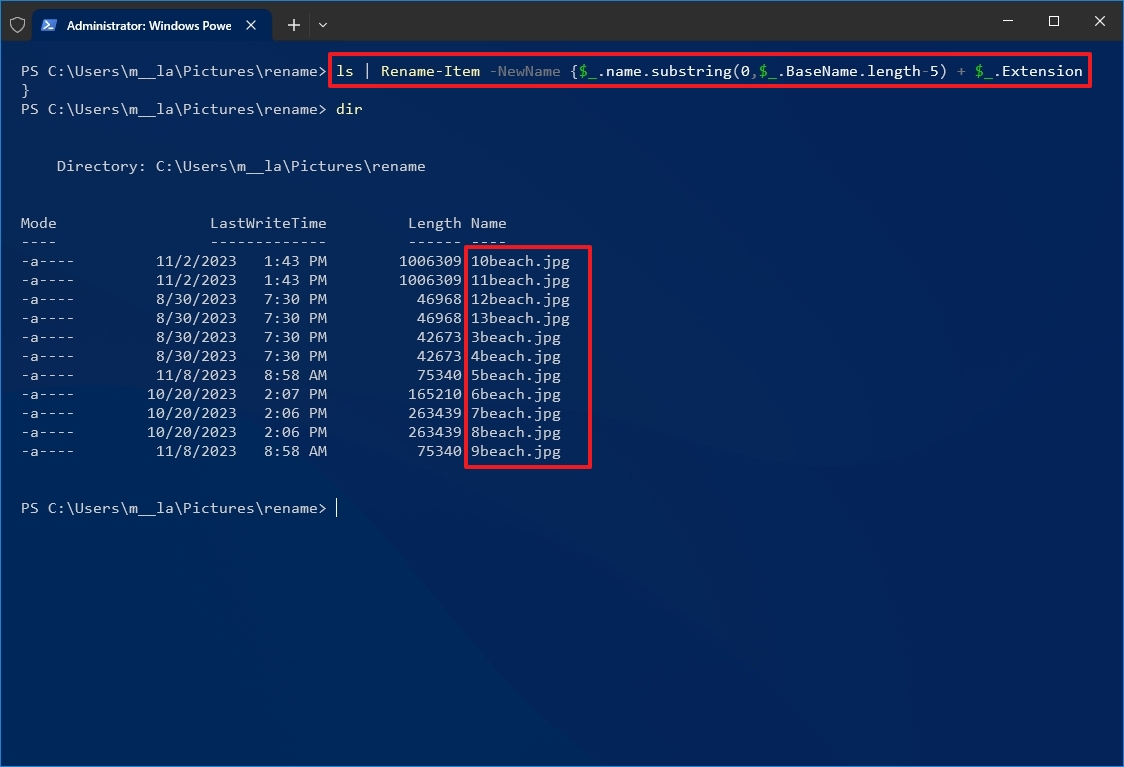
Once you complete these steps, the files in the location will have shorter names (right to left), depending on the specified length.
Delete part of the name from multiple files
To remove part of the file name on multiple files with PowerShell commands, use these steps:
- Open Start.
- Search for PowerShell and click the top result to open the app.
- Type the following command example to navigate to the files to rename and press Enter: cd PATH\TO\FOLDER
In the command, replace «PATH\TO\FOLDER» with the actual path to the location. For example, this command navigates the «rename» folder inside «Pictures»: cd C:\Users\USERNAME\Pictures\rename
- (Optional) Type the following command to view the files in the location and press Enter: ls
- Type the following command to remove part of the file name and press Enter: ls | Rename-Item -NewName {$_.name -replace «OLD-FILE-NAME-PART»,»»}
In the command, replace «OLD-FILE-NAME-PART» with the actual part of the name you want to replace. For instance, this command removes the word «trip» from the name of all files in the folder: ls | Rename-Item -NewName {$_.name -replace «beach»,»»}
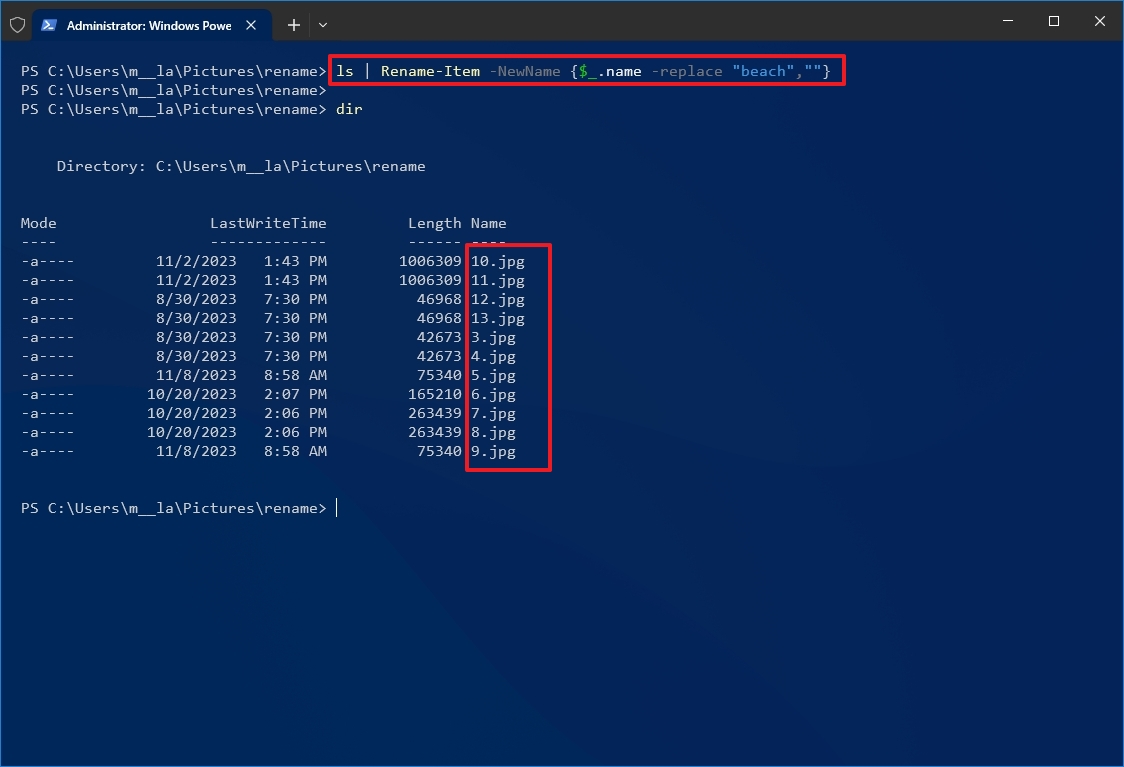
After you complete the steps, the command will remove the file name part as specified in the command.
Replace part of the name from multiple files
To rename the same part of the file name, use these steps:
- Open Start.
- Search for PowerShell and click the top result to open the app.
- Type the following command example to navigate to the folder with the files to rename and press Enter: cd PATH\TO\FOLDER
In the command, replace «PATH\TO\FOLDER» with the actual path to the location. For example, this command navigates the «rename» folder inside «Pictures»: cd C:\Users\USERNAME\Pictures\rename
- (Optional) Type the following command to view a listing of the files in the location and press Enter: ls
- Type the following command to replace part of file name and press Enter: ls | Rename-Item -NewName {$_.name -replace «OLD-FILE-NAME-PART»,»NEW-FILE-NAME-PART»}
In the command, replace «OLD-FILE-NAME-PART» and «NEW-FILE-NAME-PART» with the old and new parts of the file name. For example, this command replaces the word «vacation_» for «camping_trip_» in the file name: ls | Rename-Item -NewName {$_.name -replace «vacation_«,»camping_trip_»}
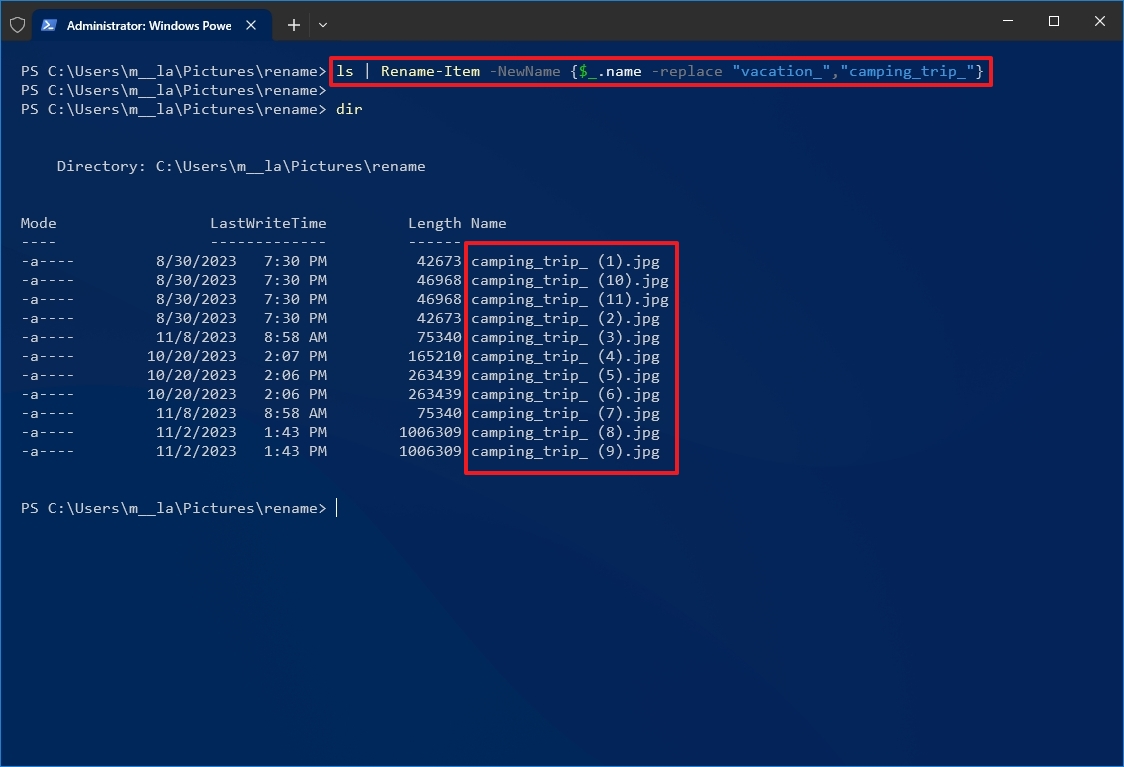
Once you complete these steps, the command will modify the file names with the replacement you specified in the command.
Remove spaces from multiple files
The space character as part of the file name can sometimes cause problems, even more so when using commands. If you have files with spaces in their names, you can use PowerShell to replace the character for a visual separator, such as a dash or underscore symbol.
To remove and replace spaces with underscores in filenames with PowerShell, use these steps:
- Open Start.
- Search for PowerShell and click the top result to open the app.
- Type the following command example to navigate to the folder with the files to rename and press Enter: cd PATH\TO\FOLDER
In the command, replace «PATH\TO\FOLDER» with the actual path to the location. For example, this command navigates the «rename» folder inside «Pictures»: cd C:\Users\USERNAME\Pictures\rename
- (Optional) Type the following command to view the files in the location and press Enter: ls
- Type the following command to remove spaces from file name and press Enter: ls | Rename-Item -NewName { $_.Name -replace » «,»SEPARATOR» }
In the command, make sure to replace «SEPARATOR» with the symbol instead of a space. For instance, this command replaces spaces with underscores in the files: ls | Rename-Item -NewName { $_.Name -replace » «,»_» }
After you complete the steps, the spaces will be replaced with the separator indicated in the command.
Change file extension
To change the file extension for a bunch of files with PowerShell, use these steps:
- Open Start.
- Search for PowerShell and click the top result to open the app.
- Type the following command example to navigate to the folder with the files to rename and press Enter: cd PATH\TO\FOLDER
In the command, replace «PATH\TO\FOLDER» with the actual path to the location. For example, this command navigates the «rename» folder inside «Pictures»: cd C:\Users\USERNAME\Pictures\rename
- (Optional) Type the following command to view the files in the location and press Enter: ls
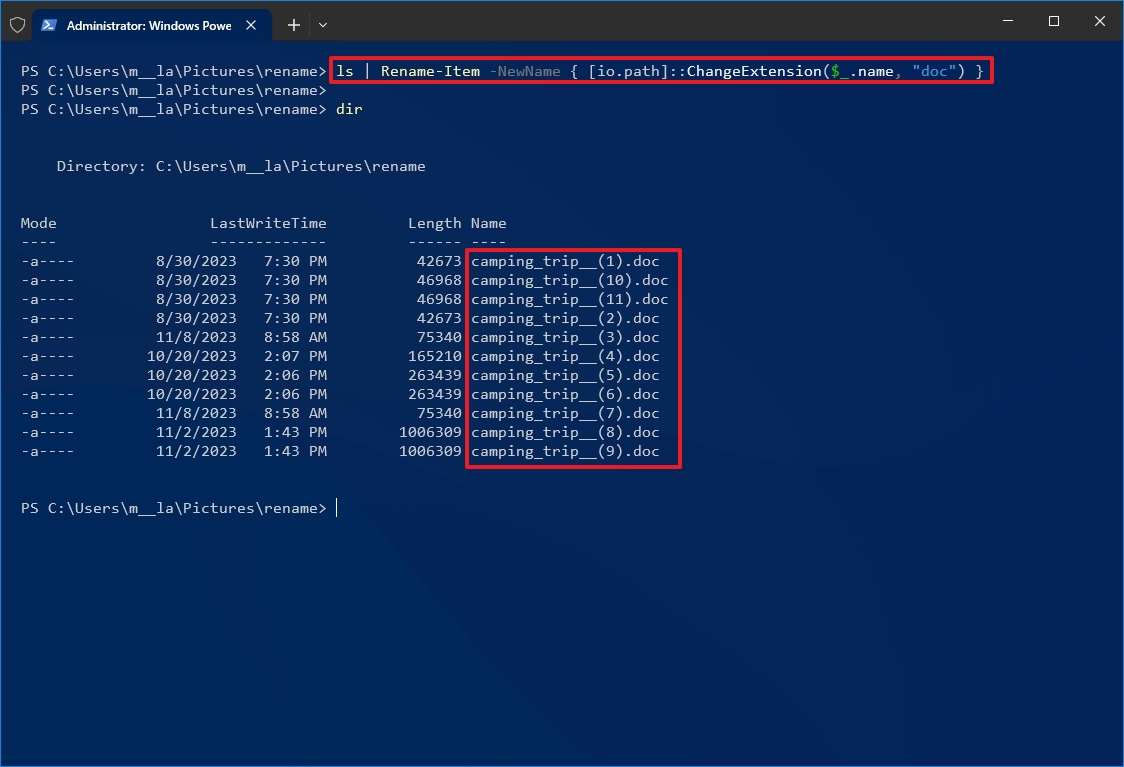
- Type the following command to change the extension on files and press Enter: ls | Rename-Item -NewName { [io.path]::ChangeExtension($_.name, «.NEW-EXTENSION») }
In the command, replace «.NEW-EXTENSION» with a new file extension. For instance, this command changes any file extension to «.doc»: ls | Rename-Item -NewName { [io.path]::ChangeExtension($_.name, «doc») }
Once you complete the steps, PowerShell will change the extension for the files in the folder location.
Rename specific extension file names
The above instructions will rename every file within the folder. However, if you want to change the name of a specific file format, such as documents, pictures, or videos, you can use the «-filter» option.
To change the names of a specific file format with PowerShell commands on Windows 10, use these steps:
- Open Start.
- Search for PowerShell and click the top result to open the app.
- Type the following command example to navigate to the folder with the files to rename and press Enter: cd PATH\TO\FOLDER
In the command, replace «PATH\TO\FOLDER» with the actual path to the location. For example, this command navigates the «rename» folder inside «Pictures»: cd C:\Users\USERNAME\Pictures\rename
- (Optional) Type the following command to view the files in the location and press Enter: ls
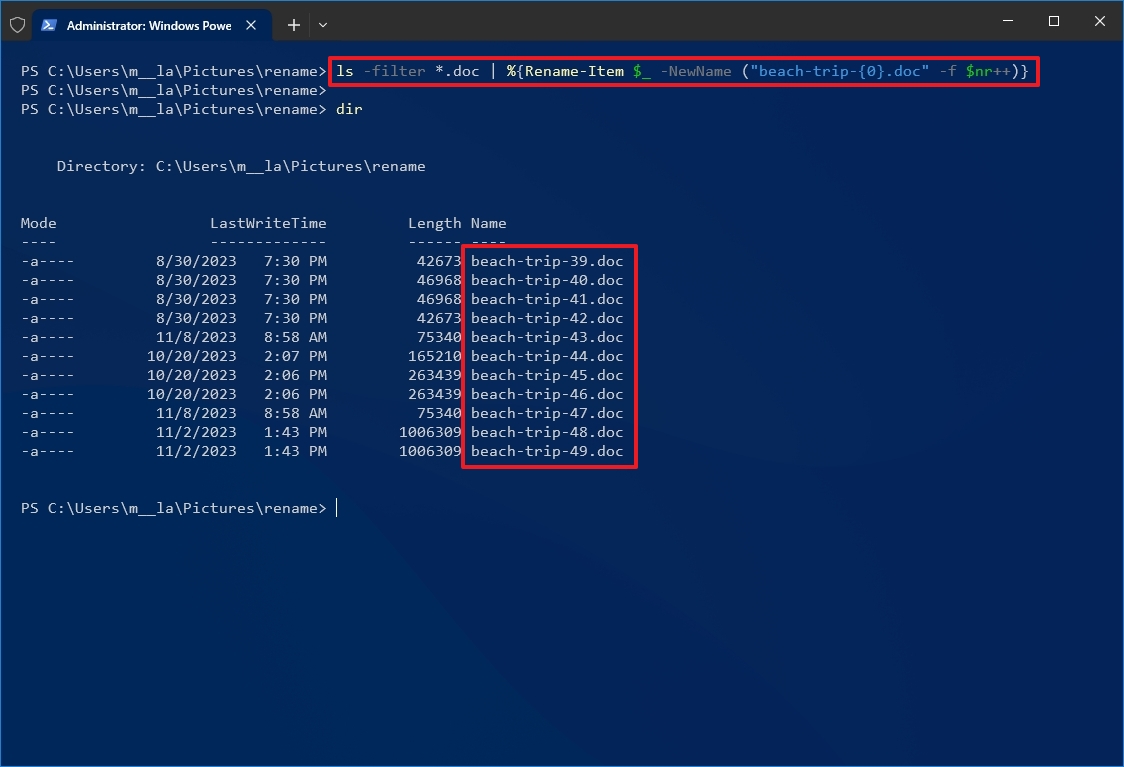
- Type the following command to rename files with a specific extension and press Enter: ls -filter *.EXTENSION | %{Rename-Item $_ -NewName («NEW-FILE-NAME-{0}.EXTENSION» -f $nr++)}
In the command, replace «NEW-FILE-NAME» and «EXTENSION» with the new parameter. For instance, this command renames only files that include the «.doc» extension: ls -filter *.doc | %{Rename-Item $_ -NewName («beach-trip-{0}.doc» -f $nr++)}
Once you complete the steps, PowerShell will rename the files with a specific extension specified in the command.
While these commands have been tested to work as expected, it is always recommended that you perform a test run before renaming the original files on your computer.
How to rename multiple files using PowerToys
On Windows 10, PowerToys is an advanced tool that adds many helpful productivity tools, including PowerRename, which makes it easier to rename files in bulk without using commands.
Install PowerToys
To install PowerToys on Windows 10, use these steps:
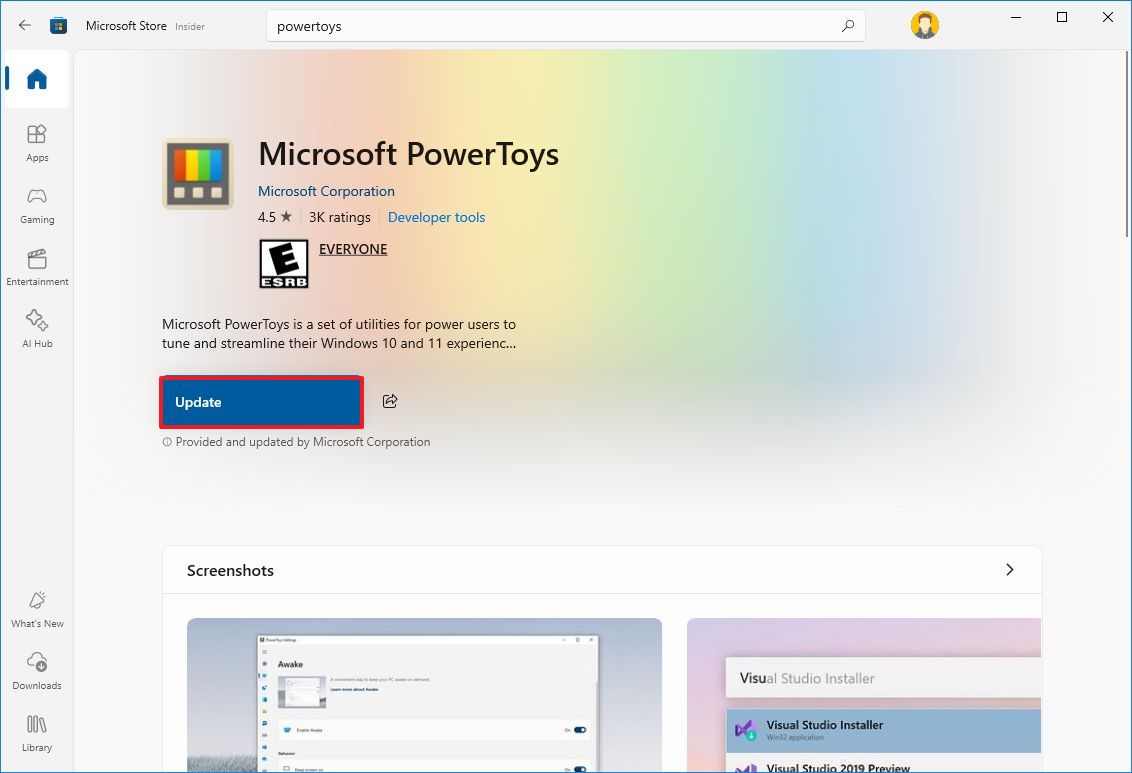
- Open the PowerToys app page.
- Click the View in Store button.
- Click the Install button.
- Open the PowerToys app.
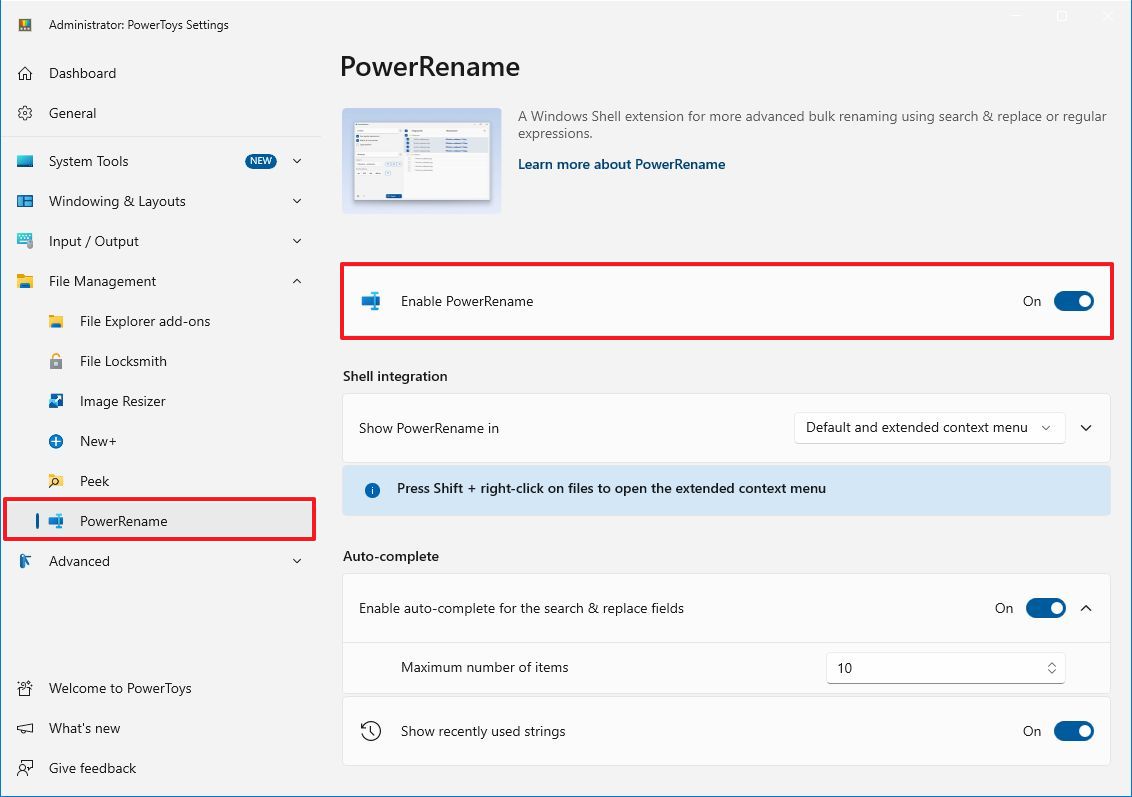
- Click on File Management on the left navigation pane.
- Click on PowerRename.
- Turn on the «Enable PowerRename» toggle switch (if applicable).
After you complete the steps, you can start using the tool to rename multiple files.
Rename files by matching partial name
To rename or replace part of the name of multiple files, use these steps:
- Open File Explorer.
- Open the folder with the files to rename.
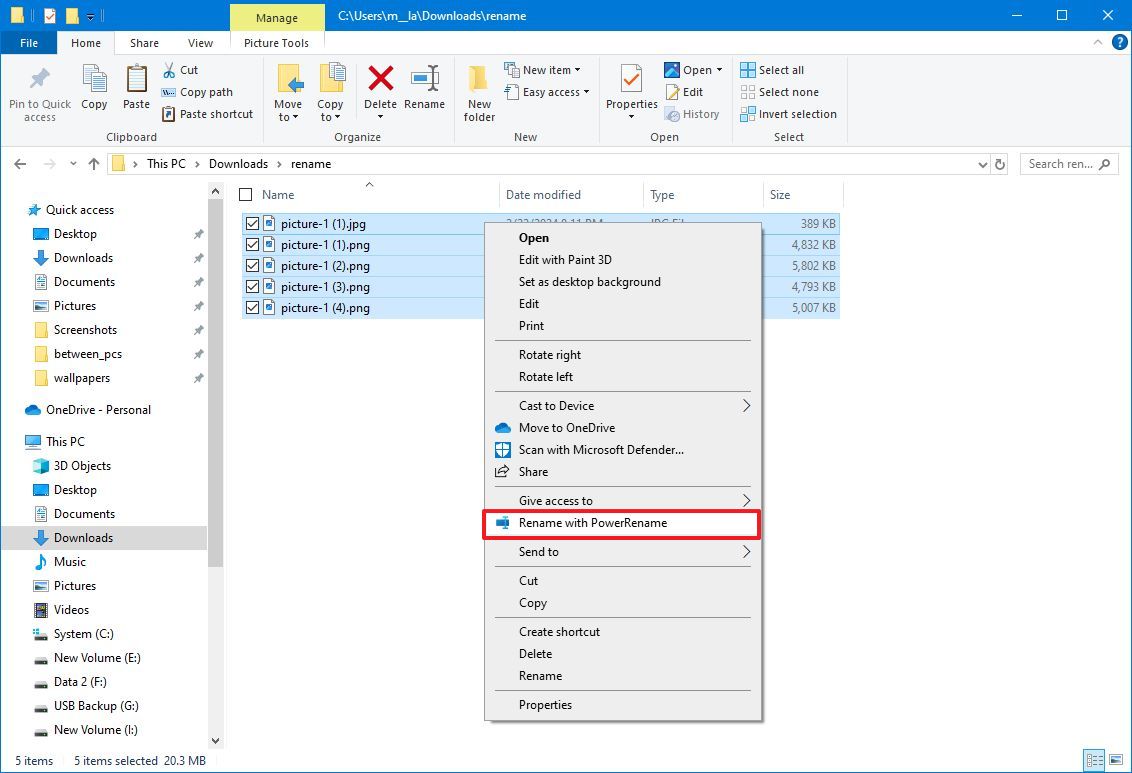
- Select the files to rename.
- Right-click the selection and choose the «Rename with PowerRename» option.
- In the «Search for» box, define the part to rename.
- In the «Replace with» box, specify the name structure you want to use for the files.
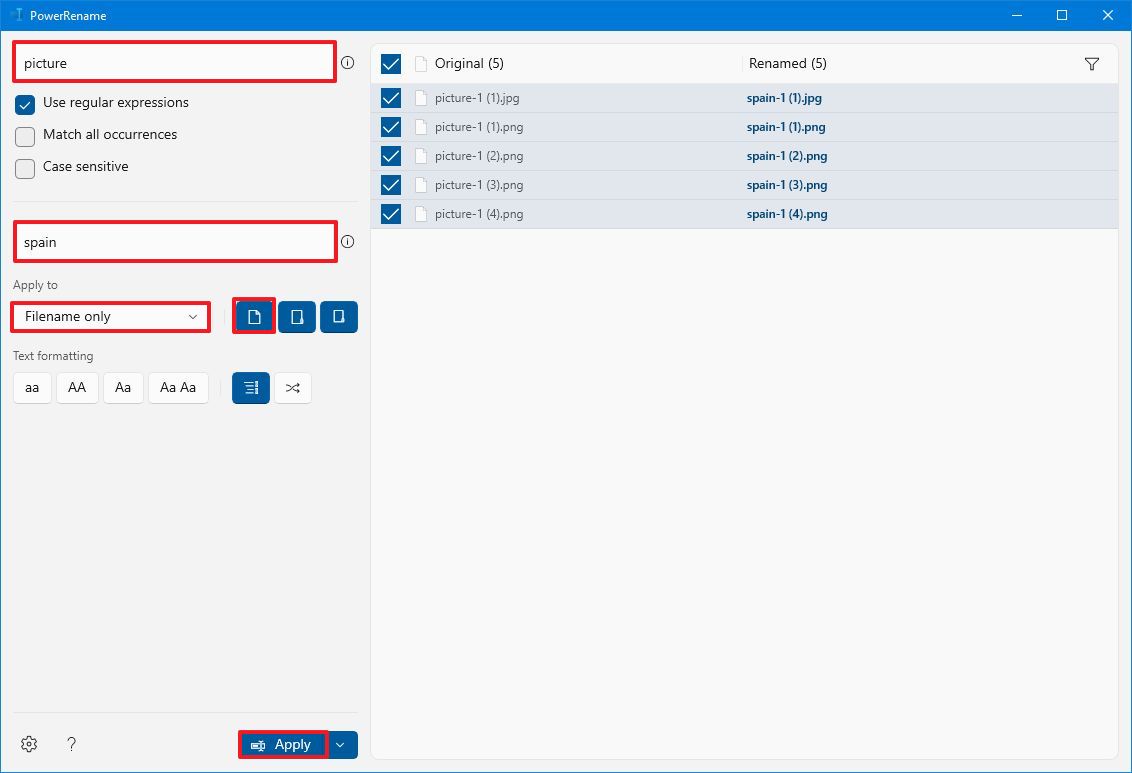
- Use the «Apply to» menu to confirm the part of the file name to change — for example, filename, extension, or both.
- Choose the content to rename, including files, folders, and subfolders, with the buttons on the right side.
- (Optional) Choose the text formatting, including lowercase, uppercase, and title case, or capitalize every word.
- (Optional) Choose the «Enumerate items» option to allow the files to have the same name but with a different number at the end.
- Confirm the preview on the right side.
- Click the Apply button.
Once you complete the steps, the files will be renamed according to your configuration.
Rename files by matching any name
To rename all the files without a common structure, use the steps:
- Open File Explorer.
- Open the folder with the files to rename.
- Select the files to rename.
- Right-click the selection and choose the «Rename with PowerRename» option.
- In the «Search for» box, use the (.*) regular expression to match all the files.
- Check the «Use regular expressions» option.
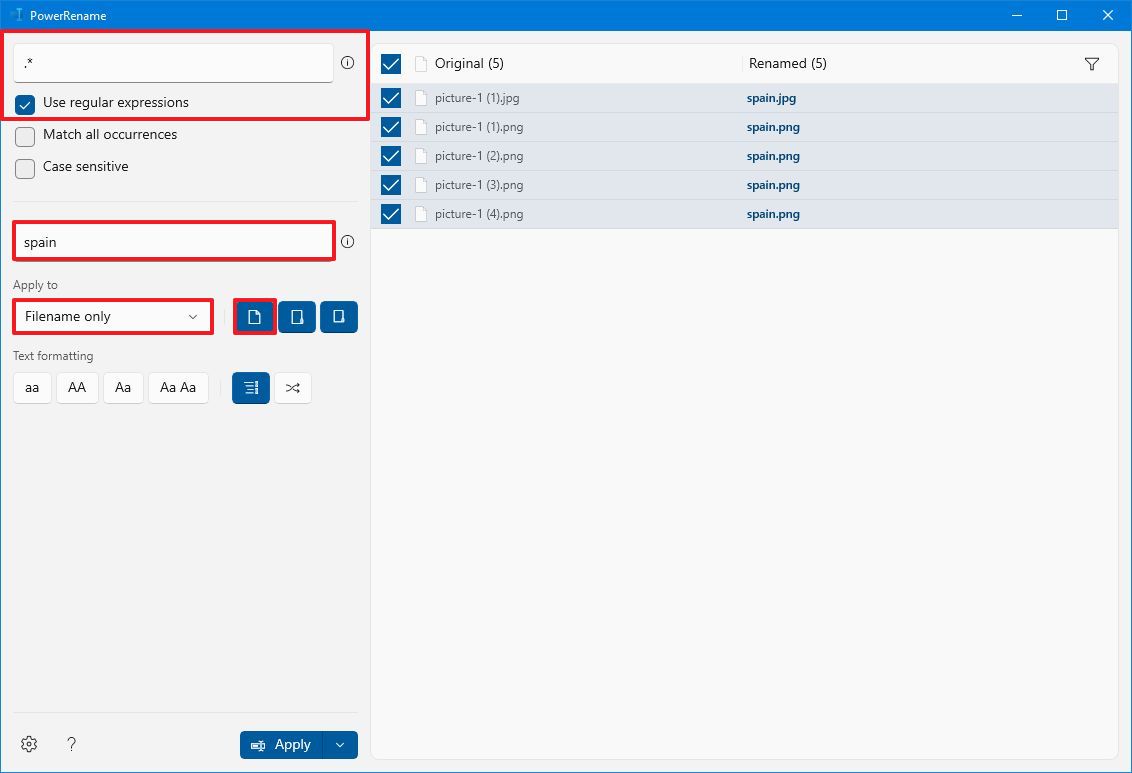
- In the «Replace with» box, specify the name structure you want to use for the files.
- Click the «File creation date and time help» button on the right side and select help to enumerate the files, since they will have the same base name – for example, «$ff» to add two-millisecond digits.
- Use the «Apply to» menu to select the Filename only option.
- Choose the content to rename, including files, folders, and subfolders, with the buttons on the right side.
- (Optional) Choose the text formatting, including lowercase, uppercase, and title case, or capitalize every word.
- (Optional) Choose the «Enumerate items» option to allow the files to have the same name but with a different number at the end.
- Confirm the preview on the right side.
- Click the Apply button.
After you complete the steps, all the files in the list will be renamed to the base name you assigned them.
Rename files by appending description
To append a description to the file name, use the steps:
- Open File Explorer.
- Open the folder with the files to rename.
- Select the files to rename.
- Right-click the selection and choose the «Rename with PowerRename» option.
- In the «Search for» box, use the (\.) regular expression to match all the files.
- Check the «Use regular expressions» option.
- In the «Replace with» box, specify the description you want to add to files — for example, «spain.»
- Quick note: If you use this option, remember the period at the end of the description to prevent breaking the file extension.
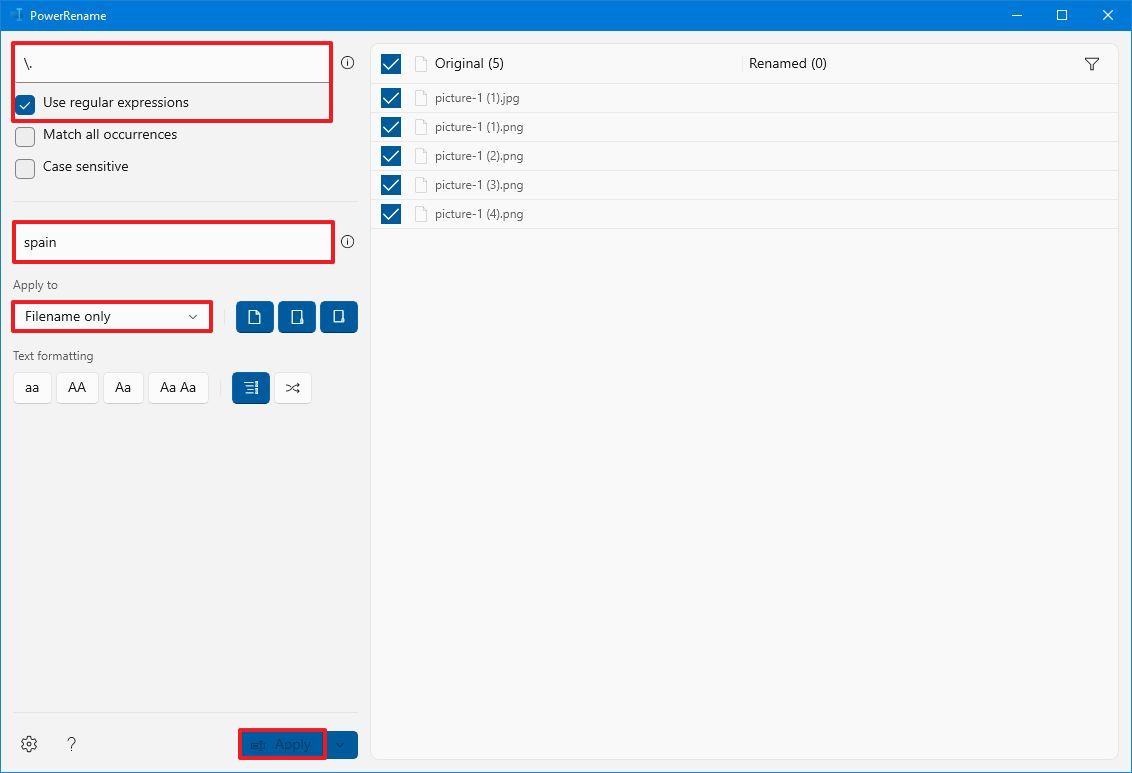
- Use the «Apply to» menu to the Filename + extension option.
- Choose the content to rename, including files, folders, and subfolders, with the buttons on the right side.
- (Optional) Choose the text formatting, including lowercase, uppercase, and title case, or capitalize every word.
- (Optional) Choose the «Enumerate items» option to allow the files to have the same name but with a different number at the end.
- Confirm the preview on the right side.
- Click the Apply button.
Change file extension
To change the file extension of multiple files with PowerToys, use these steps:
- Open File Explorer.
- Navigate to the folder with the files to rename.
- Select the files to rename.
- Right-click the selection and choose the «Rename with PowerRename» option.
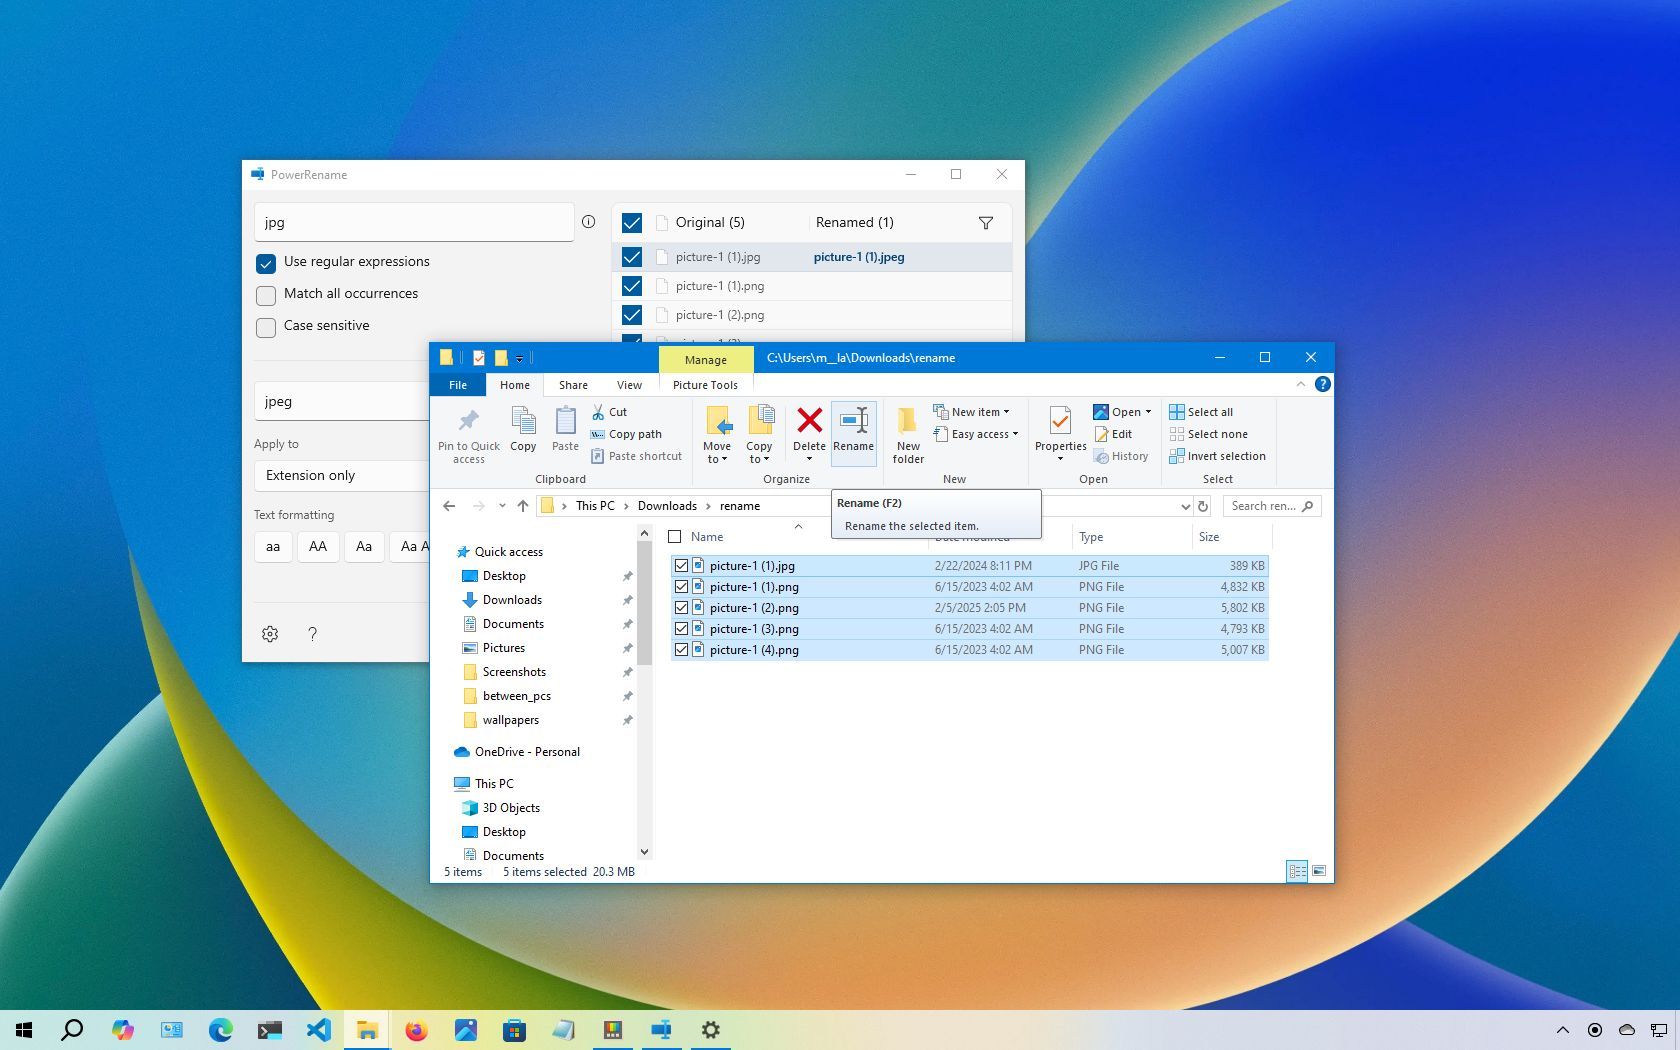
- In the «Search for» box, confirm the extension to replace — for example, jpg.
- In the «Replace with» box, confirm the new compatible extension — for example, jpeg.
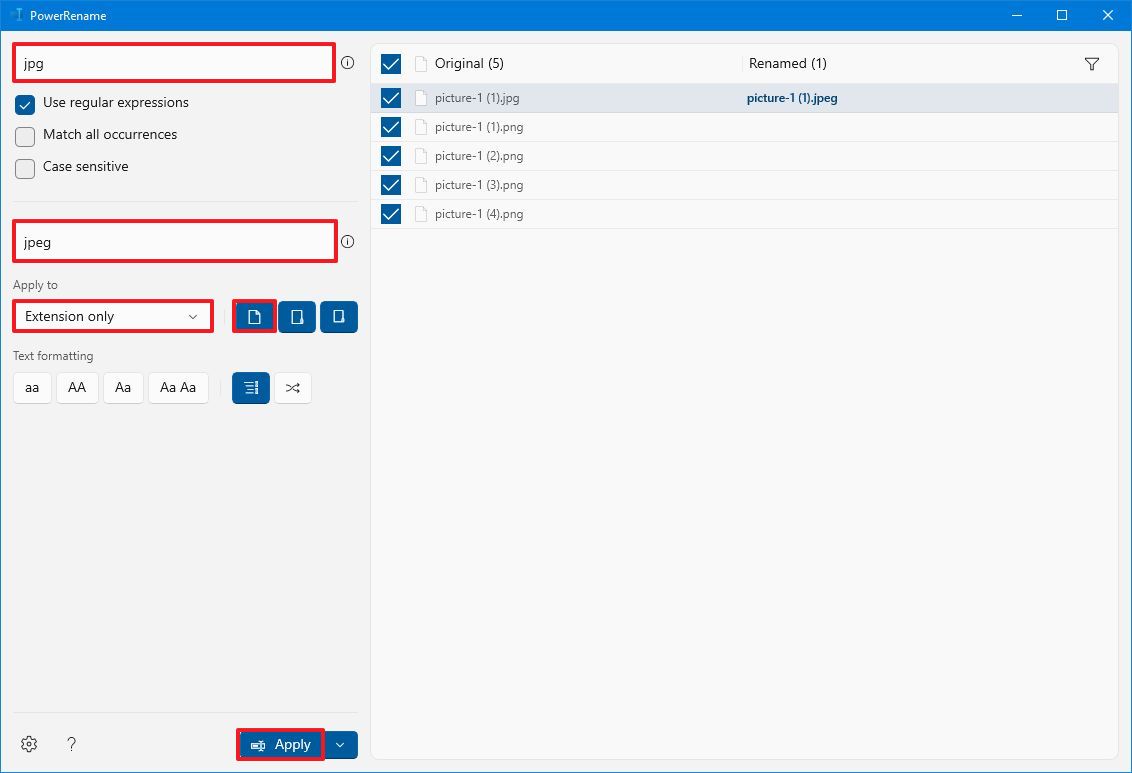
- Use the «Apply to» menu to select the «Extension only» option.
- Choose only the Include files option with the buttons on the right side.
- Click the Apply button.
Once you complete the steps, the file extension will change to the one you specified.
PowerToys PowerRename is a powerful tool that lets you manipulate file names virtually in any way you want using regular expressions. This Microsoft documentation page explains the options available for creating patterns to rename files.
More resources
For more helpful articles, coverage, and answers to common questions about Windows 10 and Windows 11, visit the following resources:
- Windows 11 on Windows Central — All you need to know
- Windows 10 on Windows Central — All you need to know
Mauro Huculak has been a Windows How-To Expert contributor for WindowsCentral.com for nearly a decade and has over 15 years of experience writing comprehensive guides. He also has an IT background and has achieved different professional certifications from Microsoft, Cisco, VMware, and CompTIA. He has been recognized as a Microsoft MVP for many years.