
Привет, недавно столкнулся с ситуацией — есть выделенный сервер, на сервер установлен Hyper-V, провайдер выдает один белый IP на сервер. Обратились ко мне с вопросом — как можно сделать так, что бы не покупая дополнительные адреса, на создаваемых на сервере виртуальных машинах работал интернет.
В случае, например с VirtualBox вопрос решается подключением виртуальной машины к сети с типом NAT, но как же быть с Hyper-V, в нем нельзя подключить виртуальный свитч к сети NAT.
Ответ очевиден — нужно подключить свитч к внутренней сети, и с него трафик натить через физический порт. Сделать это совсем не сложно.
Ниже я расскажу как можно настроить NAT на Windows Server 2016 через PowerShell, а так же как можно настроить NAT на более старых версиях ОС Windows, через RRAS (к слову и на Windows Server 2016, через RRAS то же можно делать).
Начнем с более предпочтительного и простого способа – через PowerShell, но он для Windows 2016 и Windows 10 (к слову эти же команды должны работать и на более старых версях Windows, при условии, что будет установлен PowerShell 5, но я не проверял, кто проверит, отпишитесь в комментариях).
#Добавляем виртуальный свитч
New-VMSwitch -name NAT -SwitchType Internal
#Добавляем NAT
New-NetNat -Name LocalNat -InternalIPInterfaceAddressPrefix "10.0.0.0/24"
#Назначем адрес виртуальному свитчу
Get-NetAdapter "vEthernet (NAT)" | New-NetIPAddress `
-IPAddress 10.0.0.1 -AddressFamily IPv4 -PrefixLength 24
#Делаем проброс портов
Add-NetNatStaticMapping -NatName NATnetwork -Protocol TCP `
-ExternalIPAddress 0.0.0.0 -InternalIPAddress 10.0.0.2 `
-InternalPort 22 -ExternalPort 50022
#Посмотреть текущие пробросы портов можной командой:
Get-NetNatStaticMapping
#Как и список сетей NAT
Get-NetNat
#Такими командами это хозяйство можно удалить
Remove-NetNatStaticMapping -StaticMappingID 0
Remove-NetNat -Name LocalNat
Теперь опишу способ, как можно сделать NAT, который работает практически на всех версиях винды (на 2003, 2008, 2012 и 2016 соответсвенно), будем делать NAT через RRAS.
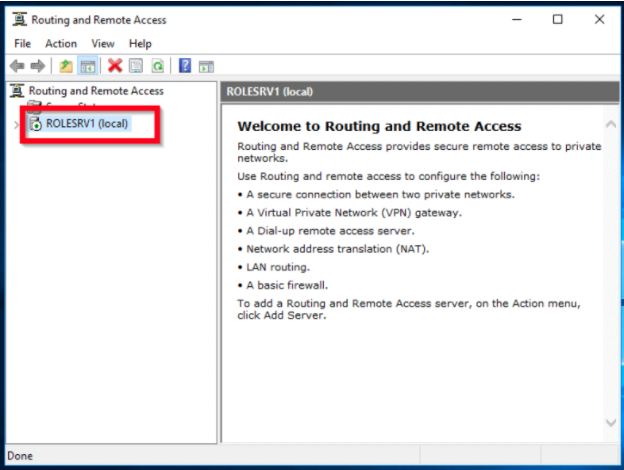
Сперва нужно поставить роль RAS, для этого заходим в диспетчер сервера, жмем управление и выбираем — добавить роли и компоненты.

В мастере добавления ролей, в ролях сервера, выбираем Удаленный доступ.

В службах ролей удаленного доступа, выбираем маршрутизация,

и добавляем необходимые компоненты.

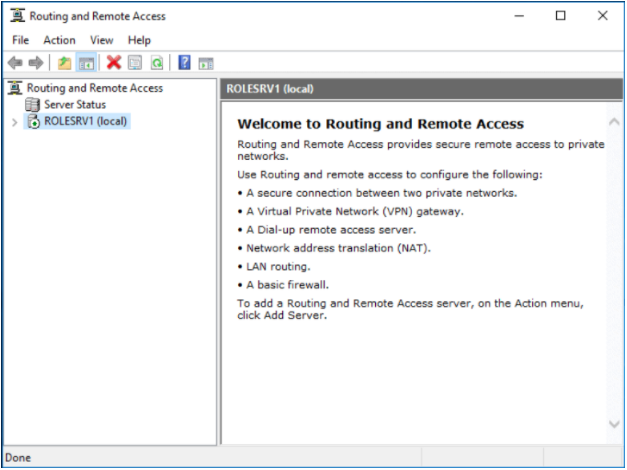
После завершения установки, перезагружаем сервер, возвращаемся в диспетчер сервера и выбираем: средства — маршрутизация и удаленный доступ.

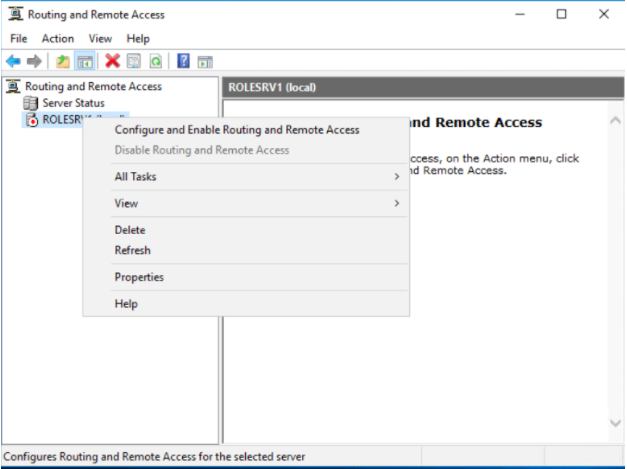
Щелкаем правой кнопкой по нашему серверу и выбираем – настроить маршрутизацию и удаленный доступ.

На втором шаге мастера настройки сервера маршрутизации и удаленного доступа, выбираем – преобразование сетевых адресов (NAT).

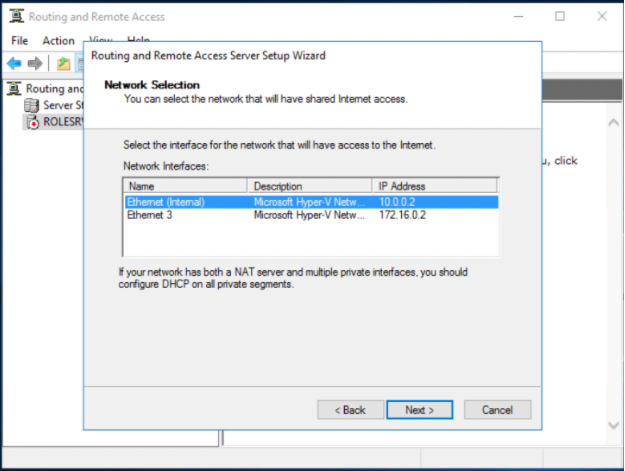
Дальше выбираем сетевой интерфейс, который подключен к интернету.

На этом настройка NAT на Windows Server 2016 закончена, вернемся в консоль управления RRAS, развернем наш сервер, перейдем в IPv4, и зайдем в преобразование сетевых адресов.

Здесь можно посмотреть свойства сетевых интерфейсов. Например для внутреннего свойства выглядят так:

А для внешнего так:

Здесь же можно сделать проброс портов, например, сделаю проброс ssh до виртуальной машины. Заходим в службы и порты и жмем добавить,

Здесь указываем понятное имя службы, входящий порт (порт по которому нужно ломиться на сервер), адрес сервера к которому пробрасываем порт, и порт сервера.
Всё порт проброшен. Можно пробовать подключиться.

This guide is for those who wants to simulate I virtual enterprise environment, and use a Windows Server as a virtual Gateway. In this example I´m going to use 2 separate VLAN and use the Gateway as a Router and also NAT all communications to the Internet. This way only one server faces the internet, and you could also have a firewall on the server.
SETUP:
1 Server 2016 Core, Name (GW) , Workgroup (but could be domain joined), used as gateway and router.
2 Server 2016 GUI, Name (MGM,MGM2), Workgroup (but could be domain joined), used for verification.
Setup Hyper-V:
On the GW server I need 3 network cards. One connected to an External switch and the other two connected to the same Private switch.
The two Private Switches I configure with VLAN ID.

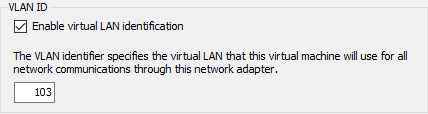
The MGM server has the VLAN 102 and the MGM2 has the VLAN 103 switch connected to them.
Setup GW Server:
Server is installed and fully patched.
On the server we now have three network cards. And I will rename them to External, VLAN 102 and VLAN 103.
First we check what Network cards we have, so logon to the server and start Powershell, and then we check what network adapters we have.
Get-NetAdapter

When looking at the LinkSpeed I see that one connection is at 1 Gbps, so that should be my External network, and the rest the internal. Bydefault the names of the cards is in order of installation, so if you first create the internal ones, they will have the lower number. So if you add them one by one, you will know which adapter is which.
Then we rename the cards, just so it will be easier to see.
Get-NetAdapter -Name "Ethernet" | Rename-NetAdapter -NewName "External"
Get-NetAdapter -Name "Ethernet 2" | Rename-NetAdapter -NewName "VLAN 102"
Get-NetAdapter -Name "Ethernet 3" | Rename-NetAdapter -NewName "VLAN 103"
And when we check again we see the new names.
Get-NetAdapter

Then we must set a IP-address of the network cards, in this case External gets from a DHCP, so we don´t need to change that one.
So for the VLAN 102
New-NetIPAddress -InterfaceAlias "VLAN 102" -IPAddress 192.168.102.1 -PrefixLength 24 -DefaultGateway 192.168.102.1

And for VLAN 103
New-NetIPAddress -InterfaceAlias "VLAN 103" -IPAddress 192.168.103.1 -PrefixLength 24 -DefaultGateway 192.168.103.1

This is not needed but I always want to enable IMCP, so lets enable that in the windows firewall.
Enable-NetFirewallRule -DisplayName "File and Printer Sharing (Echo Request - ICMPv4-In)"
Just a quick check that we have internet connectivity
Test-NetConnection

So now on with installing the RRAS. So install the Routing role and restart the server.
Install-WindowsFeature Routing -IncludeManagementTools -Restart
When the server has rebooted, log on to it again and start powershell.
Configuration RRAS:
The next part there is two solutions as I see it, the old way by using he GUI from another server, and another when you using NETSH. If you ever want to use the GUI and see what NAT that is in use and the stats for packages, then I recommend using the GUI. If anyone know a way to be able to use powershell or other ways to configure this and it will show up the same in the GUI let me know. I will now show both ways to configure this.
RRAS GUI:
From the MGM server, set it up on VLAN 102 with a IP and set the default GW to the IP of the GW server IP for VLAN 102. If using MGM2 set up with that IP and use that GW IP. Below I use MGM.If the server is in workgroup make sure that the same Admin account is on both servers with same password for easier management. If in domain, make sure your account has admin rights.
Now. On the MGM server. Install RSAT för RRAS via powershell. Restart not needed.
Install-WindowsFeature RSAT-RemoteAccess -IncludeAllSubFeature

Now start the “Routing and Remote Access” GUI.
In the GUI, right click on top of the tree and choose “Add Server”

Check The following computer and type in the IP-address of the gateway (in this case the MGM server is on VLAN 102 so we choose 192.168.0.1 to connect to the GW), and then click on connect.

Now right click on 192.168.102.1 and choose “Configure and Enable Routing and Remote Access”.

Click Next.

Select NAT and click on Next.

Select our External Network card and click on Next.

Select one of the cards (VLAN) that will be able to access internet, and click Next. In this you can´t add more then one card, but we will add it later.

The next screen will only show up if server is in a workgroup. You can choose if you want the GW to forward all DNS request towards the internet or if you will use a internal DNS and DHCP. In this case just to show how it works, so I will chose to let the GW forward all traffic. In a fully simulated environment, I would have the GW domain joined.

Click Next.

Click Finish and led RRAS be configured.

NB if you have enabled “Windows Firewall Remote Management” in the firewall you will get the following error message. This is not an Issue, because installing the Routing Role in the GW already has enabled the FW rules (at least on core).

Now expand 192.168.102.1 and the IPv4 and then NAT. If NAT does not show up, there is probably a GUI error, and a reboot of the RRAS console or the MGM server will fix that. We see that our VLAN 102 and the External Network is connected in NAT.

To add VLAN 103, right click on NAT and choose “New Interface.”

Select VLAN 103 and click on OK.
Select Private Interface and click on OK.

Now VLAN 103 should be visible under NAT.

Now, we can go on with verification.
RRAS Core:
NB, if you use this way you cant use the GUI from a 2016 server to view anything, it will throw a message that legacy is not supported and powershell must be used.
On the GW server install the install the RomoteAccess, and just because we want an output we add -PassThru
Install-RemoteAccess -VpnType RoutingOnly -PassThru
The next commands is using NETSH so start it by typing in NETSH and enter the NETSH interface. Then type “routing ip nat” to enter that.
And now add config in netsh. The first row will install the NAT functionality, this will throw a message that it does not find the file specified, but it will stil work. Row 2 will add the External Adapter with mode Full. Row 3 will add the VLAN 102 adapter. Row 4 will add the VLAN 103 adapter
install
add interface "External" mode=full
add interface "VLAN 102"
add interface "VLAN 103"
exit

And the its on to verification.
Verfification:
Now from the MGM server, make sure you have a functional DNS-server setting, or set google as one and the run Test-NetConnection.
Test-NetConnection

And from VLAN 103

So we see that internet access is working from both WLAN, and to test if the Routing works (starts working as soon NAT is in place). From VLAN 102 to VLAN 103, and we add -TraceRoute just to see the route.
Test-NetConnection 192.168.103.33 -TraceRoute

And from VLAN 103 to VLAN 102
Test-NetConnection 192.168.102.33 -TraceRoute

DONE
Steps: Enable routing on Microsoft Windows Server 2016
- You must first deploy the Routing and Remote Access Service on Windows Server.
- We strongly recommend that you refer to the specific documentation for the Windows Server version that you are using.
- This document provides information on deploying Routing and Remote Access Service for Windows Server 2016. You can refer to Microsoft’s own documentation here: https://docs.microsoft.com/en-us/windows-server/remote/remote-access/ras/remote-access-server-role-documentation
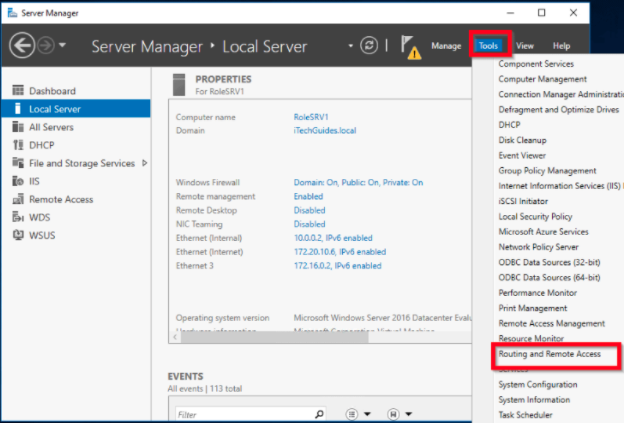
- After you have deployed the Routing and Remote Access Service, access Server Manager, click Tools, and select Routing and Remote Access.
- In Routing and Remote Access, right-click the server, and select Configure and Enable Routing and Remote Access.
- When the setup wizard launches, click Next.
- Select Custom configuration and click Next.
- Select LAN routing and click Next.
- On the summary page, click Finish.
- Click Start service and wait for the service to start.
- The server status dot turns from red to green.
- Expand the server, expand the IPv4 entry, and click on the General node.
- You can see that the computer is acting as a router between the interfaces shown.
- For further information, refer to: Connecting to a Windows Server 2016 Network.
Steps: Enable NAT on Microsoft Windows Server 2016
- Sign in to the member server that has the Remote Access role installed.

- Open Server Manager, and click Tools and select Routing and Remote Access.

- Right-click the server, and select Configure and Enable Routing and Remote Access.

- When the wizard opens, click Next.
- Select Network address translation (NAT) and click Next.

- Select the network interface that your users will use to connect to the internet, and then click Next.

- Select the network adapter that shares the internet connection, and then click Next.

- Review the summary and then click Finish.
The wizard initializes and starts the RRAS service. Once the initialization completes, the server status icon changes to green.

- Restart the server.
For more information and configuration instructions, refer to this tutorial: https://www.youtube.com/watch?v=a1xYi6pxA_4
To Enable the Routing and Remote Access Service
- Click Start, point to Administrative Tools, and then click Routing and Remote Access.
- In the left pane of the console, click the server that matches the local server name. …
- Right-click the server, and then click Configure and Enable Routing and Remote Access to start the Routing and Remote Access Server Setup Wizard. Click Next.
- Click Remote access (dial-up or VPN) to permit remote computers to dial in or connect to this network through the Internet. Click Next.
- Click VPN for virtual private access, or click Dial-up for dial-up access, depending on the role you want to assign to this server.
- On the VPN Connection page, click the network interface that is connected to the Internet, and then click Next.
- On the IP Address Assignment page, do one of the following: If a DHCP server will be used to assign addresses to remote clients, click Automatically, and then click Next. …
- Accept the default setting of No, use Routing and Remote Access to authenticate connection requests, and then click Next.
- Click Finish to enable the Routing and Remote Access service and to configure the remote access server. …
Steps: Enable routing on Microsoft Windows Server 2016
In Routing and Remote Access, right-click the server, and select Configure and Enable Routing and Remote Access. When the setup wizard launches, click Next. Select Custom configuration and click Next. Select LAN routing and click Next.
How do I enable Lan routing in Windows Server 2016?
In Routing and Remote Access, right-click the server, and select Configure and Enable Routing and Remote Access. When the setup wizard launches, click Next. Select Custom configuration and click Next . Select LAN routing and click Next. On the summary page, click Finish.
How do I connect to a Windows Server 2016 Network?
For further information, refer to: Connecting to a Windows Server 2016 Network. Sign in to the member server that has the Remote Access role installed. Open Server Manager, and click Tools and select Routing and Remote Access. Right-click the server, and select Configure and Enable Routing and Remote Access.
How do I configure routing and remote access in Access Server Manager?
After you have deployed the Routing and Remote Access Service, access Server Manager, click Tools, and select Routing and Remote Access. In Routing and Remote Access, right-click the server, and select Configure and Enable Routing and Remote Access. When the setup wizard launches, click Next. Select Custom configuration and click Next .
How do I enable routing and remote access in Windows 10?
Click Start, point to Administrative Tools, and then click Routing and Remote Access. In the left pane of the console, click the server that matches the local server name. If the icon has a red arrow in the lower-right corner, the Routing and Remote Access service isn’t enabled.
RRAS stands for Routing and Remote Access Service is a feature of Windows Server operating systems family that provides additional support for TCP/IP internetworking. RRAS makes it possible to create applications to administer the routing and remote access service capabilities of the operating system.
How do I enable routing and remote access service?
Right-click the server, and then click Configure and Enable Routing and Remote Access to start the Routing and Remote Access Server Setup Wizard. Click Next. Click Remote access (dial-up or VPN) to permit remote computers to dial in or connect to this network through the Internet.
How do I give Remote Access to a Windows Server 2016?
Manually grant RDP access to an Active Directory userLog in to the server.Right-click the Windows® icon and select System.Select the remote settings depending on your Windows version: … Click on Select Users.Click Add.Type the username you wish to add.Click Check Names. … After you add the user, click Apply and OK.
Can you use Windows Server as a router?
Windows Server 2012 R2 routing/NAT functionality feature is a part of Remote Access and allows for connecting 2 networks together, allowing a Windows machine with at least 2 NICs on 2 separate networks to handle the routing between them. To install this feature complete the steps below.
What is the difference between RAS and RRAS?
Microsoft Remote Access Server (RAS) is the predecessor to Microsoft Routing and Remote Access Server (RRAS). RRAS is a Microsoft Windows Server feature that allows Microsoft Windows clients to remotely access a Microsoft Windows network.
What is Windows Routing and Remote Access?
RRAS is a software router and an open platform for routing and networking. It offers routing services to businesses in local area network (LAN) and wide area network (WAN) environments or over the Internet by using secure VPN connections.
How do I give remote access to a domain user?
To allow domain users RDP access to the domain joined Windows instances, follow these steps:Connect to your Windows EC2 instance using RDP.Create a user. … Create a security group. … Add the new users to the new security group.Open Group Policy Management. … Expand your delegated OU (NetBIOS name of the directory).More items…•
How do I open port 3389 on Windows Server 2016?
Let’s talk about how to open port 3389 in Windows Firewall and the router….Change the default port of RDPGo to Run –> regedit to open the Registry Editor.Locate the following key: … In the right-hand pane, double-click on PortNumber.Change the value to Decimal and specify the port number between 1001 to 254535.
How do I give someone remote access?
Right-click on «Computer» and select «Properties». Select «Remote Settings». Select the radio button for «Allow remote connections to this computer». The default for which users can connect to this computer (in addition to the Remote Access Server) is the computer owner or administrator.
What server 2016 role can you install to set it up as a router?
Windows Server 2016 router configuration requires Routing and Remote Access role. Here are the steps to install this role in Windows Server 2016: Login to the server you wish to configure as a router and open Server Manager. From Server Manager, click Manage and select Add Roles and Features.
Can a server act like router?
As you can see, Windows Server can be used as a router in situations in which purchasing a hardware router is not a practical option. Using the Windows Server router can be especially effective in virtualized environments in which virtual machines reside on a number of different virtual networks.
What is server routing?
Server side routing is not part of React Router but it is still the most common form of handling routes. With server side routing, a user clicks a link that requests a new page or new data from the server (another computer). And then new data or document is served to the user.
How can you install enable and configure Remote Access services on server?
Install the Remote Access roleOn the DirectAccess server, in the Server Manager console, in the Dashboard, click Add roles and features.Click Next three times to get to the server role selection screen.On the Select Server Roles dialog, select Remote Access, and then click Next.Click Next three times.More items…•
How do I set up RRAS?
Right-click the VPN server, then select Configure and Enable Routing and Remote Access. The Routing and Remote Access Server Setup Wizard opens. In the Welcome to the Routing and Remote Access Server Setup Wizard, select Next. In Configuration, select Custom Configuration, and then select Next.
What is RRAS LAN routing?
RRAS provides multiprotocol LAN-to-LAN, LAN-to-WAN, virtual private network (VPN), and network address translation (NAT) routing services. RRAS is intended for use by system administrators who are already familiar with routing protocols and services.
How do I enable Remote Desktop on Windows Server 2019?
Open Server Manager from the Start menu. Click on the “Local server” on the left section. Click on the “Remote Desktop” disable button. Agree to Remote Desktop firewall exception warning and add users to allow by clicking on “Select Users“.
Steps: Enable routing on Microsoft Windows Server 2016
We strongly recommend that you refer to the specific documentation for the Windows Server version that you are using.
Steps: Enable NAT on Microsoft Windows Server 2016
Sign in to the member server that has the Remote Access role installed.
How to install Remote Access as a LAN router?
To install Remote Access as a LAN router, either use the Add Roles and Features Wizard in Server Manager and select the Remote Access server role and the Routing role service; or type the following command at a Windows PowerShell prompt, and then press ENTER. Install-RemoteAccess -VpnType RoutingOnly.
What is always on VPN?
Always On VPN enables remote users to securely access shared resources, intranet Web sites, and applications on an internal network without connecting to a VPN. For more information, see RAS Gateway and Border Gateway Protocol (BGP).
Can you use remote access in Azure?
Using Remote Access in Microsoft Azure is not supported. You cannot use Remote Access in an Azure VM to deploy VPN, DirectAccess, or any other Remote Access feature in Windows Server 2016 or earlier versions of Windows Server. For more information, see Microsoft server software support for Microsoft Azure virtual machines.
How to enable remote access?
To Enable the Routing and Remote Access Service. Click Start, point to Administrative Tools, and then click Routing and Remote Access. In the left pane of the console, click the server that matches the local server name . If the icon has a red arrow in the lower-right corner, the Routing and Remote Access service isn’t enabled.
How to grant remote access to a user?
Click Start, point to All Programs, point to Administrative Tools, and then click Active Directory Users and Computers. Right-click the user account that you want to grant remote access rights to, click Properties, and then click the Dial-in tab.
How to create a group VPN?
Create a group that contains members who are permitted to create VPN connections. Click Start, point to Administrative Tools, and then click Routing and Remote Access. In the console tree, expand Routing and Remote Access, expand the server name, and then click Remote Access Policies.
How to connect to a dial up network?
If they are, see your product documentation to complete these steps. Click Start, click Control Panel, and then double-click Network Connections. Under Network Tasks, click Create a new connection, and then click Next. Click Connect to the network at my workplace to create the dial-up connection, and then click Next.
Can you grant callbacks in Windows 2003?
Administrators can only grant or deny access to the user and specify callback options, which are the access permission settings available in Microsoft Windows NT 4.0. The remaining options become available after the domain has been switched to native mode.
Installing the Routing and Remote Access Role
1. Log into the server with administrative credentials
2. Open Server Manager
3. On the Dashboard, locate and click Add roles and features
4. Click Next to skip the Before you begin page
5. Choose Role-based or feature-based installation and click Next
Configure the Remote Access Role
Now that the installation is completed, we will want to actually configure the role.
How to install Remote Access Role in VPN?
On the VPN server, in Server Manager, select Manage and select Add Roles and Features. The Add Roles and Features Wizard opens. On the Before you begin page, select Next.
How to start remote access?
Select Start service to start Remote Access. In the Remote Access MMC, right-click the VPN server, then select Properties. In Properties, select the Security tab and do: a. Select Authentication provider and select RADIUS Authentication.
How to select a server from the server pool?
On the Select destination server page, select the Select a server from the server pool option. Under Server Pool, select the local computer and select Next. On the Select server roles page, in Roles, select Remote Access, then Next. On the Select features page, select Next. On the Remote Access page, select Next.
How many switches do you need to install VPN?
If you are installing the VPN server on a VM, you must create two External virtual switches, one for each physical network adapter; and then create two virtual network adapters for the VM, with each network adapter connected to one virtual switch.
What is NAS in a network?
A NAS is a device that provides some level of access to a larger network. A NAS using a RADIUS infrastructure is also a RADIUS client, sending connection requests and accounting messages to a RADIUS server for authentication, authorization, and accounting. Review the setting for Accounting provider: Table 1.
Is RRAS a router or a server?
RRAS is designed to perform well as both a router and a remote access server because it supports a wide array of features. For the purposes of this deployment, you require only a small subset of these features: support for IKEv2 VPN connections and LAN routing.
Can you use a VPN as a RADIUS client?
When you configure the NPS Server on your Organization/Corporate network, you will add this VPN Server as a RADIUS Client. During that configuration, you will use this same shared secret so that the NPS and VPN Servers can communicate. In Add RADIUS Server, review the default settings for: Time-out.
How to stop IP Helper?
To stop the IP Helper service. On the Start screen of the Remote Access server, click Administrative Tools, and then double-click Services. In the list of Services, scroll down and right-click IP Helper, and then click Stop.
Do you have to be signed in to the domain admins group?
You must be signed in as a member of the Domain Admins group or a member of the Administrators group on each computer to complete the tasks described in this topic. If you cannot complete a task while you are signed in with an account that is a member of the Administrators group, try performing the task while you are signed in with an account …
What is NAT routing?
Routing is used for multiprotocol LAN-to-LAN, LAN-to-WAN, VPN, and network address translation (NAT) routing services.
What is a RRAS?
If you are using Hyper-V Network Virtualization or you have VM networks deployed with VLANs, you can deploy RRAS as a virtual machine (VM)-based software gateway and router that allows Cloud Service Providers (CSPs) and Enterprises to enable datacenter and cloud network traffic routing between virtual and physical networks, including the Internet.
Popular Posts:
Implementing Network Address Translation
NAT is a component of the RRAS service that enables corporate computers to access resources on the Internet or other public networks. NAT translates private IPv4 addresses in a corporate network into public IPv4 addresses.
To configure NAT on SRV01, open Server Manager and click on Add roles and features, select Remote Access in server roles and LAN Routing as a role service and complete the installation process.
Now open Routing and Remote Access from tools in Server Manager. Select SRV01 then right-click and click on Configure and Enable Routing and Remote Access.

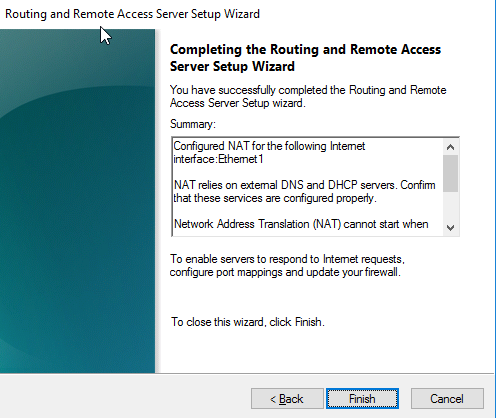
On Routing and Remote Access Server Setup Wizard page, click next.

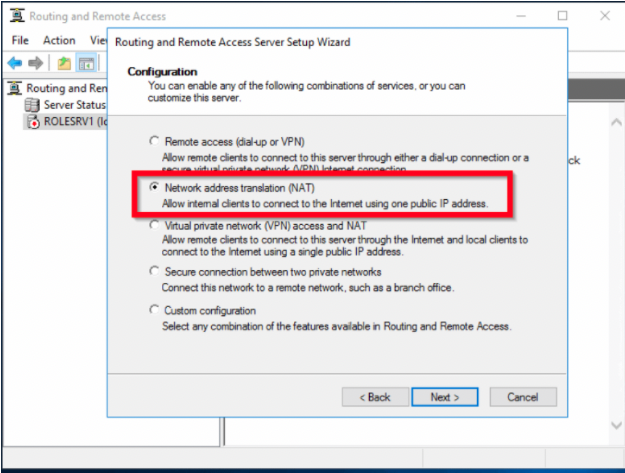
On the configuration page, select Network Address Translation (NAT) option and click next.

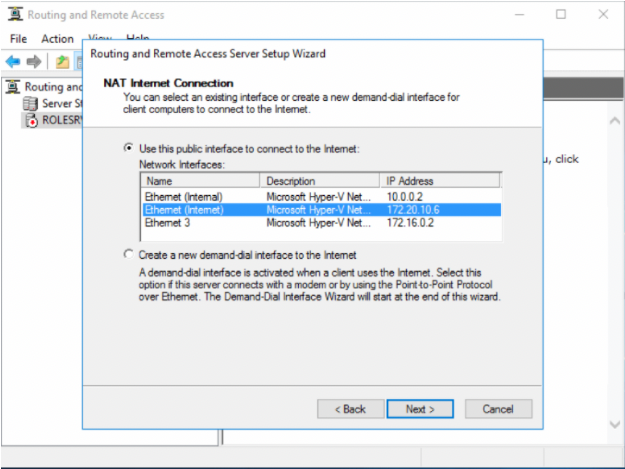
In NAT Internet Connection Page, select Use this public interface to connect to the internet option and select ethernet1 as on it public IP address is configured, then click next.

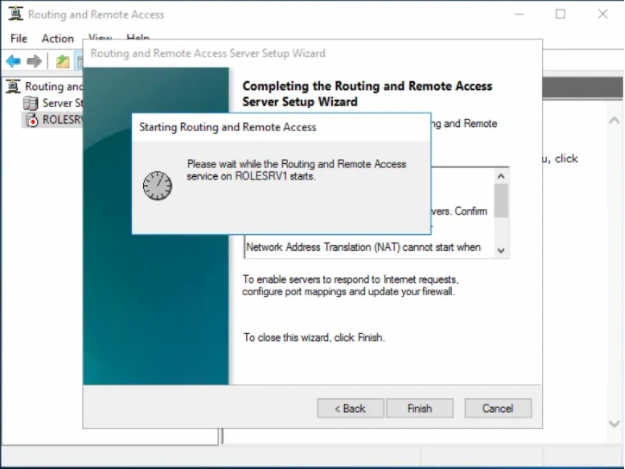
Click finish for completing the Routing and Remote Access Server Setup Wizard.
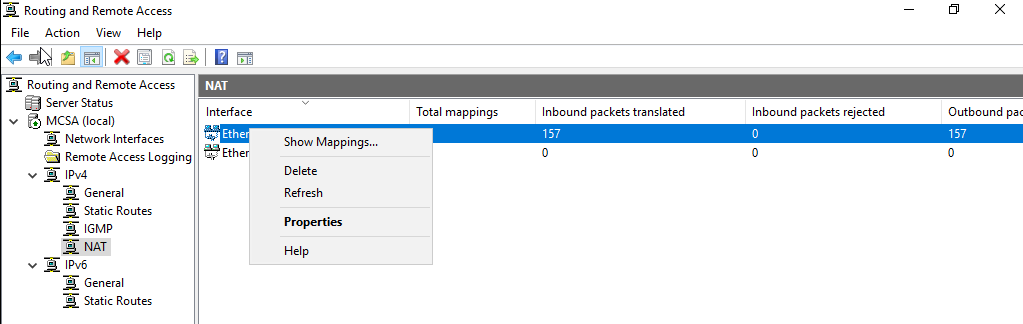
In Routing and Remote Access Console, expand IPv4 and double click on NAT.
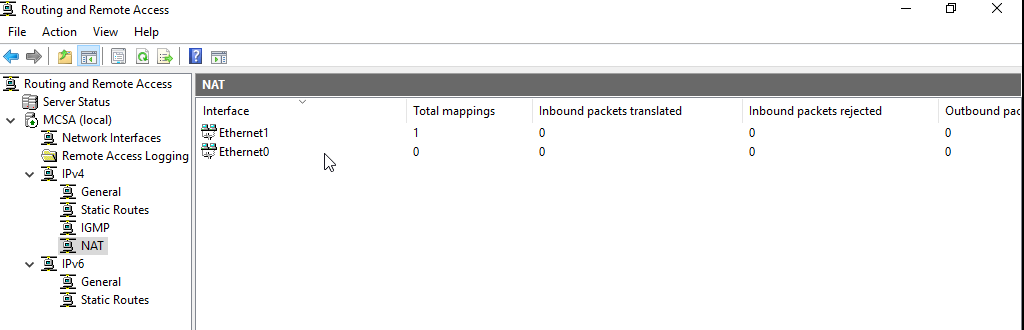
In Routing and Remote Access console, expand NAT, right-click Ethernet0, and click properties.
In ethernet0 properties, check that this interface is set as Private Interface connected to the private network.
Now in the Routing and Remote Access console, expand NAT, right-click Ethernet1, and click properties.
In ethernet1 properties, check that this interface is set as a Public interface connected to the Internet and make sure that Enable NAT on this interface is selected.
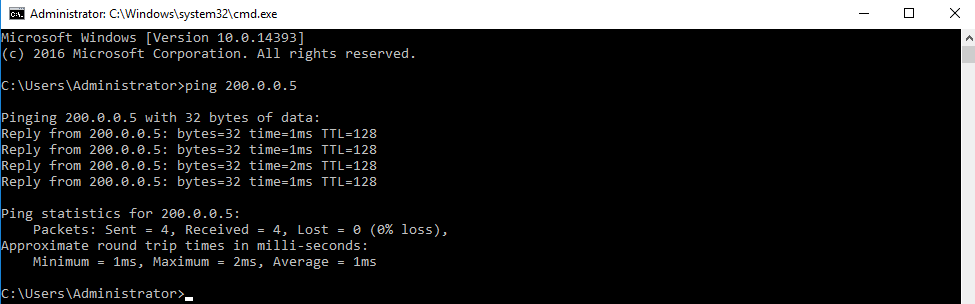
After NAT is configured you can access the internet resource. Now we can ping the external client machine that is on WAN from our internal network
Configuring Address Pool on NAT server
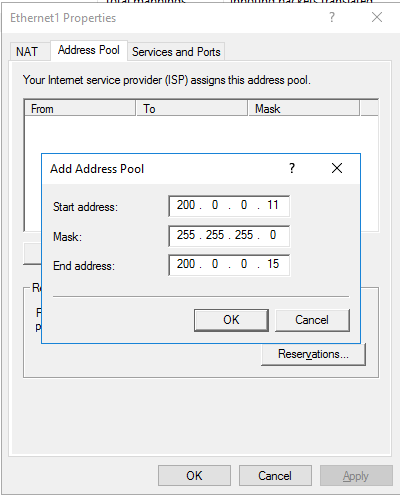
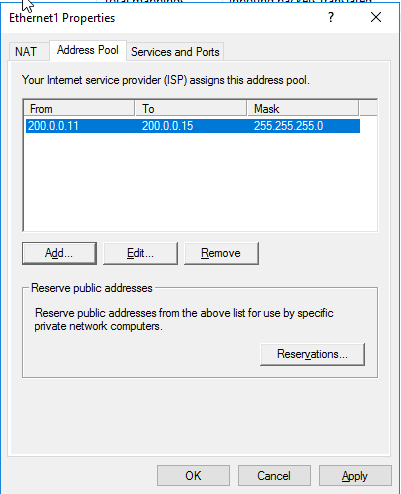
Now we are going to configure the Address Pool in NAT and going to reserve the Web Server private IP address to public IP address so that the webserver can be accessed from the external network via public IP address. In Routing and Remote Access console, go to NAT and right-click ethernet1 i.e. public interface, and click on properties.
In ethernet1 properties, go to the address pool tab then click on Add.
In Add Address Pool, specify the Start and End Address and the subnet mask. This IP Address range is the Public Address provide that is provided by the ISP. After specifying the public address pool click on Ok.
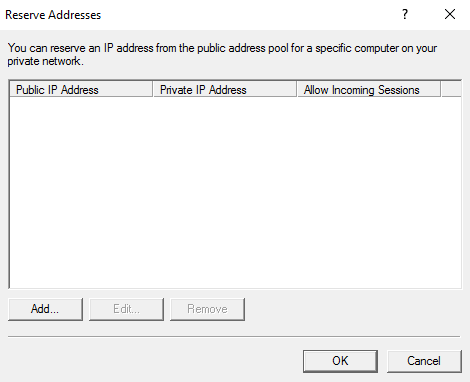
On Ethernet1 properties, in the Address Pool tab click on Reservations.
In Reverse Address, click on Add.
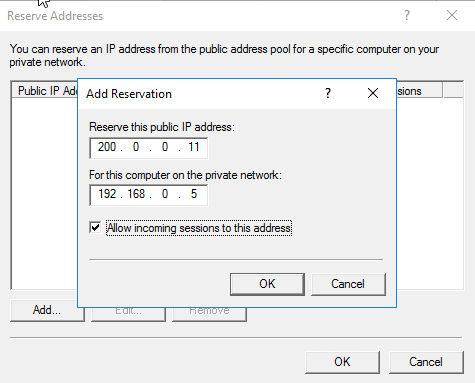
In Add Reservation, specify the reserve public IP address and the computer IP address on the private network, click on Allow incoming sessions to this address and click on Ok.
In ethernet1 properties, go to Service and Ports, from the services, select Web Server.
In Edit Service, specify the private address and click on Ok.
Make in Services and Ports tab Web Server is selected, then click ok.
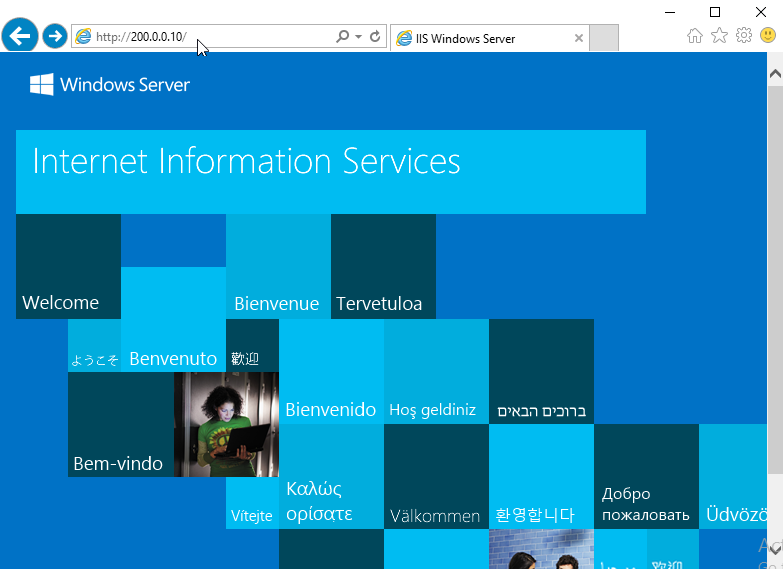
Now from the external client, we can access the internal web server that we have configured in Address Pool. Open Internet Explorer and type http://PublicIPADddress and press enter. You can see that the web page of the organization
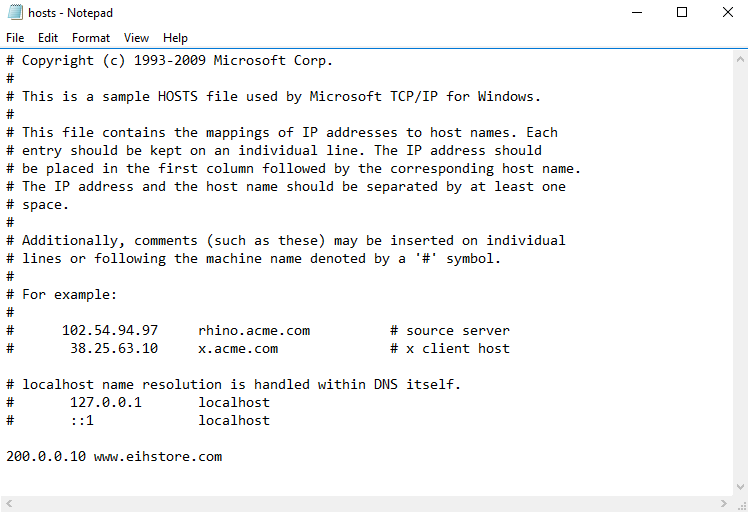
After the website is registered with the ISP, you can access the website with the web site name Here we are entering the record in the Host file.
Now access the website with the URL.

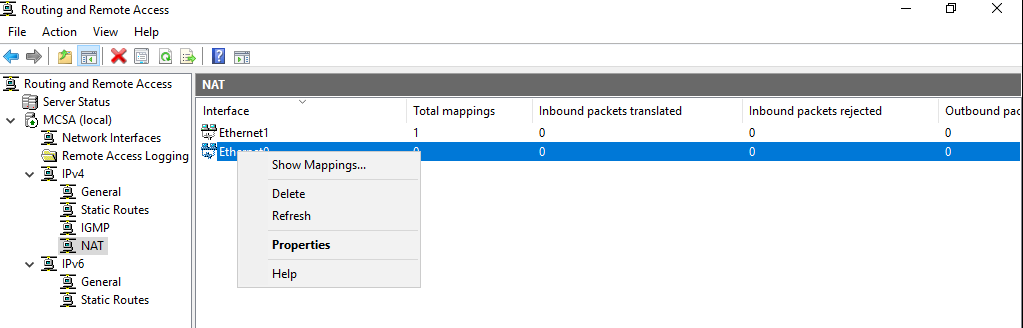
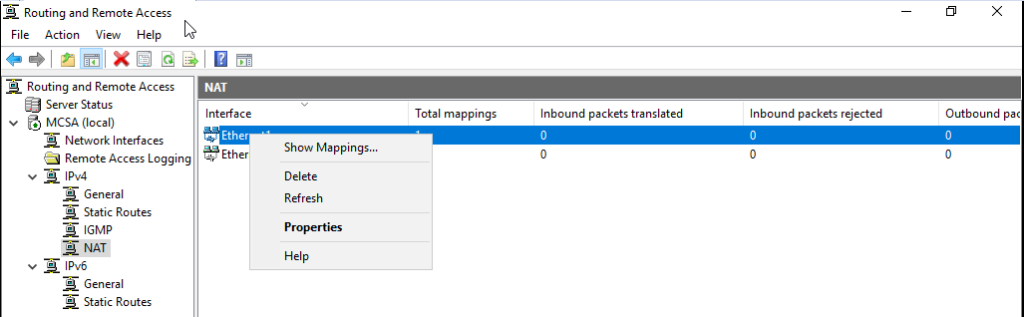
Now go to SRV01, in the Routing and Remote Access console, expand NAT, right-click Ethernet1 i.e. public interface to check the NAT translation, and click on Show Mappings.
In NAT Session Mapping Table, the Address Translation with HTTP access can be seen for the webserver. Here the public IP address i.e. 131.120.1.111 is translated to a private IP address i.e. 172.30.10.1 for port 80 from a remote or external client i.e. 131.120.1.101.
Check Out the Headphones – 50% to 70% Off
Check Out the Earbuds – 50% to 70% Off
Grammarly – Best Free Grammar checker | Spelling checker | Mistake-free document writer for Laptop/Desktop
Check Out The LAB Configuration eBook – Class A, Class B, Class C, MiN worth $78 Get at $18