
I just learned something recently (way too recently :-P) that I should have known about a long time ago, and I wanna share it with everyone who uses Windows 10 or 11 to do audio recording and editing. I’m talking about how to quickly get to something called the Manage Audio Devices panel in Windows.
Why would I want to go to the Manage Audio Devices panel?
If you’re gonna be doing audio recording on a Windows computer, you absolutely need to be able to access the Manage Audio Device panel, which allows you to quickly see all of your microphones or input interface units and their status, but more importantly, it lets you drill down into the properties and be able to see the “Levels” tab, which is something you’re definitely gonna wanna do probably a lot, especially whenever you change microphones.
If you use a USB mic, you’ll DEFINITELY need to use the “Levels” tab for your mic. You can get to that by selecting that mic, and clicking the Properties tab for it. for some reason, Windows tends to automatically turn down the input level of USB mics to like 20%! So if you can get to this control you can turn that up – usually to about 90%. If yhou wondered why you could barely hear your USB mic this might be why.
These controls used to be easy to find
In previous versions of Windows, you could access the sound panel just by clicking on the speaker icon down on the right of the taskbar. Or you could type the word “sound” into the search window at the bottom left.
But in Windows 10 and 11, the speaker icon at the right of the taskbar just takes you to this super simplified options panel that allows you to change the playback device. So that’s not good. And if you type “sound” into the search window, you no longer see the option for sound settings pop-up. You have to know that sound settings is what you’re looking for. And that’s just crazy!
The good news is that the controls ARE still there. The problem is that in Windows 10 and 11, the “Manage Audio Devices” panel got buried under all the new controls that Windows added “to make things easier.” Um. No. It did not make things easier. It actually took away some controls.
So how do I get to the panel in Windows 10 or 11?
I discovered that instead of typing “sound” into the Windows search, you had to go to Control Panel. Even that was made more difficult in Windows 11 for some reason. So I STILL had to put “Control Panel” in the search just to get there.
Once in the Control Panel, choose the “Hardware and Sound” category. And then under the “Sound” sub-category, you finally choose “Manage Audio Devices.” Click THAT!
But that is a huge pain, right?
Yes it is. It’s ridiculously long for something you need to do often. But this is what I have been doing (sigh) for the last couple of years! Eventually (I’m a slow learner sometimes) I thought, “Surely, there’s a quicker way to get there,” and I found out that yes, there is.
So what is the easy and fast way?
You can create a desktop shortcut that will take you straight to the “Manage Audio Devices” panel.. Here’s what to do to get your own sound panel shortcut.
Start by going to the Control Panel. Then when those categories pop-up, go to the top right of the screen, where it says “view by.” “Category” is the default.
Here is a video showing you how to do this:
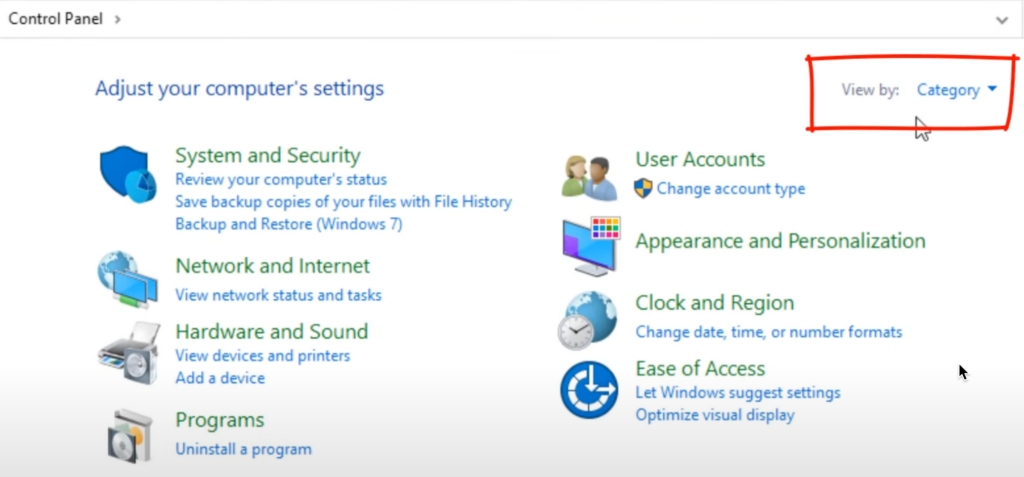
Click the drop-down arrow and click on “small icons.” This will bring everything out of their categories so you can see all the options. Find the one that says sound with the speaker icon next to it.
Right mouse click on that, and click on “create shortcut.” It will say “Windows can’t create a shortcut here. Do you want the shortcut to be placed on the desktop instead?” Say yes.
Now, you will see this icon on your desktop. If you click on that, presto! You are taken directly to the Manage Audio Devices Panel (even though the icon says “Sound”). So THAT’S easier!

I really should have known about this a long time ago, but at least I got there in the end. If you use Windows 10 or 11, do this immediately. It’ll save you lots of time as you do more audio recording on your computer.
Sign in to your MUO account
Both Windows 10 and Windows 11 allow you to enable or disable your audio output devices as needed. This is useful when multiple audio devices are connected to your system, and you don’t want to go through the trouble of disconnecting and reconnecting them repeatedly.
You can enable or disable audio output devices using Windows Settings, Device Manager, Control Panel, and Registry Editor. So, let’s go over each method one by one.
1. Enable or Disable a Sound Output Device From the Settings App
The Settings app in Windows makes it simple to add, remove, and manage audio devices on your computer. Here’s how you can use it to disable a sound output device in Windows.
- Press Win + I to launch the Settings app.
- Navigate to System > Sound.
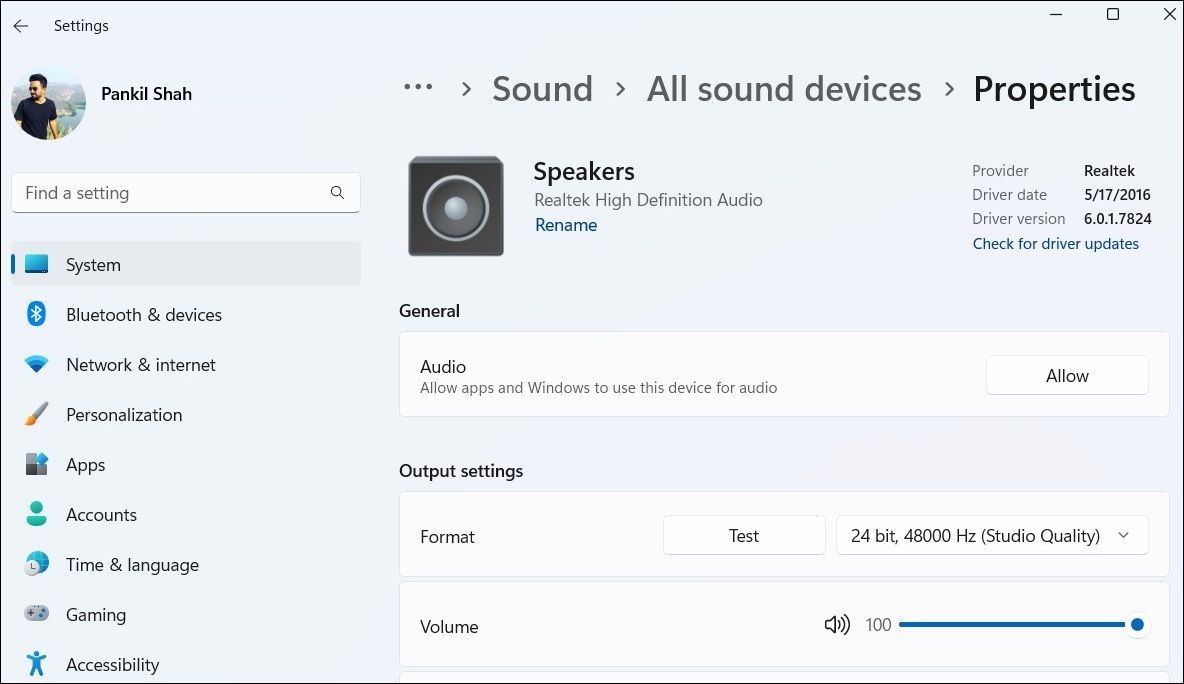
- Select the audio device you want to disable from the Output section.
-
Click the Don’t allow button next to Audio.


Once you disable the audio device, it will no longer appear under the Output section of the Sound settings page. If you want to re-enable the audio device later, use these steps.
- Open the Settings app and navigate to System > Sound.
- Scroll down to the Advanced section and select All sound devices.
- Select the audio device you want to enable.
-
Click the Allow button next to Audio.

2. Enable or Disable a Sound Output Device Using Control Panel
If you’re someone who prefers to use the Control Panel over the Settings app, you can use these steps to enable or disable a sound output device in Windows.
- Press Win + R to open the Run dialog box.
- Type control in the box and press Enter.
- In the Control Panel window, use the View by drop-down menu in the top right corner to select Large icons.
- Click Sound.
-
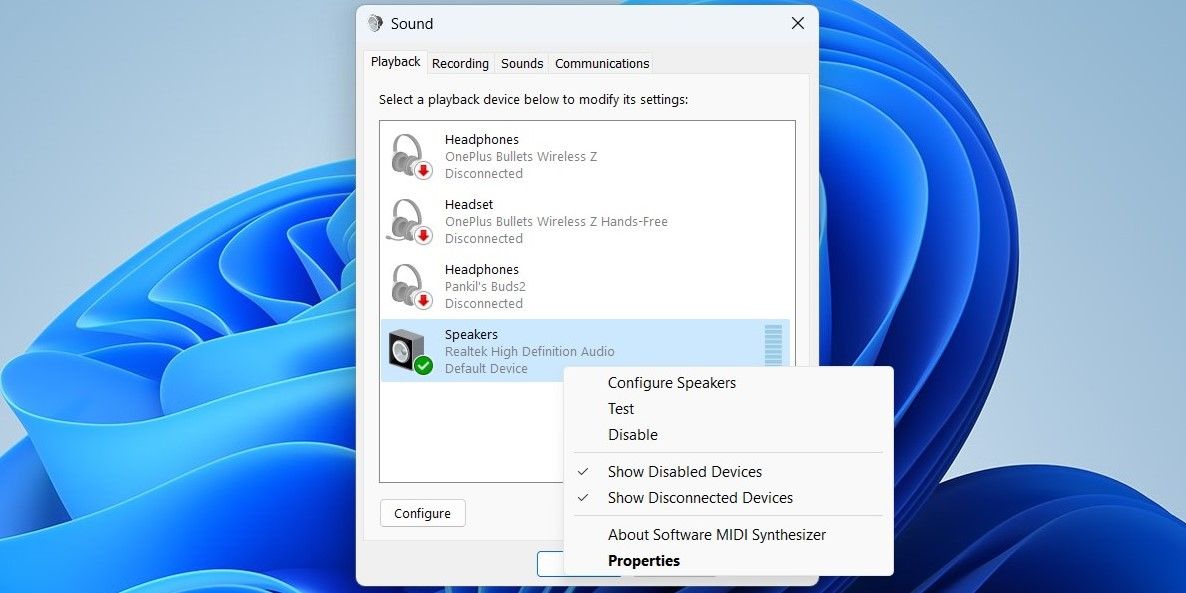
Under the Playback tab, right-click on your audio output device and select Enable or Disable.

3. Enable or Disable a Sound Output Device via Device Manager
Device Manager is a handy utility typically used to troubleshoot various system-level issues. But did you know you could also use it to enable or disable audio devices on Windows? Here’s what you need to do:
- Press Win + X to open the Power User menu.
- Select Device Manager from the list.
- Expand the Audio inputs and outputs section.
- Right-click on the sound output device and select Disable device.
-
Hit OK to confirm.

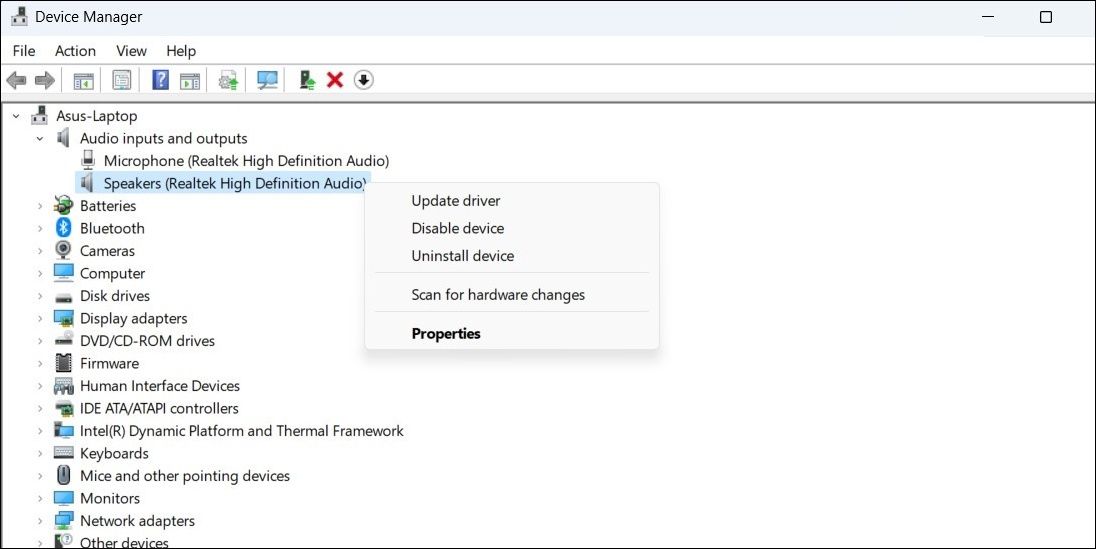
Likewise, if you want to enable an audio device, right-click on it and select Enable device from the context menu.
4. Enable or Disable a Sound Output Device With Registry Editor
Registry files on your computer contain critical settings for Windows and your devices. If you’re feeling adventurous, you can also enable or disable a sound output device using the Registry Editor.
Note that modification to your registry entries involves risk. So, it’s advisable to back up your registry files or create a restore point before using this method.
To enable or disable sound output devices using Registry Editor:
- Press Win + S to open the search menu.
- Type regedit in the box and select Run as administrator.
- Select Yes when the User Account Control (UAC) prompt appears.
-
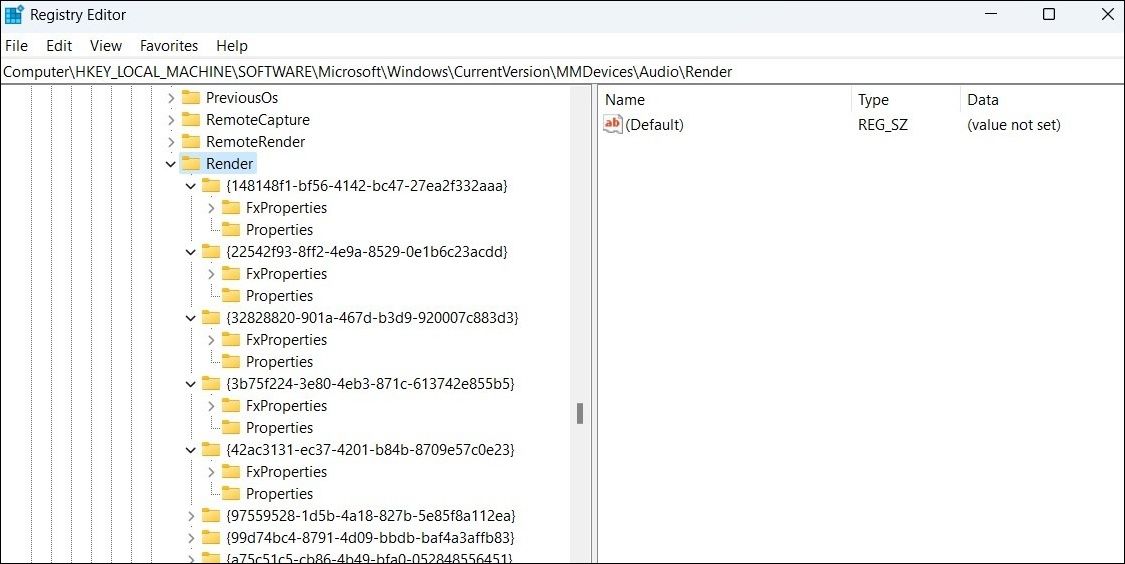
In the Registry Editor window, paste the following path in the address bar at the top and press Enter.
HKEY_LOCAL_MACHINE\SOFTWARE\Microsoft\Windows\CurrentVersion\MMDevices\Audio\Render -
Within the Render key, you’ll find several GUID entries, each representing an audio device.

-
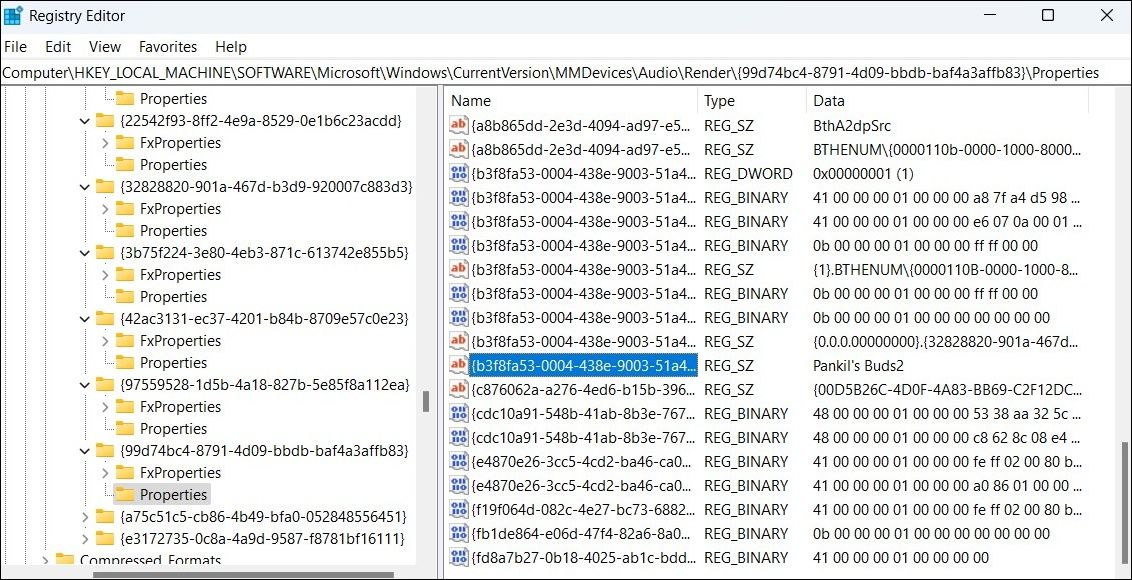
Open the Properties subkey within each GUID until you find the device you want to disable.

- Click the GUID key for your sound output device and double-click the DeviceState entry from the right pane.
-
In the Value data field, input 1 if you want to enable the device or 10000001 if you want to disable it.

- Click OK to save the changes.

Easily Enable or Disable Sound Output Devices in Windows
You can use any of the methods we discussed here to quickly enable or disable your speakers, headphones, and other audio devices.
But if you don’t want to repeatedly enable or disable audio output devices, remember that you can switch between them using the Quick Settings panel or the Settings app.
(Image credit: Future)
Even though audio devices are virtually plug-and-play on Windows 11, sometimes, you may still need to manage the settings to ensure that sounds play correctly or as intended, depending on the content.
For example, if you have multiple output devices (such as stereo speakers and gaming headsets), you can connect both to the system and configure the system to make one of them the default. Spatial sound offers a more immersive audio experience that makes it feel like the sound is playing around you and not directly from the speakers. You can enable mono audio to convert stereo sound into a single channel. You can configure special sound features to improve the audio quality. In addition, you can customize various other settings and fix the most common problems quickly.
This how-to guide will walk you through the steps to manage the sound settings on Windows 11.
How to change default audio output on Windows 11
On Windows 11, you can choose a different set of speakers, headphones, or headsets for the entire system or per application.
Choose default output for system
To change where the computer should play sound on Windows 11, use these steps:
- Open Settings.
- Click on System.
- Click the Sound page on the right side.
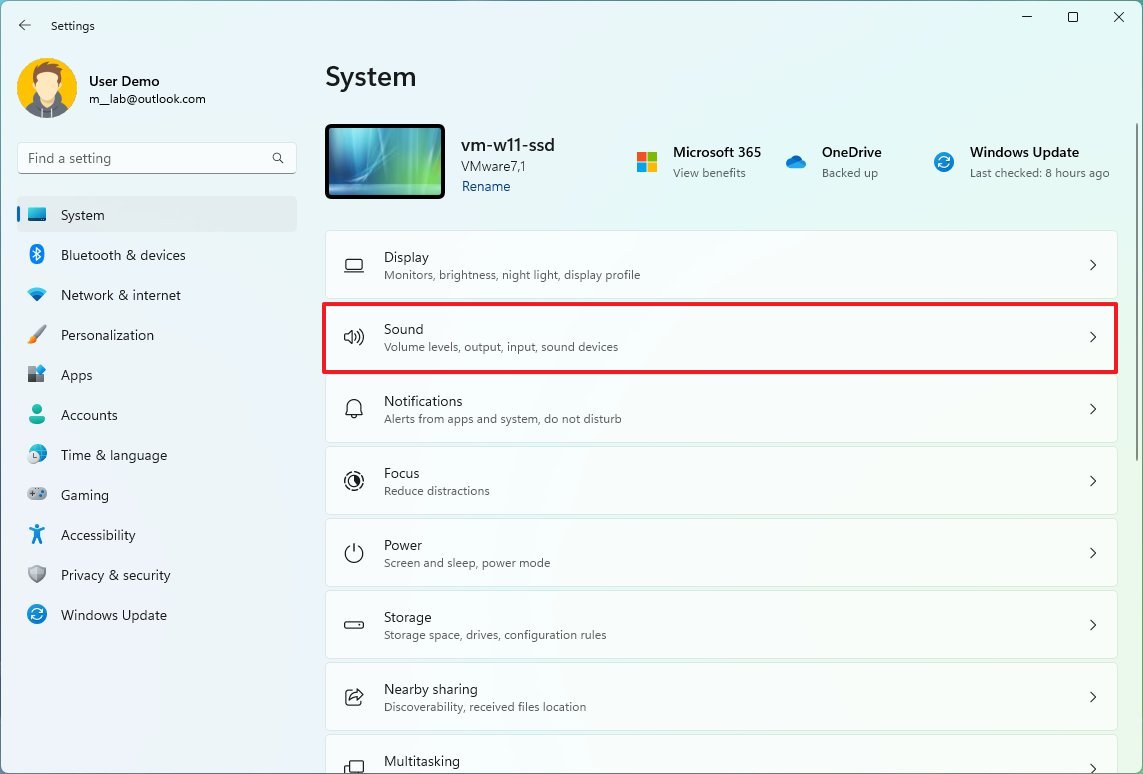
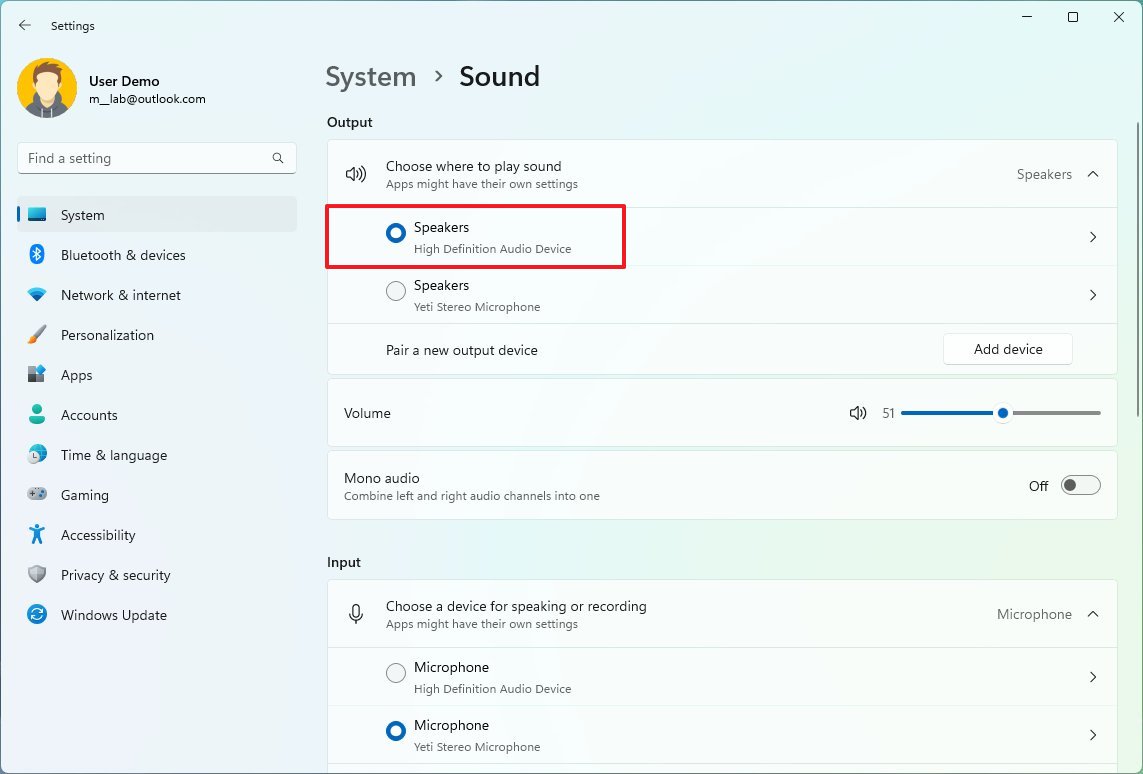
- Under the «Output» section, click the «Choose where to play sound» setting.
- Select the speakers, headphones, or headsets you want to use.
Alternatively, you can also change the default output device by opening the «Quick Settings» flyout (Windows key + A keyboard shortcut), clicking the «Manage audio devices» button next to the volume slider, and selecting the device.
All the latest news, reviews, and guides for Windows and Xbox diehards.
Choose default output per application
To set the default output device for a specific application, use these steps:
- Open Settings.
- Click on System.
- Click the Sound page on the right side.
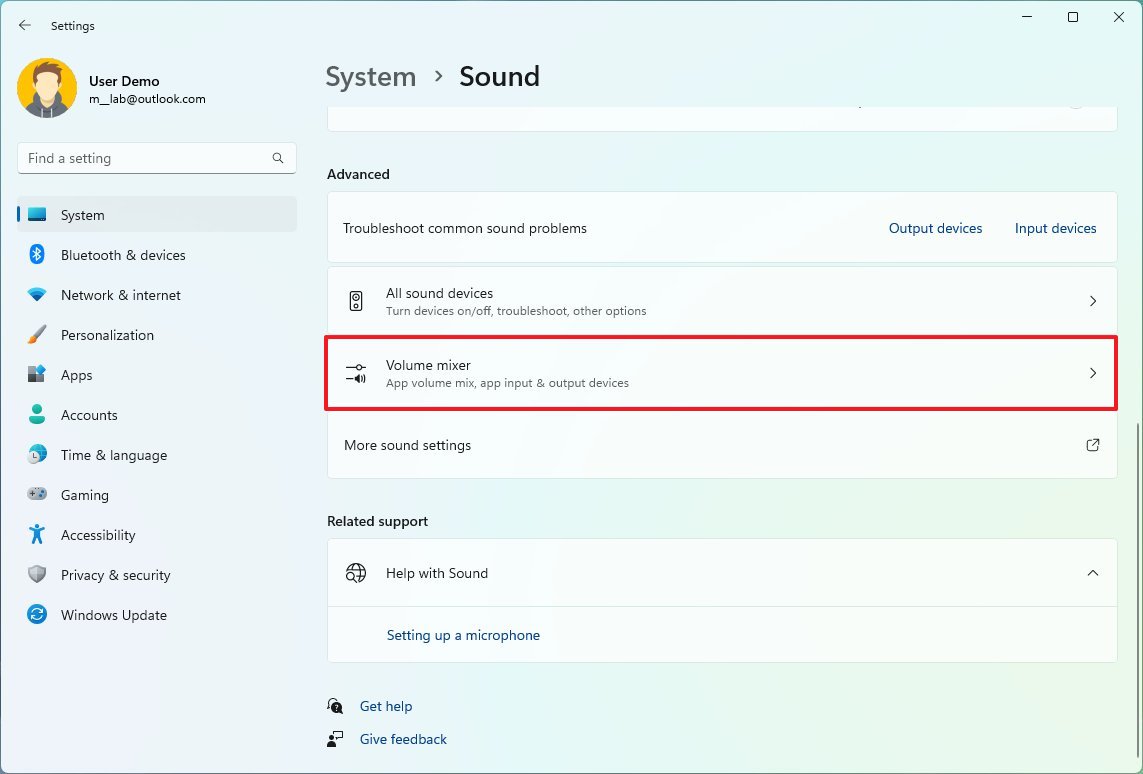
- Under the «Advanced» section, click the Volume mixer setting.
- Under the «Apps» section, select the app.
- Use the Output device setting to select a different output device.
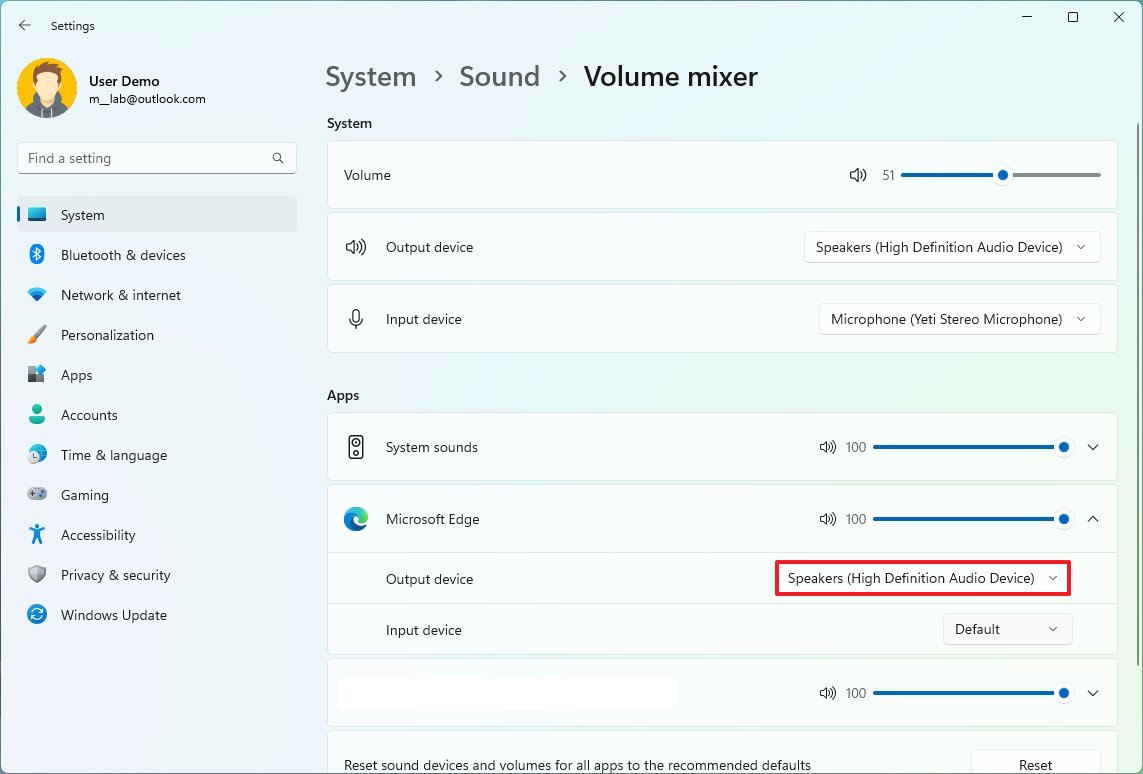
Once you complete the steps, Windows 11 will output sounds in the device you selected.
How to enable spatial sound on Windows 11
To enable or disable spatial sound, use these steps:
- Open Settings.
- Click on System.
- Click the Sound page on the right side.
- Under the «Output» section, click the Speakers setting.

- Select the «Windows Sonic for Headphones» option in the «Spatial audio» setting.
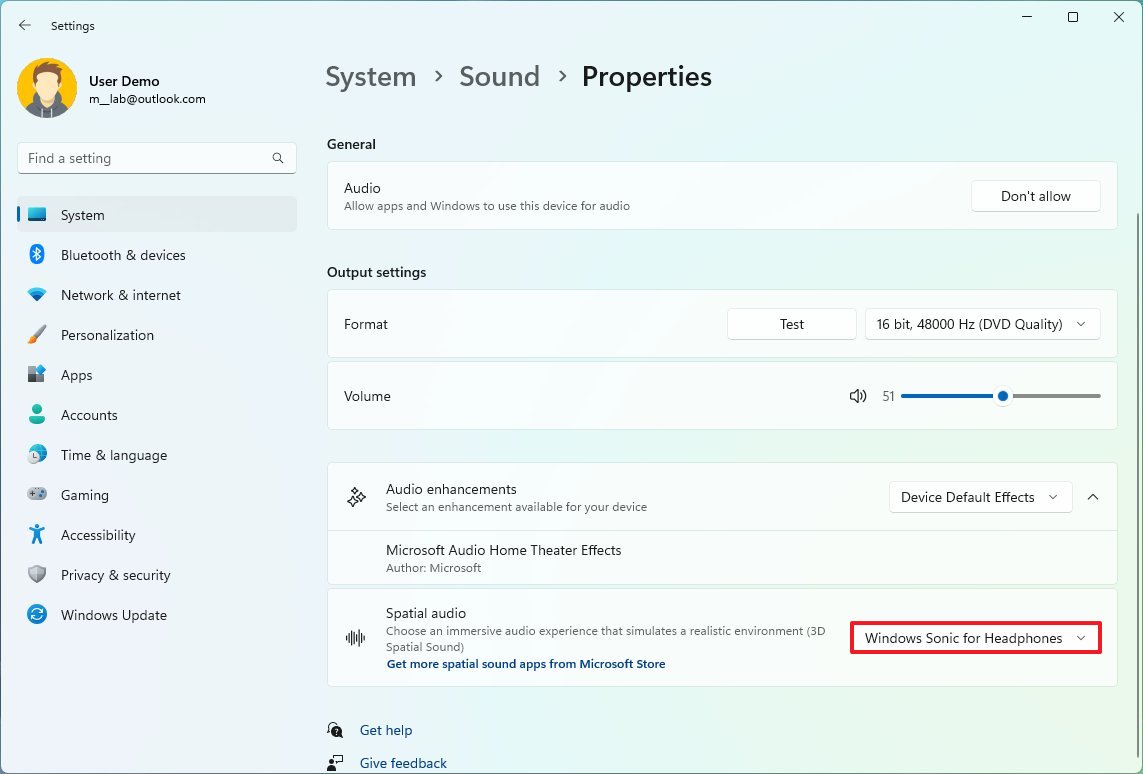
- (Optional) Select the Off option for the «Type» setting.
After you complete the steps, you will hear a more immersive sound experience from your computer.
How to enable enhanced audio on Windows 11
Windows 11 provides additional features to improve the sound quality with more bass, virtual surround, room correction, and loudness equalizer.
Enable enhanced audio features
To enable and configure enhanced audio on Windows 11, use these steps:
- Open Settings.
- Click on System.
- Click the Sound page on the right side.
- Under the «Output» section, click the Speakers setting.
- Under the «Output settings» section, select the audio profile to use in the «Audio enhancements» setting.
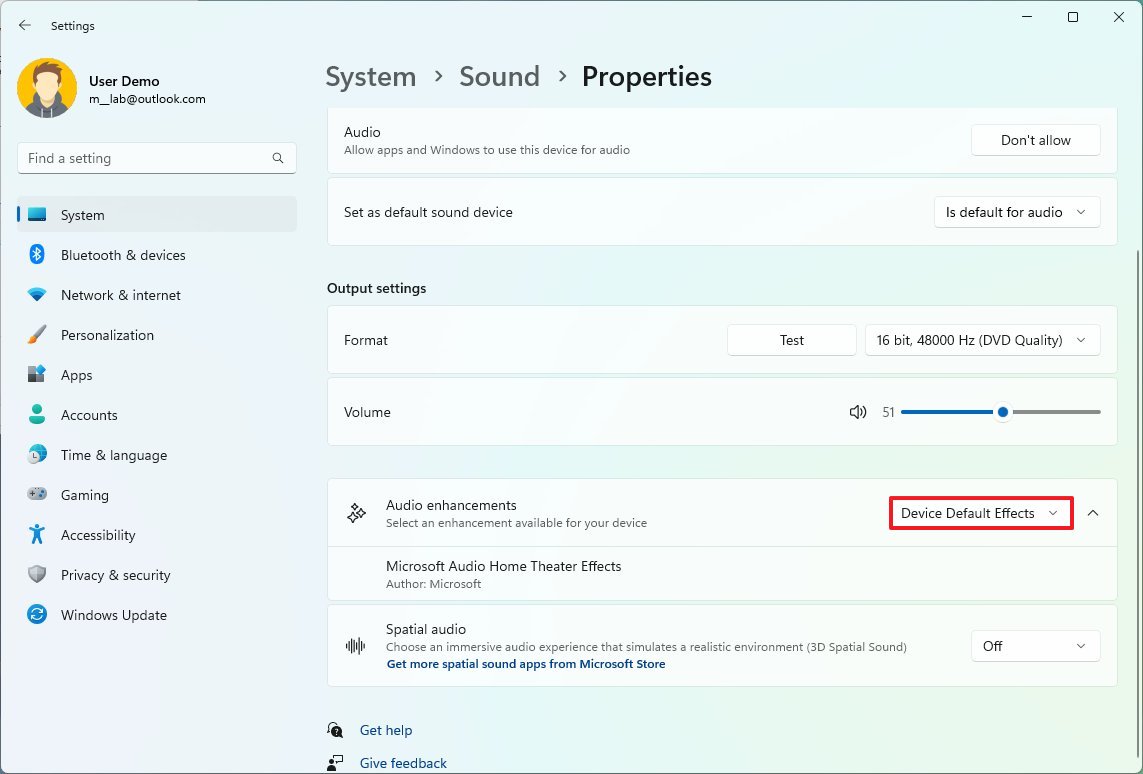
- Click the Back button to open the «Sound» page again.
- Click the «More sound settings» option.
- Select the device from list in the «Playback» tab and click the Properties button.
- Click the Enhancements tab.
- Clear the «Disable all enhancements» option (if applicable).
- Check the sound enhancement feature for Windows 11:
- Bass Boost — Boosts the lowest frequencies that the device can output.
- Virtual Surround — Encodes audio for transfer as stereo output to receivers with a Matrix decoder.
- Room Correction — Compensates for room and speaker characteristics. When selecting this option, you’ll need to complete the correction wizard.
- Loudness Equalization — Uses an understanding of human hearing to reduce perceived volume differences.
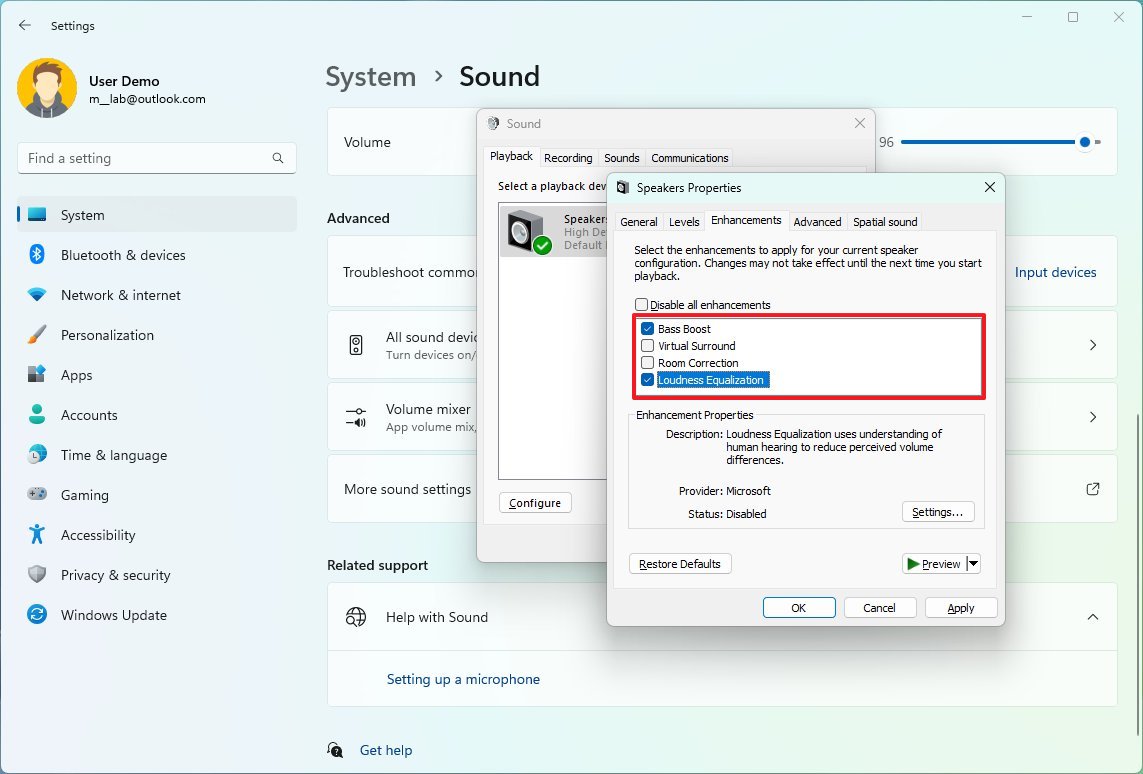
- Quick note: If you select «Bass Boost» when clicking the Settings button, you can adjust the frequency and boost levels. If you choose «Loudness Equalization,» you can change the release time by clicking the Settings button.
- Click the Apply button.
- Click the OK button.
Once you complete the steps, the audio enhancements will improve the audio quality.
These features don’t apply to everyone. If they are causing problems, it is best to turn them off with the steps below.
Disable enhanced audio features
To disable enhanced audio settings on Windows 11, use these steps:
- Click the Apply button.
- Click the OK button.
- Under the «Output» section, click the Speakers setting.
- Under the «Output settings» section, turn off the Audio enhancements toggle switch.
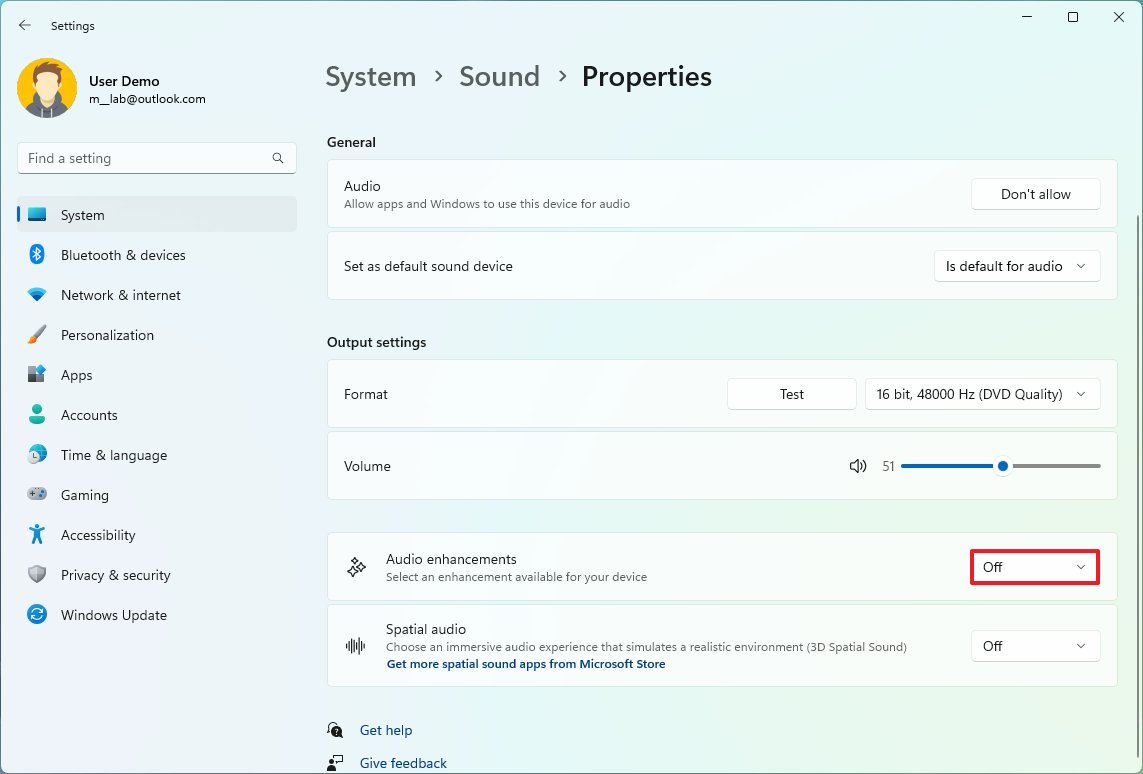
After you complete the steps, all the audio enhancements will turn off immediately.
How to disable audio output on Windows 11
You can enable or disable the system’s and apps’ access to an output device at any time without disabling the driver.
Disable output device
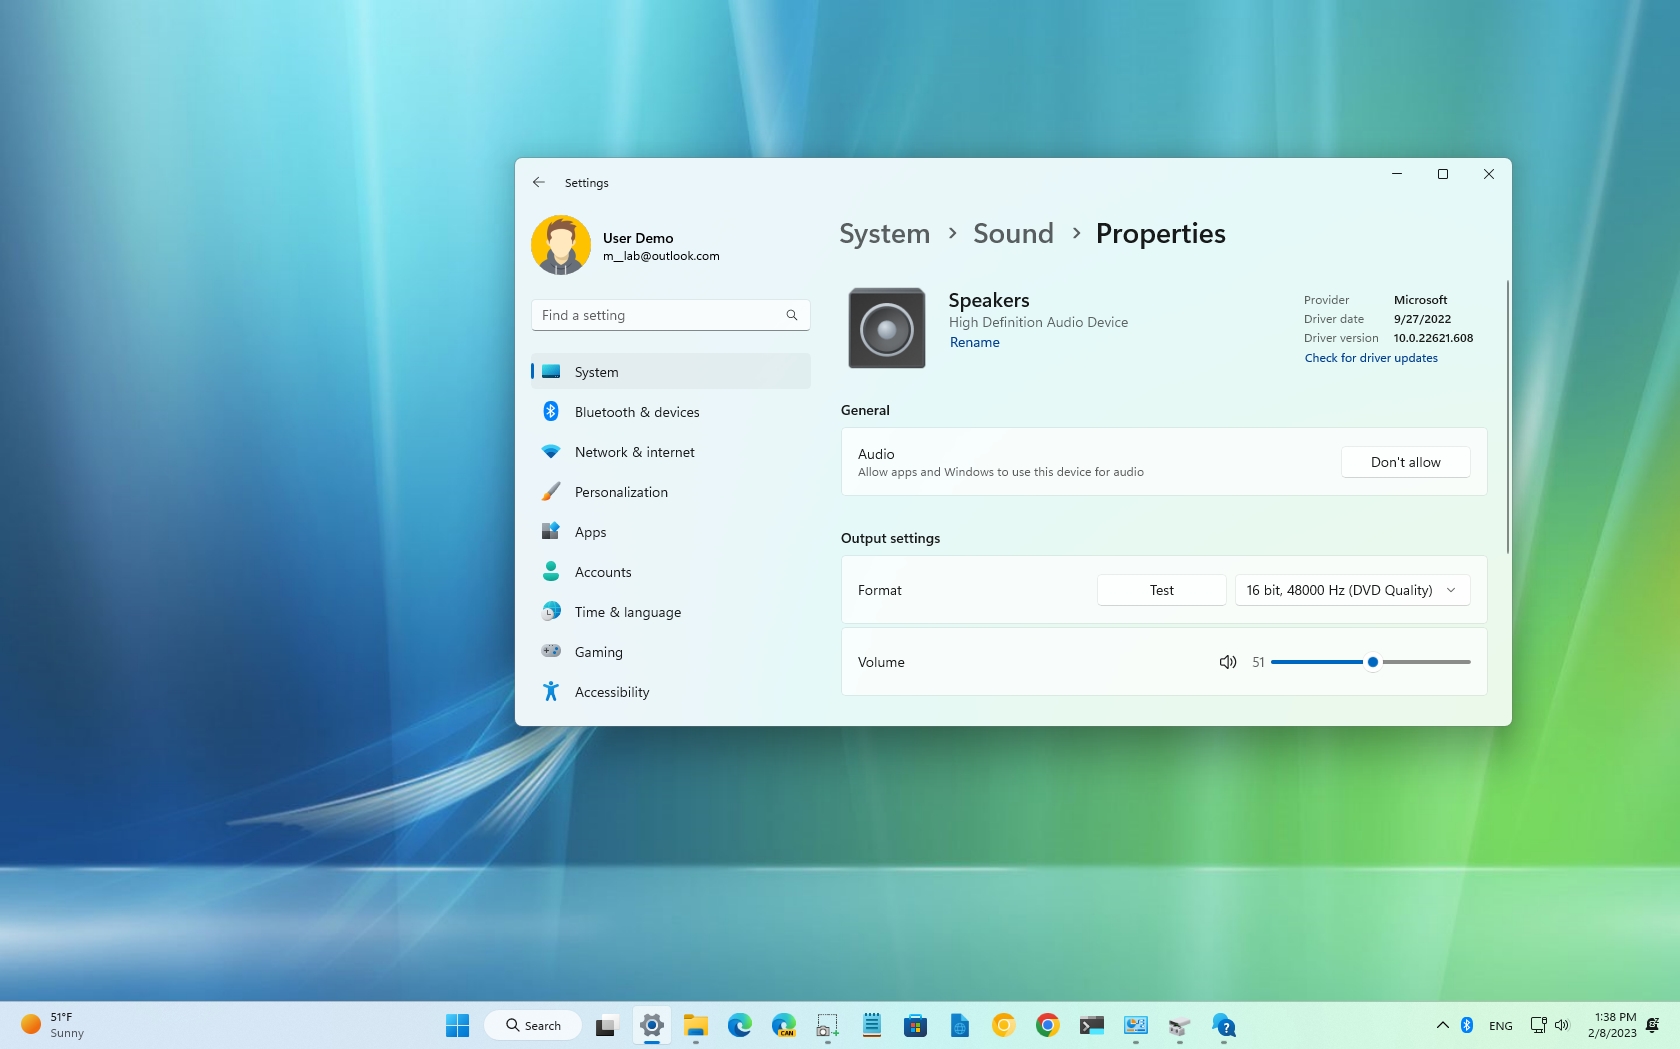
To disable an output device on Windows 11, use these steps:
- Open Settings.
- Click on System.
- Click the Sound page on the right side.
- Under the «Output» section, click the Speakers setting.
- Under the «General» section, click the Don’t allow button for the «Audio» setting.
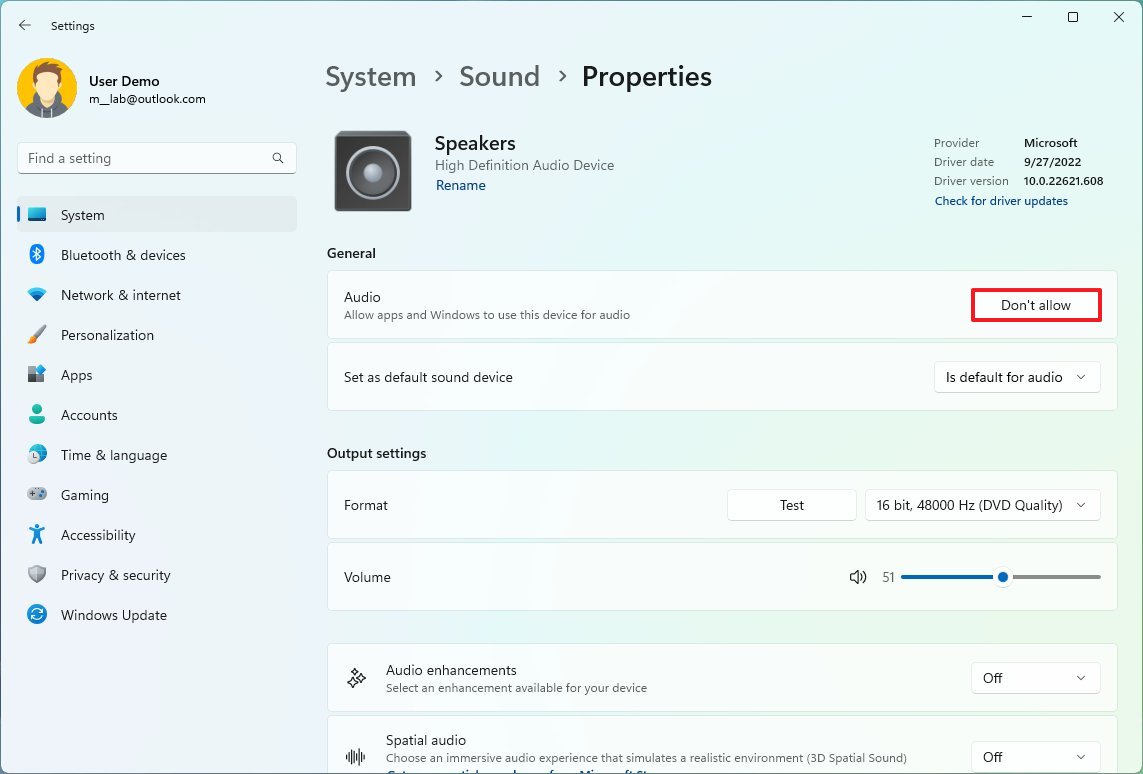
- Click the Don’t allow button again.
Once you complete the steps, Windows 11 will no longer play sounds on that specific set of speakers, headsets, or headphones.
Enable output device
To enable an output device on Windows 11, use these steps:
- Open Settings.
- Click on System.
- Click the Sound page on the right side.
- Under the «Output» section, click the Speakers setting.
- Under the «General» section, click the Allow button for the «Audio» setting.
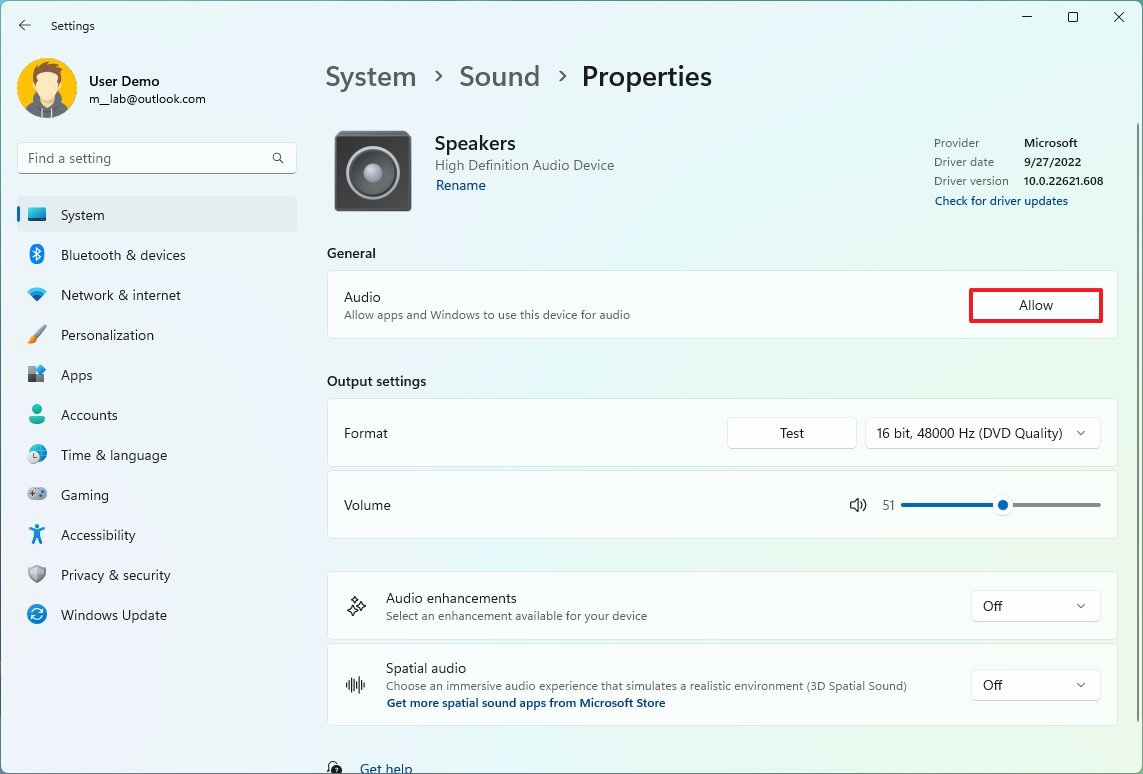
After you complete the steps, the output device will again be available on the computer.
How to check audio driver version on Windows 11
To check the audio driver version, use these steps:
- Open Settings.
- Click on System.
- Click the Sound page on the right side.
- Confirm the output device driver in the top-right corner.
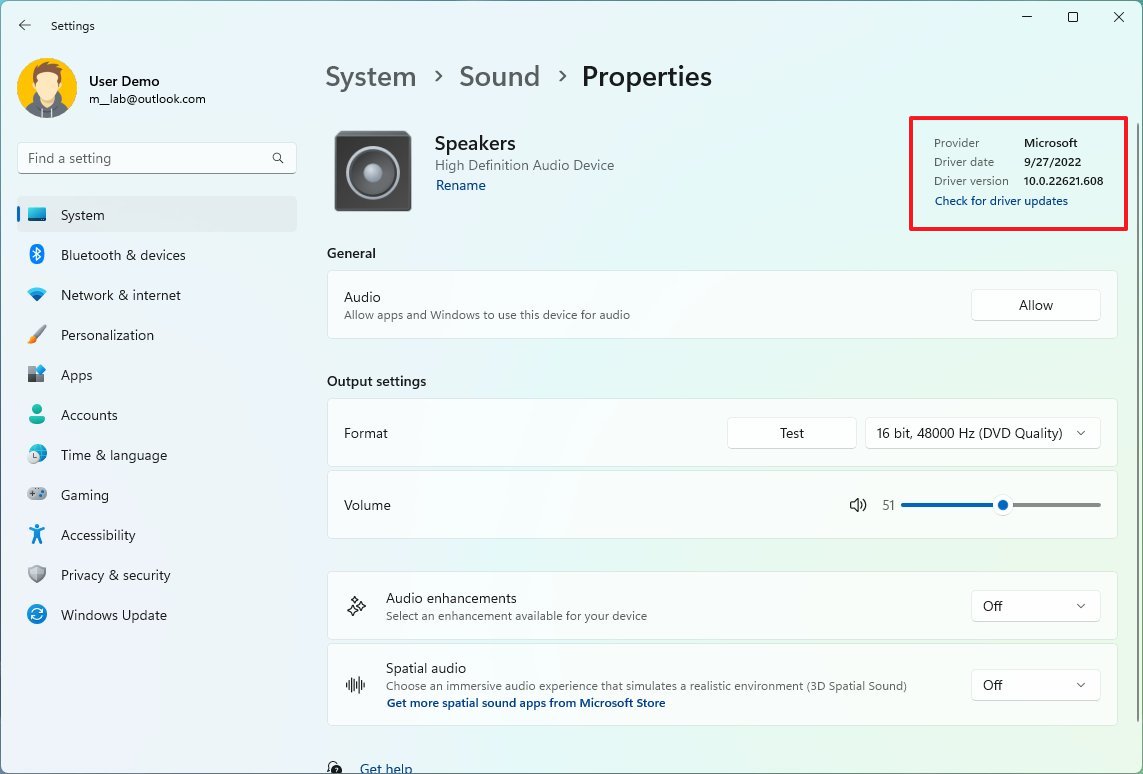
In addition to the version number, the page also shows the driver’s date and provider information.
How to enable mono audio on Windows 11
To enable or disable mono audio on Windows 11, use these steps:
- Open Settings.
- Click on System.
- Click the Sound page on the right side.
- Turn on the Mono audio toggle switch to enable the feature.
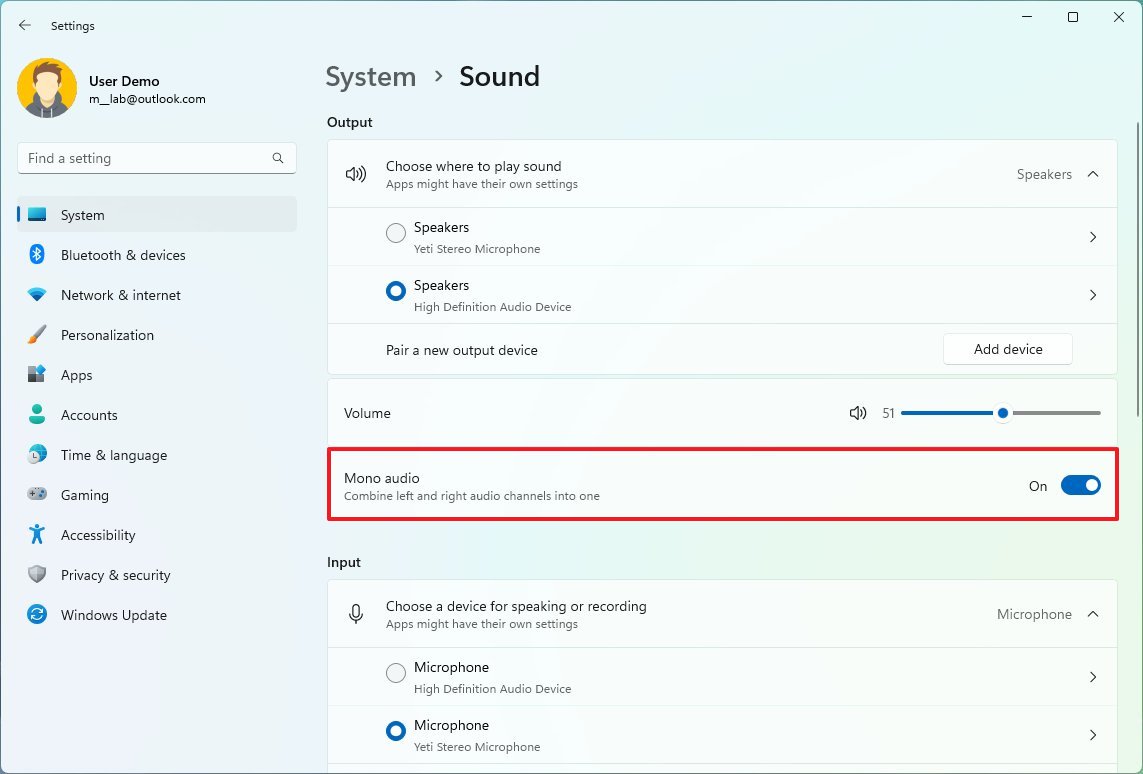
- (Optional) Turn off the Mono audio toggle switch to disable the feature.
Once you complete the steps, the stereo sound will be converted into a single channel, letting you hear everything on Windows 11.
How to pair audio output device on Windows 11
To pair a new set of speakers, headphones, or headsets to Windows 11, make the peripheral discoverable, and use these steps:
- Open Settings.
- Click on System.
- Click the Sound page on the right side.
- Under the «Output» section, click the Add device button for the «Pair a new output device» setting.
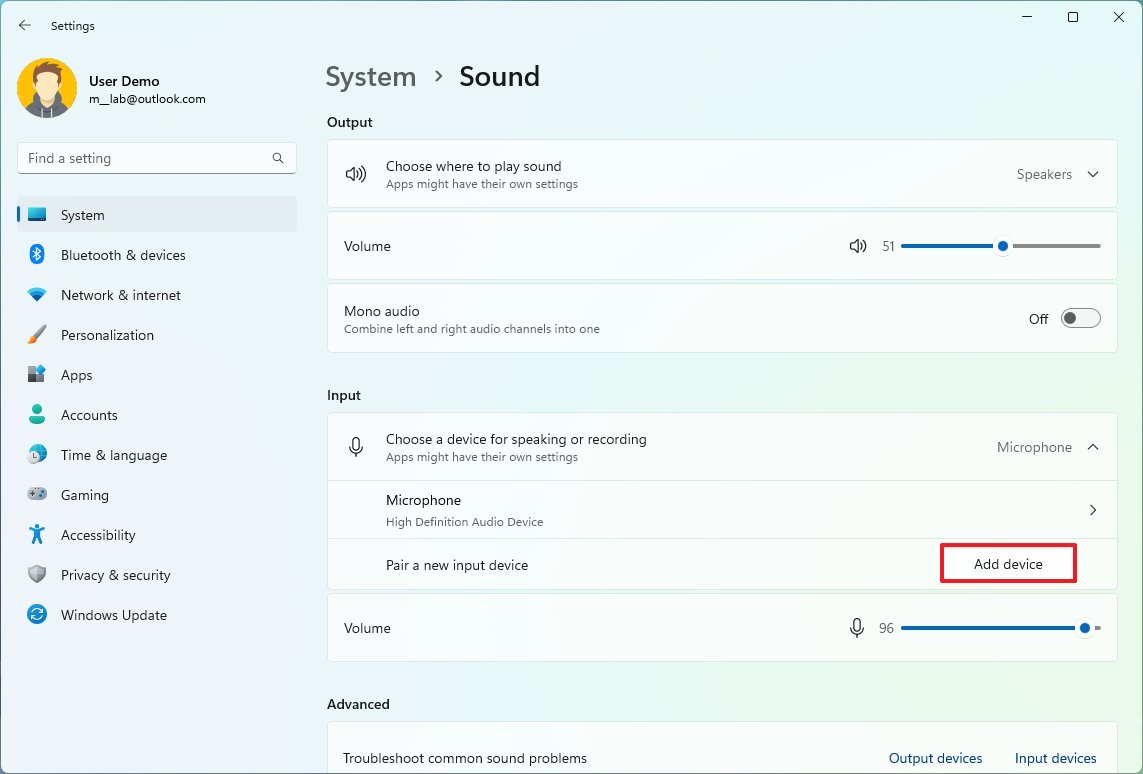
- Click the Bluetooth option.
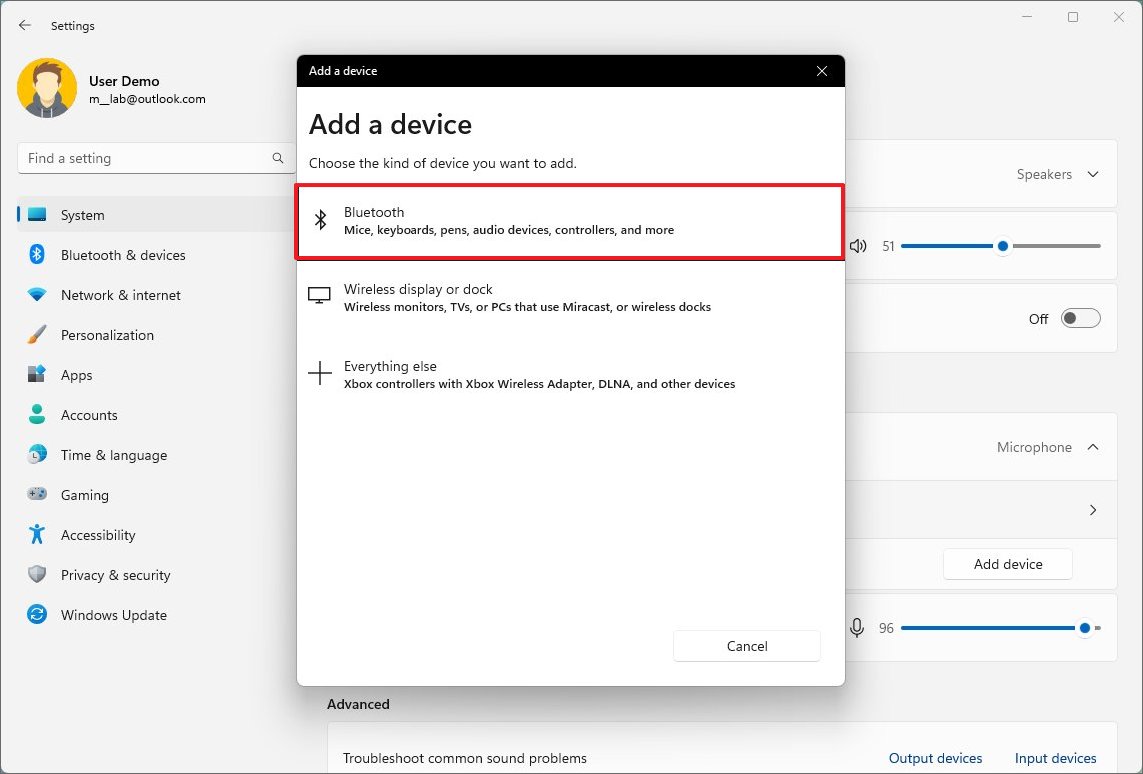
- Select the wireless speakers.
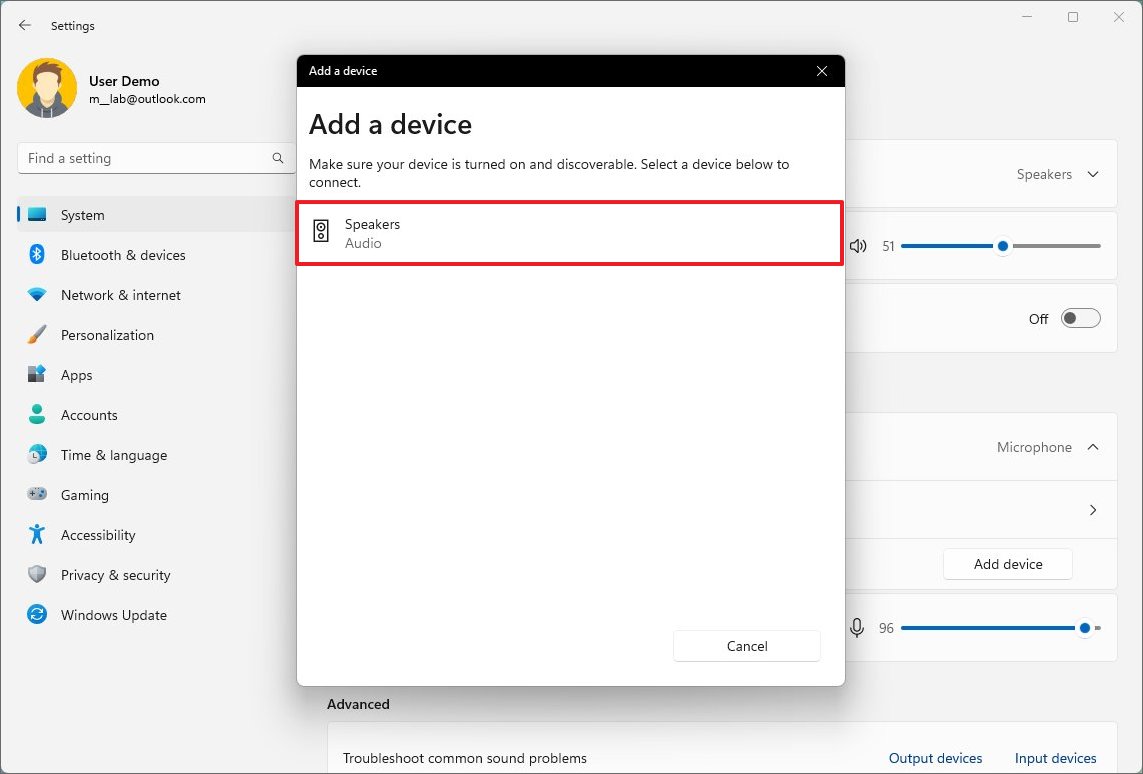
- Continue with the on-screen directions (if applicable).
After you complete the steps, the wireless output device will connect to Windows 11.
How to control system volume on Windows 11
To control the system sounds and apps on Windows 11, use these steps:
- Open Settings.
- Click on System.
- Click the Sound page on the right side.
- Under the «Output» section, use the volume slider to control the system volume.
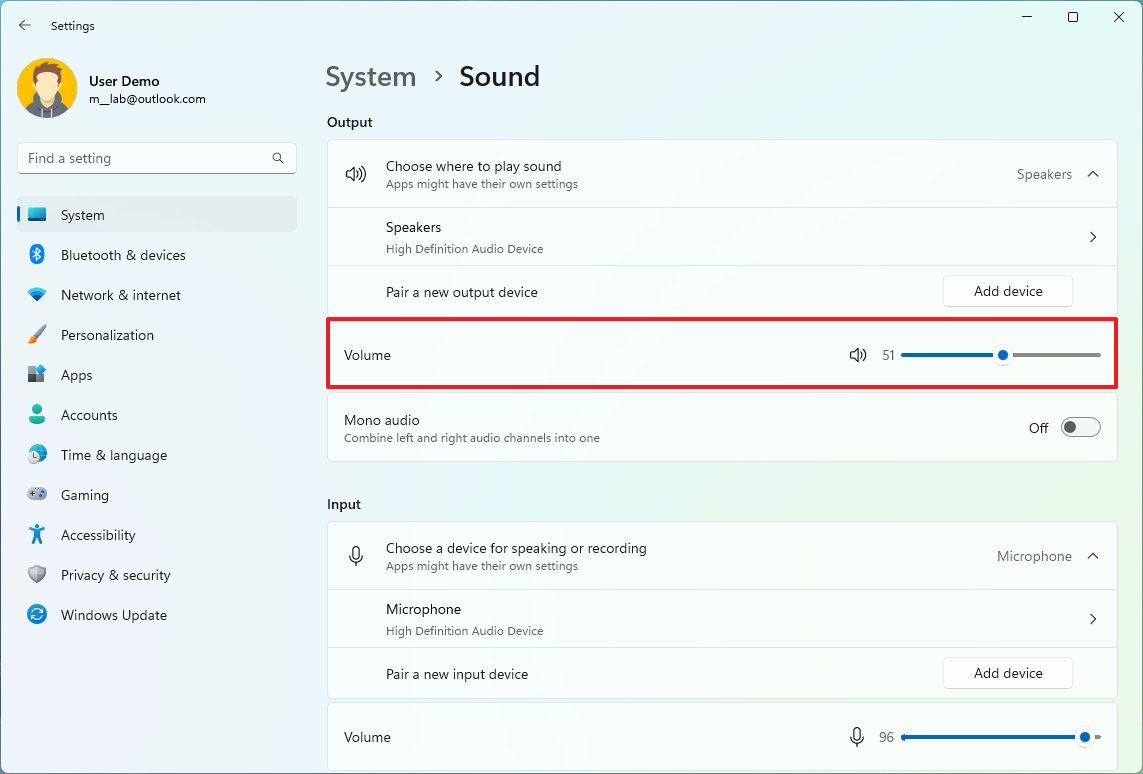
- Under the «Advanced» section, click the Volume mixer setting.
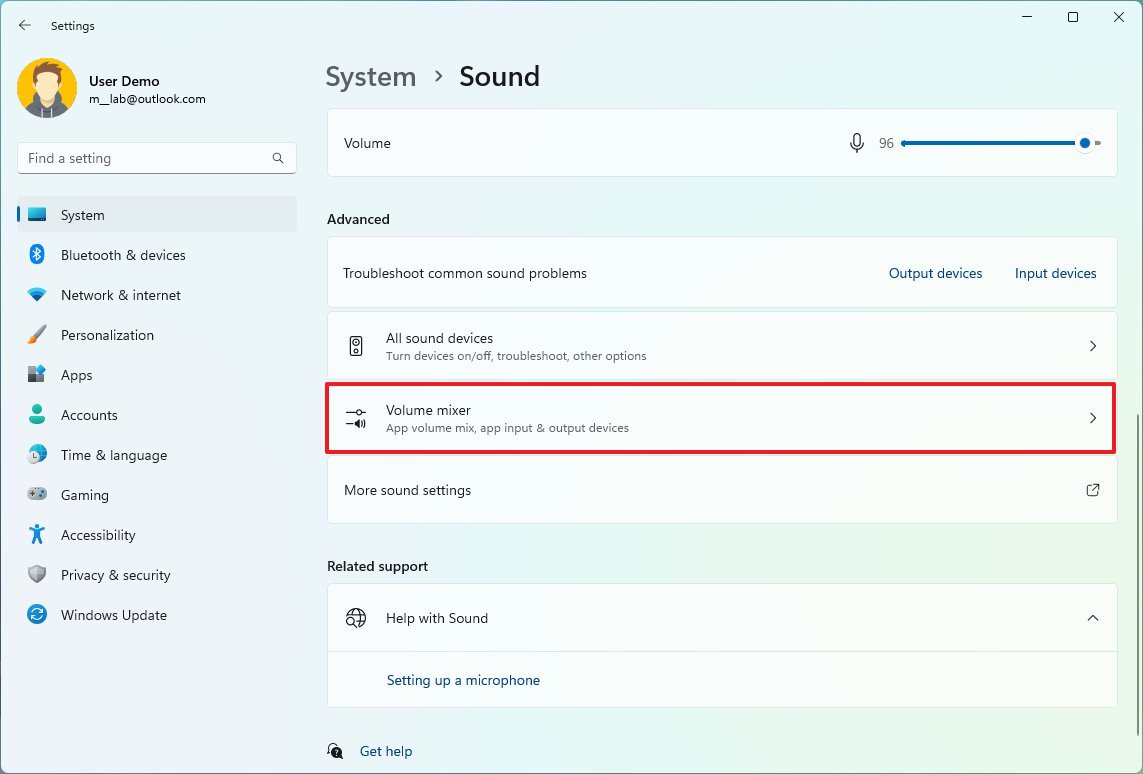
- Under the «Apps» section, use the System sounds slider to control the volume for the system sounds.
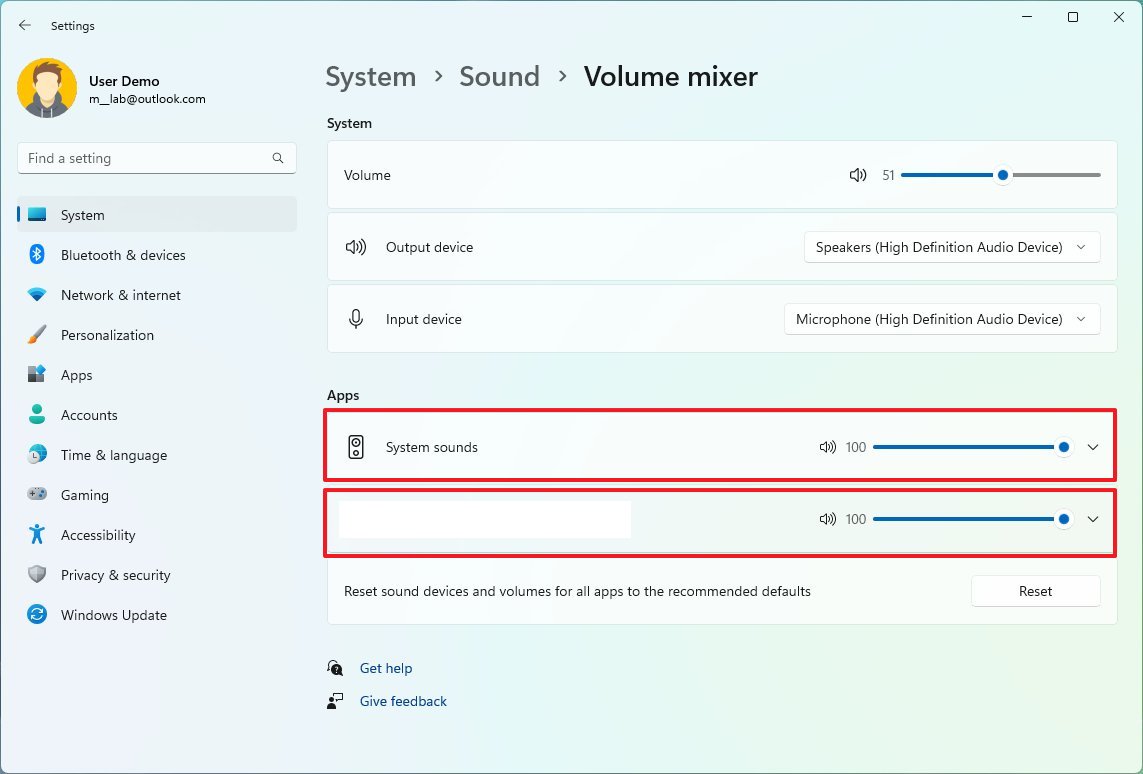
- Use the slider to increase or decrease the volume for a specific app.
- Quick tip: If you have multiple sets of output or input devices, you can click the app to select which speakers or microphone the app should use.
You can also increase or lower the volume by using the dedicated audio buttons or shortcuts in the keyboard, opening the Quick Settings flyout (Windows key + A keyboard shortcut), and using the volume slider. Or you can click the speaker icon to mute the system.
How to rename audio output device on Windows 11
To rename an output device on Windows 11, use these steps:
- Open Settings.
- Click on System.
- Click the Sound page on the right side.
- Under the «Output» section, click the Speakers setting.
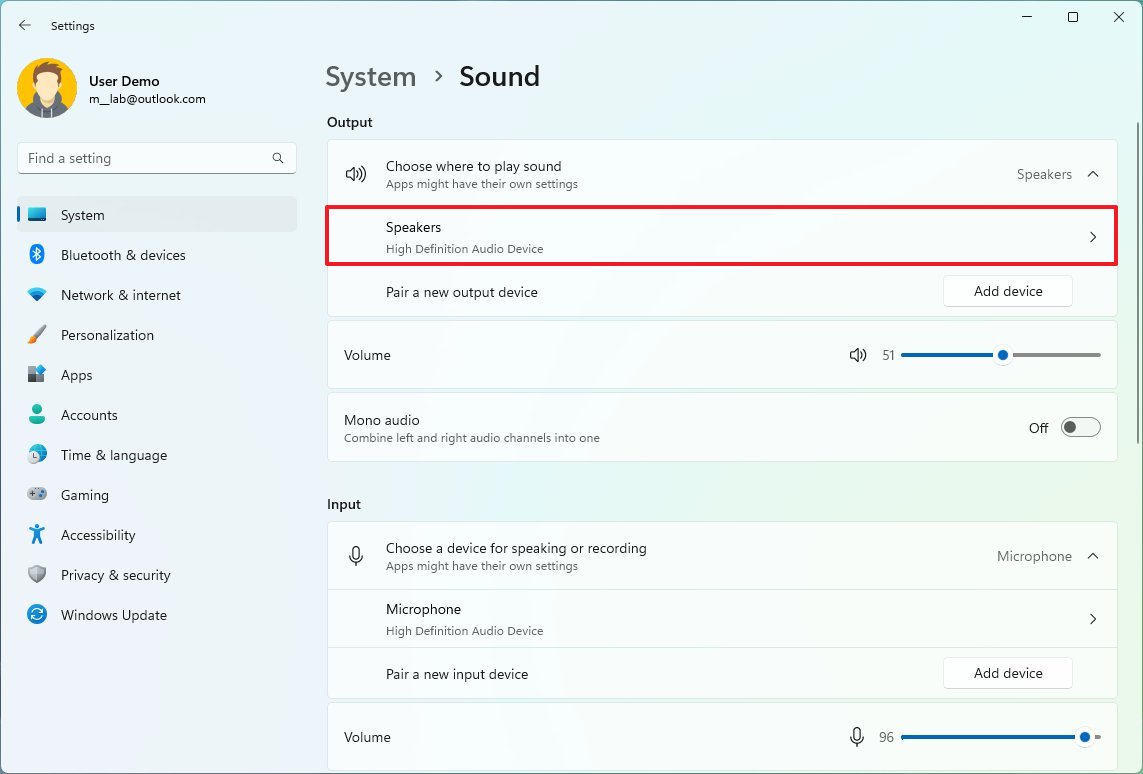
- Click the Rename button in the top-left corner.
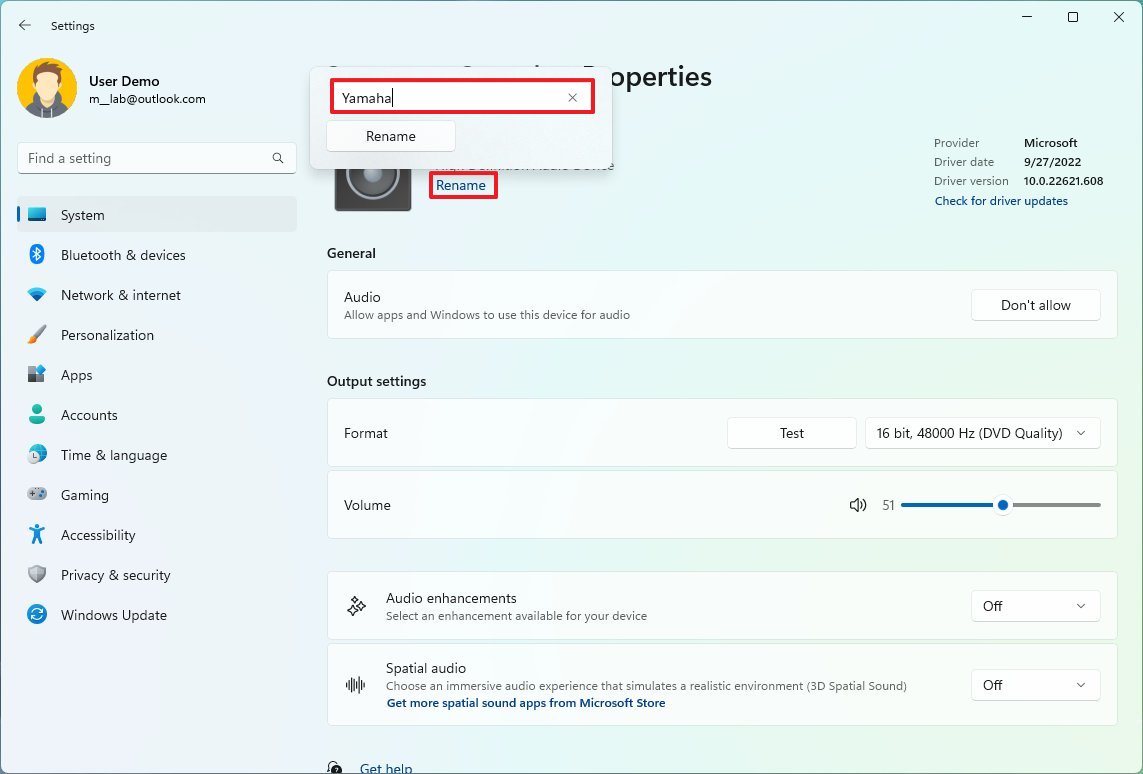
- Confirm the new name for the speakers.
- Click the Rename button.
Once you complete the steps, the new name will appear on the device (top-left side of the page).
How to test speakers or headphones on Windows 11
To test speakers, headphones, or headsets on Windows 11, use these steps:
- Open Settings.
- Click on System.
- Click the Sound page on the right side.
- Under the «Output» section, click the Test button in the «Format» setting.
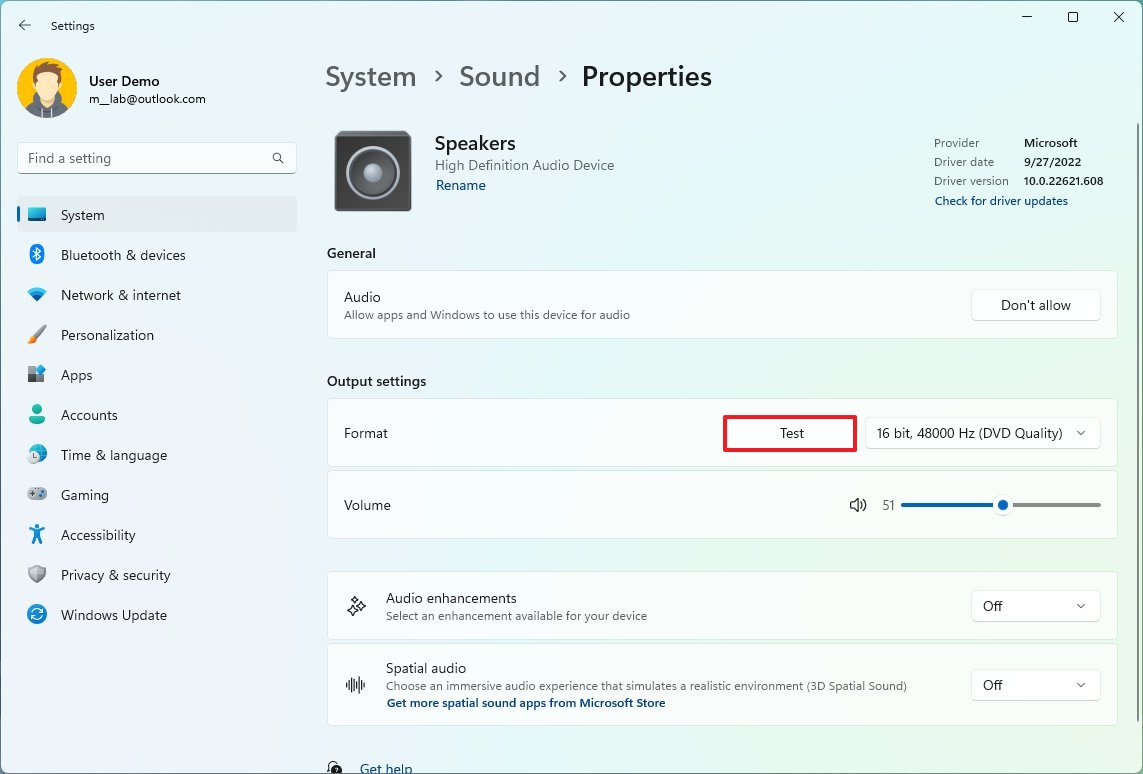
After you complete the steps, you’ll know whether the output device is working or whether troubleshooting is needed.
How to manage sound balance on Windows 11
To adjust the left and right sound balance on Windows 11, use these steps:
- Open Settings.
- Click on System.
- Click the Sound page on the right side.
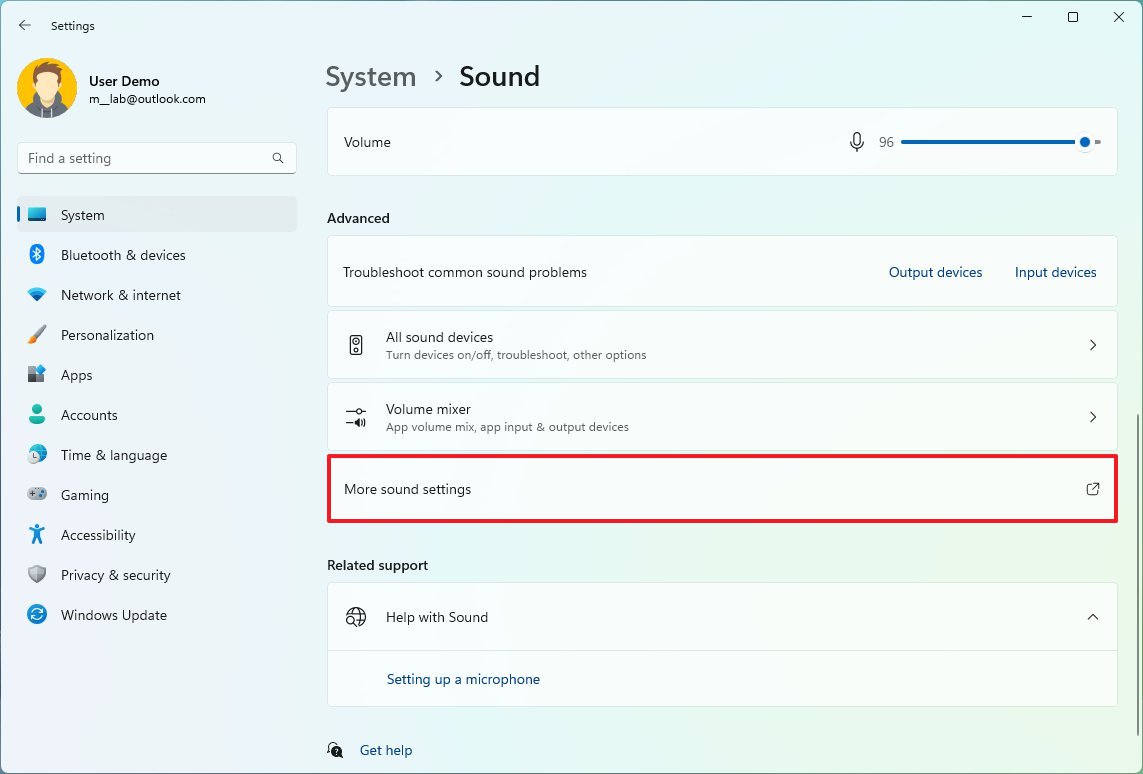
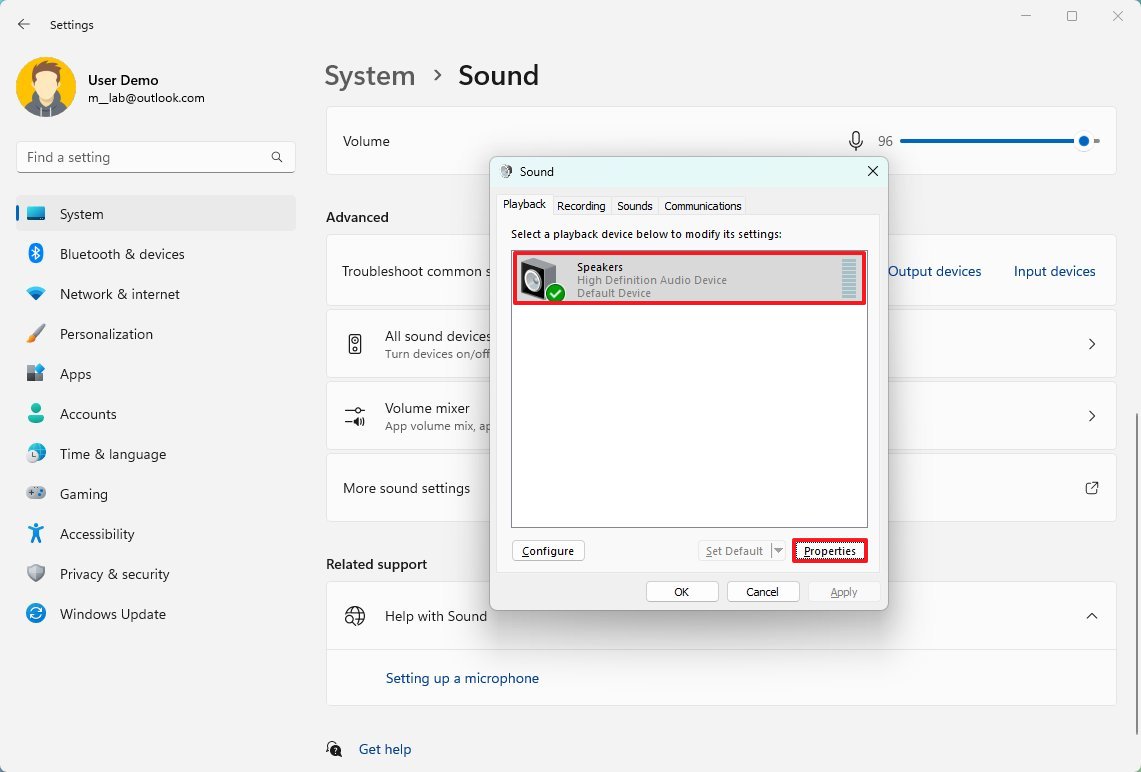
- Under the «Advanced» section, click the «More sound settings» option.
- Select the device from list in the «Playback» tab and click the Properties button.
- Click the Levels tab.
- Click the Balance button.
- Change the left and right volume settings (as needed).
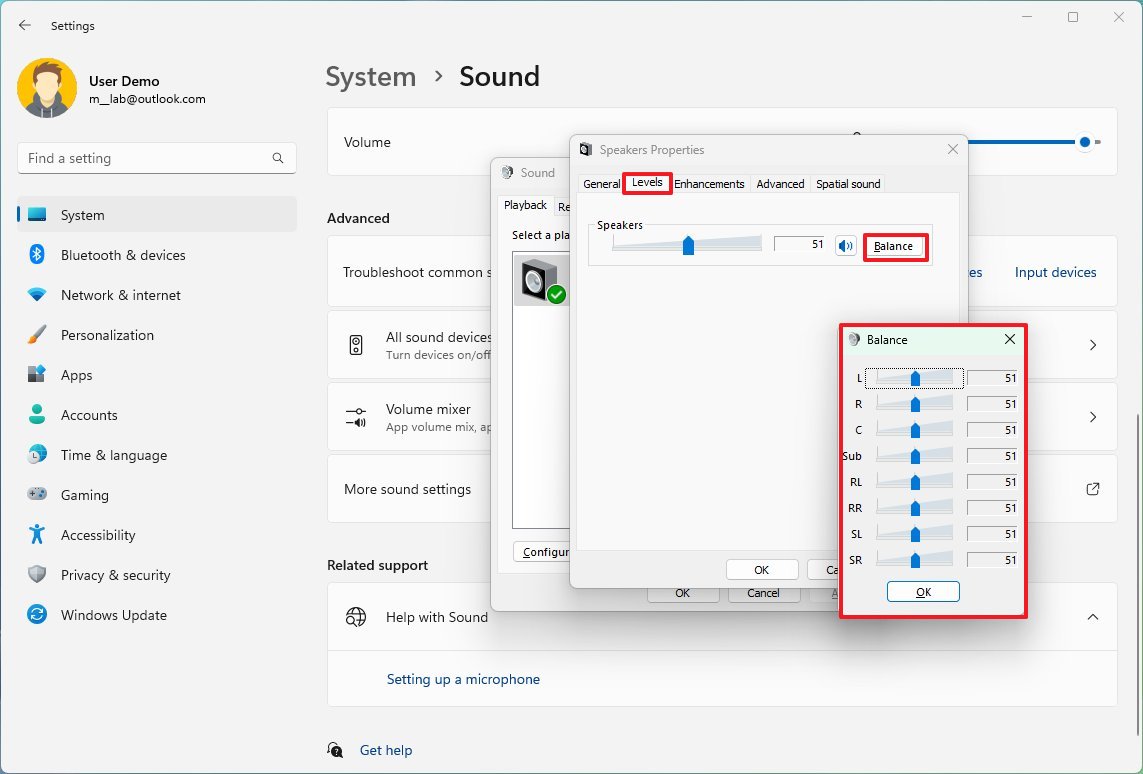
- Click the OK button.
- Click the Apply button.
- Click the OK button.
Once you complete the steps, the audio should play more balanced in the output device.
How to fix sound problems on Windows 11
To fix the most common sound problems on a laptop or desktop, use these steps:
- Open Settings.
- Click on System.
- Click the Sound page on the right side.
- Under the «Advanced» section, click the Output devices option for the «Troubleshoot common sound problems» setting.
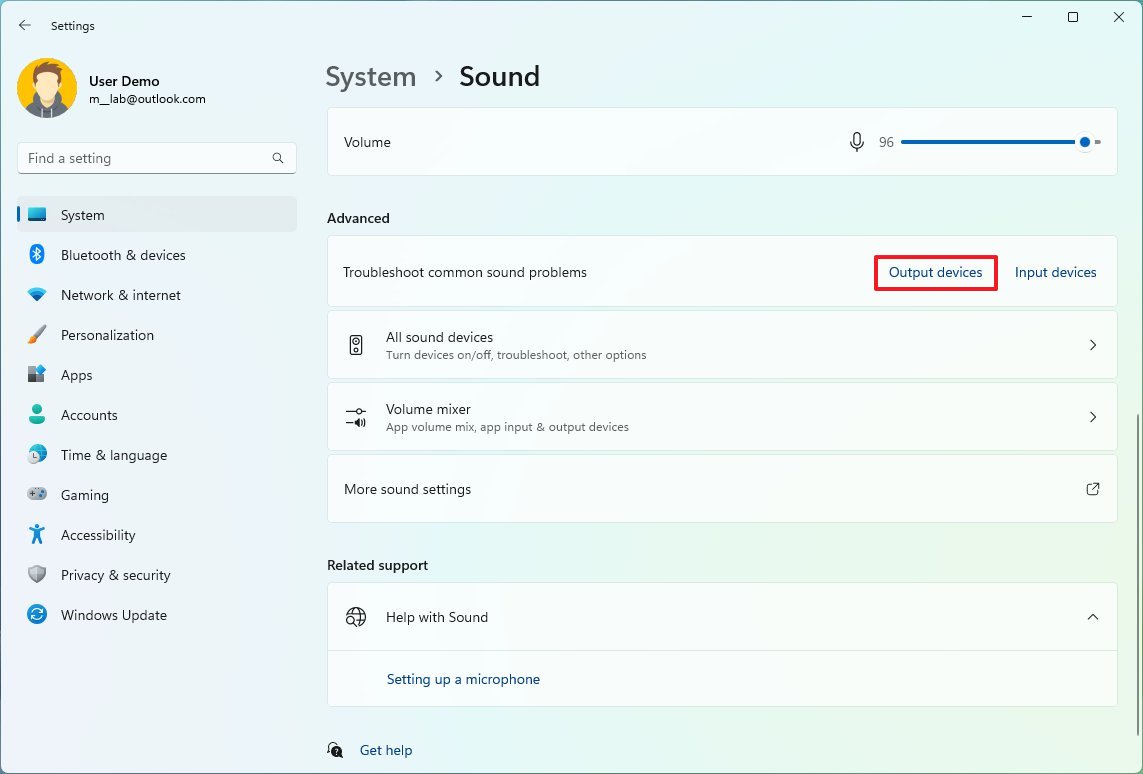
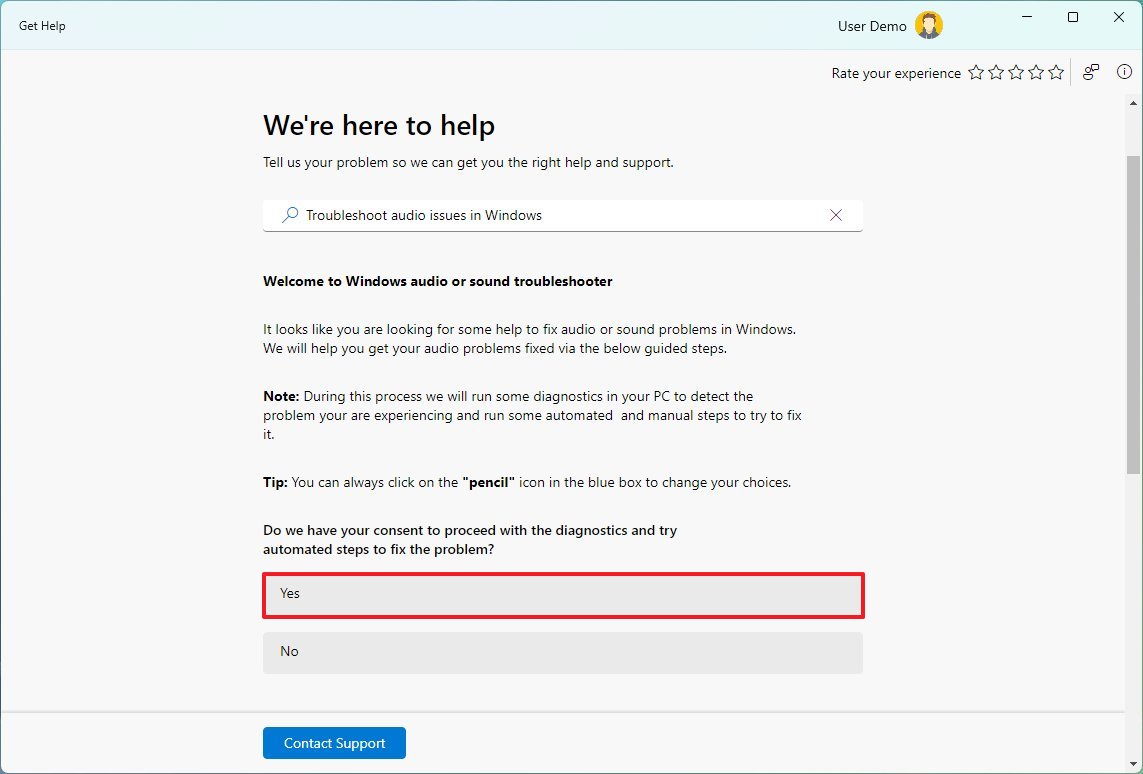
- Click the Yes button in the «Get Help» app to launch the troubleshooter.
- Continue with the on-screen directions (if applicable).
Alternatively, you can also run the sound troubleshooter directly from the Troubleshoot settings page.
More resources
For more helpful articles, coverage, and answers to common questions about Windows 10 and Windows 11, visit the following resources:
- Windows 11 on Windows Central — All you need to know
- Windows 10 on Windows Central — All you need to know

Cutting-edge operating system
A refreshed design in Windows 11 enables you to do what you want effortlessly and safely, with biometric logins for encrypted authentication and advanced antivirus defenses.
Mauro Huculak has been a Windows How-To Expert contributor for WindowsCentral.com for nearly a decade and has over 15 years of experience writing comprehensive guides. He also has an IT background and has achieved different professional certifications from Microsoft, Cisco, VMware, and CompTIA. He has been recognized as a Microsoft MVP for many years.
When it comes to managing audio devices on Windows 10, understanding how to remove them can be essential for troubleshooting and maintaining optimal sound quality. Did you know that having multiple audio devices connected to your computer can sometimes lead to conflicts and issues with playback? Knowing how to remove audio devices can help you streamline your setup and ensure smoother audio performance.
In Windows 10, removing audio devices is a simple process that can be done through the Device Manager. By accessing this tool, you can uninstall or disable audio devices that are no longer needed or causing problems. This can not only resolve any conflicts but also free up system resources for improved overall performance. Whether you want to remove a specific audio device or clean up your device list, understanding how to remove audio devices in Windows 10 is crucial for a better audio experience.
Removing audio devices in Windows 10 is a straightforward process. Here’s how:
- Open the «Settings» app by pressing «Windows + I» on your keyboard.
- Click on «System» and then select «Sound» from the left-hand menu.
- Under the «Output» or «Input» section, locate the audio device you want to remove.
- Click on the device and then click the «Remove device» button.
- A confirmation prompt will appear. Click «Yes» to remove the device.

Removing Audio Devices in Windows 10
In Windows 10, audio devices are essential for sound output and input. However, there may be situations when you need to remove or uninstall audio devices. This could be because of troubleshooting issues, upgrading to a new device, or simply cleaning up your system. In this article, we will explore the various methods to remove audio devices in Windows 10.
Method 1: Uninstalling Audio Devices from Device Manager
The Device Manager in Windows 10 allows you to manage and uninstall hardware devices, including audio devices. Follow these steps to remove audio devices using Device Manager:
- Right-click on the Start button and select «Device Manager» from the menu.
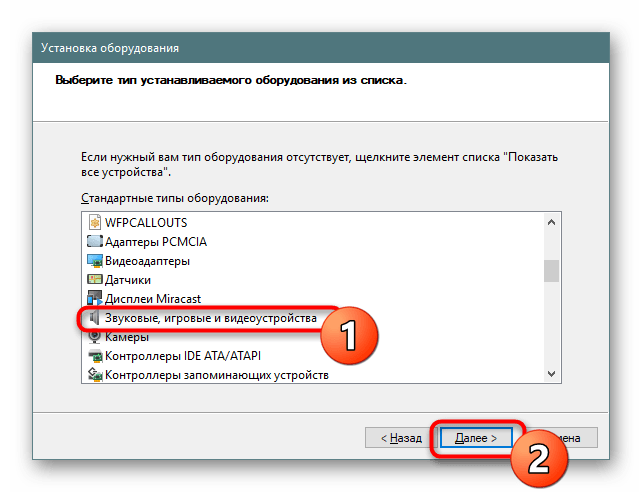
- In the Device Manager window, expand the «Sound, video and game controllers» category by clicking on the arrow next to it.
- Right-click on the audio device you want to remove and select «Uninstall device» from the context menu.
- Check the box that says «Delete the driver software for this device» if available and click «Uninstall».
Windows will now uninstall the selected audio device, including its driver software. Once the process is complete, restart your computer for the changes to take effect.
Alternate Method: Disabling Audio Devices from Device Manager
If you want to temporarily disable an audio device instead of completely removing it, you can follow these steps:
- Open Device Manager by right-clicking on the Start button and selecting «Device Manager».
- Expand the «Sound, video and game controllers» category.
- Right-click on the audio device you want to disable and choose «Disable device» from the context menu.
The selected audio device will now be disabled and will no longer be available for use. You can enable it again by following the same steps and selecting «Enable device» from the context menu.
Method 2: Removing Audio Devices from the Control Panel
Another way to remove audio devices in Windows 10 is through the Control Panel. Here’s how:
- Open the Control Panel by searching for it in the Windows search bar and selecting the relevant result.
- In the Control Panel window, navigate to the «Hardware and Sound» category and click on «Device Manager» under «Devices and Printers».
- In the Device Manager window, expand the «Sound, video and game controllers» category.
- Right-click on the audio device you want to remove and select «Uninstall» from the context menu.
Follow any additional on-screen prompts to complete the removal process. Once the audio device is uninstalled, restart your computer for the changes to take effect.
Alternate Method: Disabling Audio Devices from the Control Panel
If you prefer to disable an audio device rather than removing it completely, you can use the Control Panel. Follow these steps:
- Open the Control Panel and navigate to the «Hardware and Sound» category.
- Under «Sound», click on «Manage audio devices».
- In the Sound window, go to the «Playback» or «Recording» tab, depending on whether you want to disable a playback or recording device.
- Select the audio device you want to disable and click on the «Disable» button below.
The selected audio device will now be disabled until you enable it again using the same steps.
Method 3: Removing Audio Devices from the Settings Menu
Windows 10 provides a convenient Settings menu that allows you to manage various aspects of your computer, including audio devices. Here’s how to remove audio devices using the Settings menu:
- Open the Settings menu by clicking on the Start button and selecting the «Settings» icon (shaped like a gear).
- In the Settings window, click on the «System» category.
- Within the System category, select «Sound» from the left-hand menu.
- In the Sound settings, scroll down to the «Advanced sound options» section and click on the link that says «App volume and device preferences» under «Other sound options».
In the App volume and device preferences window, you can see a list of all your audio devices. To remove a device, simply click on the «x» button next to it. Windows will prompt you to confirm the removal, and once confirmed, the device will be uninstalled.
Alternate Method: Disabling Audio Devices from the Settings Menu
If you want to disable an audio device instead of removing it completely, you can follow these steps within the Settings menu:
- Open the Settings menu and navigate to the «System» category.
- Click on «Sound» in the left-hand menu.
- In the Sound settings, scroll down to the «Advanced sound options» section and click on the link that says «App volume and device preferences» under «Other sound options».
- In the App volume and device preferences window, you can use the dropdown menus to select «None» for the audio devices you want to disable. This will prevent any sound from being played through those devices.
The selected audio devices will now be disabled until you re-enable them using the same steps.
Method 4: Removing Audio Devices Using Third-Party Software
There are also third-party software programs available that provide more advanced features and options for managing audio devices in Windows 10. These programs often offer additional functionalities such as audio device switching and customization.
When using third-party software to remove audio devices, make sure to download and install them from reputable sources. Follow the instructions provided by the software to remove the desired audio devices.
Some popular third-party software options for managing audio devices include «Audio Switcher,» «Audio Router,» and «CheVolume.» These programs can be found on trusted software download websites and offer more flexibility and control over your audio devices.
Conclusion
Removing audio devices in Windows 10 can be done through various methods such as the Device Manager, Control Panel, Settings menu, or using third-party software. Whether you want to completely remove an audio device or temporarily disable it, Windows 10 provides multiple options to meet your needs. Use the methods outlined in this article to effectively remove and manage your audio devices in Windows 10.

Removing Audio Devices in Windows 10
In Windows 10, it is common to encounter situations where you need to remove audio devices. Whether it’s to troubleshoot sound problems or to uninstall outdated drivers, removing audio devices can be necessary. Here’s how you can do it:
- Go to the «Settings» app by clicking on the «Start» button and selecting the gear icon.
- In the «Settings» app, click on the «Devices» option.
- From the left-hand side menu, click on «Bluetooth & other devices» (if your audio device is connected via Bluetooth) or «Sound» (if your audio device is connected via a 3.5mm audio jack).
- Scroll down to the «Other devices» or the «Output» section depending on which menu you are in.
- Find the audio device you want to remove and click on it.
- Click on the «Remove device» or «Remove» button.
- Follow any prompts that appear to confirm the removal of the device.
- Restart your computer to fully complete the removal process.
By following these steps, you can easily remove audio devices in Windows 10 and ensure a smooth sound experience on your computer.
Key Takeaways for «How to Remove Audio Devices Windows 10»:
- Removing audio devices in Windows 10 is a simple process.
- Open the «Settings» menu and select «Devices.»
- Click on «Bluetooth & other devices» to see all connected devices.
- Right-click on the audio device you want to remove and select «Remove device.»
- Confirm the removal by clicking «Yes» in the pop-up window.
Frequently Asked Questions
Here are some commonly asked questions about removing audio devices in Windows 10:
1. Can I remove audio devices on Windows 10?
Yes, you can remove audio devices on Windows 10. This can be useful if you want to uninstall a device that you no longer use or if you’re experiencing issues with a particular audio device.
To remove an audio device, follow these steps:
2. How do I remove an audio device in Windows 10?
To remove an audio device in Windows 10, you can use the Device Manager. Here’s how:
1. Press the Windows key + X on your keyboard and select Device Manager from the menu that appears.
2. In the Device Manager window, expand the «Sound, video, and game controllers» category.
3. Right-click on the audio device you want to remove and select Uninstall device.
4. In the confirmation dialog box, click Uninstall to confirm the removal of the device.
5. Restart your computer to complete the uninstallation process.
3. Can I reinstall an audio device after removing it?
Yes, you can reinstall an audio device after removing it. If you want to use the device again or if you have mistakenly uninstalled the wrong device, you can reinstall it using the Device Manager.
To reinstall an audio device, follow these steps:
4. What should I do if the audio device keeps reinstalling after removal?
If the audio device keeps reinstalling itself after you remove it, there may be a driver issue. You can try the following steps to resolve the issue:
1. Open the Device Manager by pressing the Windows key + X on your keyboard and selecting Device Manager.
2. In the Device Manager window, expand the «Sound, video, and game controllers» category.
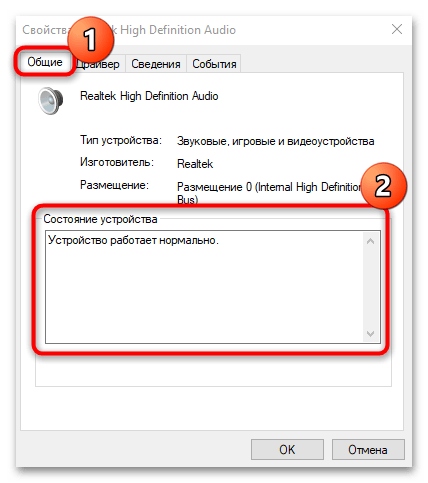
3. Right-click on the audio device and select Properties.
4. Go to the Driver tab and click on «Roll Back Driver» if the option is available. If not, click on «Update Driver» and follow the on-screen instructions to install the latest driver.
5. Can I disable an audio device instead of removing it?
Yes, you can disable an audio device instead of removing it if you want to temporarily stop using it or troubleshoot audio issues. Disabling the device will prevent it from being used by your system.
To disable an audio device, follow these steps:
1. Open the Device Manager by pressing the Windows key + X on your keyboard and selecting Device Manager.
2. In the Device Manager window, expand the «Sound, video, and game controllers» category.
3. Right-click on the audio device you want to disable and select Disable device.
4. Confirm the action in the dialog box that appears.
Remember that disabling a device is not the same as uninstalling it, and you can easily enable it again in the future if needed.
In summary, removing audio devices in Windows 10 is a straightforward process that can help resolve various sound-related issues. By accessing the Device Manager and uninstalling unwanted devices, users can easily manage their audio devices and ensure optimal sound quality.
It is important to note that before removing any audio device, users should double-check which device they are uninstalling to avoid accidentally removing vital drivers. Additionally, restarting the computer after removing audio devices can help the system reconfigure and enhance overall system performance.
Все способы:
- Шаг 1: Установка драйверов
- Шаг 2: Проверка звуковой карты
- Шаг 3: Настройка воспроизведения звука
- Способ 1: Штатные средства
- Способ 2: Параметры в Realtek HD
- Способ 3: Сторонние программы
- Вопросы и ответы: 0
Шаг 1: Установка драйверов
В первую очередь для корректной работы звуковой карты нужно установить актуальное программное обеспечение, если этого не произошло автоматически. Иногда требуется сначала определить, какие драйверы подойдут для аудиооборудования, после чего можно искать и скачивать нужные компоненты, используя встроенные средства системы или сторонний софт. Некоторые производители звуковых карт предоставляют вспомогательные утилиты для инсталляции ПО. В нашем отдельном материале описаны способы поиска и установки аудиодрайверов в Windows 10.
Подробнее: Поиск и инсталляция аудиодрайверов для Windows 10
Шаг 2: Проверка звуковой карты
После того как программное обеспечение установлено, звуковая карта должна заработать. Проверить это несложно: можно использовать штатный инструмент «Диспетчер устройств» или приложение «Параметры» у Windows 10, а также фирменную утилиту и сторонние программы. На нашем сайте автор разбирал все методы проверки звукового оборудования, где также перечислены наиболее распространенные проблемы со звуком и есть ссылки на материалы с их решением.
Подробнее: Проверка звуковой карты в Windows 10
Шаг 3: Настройка воспроизведения звука
Существует несколько методов настройки звуковой карты: используя встроенные возможности операционной системы или отдельные программы.
Способ 1: Штатные средства
Настройка звуковой карты в Windows 10 осуществляется через соответствующее окно системы. Здесь можно выбрать устройство воспроизведения и записи, отрегулировать звучание и баланс каналов.
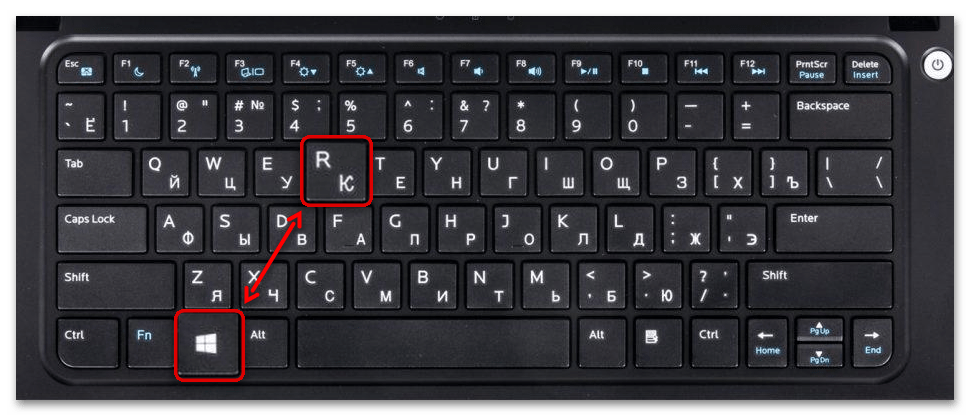
- Одновременно зажмите клавиши «Win + R», чтобы вызвать диалоговое окно «Выполнить».
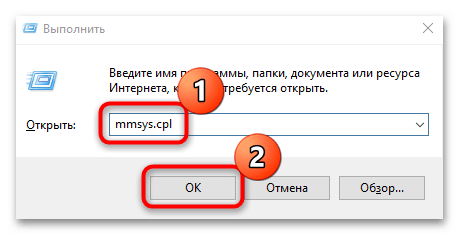
- В поле вставьте команду
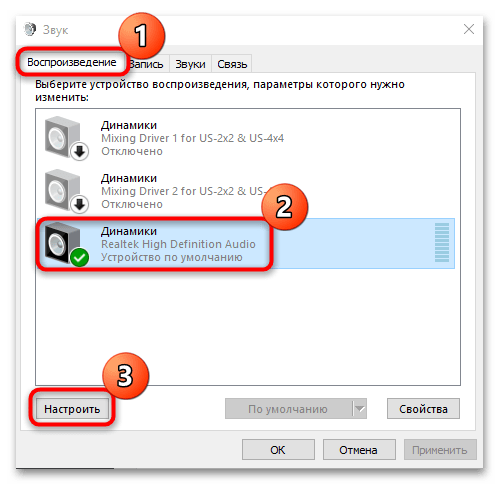
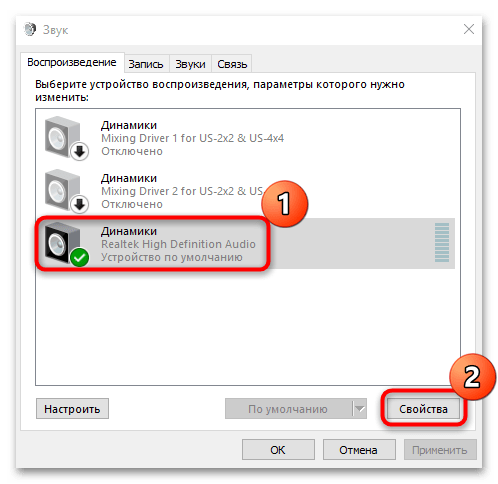
mmsys.cplи кликните по кнопке «ОК». - Откроется окно с настройками звуковой карты. На вкладке «Воспроизведение» доступен список подключенного или встроенного аудиооборудования. Чтобы настроить устройство, выделите его нажатием левой кнопкой мыши и щелкните по соответствующей кнопке внизу.
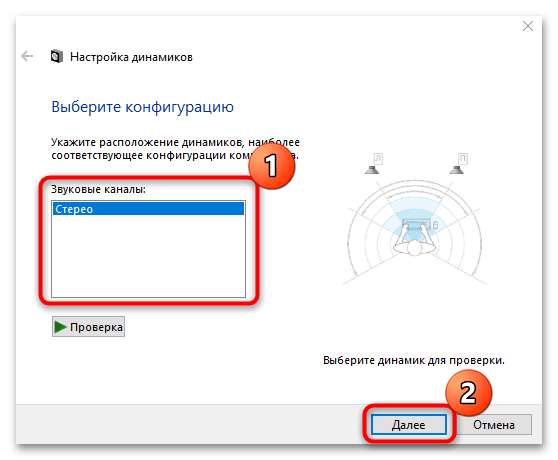
- В новом окне на первом этапе нужно выбрать конфигурацию оборудования. Также здесь сразу можно проверить звучание. После выбора нажмите на «Далее».
- Если используются широкополосные динамики, то в следующем шаге можно выбрать эту функцию. Нажмите на кнопку продолжения, а затем на «Готово».
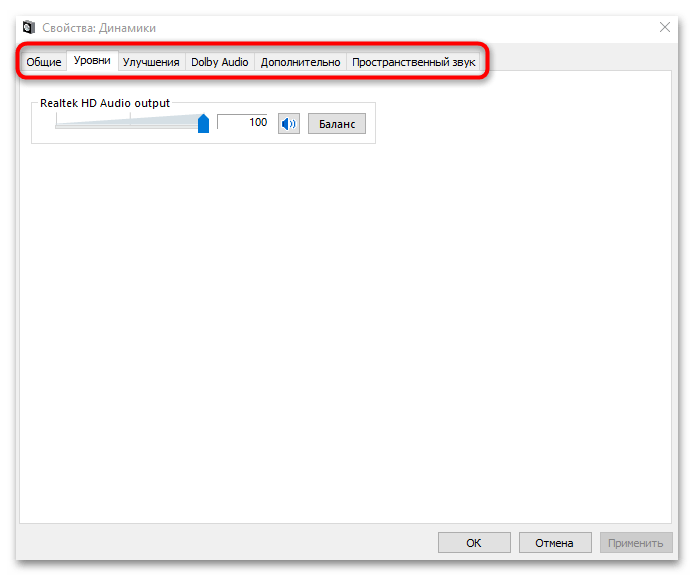
- При выборе оборудования можно нажать на кнопку «Свойства», чтобы запустить еще одно окно с параметрами.
- Здесь не только регулируются уровни, но и осуществляется включение или отключение звуковых эффектов на вкладке «Улучшения».
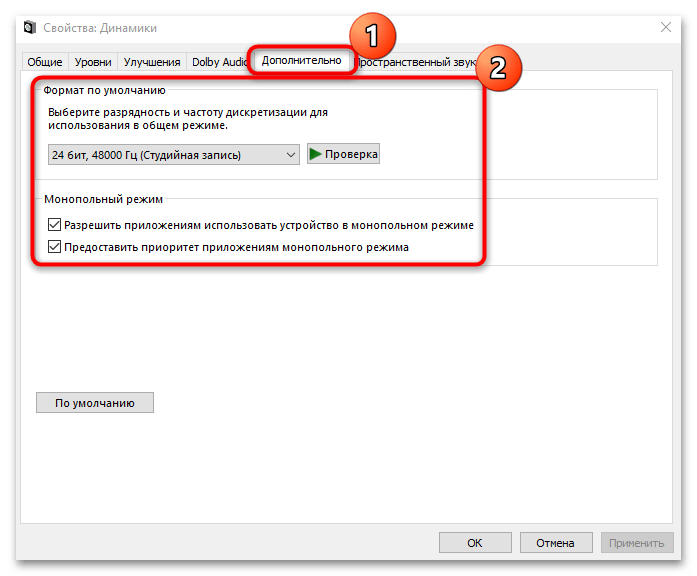
- В разделе «Дополнительно» доступен выбор частоты дискретизации и разрядность, а также настройки монопольного режима. При необходимости настроенный звук можно проверить.
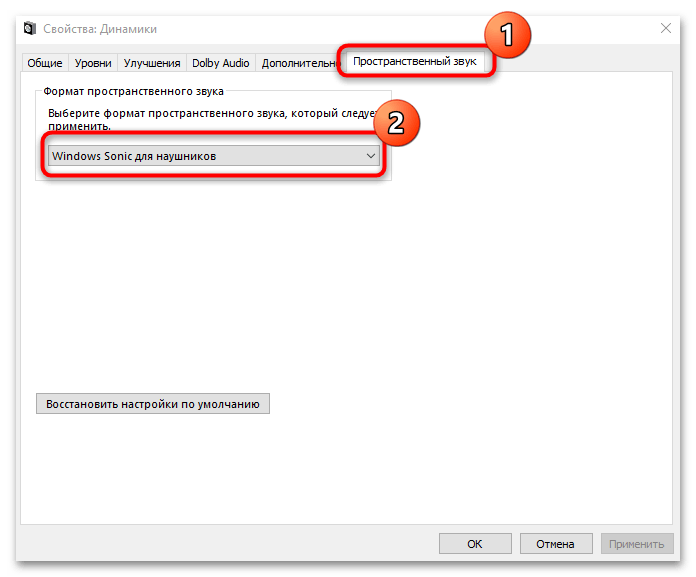
- Если звуковая карта поддерживает пространственный звук, то на соответствующей вкладке можно выбрать формат.

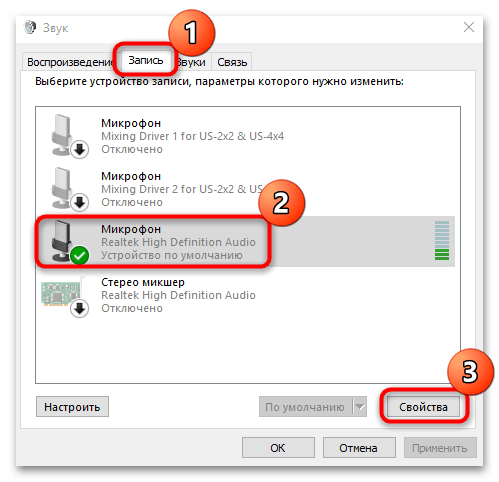
В системном окне «Звук», на вкладке «Запись», есть настройки используемого микрофона. Чтобы открыть окно с параметрами оборудования, выделите устройство и нажмите на кнопку «Свойства».
Читайте также: Что делать, если компьютер не видит микрофон
Способ 2: Параметры в Realtek HD
Программное обеспечение Realtek HD Audio Manager позволяет выбрать и настроить конфигурацию звучания акустической системы. Драйвер поддерживает объемный звук, Dolby и DTS. Открыть окно приложения можно несколькими методами: используя панель задач, средство «Панель управления» или исполняемый файл, расположенный на локальном диске. В нашем отдельном руководстве все методы описаны более детально.
Подробнее:
Методы открытия Диспетчера Realtek HD в Windows 10
Что делать, если не запускается Realtek HD в Windows 10
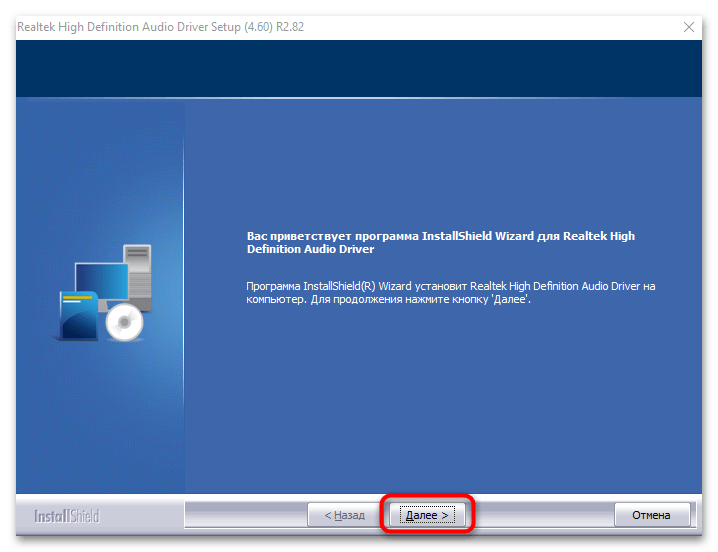
Если драйвер не установлен, то инсталлировать на компьютер его можно вручную. Также это поможет в случае, если программное обеспечение не запускается. Скачайте установочный файл, затем, перейдя по ссылке далее, следуйте инструкции от нашего автора в отдельной статье.
Скачать Realtek HD
Подробнее:
Установка Realtek HD на компьютер с Windows 10
Что делать, если не устанавливается Realtek HD в Windows 10
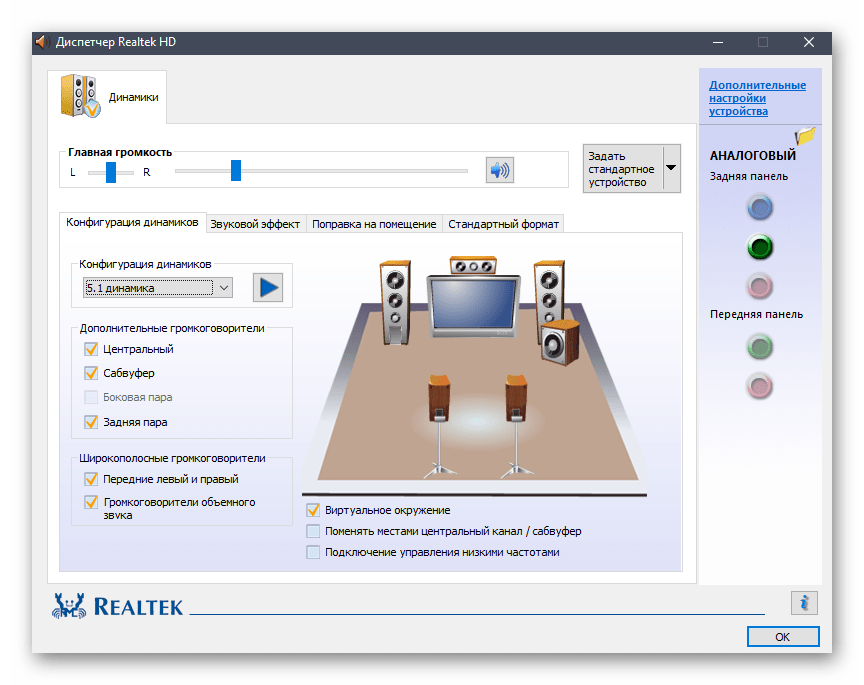
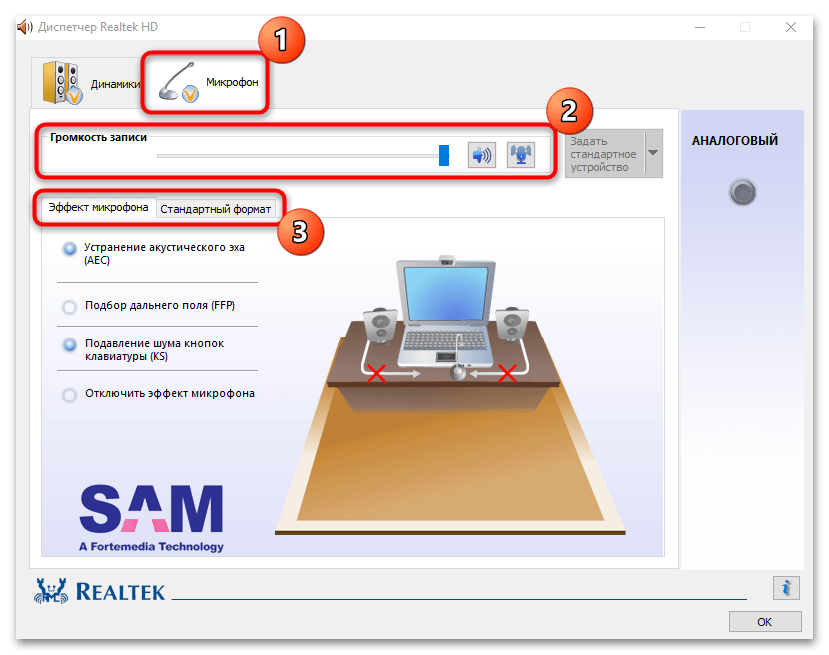
Поскольку большинство звуковых карт работают с ПО Realtek HD, то через него и можно настроить компонент. После запуска отобразится окно, где на вкладке «Динамики» выставляются параметры устройства вывода звука. Здесь доступно определение баланса каналов и регулировка громкости, а также выбор конфигурации оборудования и формата. На вкладке «Микрофон» есть настройки записывающего устройства, включая уровень громкости и добавление специальных эффектов.
Функции в Realtek HD могут отличаться, завися от используемой звуковой карты. В некоторых случаях доступно большее количество различных параметров.
Способ 3: Сторонние программы
Настроить звуковую карту можно с помощью стороннего софта, который отличается от штатных средств тем, что он представляет расширенные возможности. Условно такие приложения делятся на два типа: усилители звука и программы для максимального улучшения звучания.
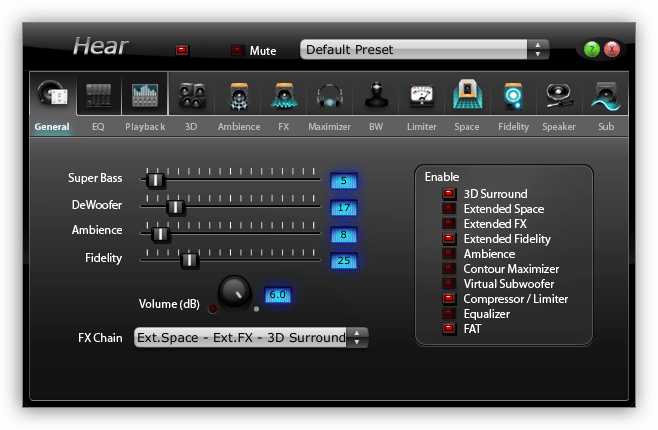
С помощью программ-усилителей выставляется наибольший уровень громкости, который сможет воспроизвести акустическая система. Некоторые из них предусматривают встроенные инструменты для удаления помех различного происхождения, а также позволяют использовать компрессию и накладывать специальные эффекты. В нашей отдельной статье собраны наиболее популярные и эффективные приложения для увеличения громкости звука.
Подробнее: Программы для усиления звука на компьютере
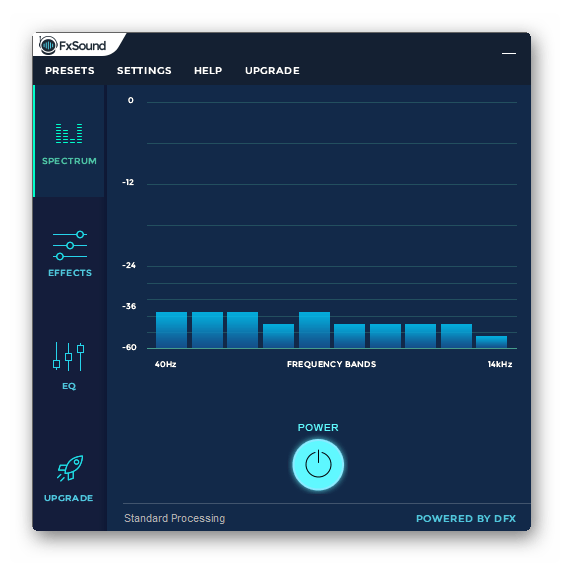
Так называемые «комбайны», или программы для улучшения звучания, располагают расширенными возможностями. Они способны оптимизировать звук большинства аудиосистем и карт, добавив объем, настроив дополнительные типы конфигурации или наложив фильтры. Встроенные эквалайзеры позволяют управлять частотами, делая звучание наиболее подходящим для определенной акустики. На нашем сайте также представлен обзор таких программ с кратким описанием и ссылками на скачивание.
Подробнее: Программы для настройки звука
Наша группа в TelegramПолезные советы и помощь