
Совет включить схему электропитания «Максимальная производительность» можно встретить не только в контексте повышения производительности ноутбука или ПК, но и для решения проблем с отключением каких-либо устройств и иногда это действительно помогает.
В этой простой инструкции о том, как включить эту схему электропитания и как добавить «Максимальная производительность» в список доступных схем электропитания Windows 11 или Windows 10, если она в нём отсутствует.
Включение или добавление схемы электропитания «Максимальная производительность»
Базовые шаги для того, чтобы включить схему электропитания «Максимальная производительность», при условии, что она доступна для выбора, следующий:
- Откройте панель управления и перейдите в пункт «Электропитание», либо нажмите клавиши Win+R на клавиатуре, введите powercfg.cpl и нажмите Enter.
- Нажмите по «Показать дополнительные схемы».

- Если в списке доступен вариант «Максимальная производительность» — просто выберите его. Если его нет — решение далее в статье.

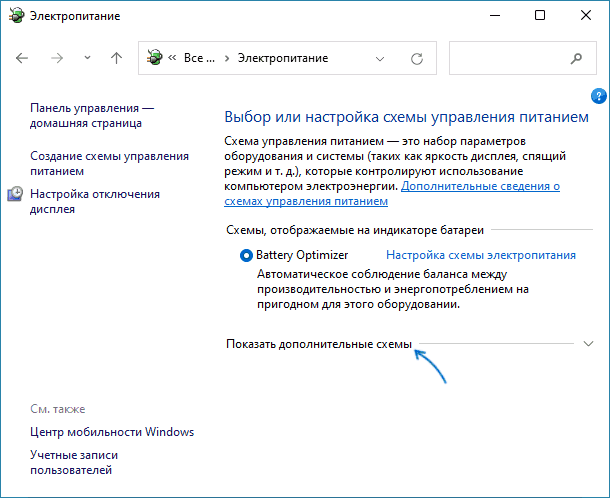

Однако, как можно видеть на скриншоте выше, пункт «Максимальная производительность» может отсутствовать в списке схем электропитания. В этом случае его можно добавить. Для этого:
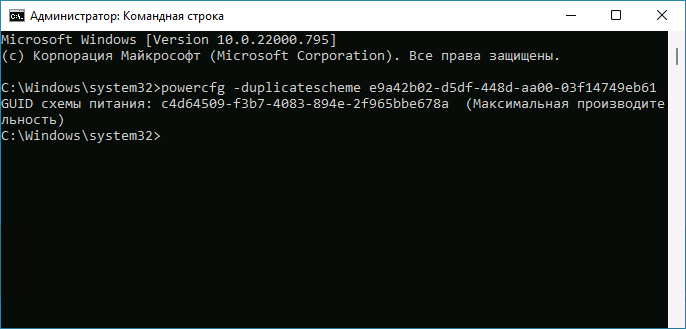
- Запустите командную строку от имени администратора. PowerShell или «Терминал Windows» также подойдет, в Windows 10 и Windows 11 их можно запустить из меню по правому клику на кнопке «Пуск».
- Введите команду
powercfg -duplicatescheme e9a42b02-d5df-448d-aa00-03f14749eb61
и нажмите Enter.

- После успешного выполнения команды, закройте командную строку.
- Снова зайдите в параметры электропитания и выберите пункт «Максимальная производительность», теперь он должен быть в списке.


Кстати, возможно вам окажутся интересными способы удобного переключения схем электропитания на ноутбуке.
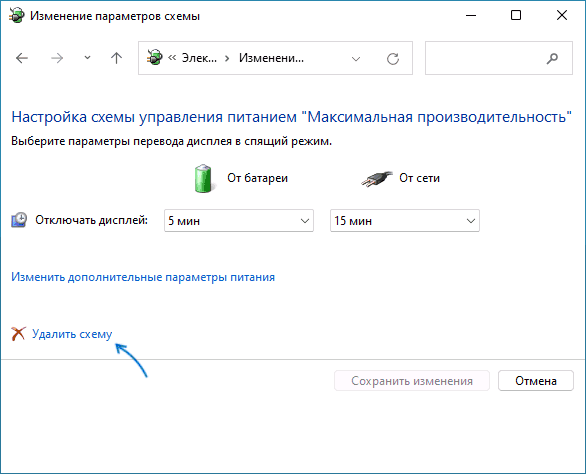
Если в дальнейшем вам потребуется удалить эту или любую другую схему электропитания, зайдите в окно «Электропитание» и нажмите «Настройка схемы электропитания» справа от схемы, которую нужно удалить.
В следующем окне останется выбрать «Удалить схему».
Если у вас остаются вопросы на тему схем электропитания в Windows — задавайте их в комментариях, постараемся разобраться.
The Ultimate Performance Power Plan, also known as Ultimate Performance mode, is a power-to-performance configuration in Windows that allows you to push your hardware to its limits. It is designed for high-end PCs that can hold up their end, while Windows keeps running them at maximum capacity.
Initially introduced in Windows 10 Professional for Workstations, the Ultimate Performance Power Plan was then introduced with Windows 10 April 2018 update. This feature is by default built into Windows, but has not been made available for devices with a battery (i.e. laptops). This is because the power consumption would be much greater and may not be worth the enhanced performance gains.
This article illustrates how to enable the feature on a Windows 11 or 10 PC, even if it is disabled for your device.
Table of Contents
What is Ultimate Performance Mode in Windows
Windows usually comes with 3 power modes: Balanced, Best Performance, and Best Power Efficiency. Ultimate Performance is a fourth power plan, which is a step further than “Best Performance.”
Ultimate Performance configures certain parameters of your computer that push the hardware to consume more power to achieve greater performance gains. The following changes are made to your computer:
- Hard disks are always running.
- Java timer frequency is adjusted for maximum throughput.
- Wireless adapter is configured to ensure maximum performance.
- Hibernation and Sleep mode is turned off.
- Processor’s maximum capacity is configured to 100%.
- Video playback quality is optimized.
What Ultimate Performance does is minimize the micro-latencies, which is the time it takes for your system to find out that the hardware needs more power and the time that power is provided. This time is very small (in milliseconds), but may make a significant difference in performing time-critical tasks.
If you want to boost your system’s hardware, let us show you how.
How to Enable Ultimate Performance Mode
Enabling the Ultimate Performance plan can be simple, provided you have the option visible in the Control Panel. Regardless, only a few additional steps need to be taken if the device isn’t available to add or enable it (in the case of a battery-powered PC).
Conventionally, perform the steps below to enable the Ultimate Performance Power Plan:
- Type in powercfg.cpl in Run to open the Power Options in the Control Panel.
- Now click Show additional plans to expand it.

- Here, you shall see the “Ultimate Performance” plan. If it is grayed out, click “Change settings that are currently unavailable.”

- Now click Ultimate Performance to select it.


Ultimate Performance mode will now be enabled. However, if you do not see the option, launch either the Command Prompt or Windows PowerShell and paste the following command:
powercfg -duplicatescheme e9a42b02-d5df-448d-aa00-03f14749eb61

After performing this task, you can select Ultimate Performance from the Power Options page in the Control Panel as discussed above.
Note: Windows 11 lets you manage your power plans through the Settings app. This can be managed from Settings app >> System >> Power and Battery >> Power Mode. However, while the Ultimate Performance mode is selected, Windows 11 disables managing your power plans from the app. This can only be changed from the Control Panel.

How to Disable Ultimate Performance Mode
In case you need to disable the Ultimate Performance power plan, you can simply select another power plan from the Power Options page in the Control Panel (Run >> powercfg.cpl).
However, if you want to remove the option entirely, perform these steps:
- Type in powercfg.cpl in Run to open the Power Options in the Control Panel.
- Click “Change settings that are currently unavailable.”
- Now select another power plan from the list (making Ultimate Performance available for changes), and then click Change plan settings in front of Ultimate Performance.
- On the next page, click Delete this plan.
- When asked for a confirmation, click Ok.


The Ultimate Performance Power Plan will now no longer exist on your computer.
Continuously running your PC on the Ultimate Performance power plan also has its downsides. So how would you know whether it is right for you?
Should You Enable Ultimate Performance Mode
The Ultimate Performance mode consumes a lot of energy, which eventually adds to your power consumption and thus, the electricity costs. Therefore, you must remember that using this power plan will cost you.
Considering that if you see negligible performance gains on your PC after enabling the Ultimate Performance mode, it may not be worth the cost.
With these considerations, it can be concluded that you should only enable the Ultimate Performance power plan if you see a significant performance difference, and you are ready to bear the overhead costs. Of course, we suggest that it should only be enabled when doing heavy tasks on your PC and then switched back to your usual power plan.
Closing Words
We do not recommend the Ultimate Performance Power Plan all the time, especially on battery-operated devices (laptops). This is because laptops have two main advantages over desktop computers: portability and backup power.
With Ultimate Performance always selected, it is bound to drain your battery much faster than your PC, reducing your backup timing and possibly reducing the productivity you were hoping for.
В Windows уже больше десяти лет есть три схемы электропитания: энергосбережение, сбалансированный режим и режим высокой производительности. По сути, они охватывали весь спектр пользовательских задач, однако Microsoft в обновлении Spring Creators Update решила добавить еще одну схему, которая называется Ultimate Performance, или максимальная производительность. В чем ее разница с высокой производительностью? В том, что в новом режиме вся производительность компьютера сосредотачивается на одной нужной вам задаче, а фоновые процессы или практически не получают ресурсов, или вообще приостанавливаются. В режиме высокой производительности Windows просто не разрешает сильно снижать частоту процессора и останавливать некоторые фоновые процессы.

Иными словами, режим максимальной производительности нужен, когда требуется, чтобы одна программа — игра, рендер, обсчет — работали максимально быстро. Режим высокой производительности нужен, чтобы вся система и все программы работали быстро, без упора на какую-либо одну задачу. Однако следует понимать, что включение нового режима не ускорит работу нужной вам программы в разы — в лучшем случае разница будет в единицы процентов, так как и до этого режима Windows вполне неплохо умела «рулить» доступными ресурсами. Но в случае с долгими расчетами это может сэкономить вам несколько минут (а может и десятков минут), что вполне ощутимо.
На данный момент новый режим сразу доступен только для Windows 10 Pro для рабочих станций, однако Microsoft не стала (или забыла?) вырезать его из обычных версий Windows 10, поэтому его можно достаточно легко включить. Для этого нажмите правой кнопкой мыши на меню Пуск > Windows PowerShell (администратор), и в открывшемся окне введите команду powercfg -duplicatescheme e9a42b02-d5df-448d-aa00-03f14749eb61 и нажмите Enter.
В настройках электропитания появится раздел: Максимальная производительность. Она полностью работоспособна, однако не рассчитана на использование от аккумулятора, так что лучше всего ее включать на компьютерах (ну или на ноутбуках, работающих от сети).
How to Enable the Ultimate Performance Power Plan in Windows 10
Windows 10 is lauded for its versatility, and one of its most compelling features is the ability to tailor the operating system to suit your needs. Whether you are a gamer, a developer, or someone who simply demands maximum performance for intensive applications, Windows 10 offers various power plans to help optimize your system’s performance. One such plan is the «Ultimate Performance» power plan. While this power plan is designed primarily for high-performance computing scenarios, it can still be beneficial for gamers and power users looking for every ounce of performance from their machines.
This article provides a comprehensive guide on how to enable the Ultimate Performance Power Plan in Windows 10, along with insights into what this plan does, when it should be used, and some tips on maximizing performance while using this power plan.
Understanding Power Plans in Windows 10
Before we dive into the steps for enabling the Ultimate Performance power plan, it’s crucial to understand what power plans are and how they work in Windows 10.
What Are Power Plans?
Power plans in Windows 10 are preset configurations that dictate the behavior of your computer concerning power consumption and performance. These plans determine how the operating system handles various hardware components, such as the CPU, GPU, storage devices, display, and network adaptors.
There are three primary power plans available by default in Windows 10:
-
Balanced: This is the default power plan and offers a good balance between performance and energy consumption. It automatically adjusts the CPU speed based on the workload.
-
Power Saver: This plan reduces the performance of your computer to save energy. It’s mainly suitable for laptops and mobile devices where battery life is a priority.
-
High Performance: This plan maximizes performance but can lead to higher power consumption. It keeps the CPU running at higher speeds for a more responsive experience.
What Is the Ultimate Performance Power Plan?
The Ultimate Performance power plan is designed for high-end workstations that require maximum performance under heavy workloads, virtually eliminating micro-latencies in the system. It optimizes system settings for workloads that demand the utmost efficiency and speed.
This plan is not available by default for all installations of Windows 10 but is particularly beneficial for users who run resource-intensive applications such as 3D rendering software, video editing tools, and gaming platforms.
Benefits of the Ultimate Performance Power Plan
Using the Ultimate Performance power plan can yield several advantages, such as:
- Reduced Latency: This plan is designed to minimize system latency, making it particularly useful for real-time applications and gaming.
- Improved Responsiveness: The system will respond faster to your commands and lead to a more fluid experience during demanding tasks.
- Enhanced Resource Management: It can allocate CPU resources more effectively, ensuring that applications have the power they need without unnecessary throttling.
When to Use the Ultimate Performance Power Plan
While the Ultimate Performance plan offers distinct advantages, it is not for everyone. Here are scenarios in which you might consider enabling it:
- Gaming: If you’re serious about gaming and want to eliminate any potential lag or performance bottlenecks, this power plan is worth enabling.
- Content Creation: Video editing, 3D rendering, and similar tasks can greatly benefit from the performance boost provided by this plan.
- Running Virtual Machines: If you’re running multiple virtual machines that require substantial resources, this plan can help manage those demands more efficiently.
However, if you’re using a battery-powered laptop, you might find that this power plan drains your battery quickly. In such cases, it’s wise to switch back to a more energy-efficient plan when not engaged in resource-heavy tasks.
Steps to Enable the Ultimate Performance Power Plan
Now that you understand the importance of the Ultimate Performance power plan and when to use it, let’s go through the steps to enable it.
Step 1: Open Command Prompt as Administrator
The Ultimate Performance power plan isn’t available through the standard settings menu, so you’ll need to use the Command Prompt to access it.
- Click on the Start Menu.
- Type cmd in the search bar.
- Right-click on Windows Command Prompt from the results and select Run as administrator.
- You might be prompted by the User Account Control (UAC) to confirm; select Yes.
Step 2: Enable the Ultimate Performance Power Plan
Once you have the Command Prompt open, you can enable the Ultimate Performance power plan by following these steps:
-
In the Command Prompt window, type the following command and hit Enter:
powercfg -duplicatescheme fffb8b3f-9b2e-4008-9b1e-4dbc12aa9c14This command adds the Ultimate Performance plan to your power plan list.
Step 3: Access and Activate the Ultimate Performance Plan
After executing the command, follow these steps to activate the Ultimate Performance plan:
-
Press Windows + X on your keyboard to open the Power User menu.
-
Click on Power Options.
-
In the Power & sleep settings window, scroll down and click on Additional power settings on the right side.
-
You should now see the Ultimate Performance power plan listed alongside other power plans.
-
Click on the dot next to Ultimate Performance to select it.
Step 4: Fine-Tuning Plan Settings (Optional)
Even after enabling the Ultimate Performance power plan, you might want to adjust specific settings to fit your workflow better. Here’s how:
-
In the same Additional power settings area, click on Change plan settings next to the Ultimate Performance plan.
-
Click on Change advanced power settings. A new window will open with various customizable options.
-
Here, you can adjust settings for the hard disk, sleep, processor power management, and more. Make the necessary adjustments, and click OK to apply.
Tips for Optimizing Windows 10 Performance with the Ultimate Performance Plan
Enabling the Ultimate Performance plan is just the first step towards optimizing your system. Here are additional tips to ensure that your Windows 10 runs at peak performance:
1. Keep Your Drivers Updated
Always keep your drivers up-to-date, especially for your graphics card and motherboard. You can do this through the Device Manager or by visiting the manufacturer’s website for the latest versions.
2. Regularly Clean Your System
Remove any unnecessary files and programs that may be slowing down your system. Use tools like Disk Cleanup, CCleaner, or your built-in system settings to uninstall software that you no longer need.
3. Monitor Resource Usage
Keep an eye on your CPU and memory usage. Use Task Manager (press Ctrl + Shift + Esc) to monitor which applications are consuming the most resources. This information can help you optimize running applications.
4. Manage Startup Programs
Minimize the number of programs that run at startup. In Task Manager, navigate to the Startup tab and disable any programs that you do not need to launch automatically with Windows.
5. Disable Background Apps
Some applications run in the background and utilize system resources without immediate benefits. Go to Settings > Privacy > Background apps, and toggle off apps that you do not need running when you’re not actively using them.
6. Adjust Visual Effects for Performance
If you want to improve visual performance without compromising functionality, consider adjusting the visual effects of Windows. Right-click on This PC, select Properties, then click on Advanced system settings. Under the Performance section, click Settings, and select the option to adjust for best performance.
Conclusion
Enabling the Ultimate Performance power plan in Windows 10 can unlock remarkable performance improvements for users who require every last bit of processing power. Whether you’re a gamer seeking to eliminate lag or a professional working on resource-hungry applications, this plan can be an essential tool for enhancing productivity and responsiveness.
However, it’s essential to weigh the benefits against the increased power consumption and adjust other settings and practices accordingly. By following the steps in this guide and implementing optimization tips, you’ll be well on your way to experiencing the ultimate performance in Windows 10.
Always remember to revert back to a more balanced plan for everyday tasks, especially if you are running on battery power, to preserve your system’s longevity and efficiency.