
Applies ToWindows 11 Windows 10
Установочный носитель, например USB-устройство флэш-памяти, можно использовать для установки новой копии Windows, выполнения чистой установки Windows или переустановки Windows.
Чтобы создать установочный носитель, перейдите на веб-сайт загрузки программного обеспечения, где можно найти пошаговые инструкции. На этом веб-сайте можно выбрать версию Windows и создать установочный носитель на USB-накопителе. Кроме того, можно создать ISO-файл для использования на виртуальных машинах или записи установочного носителя на DVD-диске:
-
Перейдите на сайт скачать Windows 11.
-
В разделе Создание установочного носителя Windows 11 выберите Скачать. Скачан инструментMediaCreationTool.exe .
-
Запустите MediaCreationTool.exe. Средство создания носителя содержит инструкции по созданию установочного носителя.
Важно: Создайте резервную копию файлов перед установкой и переустановкой Windows на компьютере. Узнайте, как это сделать.
Для создания установочного носителя требуются следующие элементы:
-
Компьютер с надежным подключением к Интернету. Время загрузки зависит от подключения к Интернету.
-
USB-устройство флэш-памяти. Пустое USB-устройство флэш-памяти не менее 8 ГБ. Рекомендуется использовать пустое USB-устройство флэш-памяти, так как все содержимое на диске удаляется. Для виртуальных машин USB-устройство флэш-памяти не требуется. Вместо этого можно создать ISO-файл для использования на виртуальных машинах. Iso-файл также можно использовать для создания установочного носителя на DVD-диске.
-
Ключ продукта. Может потребоваться 25-значный ключ продукта (не требуется для цифровых лицензий). Сведения о поиске ключа продукта см. в статье Поиск ключа продукта Windows. Многие современные устройства содержат ключ продукта, встроенный в встроенное ПО устройства. Если ключ продукта внедрен в встроенное ПО устройства, его не нужно вводить вручную. Вместо этого, если ключ продукта в встроенном ПО соответствует устанавливаемой версии и выпуску Windows, ключ продукта применяется автоматически.
После создания установочного носителя Windows можно сбросить или переустановить. Дополнительные сведения см. в статье Параметры восстановления в Windows.
Нужна дополнительная помощь?
Нужны дополнительные параметры?
Изучите преимущества подписки, просмотрите учебные курсы, узнайте, как защитить свое устройство и т. д.
Rufus
Создать загрузочный USB-диск? Это просто
Rufus — это утилита для форматирования и создания загрузочных флешек, карт памяти и т.д.
Rufus особенно полезен, когда нужно:
- создать загрузочный USB-диск из загрузочного ISO-образа (Windows, Linux, UEFI и т.д.)
- работать на системах, где не установлена ОС
- обновить BIOS или другую прошивку из-под DOS
- запустить низкоуровневую утилиту
Несмотря на небольшой размер, Rufus умеет делать всё, что нужно!
Внизу страницы приведён неполный список ISO-образов, с которыми Rufus умеет работать. (1)
Скачать
Новейшие версии:
| Ссылка | Тип | Платформа | Размер | Дата |
|---|---|---|---|---|
rufus-4.7.exe |
Стандарт | Windows x64 | 1.6 МБ | 2025.04.09 |
rufus-4.7p.exe |
Переносная версия | Windows x64 | 1.6 МБ | 2025.04.09 |
rufus-4.7_x86.exe |
Стандарт | Windows x86 | 1.6 МБ | 2025.04.09 |
rufus-4.7_arm64.exe |
Стандарт | Windows ARM64 | 5.3 МБ | 2025.04.09 |
Другие версии (GitHub)
Другие версии (FossHub)
Системные требования:
Windows 8 или новее. После загрузки приложение готово к использованию.
Поддерживаемые языки:
| Bahasa Indonesia | , | Bahasa Malaysia | , | Български | , | Čeština | , | Dansk | , | Deutsch | , | Ελληνικά | , |
| English | , | Español | , | Français | , | Hrvatski | , | Italiano | , | Latviešu | , | Lietuvių | , | Magyar | , | Nederlands | , | Norsk | , |
| Polski | , | Português | , | Português do Brasil | , | Русский | , | Română | , | Slovensky | , | Slovenščina | , | Srpski | , |
| Suomi | , | Svenska | , | Tiếng Việt | , | Türkçe | , | Українська | , | 简体中文 | , | 正體中文 | , | 日本語 | , | 한국어 | , | ไทย | , |
| עברית | , | العربية | , | پارسی | . |
Выражаем благодарность переводчикам Rufus и этой веб-страницы. Если Rufus есть на вашем языке, поблагодарите и вы их тоже!
Использование
Скачайте исполняемый файл и запустите его – установка не требуется.
Исполняемый файл имеет цифровую подпись, содержащую:
- «Akeo Consulting» (v1.3.0 или новее)
- «Pete Batard — Open Source Developer» (v1.2.0 или старее)
О поддержке DOS:
Если вы создаёте загрузочный диск DOS и используете клавиатуру не с американской раскладкой, Rufus попытается выбрать раскладку в соответствии с региональными настройками вашей системы.
О поддержке ISO:
Все версии Rufus, начиная с 1.1.0, позволяют создать загрузочный USB-диск из ISO-образа (.iso).
Создать ISO-образ из физического диска или из набора файлов очень легко с помощью программ для записи оптических дисков, например, бесплатных InfraRecorder или CDBurnerXP.
Типичные вопросы (FAQ)
FAQ по Rufus доступен ЗДЕСЬ.
Чтобы оставить отзыв, сообщить об ошибке или предложить идею, используйте GitHub трекер проблем. Также вы можете отправить письмо.
Лицензия
Открытое лицензионное соглашение GNU (GPL) версии 3 или новее.
Вы можете свободно распространять, изменять или даже продавать программное обеспечение при соблюдении лицензии GPLv3.
Rufus создан со 100% открытым кодом в среде MinGW32.
Изменения
- Версия 4.7 (2025.04.09)
- Add a mechanism to detect and download updated DBXs from the official UEFI repository
- Add ztsd compression support for disk images
- Add a new exclusion feature in the settings, to ignore disks with a specific GPT GUID
- Improve detection for compressed VHD images that are too large to fit the target drive
- Fix commandline hogger not being deleted when running Rufus from a different directory
- Fix FAT filenames from embedded images being potentially truncated on image extraction
- Fix a side-loading vulnerability [CVE-2025-26624] with
cfgmgr32.dll(with thanks to @EmperialX) - Fix UI memory leaks (courtesy of @ozone10)
- Fall back to user/system default locale when getting error description (courtesy of @Wack0)
- Don’t run the commandline hogger on POSIX shells
- Drop ARM 32-bit builds (Note that ARM 64-bit builds are NOT affected by this)
- Update FreeDOS and Grub4DOS to latest
- Другие версии
Исходный код
- Rufus 4.7 (6.6 МБ)
- Кроме того, вы можете клонировать git репозиторий с помощью:
$ git clone https://github.com/pbatard/rufus
- Дополнительные сведения см. в проекте на GitHub.
Если вы разработчик, то можете помочь в развитии Rufus, присылая свои патчи с изменениями.
Пожертвования
Поскольку постоянно задаются вопросы о пожертвовании, поясню: на странице нет кнопки пожертвования.
Причина отсутствия возможности пожертвовать в том, что, по моему мнению, пожертвования не помогают в разработке программ, а лишь вызывают чувство вины у пользователей, которые не пожертвовали.
Если вы всё же настаиваете, то можете сделать пожертвование в Free Software Foundation, так как именно благодаря FSF стало возможным создать Rufus.
В любом случае хочу вам сказать спасибо за вашу постоянную поддержку и энтузиазм, связанные с этой небольшой программой: для меня это очень важно!
Продолжайте пользоваться Rufus безвозмездно, без каких-либо пожертвований – вы ничего не должны!
(1) Неполный список ISO-образов, с которыми Rufus умеет работать
| AlmaLinux | , | Arch Linux | , | Archboot | , | CentOS | , | Clonezilla | , | Damn Small Linux | , | Debian | , | Elementary OS | , |
| Fedora | , | FreeDOS | , | Garuda Linux | , | Gentoo | , | GParted | , | Hiren’s Boot CD | , | Kali Linux | , | Knoppix | , | KolibriOS | , |
| Linux Mint | , | Manjaro Linux | , | NT Password Registry Editor | , | OpenSUSE | , | Raspberry Pi OS | , | Raspbian | , |
| ReactOS | , | Red Hat | , | rEFInd | , | Rocky Linux | , | Slackware | , | Super Grub2 Disk | , | Tails | , | Trinity Rescue Kit | , |
| TrueNAS CORE | , | Ubuntu | , | UEFI Shell | , | Ultimate Boot CD | , | Windows XP (SP2+) | , | Windows Vista | , |
| Windows 7 | , | Windows 8/8.1 | , | Windows 10 | , | Windows Server 2019 | , | Windows 11 | , | … |
В инструкции ниже подробно о том, как создать загрузочную флешку Windows 10 различными способами — с помощью официальных средств, предоставляемых Майкрософт или сторонних программ.
Приведены методы записи установочного USB-накопителя с оригинальной Windows 10 Pro и Home x64 (64-бит) и x86 (32-бит) в фирменной утилите Microsoft Installation Media Creation Tool и дополнительные способы и бесплатные программы, которые помогут вам в записи установочного USB накопителя из ISO образа с Windows 10 для установки ОС в системах UEFI и Legacy, на GPT и MBR диск или, если это необходимо — для восстановления системы.
Media Creation Tool
Сразу после выхода финальной версии новой ОС, на сайте Microsoft появилась официальная утилита Windows 10 Installation Media Creation Tool (сегодня Microsoft Media Creation Tool), позволяющая создать загрузочную флешку для последующей установки системы, автоматически загружающая на накопитель последнюю выпущенную финальную версию Windows 10 и создающая USB-накопитель для загрузки как в UEFI так и в Legacy режиме, подходящий для GPT и MBR дисков HDD и SSD.
С помощью данной программы вы получаете оригинальную Windows 10 Pro (Профессиональная, в том числе для рабочих станций), Home (Домашняя), Home для одного языка с сайта Майкрософт. И в полной мере такая флешка подойдет в том случае, если у вас есть ключ Windows 10, цифровая лицензия, либо на компьютере или ноутбуке уже была установлена лицензионная Windows 10 или 8.1 при покупке, а теперь хотите выполнить чистую установку. В последних двух случаях при установке пропустите ввод ключа, нажав «У меня нет ключа продукта», система активируется автоматически при подключении к Интернету. Вы можете установить Windows 10 с такого USB накопителя и без выполнения этих условий и работать без активации (и без особых ограничений), либо активировать её ключом от предыдущей версии системы.
Шаги по созданию загрузочной флешки Windows 10 официальным способом будут выглядеть следующим образом, сам накопитель желательно подключить сразу, размер — не менее 8 Гб, данные с нее в процессе будут удалены:
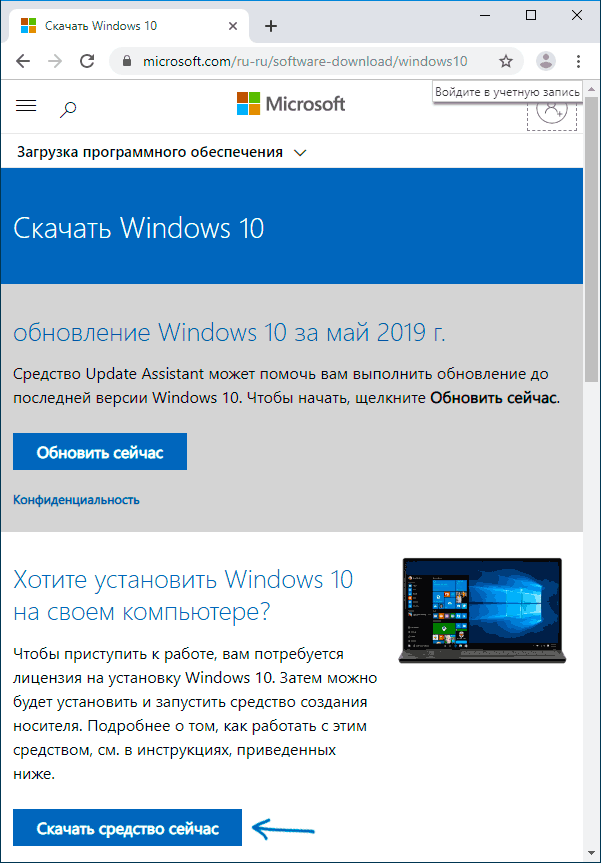
- Скачать утилиту для создания загрузочной флешки Windows 10 Microsoft Installation Media Creation Tool можно с официального сайта https://www.microsoft.com/ru-ru/software-download/windows10, нажав кнопку «Скачать средство сейчас». Если загрузка окажется недоступной, можно использовать альтернативные методы.

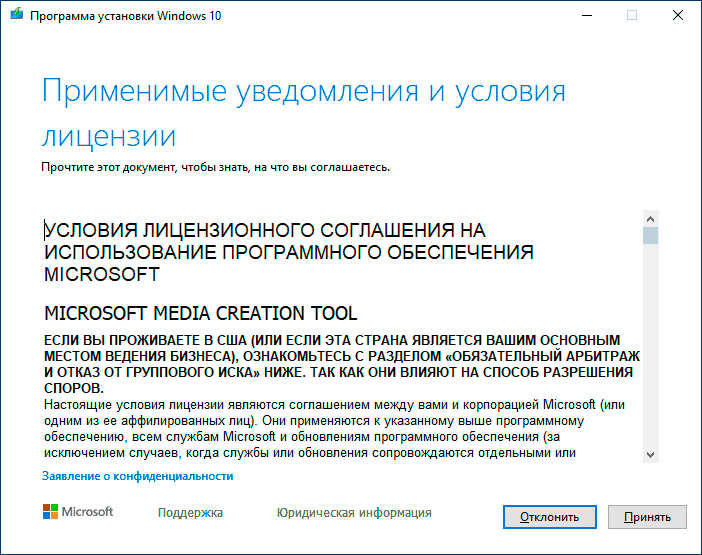
- Запустите загруженную утилиту и примите условия лицензионного соглашения.

- Выберите пункт «Создать установочный носитель USB-устройство флэш памяти» и нажмите «Далее».
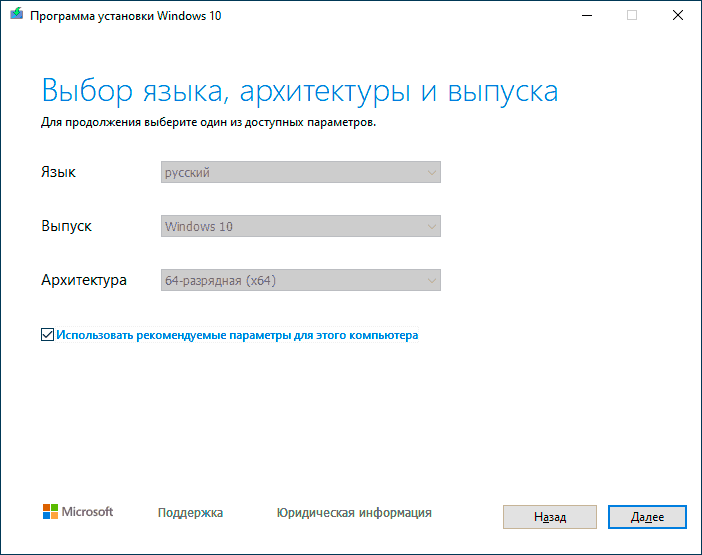
- Через некоторое время появится окно выбора архитектуры, языка системы и её выпуска. По умолчанию установлены рекомендуемые параметры, в соответствии с характеристиками текущей системы, но сняв отметку, вы можете выбрать другой язык или разрядность — 64-бит или 32-бит. Учитывайте, что в одном образе содержатся сразу все редакции Windows 10: в поле выпуск ничего поменять нельзя, выбор профессиональной или домашней версии ОС происходит во время установки.
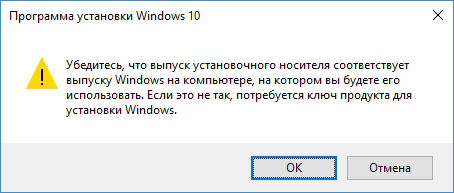
- В случае, если вы сняли отметку «Использовать рекомендуемые параметры для этого компьютера» и выбрали иную разрядность или язык, вы увидите предупреждение: «Убедитесь, что выпуск установочного носителя соответствует выпуску Windows на компьютере, на котором вы будете его использовать». Учитывая, что на данным момент времени в образе содержатся сразу все выпуски Windows 10, обычно на это предупреждение не следует обращать внимания.

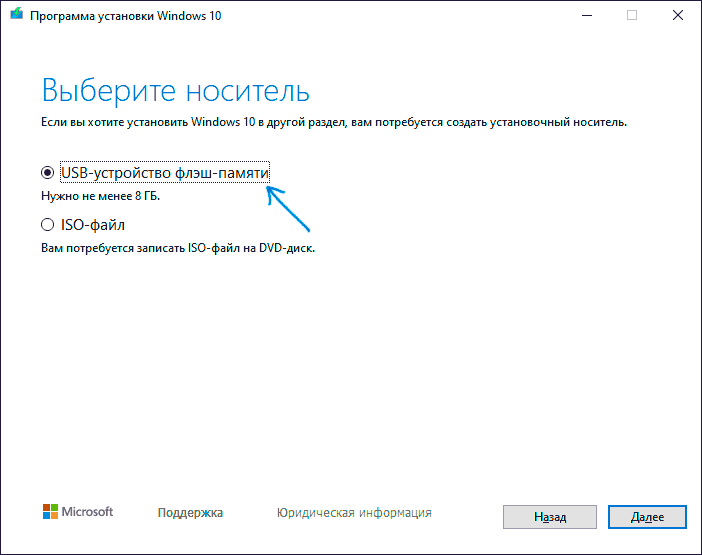
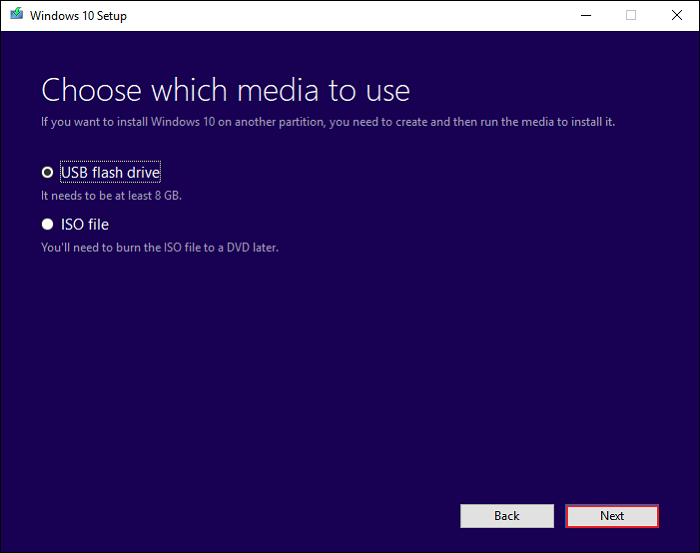
- Выберите пункт «USB-устройство флэш-памяти», если требуется, чтобы программа сама записала загрузочную установочную флешку, либо, при желании, вы можете выбрать пункт «ISO-файл», чтобы скачать оригинальный образ Windows 10 и записать его на USB или DVD самостоятельно.
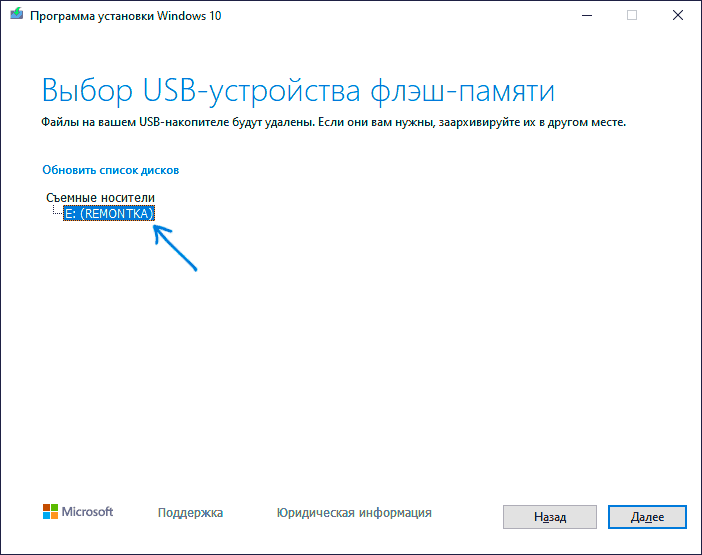
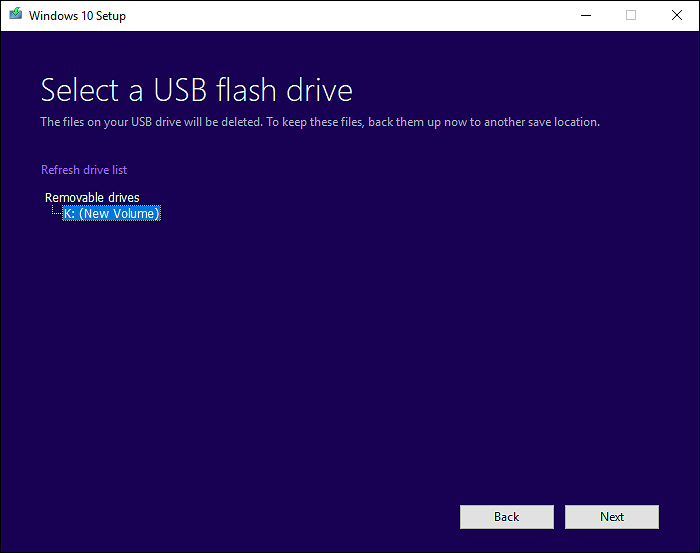
- Выберите накопитель, который будет использоваться из списка. Важно: все данные с флешки или внешнего жесткого диска (со всех его разделов) будут удалены. При этом, если вы создаете установочный накопитель на внешнем жестком диске или на USB накопителе размером более 32 Гб, вам пригодятся сведения в разделе «Дополнительная информация» в конце этой инструкции.
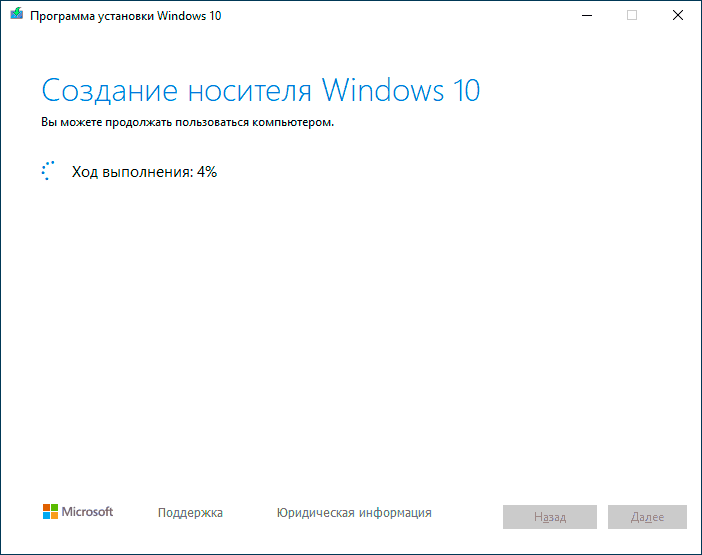
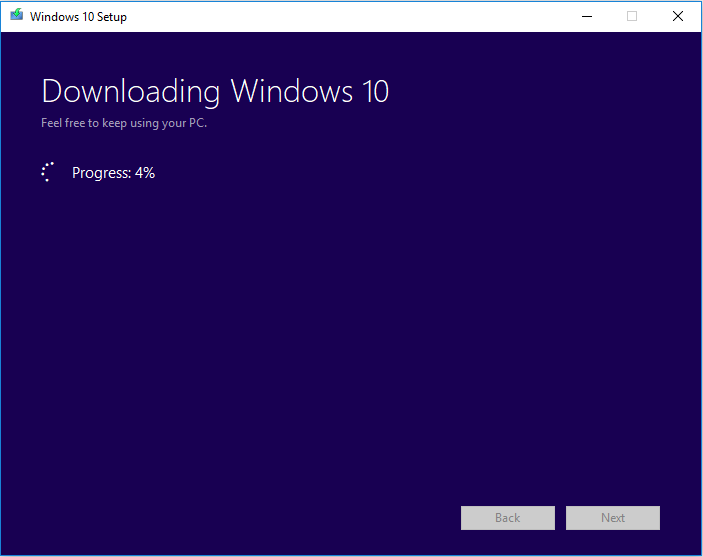
- Начнется скачивание файлов установки Windows 10, а затем — их запись на флешку: Создание установочного накопителя. Эти этапы могут занять продолжительное время.
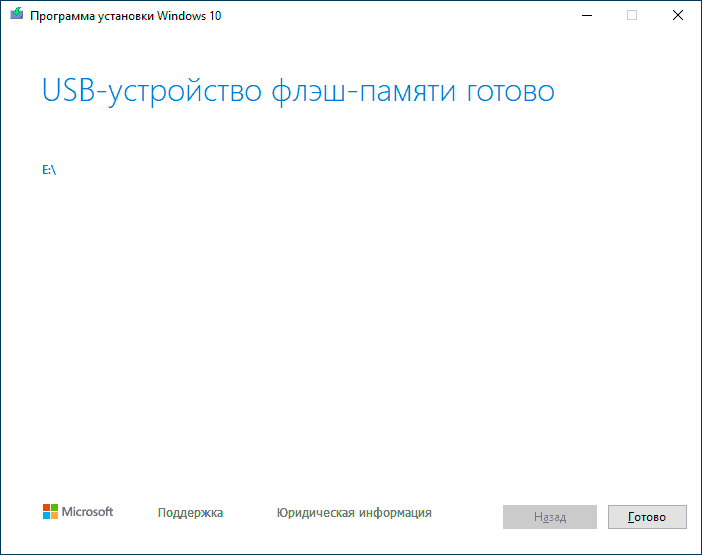
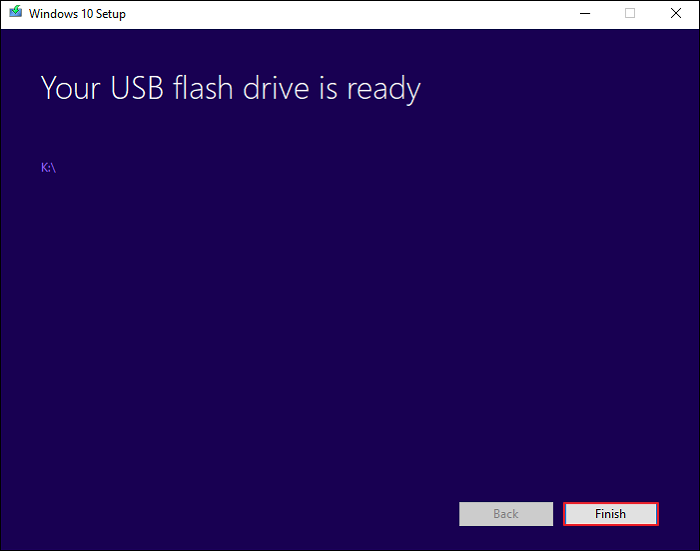
- По завершении вы получите сообщение «USB-устройство флэш-памяти готово», можно закрыть утилиту и использовать созданный накопитель.

По окончании у вас будет готовый накопитель с оригинальной Windows 10 последней версии, который пригодится не только для чистой установки системы на системах UEFI и Legacy (CSM), но и для ее восстановления в случае сбоев.
Использование Rufus для записи установочного USB
Если ваш компьютер или ноутбук не имеет UEFI (то есть у вас обычный БИОС) или по какой-то иной причине предыдущий способ не подошел, Rufus — отличная программа (и на русском языке), чтобы быстро сделать загрузочную USB флешку для установки Windows 10 для самых разных систем.
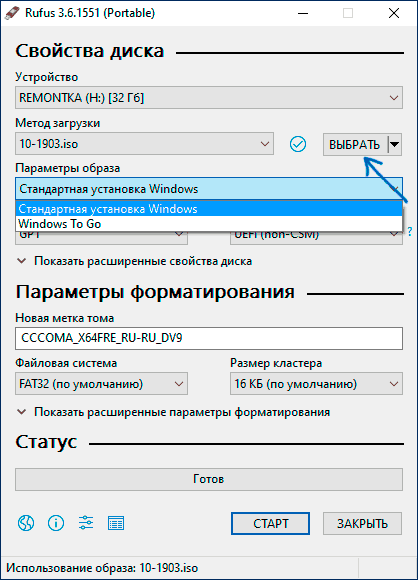
В программе достаточно указать USB накопитель, на который будет произведена запись, нажать кнопку «Выбрать», чтобы указать путь к образу ISO с Windows 10 (также вы можете скачать Windows 10 прямо в Rufus, однако в РФ функция может не работать), а в поле «Параметры образа» указать «Стандартная установка Windows».
Также следует обратить внимание на выбор пунктов в «Схема раздела» и «Целевая система». В общем случае, при выборе следует исходить из следующего:
- Для компьютеров с обычным БИОС или для установки Windows 10 на компьютере с UEFI на диск MBR выбираем «MBR» в качестве схемы разделов и «BIOS или UEFI-CSM» в целевой системе.
- Для компьютеров с UEFI для установки на GPT диск выбираем соответствующие параметры.
После этого достаточно нажать «Старт» и дождаться завершения копирования файлов на флешку. Более подробно о доступных настройках в программе, видео инструкция и официальный сайт утилиты — Загрузочная флешка Windows 10 в Rufus.
Ventoy
Бесплатная утилита Ventoy для создания загрузочных и мультизагрузочных накопителей быстро набрала популярность за счет удобства использования, совместимости и функциональности. Подойдет она и для создания установочного накопителя Windows 10 — для UEFI и Legacy загрузки, в том числе с поддержкой Secure Boot.
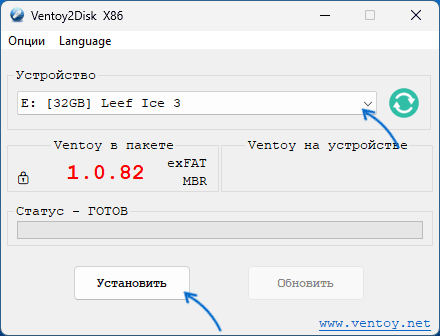
В общих чертах порядок использования программы состоит из следующих шагов:
- Установка Ventoy на накопитель: он форматируется и делится на два раздела — один с загрузчиком, другой — для файлов ISO образов.
- Простое копирование образа ISO с Windows 10 или другой операционной системой на соответствующий раздел.
Подробно об использовании Ventoy, настройках и дополнительных возможностях инструмента в инструкции про использование Ventoy.
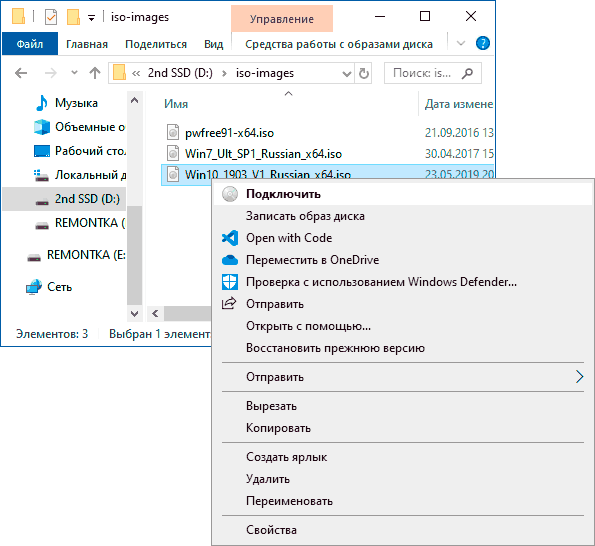
Создание загрузочной флешки Windows 10 без программ
Вы можете сделать загрузочную флешку Windows 10 вообще без программ: это требует, чтобы ваша материнская плата (на том компьютере, где будет использоваться загрузочная флешка) была с ПО UEFI (большинство материнских плат последних лет), т.е. поддерживала EFI-загрузку, а установка проводилась на диск HDD или SSD с таблицей разделов GPT (или было не критичным удаление всех разделов с него). Внимание: этот способ не сработает, если внутри файла образа есть файлы размером более 4 Гб. Подходящий образ ISO может быть создан с помощью Media Creation Tool.
Вам потребуется: образ ISO с системой и USB накопитель подходящего объема, отформатированный в FAT32 (обязательный пункт для данного способа). Причем если он уже в нужной файловой системе, имеющиеся данные с него удалять не обязательно. Сами же действия по созданию загрузочной флешки Windows 10 состоят из следующих шагов:
- Смонтируйте образ Windows 10 в системе, в последних версиях ОС это можно сделать, нажав по файлу образа правой кнопкой мыши и выбрав пункт «Подключить».

- Скопируйте все содержимое, все файлы и папки, из смонтированного образа на USB накопитель.

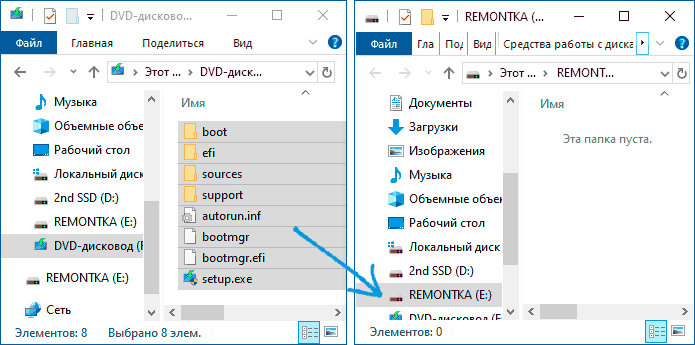
Готово. Теперь, при условии, что на компьютере выставлен режим загрузки UEFI, вы можете легко загрузиться и установить Windows 10 с изготовленного накопителя. Для того, чтобы выбрать загрузку с флешки, лучше всего воспользоваться Boot Menu материнской платы.
UltraISO
Программа UltraISO, служащая для создания, изменения и записи ISO образов, очень популярна у пользователей и, в том числе, может быть использована для того, чтобы сделать загрузочную флешку.
Процесс создания состоит из следующих шагов:
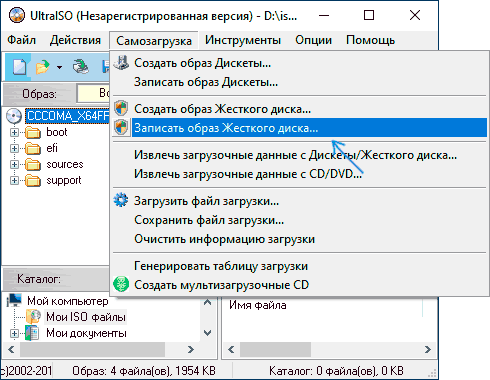
- Открыть образ ISO Windows 10 в UltraISO через меню Файл — Открыть.
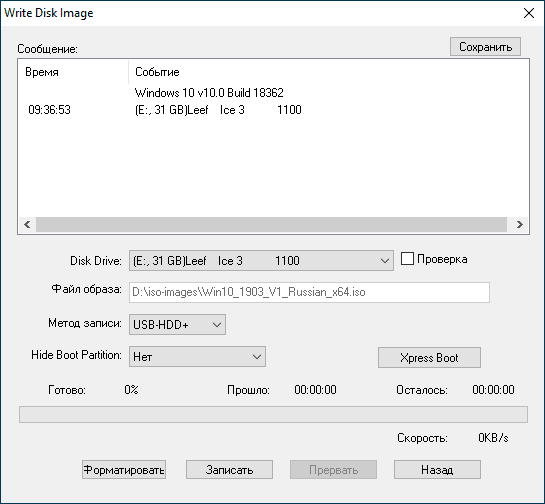
- В пункте меню «Самозагрузка» выбрать пункт «Записать образ жесткого диска».

- С помощью мастера записать установочный образ на USB накопитель, какие-либо параметры обычно менять не требуется.

Более подробно процесс описан у меня в руководстве Создание загрузочной флешки в UltraISO.
Windows 7 USB/DVD Download Tool
Официальная бесплатная утилита Microsoft, изначально созданная для записи образа Windows 7 на DVD-диск или USB накопитель не потеряла актуальности и с выходом новых версий ОС — ее все так же можно использовать, если вам нужен дистрибутив для установки.
Процесс создания загрузочной флешки Windows 10 в данной программе состоит из 4-х шагов:
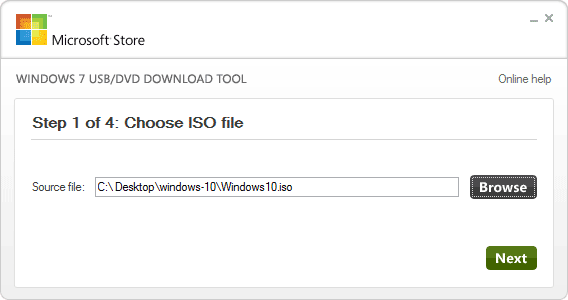
- Выберите образ ISO с Windows 10 на вашем компьютере и нажмите «Next» (Далее).

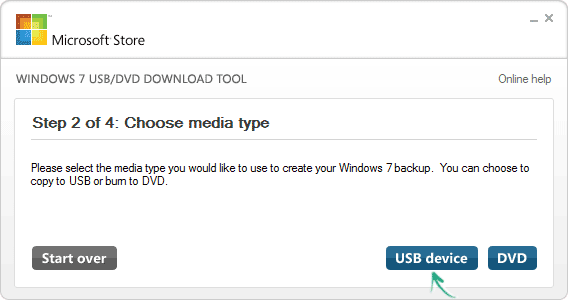
- Выберите: USB device — для загрузочной флешки или DVD — для создания диска.
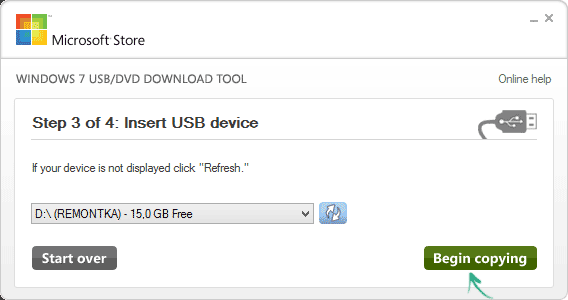
- Выберите USB накопитель из списка. Нажмите кнопку «Begin copying» (появится предупреждение о том, что все данные с флешки будут удалены).
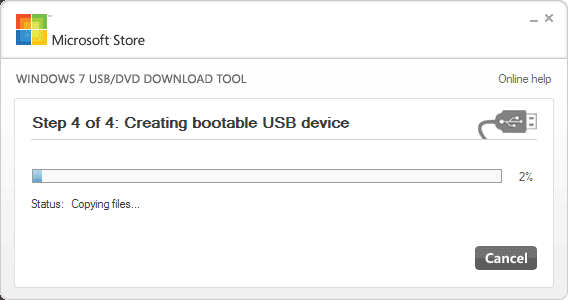
- Дождитесь окончания процесса копирования файлов.
На этом создание установочного USB-диска завершено, можно начинать им пользоваться.
Скачать Windows 7 USB/DVD Download Tool на данный момент можно со страницы на официальном сайте — wudt.codeplex.com (обновление: сайт более недсотупен, но вы можете скачать оригинальный файл, с помощью подходов, описанных в этой инструкции).
WinSetupFromUSB для создания мультизагрузочной флешки
WinSetupFromUSB — одни из моих любимых программ для целей записи загрузочных и мультизагрузочных USB. Ее можно использовать и для Windows 10, причем с помощью программы вы можете создать одну флешку с разными образами Windows 10.

Процесс (в базовом варианте, без учета нюансов) будет состоять из выбора USB накопителя, установки отметки «Autoformat it with FBinst» (в случае если образ не добавляется к уже имеющимся на флешке), указания пути к ISO образу Windows 10 (в поле для Windows Vista, 7, 8, 10) и нажатия кнопки «Go». Для детальной информации: Инструкция и видео по использованию WinSetupFromUSB.
Некоторые дополнительные сведения, которые могут быть полезны в контексте создания загрузочной флешки Windows 10:
- Загрузиться с флешки проще всего, используя Boot Menu, а не изменяя параметры загрузки в БИОС или UEFI. Если в меню загрузки накопитель отображается 2 раза — с пометкой UEFI (или EFI) и без неё, для установки на GPT диск выбирайте с пометкой, для установки на MBR — без пометки.
- В последнее время получил несколько комментариев о том, что при использовании внешнего USB диска (HDD) для создания загрузочного накопителя, он приобретает файловую систему FAT32 и его объем меняется: в данной ситуации, после того, как файлы установки на диске больше не нужны, нажмите клавиши Win+R, введите diskmgmt.msc и в управлении дисками удалите все разделы с этого накопителя, после чего отформатируйте его с нужной вам файловой системой. Либо используйте инструкцию: Как удалить разделы на флешке.
- Установку с флешки можно произвести не только загрузившись с неё в БИОС, но и запустив файл setup.exe с накопителя: единственное условие в данном случае — разрядность устанавливаемой системы должна совпадать с устанавливаемой (а на компьютере должна быть установлена система не старше Windows 7). Если же вам нужно поменять 32-бит на 64-бит, то установку следует производить как описано в материале Установка Windows 10 с флешки.
- После работы официальной утилиты Майкрософт для создания установочного USB на диске могут остаться папки ESD и Windows.BT, их можно удалить.
По сути, для того, чтобы сделать установочную флешку Windows 10 подходят все способы, которые работают для Windows 8.1, в том числе через командную строку, многочисленные программы для создания загрузочной флешки. Так что, если вам не хватило описанных выше вариантов, вы можете смело использовать любой другой для предыдущей версии ОС.
В дальнейшем может пригодиться пошаговое описание процесса установки: Установка Windows 10 с флешки. Полезные в рассматриваемом контексте дополнительные материалы — Создание загрузочной флешки Windows 11, Создание загрузочной флешки Windows 10 на Mac, Загрузочная флешка Windows 10 в Linux, Запуск Windows 10 с флешки без установки
Why Do You Create Windows 10 Bootable USB from ISO
Windows 10 operating system (OS) has gained worldwide popularity due to its reliability, better user experience, and safety. Therefore, you may have reserved a copy of Windows 10. However, some computer users still want to perform a clean installation using a Windows ISO.
You may create a Windows bootable USB from an ISO for many reasons.
- Perform Windows 10 clean installation. You can make a bootable USB of Windows 10 from ISO and then boot from it to install Windows 10.
- Have a portable Windows 10 environment. You can create Windows 10 To Go drives from ISO. This allows you to have a familiar Windows 10 environment.
Besides, when something goes wrong with the OS, you may choose to reinstall Windows. In addition, to boot a non-working computer and perform a repair, you may also need a Windows repair disc or USB drive.
2 Ways to Create Windows 10 Bootable USB from ISO
There are several ways to create a Windows 10 bootable USB from ISO when you search the Internet, but some are complicated to operate, such as using CMD. Therefore, two easy and common ways to create a bootable USB from ISO on Windows 10 will be introduced here. Let’s see how they work in detail.
| Workable Solutions | Step-by-step Troubleshooting |
|---|---|
| Way 1. Use Windows 10 Media Creation Tool | Microsoft has a utility called Media Creation Tool, which allows you…Full steps |
| Way 2. Download the ISO File and Burn it to a USB Drive | Except for using Windows 10 Media Creation Tool, you can also try…Full steps |
Way 1. Use Windows 10 Media Creation Tool
Before we burn ISO to USB, you need to download the ISO file first. Microsoft has a utility called Media Creation Tool, which allows you to download a Windows 10 ISO file and create a bootable USB to install Windows 10. This is the easiest and most effective method. You apply it to create an iso image from your hard drive. Perform the instructions below to create a bootable USB from ISO.
Step 1. Head for Windows 10 download page, and click Download Now to download and install the tool.
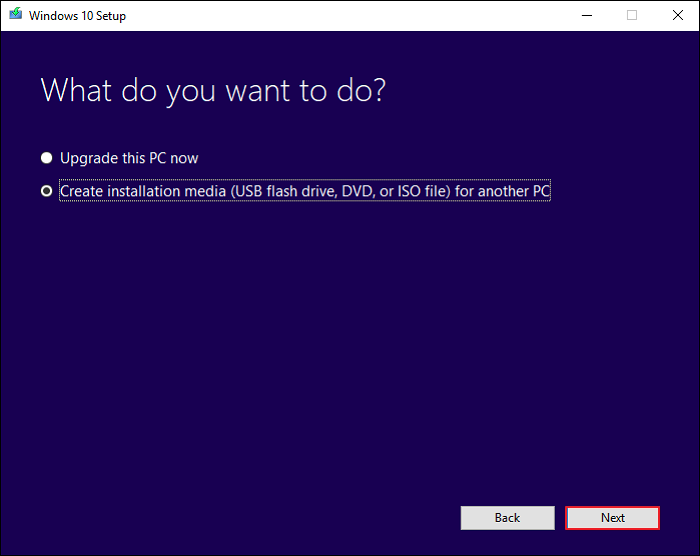
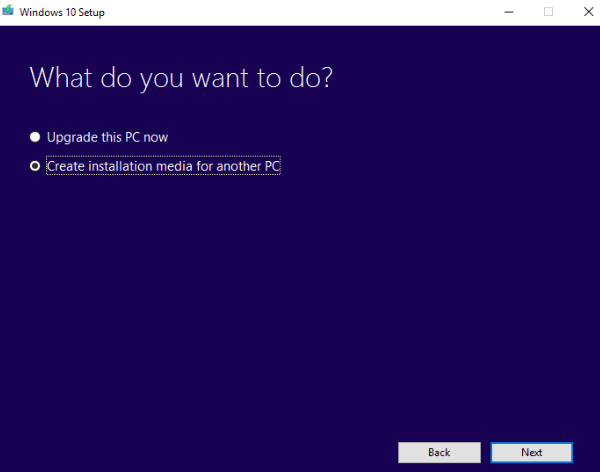
Step 2. Launch the tool, select the «Create installation media (USB flash drive, DVD, or ISO file) for another PC» option, and click Next.
If Media Creation tool does not work, click the following link to get more details.
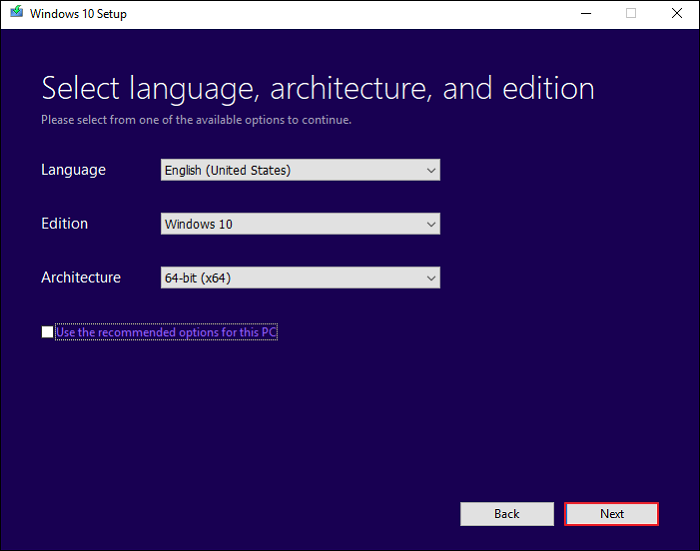
Step 3. Then, this tool will allow you to select the Language, Windows Edition, and Architecture. Also, you can uncheck the options and click «Use the recommendation for this PC» and respecify. Then, click Next.
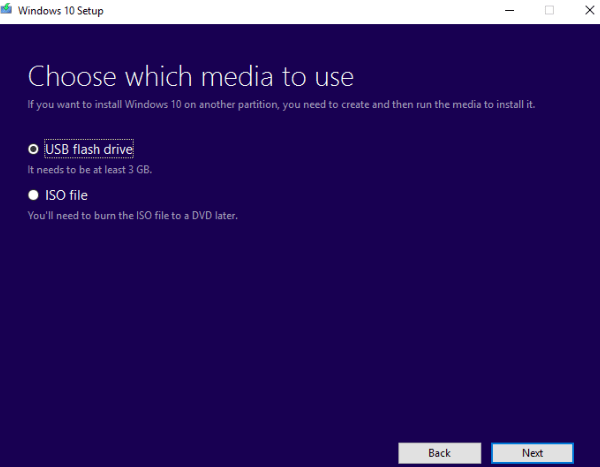
Step 4. You will see two options on the following page: USB flash drive and ISO file. Here you can directly select the USB flash drive option and make a bootable USB from ISO. Ensure your USB drive has at least 8 GB capacity.
Step 5. Select a USB drive and click Next.
Step 6. The tool will start downloading Windows 10/11 to the selected USB drive.
Step 7. When the download is completed, it will start creating Windows 10/11 media.
Step 8. «Your USB flash drive is ready» will show up when it is done. Then, click Finish. Now, you can use the USB drive to boot your computer and install Windows 10/11.
Way 2. Download the ISO File and Burn it to a USB Drive
Except for using the Windows 10 Media Creation Tool, you can also try another way. You need to download a Windows 10/11 ISO file and then use USB bootable software, such as Rufus, to burn it to your drive. Therefore, this method involves two parts.
Part 1. Download ISO File
To do so, you can also use Windows Media Creation Tool. In Choose which media to use window, select ISO file. Then, save the ISO file to a PC location. Then, continue the operations by following the wizard.
Part 2. Burn Windows ISO File to USB Drive
You can use USB bootable software like Rufus to create a bootable USB from ISO. Rufus is regarded as one of the most extraordinary tools for creating a Windows bootable USB flash drive and Windows To Go USB drive. It can also help you create an ISO image of a USB drive. It is compatible with many operating systems and is free, open-source, and straightforward.
Step 1. Download and install Rufus from its official site.
Step 2. Plug a USB drive into your PC. (Remember to back up the data on it (if any) to other places.)
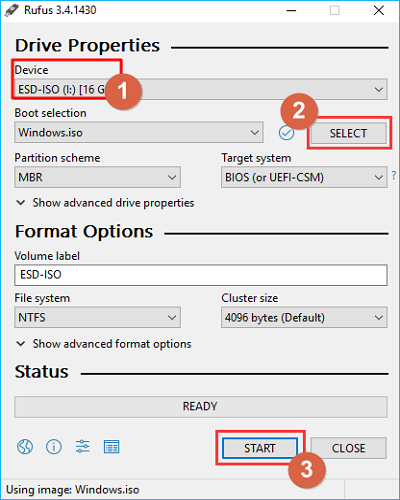
Step 3. Set the following options in Rufus to make a bootable USB flash device.
- From the Device drop-down option, select the USB flash drive.
- Click SELECT to choose the downloaded ISO file.
- Keep other options to default values. Then, click START to create a Windows bootable USB from ISO.
Step 4. When the Status displays ready (in green), click CLOSE to exit the tool.
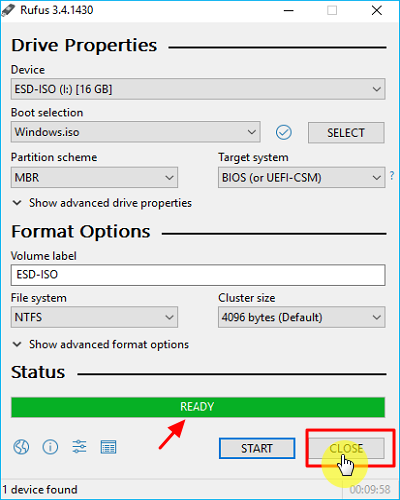
After you finish the USB bootable drive creation, you can boot your PC from it and start to install Windows 10/11.
Bonus Tip: Easy Way to Create Windows 10 Bootable USB
Creating a Windows 10 bootable USB from ISO is complicated. There are other ways to help you easily create a Windows bootable USB without using an ISO file. You can use professional Windows To Go USB creator software, like EaseUS OS2Go.
EaseUS OS2Go is a professional utility for creating a Windows bootable use. It enables you to create a Windows 10 installation USB drive without ISO. You can use it to put your Windows 10 on another PC and automatically download a desired Windows 10 version with a few simple clicks. It can help run Windows on your Mac without boot camp. The following are some other features of this tool:
- Easy-to-use interface. It has a simple and user-friendly interface to create a portable Windows To Go USB stick in seconds.
- MakeWindows portable. You can make a portable Windows for Windows 10/11.
- Run Windows on macOS. It allows you to create a bootable Windows USB drive for Mac.
- Excellent technical support. You can contact EaseUS anytime if you have an issue with OS2Go.
You can perform the following steps to create a Windows 10 bootable USB.
Step 1. Install EaseUS OS2Go on your Windows computer, it will display your system drive’s used space. Plug in a USB drive that is larger than the system drive used space. Choose the target USB drive and click Next to continue.

Step 2. EaseUS OS2Go will notify you that the following operation would delete all data on your drive. Make sure that you have backed up all the important data. Click the Continue button to proceed.

Step 3. Adjust disk layout. The default disk layout on the target drive will be exactly the same as the resource drive. You could also edit the layout according to your needs. Tick the option there if you’re using a Solid State Drive as the Windows bootable drive. Next, click Proceed.

Step 4. Then EaseUS OS2Go will start to create the portable USB drive. It usually takes a while depending on your OS and Network condition. When the progress reaches 100%, the USB drive should be bootable now.

Step 5. Insert the portable Windows USB and start your computer. Press the required key (F2, DEL, F10…) to access BIOS. Choose to boot from the USB disk.
Note: Please make sure that the boot mode (UEFI or Legacy) of the portable USB and your target computer are the same, otherwise you may not be able to boot.
The Bottom Line
That is all about how to create a bootable USB from ISO Windows 10. In short, you can use the Windows Media Creation Tool, download the ISO file, and burn it to a USB drive to help you create a Windows bootable USB.
If you do not want to create a Windows bootable USB drive using an ISO file, you can use EaseUS OS2Go to help you create one. EaseUS OS2Go is an easy-to-use tool for creating a Windows bootable USB. It also allows you to create a Windows To Go USB without the enterprise edition. Just download it and try it.
FAQs
1. Can I copy Windows ISO to USB?
You can, indeed! Download and run the Windows Media Creation program, select Create Installation Media, and then follow the on-screen instructions to create a copy of Windows 10 on a USB flash drive. You can download Rufus to help you finish the process.
2. Which is Better Power ISO or Rufus?
One of the choices for Rufus’ alternatives on this list is PowerISO. It also has many other features, including the ability to mount disks, create virtual drives, convert several image formats to ISO, and create bootable USB devices. Besides, EaseUS OS2Go can also be your choice. It is another excellent tool for creating a bootable USB for Windows and Mac.
Bootable disk is required when we need to do a fresh Windows installation. Bootable disk is a disk which contains special files to boot up or startup the computer to start a utility or program. In this case to install a Windows 10 operating system we require a bootable disk to start the installation process of Windows 10.
A bootable disk is not required when we upgrade from older operating system like Windows 7 to Windows 10. But if we downloaded an ISO file to install it on a different PC or for a clean install we must have to create a bootable disk.
Lets learn how we can create a bootable Windows 10 disk.
Microsoft has provided official tools to create a bootable disk without using any third party software. We here explain the 3 main methods.
1. Using Windows Media Creation Tool by Microsoft
This is the easiest and most reliable method. The utility automatically downloads Windows 10 and copy the files from a USB disk by making it a bootable disk. This method can also be used to download ISO files only. Follow the steps below.
- Download the Windows Media Creation Tool: Click here to download media creation tool.
- Double-click on the downloaded file.
- Select “create installation media for another PC“.
- Select Language / Edition and Architecture as per your requirement.
To learn more about it, go to https://www.microsoft.com/en-in/software-download/windows10 - Select USB flash drive for USB or ISO file for DVD.
- Your disk will be ready after the completion of the process. It requires atleast 8 GB of pen drive. Make sure there will not be any important data in the disk as it will format the disk during the creation of the bootable disk.

- Select “USB Flash Drive” option and click on Next.

You can download Windows 10 ISO files for free directly from Microsoft using this media creation tool. An activation key will be required during the installation process.
2. Using Windows USB / DVD Download Tool
This is an old and still working method to create a bootable media for Windows Installation. The name can confuse you but it is also working perfectly for Windows 10 as well. However, this method requires an ISO image of Windows 10. So first you have to download the Windows 10 iso file.
- This process requires an empty USB stick (Min: 8GB). Quickly format the USB drive first.
- Download Windows USB / DVD Download Tool & Install it on your computer.
- After finishing of its installation, Run it.
- It requires an ISO image file for Windows. Select the ISO image and start the process. you can download the ISO file of windows 10 using the media creation tool as mentioned in method 1.
- Start Windows USB / DVD Download Tool to create a bootable disk
- Select the Windows 10 ISO file by clicking on the browse button.
- Then click on Next.
- After that, it will ask you to select the USB drive.
- It will prompt you to format the USB drive. Please allow it to format the USB flash drive and start making the Windows 10 USB. Follow the remaining on-screen instructions too.
- After completion of the process, your Windows 10 bootable USB / DVD installer USB will be ready to use.


3. Create Bootable Windows 10 disk with the help of third party software.
However, you will not be required to go with this method (third party tool) because the above given two methods will work for sure. Under any circumstances, you’ll only go with the option if the above two have not worked for you.
Making a boot-able flash drive becomes pretty easy with a third party software, named Rufus. Here are the essential guidelines when using Rufus to make a bootable Windows 10 flash drive. Let’s learn the same.
- Download Rufus.
- Open Rufus.exe
- When the software launches on the screen, plug in your USB flash drive.
- Find the option Create a bootable USB drive.
- From the menu that follows, select an ISO image.
- Now click on next button to this menu and click on the Windows 10 ISO you want to install on your computer.
- Now click on the start button at the bottom, and it will begin to create a bootable USB flash drive.
- Once completed, your USB will become bootable and you will be ready to install / reinstall Windows 10 on any computer using this Windows 10 USB flash drive.
4. Create Bootable Windows 10 USB through Command Prompt
This method is useful for advanced users. Sometimes users only have access to command prompts only and are unable to start Windows. If you have an ISO file, you can create a bootable pen drive using this method. Follow the given guidelines carefully as this method is a little complicated:
- Plug in your USB drive to your computer.
- Open “Command Prompt” (Admin).
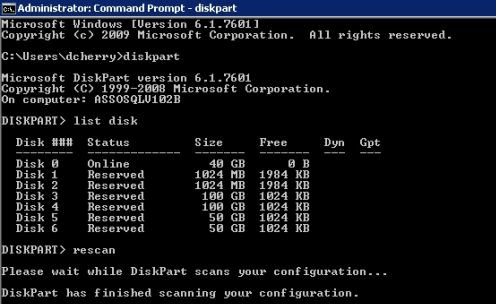
- In the Command prompt, type in the following command: diskpart and press the enter key from your keyboard.

- Now type list disk and press enter key. This will display a list of available connected disks.
- From this list, you need to select your USB drive. To do this, type select disk # and press Enter (Replace # with your disk number from the list). You will get a message saying “Disk 1 is now the selected disk’
- The next step is to clean the USB drive. To do this, type clean and press enter.
- Now create a bootable partition, simply type Create partition primary and press Enter.
- You need to select the partition you just created. Type select partition 1 and then type active and hit Enter.
- Now format the USB drive by typing “format fs=ntfs quick”. After this, press Enter.
- Assign drive letter. To assign a letter to your USB drive, just type assign. You may skip this step.
- Now get exit from disk part command by typing EXIT command. Go back to the command prompt on the main screen.
- Now minimize it for a while.
Copy the Windows 10 files to USB flash drive
Copy all the files of Windows 10 and paste them in the USB drive manually. Files can be copied from a Windows 10 disk or by extraction from an ISO file.
- Open the Windows 10 Disk / saved Windows 10 folder. If you do not have this, then download the Windows 10 ISO file from the Microsoft website and extract the ISO file to a folder, then open the extracted folder.
- Select all the files of Windows 10 and copy them.
- Now open the USB flash drive and paste all the copied files there.
Now make the USB flash drive bootable
Let’s suppose that the F: drive would be your USB drive and the E: drive is your DVD drive. Make sure the Windows 10 bootable DVD is inserted into the DVD drive from where the data is copied to the USB bootable drive.
Change the Windows active directory to the F: drive (DVD Drive). The default active directory is “C:\Windows\System32” in CMD. That Windows 10 DVD should be inserted into the DVD drive.
- Open the command prompt (admin) once again.
- Type E: and then press enter. The active directory will be changed immediately.
- Now type in the CD boot command and press enter.
- To create the bootsector in the F: drive (USB Pen Drive), type bootsect/nt60 F: into the command line.
- That’s it!! Your flash drive is now a Windows 10 bootable USB drive
And that is all there is to know about the manual creation of a bootable Windows 10 USB flash drive. all the methods are equally useful. If you’re an expert you can use the manual method without taking help from software, but beginners are advised to seek software help to avoid any complications. The best and easy method is using the Windows Media Creation Tool .
Are you still using the Windows 7? Microsoft has ended the windows 7 support.
Upgrade to Windows 10 as early as possible.
Why we need to create a bootable Windows 10 USB drive?
Since the availability of USB drives, the use of CD and DVD has prominently declined. The major reasons behind this are the ease of use, portability, larger capacity and faster copying of data files by the USB drives in comparison to the older methods. All you need is a flash drive with a capacity of more than 4GB, although 6 to 12 GB of available space is ideal for storing additional files as well. Create a bootable USB drive and keep it in a safe place that you can use this disk to easily fix the installation issues.
How to download windows 10 bootable USB or ISO image for clean windows installation.
Given above method 1 can be used to easily download the ISO image file. We didn’t found any other direct link to download ISO image for offline purpose. So downloading it using the media creation tool is the only method to get it directly from the Microsoft.
You can also upgrade to Windows 10 for Free using windows 7 license key.
Please share your experience with the creation of bootable windows 10 disk using the below comment box.