
Many people think that you need Minecraft Java edition in order to have texture packs, however, you can actually get Minecraft Windows 10 texture packs too. In fact, there are some really stunning texture packs for the Windows 10 edition if you know where to look.
We have tested and handpicked some of the best Minecraft Windows 10 texture packs for you from mcpedl.com and other great sources to make searching for your new favourite Minecraft Windows 10 texture pack collection easier.
The Best Minecraft Windows 10 Edition Shaders
The base game can be great, but let’s face it, sometimes it feels like it could do with something to make it more aesthetically pleasing. This is where shaders come in, acompanied by great Minecraft texture packs, they can visually change the entire game, giving it a fresher look.
IVG Shader

IVG stands for improved vanilla graphics, and this texture pack really does make the graphics stand out.
Evo Shader Mod

Evo Shader mod brings you ultra-realistic Minecraft shaders with an emphasis on realistic lighting.
Parallax Shaders

Parallax shaders offer some of the most detailed lighting I have seen on Minecraft Windows 10 to date.
ESTN Shaders

Sadly, ESTN has been discontinued now, but it is by far one of the most impressive shaders out there, so give it a try, while you still can.
The Best Minecraft Windows 10 Edition Texture Packs
Now you have picked a Minecraft shader, you will want to take a look at a Minecraft Windows 10 texture pack to go along side it.
Flow’s HD

Modern, sleek and stylish, Flow’s HD is perfect for designing awesome modern designs with a crisp & clean look.
Ascension HD

Ascension HD is easily one of my favorite texture packs, with crisp ultra-realistic textures, when coupled with the right shaders Minecraft Windows 10 Edition can look amazing.
Eclipse 2K

There aren’t too many 2K texture packs for Minecraft Windows 10 Edition, but Eclipse is one of the few, offering levels of detail to rival Java Edition.
Zexus PVP Pack

With a focus on PVP textures, Zexus is perfect for anyone looking to improve the visuals on all aspects of PVP in Minecraft.
Both Minecraft and the texture packs and shaders are being updated all the time, please make sure to read the descriptions from the download link before adding texture packs and shaders.
Each of the downloads will have its own zip files as well as instructions on how to install the Minecraft Windows 10 texture packs or shaders.
When you install Minecraft, you will also need to be sure you have the correct version for the texture pack or shader too.
Can You Install Minecraft Textures And Shaders Together?
Yes, in fact, by using both a Minecraft Shader and a Minecraft Texture pack, you can easily change the entire visuals for Minecraft Windows 10 Edition, making it look stunning, without changing the base game itself.
The Windows 10 Minecraft version supports skins and texture packs like its Java counterpart. Modding the look of Minecraft is something users love to do and there are texture packs that can dramatically change how the game looks. Here’s how you can install skins and texture packs on Minecraft Windows 10 UWP.
SPOILER ALERT: Scroll down and watch the video tutorial at the end of this article.
Compatible Packs & Skins
Before you install skins and texture packs on Minecraft Windows 10 UWP, it is important to know that the packs for the Java version are not compatible with the UWP version. Unfortunately, this means a good portion of some of the best, free packs cannot be used with the UWP app. It’s yet another reason that more users stick to the Java version.
To find compatible packs, check the usual repositories and read their descriptions. If a pack states that it will work on the Windows 10 version, you can download it and try installing it. Skins are just PNG files so you will not have any trouble finding them for the Windows 10 version.
Minecraft Windows 10 Game Folder
Assuming you’ve found a texture pack that is compatible with the Windows 10 version, here’s how you can install it. The pack most likely came as a zipped file. Extract it to your desktop.
Next, open the following location in File Explorer.
C:\Users\Your User Name\AppData\Local\Packages\Microsoft.MinecraftUWP_8wekyb3d8bbwe\LocalState\games\com.mojang
Texture Packs
The texture pack that you’ve extracted goes into the folder named ‘Resource_packs’. It is one of the folders present in the above location. Paste the extracted folder here and Minecraft will be able to access it.
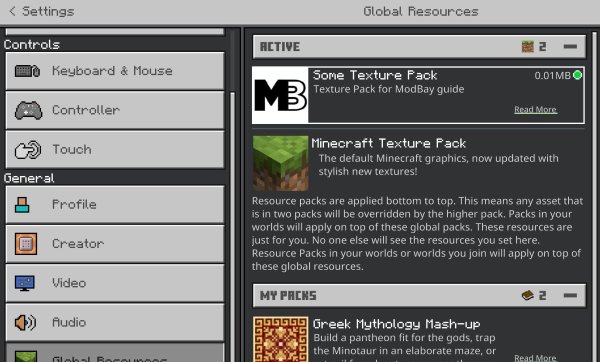
Next, you need to enable the texture pack. Open Minecraft and click Settings. Scroll down the left column, and click on Global Resources. Here, you will see a list of active, and available texture packs and it should include the one you moved to the resource_packs folder.
Select it, and click the Plus button to enable it. At any given time, you can have more than one texture pack enabled.
If a texture pack doesn’t appear, it’s likely incompatible with this version of Minecraft.
Skins
Find and download a skin for Minecraft. It’s going to download as a single PNG file. In some cases there may be more than one PNG file and each file will be a different variation of the same skin. For example, different colors of the same skin.
You can save the PNG file anywhere but it’s a good idea to place it somewhere it won’t accidentally be deleted.
Open Minecraft and click the little wirehanger icon under your avatar on the start screen. This will take you to the customize skin screen. In the Default box, click the avatar outline, and click the ‘Choose New Skin’ button in the Custom box.
Select the PNG file you downloaded, and the skin will be applied.

Fatima Wahab
Fatima has been writing for AddictiveTips for six years. She began as a junior writer and has been working as the Editor in Chief since 2014.
Fatima gets an adrenaline rush from figuring out how technology works, and how to manipulate it. A well-designed app, something that solves a common everyday problem and looks
Minecraft can be played for hours without getting bored but its default skin and texture appear basic to many users. Minecraft is heavily customizable and users can modify its aesthetics as they desire. Windows 10 Texture packs and Skins can be used to enhance the appearance of Minecraft. Windows 10 Minecraft Texture packs and Skins are available in a wide variety and can be downloaded online. If you are someone looking for tips about the same, we bring to you a helpful guide that will teach you how to install Texture packs Minecraft Windows 10.
Many types of texture packs can be loaded in Minecraft but texture packs for the Minecraft Java version are not compatible with Minecraft UWP (Universal Windows Platform) version. Texture packs for Minecraft UWP versions like Bedrock Edition are available in-game store while texture packs Minecraft Java version can be downloaded online. Here are some famous texture packs.
- Flows HD: This allows you to create amazing and complex things.
- Ascension HD: Enhances brightness and visibility of the game.
- Defscape: It has a smooth texture experience.
- EVO: Adds realism to the game by upgrading graphics performance.
Let us now move straight to the steps to install skins and texture packs in Minecraft. We will begin by learning how to install texture packs Minecraft windows 10.
1. Press the Windows key, type chrome, and click on Open.

2. Search for the texture pack of your choice and download it.
Note: Always look for ratings in texture pack and download them from reputable sites e.g. ResourcePack.

3. After the download is complete, you will see a zip file of the texture pack. Extract it to your preferred location.
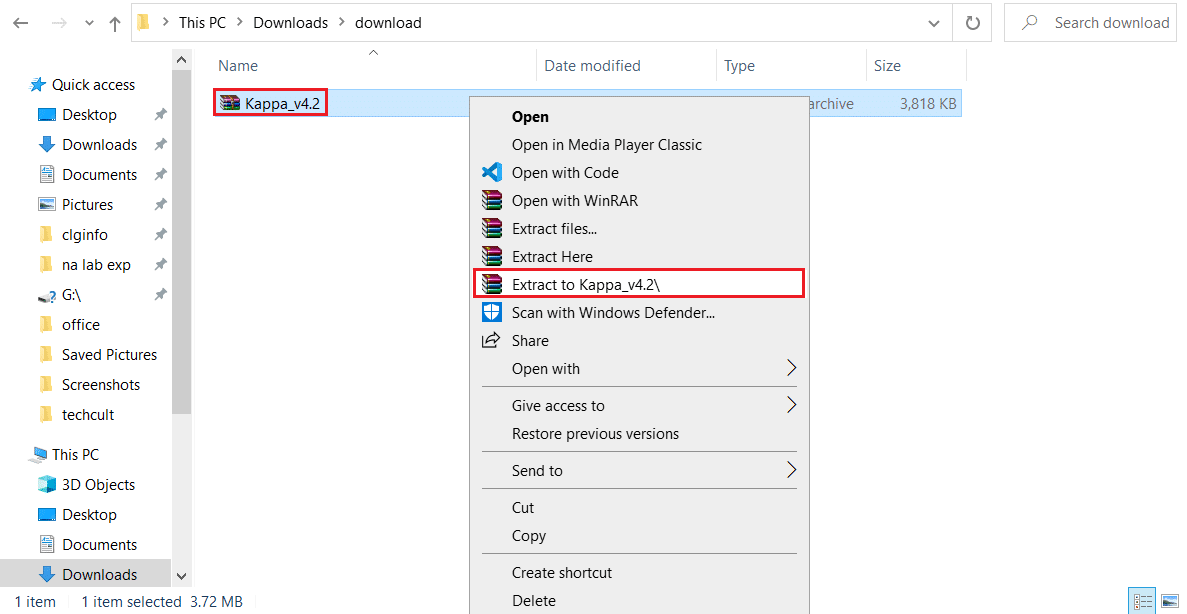
4. Go to the location where you extracted the texture pack zip file and copy it by clicking on it and pressing Ctrl + C keys together.
5. Press Windows + R keys simultaneously to open the Run dialog box.

6. Type AppData in Run Dialog Box and click OK. It will open AppData folder.

7. In the AppData folder, navigate to this path
Local\Packages\Microsoft.MinecraftUWP_8wekyb3d8bbwe\LocalSlate\games\com.mojang\resource_packs

8. Paste extracted file you copied in Step 4 in resource_packs folder. You can do that by right-clicking an empty space in the resource_packs folder and selecting Paste from the menu.
9. Open Minecraft Launcher and go to Settings.

10. In the left column, locate and click on the Global Resources button.
11. In the right pane, you should see your downloaded texture pack in the Available Packs section. Select it and click on Plus (+) symbol to enable it. You can enable multiple texture packs at once.
Note: If you are unable to locate your downloaded texture pack in the Available Packs section then it may be incompatible with your Minecraft version.
Now you know how to install texture packs Minecraft Windows 10.
Also Read: 3 Ways to Zoom Out in Minecraft
How to Install Minecraft Skin Packs
After learning how to install texture packs Minecraft Windows 10, let us learn about installing Skins in Minecraft. Downloading and installing skins in Minecraft is much simpler than texture packs. Follow the steps below to do the same.
1. Open your preferred browser and search for Minecraft skins online.
2. Download any Skin you like. It will be saved as a PNG file.
Note: In some cases, multiple PNG files might get downloaded. They will just be different varieties of the same skin.
3. Open Minecraft Launcher.
4. Go to the Skin tab.

5. In the Library section click on the Plus (+) symbol above New skin.
6. In add new skin window, give new skin any name you want and click on the Browse option.
7. In the popup window, browse and select the skin you downloaded in Step 2. Click on the Open option.
8. After the skin is loaded, click on Save & Use.
Now new skin will appear on your Avatar when you play Minecraft.
Frequently Asked Questions (FAQs)
Q1. What is the cost of Minecraft textures?
Ans: Texture packs normally cost $2.99 for players of legacy console edition but the price may vary for other versions of Minecraft. Many free texture packs are also available online.
Q2. Is Minecraft free to play on Windows 10?
Ans: Minecraft offers a free trial of the game and the length of the trial depends on the device you are downloading it on. After the free trial expires, you will need to pay for the game to play it.
Recommended:
- How to Use Bookmarks on Twitter
- Fix Minecraft Launcher is Currently Not Available in Your Account
- Fix Minecraft Connection Timed Out No Further Information Error
- Fix Minecraft Failed to Authenticate Your Connection in Windows 10
We hope that this guide was helpful and you were able to understand what are Windows 10 texture packs in Minecraft and how to install Minecraft texture packs on Windows 10. If you have any queries or suggestions then feel free to drop them in the comments section.
I will show you How To Download Texture Packs for Minecraft Windows 10 Edition 1.21.72. Minecraft Windows 10 Edition offers immense possibilities, but even infinite worlds can start feeling repetitive. That’s where texture packs come in – sweeping visual revamps to refresh your gaming experience. This guide will cover the top texture packs for transforming Minecraft Windows 10 Edition 1.21.72 into a visually renewed adventure. Textures dictate the very feel of your Minecraft world, from pastoral grasslands to frigid tundra. A new texture pack provides new lens to see your realm through. But with countless packs of varying quality, which upgrades should you trust? We’ve curated the most compelling and reliable Windows 10 texture packs that won’t tank your frames.
Get ready to install vibrant new skins for default items, enrich mob details, and unlock photorealism on par with cinematics. Or channel your inner retro gamer with classic bit-tuned textures for a nostalgia trip. Whatever your vision, a dynamic textural makeover awaits. Let’s breathe new visual life into your boxed worlds! Here are the most impactful texture packs to instantly revive your Minecraft Windows 10 Edition 1.21.72 experience. An optical adventure awaits!
Let’s get right into this guys! As you might know Texture Packs are really great to use in the Minecraft because it enhance the graphic and can also add some animations. For me personally, it is number one to do when I install Minecraft. I can’t absolutely think about not playing with it, that’s why I decided to make this tutorial for you, so without hesitation, let’s get into the first part. This part is mainly about the download. When you click on the link down below you can find many different texture packs in the link.
I also have more tutorial on my website, just check it out. Choose the right Texture Pack and then hit download. At first, it will take you to my redirection website where you can simply subscribe to my channel and then hit download. For it and then take the file and drop it on the desktop please. After that we can continue to the installation part which is much more easier for us. Let’s go guys!
Downloads:
- Texture Packs: Click here
How To Install Texture Packs in Minecraft Windows 10 Edition 1.21.72
We are the end of this article and I want to thank you for reading it, it means a lot to me, so let’s continue please. When you have the Texture Pack for Minecraft Windows Edition 1.21.72 on the desktop, we need to install it. So how do I do that? It is really simple. Go to the Windows Search Bar and type in “Minecraft Launcher” and hit enter. It will open up the launcher and on the left side of it, we can choose 4 different versions such as Java, Bedrock/Win 10, Dungeons and Legends. Choose the second option please and hit play.
After couple of second the Minecraft will appear. All you have to do now is to go back to the desktop and double-click on the Texture Pack, it will immediately take you to the game again. Now you can see text like “import started” and “import finished” then you can go to the settings. Scroll down to the resource packs and make sure you see you Texture Pack, click on it and hit active please. It will be on the top now, you can enjoy the pack in the game now! Happy mining!
This guide will show you how to install Minecraft Texture packs for Windows 10 and 11. We’ll walk through the installation of mods in .mcpack and .zip & rar extensions.
Table Of Contents
- .mcpack installation
- .zip and .rar installation
- Activating the textures
.mcpack installation
If you already have Minecraft from the Microsoft Store installed on your device, then the texture files of mcpack format will be highlighted with the icon from the Game. Please click the file twice (Enter) to launch its import into the Minecraft.
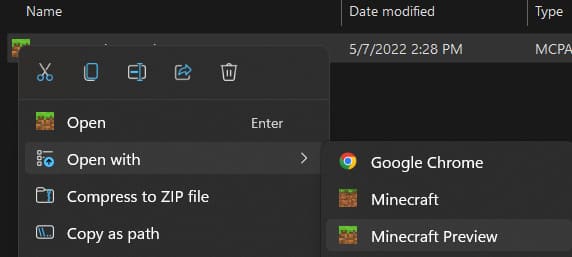
If you have both Minecraft and Minecraft Preview installed, do the following: right-click → Open With → select the desired Game’s version for import.
After the import is completed, there will be see a corresponding message.

It’s possible to activate the texture pack via the Global Resources for all Worlds or by Editing a specific World.
- Activation for all Worlds
- Activation for a specific World
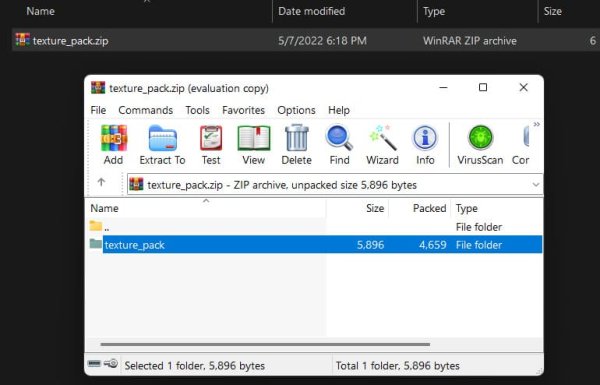
.zip and .rar installation
For Windows 10/11, to install the texture pack contained in the archive, you need to unpack the folder with the files using a special path.
It’ll require a file archiver (WinRar, 7-Zip, or other).
You can find this folder using the following path (copy the following line and paste it into the search bar): %LocalAppData%\Packages\Microsoft.MinecraftUWP_8wekyb3d8bbwe\-LocalState\games\com.mojang\resource_packs.
Please note: for Minecraft Preview, this folder is located in %LocalAppData%\Packages\-Microsoft.MinecraftWindowsBeta_8wekyb3d8bbwe\LocalState\games\com.mojang\resource_packs.
Unpack the folder with the texture pack.
Activating the textures
You can activate the texture pack via the Global Resources for all Worlds or by Editing a specific World.
- Activation for all Worlds
- Activation for a specific World
To activate the texture pack for the entire Minecraft and all Worlds, you need to go to the Settings and select the Global Resources tab.
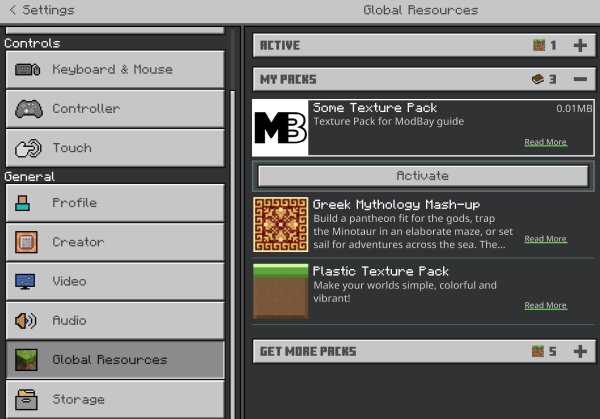
It’s done!
To activate the texture pack for a specific World, please go to the menu tab that makes it possible to Edit the desired World or Create a New World. Then select the Resource Packs tab.
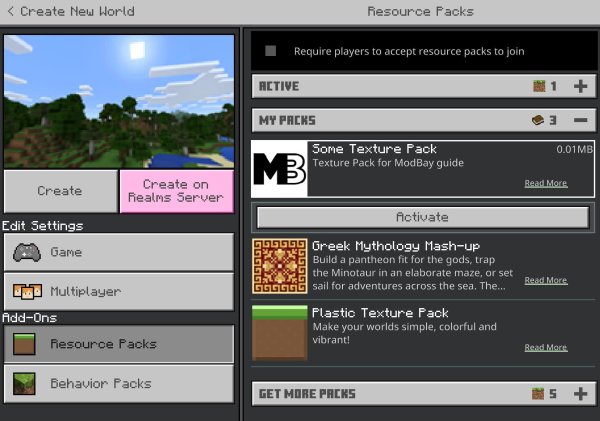
Find the texture pack and click Active.
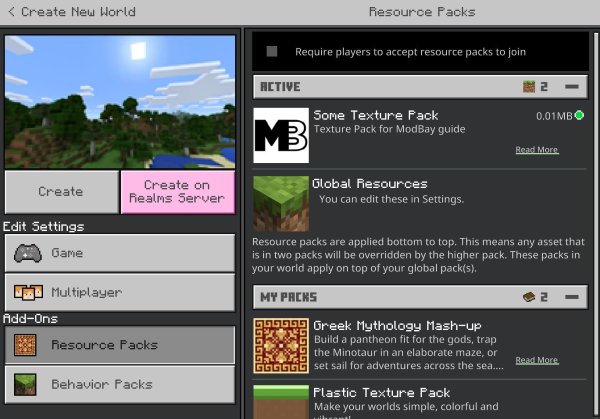
Well done!