
Sending emails from the command line can be incredibly useful for automation, testing, or simply managing your tasks more efficiently. Windows does not come with a built-in command-line utility for sending emails out of the box like some Unix systems do with sendmail. However, with a few strategies and built-in tools, you can accomplish this task. This article will walk you through the process of sending email from the command line in Windows without requiring any additional software.
Understanding Email Protocols
Before we dive into the methods of sending emails from the command line, it is vital to have a basic understanding of email protocols involved. The two primary protocols for sending email are:
- SMTP (Simple Mail Transfer Protocol): This is the standard protocol for sending emails across the Internet.
- POP3/IMAP: These are protocols primarily used for retrieving emails, although they are sometimes involved when sending emails when checking the server.
For our purposes, we will focus on using SMTP, as this is the backbone of email sending, and Windows PowerShell will be our tool of choice.
Using PowerShell to Send Email
PowerShell, a powerful task automation and configuration management framework, includes built-in cmdlets to send emails. The Send-MailMessage cmdlet allows you to compose and transmit email directly from your command line.
Syntax of Send-MailMessage
The basic syntax of the Send-MailMessage cmdlet is as follows:
Send-MailMessage -From "" -To "" -Subject "" -Body "" -SmtpServer ""-From: The email address that the email is being sent from.-To: The recipient’s email address.-Subject: The subject line of the email.-Body: The content of the email (you can use plain text or HTML).-SmtpServer: The SMTP server that will handle the email transmission.
Using the -Credential Parameter
If your SMTP server requires authentication, you can use the -Credential parameter to provide the username and password. It’s vital to ensure you retrieve this securely to avoid exposing sensitive information.
$cred = Get-Credential
Send-MailMessage -From "" -To "" -Subject "" -Body "" -SmtpServer "" -Credential $cred
When you run Get-Credential, a prompt will appear asking for your username and password, which gets securely stored in the $cred variable.
Setting Up SMTP Server
Before you can send an email via PowerShell, you need to configure your SMTP settings correctly. Here are several popular SMTP servers that you can use:
Gmail SMTP Settings
If you are using Gmail’s SMTP server, you will need the following details:
- SMTP Server:
smtp.gmail.com - Port:
587(TLS) - Requires SSL: Yes
Important Note: You may need to enable «Less Secure Apps» in your Google account settings for this to work or generate an App Password if using 2-Step Verification.
Example Command using Gmail SMTP
Here is an example of sending an email with Gmail’s SMTP server using PowerShell:
$cred = Get-Credential
Send-MailMessage -From "[email protected]" -To "[email protected]" -Subject "Test Email" -Body "This is a test email sent from PowerShell!" -SmtpServer "smtp.gmail.com" -Port 587 -UseSsl -Credential $cred
Using Microsoft Outlook for Email Sending
If you have Microsoft Outlook installed on your machine and it’s configured to send emails, you can leverage Outlook’s COM object in PowerShell to send emails. This method uses the Outlook application installed on your machine.
Example Command using Outlook COM Interface
Here’s how you can automate email sending through Outlook:
# Create a new Outlook application instance
$outlook = New-Object -ComObject Outlook.Application
$mail = $outlook.CreateItem(0) # 0: Mail item

$mail.Subject = "Test Email"
$mail.Body = "This is the body of the email."
$mail.To = "[email protected]"
$mail.Send()
Notes
- Ensure Outlook is properly configured and you have an account that can send emails.
- The script above sends a simple text email. Further properties, such as CC, BCC, and attachments, can be set similarly.
Using Telnet to Send Emails Manually
For those who are comfortable with low-level commands, you can also interact with the SMTP server directly using Telnet. This method requires Telnet to be enabled on your system (which can be done via the Windows Features).
Enabling Telnet in Windows
To enable Telnet in Windows:
- Open Control Panel.
- Click on «Programs».
- Click on «Turn Windows features on or off».
- Find «Telnet Client» and check the box.
- Click OK.
Sending an Email using Telnet
- Open Command Prompt and connect to the SMTP server:
telnet smtp.gmail.com 587- Once connected, you would see a response from the SMTP server indicating the connection is successful. Enter the following commands following appropriate prompts:
EHLO yourdomain.com
AUTH LOGIN
(base64 encoded username)
(base64 encoded password)
MAIL FROM:
RCPT TO:
DATA
Subject: Test Email
This is the email body.
.
QUIT
Using Windows Task Scheduler to Automate Email Sending
You can automate the sending of emails by creating a scheduled task in Windows. This can be done if you have periodic reports or alerts that you want to send out automatically.
-
Create the PowerShell Script: Save your email-sending PowerShell script in a
.ps1file, for example,send-email.ps1. -
Open Task Scheduler:
- Press
Windows + R, typetaskschd.msc, and hit Enter.
- Press
-
Create a New Task:
- Click on «Create Basic Task».
- Give your task a name and description.
- Choose a trigger (Daily, Weekly, etc.).
- Choose «Start a program» in the action.
- In the «Program/script» box, enter:
powershell.exe- In the «Add arguments» box, enter:
-File "C:PathToYoursend-email.ps1" -
Finish the Wizard: Review and finish the wizard. Your scheduled task will now run at the predefined intervals and execute your email-sending script.
Troubleshooting Common Issues
- Authentication Failed: Double-check your username and password, especially if using Gmail, as you may need to generate App Passwords for better security.
- SMTP Timeout: Ensure that your network permits SMTP connections.
- Firewall Issues: Your firewall might be blocking outbound connections on SMTP ports (25, 465, 587). Configure your firewall accordingly.
- Permissions: Ensure your PowerShell execution policy is set to allow the execution of scripts. You can set it using:
Set-ExecutionPolicy RemoteSignedConclusion
Sending emails from the Windows command line using PowerShell and built-in tools opens up a world of possibilities for automation and efficiency in both personal and professional tasks. By harnessing the power of SMTP and PowerShell’s capabilities, you can streamline your email communications without the need for additional software.
From manual approaches using Telnet to automated scripts with scheduled tasks, there’s a method that fits nearly any need. As you get more comfortable with these commands and techniques, you’ll find even more ways to integrate email functionalities into your workflows, ensuring you’re always connected and in control.
Иногда бывают такие ситуации, необходимо протестировать работоспособность удаленного/или своего почтового сервера, либо же нет возможности отправить электронную почту обычным путём (не работает/отсутствует почтовый клиент).
В этом случае на помощь приходит командная строка. Как же отправить почту из командной строки?
Доступ к SMTP через telnet (отправка почты). Жирным выделены команды, набранные пользователем
telnet mail.testdomain.ru 25
mail.testdomain.ru – это адрес smtp сервера, к которому вы хотите присоединиться
25 — smtp-порт сервера с которым должен соединиться клиент telnet
220 mail.testdomain.ru ESMTP Sendmail 8.13.3/8.13.4; Sat, 21 Jul 2010 09:50:16 +0400
ehlo lo
ehlo lo – здесь мы должны поздоровались с удалённым smtp-сервером
250-ENHANCEDSTATUSCODES
250-PIPELINING
250-8BITMIME
250-SIZE
250-DSN
250-ETRN
250-AUTH GSSAPI DIGEST-MD5 CRAM-MD5
250-DELIVERBY
250 HELP
mail from: [email protected]
здесь мы указываем, что адрес отправителя письма — [email protected]
250 2.1.0 [email protected]… Sender ok
информация о том, что проверка отправителя прошла успешно
rcpt to: [email protected]
здесь мы вводим почтовый адрес получателя письма [email protected]
250 2.1.5 [email protected]… Recipient ok
информация о том, что проверка получателя прошла успешно
data
комманда data говорит о том, что дальше пойдёт тело письма
354 Enter mail, end with «.» on a line by itself
сервер говорит нам, что можно набирать текст письма, а чтобы закончить письмо мы должны набрать точку «.» в новой строке в конце тела письма
testing mail system!!
это наш текст
.
точка — даём понять серверу, о том, что письмо окончено и его можно адресату
250 2.0.0 l365oGFR435164 Message accepted for delivery
уведомление сервера — письмо встало в очередь на отправку
The `smtp` command in the command line is used for sending emails via the Simple Mail Transfer Protocol (SMTP) server.
Here is an example of how you might use the `telnet` command to send an email using SMTP:
telnet smtp.example.com 25
HELO yourdomain.com
MAIL FROM:<you@yourdomain.com>
RCPT TO:<recipient@example.com>
DATA
Subject: Test Email

This is a test email sent via SMTP command.
.
QUIT
Understanding the Basics of SMTP Commands
Overview of SMTP Commands
SMTP commands are integral to the email transmission process, allowing the client to interact with the mail server effectively. These commands control the entire flow of sending emails, ensuring that the data is routed correctly and efficiently. The most commonly used SMTP commands include HELO, MAIL FROM, RCPT TO, DATA, and QUIT.
Key SMTP Commands Explained
HELO / EHLO Command
The HELO command is used by the client to introduce itself to the SMTP server. Although the EHLO command serves a similar purpose, it is an extended version that allows the server to list its capabilities, making it the preferred command in most scenarios. When you use EHLO, you receive information about what features the server supports, such as encryption methods and authentication types.
Example usage:
EHLO yourdomain.com
MAIL FROM Command
After establishing a connection, the MAIL FROM command specifies the sender of the email. This command establishes the identity of the sender and is crucial for the server’s compliance with anti-spam policies. The syntax requires the email address to be enclosed in angle brackets.
Example usage:
MAIL FROM:<sender@example.com>
RCPT TO Command
The RCPT TO command defines the recipient of the email. This command can be issued multiple times if you intend to send the email to multiple addresses. Just like the MAIL FROM command, this syntax also requires the email address to be in angle brackets.
Example usage:
RCPT TO:<recipient@example.com>
DATA Command
The DATA command signifies that you are ready to begin sending the body of the email. Once you enter this command, the server will expect the headers and the body of the message. The end of the data section is marked with a single period (`.`) on a line by itself.
Example usage:
DATA
Subject: Test Email
This is a test email sent using SMTP commands.
.
QUIT Command
The QUIT command is used to close the SMTP connection safely. It ensures that any pending messages are sent, and the session is ended gracefully. This is important to avoid unexpected disconnections or message loss.
Example usage:
QUIT
Mastering Scp Cmd for File Transfers
Setting Up SMTP in CMD
Requirements for Using SMTP from CMD
Before launching into SMTP commands, you’ll need to ensure you have the proper tools. For Windows users, Telnet is commonly used to send SMTP commands through the command line. This tool facilitates a direct connection to the mail server.
Configuring Your Local Environment for SMTP
Setting up your environment requires a few initial steps:
-
Install Telnet: If Telnet is not enabled in your Windows, you can turn it on by navigating to:
Control Panel -> Programs -> Turn Windows features on or off -> Telnet Client -
Access Command Prompt: You can open Command Prompt by typing `cmd` in the Windows search bar.
-
Connecting to Your SMTP Server: Use the following command to connect:
telnet smtp.example.com 25Replace `smtp.example.com` with your SMTP server’s address and `25` with the correct port (usually, port 587 or 465 is used for secure connections).

Mastering Ftp Cmd: Quick Commands for File Transfers
Practical Applications of SMTP Commands
Testing Email Functionality
Once your environment is set up, you can utilize the SMTP commands to test email functionality. This is particularly useful for diagnosing issues with your email services. Sending a test email can confirm whether the mail server is functioning correctly.
Example of Sending an Email via CMD
To send a test email through CMD, follow these steps for a complete walkthrough:
-
Connect to the SMTP server:
telnet smtp.example.com 25 -
Introduce yourself to the server:
EHLO yourdomain.com -
Specify the sender’s email:
MAIL FROM:<sender@example.com> -
Define the recipient’s email:
RCPT TO:<recipient@example.com> -
Begin the email body:
DATA Subject: Test Email This is a test email sent using SMTP commands. . -
Finally, close the connection:
QUIT
Mastering TFTP Cmd: Quick Tips for Efficient Transfers
Troubleshooting Common SMTP CMD Errors
Understanding Error Messages
While using SMTP commands, it is vital to understand the error messages that may arise. Common error codes include:
- 550: Requested action not taken: mailbox unavailable
- 554: Transaction failed
These error codes provide insights into issues such as authentication problems or misconfigured mailboxes.
Tips for Resolving Issues
If you encounter errors, here are a few troubleshooting tips:
- Check Firewall Settings: Firewalls may block SMTP connections. Ensure that your firewall allows traffic to the ports used by your SMTP server.
- Correct SMTP Server Settings: Double-check that you are connecting to the correct SMTP server address and port.
Mastering Findstr Cmd for Quick Text Searches
Security Considerations
Using SMTP Securely
While SMTP is a critical component of email transmission, it is susceptible to various vulnerabilities, including eavesdropping and spoofing. Users must ensure they employ secure methods of connectivity, such as SMTPS (SMTP Secure) or STARTTLS, to encrypt the email transmission.
By adopting these security measures, you can help safeguard sensitive information being transmitted through email.
Understanding Ftp Cmd Port Settings in Cmd
Conclusion
With this comprehensive guide on smtp cmd, you now possess the foundational knowledge to effectively use SMTP commands via the command prompt. By mastering these commands, you can troubleshoot email issues, test mail server functionalities, and deepen your understanding of email protocols—a valuable skill set in today’s digital landscape.
Stop Cmd Command: A Quick Guide to Mastering It
Additional Resources
To continue expanding your knowledge, consider exploring official SMTP protocol documentation and Windows CMD help resources. For enhanced productivity, leverage email client software that simplifies the use of SMTP commands while providing a user-friendly interface.
In today’s digital age, communication is paramount, and email remains a primary means of correspondence. While most people are accustomed to using email clients or web interfaces to send messages, there are times when you might need to send an email directly from the command line. Whether you want to automate notifications, manage batch processes, or simply prefer the command line interface, sending email can be efficiently executed in Windows without the need for additional software.
In this article, we will explore various methods to send emails from the command line on Windows, focusing on built-in tools and scripts that don’t require third-party applications.
Understanding the Requirements
Before diving into the specifics of sending emails from the command line, it’s essential to understand what is required:
-
SMTP Server: To send an email, an SMTP (Simple Mail Transfer Protocol) server is necessary. Most email providers (like Gmail, Outlook, etc.) offer SMTP access, which you can use for sending emails.
-
Network Connectivity: Ensure your internet connection is stable as sending an email requires access to the specified SMTP server.
-
Credentials: You may need valid credentials (username and password) for the SMTP server you’re using, especially if authentication is required.
-
Command Line Access: Accessing Windows Command Prompt or PowerShell is crucial for executing commands.
-
Security Considerations: Be aware of securing your email credentials, especially when incorporating them into scripts.
Method 1: Using PowerShell
Windows PowerShell is a powerful tool available on all modern Windows systems. It allows you to send emails using the Send-MailMessage cmdlet. Below is a step-by-step guide to using this method:
Step 1: Open PowerShell
To open PowerShell, you can search for it in the Start Menu or press Win + R, type powershell, and hit Enter.
Step 2: Construct the Command
The basic syntax for sending an email using PowerShell is:
Send-MailMessage -SMTPServer "" -From "" -To "" -Subject "" -Body "" -Credential (Get-Credential)Step 3: Fill in the Details
Let’s break down the command components:
- “: This is the address of your SMTP server (e.g.,
smtp.gmail.comfor Gmail). - “: The email address you are sending from.
- “: The destination email address.
- “: The subject line of your email.
- “: The main content of your email.
Step 4: Example Command
Here’s an example of sending an email through Gmail’s SMTP:
Send-MailMessage -SMTPServer "smtp.gmail.com" -From "[email protected]" -To "[email protected]" -Subject "Test Email" -Body "This is a test email from PowerShell." -Credential (Get-Credential) -Port 587 -UseSslStep 5: Authentication
When you run the command, you’ll be prompted to enter your email credentials. Make sure to input your password securely.
Step 6: Verify Email Delivery
Once the command executes, check the recipient’s inbox to confirm that the email was delivered correctly.
Method 2: Using Telnet
Telnet can also be used to send emails via the command line. While it might not be the most user-friendly method, it’s an excellent way to understand the entire SMTP process.
Step 1: Enable Telnet in Windows
- Open Control Panel.
- Go to Programs > Turn Windows features on or off.
- Check the Telnet Client option and click OK.
Step 2: Open Command Prompt
Type cmd in the Windows search box and hit Enter to open a Command Prompt window.
Step 3: Connect to the SMTP Server
Using Telnet, connect to the SMTP server:
telnet smtp.gmail.com 587Step 4: Follow the SMTP Commands
After connecting, you can send an email using SMTP commands:
-
Identify Yourself:
EHLO your-domain.com -
Authenticate (Base64 encode your username and password):
AUTH LOGINInput your base64-encoded username and password when prompted.
-
Specify Email Details:
MAIL FROM: RCPT TO: DATA Subject: Test Email This is a test email sent using Telnet. . -
Close the Connection:
QUIT
Step 5: Check Delivery
After execution, verify whether the recipient received the email.
Method 3: Using a Batch Script with Blat
While this article focuses on not using extra software, Blat is a lightweight command-line utility designed for sending emails via the command line, and it might sometimes be considered as a utility worth exploring.
Step 1: Download Blat
- Download Blat from the official website: Blat.
- Extract the contents to a directory.
Step 2: Set Up Blat
Open Command Prompt and navigate to the directory containing blat.exe. Set the SMTP server:
blat -install smtp.your-email-provider.com [email protected]Step 3: Create a Batch File
Create a batch file (e.g., sendmail.bat) with the following command:
blat - -to [email protected] -subject "Subject Here" -body "This is the body of the email." -server smtp.your-email-provider.com -port 587 -u [email protected] -pw your-email-passwordStep 4: Execute the Batch File
Double-click the batch file or run it from the command line. Ensure to keep your email and password secure.
Step 5: Check the Email Delivery
As with other methods, check the recipient’s inbox for delivery confirmation.
Method 4: Creating a PowerShell Script for Automation
If you plan to send emails regularly, consider creating a PowerShell script that automates the process.
Step 1: Open a Text Editor
You can use Notepad or any code editor to create a .ps1 file (for example, SendEmail.ps1).
Step 2: Write Your Script
Here’s a simple PowerShell script example:
$SmtpServer = "smtp.gmail.com"
$From = "[email protected]"
$To = "[email protected]"
$Subject = "Automated Email"
$Body = "This is an automated email sent from PowerShell."
$Credential = Get-Credential

Send-MailMessage -SmtpServer $SmtpServer -From $From -To $To -Subject $Subject -Body $Body -Credential $Credential -UseSsl -Port 587
Step 3: Execute the Script
Run the script in PowerShell, ensuring that you have appropriate execution permissions. You may need to set your execution policy:
Set-ExecutionPolicy RemoteSignedStep 4: Security Considerations
It’s critical to consider how you store credentials. Avoid hardcoding sensitive information directly into scripts. Use Get-Credential for interactive credentials input.
Conclusion
Sending an email from the command line in Windows can be a powerful tool in your technical arsenal. Whether you choose PowerShell, Telnet, or a batch script, each method offers unique benefits. PowerShell provides the most modern and user-friendly approach, while Telnet offers deeper insights into the SMTP process. Learning to send emails this way not only enhances your scripting skills but is also invaluable for tasks like systems monitoring, alerts, and automated reports.
Remember always to comply with your email provider’s SMTP guidelines and maintain security best practices when handling email credentials. With the knowledge shared in this article, you can now efficiently send emails directly from the command line without the need for additional software.
Today, We want to share with you Windows Send Email using Command Line.In this post we will show you How To Send Email From Windows Command Line, hear for sendmail.exe command line windows we will give you demo and example for implement.In this post, we will learn about windows batch script to send email with attachment with an example.
There are the Following The simple About Windows Send Email using Command Line Full Information With Example and source code.
As I will cover this Post with live Working example to develop batch script to send email automatically, so the send gmail from command line for this example is following below.
Send Email from Windows PowerShell
$From_Email = “[email protected]”
$To_Email = “[email protected]”
$Email_Subject = “Welcome To Pakainfo 25/04/1992”
$Body = “My First Send Email To Windows Command Line”
$SMTPServer = “smtp.gmail.com” //SEt Your SMTP
$SMTPClient = New-Object Net.Mail.SmtpClient($SMTPServer, 587)
$SMTPClient.EnableSsl = $true
$SMTPClient.Credentials = New-Object System.Net.NetworkCredential(“Your Live SMTP Username”, “Your Live SMTP Password”);
$SMTPClient.Send($From_Email, $To_Email, $Email_Subject, $Body)
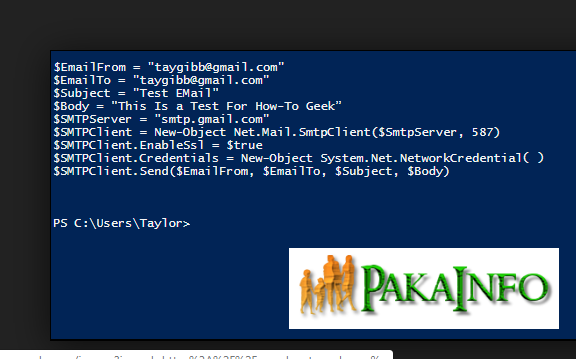
This Source Code will send simple email to the recipient some address via terminal defined remote SMTP server. We can also write this in a simple PowerShell script as well as execute.
Angular 6 CRUD Operations Application Tutorials
Read :
- Technology
- Google Adsense
- Programming
Summary
You can also read about AngularJS, ASP.NET, VueJs, PHP.
I hope you get an idea about Windows Send Email using Command Line.
I would like to have feedback on my Pakainfo.com blog.
Your valuable feedback, question, or comments about this article are always welcome.
If you enjoyed and liked this post, don’t forget to share.