
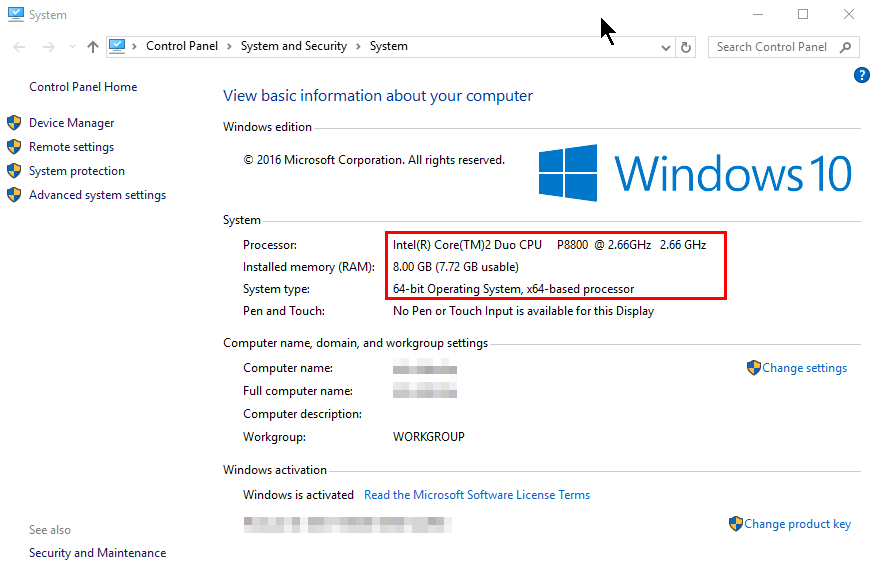
Managed to update from Windows 8.1 to Windows 10 on my MacBook Pro 17″ from mid 2009.
This is a tutorial with a few steps to follow in order to make Win 10 to run without any problems and smoothly.
«mid 2009 MacBook Pro 17inch with Windows 10»
Here is the solution to installing Windows 10 on a mid 2009 Macbook Pro:
1. In Windows 8.1 mode on the MBP get the Windows 10 update ISO and mount it as a DVD (I used Gizmo ISO mounter).
2.Go through the update process which takes some time.
3. When Windows 10 finally has set in you would notice that the keyboard extra function keys do not work, the display has a generic Microsoft driver, the trackpad has basic functionality as well.
4.First off unpack «BootCamp 4.0.4033» and install «BootCamp4.0.4033.zip\BootCamp\Drivers\Apple\AppleKeyboardInstaller64.exe»
5.Install the «AppleMultiTouchTrackPadInstaller64.exe» from the same directory as well
6.Then the display adapter needs to be fixed.
7.Go to «Device Manager/Display adapters» right click
8.Update driver/Browse my computer/locate to «BootCamp 4.0.4033»
9.Go to «Co-processor» line right click
10.Update driver/Browse my computer/locate to «BootCamp 4.0.4033»
11.Restart
12.It may happen that the Display resolution is at 1920×1200 but seem a bit too big. This is why Windows zooms in the appearance of the elements by 25%. In order to fix this issue do the following:
Desktop/right click/Display settings/Advanced display settings/Advanced sizing of text and other items/Change size of items/set custom scaling level/Scale to this percentage of normal size — set to 100%
After these steps all issues should have been solved and Windows 10 working smooth
Hope those steps would be of help!
There are the steps I took to get Windows 10 on my spare mid-2009 15″ Macbook Pro. Why? Because science! And because I like Windows 10 and because Apple stopped OS support on that machine sometime back. But mostly because I wanted to learn a bit more about UEFI systems and their boot-up sequence.
Resulting configuration
- Hardware: Macbook Pro (mid-2009) (with nVidia GeForce 9600M GT)
- Operating system(s): Only Windows 10 – no MacOS or Linux
- Boot mode: Legacy BIOS (not UEFI, else endless reboots with nVidia)
- Disk mode: MBR
- Disk encryption: Windows Bitlocker encryption


How to get there?
- Get a Windows 10 DVD
- Download the Windows 10 ISO [Microsoft link]
- Burn it to a DVD
- Boot the Windows 10 DVD in legacy BIOS mode
- Put it in the drive and power up your Mac with Alt/Option pressed
- At your Mac’s bootup screen pick the DVD icon with ‘Windows’ under it (do not pick the DVD icon with EFI under it)
- Now wait till you enter the setup …
- Convert your hard drive to an MBR style hard drive
If you’re already in pure MBR (not hybrid) mode, skip this entire section.WARNING: Backup all existing data because it will be deleted!
- At the Windows setup hit Shift+F10 for a command prompt
- Run
diskpart list disk(note your disk’s number … like a 1 or 2 etc.)select disk <disknumber>clean(this will delete all partitions or volumes on the disk)convert mbrexit(this leaves diskpart)exit(this leaves the command prompt, back to the setup)
- Install Windows
Nothing special here, regular installation process. When everything installs, you should boot right into the Windows desktop. - Install Apple Bootcamp drivers [thanks to this reddit post]
- Once inside Windows 10, download Boot Camp 5.1.5722 Drivers.
I suggest this specific version (5.1.5722) since I tried another version (5.1.5769) and it didn’t work well
- Extract the Drivers on the Desktop…
- Run CMD or PowerShell as Administrator (Use the combination Shift + Fn + F10 for right-click)
- CD into
BootCamp5.1.5722/BootCamp/Drivers/Apple - Run
BootCamp.msi
- Once inside Windows 10, download Boot Camp 5.1.5722 Drivers.
Post install fixes
- Remove Apple’s HFS windows driver
Their presence kills Windows System Restore functionality. Open an admin command window and type
cd \windows\system32\drivers

ren AppleHFS.sys AppleHFS.sys.orig

ren AppleMNT.sys AppleMNT.sys.orig
Expert zone
Some additional notes if you want to deviate from the above or want to learn more
UEFI or Legacy BIOS – avoid endless reboots
In short, pick Legacy BIOS
When you power on your Mac, it first runs the UEFI firmware. From there, your Mac can proceed into either native UEFI or switch to legacy BIOS (actually it’s UEFI simulating a BIOS via the EFI-CSM module). If you purchased your Macbook Pro with the graphics card upgrade, you actually have TWO graphics cards inside. First is the integrated Intel graphics and then you also have a discrete nVidia graphics card. In UEFI mode, they are BOTH enabled and this will kill your Windows installation when you eventually install the graphics drivers. Windows 10 will endlessly reboot, entering automatic repair etc. I think this is a bug in the nVidia drivers and 99.99% they won’t fix it. So if you have two graphics cards then you MUST pick the legacy BIOS path.
USB boot or DVD boot ?
Older Macbooks cannot boot from a USB drive (!). If you want USB booting, you need
- a hybrid GPT disk [complicated, read below]
- and then install rEFInd into that EFI system partition
I chose the simpler route of staying all MBR and just using DVDs. I did have to buy a $15 external USB DVD drive since my internal DVD drive was busted. But worth it.
Hybrid MBR – feeling brave?
Maybe you want need more partitions on your system than MBR’s paltry 4? Perhaps to enable macOS’s filevault or to enable Windows Bitlocker? Although your BIOS booted Windows will still only see 4 partitions overall, when you boot into GPT macOS it should see even more. Of course, you’ll need to cover those extra GPT partitions with a protective partition on the MBR side to keep them in alignment to avoid problem when altering partitions in the future from either side. That last bit adds some complications, so go forth only if you’re brave (and have a backup).
WARNING: This deletes all data in all partitions. Backup data as needed
- Switch to a hybrid MBR disk format
- Get the Ubuntu Desktop ISO => Burn it => Boot into it as legacy BIOS mode
- Run gparted and make sure you’ve selected the correct disk!
- In gparted’s top menu: Device => Create partition table => GPT
- Create a partition for Windows 10
- Still within Ubuntu, this time run terminal
- Run
sudo fdisk /dev/sda - Create a 500MB EFI system partition here
- Create your Windows partition here
- fdisk should mirror the GPT partitions in the hybrid MBR
- If not, hit
r(recovery) and hithto create a hybrid MBR
-
#1
Hey everyone!
So, I know that my particular Mac only technically supports up to Windows 7, but I was curious if it is possible to run Windows 10 on it?
Or rather, it’s possible, but what kind of experience does it bring? Do the drivers work? Does it behave like it is supposed to?
-
#2
Hey everyone!
So, I know that my particular Mac only technically supports up to Windows 7, but I was curious if it is possible to run Windows 10 on it?
Or rather, it’s possible, but what kind of experience does it bring? Do the drivers work? Does it behave like it is supposed to?
Windows 10 will not run on your 2009 MacBook Pro. Not sure if there is a hack that would work as there is no driver support or firmware support from Apple for your machine and Windows 10.
-
#3
Install W7 on it and upgrade it to 10.
-
#4
Windows 10 will not run on your 2009 MacBook Pro. Not sure if there is a hack that would work as there is no driver support or firmware support from Apple for your machine and Windows 10.
Why is there no support?
-
#5
Apple has elected to not support Macs older than the 2012 model year with Windows 10.
-
#6
Apple has elected to not support Macs older than the 2012 model year with Windows 10.
But does this guarantee poor performance? I think not.
-
#7
I have a 2009 white Macbook running Windows 10 in bootcamp. I installed Windows 7 first then upgraded to Windows 10. The only issue I have noticed is I can’t use the scroll feature on the magic mouse or trackpad. Everything else works fine.
The issue with a direct Windows 10 install has to do with the lack of EFI support but installing 7 first gets around the problem.
-
#8
I have a 2009 white Macbook running Windows 10 in bootcamp. I installed Windows 7 first then upgraded to Windows 10. The only issue I have noticed is I can’t use the scroll feature on the magic mouse or trackpad. Everything else works fine.
The issue with a direct Windows 10 install has to do with the lack of EFI support but installing 7 first gets around the problem.
What do I do about the Mac drivers?
Should I have installed those when I was on Windows 7?
-
#9
But does this guarantee poor performance? I think not.
I was merely replying to your question on why there was no support.
What do I do about the Mac drivers?
Should I have installed those when I was on Windows 7?
You would need to download the Boot Camp 6.x software and install that and then sideload all of the drivers from Boot Camp 5.x separately.
-
#10
My 2009 MB is my experimental machine that I do all my playing on. So the versions of El Capitan installed on it have all been beta versions (currently running 10.11.4). When I created a bootcamp partition, the only selection I had was to install Windows 7. I could then upgrade to Windows 10. Bootcamp downloaded and installed all the correct drivers — which I assume were Windows 7 drivers. Since this was all done on 10.11.0, I am not sure what version of bootcamp was installed but it was probably 5 since the only install option was for Windows 7. What ever drivers were used worked with 10.
-
#11
Thanks for your help everyone! Based on my own experiments over the last few days, I am staying on Windows 7 permanently, as that is the optimal experience based on my Mac.
-
#12
Thanks for your help everyone! Based on my own experiments over the last few days, I am staying on Windows 7 permanently, as that is the optimal experience based on my Mac.
Do you run OS X as well?
-
#13
I actually went back to a bare minimum install of Snow Leopard so that I could have as much room as possible for Windows (my hard drive is only 160GB)
-
#14
I actually went back to a bare minimum install of Snow Leopard so that I could have as much room as possible for Windows (my hard drive is only 160GB)
I imagine with a good SSD, Windows would see quite the improvement.
-
#15
I imagine with a good SSD, Windows would see quite the improvement.
I don’t have a SSD. I have a HDD.
-
#16
I don’t have a SSD. I have a HDD.
I know. I was suggesting that if you were to purchase an SSD you would see significant performance gains.
-
#17
I know. I was suggesting that if you were to purchase an SSD you would see significant performance gains.
I see. I really wish I could install Windows 10, but I guess there’s nothing that can be done about that.
-
#18
Of course you can install windows 10 on youur macbook. It just may not be quite the windows 10 you wanted.
-
#19
I see. I really wish I could install Windows 10, but I guess there’s nothing that can be done about that.
I did some research and found that if you upgrade over Windows 7 then audio support will work in 10. You would need to install some of the older drivers from older Boot Camp packages for full compatibility however. That being said, I really do think that Windows 7 is the best match for your Mac.
-
#20
If you use an older Mac and need drivers for scrolling try out Trackpad++. It might help.
-
#21
I did some research and found that if you upgrade over Windows 7 then audio support will work in 10. You would need to install some of the older drivers from older Boot Camp packages for full compatibility however. That being said, I really do think that Windows 7 is the best match for your Mac.
I know I said previously that I’m staying on 7, bit the Get Windows 10 app got the best of me.
Once I update to 10, I was planning on doing a reset through Settings. Should I install the drivers from my Mac OS X install disc, then do the 3.2 update? Where does Boot Camp 4 and 5 fit into all this?
-
#22
Once I update to 10, I was planning on doing a reset through Settings. Should I install the drivers from my Mac OS X install disc, then do the 3.2 update? Where does Boot Camp 4 and 5 fit into all this?
Do NOT install Boot Camp software off of the OS X install DVD. Instead, download Boot Camp 6 from this post. Then, once installed, open Device Manager and determine what devices still need drivers. You can download the correct up to date drivers from Boot Camp 4 from here. Do not install the whole Boot Camp 4 package, but merely the drivers you need. Essentially, you are using the Boot Camp 6 support software with Boot Camp 4 drivers.
-
#23
Do NOT install Boot Camp software off of the OS X install DVD. Instead, download Boot Camp 6 from this post. Then, once installed, open Device Manager and determine what devices still need drivers. You can download the correct up to date drivers from Boot Camp 4 from here. Do not install the whole Boot Camp 4 package, but merely the drivers you need. Essentially, you are using the Boot Camp 6 support software with Boot Camp 4 drivers.
Can you walk me through this process please? How do I install individual drivers from the Boot Camp 4 package? What if the Boot Camp 6 setup.exe doesn’t open and instead throws a «not supported» error?
-
#24
Can you walk me through this process please? How do I install individual drivers from the Boot Camp 4 package? What if the Boot Camp 6 setup.exe doesn’t open and instead throws a «not supported» error?
Start by installing Boot Camp 6. It should not throw an error but report back if it does. For the Boot Camp 4 drivers, you can install them package by package from the «Drivers» folder within the Boot Camp download.
-
#25
Start by installing Boot Camp 6. It should not throw an error but report back if it does. For the Boot Camp 4 drivers, you can install them package by package from the «Drivers» folder within the Boot Camp download.
Long story short: Windows 10 is working great for me.
Setup.exe did not work for me. I had to manually go in and run BootCamp.msi as an administrator (using task manager), which hung at the RealTek drivers. I deleted the RealTek drivers, then tried installed BootCamp.msi, which went perfectly.
The one driver I still can’t find is for the coprocessor. First off, why is it needed? What does it do? Where do I find it?
EDIT: I’m also experiencing an issue where sometimes the lock screen (time and date) will not respond to keyboard input. Since my trackpad can’t register physical clicks, I have to plug in a USB mouse to get passed that screen. Strangely, the keyboard works fine to enter my PIN every time no matter what.
Last edited:
How To Install Windows 10 on Macbook 2009 5,2 First of all we need to disable ELC System Integrity to do this you need to Boot your MacBook into recovery mode by holding cmd+R while booting. Next you need to get your Windows ISO or Installation Media. Next boot into OSX and create a partition to install Windows on.
You need an external USB drive to install Windows on older Mac computers.Do the following steps in order. Step 1: Check for software updates. Before you install Windows, install all macOS updates. Step 2: Prepare your Mac for Windows. Step 3: Install Windows. Step 4: Install Boot Camp on Windows.
What is the latest OS for MacBook Pro mid 2009?
Unibody MacBook Pro Q&A MacBook Pro Original Mac OS X Maximum Mac OS X “Mid-2009” OS X 10.5.7 “Leopard” OS X 10.11.x “El Capitan” “Mid-2010” OS X 10.6.3 “Snow Leopard” Current “Early 2011” OS X 10.6.6 “Snow Leopard” Current “Late 2011” OS X 10.7.2 “Lion” Current.
Can you install Windows 10 on a MacBook Pro?
You can enjoy Windows 10 on your Apple Mac with the help of Boot Camp Assistant. Once installed, it allows you to easily switch between macOS and Windows by simply restarting your Mac.
Is Windows 10 free for Mac?
Many Mac users are still unaware that you can install Windows 10 on a Mac for free from Microsoft perfectly legally, including on M1 Macs. Microsoft doesn’t actually require users to activate Windows 10 with a product key unless you want to customize the look of it.
Can you wipe a Mac and install Windows?
2 Answers. No you don’t need PC hardware since Yes you can delete OS X entirely after getting the drivers installed from Boot Camp on OS X. Follow the directions for creating the bootcamp USB key that comes with bootcamp (you’ll need an 8GB key).
Can a mid 2009 MacBook Pro run Catalina?
Apple said that would run happily on a late 2009 or later MacBook or iMac, or a 2010 or later MacBook Air, MacBook Pro, Mac mini or Mac Pro. This means that if your Mac is older than 2012 it won’t officially be able to run Catalina or Mojave.
How can I make my 2009 MacBook Pro faster?
Find resource-hungry processes. Some apps are more power-hungry than others and can slow your Mac to a crawl. Manage your startup items. Turn off visual effects. Delete browser add-ons. Reindex Spotlight. Reduce Desktop clutter. Empty the caches. Uninstall unused apps.
Can a mid 2009 MacBook Pro run Mojave?
Video: Apple’s new Mac OS Mojave features dark mode By comparison, Apple’s current MacOS, 10.13 High Sierra, can be run on: MacBook (Late 2009 or newer) MacBook Pro (Mid 2010 or newer) Mac Pro (Mid 2010 or newer)Jun 4, 2018.
Is it safe to install Windows on Mac?
With the final versions of software, proper installation procedure, and a supported version of Windows, Windows on the Mac should not cause problems with MacOS X. Regardless, one always should backup their entire system before installing any software or before partitioning a hard drive as a preventative measure.
How do I install Windows 10 on my Mac laptop?
Open Boot Camp Assistant, which is in the Utilities folder of your Applications folder. Follow the onscreen instructions. If you’re asked to insert a USB drive, plug your USB flash drive into your Mac. Boot Camp Assistant will use it to create a bootable USB drive for Windows installation.
How can I change my Mac to Windows 10?
How to switch between Windows and macOS. Restart, then press and hold the Option (or Alt) ⌥ key during startup to switch between Windows and macOS.
Can you run Windows on a Mac without Boot Camp?
Bootcamp has long been the default way to run Windows on a Mac. We’ve covered it before, and you can use the MacOS tool to partition your Mac’s hard drive to install Windows in its own space.
How do I do a clean install of Windows 10 on my MacBook Pro?
Insert the Windows installer USB pen and reboot the MacBook Pro. Hold down the Option key until a boot menu appears. Boot from the Windows installer.Again it is dependent on what you see. Select the disk available. Reboot and let the installer finish the windows install. Install all boot camp drivers manually.
Can you play Valorant on Mac without Boot Camp?
Can You Play Valorant on a Mac? There is no version of Valorant for Mac and you can only play it by installing Windows on a Mac. However, although there are different ways of running Windows on a Mac, Valorant will only work if you install Windows on macOS using Boot Camp.
Does Bootcamp ruin your Mac?
It’s not likely to cause problems, but part of the process is repartitioning the hard drive. This is a process that if it goes badly can cause complete data loss.
What is the cost of Windows 10 operating system?
You can choose from three versions of the Windows 10 operating system. Windows 10 Home costs $139 and is suited for a home computer or gaming. Windows 10 Pro costs $199.99 and is suited for businesses or large enterprises.
How much does it cost to get Windows on a Mac?
At the Microsoft Store, that shrink-wrapped product costs $300. You can find it discounted from legitimate resellers for roughly $250, so let’s use that price. Virtualization software $0-80 I’ve been testing VMWare Fusion and Parallels Desktop 6 for Mac. A full license for either one costs $80.
Will downloading Windows 10 delete everything on Mac?
A fresh, clean Windows 10 install will not delete user data files, but all applications need to be reinstalled on the computer after the OS upgrade. old” folder, and a new “Windows” folder will be created.
Can a Mac be too old to update?
While most pre-2012 officially cannot be upgraded, there are unofficial workarounds for older Macs. According to Apple, macOS Mojave supports: MacBook (Early 2015 or newer) MacBook Air (Mid 2012 or newer).
How do you make sure your Mac is backed up?
Make sure your Mac Pro is on the same Wi-Fi network as your external storage device, or connect the storage device to your Mac Pro. Open System Preferences, click Time Machine, then select Back Up Automatically. Select the drive you want to use for backup, and you’re all set.
Is Catalina better than High Sierra?
Most coverage of macOS Catalina focuses on the improvements since Mojave, its immediate predecessor. But what if you’re still running macOS High Sierra? Well, the news then it is even better. You get all the improvements that Mojave users get, plus all the benefits of upgrading from High Sierra to Mojave.
Время на прочтение4 мин
Количество просмотров72K
Предисловие
Столкнувшись с проблемой не работающего звука при установке Windows на свой MacBook 11го года обнаружил, что материала по данной теме в русскоязычном сегменте интернета крайне мало, можно сказать что его нет вообще. Эта статья написана в помощь всем столкнувшимся с такой же проблемой, и преследует цель описать весь процесс решения проблемы от и до. Здесь описывается способ решения проблемы на примере MacBook, но он так же подойдет и для стационарных iMac.
Здесь не будут описаны способы создания гибридного диска и dual-boot macOS и Windows на одном SSD. Предполагается, что в системе существует либо один физический диск на который будет установлена Windows, либо два физических диска с разными таблицами разделов — GPT для macOS и MBR для Windows.
Пациент — MacBook Pro 13 early 2011 с двумя SSD на борту. Для чистоты опыта второй диск с macOS пока убрал совсем. Потом его можно будет без проблем вернуть и запускать обе ОС через бут меню.


Почему и для чего нужна такая установка?
Начисто отказывается работать звук. Ни вход ни выход, драйвера скачанные специально для моей модули ноута ситуацию не меняют. На значке звука в винде висит красный крестик, штатные средства устранения ошибок проблему так же не решают.
Вдобавок не работал у меня штатный дисковод для «родной» установки винды через Boot Camp, вместо него стоял второй жесткий диск. Помогла бы штатная установка «как было задумано Apple» с использованием дисковода и лицензионного диска винды — без понятия. Скорее всего нет, так как после подкидывания USB дисковода с записанным на болванку образом установщик даже не стартовал.
В чем было дело?
Вся суть беды со звуком заключается в том, что система. запущенная в режиме EFI отказывается взаимодействовать с звуковыми устройствами наглухо. Штатное бут-меню при этом видит только EFI загрузчики.
Но на наше счастье — на маках можно запускать в режиме совместимости Legacy системы — что нам и нужно, ведь в обход EFI все работает.
Что нужно сделать?
Далее опишу шаги, которые привели меня к успешной установке и запуску windows 10 на моем старом маке. Если кратко, мы берем дамп жесткого диска от виртуальной машины, где windows наполовину установлена в режиме Legacy и восстанавливаем этот дамп на физическом жестком мака, где продолжаем установку.
1. Имея на руках только лишь мак сделать то что нам нужно будет чуть сложнее, но способ оставлю внизу статьи в пояснении. У меня есть возможность использования второй машины, поэтому использую свой стационарный пк с выведенным наружу SATA портом.

2. Для начала нужно скачать мой архив, в который я собрал все необходимые проги и образы. Архив лучше сразу распаковать на флешку, софт из него нам еще понадобится в установленной винде. Ссылка на архив в конце статьи. Содержимое на скрине ниже.

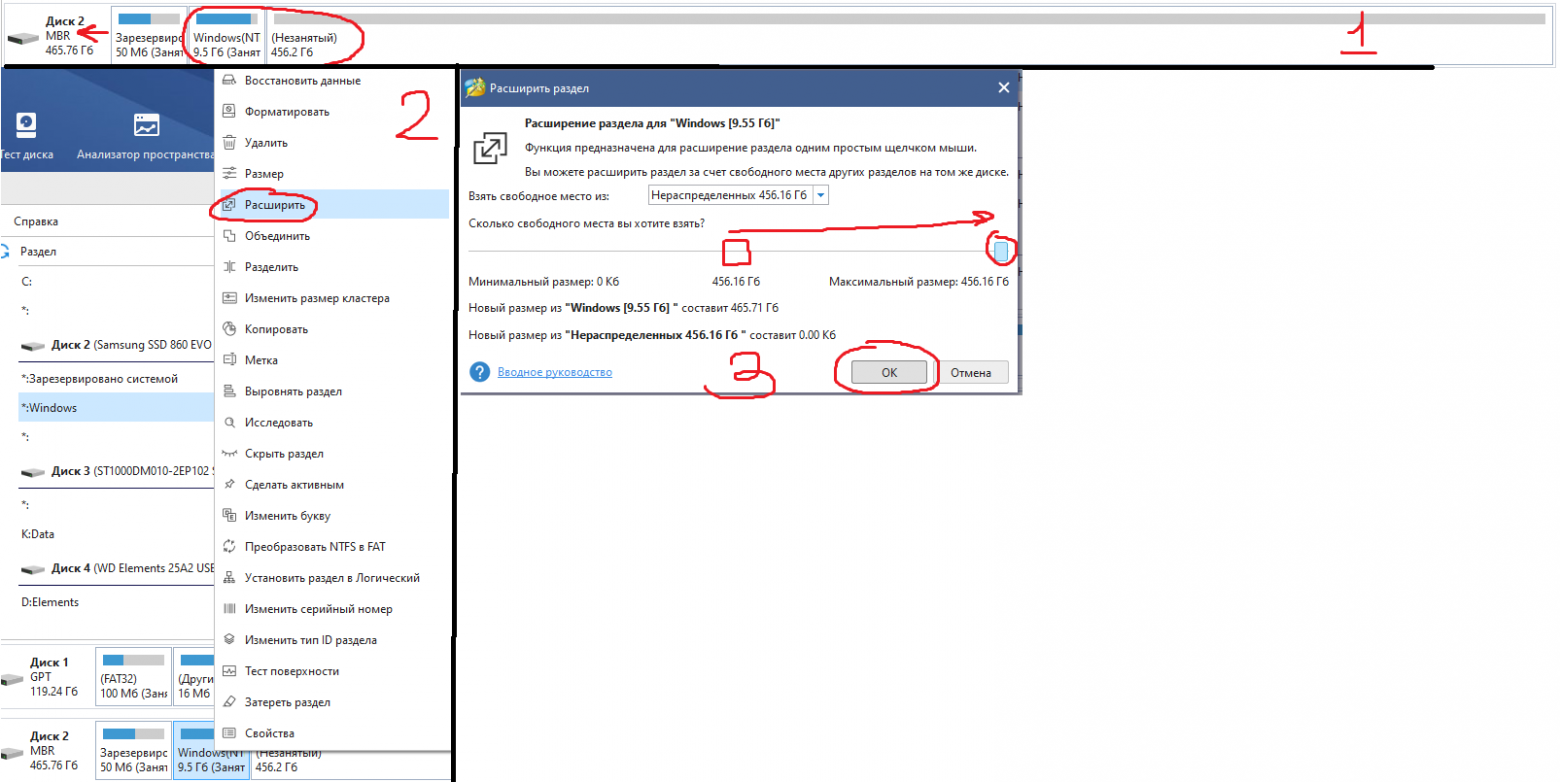
3. Снимаем жесткий диск с мака и подключаем его к ПК. C помощью PartitionWizard удаляем все разделы на этом диске и инициализируем диск в MBR — это важно для того, чтобы система запускалась именно в легаси режиме.

4. Прогой vhd2disk переносим образ виртуального диска из архива в формате .vhd на диск нашего мака. Физические диски в этой проге имеют отображение вида //PhisicalDriveX, где Х это цифра. Узнать какая цифра какому диску соответствует можно в диспетчере задач.

5. По завершению переноса образа еще раз убеждаемся что диск инициализирован в MBR в проге PartitionWizard. Если все правильно, на этом этапе на нашем диске должно быть два раздела и куча пустого места.
6. Расширяем последний раздел до конца диска. Жмем «применить» как в третьем шаге(забыл поместить картинку на скрин).
7. Выключаем ПК, отсоединяем от него диск. Отключаем питание от мака(либо отсоединяем аккумулятор в случае макбука) и устанавливаем диск обратно в мак. Ждем 30 секунд после чего подключаем питание обратно.

8. Запускаем мак, удерживая нажатой кнопку Option(она же alt). В бут меню появился диск с виндой! Выбираем его и завершаем установку системы. Мак может на этом этапе перезагрузиться пару раз, чтобы продолжить установку нужно будет снова подержать alt и выбрать диск с Windows, если этого не делать мак попытается найти EFI системы и если не обнаружит таких выдаст ошибку.

Пока что к интернету не подключаемся — автоматическое обновление винды может поломать нам всю установку. После завершения установки уже не будет видно страшного красного крестика на значке звука, но пока звук работать не будет — нет драйверов. Так же на этом этапе нужно подключить проводную мышку, так как правая кнопка мыши через тачпад без драйверов работать не будет.

9. Подключаем мак к интернету проводом. Устанавливаем 7zip из архива. Без него следующая софтина будет вылетать. Запускаем brigadier из архива от имени администратора, и ждем пока он скачает нужную нам версию драйверов.
10. Драйвера скачались в ту же папку из которой мы запустили brigadier. Нажимаем правой кнопкой мыши по setup.exe — исправление проблем с совместимостью. Штатная утилита виндовс сама определит что установщик должен работать в режиме совместимости с win7 и применит эти параметры. Сохраняем параметры совместимости. Запускаем setup.exe от имени администратора.
11. После установки драйверов на предложение перезагрузится отвечаем «да» и при включении снова удерживаем Option,выбрав в бут меню наш диск с Windows.

-
Все работает. Звук, вайфай, тачпад и клавиатура в порядке. По желанию можно установить Trackpad++ из архива, этот софт добавляет привычные пользователями macOS жесты тачпада вроде перетягивания тремя пальцами, и что более важно делает приятной и юзабельной возможность скроллинга тачпадом.
Подкинул второй диск с установленной macOS. В бут меню видно обе системы, все грузится и функционирует должным образом.


Приложение к инструкции
Если по какой-то причине у вас нет возможности отсоединить жесткий диск мака(например при установке на стационарный iMac) , качаем архив на флешку, создаем загрузочную флешку с любой Windows Portable, запускаемся с нее и делаем далее по инструкции. В этом случае brigadier запускаем до установки ОС и скачиваем драйвера через него на флешку, чтобы потом запустить из установленной винды.
Так же если у вас нет возможности подключить проводом мак к интернету, либо ваша версия Windows Portable не смогла определить сетевую карту — скачиваем на флешку с архивом нужный вам пакет драйверов отсюда.
Послесловие
Желательно отключить обновления Windows и Apple Software Upgrade. Есть риск что обновление все сломает, так как мы работаем со старым железом.
VirusTotal
brigadier
vhd2dsk
trackpad++
Все программы взяты с репозиториев их разработчиков и никак не модифицировались.
Ссылка на архив
MEGA
Как самому сделать такой дамп Legacy системы расскажу в следующей статье, если эта вызовет интерес у публики.